4 minute read
11.2 System Service
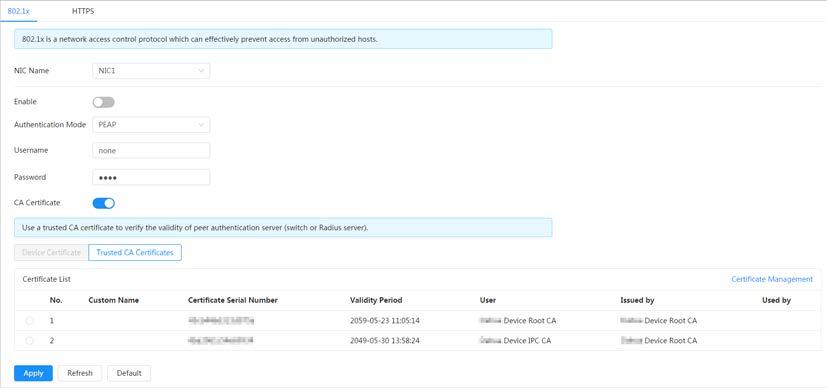
Cameras can connect to LAN after passing 802.1x authentication.
Step 1 Select Security > System Service > 802.1x
Step 2 Select the NIC name as needed, and click to enable it.
Step 3 Select the authentication mode, and then configure parameters.
● PEAP: Protected EAP protocol.
1. Select PEAP as the authentication mode.
2. Enter the username and password that has been authenticated on the server.
3. Click next to CA certificate, and select the trusted CA certificate in list.
If there is no certificate in the list, click Certificate Management at the left navigation bar. For details, see "11.4.2 Installing Trusted CA Certificate".
● TLS: Transport Layer Security. It is applied in two communication application programs to guarantee the security and integrity of the data.
1. Select TLS as the authentication mode.
2. Enter the username.
3. Click next to CA certificate, and select the trusted CA certificate in list.
If there is no certificate in the list, click Certificate Management at the left navigation bar. For details, see "11.4.2 Installing Trusted CA Certificate".
11.2.2 HTTPS
Create a certificate or upload an authenticated certificate, and then you can log in through HTTPS with your PC. The HTTPS can protect page authenticity on all types of websites, secure accounts, and keep user communications, identity, and web browsing private.

Procedure
Step 1 Select Security > System Service > HTTPS.

Step 2 Click to enable it.
Step 3 Select the certificate.
If there is no certificate in the list, click Certificate Management at the left navigation bar. For details, see
11.3 Attack Defense
11.3.1 Firewall
Configure firewall to limit access to the camera.
Step 1 Select Security > Attack Defense > Firewall Step 2 Click to enable the firewall function.
Step 3 Select the mode: Allowlist and Blocklist.
● Allowlist: Only when the IP/MAC of your PC in the allow list, can you access the camera. Ports are the same.


● Blocklist: When the IP/MAC of your PC is in the block list, you cannot access the camera. Ports are the same.
Step 4 Click Add to add the host IP/MAC address to Allowlist or Blocklist, and then click OK
Step 5 Click Apply
Related Operations
● Click to edit the host information.
● Click to delete the host information.
11.3.2 Account Lockout
If you consecutively enter a wrong password more than the configured value, the account will be locked.
Step 1 Select Security > Attack Defense > Account Lockout
Step 2 Configure the login attempt and lock time for device account and ONVIF user.
● Login attempt: Upper limit of login attempts. If you consecutively enter a wrong password more than the configured value, the account will be locked.
● Lock time: The period during which you cannot login after the login attempts reaches upper limit.
Step 3 Click Apply
11.3.3 Anti-DoS Attack
You can enable SYN Flood Attack Defense and ICMP Flood Attack Defense to defend the device against Dos attack.


Step 1 Select Security > Attack Defense > Anti-DoS Attack
Step 2 Select SYN Flood Attack Defense or ICMP Flood Attack Defense to defend the device against Dos attack.
11.4 CA Certificate
11.4.1 Installing Device Certificate
Create a certificate or upload an authenticated certificate, and then you can log in through HTTPS with your PC.
11.4.1.1 Creating Certificate
Creating certificate in the device.
Step 1 Select Security > CA Certificate > Device Certificate.
Step 2 Click Install Device Certificate
Step 3 Select Create Certificate, and click Next
Step 4 Enter the certificate information.
Figure 11-10 Certificate information (1)
Step 5 Click Create and install certificate
After the certificate is created successfully, you can view the created certificate on the Device Certificate page
Related Operations
● Click Enter Edit Mode, you can edit the custom name of the certificate.

● Click to download the certificate.
● Click to delete the certificate.
11.4.1.2 Applying for and Importing CA Certificate
Import the third-party CA certificate to the camera.
Step 1 Select Security > CA Certificate > Device Certificate.
Step 2 Click Install Device Certificate.
Step 3 Select Apply for CA Certificate and Import (Recommended), and click Next.
Step 4 Enter the certificate information.
Figure 11-11 Certificate information (2)
Step 5 Click Create and Download Save the request file to your PC.
Step 6 Apply the CA certificate from the third-party certificate authority.
Step 7 Import the signed CA certificate.
1) Save the CA certificate to the PC.
2) Do Step1 to Step3, and click Browse to select the signed CE certificate.
3) Click Install and Import. After the certificate is created successfully, you can view the created certificate on the Device Certificate page.
● Click Recreate to create the request file again.
● Click Import Later to import the certificate next time.
Related Operations
● Click Enter Edit Mode, you can edit the custom name of the certificate.

● Click to download the certificate.
● Click to delete the certificate.
11.4.1.3 Installing Existing Certificate
Import the existing third-party certificate to the camera. When apply for the third-party certificate, you also need to apply for the private key file and private key password.
Step 1 Select Security > CA Certificate > Device Certificate.
Step 2 Click Install Device Certificate.
Step 3 Select Install Existing Certificate, and click Next
Step 4 Click Browse to select the certificate and private key file, and enter the private key password.
Step 5 Click Import and Install
After the certificate is created successfully, you can view the created certificate on the Device Certificate page


Related Operations
● Click Enter Edit Mode, you can edit the custom name of the certificate.
● Click to download the certificate.
● Click to delete the certificate.
11.4.2 Installing Trusted CA Certificate
CA certificate is a digital certificate for the legal identity of the camera. For example, when the camera accesses the LAN through 802.1x, the CA certificate is required.
Step 1 Select Security > CA Certificate > Trusted CA Certificates.
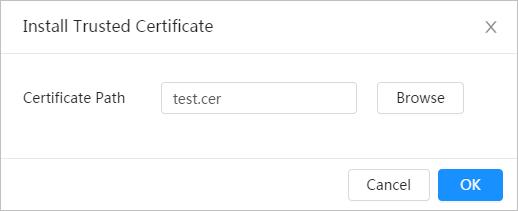
Step 2 Click Install Trusted Certificate
Step 3 Click Browse to select the certificate.
Step 4 Click OK.
After the certificate is created successfully, you can view the created certificate on the Trusted CA Certificate page.
Related Operations
● Click Enter Edit Mode, you can edit the custom name of the certificate.
● Click to download the certificate.
● Click to delete the certificate.


