
Issue 2
11 patterns and how-to guides
designers
includes embroidery cross stitch
Ana Clara Piccolo . Joanne Aston . Anne Mende Aurora Menéndez . Cathy Eliot . Clare Bray . Jenni Davis Jenny Billingham
.
Tatiana Romero . Vivienne Powers
Stitch Life
Welcome...
Hello, crafters!
Welcome to the second issue of Stitch Life magazine! Last season, we were proud to launch our very first issue of the magazine, bringing you a wide range of creative projects to stitch in collaboration with some wonderful designers. We have had some great feedback and have loved seeing how inspiring the projects have been!
For our first Autumn Winter issue, we've focused on the theme of “Cosy Retreat”. Although it’s hard to say goodbye to summer as we head into the cooler seasons, there’s plenty we love about this time of year: autumnal trees in rich shades of orange and gold, woodland walks and being at one with nature, cosy evenings socialising with friends or curled up at home crafting—and, of course, (if we’re lucky) some crisp white snowfall.
We have worked with 10 amazing designers from around the world to bring you 11 inspiring projects to make. Each project—from freestyle embroidery to cross stitch—uses materials from our extensive Anchor range and will introduce you to new techniques and beautiful designs to stitch for your home or to gift to others.
We hope you enjoy meeting the designers and enjoy the wonderful projects they’ve created especially for you!


THE ANCHOR TEAM
Stitch
Life Magazine
Stitch:
noun: a loop of thread or yarn resulting from a single pass or movement of the needle in sewing, knitting or crocheting.
verb: make, mend or join something with stitches.
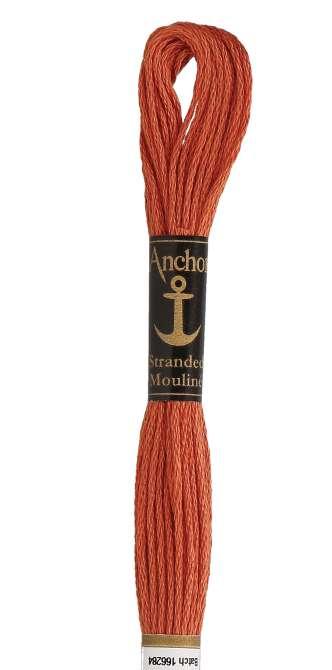
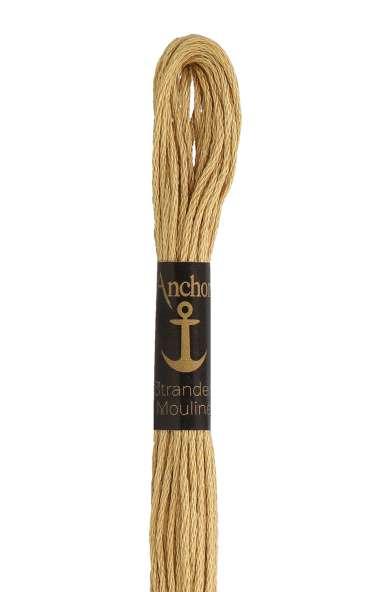
Anchor Stranded Cotton
Anchor Stranded Cotton is a superior sixstrand embroidery thread made from extra-long staple 100 per cent Egyptian cotton. It is double mercerised, resulting in a brilliant lustre, smooth finish and intense light reflection.
Available in an impressive 444 solid shades, with a further 24 mutli-coloured and 16 ombre shades, too. Each 8m skein features a 'pull free' construction, allowing the perfect length to be removed from the skein without disrupting the skein itself. This construction makes Anchor Stranded Cotton particularly versatile across all types of embroidery, so it’s no wonder it is one of the most popular embroidery threads in the world! EXPERIENCE RATING
2 Stitch Life
Anchor
@anchorcrafting Anchorcrafts.com We love to see your creations! Tag us #anchorcrafts #anchorthreads
for guidance only Beginner Intermediate Advanced
Photography: Quail Studio
Editor: Susan Elliott
All rights reserved. Reproduction in whole or any part of all material, including illustrations, in this magazine is strictly forbidden. No part may be reproduced, stored in a retrieval system, or transmitted in any form or by any means electronic, electrostatic, magnetic tape, mechanical photocopying, recording or otherwise without prior written permission from the copyright owners. The designs in this magazine are copyrighted and must not be made for re-sale. Reproduction of this publication is protected by copyright and is sold on the condition that it used for non-commercial purposes. Yarn quantities are approximate as they are based on average requirements. Colour reproduction is as close as printing will allow. First published in Great Britain in 2021 by
Quail Publishing Limited
Unit 15, Green Farm, Fritwell, Bicester, Oxfordshire, OX27 7QU
E-mail: info@quailstudio.co.uk

© Patterns & Photography Copyright 2021, Quail Publishing Limited
Concept developed by Quail Publishing Limited exclusively for Mez Needlecraft GmbH
3 Stitch Life 28
Designers: Ana Clara Piccolo, Joanne Aston, Anne Mende, Aurora Menéndez, Cathy Eliot, Clare Bray, Jenni Davis, Jenny Billingham, Tatiana Romero, Vivienne Powers
06 Aurora Menéndez – meet the designer
Freestyle – Owl moon
16
Anne Mende – meet the designer
Freestyle – Winter time banner
26 Ana Clara Piccolo – meet the designer
Freestyle – Cosy home
40 Cathy Eliot – meet the designer
Freestyle – Woodland table linen

52
Jenny Billingham – meet the designer
Freestyle – Woodland walks
62 Jenni Davis – meet the designer
Freestyle – Floral wreath
72
Joanne Aston – Anchor Studio
Cross stitch – Bookmark 78
Joanne Aston – Anchor Studio
Cross stitch – Home sweet home
82
Vivienne Powers – meet the designer
Cross stitch – Cosy cabin
88 Clare Bray – meet the designer
Cross stitch – Colours of autumn
94
Tatiana Romero – meet the designer
Cross stitch – Winter is here
Stitch library 100 Getting started – Cross stitch 102 Getting started – Freestyle 111 Contact us
4 Stitch Life
Contents 42


5 Stitch Life 54 88 72 62 18 30 96
meet the designer... Aurora Menéndez
About me
I live in the coastal region of Asturias in northwest Spain. I started to embroider about six years ago. My first projects were small embroidered brooches. I am self-taught, so everything I’ve learned has been through embroidery books and magazines. I have a small studio at home and my favourite time to go there is in the afternoons when I do my embroidery.


work is inspired mostly by nature.”
About my work
I make contemporary freestyle embroidery inspired by nature. I like to do pieces that are delicate, natural and romantic. What I like most about freestyle embroidery is that there are so many different stitches you can use. By combining them in multiple ways, you can create very varied results. When I have an idea, I turn it into a drawing. I choose the colour palette and the stitches I’m going to use and then start to stitch.
My work is inspired mostly by nature. I love walking in the countryside, as that's where I find inspiration for my embroidery.


I admire many embroiderers for their unique styles, such as:


Gimena Romera: www.instagram.com/gimenaromero Tessa Perlow: www.instagram.com/tessa_perlow Srta Lylo: www.instagram.com/srtalylo

6 Stitch Life
A.
@missarorua
“My
My project to make
7 Stitch Life EMBROIDERY
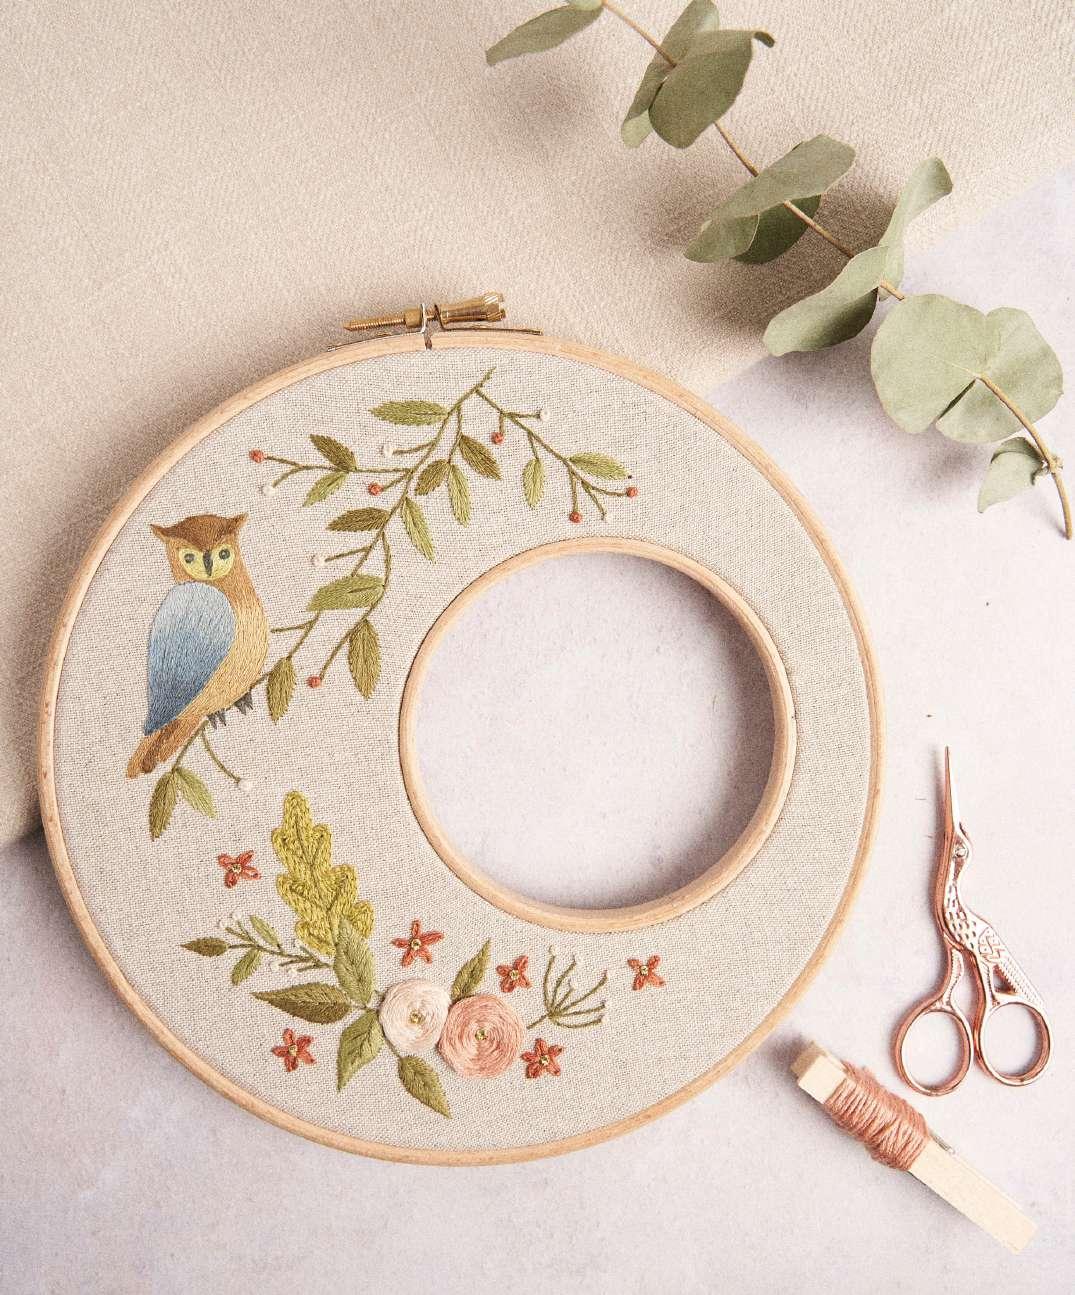
HOOP WREATH “OWL MOON” The owl sings at night, sings to the moon
Owl moon
Aurora Menéndez
In this design, we will use two embroidery hoops to create an atypical wreath that looks like a moon.
THREADS
:
YOU WILL NEED:
• Tracing paper or water-soluble/heat-erasable fabric marker
• 35cm square of linen
• 20cm (8") and 10cm (4") embroidery hoops
• Embroidery needle, no. 9 for the owl
• Embroidery needle, no. 5/7 for everything else

• Scissors
• White glue
STITCHES:
Stem stitch (see Stitch Library page 105)
Fishbone stitch (see Stitch Library page 109)
Raised fishbone stitch
Fly stitch (see Stitch Library page 108)
Straight stitch (see Stitch Library page 107)
Chain stitch (see Stitch Library page 103)
Lazy daisy stitch (see Stitch Library page 106)
French knot (see Stitch Library page 105)
Woven wheel stitch (see Stitch Library page 109)
Split stitch (see Stitch Library page 103)
Satin stitch (see Stitch Library page 104)
8 Stitch Life
Anchor Stranded Cotton 00843 x 1 00844 x 1 00845 x 1 00280 x 1 00889 x 1 00888 x 1 00945 x 1 00278 x 1 01041 x 1 00849 x 1 00921 x 1 00922 x 1 00880 x 1 00882 x 1
x
Long and short stitch (see Stitch Library page 106) x 1 Anchor
00884
1 00387
Lamé 00300 x 1
SIZE: diameter 20cm (8").
HOW TO ASSEMBLE TWO EMBROIDERY HOOPS.


1. Hoop up the smaller hoop first. Pull your fabric drum tight.
1 2
2. Flip the fabric over so the smaller hoop is face down on the table. Now place your largest hoop, in the position you want centered or offset as in the case of the “Owl moon” design. 3
3. Tighten your fabric drum. Try pulling at odd angles to remove any wrinkles.
9 Stitch Life
EMBROIDERY
GETTING STARTED
Transfer your drawing onto the fabric (see page 102). In this case, it is best to transfer the design to the fabric after it has been hooped.
DOWNLOAD PATTERN TEMPLATE AND KEY
K K
L M L L
H I J
A A A A A A A A
B B B B B B B B B
N
D
A C C
E F G
D D
The template shown here is not to scale. Please download for accurate size.
10 Stitch Life
Owl moon
1. With two strands of #00845, use stem stitch to embroider the stems, starting from the top and working down.
1
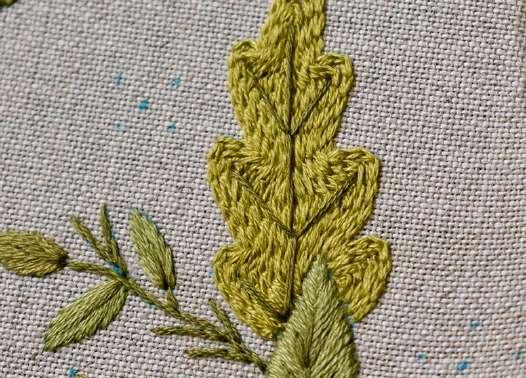
2. (a)The leaves are made with three different types of stitches: fishbone stitch, raised fishbone stitch and chain stitch. Embroider the leaves using fishbone stitch and raised fishbone stitch (two strands, #00843/#00844).
(b) Embroider the oak leaf with chain stitch (two strands, #00280).
(c) Embroider the veins of the leaves with fly stitch (two strands, #00845). 2b


2a 2c

11 Stitch Life
EMBROIDERY
3. Using one strand of #00921, outline the wing of the owl with split stitch. Fill the wing with long and short stitch and one strand of #00849, #00921 and #00922. Remember to keep your stitches close together and try to stagger their lengths to create seamless colour blending. 4


4. Outline the rest of the owl’s body with one strand of #00888 and split stitch. Fill the head, the chest and the rest of the body with long and short stitch (one strand, #00889 #00888 #00945). Fill the tail feathers with long and short stitch (one strand, #00889 #00888).

5. Embroider the face with one strand of #00278 in split stitch. Embroider the eyes, the beak and the feet with satin stitch (one strand, #01041). Finally, make two tiny stitches in the eye (one strand, #00387).
3 5
12 Stitch Life
6. To stitch the flowers with petals, use six strands of #00884 and lazy daisy stitch.
6
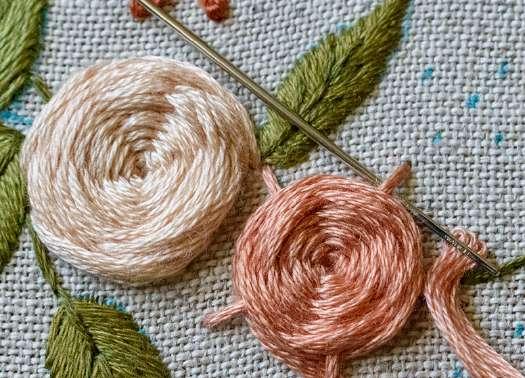
7. To stitch the other flowers, use six strands of #00880 or #00882 and woven wheel stitch.
7
8. Finally, embroider the French knots. Use the stitch guide as a reference for the colours and number of strands (picture 8a). For the centre of the flowers, use Anchor Lamé (12 strands, #00300) (picture 8b).
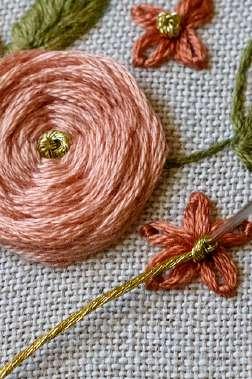


8a
8b
13 Stitch Life
EMBROIDERY
HOW TO FINISH THE HOOP

T o finish, cut away the excess fabric from the outer and inner hoop, leaving a 2.5cm border. Cut notches into the trimmed fabric in the centre hoop. This step will make it easier to fold the fabric back. Glue the trimmed fabric back with white glue. You can line the back with felt or decorated paper and glue it in place or sew it to the gathered fabric.

14 Stitch Life

15 Stitch Life EMBROIDERY
meet the designer...
Anne Mende
@pumora_embroidery


About me

I live in Brandenburg, Germany, and I am an embroiderer. I remember embroidering a bookmark in primary school, but I did not start embroidering seriously until my early twenties. I was fascinated by medieval brick stitch embroidery and made a lot of embroidered pouches and small bags. When I was younger, I learned various techniques from books, but with the Internet, it is much easier to learn new techniques and it has really increased my knowledge and skills.
I’m currently in the process of restoring an old house from the 1840s. It’s great to use my hands in a different way and get some exercise out of it, too. With the house came a lovely garden, where I’m growing vegetables and herbs. Other than that, I love to try out new crafts, such as punch needle, sun printing, wood carving and really anything that sparks my interest!
About my work
I find it so sad to hear of crafts that only one person masters and when that person is gone, all of the knowledge is gone, too. Hopefully my work helps to spread an interest in embroidery so that many more people can enjoy it in the modern world.
I love the freedom of embroidery. It combines my two passions: drawing and textiles. Since embroidery almost always has to be attached to something, the possibilities of combining materials and other craft/art techniques are limitless and exciting.

Most of the time, an idea will randomly pop into my mind and I will then explore it further on paper. After the first draft, I gather all the materials that I will need for the project and try out or learn the techniques that
I need for it. Like many artists and designers, my biggest influence is Mother Nature. I live in the countryside, and forests, animals, fields and the sky have always been my biggest inspiration. Lately, flowers have also become a new favourite of mine.
I absolutely adore the work of Emily Ferris @emillieferris. She has a very calming and mindful way of stitching and presenting her embroidery work. Then there is Yumiko Higuchi and other Japanese artists. There are a lot of very talented people promoting embroidery, which is excellent.
16 Stitch Life
Anne
“I love the freedom of embroidery.”
My project to make
WINTER TIME BANNER

17 Stitch Life
EMBROIDERY
Winter time banner
Anne Mende
YOU WILL NEED:
• 35 x100cm of medium-weight linen or cotton fabric in blue
• Sewing thread or embroidery floss to match your fabric colour


• Wooden rod, 40cm long and about 1–2cm in diameter
• 120m of string
• Embroidery needle, size 5
• Embroidery hoop, 18–20cm in diameter
STITCHES:
Chain stitch (see Stitch Library page 103)
Straight stitch (see Stitch Library page 107)
French knots (see Stitch Library page 105)
18 Stitch Life
THREADS : Anchor Stranded Cotton 00216 x 3 00002 x 3 00217 x 2 00308 x 1 00890 x 1

19 Stitch Life PUNCH NEEDLE EMBROIDERY
Winter time banner
GETTING STARTED
Fold the fabric in half and mark the middle line of the fabric. Place the pattern so that it is centred on the right half of your fabric. Transfer the pattern to one half of the fabric with transfer paper or your preferred transfer method.
The template shown here is not to scale. Please download for accurate size.
DOWNLOAD PATTERN TEMPLATE

20 Stitch Life
Use all six strands of your embroidery floss for all steps.
Begin with the stems. Use chain stitch in green to embroider all of the stems first. If you want thicker stems, make two lines of chain stitches for the stems, but one line is usually enough.
Next, stitch the leaves with chain stitches in light green. Use a mix of outlined and filled leaves. You can fill them all in or leave them as outlines—the choice is yours!
For the blossoms, use chain stitch in white to outline and fill in each petal. Stitch the outline first and then follow that line inwards, like echo lines, to fill the inside with more and more rows of chain stitches. For the little leaves outside the petals, make three straight stitches in green that go into the same place at the end of the stitch.
Then, fill the circle in the middle with French knots in ochre. Make knots around the circle first, then add three to five knots in the middle.
After that, use the light ochre to stitch three straight stitches in the centre of each petal.
For the “Winter Time” letters, use ochre and chain stitch to embroider along the lines. Follow the letters like you would write them so that the lines overlap in the right places.

To sew the banner, fold all of the fabric edges two times so that the raw edges are stuck in between. Sew over the edge with a sewing machine or hand sew using the running stitch.
Fold in the corners of the banner to the middle so that they form two triangles. Then, stitch them together at the points where they meet in the middle and iron the edges flat.
Fold the fabric into the middle so that the pointy ends meet. The part without embroidery on it should be a bit higher up than the embroidered side so that it doesn’t peek out from behind. Sew the edges together with a whip stitch so that they can’t move anymore.
To finish the banner off, stick the wooden rod into the banner. Finally, knot the cord around the edges of the rod and hang your banner.
21 Stitch Life
EMBROIDERY
1. Use chain stitch for the stems and leaves.


2. Embroider the outline first, then follow that line to add more rows of chain stitches towards the inside.
3. Make three stitches that go into the same point at the end of the stitch. 3
22 Stitch Life
1 2
4. Embroider a circle of French knots, then fill in the circle with three to five knots.


5. Add three straight stitches per petal.
6. Fold the edges of the fabric twice. Pin down with sewing pins. 6
23 Stitch Life
4 5
7. Fold the corners of the banner towards the middle. Make sure they are straight.
8. Sew the corners together with a couple of whip stitches.


9. Pin the two parts together so that the embroidered part is overlapping the back slightly. 9

24 Stitch Life
7 8
10. Whip stitch both edges together.


25 Stitch Life
10
meet the designer...
Ana Clara Piccolo
anaclara.bordou
About me
I’m a freestyle embroider from Brazil, but myself and my husband are currently based in Stuttgart, Germany.
I’ve always liked handcraft work, but I guess I’ve been strongly influenced by my family as I come from a long line of craftspeople, from seamstresses, cooks, craftsmen and painters, all the way to woodworkers. I guess that being exposed to different types of handmade work subconsciously guided me into my studies in visual arts back in Brazil. So, in one way or another, I’ve always been involved in the artistic world. I don't remember exactly what the very first thing I made was, but I know the first embroidery pattern I ever stitched was a little cactus.
based on the customer’s request. My creative process starts with the story the client tells me, as well as their wishes and preferences. I collect all of this information and create the design for the embroidery from there.


About my work
My embroidery work is modern, fun and colourful. I love to create different colour palettes and bring up lots of textures by using a variety of embroidery stitches. I’m very passionate about hand embroidery. It captivated me from the first moment I passed a needle and thread through fabric to create my first design. I find it magical that I can create unique and special pieces with my own hands, and that every piece, no matter how many times I stitch it, is slightly different and one of a kind. I always say that my main goal is to use my work to touch people’s hearts and put a smile on their faces. I work for it!

When it comes to my creative process, I am a very methodical person. There is always a planning stage before starting a new piece. Even though I know I will make changes later in the process, I still need an initial plan to work from.
My work consists mainly of original creations and custom orders. For the custom orders, I develop designs
For my original creations, inspiration comes first, and that’s influenced by the things I’m attached to or particularly fond of at that moment. There’s always a phase I’m in or something I feel more interested in. Those phases come and go, but sometimes they mix. It is a delicious craziness that ends up reflected in my work. For drawing, I usually go digital. Sometimes I sketch new designs by hand and sometimes I mix the two techniques. My style is a reflection of who I am, including my experiences and my passions. I look for inspiration in books, photographs, everyday objects, plants, etc., which means everything around me inspires me in some way. Today, I have chosen six incredible Brazilian women who have inspired me, both as an artist and as a woman. They create amazing embroidery work, in addition to being wonderful teachers who have dedicated themselves to making the art of embroidery accessible to everyone who wants to learn it.
Please take some time from your day to check out the work of Marina Dini, Renata Dania, Camila Gomes Lopes, Vanessa Israel and Laís Souza from Clube do Bordado (instagram/clubedobordado) and Andréa Orue from Primavera de 83 (instagram/primaverade83).
26 Stitch Life
Ana
My project to make
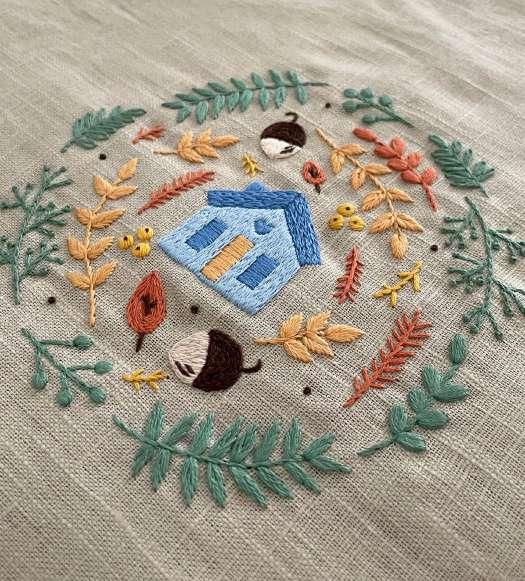
COSY HOME

I was inspired by five words when creating this pattern: autumn, cosy, inside, home and warm. The Cosy Home pattern portrays the autumn leaf lifecycle that starts with the end of summer and the shortening of the days. When the leaves start to change colour, all we want to do is stay at home, put on warm socks and get cosy on the couch.
One of my favourite seasons of the year is autumn. I love the colours, and it’s the perfect weather for sipping warm tea and getting cosy on the couch.
Feeling inspired by this, I dove into the development process for this project by doing some rough layouts and mixing some elements and feelings that remind me of autumn, like an autumn colour scheme, leaves, a warm house and cosiness. My goal was to achieve a look that could bring visual comfort and cheer people up in these difficult times we are living through. I hope others enjoy stitching this piece as much as I did.
27 Stitch Life EMBROIDERY
Cosy home
Ana Clara Piccolo
YOU WILL NEED:
• Beige linen fabric or a beige linen cushion cover (30 x 30cm)
• 15cm or 17cm embroidery hoop with screw
• Scissors
• Needle, size 7 or 9
• Fabric pen (preferably one that vanishes with heat or water—I’ve used the Pilot Frixion Pen)
• Anchor Stranded Cotton Mouliné embroidery floss
• Cushion pad
STITCHES:
Chain stitch (see Stitch Library page 103)
Satin stitch (see Stitch Library page 104)
Long and short stitch (see Stitch Library page 106)
Stem stitch (see Stitch Library page 105)
Straight stitch (see Stitch Library page 107)
Fishbone stitch (see Stitch Library page 109)
Lazy daisy stitch (see Stitch Library page 106)
French knot (see Stitch Library page 105)
Split stitch (see Stitch Library page 103)
28 Stitch Life
THREADS : Anchor Stranded Cotton 00129 x 1 00146 x 1 00216 x 1 00306 x 1 00339 x 1 00363 x 1 00380 x 1 00933 x 1

29 Stitch Life EMBROIDERY
Cosy home
GETTING STARTED
Transfer the design onto the fabric (see page 102). Centre the hoop securely over the design.
The template shown here is not to scale. Please download for accurate size.
DOWNLOAD PATTERN TEMPLATE AND KEY
30 Stitch Life
To embroider the little house:
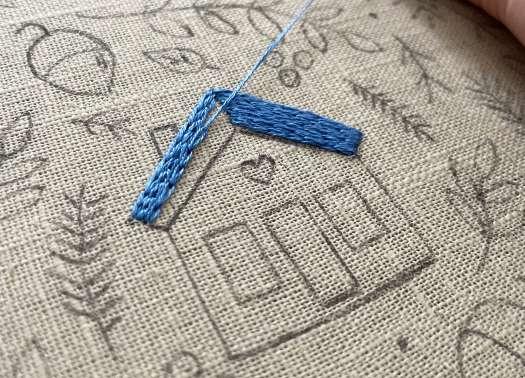
1. Roof: With two strands of #00146, use chain stitch to fill in the roof of the little house. 2
2. Chimney, windows and heart: With two strands of #00146, use satin stitch to fill in the chimney, the two windows and the heart of the little house.
3. Door: With two strands of #00363, use satin stitch to fill in the little door.


Tip: To get better definition with the satin stitch, you can start by outlining the design using backstitch and then fill in the shape with satin stitch.
1 3
31 Stitch Life
EMBROIDERY
4. House: Using two strands of #00129 and long and short stitch, fill in the walls of the little house.

4
To embroider the acorns:


1. Top part: Fill in the top part of the acorn, following the format of the design, using chain stitch. Here, we used three strands of #00380.
1
2. Bottom part: Using three strands of #00933 and long and short stitch, fill the bottom part of the acorn. One tip: start by contouring the shape using split stitch and then fill it in.
2
32 Stitch Life
3. Stem and little details: With three strands of #00380, use split stitch to embroider the stem of the acorn and the two small details on the bottom side of the acorn.

3

The little yellow seeds: 1. Using two strands of #00306 and satin stitch, embroider the yellow seeds, following the format of the design. For the small detail, use one straight stitch with two strands of #00380.

1
To embroider the little orange leaves: 1. Leaf: Using two strands of #00339 and stem stitch, embroider the leaf, following its shape.
1
33 Stitch Life
EMBROIDERY
2. Stem and little detail: With four strands of #00380, use straight stitch to embroider the stem and the small detail on the middle of the leaf.
2
Branch 01:
1. With three strands of #00306, use stem stitch to embroider the stem and straight stitch to stitch the twigs.
1
Branch 02:
1. With three strands of #00339, use stem stitch to embroider the stem and straight stitch to stitch the twigs.


1

34 Stitch Life
Branch 03:
1. To stitch the stem of this branch, use three strands of #00339 and stem stitch. After that, with three strands of the same colour, embroider the leaves using satin stitch.


Branch 04:
1. With three strands of #00363, use stem stitch to embroider the stem of this branch. Then, with the same colour, use fishbone stitch to stitch the leaves.
Branch 05:
1. Using stem stitch and three strands of #00216, embroider the stem of this branch. For the leaves, use lazy daisy stitch.
1 1
1
35 Stitch Life
EMBROIDERY
Branch 06:
1. With three strands of #00216, use split stitch to embroider the stem and the twigs of this branch. Finally, sew the small details at the end of each twig, making a French knot.


Branch 07:
1. Using split stitch and three strands of #00216, embroider the stem of this branch. Then, with the same colour, use satin stitch to fill the small circles at the end of the twigs.

Branch 08:
1. With three strands of #00216, use stem stitch to embroider the stem of this branch. Then, with the same colour, use satin stitch to stitch the leaves.
1 1
1
36 Stitch Life
Branch 09:
1. To stitch the stem of this branch, use three strands of #00216 and stem stitch. After that, with three strands of the same colour, embroider the leaves using satin stitch.


1
To embroider the little brown dots:
1. With three strands of #00380, use a French knot (here, you can wrap the thread around the needle two to three times) to embroider all of the brown dots in the pattern.
1
Finishing:
You can embroider directly on a ready-made cushion cover (just like I did) or you can create your own cushion from scratch. For this:
1. Measure out a square on your fabric and cut it out. It should be 5cm larger than your cushion pad.
2. To make the back of the cushion cover, cut a rectangle that is half the width of the square you just cut and the same height. Cut another rectangle that is two-thirds of the width of the square, again keeping the same height.
3. Fold over on one of the rectangle sides to create a hem and sew a straight stitch down it.
4. Lay both rectangles on top of the square, right sides together, and pin it all the way around, ready to sew.
37 Stitch Life
EMBROIDERY
5. Sew along all four sides and backstitch when you come to where the back pieces overlap.

This will ensure that the opening is secure. When you’ve finished sewing, cut off the end of each corner. This will ensure that the points are sharp and well-shaped.
6. Turn the cover the right way around and push out each corner. Insert the cushion pad into your cover. Your cushion is now complete!
38 Stitch Life

39 Stitch Life EMBROIDERY
meet the designer...
Cathy Eliot
@cathyeliot
About me
I live in Cambridge, England, and have been doing embroidery since my aunt taught me when I was very little. Textiles was my favourite subject at school, and I got back into it about five years ago. The first thing that I made when I started stitching again was a little purse for a Secret Santa present, embroidered with some grasses and flowers.

I’m lucky enough to now have my own studio space, but I also like to sit on the sofa in the evenings with the television on in the background while I work. I also really like illustrating, so I’m trying to sketch more, especially outdoors. Although, in cold or bad weather, this does become more tricky!

About my work


I like to create quite detailed designs. I would describe my work as botanical and delicate. People have also kindly said that I use beautiful colour palettes. Embroidery can be very calming and meditative. Freestyle embroidery allows you to draw with the thread, so you can be really creative with it.


I usually sketch out my design onto paper first, using photos for reference. The design usually changes as I’m stitching, depending on how the stitches are behaving, what colour threads I have, or how the shapes are fitting together.
Nature inspires me most—plants, flowers and gardens are endlessly changing and full of a variety of colour, texture and pattern. I would love to visit Forde Abbey and gardens on the borders of Devon, Dorset and Somerset. Their Instagram is so magical: @fordeabbey.
40 Stitch Life www.cathyeliot.com
Cathy
My project to make
WOODLAND TABLE LINEN

This embroidered illustration captures a winter’s night in a quiet woodland, where a reindeer dreams among the pine trees and fairytale mushrooms spring up around her in the snow. It is mainly stitched in two very subtle shades of light grey, with some silver sprinkles for the
Table runner and napkin
stars twinkling above the forest. The elements of the design are flexible, so you could move around the trees, mushrooms, leaves, or even add in some more deer. Flexibility and creativity are such joyful elements of freestyle embroidery!
41 Stitch Life EMBROIDERY
Woodland table linen
Cathy Eliot
The table runner featured here is 45 x 150cm and the napkins are 45 x 45cm. The design can be scaled up or down to fit the size of your materials.
SIZE: table runner - 45cm x 150cm napkins - 45cm x 45cm
YOU WILL NEED:
• 1 table runner
• 4 napkins
• Scissors
• Embroidery needle, size 7–9
• Embroidery hoops, 1 small (4"), 1 large (7")
• Water-soluble fabric pen
STITCHES:
Stem stitch (see Stitch Library page 105)
Split stitch (see Stitch Library page 103)
French knots (see Stitch Library page 105)
Chain stitch (see Stitch Library page 103)
Seed stitch (see Stitch Library page 108)
Cross stitch (see Stitch Library page 100)
Satin stitch (see Stitch Library page 104)
THREADS :
Anchor Stranded Cotton 00234 x 4 00398 x 1 00400 x 1 00301 x 1


Anchor Metalic
tip
Most knots are usually just a result of the thread twisting itself up as you stitch. If you find you keep getting tangles, every so often, hold the hoop and fabric up, letting the thread hang down (with the needle still attached) and it will unspin itself!
Metalic thread can be tricky to work with and get tangled very quickly, so only use short pieces (about 20cm long) at a time for the best results.
42 Stitch Life

43 Stitch Life EMBROIDERY
Woodland table runner & napkins
GETTING STARTED
Print the design and place it behind your fabric. Using either a lightbox or a window, trace the design through the fabric using a washable fabric pen.

Fit your hoop snugly around the fabric.

44 Stitch Life
NAPKINS Mushrooms

DOWNLOAD PATTERN TEMPLATES

The template shown here is not to scale. Please download for accurate size.
Mushrooms
1. Use two strands of #00234 to stem stitch the outlines. On the curves, use smaller stitches to make a nice, smooth curve.
1

2. The decorations on the mushrooms are done with two strands of #00398, using French knots, split stitch, seed stitch or cross stitch, but feel free to use your imagination and decorate the mushrooms however you wish!
2
45 Stitch Life
EMBROIDERY
NAPKINS
Trees
The template shown here is not to scale. Please download for accurate size.

Trees
1
1. Using two strands of #00234, stem stitch the snowy outline. 2

2. Use two strands of #00398 to draw the straight lines of the branches. These can simply be a single stitch. (If you have enlarged your design, you can use split stitch to create the branches).

46 Stitch Life
NAPKINS Leaves
The template shown here is not to scale. Please download for accurate size.
Leaves

1. Using two strands of #00234, stem stitch the stems of the leaves.


1
2. Using two strands of #00398, use split stitch and straight stitch to create the needles. You do not need to follow the pattern exactly here. Draw the needles randomly to create a full, bushy effect.
2
47 Stitch Life EMBROIDERY
NAPKINS
Deer
The template shown here is not to scale. Please download for accurate size.
Deer

1. Outline the deer using two strands of #00234 in stem stitch. Next, use two strands of #00398 to create her features. Her antlers are done in split stitch, the inner ears are a single daisy chain stitch, the eyes are a very small split stitch, the nose is satin stitch, and the mouth is, again, a very small split stitch.
1

48 Stitch Life
Snow
1. On all the napkin designs, use one strand of #00398 to stem stitch the gentle lines of the snow. Then use one strand of #00400 to create a shadow, following underneath the line of the light-grey snow.


1
Stars
1. The stars are created with a single strand of silver thread by making tiny crosses randomly dotted above the main design.
1

49 Stitch Life EMBROIDERY
The template shown here is not to scale. Please download for accurate size.

50 Stitch Life
TABLE RUNNER
Table Runner
1. To make the pattern large enough for the table runner, print out the design on a couple of sheets of paper, line up the design and sellotape it together.
The techniques and thread colours are all the same for the runner as for the napkins—except where you have used two strands of each thread, you now use three, and where you have used one strand, you now use two.
The moon is made using three strands of #00234 and stem stitch, with a couple of small stitches to add texture.
FINISHING
Dab water onto the fabric where you have used the water-soluble pen (I use a paintbrush to do this) until the pen fades completely. Leave to almost dry, then, while still damp, give it a good iron.
When washing, rinse carefully by hand in cold water, using a delicate washing liquid.
This design could be done in many different colours. I also tried a sample using a dark-grey thread on a very pale pinkish fabric (dyed naturally using blackberries!) Alternatively, use the patterns to stitch onto stockings, cushions or wall hangings to add a woodland feel to your textiles this winter.


51 Stitch Life EMBROIDERY
1
meet the designer...
Jenny Billingham
@flynn_and_mabel
About me
I’m an embroiderer living in Northampton, England. I got started with embroidery in January of 2020, when I stitched a simple cacti outline in a range of colours. I immediately fell in love with the process and have been doing embroidery ever since. Although I’ve always had a passion for textiles and thought embroidery was beautiful, it’s only recently that I’ve had the time to try it out and create my own designs.

All of my embroidery work is created from home. I love to listen to music or put the TV on in the background as I stitch the evening away. It’s especially lovely in the winter when you can get cosy and comfortable under a blanket or in the summer when you can sit out in the sunshine and fresh air. When I’m not working on a new embroidery design, I love to spend my time cooking and baking. Making cakes is always great fun—and eating them afterwards is even better!

About my work

I would describe my work as colourful, bold, bright, playful, original and distinctive. Using simple stitches to create pretty patterns and unique designs is what I love to do. In particular, I have a thing for rainbows, florals and stars, so you’ll see lots of those motifs in my designs.


One of my favourite things about embroidery is that you can pick it up and put it down whenever you like. It’s very easy to add to a design whenever you’ve got a couple of moments to spare, and it can always be transported, altered and adapted. Embroidery designs can range from very delicate to super bold, which means you can really express yourself through your embroidery work. It’s also a very relaxing and therapeutic craft.
My design process begins with sketching out potential designs by hand. I then turn them into digital artwork using my iPad. I’ve always had a passion for drawing, so I actually enjoy the process of designing my hoops as much as I do stitching them.
I find an abundance of inspiration for my work in nature, the great outdoors and my wonderful children. There are so many inspiring creators online. I follow lots of incredible makers on Instagram. A few who particularly stand out to me are @stellaandwolf (jewellery) @knittyknots (embroidery) and @thehandmadeflorist (felt flowers).
52 Stitch Life
Jenny
“Colourful, playful, original, distinctive.”
My project to make
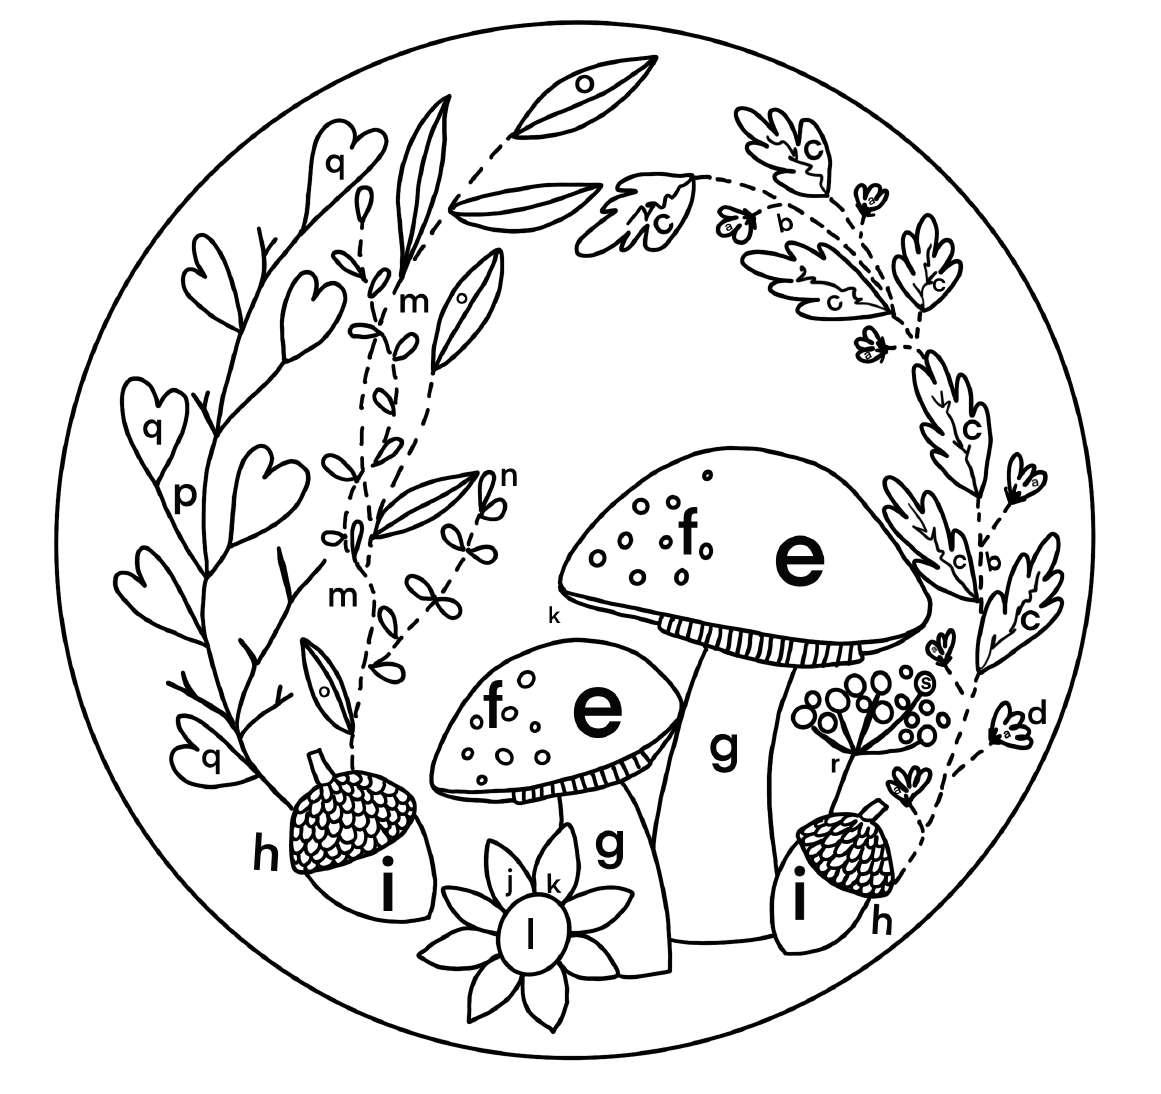
WOODLAND WALKS
There’s something about a woodland walk in autumn. The leaves changing from green to an incredible display of vibrant colours. Orange, red, brown and gold. Acorns and toadstools underfoot, a mist in the air and a blustery
breeze. This textured and tonal woodland design combines a range of stitches and colours to create the perfect autumnal embroidery.

53 Stitch Life PUNCH NEEDLE
EMBROIDERY
Woodland walks
Jenny Billingham
SIZE: 7-inch hoop
YOU WILL NEED:
• Tracing paper
• Water-soluble fabric marker or pencil
• 30cm square of natural-coloured fabric
• 7-inch embroidery hoop
• Embroidery needle
• Felt
• Scissors
STITCHES:
Backstitch (see Stitch Library page 102)
Fishbone stitch (see Stitch Library page 109)
Chain stitch (see Stitch Library page 103)
Split stitch (see Stitch Library page 103)
Satin stitch (see Stitch Library page 104)
Straight stitch (see Stitch Library page 107)
Long stitch (see Stitch Library page 106)
Short stitch (see Stitch Library page 106)
French knot (see Stitch Library page 105)
THREADS :
Anchor Stranded Cotton 00873 x 1 00022 x 1 00326 x 1 00361 x 1 00314 x 1


00311 x 1 00380 x 1
00896 x 1 00904 x 1
00907 x 1 00355 x 1
00306 x 1 00393 x 1
00891 x 1 00371 x 1
00862 x 1 00397 x 1
00236 x 1 01014 x 1
01018 x 1 00300 x 1
00379 x 1 00903 x 1
54 Stitch Life

55 Stitch Life EMBROIDERY
Woodland walks
GETTING STARTED
Transfer your drawing onto the fabric. Centre the hoop over the design and secure, ready for stitching. Pull the fabric taut.
The template shown here is not to scale. Please download for accurate size.
56 Stitch Life
PATTERN TEMPLATE AND KEY
DOWNLOAD
1. Satin stitch the small orange flowers in three strands of #00326. Using split stitch in #00862, sew the stem of the plant, taking the stitches up onto the orange flowers. Do this just around the base to look like tiny leaves. Continuing with #00862, fishbone stitch the individual leaves along the stem. Add three straight stitches of gold #00300 to each of the orange flowers.
1
2. Split stitch the outline of the red parts of the toadstools using two strands of #00022. Then fill them with long and short stitches. Start at the top with #00022 and graduate the colour as you go. Use #01014 in the middle and #00896 towards the bottom. Use two strands of each. Remember to keep your stitches close together and try to stagger their lengths to create seamless colour blending. Use six strands of #00397 to add single French knots for the white details on the top of the toadstools.


2
3. For the underside of the toadstools, use long and short stitches in three strands of #00387, but this time, go across the design rather than top to bottom. Work the stitches down the right-hand side of the stalk, then use three strands of #00361 to add a deeper tone to the left side. Blend the stitches as before. Use three strands of #00300 to add straight stitches to the underside of the toadstool. Space the stitches a few millimetres apart.
3
57 Stitch Life PUNCH NEEDLE
EMBROIDERY
4. Use chain stitches to create the top of the acorns. Use six strands of #00379. Stitch these randomly. For the bottom of the acorn, use satin stitch in three strands of #00355. 5


5. For the flower, satin stitch each of the petals in #00306 using three strands. Then add two straight stitches to the base of each petal in six strands of #00311. Finally, use six strands of #00380 to add French knots to the centre of the flower.
6. Split stitch the stem of the plant with two-tone leaves. Use two strands of #00903. After, add single chain stitch leaves in two strands of #00371. For the leaves, satin stitch each side. Use three strands of #00907 and #00904, one colour on each side of the leaf.
4 6
58 Stitch Life
7. Backstitch the stem of the heart-leaf foliage in two strands of #00236. Fishbone stitch the leaves in three strands of #00873 and #01018, alternating the colours.


7
8. Backstitch the stems of the small orange and yellow berries using three strands of #00393. Then add a mix of French knots in #00891 and #00314.
8

FINISHING
To finish your design, use the inner ring of the hoop to trace a circle onto a piece of felt. Cut this out and set to one side. Centre your embroidered design in the hoop and pull the fabric tight. Cut away any excess material, leaving a 2.5cm border. Thread a needle with machine thread and tie a knot at the end. Cut enough thread to go around the whole hoop. Sew a circle of running stitches around the hoop and gather the fabric. Tie a knot to secure. The felt circle can be glued or sewn onto the gathered fabric to cover and protect the stitching.
6
59 Stitch Life EMBROIDERY
