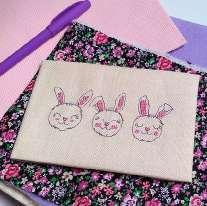
meet the designer...
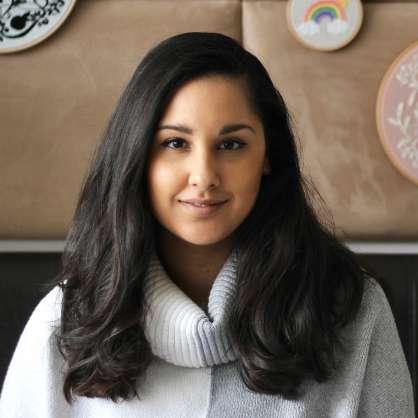
Jenni Davis
hopeandharthq
About me
I’m a freestyle hand embroiderer living in London, England. I was about ten years old when I first began to embroider. It's so long ago that I can’t remember exactly what my first design was, but I’m sure it would have included flowers. My mum was very into cross stitch in the 90s, so she gave me her book about embroidery and cross stitch. It had every stitch you could think of in it. This book became my everything. Even to this day, I still go back to it for reference. Although I would say I am self-taught, I did study textile design at university, and the designs I created during my studies were heavily influenced by hand embroidery and bead work.
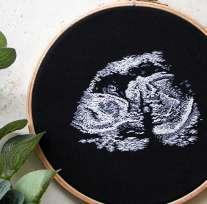
My sewing style and technique were always quite traditional until I suffered a baby loss a few years ago. I wanted to create an embroidered image of my sonogram, so I set out to make one. It developed into a new style that was very different to what I had done before. Today, three years later, I finally feel like I’ve perfected it. While I still stick to very traditional methods with my patterns, I now take a more modern approach in my overall style.
In the past, I had a dedicated studio space for my work, but since having my daughter, I now work from home and around her schedule when she’s not at nursery. My favourite thing about this embroidery is that it’s so flexible. You can take it pretty much anywhere with you.
I’ve always been a very creative, crafty person, so when I’m not working or running around after my toddler, you can find me drawing, painting, knitting, crocheting, or simply reading a book.
In particular, I truly love the technique I have developed for the sonograms. It enables me to replicate the textures of the baby’s image, making it look very realistic when compared to the real thing.
About my work
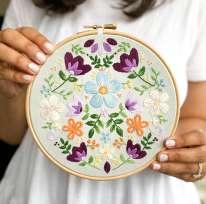
I work in two very different styles. One focuses on delicately recreating intricate baby scans in hand embroidery, and the other is mostly bold botanical or architecturally inspired patterned pieces. They both have their place in the world, and I adore them equally. If I had to sum up my work in just a few words, I would say it is unique, delicate, intricate, beautiful, bold, colourful, and monochromatic. I feel my patterns have a very playful tone to them.
When it comes to my creative process, everything starts on my iPad. For me, it’s simply more convenient, and the fact that it’s more environmentally friendly is a great bonus. I generally don’t put time limits on my designs. I’ve worked on some patterns for over a year before I was fully happy with them, while others have been finished in twenty minutes. As soon as I feel inspired, I sketch the design out and see where it goes.
Going for walks is another great source of inspiration for my work. I’m forever taking photos of flowers or leaves I like the look of while exploring the city. Living in London, there are so many new areas to explore and photograph. In particular, I seek out interesting architectural details to incorporate into my designs.
I really love the designs by @wmorrisandco.
60 Stitch Life
J
My project to make
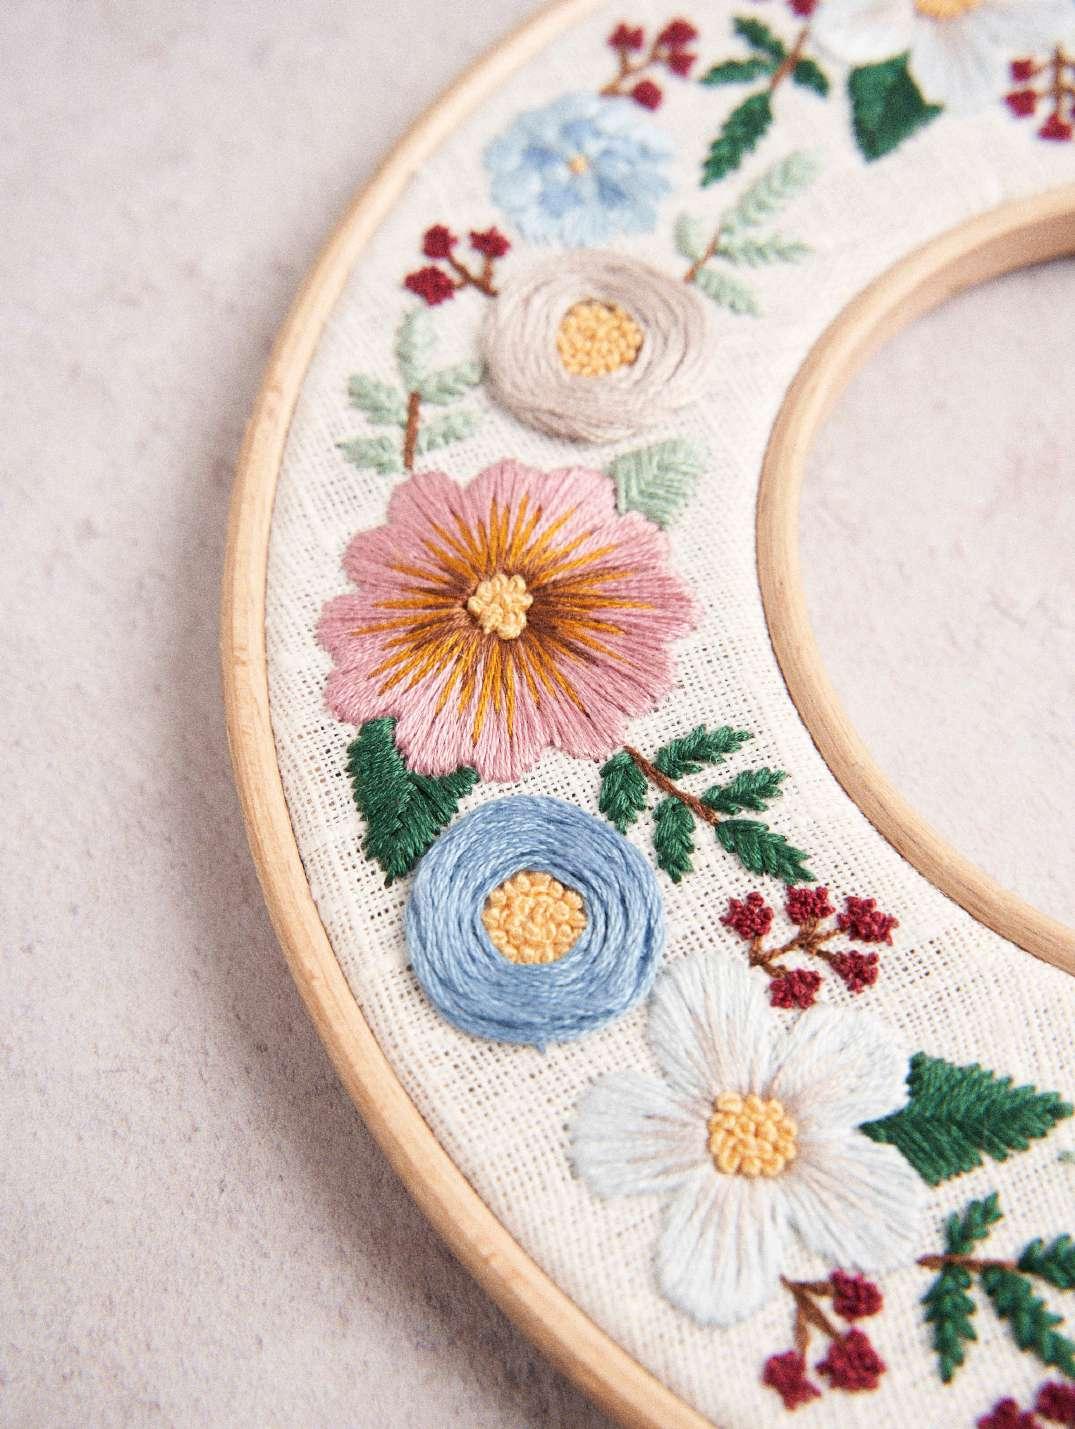
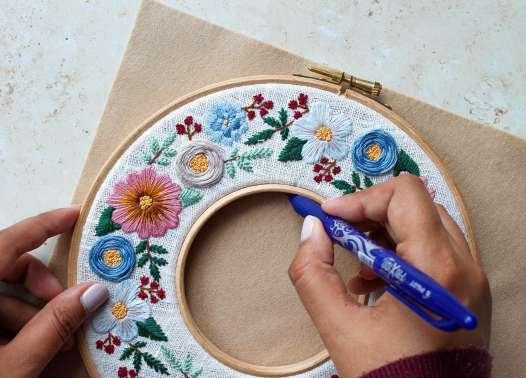
FLORAL WREATH
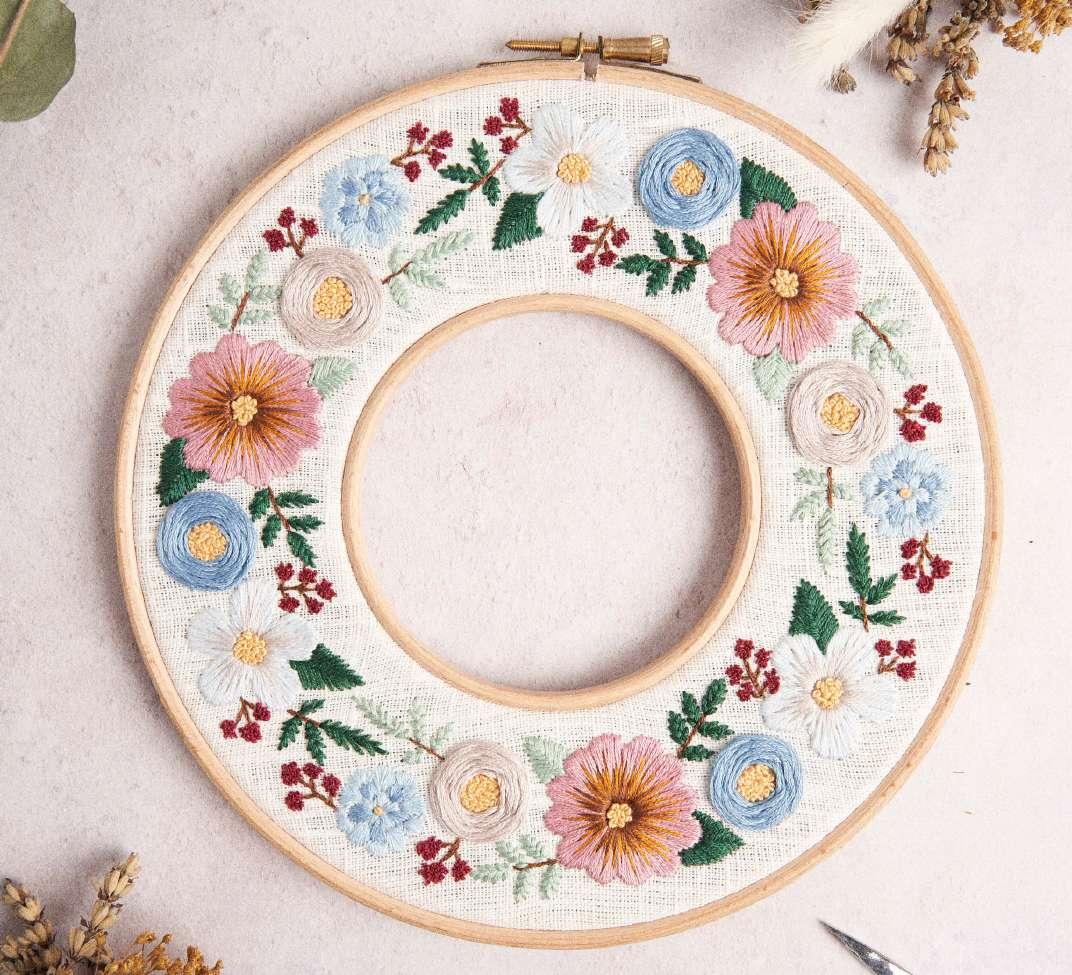
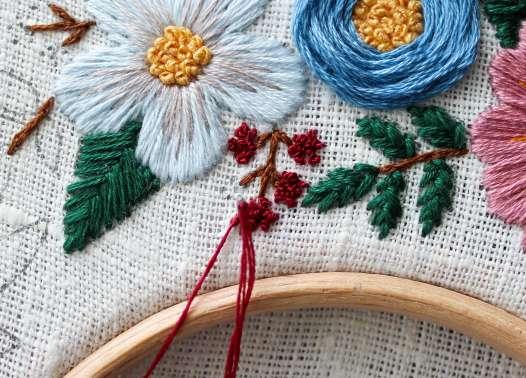
The design I have created for this collaboration is a muted botanical wreath that perfectly complements any seasonal decor.
This design is for the autumn/winter edition, so nature’s colour palette is very muted. I’ve chosen pastels and dusky tones with just a hint of bold berry colours. I’m always heavily influenced by colours first, so these wintery tones were my starting point. The botanical design came later. Textures are an important element of my designs, so it felt very natural to include a variety of stitches to create a textured effect.
I’ve truly loved working on this collaboration. The colour palette isn’t one I would traditionally use, so it was wonderful to briefly explore a new direction— and I’m so in love with the final piece! It really encouraged me to think outside of my usual process, and I really enjoyed that aspect.
Anchor embroidery threads are so beautiful, from the colour choices to the way it just glides through the fabric. It’s a lovely product to work with.
61 Stitch Life PUNCH NEEDLE EMBROIDERY
Floral wreath
Jenni Davis
This floral wreath was inspired by the cool pastel tones of winter. Icy mornings at sunrise with crisp red berries.
A perfect addition to your Christmas decorations or to just add a touch of winter décor to your home across the season.
SIZE: Finished size - 20cm
YOU WILL NEED:
• Heat-erasable pen
• 20cm embroidery hoop
• 10cm embroidery hoop
• Embroidery needle, no.5
• 30 x 30cm off-white linen
• Scissors
• Cotton thread
• 20cm circle of felt for backing
STITCHES:
Woven wheel (see Stitch Library page 109)
Backstitch (see Stitch Library page 101)
Fishbone stitch (see Stitch Library page 109)
Satin stitch (see Stitch Library page 104)
Stem stitch (see Stitch Library page 105)
French knot (see Stitch Library page 105)
Running stitch Blanket stitch
tip
Sewing the woven wheels near the end of the piece will keep them looking their best as they won’t be accidentally pulled by another thread.
62 Stitch Life
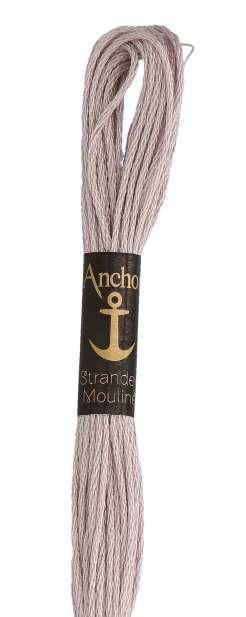
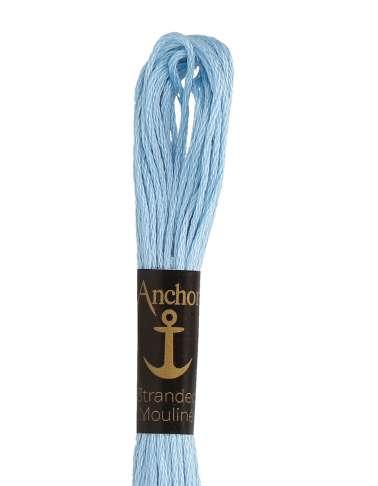
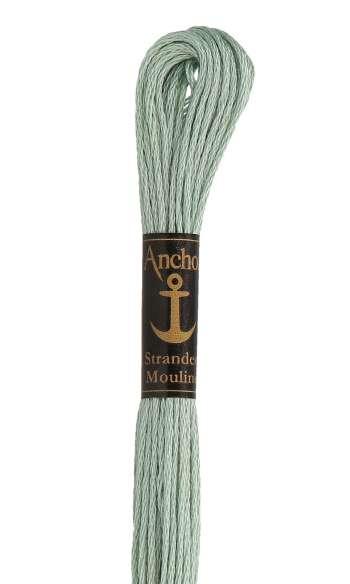
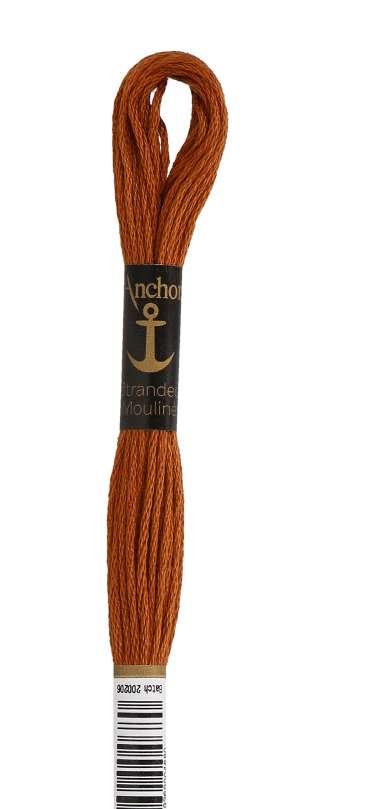
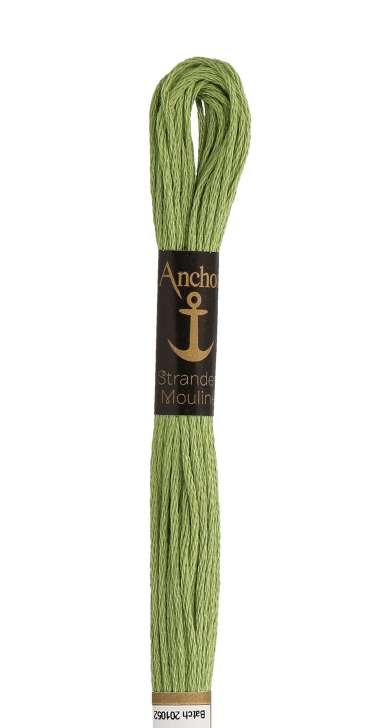
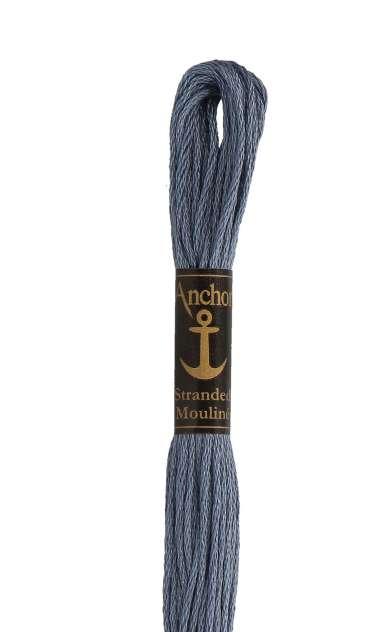
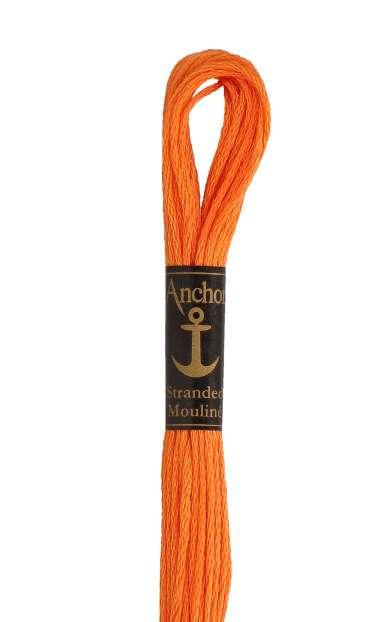
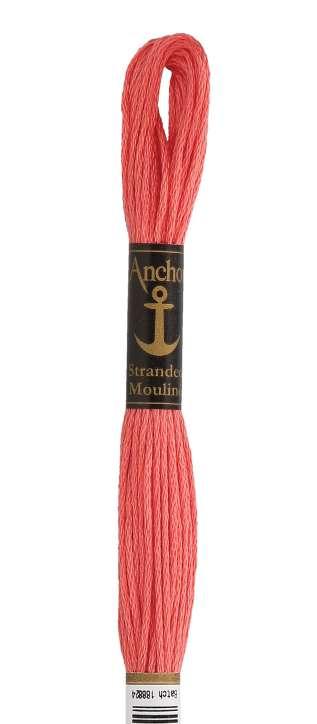
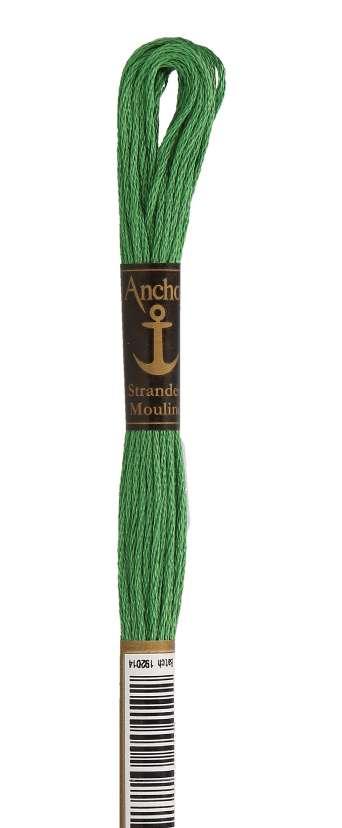
THREADS : Anchor Stranded Cotton 00875 x 1 00216 x 1 00311 x 1 00358 x 1 00308 x 1 00969 x 2 00231 x 2 00043 x 1 01031 x 1 00160 x 1 00977 x 2
63 Stitch Life EMBROIDERY
Floral wreath
GETTING STARTED
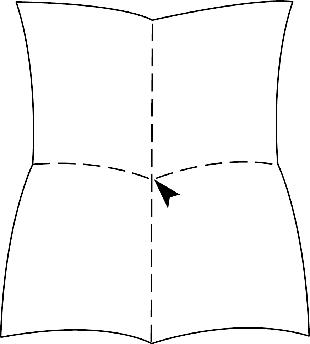
Transfer your design using your heat-erasable pen. Secure your 10cm hoop in place at the centre of your fabric with the template facing down. Turn your fabric around so the pattern is facing up and secure your 20cm hoop in place. Make sure it’s central to your first hoop and fits within the template.
DOWNLOAD PATTERN TEMPLATE AND KEY
231(6) Woven Wheel Stitch 43 (2) French Knot Stitch
358 (3) Stem Stitch 358 (3) Stem Stitch 358 (3) Split Stitch
218 (6) Fishbone Stitch 875 (6) Fishbone Stitch
969(3) 308 (3) 358 (3) Satin Stitch 1031(3) 231 (3) Satin Stitch
969(3) Back Stitch 1031 (3) Back Stitch
218 (6) Fishbone Stitch 875 (6) Fishbone Stitch 311 (6) French Knot Stitch 311 (6) French Knot Stitch
The template shown here is not to scale. Please download for accurate size.
308 (3) Stem Stitch
358 (3) Stem Stitch 977 (6) Woven Wheel Stitch
311 (6) French Knot Stitch 311 (6) French Knot Stitch
875 (6) Fishbone Stitch
218 (6) Fishbone Stitch 977 (2) 160 (2) Satin Stitch
218 (6) Fishbone Stitch
64 Stitch Life
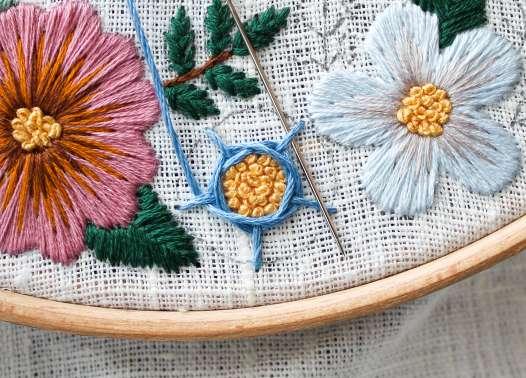
1. Firstly, working with three strands of the dusky pink floss (#00969), start outlining the flower using backstitch.
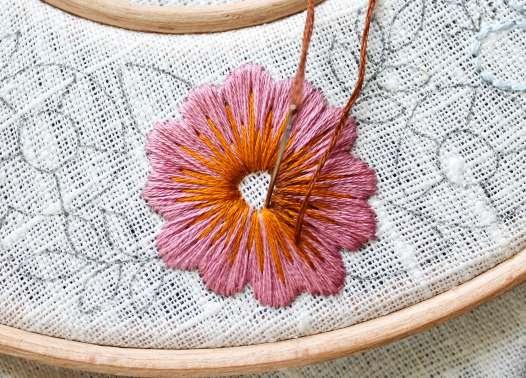
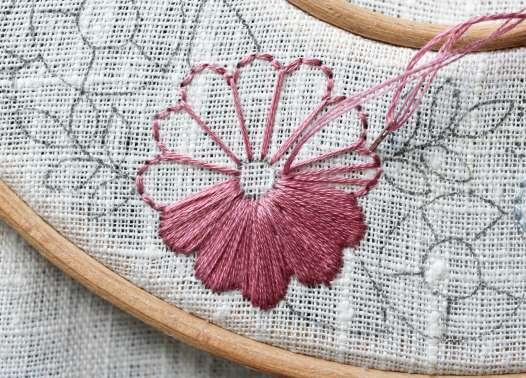

Fill in the flower with satin stitch. 2
2. Once complete, add detailing with three strands of amber (#00308), starting from the centre and fanning out. You don’t want to fill the shape, just add depth. Repeat with three strands of dark brown (#00358).
3. Using six strands of yellow (#00311), fill in the centre with French knots.
1 3
65 Stitch Life
EMBROIDERY
4. For the next flower, repeat steps 1–3 by filling it with three strands of ice blue (#01031) and adding depth with three strands of grey (#00231). 5
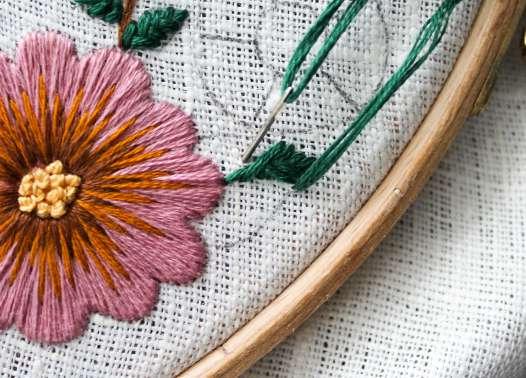
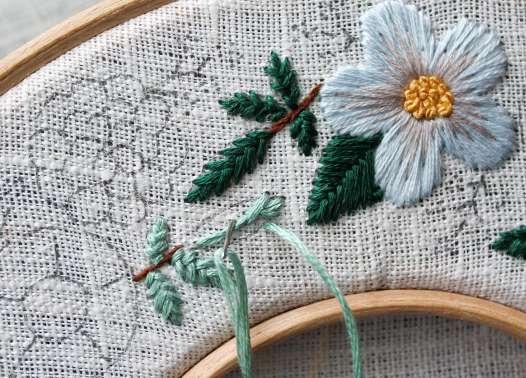
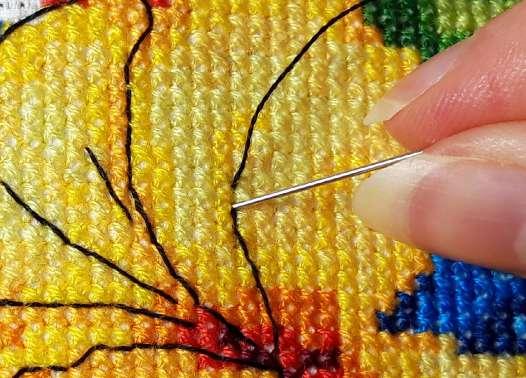
5. Moving onto the branches. Use three strands of dark brown (#00358) and work the stems with split stitch. Sew the leaves, working in a loose fishbone stitch with six strands of either sage green (#00875) or dark green (#00218), depending on the placement.
6. The larger leaves are sewn in a tight fishbone stitch using all six strands of either sage green (#00875) or dark green (#00218), depending on the placement.
4 6
66 Stitch Life
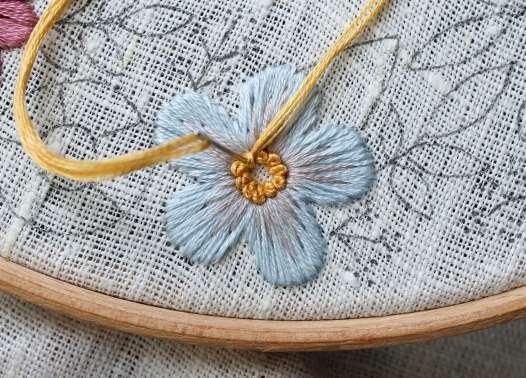
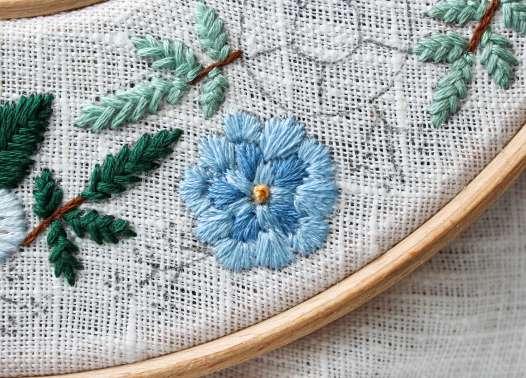
7. Using satin stitch with two strands of floss, start in the centre. Stitch the first five petals using light blue (#00160). Move onto the next five petals using the darker blue (#00977). Once finished, complete the remaining petals using light blue (#00160).
7
8. Complete with a French knot in the centre of the flower using six strands of yellow (#00311).
8
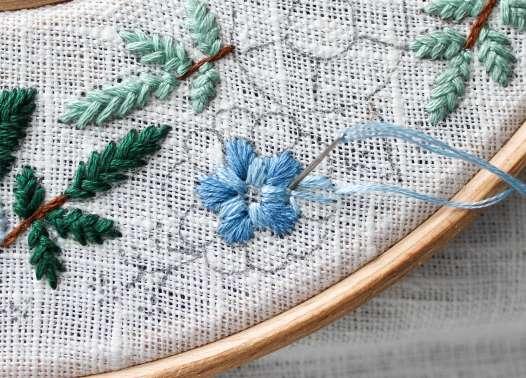
9. Using six strands of yellow (#00311), fill in the centre with French knots.
Once the centre has been filled, work a woven wheel stitch to create your rose in either darker blue (#00977) or grey (#00231), depending on the placement.
6
67 Stitch Life EMBROIDERY
10. Use three strands of dark brown (#00358) and work the stems with a split stitch. Sew the berries in red (#00043), working a French knot with two strands and one or two wraps around the needle. Add as many as you feel is needed to fill the space.
10
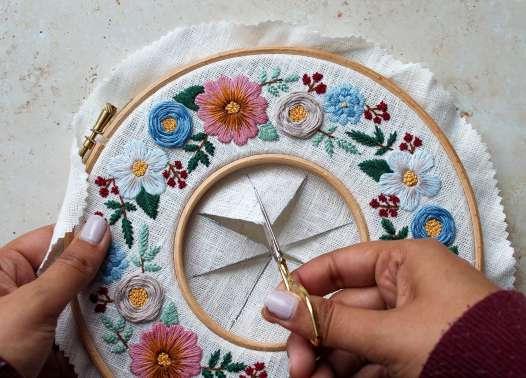
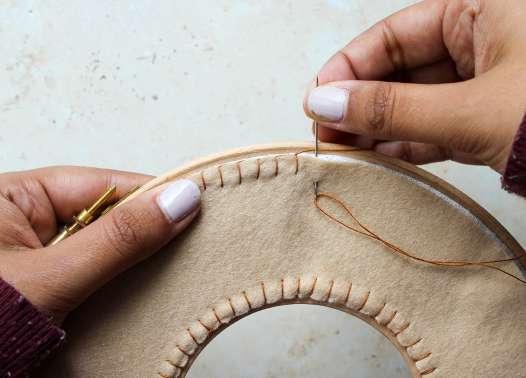
11. To finish, run a warm hairdryer or iron over the surface of the embroidery to remove the template. Cut the fabric around the outer hoop so you have around 2.5cm left.
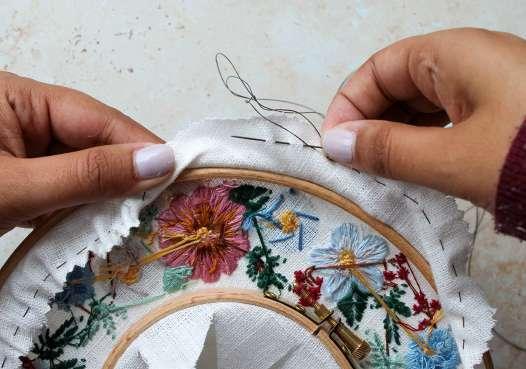
Mark the fabric at the centre of the hoop with a star and carefully cut along those lines.
11
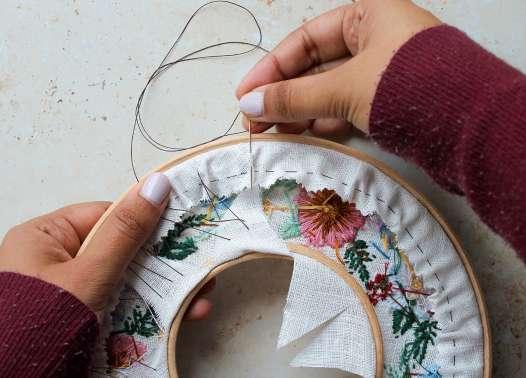
12. Next, using your cotton thread, sew a running stitch to gather the outer section of the fabric together.
12
68 Stitch Life
13. Stitch the fabric from the middle of the hoop so it attaches to the gathered trim. Make sure it’s secure, but don’t pull too tightly as you could pull the fabric out of the hoop.
13
14. Place your hoop on the felt and make an outline to create your backing template. Cut out the felt.
14
15. Finally, place the felt over the back of your hoop to make sure it’s a good fit. Trim as required and attach with a blanket stitch.
15
69 Stitch Life EMBROIDERY
Anchor Studio
Over the years we have designed hundreds of beautiful embroidery patterns and charts in the Anchor studio, ranging from cross stitch to freestyle and tapestry to long stitch.
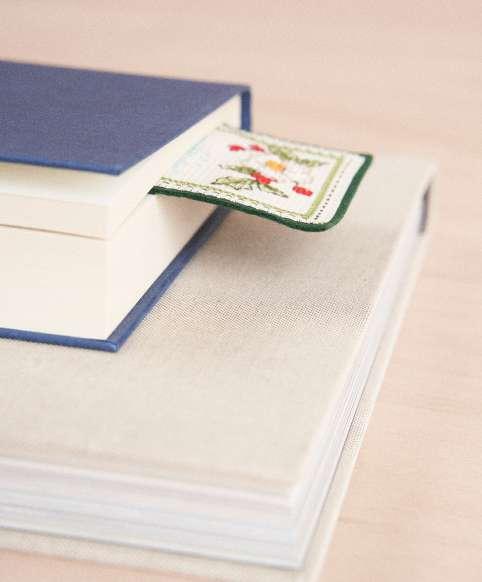
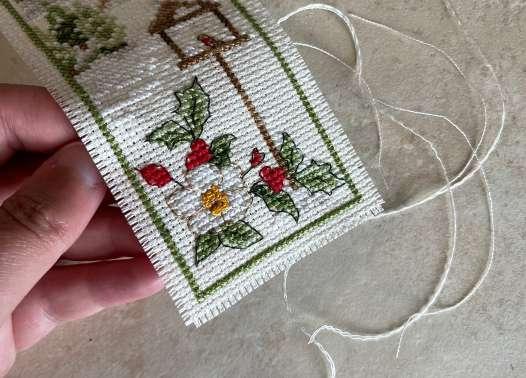
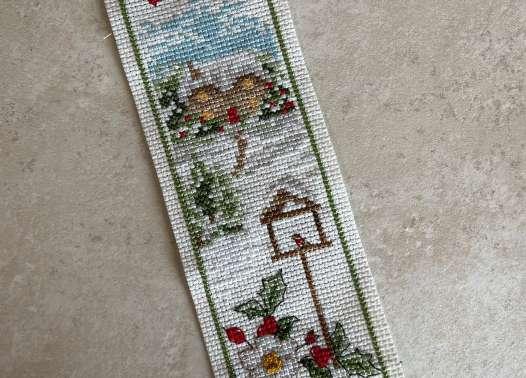
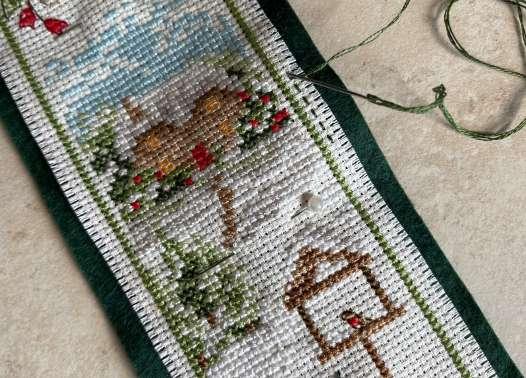
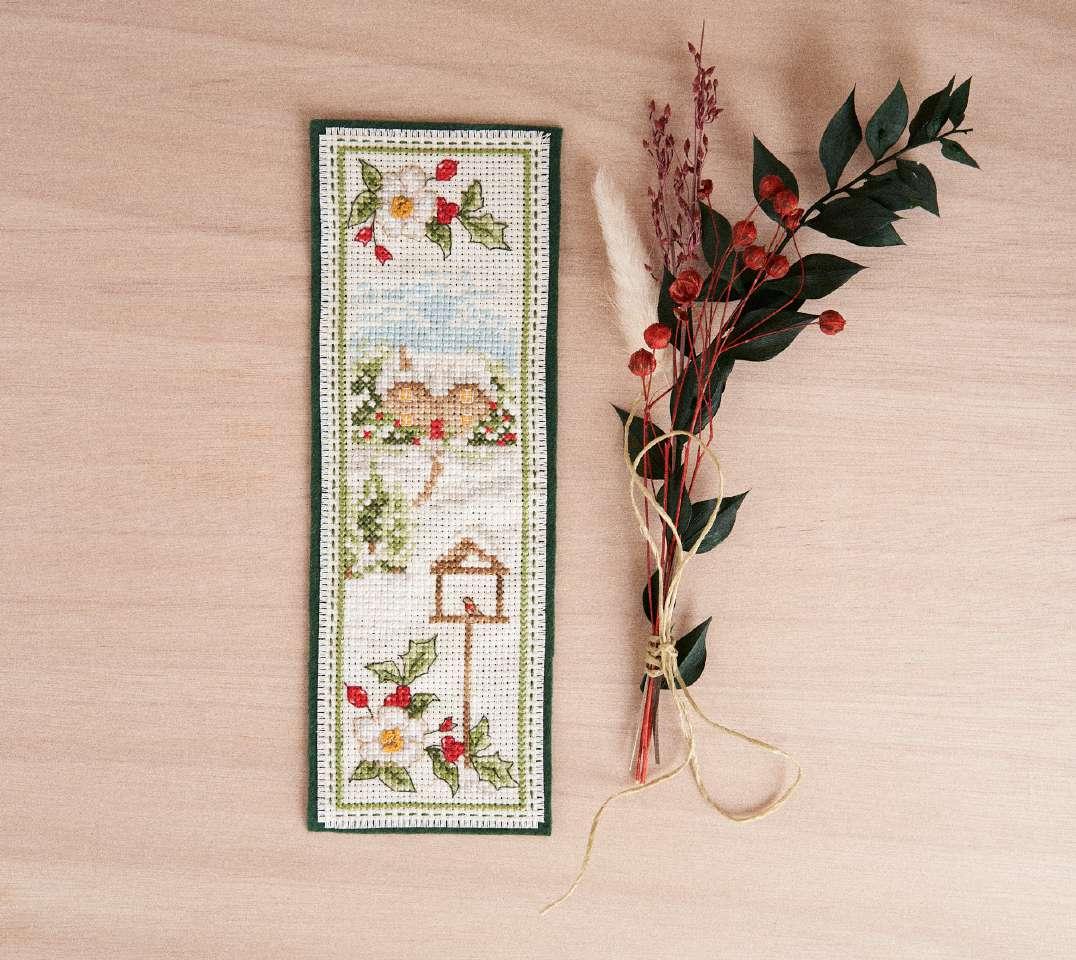
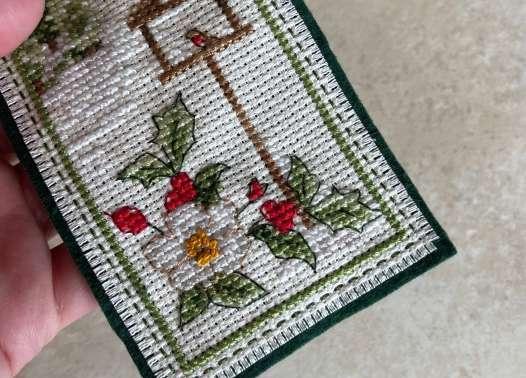
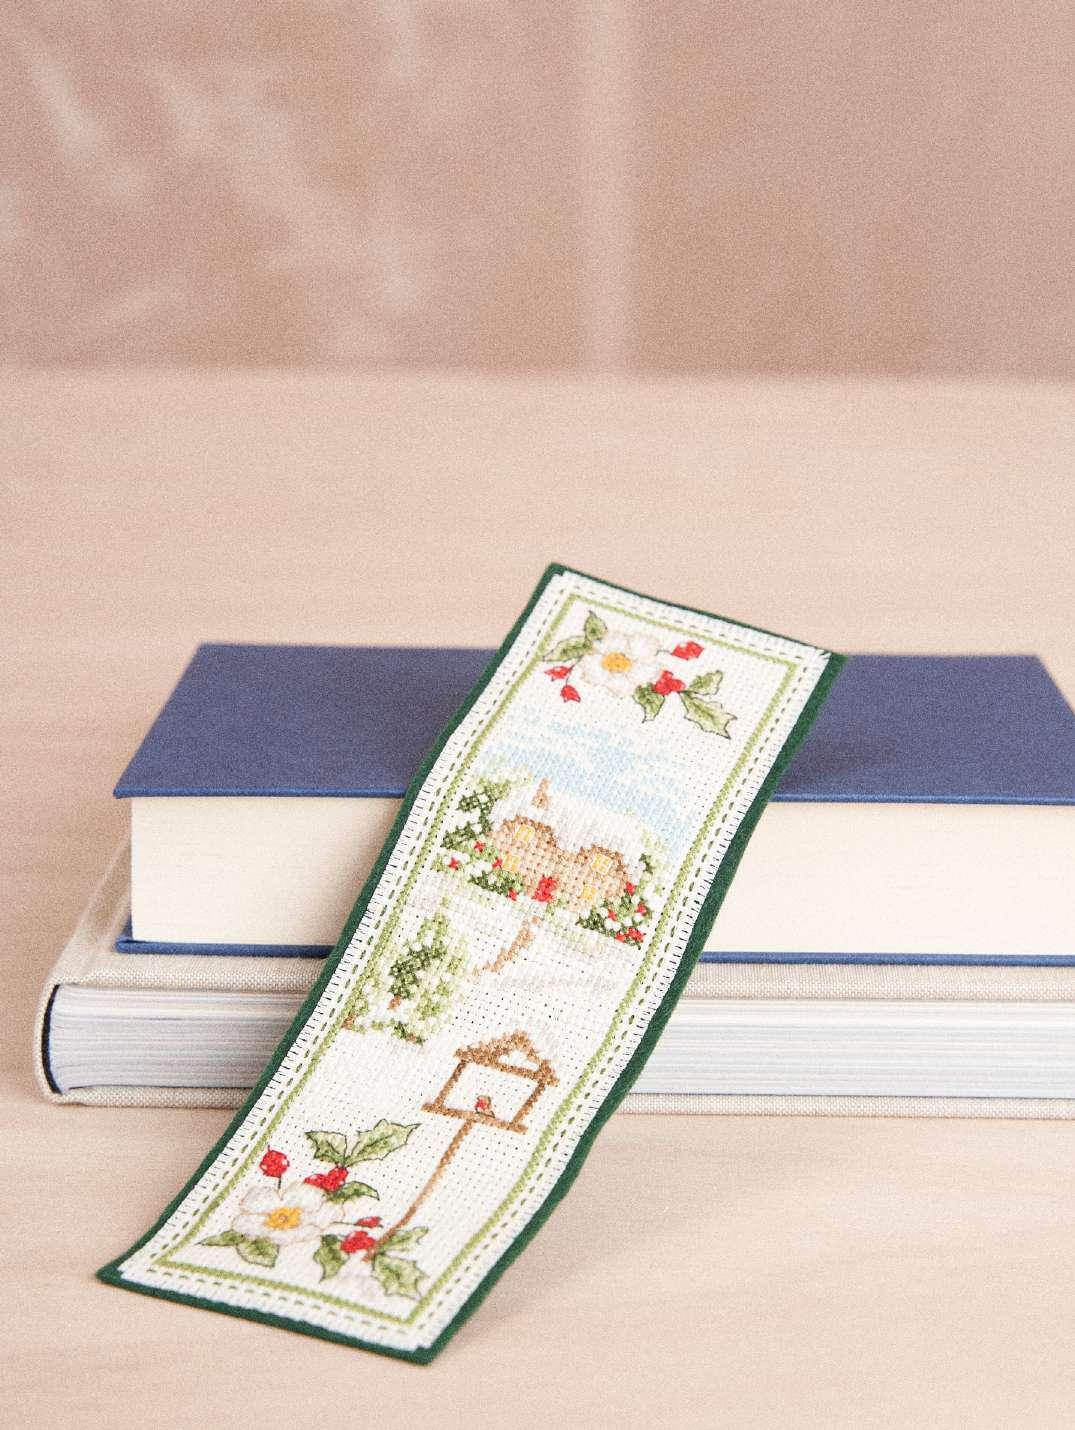
The colder winter months are perfect for staying cosy inside and stitching, but we think the next best
thing is curling up with a good book, so what better way to combine the two than with this sweet cross-stitched bookmark. Designed by our in-house designer Joanne, this book mark features a snowy garden scene and winter flowers and makes the perfect placeholder for your latest page turner!
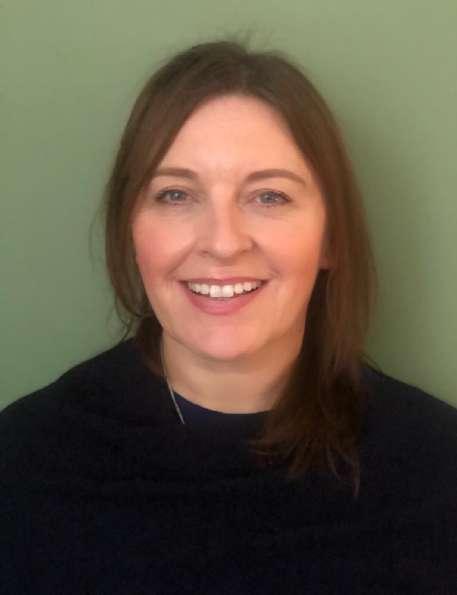
Joanne Aston
About me
I live in the UK and have worked with Anchor for many years, designing some of their most popular cross stitch and tapestry designs. My designs cover both traditional and contemporary themes and use a wide range of hand embroidery techniques.
70 Stitch Life
Project to make BOOKMARK CROSS
71 Stitch Life
STITTCH ANCHOR STUDIO
Bookmark
Joanne Aston
YOU WILL NEED:
• 14-count aida cross stitch fabric
• Medium-sized hoop
• Tapestry needle, no. 24

• Scissors
For the Bookmark:
• Needle
• Fabric scissors
• Piece of felt approx. 26 x 12 cm (we used dark green)
STITCHES:
Cross stitch (see Stitch Library page 100)
Backstitch (see Stitch Library page 101) French knots (see Stitch Library page 105)
THREADS :
Stranded Cotton
00266 x 1 00268 x 1 00862 x 1 09159 x 1
72 Stitch Life
Anchor
00303 x 1 00001 x 1 00397 x 1 01005 x 1 00046 x 1 00906 x 1 00375 x 1 00373 x 1 00372 x 1 00264 x 1
The chart shown here is not to scale. Please download for accurate size.
73 Stitch Life
STUDIO
KEY
ANCHOR
DOWNLOAD CHART AND
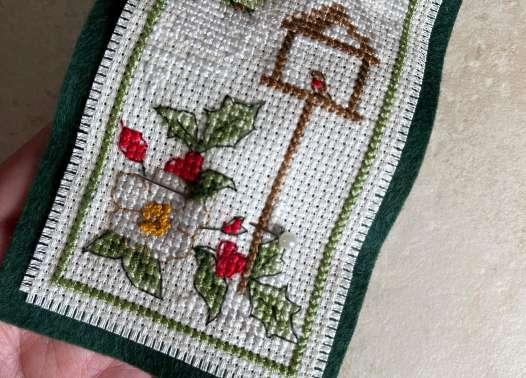
MAKING THE BOOKMARK:
Once you have completed your cross stitch, neaten it up by trimming loose threads and ironing out any creases in the fabric.

1. Trim your cross-stitched piece down to size by cutting along the third line of holes (in the aida) from the edge of the green cross-stitched border. 2
2. When you’ve finished trimming each edge, you will have left a small amount of aida fabric with two rows of holes between the cut edge and the green border.
3. Fray the raw edge of the aida by removing the threads from each side, but only up to the next line of holes. You should have a frayed edge of approx. 2mm and one row of holes remaining in the aida all the way round the edge.
1 3
74 Stitch Life
4. Trim the piece of felt so it is approx. 2cm larger in length and width than your stitched piece of aida.
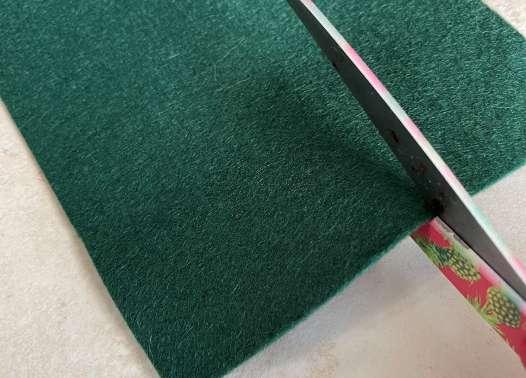
4
5. Pin the stitched aida piece on top of the felt in at least three places, ensuring it’s as straight as possible, with approx. 1cm of felt showing around each edge.
5
6. Following the row of holes that remain around the edge of the aida, stitch the aida to the felt backing with a neat running stitch using two strands of thread.
6
75 Stitch Life
STUDIO
ANCHOR
7. Once you have stitched around all four sides, remove the pins and neatly trim the felt edge closer to the fringed edge of the aida to finish!
Note: You may find that the felt back has moved slightly when you stitched the aida on top, so this allows you to neaten all your edges once more.
76 Stitch Life
7
77 Stitch Life ANCHOR STUDIO
Project to make
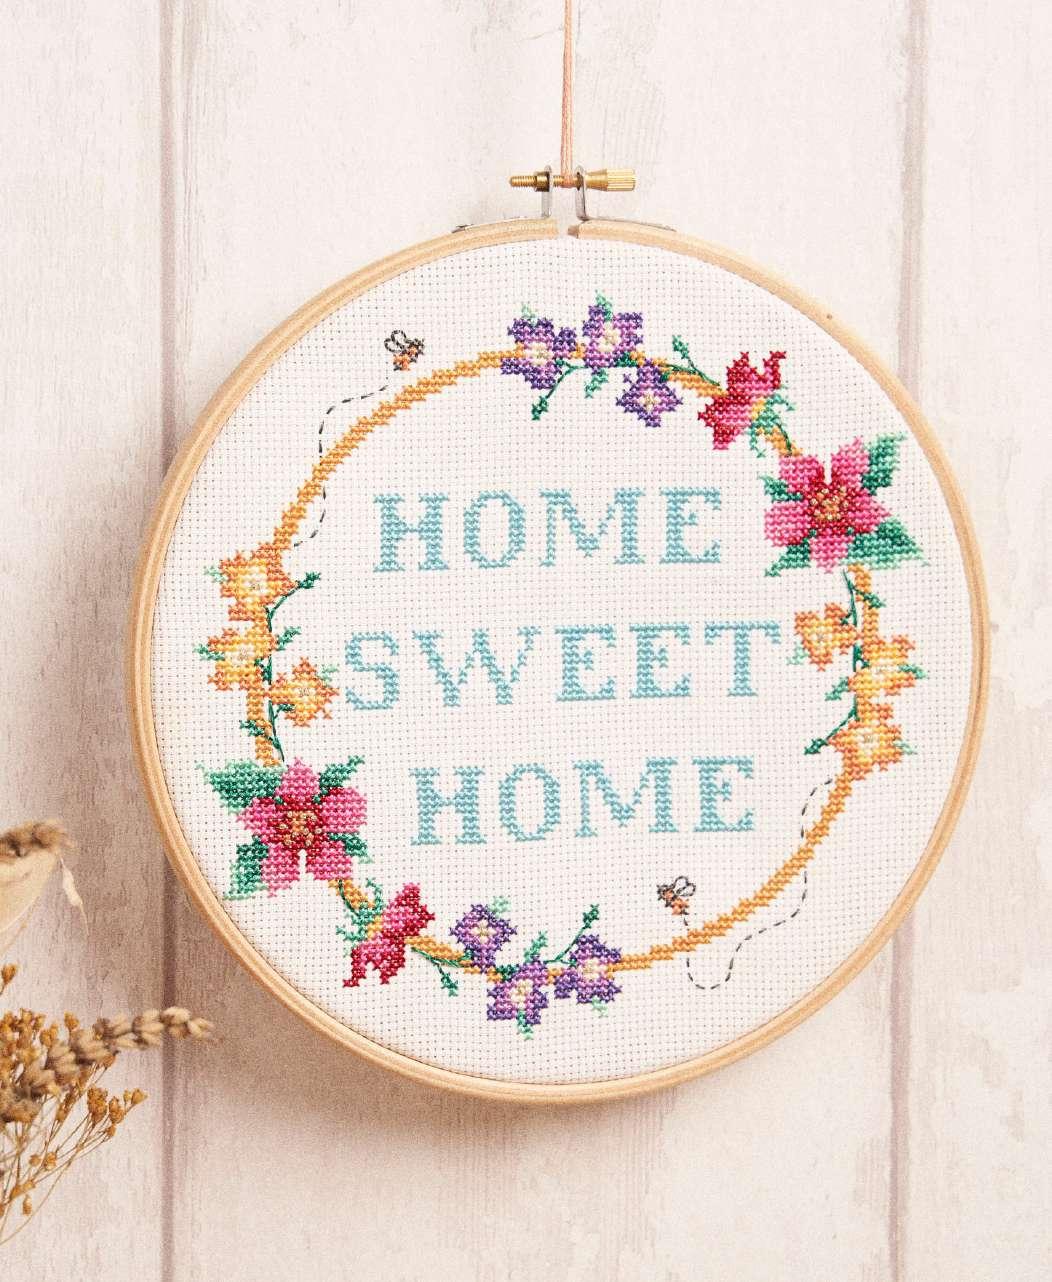
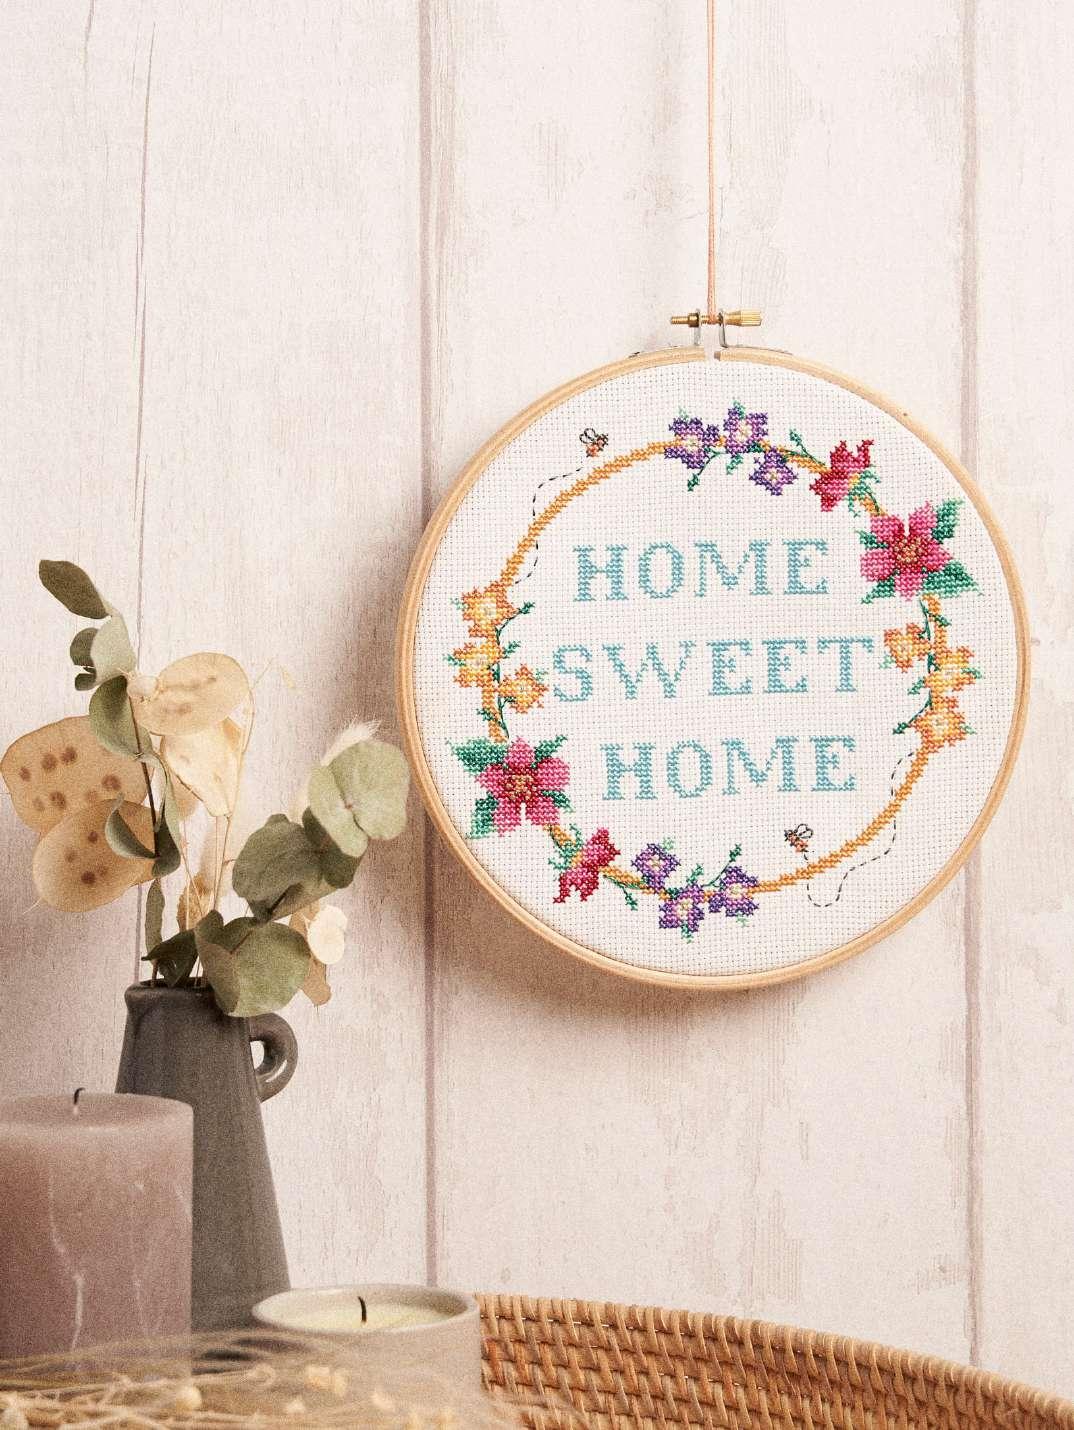
HOME SWEET HOME
78 Stitch Life
Home sweet home
Joanne Aston
Size on 14-count fabric: 18 x 18cm
YOU WILL NEED:
• 14-count white aida 38 x 38 cm
• Medium-sized hoop
• Tapestry needle, no. 24
• Scissors
STITCHES:
Cross stitch (see Stitch Library page 100)
3/4 cross stitch (see Stitch Library page 101)
Backstitch (see Stitch Library page 101) French knots (see Stitch Library page 105)
Introducing Anchor Marlitt thread:
Anchor Marlitt is a strandable 4 ply loosely twisted embroidery thread with a lustre second to none! It’s made from 100% Viscose rayon giving it a soft and silky touch and a spectacular high sheen. Available in 90 beautiful shades in 10 m skeins, Anchor Marlitt is suitable for all types of freestyle and counted thread embroidery and can be stranded down to a single Ply where necessary. The brilliance of Anchor Marlitt makes it an alternative to Stranded Cotton where additional sheen or lustre is required in a design.
Anchor Marlitt
THREADS : 00063 x 1
00815 x 1 00819 x 1 00832 x 1 00834 x 1 00846 x 1 00848 x 1 00858 x 1 00864 x 1 00894 x 1 01012 x 1 01053 x 1 01066 x 1 01069 x 1 01079 x 1
Anchor Stranded Cotton
Alternative to Marlitt 00100 x 1 00185 x 1 00189 x 1 00400 x 1 00313 x 1 00097 x 1 01003 x 1 00059 x 1 00292 x 1 00168 x 1 00187 x 1
00075 x 1 01046 x 1 00300 Metallic
STUDIO
ANCHOR
Home sweet home
GETTING STARTED
Centre the hoop securely over the fabric (see page 100).
The chart shown here is not to scale. Please download for accurate size.
80 Stitch Life
© MEZ Needlecraft GmbH 2021
KEY
A29ML18-00001 Counted DOWNLOAD CHART AND
81 Stitch Life ANCHOR STUDIO
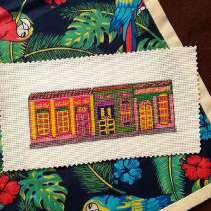
meet the designer...
Vivienne Powers
@the_vivsters
About me
The first thing I ever made was an owl cross stitch calendar at infant school. Since then, I have taught myself. I really got into cross stitch when I discovered MacStitch software, which gave me complete freedom to create. It helps me to achieve easy-to-follow charts using beautiful colours. I hated using graph paper because it was difficult to amend designs. I work at home in my studio, where I draw inspiration from watching wildlife in the garden. I also collect English stamps as I think they are perfect pieces of miniature art.
About my work
I love using bold colours and making charts that are easy to use. This means as few single stitches and fiddly bits as possible, and no more than 30 colours. For me, designs should be bright and have vivid colours that are perfectly balanced.
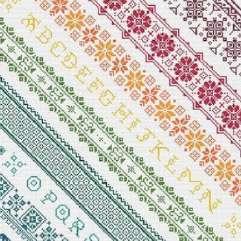
There are so many people who inspire me, such as Sanna Annuka, El Gato Gomez, Mary Blair, Georges Barbier, J.C. Layendecker and William Morris... but this is just scratching the surface.
www.etsy.com/uk/shop/Vivsters
82 Stitch Life
Vivienne
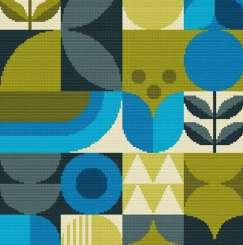
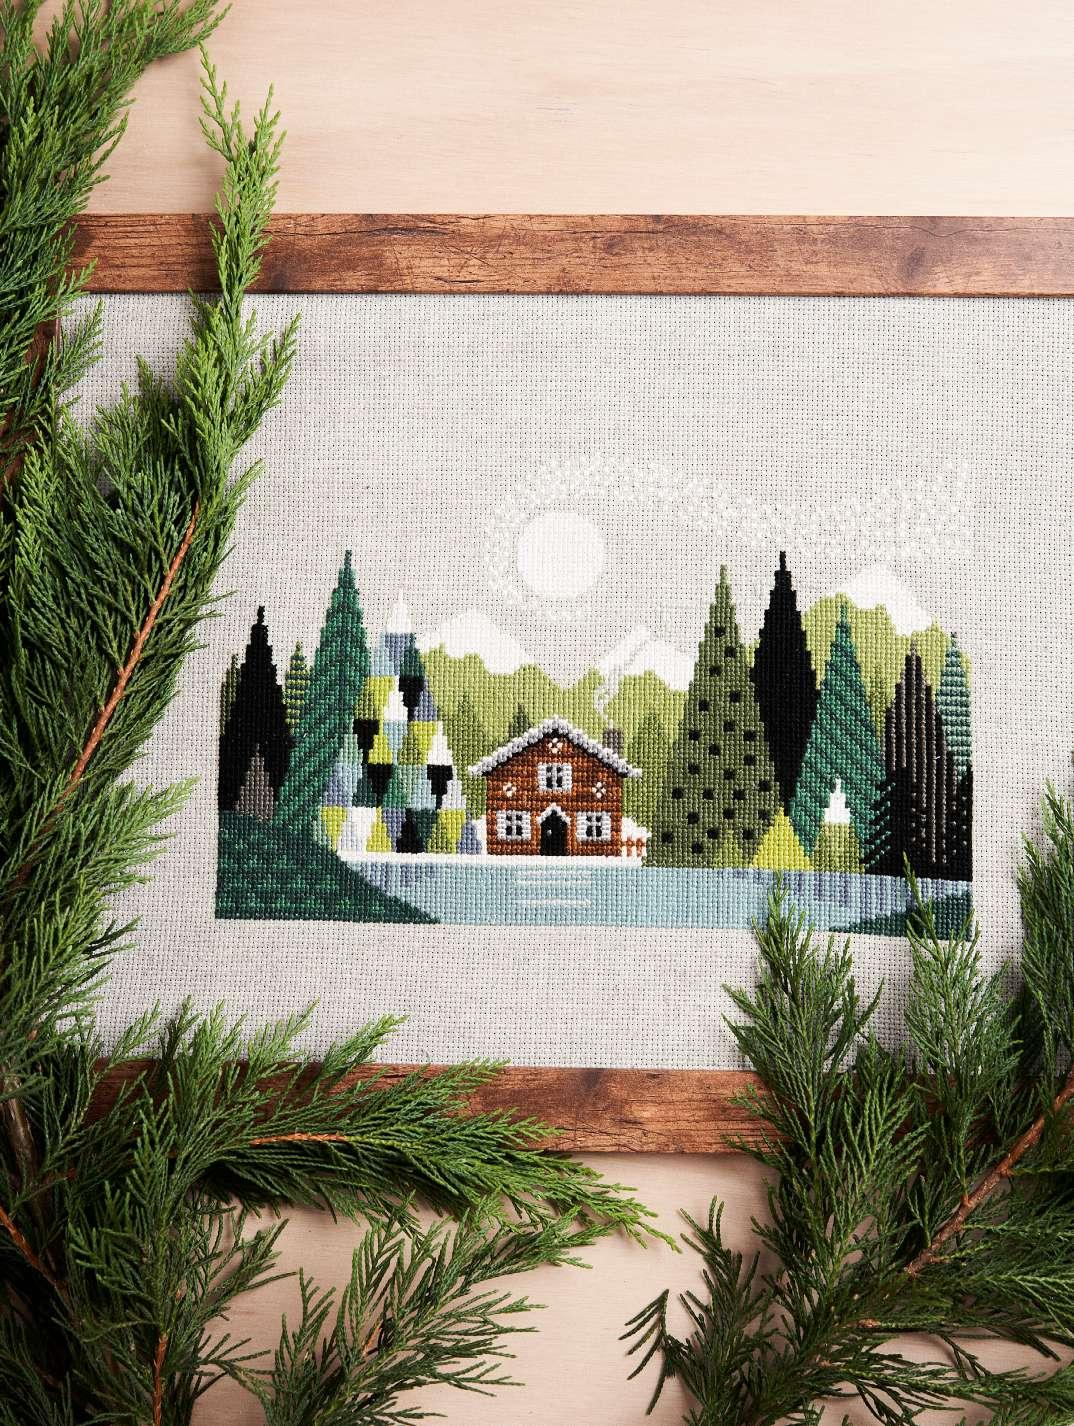
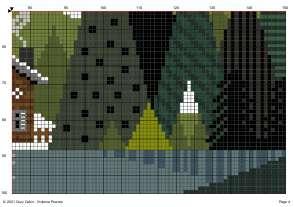
My project to make
COSY CABIN
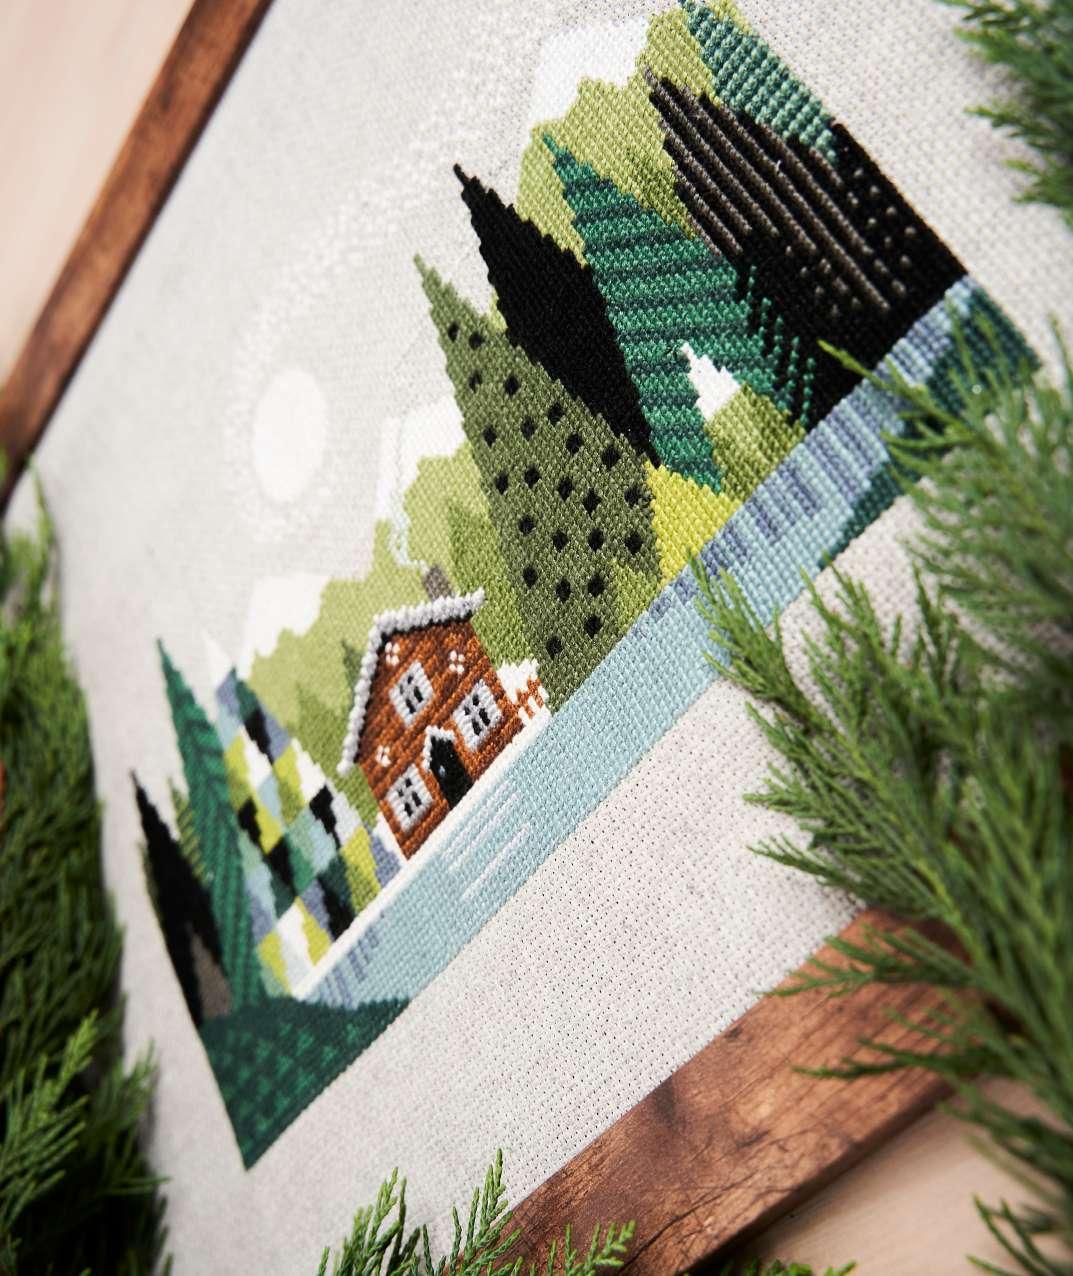
83 Stitch Life
CROSS STITCH
• Zweigart or Yorkshire aida or textured light-grey fabric to give the rustic look.
• Medium-sized hoop
• Round-end embroidery needle, no. 24
150 stitches wide x 100 stitches high
DESIGN FINISHED SIZE:
14 count: 10.7w x 7.1d inches (27.2w x 18.1d cm)
CANVAS SIZE:
Allow about 5 inches (12cm) all around the finished size for the frame.
THREAD/FLOSS:
Threads come in 6 strands. These should be divided into 2 sets of 3 strands for whole stitches and single strands for back stitches.
84 Stitch Life Cosy cabin
THREADS : Anchor Stranded Cotton 00310 x 1 00359 x 1 00273 x 1 00403 x 2 00861 x 1 00267 x 1 00266 x 1 00255 x 1 00216 x 1 00217 x 1
Vivienne Powers
STITCHES:
stitch (see Stitch Library page 100) Backstitch (see Stitch Library page 101)
• Scissors YOU WILL NEED:
Cross
00683 x 2 00922 x 1 00850 x 2 00001 x 2 00900 x 1 00235 x 1 00848 x 1
85 Stitch Life CROSS STITCH
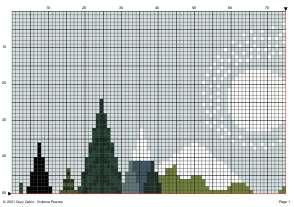
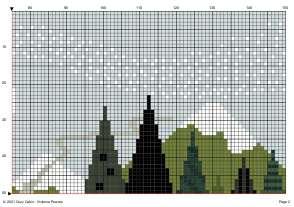
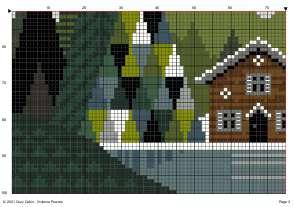
87 Stitch Life CROSS STITCH 11 22 33 44
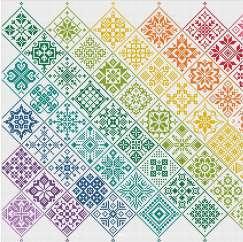
meet the designer...
Clare Bray
@climbinggoatdesigns
About me
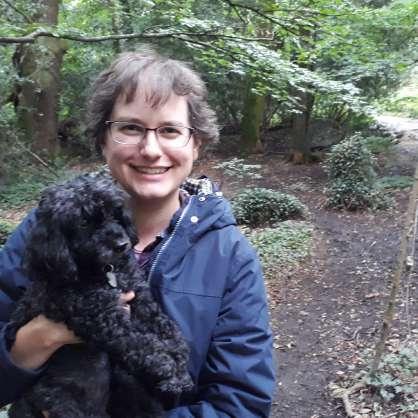
My name is Clare Bray, and I’m a cross stitch designer from Dorset in the UK. I design modern, colourful cross stitch patterns, stitchalongs, and cross stitch kits in a wide variety of themes, including pet memorials and animals, sport, bright rainbows, accurate astronomy, and Christmas, amongst many others. I’ve been crafting in some form since I was a child. In addition to making recycled cards, knitting clothes for my toys, and doing origami, I also did various children’s tapestry and cross stitch kits.

I got into cross stitch as an adult through my volunteer work for the charities Post Pals and Love Quilts UK, for whom I designed charity calendars. Love Quilts UK makes beautiful cross stitch quilts for seriously ill and disabled children in the UK. Each square is stitched by a volunteer cross stitcher and then quilted together by a volunteer quilter.
I spend most of my non-working time looking after and having fun with my wonderful elderly toy poodle Jessie. I love being outdoors in nature as much as possible, and I’m lucky enough to live near the beach and the New Forest on the south coast of England.
I draw my patterns digitally, which is something I really enjoy. Usually, I become completely absorbed in refining, changing, redrawing and tweaking the colours of a design until it’s exactly how I want it. For me, creating pictures is relaxing, creatively fulfilling, and a journey of discovery. Like all designers, I have far more ideas than I could ever produce. I also have a physics degree, so my passion for astronomy often flows into my designs.
About my work
I love to create colourful, modern designs that bring joy into people’s lives, and I’m lucky enough to do this from home while looking out on my beautiful garden. After getting involved with Love Quilts UK as a calendar designer, I inevitably wanted to cross stitch a square. Even though my own health was deteriorating rapidly, stitching a tiny bit of my square each day and seeing it grow made me feel like I was achieving something. After completing a few squares, I moved onto designing my own patterns for others, which set me on the path to opening my cross stitch design shop.
Cross stitching makes people happy, often in difficult times of their lives, and I want to be part of that as much as I can. I’m very inspired by some of my friends who are bedbound and much too ill to work. I find it tough to run a business whilst dealing with my long-term illness, but seeing them get through each day, year and decade whilst staying positive and loving is incredibly inspiring.
88 Stitch Life
Clare
“I love to create colourful, modern designs that bring joy into people’s lives”
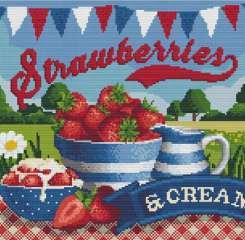
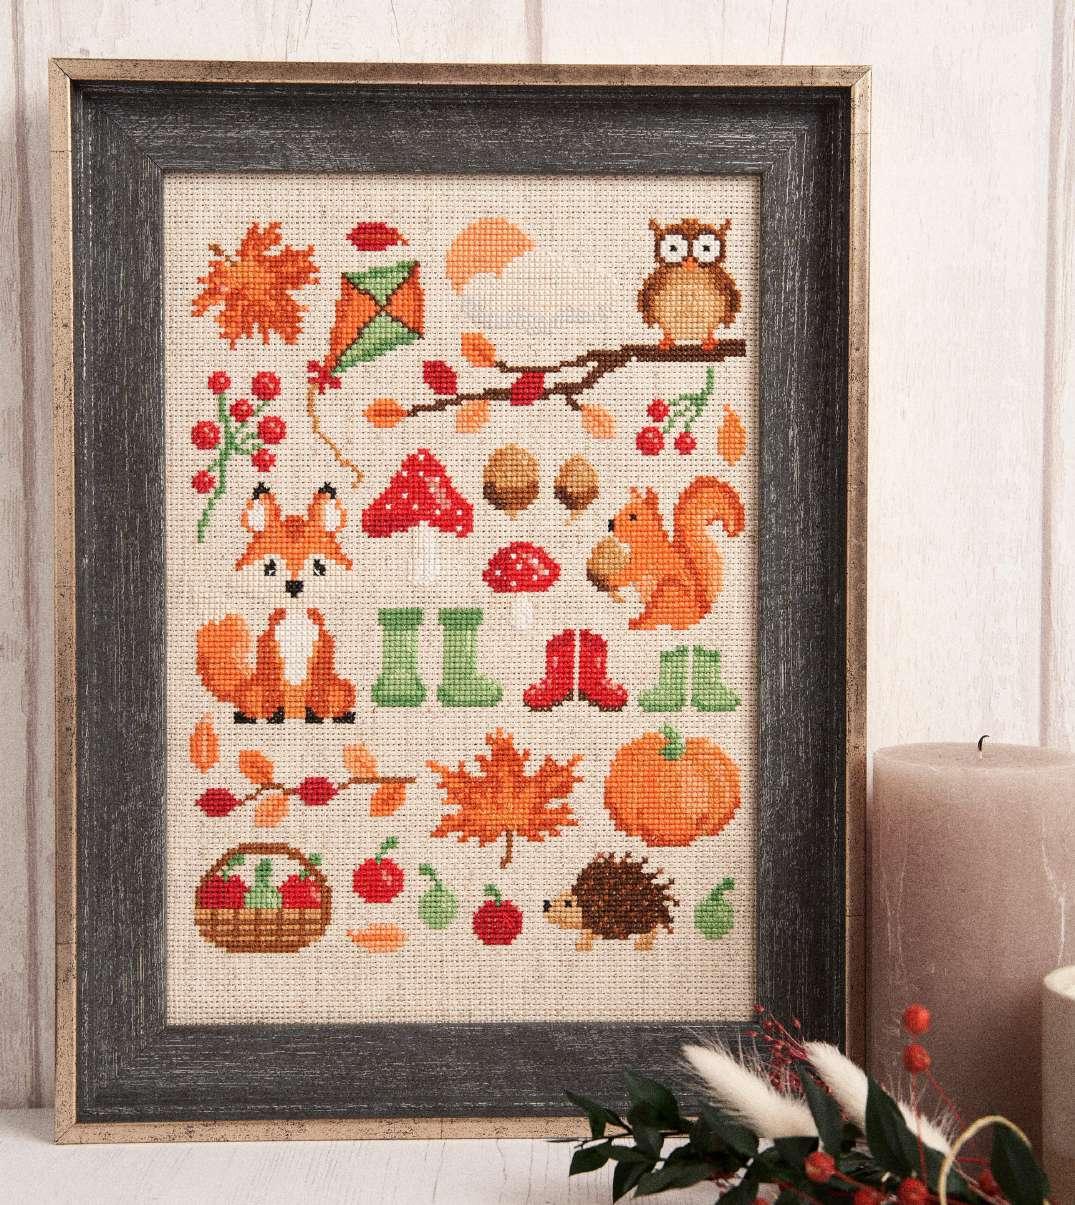
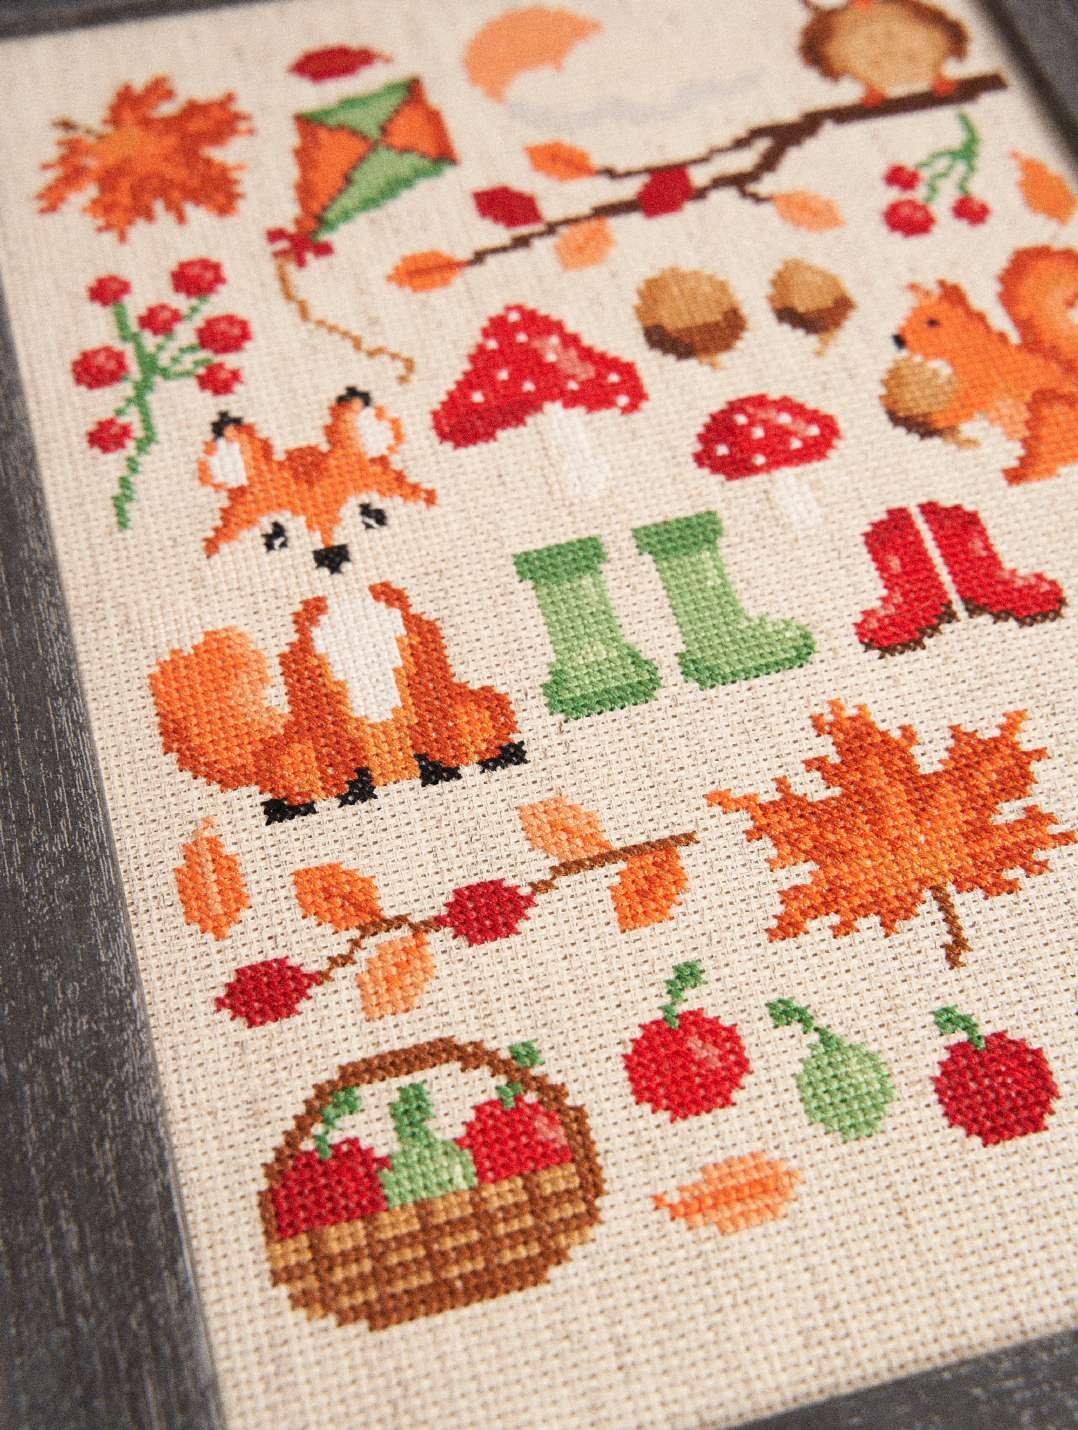
My project to make
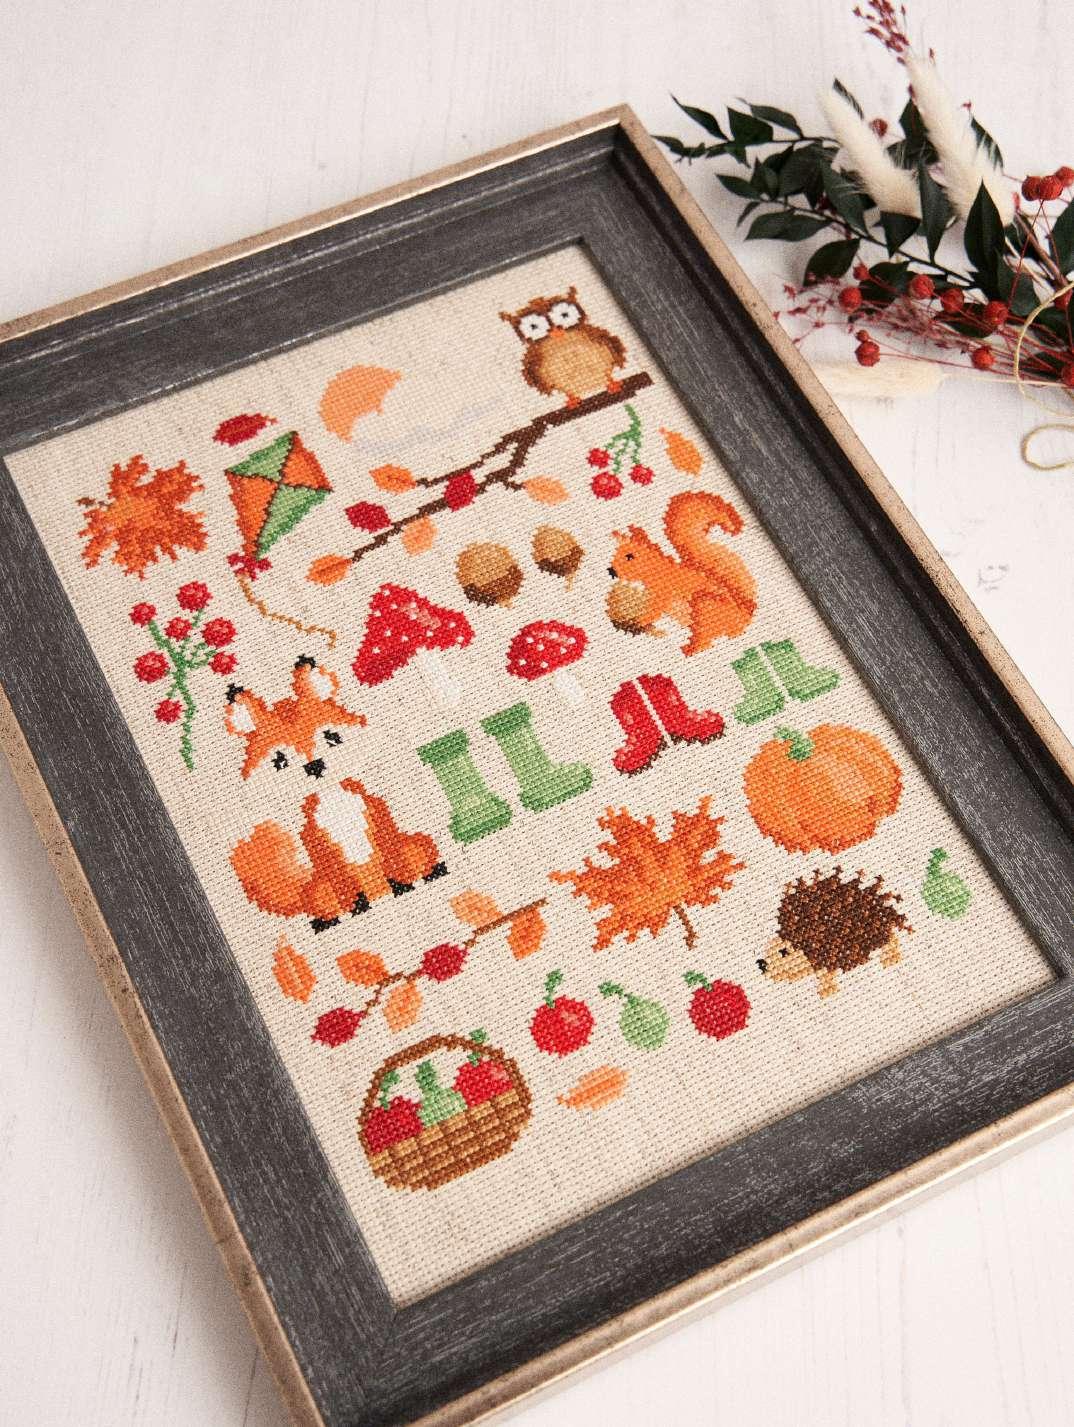
COLOURS OF AUTUMN
For this project, I wanted to create a cute and fun design that incorporates the colours and motifs of autumn. The design is based on the outdoor joys of
this season, with its rich colours, wildlife, fruit and, of course, crunching through those golden autumn leaves!
89 Stitch Life
CROSS STITCH
Colours of autumn
Clare Bray
SIZE:
Size in stitches: 101 x 134
Size on 14-count fabric: 7.21 x 9.57 inches or 18.32 x 24.31cm
YOU WILL NEED:
• 14-count aida cross stitch fabric
• Medium-sized hoop
• Round-end embroidery needle, no. 24
• Scissors
STITCHES:
Cross
(see Stitch Library page 100)
(see Stitch Library page 101)
90 Stitch Life
00002 x 1
x 1
1
1
1 00240 x 1
THREADS : Anchor Stranded Cotton
00010
00046 x
00047 x
00234 x
00242 x 1 00244 x 1 00310 x 1 00323 x 1
stitch
Backstitch
00324 x 1 00326 x 1 00330 x 1 00359 x 1 00362 x 1 00387 x 1 00403 x 1 01045 x 1 01046
91 Stitch Life CROSS STITCH
93 Stitch Life CROSS STITCH
meet the designer...
Tatiana Romero
@mimaletalila
About me
I am Venezuelan and live in Mexico City. I have been crafting since I was a child, but I started to cross stitch about 12 years ago when a co-worker introduced me to it. Since then, I have taught myself. I started by searching on the Internet for cross stitch tutorials and the best materials to use. I spent a lot of time reading instructions on designers’ websites and magazines. I practised a lot. All of my friends and family have some of my embroidery from those early days!
When I design, I do it in my small embroidery area, a minimalist space decorated with pale colours and with only a few things displayed. I like everything to be properly stored out of sight. I like to embroider on the living room sofa or on the bed listening to the TV.
I love nature. I have a photo album with pictures that I take of all the flowers, butterflies and animals that I see outdoors. I am also a bird watcher, and I like to walk and keep a written record of the birds that I’ve seen. I also like sewing and writing.
About my work
I work with cheerful, colourful palettes following modern and cosy designs that allow me to add new cross stitches to my designs. I believe that cross stitch can still be a part of modern crafts. I enjoy seeing how each stitch builds up the design. I love the details that make the skill of embroidery perfect. My style is focused on what I like to enjoy in my real life—nature—in harmonious and happy colours.
When I begin a new design, I focus on a motif and
the colours that represent it. I make a pencil sketch that I colour with crayons so that I can study the colours that I want to focus on. Finally, I take it to the digital design programme that I use. Throughout the process, I’m constantly correcting details.
Anything in nature that I think I can capture in cross stitch inspires me. When I first started, I was also captivated with Blackbird designs. I fell in love with the subtlety of their colour palette and the use of nature in their designs: www.blackbird-designs.com
94 Stitch Life
Tati
“Anything in nature that I think I can capture in cross stitch inspires me.”
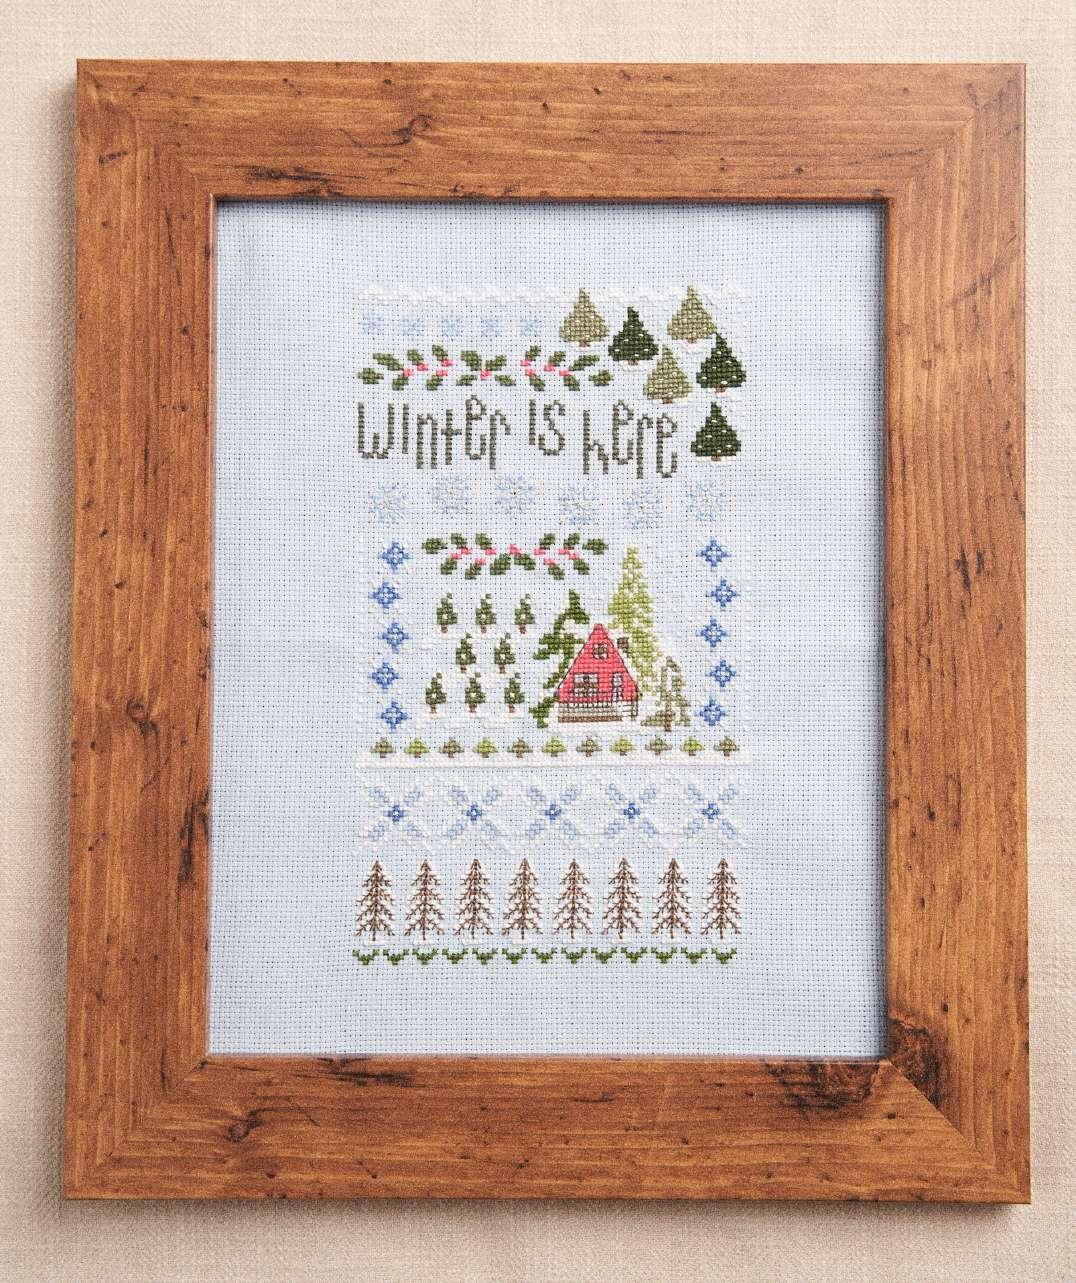
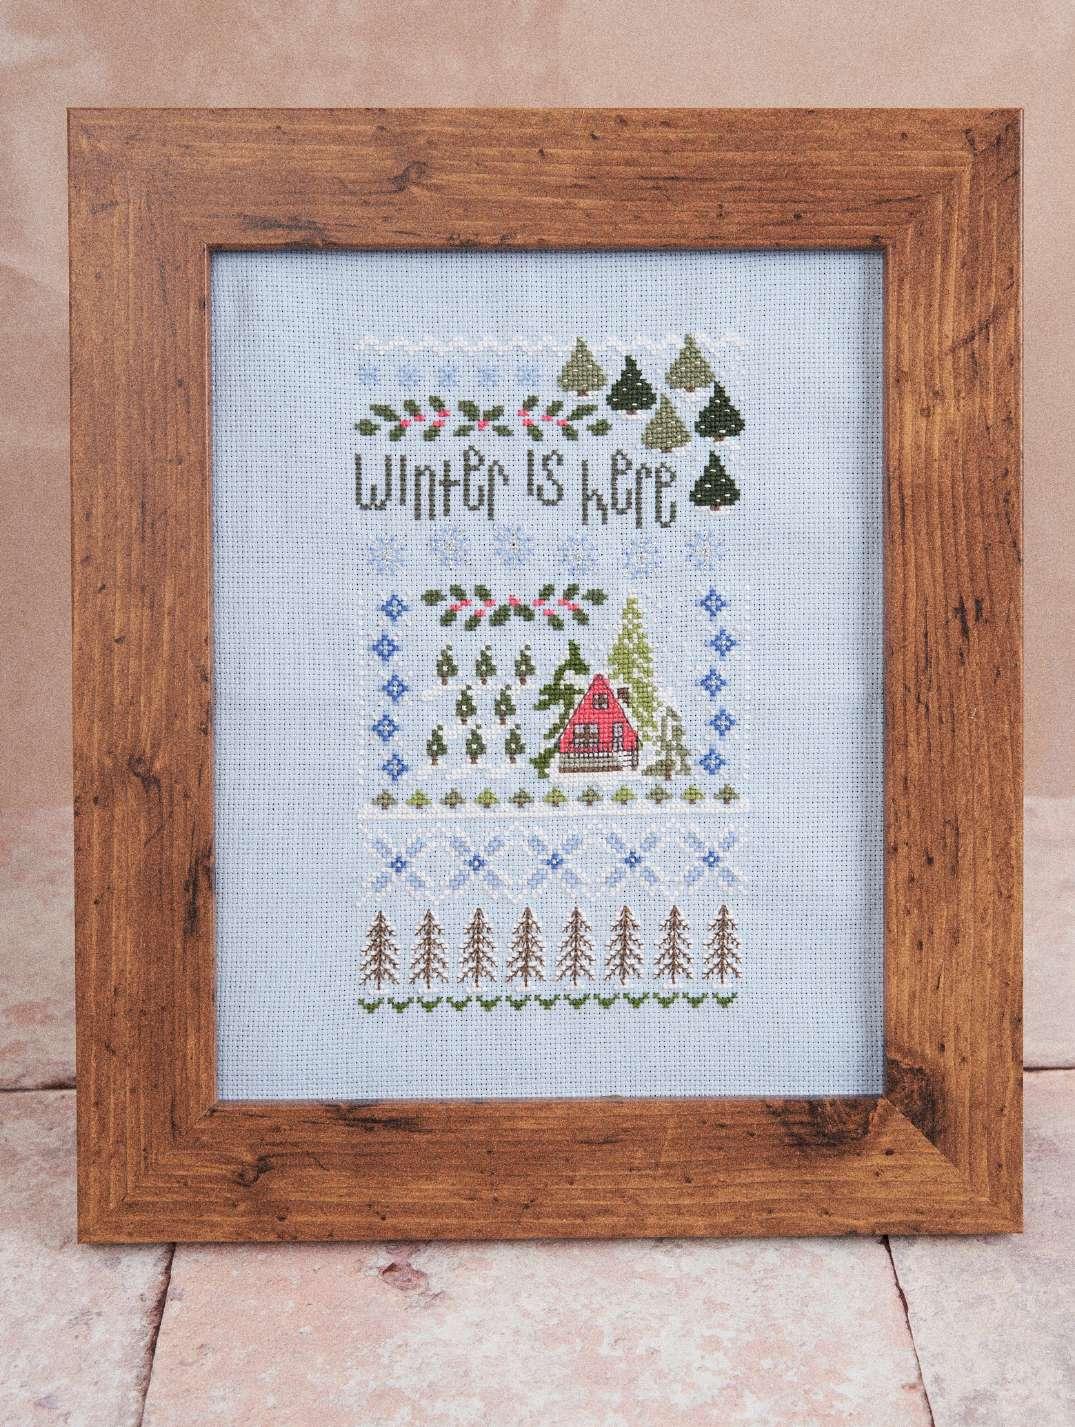
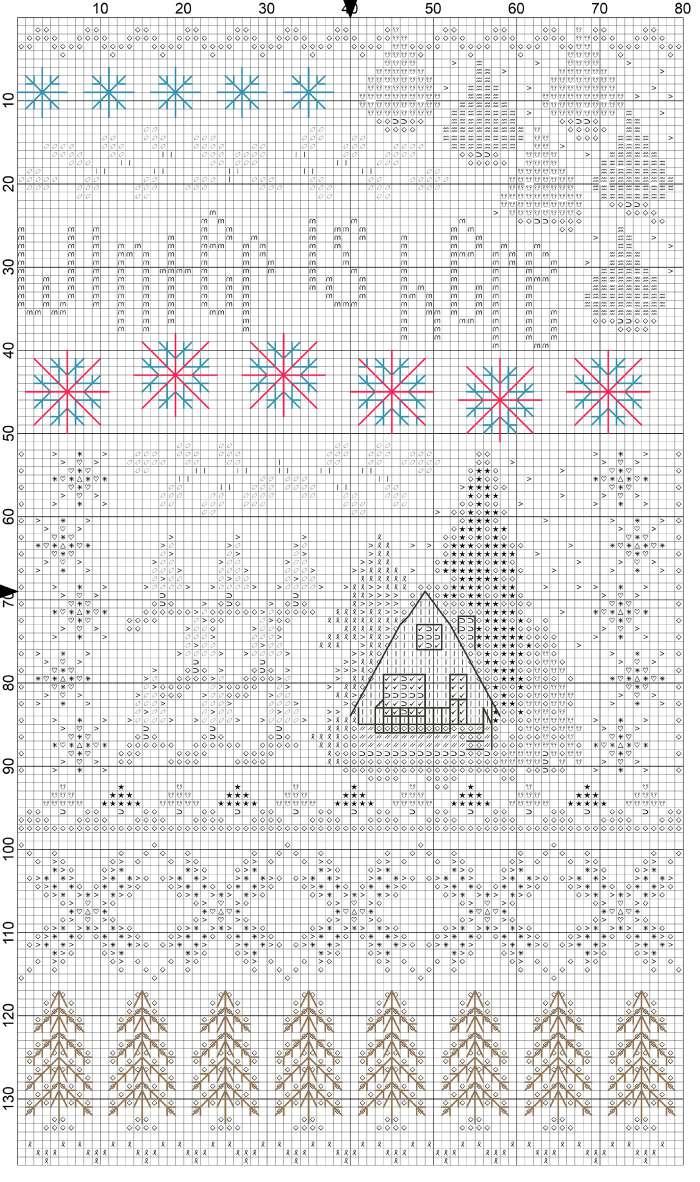
My project to make WINTER
IS HERE
95 Stitch Life CROSS STITTCH
Winter is here
SIZE:
Design area: 12.70cm x 21.74cm (5.00" x 8.56")
Stitches: 80 x 137 stitches
YOU WILL NEED:
• 25cm x 40cm (10" x 15") piece fabric 16-count aida, off-light-blue colour
• Medium-sized hoop
• Round-end embroidery needle, no. 26
• Scissors
STITCHES:
Whole cross stitch Backstitch (see Stitch Library page 101)
THREADS :
Anchor Stranded Cotton
00001 x 1 00028 x 1 00145 x 1 00147 x 1
00266 x 1 00268 x 1 00273 x 1 00860 x 1 00861 x 1
00862 x 1 00870 x 1 01037 x 1 01040 x 1 01086 x 1
Backstitch lines
00001 x 1 00145 x 1 01041 x 1 Anchor Lamé 00301 x 1
tip
I find it easier to leave the backstitch to the end. Then, finally, I make the stitches with metal threads.
Tatiana Romero
97 Stitch Life CROSS STITCH
GETTING STARTED
Centre the hoop securely over the fabric (see page 100).
The chart shown here is not to scale. Please download for accurate size.
DOWNLOAD CHART AND KEY
98 Stitch Life

99 Stitch Life CROSS STITTCH
GETTING STARTED WITH CROSS STITCH
The squares on a cross stitch chart correspond to the grid created by the holes in the fabric. Each coloured square represents a single cross stitch. Sometimes symbols are also included. Use the chart key to match the thread colours to the design.
Prepare your fabric by ironing it gently. Fold it in four to locate the centre. It is helpful to mark the centre with a pin or small stitch. Then, find the centre square of your chart. This is where you should begin stitching. One square of the chart represents one stitch of the design.
Use a frame or embroidery hoop to keep an even tension while sewing.
Cut the thread to no more than 50cm in length. Anchor Stranded Cotton embroidery thread is made up of six individual strands. Separate the number of strands needed as indicated on your chart.
Work stitches of the same colour close together and do not move to areas that are more than 2.5cm away. Work sideways—from left to right or right to left—and always stitch and complete the cross in the same direction. Complete the cross stitches and then add backstitch if shown on the chart.
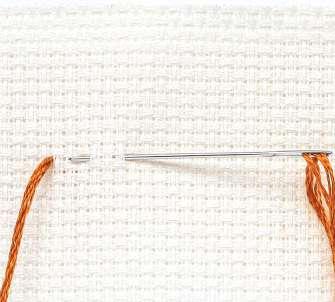
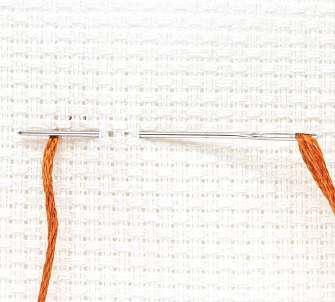
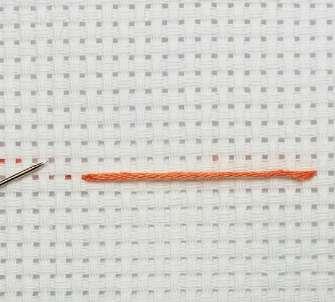
How to sew cross stitch
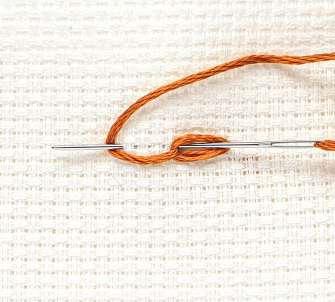
1. Cross stitch is worked in rows going from left to right. Beginning at the back of the fabric, bring your needle up through a hole towards the front. Then pass your needle through a hole diagonally opposite from where you started. This makes a half-cross stitch (/). Make a second half-cross stitch by bringing the needle back up through the hole that is directly below the one you last used. Continue stitching along the row.
100 Stitch Life
1
[3] [4] [11] [10] [8] [13] [14] [4] [5] [11] [8]
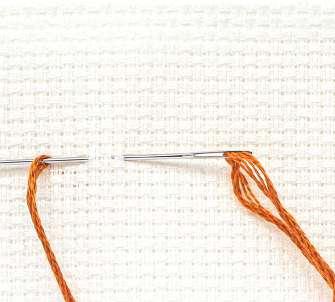
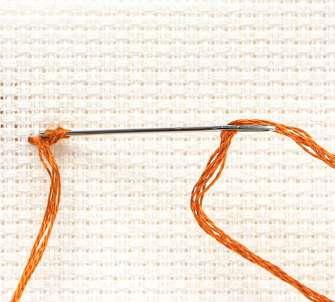
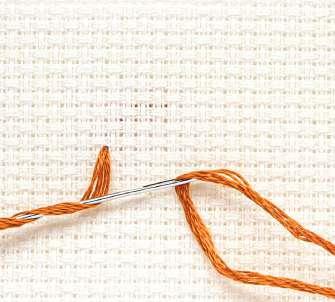
2. Return back along the row to make a series of half-cross stitches in the other direction.
2
Fractional stitches
Cross stitch

Half-cross stitch ¾ cross stitch ¼ cross stitch
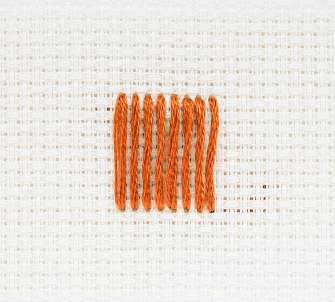
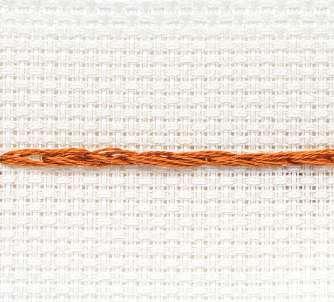
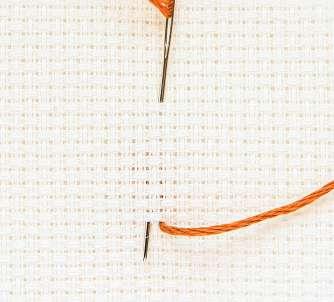
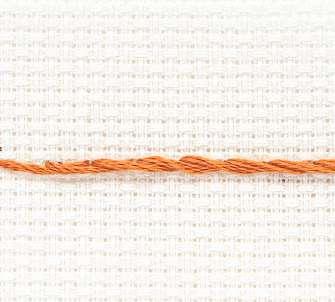
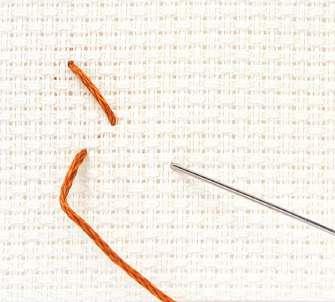
How to sew backstitch
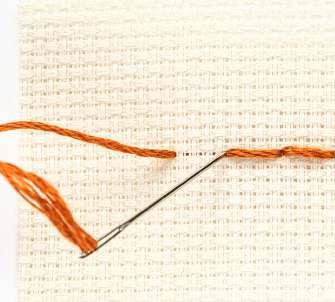
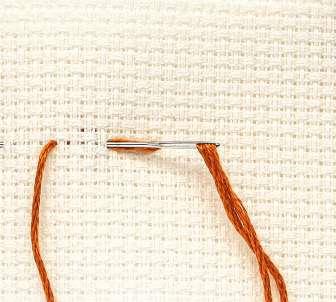
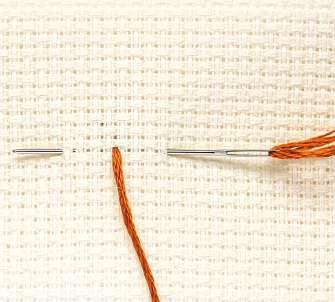
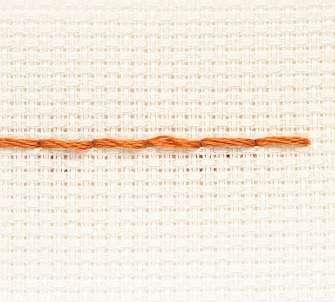
Backstitch is a single line of stitches used to add definition to patterns and shapes. Stitches are usually worked within the main holes of the fabric, but if you need to outline a shape in a smaller area, you can make smaller stitches through the weave.
101 Stitch Life
PUNCH NEEDLE PUNCH NEEDLE STITCH LIBRARY
CROSS STITCH STITCH LIBRARY
GETTING STARTED WITH FREESTYLE
Iron the fabric and place it over the printed pattern. Trace the design using a pencil or water-soluble fabric marker. Laying it onto a lightbox or against a window will help you to see the design clearly through the fabric.
Use a frame or embroidery hoop to maintain an even tension on your fabric while stitching. Ideally, stitch with a 50cm length of thread. Anchor Stranded Cotton thread is made up of six individual strands. Separate as required to use the number of strands stated on the chart/key.

Backstitch
This is a single line of stitches used to add definition to patterns and shapes.
Follow the chart and key, placing the various colours and stitches. Work stitches of the same shades that are close together at the same time. Do not move to areas that are more than 2.5cm away as this makes subsequent stitching difficult and the thread may show through. Ensure that you completely cover the drawn design on the fabric when stitching as this may also show through.
Follow the step-by-step photos to complete your freestyle embroidery projects.
102 Stitch Life
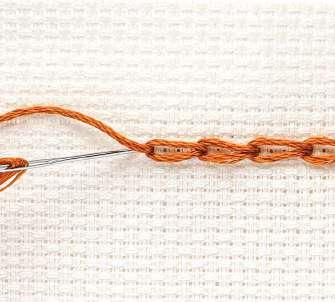
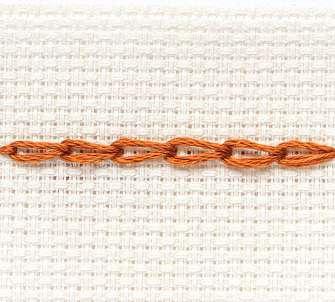
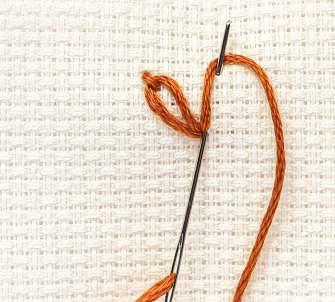
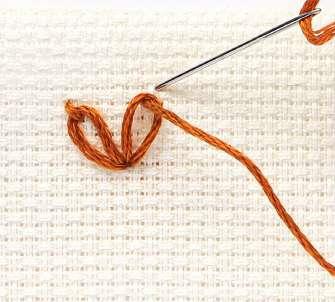
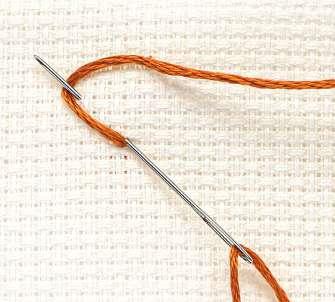
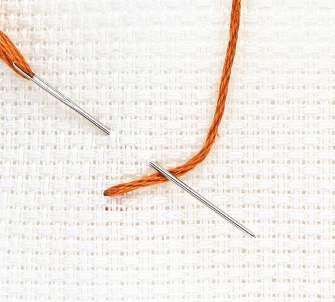
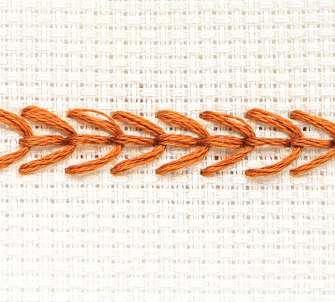
Chain stitch
Chain stitch is a series of loops that form a chain-like pattern.
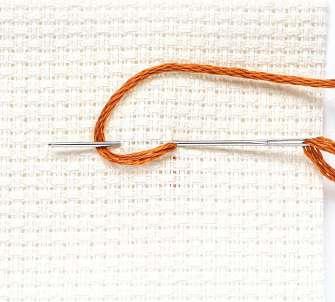
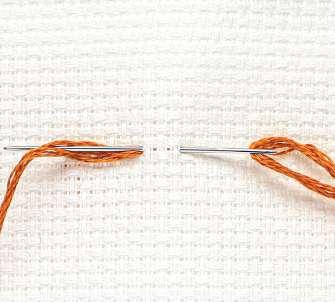
Split stitch
In split stitch stitching, the needle splits the thread of the previous stitch before it, creating the next stitch.
103 Stitch Life
PUNCH NEEDLE STITCH LIBRARY CROSS STITCH STITCH LIBRARY FREESTYLE
Satin stitch
Work a series of parallel straight stitches to completely fill an area.
104 Stitch Life
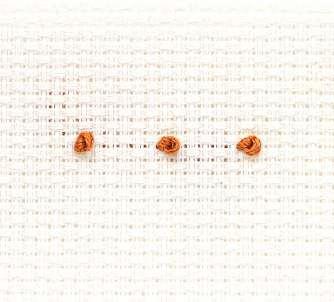
French knot
French knots are small, dot-like stitches that look like small beads.
Stem stitch
This stitch is often used to outline shapes or create strong lines.
105 Stitch Life
PUNCH NEEDLE STITCH LIBRARY CROSS STITCH STITCH LIBRARY FREESTYLE
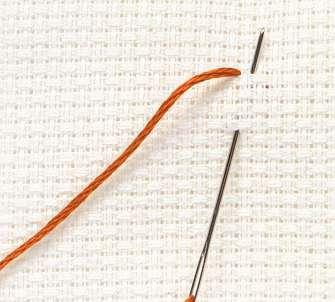
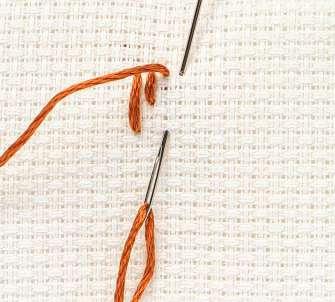
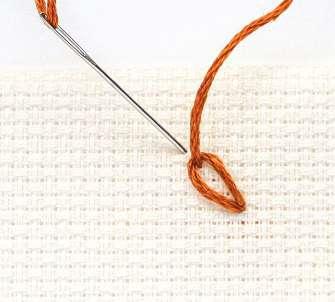
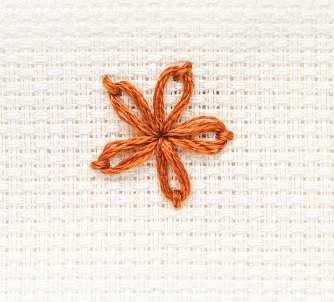
Lazy daisy stitch
Worked in a similar way to chain stitch, lazy daisy is also known as detached or single chain stitch.

Long and short stitch
Combine long and short stitches to fill in a shape and blend colours
106 Stitch Life
Straight stitch
Straight stitches can be arranged in groups to make simple shapes, such as flowers, leaves and geometric designs.
107 Stitch Life
PUNCH NEEDLE STITCH LIBRARY CROSS STITCH STITCH LIBRARY FREESTYLE
Fly stitch
Also known as Y-stitch, fly stitch can be worked in rows or individually.


Seed stitch
Evenly scatter small straight stitches to fill an area.
108 Stitch Life
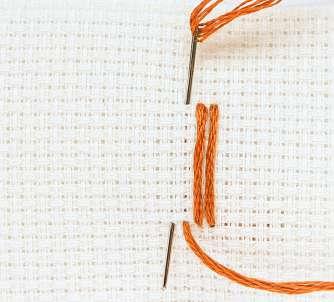
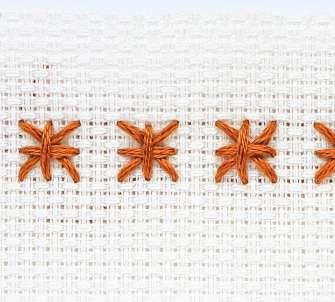
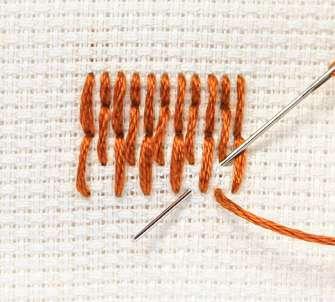
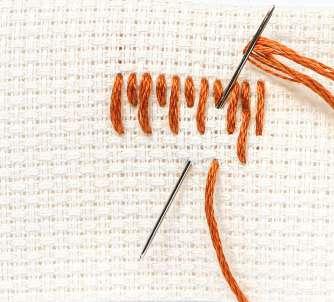
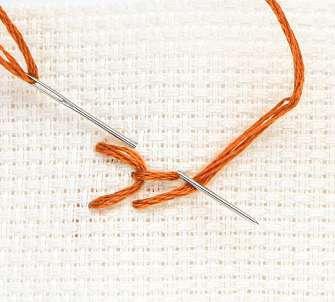
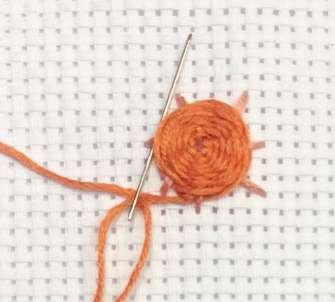
Woven wheel stitch
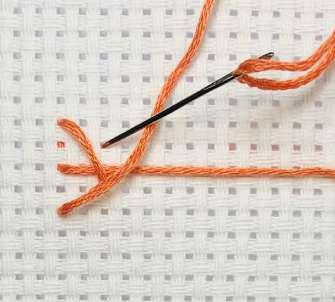
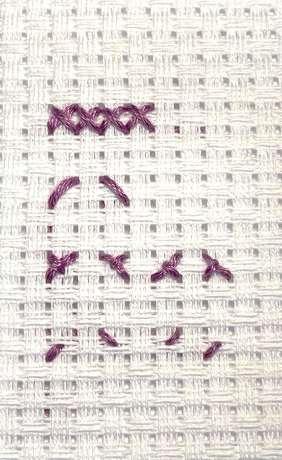
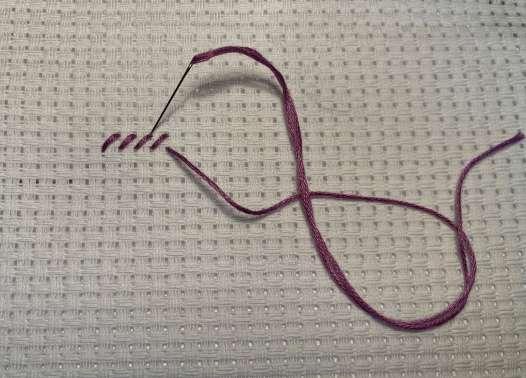
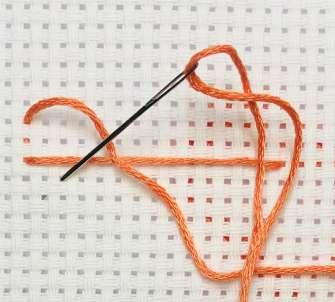
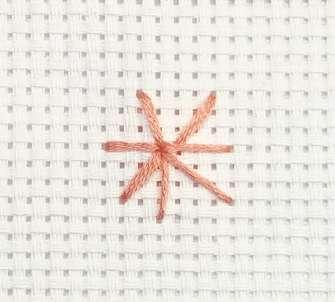
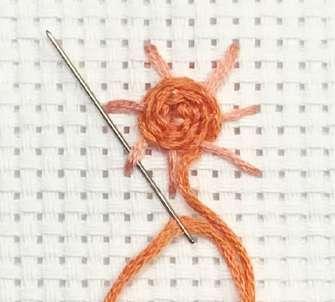
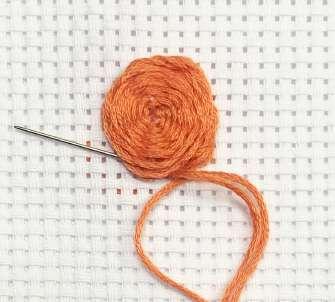
Sometimes called woven rose stitch, the weaving can be done very tightly to create thick, built-up petals, or it can be woven loosely for a softer, flatter effect. Begin by making an odd number of spokes of a wheel using straight stitch. Then, weave around, in and out of the spokes until the area is full.

Fishbone stitch
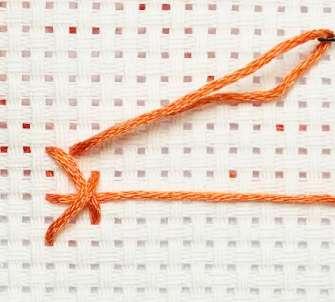
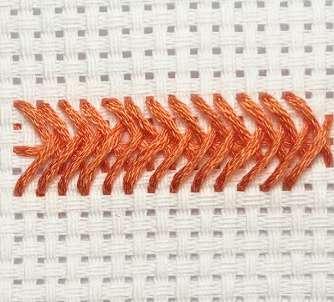
Ideal for making leaves or feathers, these stitches cross each other at the centre, creating a dense middle section. Begin with a single straight stitch to mark the centre and then work diagonally from either side, crossing over the centre stitch until the area is filled.
109 Stitch Life
PUNCH NEEDLE STITCH LIBRARY CROSS STITCH STITCH LIBRARY FREESTYLE
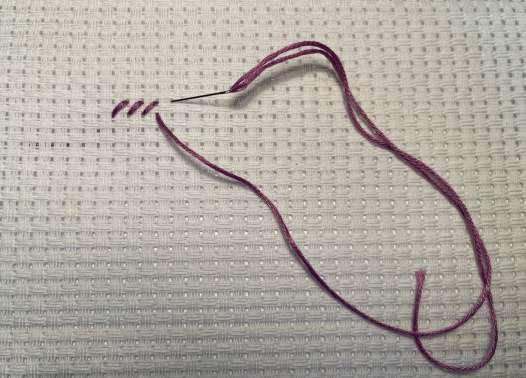
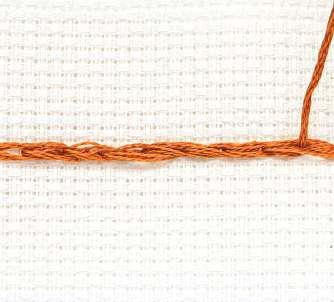
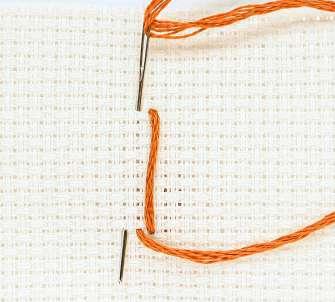
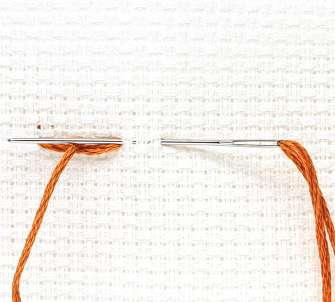
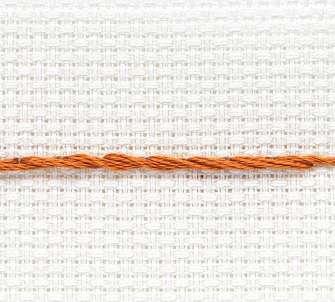
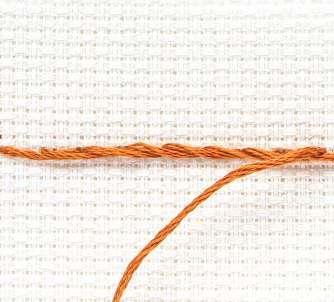
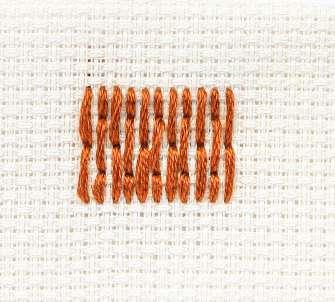
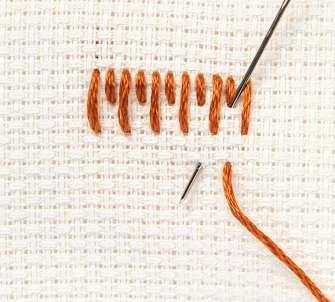
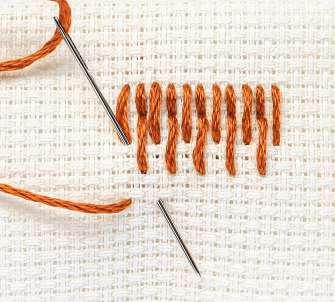
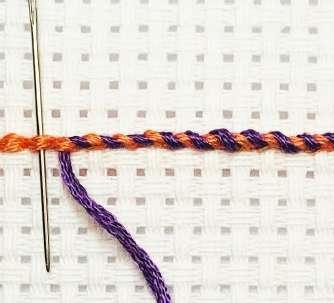
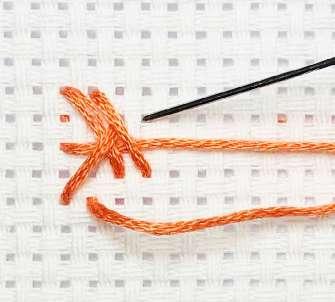
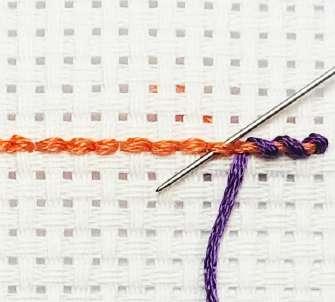
Whipped backstitch
This creates a well-defined, smooth line, ideal for lettering and outlines. Start by creating a line of backstitch and then weave in and out with a second piece of thread.
110 Stitch Life
PUNCH NEEDLE STITCH LIBRARY CROSS STITCH STITCH LIBRARY FREESTYLE
Contact Us
Website: https://anchorcrafts.com/en Facebook: https://www.facebook.com/anchorcrafting/ Instagram: https://www.instagram.com/anchorcrafting/ Pinterest: https://www.pinterest.pt/anchorcrafting/_created/
Find a store: https://anchorcrafts.com/en/store-locator
Contact us: https://anchorcrafts.com/en/contact
111 Stitch Life
Stitch Life
anchorcrafts.com
