How to color-match self-striping yarn when starting a new ball KNIT
...to K, is to Knitting with Fibra Natura
How to convert a knitted sweater pattern into a cardigan
Knitting a bobble stitch cardi
Get to know your yarn before you start knitting
KNITmuch
EDITOR-IN-CHIEF, ART DIRECTOR
Carla A. Canonico Carla@KNITmuch.com
ADVERTISING SALES
John De Fusco John@KNITmuch.com
PUBLISHER
A Needle Pulling Thread
PHOTOGRAPHERS
Carla A. Canonico, John De Fusco, Contributors
BLOGGERS/CONTRIBUTORS
Michelle Porter fondlepatterns@sympatico.ca
Cristina Simionovici cris.sim@gmail.com
Cynthia MacDougall ktogdesign@gmail.com
GRAPHIC DESIGN
Carla A. Canonico Carla@KNITmuch.com
Sondra Armas Sondra@KNITmuch.com
SOCIAL MEDIA and WEB
Maria Corina Guillen Joaquin Rojas
WEBSITE / BLOG : KNITmuch.com
Facebook : KNITmuch
Pinterest : knitmuch Twitter : @KNITmuchmag
WHERE TO GET YOUR COPY
KNITmuch is a quarterly eMagazine published by A Needle Pulling Thread. It is available free for personal use online at KNITmuch.com
A limited number of printed copies of KNITmuch are available for purchase at select yarn shops and specialty stores. Ask for it at your local shop. KNITmuch is not available by subscription.
YARN SHOPS
If you are interested in carrying KNITmuch in your store, please email John@KNITmuch.com
EDITORIAL
Bloggers, designers, and other contributors who would like to be considered for future issues please email Carla@KNITmuch.com with a brief description of your work and your proposed project.
No part of this publication may be reproduced without written permission from the publisher.
All designs, patterns, and information in this magazine are for private, non-commercial use only, and are copyrighted material owned by their respective creators or owners.
KNITmuch
...to K, is to
Knitting a bobble stitch cardi 9 How to knit the bobble stitch
10
11
Knitting the Roberta Bobble Cardigan | progress and project notes
Knitting 2 yarns held together and deciding on the button band
12 5 things I learned knitting the Roberta Bobble Cardigan
14 How to convert a knitted sweater pattern into a cardigan
16 PRO TIP: Get to know your yarn before you start knitting!
19 Do I need to color-match my self-striping yarn when starting a new ball?
22 How the 3-needle bind-off is still the best for joining these seams
24 Finishing the conversion of a knitted winter pullover into a spring cardigan
26
Fibra Natura Kingston Tweed | Learning more about this yarn
27 Fibra Natura Kingston Tweed | Swatching for the lacey Arum Shawl
28 The Arum Shawl | Knitting a lace pattern
29
Fibra Natura Kingston Tweed | A lifeline for knitting lace
30 Blocking a lacey shawl makes the shawl spectacular!
Dear Knitting Enthusiasts,
Welcome to the Summer 2024 edition of KNITmuch!
editor's letter
As the sun shines brighter and our days grow warmer, we find ourselves inspired by the possibilities of new projects. This issue is all about embracing the intricate beauty of bobble stitches and the elegance of lace, with a special focus on the versatile Fibra Natura Kingston Tweed yarn and UNIVERSAL YARN Penna and Cotton Supreme Waves.
In this edition, we delve into doubleknitting with our comprehensive guide, perfect for creating reversible, practical, and beautiful fabrics. Adding to the fun, our step-by-step instructions on knitting a bobble stitch cardigan will help you create playful textures effortlessly.
Follow along with our detailed notes and tips as we knit the charming Roberta Bobble Cardigan, covering everything from yarn choices to personal insights. Additionally, explore the knitting technique with two yarns held together for added texture and depth, and learn how to select and attach the perfect button band.
Discover the lessons from knitting the Roberta Bobble Cardigan, helping you avoid common pitfalls and achieve stunning results. If you want to transform a favorite sweater pattern into a cardigan, our easy-to-follow conversion guide will show you how. Understanding your yarn can make all the difference, so we share tips on getting acquainted with your yarn for the best knitting experience.
We also address whether you need to color-match selfstriping yarns and how to seamlessly transition between yarn balls. The 3-needle bind-off remains a favorite for joining seams securely and neatly, and we explain why this technique is unbeatable. Our detailed guide will also help you convert a cozy winter pullover into a light, breezy spring cardigan. Get to know the unique qualities of Fibra Natura Kingston Tweed and why it’s perfect for your summer knitting projects. Discover the importance of swatching, especially when working with lace patterns like the Arum Shawl. Lace knitting can be a rewarding challenge, and we provide a detailed guide to help you master the lacey Arum Shawl. Learn how to use a lifeline when knitting lace to save your work from potential mishaps and finish your projects beautifully with our guide to blocking a lacey shawl.
As always, we aim to bring you inspiration and knowledge to fuel your passion for knitting. Whether you’re a seasoned knitter or just starting, we hope this issue offers something special to enhance your summer knitting journey.
Happy knitting!
Cheerfully,
Knit Together
with Cynthia MacDougall
double-knitting
Cynthia MacDougall
Knit Together Design Studio
PO Box 562 Stn Main
Orillia, ON L3V 6K2 ktogdesign@gmail.com
ravelry name: macknitnow
Double-knitting is a type of knitting that produces a two-layer fabric which, when worked with two colours of yarn, creates a reversible fabric with a positive image on one side (light-on-dark), and a negative image on the opposite side (dark-on-light).
Double-knitting can be worked by knitting the knit stitches and slipping the purl stitches to work one side of the fabric, then working the row again, purling the stitches that were slipped on the first pass, and slipping the stitches that were knitted on the first pass. Alternatively, the two layers can be made at the same time by knitting the stitches of the layer facing the knitter, and purling the stitches of the other layer. Both methods seem to grow slowly, but once the rhythm of the knitting becomes comfortable, this form of knitting is enjoyable and rewarding. The reason double-knitting seems to grow slowly in the slipped stitch method is because each row is worked twice – once for the knit side and once for the purl side. In the both-sidesat-once method, it is because the yarn is taken from front to back before each knit stitch and from back to front before each purl stitch.
Tension with double-knitting is often different than it is for single-layer stocking stitch fabric, so it is advisable to create a swatch ahead of time
to find out how double-layer knitting will affect your tension. For example, a worsted weight yarn normally has a tension of 20 stitches to 4" [10cm] with 7US [4.5mm] needles, however the tension given in one pattern is 14 stitches to 4" [10cm] on 6US [4mm] needles. The reason the tension expands is partly due to the way the yarns interconnect during the making of the fabric.
The slip stitch method of double-knitting can be used to make a tube on two needles. If the fabrics are left open at the top, a pocket can be formed.
Double-knitting can also be used to work reversible, two-colour patterns, either flat, or in the round. At the point where the colours change, the fabrics "lock" together. Where the next colour change occurs, the fabrics again lock together.
This square is part of an afghan. The number of stitches had to be reduced in order to have it match the width of the other squares. The square was made on two needles using the same method as the oven mitt rather than the slip stitch method.
The grey square is the reverse of the white square.
When learning double-knitting, it is best to begin with a very simple design, such as a three-stitch check, so that the design can be easily seen and errors readily identified.
Any black-and-white chart can be used to make two-colour double-knitting. When I work double-knitting in two colours, I like to think of each square as a "unit" with one light and one dark component. When working the light square, the light colour "leads", forming a stitch on the "right" side, followed by the dark colour, which forms the matching stitch on the "wrong” side. Likewise, when working a dark square, the dark colour "leads", and the light colour follows. When finished, the side of the fabric that faces the knitter (facing side) will match the appearance of the chart, and the "away" side of the fabric will be the negative of the chart.
Shaping can be done on double-knitting – the oven mitt project in this issue has increases for the thumb gusset, and decreases at the top of the fingers. When working increases and decreases, the important things to remember are that the increases or decreases must be worked on both sides of the fabric, and that they should be worked the same way as the stitches are knitted: with the increase or decrease worked on the side facing the knitter, then on the "away" side. When working decreases, the stitches have to be slipped and arranged into pairs so that two stitches can be knitted on the "facing” side, and on the "away” side.
Casting off double-knitting can be done in several ways. For the oven mitt, the "pinhole" cast off is used: Break the yarns and thread each colour into a separate tapestry needle or bodkin. Slip the knit stitches onto the bodkin with the knit colour and the purl stitches onto the bodkin threaded with the purl colour. Draw the yarns up tightly and weave in the ends.
Make sure that the layers are stitched together.
If the cast off will be worked into a seam, the stitches can be cast off with a single colour of yarn. Choose one colour of yarn for the cast off. Break off the other yarn colour for weaving in later. With the chosen colour, knit two stitches (one unit) together (or knit them together through the back of the loops). Knit the next unit the same way, then slip the first stitch on the right needle over the last one made. This makes a very firm cast off with little elasticity.
A looser method of cast off is made using both colours. Working the same way as for the body (moving the yarn back and forth as needed), knit the first stitch in the appropriate colour, then purl the second stitch in its respective colour. Cast the first stitch off in the usual manner. *Knit the next stitch in its colour, then pass the first purled stitch over the knit one just formed on the right needle.
Increasing and Decreasing in Double-Knitting
Purl the next stitch in its colour, then pass the knit stitch on the right needle over it. Continue from * to the end of the row or round.
There are other ways to cast off in double-knitting, but either of the two methods described above will work for most projects.
Extreme Double-knitting: New adventures in reversible colourwork, Alasdair PostQuinn, Cooperative Press, 2011
The thumb gusset of the oven mitt is made using M1 increases. When the unit before the increase is completed, pick up the bar between the last-worked and next stitch on the facing side of the work, Photo 1. Insert the needle tip into the loop as if to knit it, and knit the loop, Photo 2
Make the purl increase: Turn the work toward you and locate the bar between the last-worked and next stitch on the "away" side of the work and put it onto the left needle, Photo 3. Purl the loop through the back of the stitch, Photo 4
To make a decrease, the stitches of two units need to be re-arranged. Slip three stitches (two stitches of the first unit, and one stitch of the second unit) onto the right needle, Photo 5. Catch the back of the middle stitch (an “away side” stitch) with the tip of the right needle (Photo 6), and put it on the left needle. Catch the dropped stitch (a “facing side” stitch) with the tip of the right needle, Photo 7. Slip the two facing side stitches back onto the left needle, Photo 8
Knit the two facing stitches together, then purl the two “away side” stitches together.
Double-knitting is a subject that can fill a book. There are many ways of working cast ons and cast offs. It can be used to make tubes, or extra-thick layers of cloth. There are even ways to make letters come out so they are legible from the facing and the ‘away’ sides of the fabric. Double-knitting takes a little practice, but it’s an enjoyable technique worth adding to your knitting repertoire. z 2 1 3 4 6 5 7 8
Photos this page by Cynthia MacDougall
Knitting a bobble stitch cardi
Bobbles add a lot of sympatico to an otherwise plain knit cardigan.
I found two yarns in shades of yellow that remind me of blooming crocuses, forsythia buds and the sun that I miss so much during the winter, FIBRA NATURA Kingston Tweed - Ochre and UNIVERSAL YARN PennaManuka, both are fine yarns so they can be held together while knitting.
The stitch used in the pattern suggests flower buds.
The Roberta Bobble Cardigan is a free pattern, written for a different yarn but I think it will make a cheerful autumn cardigan and as the construction is straightforward, I can adapt it for the yarns I chose.
I read the pattern and decided on the yarn and all the tools and notions I need for the cardigan, and here they are, yarns and notions to lift my mood and make me think of spring and flowers!
The first yarn is a lace yarn, a mix of 50% baby suri alpaca, 22% nylon and 28% extra fine merino wool.
Cristina Simionovici
The yarn is light and fuzzy and as it has 50% alpaca yarn it will be warm. Garments knitted in alpaca yarn tend to “grow” while wearing, so it is a good idea to knit it together with a yarn that has more wool and therefore more memory.
The second yarn, FIBRA NATURA Kingston Tweed is a blend of 50% wool, 25% alpaca and 25% mixed fiber in colorway Ochre. The two yarns are almost the same color, they will blend well when knitted together.
While reading the pattern I noticed I will need stitch markers and a row counter. KNITTER'S PRIDE The Mindful Markers has 100 stitch markers, 5 types of them, they will help me keep track of the pattern.
The row counter is a must for this pattern and therefore I will use the KNITTER'S PRIDE Mindful Row Counter
Photos by Cristina Simionovici
The Roberta Bobble Cardigan a free knitting pattern
UNIVERSAL YARN Penna alpaca lace yarn in Manuka colorway
FIBRA NATURA Kingston Tweed, skeins with labels
KNITTER'S PRIDE The Mindful Markers - 100 pcs - assortment
KNITTER'S PRIDE Mindful Row Counter – Teal and bag
How to knit the bobble stitch
Knitting with two yarns held together
Knitting with two strands held together is not a complicated technique. You knit with two strands of yarn at the same time as if they were one single yarn. Typically, this technique is used to achieve interesting colour combinations or to combine two fine yarns into a more substantial weight. In my case, the pattern recommends a heavier weight than any of the two yarns chosen but if I hold them together, they will get to about the same weight as asked for in the pattern.
I do not like to wind the two yarns together before knitting them as this might create different tension in the two yarns. I use the two balls but treat the two strands as one yarn. I need to pay attention when picking (or wrapping the yarn around the needle) to catch both strands. If knitting with two strands is new for you, there are some instructional videos and articles that can be helpful.
There are a few tips for knitting with more than one strand: one is to thread all the strands through a straw, it might help. You can also thread them through two or three stitch markers, this will help to keep the tension even in the two yarns.
The two yarns I’m using are fuzzy because of the alpaca content and they stick well together, no need to thread them through the straw!
Knitting the bobble stitch
Here are the instructions for making one bobble as described in the Roberta Bobble Cardigan:
MB
(Make Bobble)
1. Yarn over (yo)
2. Knit into next st but do not remove st from needle.
3. Yarn over (yo)
4. Knit into the same st and do not remove st from the needle.
5. Yarn over (yo).
6. Knit into same st again and remove st from the needle (6 sts increased).
7. Turn, p6.
8. Turn, k6.
9. Turn, (p2tog) 3 times.
10.Turn, slip 1 as if to knit, k2tog, pass slipped stitch over k2tog and off the needle.
I must turn the work 4 times for each bobble, and I have a few bobbles in each row. The number of the bobbles increases as the work grows as the cardigan is worked top down. It will be easy to turn so many times in the beginning, when the rows are short, and the work is not too big, but after a while, this becomes slow and difficult.
One option is to work as described and turn my work four times for each bobble, another one is to knit the bobble stitches “backwards”, without turning the work. I opted for knitting backwards. The bobbles require more time and yarn than I estimated, but that will just make the gray days pass faster.
Knitting the Roberta Bobble Cardigan progress and project notes
The swatch I did with the two yarns and circular needles
LANTERN MOON Destiny
Circular Needles 32 (80cm) - Size 3 (3.25mm) ordered for this project did not give me the required number of stitches and rows.
I had to change to size US 6 [4mm] circular needles and was able to get very close to the required gauge of the pattern: 26 sts + 39 rows = about 6” [15cm] over Stockinette st (knit on RS, purl on WS).
Even though the body of the cardigan is knitted back and forth, using the circular needles allows me to hold comfortably all stitches, and there are many of them!
The pattern is written row by row for the yoke section and I was able to go through it thanks to the little KNITTER'S PRIDE Mindful Row Counter that kept track of my work. I made a rule for using it: every time I started a new row, I clicked the row counter so that the row I followed in the pattern and the row number shown on the counter were the same.
The yoke progressed nicely: The LANTERN MOON Destiny Circular Needles are some of my favorite needles as they are light and elegant, and the cable is smooth and does not coil. Beautifully crafted in ebony, they help me enjoy my knitting even more.
The increases for the raglan and the V-neck make every row longer and longer and the bobble row takes time and yarn.
Finally, I finished the yoke. I need to divide the work for the body and the sleeves and continue knitting.
The yoke of the Roberta Bobble Cardigan, the two yarns used for the project, row counter and fixed circular needles.
Knitting 2 yarns held together and deciding on the button band
Now it’s time to divide the stitches for body and sleeves.
I place the sleeve stitches on scrap yarn and continue knitting the body. I panic as it looks like I will run out of the Penna yarn! The bobbles used up more yarn than expected. I stop knitting the body and place all body stitches on a spare needle.
I will finish the sleeves first and I will knit the body afterwards. The length of my cardigan will depend on the quantity of yarn I have.
Judging by the remaining UNIVERSAL YARN – Penna yarn I will have to knit the ribbing with just one yarn. The yardage in the FIBRA NATURA – Kingston Tweed is more and therefore there will be enough yarn to do all the ribbing: cuffs, bottom ribbing, and the front ribbing with just this yarn.
The bobbles through me off when I estimated the yarn requirements for the cardigan.
I would have needed 7 balls of Penna yarn to be able to complete the ribbing with two yarns held together.
So, the decisions are made I will knit all ribbings with one yarn with smaller needles, and I will adjust the length of the cardigan depending on how much Penna yarn I have.
The sleeves are done, and I continue knitting the body up to the last inch of Penna yarn, I even use the swatch yarn! The body is long enough for me, I don’t have to get more yarn!
There is already a slight color difference between the body and the ribbing as for
the ribbing I use just one strand of yarn and the texture is also different in the ribbing section. Having 1/1 rib for the sleeves and 2/2 rib for the bottom and button band will be more than I like. I will work all ribbings (sleeve, bottom, button band) in 1/1 rib.
The Button Band
As I’m using finer yarn for the button band, I must change the way I pick up stitches for it. The pattern asks to pick up 2 stitches for 3 rows (2:3) but I had to pick up 3 stitches for every 4 rows (3:4) to get more stitches along the front and the V-neck.
The yoke of the Roberta Bobble Cardigan, the two yarns used for the project, row counter and fixed circular needles.
Picking up stitches for the button band using 3:4 ratio.
5 things I learned knitting the Roberta Bobble Cardigan
Button band - continued
The pattern has 4 buttons on the cardigan, but somewhere in my knitting brain, I stick to the idea that a cardigan needs an odd number of buttons: 3 or 5. So I must choose my buttons and decide how many buttonholes I need.
I settle for 3 buttons, and I must mark on the button band the placement of my buttonholes. The stitch markers help me find the right place. I counted the stitches twice, making sure the buttonholes were evenly spaced.
After completing the button band, it’s time for the last finishing touches.
There are not too many ends to weave in, thanks to the top-down raglan construction. I also need to sew the buttons on.
I can use the elegant KNITTER'S PRIDE Mindful Wood Darning Needles - Teal. They have a wooden storage case and a storage bag. I have two larger ones and two smaller ones from which to choose.
Finally, I wet the cardigan and laid it flat to dry. It seems to me it’s little use for blocking a raglan top-down cardigan with a lot of bobbles.
And here it is, another finished project!
What I learned
1. Holding two strands of yarn together gives a new structure to the knitted fabric.
2. The bobble stitch uses up a lot of yarn! Buy an extra ball of yarn.
3. The ribbing for the cardigan should have used two strands of yarn held together but I had to improvise as I was running out of the UNIVERSAL YARN Penna.
Button band with stitch markers for buttonholes and positioning buttons Wooden sewing needles with case and storage bag
4. The knitting technique of knitting backward when knitting the bobble stitch saves time.
5. I think the bobbles will look even better in a less fuzzy yarn, but I still like them on this cardigan.
AND…
6. I’m still waiting for spring, the sun, yellow crocus buds, and blooming forsythia.
FIBRA NATURA Kingston Tweed - Ochre and UNIVERSAL YARNS Penna - Manuka, worked together, to make up an ideal fabric for a spring or fall cardigan. I hope you enjoyed learning about my knitting journey.
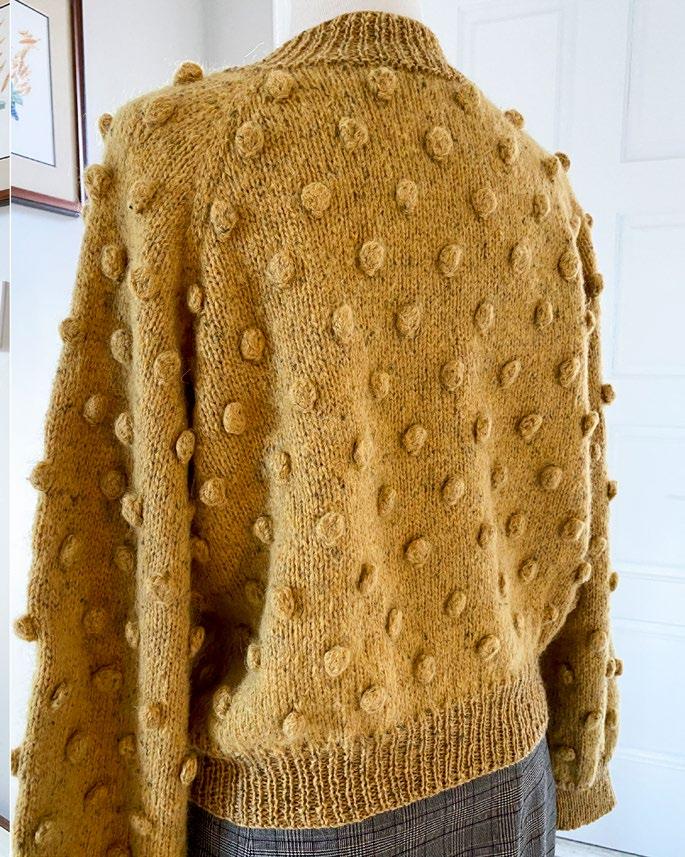
The finished Roberta Bobble Cardigan!
Cristina Simionovici
How to convert a knitted sweater pattern into a cardigan
Michelle Porter
I’ll be transforming this vibrant, self-striping, 100% cotton from UNIVERSAL YARN called Cotton Supreme Waves (color Equator) into… … my interpretation of an essential spring cardigan (shown below). Keep reading to learn my process!
I chose the self-striping Cotton Supreme Waves yarn because of its energetic and eye- catching color combos, and I especially love the denim blue, pool blue, and verdant green of the Equator colorway! Surely gazing at these tempting cakes will lift you from your winter tendencies.
Nothing says the first day of spring to me more than an awning stripe fabric pattern!
Knowing that Cotton Supreme Waves works up in stripes, I was hoping to find a knitting pattern that was knit sideways, so my stripes would be vertical. I searched the free patterns offered by UNIVERSAL YARN on their website and found just what I wanted – almost!
The Ribline Pullover, designed by Rachel Brockman was very close to what I was looking for. It was designed for the UNIVERSAL YARN Offbeat, which is 90% acrylic and 10% alpaca. Lucky me, it is listed as the same thickness as Cotton Supreme Waves (DK), so the tension gauge should be close to the same! The only challenge was that Ribline Pullover has long sleeves and a tall neckband, and it’s a pullover. I wanted shorter sleeves, a crew neck, and a buttoned cardigan.
Photos by Michelle Porter
The vibrant self-striping colors are visible in this grouping of Cotton Supreme Waves
This is my finished cardigan converted from the Ribline Pullover which is perfect for spring weather.
UNIVERSAL YARN
Cotton Supreme Waves
The sketch next to the pattern photo shows the changes I need to make to convert this winter style into a spring wardrobe must! See what my process is like in the next four days as I share the detailed modifications. The article that follo will be about the sleeves and how to make them shorter. Also, I will give a lot of tips for knitting with the self-striping yarn Cotton Supreme Waves that you might not have anticipated. Save these articles so you too can convert this winter sweater to a spring cardigan!
Cotton Supreme Waves in color Equator to welcome spring
Cover photo of Ribline Pullover by Rachel Brockman is compared to my sketch of the desired cardigan.
PRO TIP: Get to know your yarn before you start knitting!
As promised, I’ll tell you how to modify the sleeves to make them short. But first, we need to talk about how to get to know your yarn. I know you’re cringing right now because I’ll talk about swatches. To get acquainted with the qualities of Cotton Supreme Waves, you do have to knit some swatches and I’ll tell you why.
The first reason I needed to knit some swatches was to choose the best needle for my style of knitting
I know from experience that knitting with cotton feels different than knitting with wool. I find cotton is less forgiving and doesn’t snap back when forming the stitches. I tried needles constructed from different materials to determine which would give me the best combination of control, flow, and tension.
I tried needles comprised of laminated wood, natural wood, nickel-plated brass, coated aluminum and premium bamboo. I needed a little more grip to get better control of the stitches so I chose the Takumi Premium Bamboo circular knitting needles by Clover.
My tension was a little bit loose for the DK gauge I needed with a size Takumi Premium Bamboo 4 mm, so I used a size 3.75mm to get the proper gauge.
The next reason to knit several swatches is to get to know the pattern stitch
I made 3 large swatches in Slip Stitch Rib with the needles I hoped to use for the garment. The pattern Ribline Pullover lists the main stitch used as Slip Stitch Rib. To produce this stitch consistently it takes a bit of practice. It’s a good idea to build up some muscle memory before you dive into the garment if you want to achieve an even knitted fabric.
The materials required to produce the converted spring cardigan Swatches knit with different needle compositions to determine my favorite for Cotton Supreme Waves
Another good reason to knit several large swatches is to test the wash-ability.
Cotton is a bit tricky when it comes to washing (and blocking). Typically I would hand wash and dry flat a knitted garment, but this yarn label states machine wash warm, tumble dry! Cotton garments in general tend to shrink in length (and sometimes get wider) in the washing machine and especially the dryer. This sweater pattern is worked sideways, so the stitch width will be the length of the garment. I had better be aware of any changes that need to be considered before I make my modifications to the pattern.
So what are my findings? Well, good news! First, I hand-washed a swatch with Soak gentle laundry soap, squeezed it out and then let it dry flat on a towel. The wash water had no loose dye! So I can feel comfortable that the yarn is colorfast (and navy blue is a tricky one). Once dry, it did shrink in length a little bit and I took note; the width was unchanged. The second swatch was only steam-blocked and it remained the same size. Then the last swatch was machine washed on gentle, with a few tee shirts, using plantbased liquid detergent. Then it was tossed in the dryer with the same shirts on medium heat, until it was fully dry. It did shrink in length; the width was unchanged. On the plus side, it got softer and fluffy!
What I learned from test washing was super important! Not only did I get to know what to expect after laundering, but I found that my tension gauge now matched the listed gauge on the Ribline Pullover pattern. The machinewashed and dried swatch was on gauge!
And the last reason to knit several large swatches is to know your gauge!
My unwashed swatch has a gauge of 24 sts X 33 rows = 4” in Slip Stitch Rib. And my machinewashed and dried swatch has a gauge of 24 sts X 36 rows = 4” in Slip Stitch Rib. What this means to me is that I can go ahead and knit through the pattern as written, without making adjustments for gauge. And I know that 9 rows will equal 1” once finished, no matter what the tape measure says. Just put away the tape measure and trust the numbers.
Back to the sleeves and how to get started on the sweater
This sweater is knit sideways and divided into two pieces, right side and left side. It begins at the right sleeve. I decided to make my sleeves elbow length, approximately 6” - 7” long. I need to cast on and start my sleeves at the point in the pattern where they are 6” from completion at underarm. I did the math and won’t bore you with the calculations.
Swatches knit in Slip Stitch Rib pattern with Cotton Supreme Waves before test washing.
Swatches knit in Slip Stitch Rib pattern with Cotton Supreme Waves after test washing two.
Instead of starting the pattern as written, follow my instructions below:
RIGHT SIDE
Sleeve
With 32-40” circ ndl, cast on 60 (64, 74, 78, 82, 88, 92, 98, 102) sts.
Inc Row (RS): K1, m1R, cont as est’d to last st, m1L, k1 – 2 sts inc’d.
Maintaining Slip Stitch Rib as est’d, rep Inc Row every 0 (0, 0, 0, 0, 0, 6, 6, 0) rows, 0 (0, 0, 0, 0, 0, 4, 4, 0) more times, then rep Inc Row every 24 (16, 12, 10, 8, 8, 8, 8, 6) rows, 1 (2, 3, 4, 5, 5, 2, 2, 7) more times – 4 (6, 8, 10, 12, 12, 14, 14, 16) sts inc’d, 64 (70, 82, 88, 94, 100, 106, 112, 118) sts. Cont even in patt as est’d until piece meas approx 6½”- 7” from cast-on edge, ending with a WS row.
This sleeve opening will have a circumference of approximately: 10 (10¾, 12½, 13, 13¾, 14¾, 15½, 16½, 17)” and rest near the elbow. You could always work fewer rows once you have increased to the full stitch count to make it even shorter. It is necessary to get to full stitch count before proceeding in the instructions to Body Increases, for the stitch pattern to work correctly.
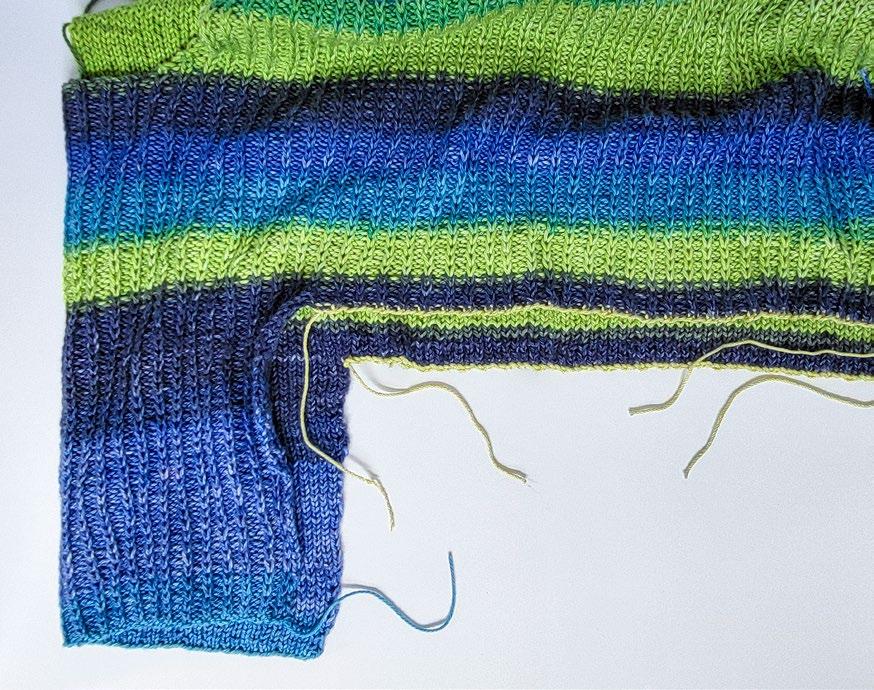
Beginning of sleeve knit in Slip Stitch Rib pattern with Cotton Supreme Waves
Do I need to colormatch my selfstriping yarn when starting a new ball?
As the spring cardigan converted from Ribline Pullover starts to take shape, and I completed the sleeve instructions that I wrote out (in full!), you may have some questions. Cotton Supreme Waves is a selfstriping yarn. What happens when I need to change to a new ball? How will I match the left sleeve to the right sleeve? Do I even need to color match the stripes? Well, let’s proceed to the next step in the instructions and I will guide you through some options.
The next instructions on the Ribline Pullover pattern are for the Body Increases
On the pattern instructions for Ribline Pullover, it states to cast on a specific amount of stitches at the end of the next two rows that will become the (right) side seam, and thus the length of the body. But there’s a preface note before that stating: Note: Maintain newly cast on sts in Slip Stitch Rib patt. I gave that a little thought and came up with the idea of using a provisional cast-on. I used a slippery waste yarn of a similar thickness, along with the crochet hook/one-step method. There are many other methods of provisional cast-on, but if you would like to see this demonstrated look here for a tutorial by VeryPink Knits.
I chose to do my cast-on with the provisional method, because I figured it would be easy to join the side seams. To join the right half and left half of the sweater at the center back, you are directed to use the 3-needle bind-off method, and I thought I should do that at these seams as well. I’ll share with you why that might not have been the best choice. I did however remember that I cannot work the sl1 stitch in the Slip Stitch Rib pattern on the WS row over the waste yarn stitches. Because the waste yarn will be removed later, there will be no stitch there. So, I worked: p1, k2 instead, over only the cast- on sts.
Beginning to work in Slip Stitch Rib pattern over the provisional cast-on stitches at end of sleeve on a RS row.
Beginning to work in rib pattern over the provisional cast-on stitches at end of sleeve on the next WS row.
Completion of the right front showing neck shaping and a new strand joined at hem edge.
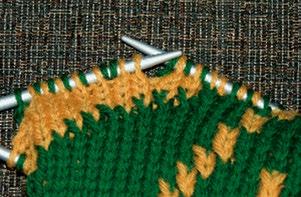
Color matching when joining a new ball of self-striping Cotton Supreme Waves
Eventually, a new ball of yarn must be joined. We remember how important it is to always join a new ball at the end of a row or where a seam will be, if at all possible. That requires cutting off the length of yarn that will not make it across the next row. With self-striping yarn (also gradients) it is considered best practice to join the new ball of yarn at the same spot in the color progression. Here is what the Ribline Pullover pattern says:
Please note: Offbeat is a self-striping yarn. To ensure your project looks as close to the sample as possible, when breaking and rejoining yarn, be sure to visually color match the point at which you’re rejoining. This may require you to wind off yarn, but the results are well worth your effort.
In short, I did this. I carefully chose my next ball of Cotton Supreme Waves to start with the color I just ended with and cut off a small amount to best match the place in the stripe. I did this color matching every time I joined yarn. Yes, doing so uses more yarn.
Once the right half of the sweater is complete, the stitches remain open and are on hold at the center front and back. I used spare Takumi Bamboo Premium needles with Large Point Protectors at the ends to hold the large number of stitches. No changes are needed to convert the Ribline Pullover into a cardigan at this point!
The left half of the sweater is worked same as for right half; reversing which row the neck shaping is formed. This piece will also end with the stitches remaining open and on hold at the center front and back. The article that follows will describe joining the two halves with 3- needle bind-off and how I modified the front seam into a button band.
Should the left side of the cardigan mirror the right side of the cardigan?
Answer: Only if you want it to! I did make my sides match. I deliberately chose the first ball of the second sleeve to match the first sleeve, and I still had to remove a small amount of yarn to get the stripes to start at the same point. While I worked through the left half, I color-matched all my new balls as I joined them. But if you want more random stripes, or are happy to have different-looking sides, you don’t have to color-match self-striping yarn. Cotton Supreme Waves would look fantastic either way!
Completion of the right half showing sleeve and front with back folded at shoulder.
Beginning the left sleeve to color match the right sleeve showing the yarn removed.
CLICK on the cart to purchase the pattern!
Thoughtful Soles Series
Welcome to Thoughtful Soles Series by Lorraine Thompson! This is a zany collection of knitted sock patterns to tickle your funny bone every time you wear them.
GINGHAM APPLES
WOOL STEW
How the 3-needle bind-off is still the best for joining these seams
The cardigan converted from Ribline Pullover in Cotton Supreme Waves is finally ready for assembly! This article will cover a 3-needle bind-off, picking up stitches for the hem and neck band, and adding button bands instead of joining the center front.
I also hinted that the provisional cast-on might not have been the best choice for the new stitches forming the sides of the body of the Ribline Pullover pattern. Now I’ll tell you why, what I did do, and what I could have done differently.
So what did I do wrong with the provisional cast-on? I forgot that for the waste yarn to pull right out as easy as unravelling a row of crochet (or knitting) it has to be worked in all knit, or all purl. Definitely not any form of ribbing! Every time the yarn goes forward or back for the rib, it is wrapped around the strand of waste yarn. This makes pulling out the waste yarn nearly impossible. I ended
up cutting it out with scissors, which worked just fine BTW. What I could have done was either: work the first row over the provisional stitches in just knit, instead of Slip Stitch Rib; or I could have chosen a different cast-on method.
Join the two side seams and center back seam of the converted cardigan with a 3-needle bind-off.
This method worked beautifully! To do: put right sides of two pieces together, with open stitches and both needles pointing the same way, and with the third needle bind off through the double layer as if it was one. If you would like to see a video tutorial click on https://www.instagram.com/reel/ C3V2rCapPN9/?hl=en
After joining the center back seam that connects the right half to the left half of the sweater and both side seams with 3-needle bind-off, the sleeve seams will still need to be sewn. I used mattress stitch and it zipped together perfectly. The knit stitch at each edge of the sleeve as directed in the pattern, made it very easy to sew. Until this point in the pattern instructions for the Ribline Pullover there had not been any differences between making a pullover or a cardigan.
Removing waste yarn from provisional caston at sides of body to place stitches on needle.
A close up of 3-needle bind-off in action, showing a side seam being joined.
Next: the final modifications to convert the Ribline Pullover to a spring cardigan
Instead of joining the stitches from the right half to the left half at the center front, keep the stitches on hold. Then proceed to pick up stitches for the hem. There should not be much difference from the pattern as written, but I found it called for a few too many stitches.
Work Hem as follows. Beginning at the opening edge of the left front and RS facing, pick up and knit one stitch for every two rows along the entire bottom edge. Work 8 rows of garter stitch then bind off on WS row.
I used the same method for the Neckband: Beginning at opening edge of right front and RS facing, pick up and knit one stitch for every two rows and one stitch for every bound-off stitch along the entire neck edge opening. Work 8 rows of garter stitch then bind off on WS row.
Next is the Buttonhole Band
I found I had to use a much smaller needle than the rest of the pattern to get my garter stitch tension to match the Slip Stitch Rib. I used a 3.25mm circular needle.
Beginning at bottom of the hem at opening edge of right front and RS facing pick up and knit one stitch for each ridge of garter stitch from hem, then knit across held stitches of center front, and then pick up and knit one stitch for each ridge of garter stitch from the neckband. If you need a few more stitches or fewer stitches to space out your buttonholes evenly you can pick up extra or decrease in this row. My buttonhole band has 126 sts and I have 8, 18mm wooden buttons by Knit-One, to be spaced out. Work 4 rows of garter stitch then work the buttonholes on the next row (WS): K3, yo, k2tog, (k15, yo, k2tog) 7 times, k2. Work 3 more rows of garter stitch and then bind off on WS row.
The Button Band will be easy: With the same needles as Buttonhole Band, beginning at the top of neckband at opening edge of left front and RS facing follow the same instructions as Buttonhole Band but omit the buttonholes.
That concludes all the detailed modifications that you need to convert the winter style of Ribline Pullover into an uplifting spring cardigan made with UNIVERSAL YARN Cotton Supreme Waves. All that remains are the finishing touches! In my next and last article for this feature, I’ll show off the completed cardigan in real life, with lots of photos! I think you will agree the 3-needle bindoff at the center back seam really sets off the design!
Close up of cardigan showing neckband, buttonhole band, and button band with button placement marked.
Close up of right shoulder of cardigan showing neckband, buttonhole band, and the center back seam inside sweater.
Finishing the conversion of a knitted winter pullover into a spring cardigan
I hope you have enjoyed following the conversion of the wintery Ribline Pullover by Rachel Brockman into a garden fresh spring cardigan, knit in UNIVERSAL YARN Cotton Supreme Waves (color Equator).
The final result is very pleasing, if I do say so myself! The wooden buttons certainly set off the lush and exuberant hues of the Equator colorway.
Now have a look at the back of the cardigan. The 3-needle bind-off at the center back is the perfect choice to enhance a sideways knit design done with Slip Stitch Rib. And look how the seam really highlights the beauty of the self-striping yarn Cotton Supreme Waves! Al bacio/ Chef’s kiss!
I am so pleased with the results of the converted cardigan; I took it out for a test drive in real life!
The actual vernal equinox (first day of spring) is a few weeks away, but I couldn’t wait to try out my new favorite cardigan. Trade secret: I went to an indoor tropical garden to get some realistic photos of what I will look like this spring when you see me walking around.
Cardigan showing neckband, buttonhole band and button band with button placement marked.
Completed cardigan, front view, showing the wooden buttons sewn in place.
UNIVERSAL YARN
Cotton Supreme Waves
I’ll close this Cotton Supreme Waves knitting adventure that converted the Ribline Pullover into a lively spring cardigan with a quote from Virginia Woolf (author):
“I enjoy the spring more than autumn now, one does, I think, as one gets older.”
Michelle Porter
Completed cardigan, back view, showing the 3-needle bind-off seam at center back.
This is my finished cardigan converted from the Ribline Pullover which perfectly displays my passion for spring.
Fibra Natura Kingston Tweed
Learning more about this yarn
Cristina Simionovici
Join me to learn more about a yarn that I like working with. It comes in a variety of great colors and has a slightly rustic feel.
The yarn is Fibra Natura Kingston TweedOchre
Wool will keep me warm and creates good stitch definition. The alpaca will add warmth and a little halo to my knitting, and both alpaca and viscose will add drape to the fabric. So, based on all these, I browsed free patterns to find a suitable one that will allow me to learn more about this yarn and showcase the best of its properties.
I chose the Arum Shawl pattern, which is a pattern that uses the Kingston tweed yarn; no substitution required.
The pattern asks for 3 skeins of yarn. It is a lace pattern therefore I will need additional tools to make my work easy and enjoyable: stitch markers, a row counter, and blocking wires. I have everything I need.
• Fibra Natura Kingston Tweed - Ochre
• KNITTER'S PRIDE The Mindful Markers
• KNITTER'S PRIDE Mindful Row Counter
• KNITTER'S PRIDE Steel Blocking Wires Set
There’s a large assortment of stitch markers, so I can choose the ones I need for this project.
Fibra Natura
Kingston Tweed
Photos by Cristina Simionovici
3 Fibra Natura Kingston Tweed, skeins with labels, row counter, stitch markers and blocking wires
The Arum Shawl on a mannequin
This photo by UNIVERSAL YARN
Fibra Natura Kingston Tweed
Swatching for the lacey Arum Shawl
I chose the Arum Shawl free pattern, a lacey shawl pattern written for the Kingston Tweed yarn. This is how the pattern describes the finished object: “Warm, yet lightweight and airy, this shawl is optimal for mildly cool days. Kingston Tweed adds a touch of rustic texture.”
I can’t wait to start this project and to see it grow into a lovely shawl. But there’s more to do before casting on.
First things first. I must make a swatch. You’ll probably ask, why do I need to make a swatch for a shawl? The pattern is written exactly for this yarn, so why go through the trouble of swatching?
Well, the pattern asks for US Size 7 [4.5mm] needles, the band on the Kingston Tweed skeins recommends US size 4-6 [3.5 – 4mm] needles, and I’m a little bit of a loose knitter, so the swatch will help me choose the needle size.
Also, this is a lace pattern so it’s good to get used to the pattern before starting the shawl.
I start to work in stockinette stitch to evaluate the density of the fabric and use different size needles. Once I get a result I like, I swatch the lace pattern. It doesn’t take long to get the swatch done. Then I steam it and let it rest for a few hours.
I insert a reversed stockinette row between sections knitted with different-sized needles and mark the size of the needles on the swatch; I use one eyelet for the mm size of needles and a purl for each 0.25 fraction of the size. This way I don’t have to tag the swatch and I can always read the size of the needles used.
For example, if the needle size is 3.75mm, I mark it with 3 eyelets (for the 3mm) and 3 purls (for the .75) in the stockinette fabric.
After measuring the swatch, it turns out my number of stitches matches the number required in the pattern if I use US size 6 (4mm) needles. However, the number of rows is off (is there a mistake in the pattern?). Based on the swatch, I can go ahead and start my project
I cast on and set up the lace pattern. I use stitch markers for each repeat in the lace pattern, this will help me keep track of the pattern.
The swatch for the shawl using different size needles
Swatch close-up showing the eyelets and purls marking the needle size
Started shawl on needles
The Arum Shawl | Knitting a lace pattern
The Arum Shawl pattern has row by row written instructions for the lacey pattern and as well as a chart for the same pattern.
For me it’s easier to follow the chart.
I use the row counter to keep track of the pattern row I’m working on.
The pattern is worked over 18 rows, and I’ll reset the counter every time I start a new pattern repeat.
The pattern also asks to decrease one stitch every 4 rows. Oh, how I wished the number of the lace pattern would be divisible by 4! But it’s not, so I must track the chart rows and the decreasing rows (every 4 rows).
I carry a strand of yarn to count the decreasing rows marked in blue in the following picture.
After completing a few repeats of the lace pattern, I make sure I insert a lifeline marked in green in the following picture.
If you look carefully, you can see I inserted a lifeline 2 repeats below and I inserted it through the stitch markers as well (my mistake). As a result, I had to leave the stitch markers on the lifeline and replace them with new ones. Lucky for me, the Mindful Collection stitch markers have 20 stitch markers of each kind, I can replace them all. For the following lifelines, I paid more attention.
The pattern also leaves it to the knitter to figure out how to handle the decreases in lace pattern.
“Note: When working decreases in lace, maintain stitches in pattern as established. If there are not enough stitches to work decreases and corresponding increases in the pattern stitch, work these extra stitches in St or rev St instead (i.e. knit the knits and purl the purls).”
This makes the work challenging and interesting at the same time. I try my best to keep, as much as I can, the lace pattern on the decreasing edge!
Arum Shawl lace pattern chart and row counter
Arum Shawl in progress with highlighted lifeline and row counting thread
Arum Shawl in progress with lifeline and row counting thread
Fibra Natura Kingston Tweed
A lifeline for knitting lace
I also mentioned a lifeline. What is a lifeline in knitting lace?
A lifeline is a thread, preferably a smooth yarn like cotton or nylon, that’s threaded through all the stitches once you finish a pattern repeat or a section of a lacey pattern. This way, if you need to unravel your work when you make a mistake, you can go back to the lifeline. This avoids having to unknit every stitch. All stitches will be on the helper thread or lifeline, and you can put them back on the knitting needles and restart knitting.
I’m not able to memorize the lace pattern as it has knits, purls, decreases and yarnovers, so I have to follow the chart carefully up to the last rows.
The tip of the shawl has an additional chart for decreases when there are fewer stitches than half of the stitches in one lace panel repeat.
I finished the shawl using just under 3 skeins of the Kingston Tweed and am ready to look at my work.
The knits and purls create a textured fabric that looks corrugated and hides the yarnovers. The lacey effect is not visible just yet.
To make my work shine, I must go to the last essential step of lace knitting: blocking!
I wrote “last step” but well, there are a few phases in this last step.
I immerse the shawl in a bowl with warm water mixed with a few drops of Soak and let it soak for a few hours.
Close-up of knitting showing a lifeline
the
Blocking a lacey shawl makes…
After a few hours, I took the shawl out and wrung the water out of it. I prepared the KNITTER'S PRIDE Steel Blocking Wires Set for blocking the shawl. The set comes with 6 wires of 38”, 6 wires of 20”, 3 flexible wires of 38”, 20 t-pins and 1 measuring tape – everything you need for blocking.
I started inserting the long 38” wires through the edge of the shawl, every 4 rows, trying to be consistent with my threading. As the edge of the shawl was longer than the wires, I had to add two wires for each long edge.
I stretched the shawl and pinned the wires in place with the t-pins. Now I can admire the lacey pattern and wait for the shawl to dry.
The finished Arum Shawl is ready for blocking using blocking wires set and t-pins.
Inserting wires for blocking
Blocking the finished Arum Shawl
shawl spectacular!
Cristina Simionovici
This photo by Carla A. Canonico
Standard Yarn Weight System
Standard Yarn Weight System
Standard Yarn Weight System
Categories of yarn, gauge ranges, and recommended needle and hook sizes
Yarn Weight Symbol & Category Names
Type of Yarns in
Yarn Weight Symbol &
* GUIDELINES ONLY: The above reflect the most commonly used gauges and needle or hook sizes for specific yarn categories.
** Lace weight yarns are usually knitted or crocheted on larger needles and hooks to create lacy, openwork patterns. Accordingly, a gauge range is difficult to determine. Always follow the gauge stated in your pattern.
*** Steel crochet hooks are sized differently from regular hooks--the higher the number, the smaller the hook, which is the reverse of regular hook sizing.
This Standards & Guidelines booklet and downloadable symbol artwork are available at: YarnStandards.com Standards & Guidelines For
KNITmuch
Standard abbreviations & terms
alt = alternate
approx = approximately
beg = begin(ning)
BO= bind off
CC = contrast color
ch = chain
cm = centimetre(s)
cn = cable needle
co = cast on
cont = continue, continuing
dc = double crochet
dec = decrease(s), decreasing
dpn = double-pointed needle(s)
foll = following
g = gram(s)
hdc = half double crochet
inc = increase(s), increasing
in(s) = inch(es)
k = knit
kf&b or kfb = knit into front and back of st (increase)
ktbl = knit through the back loop
k2tog = knit 2 sts tog (right-leaning decrease)
k3tog = knit 3 sts together (double right-leaning decrease)
m = marker
m = meter(s)
m1 = Make 1 stitch: pick up the horizontal strand between 2 stitches from front to back and knit it tbl (lifted increase)
MC = main color
mm = millimetre(s)
oz = ounce(s)
p = purl
p2tog = purl 2 sts tog (decrease)
patt = pattern
pfb = purl into front and back of stitch (increase)
pm = place marker
psso = pass slipped stitch over
RS = right side
rem = remain(ing)
rep = repeat
rev = reverse
rnd = round
sc = single crochet
sl = slip
skp = slip one st, knit next st, pass slipped st over knit st (dec)
ssk = slip, slip, knit: slip 2 sts knitwise, 1 at a time, insert left-hand needle into front of both sts and knit them tog (left-leaning decrease)
* GUIDELINES ONLY: The above reflect the most commonly used gauges and needle or hook sizes for specific yarn categories.
* GUIDELINES ONLY: The above reflect the most commonly used gauges and needle or hook sizes for specific yarn categories. ** Lace weight yarns are usually knitted or crocheted on larger needles and hooks to create lacy, openwork patterns. Accordingly, a gauge range is difficult to determine. Always follow the gauge stated in your pattern. *** Steel crochet hooks are sized differently from regular hooks--the higher the number, the smaller the hook, which is the reverse of
** Lace weight yarns are usually knitted or crocheted on larger needles and hooks to create lacy, openwork patterns. Accordingly, a gauge range is difficult to determine. Always follow the gauge stated in your pattern. *** Steel crochet hooks are sized differently from regular hooks--the higher the number, the smaller the hook, which is the reverse of regular hook sizing. This Standards & Guidelines booklet and downloadable symbol artwork are available at: YarnStandards.com
This Standards & Guidelines booklet and downloadable symbol artwork are available at: YarnStandards.com
sssk = slip next three stitches individually, knitwise. Insert tip of left needle from front to back into the fronts of these three stitches and knit them together (double left-leaning decrease)