Get a head start on your summer knitting with Fibra Natura FLAX
KNITmuch
EDITOR-IN-CHIEF, ART DIRECTOR
Carla A. Canonico Carla@KNITmuch.com
ADVERTISING SALES
John De Fusco John@KNITmuch.com
PUBLISHER
A Needle Pulling Thread
PHOTOGRAPHERS
Carla A. Canonico, John De Fusco, Contributors
BLOGGERS/CONTRIBUTORS
Michelle Porter fondlepatterns@sympatico.ca
Cristina Simionovici cris.sim@gmail.com
Cynthia MacDougall ktogdesign@gmail.com
Sarah Dawn Adams sarahdawnsdesigns@gmail.com
GRAPHIC DESIGN
Carla A. Canonico Carla@KNITmuch.com
Sondra Armas Sondra@KNITmuch.com
SOCIAL MEDIA and WEB
Maria Corina Guillen
Joaquin Rojas
WEBSITE / BLOG : KNITmuch.com
Facebook : KNITmuch
Pinterest : knitmuch Twitter : @KNITmuchmag
WHERE TO GET YOUR COPY
KNITmuch is a quarterly eMagazine published by A Needle Pulling Thread. It is available free for personal use online at KNITmuch.com
EDITORIAL
Bloggers, designers, and other contributors who would like to be considered for future issues please email Carla@KNITmuch.com with a brief description of your work and your proposed project.
No part of this publication may be reproduced without written permission from the publisher.
All designs, patterns, and information in this magazine are for private, non-commercial use only, and are copyrighted material owned by their respective creators or owners.
KNITmuch
...to K, is to
6
Knit Together - Washing Woollies and other textiles
8 I’ll take my knitting to go! 3 places to knit when travelling
11
Pack your travel knitting bag for your next project – a knitted striped hat!
14 Easy pattern instructions for knitting open finger mitts
17 The perfect cowl does exist – A great ‘knit on the go’ project!
19 These boot cuffs are made for the outdoors! EASY knitting pattern
22 Dyeing wool yarn with Rit all purpose dyes
23 What you need to get started
24
Snow dyeing yarn for a random effect – 8 steps to a variegated look
27 Warp painting wool for a planned weaving project - dyeing stripes
30 Kettle dyeing with a slow cooker and liquid dye
32 Fibra Natura FLAX | A fine natural yarn for knitting and crocheting
33 The pattern + more about the swatches
37 Getting started and following the pattern
38 Knitting the V-neck + the front of the tunic
39 Finishing touches on the Simple Summer Tunic
42 Yarn Review: Fibra Natura FLAX for Summer Knitting!
43 Knitting an Eyelet Skirt | Converting a pattern to knit in the round
45 How to work ‘At the Same Time’ instructions in knitting patterns
47 Why change needle sizes in a knitting pattern? What does it do?
48 Working a hem with a three-needle bind off and I- cord
editor's letter
Welcome to another inspiring issue of KNITmuch, where we celebrate the joy, creativity, and camaraderie of knitting! Whether you're a seasoned stitcher or just picking up your first pair of needles, this issue is packed with ideas to spark your imagination and grow your skills. As the seasons shift, our thoughts turn to projects that are not only functional but also filled with character and charm. In Knit Together, we discuss the art of caring for your knitted treasures with tips for washing woollies and other textiles. After all, the life of every hand-knit piece deserves thoughtful attention.
Are you itching to take your knitting on the road? We’ve got you covered! In I’ll Take My Knitting to Go, discover three perfect places to knit while traveling, and learn how to pack your travel knitting bag with ease. Need a project to bring along? Try our striped hat pattern or the perfect cowl—simple, portable, and oh-so-stylish!
For those embracing winter vibes, we offer cozy patterns that you’ll love: open-finger mitts to keep your hands free for chilly mornings, durable boot cuffs for outdoor adventures, and even a tutorial on knitting an eyelet skirt. And if you’re curious about working “at the same time” instructions or changing needle sizes in your patterns, we’ve included handy guides to demystify these techniques.
Speaking of creativity, have you ever dyed your own yarn? This issue is brimming with dyeing inspiration, from using Rit all-purpose dyes to snow dyeing for a unique variegated look. Explore warp painting for weaving projects, and learn how to kettle dye with a slow cooker. Dyeing your yarn is a fabulous way to personalize your stash and add new dimensions to your projects.
For summer-ready knitters, our feature on Fibra Natura FLAX yarn will be a treat. With its natural feel and versatility, it’s perfect for lighter garments. Check out our step-by-step guide to knitting the Simple Summer Tunic and a detailed yarn review to help you make the best choice for your summer wardrobe.
Finally, for those who enjoy mastering finishing techniques, we’re diving into working hems with a three-needle bindoff and I-cords. These small details can elevate your work to new heights of professionalism and polish.
Knitting is more than just stitches and yarn—it's a way to connect with ourselves, each other, and the world around us. As you browse through this issue, I hope you find inspiration to try something new, revisit a favorite technique, or simply take a moment to enjoy the meditative rhythm of knitting.
Happy knitting!
Cheerfully,
In the spring!
…time to put away those wonderful items we’ve made that have kept us and our loved ones warm these past few months. From hand knitted scarves to machine quilted quilts, now is the time to spring clean these items and put them away until fall, but how should this be done?
Knit Together Washing Woollies
with Cynthia MacDougall
Just as different textiles have different purposes and offer different levels of warmth, there are different ways of cleaning items. The four main methods of cleaning are hand washing, machine washing, dry cleaning, and steam cleaning.
Steam cleaning is usually reserved for large items that can’t be easily transported. A large hand-hooked rug is a suitable candidate for steam cleaning, but this has to be done carefully. Because vacuums and hand-hooked rugs don’t play well together, the best way to clean one is to turn it over onto a mat, deck, sheet or other flat surface and allow the sand and grit in the rug the chance to get back out. The rug can then be spot cleaned by applying the suds of a gentle detergent meant for woollens with a soft brush, then dabbing the areas dry. If a more
and Other Textiles
Originally published in ANPTmag Spring 2013
thorough, sanitizing cleansing is desired, the rug can be steamed with either a garment steamer or a steamer designed for floors. Some rug hookers advise against wetting a rug thoroughly, because the moisture absorbed by the wool can take so long to dry it can mildew or even rot the burlap backing.
Dry cleaning is expensive and uses chemicals that can be harsh on some fabrics. Many manufacturers recommend that garments be dry cleaned – –sometimes to protect the manufacturer from potential liability. Other times, dry cleaning is recommended because the garment requires particular finishing, such as pressing. I tend to dry clean garments that have more than one type of fibres in them – for example, a wool jacket with an acetate satin lining. While
the wool can be hand washed, and the acetate can be hand washed, the lining is going to wrinkle considerably, and will be difficult to press by hand, and, because the dry cleaner has specialized forms, they can keep the garment looking its best. So, dry cleaning suit jackets and blazers is worth the investment. Because of the stiffness of the canvas, I also send any needlepoint pieces to a professional cleaner.
Most of our garments and household linens can be cleaned by hand or by machine. Today’s top load washers use less water and are kinder to clothes than the top loading ones with agitators, which makes it possible for items we used to wash by hand to be washed conveniently by machine.
I allow the fibre content of the garment help me decide how to wash it. Is it polyester, acrylic, linen, or cotton? Whether it is curtains, a table runner, or hand knits, if the answer is yes, into the washer it goes. I will also comfortably put such items into the dryer, although, I find today’s dryers to be very hot, so to preserve the shape and elasticity of items, I prefer to dry all my hand-knits –even socks – on a drying rack.
If the garment is made of superwash wool, then I will let my “super washer” wash it. But, like my other hand knits and hand wovens, my preference is to lay the items out onto a rack to dry.
Quilts can be washed by machine if they have a cotton or polyester batting. Antique quilts and quilts with a wool or silk batting require special care. Wash quilts according to the directions for the fabrics used to make the quilt, and use the most gentle cleaning instructions as the rule to follow. A crazy quilt with velvet sections is going to require different care than an all-cotton quilt.
To machine wash an “everyday” quilt, wash it in cool or warm water on the express wash or delicate cycle on the washing machine with a gentle laundry detergent or low-sudsing quilt wash. If the delicate cycle is used, an extra spin cycle may be required to extract more of the water from the fabric. Quilts should be dried flat, if possible. The drying process can be “kick started” by putting the quilt in the dryer for a few minutes.
Always fold a quilt in a different way when putting it away for storage; folding it the same way each time will weaken the quilt at the fold lines. Museums roll quilts for storage, but most homemakers don’t have the space for this.
Hand washing is used to clean delicate fibres such as silk, alpaca, and wool that might shrink if put through a machine wash cycle. I knit a lot of shawls, and, while I could machine wash the ones made from sock yarn, I tend to wash them by hand, because they require blocking afterward, and I wet block* my
shawls and want a little more moisture left in them. If I am confident that the colours in my counted cross stitch are fast, I will hand wash these projects, but never do anything in the washing process that will cause a crease in the item, as this will be hard to remove, even with an iron.
Here is my method for hand washing. Fill a basin or laundry tub with warm water and a gentle cleanser like hair shampoo or a wash specifically made for woolen garments. I use water that is hot enough to be comfortable for my hands. Immerse the garment into the water, give it a gentle swish (too much agitation can cause shrinkage), then leave it to soak for 15-20 minutes.
To drain the water I hold the garment(s) against the side of the sink or basin, and pull the plug. As the water drains, I press the garment gently against the side of the sink to force out some of the excess water. Holding the garment in place, I re-fill the sink with clear water slightly cooler than the original wash water. I put the garment into its rinse bath, dunking it below the surface and giving it a gentle swish. This time, I only soak the piece for 2-5 minutes. Then, I drain the sink as before, and re-fill the sink for a second rinse. Some people like to add a drop of essential oil of lavender, tea tree, or cedar, to the last rinse. I prefer to put a sachet treated with one of these oils into the storage container. Others like to add vinegar to the rinse water, but vinegar is an acid that should be used sparingly on fabrics, and never on silk.
To dry the garment , I squeeze out as much water as I can – gently, without twisting or wringing the garment. Then I place it as flatly as possible on a dry towel. I fold the towel in toward the centre of the garment, making a long, thin panel. Then I roll the panel up on the short end and squeeze hard, allowing the towel to absorb as much moisture as possible. This is the only way I handle cross-stitched pieces, which I will press gently with an iron when they are almost dry, but only if there are no filament or metallic thread in them.
If the garment needs to be blocked, this is when I do it. Garments like sweaters or blankets that just need to be “tweaked” into shape are laid out flat. I pat the shoulders, sleeves, and hem into the desired shape, then leave them to dry.
When spring cleaned items are completely dry, they can head into storage. I like to store woollens in cotton bags or pillowcases with a sachet of lavender, chamomile, cedar, wintergreen, or tea tree oil. Cotton quilts can be placed directly into drawers, blanket boxes, or bins and put into a dry area for the summer.
*Wet blocking means to wet the garment thoroughly, then stretch it out to shape on a padded surface (often covered by a sheet). Pin it into shape with rust-proof pins and leave it to dry. z
Cynthia MacDougall
Knit Together Design Studio
Orillia, ON L3V 6K2
ktogdesign@gmail.com
ravelry name: macknitnow
How do you pack for travel knitting? I chose UNIVERSAL YARN Deluxe Stripes in color
Timber to create 4 simple accessories that will travel well. You can even start wearing them as soon as they’re completed!
Maybe you have a couple of weekend getaways planned or maybe a road trip or two. Knitters want easy portable projects to knit now, wear now, that we can also wear later.
Pattern instructions for a hat, mitts, cowl, and boot cuffs are included in the next 4 articles. There are lots of pictures to demonstrate the process. I hope you’ll be inspired to take your knitting with you on your next outing.
You might visit plenty of cold and windy places, even in the summer. It's very clever to have some handy warm pieces to wear.
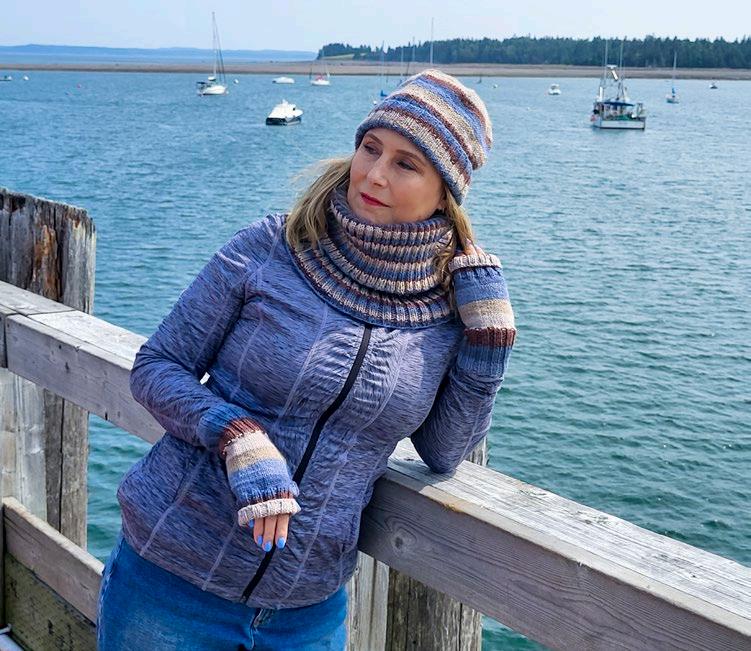
Hiking while wearing hat, mitts, cowl, and boot cuffs knit in UNIVERSAL YARN Deluxe Stripes.
Sight-seeing at the end of a cold and windy wharf at St. Andrews by-the-Sea, New Brunswick.
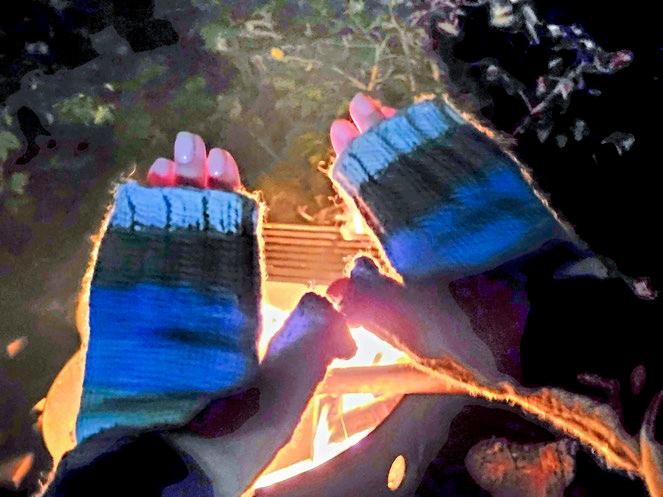
Warming my hands with a campfire and the open finger mitts knit in UNIVERSAL YARN Deluxe Stripes
It can get very cold at night while camping late in the season. Already, these mitts have been very well used. This hat was borrowed for a hiking trip during an especially cold day. I bet some of you know where this place is! If you camp or hike, you know how important a basic toque or beanie hat is. All these pieces that I have included in my blog s are unisex!
What to pack in your travel knitting bag
I mentioned above that I chose UNIVERSAL YARN Deluxe Stripes, in color 307 Timber. I love the self-striping effect, and the combo of browns and blues is perfect for pairing with denim. It’s a medium weight yarn that knits fast and washes well.
I planned out a few items I might like to knit and made a list of needles and notions, trying to keep it well curated to avoid duplicating or overpacking. Here is the list of what I decided to include.
materials
needles
• KNITTER’S PRIDE Dreamz size
US 7 [4.5mm], 10” [25cm] long
• KNITTER’S PRIDE Dreamz size
US 7 [4.5mm], 16” [40cm] long (2 sets)
• KNITTER’S PRIDE Dreamz
size US 7 [4.5mm], 24” [60cm] long
• KNITTER’S PRIDE Dreamz size
US 4 [3.5mm], 10” [25cm] long
• KNITTER’S PRIDE Dreamz size US 4 [3.5mm], 16” [40cm] long (2 sets)
• KNITTER’S PRIDE Dreamz
size US 4 [3.5mm], 24” [60cm] long
notions
• UNIQUE Sewing Folding Scissors
• UNIQUE Knitting Dropped Stitch Rescue Keychain
• Clover KNIT MATE Knitting Accessory Set
• Soak Gentle Laundry Soap, Wild Mint, 3 fl oz / 90 ml size
• VIVACE Knitting Bag
The yarn, notions and products I packed in my travel knitting bag
Items included in the Clover KNIT MATE Knitting Accessory Set
Mark wearing a hat knit in Deluxe Stripes at Big Bend Lookout, Arrowhead Provincial Park
Photos by Michelle Porter
This Clover KNIT MATE Knitting
Accessory Set has just about everything you need to pack, so it’s a great investment! I only had to add some personal items to complete my travel kit, such as reading glasses, lip balm, an emery board, a notepad, and a pencil.
If you’re wondering whether these items will pass through airport security in carry-on luggage, the answer is yes! I was able to go through domestic flights with no hassle.
Here are 3 places you can take your travel knitting to go!
1. The passenger seat of your vehicle during long road trips. It’s the perfect spot for knitting swatches! I knit all the tension gauge swatches I needed during one long drive. At our destination, I blocked the swatches and had them ready to measure up for the next day.
2. Knitting at the cottage. It doesn’t have to be yours! Visiting at a friend’s cottage is very lovely indeed. You can get lots of knitting done while having a few drinks and long conversations. Keeping the knitting simple is the key.
3. You can take your knitting to a festival parade. Small towns still have such great festivals! Notice how the ball of yarn sits in the drink holder of the folding chair. This works for music festivals too. Any of those bring-your-own-seat events are an invitation to bring your knitting. Did I mention kids’ soccer games or softball tournaments?
Taking my fully stocked travel knitting bag to my friend’s cottage in Muskoka
Knitting all my swatches during a road trip
Enjoying the International Festival Parade while knitting my cowl in St. Stephen, New Brunswick
You may find, as I have, that the travel knitting bag is more important than your backpack, and at least as important as your snacks! The small size of the VIVACE Knitting Bag in black is discrete and easy to grab and go. I can easily pack 3 balls of UNIVERSAL YARN Deluxe Stripes into it, as well as all the needles and accessories I described in previous .
Be sure to stop and enjoy the view as you walk along the river. Taking the time to pause is rewarding for the soul. Also, the memories and impressions are knit into the piece you’re working on. It makes each item ‘souvenir knitting’. Later, in the cold, deep winter, when I pull out this piece to wear, I’ll be reminded of this river walk, the sounds, and the smells.
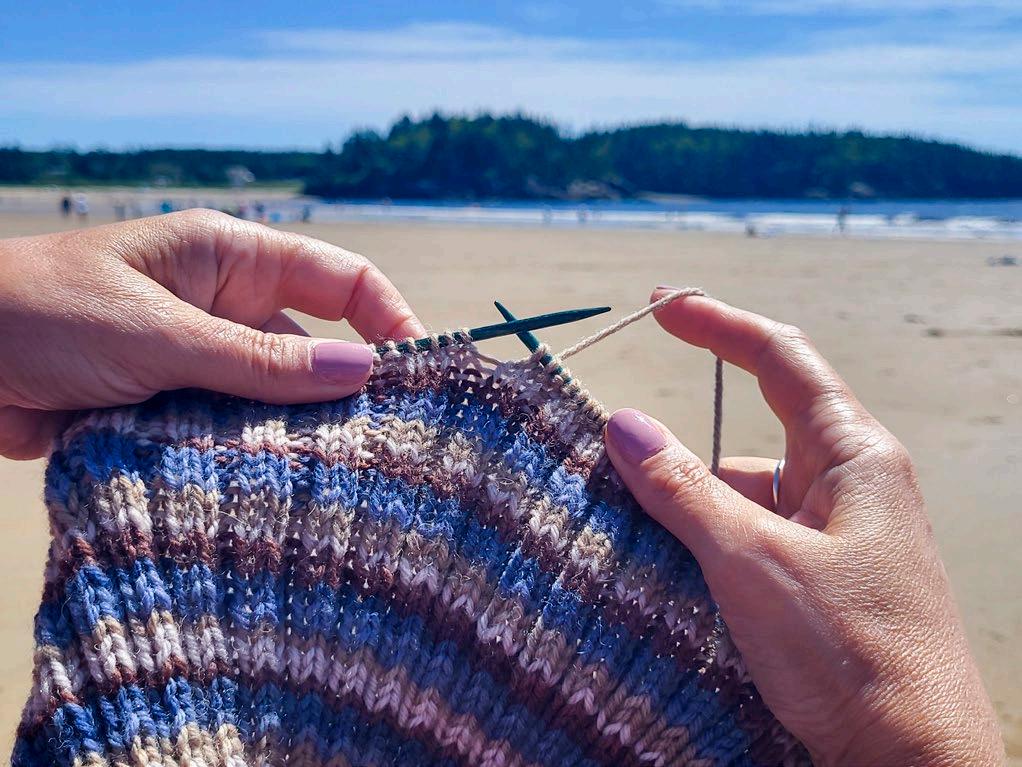
Long afternoons spent at the ocean beach are the perfect times to get some real progress on that cowl. Some folks like to read. I confess I prefer knitting. It keeps me more in the moment, even as time seems to pass more quickly.
I always bring knitting to the beach. #beachknitting is a popular hashtag on Instagram. And I do think that folding chairs were designed to hold yarn, not a drink. Work on something easy to pick up and put down, for when you want to get in that quick swim.
What do you do when you finally make it to the top of that rock? Whip out your knitting and rest for a while! The view is always sweeter when you have something to do once you get there.
Camping in the rain. Can you think of anything better to do while camping, especially when it’s raining? I made a lot of progress on the hat that day!
Taking in the view of the Saint Croix River while knitting on my cowl, in St. Stephen, New Brunswick.
A close-up of Michelle knitting the cowl, at New River Beach, New Brunswick (#beachknitting)
Knitting the cuff of my mitts using 2 circular needles, at Lake Utopia, New Brunswick (#beachknitting)
Making the hat
The first travel project pattern I created using UNIVERSAL YARN Deluxe Stripes is for the hat. I used the materials listed in the at the beginning of the feature which I packed into my travel knitting bag.
One size, adult; approximate circumference: 21¼” [54cm]
Abbreviations
Approx approximately cm centimeter(s)
in inch(es)
k knit
k2tog knit two stitches together as one = decrease of one stitch
m meter(s)
mm millimeter(s)
p purl
pm place marker
rm remove marker rep repeat rnd(s)
round(s) sm
slip marker
st(s) stitch(es)
St st Knit all right-side rounds
yd yard(s)
[ ] work instructions inside brackets a specified number of times
2 x 2 Rib [k2, p2] repeat to end of round, and repeat round to form pattern
18 sts x 24 rnds = 4” [10cm] in St st on US 7 [4.5mm] needles, blocked
32 sts x 32 rnds = 4” [10cm] in 2 x 2 Rib on US 4 [3.5mm] needles, blocked
Instructions
With US 4 [3.5mm] needle, cast on 96 sts. Join in round, taking care not to twist sts and place a stitch marker for beginning of rnd. Slip marker throughout.
Work 40 rnds of 2 X 2 Rib, or approx 5” [13cm].
Change to a US 7 [4.5mm] needle and work 16 rnds of St st, or approx 2½” [6.5cm].
The reward at the end of a hike is getting to knit while enjoying the view.
Knitting a simple hat is the perfect pastime for a rainy day while camping.
Shape crown
Next rnd: [K14, k2tog, pm] rep 6 times. 90 sts.
Next rnd: Knit.
Next rnd: [K13, k2tog, sm] rep 6 times. 84 sts.
Next rnd: Knit.
Next rnd: [K12, k2tog, sm] rep 6 times. 78 sts.
Next rnd: Knit.
Next rnd: [K11, k2tog, sm] rep 6 times. 72 sts.
The crown is reduced with each decrease in stitches. Once the circumference is too small to spread around the 16” [40cm] needle length, introduce the second size US 7 [4.5mm] needle. Work using the two circular needle technique.
Next rnd: [K10, k2tog, sm] rep 6 times. 66 sts. Next rnd: [K9, k2tog, sm] rep 6 times. 60 sts. Next rnd: [K8, k2tog, sm] rep 6 times. 54 sts.
Continue to decrease 6 sts each round as established, for 7 more rounds. 12 sts.
Next rnd: [K2tog, rm] rep 6 times. 6 sts remain.
Finishing
Cut yarn, leaving a 6” [15cm] strand. Using a yarn needle, thread through 6 open sts and draw up tight to close the top. Fasten the yarn securely to the inside of the hat and trim the ends. Weave in the yarn end from the cast-on. Wet block with a quick bath of SOAK wash, in a cool basin of water. Dry the hat on a hat form, if possible; otherwise, spread the hat on a towel, turning it several times during dry time. In the next , you’ll find the easy pattern for the mitts.
UNIVERSAL YARN Deluxe Stripes is a great choice for these fast-to-make mitts, as the stripes add the perfect design element. There will be lots of pictures, as I continue my theme of ‘knitting to go’.
A close-up of the hat knit in Deluxe Stripes, showing the details
The best campsite set-up you can have includes a fire, guitar, a BBQ and easy knitting!
A close-up of the hat knit in UNIVERSAL YARN Deluxe Stripes, showing shaping of the crown using 2 circular needles.
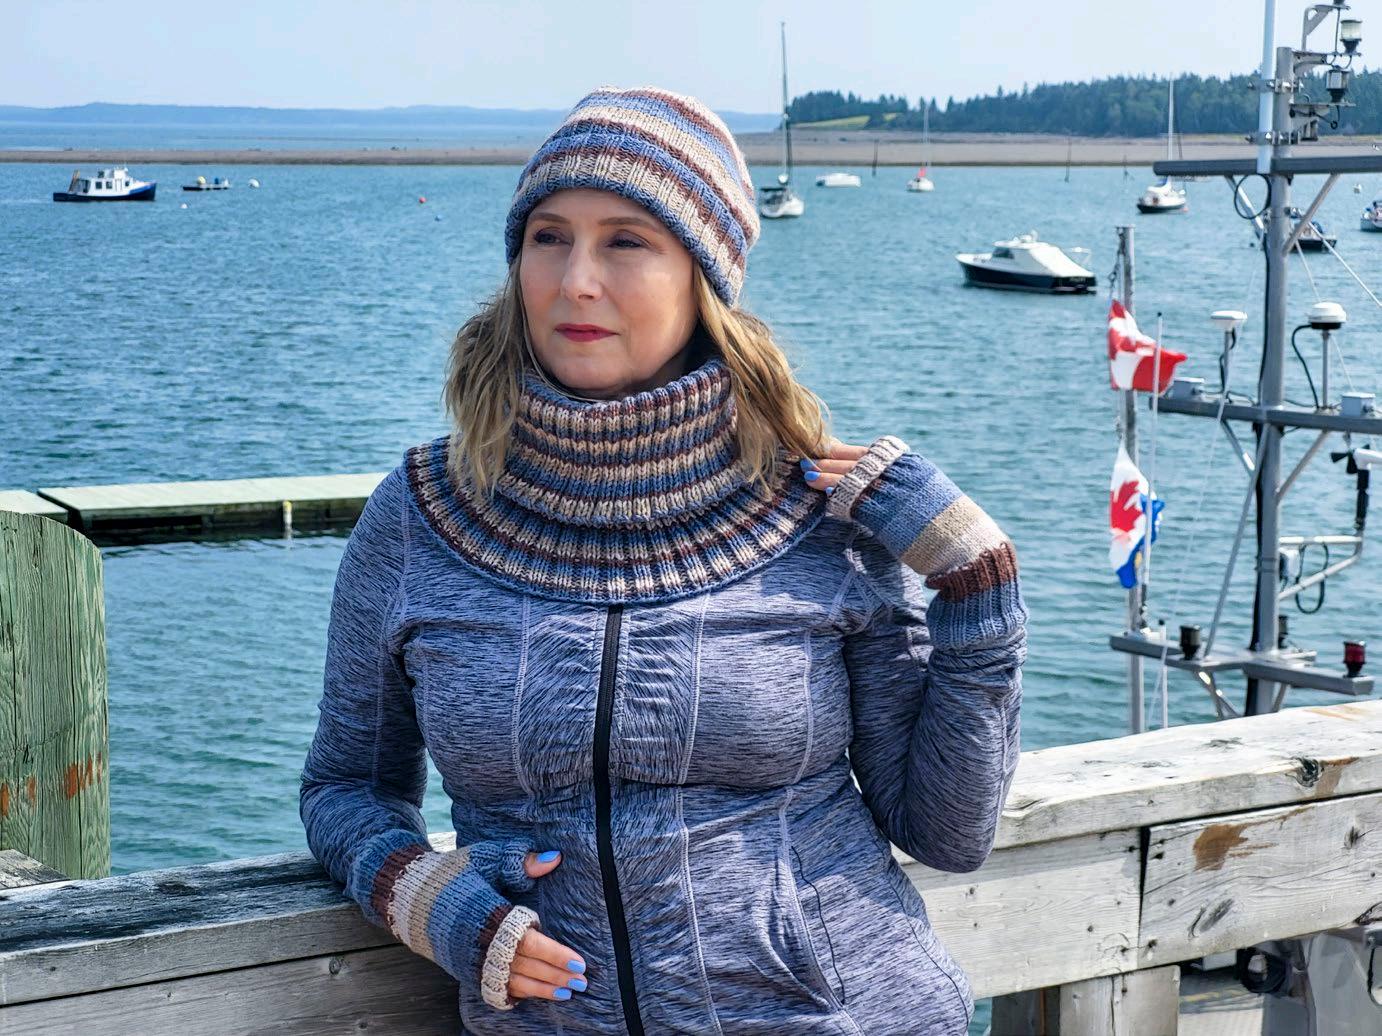
Wearing the hat, mitts, and cowl on the wharf at St. Andrews by-the-Sea, New Brunswick
If you love fast and easy projects, these open-finger mitts in UNIVERSAL YARN Deluxe Stripes will be your favorite pattern for knitting and wearing! As you may have noticed, the pictures are part of the pattern. Also, just as in the hat pattern, this pattern uses the materials I listed at the beginning and that I packed in my travel knitting bag.
(make 2, both alike)
One size, adult; approx. hand circumference: 7¼” [18.5cm]
Abbreviations
approx approximately cm centimeter(s)
in inch(es)
k knit
m meter(s)
M1L make one stitch that leans left M1R make one stitch that leans right mm millimeter(s)
p purl
pm place marker
rm remove marker
rep repeat
rnd(s) round(s)
sm slip marker
st(s) stitch(es)
St set Knit all right-side rounds
yd yard(s)
[ ] work instructions inside brackets a specified number of times
2 x 2 Rib [k2, p2] repeat to end of round, and repeat round to form pattern
A close-up of open-finger mitts knit in UNIVERSAL YARN Deluxe Stripes
Knitting the first cuff of my mitts using 2 circular needles while camping
22 sts x 32 rnds = 4” [10cm] in St st on US 4 [3.5mm] needles, blocked
32 sts x 32 rnds = 4” [10cm] in 2 X 2 Rib on US 4 [3.5mm] needles, blocked
Instructions
Begin at cuff.
With a US 4 [3.5mm] needle, cast on 40 sts. Divide sts onto 2, 16” [40cm] long needles, 20 sts on each. Join in round, taking care not to twist sts, and place a stitch marker for beginning of rnd. Slip marker throughout. Work using the two circular needle technique
Work 24 rnds of 2 X 2 Rib, or approx 3” [7.5cm]. Then work 4 rnds of St st, or approx ½” [1.5cm].
Thumb gusset
Rnd 1: K2, M1R, k2, M1L, pm, k to end. 42 sts.
Rnd 2: Knit, slipping both markers.
Rnd 3: K2, M1R, k to next marker, M1L, sm, k to end. (Increase of 2 sts). Rep last 2 rnds 4 more times, then rep Rnd 2 once more. 52 sts
Next rnd: [K2, p2] 4 times, sm, k to end.
Place sts on hold for thumb
Next rnd: K2, slip next 14 sts to spare needle (US 4 [3.5mm], 10” [25cm] long) and cover ends with point protectors, rm, cast on 2 sts (with backward-loop method) to end of right- hand needle, k to end of rnd. 40 sts.
On the beach again, knitting the thumb gusset of my mitt using 2 circular needles.
The hand of my mitt is being knit using 2 circular needles, while the stitches of the thumb gusset are on hold.
The hand of my mitt is complete and the thumb is knit using 2 circular needles.
Hand
Work 10 rnds in St st, or approx 1¼” [3cm].
Then work 16 rnds in 2 X 2 Rib, or approx 2” [5cm]. Bind off in 2 X 2 Rib pattern. Cut yarn and fasten off.
Thumb
Return 14 sts of thumb from hold to working needles. With right side facing, rejoin yarn to the left of these sts and working clockwise, pick up 6 sts across opening edge of hand (1 st in each space). Divide 20 sts on 2 needles. Join in rnd and continue in established 2 x 2 Rib pattern as follows: Next rnd: [P2, k2] rep to end. Rep last rnd 15 more times, or approx 2” [5cm]. Bind off in 2 x 2 Rib pattern. Cut yarn and fasten off.
finishing
Weave in yarn ends, closing any gaps. When making the second mitt, you can choose to color match the stripes, or use the next color stripe that appears in the ball. Wet block with a quick bath of Soak wash, in a cool basin of water. Spread on a towel, turning several times during dry time.
The finger and thumb ribbing can be folded down to reveal more of your fingers for greater dexterity. Or, you can wear the ribbing extended to cover your fingers for more warmth.
The finger and thumb ribbing can be folded down to reveal more of your fingers for greater dexterity. Or, you can wear the ribbing extended to cover your fingers for more warmth.
Open finger mitts knit in UNIVERSAL YARN Deluxe Stripes showing how ribbing can be folded down
You now have the pattern for the hat and the mitts; the next pattern is for the cowl.
Now, here are the straightforward pattern instructions for the cowl. This may be the most wearable cowl you come across. It’s one-part turtle neck, onepart dickie, and one-part capelet. Knit using UNIVERSAL YARN Deluxe Stripes, it’s totally reversible and can be considered unisex. This is simple, meditative knitting. Perfect to take along on any outing.
One size, adult
approx circumference at cast-on / bind-off edge 29½” [75cm]
approx length 12” [30.5cm]
abbreviations
approx approximately
cm centimeter(s) in inch(es)
k knit
m meter(s)
mm millimeter(s)
p purl
rep repeat
rnd(s) round(s)
st(s) stitch(es)
yd yard(s)
[ ] work instructions inside brackets a specified number of times
2 x 2 Rib [k2, p2] repeat to end of round, and repeat round to form pattern
26 sts x 24 rnds = 4” [10cm] in 2 x 2 Rib on US 7 [4.5mm] needles, blocked
32 sts x 32 rnds = 4” [10cm] in 2 x 2 Rib on US 4 [3.5mm] needles, blocked
I am wearing the gorgeous cowl near the wharf at St Andrews By the Sea, New Brunswick.
I’m enjoying a serene moment while knitting on my cowl at a private riverbank retreat.
The knitted but not yet blocked cowl shows the shape achieved by changing needle sizes.
Instructions
With US 7 [4.5mm] needle, cast on 192 sts. Join in round, taking care not to twist sts and place a stitch marker for beginning of rnd. Slip marker throughout. Work 32 rnds of 2 x 2 Rib, or approx 5” [13cm].
Change to US 4 [3.5mm] needle and work 32 rnds of 2 x 2 Rib, or approx 4” [10cm].
Change to US 7 [4.5mm] needle and work 18 rnds of 2 x 2 Rib, or approx 3” [7.5cm]. Bind off all stitches loosely in 2 x 2 Rib pattern. Cut yarn and fasten off.
finishing
Weave in all yarn ends–wet block with a quick bath of Soak wash in a cool water basin. Spread on a towel, turning several times during dry time. Let’s talk a little about Soak Gentle Laundry Soap, no-rinse laundry soap.
Soak is a well-developed product designed with knitted wool items in mind, but it is so much more! Yes, I use it to clean my hand-knitted sweaters and accessories. This product doesn’t need to be rinsed out, so it’s also perfect to add to the wash water when you’re blocking your finished knitted or crocheted items. But it’s also great for so much more! It’s the perfect travel companion for all your laundry needs, such as bathing suits (and underwear). It’s environmentally friendly and leaves no residue. The 3 fl oz [90ml] size bottle is allowed in your liquids and gels bag when flying.
The fragrances are incredibly subtle, but if you prefer, there’s a scentless version. I like the Wild Mint scent the best; for me, it smells extra fresh. I forgot to mention that you can use it in the washing machine too, especially for your delicate cycle.
I have one last pattern to share with you. If you’re a fan of those easy meditative knitting projects, then you’re also going to love the boot cuffs! The boot cuffs are the easiest yet. The delightful stripes of UNIVERSAL YARN Deluxe Stripes are the details that make this simple design so effective.
I’m using Soak while camping to wash our bathing suits and swim trunks at the end of the day.
The hat, mitts, cowl, and boot cuffs knit in UNIVERSAL YARN Deluxe Stripes in action!
Whether you call them boot cuffs, boot toppers, hiking socks, or old-fashioned legwarmers, these knitted add-ons are surprisingly useful. This is the ideal project for a beginner knitter or when you want to relax and find your knitting Zen. Knit up in UNIVERSAL YARN Deluxe Stripes and using the KNITTER’S PRIDE Dreamz US 7 [4.5mm] circular needles in the 10” [25cm] length; you can’t make it any more straightforward to produce.
26 sts x 24 rnds = 4” [10cm] in 2 x 2 Rib on US 7 [4.5mm] needles, blocked
Instructions
With US 7 [4.5mm] needle, cast on 76 sts. Join in round, taking care not to twist sts and place a stitch marker for beginning of rnd. Slip marker throughout.
Work 50 rnds of 2 x 2 Rib, or approx 8½” [21.5cm].
Bind off all stitches loosely in 2 x 2 Rib pattern. Cut yarn and fasten off.
I’m wearing the boot cuffs knit in UNIVERSAL YARN Deluxe Stripes while camping late in the season.
finishing
Weave in all yarn ends. When making the second boot cuff, color match the stripes, or use the following color stripe that appears in the ball. Wet block with a quick bath of Soak Gentle Laundry Soap, in a cool basin of water. Spread on a towel, turning several times during dry time.
I find that I wear my boot cuffs mostly with short boots, to extend the length. But I know people also use them while hiking along narrow grassy areas or trails with brush to keep ticks at bay. You can wear them over your pantlegs to keep out snow, or under for secret warmth. And you can tuck the boot cuff into your boots or wear over top. I also like to line the top of tall kneehigh boots, to keep my skin from chafing if I’m not wearing hosiery.
I’ve shared with you my 4 favorite knitted accessories for the outdoors.
I hope you’ve been inspired to take your knitting on your next outing. You can also use my advice from 1 on what to pack in a travel knitting bag as gift ideas! Plus, any beginner knitter would benefit from these easy and simple pattern suggestions.
UNIVERSAL YARN Deluxe Stripes is a fantastic yarn that works quickly, has excellent stitch definition, and has stripes that make it so fun to knit! Tag and save these five s for yourself and share them with your knitting friends! If you know a beginner knitter, make sure to let them know about these KNITmuch s!
Michelle Porter
The second boot cuff starts later on the same day; it is that fast.
The ideal time to wear all 4 of the knitted accessories is a cool morning hike.
The short circular needle makes the boot cuff easy to knit and bring along on a hike.
In Big Splash Knits, Shirley A. Scott (aka “Shirl the Purl”) presents over 20 outerwear knitting projects perfect for a boil-up in the woods, a hike by the sea, or a trot around town. Each pattern is accompanied by expertly and clearly written instructions and inspirational photographs. Helpful tips and colourful stories round out this collection.
Written with the same passion and attention to detail as the award-winning Saltwater Knits series (which Scott coauthored with Christine LeGrow), Big Splash Knits will appeal to a wide range of knitters. These designs are inspired by the traditions of Atlantic Canada, showcasing a love of life by the ocean that will resonate with our neighbours in New England and like-minded knitters in Europe and Scandinavia.
FEATURES
• Thorough, detailed, step-by-step instructions.
• Difficulty rating for each pattern: *Smooth Sailing, ** Choppy, ***Gale Force.
• Insight into yarns, needles – and that old devil, gauge.
• Helpful tips and suggestions to help you be a neater knitter.
About the author
Shirley Anne Scott, sometimes known as Shirl the Purl, has adored knitting since she was a child working away on her first project, a yellow scarf that came to resemble an amusing map of Africa. After a brief intermission for puberty and the sowing of wild oats, she took up the needles once again and never put them down. “To live is to knit” is her motto.
Shirl’s knitting life has been an especially rich one, full of amazing opportunities for historical research, designing, teaching, public speaking, writing and travel. The knitting world has been kind to her, but in recent years, the wonderful experience of moving to Newfoundland and teaming up with Christine LeGrow to write the Saltwater Knitting books became the icing on her cake.
Big Splash Knits is her sixth book.
For purchase: https://boulderbooks.ca/product/big-splash-knitsmittens-hats-socks-and-more-from-atlantic-canada/ or your favourite shop
MITTENS, HATS, SOCKS, AND MORE FROM ATLANTIC CANADA
SHIRLEY A. SCOTT
This photo by Anja Sajovik
Dyeing wool yarn
Welcome to another exciting KNITmuch Issue, where I’m doing something completely different. I’m dyeing yarn with Rit dyes and UNIVERSAL YARN Ready to Dye collection.
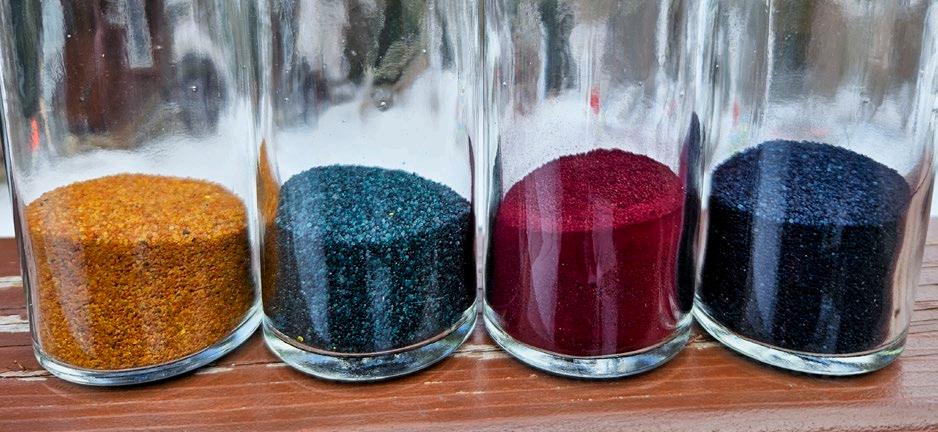
Rit All Purpose dyes are formulated for dyeing both protein and cellulose based fibers. Both the powder and liquid versions are available in a multitude of colors. I’ve opted to use Scarlet, Golden Yellow, Teal and Royal Blue in powder form, and Eggplant in the liquid as my colors.
The powder colors I chose are basically the 3 primary colors, which can be mixed to create an endless array of colors. Teal or turquoise can be difficult to achieve so I opted for that color in its pure form. That theory also applies to the eggplant color which is a rich deep shade of purple that can take a fair amount of experimenting with red and blue to achieve the same depth of color.
As mentioned, the Rit all purpose line is formulated for protein, meaning animal fibers such as wool, silk, and alpaca, and cellulose (plant) based fibers such as cotton, linen, and bamboo. Although not formulated for synthetic fibers such as polyester, acrylic, fiberglass, and metallic, Rit does have a line of dyes for these called Rit DyeMore
with Rit
all purpose dyes
I’ve done a fair amount of yarn dyeing with acid dyes, indigo, and nature dyeing to date and I always enjoy the outcome, whether expected or not. I always thought of Rit dyes as being a fabric dye, especially for tie dye, but they can also be used for yarn.
Speaking of yarn, UNIVERSAL YARN has a Ready to Dye collection of which I’m using a Superwash Merino Angora Nylon Sock Weight, a Wool/Nylon Sock Weight, and a Superwash Merino Sock Weight
All 3 skeins are wool based with 25% nylon content in 2 skeins and 20% Angora in one of them. Rit All Purpose Dye will work on all these fibers, however, the amount of nylon content can have an impact on the final color.
The instructions for using Rit dyes discuss the Stove Top Method, Washing Machine
Method, and Sink/Bucket Method, however, I’ll be using 3 different methods for dyeing the yarn; Snow Method, Warp Painting, and Kettle Dyeing.
Rit All Purpose Dyes are available in both powder and liquid form in a multitude of colors.
Cindy O'Malley
UNIVERSAL YARN Superwash Merino Angora Nylon Sock Weight, Wool / Nylon Sock Weight, and Superwash Merino Sock Weight from the Ready to Dye Collection
It’s important to note that you must have separate equipment from your regular kitchen utensils. Everything I use is dedicated to dyeing. You might say that I have a dyeing stash that is comprised of equipment, tools, and yes, even yarn. It might seem expensive to have all of this equipment, but there are very economical ways of obtaining what you need. Between thrift stores, dollar stores, yard sales and old used stuff, I managed to get everything you see.
For cooking the dye, I use:
• old roasting pan – friend’s destash
• cooling rack that fits inside the roasting pan – retired from the kitchen
• slow cooker – thrift store
• stock pot – from the Guild studio
• colander for steaming over a stock pot – dollar store
For measuring and pouring, I use:
• metal measuring spoons and funnels - dollar store
• measuring cup - retired from my kitchen
• condiment squirt bottles for holding and applying the liquid dye - dollar store
• spice jars to hold the dye powder – dollar store
• swizzle sticks for stirring –long-forgotten barware
What you need to get started
For safety purposes, I use:
• latex gloves – Covid stash
• mask for mixing powder dye – Covid stash
• drop sheet or shower curtain liner – dollar store
• old rags or towels for wiping up – retired from home use
Other items to have on hand include:
• thermometer to check the temperature of the cooking water – from the toolbox
• foam brushes for painting –optional
• plastic zipper locking bags and plastic wrap
• vinegar – must-have for setting the dye on proteinbased fibers
• salt – must-have for setting the dye on cellulose-based fibers
• bucket, tub, or separate sink for soaking the yarn
Where to do your dyeing is also important as you shouldn’t dye where food is prepared. I have access to the dye kitchen of my Guild, but not everyone has that luxury. In the summer months, I use the side burner on my barbeque for the stock pot or roasting pan. The slow cooker(s) – I have several – can be plugged into an outdoor outlet. If working outside is not an option, just make sure that the dyeing and food preparation areas are completely segregated. The laundry room is also an option, especially for mixing dyes and rinsing the yarn.
I have everything I need to get started – the yarn, the dyes, and the equipment. I’ll begin dyeing using the Snow Dye method. I hope you join me as I use the Rit All Purpose Dye powders to color one of the skeins from the Ready to Dye Yarn collection. This will be fun!
Photos by Cindy O'Malley
Dedicated equipment and tools for dyeing
Snow dyeing yarn for a random effect steps to a variegated look
I’m snow dyeing! I’m very excited as this is my first time, and you won’t find the instructions on the box for doing this. It’s a complete experiment, but not without research. There are many sources available online, and they all seem straightforward.
I’m using the powder form of the Rit All Purpose Dyes for my experiment. I’ve opted to use the Royal Blue, Golden Yellow and Teal as my color choices. Using the funnel, gloves, and mask, I emptied each color into the spice jars.
Before I begin with the dyeing process, the yarn needs to be soaked in warm water and vinegar. I’m using the Superwash Merino / Angora / Nylon (50/30/20) blend of sock weight yarn which weighs 3.5oz [100g] at 460yd [420m]. Since the instructions state a cup of vinegar to a pound of fabric, I guessed how much to add to the water. I let the jug glug a few times and figured that was close to a ¼ cup. I let the yarn soak for a good hour or more.
In the meantime, I gathered all the other equipment needed for this project which included the roasting pan, cooling rack, tongs, dye powder, scoop for the snow (I used an empty yogurt tub), and 4 votive candle holders. I didn’t mention those but they turned out to be very important.
1. Place the votive candle holders upside down at the bottom of the roasting pan and place the cooling rack on top of them.
2. Place the yarn on the cooling rack. You can try and place it strategically, but I just spread it out as evenly as I can in a very random fashion. It looks like spaghetti in the bottom of the pan.
3. Scoop snow; clean snow that is. Pile it on top of the yarn and pack it down as best as you can. Fill it as high as possible without it spilling over. Now it looks like whipped cream atop a dessert.
Rit All Purpose Dye powder emptied into spice jars
The soaked yarn spread out evenly over a raised rack in the bottom of the roasting pan
Packed snow on top of the yarn in the roasting pan
This was a challenge that I wasn’t expecting given that I now live in a snow belt. This winter has been a strange one given all the false springs we’ve had. In the morning following a drifting snowstorm, I immediately jumped into action to collect the snow.
4. Shake the dye over the top of the snow. This is where the spice jars come in handy. It was easy to shake and spread the powder where I wanted it. Completely cover all the snow with the dye powder. I started off using Blue, Teal, and Golden Yellow but then decided to add Scarlet to the corners of the blue and yellow. I wasn’t after red but I wanted to see if it would produce purple and orange respectively.
5. Bring the pan inside and let the snow melt. Leave the roaster uncovered. However, whenever we left the room or went to bed that night, I’d put the roaster lid on to make sure the kitties didn’t try to play with the colored snow. The lid slows down the melting process but all was good the following morning.
6. Behold the wonder! I was amazed at what I saw the next morning. All the snow had melted and my spaghetti was now brightly colored. Using the tongs, I scooped the yarn into a zipper-locking bag for the final heat set. I noticed a fair bit of uncolored areas on the underside of the yarn, but since it was spread so randomly, the white was also random. White is a color so I’m good to go. By the way, don’t empty the puddle at the bottom of the roaster. We’ll use it later.
7. Steam the bag of yarn to heat set the color. I took the bag to the Guild dye kitchen for this process. I heated water in a stock pot, placed the bag in the colander and let it steam for an hour, flipping it over halfway. When done, I took it back home for the final step(s).
8. Rinse the yarn under cold water until the water runs clear. I was very surprised that the water ran clear right from the get-go. That means all the dye was absorbed and set into the fibers. Then I draped it over a hanger to let it dry. Once again, behold the wonder!
Rit All Purpose Dye powder spread over top of the snow
Melted snow leaves brightly colored yarn.
Dried skein of yarn highly variegated from the snow dyeing process
I wanted random and I got random and I love the color combination. Spreading the red over a bit of the blue and yellow turned out exactly as I had hoped for resulting in purple and orange.
As I mentioned in Step 6 – don’t throw out the puddle. As the snow melts, it makes a puddle at the bottom of the roaster taking the dye colors with it. I just had to use the puddle but needed some yarn to dye so I turned to my stash.
Years ago, I inherited a huge amount of mercerized crochet cotton. I have no intention of crocheting with it but think that one day I’ll use it to weave. I’ve often dipped into this stash for dyeing experiments and thought why not, let’s do it again. Rit All Purpose Dye is formulated for protein and cellulose fibers, so I thought this was a great opportunity to try it out on cotton.
I soaked the yarn in warm water and dissolved salt as per the instructions, however, the quantity of salt was a bit of a guessing game for my 50g skein of cotton. I added the yarn to the heated puddle, shook a little more salt over top and let it simmer until the liquid was almost clear. Once again, behold the wonder!
In warmer weather, snow dyeing is not feasible. However, substituting snow with crushed ice is an option. This was an amazing experiment. I don’t dye with a proven recipe; every time I dye yarn, it’s always an experiment. If I don’t like the results, I over dye it later. It’s fun, and I enjoy it.
Snow dyed skein of wool blend with a puddle dyed skein of cotton
Rit All Purpose Dye in Golden Yellow, Teal and Royal Blue with UNIVERSAL YARN Ready to Dye Superwash Merino Angora Nylon Sock Weight yarn
Warp painting wool for a planned weaving project - dyeing stripes
I originally planned on using the primary colors of Golden Yellow, Scarlet and Royal Blue for dyeing the Wool / Nylon blend of sock weight yarn thinking that I could mix and match the colors to create different shades. This time, I’m mixing the powder to create liquid dyes that will be applied to the warp yarn.
Using the condiment squirt bottles, a funnel, the measuring spoons, and wearing a mask and gloves, I placed a ¼ teaspoon in each bottle. It was easy to scoop the powder out of each spice jar with the measuring spoon. Then I poured 4oz of hot water into each container, attached the lids and gently shook each bottle to dissolve the powder. It was at this point that I decided to mix up a batch of the Teal powder. By the way, the lids were not leak-proof so I’m really glad I was wearing gloves.
To prepare the yarn, I wound it using my warping mill to the length I wanted for my warp. I secured different sections together and soaked it for an hour or so in a fairly hot water bath along with some vinegar.
To prepare for the dyeing, I spread out the shower curtain liner on my back deck, laid strips of plastic wrap, and then arranged the yarn into sections and lengths. As it turns out, my liner wasn’t as long as the yarn so I had to squish it up a bit to get it all on.
Now for the creative part – painting the warp. This step can be done with foam paint brushes but I couldn’t find mine so I squirted my dye and squished it as I went along. I wasn’t after perfect stripes of color but rather free-range stripes, so to speak.
Rit All Purpose Dye in Golden Yellow, Scarlet and Royal Blue with UNIVERSAL YARN Ready to Dye Superwash Wool and Nylon Sock Weight yarn
The warp yarn arranged on the plastic wrap on top of the shower curtain liner
The dye is squirted onto the yarn in lengths and then squished together to blend the colors.
This can be a very messy process, so working outdoors with gloves, old shoes that were easily removed, and my paint clothes was the right choice. I’m glad I opted to include the teal as it has a lovely effect with both the yellow and blue on either side. I also decided I didn’t want pure red, so I squished the red stripes with some of the blue stripes to create more burgundy or purple striping. The same applied to the yellow. I didn’t want yellow but rather variations of green by squishing the yellow with the teal to one side, and with blue on the other. This was both creative and fun, but a little tough on the back. It would’ve been easier to work at table height.
Once I was satisfied that all the color was applied to my liking, it was time to wrap it up in strips of plastic wrap. I wrapped the different strips of plastic around the yarn sections where the colors could blend a little; meaning, the red was wrapped with some of the blue, some of the blue was wrapped with the teal, the teal with the yellowish green, and then with the blue. Then I wrapped the yarn into a coil and popped it into a zipper locking bag. Now it’s ready for steaming to heat set the dye.
After the steaming process was done and the yarn cooled, I rinsed the skein under cool water and hung it to dry.
Behold the wonder! I was very pleased with my color transitions and glad that I didn’t go for pure red or yellow. The blend with the adjoining colors was perfect. Now for the hard part, getting the skein back in order so I can warp my loom.
I’m very pleased with the whimsical striping effect. It looks great on the loom. But what do I use as my warp? If I had more of the yarn available, I would’ve used the remaining dye liquid to make a matching color. I’ll have to ‘shop my stash’” to find the perfect match.
Not wanting to waste a single drop of the remaining dye, I combined the teal and golden yellow into a single bottle, then added half of the blue to that bottle and the other half to the leftover red. I raided my crochet cotton stash once again and soaked two skeins in a hot water and salt solution. This time, I emptied each bottle of liquid into a zipper-locking bag and added a skein of cotton. Then I immersed the bags into my slow cooker and let it cook for several hours. When I removed the two skeins there was still lots of color left in each bag, so I repeated the process with two more skeins. There’s a noticeable difference in the intensity of color between the 1st and 2nd skeins, but they go together beautifully.
The warp painting process was a fair amount of work but the results made it all worthwhile. Next time, I’ll do the painting on top of a table to make it easier on my back.
The strips are wrapped in plastic, coiled, then placed in a zipperlocking bag.
The color transition of the stripes is exactly what I was hoping to achieve.
Whimsical stripes of warped yarn on a Rigid Heddle Loom
Crochet cotton stash yarn used to soak up the remaining liquid dye of the Golden Yellow/Teal/Royal Blue and Scarlet/Royal Blue Rit dye
CLICK on the cart to purchase the pattern!
Thoughtful Soles Series
Welcome to Thoughtful Soles Series by Lorraine Thompson! This is a zany collection of knitted sock patterns to tickle your funny bone every time you wear them.
GINGHAM APPLES
WOOL STEW
Kettle dyeing with a slow cooker and liquid dye
I’ve done kettle dyeing before with both natural and acid dyes. This is a first with Rit dyes, but I’m approaching the process exactly the same.
I added hot water to the slow cooker along with about 2oz of the Rit liquid dye. I really didn’t know how much to add, but thought that was a good start. After presoaking the yarn in hot water and vinegar, I added the yarn to the slow cooker and let it cook.
The Rit dye instructions state that the water temperature should be at least 140 degrees Fahrenheit. This is where the thermometer mentioned in my second article, comes into play. I did this temperature check in the previous article, Warp painting wool for a planned weaving project - dyeing stripes, as well just to make sure the slow cooker heated up enough for the dye to set.
I let it cook for quite some time before turning off the slow cooker and leaving the yarn to sit in the pot overnight. I took it out the next morning and let it dry.
I liked the color even though it wasn’t as dark as I’d hoped for. What I didn’t like were the spots where the dye didn’t take very well around the skein ties. I double-checked the ties to ensure they weren’t tight before I started and I did stir
the pot while cooking, but I still ended up with these spots. Perhaps I should have left it in the pot longer as there was a bit of color left in the water.
While I was deciding what to do, I did the cotton stash experiment again to try and soak up the remaining color, which is known as the exhaust pot. To my surprise, the cotton absorbed more color than I thought was left in the pot. That told me I should’ve left the original skein in the cooker, but to no avail. It’s better to start off lighter than desired as you can always dye it again, which is what I did.
So, I added 1oz of the dye liquid and a bit of vinegar to a squirt bottle. I’d already deposited the skein in the slow cooker to soak and heat up. Then I squirted a bit of dye on the light spots of the skein and added the balance to the water. Then repeated the cooking and drying process.
I couldn’t believe the difference in color. This is what I was hoping for in the first place. A little bit of dye goes a long way, but a bit more color goes even further. I’m very pleased with the results. When I put this skein beside the cotton skein, the color combination is awesome.
Rit All Purpose Dye liquid in Eggplant or Aubergine and UNIVERSAL YARN Superwash Merino Sock Yarn
The dried skein of Superwash Merino dyed with Rit All Purpose Dye in Eggplant
The newly dried skein of Superwash Merino with a little more Rit All Purpose Dye in Eggplant
The Superwash Merino skein dyed a 2nd time and the cotton dyed from the 1st exhaust pot
Much of it was total experimentation but the lessons learned have only encouraged me to do more. Dyeing yarn is fun!
If you’re wondering what I’ll do with the cotton skeins I dyed, they actually need another process. Rit recommends using Rit ColorStay Dye Fixative to lock in the color on cotton. Since I wasn’t planning on dyeing cotton, I don’t have any on hand, but will get some so I can keep the colors. One day, I’ll weave with my crochet cotton stash and now I have an amazing array of colors to add to the project.
I have one more photo to share with you, but I have to say that this photo was taken before I did the second round of dyeing on the merino skein. I couldn’t take another photo because the yarns from Day 3 and 4 were already in use.
For the final time, behold the wonder! I’m so happy with my results and I really enjoyed the different dyeing techniques.
I mentioned that I couldn’t take a photo of the final eggplant skein with the other two as they were already in use. The Snow Dyed skein is knit into a long cowl and the warp painted skein is on my loom awaiting the perfect weft yarn. As for the Kettle Dyed Eggplant skein, I have a special purpose for it in mind. I hope you enjoyed this feature as much as I did and picked up a few tips on dyeing with Rit All Purpose Dyes
Happy Knitting!
Cindy O'Malley cindooknits.blogspot.com
The three skeins of UNIVERSAL YARN Ready to Dye collection dyed with Rit All Purpose dyes
Winter is a good season to prepare for the very hot days of summer. In this feature I chose to knit with natural vegetable yarn, a yarn fit for a summer tunic.
While animal fiber such as wool, alpaca, yak, cashmere, and mohair are well known for keeping us warm during the cold months, vegetable yarn is well known for absorbing moisture and keeping us cool. No wonder summer clothing uses cotton, linen, and blends of these fibers.
Linen is a lighter fiber than cotton and dries faster, so let’s give it a try!
The yarn I chose is Fibra Natura FLAX in color dusted apricot. The name and the color make me think of sweet, warm summer evenings and the color hints of a summer sunset.
It’s a fine yarn: 137yds [125m] per 1.75oz [50g] hank and is 100% natural linen. It feels a little bit rough in the beginning, but I know for sure linen softens when you wear it.
Fibra Natura FLAX
A fine natural yarn for knitting and crocheting
Cristina Simionovici
Vegetable fiber, particularly linen, has no stretch, does not bounce back when knitting, and is slippery on metal needles. I’ll have to swatch the yarn with needles made of different materials such as metal, plastic, and wood. I’ll choose the needles that make my knitting more pleasant and give me a more evenlooking swatch. Linen is not very forgiving; any change in tension will show in my swatches.
The band on the skein recommends US 5 [3.75mm] needles for 4” [10cm] square over 24 sts/24 rows. I know my tension will be looser with linen, so I chose US 3 [3.25mm] needles for my swatch and project.
The needles I'll use are:
• Wood LANTERN MOON
Destiny Circular Needles 32 (80cm) - Size US 3 (3.25mm)
• Metal KNITTER'S PRIDE Mindful 80cm (32″) Fixed Circular Lace Knitting Needle - 3.25mm (US 3)
• US 3 [3.25mm] plastic needles (unknown brand)
• KNITTER'S PRIDE The Mindful Markers
• KNITTER'S PRIDE Mindful Row Counter
And now it’s time for swatching. The swatches are worked over 42 stitches and 42 rows. That will give me enough fabric to measure a 4” square.
From left to right, the swatches were made with metal, plastic, and wood needles.
3 stockinette swatches worked with Fibra Natura FLAX yarn
The pattern + more about the swatches
I’ll talk about the pattern which is a Simple Summer Tunic I created years ago.
Start of pattern
The garment is knitted in 4” squares, alternating between stockinette and reversed stockinette stitch, creating a relaxed tunic or mini dress.
With very little shaping and no sleeves, the knit is fast and a good social knitting project.
The tunic is knitted top down allowing for different lengths. It can become a top or a dress, depending on the length. If you decide to knit a dress, allow for more yarn. With an additional 3 skeins, you can knit a midi dress.
sizes Small (Medium) materials yarn
• 7 (8) skeins of Fibra Natura FLAX
notions
• row counter
• stitch markers
• tapestry needle gauge
24 stitches and 28 rows for 4” [10cm] using US 3 [3.25mm] needles
The pattern is written for sizes S(M) with the instructions for the smaller size followed by the instructions for the larger size in brackets. Where only one number is given, that number is used for both sizes.
abbreviations
k = knit
p = purl
st(s) = stitch(es)
pm = place marker
rm = remove marker
sm = slip marker
RS = right side
WS = wrong side
Back
Using a scrap yarn, cast on 114 (128) stitches.
Switch to your working yarn and work across the row on the RS:
Row 1: K2, place a marker, * knit 22(24) sts, purl 22(24) sts **, repeat once more from * to **, knit 22(24) sts, pm, k1, slip 1 with yarn in front.
Row 2: K1, p1, slip marker, work stitches as they appear (knit the knits and purl the purls) up to the marker, p1, slip 1 with yarn in front.
This will set up the 5 squares alternating the stockinette and reversed stockinette.
If you don’t want to do any shoulder shaping, repeat Row 1 and Row 2 until you complete 28 rows.
simple summer tunic
Optional – shape shoulders using short rows.
Note: In this section, I use the wrap-and-turn technique for short rows, but any other technique will work as well.
Row 3: (Optional, shaping the shoulders) k2, sm, work stitches as set up to the last section of purled stitches: 90 sts (98 sts). Wrap and turn.
Row 4: (Optional, shaping the shoulders) work stitches as they appear up to the last section where the reversed stockinette changes to stockinette stitch. Wrap and turn.
Photos by Cristina Simionovici
A
Row 5: (Optional, shaping the shoulders) work stitches as they appear for 3 sections. Wrap and turn.
Row 6: (Optional, shaping the shoulders) work stitches as they appear for 1 section (the central section). Wrap and turn.
Row 7: (Optional, shaping the shoulders) work stitches as they appear to the end of the row, unwrapping the wrapped stitches as you reach them.
Row 8: (Optional, shaping the shoulders) work stitches as they appear to the last 2 sts, unwrapping the wrapped stitches as you reach them, p1, slip 1 with yarn in front.
Repeat row 1 and 2 until 28 rows are completed.
Row 29: K2, * purl 22 (24) sts, knit 22 (24) sts **, repeat once more from * to **, purl 22 (24) sts, k1, slip 1 with yarn in front.
Row 30: K1, p1, * k22 (24) sts, p22 (24) sts **, repeat once more from * to **, k22 (24) sts, p1, slip 1 with yarn in front.
Repeat row 29 and row 30 until you reach row 56.
Continue repeating rows 1 to 28 (without any shaping) and 29 to 56 to the desired length. Depending on your preferences you may end with row 28 or row 56.
Right front V neckline
Remove the provisional cast-on and mark the center 40 sts for the back of the neck.
Row 1 (RS): K2, place marker, purl the knitted stitches and knit the purl stitches up to 2 stitches before the center 40 stitches, place marker, k1, slip 1 with yarn in front. Turn work.
Row 2 (WS): Slip 1 st, purl 1 stitch, sm, work the rest of the stitches as they appear up to the marker, p1, slip 1 with yarn in front.
Row 3: Repeat row 1 slipping the stitch marker.
Row 4: Repeat row 2 slipping the stitch marker.
Row 5 (RS) Increase row: K2, sm, work stitches as they appear up to the marker, make 1 left, slip marker, k1, slip 1 with yarn in front.
Row 6 (WS): Repeat row 2 slipping the stitch marker.
Row 7 (RS): Increase row: k2, sm, work stitches as they appear up to the marker, make 1 left, slip marker, k1, slip 1 with yarn in front.
Row 8 (WS): Repeat row 2 slipping the stitch marker.
Row 9 (RS): Repeat row 1 slipping the stitch marker and taking care to switch from stockinette to reverse stockinette when the center section reaches 22 (24) sts, not counting the stitches after the marker.
Row 10 (WS): Repeat row 2 slipping the stitch marker.
Repeat rows 5 to 10 until you increased 21 sts. Leave the RS, but do not cut the yarn. Increases are done alternating every 4 rows with every 2 rows.
Left front V neckline
Place the center 40 sts on a scrap yarn and resume working on the left 37 (42) sts. Attach a new yarn and start on the RS, at the neckline end.
Row 1 (RS): K2, place marker, purl the knitted stitches and knit the purled stitches up to the last 2 stitches, place marker, k1, slip 1 with yarn in front.
Row 2 (WS): K1, p1, slip marker, work stitches as they appear up to the marker, p1, slip 1 with yarn in front.
Row 3: Repeat row 1 slipping the stitch marker.
Row 4: Repeat row 2 slipping the stitch marker.
Row 5 (RS) Increase row: k2, sm, make 1 right, work stitches as they appear up to the next marker, slip marker, k1, slip 1 with yarn in front.
Row 6: (WS) Repeat row 2 slipping the stitch marker.
Row 7 (RS) Increase row: k2, sm, make 1 right, work stitches as they appear up to the next marker, slip marker, k1, slip 1 with yarn in front.
Row 8 (WS): Repeat row 2 slipping the stitch marker.
Row 9 (RS): Repeat row 1 slipping the stitch marker and switching from stockinette to reverse stockinette when the center section reaches 22 (24) sts, not counting the stitches after the marker.
Row 10 (WS): Repeat row 2 slipping the stitch marker.
Repeat row 5 to 10 until you increase 21 sts. Cut the yarn.
Joining the left and right front
Place all stitches on the same needle, and resume knitting with the yarn from the RS of the front neckline.
Work the edge stitches as usual: k2, work up to the last marker, remove marker.
The last 2 stitches of the RS and the first 2 stitches of the left side are worked together.
Place the first 2 stitches of the left side onto a cable needle. Knit the stitch before last of the RS together with the first stitch of the left side from the cable needle, knit the last stitch of the RS with the second stitch from the cable needle (2 stitches decreased) remove marker and work to the end of the row up to the last marker, slip marker, k1, slip 1 with yarn in front.
Next row (WS): K1, p1, sm, work stitches as they appear up to the last marker, p1, slip 1 with yarn in front. Next row (RS): K2, sm, work stitches as they appear up to the center two stitches. Work the center two stitches in the pattern of the central square.
Continue working alternating stockinette and reverse stockinette every 28 rows up to the desired length.
Finishing the tunic
Sew the side seams using the knitted edge stitch as guide for the seam line. Leave an opening of 7¼ (7½)” for the arm opening.
Finishing the neckline
Starting at the middle of the back, attach a new yarn and knit 20 sts, pick up stitches along the V neckline using the knitted edge stitch as a guide for picking up stitches. For a tighter neckline pick up 3 stitches for each 4 rows, otherwise pick one stitch for each row. Knit 20 stitches to the middle of the back.
Bind-off using an I-cord bind-off
1. With RS facing, cast on 3 stitches needed for I-cord onto the left needle.
2. Knit 2 stitches.
3. Knit the next two together through the back loops.
4. Transfer all stitches from the right needle back to the left needle.
5. Repeat steps 2 to 4 until all stitches are bound off.
Finishing the armholes
Starting at the underarm seam and using the knitted edge stitch as a guide, pick up 3 stitches for each 4 rows around the armhole.
Bind-off using an i-cord bindoff. Sew in the ends.
Your tunic is ready for the hot days to come!
options
You have the option to make the back longer than the front for a more sophisticated look, add pockets for convenience, or extend the tunic to create a midi dress.
Wear the tunic with a skirt or wide long pants. You can also use it as a long vest over a shirt. It is a simple but very versatile garment.
End of pattern
Blocked swatches for the tunic using different size needles
More about my swatches for this pattern
The swatches are knitted and washed. I laid them flat to dry and now I can measure them to choose the type of needles I’ll use for the project.
The swatch knitted with metal needles has 24 stitches and 27 rows for 4 inches.
The swatch knitted with plastic needles has 25 stitches and 29 rows for 4”.
There isn’t a big difference, so I can choose the needles that give a better look and feel to my knitted fabric. I like the feel of the fabric knitted with the wood needles, so I’ll use for my project the LANTERN MOON Destiny Circular Needles 32 (80cm) - Size US 3 (3.25mm)
Swatch using US 3 [3.25mm] size metal needles before blocking
Swatch using US 3 [3.25mm] size plastic needles before blocking
Getting started and following the pattern
I start with a provisional cast-on and continue with setting up the checkered pattern, alternating stockinette and reverse stockinette stitches.
After the short rows for the neckline and after I completed the first 28 rows, I switched the stockinette with reversed stockinette and the reversed stockinette with stockinette stitches. The different structure marks the squares quite clearly.
I continue knitting, alternating the squares. The rustic look of the fabric and the summer color wins me over with every single row I knit!
A knit stitch is kept along the sides, regardless of the stitch pattern of the square. This stitch will be helpful when sewing the sides together and when picking up stitches to finish the armholes.
I’ll continue knitting to finish the back as I need 8 rows of squares for my chosen length.
The back of the tunic is knitted in a pattern alternating stockinette and reverse stockinette.
Knitted fabric in alternating squares of stockinette and reversed stockinette
Detail showing the edge knitted stitch
Knitting the V-neck + the front of the tunic
Now that the back is finished, I’ll start working on the front. The V-neck is a little challenging as I’ll need to keep track of my increases.
I remove the provisional cast on and transfer all the life stitches onto my working needle. I also mark the central back neck stitches.
I’ll work on the two sides of the V neckline at the same time, this way I make sure the increases are mirroring each other on the two sides of the front.
I place the center stitches for the back of the neck on a scrap yarn and place all other stitches on the needles. Each side of the V-neck is worked with a different ball of yarn.
I start working on the two sides of the front paying attention to the increases, the edge knit stitches and the checkered pattern. The work is a little more time-consuming this way, but when it’s done, the V neckline will be completed. The most important thing for this step is to count the stitches in the partial squares and make sure to not break the checkered pattern.
Once I complete all the increases, I’m ready to join the two sides. The two edge stitches of each neckline side are worked together using a cable needle. After working them together, I count the stitches on the central square making sure the number is right (22 stitches as I’m knitting the smaller size).
I cut the yarn from the left side of the front and continue knitting across all stitches. On the next right-side row, I’ll work all stitches of the central square in reversed stockinette stitch.
From now on it’s just knit and purl, alternating and working to the same length as the back using Fibra Natura FLAX in the gorgeous dusted apricot colorway.
Working stitches after removing the provisional cast on
Start of work for the front – The back of the neck stitches placed on a scrap piece of yarn
Working on the two front sides at the same time
Joining the two front sides of the V neckline
Finishing touches on the Simple Summer Tunic
I closed the side seams using the mattress stitch and I left a slit open on both sides over one row of the squares. I left an opening of 7¼” for the armhole.
Now it’s time to finish the neckline with an I-cord bind off. I decided to use some smaller needles for the bind off. I started in the middle of the back, knitted across half of the back stitches, picked up stitches along the V neckline (one stitch for each row) and knitted the second half of the back of the neck stitches.
The I-cord bind off is a little more time-consuming, but will give the garment a more polished look.
I picked up stitches around the armholes and finished them with an I-cord bind off and I decided to add an I-cord bind off along the bottom of my tunic as well.
Side seam with an open slit over one row of squares
Finishing the neckline
There are not many ends to sew in, so this is an easy, fast step in finishing my work.
After soaking it in very hot water, I lay it flat to dry. I didn’t block the tunic, but the irregularities of the tension are not so visible after washing it. It looks like a warm weather garment with a rustic feel and I can’t wait to wear it.
I’ll enjoy my handmade garment and celebrate the refreshing Fibra Natura FLAX yarn.
And this is how this chapter of my knitting adventure ends. Thank you for tagging along while I made the Simple Summer Tunic with the natural fiber flax Fibra Natura FLAX in the gorgeous dusted apricot colorway. It comes in a variety of beautiful colors perfect for sunny summer days.
Cristina Simionovici
Front view of the finished tunic
Back view of the finished tunic
Simple Summer Tunic in Fibra Natura FLAX – finished
much
Yarn Review: Fibra Natura FLAX for Summer Knitting!
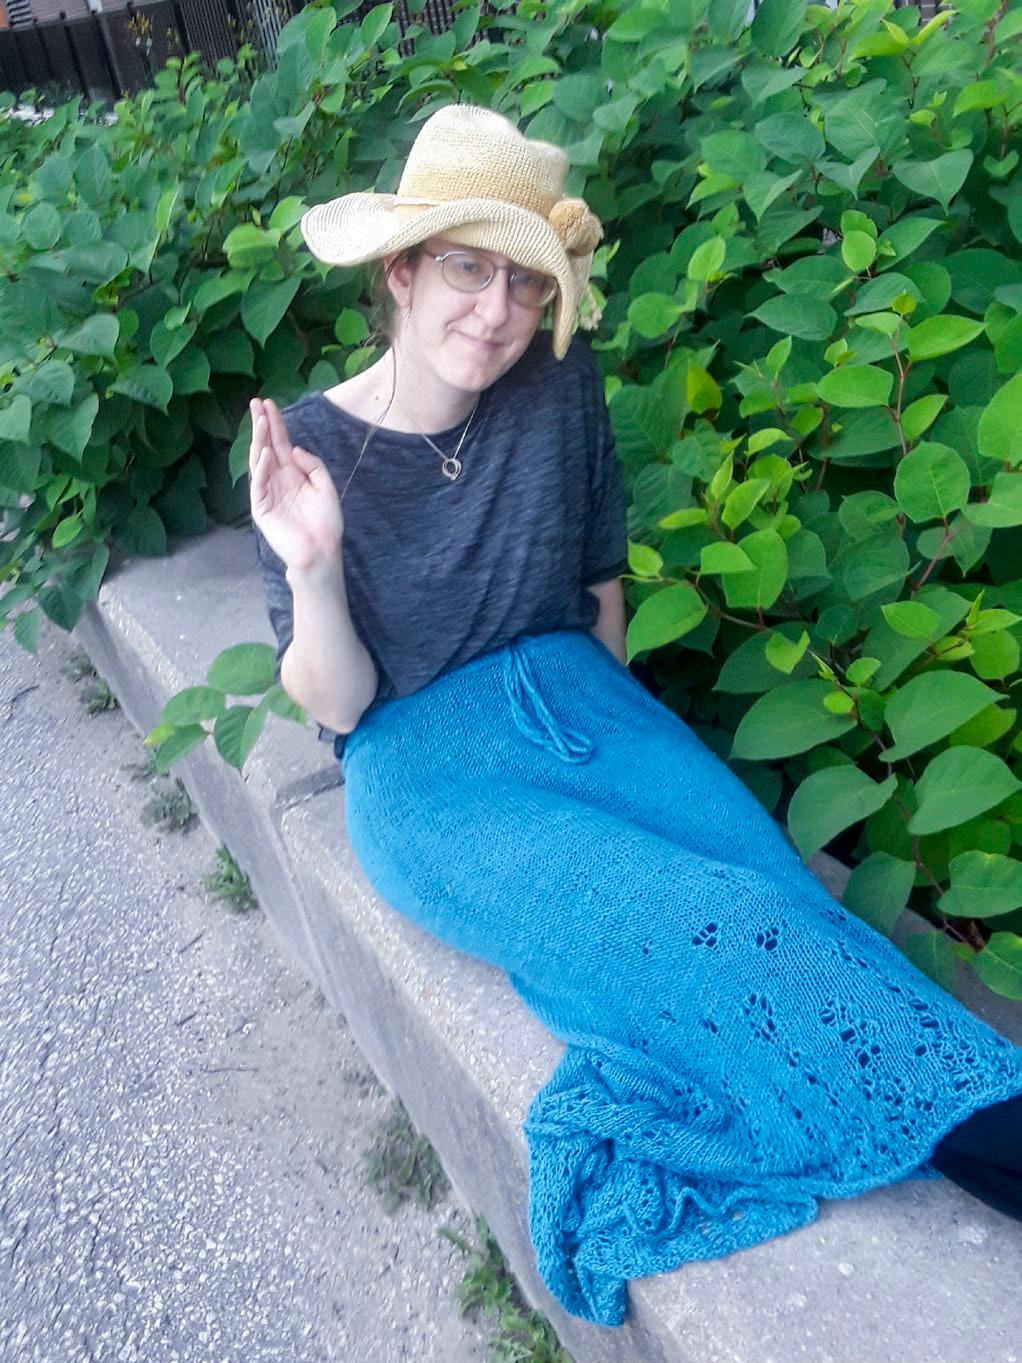
Hello and welcome! I’m knitting up an Eyelet Skirt in Fibra Natura FLAX. This 100% Linen yarn is perfect for lightweight summer garments, and its drape makes it ideal for a flowy garment like a skirt! With 33-plus colors, I decided to stick with my favorite colors, and went with the same color the original pattern sample was knit in - Fibra Natura FLAX in Adriatic.
That said, winding this yarn was an adventure. Straight out of the skein, the yarn is, like most linen yarns, quite rough on the hands, so much so that I regretted my choice to hand- wind this with my nostepinne! Each skein is only 137 yards, though, so it wound up quite quickly, even though I was winding it by hand - each skein didn’t take very long at all.
Although it’s rough to knit with, it gets -so- much softer with a wash and a dry, so, even if you’re at first put off by the texture of the Fibra Natura FLAX, just trust that it really softens up once you wash it. The lace bloomed out beautifully, and I’m really happy with how it all turned out. Plus, the advantage of having a natural fiber that can go through the washer and dryer is so very convenient!
I’ll work through the Eyelet Skirt pattern, using Fibra Natura FLAX making some modifications as I go, specifically, I want to work this pattern in the round, rather than knit flat as the pattern is written.
Winding up a skein of Fibra Natura FLAX in Adriatic on a nostepinne
The finished Eyelet Skirt, knit in Fibra Natura FLAX yarn
Photos by Sarah Dawn
Sarah Dawn
Knitting an Eyelet Skirt
Converting a pattern to knit in the round
The first thing I did was read through the whole pattern—all of it. I can’t count the number of times I started a pattern, only to get surprised or confused by something, because I didn’t read through the pattern in the beginning!
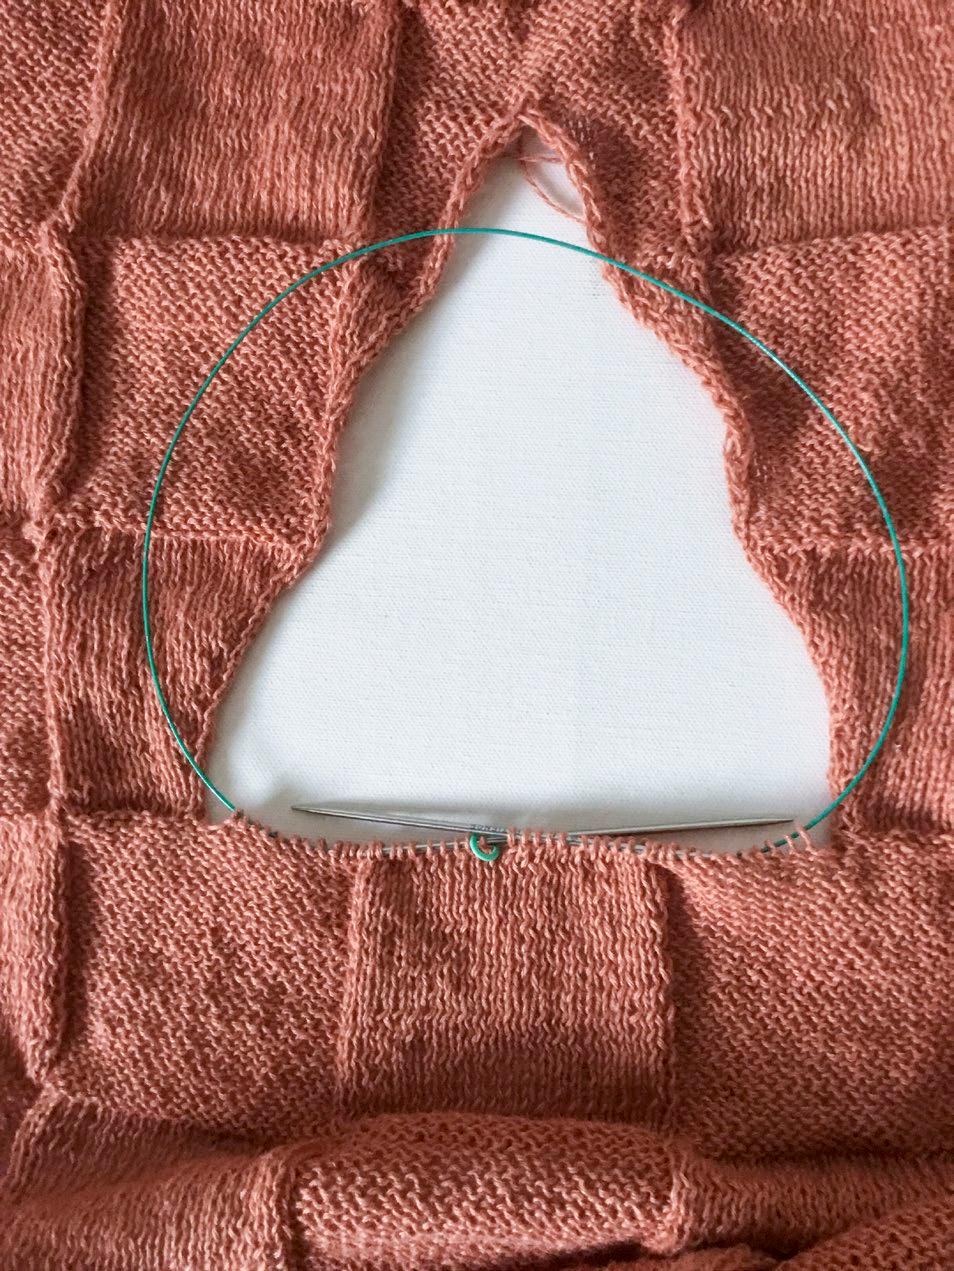
As written, the Eyelet Skirt pattern is knit in four flat panels that are seamed together with the mattress stitch. Three of these panels are identical, the fourth panel has the opening at the waist for the drawstring cord, but the rest of the fourth panel is identical. I decided that instead of trying to mattress stitch all these panels together, especially because the hem is folded over and bound in place before the panels are sewn together, I’d just save myself some trouble and knit the skirt in the round.
If you convert a project from knit flat to work in the round, it’s even more important to look through the entire pattern before you start.
First, I looked at the lace charts.
For each chart, all the lace was worked on the right side of the fabric, with wrong side rows being plain purl rows. This is immensely useful. Working the skirt in the round means that every row – now round – is a right-side round, and if there was any lace or shaping on the wrong side, I’d have to go through and figure out the equivalent stitches. Not having to do that makes this process a lot easier!
The Eyelet Skirt pattern using Fibra Natura FLAX yarn in Adriatic colorway
Charts for the Eyelet Skirt knitting pattern
I also took a look at where the decrease rows fell. They all fell on odd-numbered right-side rows, so again, that made my life a lot easier.
Finally, I noticed the pattern had instructions for a selvedge stitch on each panel. Since these are stitches you use to seam the panels, they don’t count toward the finished sizing of the skirt. You lose either half of each selvedge stitch or the whole selvedge stitch, (depending on where you choose to place your seaming), from the final width of the skirt. So, one of the questions when converting a pattern from knit flat to in-the-round is: do you keep the selvedge stitches in or not?
I chose to keep them. Having a few extra selvedge stitches won’t make that much of a difference in sizing - 8 extra stitches at this tension (6 stitches per inch) is an extra 1¼” over the full width of the skirt. But, a) I like fuller skirts, and b) the waist drawstring is what will control the waist width once the pattern is all finished and washed so, an extra 1¼” there won’t make a difference.
Also, I know myself. If I didn’t include those stitches, I’d have to subtract two from my stitch counts. I know that if I forgot to do that, I’d wonder why my stitch counts were off. I’m stopping that problem before it starts.
Each panel for size small has a cast on of 84 stitches, so I cast on 4 sets of 84 stitches, separating them with the very handy UNIQUE Knitting Split Ring Markers. This worked out to 336 stitches on my Clover 4mm bamboo circular knitting needles. There were a lot of stitches to put on my 24” circular needles, but it worked out in the end! To make the long tail cast on more bearable, I cast on using two strands, one strand of yarn from the center of my yarn ball, and one strand of yarn from the outside of the same ball so I didn’t have to estimate how much of a tail I needed for the cast on.
After that, I just followed the instructions for each panel except, instead of working one panel at a time, I worked all four panels at once while reading the instructions for each row.
The hardest part of this pattern was matching the lace pattern to the decrease rows, as both happen at the same time. I think most knitters get a bit panicked when they see “at the same time” as an instruction in a knitting pattern. But I promise, it’s not as hard as people often think.
The lace pattern on the Eyelet Skirt
Casting on using Fibra Natura FLAX in Adriatic, Clover Bamboo Circular Needles and UNIQUE Knitting Split Ring Stitch Markers
How to work ‘At the Same Time’ instructions in knitting patterns
The best thing you can do for yourself is to keep meticulous track of your rows. First, get a notepad or a Word file, and write down every decrease row for your size. In the Eyelet Skirt pattern, they’re fully numbered in the lace section so, just write down each row number for a decrease row.
Next, get yourself a row counter you’ll remember to use. This can be an app, a clicky counter, or a counter on the needles; it doesn’t matter what it is, so long as you remember to count your row when you’re done.
After that, it’s all about paying attention. Every time you start or end a panel with a decrease section (also, if you’re like me and knitting this in the round, the UNIQUE Knitting Split Ring Markers are going to be your absolute best friend here!) take a look and see what the decreases do to the lace pattern. You’re basically getting an extra stitch because of the decrease stitch, but you’re also losing a stitch because of the decreases.
Wait, what? This gets a little complicated, so please, try and stick with me.
Take, for example, rows 11 to 18, where you’re supposed to work Lace Pattern 2, and you start row 1 of the lace chart on stitch 5 for the size small. This also coincides with the first decrease row on row 11.
So, that translates as k1 (selvedge stitch), ssk, (decrease row), ssk (fifth stitch of the first row of Lace Pattern 2), yo, and continue in pattern. Not too bad, right?
However, when you get to the start of row 3, that messes things up. Because we now have k1 (selvedge stitch), then an extra stitch from the ssk in the decrease row, then the fifth stitch of the chart. You, the knitter, cannot simply do only
what the pattern says (which is to start row 3 of the Lace Pattern 2 on row 5), because now there’s an extra stitch in there! It won’t work (trust me, I tried, and got very confused). So, you have to account for that extra stitch, and treat it as the 4th stitch of row 3, which is a yarn over and, therefore you must also do the associated decrease in stitch 5, as well.
Still lost? Don’t worry, I was too, and had to make plenty of notes to get this to work. If it helps, here’s a copy of the notes I made on the stitch chart, for something that hopefully makes more sense.
My notes with an edited version of Lace Pattern 2 showing how the decrease row alters the lace pattern stitch count
The Finished Eyelet Skirt, knit in Fibra Natura FLAX yarn
The same logic holds true for the end of each section, where you’ll have an extra stitch from the decrease row. Here, however, it’s much easier to do as the pattern says. Look at the last set of stitches in the stitch repeat, and work the lace until you have three stitches remaining (one selvedge stitch and two for the decrease). Make sure that, in the lace pattern, you have enough stitches to work the yarn over stitch and its corresponding decrease. If you don’t have enough stitches, then just work in stocking stitch to the last three stitches of the panel.
And this holds true for pretty much all the decrease rows, too. You have to account for any decrease rows when you’re working out where the charts sometimes start. The best thing I
can say is that you have to pay attention, count your stitches, and account for both the selvedge stitch and any decreases when you’re figuring out where to start each row. Now, luckily, there’s no lace section where you have two decreases in one lace section, so you only have to do this step once, at most, for each lace chart.
Complicated? Yes, but, not untenable. And the Fibra Natura FLAX tinks back very easily, so if you do make a mistake or things don’t line up, it’s not too hard to go back and fix it. Yes, it’s not pleasant to unravel 300-plus stitches, but, at least, the yarn won’t be fighting you while you do so!
Also, learning to read your knitting will be a huge benefit here, so you can see pretty quickly if something doesn’t line up.
Once you get through the bottom edge of the skirt, that’s by far the most complex part. As you work your way up the skirt, the lace gets progressively less complex; the upper part of the skirt actually has no lace and is knit on smaller needles.
Why the change in needle size? See the article that follows, as we switch to a Takumi Bamboo Circular Needle Natura FLAX in the beautiful Adriatic color.
The first decrease rounds of the Eyelet Skirt Pattern
Why change needle sizes in a knitting pattern?
The first reason has to do with sizing. If you switch to a smaller needle size, but keep the same number of stitches, the finished object will be smaller. (Conversely, if you switch to a larger needle size, and keep the same number of stitches, the pattern will be bigger.)
You can see that very clearly in the Eyelet Skirt pattern. When I switched from the 4mm Clover Takumi Bamboo Circular Needle to the 3.5mm Bamboo Circular needles, my tension went from 6 stitches per inch, to 6.5 stitches per inch. I get the same number of stitches, tighter tension, and a smaller object. In this case, the tighter tension (along with the decrease rows), serves to bring the skirt in at the upper hips and waist.
The second reason is the fabric. The tighter the tension, the less light gets through the fabric. You can see this clearly in the photos in the pattern. On my own knitting, the difference is a little less visible (the black UNIQUE Knitting Split Ring Markers is where I made the switch), but it definitely pulled the work in a bit more.
For a skirt, I want a denser fabric with minimal light bleeding through for the upper portion of a skirt. That said, the fabric I knit at the new 6.5 stitch per inch gauge, still has a bit of transparency – I suspect this is why the model and I were both wearing black leggings when we took the pictures!
What does it do?
But remember, you, as a knitter, have control over your gauge. So, if you want an even denser and even less see-through fabric at the top of the skirt, you can easily go down to a smaller needle (and, if I knit this again, I might test it out with a 3mm or even 2.5mm circular needle!). This will bring the waist of the skirt in a little more and change the way the hem flares. None of these things are bad things, rather, they're things that you get to decide as a knitter. It’s one of the great advantages of our craft!
Of course, the gauge of the fabric isn’t the only thing that’s going to shape the waist of the skirt. The top hem, with the I-cord drawstring, also plays a huge role in the fit and drape of the skirt – and that’s in the article that follows as we finish the Eyelet Skirt with Fibra Natura FLAX yarn!
Switching to a smaller knitting needle while knitting the Eyelet Skirt
Switching to a smaller knitting needle while knitting the Eyelet Skirt
Working a hem with a three-needle bind off and I- cord
Now that we’ve knit through the upper section of the Eyelet Skirt using Fibra Natura FLAX yarn, it’s time to add the hem and the I-cord drawstring. After doing the much more complex lace work and decreasing, this is comparatively quite simple.
The hem is worked in stocking stitch, with one elongated stitch that forms the opening of the drawstring. This is worked by wrapping the yarn twice around the needle when knitting, then dropping it on the next row – the slack in the yarn creates a larger stitch that the drawstring can fit through. I found that since the Fibra Natura FLAX is a little bit of a rougher yarn (before washing), the opening wasn’t quite as large as I expected; the yarn caught on itself a little rather than dropping down smoothly. But it was a big enough gap to get the drawstring through, which is the important part.
hem will be joined after it’s folded overusing a piece of scrap yarn. Instead, I chose to mark various stitches of that row on the Wrong Side of the work with the UNIQUE Knitting Split Ring Markers, rather than feeding a piece of scrap yarn through every stitch as I went. However, I made one miscalculation here. It was far, far easier for me to see and pick up the stitches for the hem on the Right Side of the work.
So that’s what I did. I picked up the stitches on the Right Side of the work, anyway. The stitch markers helped but were not as helpful as they could’ve been – if I thought ahead, I would’ve put them on the Right Side of the work. Oh well!
The issue with picking up stitches on the Right Side of the work is that the hem is bound to the Wrong Side of the work with a three-needle bind off, which made things interesting. To fix that problem, once I had all my stitches picked up, I flipped the skirt inside out, inserted the needle tip of the 4mm Clover Bamboo Circular Needle (which is the needle I used to pick up the stitches since the 3.5mm Clover Bamboo Circular Needle was still in the main body of the skirt) behind the work with the picked up stitches still on the needle. That gave me a nice line of picked-up purl stitches on the Wrong Side to work the three-needle bind off and close off the hem.
Picking up stitches for the hem of the Eyelet Skirt with a Clover Bamboo Circular Needle
Doing a three-needle bind off on the Eyelet Skirt using two Clover Bamboo Circular Needles
Once I did the three-needle bind off, it was a simple matter of knitting up the I-cord and inserting it into the eyelet for the hem. Many people will tell you that you have to use double pointed needles to work an I-cord, but that’s not true at all. You can also use circular needles. I used the same Clover Bamboo Circular Needles I used to make the skirt (no need to look about for a set of double pointed needles when I had something absolutely useful right at hand!).
It’s exactly the same as working an I-cord with double pointed needles; you just have to slide the stitches a touch further along the needle cable and onto the other end of your circular needle.
Once I got the I-cord done, I fed it through into the hem.
I use a safety pin for this, and it’s not hard at all –just put the safety pin into the end of the I-cord, then worm the safety pin along the tube created by the bound off hem until you go all the way around! The pattern notes that you can use elastic instead of a drawstring. If that’s what you choose, stitch the ends of your elastic together once you feed it through, then stitch the eyelet closed so the elastic doesn’t show.
If you followed along this far, congratulations, you now have a finished Eyelet Skirt; a skirt that can go through the washer and dryer since Fibra Natura FLAX is a 100% linen yarn!
I’ve already made good use of this skirt in our hot and humid summer weather, and got some compliments on it, too!
Sarah Dawn sarahdawnsdesigns.com
Feeding the I-cord into the hem of the Eyelet Skirt, knit in Fibra Natura FLAX yarn
Eyelet Skirt
Standard Yarn Weight System
Standard Yarn Weight System
Standard Yarn Weight System
Categories of yarn, gauge ranges, and recommended needle and hook sizes
Yarn Weight Symbol & Category Names
Type of Yarns in
Yarn Weight Symbol &
* GUIDELINES ONLY: The above reflect the most commonly used gauges and needle or hook sizes for specific yarn categories.
** Lace weight yarns are usually knitted or crocheted on larger needles and hooks to create lacy, openwork patterns. Accordingly, a gauge range is difficult to determine. Always follow the gauge stated in your pattern.
*** Steel crochet hooks are sized differently from regular hooks--the higher the number, the smaller the hook, which is the reverse of regular hook sizing.
This Standards & Guidelines booklet and downloadable symbol artwork are available at: YarnStandards.com Standards & Guidelines For
KNITmuch
Standard abbreviations & terms
alt = alternate
approx = approximately
beg = begin(ning)
BO= bind off
CC = contrast color
ch = chain
cm = centimetre(s)
cn = cable needle
co = cast on
cont = continue, continuing
dc = double crochet
dec = decrease(s), decreasing
dpn = double-pointed needle(s)
foll = following
g = gram(s)
hdc = half double crochet
inc = increase(s), increasing
in(s) = inch(es)
k = knit
kf&b or kfb = knit into front and back of st (increase)
ktbl = knit through the back loop
k2tog = knit 2 sts tog (right-leaning decrease)
k3tog = knit 3 sts together (double right-leaning decrease)
m = marker
m = meter(s)
m1 = Make 1 stitch: pick up the horizontal strand between 2 stitches from front to back and knit it tbl (lifted increase)
MC = main color
mm = millimetre(s)
oz = ounce(s)
p = purl
p2tog = purl 2 sts tog (decrease)
patt = pattern
pfb = purl into front and back of stitch (increase)
pm = place marker
psso = pass slipped stitch over
RS = right side
rem = remain(ing)
rep = repeat
rev = reverse
rnd = round
sc = single crochet
sl = slip
skp = slip one st, knit next st, pass slipped st over knit st (dec)
ssk = slip, slip, knit: slip 2 sts knitwise, 1 at a time, insert left-hand needle into front of both sts and knit them tog (left-leaning decrease)
* GUIDELINES ONLY: The above reflect the most commonly used gauges and needle or hook sizes for specific yarn categories.
* GUIDELINES ONLY: The above reflect the most commonly used gauges and needle or hook sizes for specific yarn categories. ** Lace weight yarns are usually knitted or crocheted on larger needles and hooks to create lacy, openwork patterns. Accordingly, a gauge range is difficult to determine. Always follow the gauge stated in your pattern. *** Steel crochet hooks are sized differently from regular hooks--the higher the number, the smaller the hook, which is the reverse of
** Lace weight yarns are usually knitted or crocheted on larger needles and hooks to create lacy, openwork patterns. Accordingly, a gauge range is difficult to determine. Always follow the gauge stated in your pattern. *** Steel crochet hooks are sized differently from regular hooks--the higher the number, the smaller the hook, which is the reverse of regular hook sizing. This Standards & Guidelines booklet and downloadable symbol artwork are available at: YarnStandards.com
This Standards & Guidelines booklet and downloadable symbol artwork are available at: YarnStandards.com
sssk = slip next three stitches individually, knitwise. Insert tip of left needle from front to back into the fronts of these three stitches and knit them together (double left-leaning decrease)