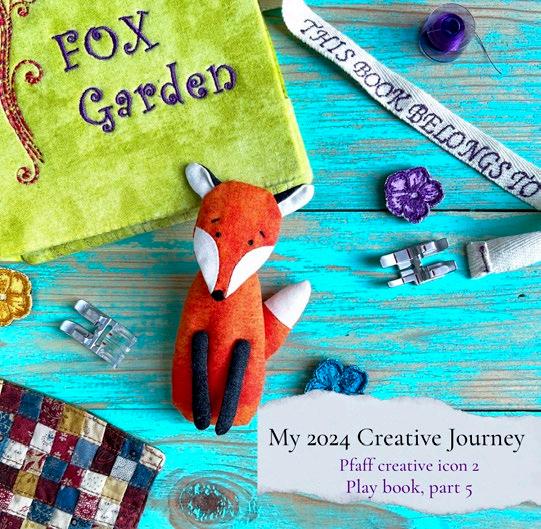
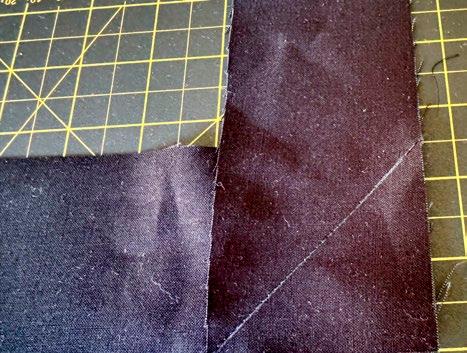
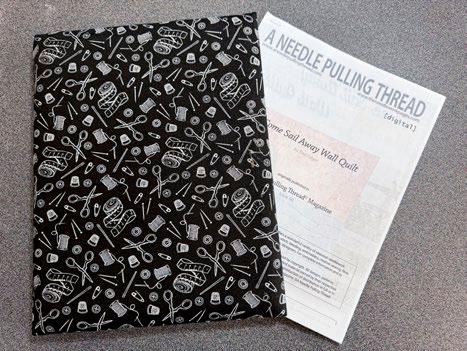
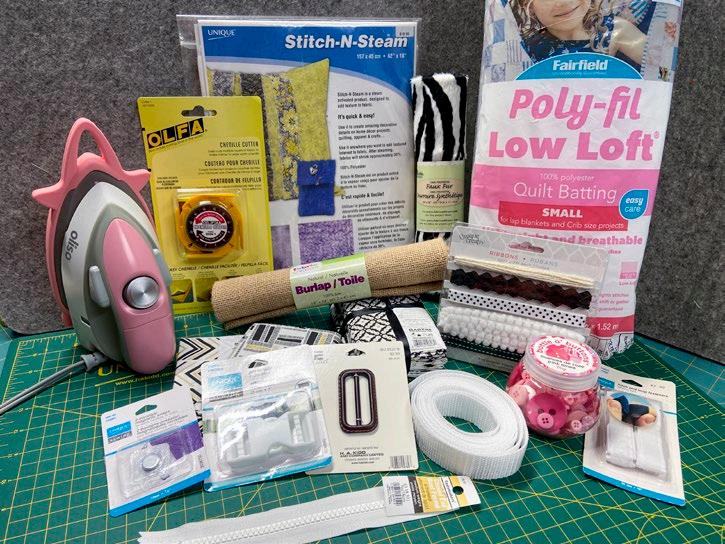
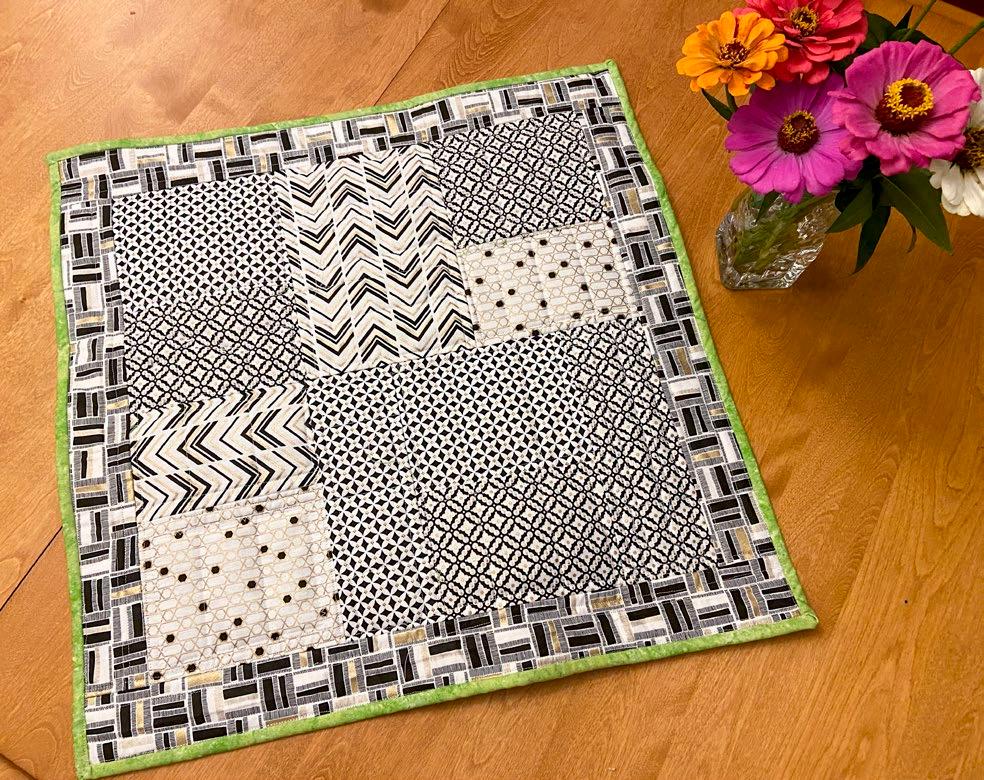
quilt | strip piecing quilt | fox-themed play book
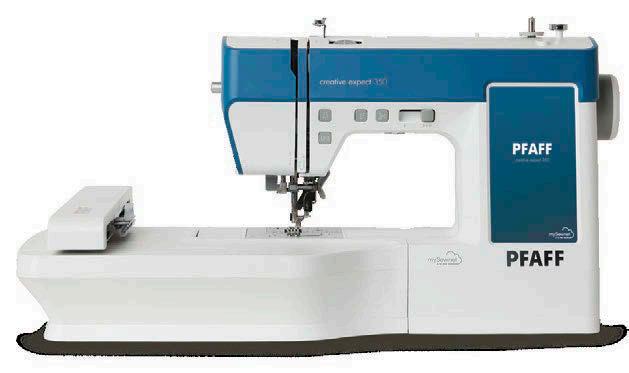
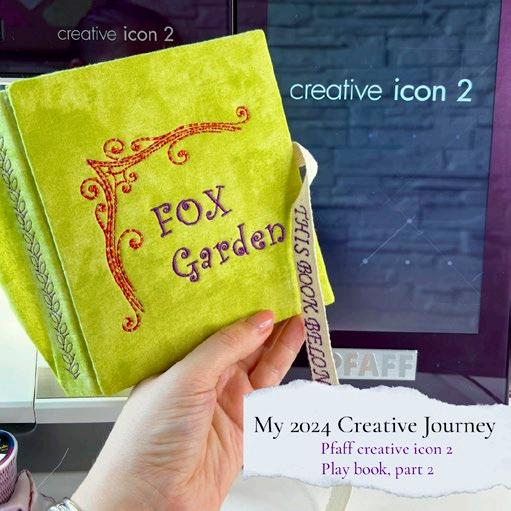
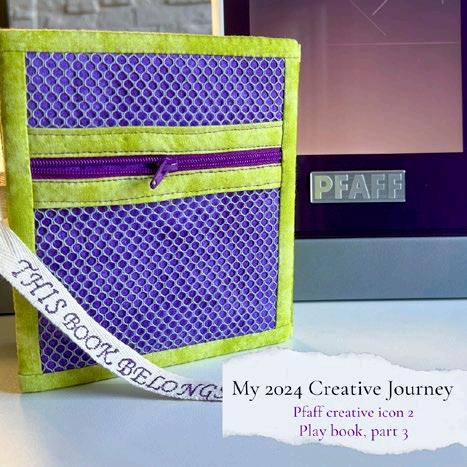
Sewing a play book PFAFF creative icon 2 ♥
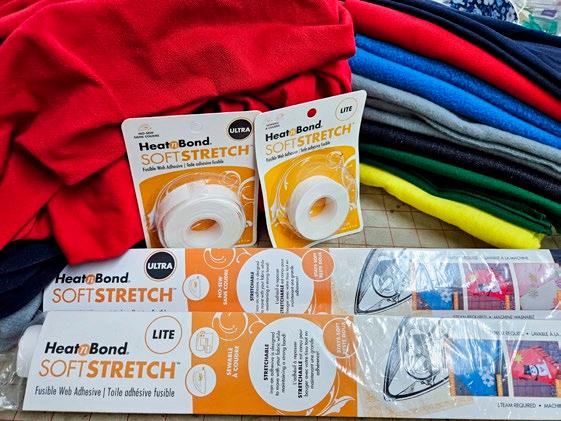
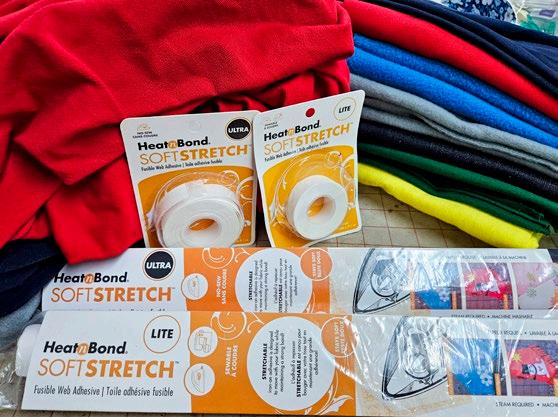
WHY Hemline Gold QUILTING tools are made to travel ♥
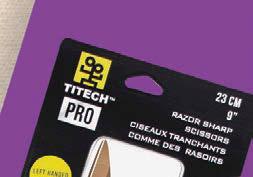
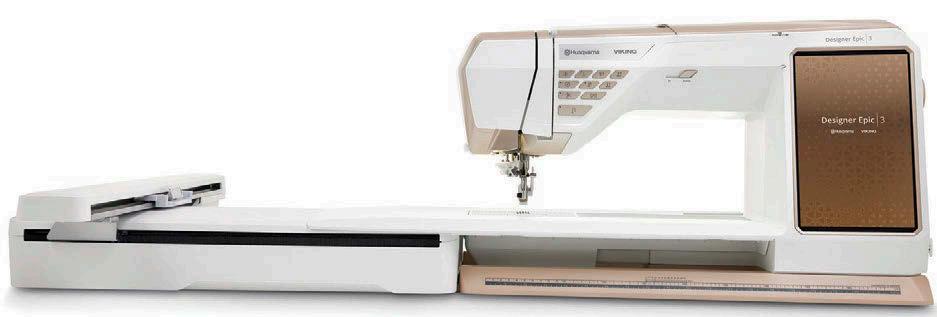
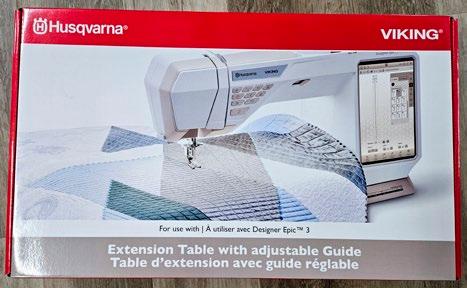
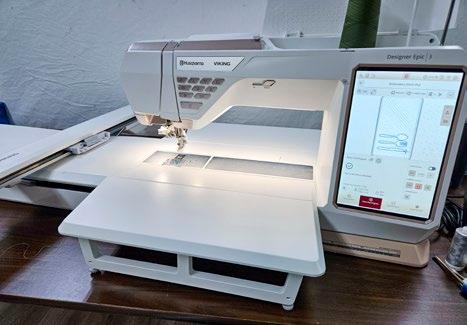
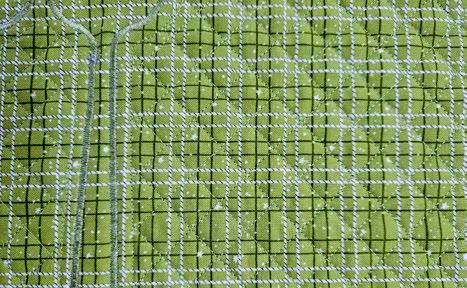
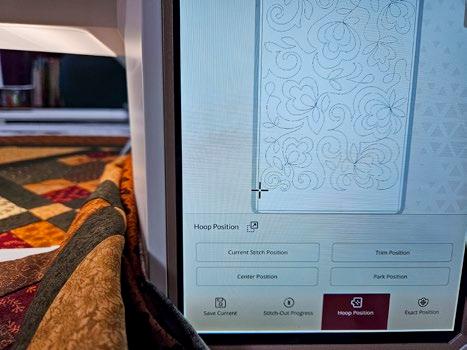
What to know about edge-to-edge QUILTING with the HV Designer Epic 3 ♥
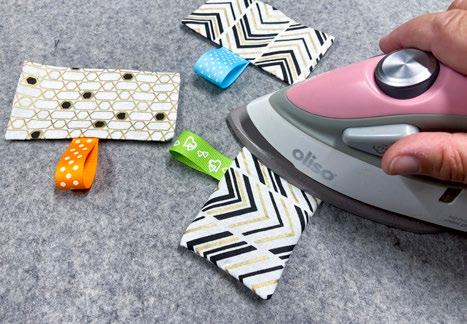
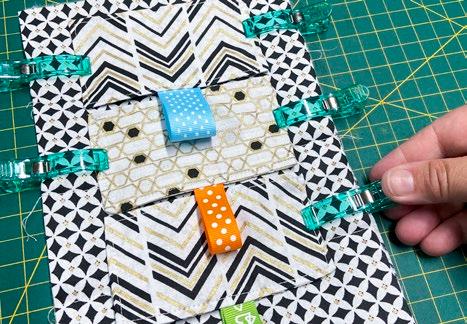
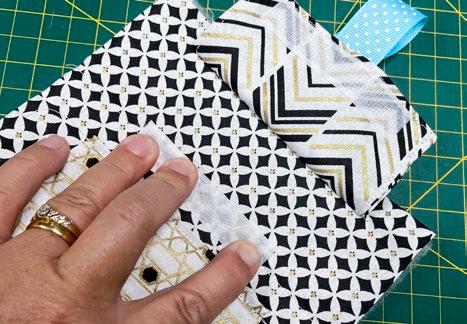
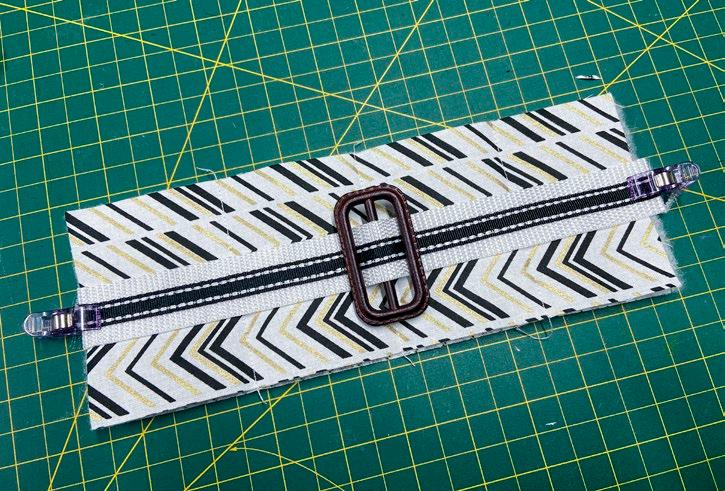
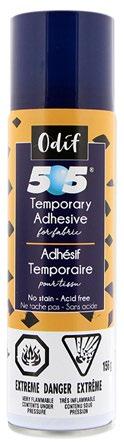
Use hook & loop tape to make peek-a-boo windows in a fidget QUILT ♥
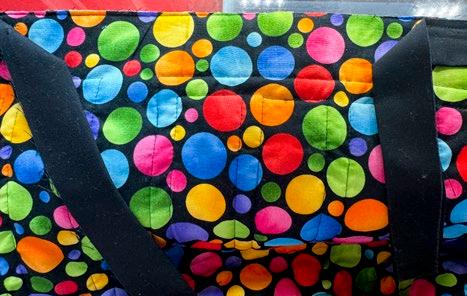
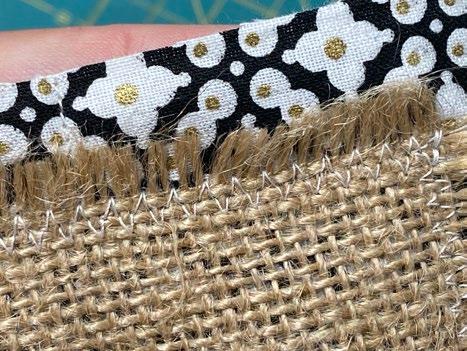
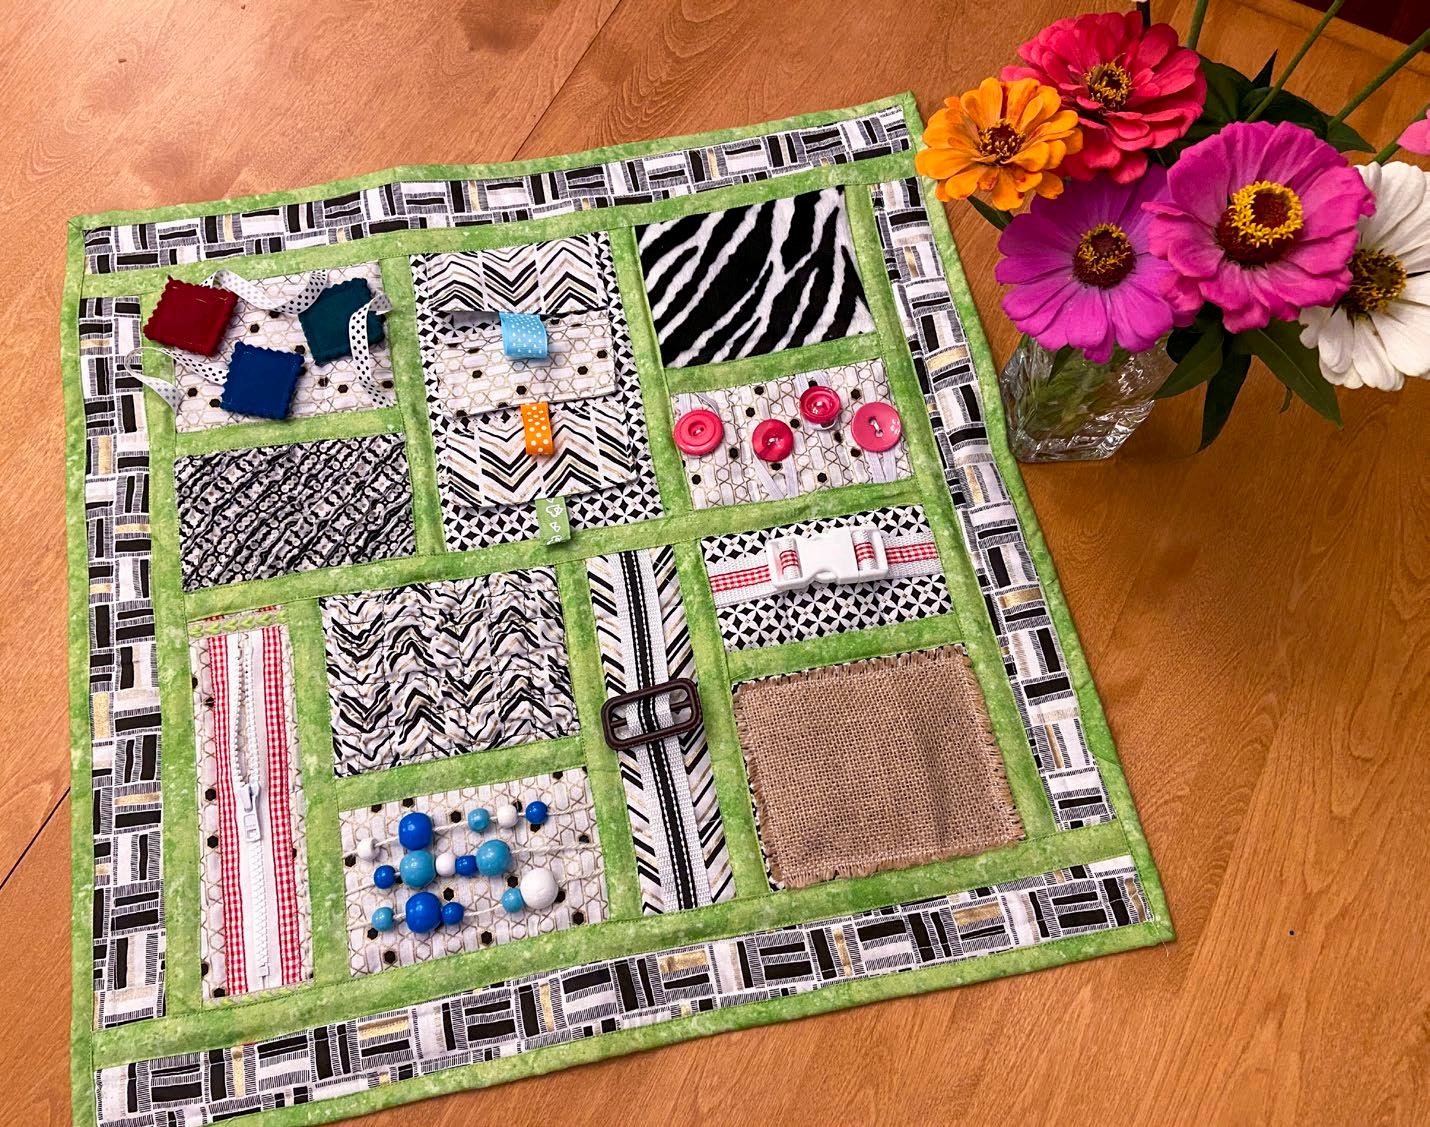
fidget
Editor'sLetter
As we step into this issue of QUILTsocial, we’re embracing the joy of crafting with creativity, precision, and playfulness. Whether you’re a seasoned quilter, a machine embroidery enthusiast, or someone who loves to explore new sewing techniques, we’ve packed these pages with inspiration to keep your hands busy and your creativity flowing.
This time, we’re diving into the whimsical world of play books, where embroidery meets imagination. You’ll find step-by-step guides on sewing a foxthemed play book, adding embroidered details with the PFAFF creative icon 2, and even making a delightful fox toy with a miniature quilt. These projects are not only fun but also a great way to experiment with textures and embellishments.
For those who love efficiency in their quilting, we’re exploring tools that make a difference. From the OLFA rotary cutter and rulers designed for quilters on the go to the versatile Hemline Gold Multi-Use Craft Bag, we’re spotlighting essentials that simplify your projects. Plus, if you’ve ever wanted to try the quilt-as-you-go method, we have a step-by-step guide to help you achieve a beautifully assembled quilt with ease.
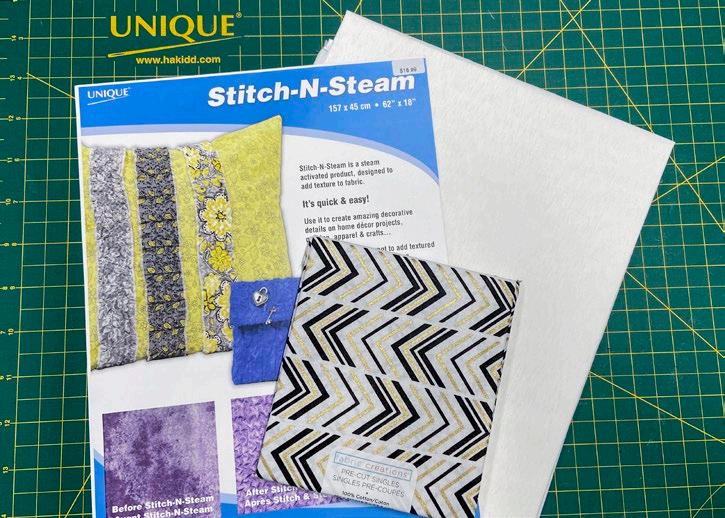
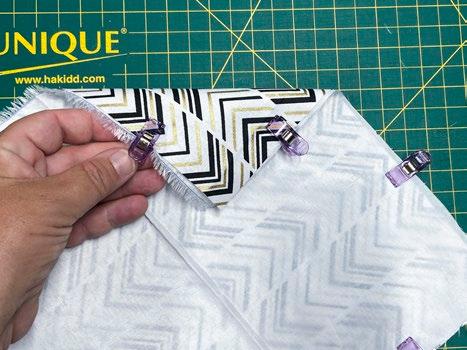
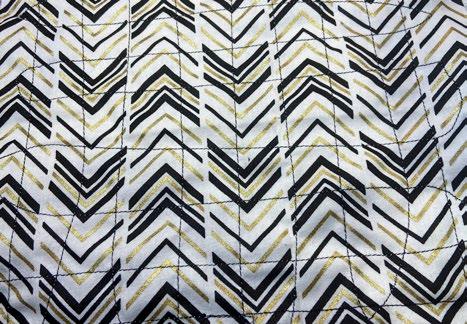
And let’s not forget the power of innovation! With the Husqvarna VIKING Designer Epic 3, we’re delving into guided pictograms, edge-to-edge quilting, and custom embroidery techniques that elevate your sewing experience. If you’re eager to add dimension to your quilts, you’ll love our tips on creating texture with Stitch-N-Steam and making chenille fabric in just a few simple steps.
From playful projects to practical tools and expert insights, this issue is a celebration of the joy and versatility of quilting. We hope you find ideas that inspire your next masterpiece, whether it’s a cozy quilt, a charming play book, or a beautifully embroidered accent. Happy stitching!
Cheerfully,
Photo by Bozhin-Karaivanov
OUILT
PUBLISHER,
Carla A. Canonico carla@QUILTsocial.com
PUBLISHER, ADVERTISING SALES
John De Fusco john@QUILTsocial.com
PHOTOGRAPHERS
Carla A. Canonico, John De Fusco
BLOGGERS/CONTRIBUTORS
Elaine Theriault crazyquilteronabike.blogspot.com
Christine Baker uppercanadaquiltworks.com
Olesya Lebedenko olesya-l-design.com
Paul Léger www.paullegerquilts.com
GRAPHIC & WEB DESIGN
Carla A. Canonico carla@QUILTsocial.com
GRAPHIC ASSISTANT and SOCIAL MEDIA
Sondra Armas
Maria Corina Guillen
WEBSITE / BLOG : https://QUILTsocial.com
Like us on Facebook : QUILTsocial
Follow us on Pinterest : quiltsocial
Follow us on Instagram : quiltsocial
Follow us on X: @QUILTsocial
WHERE TO GET YOUR COPY
QUILTsocial is a quarterly eMagazine published by A Needle Pulling Thread. It is available free for personal use online at https://QUILTsocial.com
A limited number of printed copies of QUILTsocial are available for purchase at select quilt shops and specialty stores. Ask for it at your local shop. QUILTsocial is not available by subscription.
QUILT SHOPS
If you are interested in carrying QUILTsocial in your store, please email john@QUILTsocial.com
EDITORIAL
Designers and other contributors who would like to be considered for future issues please email carla@QUILTsocial.com with a brief description of your work and your proposed project for the magazine.
No part of this publication may be reproduced without written permission from the publisher.
All designs, patterns, and information in this magazine are for private, non-commercial use only, and are copyrighted material owned by their respective creators or owners.
32 OUILT
6
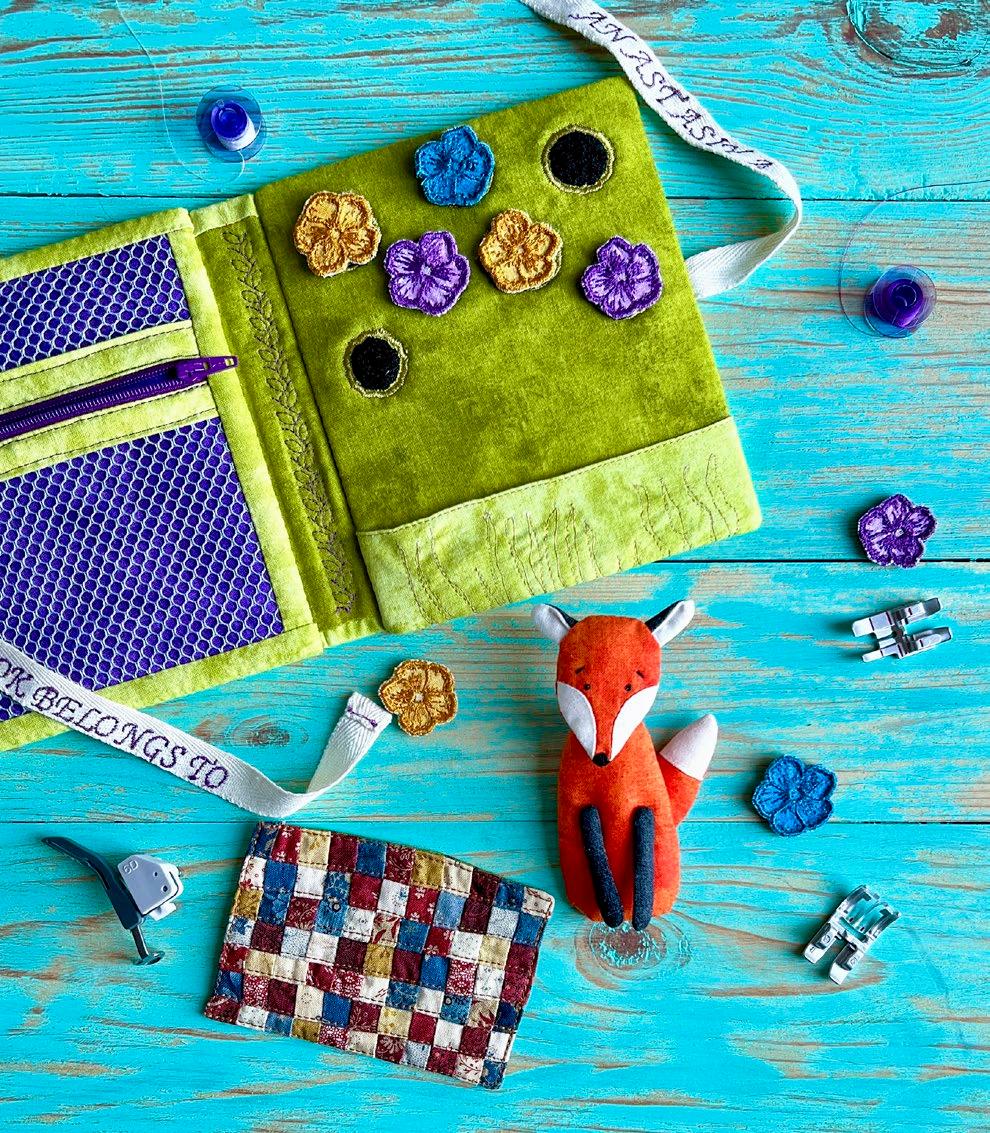
Sewing a play book with ease | PFAFF creative icon 2
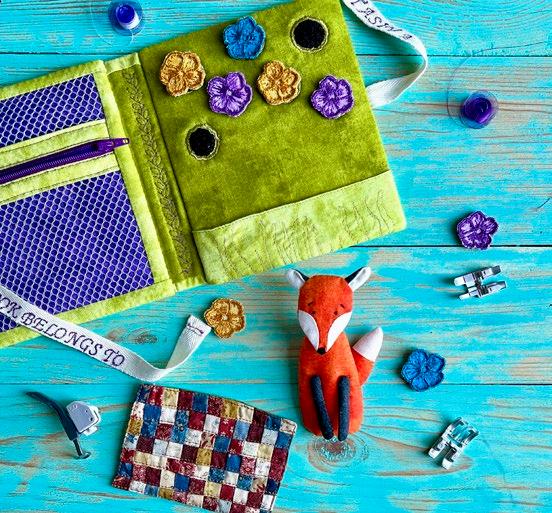
10 This fox-themed play book has embroidery on its laces and its spine!
13 Make a zippered, mesh fabric pocket for a play book page
16 mySewnet + creative icon 2 make pretty flower patches for a play book
20 Put the play in play book with an adorable fox toy and a miniature quilt
24 What’s in your Hemline Gold Multi-Use Craft Bag?
26 OLFA rotary cutter and rulers for quilters on the go | strip piecing quilt
28 Quilting tools to help with ever yday needs
30 Oliso M3Pro project iron – the perfect travelling companion
32 WHY Hemline Gold quilting tools are made to travel
34 How to customize your Husqvarna VIKING Designer Epic 3
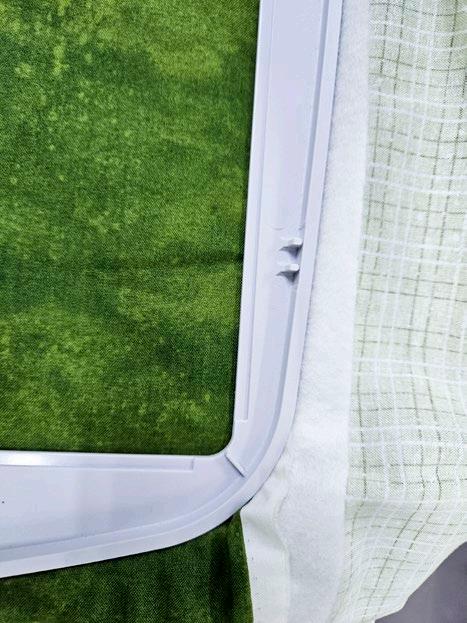
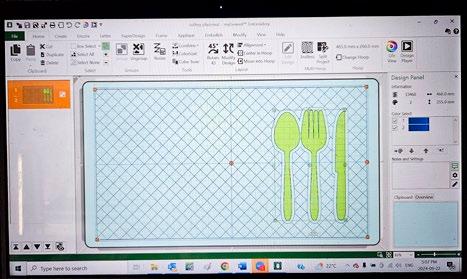
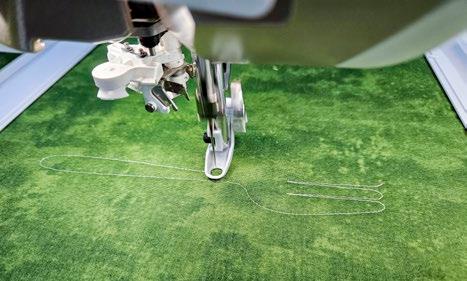
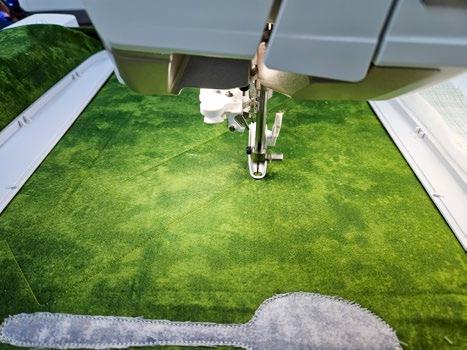
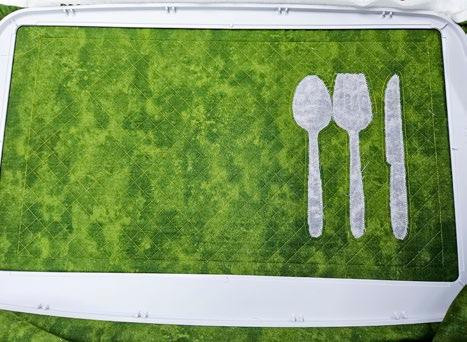
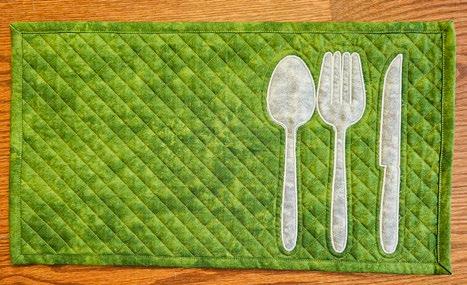
45 Creating an applique placemat in the Designer Regal Hoop!
47 What to know about edge-to-edge quilting with the HV Designer Epic 3
52 4 easy steps to create texture in a quilt with Stitch-N-Steam
54 5 easy steps to make chenille fabric
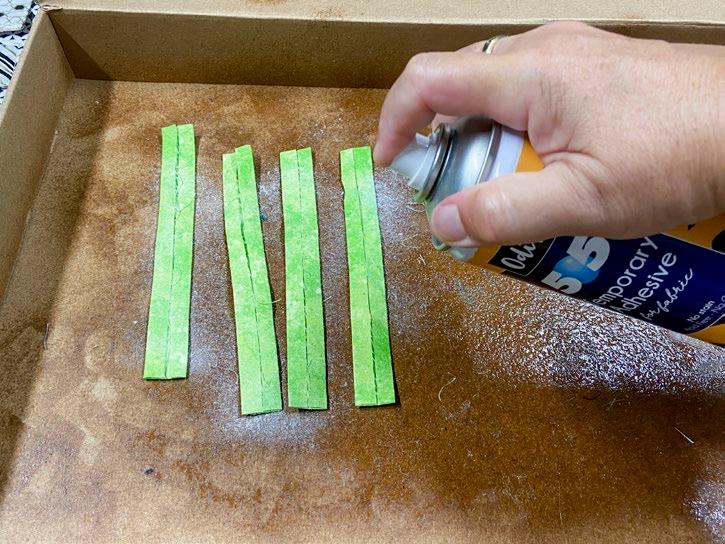
55 Use hook and loop tape to make peek-a-boo windows in a fidget quilt
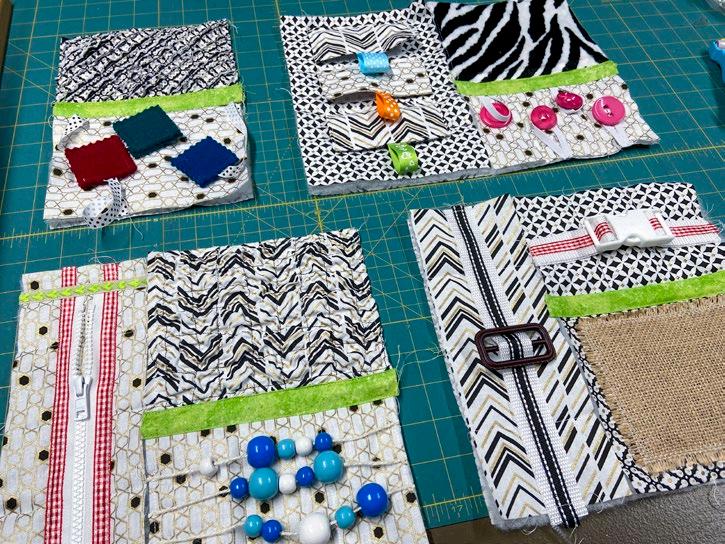
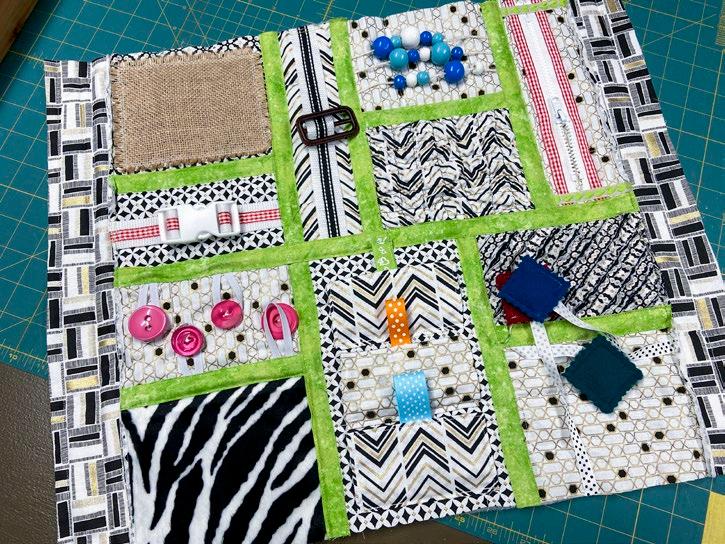
57 5 simple sewing notions make fun blocks for a fidget quilt
59 6 easy steps to assemble a quilt using the quilt-as-you-go method
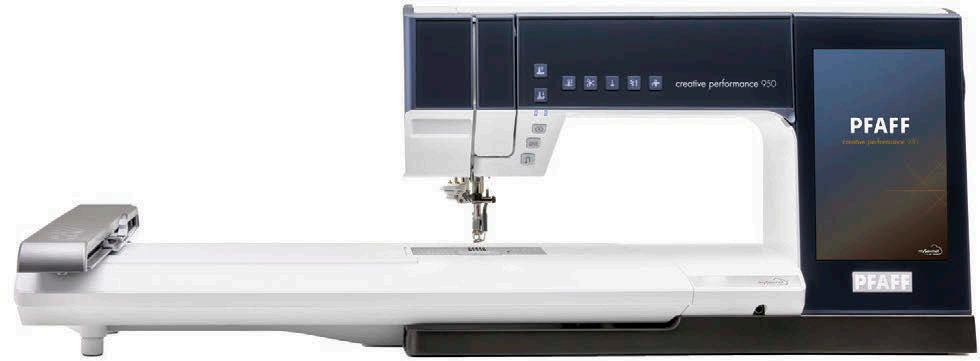
I’m excited to be back and share all the new insights I’ve gained from my adventures with the PFAFF creative icon 2 Sewing and Embroidery Machine After months of dedicated research and experimentation, I dive back into a playful project featuring one of my favorite animals–the FOX! This adventure starts with a truly captivating project: a play book with a fox and patch flowers! Even though it’s just one spread, we’ll have a blast incorporating a zipper, mesh fabric, Velcro, a stuffed character, machine applique, and embroidery. And, of course, the PFAFF creative icon 2 will be with us every step of the way.
So, let’s power up our machine and get ready for some creative fun!
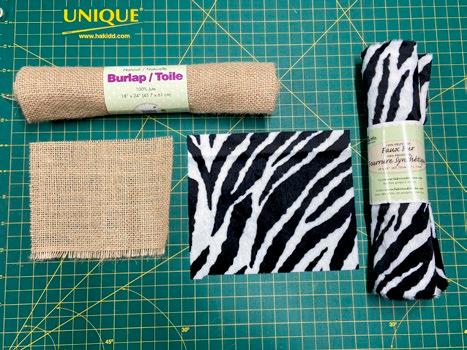
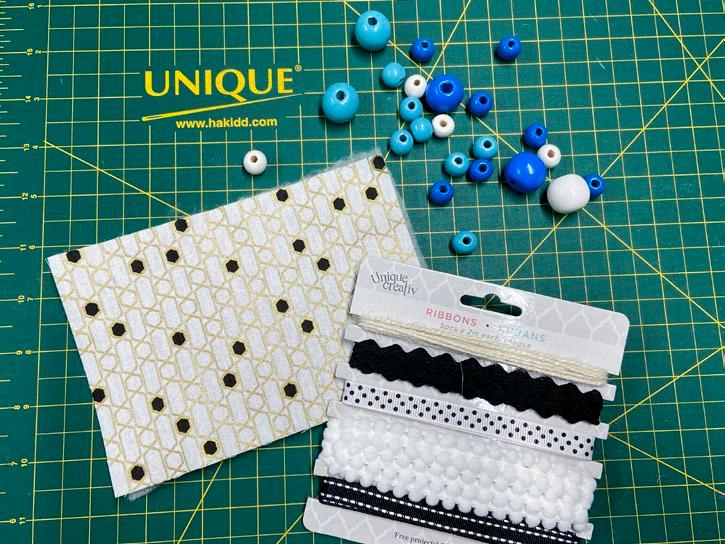
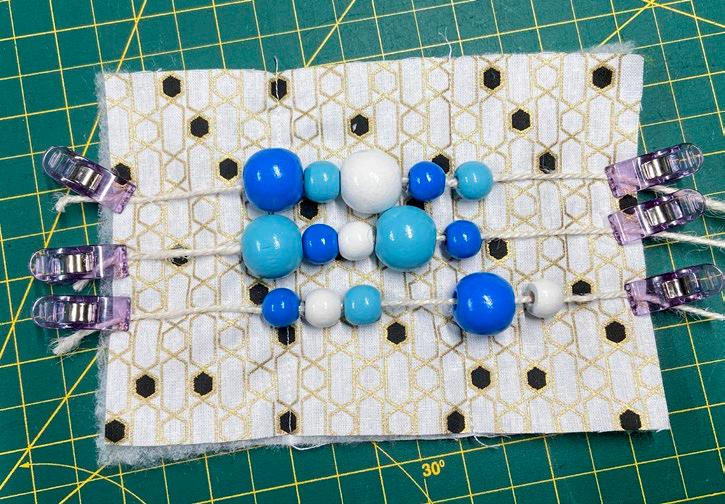
Before we dive in, let’s take a moment to check our supplies for the play book and ensure everything is organized and ready for sewing. Here is the complete list of the materials we’ll use.
materials
fabric
• 2 - 10” x 10” pieces of light ombre green fabric for book cover
• 1 - 5 ¼” x 6¼” piece of deep ombre purple fabric for the inside page
• 1 - 9” x 9” piece of deep ombre green fabric for the inside page
• 2 - 1½” x 6½” strips of light ombre green fabric
• 2 - 1½” x 6¼” strips of light ombre green fabric
• 1 - 3” x 61/8” piece of deep ombre green fabric
• 1 - 3” x 7” piece of light ombre green fabric
Sewing a play book with ease PFAFF creative icon 2
Olesya Lebedenko
• 1 - 3” x 6½” piece of light ombre green fabric
• 1 - 1¾” x 12” piece of light ombre green fabric
• 1 - 5” x 12” piece of mesh fabric (for fabric in this project the gray color is used)
• 1 - 4” x 10” piece of light ombre purple fabric
• 1 - 4” x 10” piece of deep ombre yellow fabric
• 1 - 4” x 10” piece of deep ombre blue fabric
• 2 - 7” x 7” pieces of ombre orangeyellow fabric for fox figure
• 1 - 5” x 5” piece of off-white fabric
• 1 - 3½” x 5½” piece of fabric of your choice for mini quilt backing (optional)
• 77 - ¾” x ¾” scrap fabric pieces for mini quilt (optional) thread
• 1 spool of Mettler 40wt polyester thread to match your book cover fabric
• bobbin wound with thread to match your main fabric
• 1 spool of Mettler 40wt polyester thread to match the inside book fabric
• bobbin wound with thread to match the backing
• a variety of spools of Mettler 40wt polyester thread for flower applique
• 1 bobbin of black (or white) Mettler 40wt polyester thread to match the Velcro notions
• stiletto and fabric glue pen
• patchwork clips and fine glass head pins
• 2 - 5/8” x 17” pieces cotton lace
• sharp scissors and pinking shears
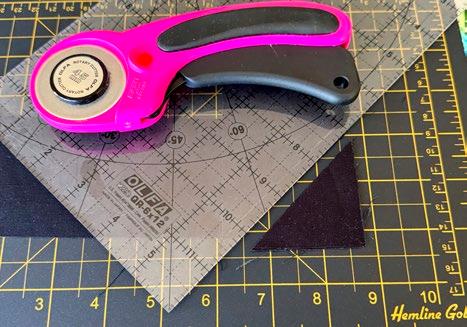
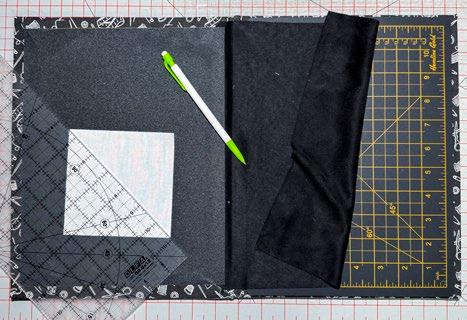
• 6” x 12” ruler and rotary cutter
• cutting mat and pencil
• water-soluble or heat-removable marker
• 1 sheet of transfer paper (optional)
• 4 - 5¼” x 6¼” pieces of ultra-firm stabilizer (such as Pellon 70 Peltex Sew-In Ultra Firm Stabilizer)
• 1 - ¾” x 61/8” piece of ultra-firm stabilizer (such as Pellon 70 Peltex Sew-In Ultra Firm Stabilizer)
• 9” x ½” Velcro strip (black or white)
• 6” lightweight zipper
• 5 - 10” x 10” pieces of PFAFF Whisper
Web Mesh Light Stabilizer
• 2 - 18” x 12” pieces of PFAFF Aqua Magic Stabilizer
- PFAFF Universal Needles Size 80 or 90
- PFAFF Quilting Needles Size 90/14
- PFAFF Titanium Embroidery needle size 90
feet/machine accessories suggestions
• 0A Standard Presser Foot for IDT System
• 4 Zipper Foot for IDT System
• 6D Dynamic Spring Foot
• PFAFF ¼” Quilting Foot for IDT System
• creative 120 Square Hoop (120 x 120 mm)
• creative 260 x 200 Elite Hoop (260 x 200 mm)
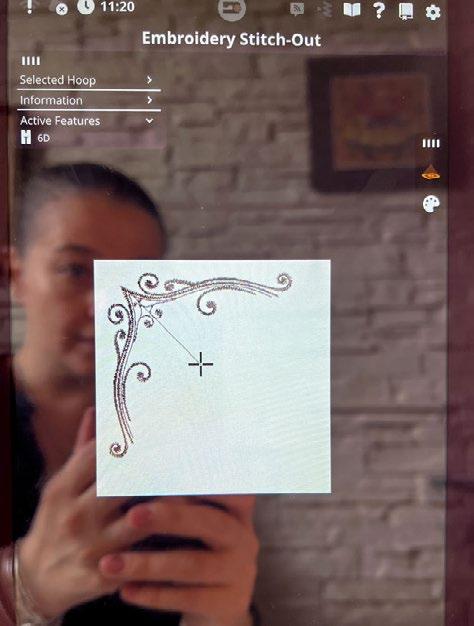
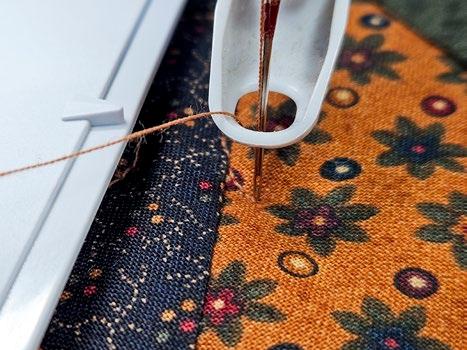
It’s time for my favorite part of the process - switching on our PFAFF creative icon 2. Attach the embroidery unit. Just a friendly reminder that it is recommended to use the standard zigzag stitch plate for embroidery and applique. However, if you forget to switch, the embroidery navigation on the screen will provide all the necessary recommendations and reminders before the embroidery process. On the welcome screen touch Embroidery option. A pop-up message prompts you to clear the embroidery arm and remove the hoop if attached before calibration. Tap 'OK,' and the machine will proceed to calibrate while the embroidery arm moves to the ready position. Load the bobbin. Thread the machine. Attach the 6D Dynamic Spring Foot
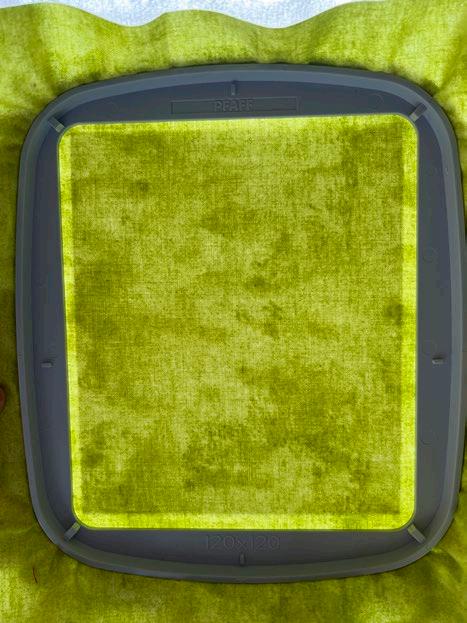
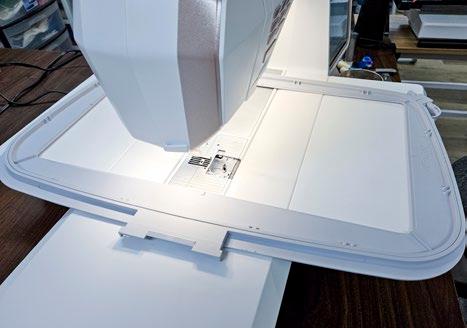
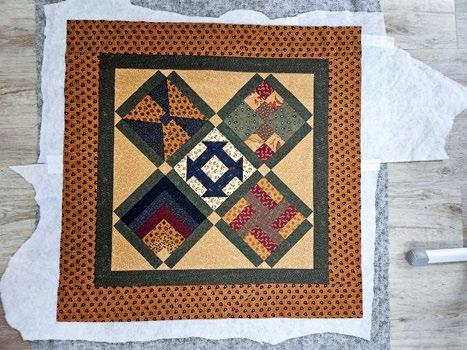
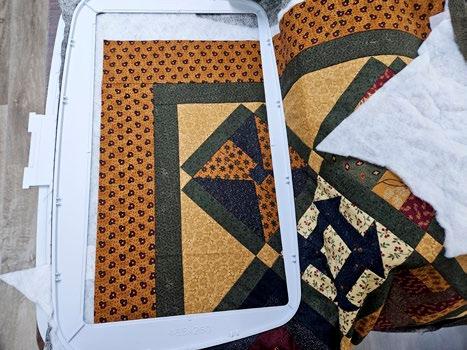
Take the creative 120 Square Hoop (120 x 120 mm) and prepare your sandwich with the following layers: start with a 10” x 10” piece of PFAFF Whisper Web Mesh Light Stabilizer add a 5¼” x 6¼” piece of ultra-firm stabilizer and finally place a 10” x 10” piece of light ombre green fabric with the right side up. Hoop the sandwich.
Photos by Olesya Lebedenko
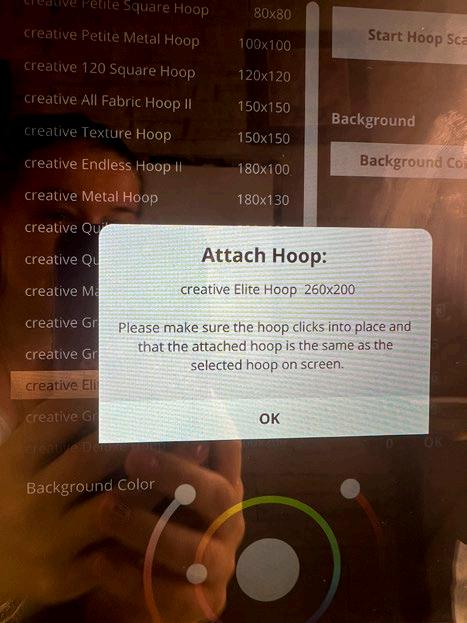
Hold the hoop up to the light to ensure the stabilizer is centered. On the screen, select the hoop size by clicking on the appropriate option. Choose the correct hoop size and click “Start Hoop Scan.” A pop-up message will prompt you to attach the hoop. To attach it, slide the hoop connector into the hoop attachment from front to back until it clicks into place. Click “OK” on the screen. The hoop scan process takes only about a minute!
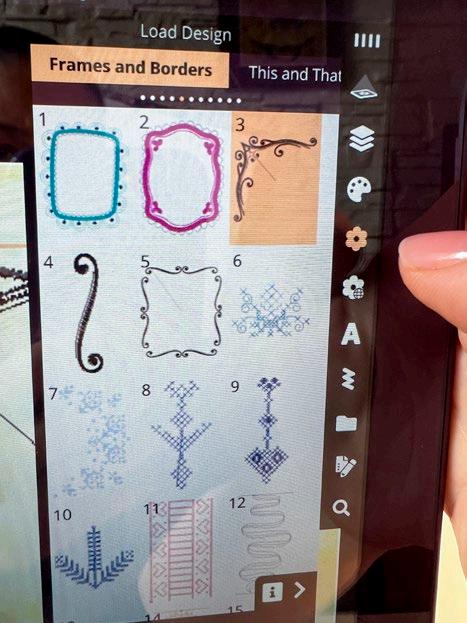
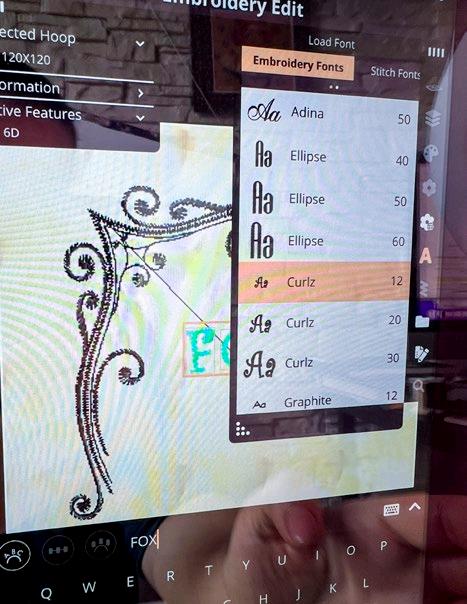
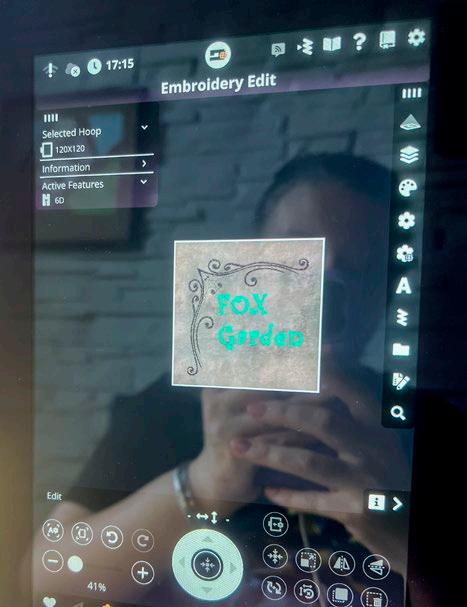
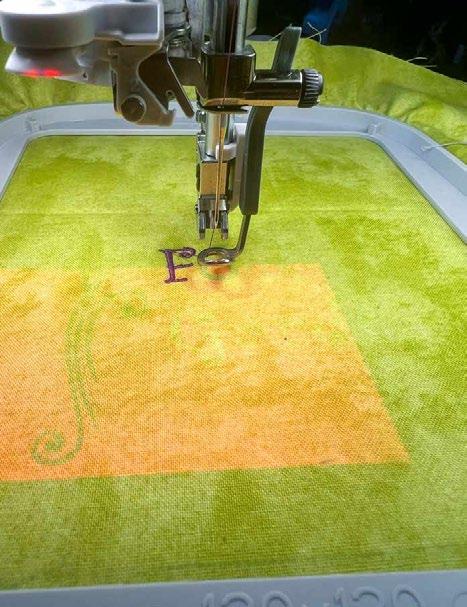
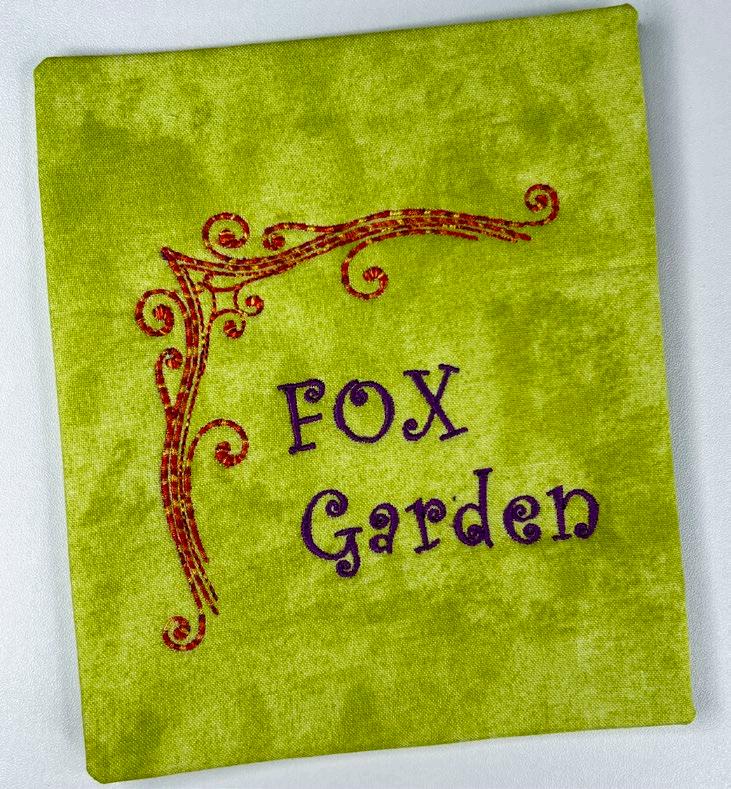
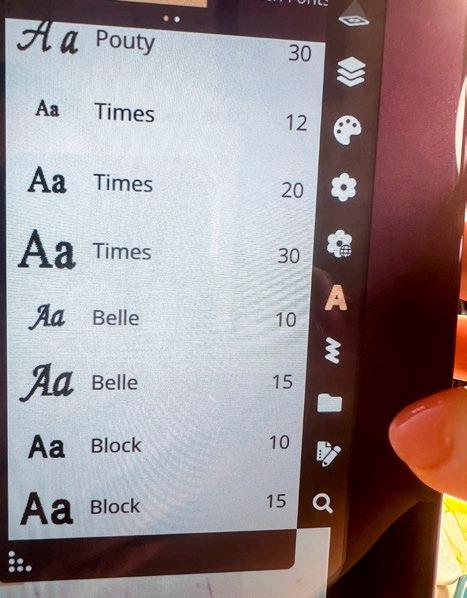
One of the things I love about the PFAFF creative icon 2 is a built-in embroidery designs library!!! There are so many beautiful options to choose from! To load a design for editing on a screen click “Edit design”. Scroll to the “Frames and Borders” category. For our book cover, I picked up frame design#3. Click on Frame#3 to load the design for editing. I also decided to embroider the title of our book “FOX Garden”. To write the title, I clicked “Embroidery Fonts” and picked “Curlz 12”. Enter the title with the pop-up keyboard.
Our design is ready! Click the Projector icon and set the background color and the LED Work Light level by moving the indicator. To start on a screen click the “GO” icon. On a machine panel press the start button. And watch the magic happen as your stitches come together perfectly!
We’ve completed the main preparation and it’s the best time to pick up the embroidery design, set a position, and with the projector illuminate it on the correct spot for our book cover.
The PFAFF creative icon 2 sewing machine creative 120 Square Hoop (120 x 120 mm)
The PFAFF creative icon 2 sewing machine creative 120 Square Hoop (120 x 120 mm) with the hooped sandwich
The PFAFF creative icon 2 sewing machine creative 120 Square Hoop (120 x 120 mm)
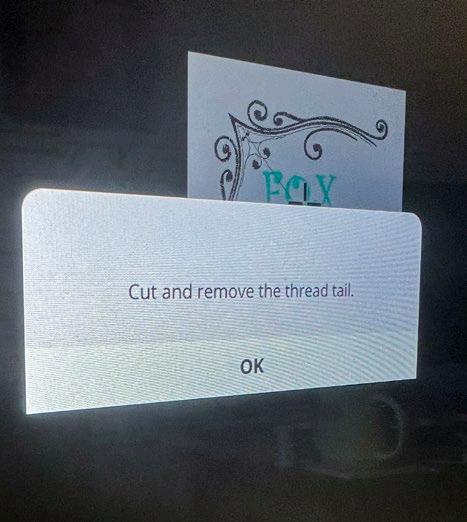
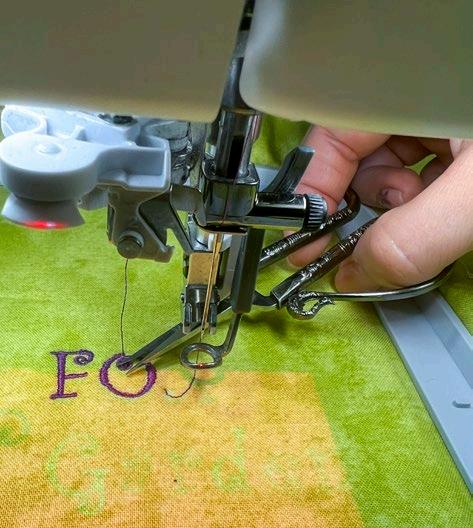
While embroidering the lettering, your machine will occasionally ask for some action from you. After each finished letter a pop-up window will appear on your screen with instructions. You’ll need to cut the thread and pull it to avoid getting it stuck or creating a messy back on the embroidery. So, cut, pull, click “OK” on the screen, and then press the start button on the machine panel. As soon as the title is finished, rethread the machine if you’d like to change the thread for the frame. Click the “GO” icon again, then press the start button on the machine panel. Give it about 5 minutes to create perfection!
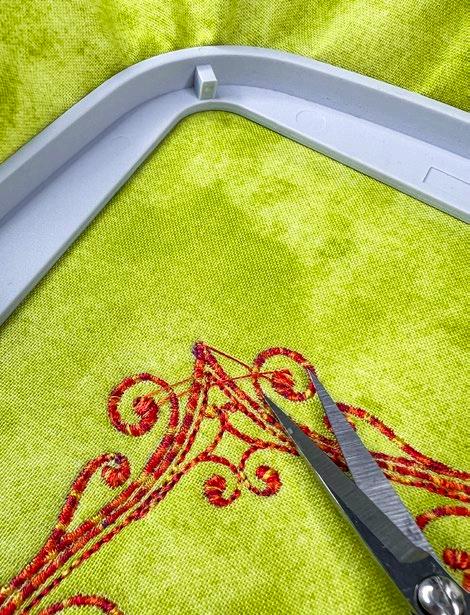
The machine will play a melody and a pop-up window will notify you that the embroidery is finished. To remove the hoop from the embroidery arm, press and hold the gray button on the hoop attachment, then slide the hoop toward you. Cut any excess threads, and carefully unhoop your finished masterpiece.
For the back, I used the same frame design#3. On the screen, go to “Edit the Design” mode, click on each word of the title, and press the “Bin” icon to remove it. Load another sandwich, just like the first one. Attach the hoop and click through all the necessary “OKs” to start the embroidery.
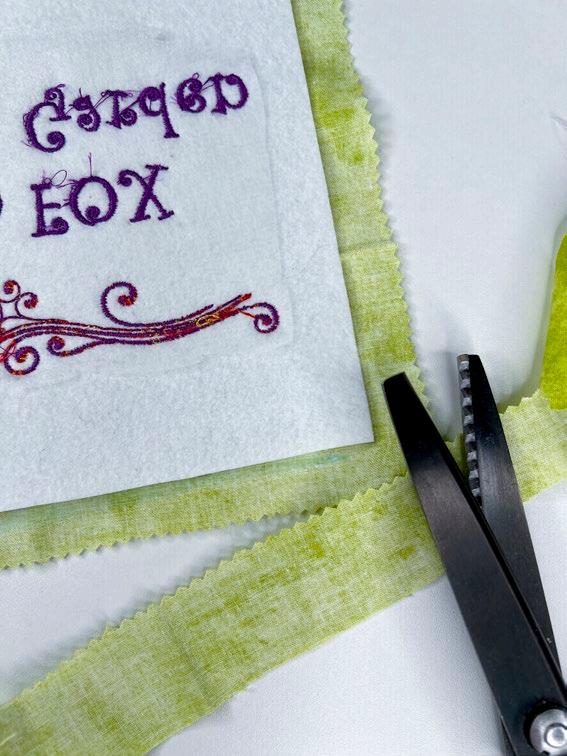
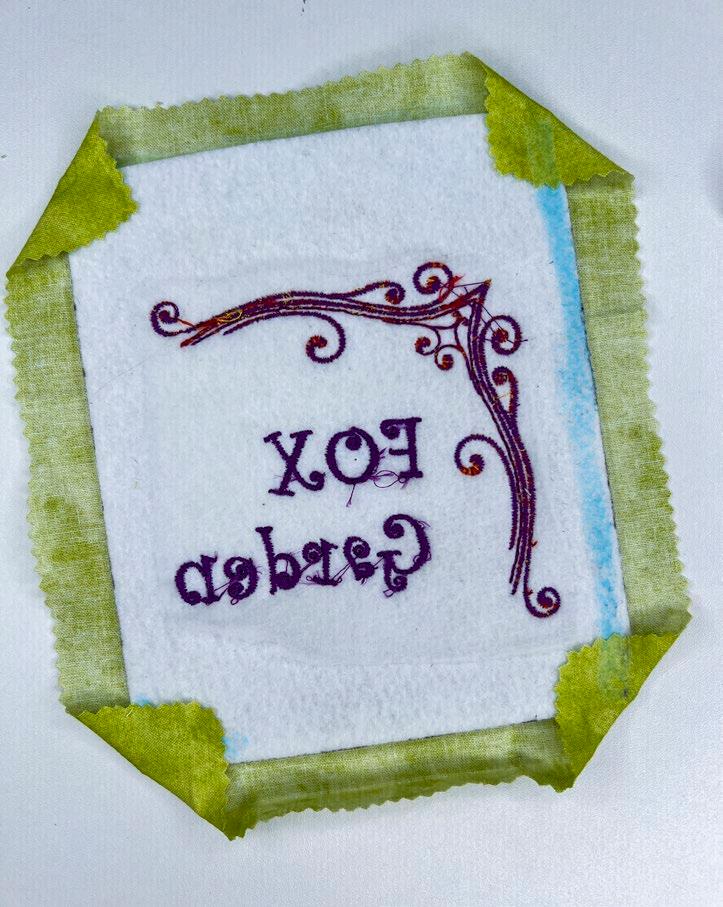
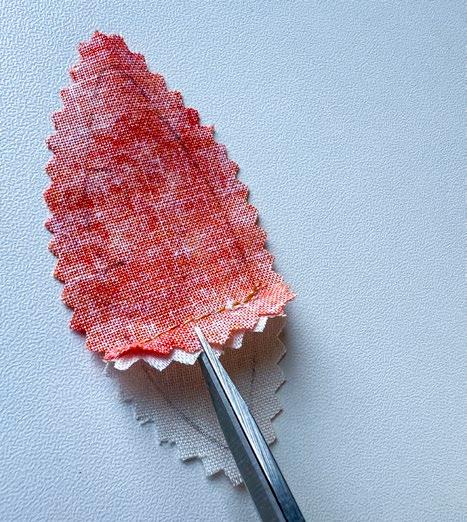
Both of our front book cover pieces are stitched! Trim off the excess light stabilizer around the embroidery. Cut the fabric around each piece, leaving a ¾” allowance using pinking shears.
TIP Using pinking shears helps prevent the fabric edges from fraying, so you won’t have threads scattered everywhere.
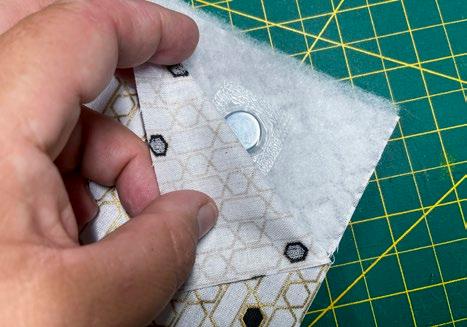
Using a fabric glue pencil, start at the corners and draw a glue line. Fold the fabric and glue it in place. Next, draw glue lines along the sides of the rectangle, flip the seam allowance over, and glue it down. Press each finished piece with steam to set everything nicely. Repeat for the back side of the book cover.
Our first part is done. Next, we’ll dive into two more steps of creating our playful fox-themed book. We’ll be adding embroidered lace and crafting the book spine!
Trimmed stabilizer around the embroidery design. The front fabric is trimmed with pinking shears to a ¾” allowance.
The wrong side of the play book cover with the finished glued corners.
The embroidered front side of the play book cover with the finished and glued seams to the wrong side along the shape.
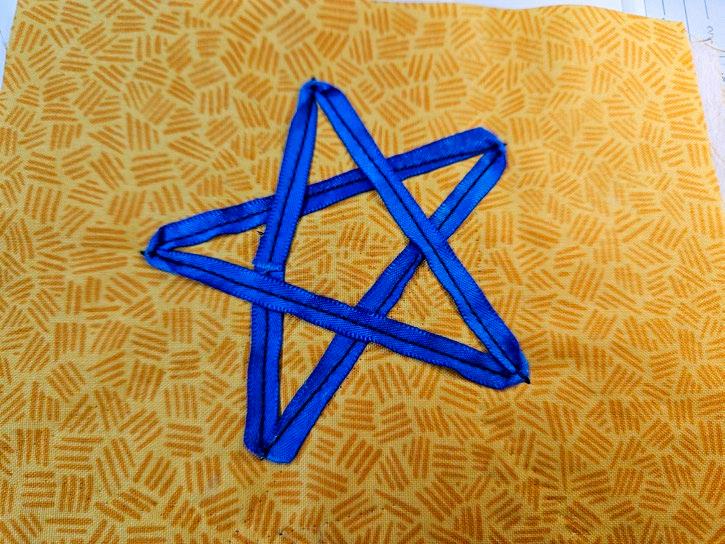
This fox-themed play book has embroidery on its laces and its spine!
In this segement, we’ll use the PFAFF creative icon 2 to machine embroider custom sayings directly onto laces, adding a personal touch to each piece. We’ll also assemble the book spine. Let’s continue our creative journey and bring this project to life!
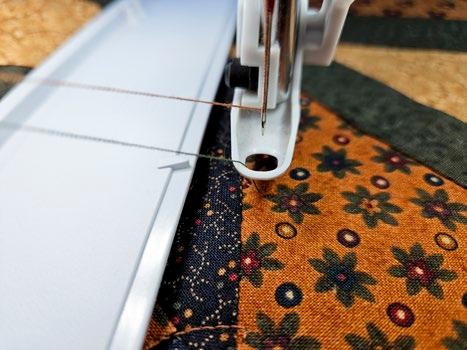
Just like before, we’re starting in embroidery mode. On the welcome screen, select the Embroidery option. A pop-up message will prompt you to clear the embroidery arm and remove the hoop (if attached) before calibration. Tap 'OK,' and the machine will calibrate, moving the embroidery arm into the ready position. Load the bobbin, thread the machine, and attach the 6D Dynamic Spring Foot
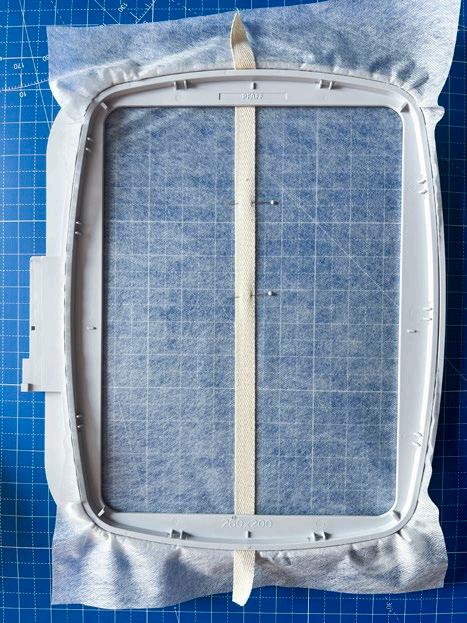
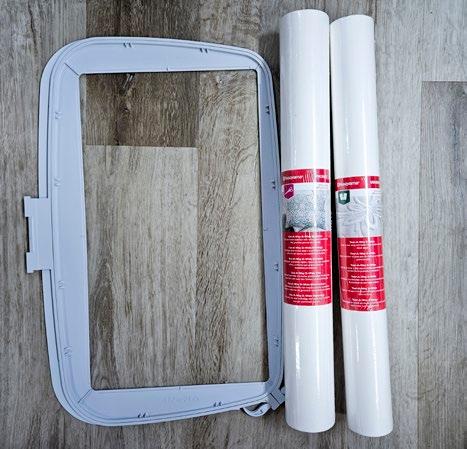
Take the creative 260 x 200 Elite Hoop (260 x 200 mm) and prepare your sandwich with the following layers: start with an 18” x 12” piece of PFAFF Tear-a-Way medium-weight stabilizer, then place the lace directly in the center. Hoop the sandwich. Pin the lace in place to keep it secure. We’ll remove the pins as we go during the embroidery process. On the screen, select the correct hoop size from the options. Once selected, click “Start Hoop Scan.” A pop-up message will appear, asking you to attach the hoop. Simply slide the hoop connector into the attachment from front to back until it clicks into place. Then, press "OK" on the screen.
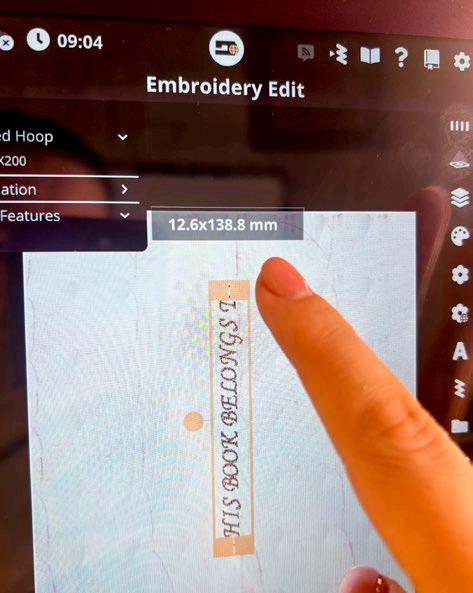
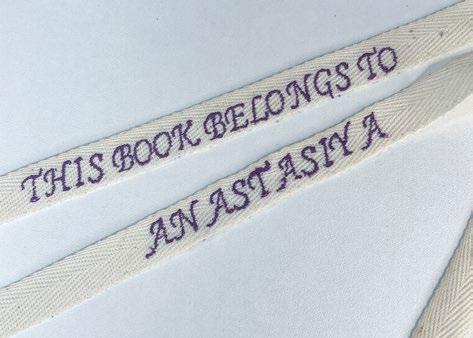
It’s time to design the text! I chose to embroider "This Book Belongs To" on one lace, and my daughter's name, "Anastasiya," on the second lace. To create the text, I clicked on "Embroidery Fonts" and selected "Belle 10." I entered the text using the pop-up keyboard, making it all uppercase for better visibility. I clicked the "Edit Design" icon and rotated the text 270 degrees to adjust the placement and fit for the lace. For the 5/8” width lace, I resized the text to 12.6 x 138.8 mm. Before starting, I used the projector to double-check the placement. Now, we’re all set for embroidery! To begin, click the "GO" icon on the screen and press the start button on the machine panel.
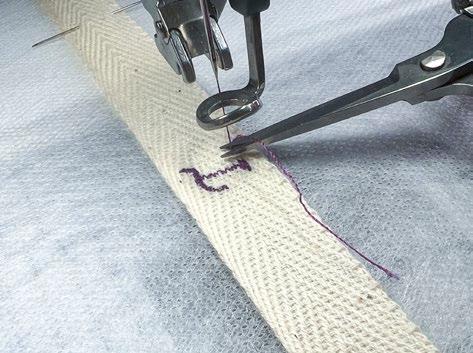
As the machine embroiders the lettering, it will occasionally prompt you to take action. After each letter, a pop-up window will appear with instructions. You’ll need to cut and pull the thread to prevent tangling or a messy back, which is especially important since the back of the lace will be visible. Once you've done that, click "OK" on the screen and press the start button on the machine panel.
Play book and custom embroidered laces with the PFAFF creative icon 2 sewing & embroidery machine
The PFAFF creative 260 x 200 Elite Hoop (260 x 200 mm)
When the first lace is complete, remove the hoop and load the second piece of lace in the same way.
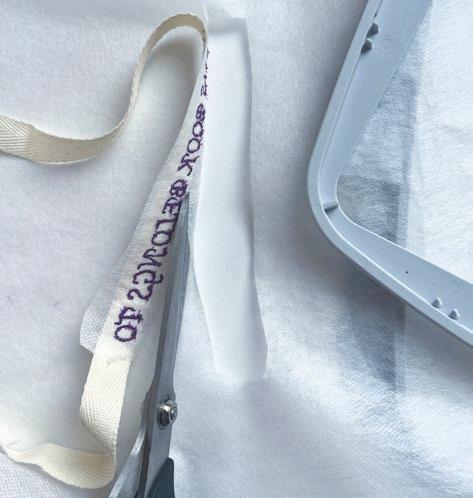
Once the second lace is finished, trim the water-soluble stabilizer around the embroidery. Wash each piece to dissolve the stabilizer, let it dry, and then press it.
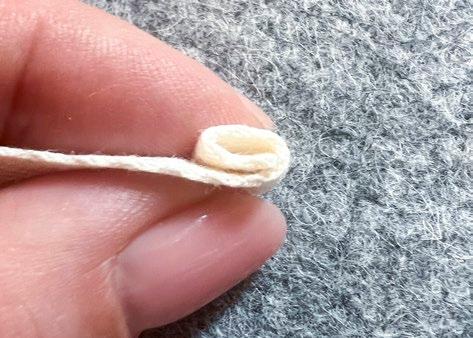
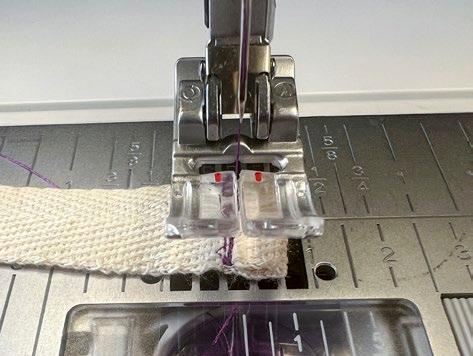
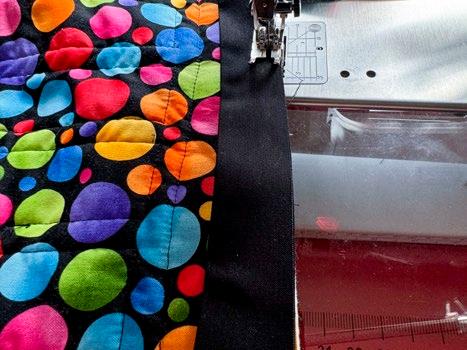
Click the home icon on the screen and select the sewing mode. Attach the 0A Standard Presser Foot for the IDT System. Pull the IDT system down until it engages. Now it’s time to finish our laces! Trim the lace raw edges if needed. Fold one raw edge of each lace twice, then stitch along the edge to secure the fold.
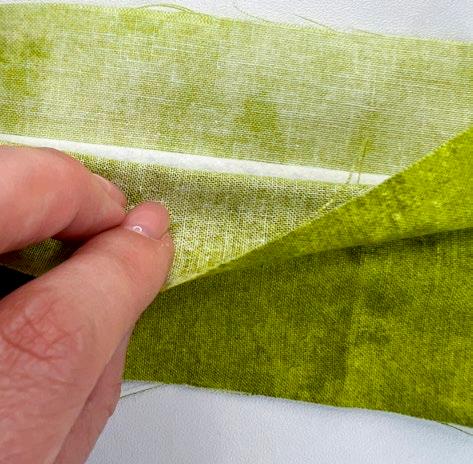
To create the book spine, take one 3” x 61/8” piece of deep ombre green fabric and one 3” x 7” piece of light ombre green fabric. Place them right sides together and pin along the short edges. Stitch with a ¾” seam allowance. Turn the loop right side out and insert a ¾” x 61/8” piece of ultra-firm stabilizer, positioning it in the middle between the short edges. Press with steam
The PFAFF creative icon 2 sewing machine creative 260 x 200 Elite Hoop (260 x 200 mm)
Trimming water soluble stabilizer around the embroidery design on the lace.
Finished the embroidery design on the lace demoing the stabilizer dissolving process
Two finished laces with embroidered sayings, dried and pressed.
Close-up of the lace with the raw edge rolled twice.
The stitching the edge of the lace to secure the folded edge with 0A Standard Presser Foot for IDT System on PFAFF creative icon 2 sewing machine
Creating the book spine with two different shades of ombre green fabric. Place right sides together. Pin and stitch along short sides creating a loop.
Demoing the inside of the sandwich for the book spine
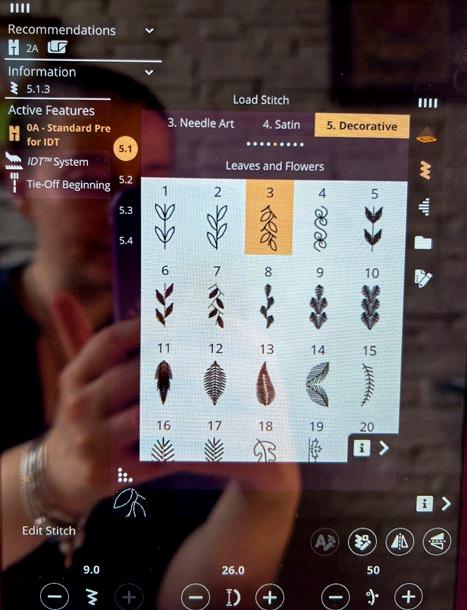
The final step for the spine is to secure the stabilizer. And we’ll do it with a decorative built-in stitch! To load a stitch, click on “Load a Stitch” and scroll to the “Decorative” category. For this project, I chose the "Leaves and Flower" category and selected stitch 3.
Click on stitch 3 to set it up for stitching. Next, click the Projector icon to adjust the background color and LED Work Light by moving the indicator. For easier navigation, turn the stitch preview to “On.”
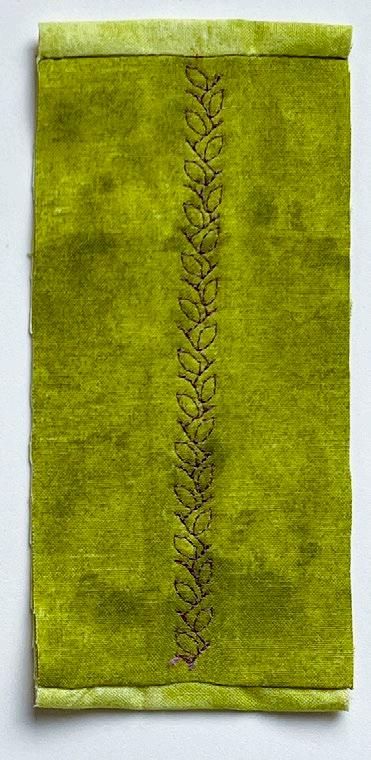
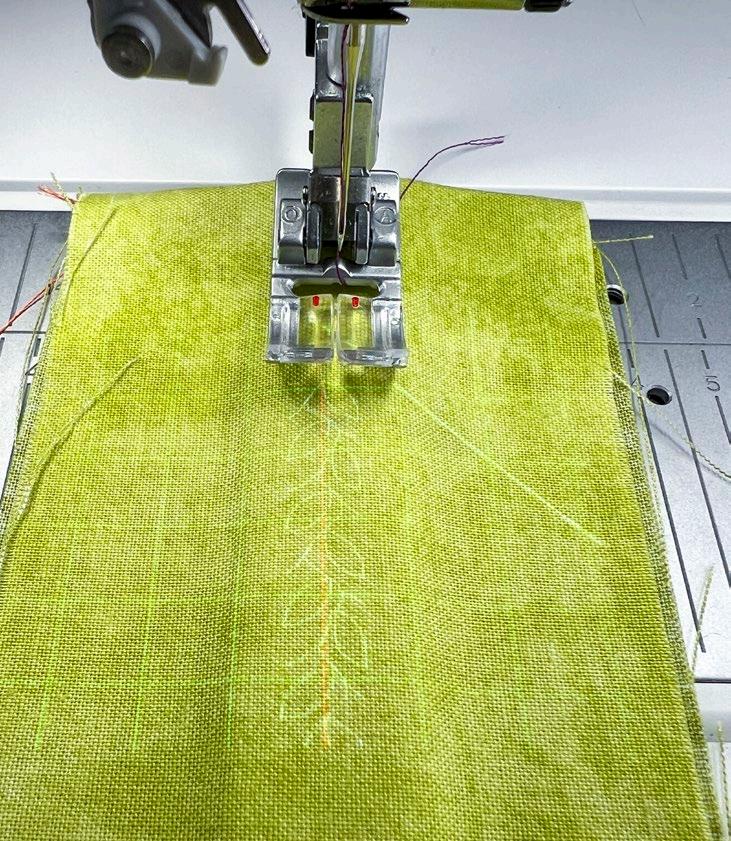
Place the spine sandwich so that the stitch projection is directly in the middle. Quilt from edge to edge using the projected stitch navigator. Trim the threads along the raw edges and press the spine with steam.
The PFAFF creative icon 2 sewing machine with adjusted 0A Standard Presser Foot for IDT System
The quilted and pressed book spine
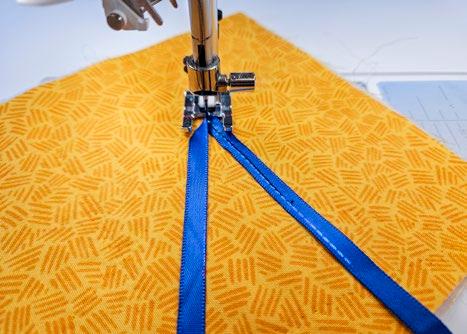
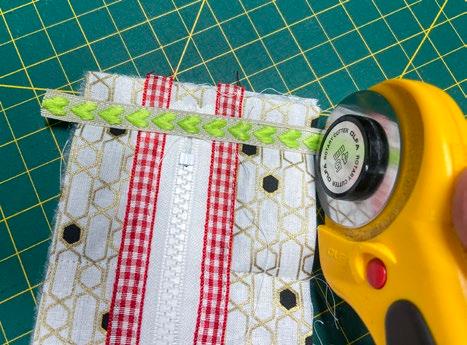
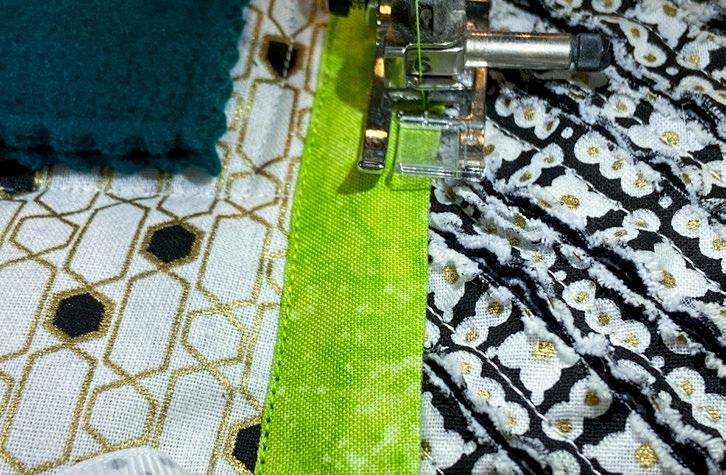
Make a zippered, mesh fabric pocket for a play book page
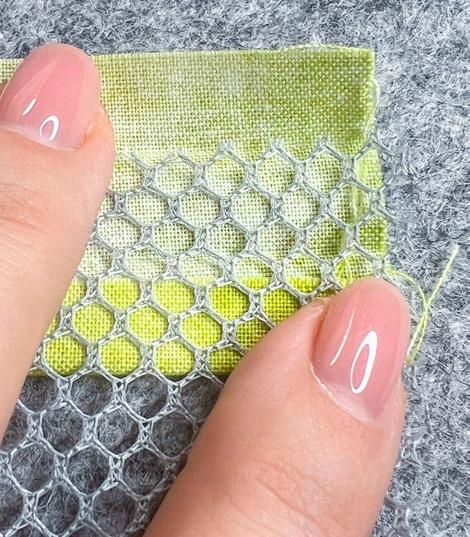
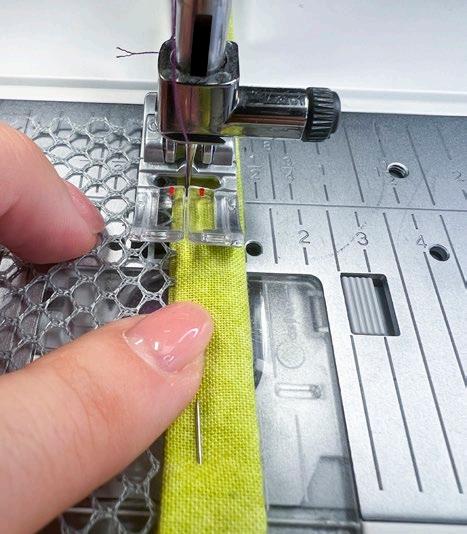
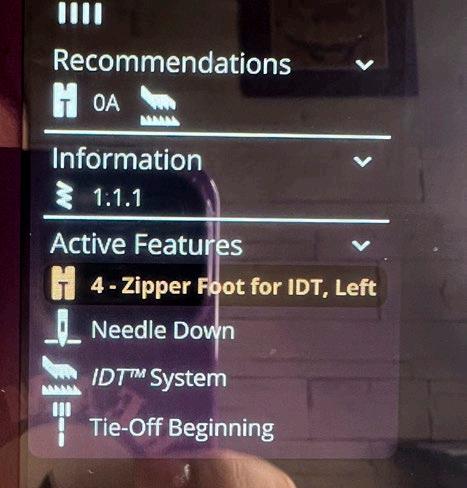
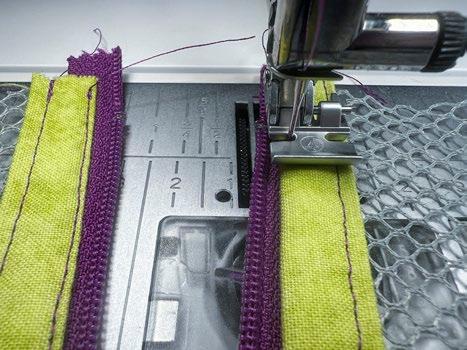
I’m excited to share my newfound love for working with mesh fabric. I used to avoid it because it shifts easily, but with the PFAFF IDT System, I’ll never have to worry about that again! Let’s switch on our PFAFF creative icon 2 and get ready to have some fun! Be sure to keep your 4 Zipper Foot for IDT System and 0A Standard Presser Foot for IDT System handy as we’ll be using them a lot.
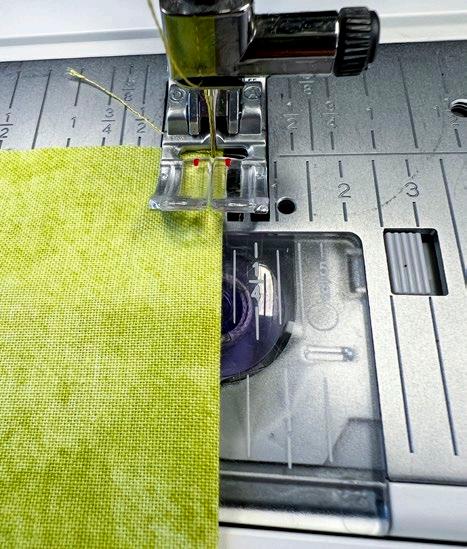
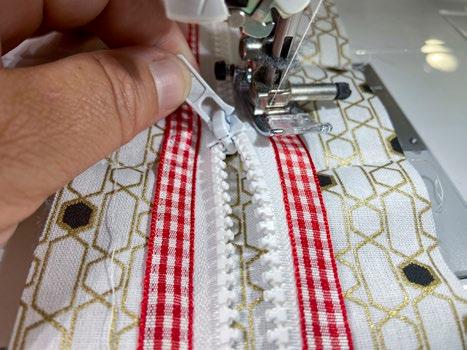
First, we’ll take a 1¾” x 12” strip of light ombre green fabric and make a binding. Fold it in half along the long side with the wrong sides together. Open the strip back out and press the ¼” seam allowance to the wrong side along one long edge. Repeat for the other long edge. Open one side of the binding and place the 5” x 12” mesh fabric along the pressed seam. Fold the binding over the edge of the mesh and pin it in place. Attach the 0A Standard Presser Foot for the IDT System and stitch with a straight stitch, keeping close to the edge of the binding. Don’t forget to remove the pins as you go. Once your binding is stitched in place, cut the finished piece in half along the short side. This will give you two equal pieces, each with a neatly finished edge, ready for the next step.
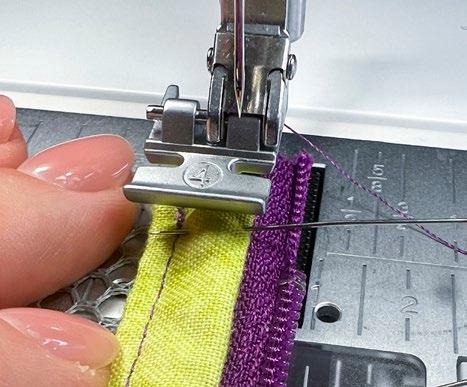
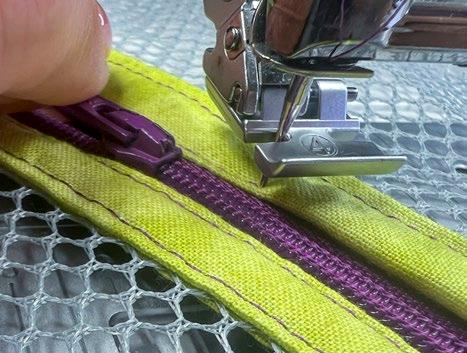
Now switch to the 4 Zipper Foot for IDT System. Attach it in the right position. Let me explain. With this foot, you don’t need to adjust the needle position manually. With a simple touch, you can switch the foot’s position, making stitching the zipper a breeze! Open the zipper and place one side along the top of the binding. Pin it in place if needed, and stitch from edge to edge. Then, move your zipper foot to the left position. You’ll see this change under the Active Feature on your screen.
PFAFF creative icon
Take the second piece of the bound mesh and align it with the other side of the zipper. Stitch about halfway. Stop with the needle down. On the machine panel, press the foot-up button, pull the zipper slider through, and tape the zipper in place. Continue stitching to the edge of the piece.
A play book with custom embroidered laces and the PFAFF creative icon 2 sewing and embroidery machine
Positioning the binding to secure the mesh fabric.
Fold the bias to secure the mesh fabric in between.
Stitch from edge to edge with the 0A Standard Presser Foot for IDT System.
Attaching the zipper with the 4 Zipper Foot for IDT System in the right position
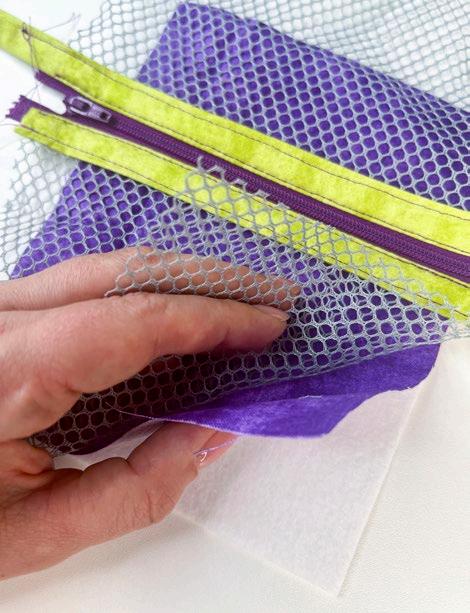
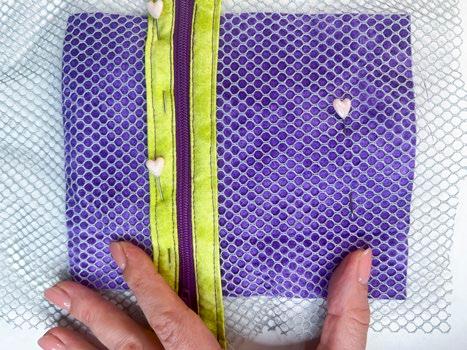
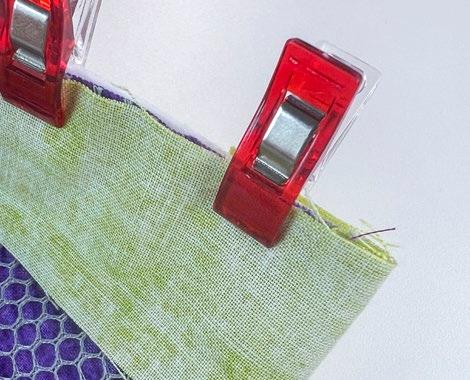
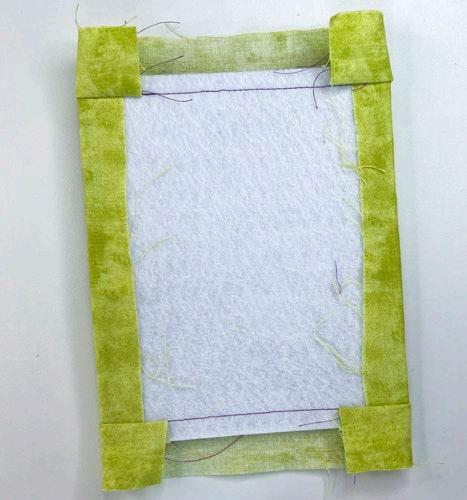
The next step is to create an inner page. For this, we will need a 5¼” x 6¼” piece of ultra- firm stabilizer and a 5¼” x 6¼” piece of deep ombre purple fabric. Make a sandwich with the stabilizer, the purple fabric right side up, and the zipper mesh piece on top. Position the zipper 2 to 2½ inches from the short top edge. Pin the sandwich.
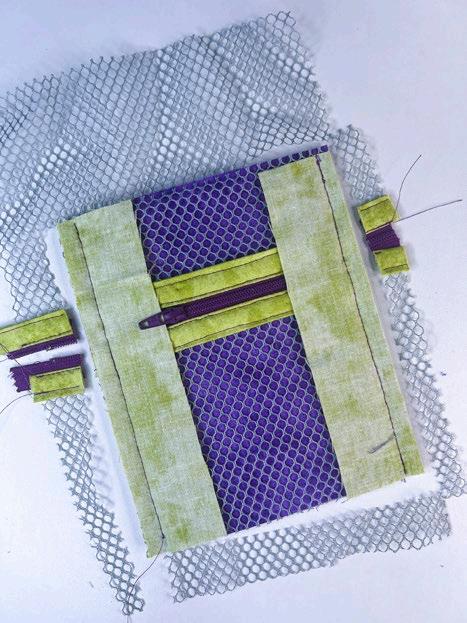
Take 2 strips of light ombre green fabric, each measuring 1½” x 6¼”, and place them along the long sides of the page. Position the zipper slider 2 inches from the edge of the page and pin along the sides. Be sure that the raw edge of each strip aligns with the edge of the page. Switch back to the 0A Standard Presser Foot for the IDT System, and stitch from edge to edge with a 3/8” seam allowance. Trim any excess mesh fabric. Fold the side strips to the wrong side of the sandwich and use a fabric glue pen to secure them in place.
For the top, take 2 strips, 1½” x 6½” of light ombre green fabric, and clip them along the short edge of the page, ensuring that the raw edge of each strip aligns with the edge of the page. Leave 1 inch of excess on each side of the strip. Fold the excess edge of the strips to the wrong side of the page, clip, and stitch from edge to edge with a 3/8” seam allowance. Turn and press the strip. Fold the fabric over to the wrong side of the page and glue it in place.
The PFAFF 4 Zipper Foot for IDT System with the foot in the left position.
Lift the 4 Zipper Foot for IDT System up and close the zipper.
Layering the pocket sandwich with the stabilizer, the purple fabric right side up, and the zipper mesh piece on top.
The pinned pocket sandwich.
The mesh fabric and the zipper have been trimmed with a rotary cutter.
Gluing the sides on the wrong side of the play book inner page.
The clipped top strips with 1” excess on each end.
Folded and clipped strips to finish the inner book page.
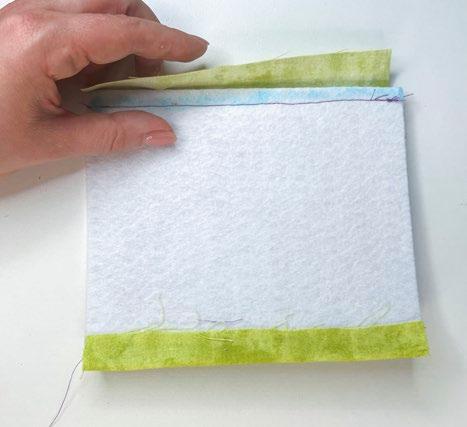
The wrong side of the play book inner page with attached and pressed top strips.
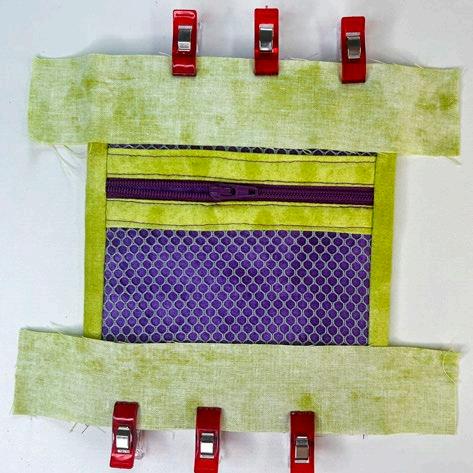
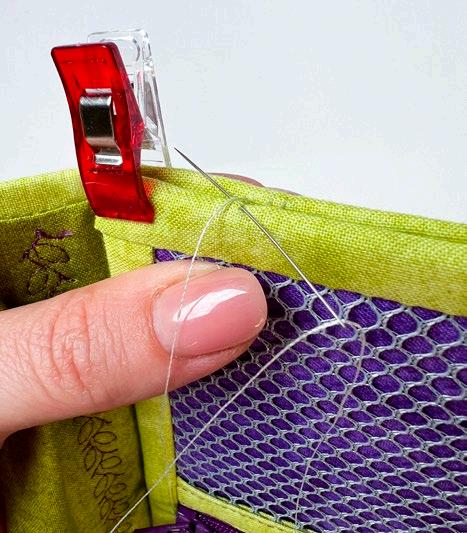
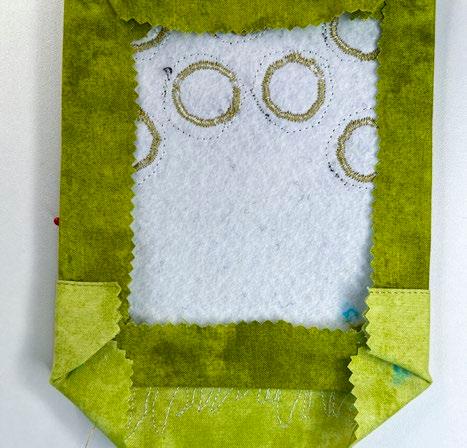
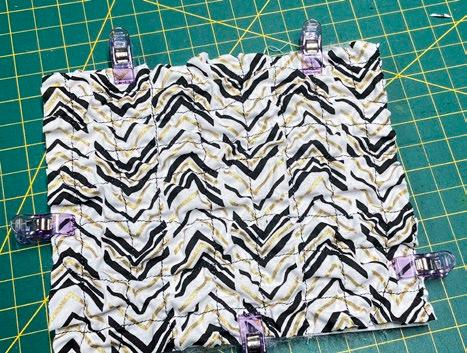
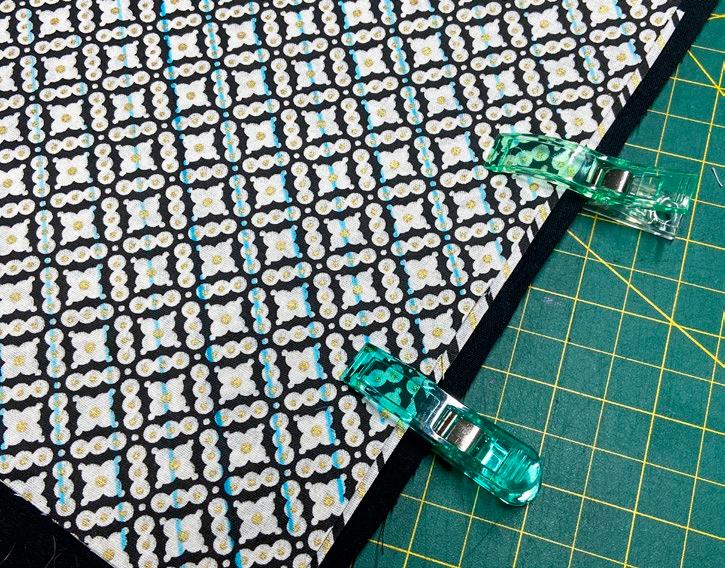
We're all set to finish the side of the book cover. Place the front cover with the wrong side facing up. Position the lace so that its raw edge is 2½” from the top of the page, ensuring the wrong side of the lace is facing up. Next, place the spine along the second side of the page. Position the page with the mesh pocket right side up. Clip all layers together to secure everything in place. Hand stitch all around the page using a loop or blind stitch.
Fantastic work, everyone! We've wrapped up the page with the mesh fabric pocket and attached the zipper in a fun and straightforward way.
The process of putting the front play book cover together.
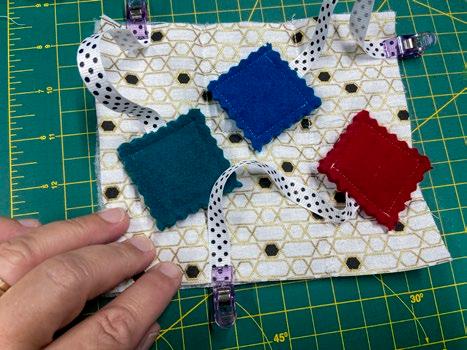
All elements of the front play book cover and the embroidered spine are clipped together with the mesh zipper pocket on the top.
Hand stitching the front cover.
mySewnet + creative icon 2 make pretty flower patches for a play book
We’ll dive into creating beautiful, embroidered flower patches using designs from mySewnet library to bring a playful touch to our project. Then we’ll learn how to work with Velcro for a practical and fun way to add flexibility to our book’s layout. So grab your 6D Dynamic Spring Foot, 0A Standard Presser Foot for IDT System, and the creative 120 Square Hoop (120 x 120 mm), power up your PFAFF creative icon 2, and let’s get started!
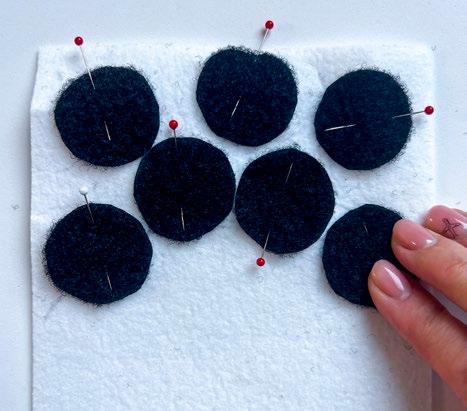
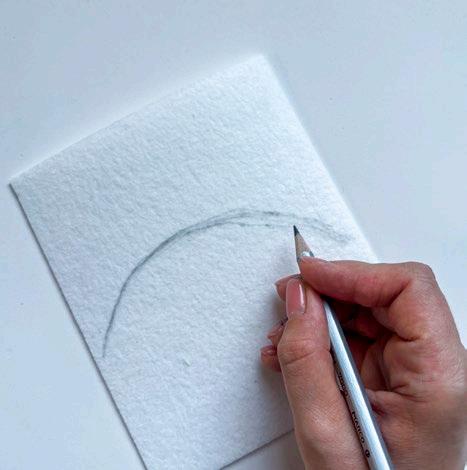
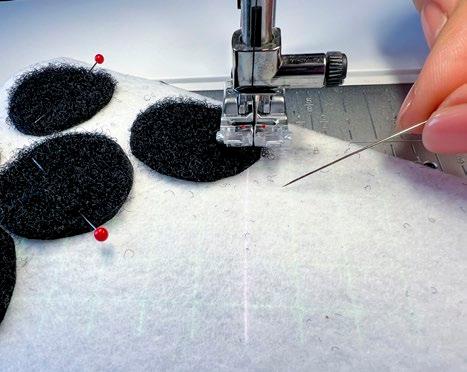
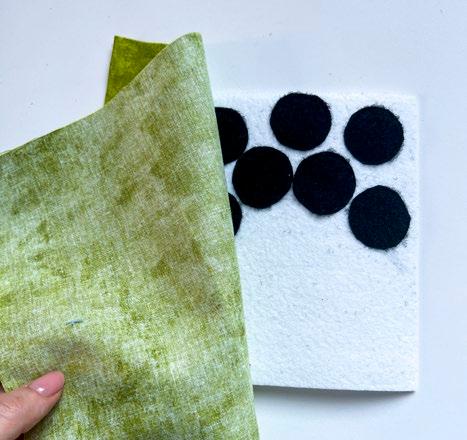
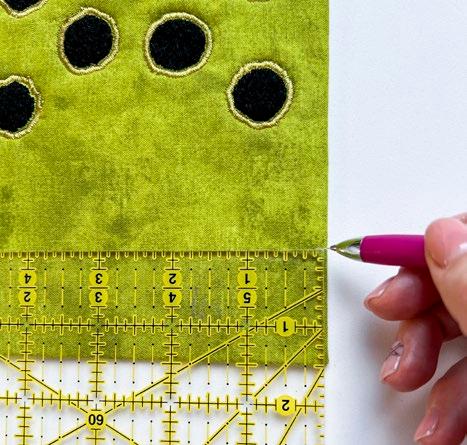
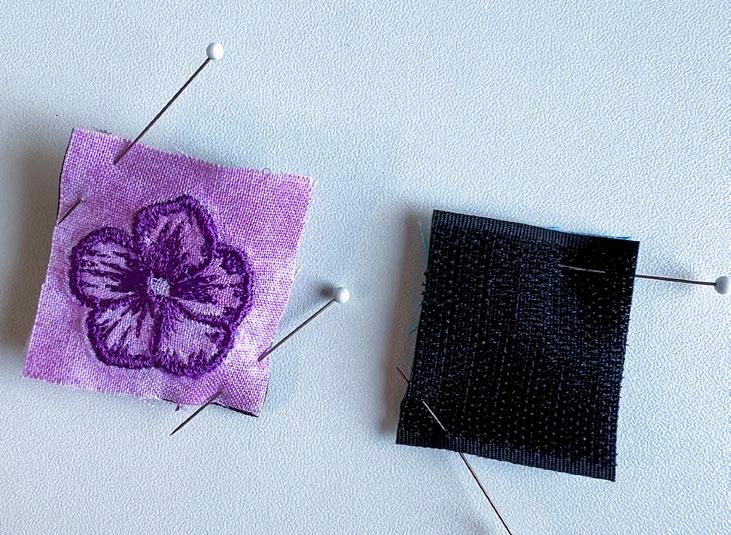
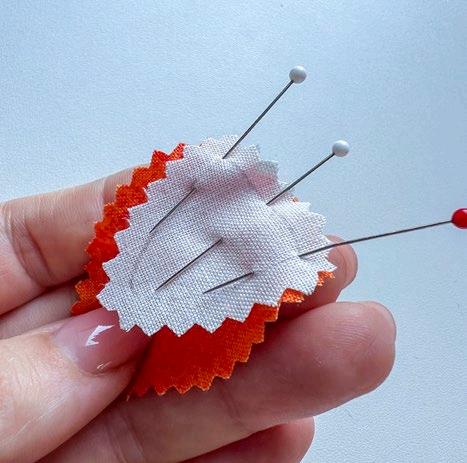
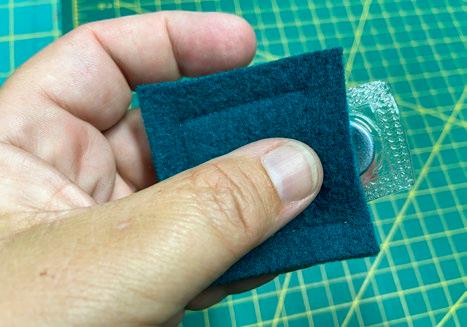
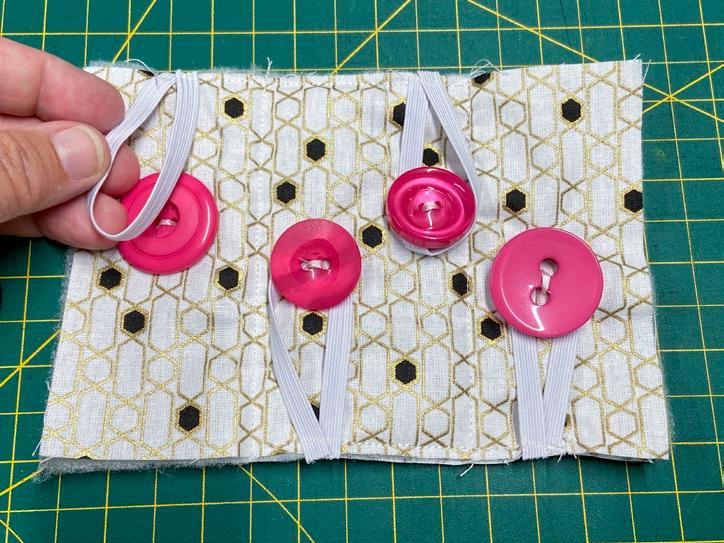
Take the last 5¼” x 6¼” piece of ultrafirm stabilizer and with a soft pencil draw a semicircle in approximately the middle of the page. I like to use my thread spools as small circle templates. For this project, I’ll use my 500m and 200m spools. Separate the 9” x 1½” Velcro strip into two pieces. One is the hook side, and the other is the loop side. Flip the loop side (the one with the dense nylon pile) to the wrong side. Using the 500m spool base, trace 7 circles onto the wrong side of the Velcro strip. Cut out the circles on your drawn line. Pin them onto the ultra-firm stabilizer, using the semicircle line as your guide. Select the sewing option on the welcome screen of your PFAFF creative icon 2. Attach the 0A Standard Presser Foot for IDT System and pull the lever down to engage it. Next, click the projector icon and adjust the background color and LED work light using the slider. For better visibility, turn the stitch preview on. Using the projected stitch navigator as your guide, sew a straight stitch close to the edge of each circle. Remove the pins as you go.
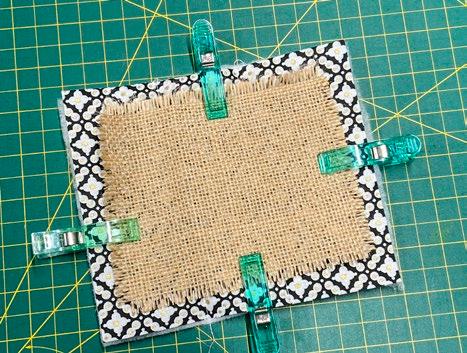
Place a 9” x 9” piece of deep ombre green fabric right side up, over top of the stitched circles on the stabilizer, centering the fabric to the stabilizer. Use clips to secure the layers.
The inside play book page with embroidered flower patches.
Lightly sketch a semicircle on the ultra-firm stabilizer page with a soft pencil.
Use the base of a thread spool as a circle template.
Place the Velcro circles on the ultra-firm stabilizer for a book page.
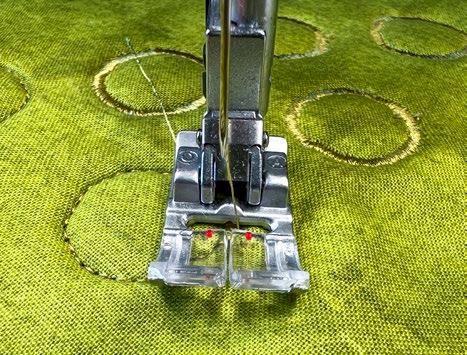
Use the 0A Standard Presser Foot for IDT System with the projector on to stitch the Velcro circles.
Cover the stitched circles on the stabilizer with the deep ombre green fabric.
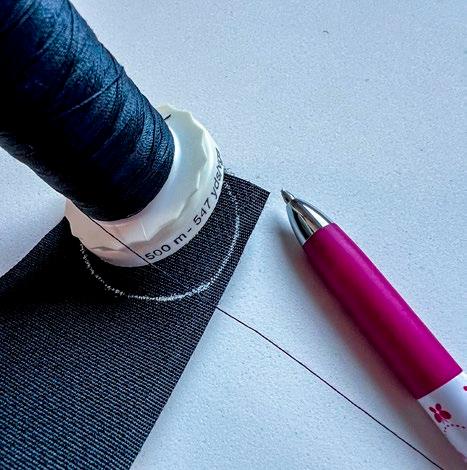
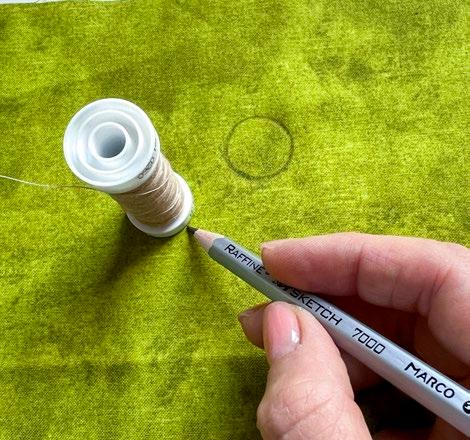
Place a 200m thread spool in the middle of each Velcro circle and trace around the outside edge with a soft pencil. Hold the stabilizer up to the light to ensure the small circles are perfectly centered. With the projected stitch navigator, sew a straight stitch around each small circle, trimming thread tails each time to keep the back clean.
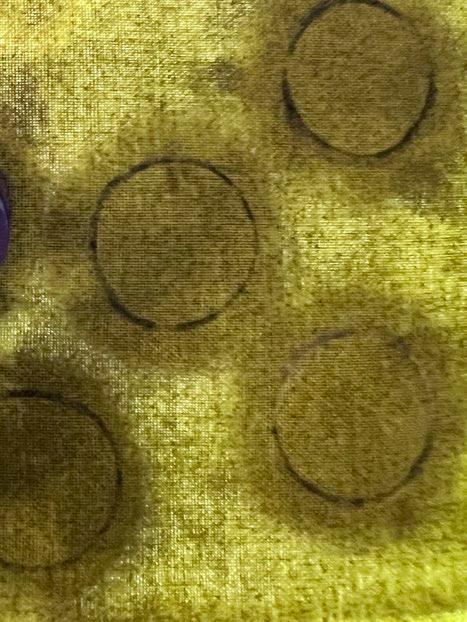
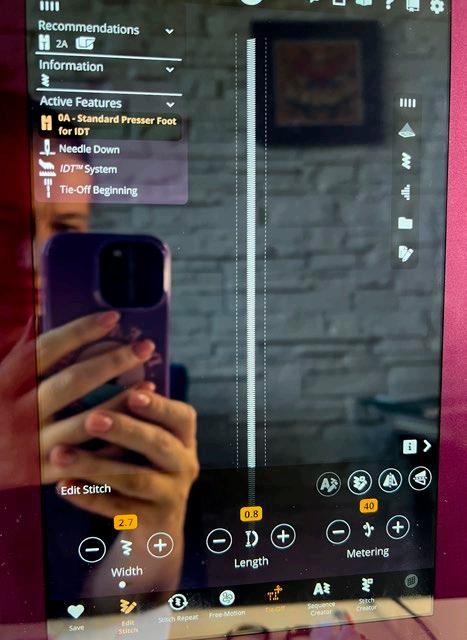
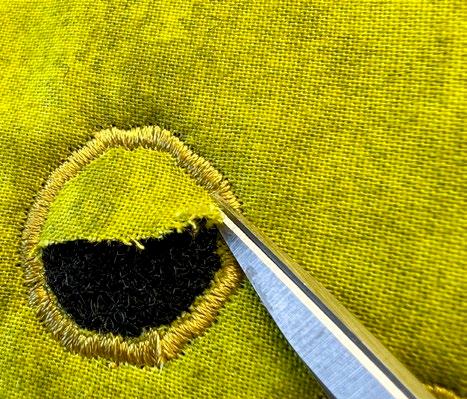
Click on the load stitch icon and choose utility stitch 12. Adjust the width to 2.7, the length to 0.8, and the metering to 40. Don’t forget to save this stitch for easy access in future projects. For your needle, I recommend using PFAFF Quilting Needles Size 90/14. Thread your machine with the desired thread color and sew a zigzag stitch along the edge of each circle. Make sure not to push or pull the fabric while sewing as it may distort the stitches. Let the machine guide your work at its own pace and enjoy the stitching process. Now carefully cut out each inner circle to expose the Velcro. Be sure to stay close to the edge of the stitches. Flip over so that the wrong side is facing up. With a fabric glue pencil draw a glue line at the corners. Fold the excess fabric over to the wrong side of the page and press it to secure. Next, draw glue lines along the sides of the rectangle, fold the seam allowance to the wrong side of the page, and glue it down for a neat and clean finish.
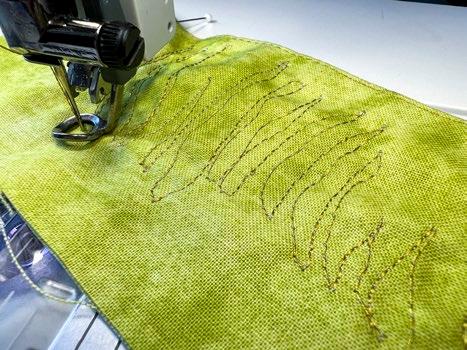
To create a quilted pocket, take a 3” x 7” piece of light ombre green fabric, fold it in half lengthwise with right sides together, and stitch along the long edge with a straight stitch close to the folded edge. Now, attach the 6D The Dynamic Spring Foot. As soon as the foot is attached, the free-motion options window will pop up on your screen. Select the dynamic spring option Thread the machine with your desired color and starting 1” from the edge on each side of the seam allowance freemotion stitch some grass contours.
Use the base of a spool of thread as a circle template.
Hold the page sandwich up to the light to ensure the traced circles are centered.
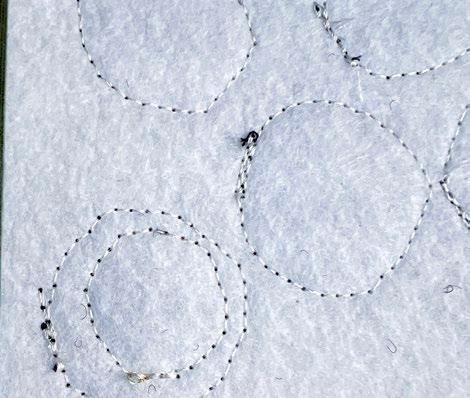
The wrong side of the stabilizer shows the stitched inner and outer circles.
PFAFF 0A Standard Presser Foot for IDT System and the contour stitching process.
Cut out the inner circle of the top fabric to reveal the Velcro.
Straight stitch the pocket edge with the PFAFF 0A Standard Presser Foot for IDT System.
Free-motion stitch the grass with the PFAFF 6D Dynamic Spring Foot
Mark 1 ½” from the edge of the page with a fabric marker, then place the quilted pocket in position. Pin the pocket securely. Using a fabric glue pencil, fold the seam allowance of the pocket and glue it to the wrong side of the page. Now that all the elements are prepared, it’s time to finish the back of the book. Place the back cover with the wrong side facing up.
Position the remaining embroidered lace so that its raw edge is 2½” from the top, with the wrong side of the lace facing up. Now, place the spine along the opposite side of the page. Finally, position the page with the Velcro circles, right side up. Clip all the layers together to secure them in place, and hand stitch around the page shape using a loop or blind stitch.
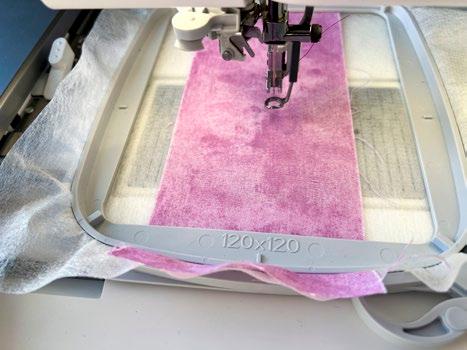
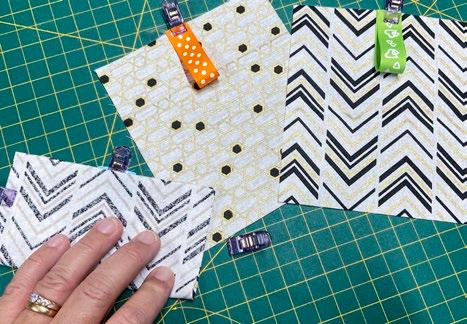
Prepare three fabric sandwiches as follows. Start with a 10” x 10” piece of PFAFF Whisper Web Mesh Light Stabilizer then place a 4” x 10” piece of fabric on top with the right side facing up. Use light ombre purple fabric for the first sandwich, deep ombre yellow for the second, and deep ombre blue for the third. Hoop the first sandwich in your creative 120 Square Hoop (120 x 120 mm) then click on mySewnet from the welcome screen. Sign in or create an account to access the library and get ready for the next steps.
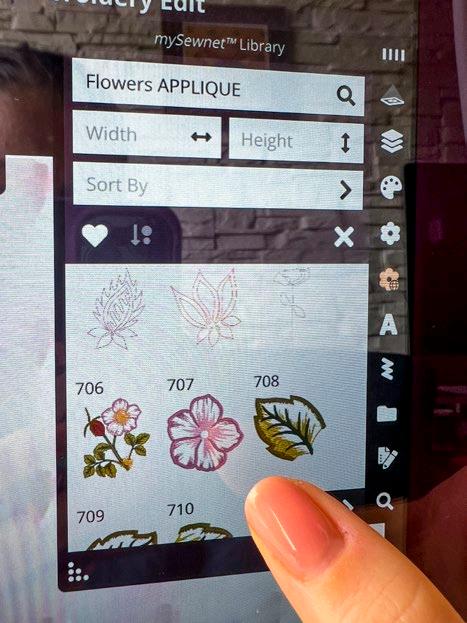
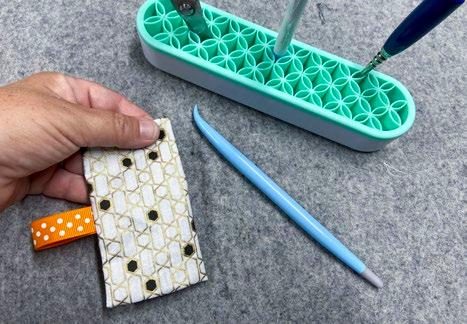
Since our Velcro strip is 1½” (38.1 mm) wide, the final flower applique should be approximately 26mm x 26mm or 27mm x 27mm. This size is perfect for stitching multiple flowers at once in the hoop. On your PFAFF creative icon 2 screen, press the applique creator icon with the globe symbol to access the mySewnet design library. Search for applique and browse through the designs. There are so many beautiful options! For my fox garden, I chose flower 707. Click the design twice to load it for editing.
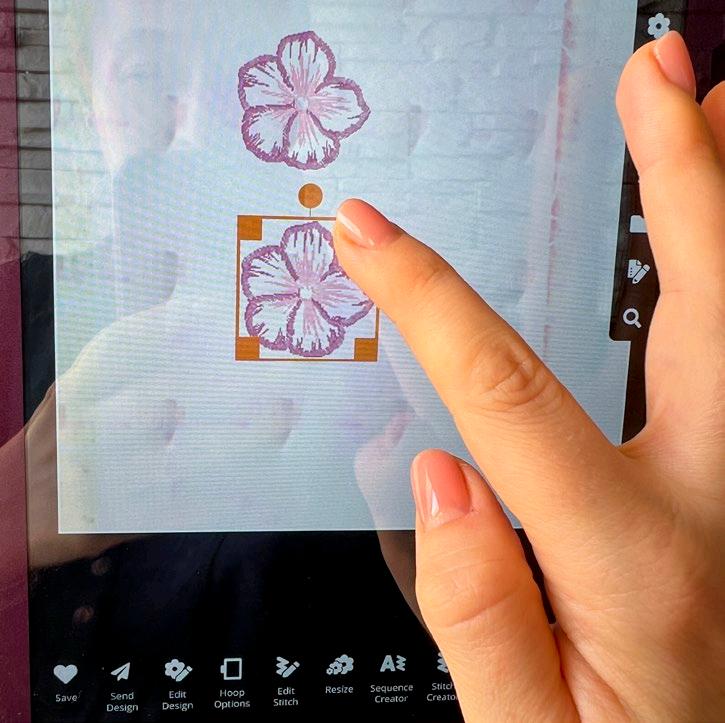
Now let’s adjust the size. Click the resize icon and use the control points to resize the first flower to approximately 26.1 x 26.3mm. Add a second flower and set the size to 27.4 x
27.7mm. Once you’ve resized both flowers, click the resize icon again to return to the main editor. Next, click the edit design icon to fine-tune the size and placement of your applique flowers. Once ready, set up the hoop with the first fabric sandwich. Click the projector icon and adjust the background color and LED work light using the slider. To begin, click the go icon on the screen, then press the start button on the machine panel. Now, just sit back and enjoy watching the embroidery bring your flowers to life!
Mark 1½” from the edge of the page with a fabric marker, then place the quilted pocket in position.
Glue the seam allowance to the back of the play book pocket.
Clip all the elements of the back play book cover and the embroidered spine together.
The PFAFF creative 120 Square Hoop (120 x 120 mm) hooped with fabric and stabilizer.
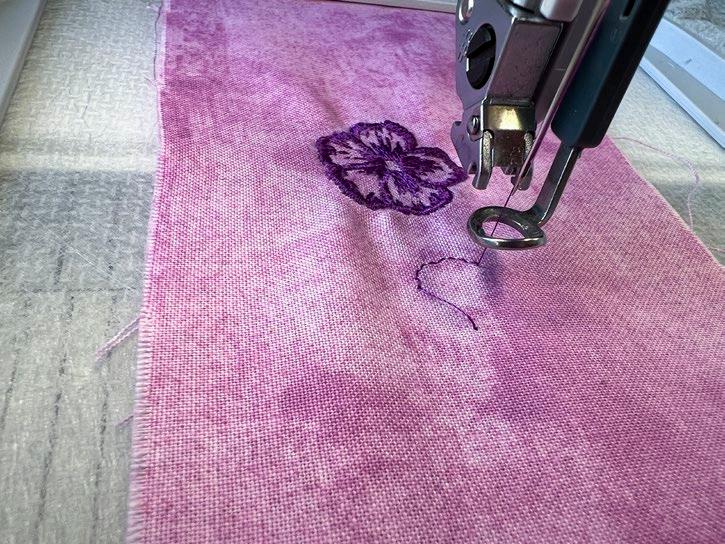
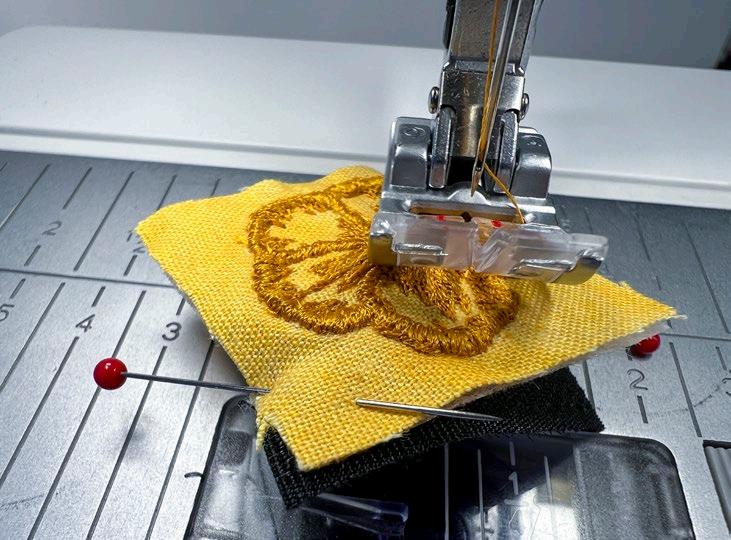
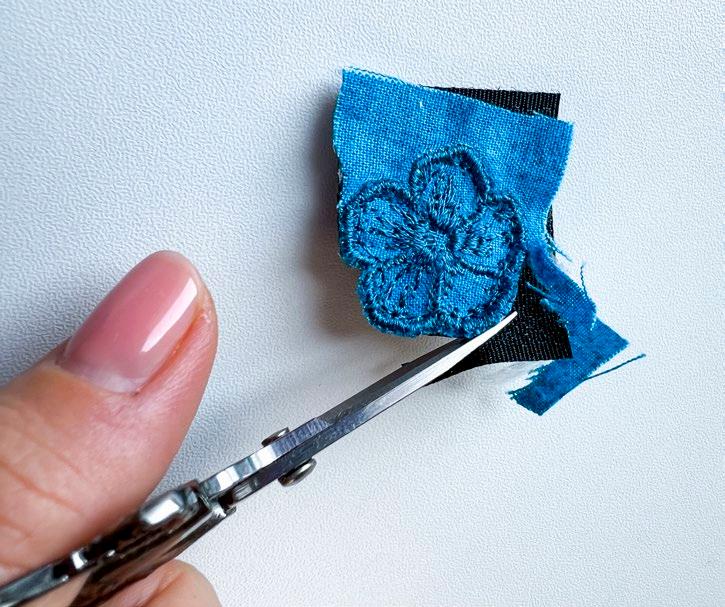
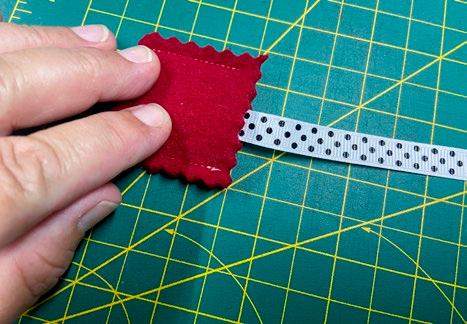
After completing the embroidery, reload the hoop with the next fabric color and repeat the process until all three fabric sandwiches are done. Trim each embroidered flower to 1½” x 1¼”. Cut the 9” x 1½”, hook side of the Velcro strip into seven equal pieces each measuring 1½” x 1¼”. Flip the hook side so it's facing down (wrong side up). Place a flower on top of each Velcro piece with the wrong sides together and pin. Attach the 0A Standard Presser Foot for IDT System and stitch along the flower silhouette with a straight stitch, staying close to the inner edge of the applique for a precise finish. Finally, fussy cut each flower patch with scissors, staying close to the edge of the stitches for a neat finish.
Resizing the design with the PFAFF creative icon 2 sewing machine 10.1-inch capacitive touch screen.
The PFAFF 6D Dynamic Spring Foot stitching the embroidery flowers.
Place each flower on a Velcro piece, wrong sides together and pin.
Stitch around the edge of the embroidered flower with the 0A Standard Presser Foot for IDT System and matching thread.
Fussy cut the flower patch.
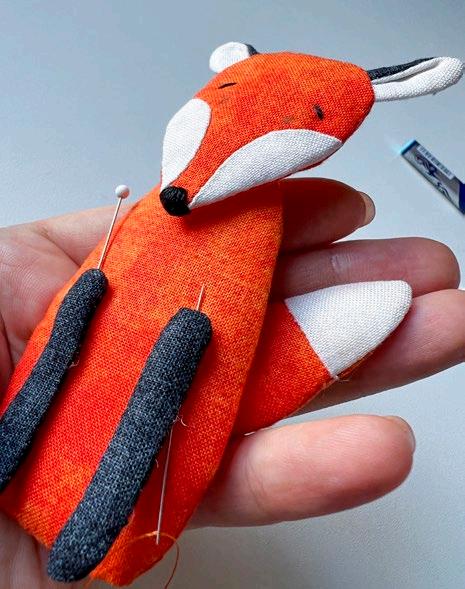
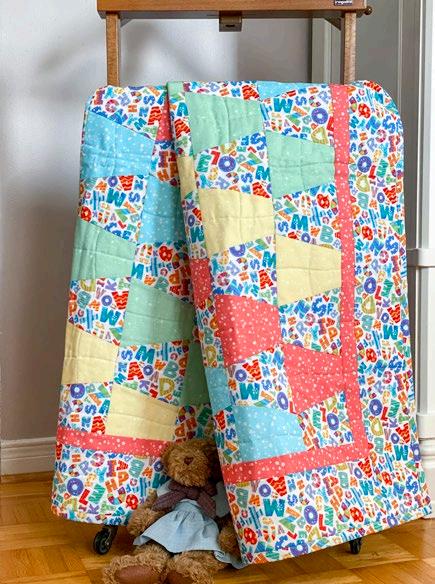
Put the play in play book with an adorable fox toy and a miniature quilt
For the last part of this play book project, we’re making the sweet little stuffed toy fox with its miniature quilt. Let’s get started.
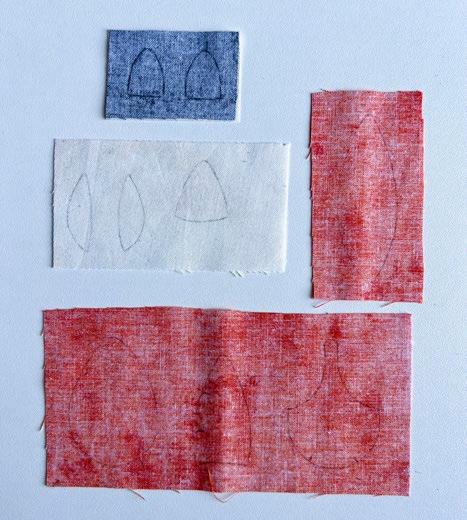
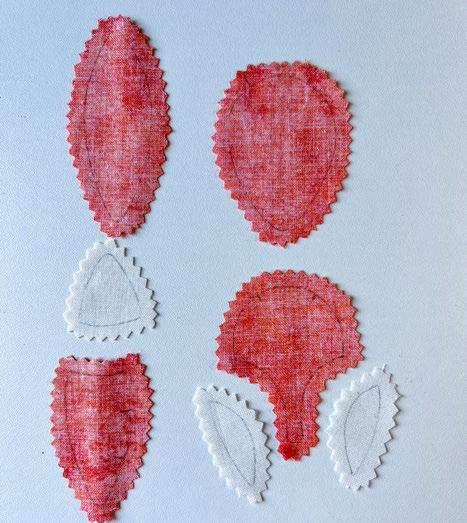
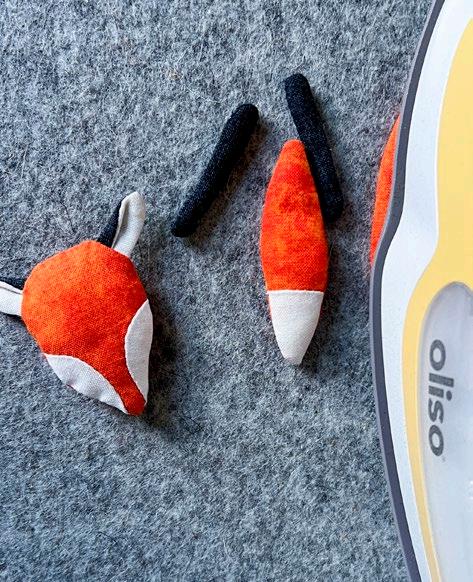
1. Download and print the sweet little stuffed toy fox pattern and cut out your templates. Be sure to set the printer settings to print the actual size. Keep in mind that the templates don’t include the seam allowance.
2. Trace the templates onto the wrong side of the fabric.
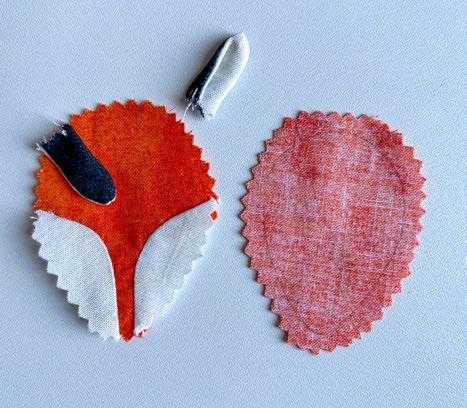
1. You need 2 – 1½” x 2½” pieces of fabric, one off-white and one black for the ears. Position them with the right sides together.
2. you need 1 – 2” x 4” piece of offwhite fabric for the tail tip and cheeks.
3. For the tail's head and front part, you need 1 – 3” x 6” piece of ombre orange-yellow.
4. For the back side of the tail, use a 2” x 3½” piece of ombre orangeyellow fabric.
5. For the fox's body, take a piece of 5½” x 4¼” of ombre orange-yellow fabric and fold it in half widthwise with the right sides together.
3. Trace the body, marking an opening at the bottom for turning. For the paws, use a 2” x 5” piece of black fabric and fold it in half widthwise with the right sides together. Trace the paws and mark an opening for turning.
4. Pin before stitching. Cut out all pieces with a ¼" seam allowance added.
TIP It’s easier to stitch the tiny pieces first and then cut them out with an added ¼" seam allowance.
We're all set to assemble our miniature stuffed fox. On the welcome screen, tap the sewing option. Load the bobbin and thread the machine. Attach the PFAFF ¼” Quilting Foot for IDT System.
Now, it’s time for the magic to happen! When working with such tiny pieces, the beauty of using the PFAFF creative icon 2 sewing and embroidery machine is that as soon as you release the pedal, the presser foot goes up a half step! This gives you complete control to stitch curves, adjust your fabric, and remove pins without any risk to the machine.
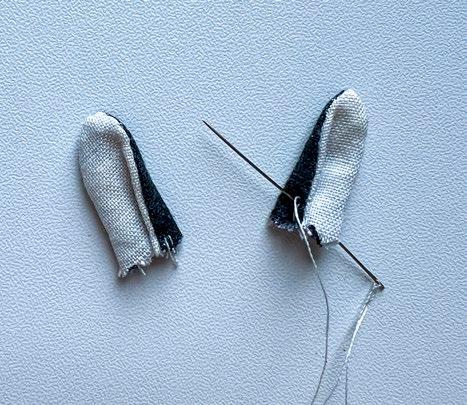
5. Pin the tail tip and main part together, aligning the right sides. Use the drawn line as a guide for pin placement. Stitch carefully, removing the pins as you go.
6. Clip the cur ves along the stitched line. Be sure not to cut beyond the stitch line. Press the seams for a neat finish.
7. Nex t, place the front and back pieces of the tail sections right sides together, pin, and stitch around the shape. Leave an opening for turning and adding the stuffing.
Our custom embroidered play book with the PFAFF creative icon 2 sewing machine.
The wrong side of the fabric with traced patterns.
Cut out the fox pieces with a ¼” seam allowance.
The folded black and ombre orange-yellow fabric pieces with pattern templates traced.
Pic
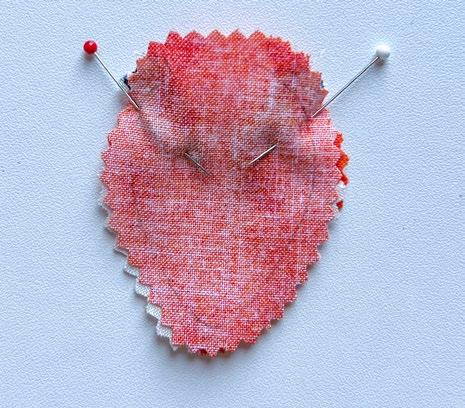
8. Now stitch the fox’s muzzle. Pin the cheek and muzzle pieces, right sides together using the drawn line as a guide. Stitch along the shape from edge to edge, removing the pins as you go. Repeat for the second cheek.
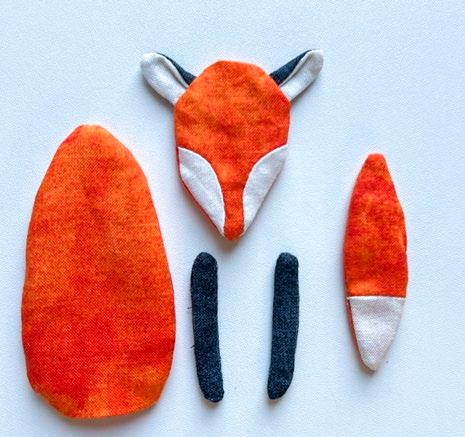
9. Clip the stitched curves on the cheeks, careful not to clip past the stitch line. Press. Next, sew the body, ears, and paws. Cut out with a ¼" seam allowance. Turn the ears right side out and press. Fold over one side of each ear and secure with several hand stitches. Pin each ear between the two parts of the head, with the fold facing the cheeks. Sew along the shape, leaving a ½" opening.
Secure
Place the prepared head segments together before stitching.
The head is pinned and ready for stitching.
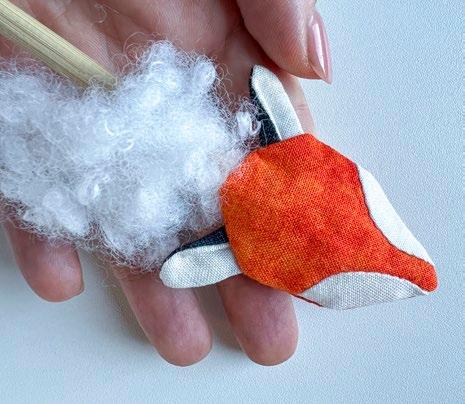
10. Turn all pieces right side out through the opening and press. Gently stuff all the parts.
A chopstick will help push the stuffing inside.
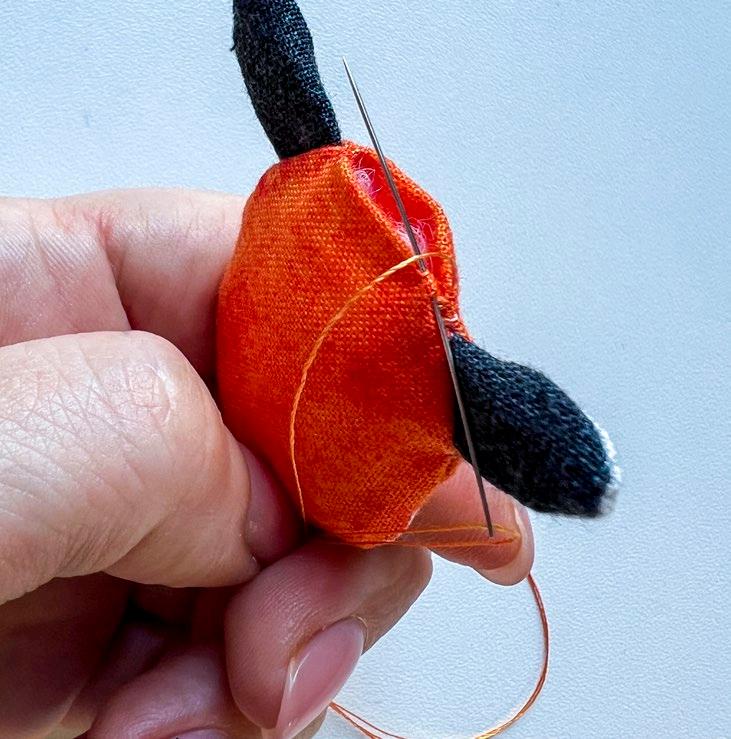
11. Blind stitch the openings of each part to close. Press all parts with steam to maintain a better flat shape.
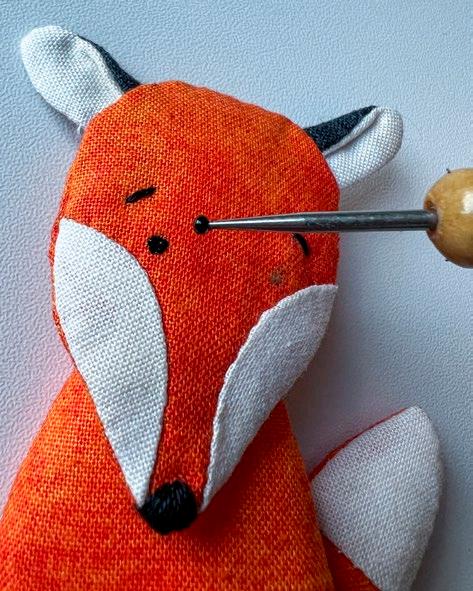
12. Mark the eyes and eyebrows with a water-soluble or heat-erasable marker. Create the eyebrows and nose with several loop stitches.
Pin the tail tip and main part together, aligning the right sides.
Clip the curved seam on the tail sections.
at the right The front and back sections of the fox’s tail are placed with the right sides together.
the fold with a loop stitch on the ears.
Turn all the segments right side out.
The finished and pressed parts of the toy fox.
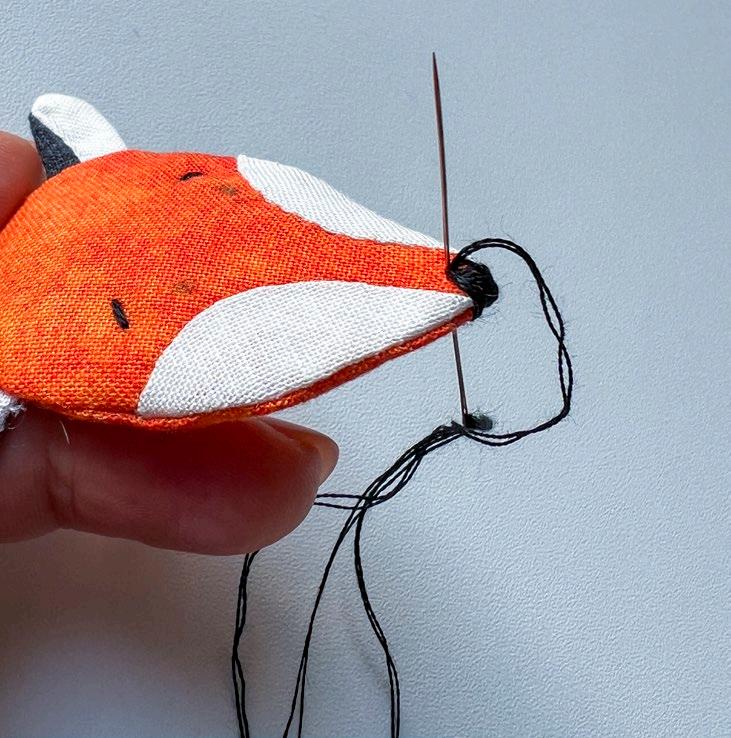
13. Pin the fox parts together. Blind stitch each element in place. Use an embossing stylus and black paint to add the fox's eyes.
TIP Instead of drawing, you can use a French knot, a micro mini button, or beads for the eyes.
Now, it's time to make an optional micro mini quilt! Why did I challenge us to create this accessory? First, kids absolutely love having these cute little extras. But, what I appreciate is how the PFAFF creative icon 2 Sewing and Embroidery Machine handles even the tiniest pieces without eating the edges. The feeding and IDT System give me complete confidence that no matter the size of the pieces, each stitch will come out ideally!
Pressing the fox pieces
Loop stitching the nose.
Pin the sections of the fox in place on the body.
Hand stitch all the sections to the body.
Add the eyes with a stylus and black paint.
Blind stitch the opening of the fox’s head.
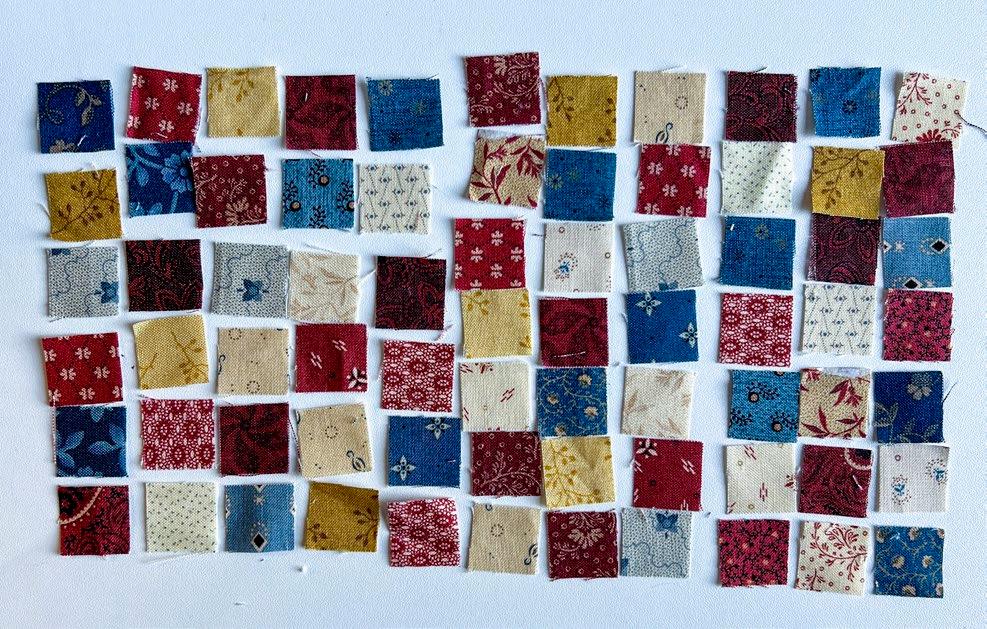
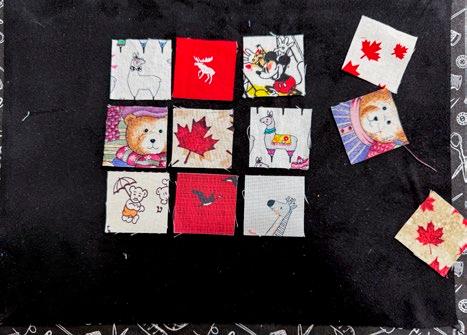
To make our mini quilt, gather 77 scrap fabric pieces, each measuring ¾” x ¾”. Arrange them in any preferred order, and if you like the layout, take a picture with your phone to follow later. Pair the squares with right sides together, and use the chain stitching method to sew them with 1/8” seam allowance. Once all the squares are stitched, press the top of the mini quilt.
1. Layer the top of the mini quilt and the 3½” x 5½” backing piece with the right sides together, pinning them in place.
2. Stitch around the edges, leaving a 1½” opening for turning.
3. Turn the piece right side out and press it flat. After pressing, use a quilt clip to secure the opening.
4. Stitch with a straight stitch, keeping close to the edge.
5. Finish by quilting with simple, straight lines.
The play book is finished! I’m genuinely excited about the results and can’t wait to tackle our following projects as I explore all the beautiful features of the PFAFF creative icon 2 sewing and embroidery machine.
Thank you for being part of this journey, and here’s to our next creative adventure!
Sincerely,
Olesya
Olesya Lebedenko olesya-l-design.com
The pieces of a micro mini quilt are ready to stitch.
Chain stitching with a PFAFF ¼” Quilting Foot for IDT System
The finished play book, micro mini quilt, and cute toy fox.
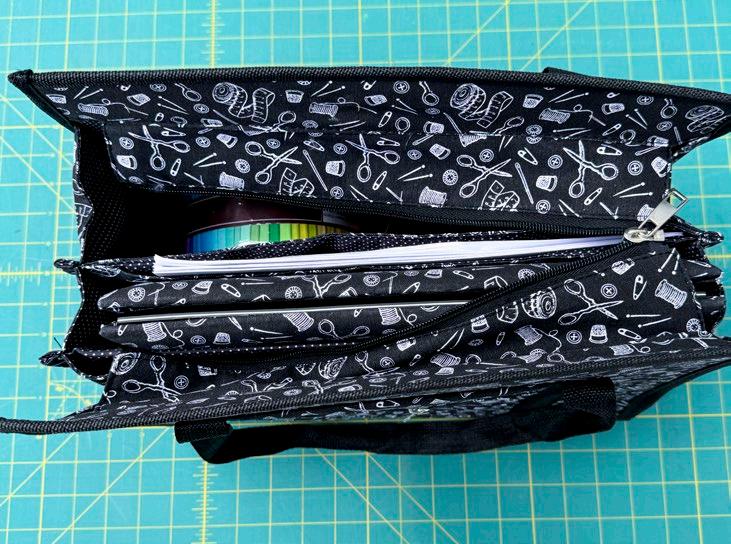
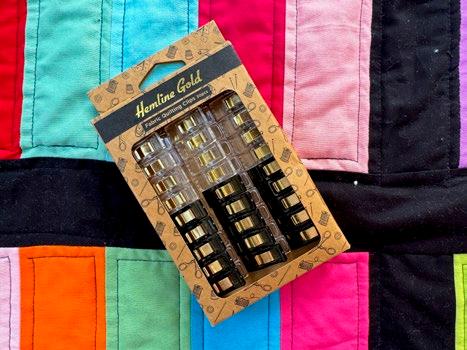
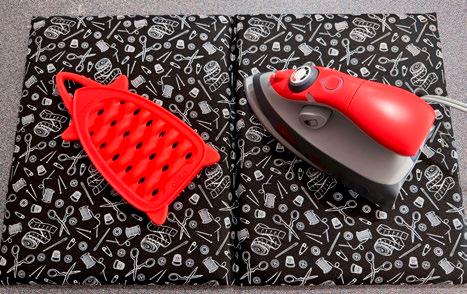
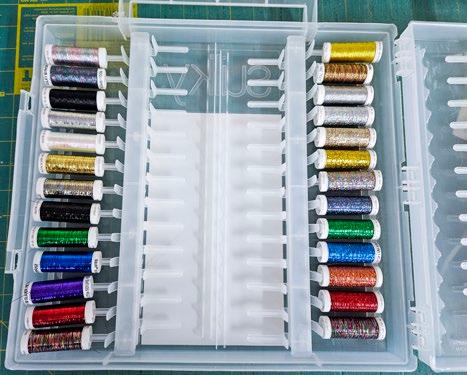
What’s in your Hemline Gold Multi-Use Craft Bag?Paul
Léger
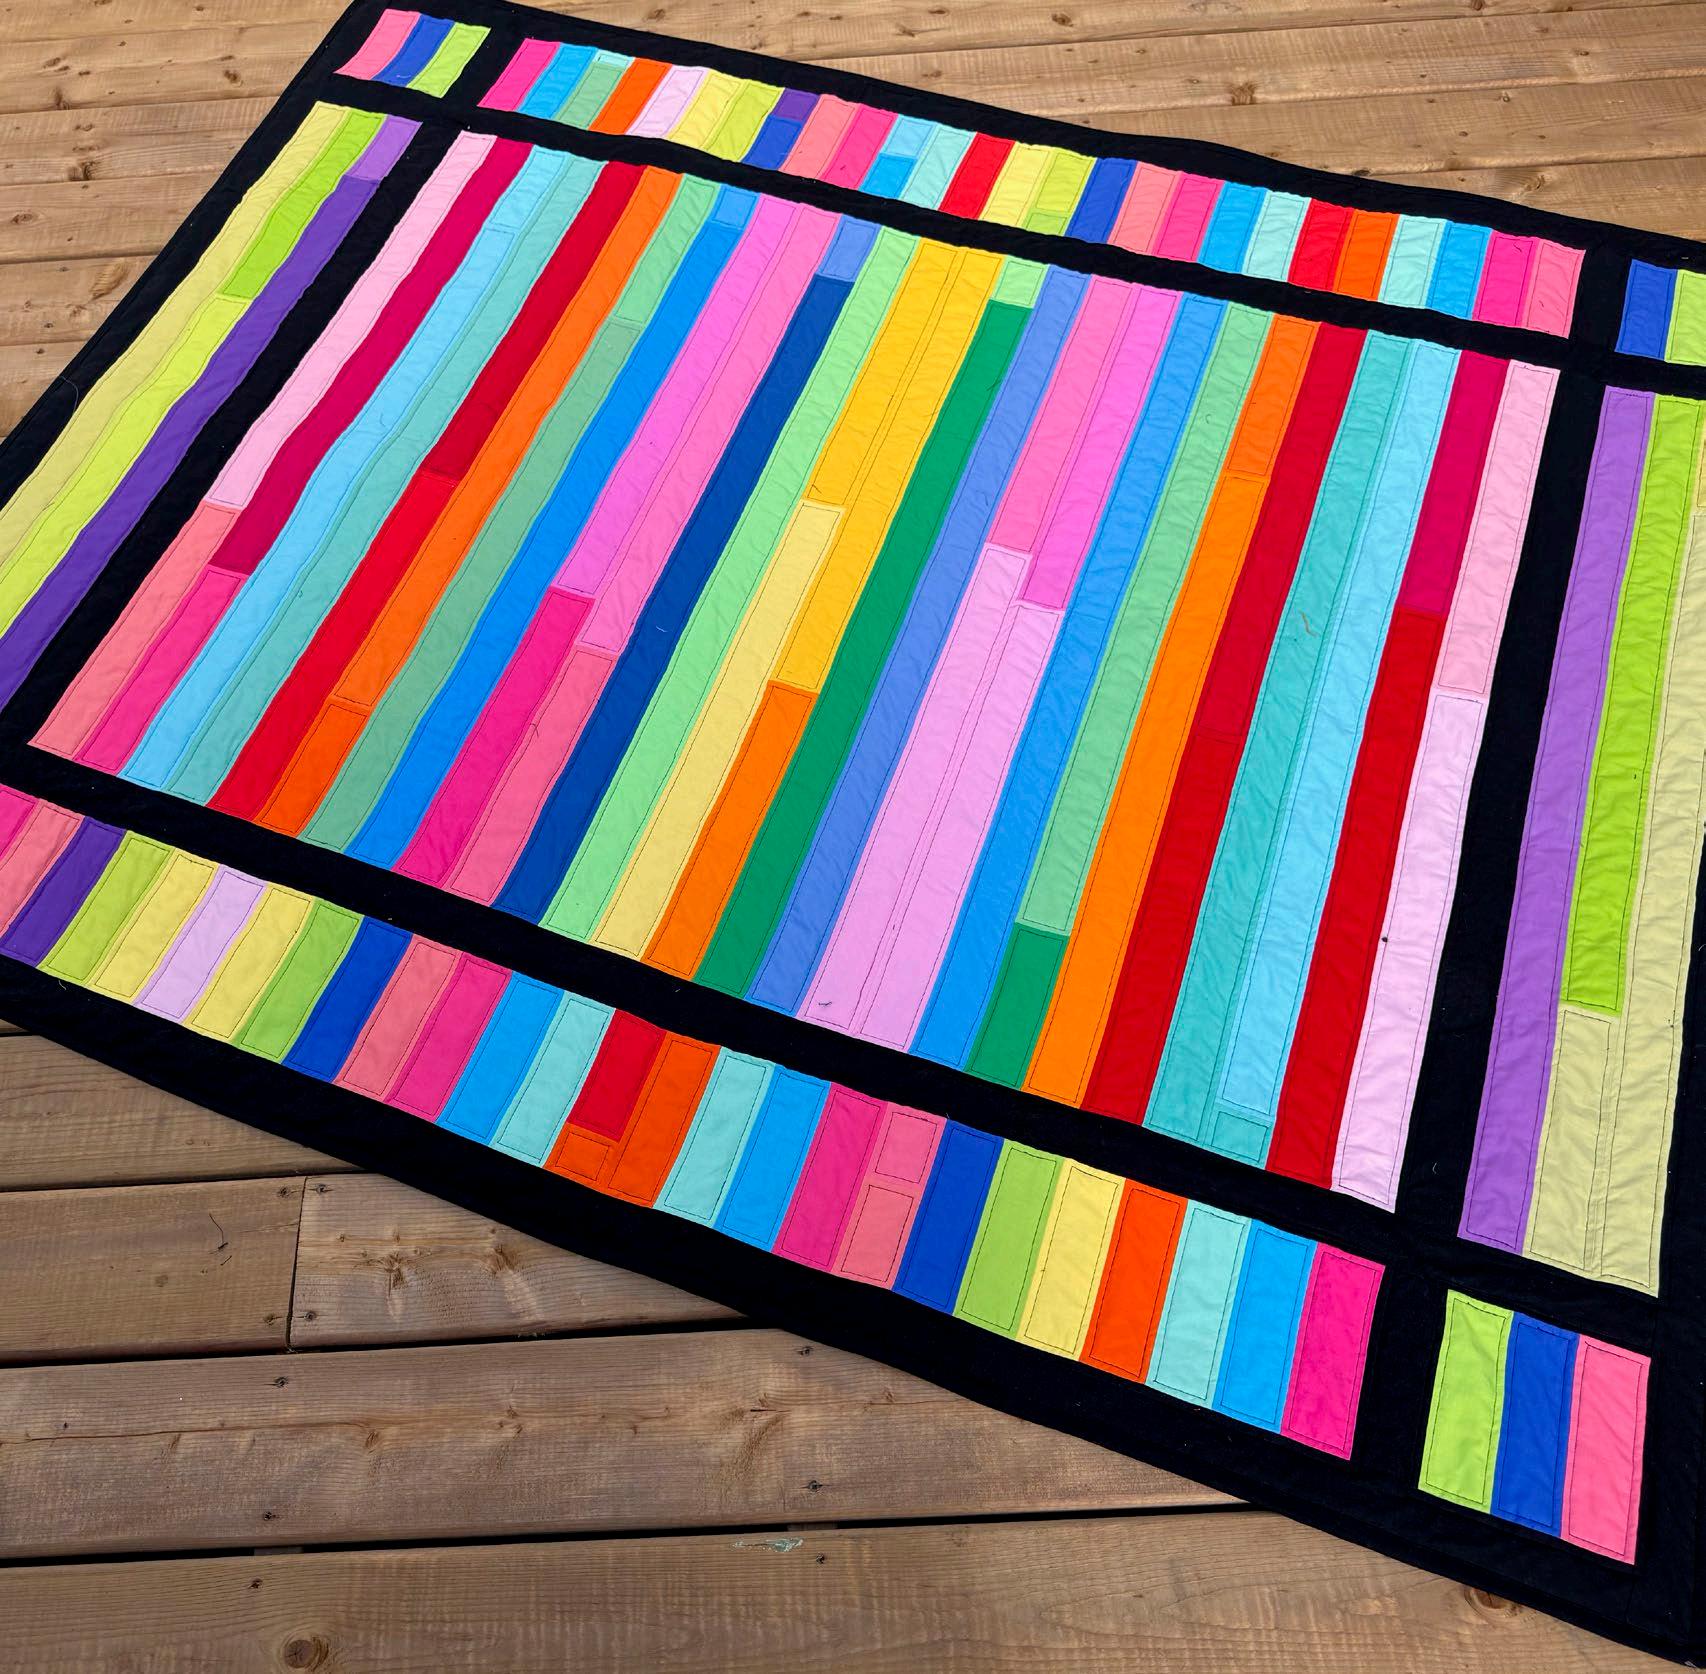
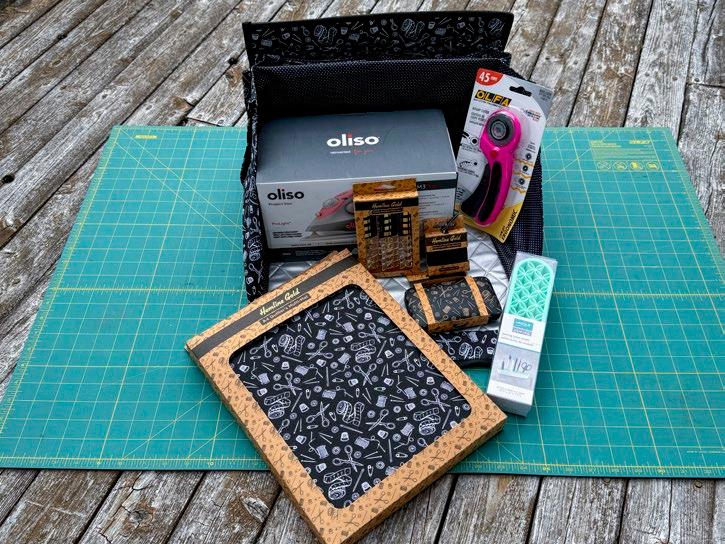
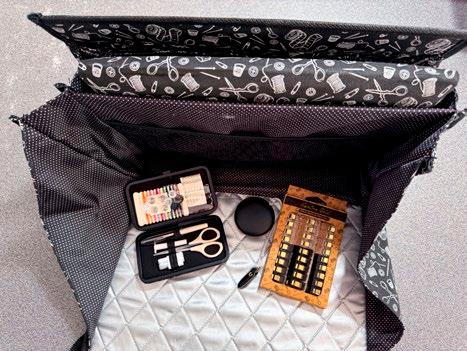
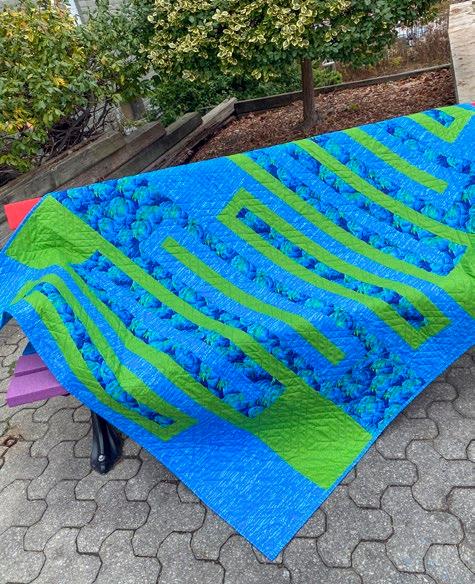
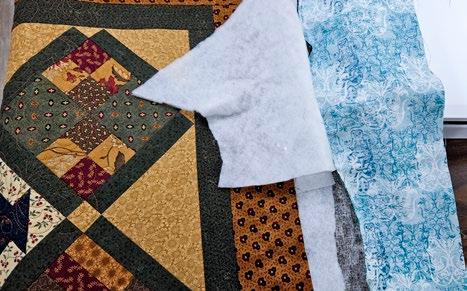
Recently, I travelled to the East Coast to visit family. As I have so many ideas and never enough time, I knew I had to bring at least one quilting project on vacation with me. What better way to keep oneself busy on a rainy day than by quilting while looking out to sea? I decided to bring everything I needed to make a strip quilt, not just an ordinary strip quilt but one with an added fun element. My Hemline Gold Multi-Use Craft Bag made packing easy.
Most of us have attended retreats with cars full of quilting and sewing projects and all the tools and notions needed to complete them. I found packing for my East Coast trip a little different as I would only work on one project and didn’t want to overpack, considering that the space available would be limited.
With careful thinking, here are some of the tools I packed for this trip:
• HEMLINE GOLD Multi-Use Craft Bag (28.5cm x 36.5cm x 17.8cm)
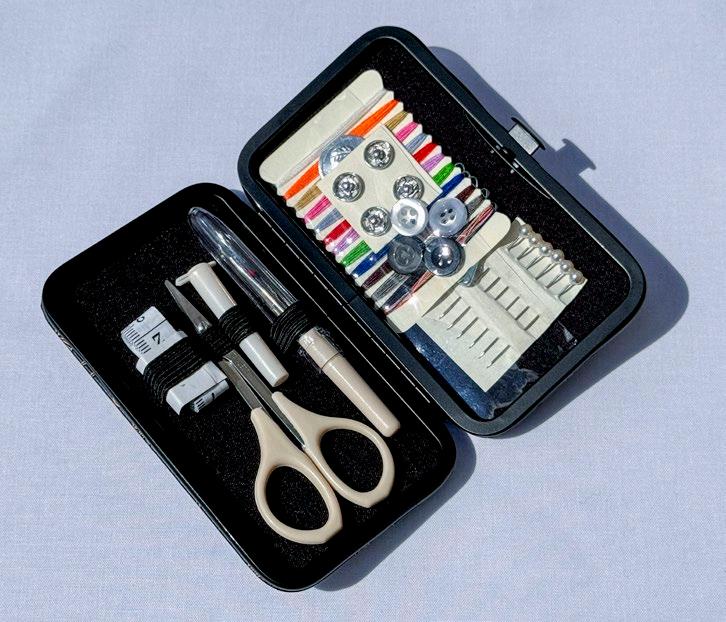
• HEMLINE GOLD S ewing Kit
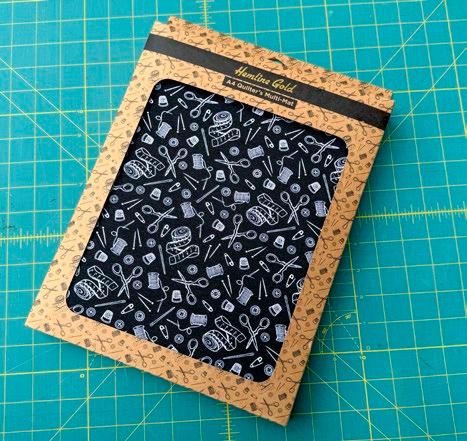
• HEMLINE GOLD Quilters 4-in-1 Multi-Mat (30cm x 24cm)
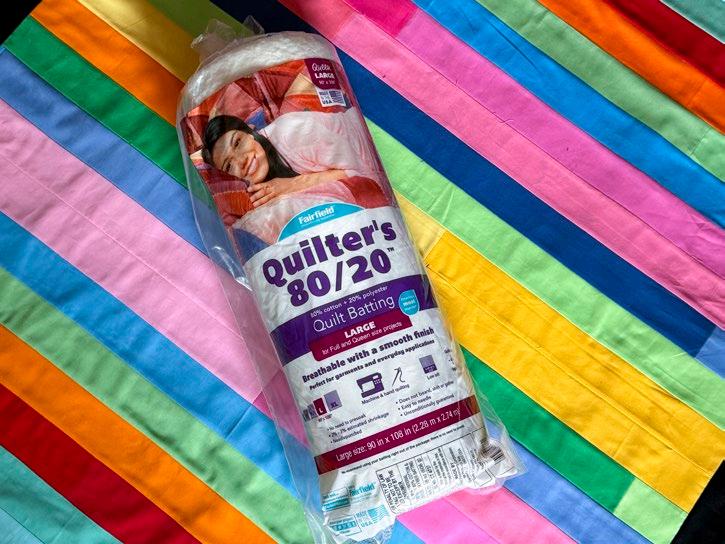
• FAIRFIELD Quilter's 80/20TM Quilt Batting - 229 x 274cm (90” x 108”)
materials
fabric
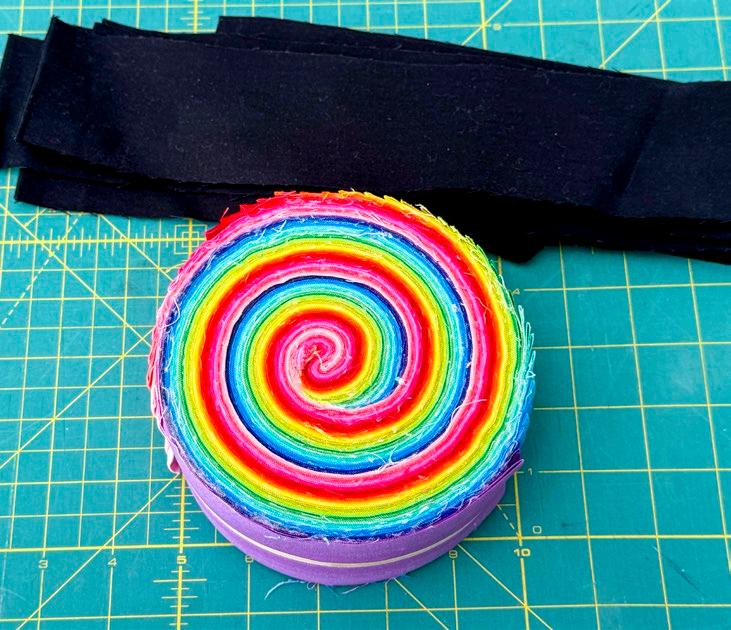
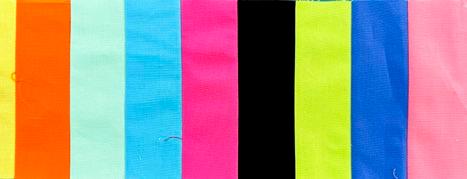
• one full 2½” strip roll (the size of a roll is normally 40 to 42 strips)
• 1½ yds [1.4m] black fabric
• 3½ yds [3.25m] backing fabric
• one single batting
Photos by Paul Léger
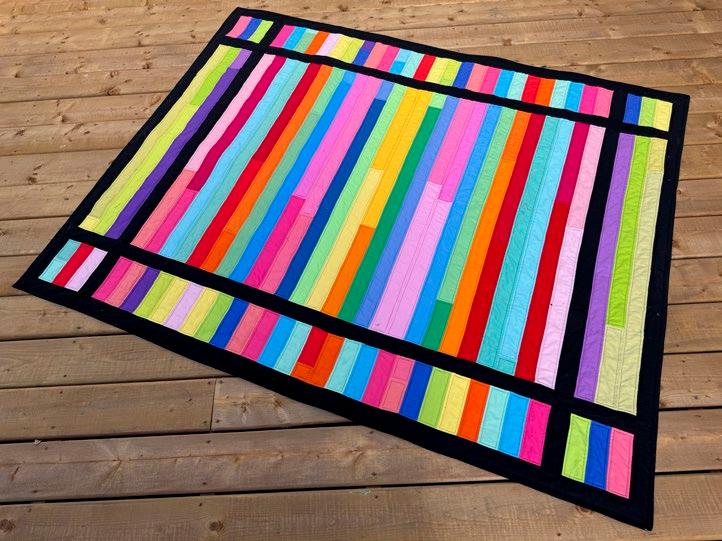
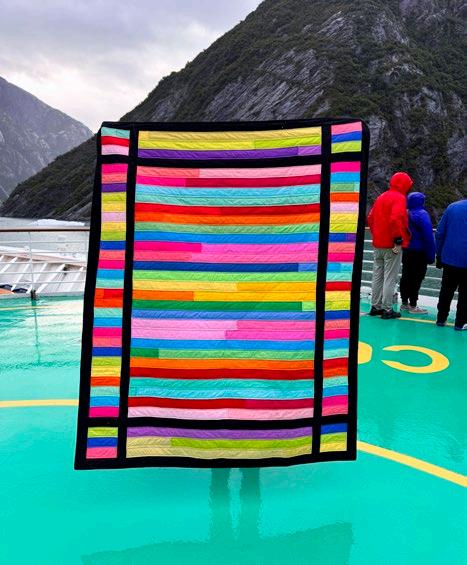
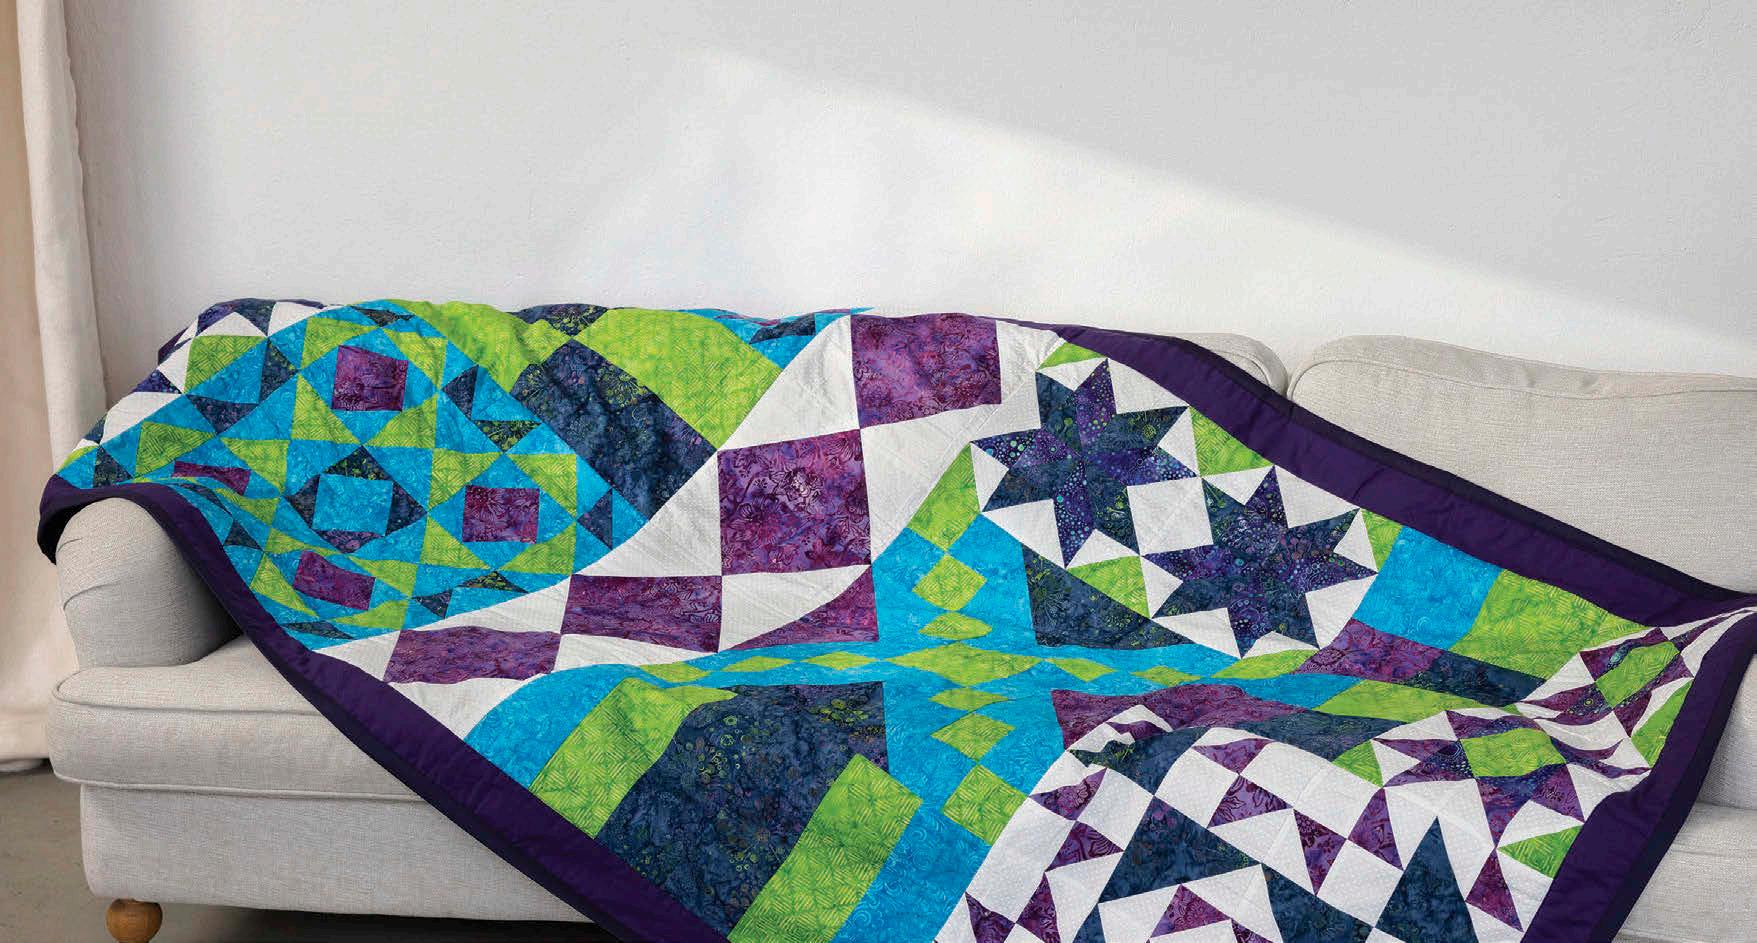
A fun and easy strip trip quilt
A Hemline Gold Multi-Use Craft Bag to hold all our tools and notions
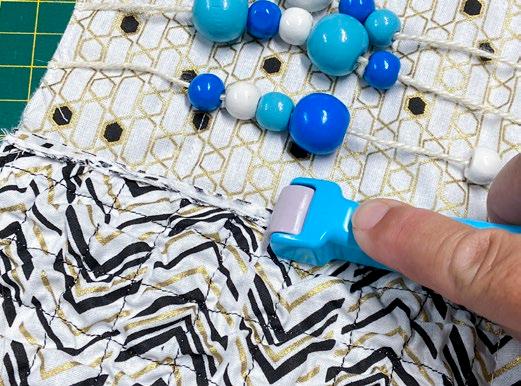
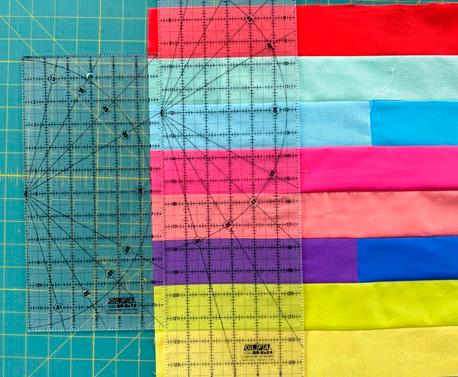
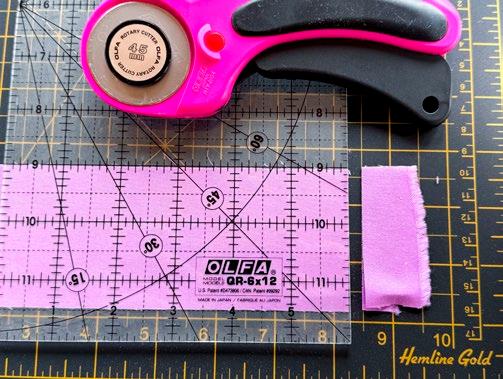
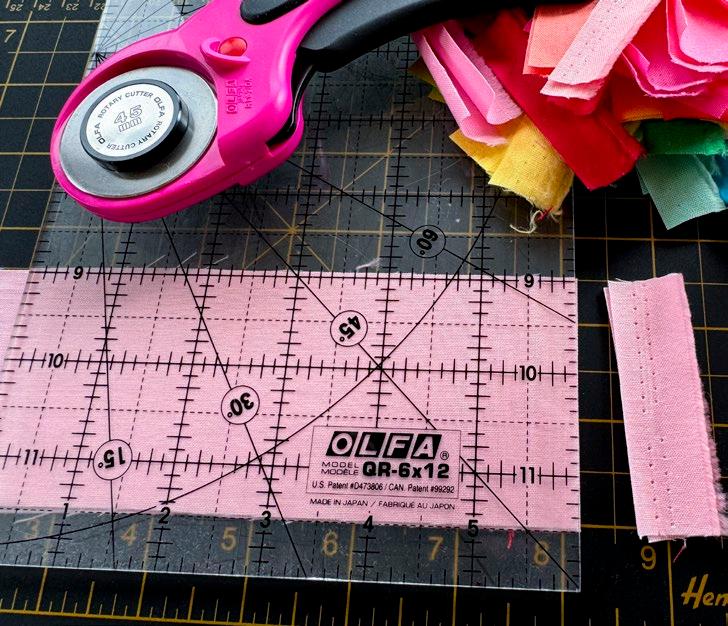
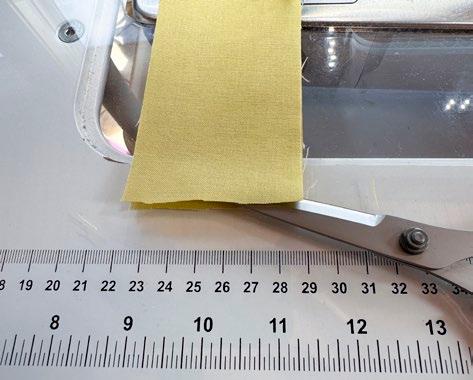
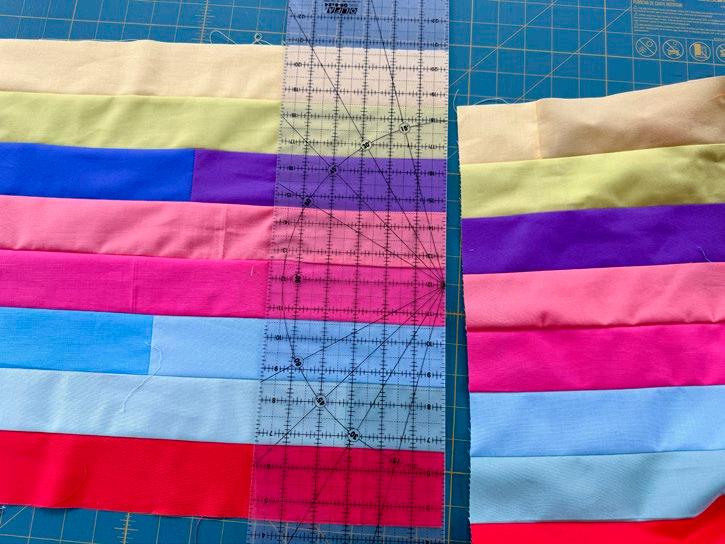
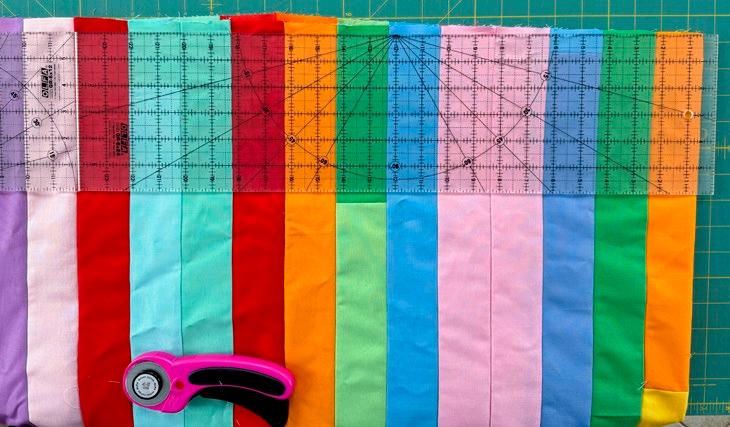
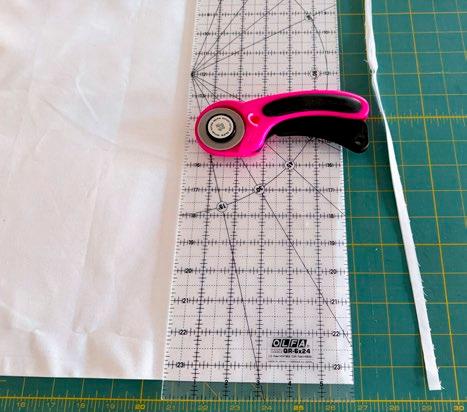
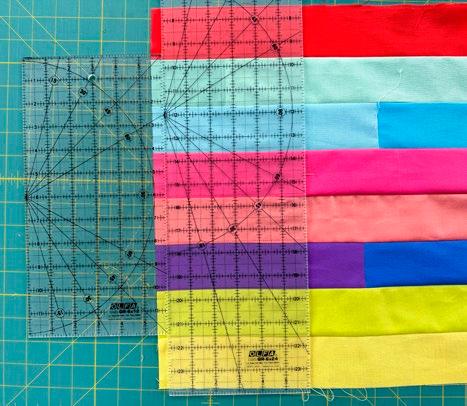
Let's start preparing the strips from the roll will be quick and straightforward. The Hemline Gold Quilters 4-in-1 Multi-Mat is perfect for cutting these strips. Use the OLFA 45mm ergonomic rotary cutter and the OLFA 6” x 12” frosted acrylic ruler to help with this task, and cut the selvage ends off each of the strips. I liked the order my strips were in when I opened the roll, so I didn’t mix them up but cut the selvages off in their original order. Next, and very significantly, cut either the first or last strip in half so that you have two pieces measuring roughly 2½” x 20”.
Here are a few reasons I like using strip rolls.
Š So may quilt project possibilities.
Š All the strips are cut and ready to use.
Š The colors are always coordinated with one another.
Š And my favorite, each strip set, no matter the fabric company is cut to 2½” wide.
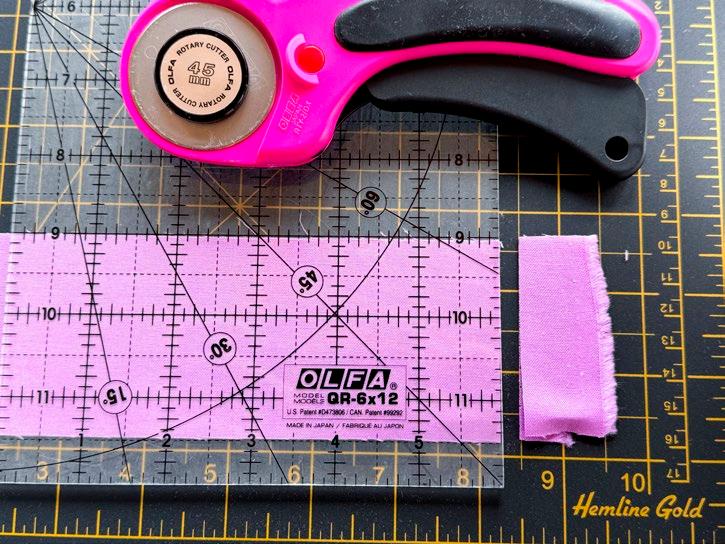
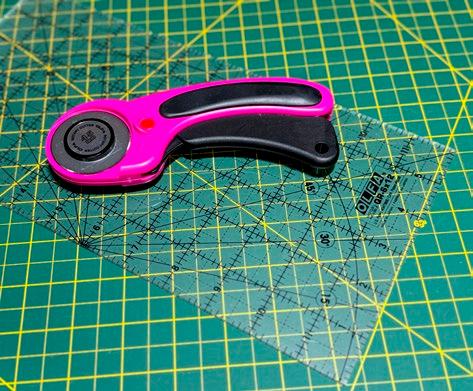
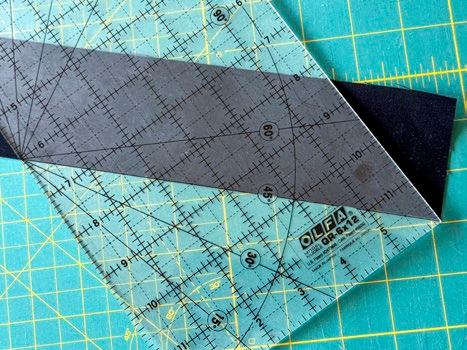
Even with the precut strips, there’s always a need for the OLFA 45mm ergonomic rotary cutter and the OLFA 6” x 12” frosted acrylic ruler. Both these wonderful tools will make easy work of fabric cutting.
I’ve tried many craft bags and boxes over the years and I have to admit that the HEMLINE GOLD Multi-Use Craft Bag is pretty cool. It had enough space for all my smaller tools, fabrics and papers, and I could still close the zipper. I really do like this craft bag!
We've gathered our supplies with the help of our Hemline Gold Multi-Use Craft Bag and prepared our strip set.
A strip set and black fabric to make a strip quilt
Cut the selvage edge off each strip.
OLFA tools make trimming the fabric strips easy.
My Hemline Gold Multi-Use Craft Bag
OLFA rotary cutter and rulers for quilters on the go
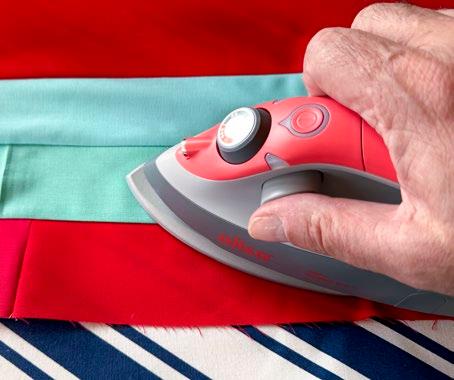
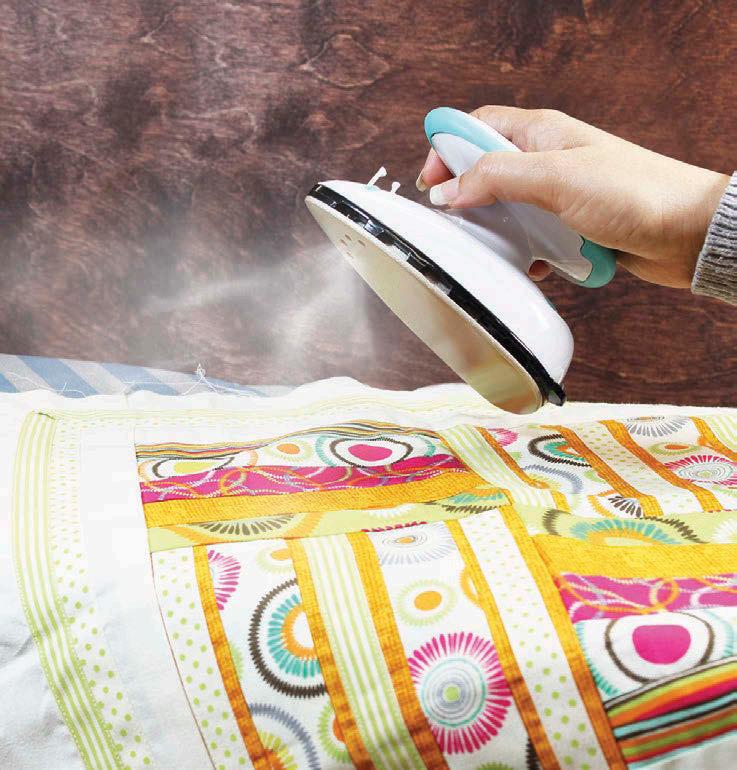
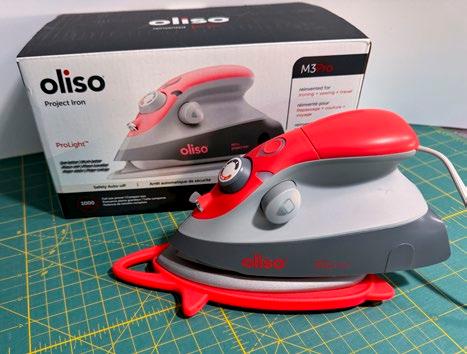
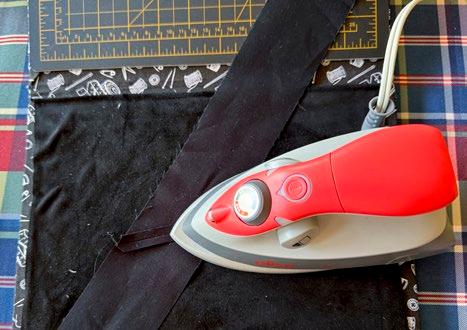
I’m using the OLFA 45mm ergonomic rotary cutter and OLFA 6” x 12” frosted acrylic ruler to prepare for sewing while using the Oliso M3Pro Project Iron to keep the strips for our strip quilt pressed to perfection. Let’s get started.
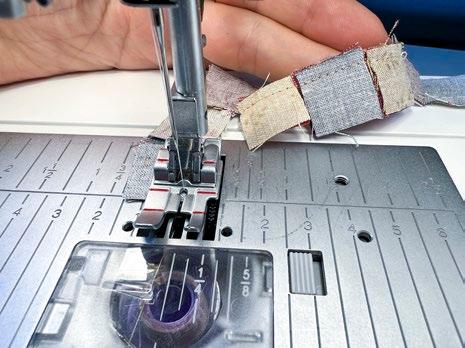
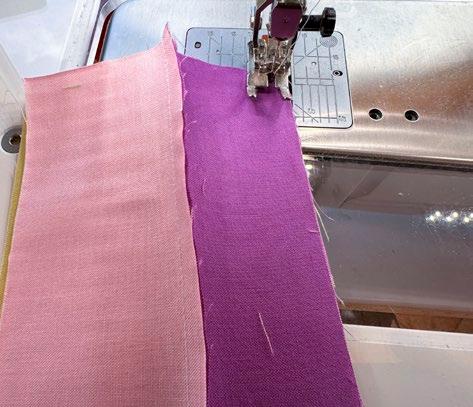
A strip quilt is one of the easiest quilts to make. The first step for our quilt is to sew each strip end to end using a ¼” seam. Considering a strip is on average 40” long, once all the strips are sewn end to end the resulting pieced strip will be approximately 1600” long.
Press the seams open.
Now take the 1600” long strip, fold it in half lengthwise with the right sides of the fabric touching, and sew along one long edge.
With only 3” to 4” of the folded strip remaining to be sewn use scissors to cut the fold open. Repeat this step at the end of every seam for all upcoming folds.
Open the strip set, fold it in half again, right sides together, line up the raw edges, and sew along one edge. Don’t forget to cut the fold before you sew to the end.
I don’t stop and press after every seam at the beginning. I wait until I have a fourstrip wide set and then I press. As I wasn’t sure my sister had an iron, I had my Oliso M3Pro Project Iron–Coral with me, just in case. Well, it’s a good thing I did because all my sister found of her iron was an empty box.
Lets make a strip piecing quilt
When you’re ready, place the strips on your ironing board and press all the seam allowances in one direction.
After the pressing is completed, fold the four strips in half and sew along one long edge.
From now on, we’ll press after each seam. The fold and sew step will need to be done twice more, but before we do this, we’ll cut the strip set down a little.
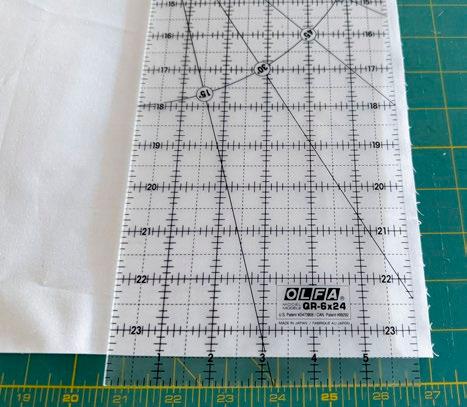
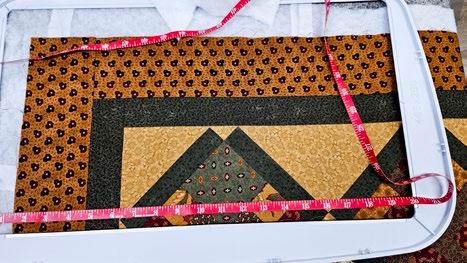
We’re making the cut now because the strip set is currently eight strips wide, 16½”, the perfect width to use the OLFA 6” x 12” frosted acrylic ruler. From one end of the eight- strip set cut off a 54” section and set it aside.
As mentioned earlier, a typical strip is approximately 40” long. With a 54” section removed, the remaining strip set should be approximately 165” long or better.
Magenta OLFA 45mm ergonomic rotary Cutter and an OLFA 6'' x 12'' Frosted Acrylic Ruler.
Cut the end of the strip on the fold.
Fold the strips a second time and sew along one side.
Using the Oliso iron to press the seams.
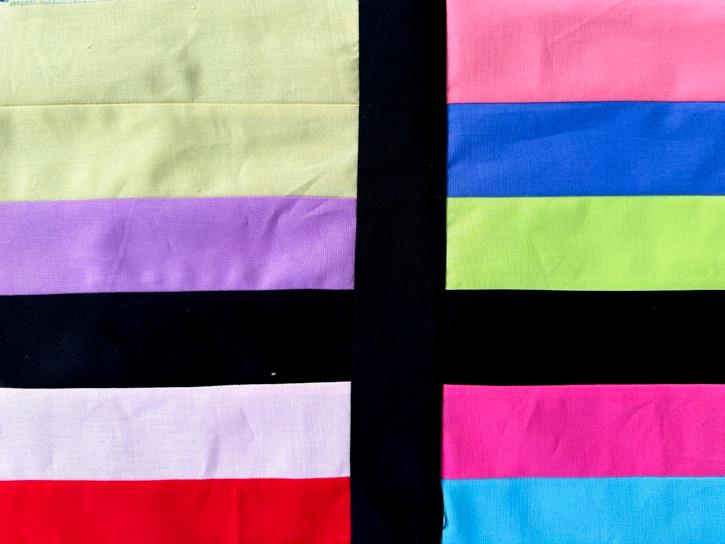
Fold the eight-strip set in half, right sides together, line up the long edges as before, sew, and press. The strip set will now be 16 strips wide.
Do one last fold. Sew along the edge one last time and press. The strip set now has 32 strips.
The last step for now is to square off the edge. I folded the quilt in two and used the OLFA QR-6x12 - 6” x 12” Frosted Acrylic Ruler and the OLFA QR-6x24 - 6” x 24” Frosted Acrylic Ruler end to end to trim the edge.
I truly believe that quality tools are a must. With the OLFA 45mm ergonomic rotary cutter, the OLFA QR-6” x 12” and OLFA QR-6” x 24” frosted acrylic rulers, and the Oliso M3Pro Project Iron a quilter can’t go wrong.
We’ve finished the main body of our fun and easy strip quilt.
Cut a 54” section from one end of the eight-strip wide strip set.
Square off the raw edges of the strip quilt.
OLFA 45mm ergonomic rotary cutter and OLFA 6'' x 12'' and the OLFA 6” x 24'' Frosted acrylic rulers.
Quilting tools to help
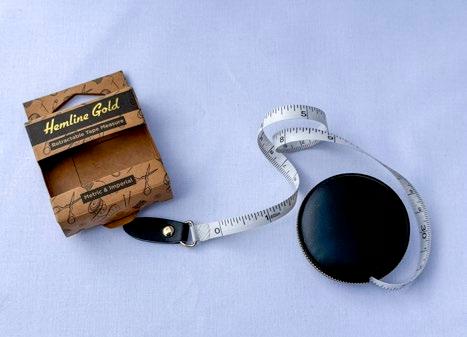
I often take a quick measurement during the process of making a quilt to ensure that I’m on the right track. I use a tape measure such as the HEMLINE GOLD Retractable Tape Measure - 150cm/60. The precision of this tape measure never lets me down.
The first thing we’ll do now is to square off the black fabric and cut the strips for the black accents.
If you aren’t sure how to square off, here’s a quick little tutorial.
Note: This tutorial will be shown with white fabrics for better visibility.
Fold the fabric in half, selvage to selvage, and place it on your cutting mat.
Line up the dotted line of the OLFA 6” x 12” frosted acrylic ruler against the folded edge of the fabric. The dotted line and the fold must be perfectly matched. Be sure that there’s some fabric past the edge of the ruler that can be trimmed.
Cut the excess fabric along the ruler's edge with the fabric and ruler aligned.
Now square off the black fabric and cut 20 - 2½” strips. Once two or three strips have been cut, it’s an excellent habit to square off the fabric again. Doing so will ensure nice straight strips.
Next, we’ll cut 6½” strips from the 54” length of pieced strips we set aside.
As I’m not at home and didn’t bring all my OLFA rulers, I’ll get the job done with the help of both the OLFA 6” x 12 frosted acrylic ruler and the OLFA 6” x 24” Frosted Acrylic Ruler together, or should I say, side by side.
Cut a total of 8 units of 8 strips each.
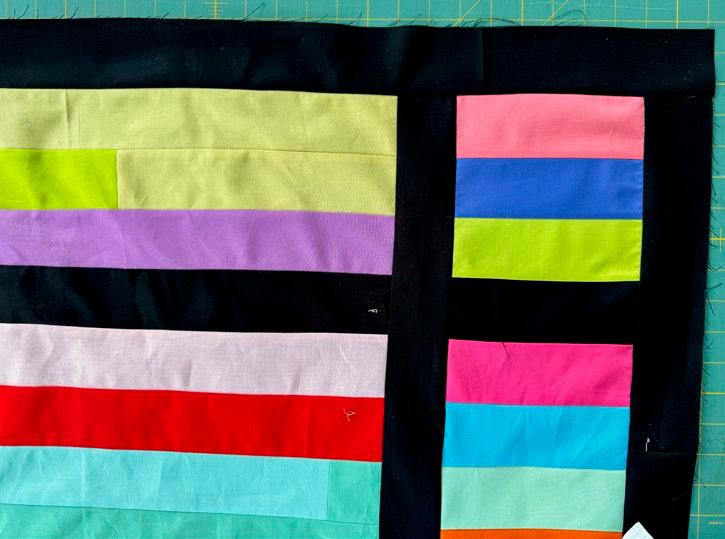
Separate the 8 units from the above step into two stacks of 4 sets each. Sew 4 sets of 8 strip units end to end. Repeat with the second set. Once sewn, there will be 2 strip sets of 32 strips each.
Cut 4 - 2½” x 6½” pieces from one of the black strips cut earlier.
Add a black 2½” x 6½” strip between the third and fourth strips of the 32-strip unit. Yes, the seam ripper will need to come out to place the small black strip. Repeat this step so that there’s a black strip in the same position at each end of both 6½” x 32 strip sets. Once completed, there’ll be 34 strips in each strip set.
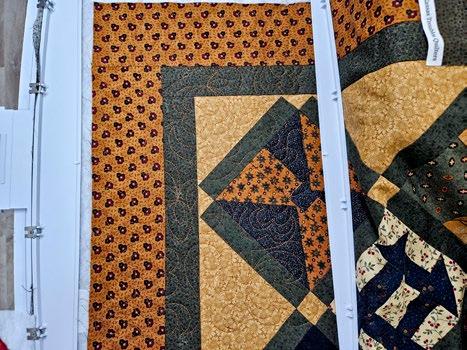
We completed the center part of the quilt. The center of my quilt is 37½” wide after trimming and contains 32 strips.
Note: Your quilt center may be a different width as there are many variables when making a strip quilt, such as:
• The length of the strips used.
• The number of strips in a roll.
• When and how the edges of the center were squared off.
Use a seam ripper to remove the three strips at each end of the center. Sew on a black strip that you’ve trimmed to the width of your quilt. Re-sew the three strips to each end.
A Hemline Gold Retractable Tape Measure
Place one line of the ruler on the edge of the fabric.
Trim the fabric edge to straighten.
Cut 6½” sections from the pieced strips.
Add a black 2½” x 6½” strip.
Add a black strip to each end of the center unit.
with everyday needs
Sew enough black strips on the short sides to cut 4 lengths measuring 2½” x 68½”. I used my HEMLINE GOLD Retractable Tape Measure - 150cm/60 to keep my measurements accurate.
Sew one 68½” black strip to both long sides of the pieced center section, then sew the 6½” x 34 strip sets to the black fabric.
Add a black strip to the sides of the center unit, then add the 6½” pieced strip set.
We’ll take the two remaining 2½” x 68½” back strips and sew them to the long outer edges of the quilt. Measure the width of your quilt top. Sew three of the remaining black strips together and cut two strips to the required length. Sew them to the top and bottom of your quilt.
Add 2½” black strips around the quilt to create a border.
The quilt top is complete! I’ll quilt it using Fairfield Quilter's 80/20 Quilt Batting, 229 x 274cm (90” x 108”)
At the start of this article, I talked about the HEMLINE GOLD Retractable Tape Measure- 150cm/60. I want to show you another product I like, the HEMLINE GOLD Sewing Kit. It has a beautiful case that takes hardly any room in a suitcase or toiletry bag. This little kit comes with everything you may need in an emergency or when wanting to do some hand sewing.
Fairfield Quilter's 80/20 Quilt Batting
A Hemline Gold Sewing Kit
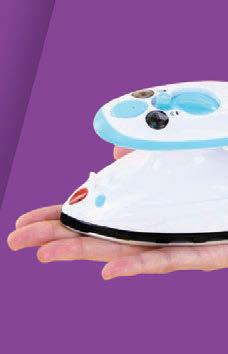
Oliso M3Pro project iron
The perfect travelling companion
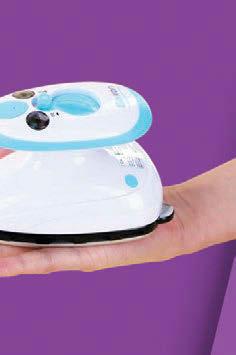
Most quilters prefer to travel to a retreat or class with their iron. Bringing a large iron is not always practical, but bringing an OLISO M3Pro Project Iron - Coral sure is. It’s small, powerful, and has a water reservoir for those who like steam.
The final step to complete the strip quilt we’ve been working on is to add the binding. For many, this is a moment they enjoy as it relaxes them. Others find it’s a small hurdle as they don’t enjoy handwork. I don’t mind sewing on a binding; I do it entirely by machine.
The pins and scissors in our HEMLINE GOLD Sewing Kit will help us construct the binding.
To start, take the seven remaining black 2½” strips that we cut previously and mark a 45- degree angle on the end of each strip using the OLFA 6” x 24” Frosted Acrylic Ruler
Place one black strip at a 90-degree angle, right sides together, over the end of another black strip. Pin in place and sew along the diagonal line. Repeat until all seven strips are sewn together.
Stop sewing approximately 12” from the start point of the binding.
Press the seams open using the OLISO M3Pro Project Iron
Sewing 45-degree angles when combining the strips will help reduce the bulk when we sew the binding onto the quilt.
Fold and press the strip in half lengthwise, with the raw edges touching and the wrong sides together. Leave a 12” tail unsewn then use a ¼” seam to sew the long binding strip to the back of the quilt. Be sure that the raw edges of the binding line up with the raw edges of the quilt.
Stop sewing about 12” from where you
Place a pin 2¼” in from the narrow end of the strip at the start of the binding.
Place a pin 2¼” from the end of the
Bring the end of the strip up and cut it where it meets the pin. The start and end of your binding strip will now overlap by 2¼”.
Trim the extra fabric ¼” away from the seam.
The oliso M3Pro project iron
Mark a 45-degree angle on the end of each strip.
Place one strip over the other and sew along the marked line.
Trim ¼” away from the seam.
Press the seams open.
Sew the binding to the back of the quilt.
started.
strip.
To join the strips, draw a 45-degree angle line on one of the strip’s ends. Overlap the strips, right sides together, and pin.
Sew on the line. Double-check to be sure nothing is twisted, then trim the excess fabric ¼” away from the seam. Finish attaching the binding to the quilt.
Before turning the binding to the front of the quilt, cut a little bit of the excess fabric and batting away from all four corners.
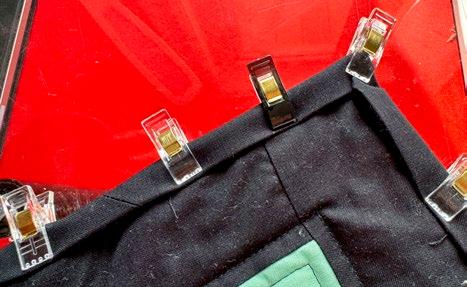
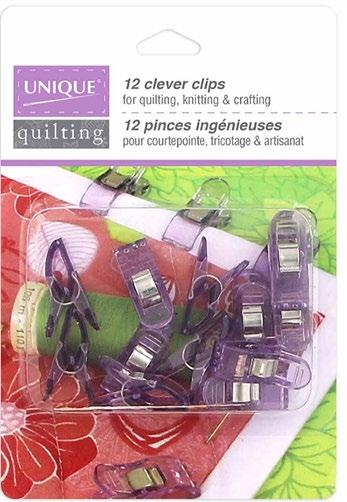
Get those HEMLINE GOLD Quilters Clips ready to help keep the binding folded over evenly.
Fold the binding to the front of the quilt.
Use the Hemline Gold fabric clips to keep the binding in place while you sew it.
Fold the binding to the front of the quilt and use
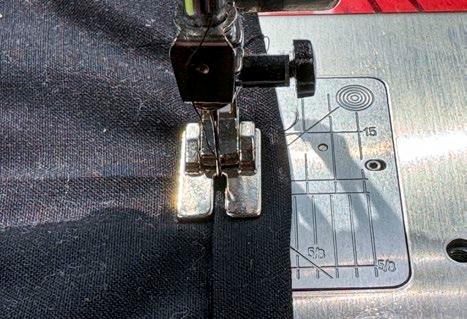
Use a straight stitch and sew along the edge of the binding to attach it to the front of the quilt.
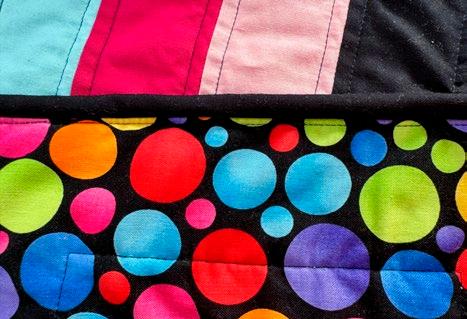
This sewing method on the binding doesn’t diminish the quilt’s beauty. On the back, all that shows is a small seam parallel to the binding.
My favorite tool was the OLISO M3Pro Project Iron. It’s small, compact and powerful. Another fun feature of the oliso M3Pro project iron is that they all come with a SOLEMATE, a hightemperature silicone iron rest that allows the user to place it face down while ironing and safely store it away when you’re done. It even has an integrated loop for hanging.
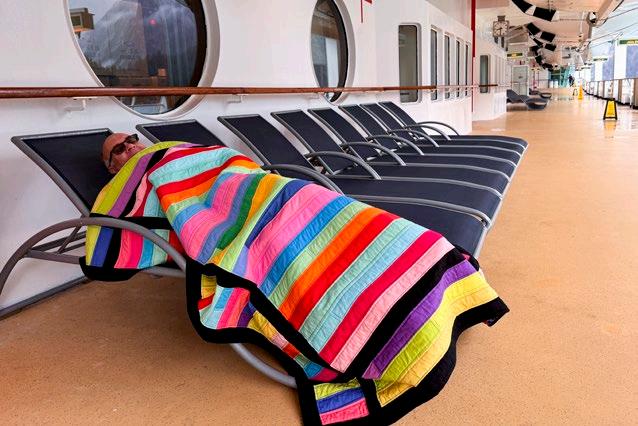
Now that my East Coast vacation has ended, I’m off again, this time on an Alaska quilting cruise. What better location to take photos of the completed quilt?
We used the OLISO M3Pro Project Iron, HEMLINE GOLD Quilters Clips (Pack of 30), and HEMLINE GOLD Sewing Kit to make and attach the binding to our fun and easy strip quilt.
I
Draw a 45-degree angled line on the end of one strip.
Cut away a small piece of the corners.
A set of Hemline Gold clips
Hemline Gold clips to hold it in place.
Sew the binding down on the fold.
The back of the quilt with the finished binding
The oliso M3Pro project iron with silicone SOLEMATE.
The completed quilt
couldn’t help myself; I had to try it on for size!
WHY Hemline Gold quilting tools are made to travel
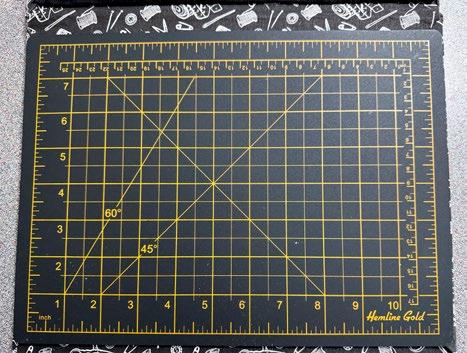
This feature is all about the HEMLINE GOLD Quilters 4-in-1 Multi-Mat (30cm x 24cm) and its wonderful, multiple uses. The Hemline Gold Quilters 4-in-1 MultiMat has four uses.
First, the cover doubles as a padded ironing surface. In its folded state, the ironing surface is 12” x 9½” (30cm x 24cm). When open, it's a generous 12” x 16 ½” (30cm x 42cm).
The inside cover contains a small cutting mat measuring 11” x 8”. This size is perfect for cutting many needed shapes and sizes of fabric.
The other side of the inside cover has a double purpose. First, the nonslip fabric can be used as a mini design wall. The second purpose of the back inside cover is hidden. There is a fine sheet of sandpaper underneath the nonslip fabric. Why a sandpaper sheet, you ask? I love using this sheet of sandpaper when I need to draw lines, and I don’t want the fabric to move. For instance, when I draw a diagonal line on a piece of fabric that’s not on sandpaper, the fabric can and probably will move. Placing the fabric on the fine sandpaper will prevent the fabric from shifting.
I love that I can draw a perfectly crisp line from corner to corner.
So, as you see, the Hemline Gold Quilters 4-in-1 Multi-Mat can be used in 4 ways:
1. an ironing pad
2. a cutting mat
3. a design pad
4. an anti-slip sandpaper sheet
I have a fifth use for the Multi-Mat. I can carry patterns or papers inside when it's folded for travel!
The HEMLINE GOLD Quilters 4-in-1 MultiMat is, indeed, a useful quilting tool, and it fits perfectly in the HEMLINE GOLD Multi-Use Craft Bag. Be sure to get both and include all the other Hemline Gold tools.
A Hemline Gold Quilters 4-in-1 Multi-Mat
The Hemline Gold Quilters 4-in-1 Multi-Mat’s ironing surface.
A Hemline Gold Quilters 4-in1 Multi-Mat has a cutting mat on one inside cover.
The other inside cover of a Hemline Gold Quilters 4-in-1 Multi-Mat is a mini design space.
A Hemline Gold Quilters 4-in-1 Multi-Mat back cover also has a sheet of fine sandpaper
The sandpaper on the Hemline Gold Quilters 4-in1 Multi-Mat stops the fabric from sliding when marking lines.
The Hemline Gold Quilters 4-in-1 Multi-Mat can also double as a folder for patterns and papers.
The Hemline Gold Multi-Use Craft Bag, 4-in-1 Multi-Mat, sewing kit, retractable tape measure, and a package of 30 Quilters clips
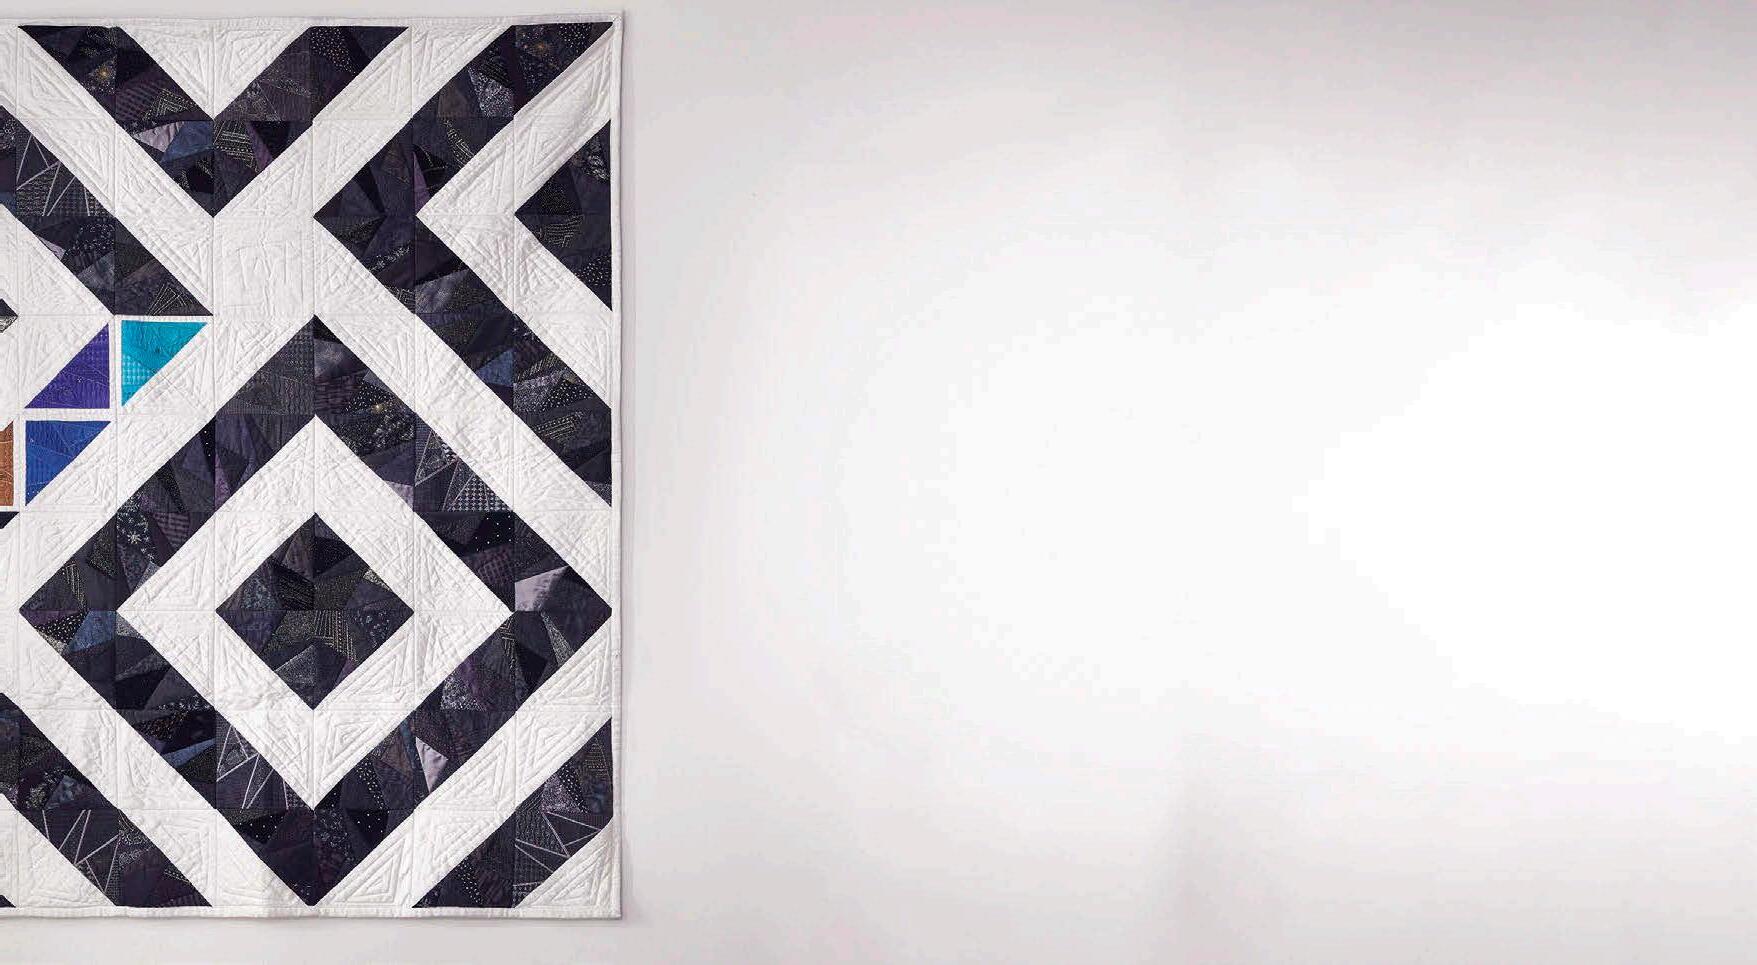
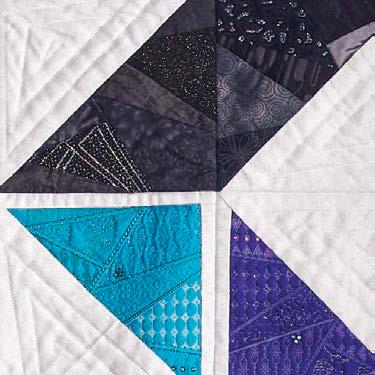
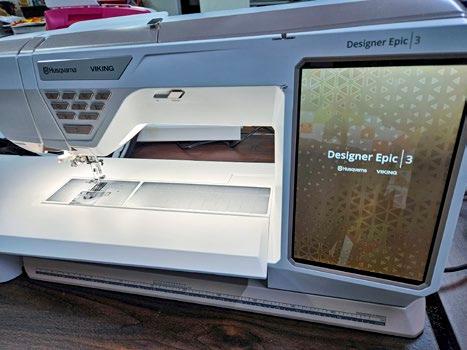
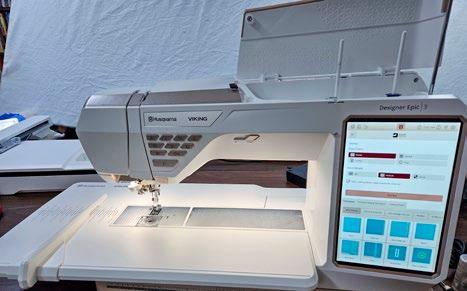
How to customize your Husqvarna VIKING Designer Epic 3
Elaine Theriault
Before we begin, you might want to check out other posts about the Designer Epic 3 at the links below. Each link represents the first post of the week. You’ll find five blog posts linked to each one, so be sure to advance to the subsequent posts via the link at the bottom of the first post.
Introducing the Husqvarna VIKING
Designer Epic 3
Navigating the JoyOS Advisor and the Projection System on the Husqvarna VIKING
Designer Epic 3
Quilting with the Husqvarna VIKING
Designer Epic 3
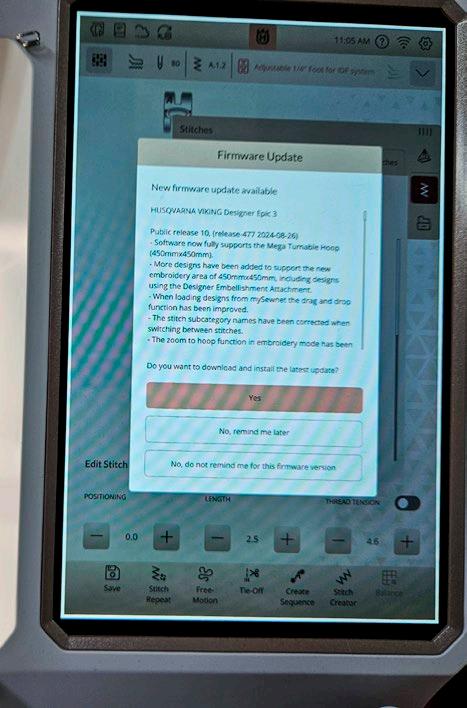
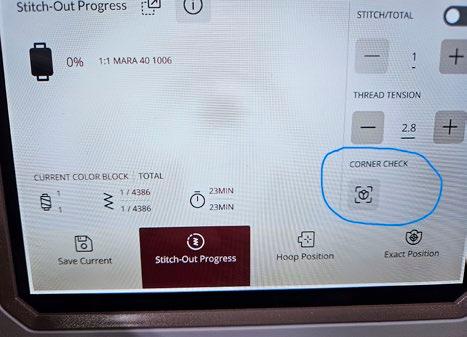
Sophisticated software is the key to some fantastic features inside this top-of-the-line sewing and embroidery machine, and like all software, there are updates and changes regularly. Some are bug fixes, and some are improvements. One of the MANY things I LOVE about the Designer Epic 3 is the Wi-Fi connectivity because it’s super easy to get the latest updates and transfer embroidery files.
You'll see a notification at the top of the screen if there’s a new firmware update. Sorry, I didn’t take a close-up of the icon, but it looks like two curved arrows that form a circle, and it’s on the top bar. Select that icon, and it’ll open
You also have the option to load the update using a USB, but I've always done it via Wi-Fi and have never had issues. If your Wi-Fi is good, you should be OK, but if you prefer using a USB, go to the main Husqvarna VIKING webpage, and at the bottom, you’ll see Machine Manuals and Updates. That’s where you’ll find the download. Then, follow the instructions to update it. You should also be receiving an email letting you know there’s a new update. If you’re NOT getting that email, you need to go to your mySewnet account and be sure you have selected newsletter updates. And make sure your Designer Epic 3 is registered!
The most recent update took some time to download and install, and then the Designer Epic 3 restarts, and I'm all set to start sewing. It’s a good idea to have your embroidery unit attached
when you do the update. Otherwise, it’ll have to sync when you connect it after doing an update.
There are some new things to share with you since the Designer Epic 3 first came out, and let’s face it, there's so much in this fantastic sewing and embroidery machine that it’s hard to grasp it all at once, so I’ll review a few things as well. Let’s look at a couple of menu options.
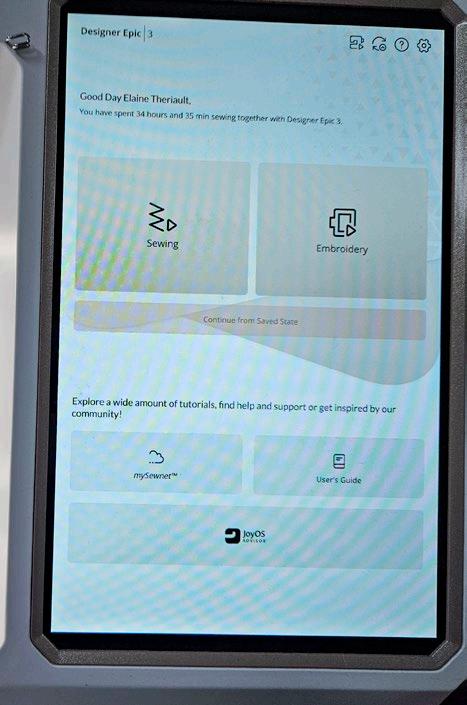
Here’s what the home screen looks like. I love that it greets me and tells me how many hours we have spent together.
Once you see the home screen, selecting either sewing or embroidery is easy. You can also head to the built-in User’s Guide, where it’s easy to locate information using the Table of Contents, the Index, or keyword searches. Having this tool builtin is phenomenal, as it’s one less thing I need to clutter up my sewing space. There's access to mySewnet Blog, where you’ll find inspirations for new projects using techniques from the Husqvarna VIKING sewing and embroidery
Photos by Elaine Theriault
The Firmware Update menu
The home screen for the Husqvarna VIKING Designer Epic 3
machines. You’ll also find access to the JoyOS Advisor, which has a fantastic wealth of information.
There’s so much information on sewing, quilting, and embroidery in the JoyOS Advisor. Or if you're brand new to your Designer Epic 3, there's a section on getting started that shows you how to wind bobbins, thread the machine, and so much more.
You’ll also find tutorials on advanced features, like Create Shape and Create Applique. Don’t be afraid to sit down and follow along with these tutorials, as they are patient and easy to follow.
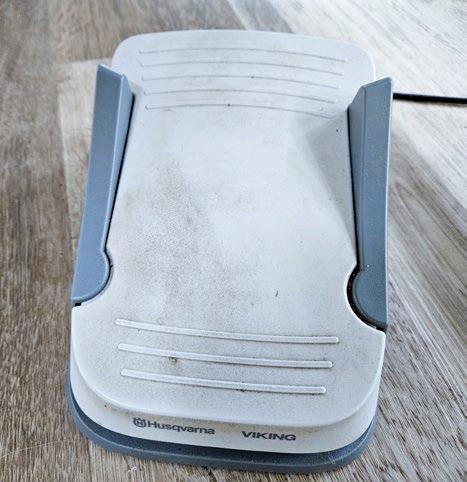
Under the Accessories tab, you can check out the fantastic optional accessories for the machine and techniques like quilting and embroidery. I LOVE the Multi-Function Foot Control. I've been working on a significant applique project, and the ability to program some of the functions into the foot control was tremendous. Instead of reaching for the buttons on the Function Panel, I simply swung my foot to the right and left to activate the functions I wanted.
As you can see, it’s well-used. It’s heavy, it doesn’t move, and I LOVE it.
And be sure to check out the information on needles and stabilizers in the JoyOS Advisor. You’ll be so much more knowledgeable after spending some time there. The more I learn, the easier things become! I got a chuckle the other day while browsing in a fabric store when a customer timidly asked me, “Do you sew?” She was struggling with what needle to purchase for her project. Well, it was her lucky day!
I hear over and over that people want lessons. What I find is that everything is so well laid out and easy to access in the JoyOS Advisor (and the other Designer Epic 3 menus) that all you need is to be curious!! Get your cup of tea and sit down each day and explore something. You won't be able to cover it all in one day, nor will you remember it all. But knowing that it's there, you'll be able to return and get the information when you need it!!
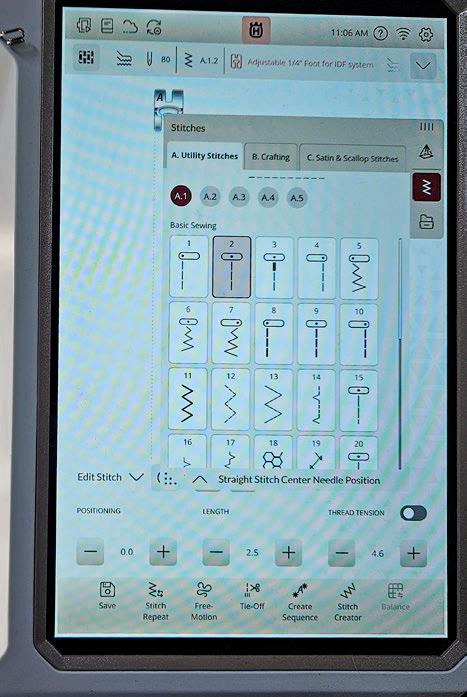
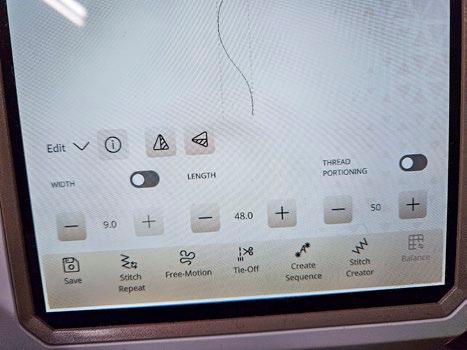
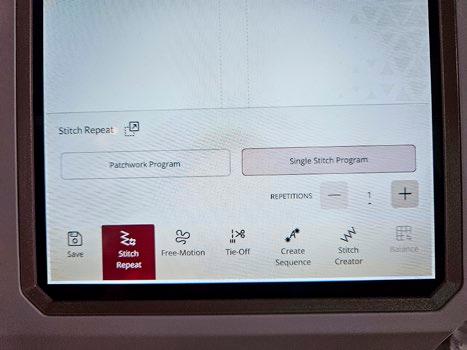
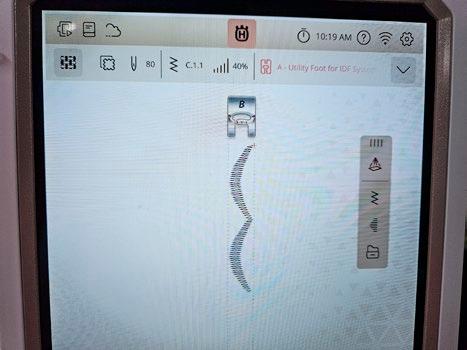
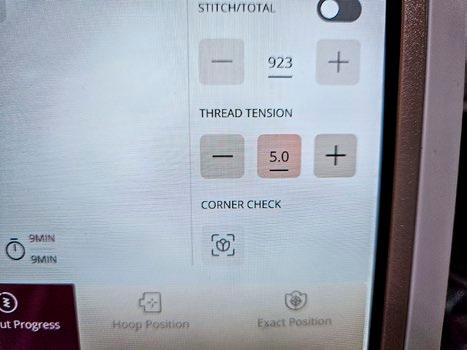
I’ve moved into Sewing Mode and opened the Stitch Menu, which you can see highlighted on the right-hand side. Remember, almost all selections are toggles – touch to turn on, touch to turn off.
While most functions are easy to explore, there’s one function that I've recently discovered that’s a bit hidden, so I'll share it with you. It's called the Canvas/ Workspace Customization. Select your Settings Menu (the gear icon in the top right-hand corner) to find this, then select the Personalize tab and toggle the Canvas/Workspace Customization to ON.
To make it easier, here’s a video showing exactly how to get there. Take a minute to watch the video to see how to activate the Canvas/Workspace Customization on the Husqvarna VIKING Designer Epic 3 and ensure that this setting is ON for your Designer Epic 3. I'll share with you what it does in a minute.
Now that this setting in the ON position, you'll notice that NOTHING happens. Check out this next video to see how the customized feature works with the Tie-off Function in sewing mode. I LOVE this feature and was so excited when I learned how to make this happen!
This next video will show two more functions, the Free-Motion and Stitch Repeat, where you can customize the menus if the Canvas/Workspace Customization is ON.
Oh my – I LOVE that feature, and you can be sure that my Canvas/Workspace Customization will always be in the ON position!!
The JoyOS Advisor menu
The Multi-Function Foot Control
The Stitch Menu
Multi-Function Foot Control
Earlier, I mentioned the Multi-Function Foot Control. I’ve been working on a significant applique project, and I'm using the Blanket Stitch (A.2.4), one of my favorite applique stitches. I programmed the Multi-Function Foot Control for Stitch Restart on the right side and Tie-Off on the left side, which sped up the stopping and starting! And the resulting stitches are beautiful. I've used a 50-weight thread for the top and a Husqvarna Viking prewound (for machine embroidery) bobbin for the bobbin.
If you want some tips on applique, check out this QUILTsocial blog post, 7 tips for successful applique every time! I’ve done many posts on applique, so be sure to search for the others.
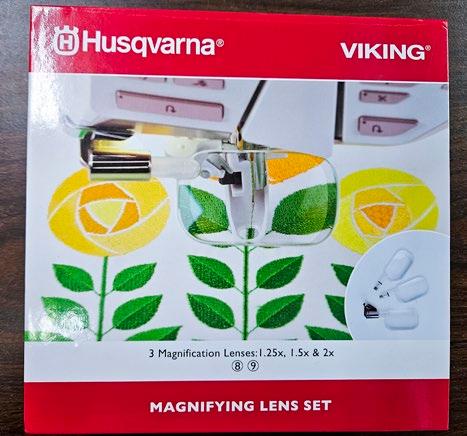
Magnifying Lens Set
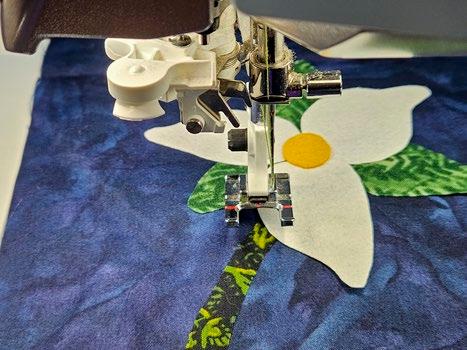
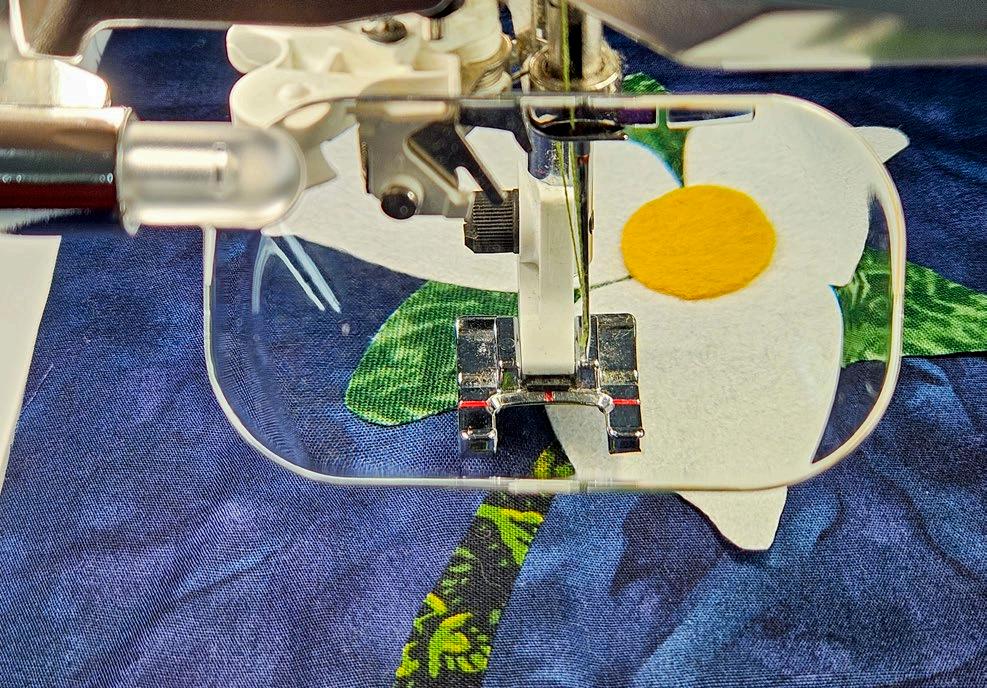
However, applique is precise, detailed work, and let's face it, my eyes are not as young as they used to be. I'm in total denial about that, but I've had to realize that I can no longer see to stitch without some assistance. So I attached the Magnifying Lens Set, and WOW --- what a game changer!
Oh my goodness, I cannot believe the difference. I set the camera up on a tripod so the camera is in the same position and has the same settings for the following two pictures. Here's what I see without the magnifying lens.
And here's what I see with the 1.25 lens attached.
It doesn't seem like a big deal, but it made enough of a difference that I could easily see what I was stitching, and my stitches are beautiful. I was a bit worried that it would interfere with changing threads or bobbins (I went through a LOT of thread changes on this project), but it was easy to swing the lens out of the way when needed.
There are two other lens strengths in the box (1.5 and 2.0), so as my eyes get tired or deteriorate further, I'll still be able to see and get beautiful stitches. I LOVE the magnifier!!! Right now, it’s set way to the back of the Designer Epic 3, as I’m working on something that doesn’t require the magnifier.
Be sure to join me as we continue to explore the fantastic options on this fabulous sewing and embroidery machine!
The blanket stitch
The Magnifying Lens Set
Without the magnifying lens
The work using a 1.25 magnifying lens
8 Insider Tips for Mastering Guided Pictograms
Husqvarna VIKING Designer Epic 3
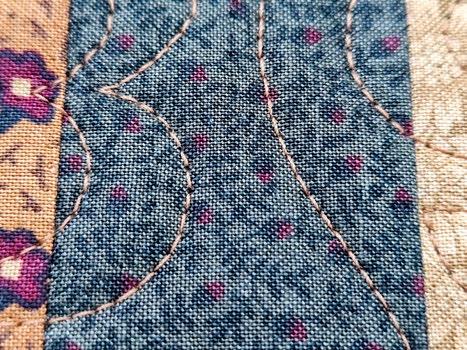
I'll check out a stitch category I haven't spent much time with, called Guided Pictograms, which is in Menu I.2. Check out this video about Accessing Guided Pictorgrams on the Husqvarna VIKING Designer Epic 3 to get an overview of how to access the menu and the information related to each programmed design.
Now that we know where to find them, here are some tips to help you stitch them out.
1. Use a stabilizer. Whether stitching on one or two layers of fabric, you must have something like Husqvarna VIKING Tear-a-Way stabilizer or fusible fleece to stabilize the stitches. I used fusible fleece sandwiched between two layers of fabric.
2. Slow down. When I stitched these designs too quickly, they tended to go wonky. Play with the speed slider to find your sweet spot.
3. All the functions, including Stitch Restart, work with these stitches, so don't be afraid to use them.
4. Be sure to pull up your bobbin thread to the top. That should be a given for any work you do, but I'm reminding you that it's essential, especially if you want the back of your work to look as nice as the front.
5. As mentioned in the video, turn the Projection on and ensure the Stitch Preview and Stitch Guide 1 are activated. Close the Projection menu.
6. Use the START/STOP function, not the foot pedal, as the number of stitches and the appropriate STOP commands exist in each design, so it's easier to let the Designer Epic 3 do the work.
7. Use the Open Toe foot to stitch these designs. Design 14 (fish) and 15 (candy) automatically have a few extra turns programmed in, and you don't want to break a needle. You'll also see some zigzag stitches in designs 6 (four points), 7 (multiple points), and 9 (bowtie)
8. Use the decorative or zigzag stitch plate.
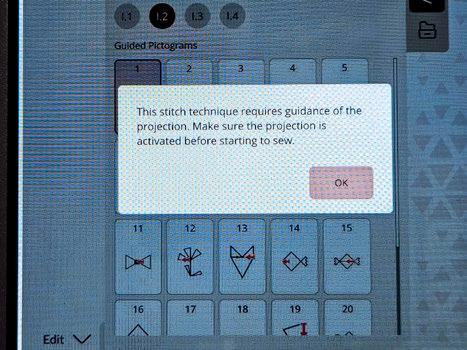
A pop-up message appears when you select one of these designs. You'll get this message even if you have already turned the Projection on. You do NOT need to touch OK; the pop-up message will disappear when you start sewing.
I'll stitch out all 25 designs, and I'll show you a couple of small projects made with the Guided Pictograms. Let's get started!
You'll see a small red arrow on each design in the stitch menu. That shows you the starting point and the direction of stitching. I wish this could be a bit larger as sometimes it was hard to judge where to position my fabric to start. That's why I'm stitching the designs out so I can judge the size and the position where I want to stitch them. I'm very visual, and I need that information in front of me. You can always take a picture with your smart device and expand it like I did here.
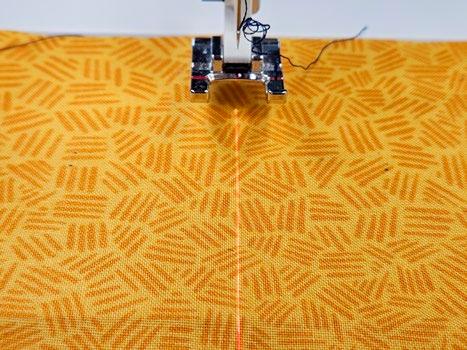
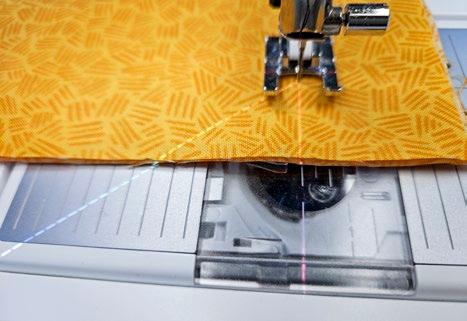
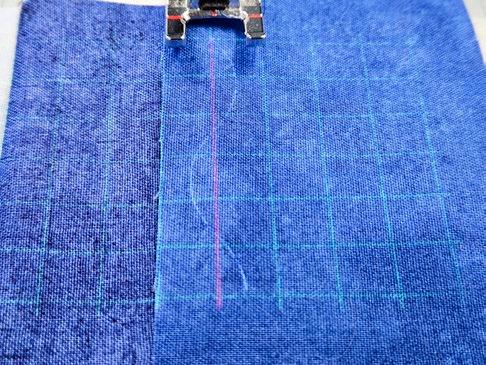
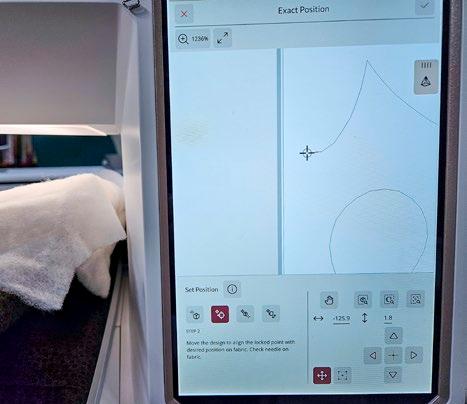
Position your fabric where you want to start. You'll see only the Stitch Preview line, which is red (you can select any color you wish). The Guided Pictograms use a straight stitch, so the Stitch Preview is a straight line. If I used a different stitch, I'd see it projected onto my fabric. Then, touch START/STOP, and the Designer Epic 3 will stitch until the programmed STOP command. Make sure you're using your Needle Stop Up/Down function.
You'll now see the Stitch Preview (red) and a dashed line, which is the Stitch Guide (white).
Husqvarna VIKING Designer Epic 3
Pop-up message when you select a Guided Pictogram
The red arrow indicates the start point and the direction of the stitching
The Stitch Preview
The Stitch Preview (red) and the Stitch Guide (dashed white)
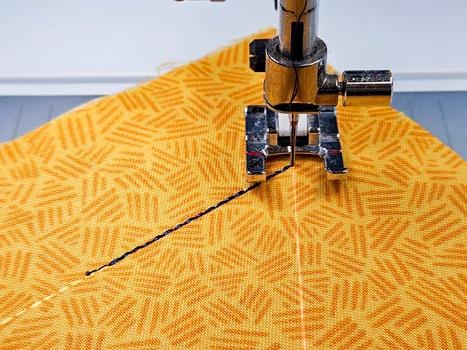
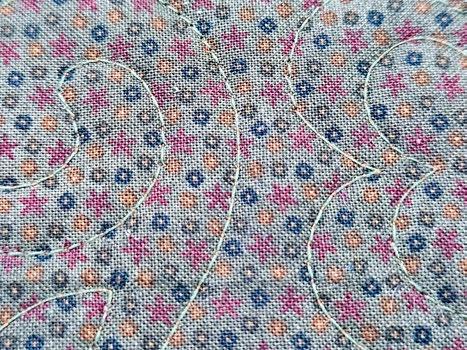
Rotate the project so the Stitch Guide is on the line of stitching you just stitched. Then, touch START/STOP again and wait for the machine to stop. Continue this way until you return to the design's beginning.
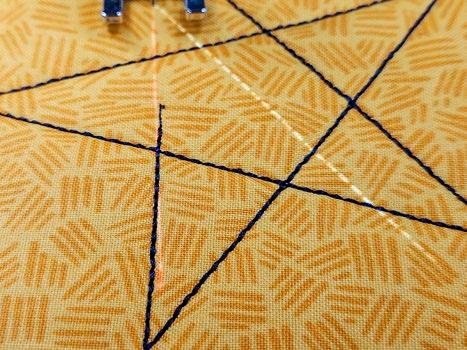
See it in action in the video about How the Guided Pictogram Stitch Technique works. Sometimes, I spin my fabric around several times before the Stitch Guide lines up with the stitching line! But once you get the hang of it, it's super easy and uses the Projection well. When you start to stitch, the Stitch Preview disappears, and you'll have to rely on the Stitch Guide, so it's essential to keep that line parallel to the previous line of stitching. Some people like to hold their fabric, some want to guide it, and some like to let the feed teeth do all the guiding. Be sure to test it out and see what works for you. It can also depend on the size of your fabric piece and whether there is any drag on it around the needle. I'm slightly off as I come to the end of the design.
There are times you may have to fudge the final join. The slower I went, the easier it was, but the final join could be affected if my fabric shifted somewhat or I didn't keep the lines parallel. But in the long run, finding the slightly wonky line is not easy. Use the Stitch Preview to help line things up. Every time you stop sewing, the Stitch Preview returns.
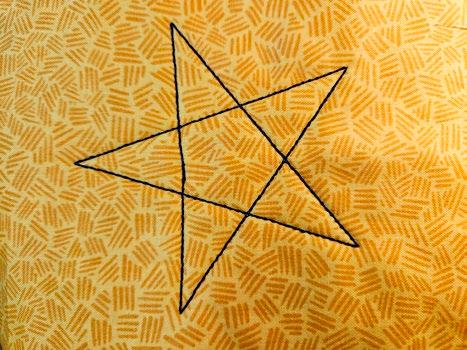
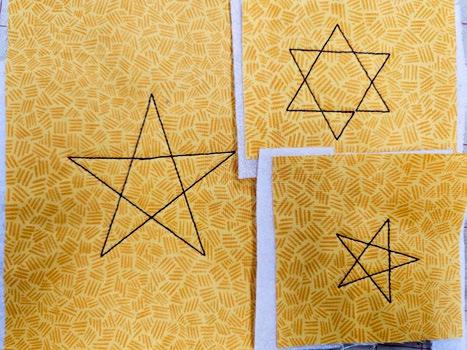
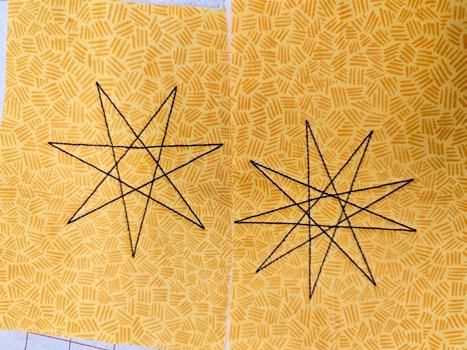
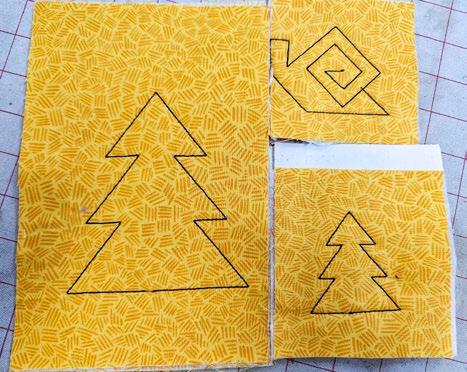
Here are the twenty-four (wait for number twenty-five) designs. There are a variety of stars.
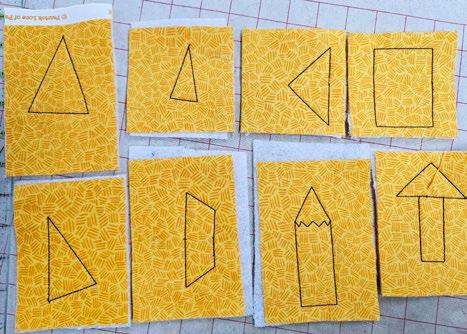
Then you have some basic shapes.
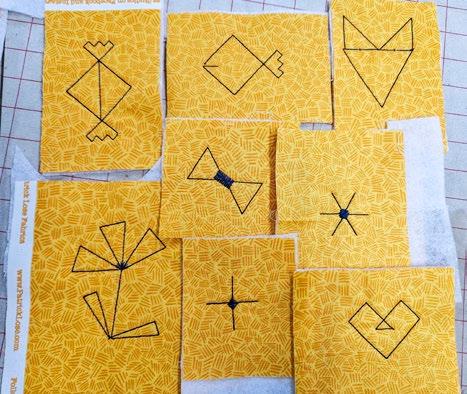
There are also some funkier designs. All these have a name and size, which you can find in the Guided Pictogram menu. Note that FOUR of these designs have NON-straight stitching on them: the Cross (I.2.6), the Star (I.2.7), the Bow (I.2.11), and the Flower (I.2.12). Be sure to use the optional Open Toe Foot for these designs. Also, the Fish (I.2.14) and the Candy (I.2.15) have the jagged edge already programmed in, so you don't have to pivot. But you must use the Open Toe presser foot to accommodate the stitch. Be sure to read the pop-up messages!
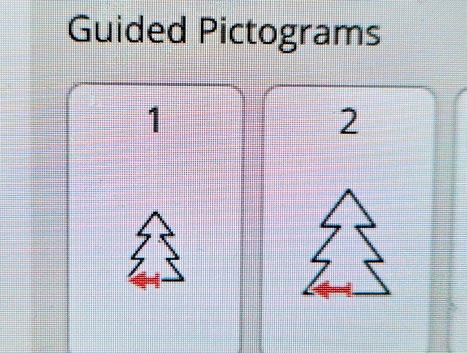
Last but not least, there are two trees and a snail.
Pivoting and placing the Stitch Guide on the previous line of stitching
Keep the Stitch Guide parallel to the previous line of stitching
The slightly wonky line is barely noticeable
Star-shaped Guided Pictograms
Two more star Guided Pictograms
Basic Shapes of Guided Pictograms
Funky Guided Pictograms
Trees and a snail from the Guided Pictogram menu
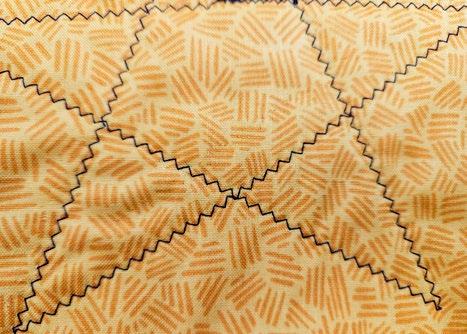
The stitch used in these programs is a triple stitch, so you get a nice thick line of stitching. Here's what it looks like on the back.
There's a lot of variety with the Guided Pictograms, and you can combine multiple shapes. The size and the start point will help when combining individual designs into larger units. Note that you cannot modify the size or stitch length of these designs.
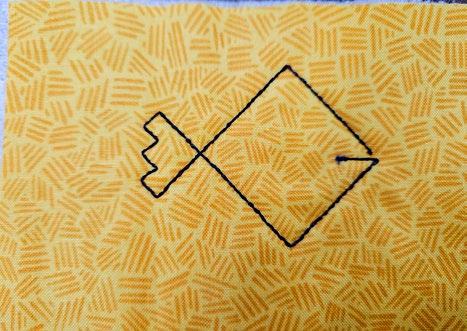
Now, let's look at the 25th design (I.2.25).
An information box provides the name and size of each design.
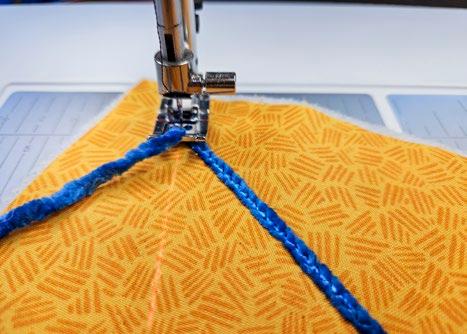
Wait – the information box for the 25th design is different. Yarn? What's that all about? If you read the description, the information you need is right there. This design allows you to couch yarn using the Three-Hole Yarn Foot for IDF. I LOVE the Three-Hole Yarn foot and can't wait to try it.
information
The only thing I changed was to thread yarn into the center hole of the ThreeHole Yarn Foot, but everything else functions the same. It's essential to read those pop-up messages. I'll lay the yarn on the Stitch Preview (red) and touch START/STOP.
In this photo, I have reached the first programmed STOP. I've lined up the Stitch Guide line on the previous stitching line (with the yarn couched in place).
Then, position the yarn over the Stitch Preview (red) and hold it in place. Touch START/STOP to stitch the next line of stitching and continue until you get back to the start.
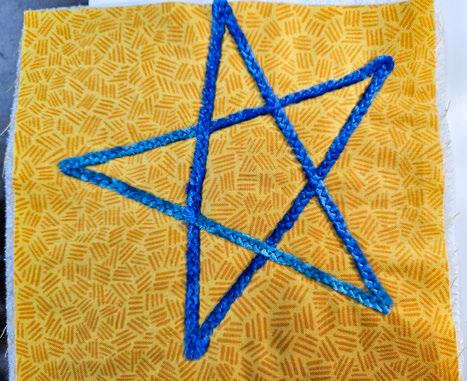
there's the star with the couched yarn. I used a matching thread, but you can use whatever color you want!
Here's what the back looks like. The zigzag secures the yarn in place. None of the other pictograms have this ability.
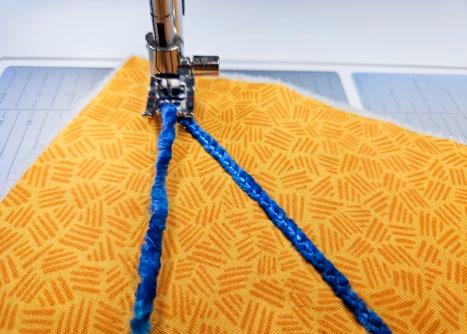
Technically, you could couch using any other designs, but instead of using yarn, which requires a zigzag stitch, you can use ribbon. Like the photos of the yarn-couched star, we are at the first pivot point, and the Stitch Guide sits on the first line of stitching, and the Stitch Preview (red) is directly in front of the needle.
The "wrong" side of the Guided Pictogram
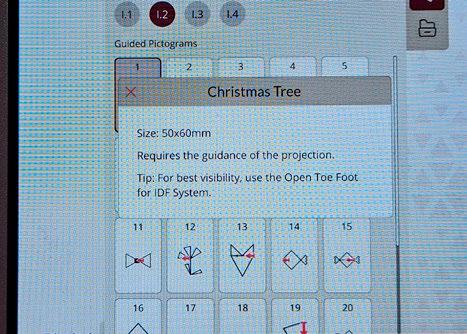
The information box for the Christmas Tree Guided Pictogram
The
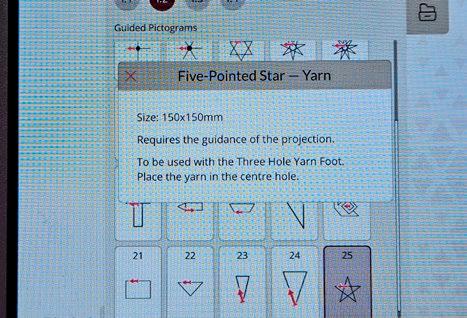
box for the Five-Pointed Star -Yarn in the Guided Pictogram menu
And
Line up the Stitch Guide with the previous stitching
Ready to stitch the next line
The Five-Point Star - Yarn in the Guided Pictogram menu
The back of the yarn couched Guided Pictogram
Place the ribbon over the Stitch Preview and continue to stitch
Pivoting at the corner
Prepared to stitch the second line
And here's the completed star with the couched ribbon. Cut the yarn or the ribbon at the end. If you are not making a double-sided item, where the back will show, you can take the ends and, using a yarn needle, pull them through to the back of the work and secure them. In this example, I simply cut the ends of the ribbon. Some ribbons will work better than others, and you need to experiment with the pivot points for folding the ribbon. This sample is my first attempt with this ribbon, and I'd like to neaten those points a bit.
Wait! There's more! Here's another thing you can do with the Guided Pictograms. Why not add an applique fabric before you start to stitch? Place the applique fabric onto your background and stitch your Guided Pictogram.
Then, trim away the excess using your Husqvarna VIKING applique scissors, and you'll get a beautiful raw edge applique.
Wow, there are so many possibilities – we could play for a long time with the Guided Pictograms on the Husqvarna VIKING Designer Epic 3
A Guided Pictogram with ribbon
The Guided Pictogram as an applique
The raw edge applique from a Guided Pictogram
Guided Pictogram Projects
The more I play with them, the more ideas I get! It’s just one more excellent feature on the Husqvarna VIKING Designer Epic 3. I could play all day for many, many weeks!
I’ll share some projects I created using the Guided Pictograms. So, let’s begin.
I found stitching out a sample of the 25 Guided Pictogram designs very useful, as it gave me a visual for the size and where to position my fabric to start stitching. It also allowed me to play with them like building blocks to help visualize a design.
I’m a very visual person, and I need that tool. The name of the design can also help! You’ll see what I mean by that in a minute.
In this article, I’m using metallic threads in my projects. Check out the SULKY Slimline Metallic Dream Assortment. It’s an excellent starter package that comes in a beautiful storage case. I had zero difficulty using the metallic threads on the Designer Epic 3. I used a pre-wound bobbin, stitched at a reduced speed, and had no issue with the threads shredding or breaking, even though I used a regular needle.
Three kinds of metallic threads, Sliver, Holoshimmer, and regular metallic, are in the starter box, and all worked equally well.
You can make the guided pictogram pictures as easy or complex as you like. I also want to incorporate some decorative stitches into my project, so I started by reviewing the guided pictogram samples. Here, I found the two-part boat. One is labelled boat, and the other is labelled sail. Be sure to watch the names of the designs, as some of them work together. Don’t be afraid to work outside the box; perhaps you’ll find another creative way to use these designs.
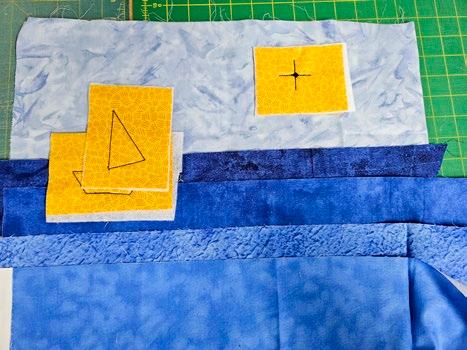
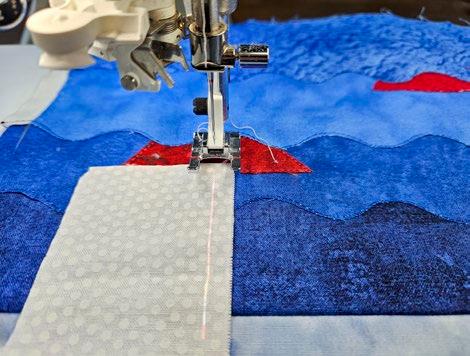
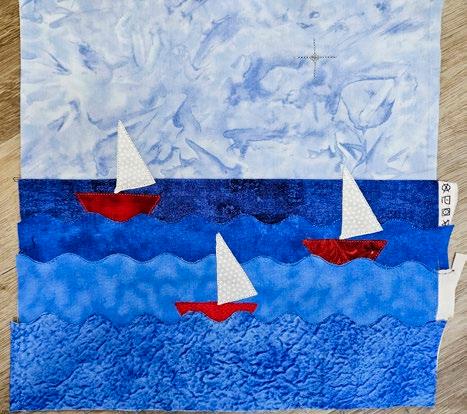
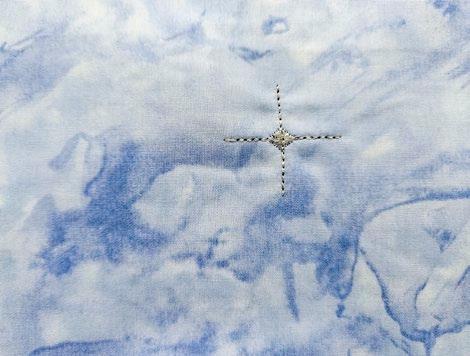
I considered adding the fish design to the water but instead went for the four-point star for the sky. To replicate a wavey ocean, I’ll use four blue fabrics for the waves and one blue for the sky.
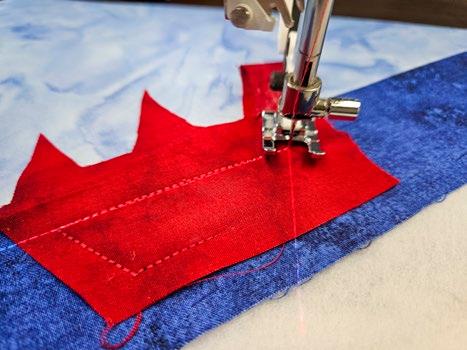
I’ll start with a piece of fusible fleece for the base and place the sky and the blue fabrics onto it to get a sense of proportion. Next, I’ll use a straight stitch to sew the first wave to the sky, right sides together, through all the layers. I'll press the seam to the wave, then figure out where to position the first boat.
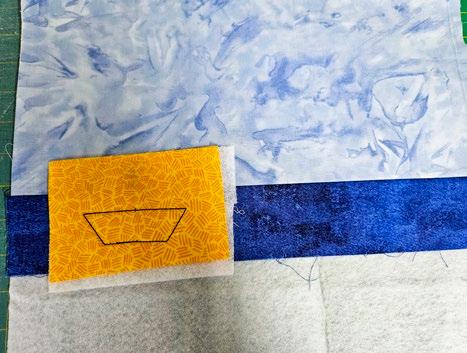
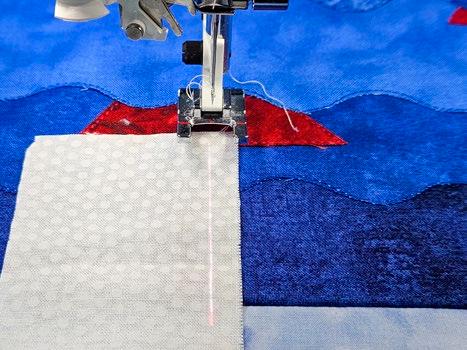
Once you have the boat mostly where you want it, applique a scrap of fabric using the Guided Pictogram stitch. The Projection system with the Stitch Preview and Stitch Guideline is fabulous!
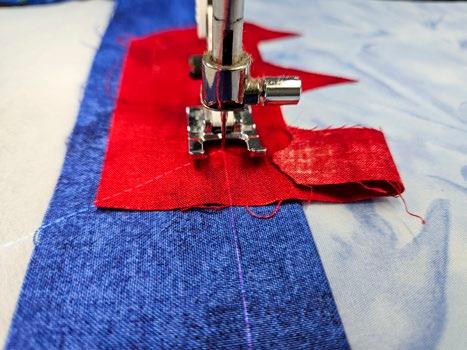
Pivot the fabric and stitch the following line. You can see the Stitch Guide to the left on the previous line of stitching and the Stitch Preview in front. This is where the following stitching line will go. It’s super easy! After stitching the boat shape, I’ll use my Husqvarna VIKING Applique scissors to trim the excess fabric.
A starter package of Sulky metallic thread.
A selection of metallic threads
The basic layout for my design
Position the first Guided Pictogram boat by stitching a sample of the stitch on scrap fabric.
The Stitch Preview and Stitch Guideline help to position the fabric for applique.
The Projection provides a guide to stitching the Guided Pictogram applique
Now, it’s time to add a wave. Place the next blue fabric strip, right side up, over the first wave fabric. Positioning the blue fabric over the bottom of the boat makes it look more realistic than if the boat is sitting on the wave. Choose a quilting wave stitch from the Quilt Menu. Select the Grid in Projection to help guide your stitching. You can see the Stitch Guide, red line, which I don’t need as I’m using the edge of the grid along the raw edge of my fabric. The wavey line is the Stitch Preview. It shows how big and deep the wave will be. Adjust the length and width until you have something you’re happy with. Note the settings as you’ll be moving back and forth between the Guided Pictogram designs and the wave stitch.
I used cotton thread to stitch down the boat and will change to metallic threads to stitch the waves. Once the wave is secure, it’s time to use the applique scissors again and remove the excess fabric. All the applique on this project is raw edge.
Here are the settings I’m using, but you can use whatever you wish. There are several stitches to choose from. You may even want to use a different wave stitch for every line. There are so many choices!
Serpentine stitch settings
I’ll stitch three boats onto my piece and separate each one by a wave. Then it’s time to stitch down the sail, another Guided Pictogram called Sail (I.2.15). It’s easy to position the sail, as there’s a tiny reference guide that stitches on the boat, though you could position it wherever you want. The stitching starts at the bottom of the mast, so it’s easy to line it up with the boat.
Stitching the sail in place
I’m using my Open Toe Foot for all the stitching to make it easy to see how everything’s lining up.
Use the Open Toe Foot for better visibility
Trim the sails after stitching them in place. Here’s the piece! It looks fantastic and is so easy to create using the Guided Pictograms.
Here’s a close-up of the Guided Pictogram, four-point star stitched in the sky with a metallic thread. It turned out amazing, and again, there were zero issues with the metallic thread.
I love this piece! I’ll quilt mine later. I’ll add a backing fabric and use freemotion quilting or some decorative stitches to finish it. Then, trim and bind the piece. That’s a project to finish another day.
The second project we’ll create using the Guided Pictograms is a Christmas tree. I’ll use the large tree (I.2.2) and a piece of green felt to make an applique on white cotton fabric.
To trim the tree, I’m using a variety of decorative stitches and Projection to add the decorations. I’ll use a scallop stitch (I.2.7) for the garland.
Raw edge applique the next strip of blue fabric using a wave or serpentine stitch.
Raw edge applique with the serpentine stitch
The Guided Pictograms Regatta
The guided Pictogram four-pointed star
Stitch preview for the garland
Use the Stitch Repeat tool to get the appropriate number of stitch sequences.
I’ve selected two stitch sequences using the Stitch Repeat tool. I love that I can see them on the screen so I know I haven’t made a mistake.
If you’re wondering how I know two stitch sequences will work, I use the Stitch Preview in Projection. If I need to adjust the stitch length, I can see those changes in the Stitch Preview. Stitch Preview is a fantastic feature, and I can see many uses for it in the future.
Then, use the single sequin stitch to add lights, using a metallic thread to stitch them in place. Lastly, I’ve added a star on top using an Omnimotion stitch and a metallic thread.
Here’s a useful optional accessory for the Designer Epic 3 – the Extension Table. It comes with an adjustable guide in case you are working with something significant and need a guide. Think about hemming curtains.
Here’s what it looks like on the Designer Epic 3. There is so much room to work. I’m a fan of the extension table and don’t like to work without it. It’s also very sturdy.
Guidelines on the table bed help you position the sliding guide. Look at all that space to the left of the needle!
The possibilities for creating unique designs with Guided Pictograms and Projection are endless. Pull your creativity hat out of the box, look at those sample stitch-outs of the Guided Pictograms, then wander through the menus of decorative stitches, and before you know it, you’ll have a one-of-a-kind project!
We need to remember that we’ve purchased the amazing Husqvarna VIKING Designer Epic 3 as a tool to make our sewing and embroidery easy. It’s so important to explore the options and features to ensure that we are taking full advantage of all it has to offer, and so far, my goal has been to show you some fantastic tools that allow you to be super creative.
The Stitch Repeat tool
The Stitch Repeat set to two stitch sequences
Using Stitch Preview to determine the stitch length and number of stitch sequences
The decorated Christmas tree
The Optional Extension Table
The optional Extension Table with the guide in place
Guide marks on the extension table
Creating an applique placemat in the Designer Regal Hoop!
I'm moving on to some embroidery with the Husqvarna VIKING Designer Epic 3.
The box with the Designer Epic 3 includes four traditional embroidery hoops: the Designer Regal Hoop (465 by 260), the Designer Royal Hoop II (360 by 200), the Designer Jewel Hoop II (240 by 150), and the Designer Splendid Square Hoop II (120 by 120), as well as an adapter for use with some of the legacy hoops.
I want to explore the Designer Regal Hoop (465 by 260), the largest nonturnable hoop! And it’s enormous! You’ll see that I’ve set up the Designer Epic 3 with the recommended Large Hoop Supports in the front and the back of the embroidery area.
There are two supports, one for the front and one for the back, which are very easy to put on and remove. I have to push the embroidery machine back onto
the table a bit to accommodate the extra width, so I use them when using the Designer Regal Hoop, but I’ll take them off when using a smaller hoop. However, I can leave them on all the time if I wish. You can see how those extensions are helping to support the larger hoop.
It’s easy to hoop your project and stabilizer as there are 24” rolls of stabilizer in some of the most popular types. Shown here is a Tear-A-Way X-Wide and a Cut-A-Way X-Wide.
To get started, you need an area large enough to hoop your fabric. Whether you use your cutting table or have enough room beside the embroidery machine, you want a nice, sturdy area to hoop your fabric. If you’re floating the fabric, you’ll still have to hoop the stabilizer.
I’m using a 6-foot wooden banquet table with room to the left of the embroidery unit to hoop my projects. It’s sturdy enough to support the Designer Epic 3 during the embroidery stitchout.
I’ve decided to make a quilted placemat with applique to visualize the maximum stitchable space in this large hoop. I’ll use a thin batting and cotton fabric for the top and bottom with all three layers in the hoop. Be sure you have enough fabric on all four sides to secure the project in the hoop.
Husqvarna VIKING Designer Epic 3 with the Large Hoop Supports
The Large Hoop Supports
The Designer Regal Hoop on the Large Hoop Supports
The Designer Regal Hoop and two rolls of X-wide (24”) stabilizers
Make room to hoop your project
Two layers of fabric and a layer of thin batting in the Designer Regal hoop
Around the perimeter of the embroidery hoop, plastic ribs allow you to use hoop clips (not pictured) to provide additional support. Depending on the hoop size and how many layers of fabric or stabilizer are along the edge, I’ll choose to use some, all, or none of the hoop clips.
I searched the internet for a black and white clip art of cutlery and brought that into the mySewnet Embroidery Software, where I used Express Design to create an applique. While this is an effortless process, the results can vary greatly depending on the quality of the clip art you start with. Also, be careful of the copyright of the images you select. Then, I went to the Quilt Block Wizard tool, where I answered a few questions about the style of quilting I wanted. This grid pattern surrounding the applique was the result. I’m ready to send the design through the mySewnet Cloud to the Designer Epic 3.
The proportion for a placemat might be slightly out of whack, but my goal is to see the maximum size piece I can create in this hoop. It’s now time to start stitching. When I created the design, I designated the stitching order and chose the applique to stitch first. The software will generate SVG files for the applique, which I can use with the Singer Momento (digital cutter). In this instance, I chose to trim the excess fabric away with my Husqvarna VIKING Applique Scissors.
Once the applique is in place, it’s time to change the thread and stitch the quilted grid in the background. I’ll use a matching thread in the bobbin for all the stitching, so the piece will look as lovely on the back as it does on the front. When this is on the table, someone will peek underneath to see how good a job you did! You know they will!
I made the placemat twice. The first time, I selected a running stitch as the final stitch for the applique when I wanted a satin stitch! It’s all a learning experience!
Here’s the second piece with the satin stitch applique, and I love it! It was easy to put the binding on, and now I have a great visual reference for the project size that I can create in the Designer Regal Hoop.
If you want to peek at the back, this is what it looks like! And yes – I’m thrilled with the result. I want to make another one, and this time, I’ll cut the applique shapes on the digital cutter as some of those parts are somewhat small to trim with scissors.
I wanted to note the optional Husqvarna VIKING Mega Turnable Hoop. I won’t have time to play with it now, but it’s here, and I can’t wait to open the box. As mentioned before, you can see the clips in the photo that help secure the fabric.
The stitchable area of this hoop is 450 by 450, which is over 17” if you’re like me and struggle with translating metric to inches. That’s huge!!! The possibilities of what I can stitch are flashing through my head.
The ribs for attaching the hoop clips
Creating the design in the mySewnet Embroidery Software
The placement stitch for the applique
Grid quilting with machine embroidery
The first placemat is complete.
The placemat is made with applique and quilting in the hoop.
The back of the placemat
The Mega Turnable Hoop
What to know about edge-to-edge quilting with the Husqvarna VIKING Designer Epic 3
We’ll explore edge-to-edge quilting in the hoop with machine embroidery. Let’s get to it!
I’ll use the Designer Regal Hoop to quilt with the embroidery machine, which is becoming extremely popular for quilters. With this larger hoop, the number of hoopings will be less, so I’ll complete it much faster!
Here’s a tip for calculating the size of the backing.
Measure your quilt and take note of the size of the embroidery design you’ll be using. My quilt is 30 inches square, and the embroidery design fits into a 10” by 16” hoop – the equivalent of the Designer Regal Hoop (465 by 260). I’ll have to do two rows of three hoopings in each row to fill the quilt. If you want or need more precision, you can always stitch out a sample of the quilting motif to get the exact measurement. I start in the top lefthand corner. The design will rarely work out exactly, so you’ll have to stitch off the right-hand side and the bottom.
To accommodate this, the backing must be larger by at least one-half the width of the embroidery hoop you’ll use. If the backing isn’t large enough, you may want to add some strips of fabric along the appropriate sides so you can readily hoop the quilt. You won’t stitch on this excess. It simply allows you to hoop the quilt. When you layer your project, put the excess on the right-hand side and bottom, but still leave enough so that you can hoop the top left corner.
The first step is to layer the quilt. I’m using up some batting scraps, and as long as I have the backing large enough to hoop, I’ll be OK. I didn’t technically baste this project as it’s only 30” square, but I used steam in my iron and pressed the front and the back with the batting between. It’s been my experience that the pressing is enough to keep the three layers stable when quilting with an embroidery hoop.
While I can hoop a thicker batting in the traditional hoop, I’m not a fan and prefer to use a thin batting or a fusible fleece. This first hooping is relatively simple, but I need to know where my embroidery design will start and stop. You may have to fiddle with the positioning until you get familiar with the stitchable area and how it relates to the design. Notice that there isn’t a lot of excess quilt backing along the left-hand side and the top, but there’s enough for the project to fit securely in the hoop. I’ll work from the top left in rows, keeping the bulk of the excess backing on the right-hand side and the bottom.
My priority with this first hooping is that I want my design to stitch along the left edge and the top of the quilt. The design could run off slightly on those edges, but I don’t want the design to be too far inside the edge of the quilt. The first time you hoop a project, it might take some time to understand where the design is relative to the edge and top of the embroidery hoop, so take a minute to understand that. We’ll use the Designer Epic 3 positioning tools to assist with the process.
Now, it’s time to load the design and check the positioning. You may need to adjust the fabric in the hoop, and as I mentioned, the first time can be a bit tricky. There’s an indentation along the edge of the embroidery hoop (picture in a minute) to show you the stitching area. That indentation is very helpful to get you started, though it depends on how big your design is and where it’s sitting in the embroidery hoop.
Don’t forget that if you have many designs in a folder starting with a similar name, you can change from icons to a list, which is very helpful.
Husqvarna VIKING Designer Epic 3
An additional fabric strip has been added to allow the project to fit in the embroidery hoop.
The three layers are together.
The top left corner of the quilt in the embroidery hoop
I’ll move to embroidery stitch-out mode, and the first thing I’ll do is a Corner Check. You’ll find the Corner Check in the Stitch-Out Progress tab.
I’ll check that the top left corner of the design matches how I hooped my fabric. Then, I’ll proceed to check the remaining four corners.
If I need to tweak the design’s position, I can always use my Exact Position tool, which you’ll find in Embroidery Stitch Out. I must remember that the larger the design, the less room there is in my chosen hoop. Sometimes, I have very little room to move from side to side. I have plenty of room to move up and down in this case. I get very good at knowing where and how to hoop my project as I progress.
Many people use embroidery thread in the bobbin and the top for quilting, but I wanted to try a non-embroidery thread. I confess that I let the entire design stitch out before I checked the back, and it was – well, we can see that it was not pretty. So, I recommend stitching a couple of inches to check the tension and adjust accordingly. It’s easier to rip out a few inches than an entire hoop, although in my case, the tension was so off that it didn’t take long to remove all the stitches.
The default setting is 2.8, so I raised the top tension to 5.0 and got better results. Please do not assume, as I did, that the tension will be OK. The Designer Epic 3 has no clue what kind of thread you’re using, so always do a test stitch and become comfortable with changing the tension settings!
Here’s what the front looks like.
And here’s the back. The top tension could have been a bit higher – maybe a 6, but it’s still a well-formed stitch. Don’t be afraid to play with the tension!
Before I knew it, the first hoop was complete. I stayed with the embroidery to ensure the edges along the top and the left-hand side did not flip in.
Now for the fun of doing the second hooping. Oh, did you notice the clips along the right-hand side? I only had the backing in the hoop along the edge and used the clips for extra support.
Do a corner check to see where your design will stitch.
Checking the top-left corner for placement
The Exact Position Tool
The tension was less than perfect on my first attempt.
The top tension is at 5.0
The stitching on the front of the quilt
The stitching on the back of the quilt
The first hooping of machine embroidery quilting
When you purchase an edge-to-edge embroidery quilting design, there is a start and end point, and both are on the same horizontal level of the design. Your start point must match the previous endpoint.
By starting at the top-left, working to the right, and working in rows, I’m emulating how the quilting would take place on a long arm. It worked like a charm on this project.
I used the same design repeatedly, so I never moved out of Embroidery Stitch Out mode. Here’s another trick to help with the second and subsequent hooping.
When working on the next hooping, return to stitch number one. Then, using the Hoop Position tool, select Current Stitch. In an ideal world, this stitch should fall just beside the last stitch from the previous design. If it doesn’t, you must either rehoop the fabric or reposition the design on the screen. The first one or two hoopings can be a bit of a challenge, but then you’ll get the hang of it, and it’ll be pretty simple.
You may need to fuss with the hooping or move the design in the hoop, but remember to use all the available tools to make the designs fit where you want them – Corner Check, Exact Position, and Hoop Position – Current Stitch Position all help to make quilting in the hoop accurate and enjoyable.
When you’re happy with the placement, pull up the bobbin thread (I don’t use scissors, as I like to control the bobbin thread) and then touch Start
Another aid I use is a measuring tape which I place along the inside of the hoop to help me identify the stitching area. Remember those indentations along the edges of the hoop as they indicate where the design will stitch. Don’t rely entirely on this, use the tools within the embroidery stitch out. Drop your needle manually if you need to double-check the position.
I find this step handy when hooping the designs as there will be some previous stitching inside the hoop, but the big question is how much. This step helps me judge that.
I didn’t baste this project as it was only 30 inches square, although I did press all three layers together and doublechecked the back every time I rehooped. While it looks like I have a crease on the left, it’s just a tiny wrinkle under the stitching. Feel free to baste if you feel more comfortable doing so.
The design will likely extend beyond the edge as you approach the final hooping on the right-hand side. It would be rare for it to line up perfectly. I stay close to my machine while stitching that edge. If you like, you can stop the embroidery when the stitches reach the end and advance until the stitching is back on the project.
I find that the second you don’t pay attention, something you don’t want happens. Thankfully, this time, it was within the bounds of the binding, so I left it.
Matching the start point with the previous endpoint
Checking the Current Stitch Position
Pulling up the bobbin thread
Use a measuring tape to help highlight the stitching area
The back of the embroidery
The final hooping in the first row
I had to fuss a bit to get started on the second row, but once I understood the height of the embroidery design in the hoop, I had a better idea of how to hoop the project. I should mention that I didn’t place a single mark on this quilt, yet there are zero overlaps or significant gaps between the designs. Using the Designer Epic 3 tools, I got a gorgeous quilt, entirely quilted with machine embroidery. I’m thrilled!
I completed this project with just six hoopings and am thrilled with how easy it was. There was a bit of a learning curve, but it’s all logical and worked out amazingly. There might be a slight, less than two stitches, gap between the start and end of a couple of the designs, but you do your best to fit them in so there are no pattern overlaps. Don’t forget that fabric and quilts are incredibly fluid and can shift and shrink as they are quilted. A quilt will never be perfect, so we need not fret. It would take you some time to spot those joins, so I’m not losing any sleep over it!
As I do for all my two-sided embroidery, I turned off the Jump Stitch and Automatic Cutter and cut the threads manually. And I also turned off the deLuxe Stitch System. It’s all a question of playing with the various settings and discovering what works for you with the type of thread, needle, and fabrics you use.
I had a blast playing with the Husqvarna VIKING Designer Epic 3 for this feauture. I hope you picked up some tips and are inspired to try something new. Be sure to visit your local Husqvarna VIKING dealer to take this incredible sewing and embroidery machine for a test drive. Just reading about it here doesn’t do justice to all its abilities!!
Have a great day!
Ciao!!
Elaine Theriault crazyquilteronabike.blogspot.com
A little oops when you don’t pay attention!
The finished quilting on the wall quilt
The quilting stitches
4 easy steps to create texture in a quilt with
In this feature I'm excited to show you how to make a fidget quilt featuring many different textures and interesting elements. I’ll use an easy, quilt-as-you-go method that will work well for any level quilter.
Fidget quilts are small lap quilts with moveable objects that people can use to fidget or keep their hands busy. They’re great for kids and people with dementia, Alzheimer’s, or autism. They usually have a variety of fabrics, zippers, buttons, toys that move, snaps, ribbons, and other notions. Fidget quilts can serve as entertainment to pass the time, engage a patient’s mind, and help them focus. They can also help someone calm down if they’re upset.
UNIQUE QUILTING Stitch-N-Steam – 157 x 45cm (62” x 18”) will help add texture to plain fabric.
I’ll use a product called UNIQUE QUILTING Stitch-N-Steam - 157 x 45cm (62'' x 18'') and one of the fat quarters from the FABRIC CREATIONS Fabric Bundle (5pcs) - Metallic Gold - 45 x 53cm (18in x 21in) to create a wonderfully textured fabric to add to my little quilt.
I’ll use other products like:
Oliso M2Pro Mini Project Iron
Stitch-N-Steam
FAIRFIELD Low-Loft® Quilt Batting - Crib114 x 152cm (45'' x 60'')
UNIQUE QUILTING Clever Clips
OLFA CHN-1 - Chenille / Textile Cutter
UNIQUE CREATIV Trim Pack - Black & White
FABRIC CREATIONS Burlap Fabric - Oyster45 x 61cm (18'' x 24'')
FABRIC CREATIONS Faux Fur Fabric - Zebra45 x 76cm (18'' x 30'')
First, I’ll cut the fabric pieces I need for all the different segments in the quilt.
If you’d like to make your own fidget quilt, here’s what you’ll need: fabric
• coordinating fat quarters
• 30” [75cm] for outer border
• 18” [50cm] for sashing and binding
• crib-size quilt batting
From the fat quarters, cut the following:
• 4 - 3½" x 9½" rectangles
• 2 - 6½" x 9½" rectangles
• 8 - 4½" x 6½" rectangles
• eight 5½" x 6½" rectangles
From the batting cut:
• 2 - 3½" x 9½" rectangles
• 1 - 6½" x 9½" rectangles
• 4 - 4½" x 6½" rectangles
• 4 - 5½" x 6½" rectangles
Make the quilted backgrounds
Now I’ll make quilt sandwiches with two pieces of fabric and one piece of batting in each of the different sizes and use UNIQUE QUILTING Clever Clips to hold them together. I’ll quilt two or three lines across the sandwiches to hold them together.
Christine Baker
An assortment of useful crafting products to create a fidget quilt
Make quilt sandwiches with two pieces of fabric and one piece of batting.
Cut the Stitch-N-Steam and the fabric at least 30% larger than you need for your finished fabric.
Add texture to fabric
Step 1 Cut fabrics.
UNIQUE QUILTING Stitch-N-Steam - 157 x 45cm (62'' x 18'') is a 100% Polyester, steam-activated product designed to add texture to fabric. Use it to create amazing decorative details on home décor projects, quilting, apparel & crafts, anywhere you want to add textured interest to fabric. After steaming, the fabrics will shrink approximately 30%, so I’ll cut both the FABRIC CREATIONS Fabric Bundle (5pcs) - Metallic Gold - 45 x 53cm (18in x 21in) and the Stitch-N-Steam 10" x 10" so I’ll be sure to have a big enough piece to fit into my quilt.
Step 2 Layer and clip.
Next, I’ll clip the Stitch-N-Steam to the wrong side of the fabric. Don’t worry if the UNIQUE QUILTING StitchN-Steam—157 x 45cm (62'' x 18'') has wrinkles; they won’t affect the shrinking process.
Step 3 Stitch together.
Now I’ll stitch lines both vertically and horizontally on the fabric. The more stitching lines and the closer they are together, the more textured the finished fabric will be. I’m not worrying if these lines are straight or crooked. I don’t think they’ll show up in the finished fabric.
Step 4 Steam.
Now that the two fabrics have been stitched together, I’ll use my Oliso Pro TG1600 Pro Plus Smart Iron to steam them. At this step, it's important to hold the iron above the fabric and press the steam button only. I don’t want to press down on the fabric at all, as this will flatten it. Check out this video
Step 5 Trim to the desired size.
Now I’ll trim my textured fabric to 5½" x 6½" and clip it to one of the 5½" x 6½" quilted sandwiches. A quick basting stitch all the way around will keep the layers together.
Burlap and fur-textured blocks
Now, I’ll get my burlap and fur-textured blocks made. The first thing I’ll do for these is cut a 5½" x 6½" rectangle of the FABRIC CREATIONS Faux Fur Fabric - Zebra - 45 x 76cm (18'' x 30'') fabric and a 4" x 5" rectangle of the FABRIC CREATIONS Burlap Fabric - Oyster - 45 x 61cm (18'' x 24'')
Baste the faux fur along all four sides to one of the
Pull two threads out from each edge of the burlap rectangle to make a fringed edging, then center it on top of one of the 5½" x 6½" quilt sandwiches. Keep these layers together using some UNIQUE QUILTING Clever Clips Large12pcs.
A wide zigzag stitch perfectly secures the burlap to the quilt sandwich and prevents the edges from fraying.
Three of my textured blocks for the fidget quilt are now done. It was fun trying out the UNIQUE QUILTING StitchN-Steam - 157 x 45cm (62'' x 18'') on the FABRIC CREATIONS Fabric Bundle (5pcs) - Metallic Gold - 45 x 53cm (18in x 21in). I love watching it shrink the fabric to make such a cool texture.
Baste the faux fur on all four sides to one of the 5½" x 6½" quit sandwiches.
Photos by Christine Baker
Clip the fabric and Stitch-N-Steam together with UNIQUE Clever Clips.
Stitch horizontal and vertical lines through the fabric and Stitch-N-Steam.
Trim to 5½" x 6½" and then clip to one of the 5½" x 6½" quilted sandwiches.
Cut a 5½" x 6½" rectangle of the faux fur fabric and a 4" x 5" rectangle of the burlap fabric.
5½" x 6½" quilt sandwiches.
Center the burlap rectangle on one of the 5½" x 6½" quilt sandwiches and clip it in place.
Use a zigzag stitch to secure the burlap to the fabric and prevent the edges from fraying.
5 easy steps to make chenille fabric
I’ll make another textured block using the OLFA CHN-1 - Chenille / Textile Cutter to make fuzzy chenille fabric.
Step 1 Cut the layers of fabric
The OLFA Chenille Cutter can cut from 4 to 8 layers of fabric, so I’ll cut 3 - 8" x 10" rectangles from the FABRIC CREATIONS Fabric Bundle (5pcs) - Metallic Gold - 45 x 53cm (18in x 21in) and 1 from a black fabric that I have on hand. The base layer will remain uncut and should be larger than the top layers, so I’ll cut another piece of black fabric 10" x 12". Layer all pieces, right sides up, with the largest piece of fabric on the bottom.
Step 2 Draw diagonal lines on the top fabric.
To ensure that the channels are straight and equally spaced, I’ll draw diagonal lines ½" apart across the top fabric using a UNIQUE SEWING 2-in-1 Dual-Tip Washout/Air Erasable Marking Pen–Fine and my OMNIGRID Ruler - 12½" x 12½'' (31.75 x 31.75cm). For the chenille cutter to work, the channel it cuts through must be on the bias grain of the fabric.
Step 3 Stitch along the lines.
I’ll clip everything together using some UNIQUE QUILTING Clever Clips Large12pcs. The instructions that come with
the OLFA CHN-1 - Chenille / Textile Cutter say to use a longer stitch length, so I’ll set my sewing machine to 2.5 instead of the usual 2 and stitch all the lines.
Step 4 Cut through the channels.
Now I’ll cut through each channel using the OLFA CHN-1 - Chenille / Textile Cutter. I’ll take extra care not to cut the bottom (base) layer.
Step 5 Fluff.
Next, I’ll wash the fabric in soapy water and throw it in the dryer with some towels to fluff it up. Here’s the finished product.
Trim the piece of chenille to 4½" x 6½", then clip it to one of the 4½" x 6½" quilted sandwiches. Baste all the way around to keep the layers together.
The OLFA CHN-1 - Chenille / Textile Cutter is so easy to use! I like that you can use it to make 4 different sizes of chenille channels. All the different texture blocks are made, I’ll start making some of the activity blocks for my quilt. I’ll use buckles, zippers, buttons, and more.
The OLFA Chenille Cutter
Layer the 4 smaller pieces of fabric on top of the largest piece with all right sides up.
Draw diagonal lines ½" apart across the top fabric.
Clip the layers together and then sew along each line.
The finished chenille fabric
Use hook and loop tape to make peek-a-boo windows in a fidget quilt
All the textured blocks for my quilt are complete, so on to the activity blocks. I’ll use UNIQUE SEWING Self-Gripping Fastener Strip - 25cm (10'') - White, UNIQUE
Webbing 25mm x 10m (1'' x 11yd) - White, an ELAN Trench Buckle - 45mm (1¾') - Brown, ribbon and twine from the UNIQUE CREATIV Trim Pack - Black & White and beads to make three different blocks.
Peek-a-boo windows block
To begin, I’ll cut three 5½" x 6½" rectangles from the FABRIC CREATIONS Fabric Bundle (5pcs) - Metallic Gold - 45 x 53cm (18in x 21in). I’ll clip a folded scrap of ribbon to one short end of each rectangle then fold them in half, right sides together, and clip again with UNIQUE QUILTING Clever Clips Large12pcs
Now, I’ll stitch along the raw edges, leaving a small area open for turning. Once the flaps are turned right side out, I’ll push out the corner points using a CLOVER 7807 - Hold it Precision Stiletto
Having a UNIQUE SEWING Sewing Tools Holder right by my sewing machine or on my UNIQUE QUILTING Wool Pressing Mat - 18'' x 24'' - Grey is excellent so that I know where all of my sewing tools are.
I’ll press all the flaps with my OLISO M2Pro Mini Project Iron with Solemate and topstitch on all four sides.
Next, I’ll cut the UNIQUE SEWING SelfGripping Fastener Strip - 25cm (10'') - White into three short sections, remove the backing, and attach one side to the quilt under the edge of each flap. Each strip must be held in place for about a minute and left to cure for 24 hours before use.
Now I’ll arrange the flaps on top of the 6½" x 9½" quilt sandwich and use some UNIQUE QUILTING Clever Clips Large - 12pcs to hold them in place. I’ll secure them to the quilt sandwich by topstitching along the side across from the ribbon.
To complete this block, I’ll pull the flaps out of the way and attach the other side of each piece of UNIQUE SEWING SelfGripping Fastener Strip - 25cm (10'')White to the correct position on the quilt sandwich.
Clip a folded ribbon to each fabric rectangle, fold it in half, and clip again.
Push the points of the corners out with a Precision Stiletto
Press each flap.
Arrange the flaps on the quilt sandwich and clip them into place.
Press one side of the hook and loop tape to the back of each flap.
Position and secure the matching hook and loop tape pieces to the quilt sandwich.
Buckle slider block
I’ll make the buckle slider block using an ELAN Trench Buckle - 45mm (1¾'')Brown, a piece of UNIQUE Webbing 25mm x 10m (1'' x 11yd) - White, and one of the ribbons from the UNIQUE CREATIV Trim PackBlack & White.
I’ll topstitch a 10” piece of ribbon to a 10” piece of webbing and then thread it through the buckle. UNIQUE QUILTING Clever Clips Small - 12 pcs will hold the two ends of the webbing in place on either end of the 3½" x 9½" quilt sandwich so I can baste them in place, on the short sides with my sewing machine.
Bead slider block
For my last block, I’ll use some beads on hand, along with pieces of white twine from the UNIQUE CREATIV Trim Pack - Black & White. These will be sewn to one of the 4½" x 6½" quilt sandwiches.
After sliding beads onto three pieces of white twine, I’ll clip them to the quilt sandwich and use my sewing machine to baste the ends of the twine to the short sides of the fabric.
These three activity blocks came together quickly and will be fun additions to my fidget quilt. Once again, those UNIQUE QUILTING Clever Clips Small - 12 pcs really came in handy when assembling the parts. Isn’t it great to have quilting tools that you can use repeatedly?
A buckle, ribbon, and white webbing will be used to make a slider for the fidget quilt.
Slide the buckle onto the webbing and then secure to the quilt sandwich with clips.
Beads and twine will be used to make a bead slider block for the fidget quilt.
Slide beads onto three pieces of twine and then clip them to the quilt sandwich.
5 simple sewing notions make fun blocks for a fidget quilt
Now I’ll use 5 more sewing notions to make the remaining activity blocks.
Magnetic snaps block
To make the first block, I’ll use 2 packs of UNIQUE SEWING Invisible Magnetic Snaps Sew-On - 12mm (½'') - 2 sets, and some wool felt along with ribbon from the UNIQUE CREATIV Trim Pack - Black & White
The first step is to insert 3 magnet halves into one of the 5½" x 6½" quilt sandwiches, between the quilting lines and underneath the top fabric, and stitch around them to keep them in place.
Next, I’ll cut 2 - 2" squares from 3 different colors of wool felt and stitch them together, leaving 1 side open to slip a magnet half inside.
I’ll trim all 4 edges of the wool felt squares with my SOFTKUT Pinking Shears (Scissors) - 8½'' (21.6cm), slide in a 6" piece of ribbon, and sew the remaining side closed.
To complete the block, I’ll stick the felt magnets to the magnets in the quilt sandwich and arrange the ends of the ribbon so they line up with the edge of the quilt sandwich. I’ll use my UNIQUE QUILTING Clever Clips Small - 12 pcs to secure them in place and my sewing machine to baste the end of each ribbon to the edge of the 5½" x 6½" quilt sandwich.
Zipper block
For the next block, I’ll topstitch the COSTUMAKERS General Purpose Closed End Zipper 20cm (8'') - White - 1700 and 2 lengths of red gingham ribbon from the UNIQUE CREATIV Trim Pack - Red & Green to 1 of the 3½" x 9½" quilt sandwiches.
2
Next, I’ll sew a length of the green heart ribbon on top of the zipper ends and trim the ends of the ribbon with my OLFA RTY-2/DX–Deluxe Ergonomic Handle Rotary Cutter 45mm.
Slide 3 magnet halves inside the quilting lines and between the layers of the quilt sandwich.
Sew 2 squares of wool felt together to make a pocket and then insert one half of a magnetic snap.
Slip a ribbon inside the pouch and stitch it closed.
Clip the ends of the ribbons to the edge of the quilt sandwich and baste in place.
Topstitch
pieces of ribbon and a zipper to the quilt sandwich.
Sew a ribbon across the ends of the zipper and then trim the ends even with the quilt sandwich.
Parachute buckle block
For the parachute buckle block, I’ll topstitch some red gingham ribbon onto 2 – 11” lengths of UNIQUE Webbing 25mm x 10m (1'' x 11yd) - White. The UNIQUE QUILTING Clever Clips Small - 12 pcs easily keep the ribbon and webbing together while I stitch. I’ll fold the 2 lengths of webbing in half and thread them through the 2 sides of the UNIQUE SEWING Double Adjust Parachute Buckle - Plastic - 25mm (1'') - White then take the raw ends of the webbing and clip them in place along the 2 short ends of a 4½" x 6½" quilt sandwich. The last step is to baste the ends in place with my sewing machine.
Buttons and elastic block
For my last activity block, I’ll use large buttons from the CRAFTING ESSENTIALS Bottle of Buttons - Pink Tones - 75g (2.6oz) and 4 - 4" pieces of UNIQUE Braided Elastic 3mm x 3.7mWhite. I’ll attach them to the last quilt sandwich that is 5½" x 6½".
This block is super simple to make. First, I’ll fold the pieces of elastic in half and baste the ends to the edges of the quilt sandwich. Then, I’ll sew on the buttons so each fits inside 1 of the elastic loops.
Wow! That’s all the activity blocks finished. It was fun experimenting to see how notions such as UNIQUE SEWING Invisible Magnetic Snaps - Sew-On - 12mm (½'') - 2 sets, UNIQUE Braided Elastic 3mm x 3.7m - White, UNIQUE SEWING Double Adjust Parachute Buckle - Plastic - 25mm (1'') - White, UNIQUE Webbing 25mm x 10m (1'' x 11yd) - White and COSTUMAKERS General Purpose Closed End Zipper 20cm (8'') - White - 1700 can be used to make different aspects of the quilt.
I can’t wait to see what this fidget quilt will look like when it is all sewn together.
Center and clip 1 length of red gingham ribbon to each piece of webbing.
Thread the webbing through the sides of the parachute buckle and then secure the ends to the sides of the quilt block.
Use buttons and narrow elastic to make the last activity block. Sew on the folded elastic pieces and then the buttons.
6 easy steps to assemble a quilt using the quilt-as-you-go method
I quilted all the blocks before adding the textures and notions, so now I’ll use an easy quilt-as-you-go method to assemble the quilt.
Step 1 Sew two blocks together.
The first thing I’ll do to assemble my quilt is to sew a 4½" x 6½" block to a 5½" x 6½" block with the back sides together. I’ll use some UNIQUE QUILTING Clever Clips Small - 12 pcs to secure the two blocks and sew along this edge using a ¼" seam.
Step 2 Trim and press.
Next, I’ll trim the seam allowance to just 1/8" and use a CLOVER 7812 Roll & Press to open and flatten the seam between the two blocks.
Step 3 Make sashing.
I need to make sashing strips to cover the seams that are showing on the front of the quilt. To do this, I’ll first cut 5 - 1½" x WOF (width of fabric) strips from my sashing/binding fabric. I’ll place the first strip right side down on my UNIQUE QUILTING Wool Pressing Mat - 18'' x 24'' - Grey, fold the two long edges into the middle, and press with my OLISO M2Pro Mini Project Iron with Solemate. I’ll use my CLOVER 240 - Fork Pins - .56mm to secure the end to the wool pressing mat and then work my way to the other end, pressing the sides into the middle all along the strip. If you have a CLOVER 464/18 - Bias Tape Maker - 18mm(¾''), you could use it to make this process much quicker.
The 11 blocks that will make up the fidget quilt
Use clips to hold the blocks for stitching with the back sides together.
Use a Roll & Press to open and flatten the seam between the two blocks.
Fold the two edges of the strip into the middle on the back and press.
Step 4 Trim and spray the sashing strips.
Now I’ll cut 4 sashing strips that are 6½" long and spray the back of them with Odif 505 Temporary Quilt Basting Adhesive Fabric Spray - 156g. I use an old boot box to put the strips in for spraying. This helps to prevent the adhesive spray from getting on other items in my sewing room.
Step 5 Sew sashing strips over the seams.
I’ll place the sashing strips over the seam allowances so all the raw edges are covered and press down on them so they are securely stuck in place. Next, I’ll use a matching thread to topstitch along each side of the sashing.
I’ll repeat these steps to cover all the shortest seams and sew these sections to the larger blocks.
I’ll follow the steps above to trim, flatten, and cover the seams and repeat the process until all the blocks have been assembled into the quilt top.
Step 6 Add borders (optional).
At this point, I could just put binding around the edge, and the quilt would be done, but I’d like it to have borders so it’s a bit larger. Since the rest of the quilt is already quilted, I’ll make a quilt sandwich using my border fabric and more of the FAIRFIELD Low-Loft® Quilt Batting - Crib - 114 x 152cm (45'' x 60'') and quilt it on my sewing machine. To have enough for all 4 borders, I’ll make my quilt sandwich at least 12" x 25".
Next, I’ll cut the quilted border fabric into strips that are 2½" wide and trim 2 of these to be the same length as the sides of the quilt.
Match the assembled blocks to the larger ones to which they will be sewn. Sew the side borders onto the quilt.
Trim the sashing strips and spray the back of each with adhesive spray.
Topstitch along each side of the sashing with matching thread.
Once again, I’ll sew the border strips to the quilt with the backings facing each other, then trim, flatten, and cover the seam on the front with sashing strips.
I’ll repeat this process to add the top and bottom borders to the quilt then sew on the binding.
This project was so much fun, and the backing turned out well too. If you’re using this quilt-as-you-go method for a more traditional kind of quilt, you could use the same fabric for the backings of all the quilt sandwiches and borders, but I think the different backings on this project make it look really neat!
The complete fidget quilt (front)
Thanks for following along as I made this quilt-as-you-go fidget quilt. Some of the notions I used in this article such as the UNIQUE QUILTING Clever Clips Small - 12 pcs, my UNIQUE QUILTING Wool Pressing Mat - 18'' x 24'' - Grey, Odif 505 Temporary Quilt Basting Adhesive Fabric Spray - 156g and my OLISO M2Pro Mini Project Iron with Solemate, are ones I use for almost every project I make. The CLOVER 7812 Roll & Press and the CLOVER 240 - Fork Pins - .56mm, also helped to make this project successful. I hope you’re inspired to create your own fidget quilt and that perhaps you’ll think about donating one or more to your local branch of the Alzheimer Society of Canada
Christine
Baker
www.uppercanadaquiltworks.com
The back of the completed fidget quilt
BUSINESS DIRECTORY
Bytowne Threads - Ottawa, ON
1.888.831.4095 bytownethreads.com
mlj@bytownethreads.com
To list your business please email john@quiltsocial.com
Kelly's Creative Sewing
804 Main St, Dartmouth, NS B2W 3V1 902.435.7380 k ellyscreativesewing.ca
Featuring Aurifil thread from Italy. Long staple Egyptian cotton threads - 270 colours in 12, 28, 40 and 50 wt; 88 colours in 80 wt. Polyester Aurilux - 240 high sheen colours. Wool threads - 192 colours. Many kits available. Check our website!
Canadian National Fabric - Brampton, ON https://canadiannationalfabric.com/
info@canadiannationalfabric.com
We are an online fabric shoppe offering a wide variety of fabrics, patterns, books and notions for all your sewing needs. Flat rate Canada wide shipping of $15. All orders over $55.00 before taxes and shipping will get a free mystery fat quarter. Shop in person available by appointment!
El Cajon Sew & Vac
1077 Broadway, El Cajon, CA 92021
619.442.2585, sewezr.com
Gitta's
271 Lakeshore Rd E, Mississauga, ON L5G 1G8
905.274.7198 g ittas.com
questions@gittas.com
Nestled in the east village of Port Credit, Gitta's is the place where stitchers meet with their stitching friends, shop for stitching supplies and see the new stitching designs from Europe and the United States. Haus of Stitches
626 Main Street, Humboldt, SK S0K 2A0
306.682.0772 or toll-free 1.800.344.6024
hausofstitches.ca
Our one of a kind store offers everything you need for sewing, quilting, knitting, rug hooking and needlework. Authorized dealers for Janome and Elna.
kellyscreativesewing@gmail.com
We offer sales and on-site service of high-end domestic embroidery, sewing machines and sergers, as well as a variety of educational programs.
Ottawa Sewing Centre
1390 Clyde Ave, #107, Ottawa, ON K2G 3H9 613.695.1386 o ttawasewing.com
ottawasewing@gmail.com
Authorized Dealers for Brother, BabyLock, Elna, Q'nique & Grace quilting frames. Specialize in sales, parts & servicing for all makes & models of quilting/ embroidery/sewing/serger/overlock machines & cabinets by Sylvia Design.
Sew Inspired
375 Daniel St S, Arnprior, ON K7S 3K6 613.623.0500 sewinspired.ca info@sewinspired.ca
Your Ottawa Valley PFAFF® Authorized Dealer. We have a large supply of quilting & sewing supplies, knitting supplies, as well as in stock PFAFF® sewing machines. We also have a listing of sewing and quilting classes.
Sew Productive
47 Mill St E, Acton, ON 519.853.0007 sewproductive.ca melinda@sewproductive.ca Classes, clubs, fabric, thread, notions, crafting. Certified sales, service, and repair for Husqvarna VIKING®, PFAFF®, Singer®, and HandiQuilter®.
The Quilt Store / Evelyn's Sewing Centre 17817 Leslie St, Unit 40, Newmarket, ON L3Y
The Quilt Store West 695 Plains Rd E, Unit 6, Burlington, ON L7T 2E8 905.631.0894 or toll-free 1.877.367.7070
thequiltstore.ca
Now with 2 locations to serve you, we are your Quilt Store Destination! The staff here at The Quilt Store is always on hand to provide Quilt Wisdom, Quilt Inspiration and most of all we pride ourselves as the place to make... All Your Quilt Dreams Come True!
The Stitcher's Muse Needleart #101 - 890 Crace St, Nanaimo, BC V9R 2T3 250.591.6873 thestitchersmuse.com info@thestitchersmuse.com
A divine little shop with supplies for all your hand stitching needs! Friendly, knowledgeable, helpful staff. Cross stitch, canvaswork, needlepoint, embroidery, counted thread, lace making & more. Books, patterns, fabric, threads, tools.
The Yarn Guy 15 Gower St, Toronto, ON M4B 1E3 416.752.1828 or toll-free 1.800.836.6536
theyarnguy.com i nfo@sewknit.ca
See us on Facebook, follow us on Twitter! Knitting machines, sewing machines, repairs, parts for Passap, Studio, Singer, Silver Reed, Superba, White. Sewing notions and supplies, books, ball yarns, coned yarns, TAMM yarns, Paton's yarns, Bernat yarns, Phentex yarns, Bernat kits & crafts.
Upper Canada Quiltworks – Quiltworks Studio PO Box 64, Brockville, ON K6V 5T7