

Welcome to the zone with the new Precision 5000 Series mobile workstations, where creativity flows uninterrupted. Featuring immersive InfinityEdge display, up to Intel ® Core™ i9 processor and Dell Optimizer for Precision.
Learn more at Dell.com/Precision
As a special thank you to the AUGIWORLD community, you can find exclusive offers from Dell at Dell.com/AUGI



Our world is built on customization. We customize our homes, our vehicles and even our jobs. The purpose of customization is to create something that works better for us as individuals, families and teams.
When working with CAD and BIM software, customization makes it possible to create better workflows and to improve processes that are begging to be streamlined.
What is customization?
Customization is Subassemblies in Civil 3D, Families in Revit, Dynamo Scripts for Revit or Civil 3D, Tool Palettes, Ribbon Components, Templates/Prototypes, Blocks/Cells, Command Macros, Aliases, Shortcut Keys, in addition to all the programming code (C++, AutoLISP, .NET, VBA, Diesel, etc.) that is available to us as well.
Customization is creating content to standardize your organization, enabling the creation of drawings that are consistent no matter who creates them.
Customization is improving the CAD/BIM interface to make it more functional for the individual user or for an entire organization.
Customization helps you to follow national or international CAD and BIM standards.
Read on to find articles from our wonderful authors on Mapbooks in Map 3D, Custom Subassemblies in Civil 3D, Customization of Site Grading and more.
I hope you all are enjoying the beautiful fall colors, whether that is the beautiful array of colors in tropical locations or the oranges and reds that flag the colder weather that is returning.
Sincerely,
KaDe
www.augiworld. com
Todd Rogers - todd.rogers@augi.com
Isabella Andresen - isabella.andresen@augi.com
Tim Varnau - tim.varnau@augi.com
3ds Max - Brian Chapman
AutoCAD - Jim Fisher
AutoCAD Architecture - Melinda Heavrin
AutoCAD Civil 3D - Shawn Herring
AutoCAD MEP - William Campbell
BIM Construction - Kenny Eastman
Tech Manager - Mark Kiker
Inside Track - Shaun Bryant
Inventor
Revit Architecture - Jay Zallan
Revit MEP - Nathan Mulder
Revit Structure - Jason Lush
Kevin Merritt - salesmanager@augi.com
AUGI Executive Team
President KaDe King Vice-President
Frank Mayfield
Treasurer Todd Rogers Secretary Kim Fuhrman
AUGI Board of Directors
Eric DeLeon Kimberly Fuhrman

KaDe King Chris Lindner
Frank Mayfield Todd Rogers Scott WilcoxAUGIWORLD magazine is a benefit of specific AUGI membership plans. Direct magazine subscriptions are not available. Please visit www.augi.com/account/register to join or upgrade your membership to receive AUGIWORLD magazine in print. To manage your AUGI membership and address, please visit www.augi. com/account. For all other magazine inquires please contact augiworld@augi.com
AUGIWORLD is published by AUGI, Inc. AUGI makes no warranty for the use of its products and assumes no responsibility for any errors which may appear in this publication nor does it make a commitment to update the information contained herein.
AUGIWORLD is Copyright ©2022 AUGI. No information in this magazine may be reproduced without expressed written permission from AUGI.
All registered trademarks and trademarks included in this magazine are held by their respective companies. Every attempt was made to include all trademarks and registered trademarks where indicated by their companies.
AUGIWORLD (San Francisco, Calif.)
ISSN 2163-7547



AUGIWORLD
this issue. What better way to celebrate than to bring back Lynn Allen for another interview, exactly 20 years from the 2002 interview she did with AUGIWORLD magazine! Lynn sat down with our very own Frank Mayfield for an up close and personal interview. Read on to find out what Lynn has been up to and what the future holds for her.
Hi everyone, Frank Mayfield here from your AUGI board of directors, with a very special guest for a very special interview today.
AW: I’m happy to say that our guest is the one and only Lynn Allen. Lynn, welcome and thanks for joining me.
ALLEN: Thank you. Thanks for inviting me.
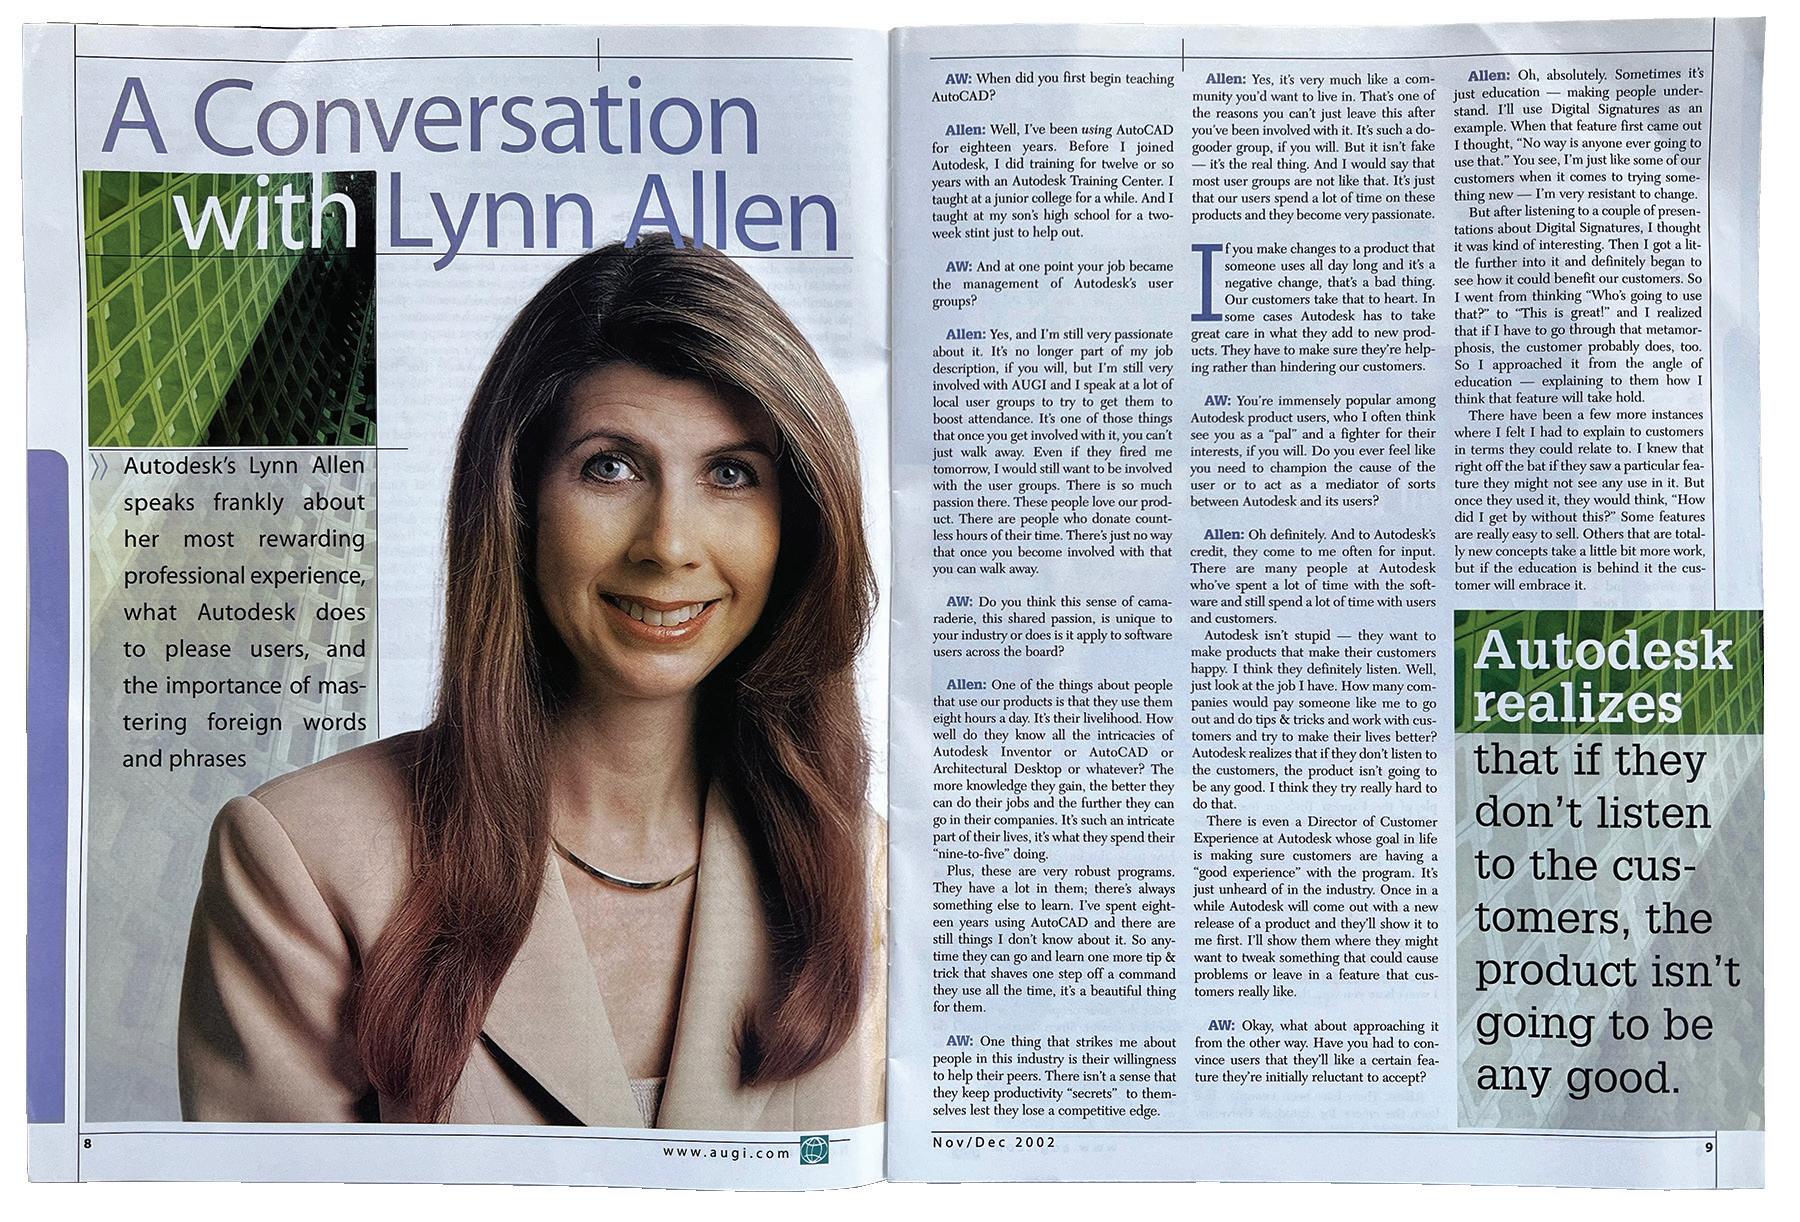
AW: You’re so welcome. So, what makes this interview so special? Well, obviously just having Lynn here would do that, but there’s another reason. You see, we’re celebrating the 20th anniversary of our monthly magazine AUGIWORLD, which first hit the press way back in September of 2002. That very first issue featured our then President, Yoshi Honda, and then Lynn, to grace the cover of our issue, as she was the subject of a terrific interview.

So, your AUGI Board of Directors thought we would celebrate this big date in AUGI history by inviting Lynn back and reprising that very first interview for the October 2022 issue that’s going to be published exactly 20 years later.

So, Lynn, do you remember doing that first interview? And if so, do you remember who did it?
ALLEN: Good question. So, that was a long time ago. That was 20 years ago. I do remember doing the interview, but I can’t for the life of me remember who interviewed me. Do you know Frank?
AW: No, I don’t. The issue from 2002 only says AW and nowhere in it does it say who actually did it.
ALLEN: Maybe someone will read this interview and come up with the answer, because now I’m dying to know. I’m curious. I did go back and read it, but I can’t remember who did it. But I do know that back then, I was very flattered to be invited to participate in that. And I was so excited when I saw I was on the cover! Cover girl of AUGIWORLD! And I’m excited and flattered as well today to be invited to participate 20 years later.
AW: You know, back to the “who did it?” We still have people in the organization that were there and still active now, and I ask what I would call our resident historian, and he can’t remember either. It must have been one of two or three people. I was like, well, I don’t know. If Lynn says one of those words, that’ll be great.
ALLEN: It could have been John Clauson.
AW: So, moving on. I know most of our readers and viewers have known you over the years as being the face of AutoCAD, but your life and your career took a bit of a left turn a few years ago and now you’re no longer with Autodesk. So, will you tell our members what you’ve been up to since you left Autodesk?
ALLEN: Sure. I took a big left turn. There’s a lot of people who used to joke and say I would be the one who turned out the lights at Autodesk, but you’ll never know where life is going to take you, right? So, I’m very excited to say that now I work for this fabulous company called Dassault Systémes. I’ve never been happier. It’s really been great. And I’m still a global technology evangelist. I’m still helping our users and customers embrace the latest technology and embrace change in helping them be more successful and get their jobs done faster. And you know, tips and tricks, and all the stuff that I used to do at Autodesk, just a different company. Dassault Systémes is a huge company. It’s like twice the size of Autodesk. I report into one particular
division that’s primarily focused on SOLIDWORKS. So, the division I report into is called 3D Experience Works. But most people know the product called SOLIDWORKS, which falls underneath that umbrella, which is a super popular product and a super exciting product. So, that’s what I’m doing now. Kind of the same role, but a different company. AW: You sound excited about it. What’s the best part about your new employer, Dassault Systémes?
ALLEN: There’s a lot of good things about my new employer. One of the things that I probably like the most is that they are all about their customers and their users. They are super enthusiastic. Their SOLIDWORKS user group reminds me of AUGI, and it reminds me of the early days of the AutoCAD user groups that are super, super passionate, and our organization supports them to the ninth degree. Just like the old days, you know, and just last week I was at the live event here in Portland that was supported by SOLIDWORKS, and the Execs and the CEO go to the user groups all the time. Or they invite them out to headquarters all the time. This sounds like I’m just making this up, but they know that if the customers aren’t happy, and if they don’t like the software, that they’re not going to buy it. They really put so much focus on keeping the customers happy and making sure that the software does what it is supposed to do to make them happy. They used to take the wish list, you know AUGI has this great wish list that they do, and they would take it on the main stage at their equivalent of Autodesk University and read down that list. Then, they would have the developers talk about it and, “Has it been deployed? Can we put it in the product?” They’re like all about the customers, and that makes me super, super happy.
AW: A lot of our members may not be familiar with Dassault Systémes. You have mentioned a couple of their product names already. Can you share with us some of the other design software titles that come to Dassault Systémes?
ALLEN: Sure, absolutely. The one that got them up and started, which put them on the map, was one called Catia, which is a 3D solid modeling solution which is really high end, and it’s used by like the big aerospace companies and big car companies, like Boeing for example. It’s like the Rolls Royce of CAD, where they can design their airplanes and simulate them. Then Dassault Systémes will customize it specifically for them to help them make sure they
can get their jobs done. It’s very high end. And then SOLIDWORKS is for the smaller companies. It isn’t as expensive and it’s the most popular 3D solid modeling product out there, and we have a lot of happy users out there that use the product. And then there are simulation products, and we have PLM products, and we also have a 2D CAD product called DraftSight.
AW: One word that popped out at me, and that’s DraftSight. DraftSight is working alongside AUGI in some ways. I know they’ve done some advertising and some articles. It seems to be turning into a really nice relationship for both of us. And since you brought that up, can you tell us a bit more about DraftSight, and how it does fit into today’s CAD world?
ALLEN: Absolutely. So, I think some people think that when I made the move over to Dassault Systémes, it was because I was going to be doing stuff with DraftSight. But that’s not the case at all. I actually didn’t even pick up DraftSight until I had been there, for I don’t know, over 6 months, and
then the product manager said, “Hey, Lynn would you check this out and tell me what you think?” and I had heard of it when I was at Autodesk, because there were some DraftSight users that would come up to me when I was talking about AutoCAD and there were a couple of commands actually in DraftsSight that I had wished that we had an AutoCAD that I had to write some Lisp routines to Jerry rig it up a little bit. So, I started kind of fooling around and playing with DraftSight, and I was like, man, this is really an awesome 2D CAD product. I think when I was looking, you live in the AutoCAD world, you don’t realize that there’s other CAD products out there. How could there be? Because AutoCAD is so amazing, right? That’s the world that I lived in. But Draftsight is very similar to AutoCAD. In fact, you can type in just about any other CAD command and DraftSight will recognize it. It maps it for you, and it has a very similar user interface; object snaps, and the little layer commands that I like. As a matter of fact, I like their layer dialogue box better in DraftSight. All the function keys are the same, and just a very similar, very intuitive interface. And one of the great things about DraftSight is
it is a fraction of the cost of AutoCAD, and it still supports network licenses. That’s been something that’s been very frustrating to a lot of AutoCAD users, is that they might have fifty people that need to access the software very casually just every once in a while, and now there’s no network licenses then I have to buy fifty licenses, because they only want to buy a network license for ten, so that’s only ten people in a given time that can use it. In fact, with DraftSight, you can buy a perpetual license, which in case you don’t know, what that means is, you can just buy it. DraftSight was really an eye opener for me. So, I started doing demos and webinars on it, and it’s been really fun. We’ve had a lot of companies that have switched over. Lots and lots and lots of companies have made the move over to DraftSight.
AW: It sounds like you’re kind of the face of DraftSight now as well?
ALLEN: Yeah, I mean, I didn’t plan to be the face of AutoCAD. It wasn’t like my goal in life. I just started doing videos and writing a lot of those articles and books and stuff, and I just wanted to share tips and tricks and help people embrace the products. It just fell on me. It just happened. I think the same is true with DraftSight. That wasn’t my goal, but you know I was asked to do one webinar and then I was asked to do another one and so I just kind of fell into that as well. But I’m enthusiastic about it. So, I don’t mind really. It’s really fun.
AW: You know, we’re working in conjunction with them here at AUGI.
ALLEN: We appreciate that. I mean, that’s one of the first things I thought of too was, I love AUGI, and how exciting it would be to reach out to you guys, and say, “Hey, you guys, should check this out.”
AW: Back to the to the face of AutoCAD, one more time, you were the face of AutoCAD, but you’re also, in our opinion, the face of Autodesk University. You often served as the emcee and you’re certainly always a part of the experience of going there. So, you teased it a little bit earlier, tell us about Dassault Systémes similar experience of an AU. What do you call it?
ALLEN: Yeah, we have an equivalent. It is called 3D Experience World. And we have SOLIDWORKS like I mentioned before, we have DELMIA. We have a
AUGIWorld Magazine cover Sep. - Oct. 2002
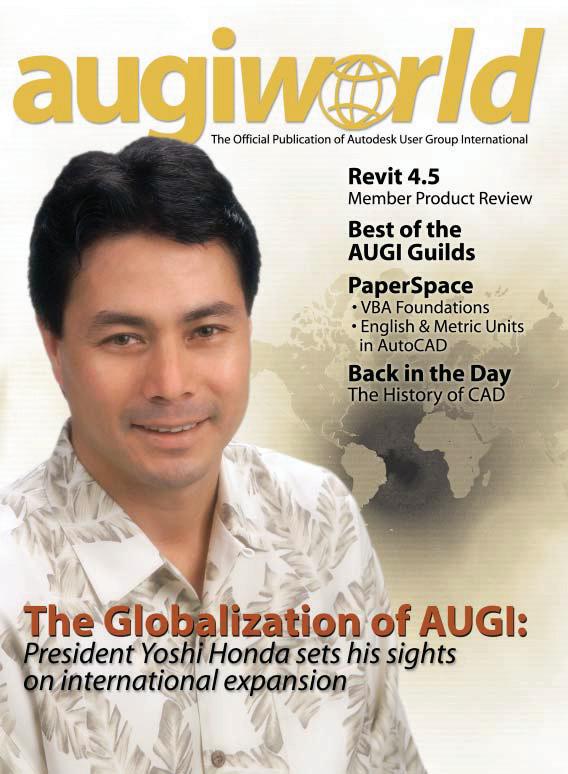
variety. We have SIMULIA, and DraftSight. We have a variety. It is a very exciting user event. It moves around. This coming next year, it is going to be in Nashville. It’s usually in February, and it is super exciting with fun events. We have lots of classes. We have general sessions, and it is lots and lots of fun. Now I’m not the host, or emcee of this event like I was at Autodesk University. They have a paid professional who serves as the emcee named Tracy, and they all love her. She’s been doing it for a long time, and you know, if it ain’t broke, don’t fix it. She’s really, really good, and lots and lots of fun. I do a few things. I emcee a couple of things during the event. But I am more than happy to sit back and watch her do her thing. She gets people really excited and rubbed up, and so it’s good.
AW: Do you have a single favorite AU memory that you can share with us?
ALLEN: Oh, so many, so many! I think on my way out, it was the last year that I was hosting, or emceeing. I was escorted up on the stage by Storm Troopers while they played the Star Wars music,
which I think they paid an arm and a leg for to get the approval, and that was pretty exciting. I have to admit that it was fun. Then, I would say my personal favorite, selfishly, I’m a big John Cleese fan and I love Monty Python. I love Mont Python and the Holy Grail. It is one of my favorite movies, and we were able to get him to be part of our party that one year. I got to share the stage with him! I have to do a whole thing on Spam, and talk about Monty Python and the Holy Grail, and do coconuts with him. You know it was just so much of a thrill for me to be able to share the stage with one of my idols!
AW: So back to thinking AUGI for a second. A lot of our members might not realize this, but for a few years, even prior to the 2002 interview, you were part of the leadership team here at AUGI. You served on the board as a Senior Autodesk Representative, a position we don’t have anymore. The point is, you’ve been one of us in some capacity for a long, long time. The question is whether it is any official or unofficial capacity, whatever the role, what are your best memories of working with AUGI for all these years?
ALLEN: Wow! Once again, so many. Because I did it for so long. So, I had an official role in the early days, like in the nineties. I’m really aging myself. I was the Global User Group Manager and AUGI fell into that. We had a fabulous team, which I always said I was living the dream, because we were all so excited to go to work every day. And just to work with user groups as your job, oh my gosh! That was living in a dream. We got to experience taking NAAUG the North American AutoCAD User Group to AUGI, the AutoCAD User Group International, to the Autodesk User Group International. There were a few changes and metamorphosis in there. There was the Board. That fabulous Board. The people who volunteered. Like you, Frank, volunteer your time, like you don’t have enough going on in your life already. Volunteered your time to advise, and we were always just the group of people to support the vision that the Board had. I would say for me, that the personal memories, even though it was about this great organization that was helping users be more successful in embracing these products and being more successful in their job, out of all of it, that it was like an extended family where you got to know these people. We travel with them. We did road shows with them, and I got to meet some of the most amazing people in the world who are still like some of my closest friends today. I mean, I consider you my friend Frank, and Donnia Tabor-Hanson, or Bob Bell is like one of my besties for sure, and I don’t want to start naming names, because then if I leave someone out I’m going to get in trouble. I think also, along with that, there’s a degree of sadness because we’ve lost some amazing souls that worked with us like Bill Adams, for example, who is just a joy to always have around. Just the happiest Australian ever. And we got to know his wife, Karen. Just a hard-working group of people that become more than just volunteers. They become family and it’s hard to explain.
AW: It’s not hard for me to understand because I am immersed in it now, myself, and you know I feel the same way. You know my fellow board members now, feel like family.
ALLEN: It’s more than just a job. Yeah, so I have a special place in my heart for all things AUGI, and all that it’s personally brought to me.
AW: Terrific perspective, and given that, what would you say is AUGI’s most important contribution to the CAD and BIM industry
throughout all those years?
ALLEN: These questions are good. Well, I think it’s like the same as it was in the early days when AutoCAD first came out. People didn’t know how to use it. There weren’t books in the early days. There wasn’t a lot of guidance, and so people would go to user groups to learn how to use their product, to network, and to get advice to learn best practices. New technology continues to come out and users and myself included, we rely on user groups to help us make it through these transformations and to get advice. Is this a good product? Is that a good product? Is this the right way we should be doing things? Is this just a waste of time? And we believe user groups are the truth, right?
You know, when I read an article in AUGIWORLD, I believe that they mean it. That’s the way of the world. And no one paid them to say it like. But for the most part, when somebody tells you something in the AUGI forums, or whatever, I believe that’s non-biased. And I think that that’s where AUGI really shines. I think that’s really crucial. I always like to say that they’ve helped people through so many hurdles, and I, as you know, I always like to say that when you post a question in the AUGI forums and it was especially helpful and useful in the earlier days, I need to get my jobs in, I can’t call my reseller at 9 o’clock at night, and have a question, and I got to get this job done. You could post something on the AUGI forums and in some place, somewhere in the world, there’d be somebody who knew that answer that would answer for you right then and there and save you when you needed it the most. And those types of things, those are priceless.
AW: Yeah, we like those stories. So, moving back to that first issue again, in that very first interview
back in 2002, you told us a great story about an embarrassing incident where you used a foreign phrase that didn’t quite translate the way you thought it did. I’m not going to spoiler alert our audience here. So, are there any other such unforgettable moments in the 20 years since that you could share with us?
ALLEN: Yeah, I was really well known for a story which has been known as the Lynn Allen cell phone story, which I’m not going to get into now because of time. Somebody once recorded me telling the story. It’s like this running joke wherever I went and would be, “Lynn tell the cell phone story.” So, if you just Google Lynn Allen’s cell phone YouTube it’ll pop up.
But I was thinking at AU, there were a couple of funny things that happened. I remember some people get really enthusiastic about wanting to talk to you. You probably felt that yourself if you taught a class. They want to come and ask you questions and there’s a lot going on, and sometimes my schedule was really packed, and I didn’t have time to talk to everybody. I had to go from A to B and B to C and C to D. I remember one time this guy was so enthusiastic he just had to ask me some question about something, and he followed me right into the lady’s room. I remember turning around and going, “Excuse me, you’re going to have to wait.” He was pretty embarrassed.
I remember one of my most embarrassing or totally taken off guard moments at Autodesk University as I mentioned, John Cleese earlier. Now you should know that John Cleese onstage is friendly, offstage is like crickets. He’s not rude, he just doesn’t give you the time of day. He’s not Mr. Friendly. We weren’t like sharing coffee and chatting offstage. So,
we were on stage in the beginning for a little bit. We were talking of setting the stage for Monty Python and the Holy Grail, and then he answered a few questions. Then we came back after the movie, and he was on fire after the movie. I don’t know if you know this, but Monty Python and the Holy Grail was not really popular when it first kicked off, and so he had never actually really seen it in a movie theater setting, let alone with 5,000 people. That was a very big high for him, all with coconuts. A lot of people knew the words by heart, so he could hear them. It was like the Rocky Horror Picture Show kind of time, you know? He could hear people in in in the green room yelling out the words. He was on a high from experiencing this. So, he comes on the stage, and we did answer a few more questions, and he was pretty entertaining, and we were drawing tickets to give away prizes, and I said he was like he was on fire. And then, all of a sudden, he grabs me, and he dips me, and he all kisses me on the stage like out of the clear blue. Definitely not scripted. I did not see that coming. And then he pulls me back up, then he goes on, and I’m just like, what’s happening right now.
AW: So, you know I’ve mentioned it a few times now, the 2002 issue where Lynn has the interview, it’s in our archives out on our website, www.augi. com. But it’s only viewable if you’re one of our professional level members. However, for this special event, we’re going to make it available to everyone. So, I want you to look for a link on our homepage. Follow one of our social media accounts where we’ll post it. And I think it’s going to be scheduled to be in our next hot news email blast as well.
Lynn, how have you seen user groups change in the last 20 years? And where do you see them headed in the future?

ALLEN: So many good questions, Frank. Well, user groups, they’ve definitely morphed, that’s for sure. I mean, you know, I feel like many people thought that user groups would go by the wayside with the Internet, with YouTube and with Google, cause now, you can find all this information online, who needs use groups anymore? But there’s still that networking aspect of it. And this wanting to be with other people who do what you do all day and wanting just to get together and discuss things. And so, I you know I feel like in some cases maybe they’ve wanted a little bit, the face-to-face ones, maybe, but in some cases I would say that they have not.
AW: What is the most impactful change in our industry, since that first interview in the last 20 years?
So, I was one of the early champions of the cloud, and I was one of the first people out there running around doing road shows and presentations on the cloud. And why should you care about it? and why it’s important, and how it’s going to help you have a better CAD life. You don’t really get and understand the advantages and I’m still preaching it, and I still don’t think people fully understand that the power of the cloud is in the mobility aspect. The ability to access your design data anytime, anywhere, any place.
The collaboration aspect of it is being able to talk to people anywhere in the world, and work with
anybody anywhere in the world to truly collaborate on your designs. And then the biggest deal with the cloud, honestly, is that infinite computing power where now you’re no longer limited to whatever hardware your boss decides that you’re worthy to have, but you can access those 90 million servers, which, when I first started talking, it was like 10 million servers. Now, it’s like 90 million servers out there, and to do supercomputing and simulation of any type. Whether it’s energy simulation or if it’s just simulating the integrity of a product, or rendering.
AW: So, you know AUGI’s gone through change. Also, everybody, anybody and everything in 20 years will have gone through change. You spoke about it earlier. We started out as little old NAAUG, right? There was just a handful of us being NAAUG. and then we turned into AUGI the acronym, and now we’re AUGI, not the acronym, we’re just AUGI, the word. And so, we continue to change, and changing in the background, and as we speak right now.
ALLEN: You’re changing, and you’re helping other people change, too. You’re helping the industry change. Embrace change. I mean I think that’s what you guys are the best at.
AW: We’re apparently also really good at gaining membership, because that’s something else that’s really changed in the last 20 years. Would you believe it if I told you now that we have over 602,000 members at AUGI?

ALLEN: Unbelievable!
AW: Yeah, it really is, and still growing. Do you care to guess what the membership was back when you did that first interview in 2002?
ALLEN: 2002? 80,000?

AW: Good guess. A little high. It was 34,000.
ALLEN: Wow! So just in case people wonder whether or not user groups continue to be successful, people better pay attention to you guys.
AW: So, you know, when we did that first interview with you, AutoCAD 2002 had been out since summer of the previous year, and of course it was considered state of the art at the time, and it had new features. It’s a big thing about new software, and some of them are still used today, and others have long since retired. But among the survivors that were important then was associative dimensions. I can’t imagine doing things without the dimensions being associated to the objects
anymore. Layer Translator was new. The CAD Manager’s best friend, E-transmit was introduced, and of course everyone’s favorite AutoCAD command, the block attribute manager was new. Which is better known to everyone as…

AW: Is there any aspect of our industry that you feel really hasn’t changed any at all in 20 years? We’ve talked about change, but what hasn’t it really changed?
AW: So, let me pivot here. Instead of looking at the past, be a little bit more forward-looking. Do you see any new technology that may be kind of game changer in the industry within the next 5 to 10 years? Or maybe it’s even a hyped technology that everybody’s talking about but it’s not quite here yet. Do you have your ear to the ground for that sort of thing?
ALLEN: Yeah. So, a lot of what I’ve done in the past was talk about the future of design, and I like to talk about a lot of technology. It’s hard to tell what’s going to grab a hold and what’s not. I think most of it will grab a hold eventually, just a matter of when. And you know I have talked a lot about generative design. I have talked a lot about artificial intelligence, machine learning, but I think just in general, our software just keeps getting smarter and smarter, getting more artificial intelligence. And when you talk about that, even generative design or machine learning, people get really nervous. Like, we’re going to start to lose our jobs, machines are going to get so smart. Our software is going to get too smart. We’re not going to be needed anymore, which is like the most ridiculous thing ever. There are certain things that we do every day, take CAD, or what we do every day in our CAD lives that are boring and tedious. And what if the software was smart enough to watch what you did every day and go, you know I could do that for you, Lynn, something even as simple as every time you dimension Lynn, I know you like to dimension like this. How about if I just do that for you? Do you think I would say, “Oh, no, I prefer to do all of my dimensions myself?”
ALLEN: What hasn’t changed is people still need to get their jobs done. A lot of people still have to turn in DWGs. Like we kind of laugh you know working at Autodesk, everybody was like AutoCAD’s going to be gone, this 2D CAD stuff is going to drop off the face of the earth. And yet, it’s still the number one CAD program in the world, at least 2D CAD DWG formats, still number one.
So, the world did not go completely to 3D. We can’t just turn in a 3D drawing of our building. That would be great, if we could, but we still have to turn in those flat 2D construction documents. And the same is true in the mechanical space as well. In many cases, not all cases, but someday maybe it won’t be like that. So, that part hasn’t changed.
AW: You know you’re all about the picks and clicks, right?
ALLEN: I love doing that. I would never say that. But you can see more and more software is getting smarter and smarter. Some software is just like Auto Routing. It follows what you did. It pays attention to what you’re doing, and we’ll do some auto routing for you. You know not saying that you shouldn’t go back and check it, you might want to do a little look see. Look at generative design, where you have a situation where I have to come up with this particular type of model, and these are the parameters, and I have some ideas in my mind. But let’s just throw it over the wall to the computer and see what it comes up with. Now it’s going to come up with back with like hundreds of designs.
That’s time consuming for you, by the way, to look through all those designs. But you may not even go with the final design that the computer comes up with, but you might come up with some great alternative ideas that you never thought about. And that’s what I really do like about it. That little out-of-the-box thinking we tend to be kind of close minded about what we think about blah blah blah. But what if it even just opened the door to some better design? These are the things I start to think about doing things other ways. A computer could maybe help us with it, but the computer isn’t going to pick which one of those designs you should use. And you know that’s still going to be your job, so no one’s going to take your job away. But computers are getting smarter, software is getting smarter, and I am totally all about that. So, I think that you’re going to see more and more of that.
AW: All right, moving on here. Good answer by the way. So, for those of us in the industry who are contemporaries to each other, we’ve all seen and done a lot throughout all these years. My question is, what would you say your biggest accomplishment is in your career? What’s your biggest accomplishment that you can look back on? Or maybe the most important?
ALLEN: I feel that when I first got involved; so, I’m going to pull out the female woman card here, because when I first started in the industry, I was like the only woman, really one of the only women, at least in the industry. I started teaching AutoCAD, and like every ten classes there’d be one woman. In my classes were all men, and they were shocked
when they walked in, and they saw a female teacher. I was really young too, so I had to totally prove myself. Thank God I knew what I was doing because I really had really prove myself. I had more than one guy walk in and asked me to go get him some coffee, because he was sure I was not the teacher. Yeah, you know I have no ego. I was fine. I went and got him coffee, and then he was very upset when he found out I was the teacher. I feel like I tried really hard to be a role model over the over the years for women and for girls. I’ve done a lot of STEM presentations and just holding my head high and I don’t feel like I was personally held back as a woman, and I just never let the thought cross my mind, and I’ve really been treated very well in this industry. I like to try to set that example that girls and women can do whatever they want to. I was definitely in a male lead industry. Now that’s changed a lot.
Now, there’s still more men than women. We used to joke a lot at Autodesk University, it’s like one of the only places where the line to the men’s room

10 lucky people are winners in the AUGI Instant Winner game… are you one of them? Compare your winning number (printed on the band wrapped around the Nov/Dec issue of AUGIWorld magazine) to the winning numbers posted in the AUGI booth (#363). If the numbers match, you win an AUGI logo MP3 player. Simple!
AUGIWorld magazine deliverstips & tricks andtechniques thatwill boost productivityyour with products.Autodesk

Sponsored by OFC Desk
World Leader in Office Interior Design Software
AUGIWorld is available exclusively to AUGImembers, so if you aren’t already amember, now is the time to join!Go to www.AUGI.com to sign up.
Play AUGI Lucky 7, an Exhibit Hall game, and enter for a chance to win incredible prizes! The game card and rules are in your AU bag – check it out, then play and win.
Sponsored by
Join AUGI - www.AUGI.com
Are you the “best”AutoCAD user at AU 2006?
Prove it! Register forthe AUGI Top DAUGChallenge at theAUGI Booth (#363)and vie for the title ofTop DAUG plus somefabulous prizes fromHP, sponsor ofAUGI Top DAUG.
AUGI ads from AU 2006
is way longer than the line to the female’s room. But you see more and more women are getting involved in engineering, getting involved in CAD. But I don’t feel like it held me back at all. I never even really honestly processed it.
AW: So that’s great. That was then, this is now. What continues to drive you now, Lynn?
ALLEN: What continues to drive me? I still think I can make a difference. And I hope I still make a difference. I’m an executive in this company and I feel like they listen to me. If something needs to change, I feel like I’m in a place where I can make that happen. I go out and I listen to the customers. I’m fortunate to work someplace where they do want to make changes. And they say Lynn, “You know it’s just a software product?” Oh, really? Is it just a software product? But it’s not just a software product. People that use our products use it like 8 hours or more a day. It is an important product. These products can take their lives. These products need to be good. They need to be efficient; they need to be friendly. We want our products to be something that our customers enjoy using, because they have to use them all the time. You know, it’s not like a product where you just go bounce in and out of. If it’s no bueno, it’s no bueno.
AW: I’ve been there having used numerous software design products over the years. No bueno shows itself in a hurry.
ALLEN: One bad feature could take someone down all day and they’re hitting their heads against the wall all day with you. You ruin someone’s day.
AW: Yes, I totally understand that. Looking a little bit even more forward in what drives you right now, this may come off sounding as a bit of an odd question, but we all face it at some time. So, I’m curious. Do you have an end-game for yourself, or are you more like me, and a lot of us, that you feel you always will have that need to keep your toes dipped into the CAD and BIM waters in some way?

ALLEN: Or in nice, warm, sunny beach water.
AW: Is that the Lynn aim at some point?
ALLEN: I mean, I love what I do. I think as long as it still sparks joy, I’m going to be involved. I would never turn my back on answering questions or helping anybody that I could. That’s for sure. You know I still answer questions when I need to, or Autodesk questions, or I point people in the right direction. Even though I don’t even work for the company anymore, for crying out loud.
AW: And why can’t you do that with a drink in your hand, on the beach?
ALLEN: Well, I would love to do it with the drink of my hand on the beach. But you know as long as I’m still adding value, you know I can’t emphasize enough how much I enjoy my job. I mean I really
enjoy my job right now. I work with unbelievable people that are so much fun. Once the fun stops… we’ll see. I don’t know if I’m going to be around for the next 20th edition of AUGIWORLD, doing another article.
AW: We are at the point of closing this out, and to do so, I thought it would be kind of fun to use the same final question that we posed to you back in 2002. So, the question then was, if you are limited to offering just one bit of advice to a brand-new CAD user or BIM user, what would that be?
ALLEN: So, I’m assuming they’re probably young. Let’s assume that they’re like the next generation. So, one of the things that I hear a lot from the next generation is, they’re dealing with like our generation. We got a lot of people that are entrenched in what they’ve been doing and happy with what they’ve been doing, and a lot of our generation doesn’t like change. Or they think they know it all, or we know it all, or we’re wiser beyond our years and so on, and so forth. Sometimes it’s a little frustrating because they get the next generation because they have all these great ideas, and all these things they want to change, and all these things they want to do. I just don’t understand why us baby boomers, or whatever, aren’t just willing to just go, okay, yeah, let’s do all those things. Instead, it’s not uncommon for them just to get shut down, and it’s very frustrating for them.
So, my advice would be, embrace the wisdom of your elders. Just say, oh, my gosh, you guys are so wise and that’s fabulous! And when you approach them with new technology, or new ideas, try to approach it in a way that would appeal to them like the benefits. If we bought this technology, or we embrace this technology, or if you let me try this, or whatever, this is going to save us this amount of time. This is going to save us this amount of money. This is going to mean you don’t have to do this boring thing you do all the time. Show ways it’s going to make other people’s lives better. Because that’s kind of what I do as an evangelist, right? When I show people new technology, I Basically try to put myself in their shoes and say, “I’m going to make your life better with this technology.” If I can’t do that, then I should not be selling that technology, and that’s what you need to do when you want to walk into a new job. You need to figure out how to phrase it in a way that they’re going to
want to embrace it while always acknowledging that they know best. Try not to get them to change too much at one time. Take it one step at a time. Try not to throw a whole bunch of software at them at one time, or a whole lot of changes at one time.
AW: Sounds like great advice to me. Whatever it is, and different than what you gave as an answer 20 years ago. Find that article. Read it for yourself. So, everybody, go out and find that that issue from 20 years ago.
Lynn, I want to say thank you. Thank you so much for lending us your valuable time. I know the readers and viewers will enjoy this interview hopefully for years to come.
Thank you so much.
ALLEN: Yeah, sure. Thank you for taking your time too, Frank. You are great, and you know what? In 20 years, I’m going to remember that YOU are the one who interviewed me.
Lynn Allen spent over 20 years with Autodesk promoting its annual releases of AutoCAD, producing hundreds of AutoCAD video tips, writing countless articles for Cadalyst Magazine and writing three AutoCAD books. There are not many people out there who know more about AutoCAD than Lynn does. As a Technology Evangelist, she is always staying on top of CAD trends and working to help people move forward and embrace change. Lynn’s speaking engagements, online presentations and videos have reached over five million individuals. Her passion and strength is connecting with users, sharing CAD insights and shining a light on new technology. Throughout her tenure at Autodesk and now Dassault Systèmes - she has proved instrumental in helping customers adopt and move from one technology/software to another.


Last time I laid out a plan to get you some help by asking for more staff. It started with defining what another staff person would be tasked with, keeping track of the hours you spend on those tasks, outlining what you could do if you have more time, track or charge your overtime, define delays that are happening, make a staffing pan, and then following up by making your case and ask for staff. If you do not get a “Yes,” then keep asking.
Let’s think positive and assume that all your asking has finally gotten approval and you can now start the hiring process. Now comes some protracted time spent seeking candidates, vetting applicants and hopefully making an offer, having it accepted and bringing on a new person.
The first place to start, is with your Human Resources department. Working closely with them only makes the process go smoother. Find out what they suggest and require you to do. They may have forms,
processes, guidelines and more. They need to be part of your effort. Depending on how your firm works, they can streamline or derail your efforts. You want them on your side. Get the low down on the process and work with them from start to finish. Don’t let them run the entire effort. You need to manage it. HR is not always as tech savvy as needed to frame the job, or to vet resumes and candidates. They may also be busy with other open positions. You need to lead the effort.
Develop a job description using your firm’s format. Make sure you get as specific as needed to define the normal tasks and areas of oversight. Include responsibilities and define authority levels as needed. HR may have some boilerplate verbiage that needs to be included, but you are the only one that can define what the person will be expected to do. Be as clear as you can without getting bogged down in overtechnical descriptions. That may sound funny for a technical position, but you don’t want to narrow down tasks and duties so far that it
constrains the candidates from applying. Include the technical expectations for the person and what they are expected to have skills in and expertise with. List out required certifications, education and length of employment in the field. Take a look at an example BIM Manager JD that I developed a while back (it is kind of old) at http://www.bimmanager.com/bimmanager-job-description/ .
This is another area you need to work alongside HR and maybe Finance with. They may have salary surveys that can help. Check out the AUGI Salary Survey as well. It is a valid and focused third party reflection of the salary levels needed for todays tech jobs. Recently with the economic climate we are in and the tight job market, you need to make sure your firm knows what it takes to bring in good candidates. Push toward the top of the salary limits. You can always offer less if the person does not meet all your desires, but you can’t offer more unless you go back to HR and Finance to get approval.
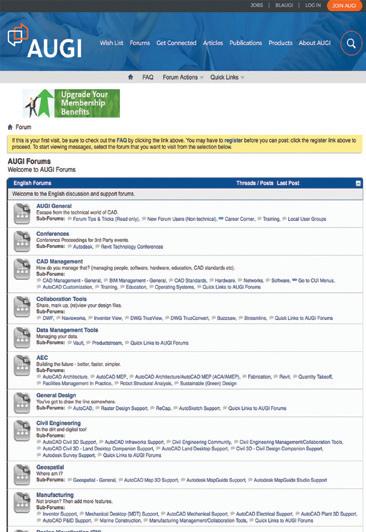
HR can help with this. They can get the job posted with online job boards. You may want to mention any of the tech job boards that they might not know about. Make sure you mention AUGI’s Career Center https://careers.augi.com/. When your post is first placed you may get a lot of response. Keep the posting fresh and consider adding a paid upgrade to get your posting featured and seen. Don’t rely on postings to get the candidates you may want. Spread the word yourself. Reach out to any groups you may know that might have job seekers. Talk it up at meetings and maybe tech social events if it is appropriate. The AUGI Career Center is also a good place to check out Job Description examples.
Now that the Job Description is done, and the job is posted, you finally have applicants and responses coming in. You need to stay on top of it and move fast. The job market today is very tough. Candidates are taking jobs quickly. I even hear that they are accepting offers and then accepting another job before the start date and leaving the first employer behind. I hope that will not happen to you.
I like to see all resumes. Sometimes HR will offer to weed out resumes that do not fit the requirements. While this is a valid offer and many can do a topnotch job, some non-technical staff can decline
some resumes that may hold promise. But if you require a degree to fill an opening, or have to have some key talents, then HR can help sift out those that are missing the mark.
When reviewing resumes, keep in mind something that I heard a long time ago and cannot remember who said it or wrote it. “If you think the person might not be a good fit, they aren’t. If you think the person is a good fit, they might be.” Emphasis on, “might.” In other words, finding the right person is tough sometimes. You need to have a good technical fit and cultural fit. The person needs to be able to get the job done and get along with their new co-workers.
What I do is move through resumes pretty fast. If something catches my eye as a possible good fit, I keep the resume. If they hit me as not a good fit, I move them to the “no thanks” pile. Sorry to sound so tough, but if you get a lot of resumes, you really do not have the time to analyze every one of them. After I have gone through the resumes once. I go back and look at the “keeper” pile and see if the ones that I thought were interesting, actually still are. If they are, then the applicant moves to candidate and I start the interview process.
Next time, I will look at interviewing. It is more of an art than a science. Is there a perfect filtering question? Do you work with a panel for interviews? Who makes the final call? There is a lot to think through… See you next month.
Mark Kiker has more than 30 years of hands-on experience with technology. He is fully versed in every area of management from deployment planning, installation, and configuration to training and strategic planning. As an internationally known speaker and writer, he is a returning speaker at Autodesk University since 1996. Mark is currently serving as Chief Technology Officer for SIATech, a non-profit public charter high school focused on dropout recovery. He maintains two web sites, www.caddmanager.com and www.bimmanager.com.





Maxscript remains one of the more powerful ways to apply customization to 3ds Max. Combining the built-in Listener and editor, we manipulate and test code at runtime, making it a powerful option for users to experiment and explore ways to improve their experience with the software. Through Maxscript, we can manipulate nearly every object inside the software, including but not limited to:

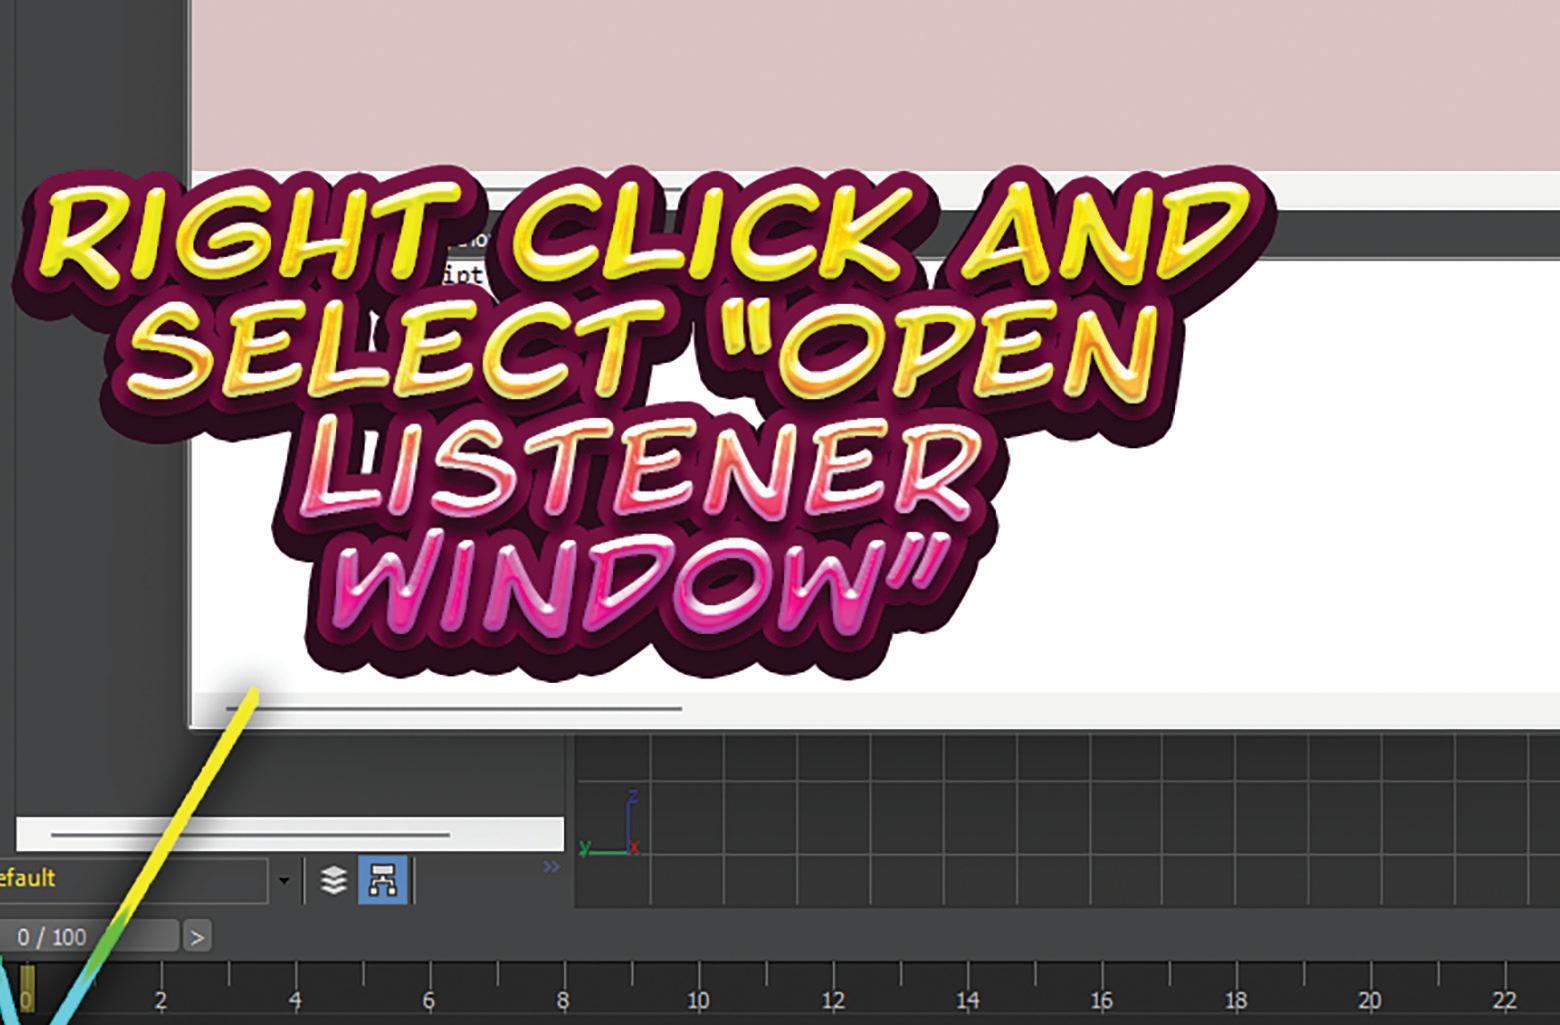
So, let’s dive into it. First, right-click over the pink box located on the lower left of your screen to open the Listener displayed in Figure 1.
In the Listener window, you’ll find a menu “MacroRecorder.” The recorder will echo the actions we take in 3ds Max in Maxscript. That is a great
tool to learn from or to copy and paste scripts to supplement our actions.


Like most coding languages, the most common values used when working with Maxscript are floats, integers, and strings. Floats are decimal numbers such as 3.4. Integers are whole numbers such as 1 and 2. Strings are representations of words or a collection of characters, legible or not, and can be alphanumeric, which means they can contain both letters and numbers. Similar to another coding, the value types are essential. For example, adding two floats will return a value representing another float. Adding two integers will return a value representing an integer. If we add a float to an integer, the decimal will ensure a float is returned. Strings are defined with quotation marks such as, “Hello.”
Variables are simple to assign in Maxscript. In the white box located on the Listener window, we can type the following: X = 7. That will assign the value of 7 to X. We can type Y = 8 on a second line. Following up, if we type X + Y, the Listener will identify the values accordingly and return the value of 15 demonstrated in Figure 2. Note that Maxscript isn’t case-sensitive, so either capital or lowercase X would represent the same value.

Maxscript provides us access to nodes and properties displayed in the Modifier panel in Figure 3.
For each of the nodes, there are subclasses. That includes the primary classes, such as geometry or space warps. For example, the Geometry node contains Box, Sphere, Cylinder, etc. So, let’s say we want to insert a Box using Maxscript. We define our variable “mybox” and then assign it the Maxscript value to insert a basic box: mybox = box (). As shown in Figure 4, a box is imported on-screen, maintaining the value “mybox.” That allows us to manipulate it as we want.
If we type the following: showclass “box. *” Maxscript will return the properties we can manipulate. Simply adding the property, we want to modify to
the end of our defined variable allows us to later it however we want. See Figure 5, where I increased the length of the box by inputting: mybox.Length = 1000.
Manipulating the transformations of the objects is relatively simple. For example, we can input the following: move mybox [15,15,15]. That will relocate the box from its current position to 15 units in the x, y, and z axes. To alter the box’s coordinates directly, we alter the position property like the following: mybox.position = [0,0,0]. 3ds Max (and most 3D software) uses Euler angles for rotation (rotation in all three axes). That means we need to define rotation for each axis. So, to rotate, we first define our transform: my rotate = Euler angels 0 45 0. Then, we can apply it to the box using: rotate mybox my rotate displayed in Figure 6. Be sure to press enter when defining the rotation variable to log it in the Listener before trying to use the value afterward. Alternately, we can rotate through a single axis by altering the property like the following: mybox. rotation.X = 45.
We can set the scale of an object similarly: mybox.scale = [50,50,100]. We can scale it up relatively using the following input: scale mybox [50,50,50].
Arrays are essentially a list of multiple elements, helping us to apply processes through all of them. For example, if we type “select lights,” Maxscript will select all the lights in our scene. This selection is essentially an array. To create arrays, we can type: my_awesome_array=# ($box001, $box002). That will add boxes 001 and 002 to an array. If we select many objects, we can input “my_ awesome_array = selection as an array” to add everything.

Many objects in 3ds Max can be manipulated using simple commands.

For example, we can hide or delete cameras and lights by typing “hide lights” or “delete cameras.” Wild cards are used in Maxscript for selection as well. For example, if we want to select all spheres with the name “roundy” in them, we could type the following: select $*roundy*. That will search all objects for the text roundy anywhere inside the names string and select them.
Functions are a collection of actions we want to call in other portions of code. For example, if we want to create a box, have the length and width set to 100, and convert it to a poly object we would define the function as demonstrated in Figure 7.


There are numerous ways to iterate and repeat code; most use “do, while, if, and for” to accomplish the task. One way to iterate this would be the following script: for I = 1 to 5 do (print I). This will print 1, 2, 3, 4, 5. To iterate over a collection of objects, we can type: for obj in objects do (print obj. name). That will list the name of every object.
Brian Chapman is a 3D Artist in Las Vegas with an extensive history of building 3D content for AEC, game, film, and software development. Brian holds various degrees and certifications in art, graphics, media, and web, with experience in design and application development. Brian can be reached procadman@ pro-cad.net

Amap book in Map 3D divides your map into multiple “tiles” and displays each tile on a separate page. Different from the plan production tools Map books will tile the maps in a grid pattern and place them in a sheet set for printing. The concept of using a grid and overlaying your map. Each section of the grid represents a tile. Each map book you create will also be associated with a Sheet Set.
Open Map 3D and on the View tab of the ribbon move to the palettes pane and select Map Task Pane as shown in Figure 1. When selecting Map

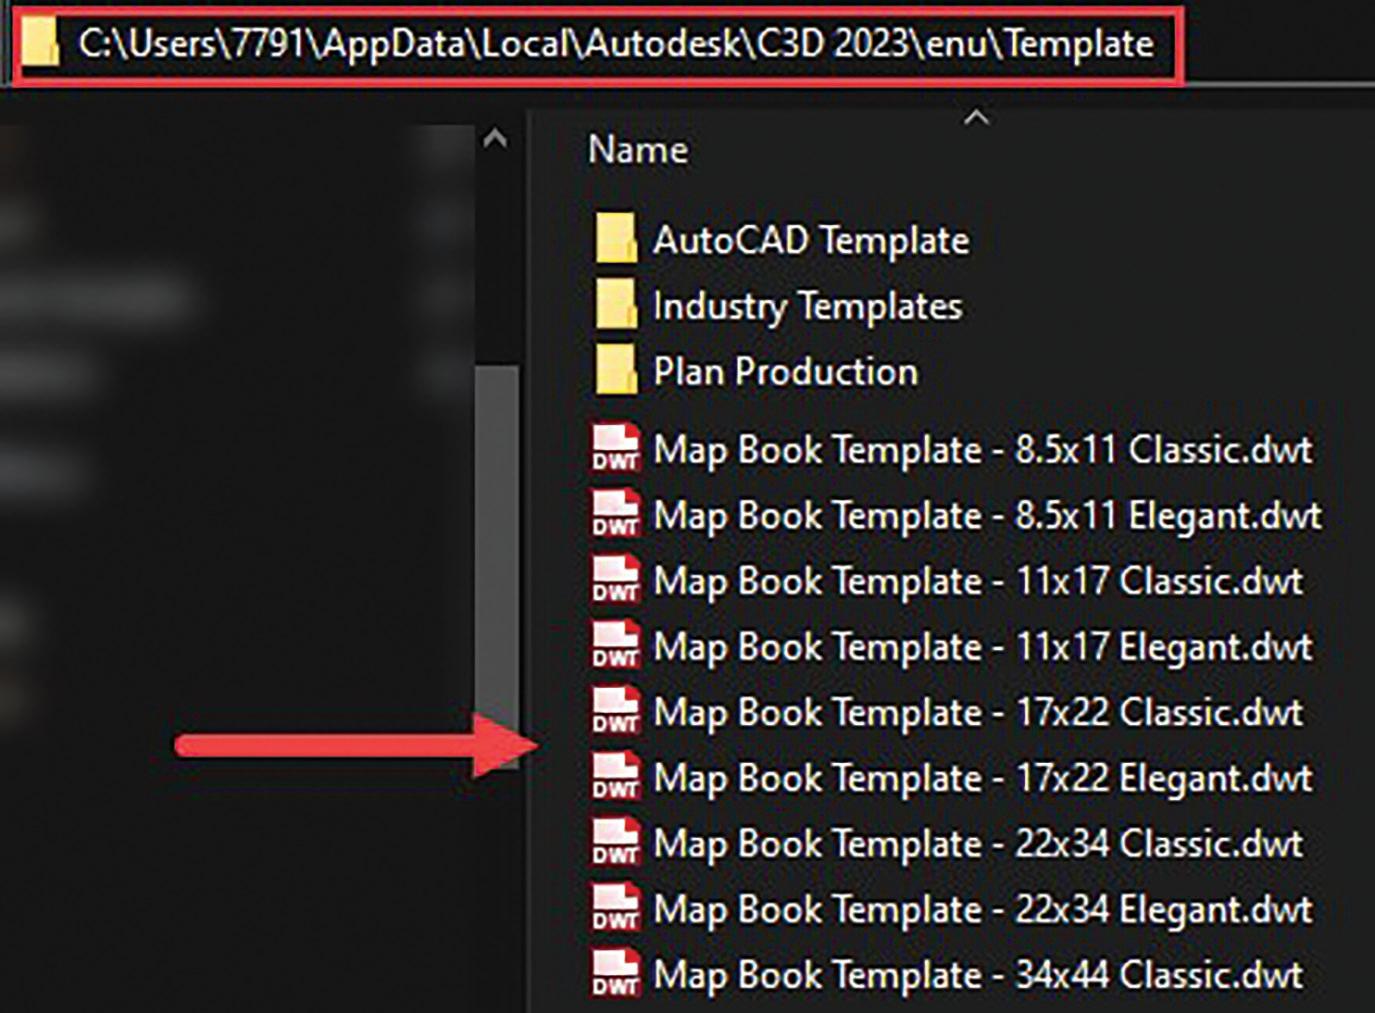
This is where you will begin the process of creating your Mapbook. First, a template must be created to ensure that we are providing the correct viewports including a plan view and key plan (if necessary). Open an existing map book template from Autodesk or your company’s standard title block. Autodesk provides map book templates for a variety of paper sizes included in the Templates folder as shown in Figure 2.
Use the following steps to create your company standard template.
1. Open a template and rename the layout tab to your preference. Resize the viewports on the layout as needed.

2. Customize the viewports on the template as desired. Do you need the main viewport and a key plan?
3. Make sure you have the correct placeholders in there for the Mapbook.
4. Save the map file as a DWT (AutoCAD Drawing Template) file.
You must identify each element in your map book template as a placeholder for information to be displayed on your map. For example, you select the viewport intended for the title and identify it as a title block placeholder. To create a map book, you must first set up a map book template. You can start with a sample template or your company standard and adapt it to your needs. When the template is complete, you generate the map book. Every map book template specifies printer settings (such as paper size and the printer driver to use) and defines the size and position of elements on the page (for example, the legend, title block, and map tiles).
We will now review the template settings and viewports. The title block needs to be an AutoCAD block object inserted into Paper Space on a layout. You will want to give the layout a logical name (i.e., ANSID – 22 x 34). If your title block contains fields for attributes that will work very well. You can also set up your title block to be linked to a Sheet Set template to assist in populating the data throughout the project.
The Main Viewport (4) is the only setting that is needed within your template for a Mapbook to be created. The main viewport will be used as the size
of the map you will be created depending on the tiling scheme. The following 4 placeholders are shown in Figure 3. (Image does not represent the original size, cut for clarity).
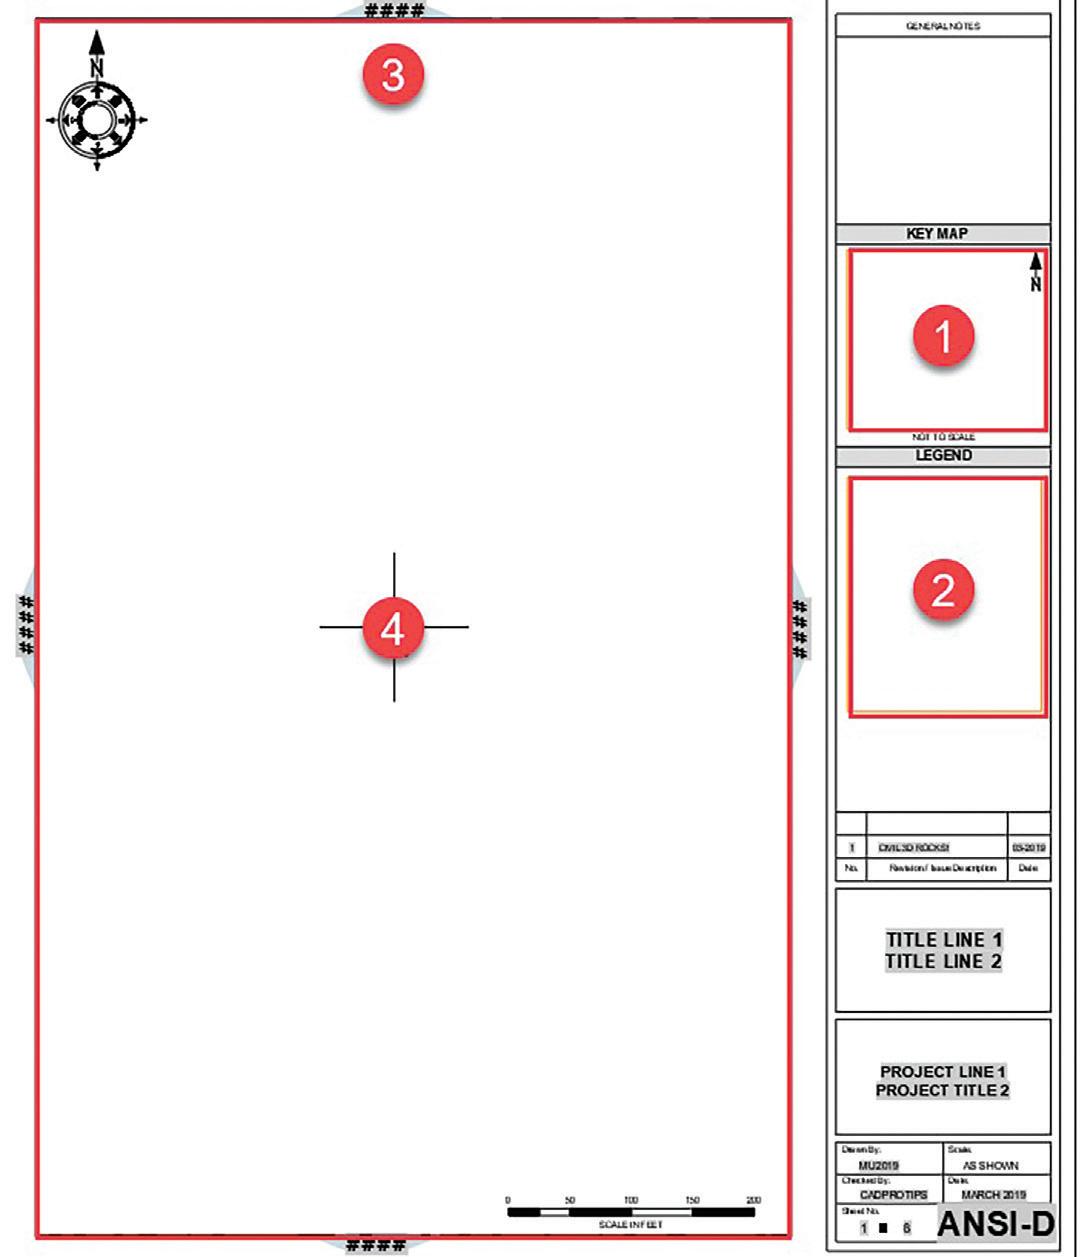
1. Map book Placeholders.
2. Viewport for the Keymap
3. Viewport for the Legend
4. Sheet Set Manager fields.
Figure 3: The title block template
The viewports included within the template are NOT part of the actual title block so create the block prior to creating the viewports. If you create the viewports on a non-plot layer you will need to include a border for them as part of the block to ensure that you have a place where the maps can connect.
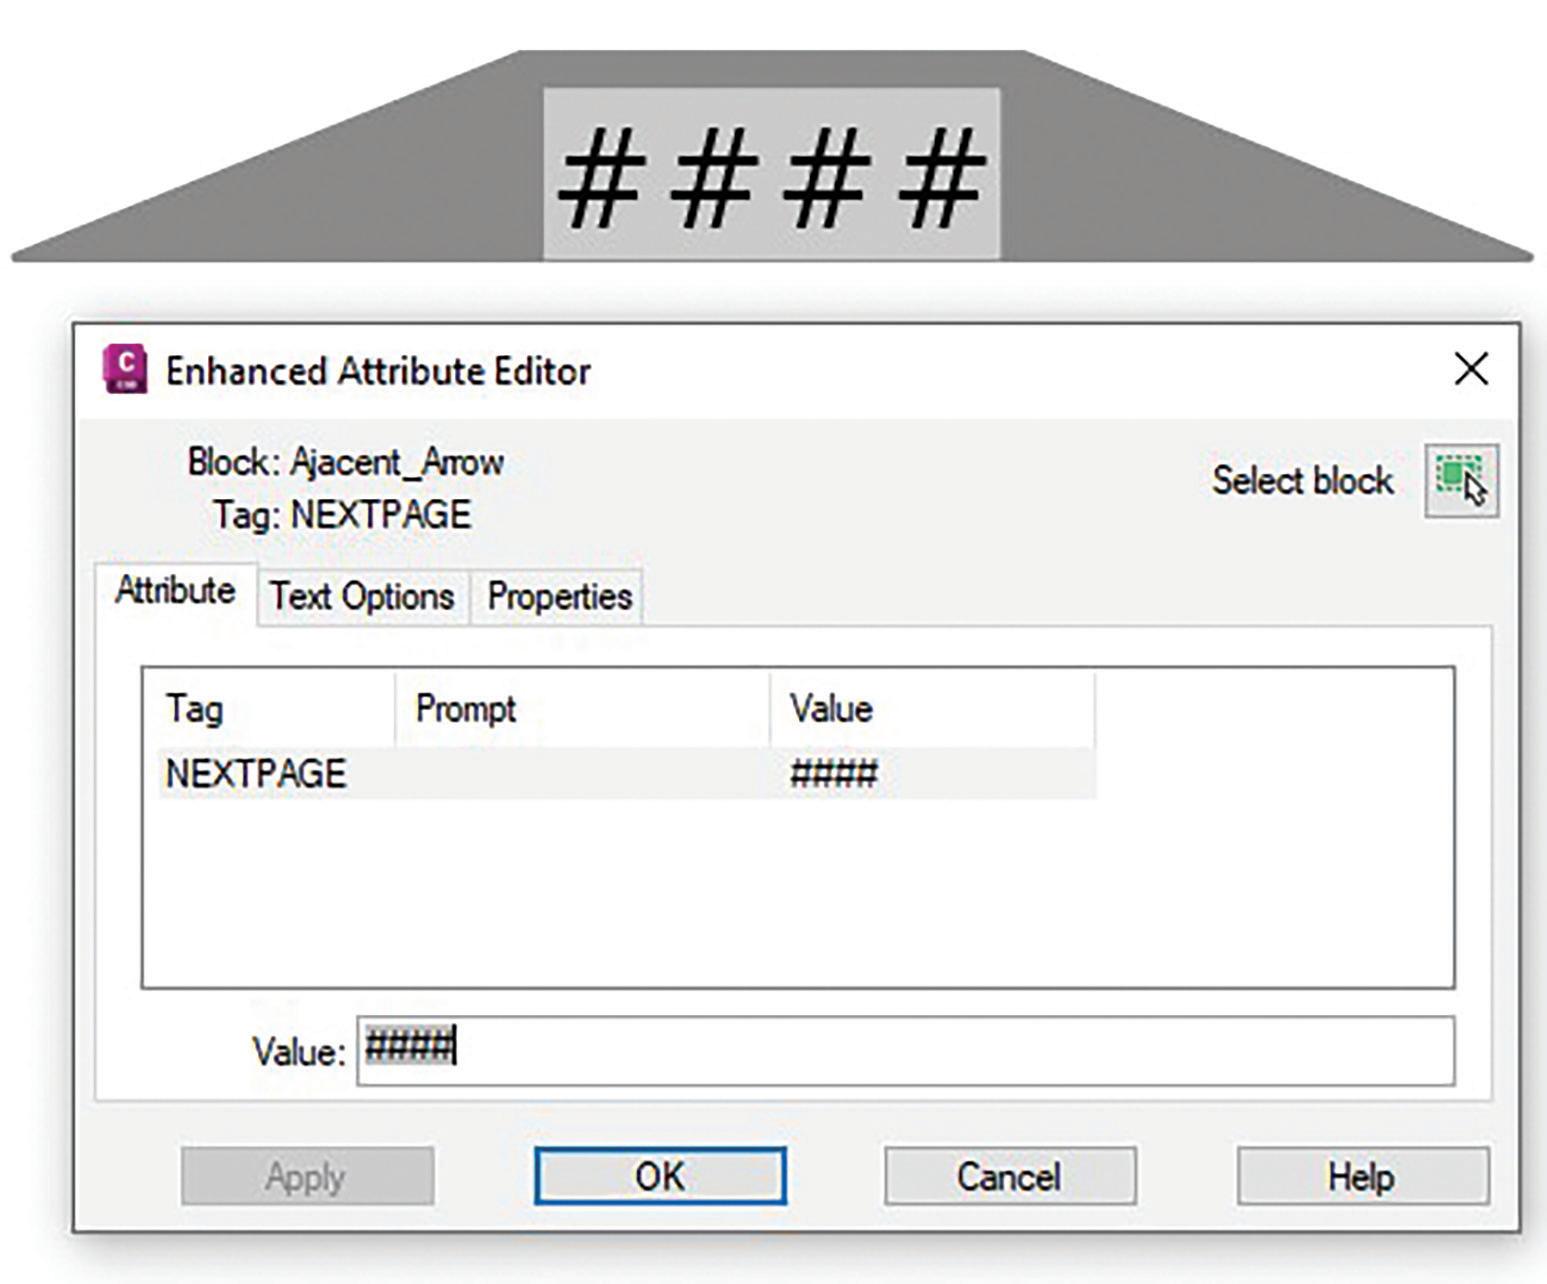
The last items we add to the template are the “Adjacent Arrow” blocks. These are the arrows that point to the top, bottom, left, or right with the adjacent page listed on them. These arrow blocks are a block with one attribute defined with a field as the value, after one is inserted on the template in paper space, we will assign the attribute a “field value” using a sheet set custom property.
Figure 4: The Adjacent_Arrow block
Note: Map 3D is smart enough to understand that if there is no map connecting to that area then the block will not be inserted letting the user know that the Mapbook does not continue in that direction. Double click the field (####) to ensure that we are referring to the correct portion of the map.
For the In the Field Dialog Browse to the SheetSet category:
1. Select SheetSet from the field name list.
2. Select CurrentSheetCustom from the field name list.

3. Select the Title case for the format (this is your company standard or preference).
4. Type in Top (Case Sensitive).
5. Select OK to close.
Save your template file and go back into Map 3d. You now must identify the placeholders within your template file. If you do not complete this step the maps will not be created. Follow these steps in the Task pane. Refer to Figure 6 for these steps.
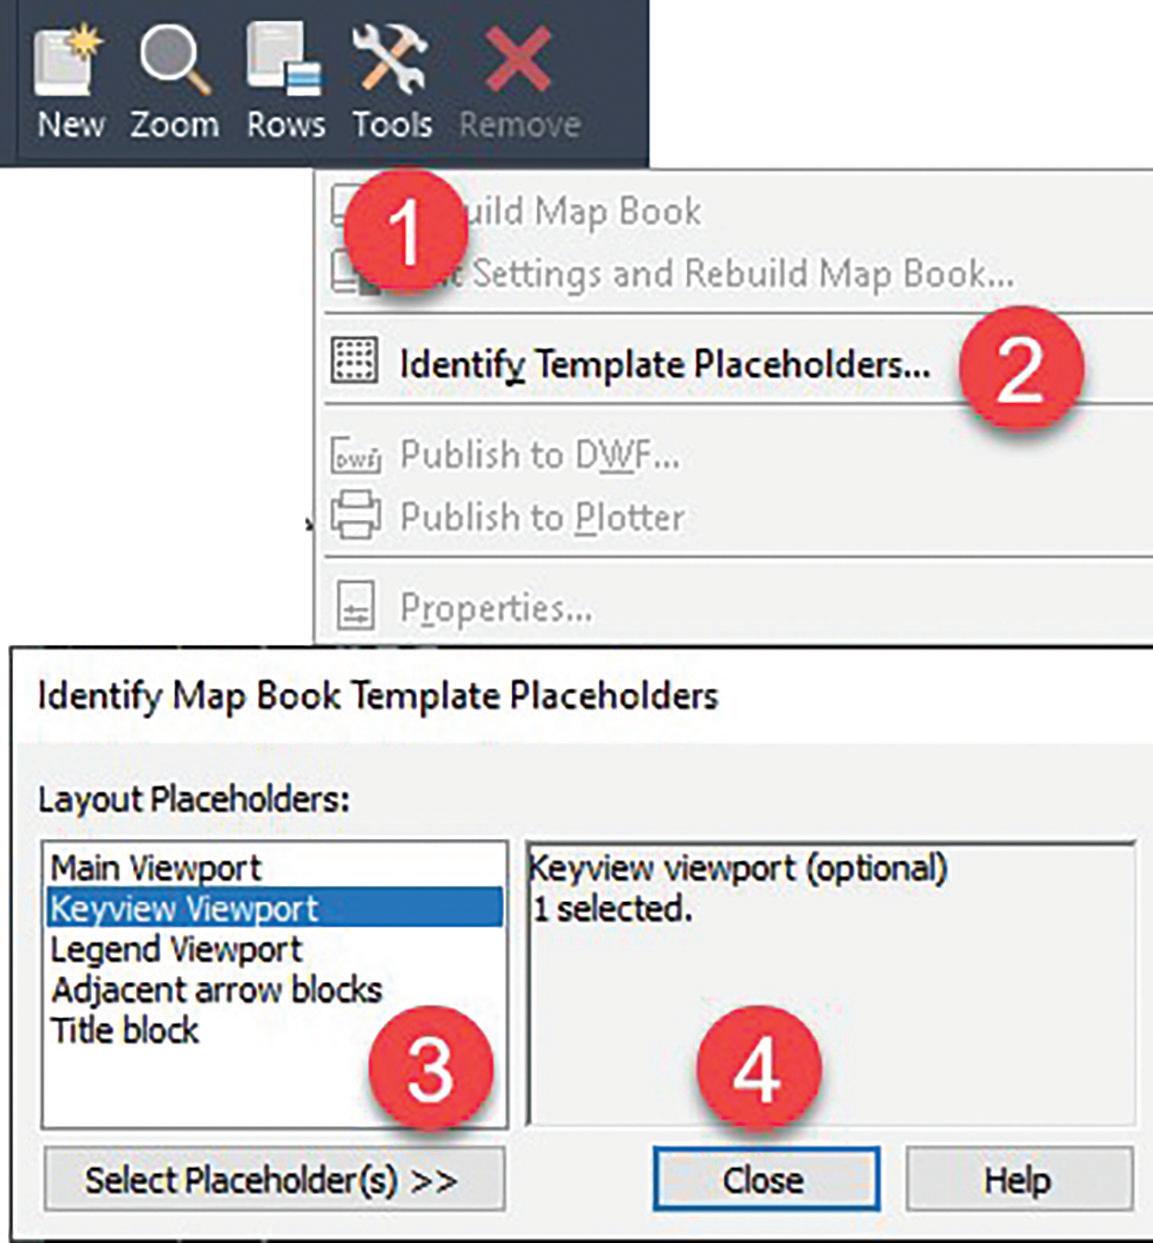
1. Select Tools
2. Identify Template Placeholders
3. Select the placeholders that will be used in your current drawing.
4. Close the dialog box and the drawing.
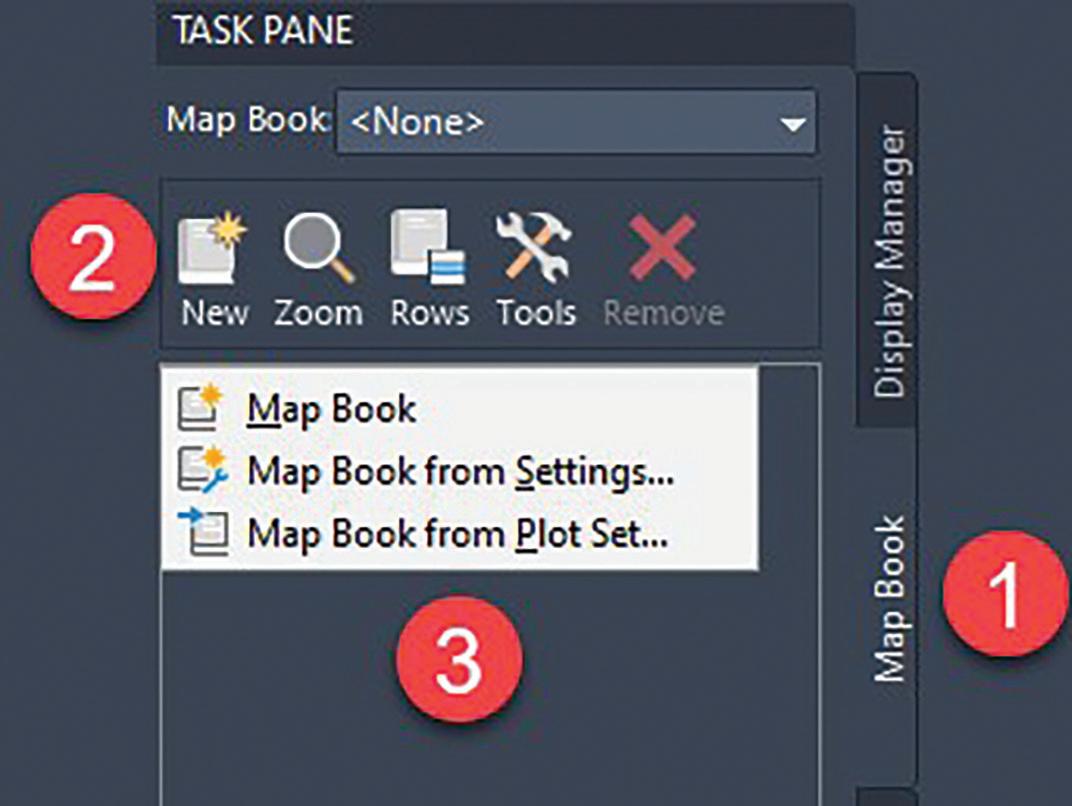
Now that we have the template created, we can now create our map book. With your map open move to the Map book tab on the task pane (1) then select New (2) and lastly Map Book (3).
Arrow
Figure 7: Create the Map Book
Starting with the first node it wants you to tell it what you want to create the map book from. The choices are Map Display or Model Space. We are going to choose Model Space and type in the name Mapbook_Project. The map display button will allow you to connect to GIS data and use that as the source of your map book. The next step is creating a Sheet Template. This will be directly linked to the title block template we created at the beginning of the setup.
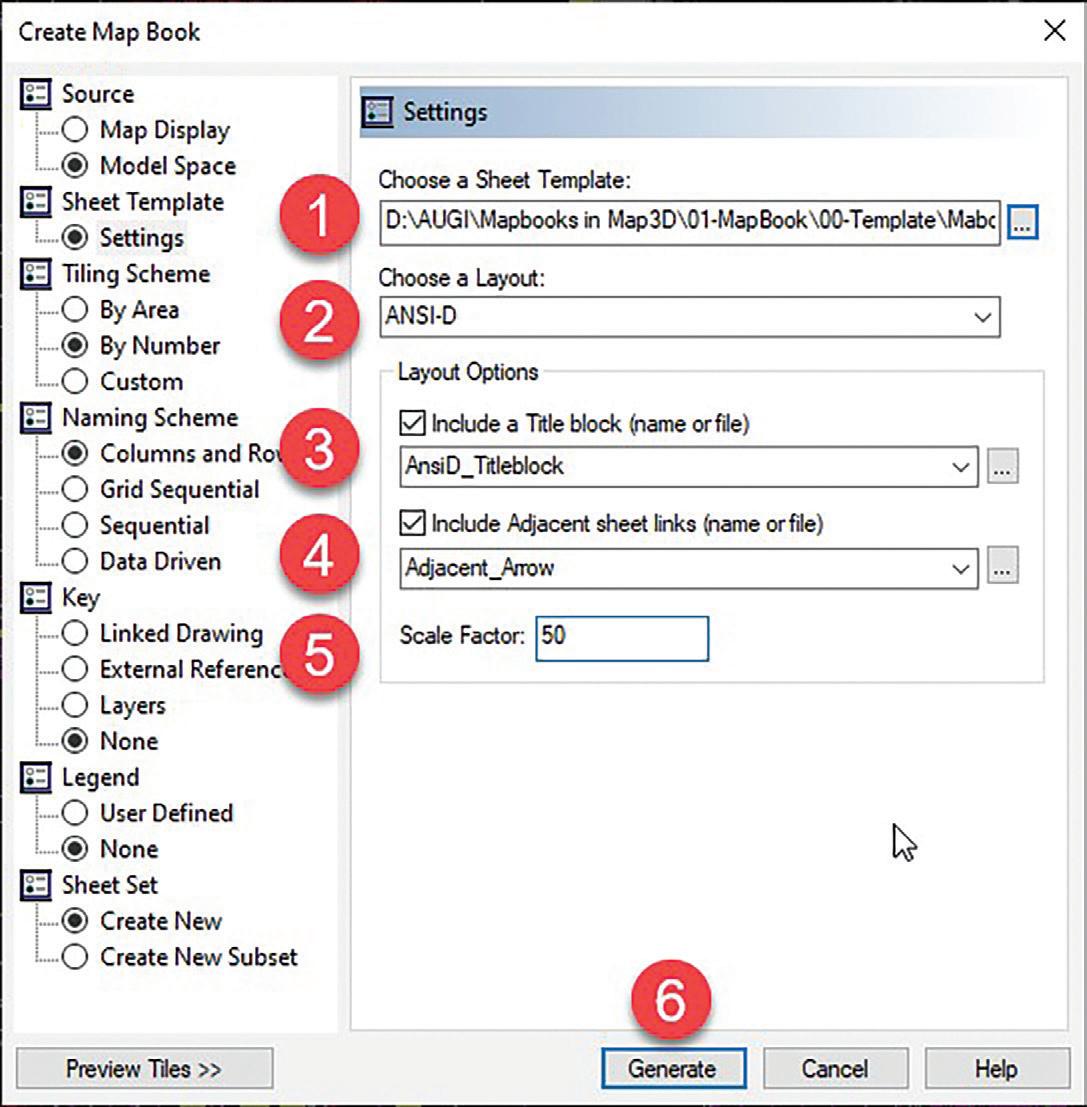
1. Select the ellipses on the right and navigate to your template containing your map book elements.
2. Select the desired layout.
3. Include the name of your title block file (block within the template).
4. Add the adjacent arrow block.
5. Enter the desired scale factor.
6. Preview the tiles. This is very important to see if your scale covers the desired area of your map book. When you are done making the preview you can go back and adjust the area after you set up the columns and rows.

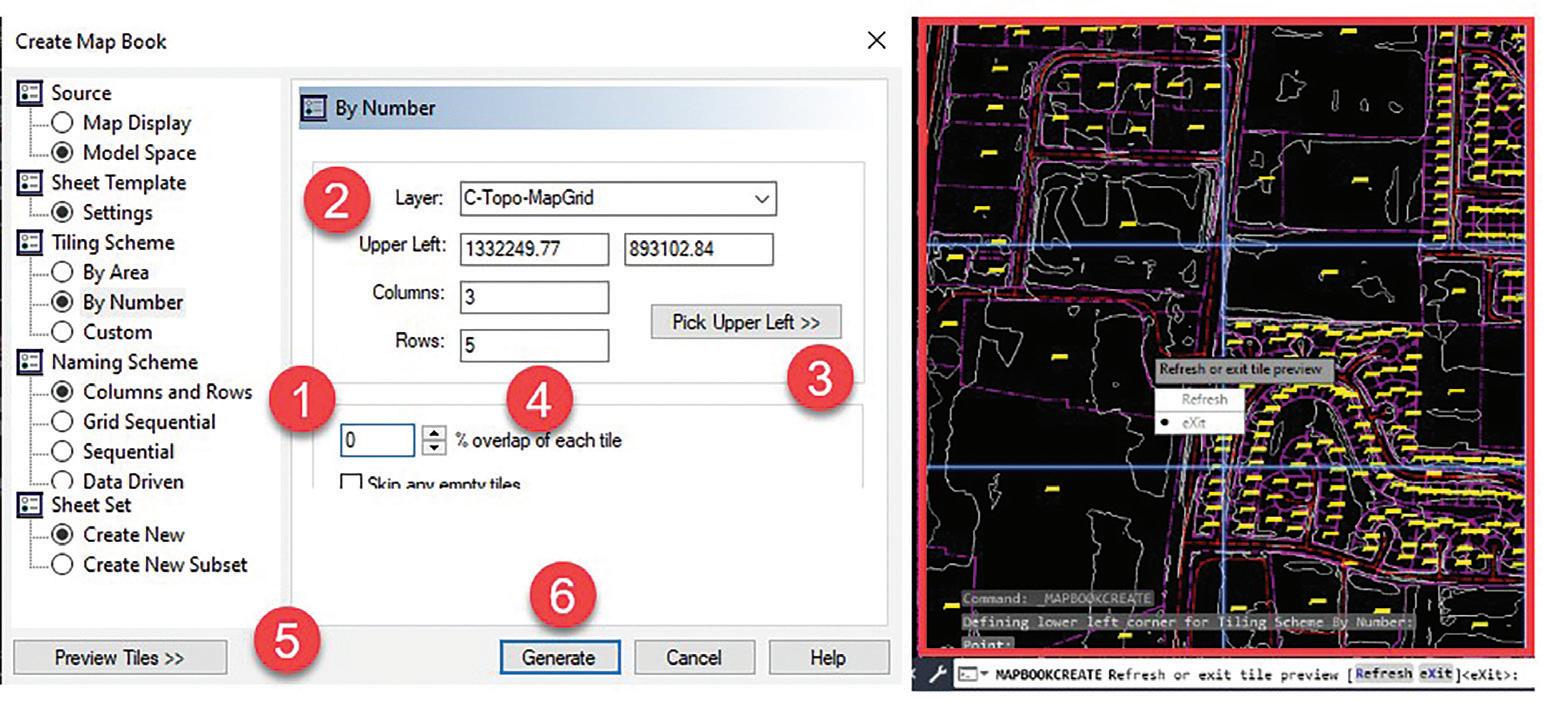
Moving on to the tiling scheme. We have the options of ‘By Area’, ‘By Number’, or ‘Custom’. Note: If you select ‘By Area’… Map 3D will calculate the area and place a square grid pattern for your map. Your viewports will then be moved and scaled to fit the area you have selected. Select ‘By Number’ as shown in Figure x and follow steps 1 thru 6. Steps 1 thru 6 are shown in the order of the workflow for completing your tiling scheme.
1. Select ‘By Number’.
2. Select the layer to place the map grid boxes on. Create this layer in your template then move to the main viewport and make sure the layer is frozen in that viewport. This way when you create the maps the layer will be off in the viewport and will not print.
3. By selecting the upper left corner, you will define the starting point of your grid. The lower
left will be represented by the scale you choose, the size of your main viewport, and the columns and rows.
4. Select how many columns and rows you would like. You can change this after you preview the map.
5. 0 percent for the overlap. We do not want any overlap and would like our maps to connect via the borders or match lines.
6. Preview tiles. This is very important. You will have the option to preview your grid sequence to see if you have covered your entire area. Continue changing the columns and rows until you have the correct area of coverage.
You have several options for creating keymaps. Typically, the keymap is a smaller map displayed within the title block area with a view frame to identify the map displayed.
1. Select ‘Layers’
2. Select the layers below and hit Add layers
for the map key.
3. The layers that will be used for the keymap will be displayed within this window.

We already have a legend in the model space for your current project. We also have the viewport defined in our template. Therefore, we are going to select the window of the legend.

1. Select User Defined
2. Select modelspace bounds >> You will be taken out to your map where you will select the upper left corner and then the lower right corner for the boundaries of your legend.
3. Preview displayed within the window.
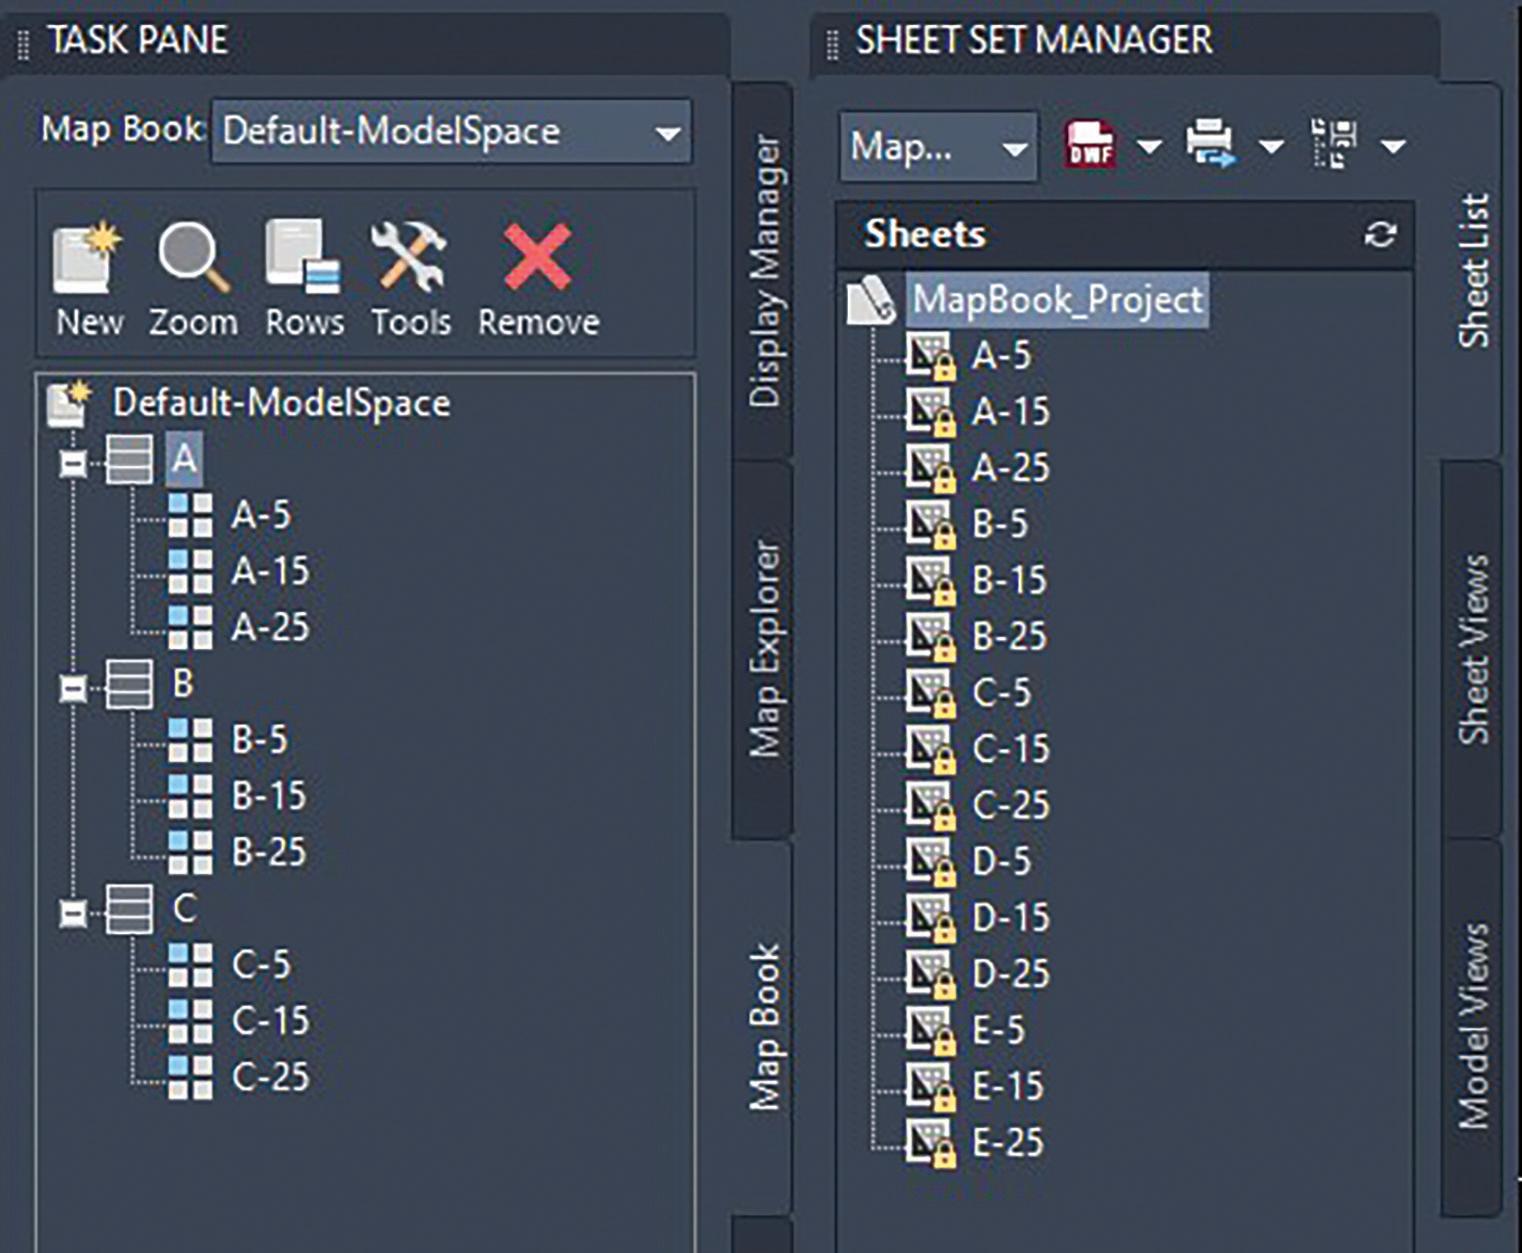
Next you will create your map book. In Figure 13, you can see how the tiles start with A and are similar to subsets within the Sheet Set Manager. Followed by the numbering scheme. You can customize these after you create the tiles to your project and/or company standard.
Although this is not a paper on the Sheet Set Manager when you create a map book you can also create a sheet set. New or a subset of an existing one. Good practice would be to create one that already is for your project and has fields set up that will automatically populate throughout your project.
1. Select Create New
2. Move out to your folder and select an existing Sheet Set or a new Sheet Set.
3. Move to steps 4 and 5 if adding to an existing Sheet Set.
4. Rename the subset
5. Rename the subset to Mapbook.


Whether you are using Map 3D or Civil 3D the power of the map book tools can help you create and set up tiled maps quickly and with efficiency. Think about workflow and how many times you have been asked to split up a large site plan in a tiled or grid pattern. There are many times when creating sheets with a map book can be effective for large commercial, civil, and industrial sites.
Having a grid-style approach can help you keep your sheets organized and easily accessible through a map book. Imagine how many projects in the past you could have used this method to create and separate those large sites including a key map for quick reference. Map books can help you become more efficient and productive making you more valuable and providing profit to the company you work for.
Sam Lucido is a Design Systems Administrator for CHA Consulting, Inc. He has over 25 years of experience involving design, user support, and customization. Sam is professionally certified in AutoCAD, and Civil 3D, and is an Autodesk Expert Elite Member. Sam has been a top-rated Autodesk University Speaker for the past 7 years and created many articles on AutoCAD and Civil 3D through the Autodesk Knowledge Network. He uses his vast knowledge of AutoCAD and Design Technologies to help provide support to engineering and design teams at CHA. You can find him at CADProTips.com and he can also be reached at sam.lucido@cadprotips.com.

Have you ever been frustrated that grading with feature lines doesn’t seem to give you the same level of information and detail that corridors do? Let’s be honest, corridors have a lot of benefits and open the door to possibilities, so, why not adapt these linear tools for use on site development grading? Let’s explore how to customize different tools in Civil 3D to put corridors to work!
Feature lines have been promoted as the primary tool for site grading for years, utilizing grading objects to make adding daylights and curbs more user friendly. However, the use of featurelines and grading objects do not show depth of pavement, subbase or topsoil. Sure, there are ways to try and add this detail, but it never seems to be quite the same as the materials used in corridors.
This article will explore a different approach to site grading by customizing subassemblies, utilizing
alignments, manipulating corridors, and establishing code set styles to enable the use of cross sections, material quantities, and cut/fill volume calculations in site design. There is an assumed knowledge of some Civil 3D tools, including alignments, offset alignments, connected alignments, profiles, assemblies, and corridors.

Corridors are built from three basic entities, horizontal alignments, vertical profiles, and assemblies. These basic entities most often relate to roadway design, with all the parameters centralized around the horizontal alignment or baseline. Once the baseline has been established, the vertical profile and assembly(s) determine how the grading will be achieved. Wouldn’t it be great to design a parking lot with one baseline instead of trying to control everything from the perimeter? The resultant of using a baseline instead of perimeter feature lines is
continual longitudinal and cross slopes. In addition, cross sections can be cut across the site showing dynamic pavement, curb, and sidewalk sections with accurate slope labels. This workflow is best achieved with the creation of custom subassemblies and code set styles.

If you have never worked with Subassembly Composer, the thought of creating custom subassemblies for your project may seem intimidating, however some of my most simplistic subassemblies are the ones most employed on my projects. I have created custom subassemblies for bituminous pavement, concrete pavement, curb, and sidewalk that are based on the typical details we provide on our projects. Basing these subassemblies on our details allows for more accurate design and breakdown of the materials that will require quantities as the project progresses. The most important setting to note when building your custom subassemblies is to allow target parameters for offset and elevation. It will be critical to site design with corridors.


When utilizing custom subassemblies, frequently you will create your own codes to define them. For instance, the shapes may be coded to represent a particular material, or a point may be coded in order to add a specific label in a cross section. In my work we utilize different strengths of concrete pavement, so we code them as heavy duty and low volume to distinguish them in material quantities later in the project design. Once you import your custom subassemblies into Civil 3D, you need to import the custom codes you created and add them to your Code Set Style.
In the figure above, a bituminous pavement section has been created in Subassembly Composer. The target offset and target elevations will be applied for P2 in relation to the origin/P1. Once this has been established, allowing for flexibility in design, the remaining sections (e.g., base course, subbase) can be added by depth. Now you have the basic subassemblies to begin.
I have several different Code Set Styles that display my codes differently, depending on the purpose. Have fun and play around with the styles to achieve just the right look for your projects.
The baseline, also known as the horizontal alignment, will be the foundation of design. The
projects I typically work on are facilities projects, with a perimeter access drive to access various portions of the building, and a parking lot for administrative needs. The baselines I establish on such a project are typically the centerline of the access drive and the main access of the parking facility.
sometimes referred to as curb returns, and a separate assembly is needed for perimeter curblines or daylights.
For assemblies, the cross-slope parameter inputs are the typical cross slopes. As stated previously, variations in slope will be controlled by offset alignments and profiles. Curb heights or widths can also be controlled with profiles by utilizing custom dimension control subassemblies as demonstrated by Jeff Bartels here (Applying Transitions to Virtually ANY Civil 3D Subassembly, on YouTube).
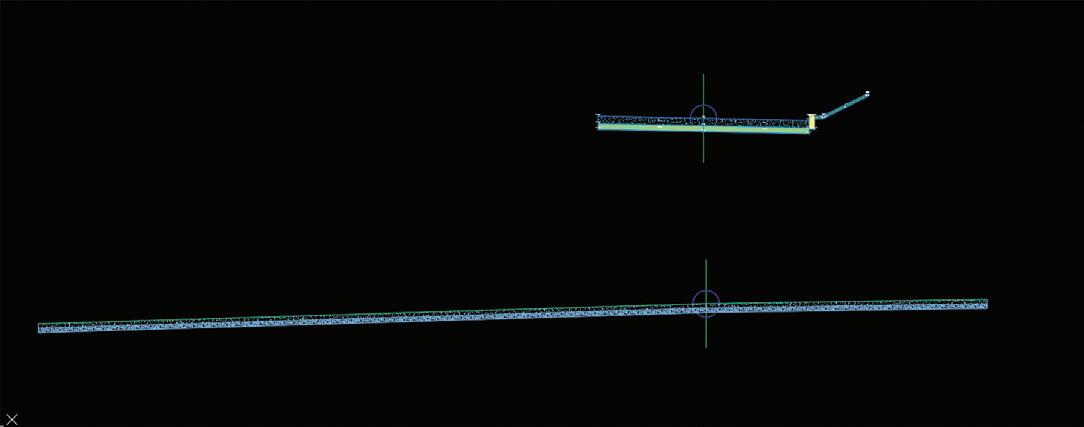
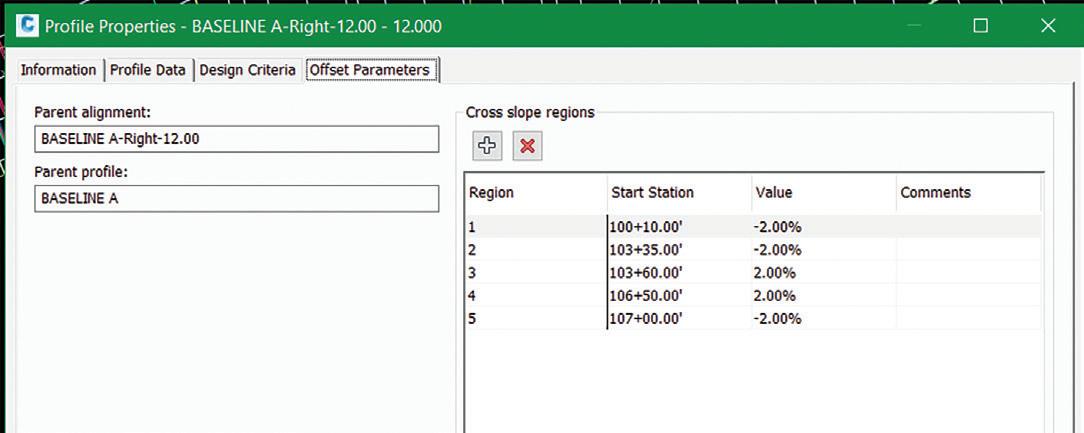
Once you have determined the best locations for your baselines, the vertical profiles will need to be created. Some calculations will be necessary to determine the optimal elevations of the profile to ensure sidewalk areas surrounding the building continue to meet ADA requirements. No need to worry too much about variations from the baseline, we will utilize offset alignments with profiles and connected alignments with profiles to control differences in slopes from the baseline.
Keep your assemblies simple. The best way to manage your assemblies on a project is to have as few assemblies as possible. It is much easier to maintain five assemblies than twenty-five. Typically, I try to use one assembly for the parking lot and one assembly for the access drive, but this can vary depending on the site layout. Intersections require an assembly for the connected alignment,
Frequently, the cross slopes of a project will vary and will not be the same throughout the entire project site. Often, these variations are handled through multiple assemblies, but that can become cumbersome to manage and edit as the project progresses through design. Instead, I like to employ the use of offset alignments with profiles to manage varying slopes. The cross slope on the access drive for my example project changed from a -2% cross slope to a +2% cross slope and back to -2% to account for the existing terrain. The use of offset alignments allowed for one assembly to be used and the changes in the slopes to be established with the offset alignment profiles along the edge of pavement, setting the stations where the transitions would occur.
The same concept applied the access drive is applied to the parking lot design. Offset alignments with profiles can be established at the breaklines of the design, such as where the drive aisle and parking stall meet. The offset alignments at drive aisle and access drive intersections are required in order to create intersections. For parking lot access design with corridors, I find it best to manually create the intersections with targeting rather than utilizing the intersection tool. Once the offset alignments have
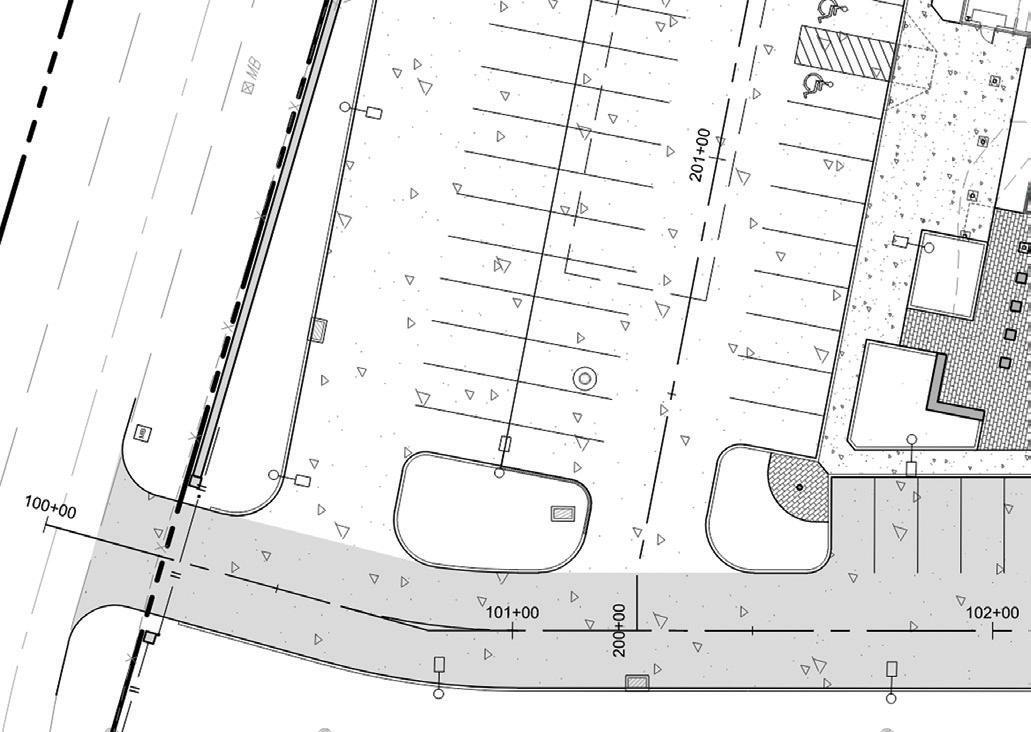
been created on the edges of the drive aisles and access drives with their associated offset profiles established, the connected alignments with profiles can be generated.
as corridor baselines and target your access drive alignments or offset alignments.
Overall, after creating the base corridor the majority of the site pavement areas should be covered by the corridor.
Now you have all the elements to start creating the base corridor for your project. Yes, there will be more than one corridor required to create a fully functional site grading. Corridors are inherently a linear tool, therefore any curb, sidewalks, or daylights surrounding your parking lot will need to follow a different baseline.
Create a corridor and add your baselines, profiles, and assemblies as usual, avoiding the intersections. Set the targets of your custom subassembly, target the offset to the offset alignment and the elevation to the offset alignment profile. Manually create the intersection by adding the connected alignments
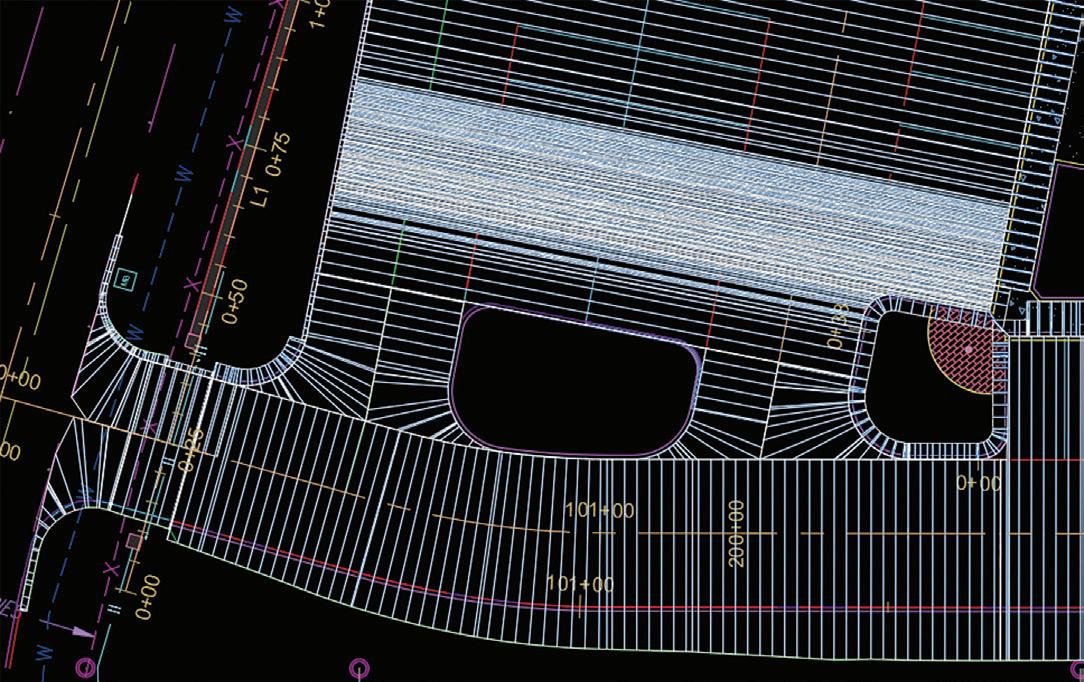
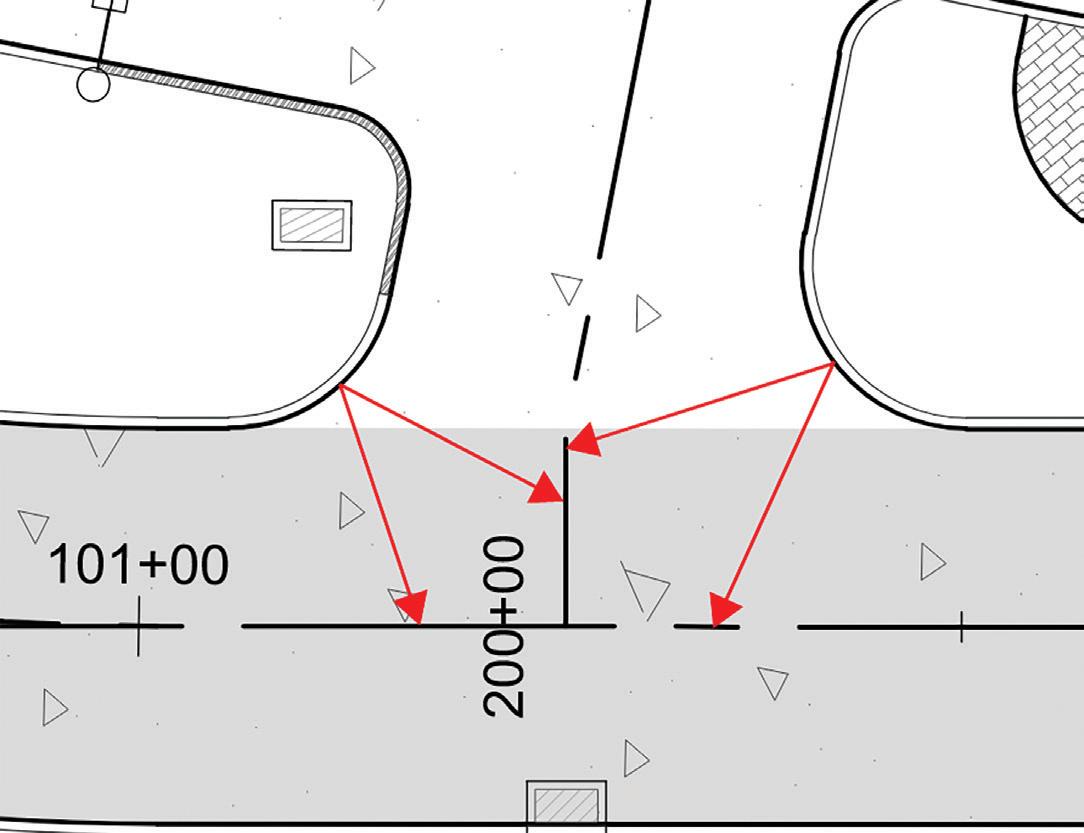
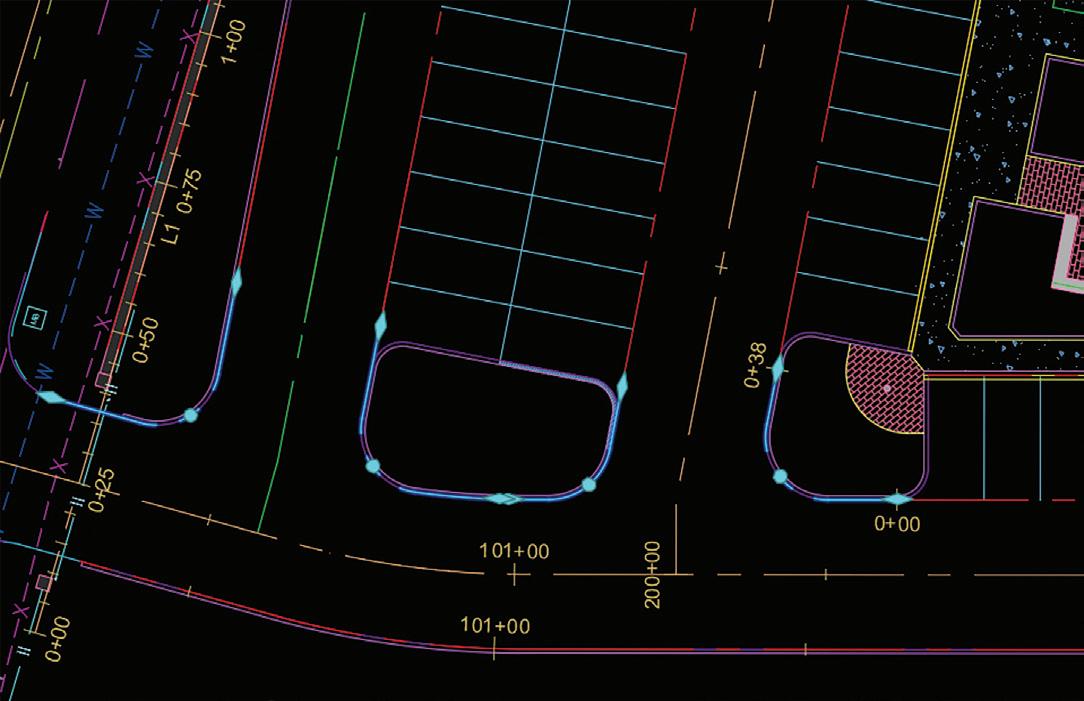
Once the base corridor has been created, you can start the finer detailing of your grading scheme. For curblines, I create a featureline from the perimeter curbline linework and set it relative to the base corridor surface. Then, if you change your horizontal baseline, the offset alignments, connected alignments, and the featurelines will all change with it! Isn’t it great to let Civil 3D help do the heavy lifting for you? A separate assembly will be needed to set along the curbline, adding any sidewalks or daylighting needed in the assembly. Create the curb corridor using the featureline as your baseline and no profile will be needed. Don’t fret if you need to create a curb depression or driveway entrance, Jeff Bartels gave us the tools in the dimension control mentioned earlier (Applying Transitions to Virtually ANY Civil 3D Subassembly, on YouTube). By using the dimension control, you can easily transition between a full height and depressed curb.
Depending on the layout of your project, you might be able to utilize a custom sidewalk section and target the offset and elevation of your building. If that is possible for your site design, you have even more coverage with your corridor.
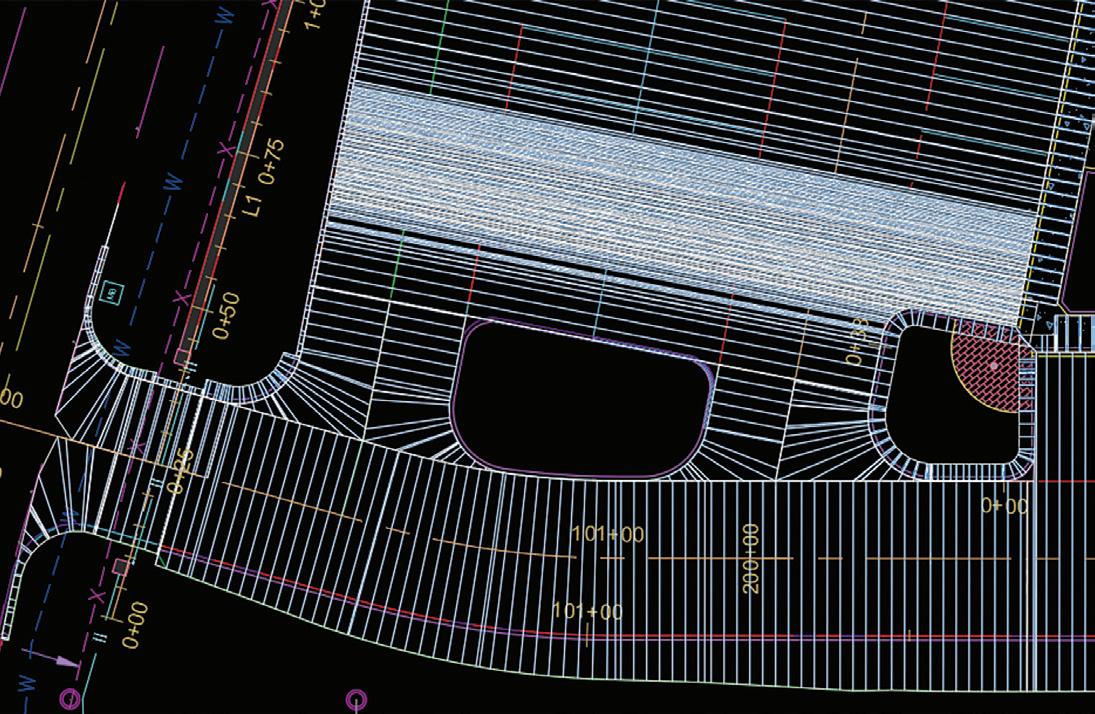
Finally, to the part you have been building up to and waiting for, the cross sections! With the base corridor, curbline corridor, and composite surface you will be able to run sample lines and cut cross sections through your access drive and parking lot. You will be able to see the changes in cross slope, add elevation labels as needed and present all the information the contractor should need. Creating typical sections to place on your plans should also be a piece of cake now that all your grading has pavement depths, subbase, curblines, etc.
In addition, cross sections enable the use of volume and material calculations. You could create a volume comparison surface, using the datum surfaces from the corridor for a more accurate analysis, or enable the use of volume calculations with methods such as average end area. Utilizing corridors to create your grading also gives you the ability to provide material calculations. This is where those custom subassemblies really come into play by splitting up different materials such as heavy-duty concrete, low volume concrete, and sidewalk concrete. A material volume table can be provided showing the breakdown of each of these materials, helping to calculate quantities for your project.
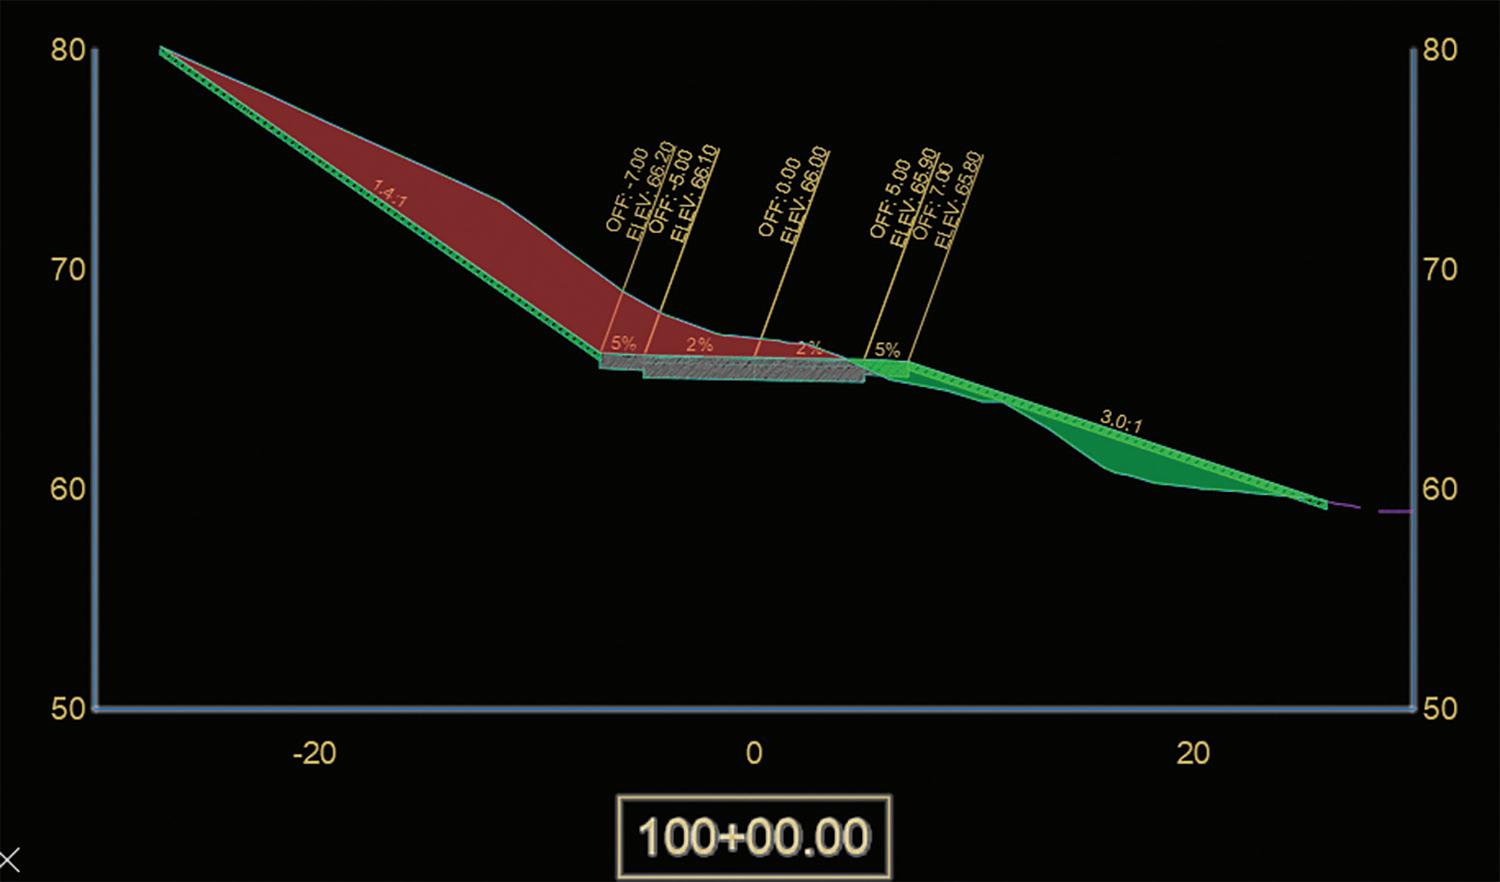
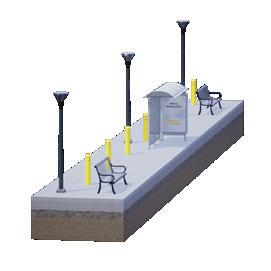
design to site grading with the use of baselines and cross sections.
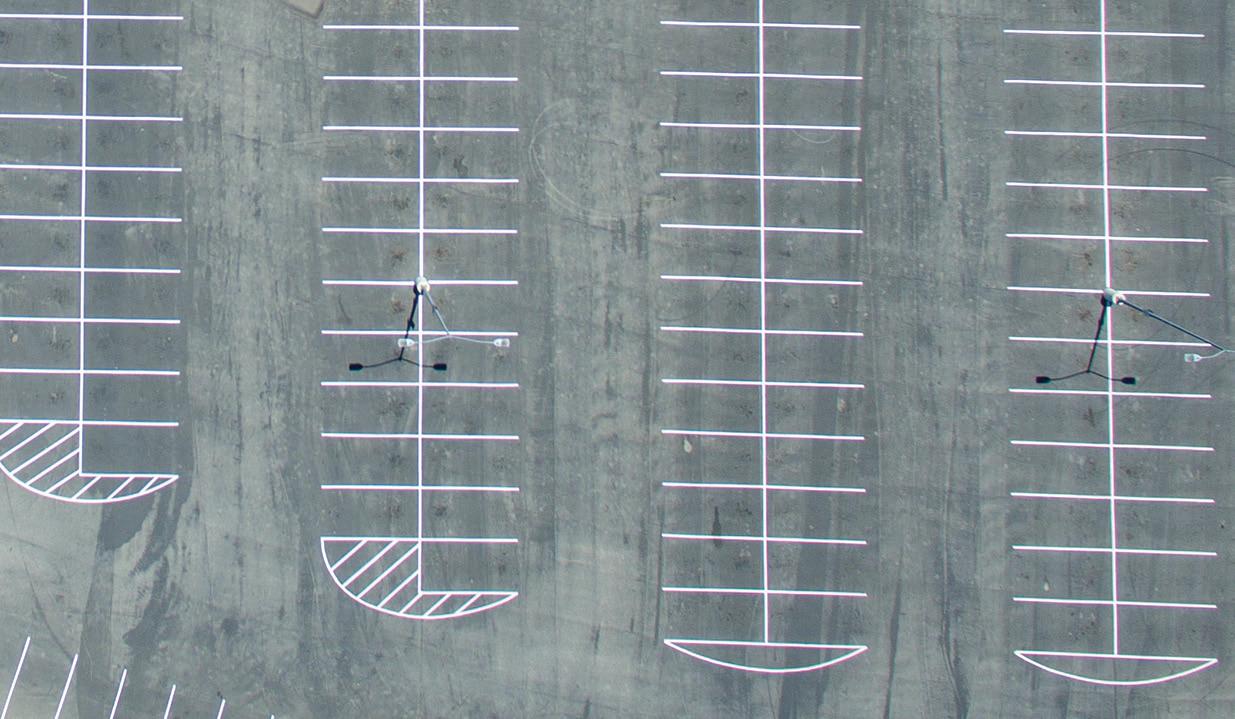
Applying corridors to site grading was an adventure, and I talked to a lot of people along the way while I tried to figure this workflow out. I have put the workflow outlined in this article to the test across several projects and the results have been better than I could have hoped. There are a lot of initial setups required, but the flexibility in design throughout the duration of a project, adjusting one piece of the puzzle and having the program domino that change throughout numerous other entities has made revisions much easier to accomplish.
Shelby L. Smith has a B.S. in Civil Engineering from Penn State University with a minor in Architectural History. She has been working with Autodesk software for approximately 20 years and is an Autodesk Civil 3D Certified Professional. Her background is diverse in civil site design including transit authority headquarters, private & commercial land development, and a brief time in oil & gas. Researching and implementing new methods for modeling is an aspect she enjoys, especially with a passion for grading design. Shelby likes the challenge of creating templates, customizing styles and tools to enable a better workflow in Civil 3D. She has led the effort to implement and create drafting and design standards for her company utilizing Autodesk AutoCAD, Civil 3D, SubAssembly Composer, and InfraWorks software.

After working with a team of engineers who were previously experienced in highway design, I realized how much grading with featurelines wasn’t providing the best result. Simply trying to control a large parking lot only by the perimeter and the occasional breaklines didn’t make sense. In addition, the use of a grid surface with feature lines and corridors did not suit my needs for design. Therefore, I sought to apply the same methodology of highway

introducing three new Membership
more
than
more
fellow
expanded, more
Basic members have access to:
members have
members have access to:
access)
access and
As the theme of this issue is customization, I have come up with a few apps that allow you to customize and ‘tweak’ in various Autodesk applications. You will see that I have a bit of a Revit slant going on there too.
The Autodesk App Store is full of these types of apps, not just the ones I have mentioned, so make sure you search the store, as I’m sure you will find many apps that will help you work smarter, not harder.
Here are this month’s picked and mixed opportunities to advance your skills, processes, and workflows with the most current AEC-related software and hardware updates available.
(AutoCAD, Revit, Advance Steel)
https://apps.autodesk.com/ADSTPR/en/Detail/ Index?id=7409116658041045947&appLang=en &os=Win64
Autodesk AutoCAD
Version: 2021, 2020, 2019, 2018
Autodesk Revit Version: 2021, 2020, 2019, 2018
Autodesk Advance Steel Version: 2021, 2020, 2019, 2018
This application will help you to create a custom tile hatch pattern with the gap between tiles in horizontal and vertical angles.
As most of the constructors know, if you want to install tiles on the floor or walls accurately, you must consider the gap between tiles in your drawing. This application will help you to make your custom tile hatch pattern with a gap between tiles and customizable tile size.
Note: This app uses a custom installer (and not the standard App Store installer).
We all know how hard it is to set up tiles. This is a great custom tool to help you places tiles in your projects!

https://apps.autodesk.com/RVT/en/Detail/Index?id=6427827 500547095384&appLang=en&os=Win64
Autodesk Revit
Version: 2023, 2022, 2021, 2020, 2019
Autodesk® Revit® automatically joins the elements with its default rule. If you want to switch the join order between elements, you must do it manually. If you have
a project with thousands of elements that need to be switch joined, this would be a huge task.
This tool will help you to quickly Join and Unjoin as many elements as you like with your defined order.
A good one for that moment when you realise that your join order on a big project needs to change!
QUICK ROTATE (Revit) https://apps.autodesk.com/RVT/en/Detail/Inde x?id=7370580827984278858&appLang=en&o s=Win64
Autodesk Revit
Version: 2022, 2021, 2020, 2019, 2018
An essential add-in for all BIM Modelers!
Create your own custom commands to rotate selected elements with a tap of a finger.
You can think of this app as an improved version of the native “Spacebar rotate command” in Autodesk® Revit®.

What’s different from the native “Spacebar rotate command”. You can use it in any kind of view like plan view, elevation, and 3D views.
You can set up in advance your custom rotation angle and rotation axis. It works with a selection of multiple elements and works with more types of elements such as: model elements, detail items, grids, and sections.
A typical app workflow would be to use this plug-in’s settings interface to set up 1, 2 or 3 different Quick Rotate commands, setting their rotation angle, and their rotation axis.
Then, attribute your custom commands to your own keyboard shortcuts, and trigger them with a tap of a finger!

the user
select
Style and
automatically start every time the user

very easy to change styles of colors and texts

can save
great Revit plugin,
own
allows you to
by
your

