


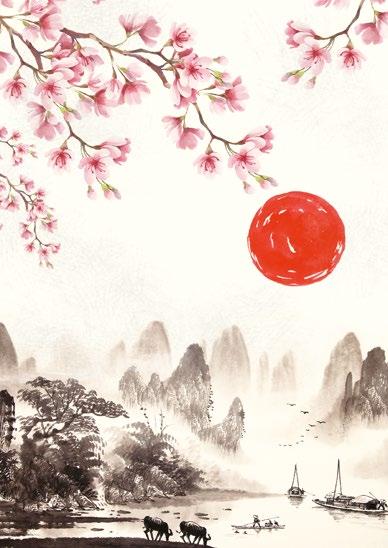


PROJECTS & IDEAS TO TRY!!! OVER40 6 STUNNING PROJECTS TO MAKE WITH YOUR EXCLUSIVE GIFT! 20 COMPLIMENTARY DESIGNS HOW TO CREATE FLOWERS WITH CIRCLE INTERLOCKING LACE DIES HOW TO USE GILDING FLAKES TO CREATE BACKGROUND EFFECTS YOUR EXCLUSIVE SVG! INSPIRATION • INFORMATION • EDUCATION Issue 22 DIGITAL
this issue’s...
Hi Crafters,
Here we are with issue 22 and we've got some great projects in this issue for you!
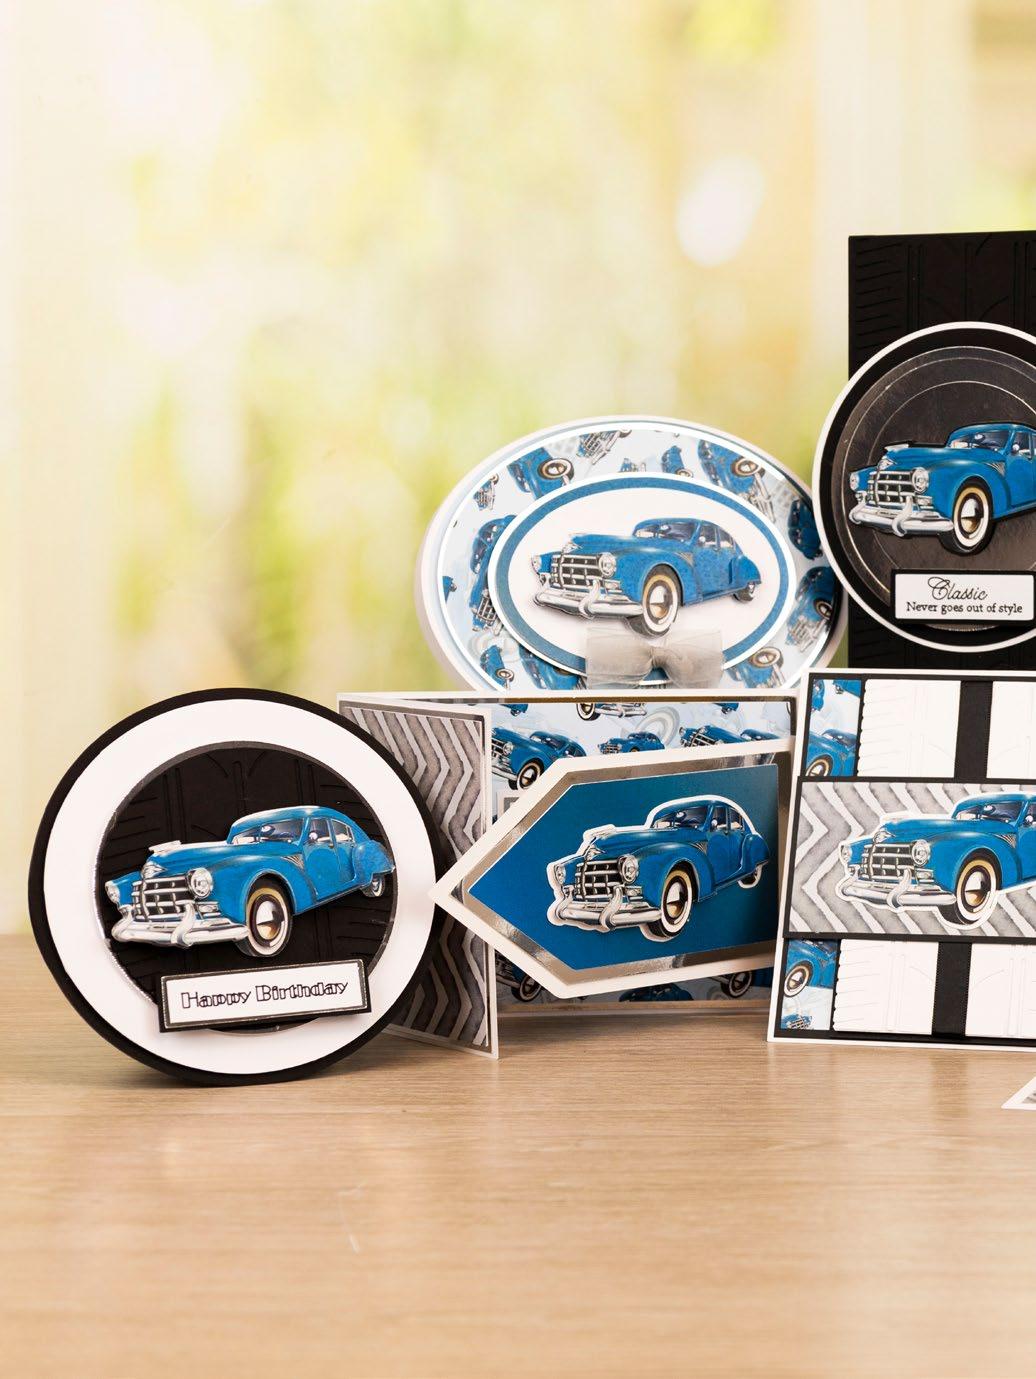
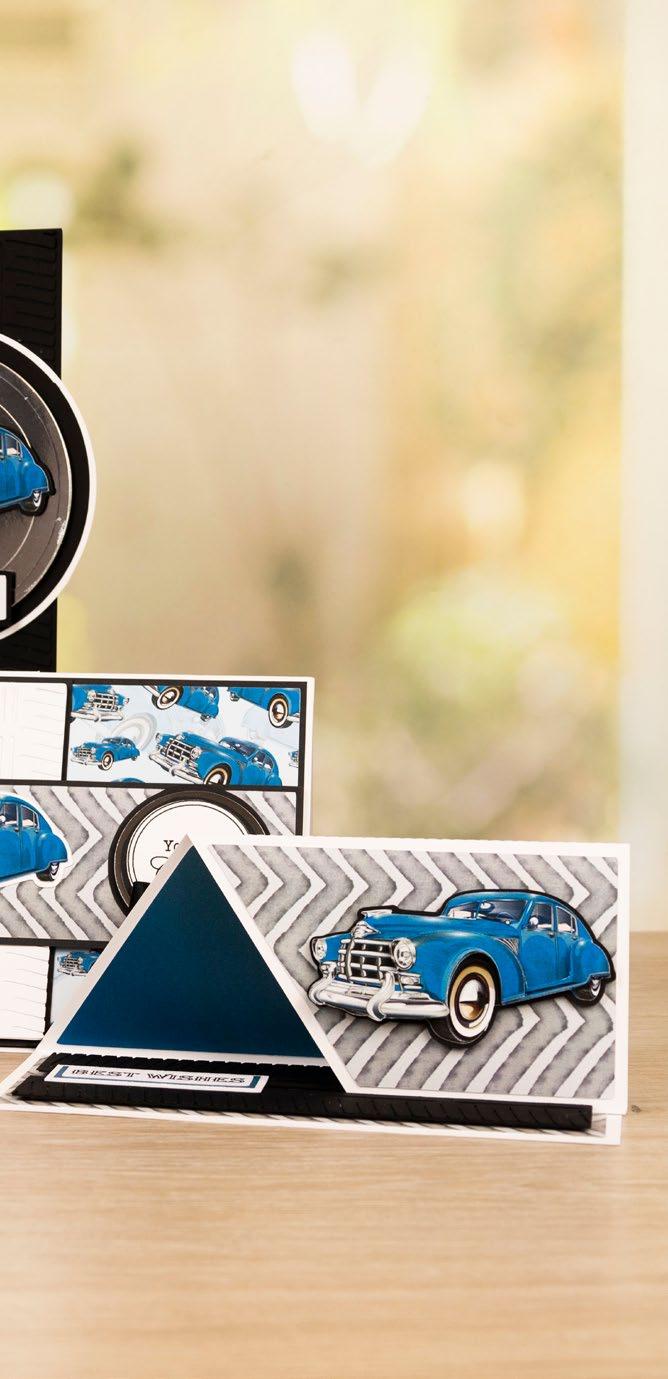
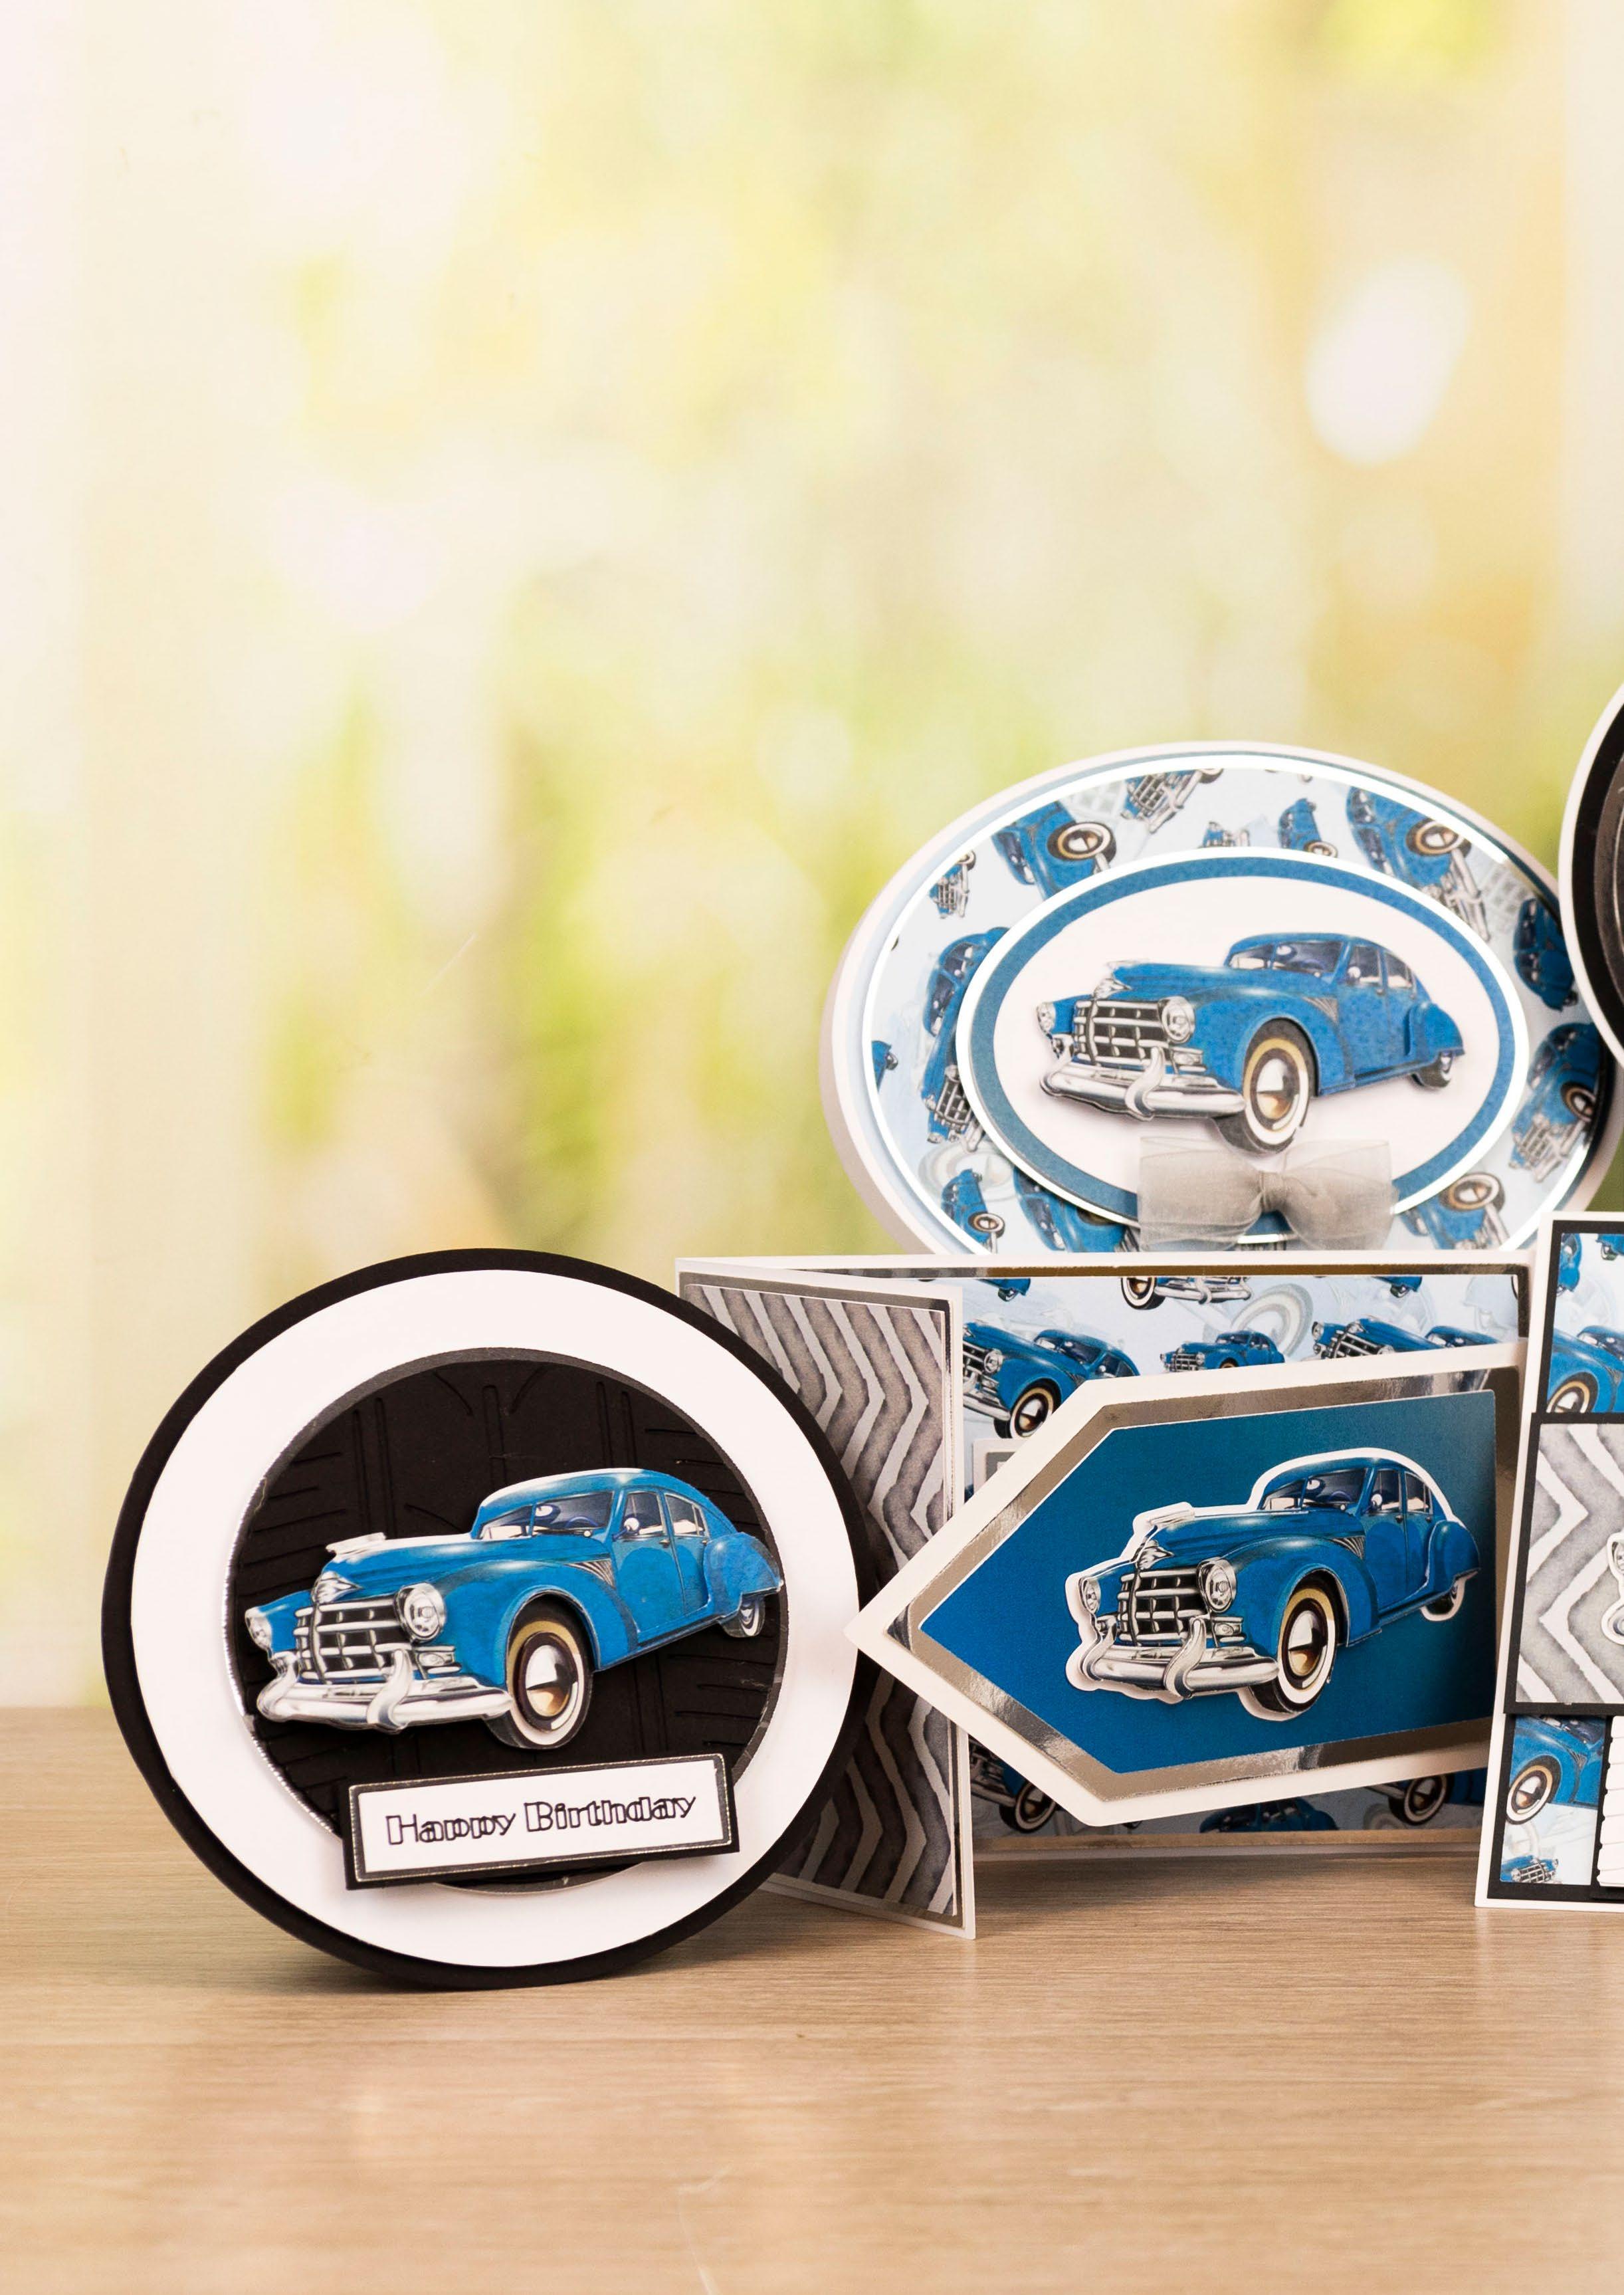
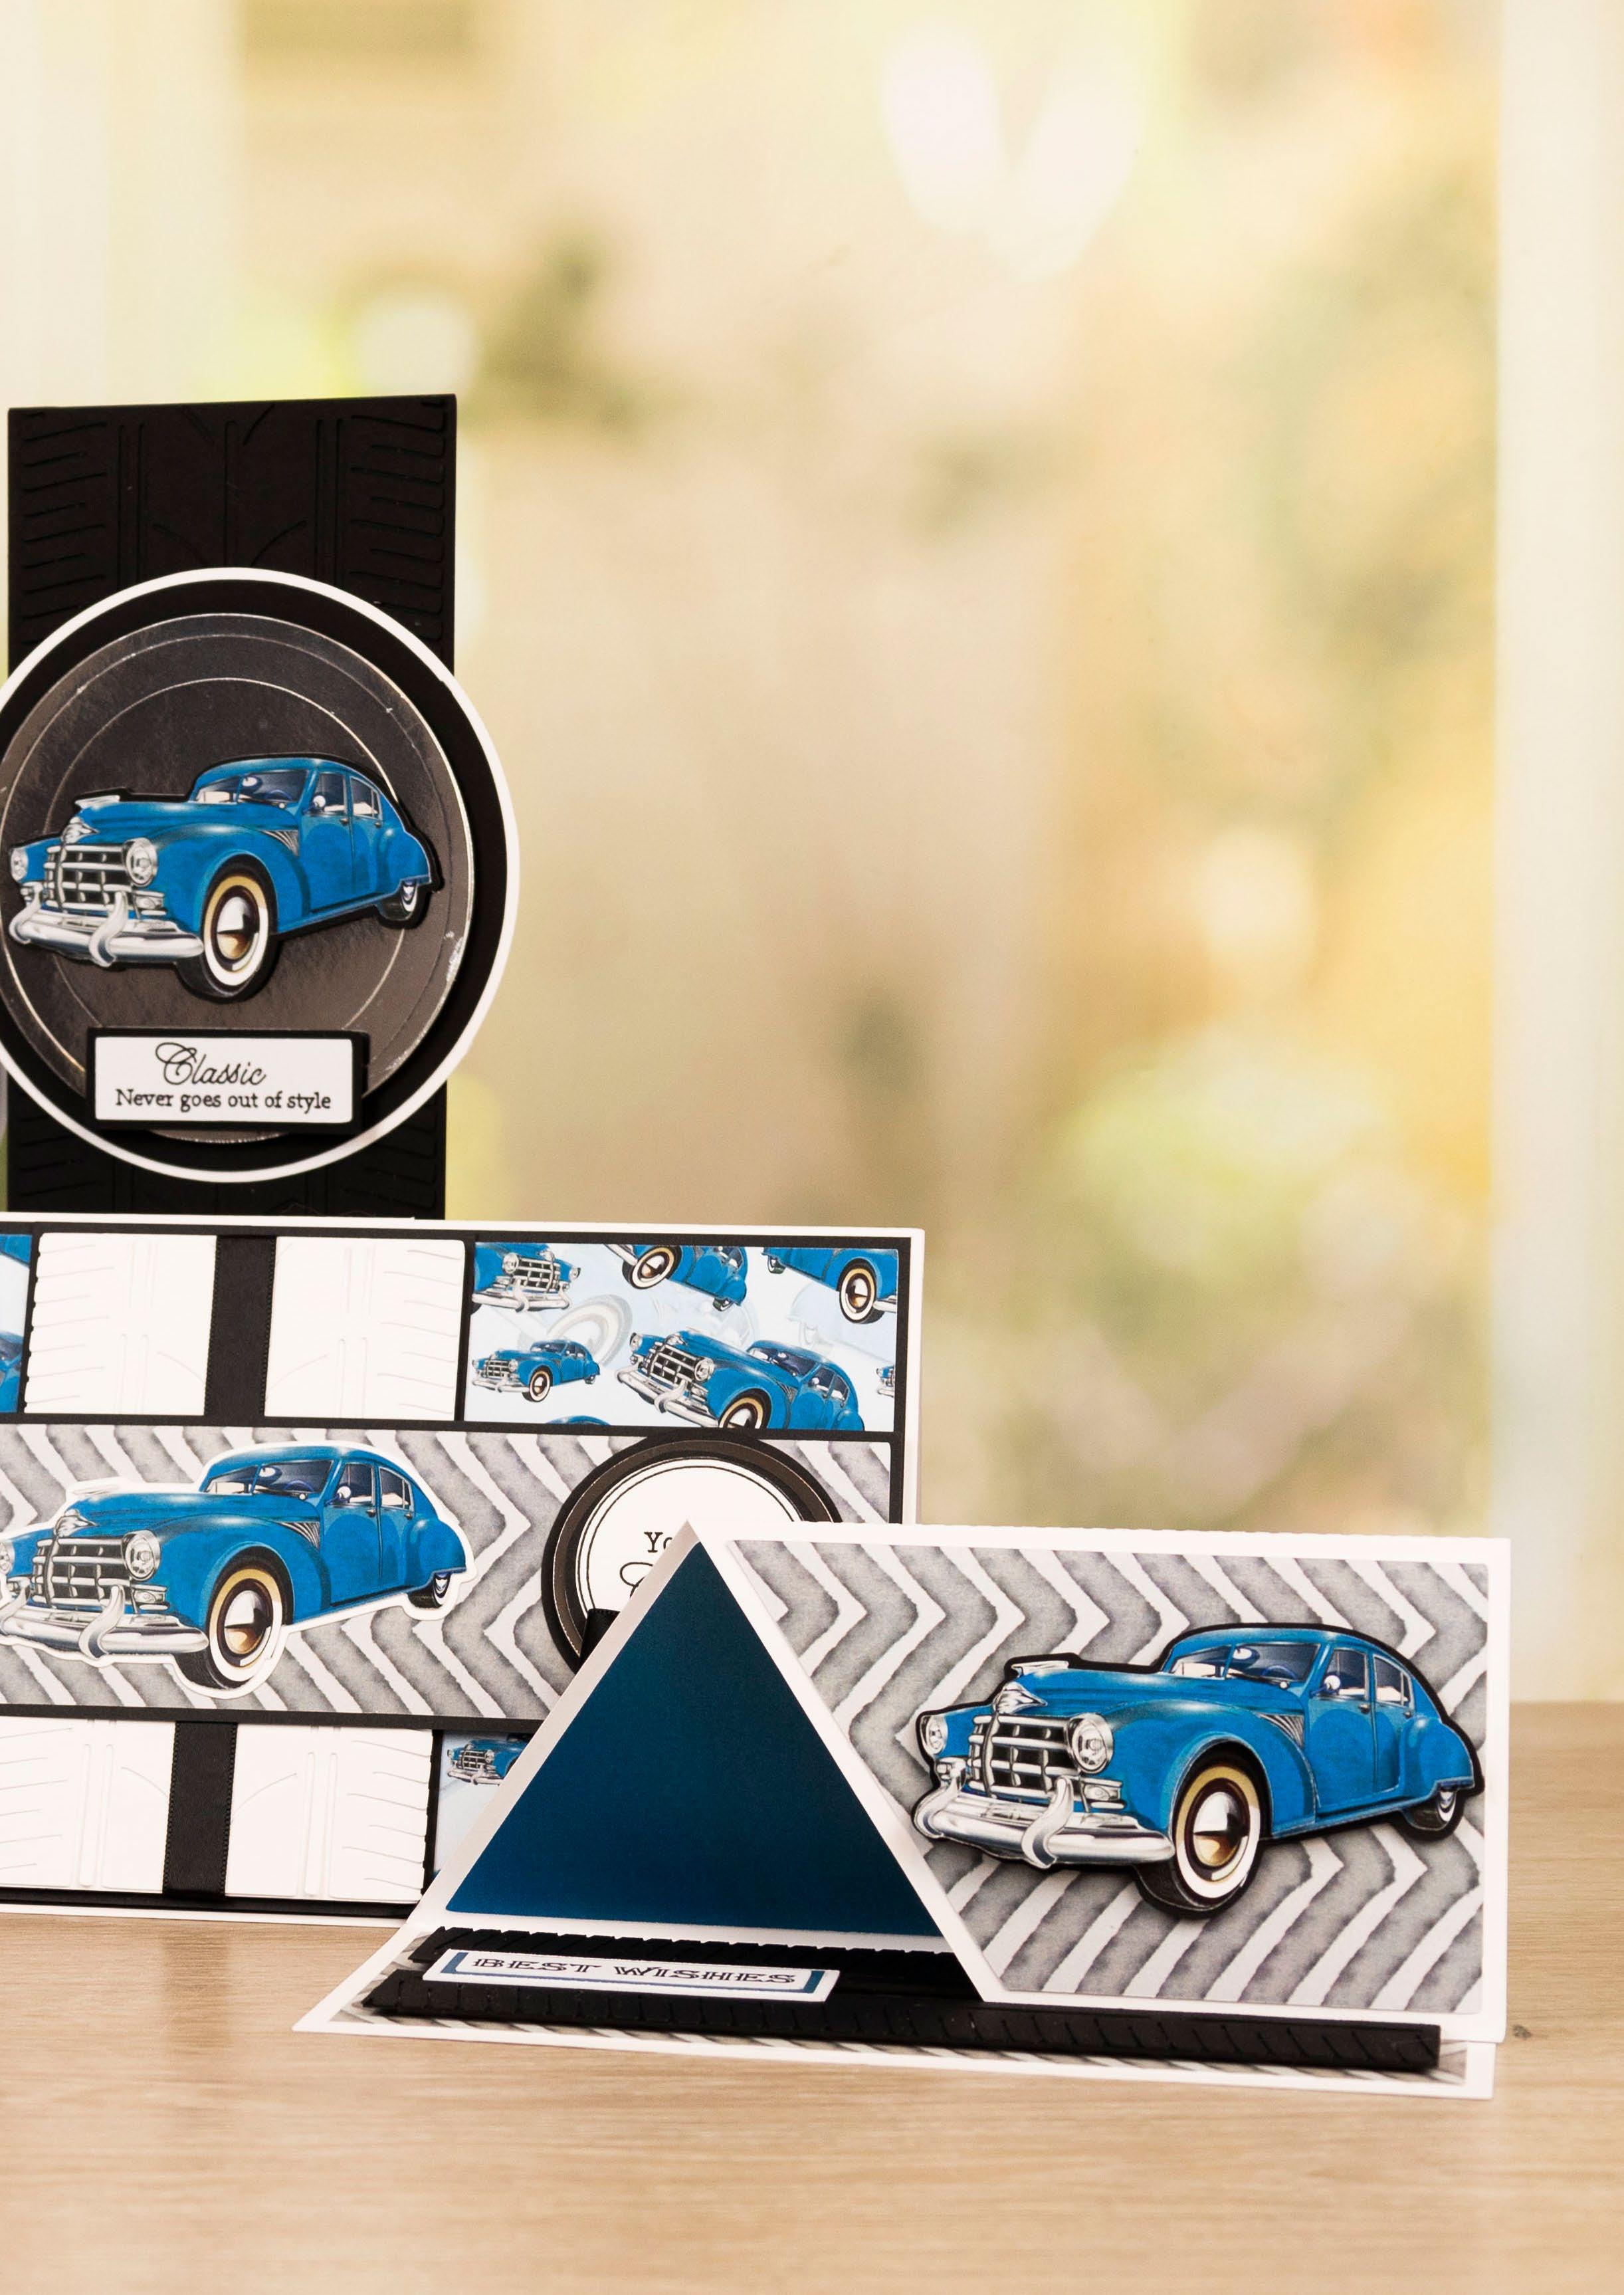
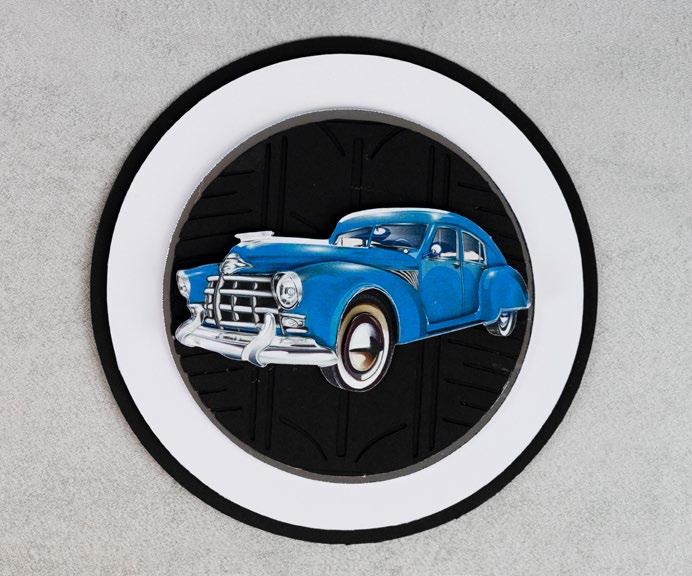
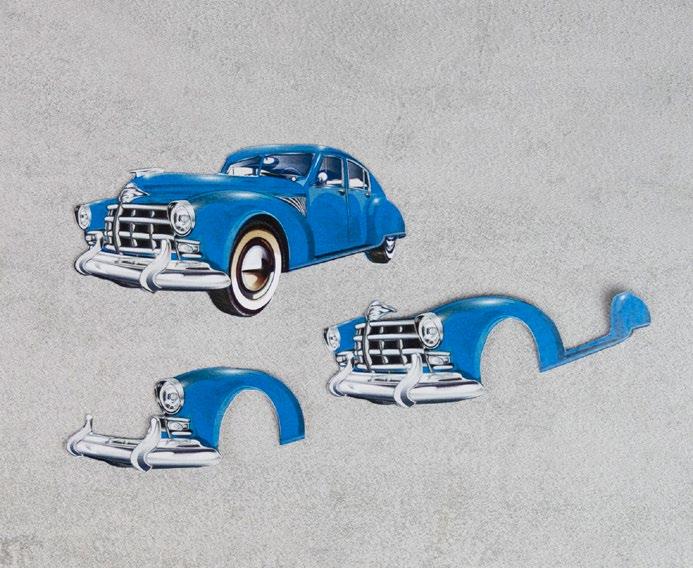
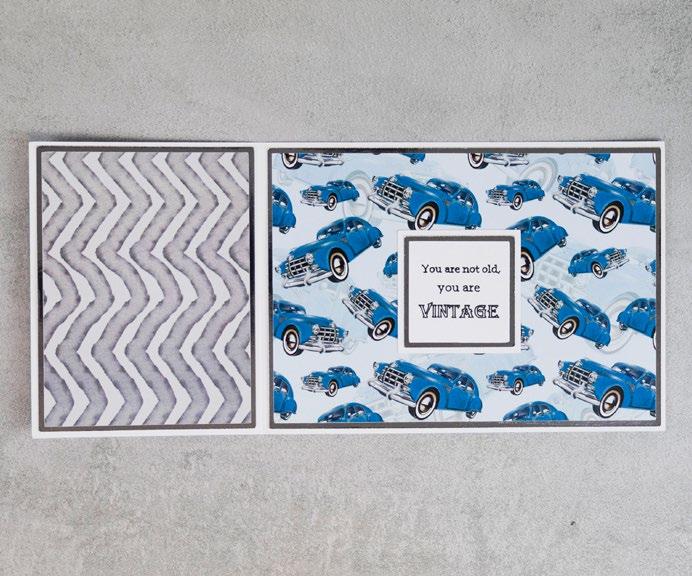
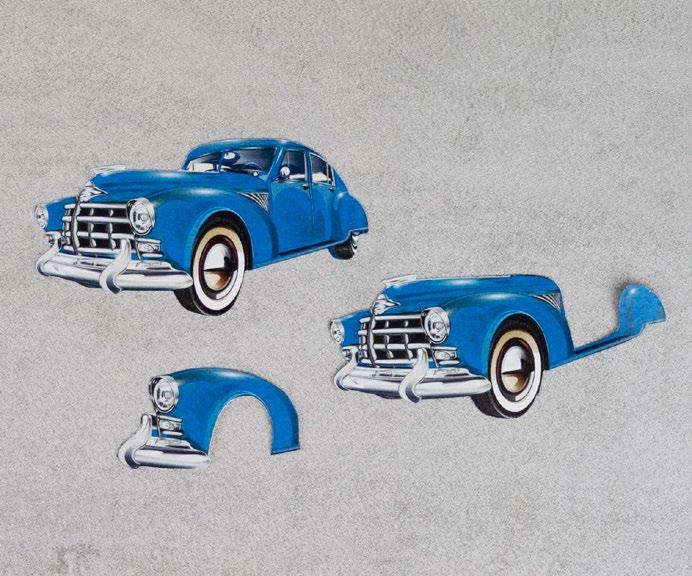
We've gone down a different road, pardon the pun, with your exclusive SVG for this issue and we're giving you this classic vintage car and tyre tracks stencil. This is a great little SVG for any car enthusiasts in your life!
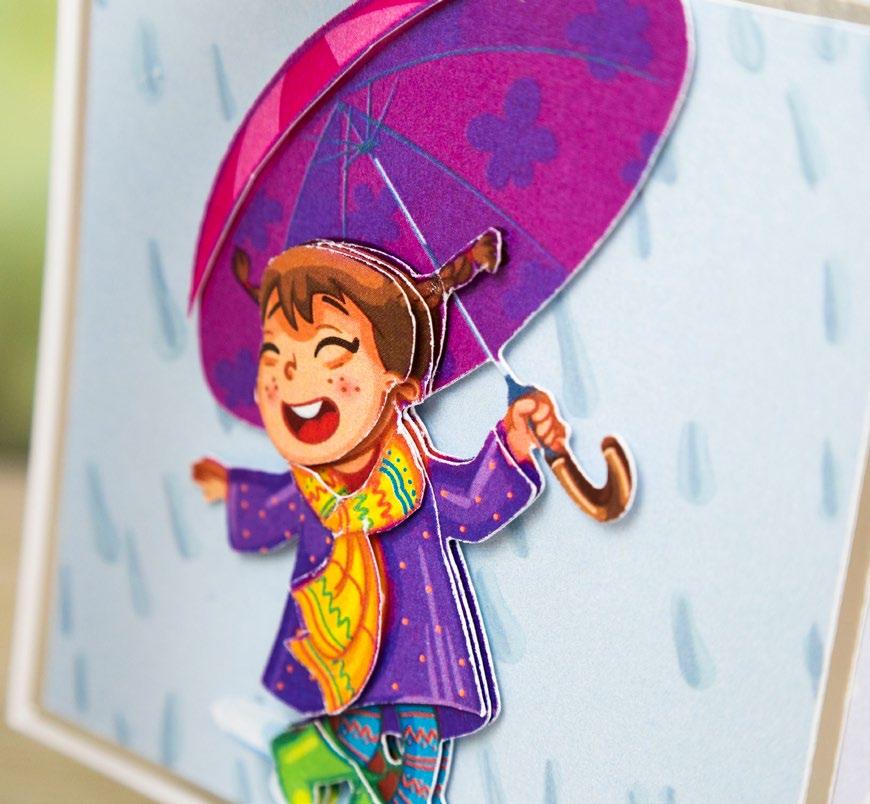
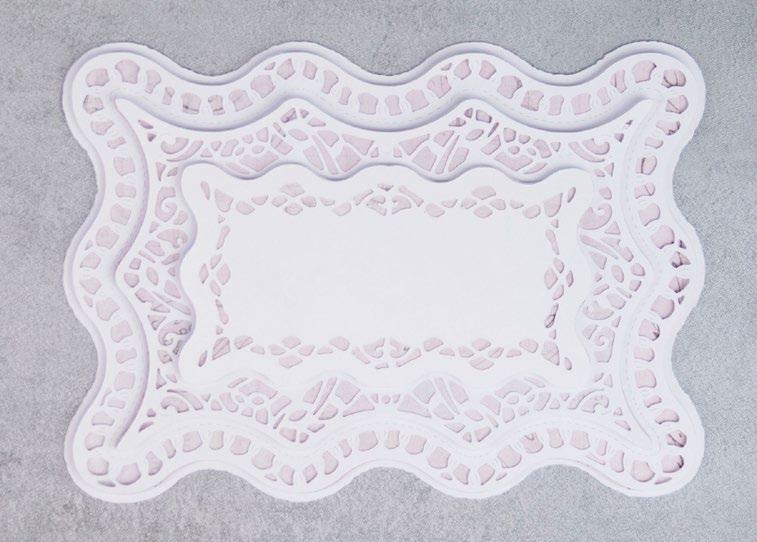
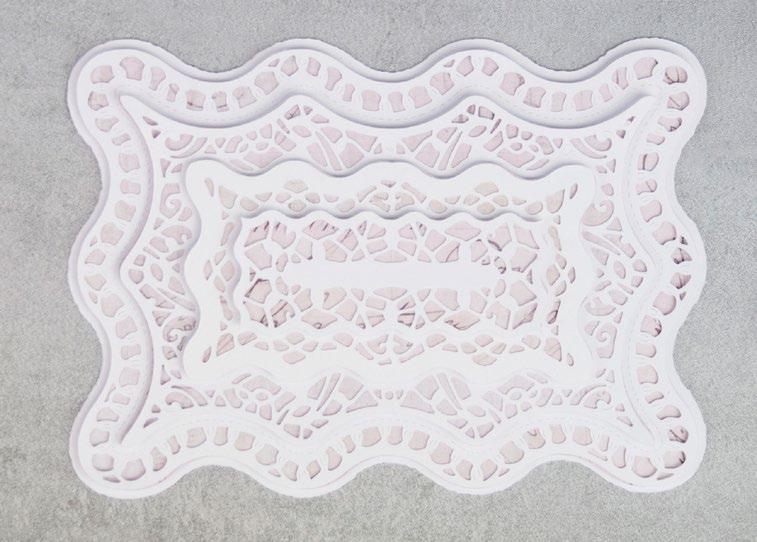
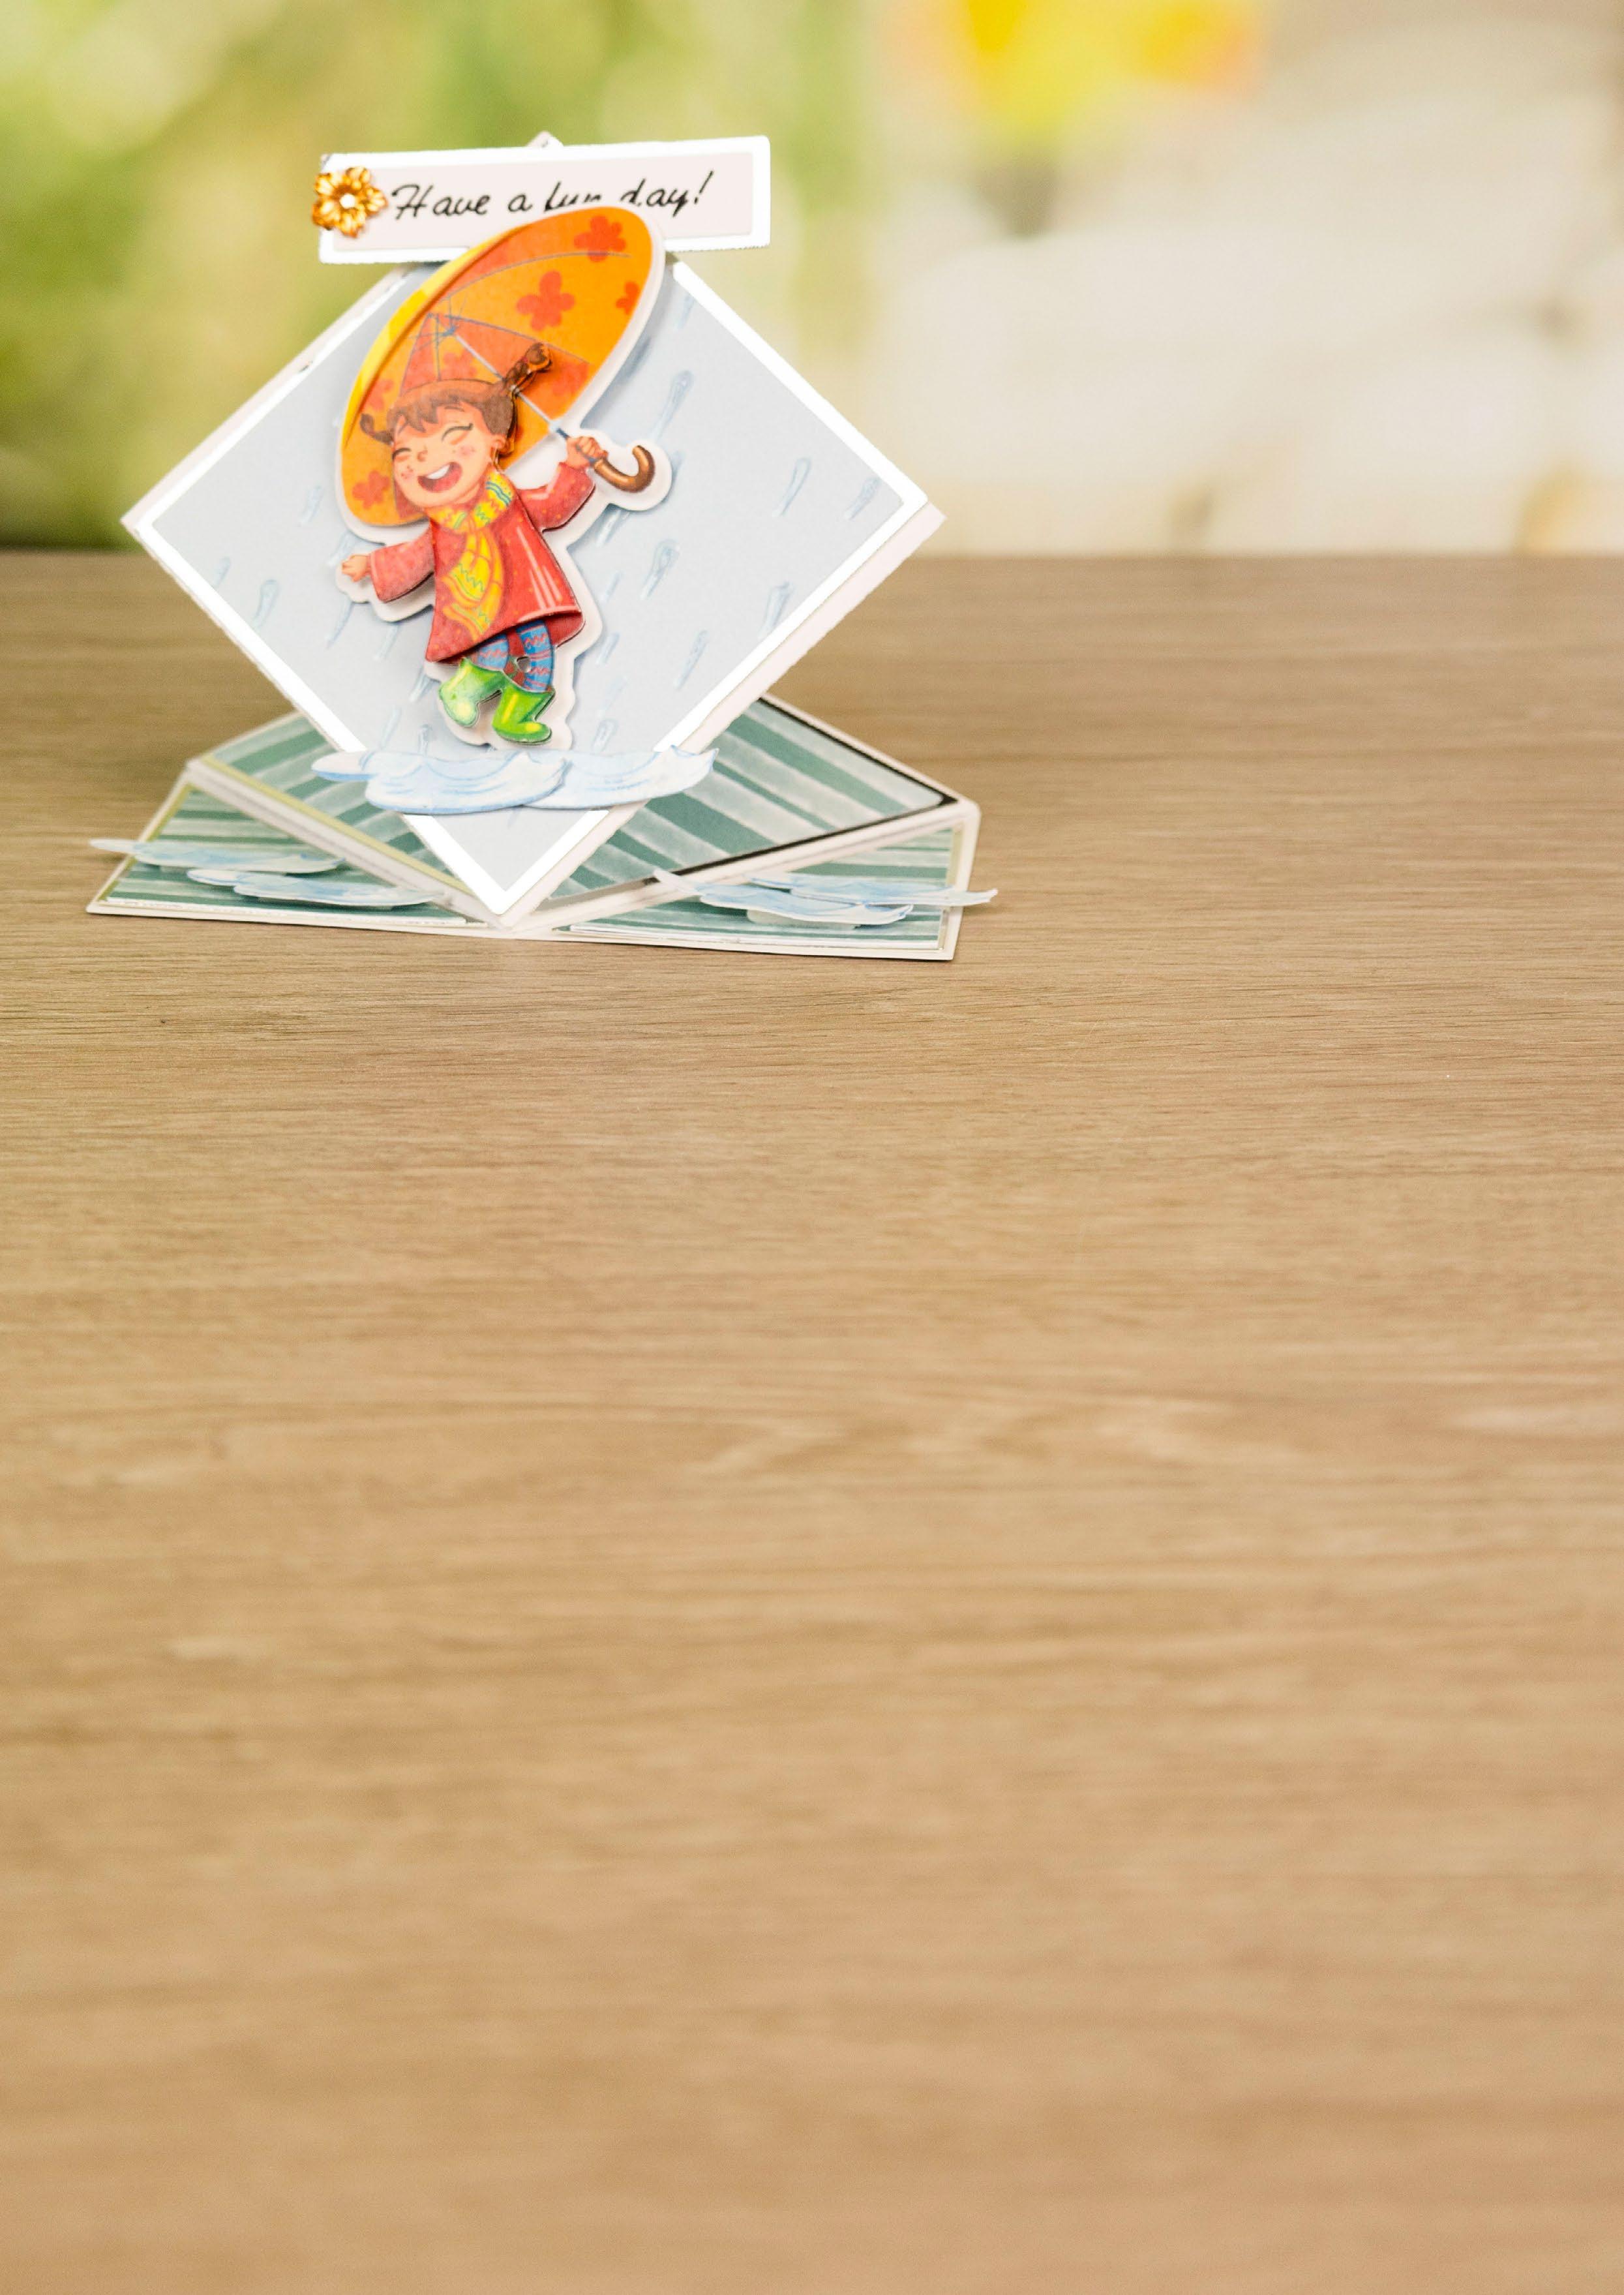
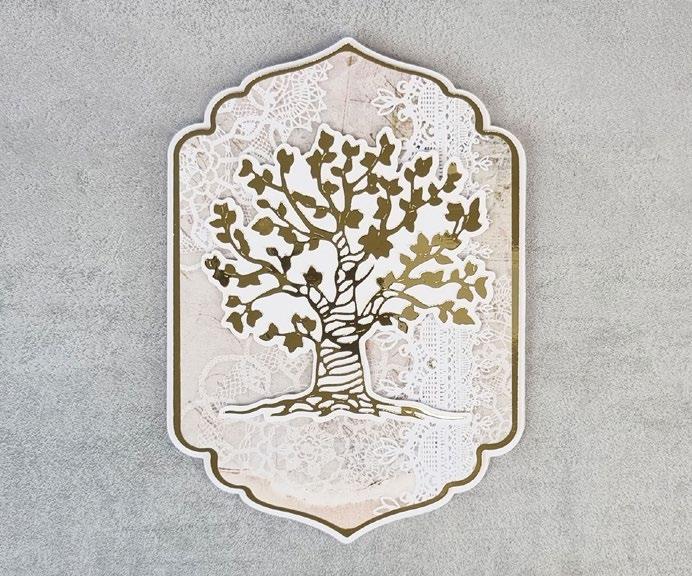
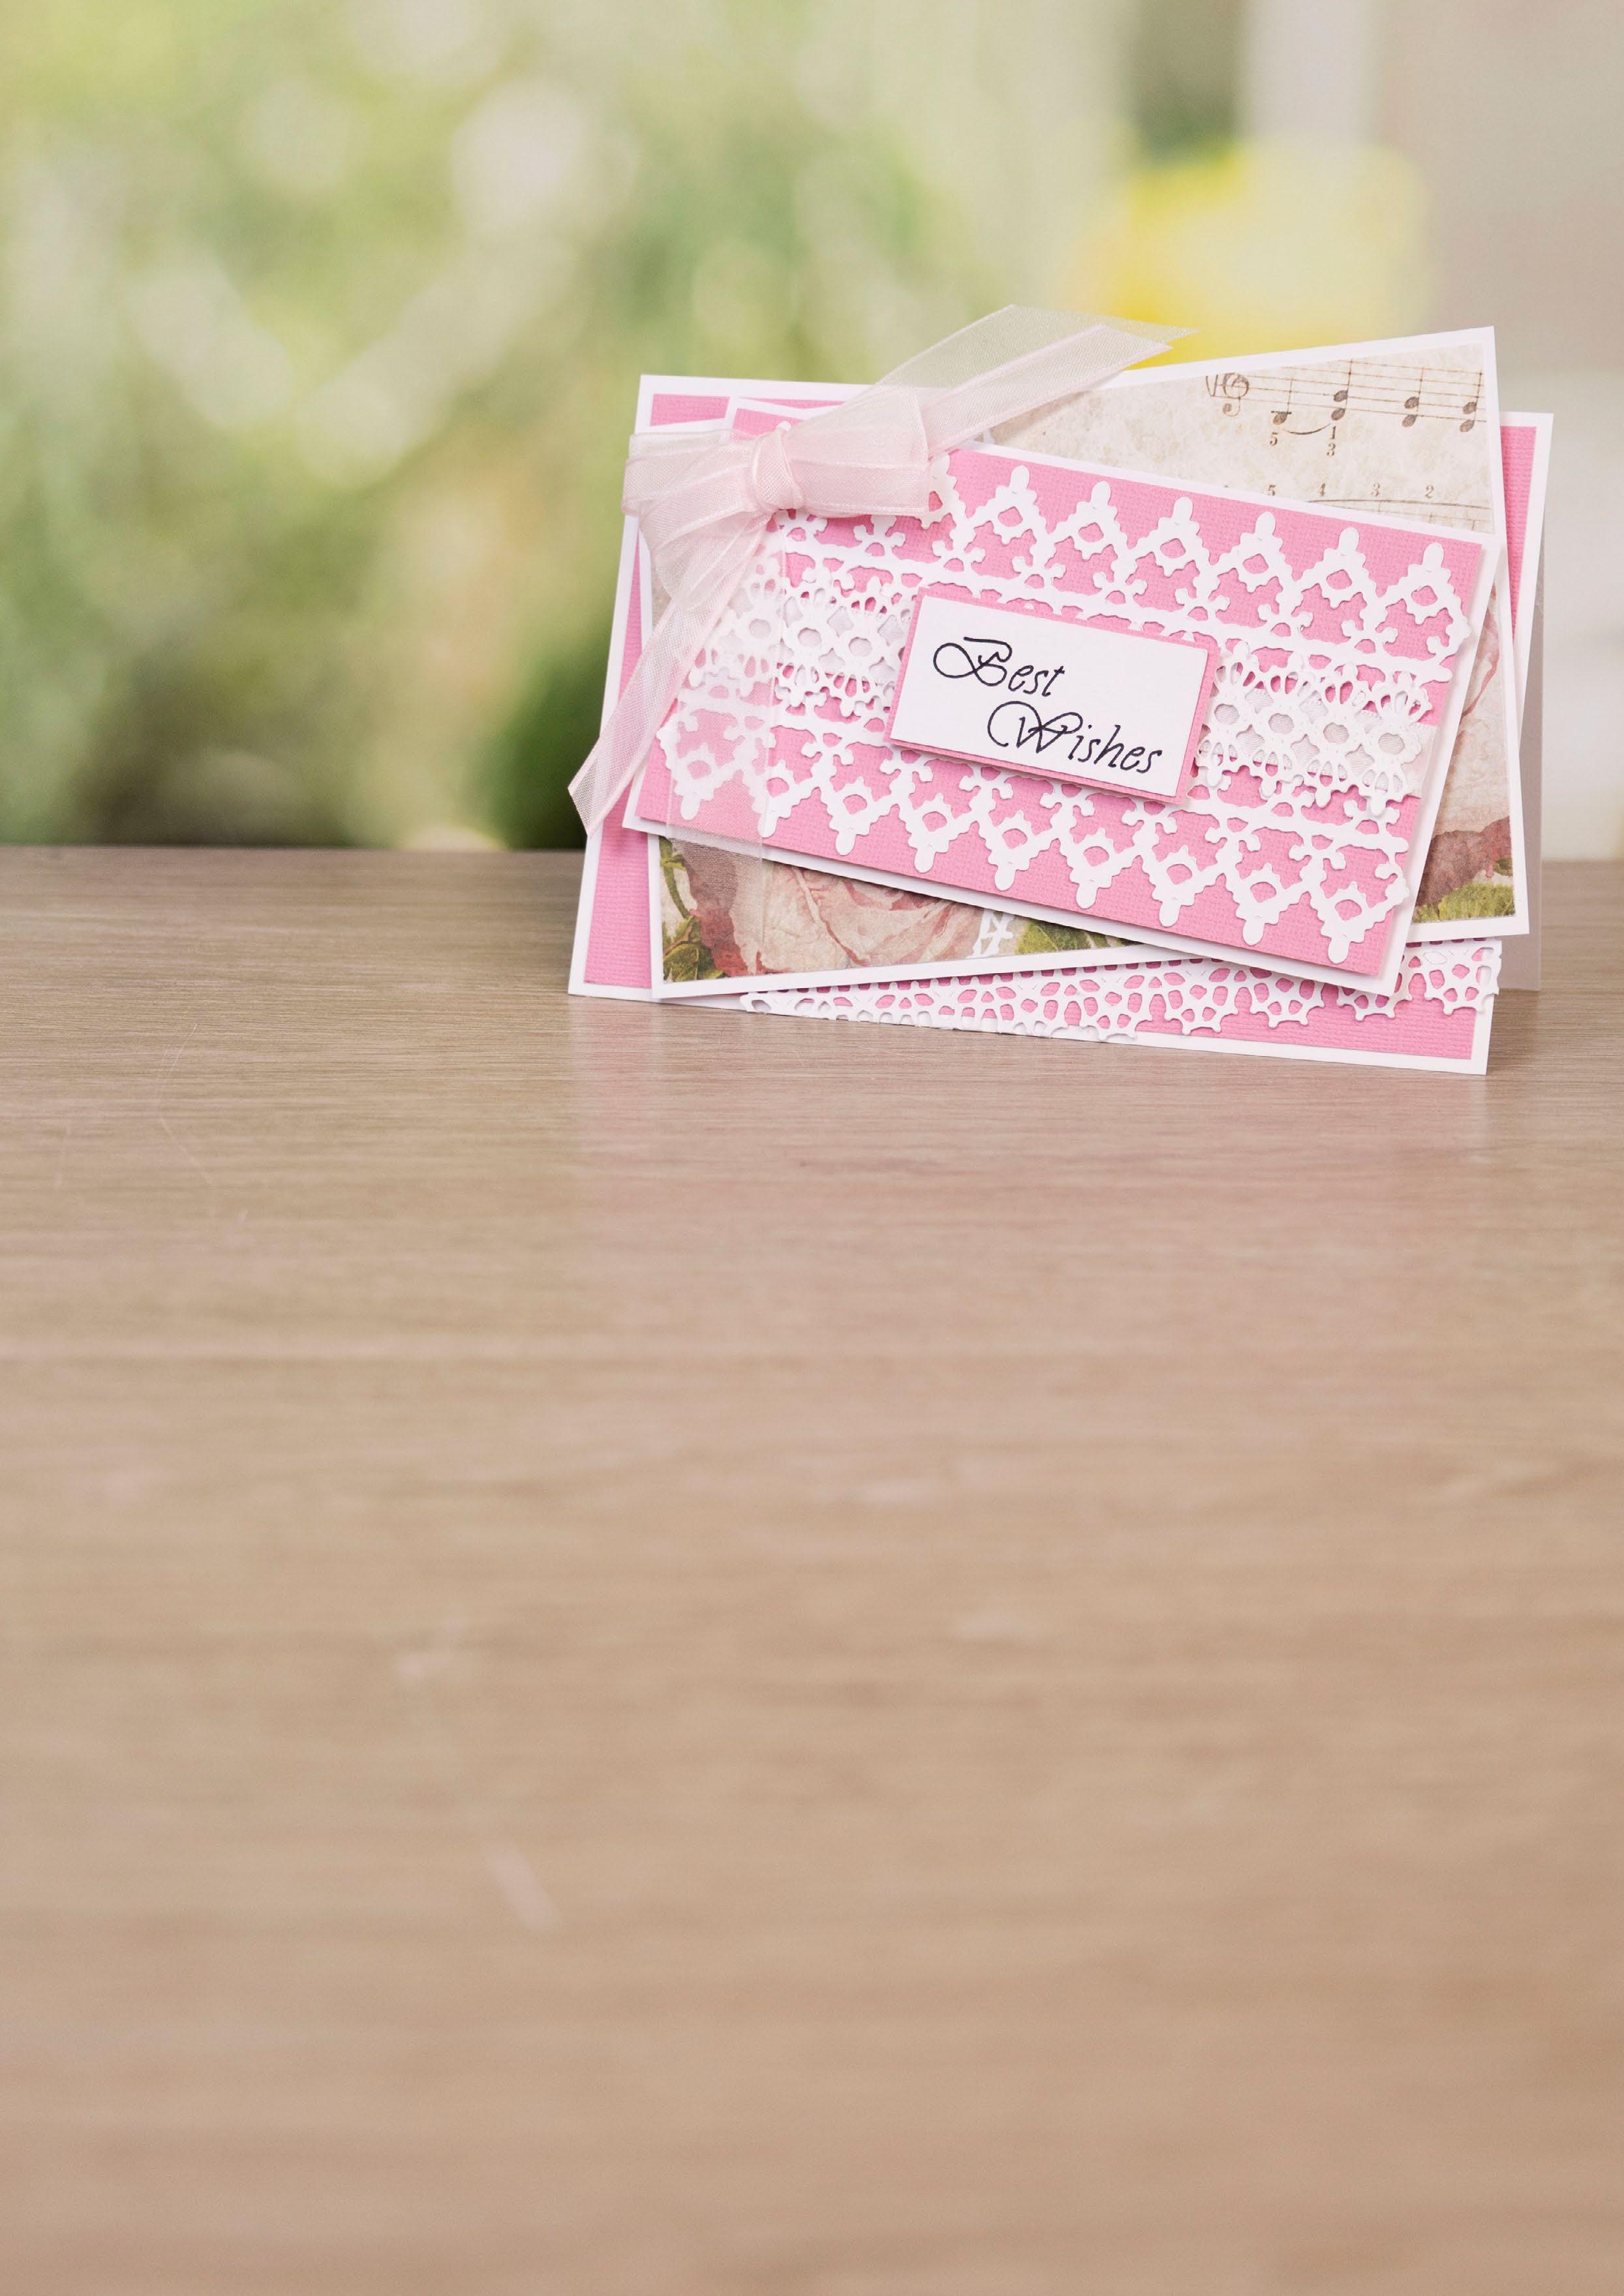
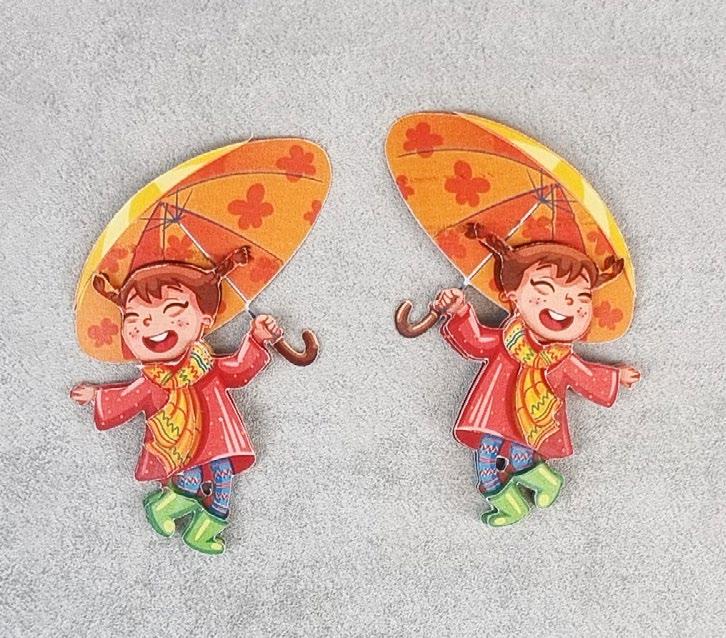
Going back to classic Tattered Lace we have some beautiful lacy SVGs in this issue with the Floral Beauty and the Borders Of Beauty. These are simply stunning when just cut from white cardstock. Then we have some fun over the edge sentiment SVGs and a cute little girl having the time of her life dancing in the rain! There's also the Tree Of Life SVG, which on it's own is a beautiful tree, but you can add your family members with the frame to make perfect family cards.
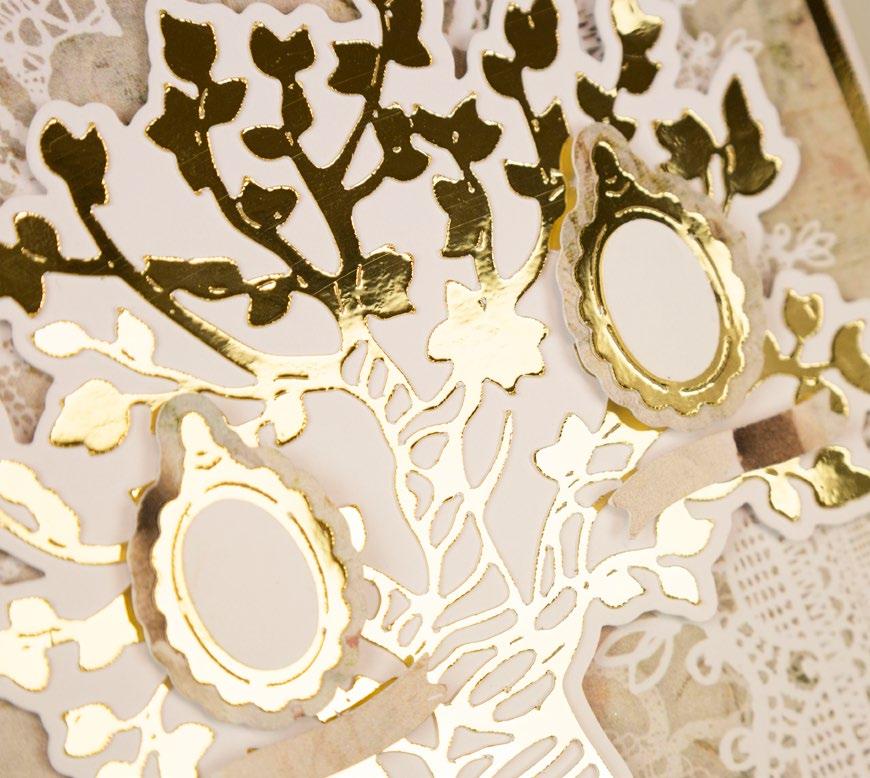
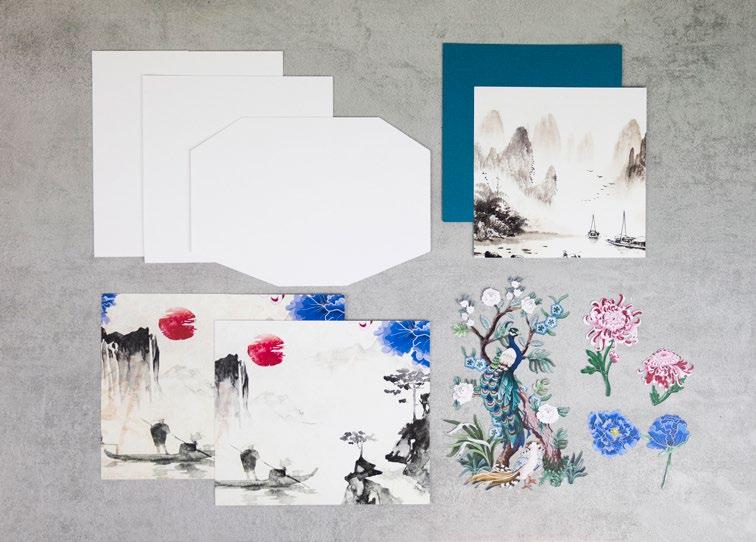
We loved our Vintage Heirloom collection so much and there is so much you can do with all those nested shapes so we brought this back to show you a bit more. We've also featured the Floral Facade collection which has gorgeous scenes and a screen, as well as pretty florals. David has made a lovely lantern with these!
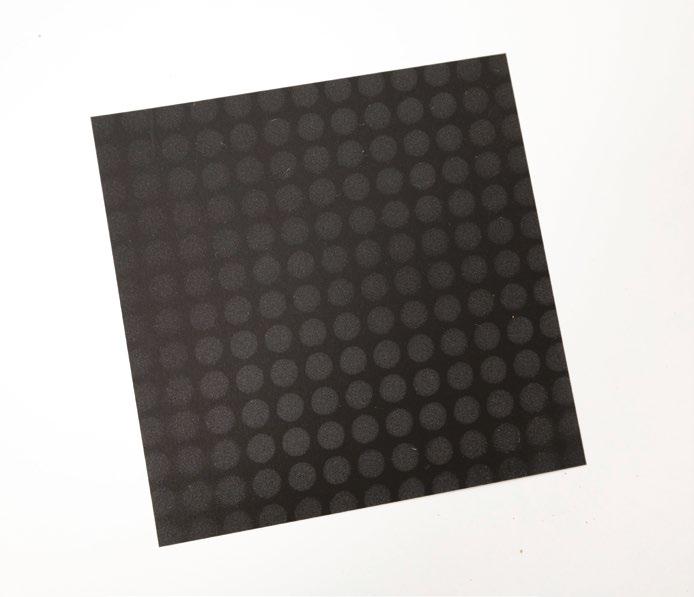
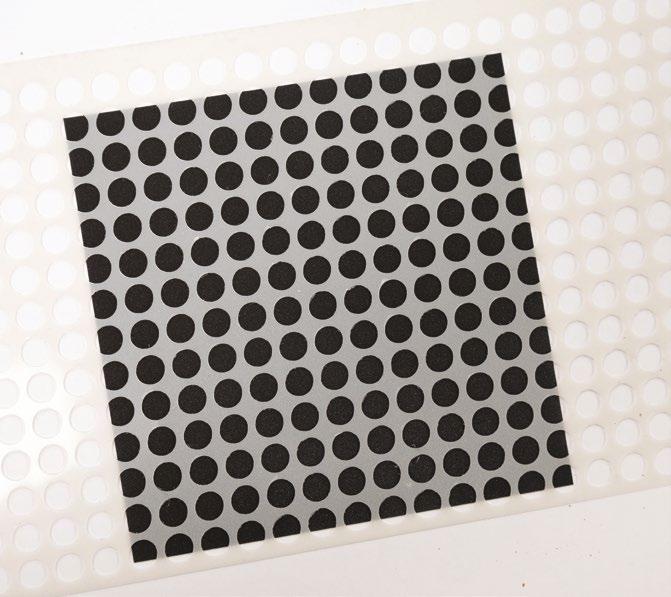
Check out the How-To on page 56 for how to make a great stencil background using just a simple butterfly file and your machine.
Hope you enjoy and happy crafting!
CONTENTS
4-14 EXCLUSIVE GIFT: VINTAGE VOYAGE
6 projects using your exclusive Vintage Voyage SVG & tyre tracks stencil.
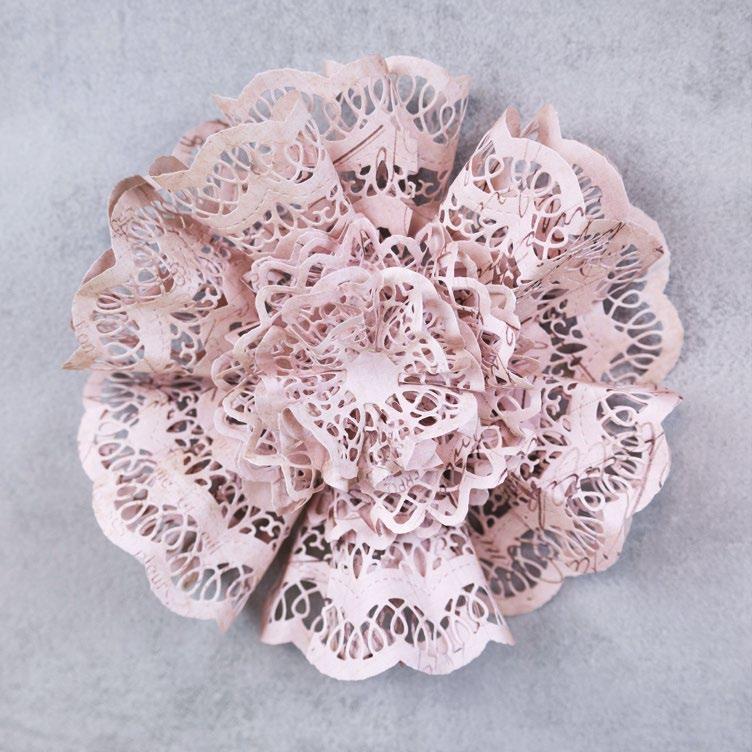
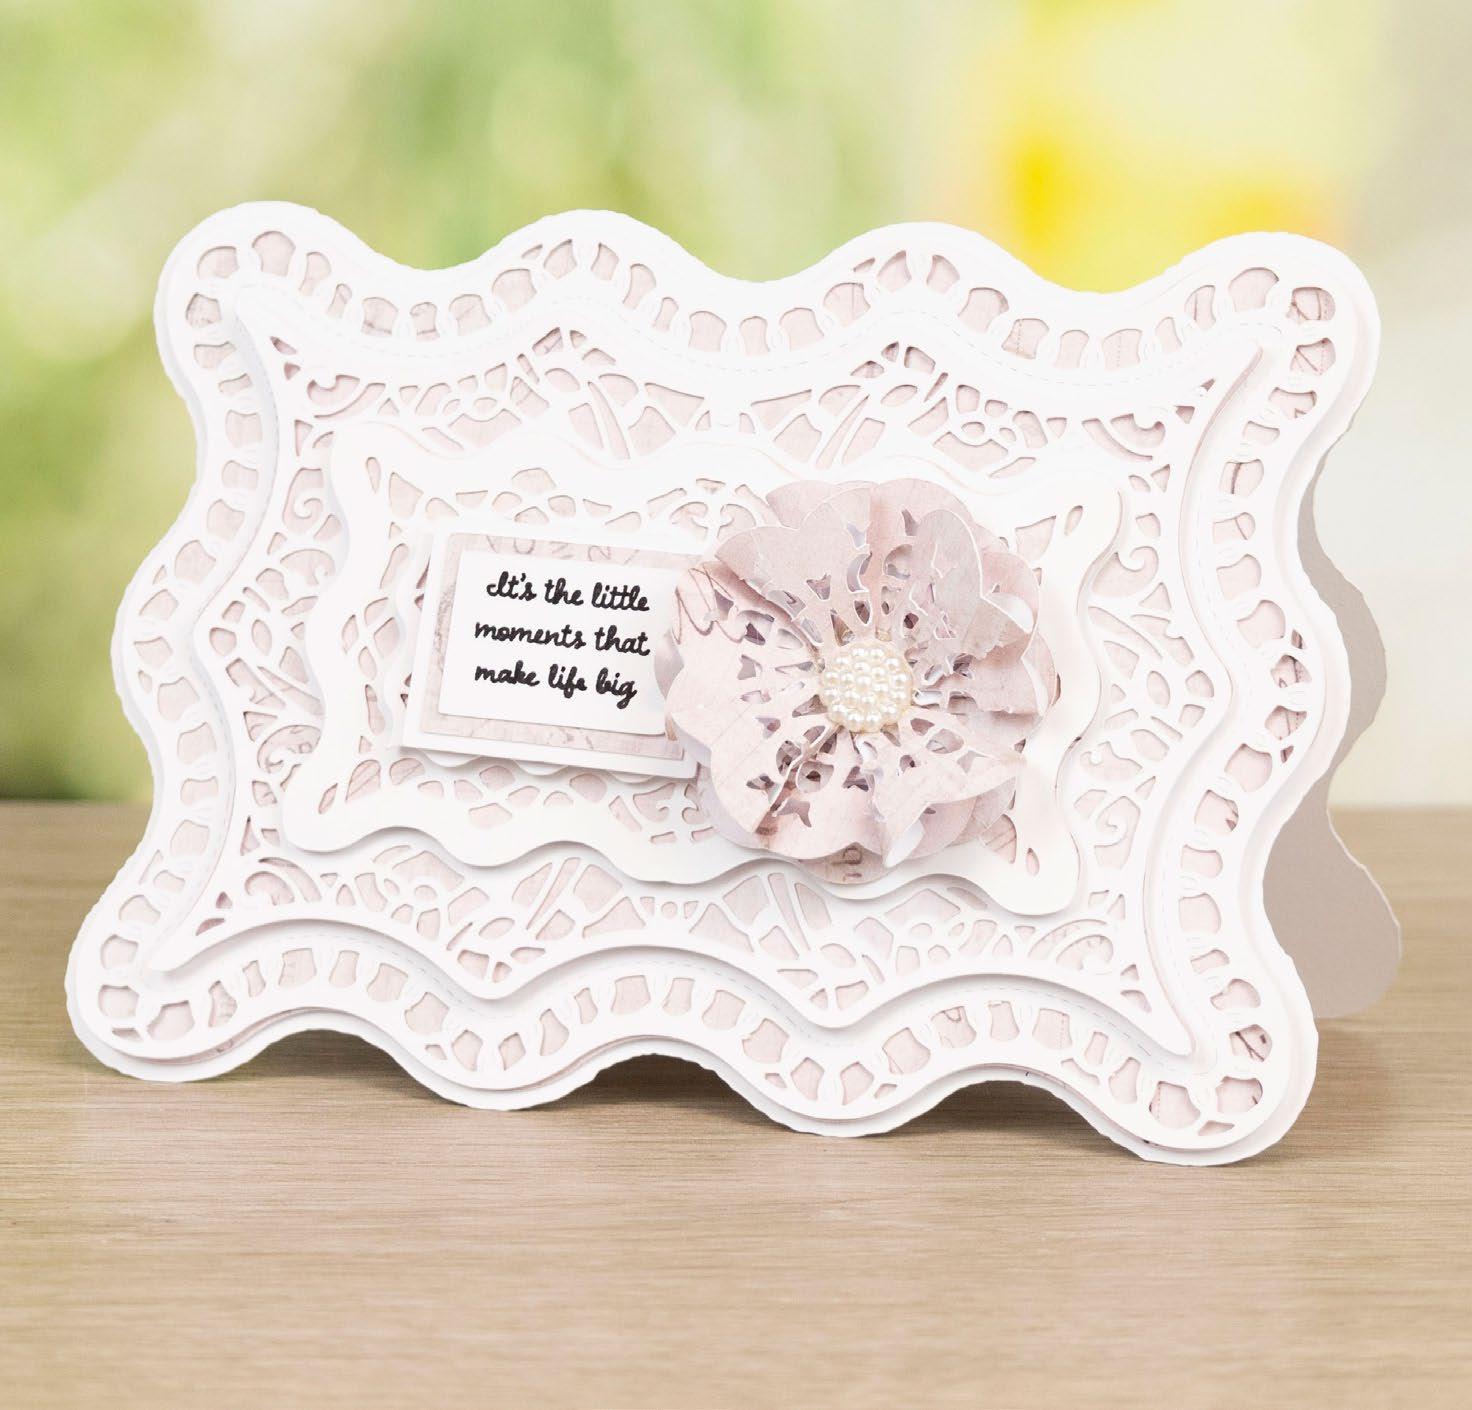
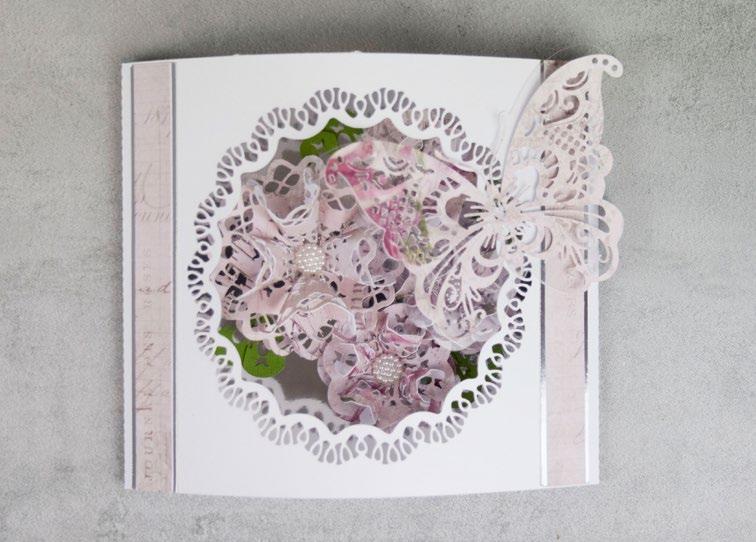
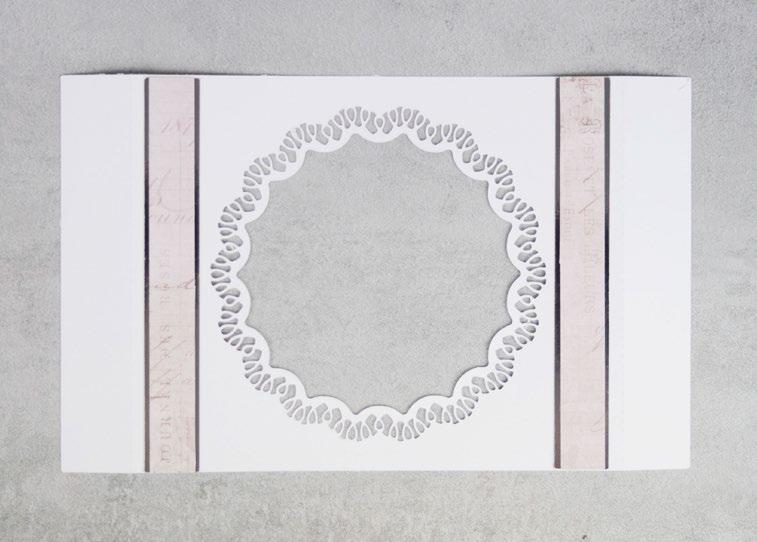
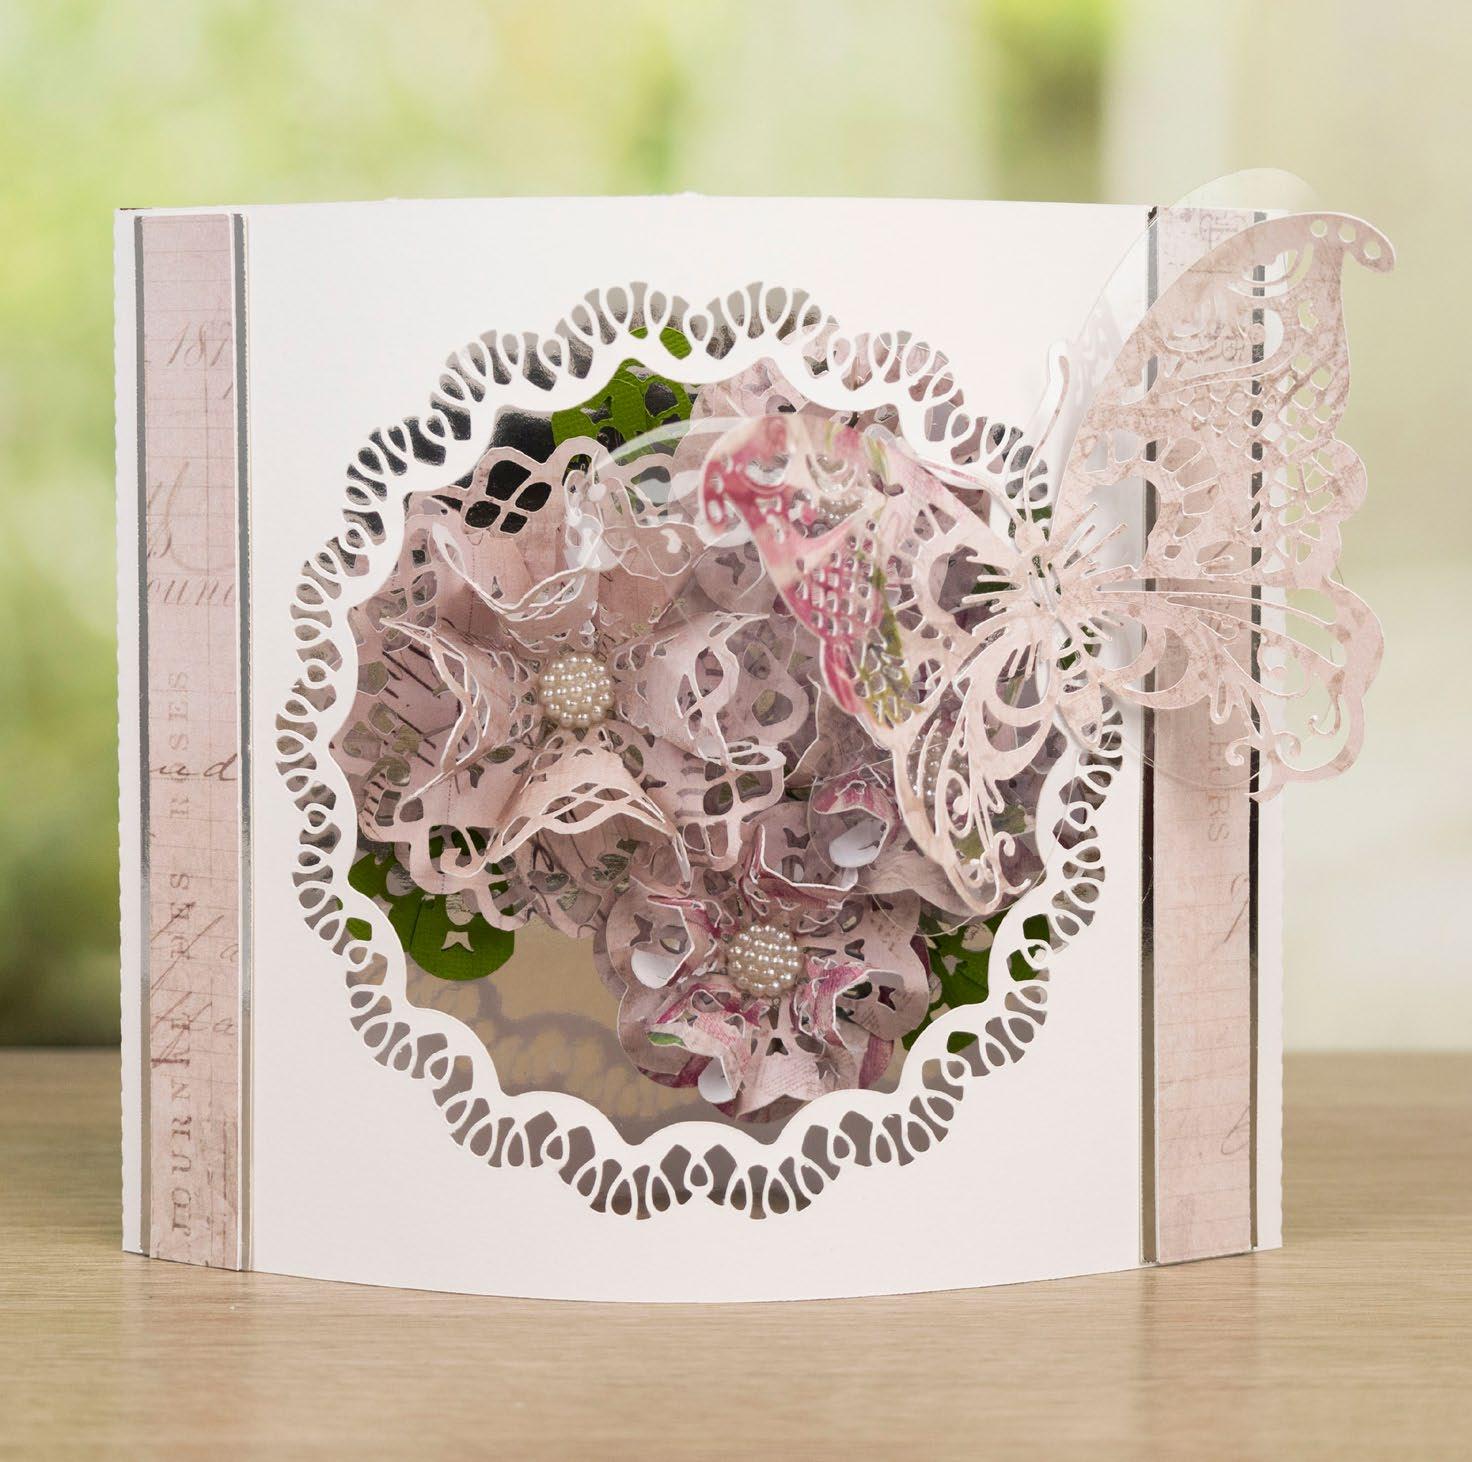
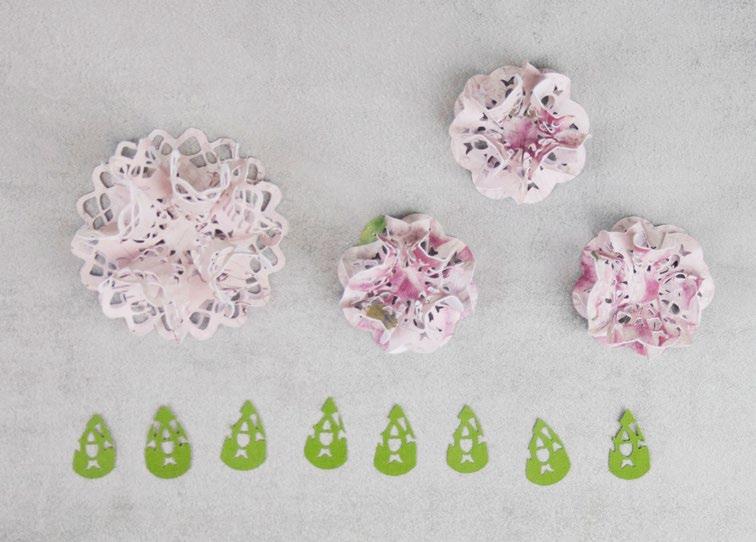
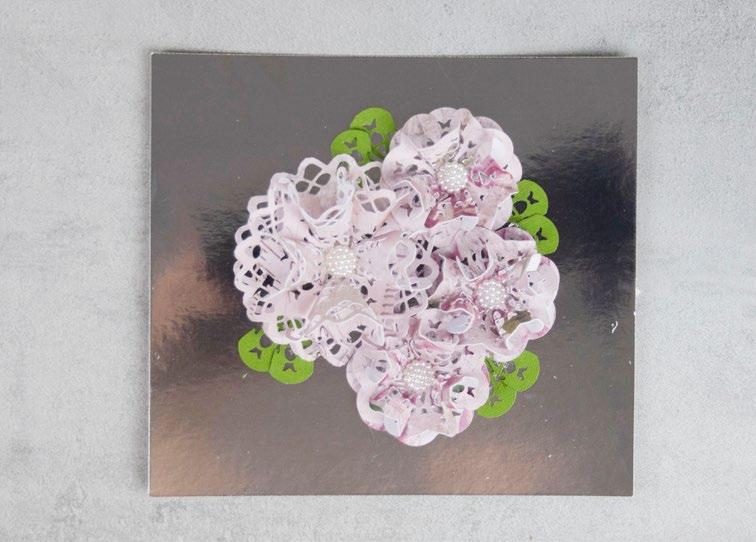
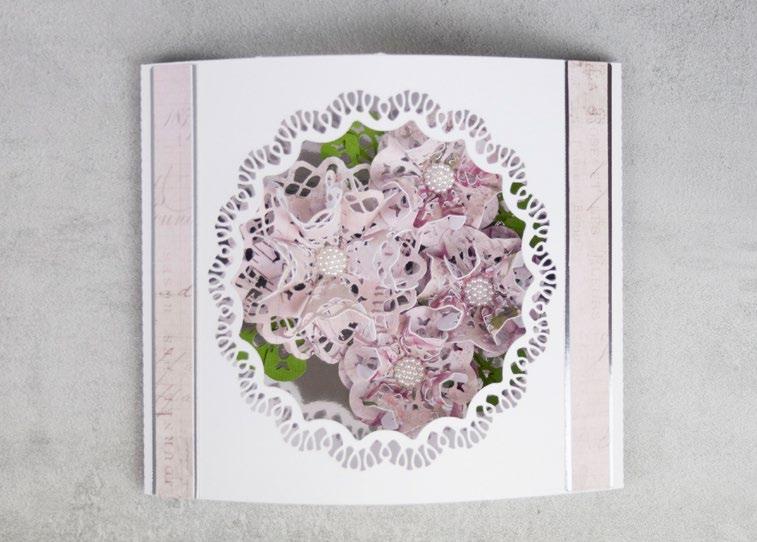
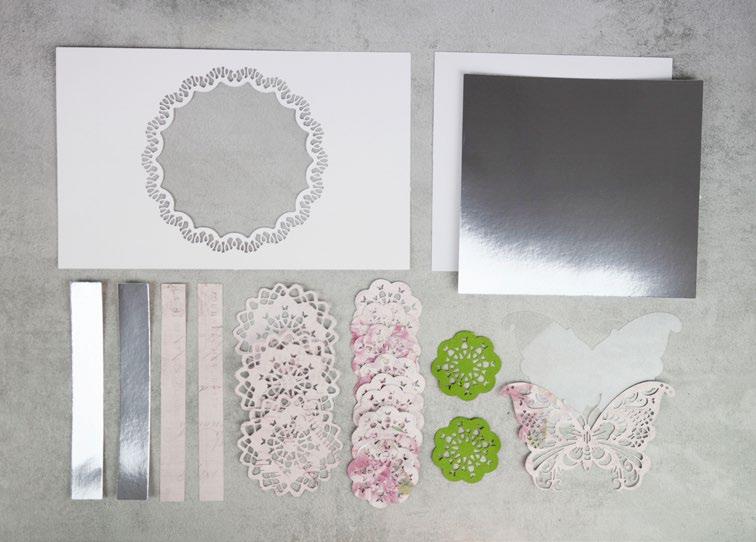
15 HOW TO: MAKE FLOWERS WITH THE CIRCLE INTERLOCKING DIE SET
Vicky show's you a simple way to make beautiful lacy flowers using the circle SVGs.

16-19
PROJECTS: VINTAGE HEIRLOOM
We loved this collection so much we wanted to show you more!

20-21 SPECIAL FEATURE: DAVID'S LANTERN
David Wait show’s you how to make a stunning lantern using SVGs from our Floral Facade collection.
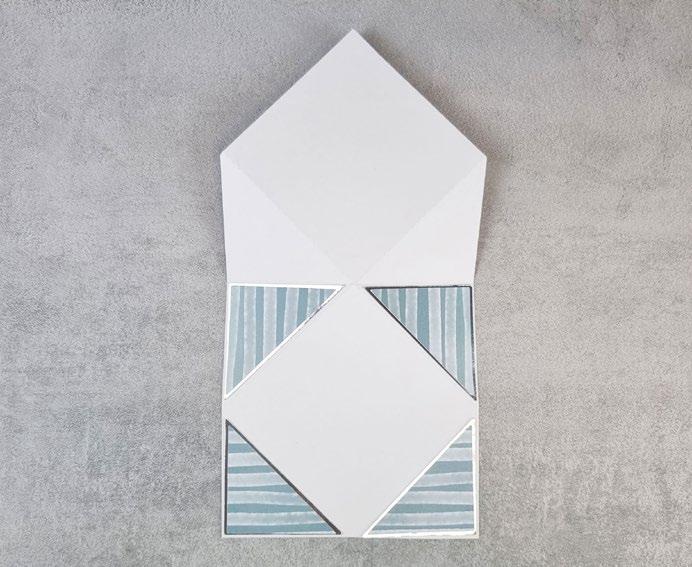
22-23 SPECIAL FEATURE: LOUISE'S POP UP CARD
Louise has made a great pop up card using the exclusive SVG with one of our over the edge sentiment SVGs!
in
ONTHE COVER! 2 | www.tatteredlace.co.uk
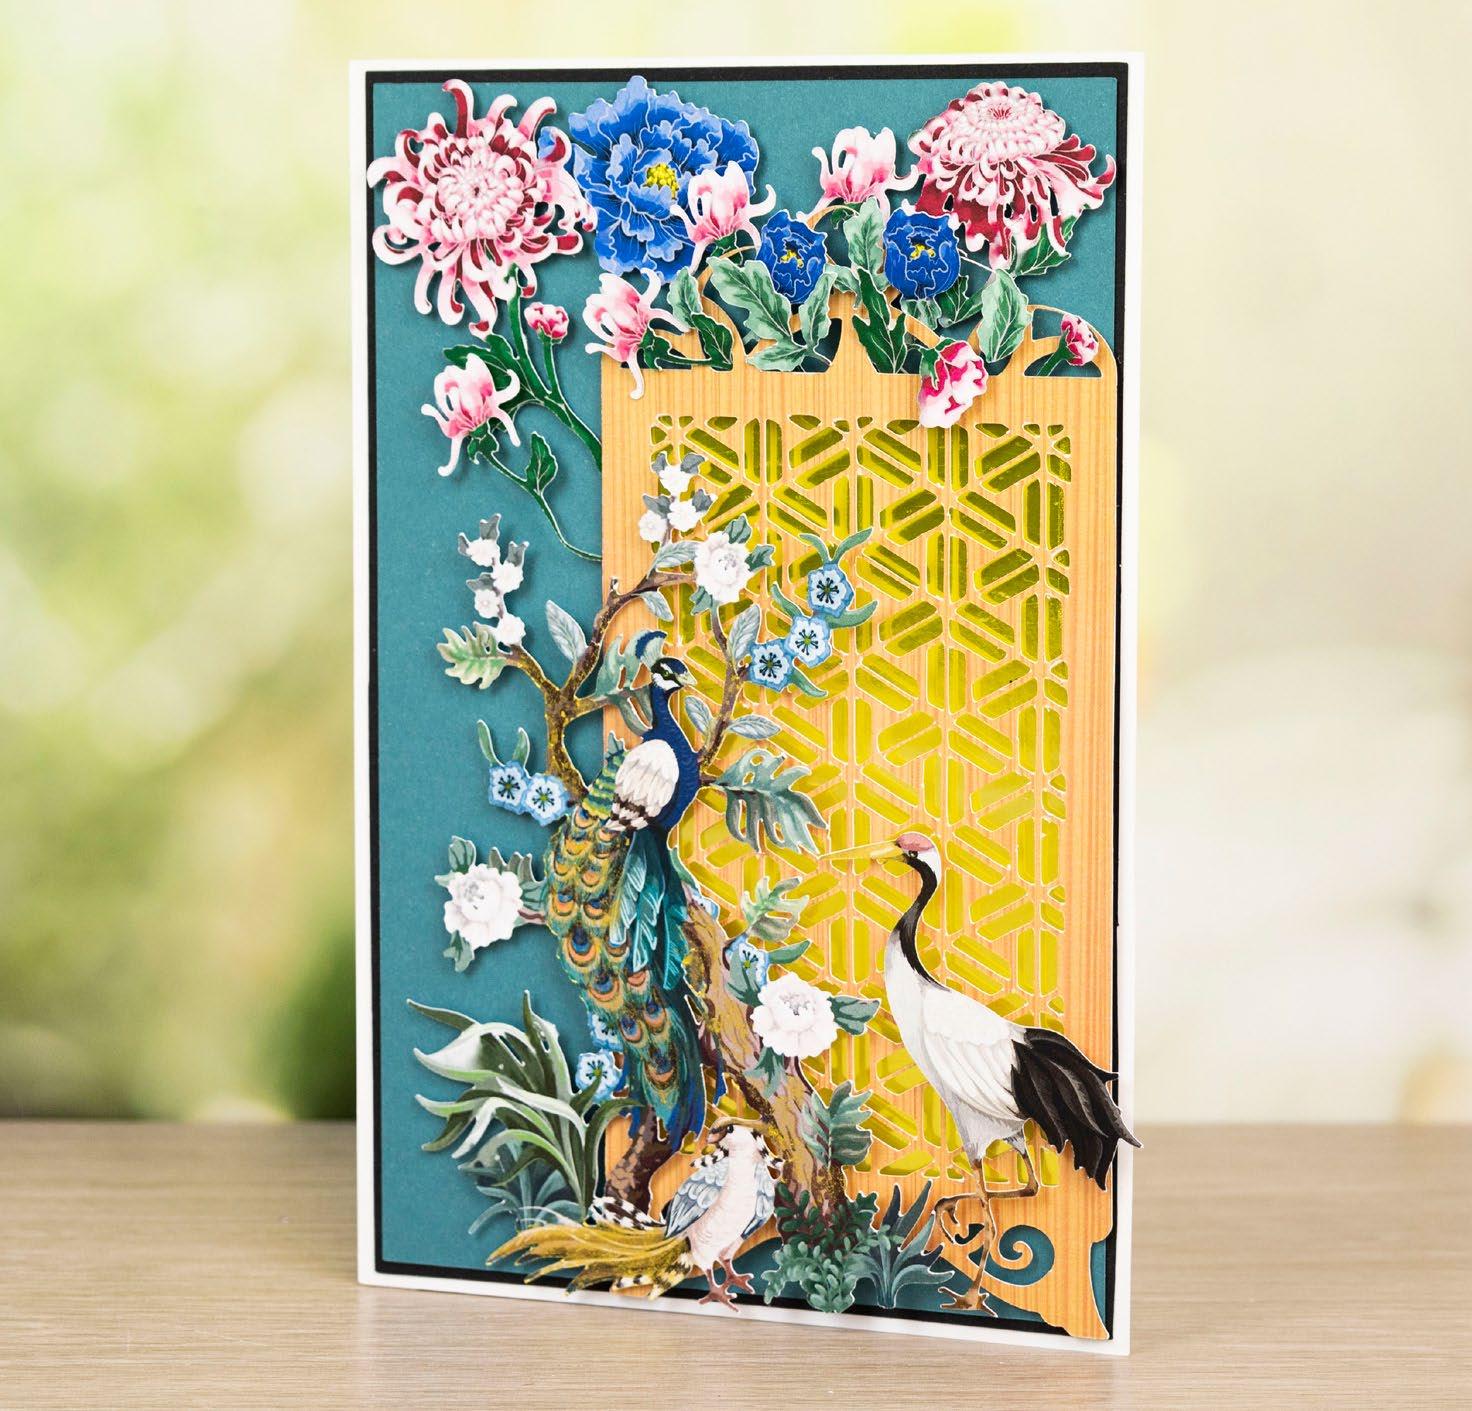
24-27 PROJECTS: FLORAL FACADE A collection inspired by antique screens and ink paintings. 28-29 SPECIAL FEATURE: DOUBLE HEART EASEL This special card features a good mix of the collections used in this magazine. 30-31 PROJECTS: THE POWER OF WORDS To use over the edge or just as simple sentiments! 32-36 PROJECTS: DANCING IN THE RAIN There's some great card shapes included to use with this fun SVG! 37 BREAKDOWNS: FLORAL BEAUTY Snip into the SVG cuts and see what else you can create! 38-39 PROJECTS: FLORAL BEAUTY This floral heart makes a beautiful topper for your cards. 40-42 INSPIRATION: 6 WAYS WITH GILDING We've had some fun with gilding flakes and show you some of our favourite ideas for creating stunning background effects. 44-47 PROJECTS: TREE OF LIFE Create gorgeous cards for all the family! 48-51 PROJECTS: BORDERS OF BEAUTY These lacy borders are the perfect decoration to any card! 52-55 SPECIAL FEATURE: HIDDEN SPINNER GIFT BOX This cute gift box has a little suprise inside when you open it up! 56-57 HOW TO: MAKE A BUTTERFLY STENCIL BACKGROUND Use one of your magazine SVG files to make a stencil background. 56-57 NANCY’S COLUMN Let’s see what Nancy has been up to lately! TATTERED LACE TEAM Managing Editor Beckie Warburton Editorial Assistant Diane Peternel Consultant Editor Nancy Watt Craft Consultant Stephanie Weightman Consultant Project Designers Louise Patten Vicky Derrick Graphic Designers Jon Peters Sam Bruce Craft Experts Stephanie Weightman Melanie Heaton David Wait Amanda Carpenter Kasia Chojnacka Media Manager Andrew Coates Web Developer Sean Platts MEL’S HINTS & TIPS! WHICH CARDSTOCK? Please use the guide below as an indication of which cardstock is best to use for each part of your card projects throughout this magazine. BASE CARD: 240-300GSM MAT LAYERS: 240GSM STASH FILES/CHARISMA: 120-140GSM Now that you are familiar with your machine you will find that you need to unlock the aspect ratio on the rectangle / oval to cut the shapes required for some projects. All dimensions are included in mm to give you the perfect measurements. www.tatteredlace.co.uk | 3
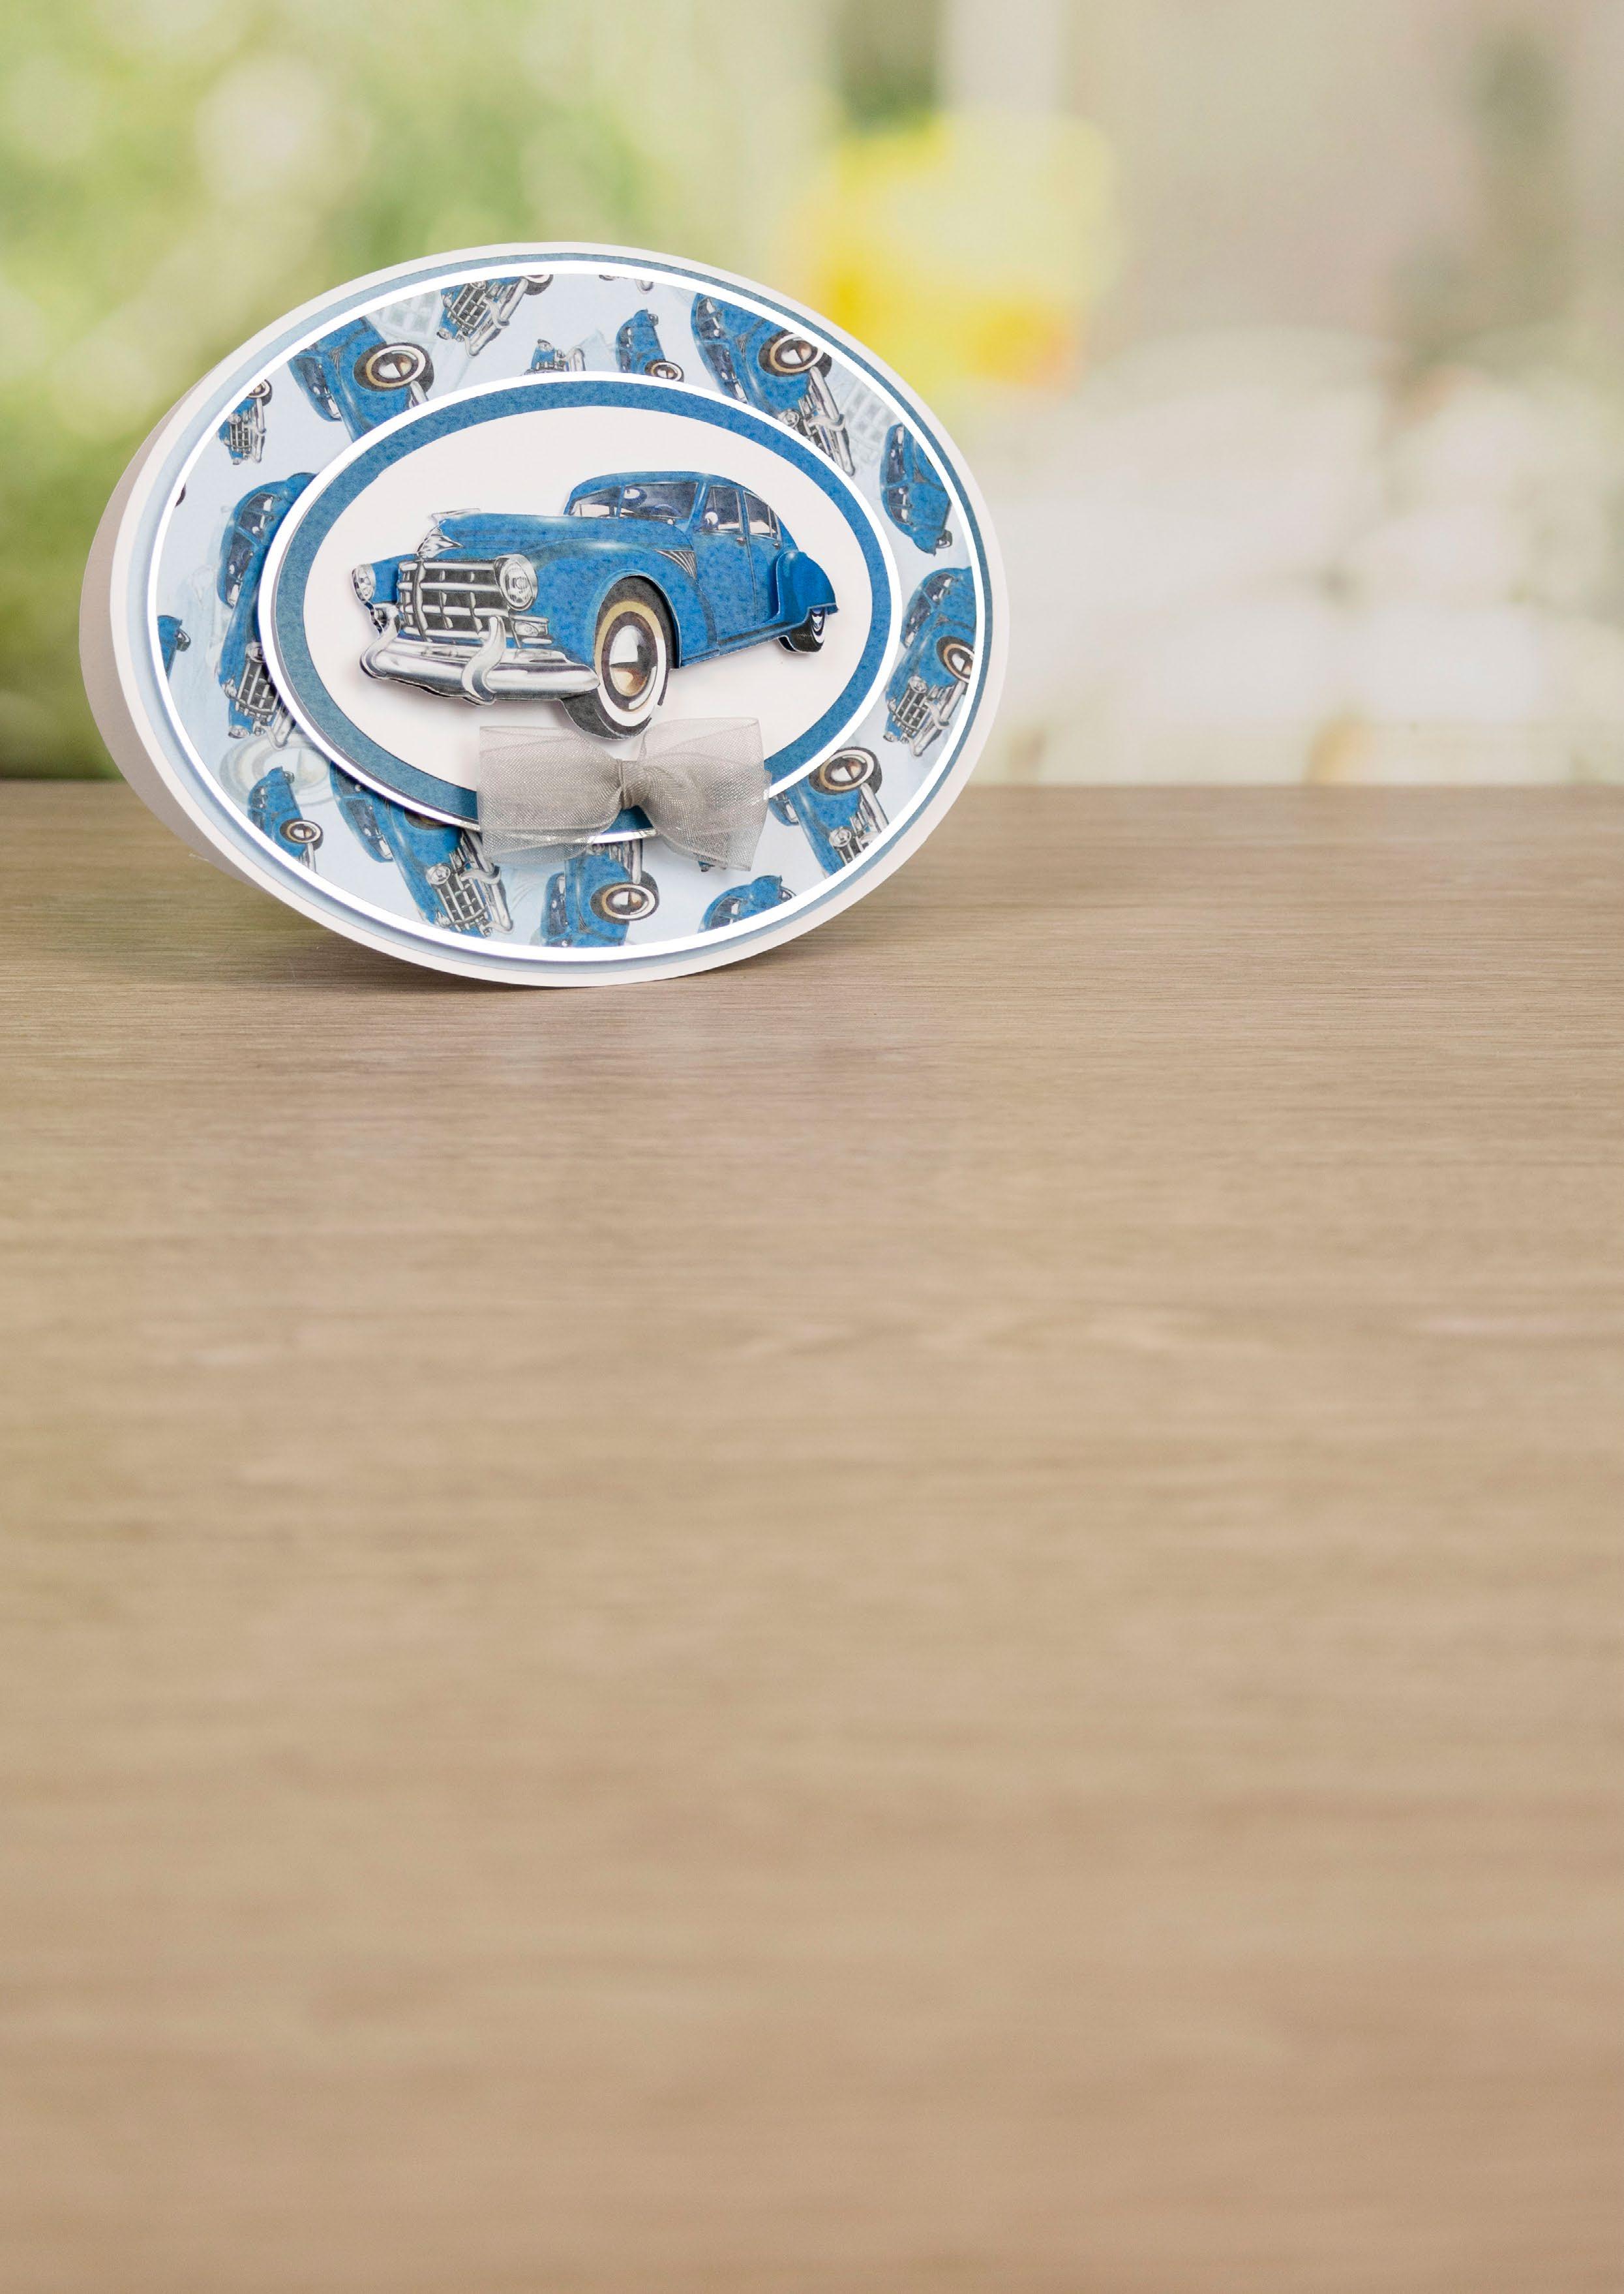
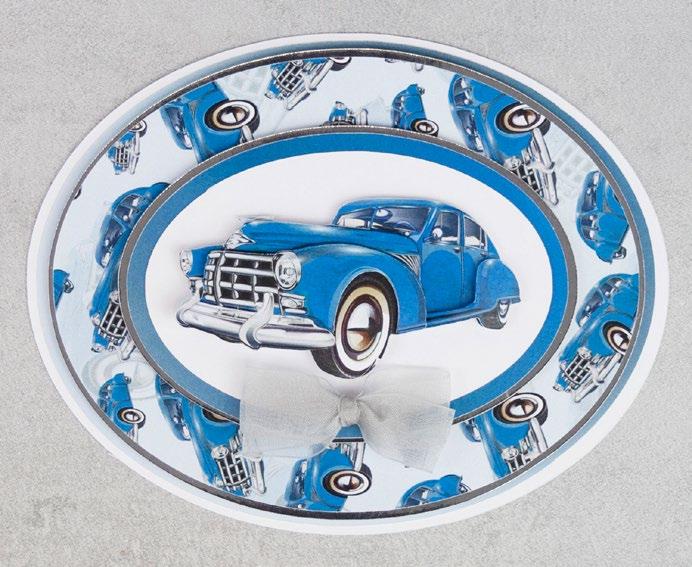
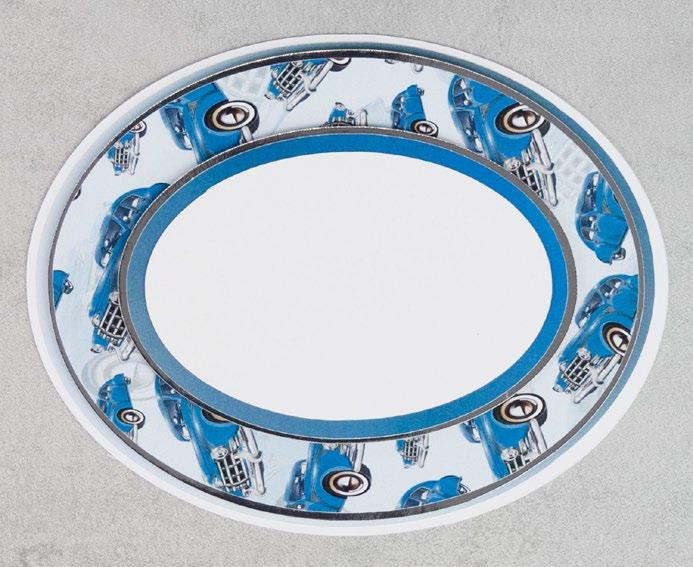
VINTAGE VOYAGE your exclusive gift... 4 | www.tatteredlace.co.uk

INCLUDED WITH THIS ISSUE! www.tatteredlace.co.uk | 5

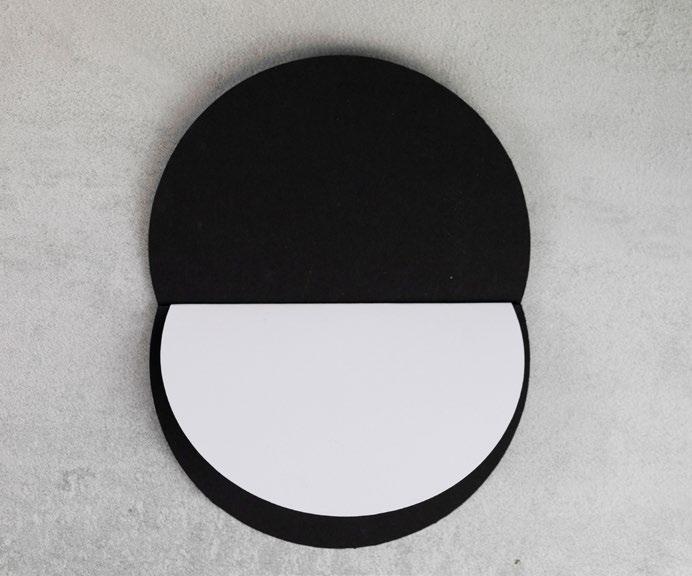
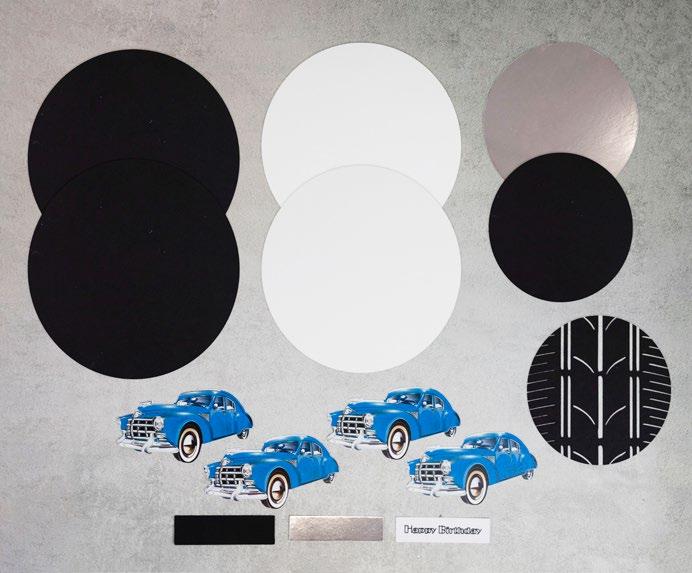
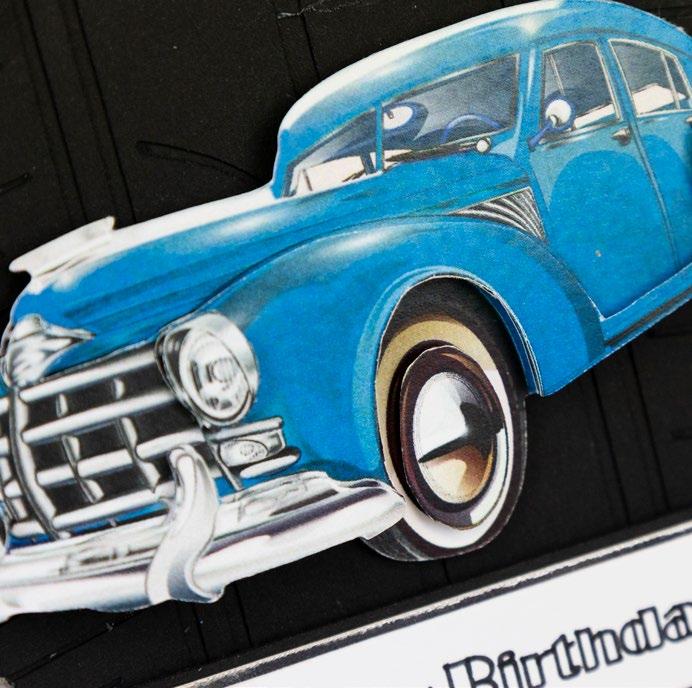
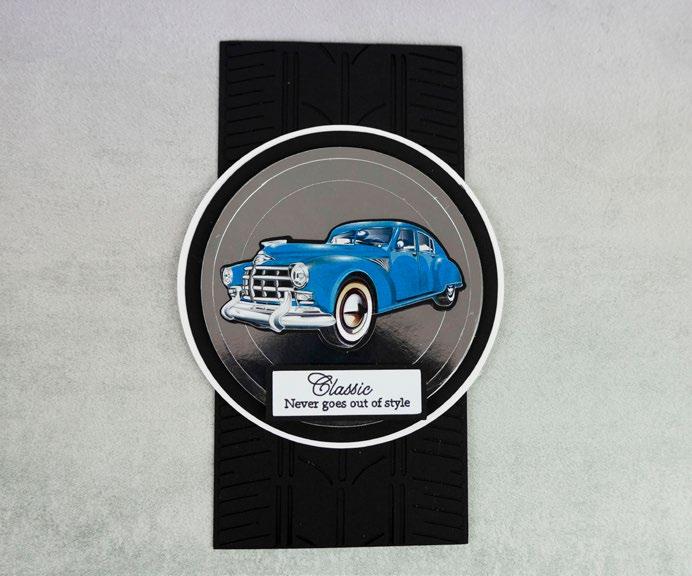
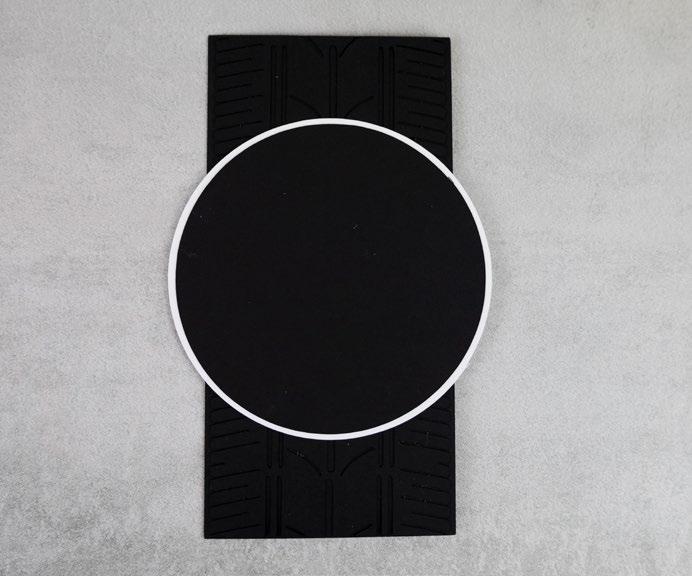
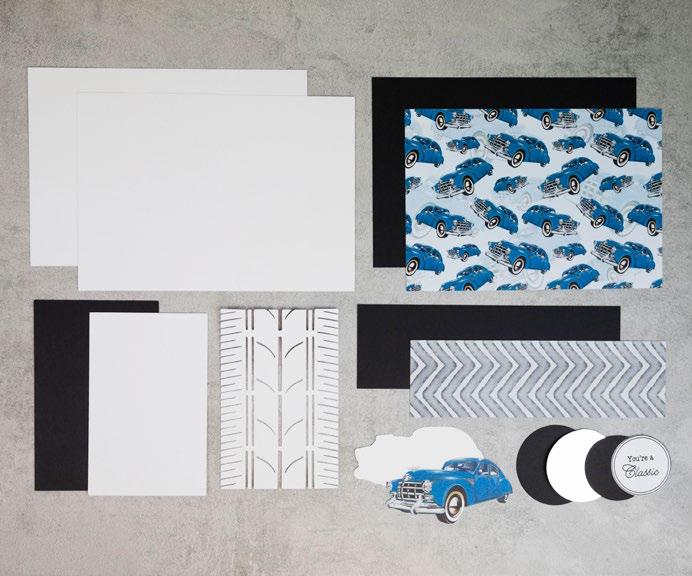
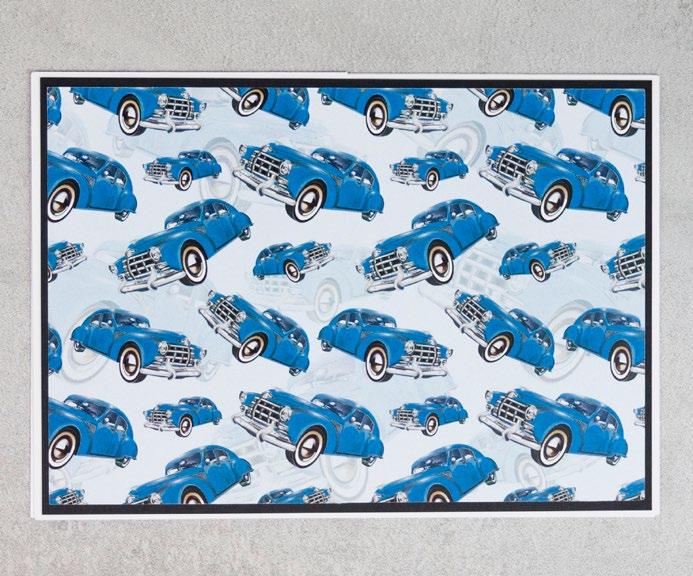
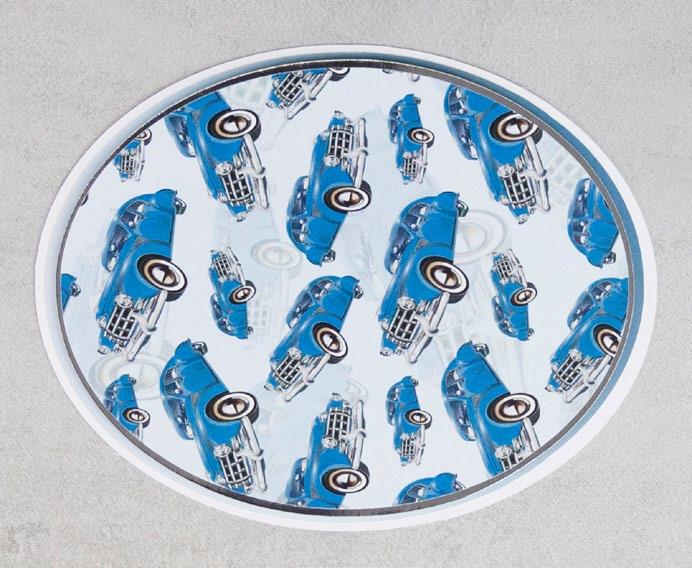
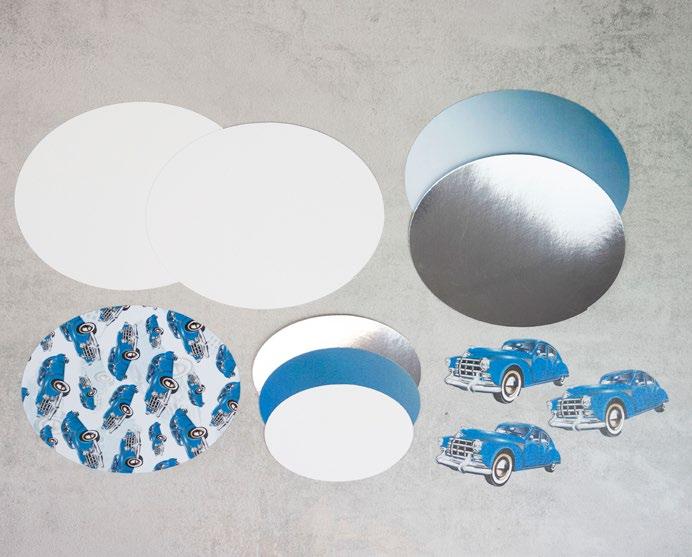
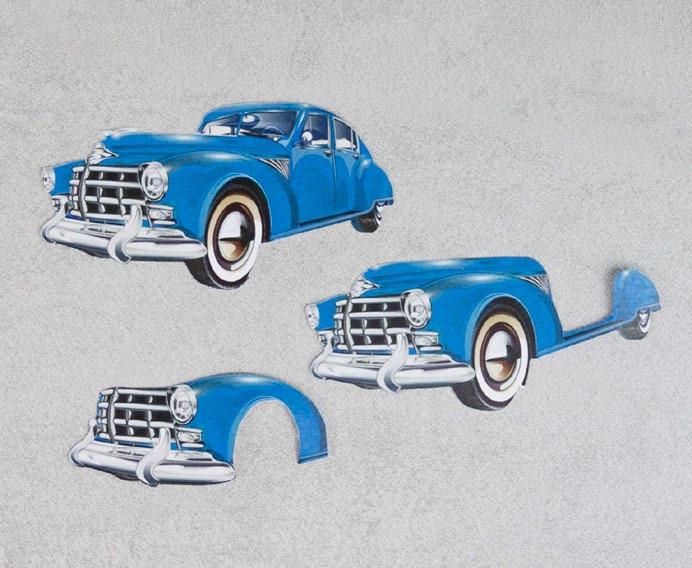
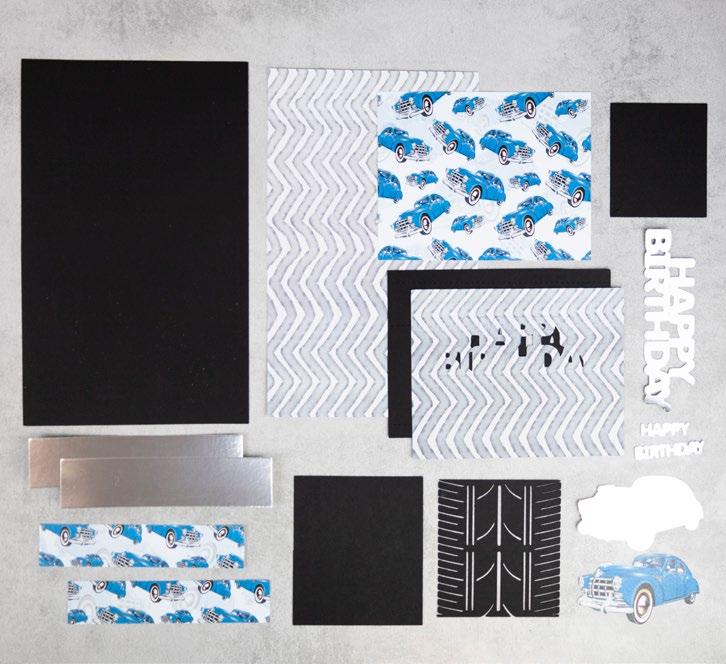
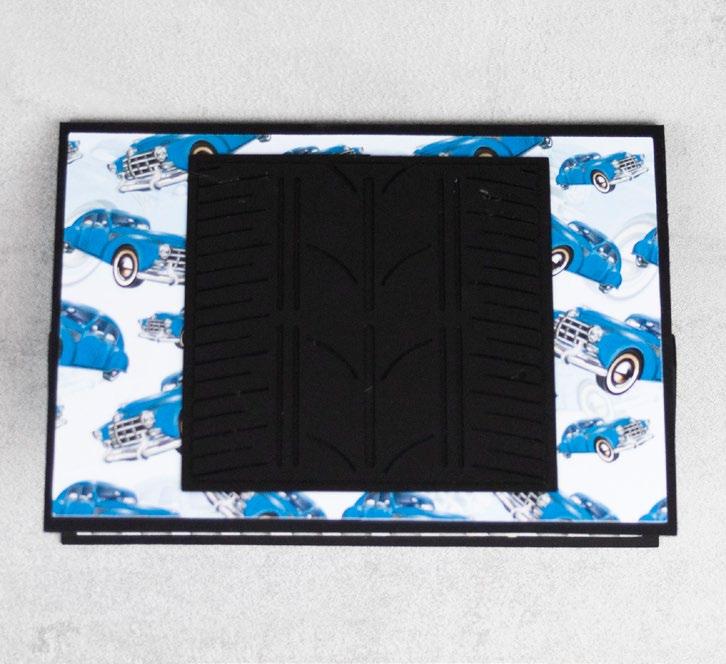
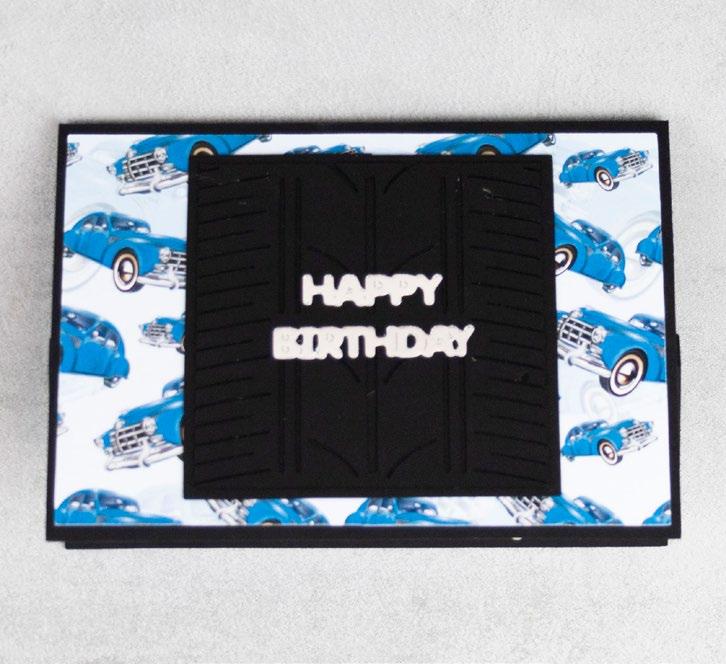
What you’ll need: • 01-01-Vintage Voyage SVG files • Black cardstock • White cardstock • Silver mirror cardstock • White paper • Decoupage Glaze --------------------------------- EXCLUSIVE GIFT - VINTAGE VOYAGE -------------------------------------6 | www.tatteredlace.co.uk
•
•
135mm
65mm
•
13mm rectangle
sentiment draw file)
silver
106mm
70mm
On one of the large black circles, measure
18mm rectangle
50mm from the top edge
score and fold across to create a tab. Trim a straight edge across the
the white paper circle,
45mm from the top edge
onto the black circle, only sticking the tab. Mat the other large black circle onto
score and fold across.
create the card front.
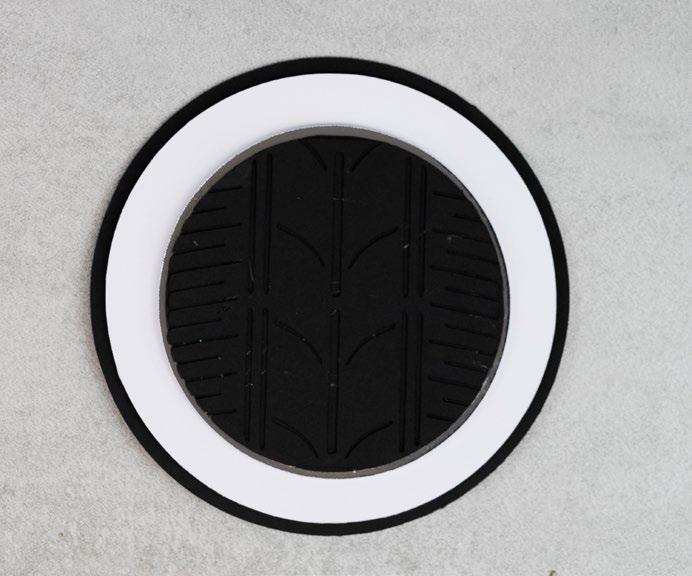
Mat the white circle onto the card with foam tape. Mat the emboss cut onto the small black circle.
onto the silver circle with foam tape, and mat onto the card with foam tape.
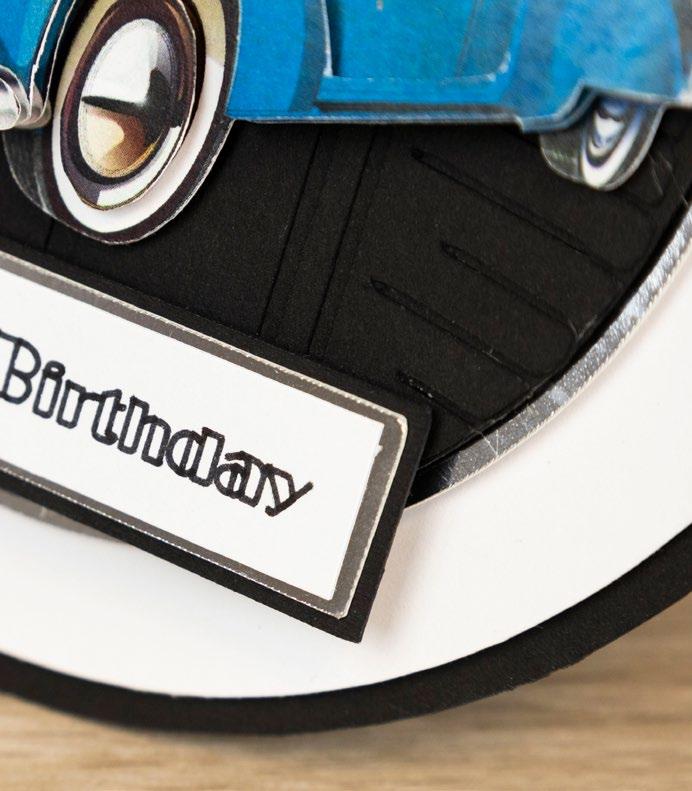
car
Add Decoupage Glaze to the windows, grill, bumper, lights and the hub


together with foam tape. Mat onto the
Build up the decoupage
with foam tape.
Mat the sentiment rectangle onto the silver rectangle, then onto the black rectangle.
onto the card with foam tape.
--------------------------------- EXCLUSIVE GIFT - VINTAGE VOYAGE -------------------------------------www.tatteredlace.co.uk | 7 1 Cut all the pieces needed to create the project as listed below; Step bySteps 1 3 5 2 4 6 From SVG downloads: • From black cardstock: - 1 x VV-1-Emboss • From charisma: - 1 x VV-1-Charisma From machine memory: • From black cardstock: - 2 x 144mm circle - 1 x 101mm circle - 1 x 73mm x 21mm rectangle
From white paper: - 1 x 135mm circle
From white cardstock: - 1 x
circle - 1 x
x
(with
From
mirror cardstock: - 1 x
circle - 1 x
x
2
down
and
bottom. On
measure down
and
Mat
the card to
3
Mat
4 Trim the
charisma cuts as shown in the image. 5
cap.
and mat
card
6
Mat
CLICK HERE TO DOWNLOAD YOUR SVG CONTENT PROJECT 1
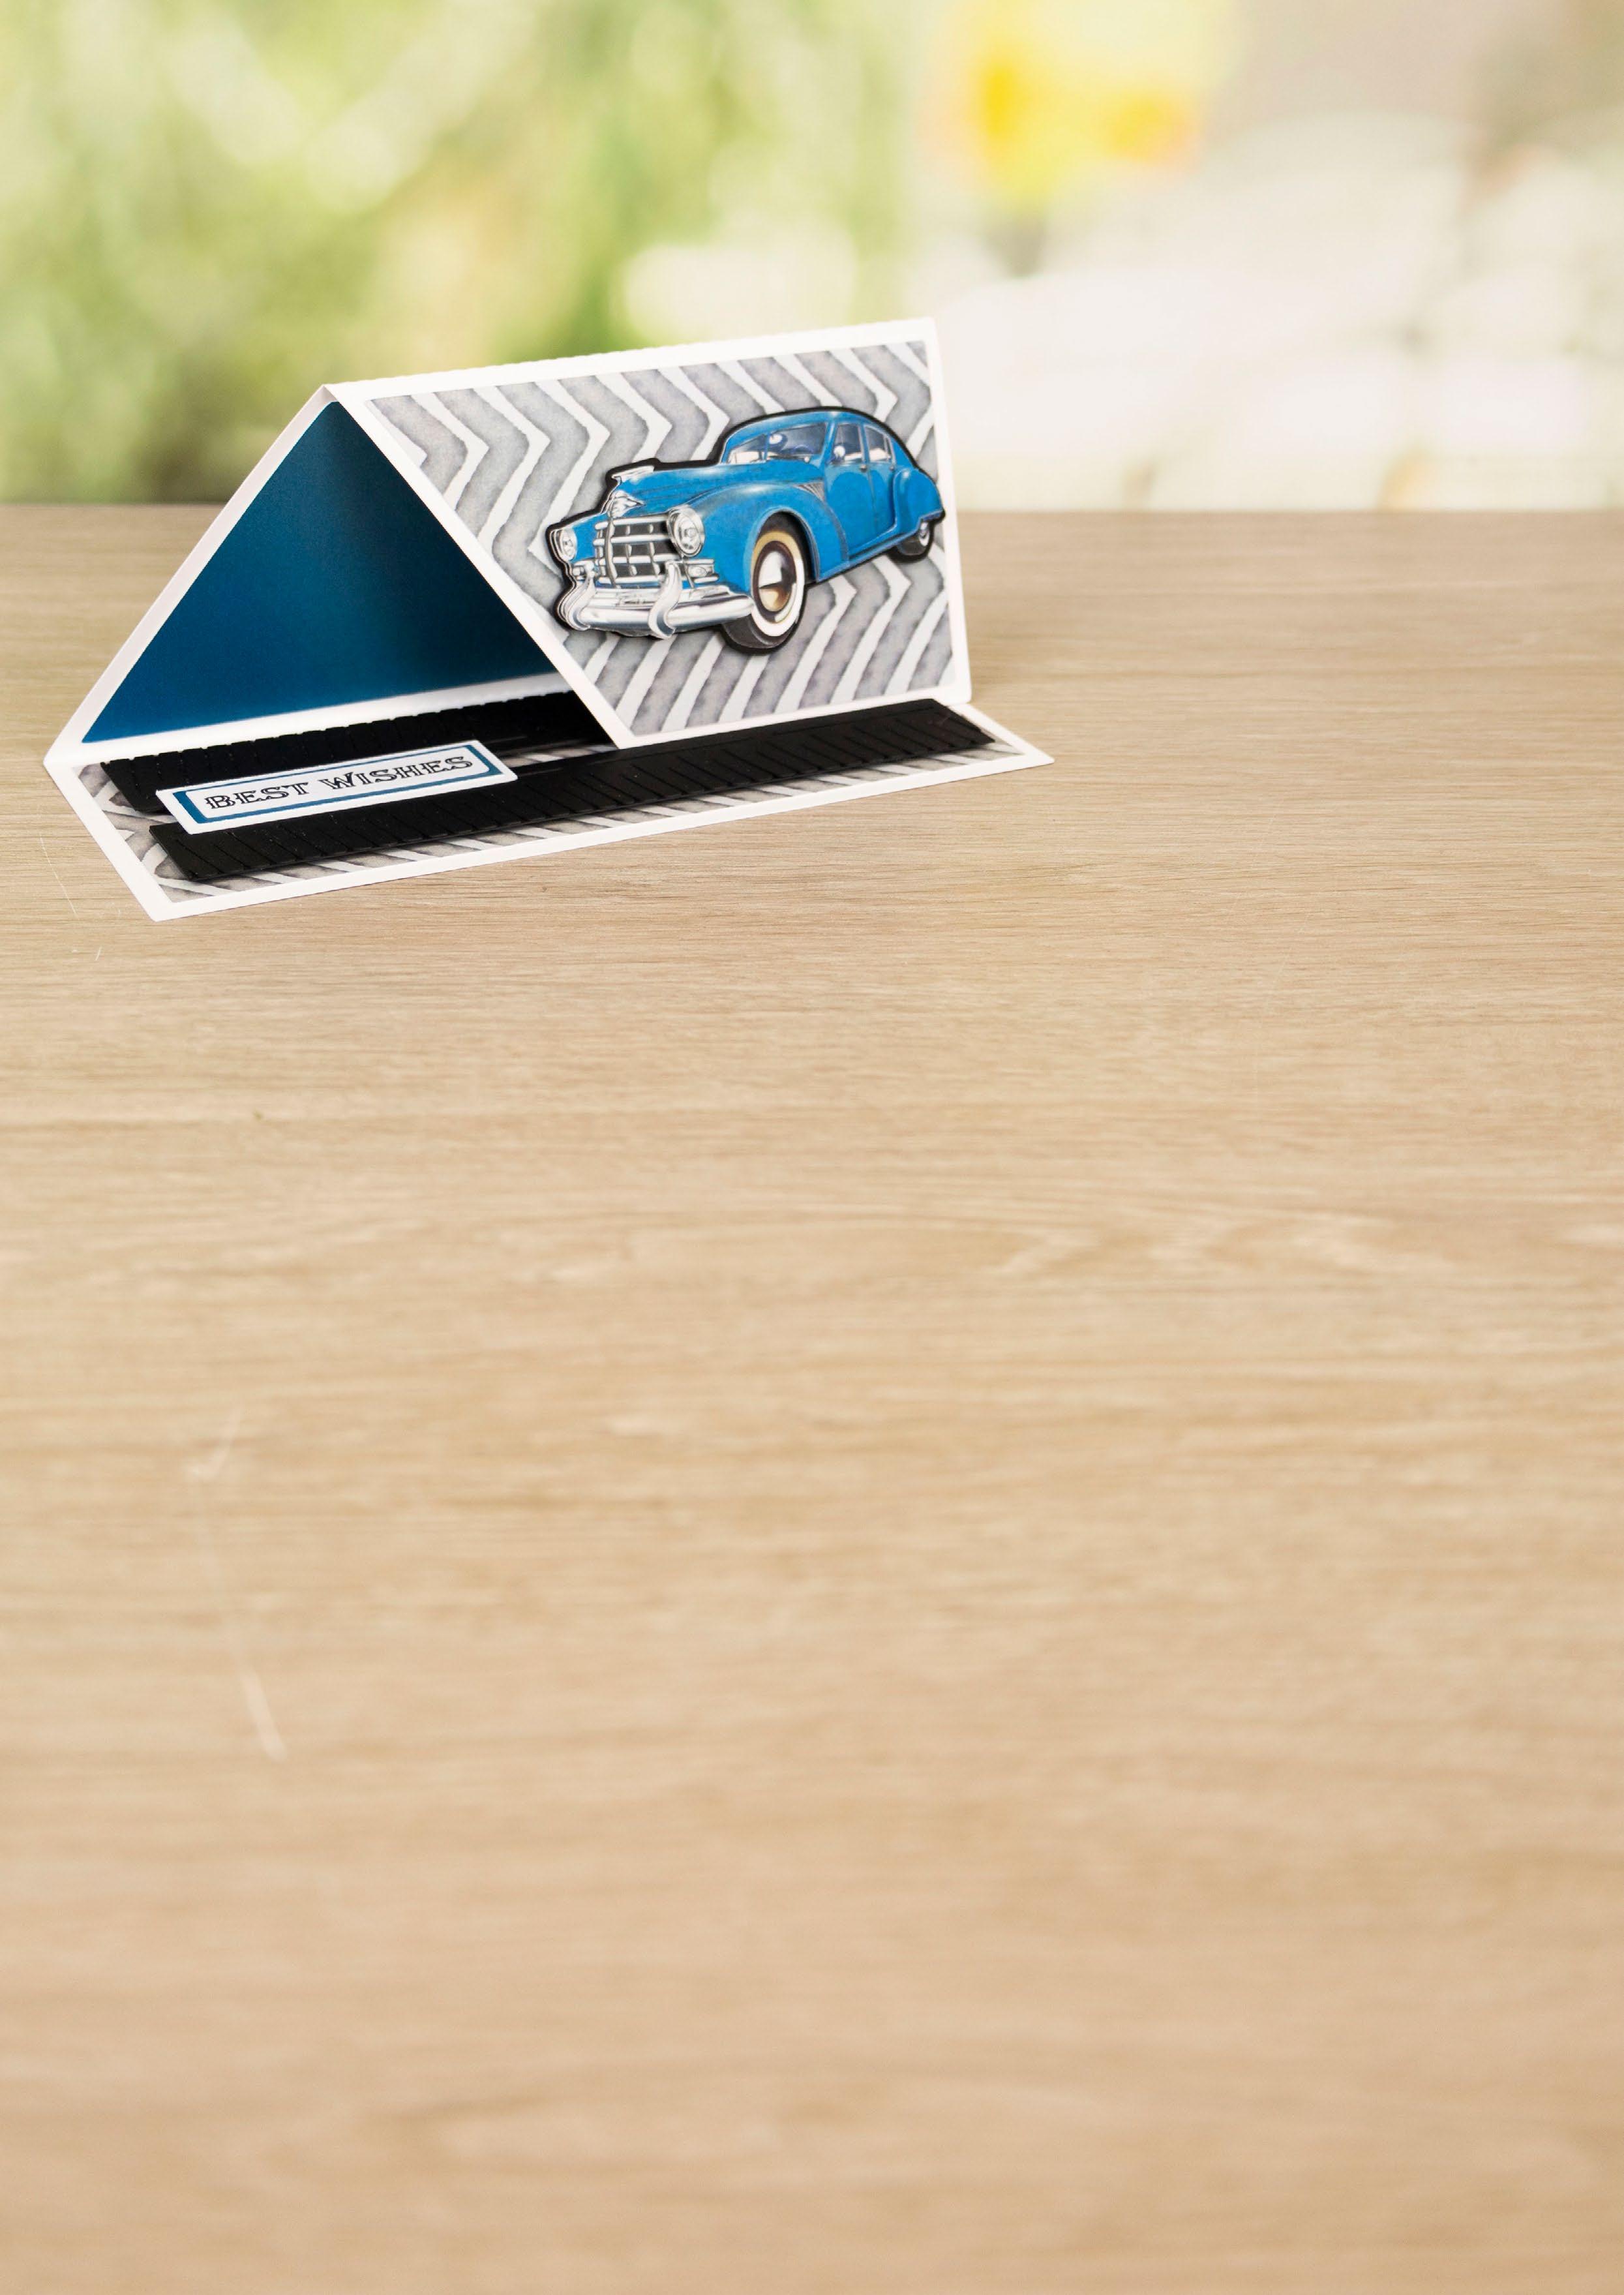
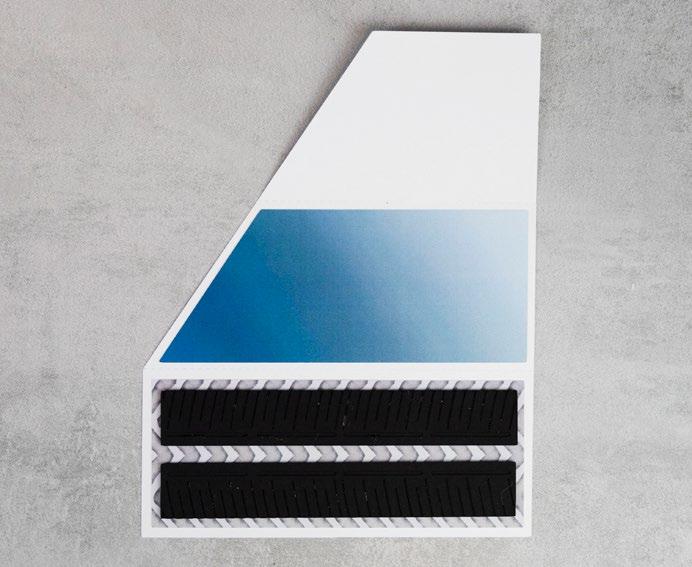
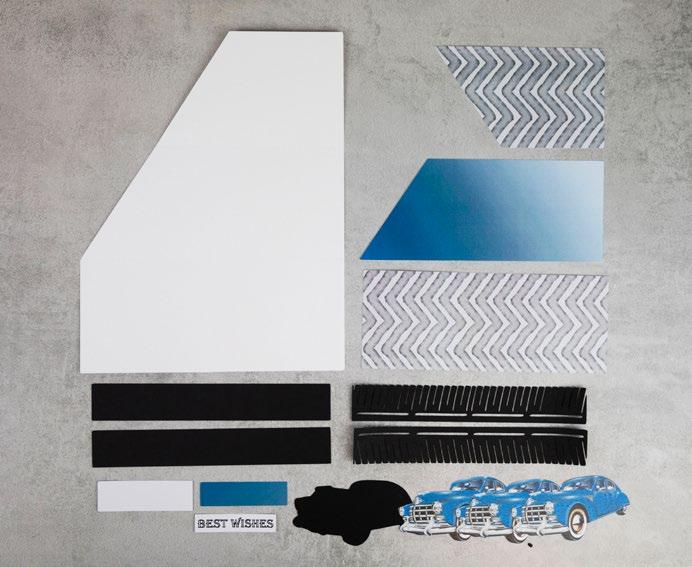
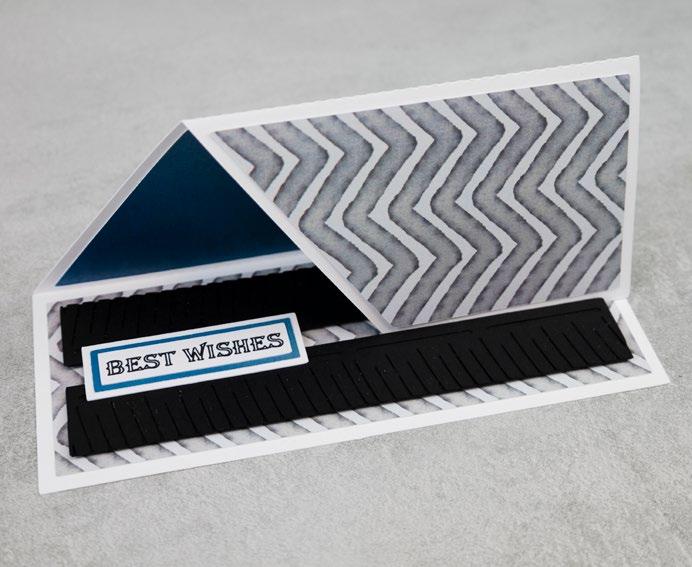
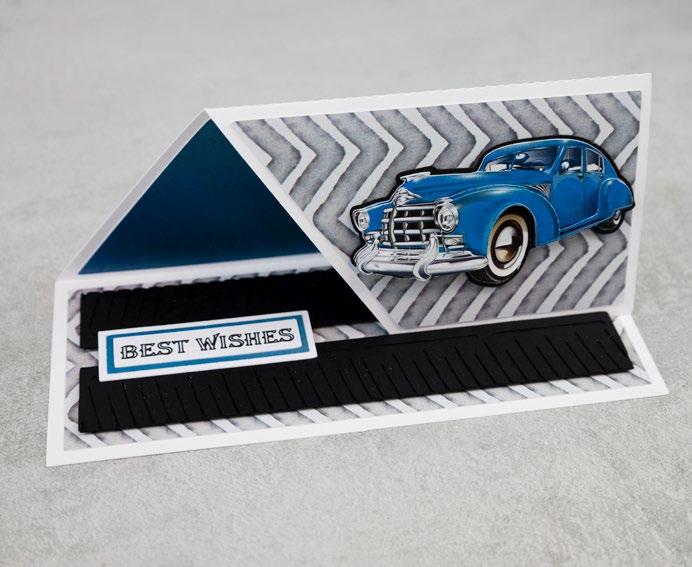
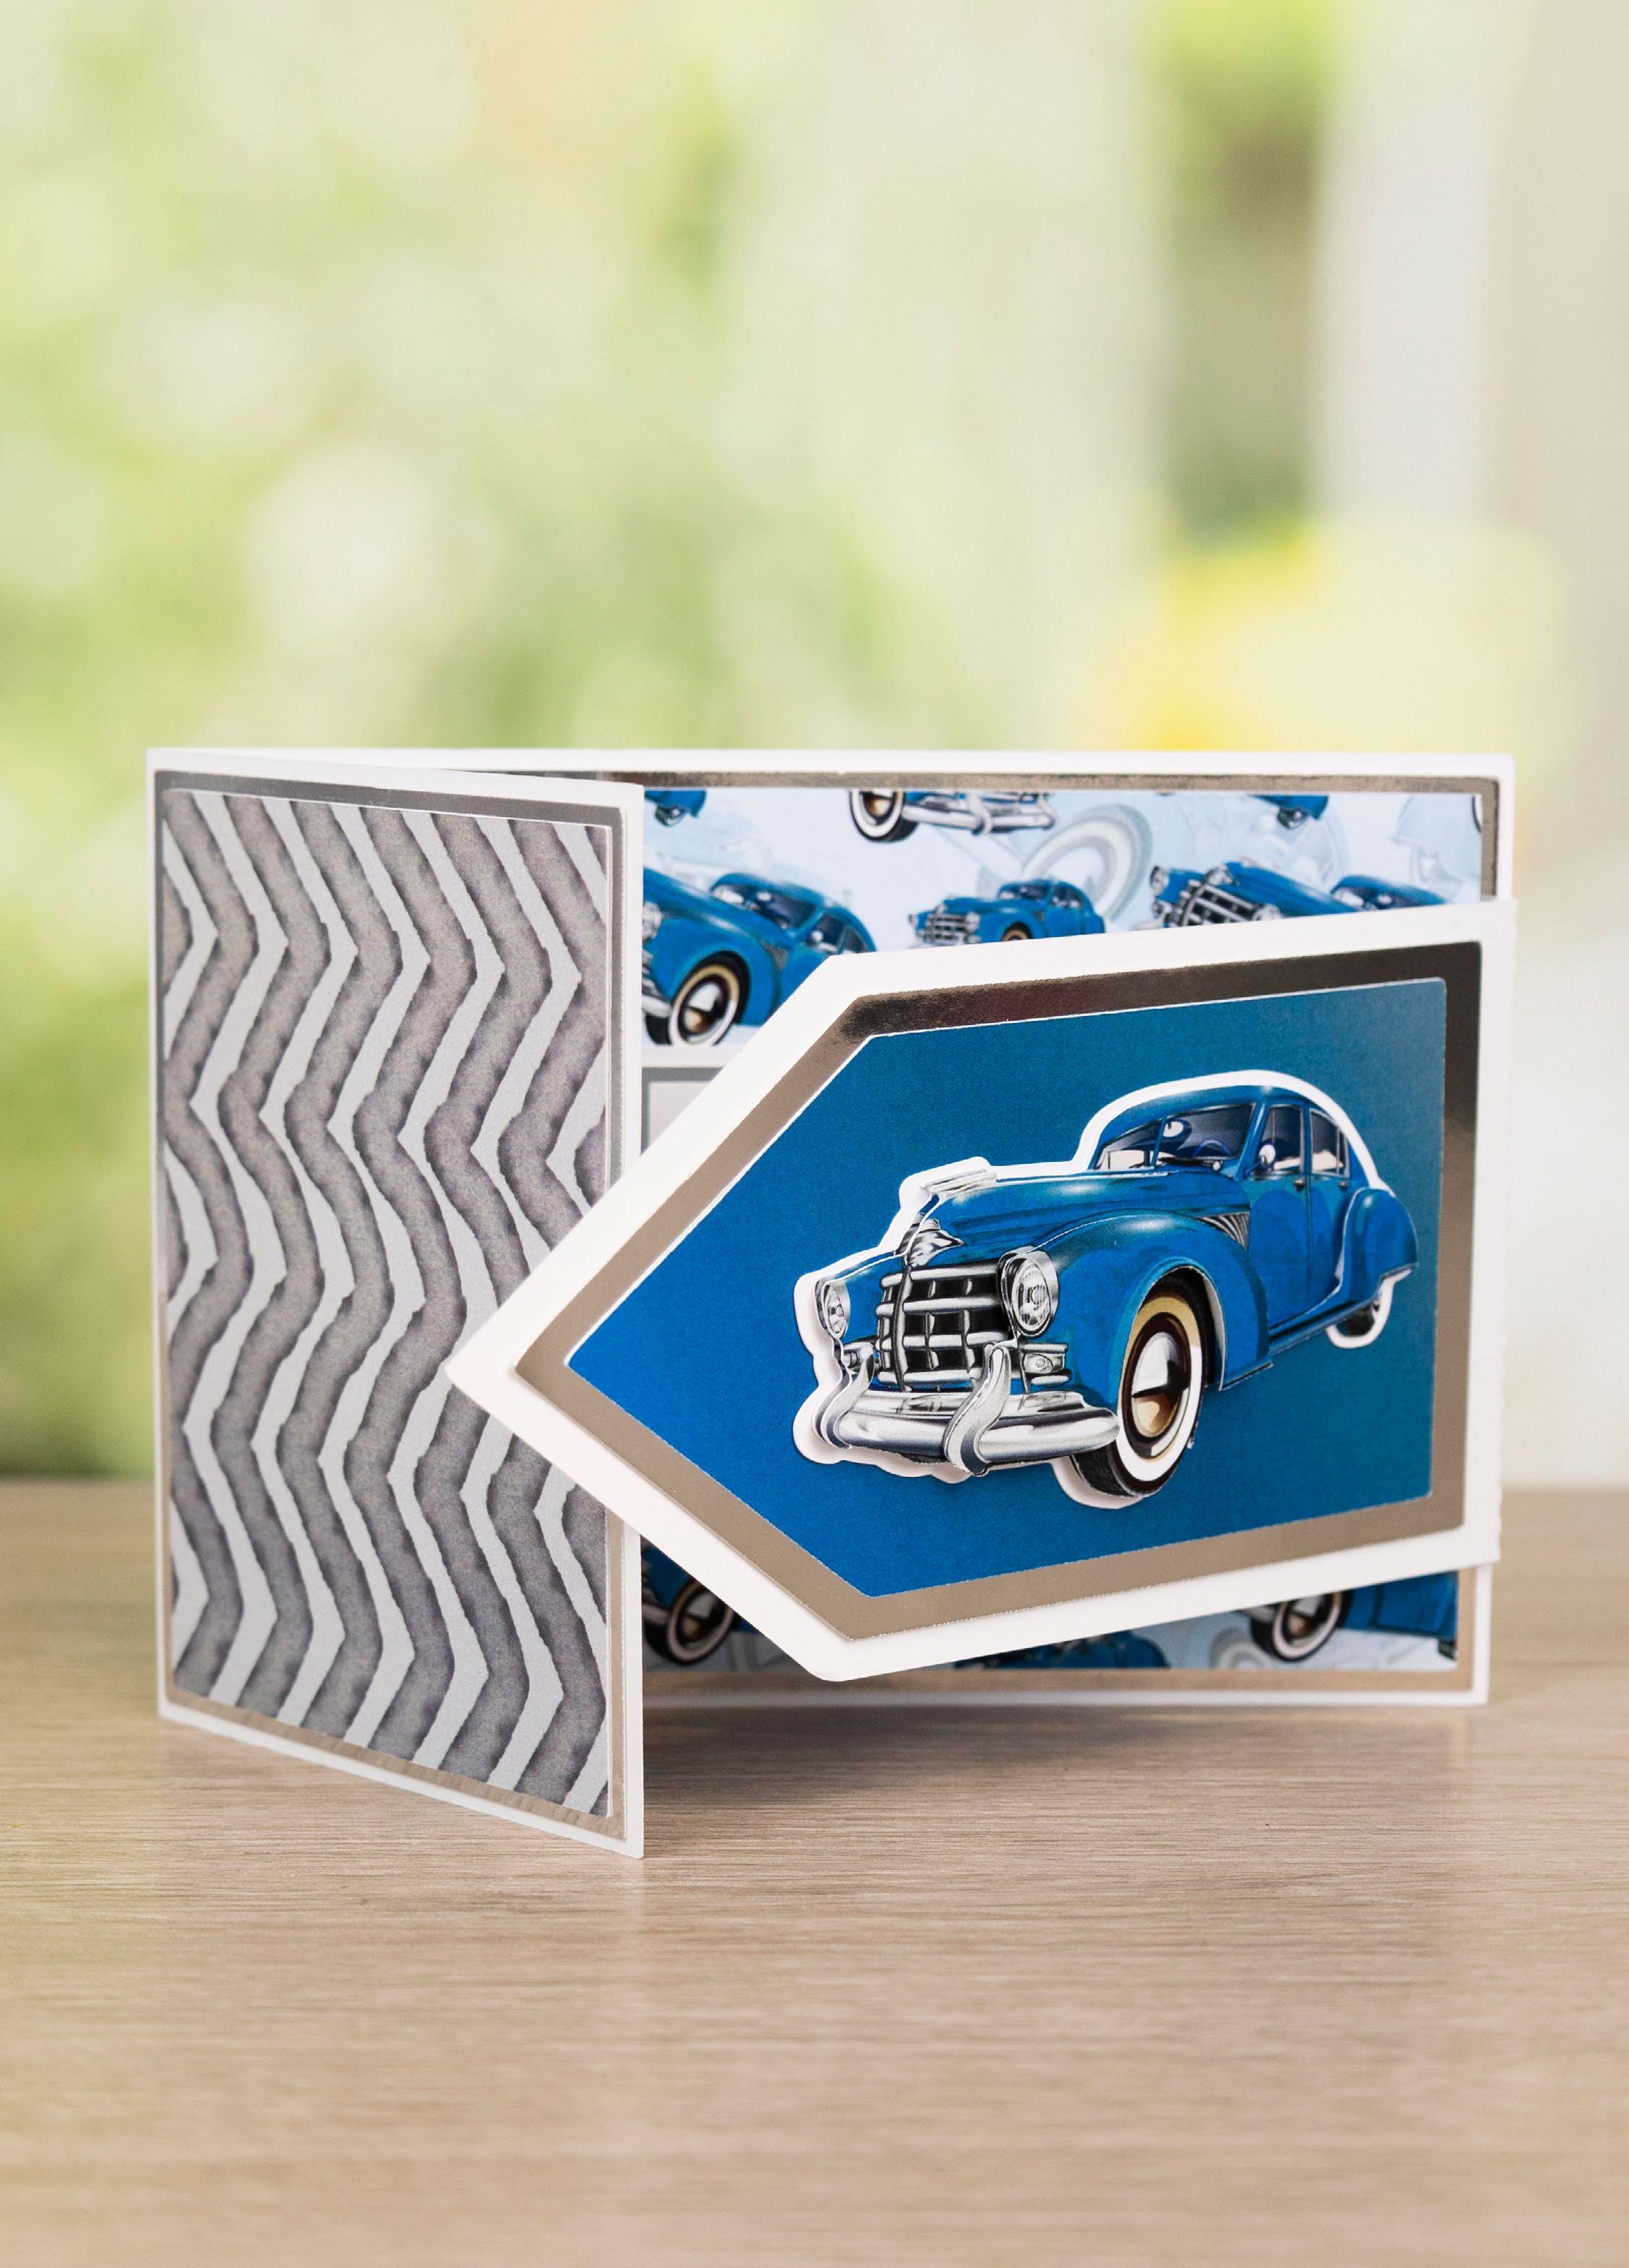
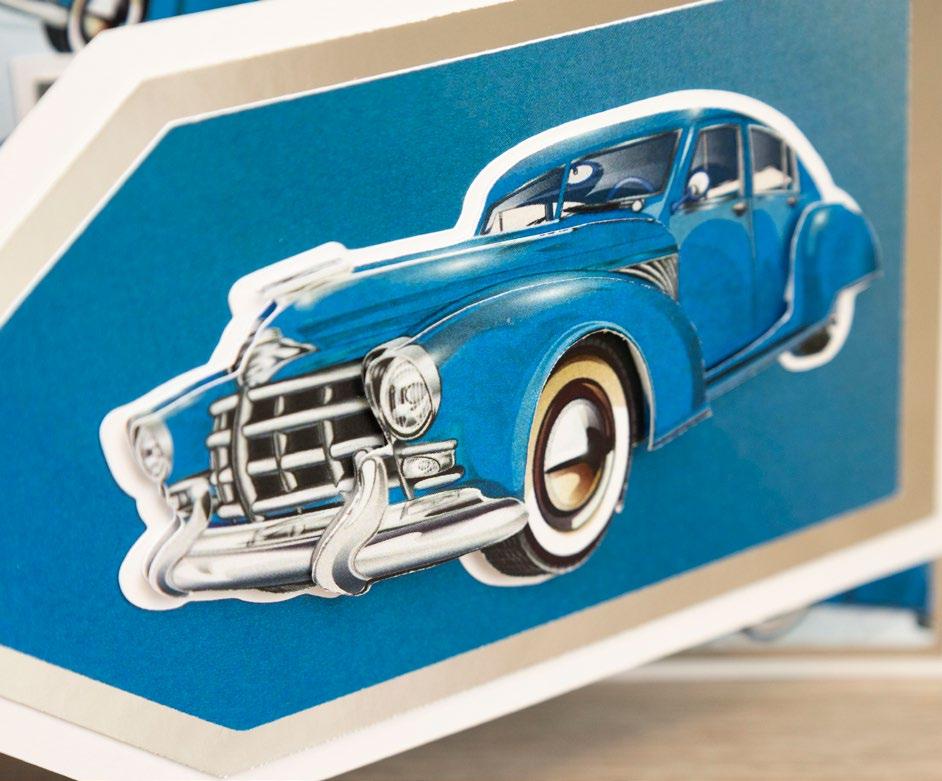
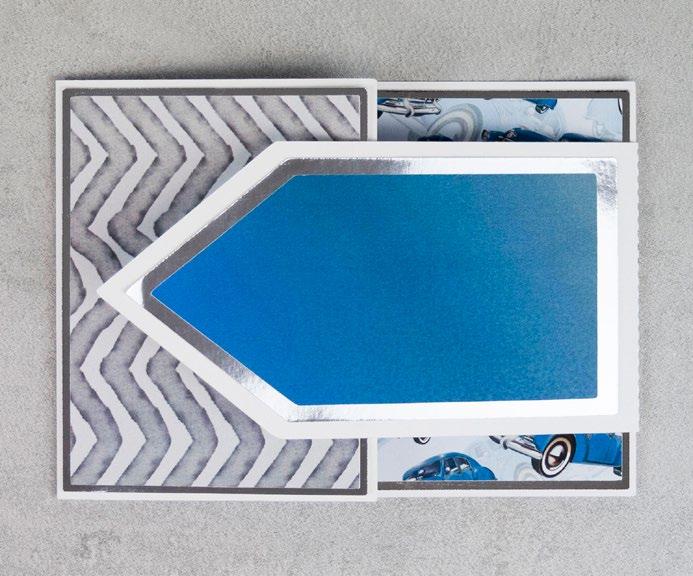
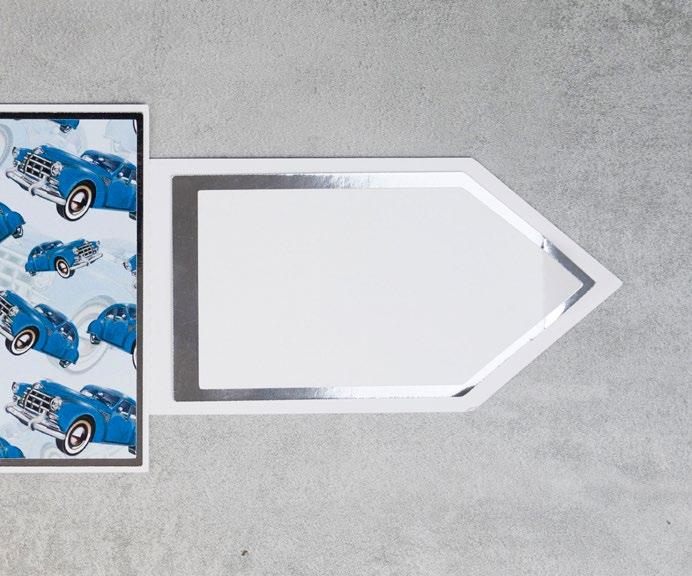
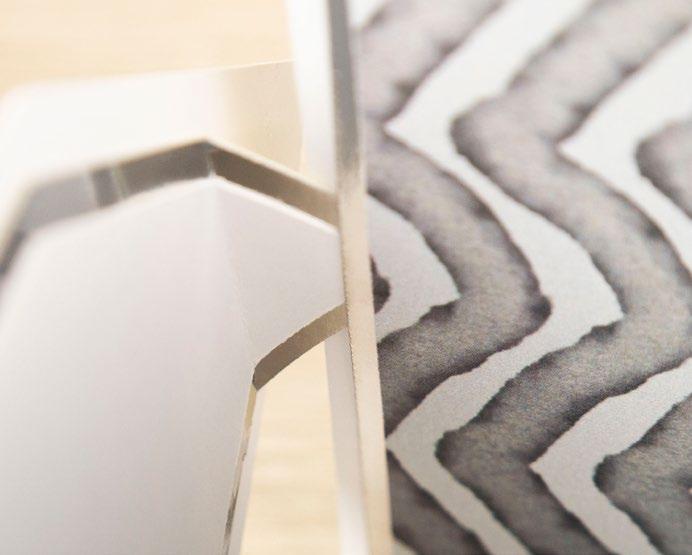
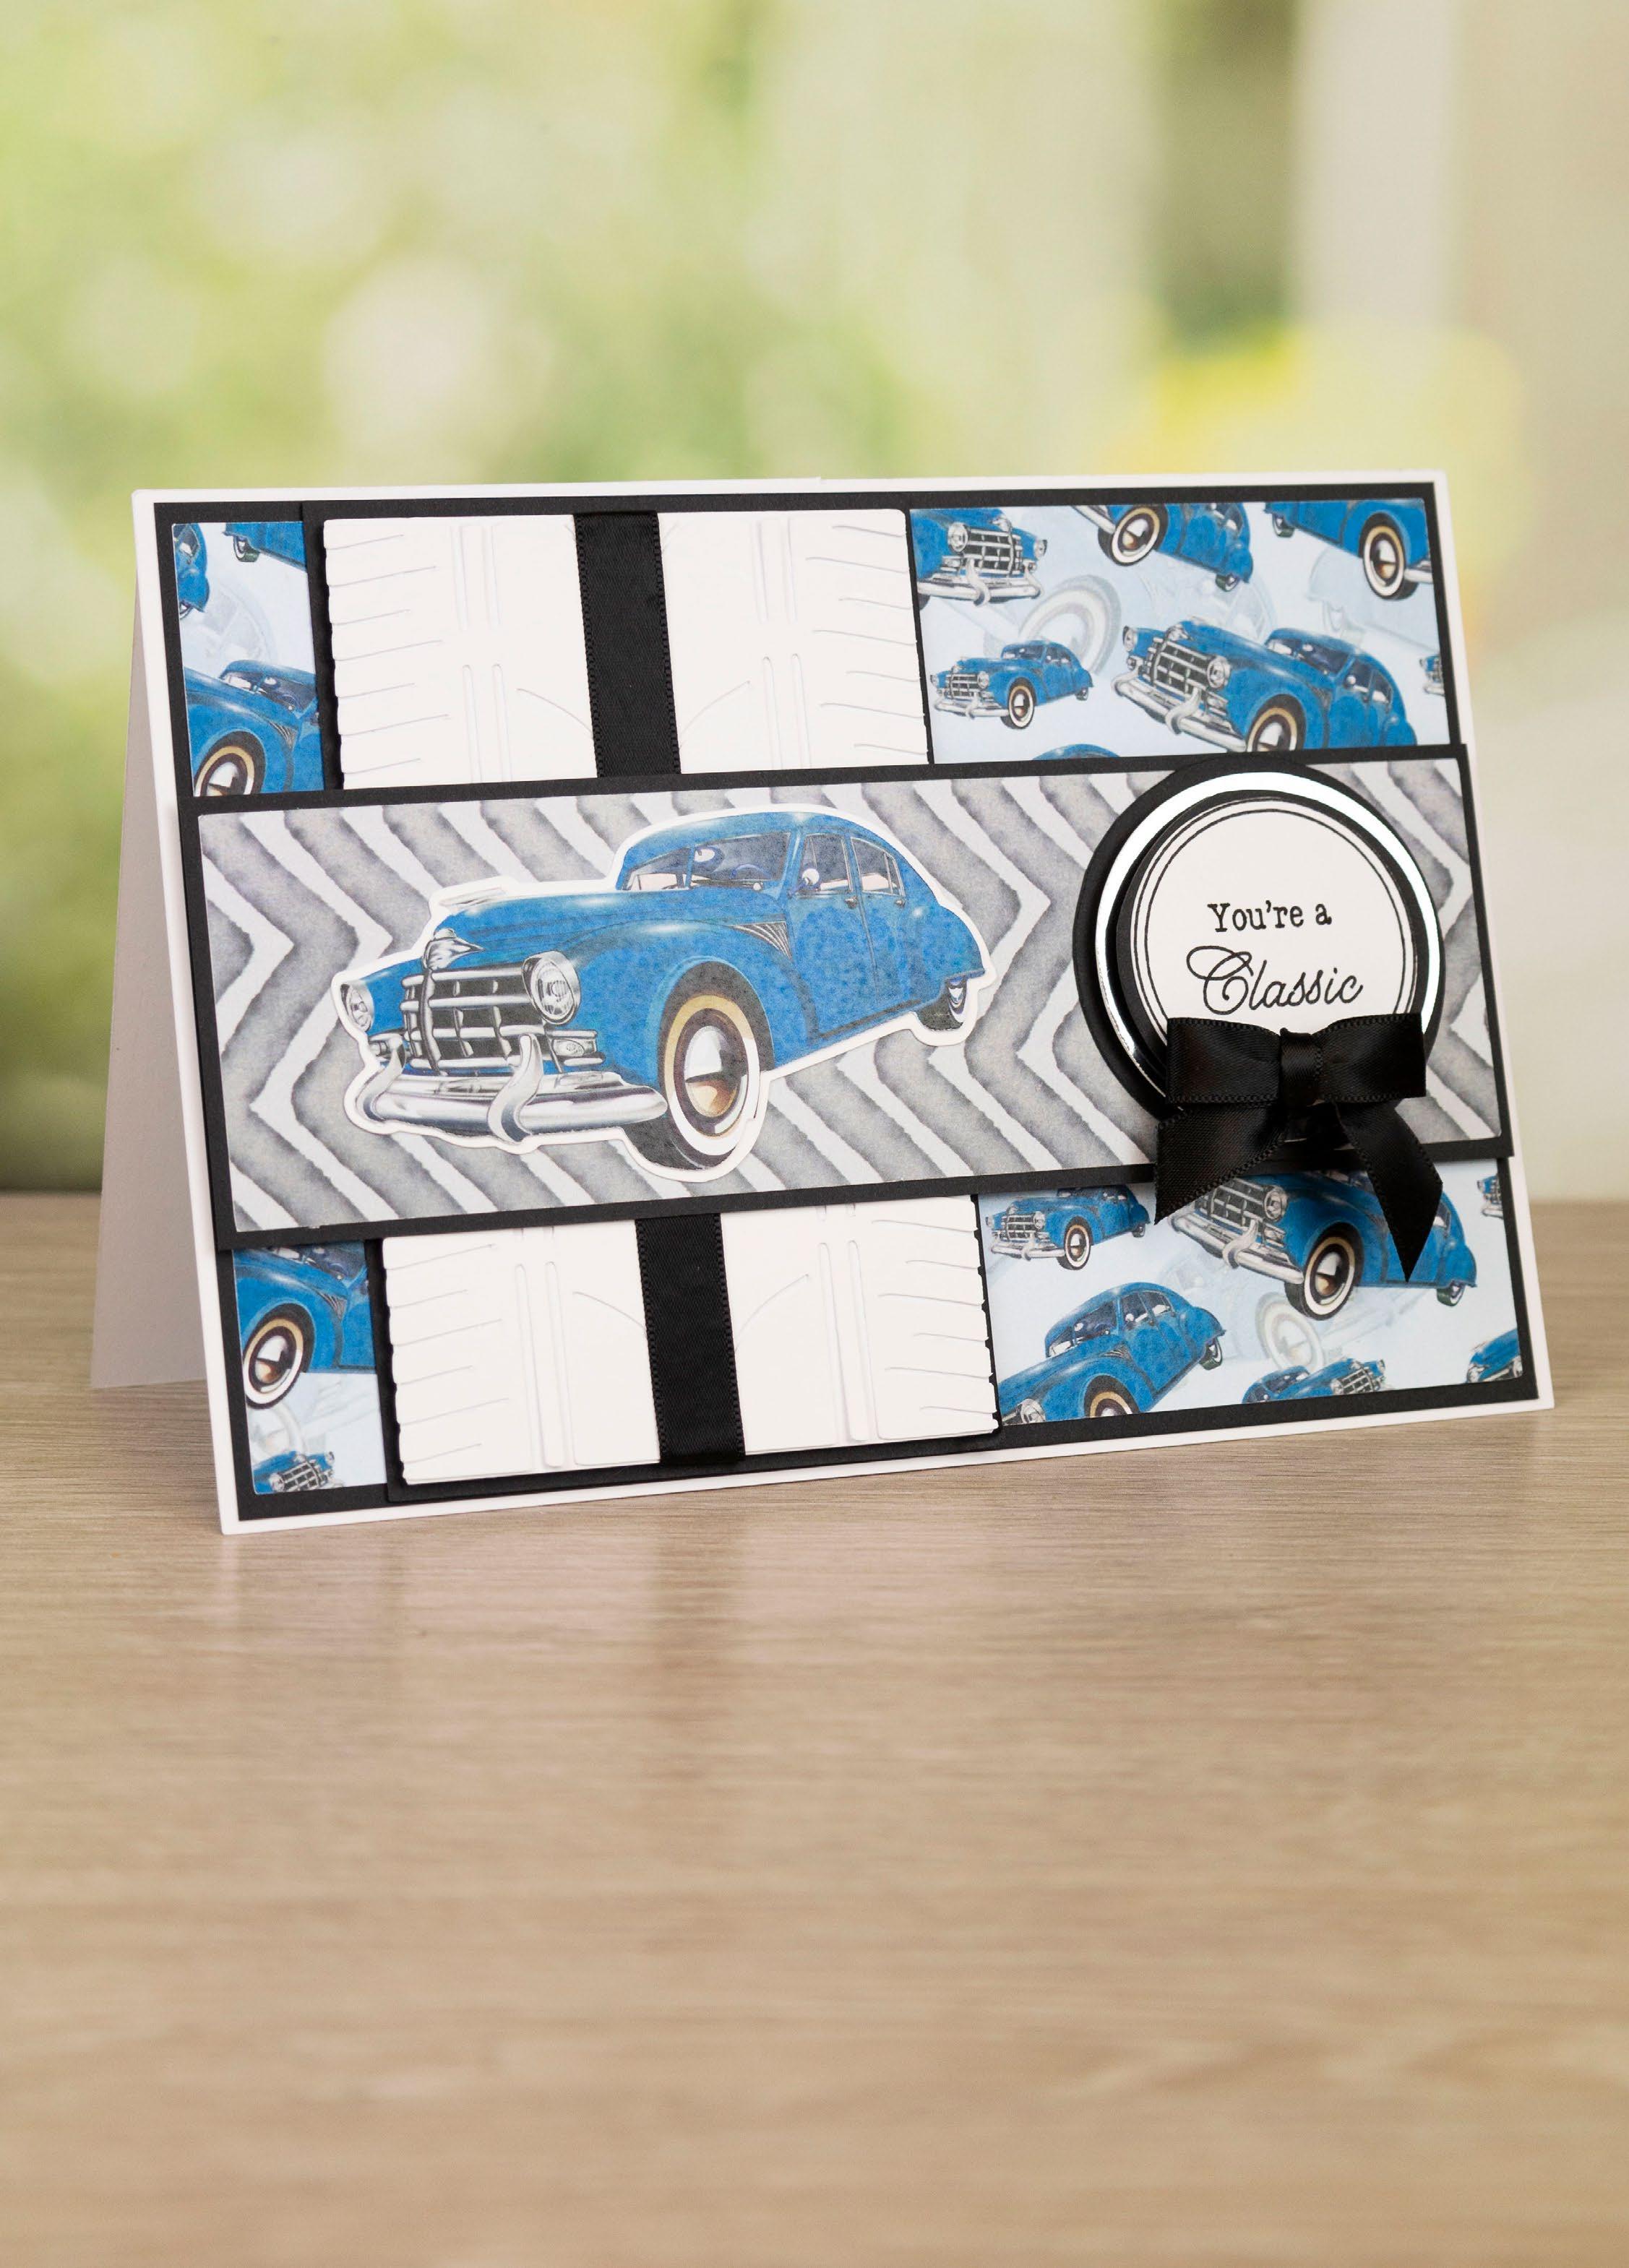
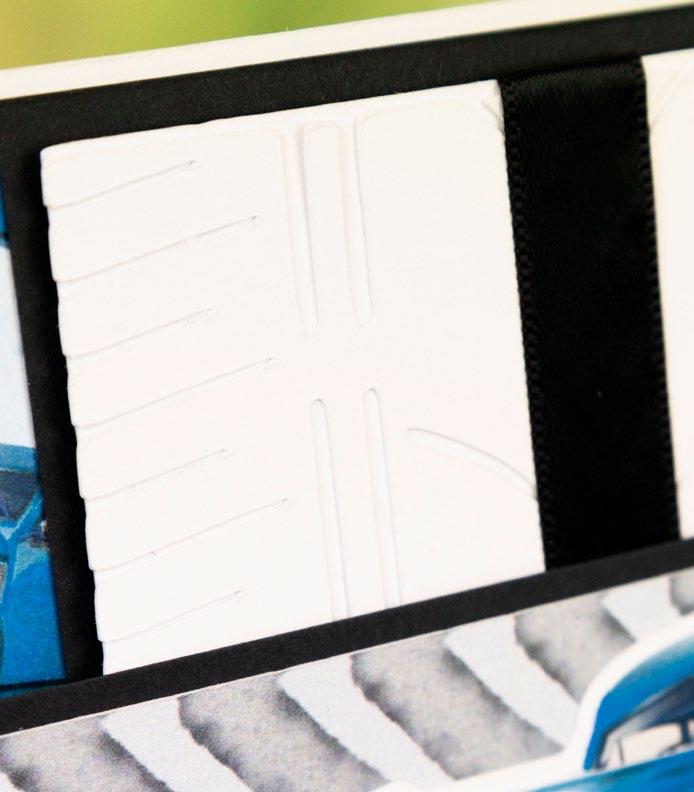
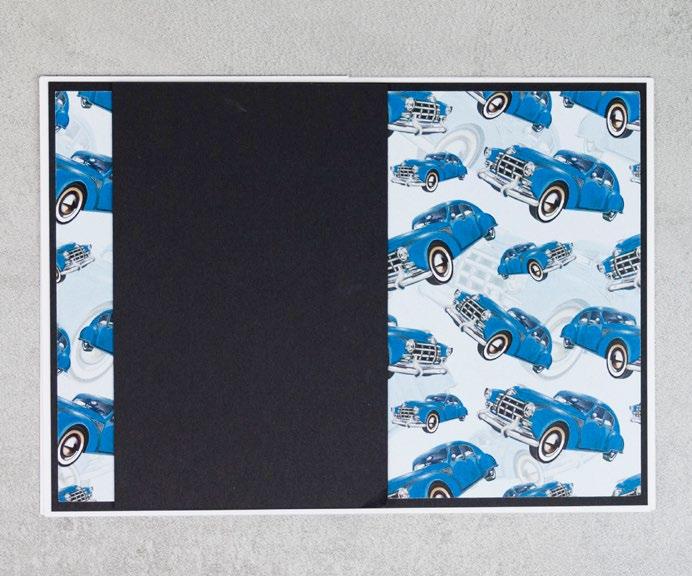
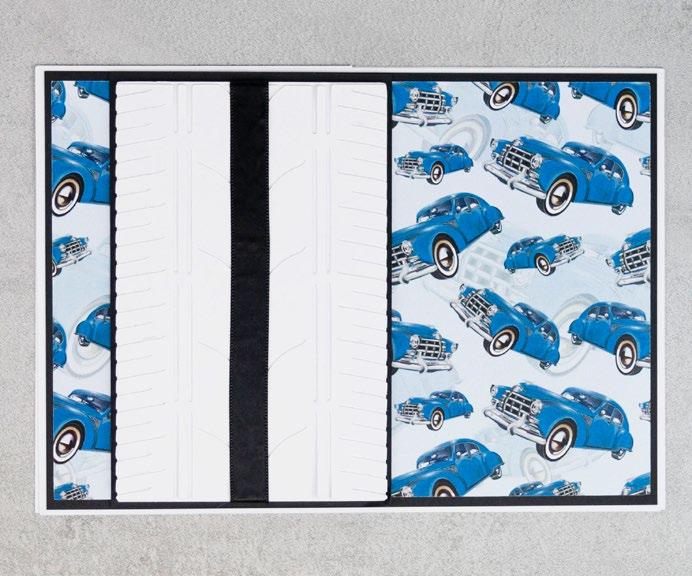
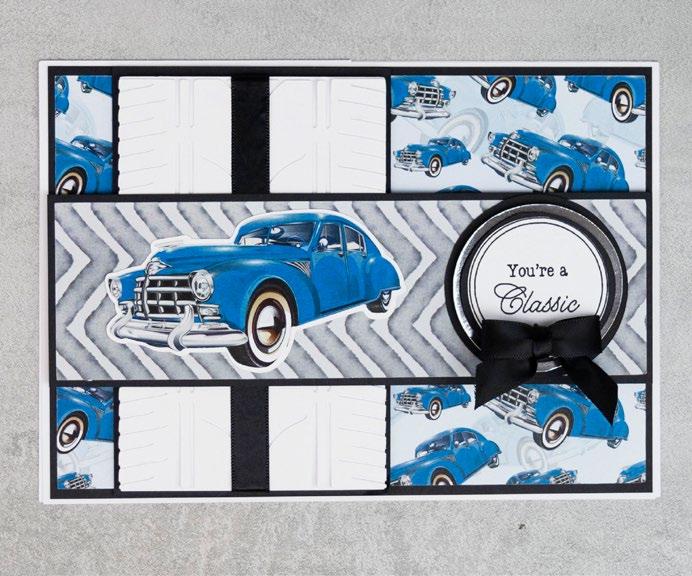
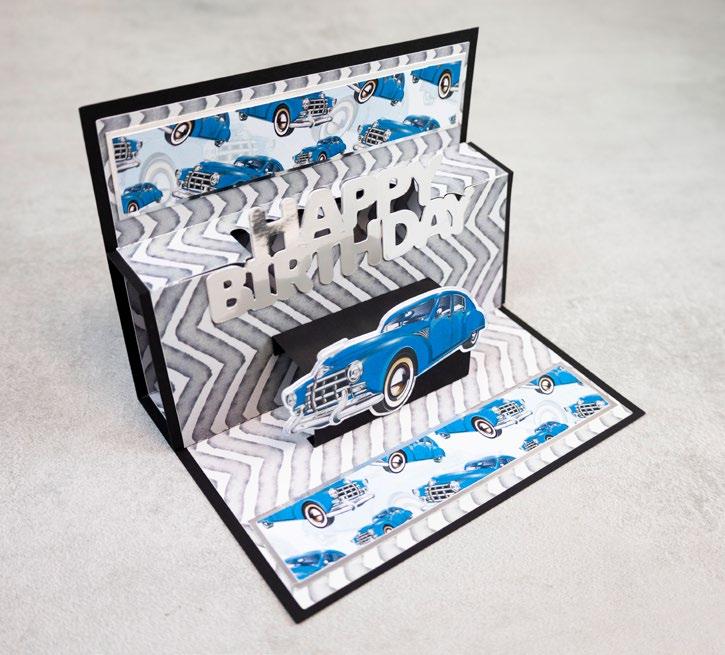
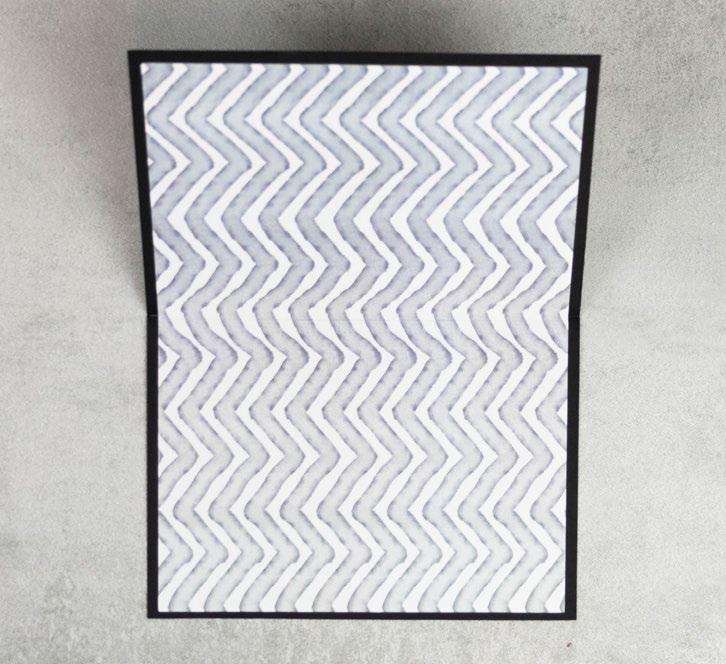
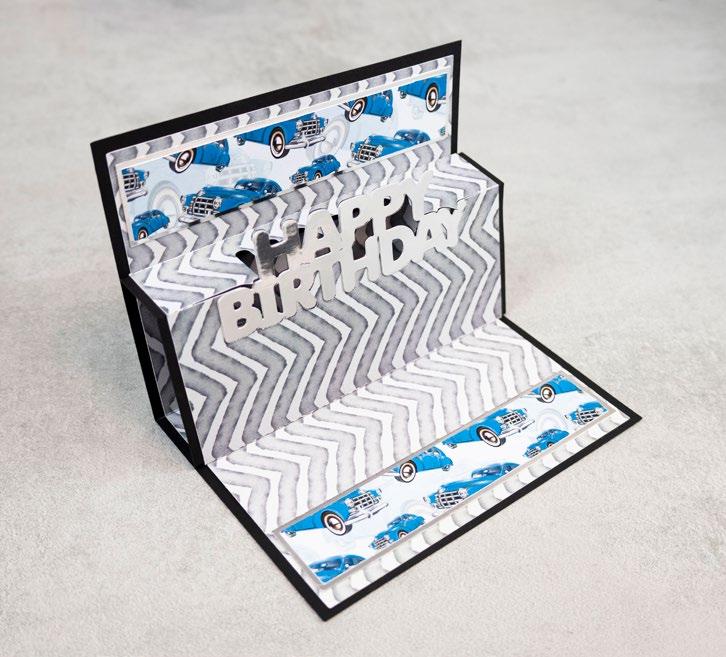
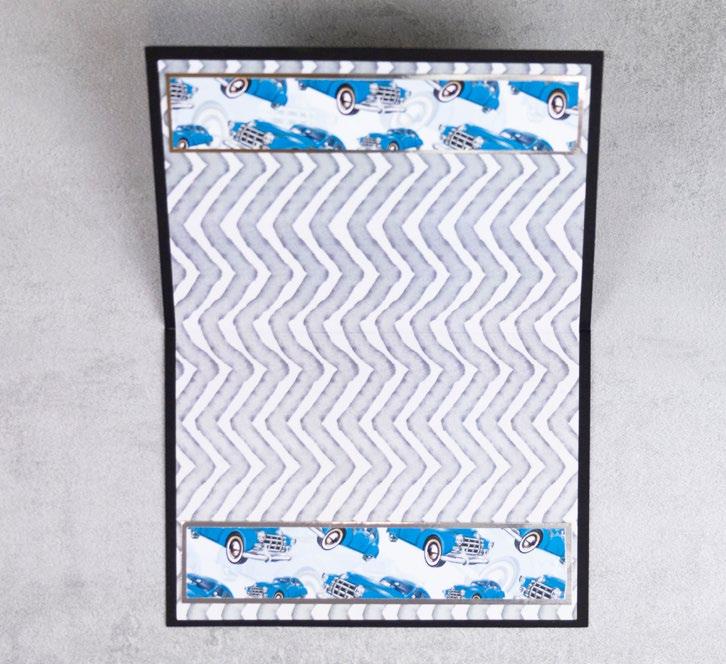
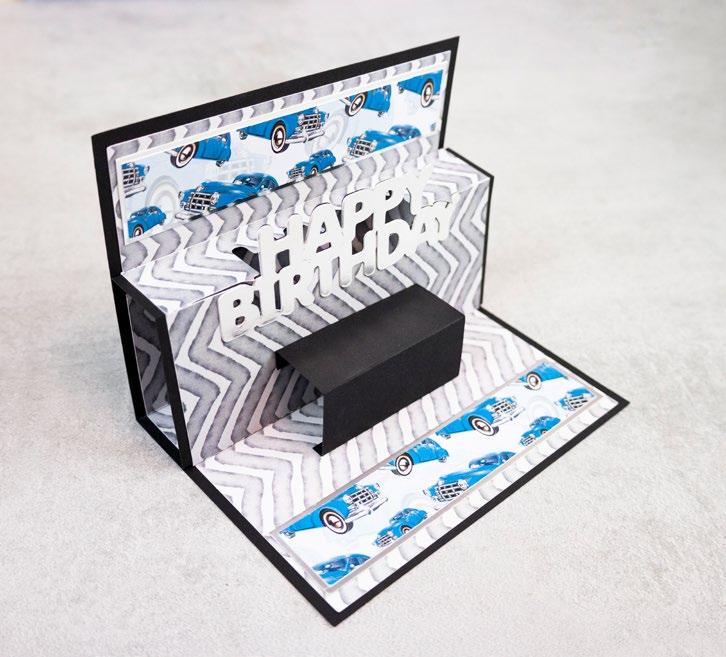
Step bySteps 1 2 3 4 5 1 Cut all the pieces needed to create the project as listed below; From SVG downloads: • From white cardstock: - 1 x VV-2-Card Base • From black cardstock: - 1 x VV-2-Emboss - 1 x VV-2-Car Outline • From backing paper: - 1 x VV-2-Card Mat 1 (gradient) - 1 x VV-2-Card Mat 2 (chevron) • From charisma: - 1 x VV-2-Charisma From machine memory: • From black cardstock: - 2 x 190mm x 30mm rectangle • From white cardstock: - 1 x 65mm x 15mm rectangle (with sentiment draw file) - 1 x 75mm x 25mm rectangle • From backing paper: - 1 x 200mm x 80mm rectangle (chevron) - 1 x 70mm x 20mm rectangle (gradient) 2 Ink around the edges of the chevron rectangle and the gradient card mat 1. Mat onto the bottom and middle panels of the card base. Mat the emboss cuts onto the black rectangles, and mat onto the bottom panel of the card with foam tape to create a stopper for the easel. 3 Fold on the score lines and fold over to create an easel card. Mat the chevron mat 2 onto the front of the easel. Ink around the edges of the sentiment rectangle and other white rectangle. Mat either side of the small gradient rectangle and mat onto the stopper. 4 Trim the car charisma cuts as shown in the image. 5 Build up the decoupage and mat together with foam tape. Mat the car onto the outline and mat onto the top of the easel with foam tape. What you’ll need: • 02-02-Vintage Voyage SVG files • White cardstock • Black cardstock • Distress Ink – Weather Wood --------------------------------- EXCLUSIVE GIFT - VINTAGE VOYAGE -------------------------------------CLICK HERE TO DOWNLOAD YOUR SVG CONTENT PROJECT 2 8 | www.tatteredlace.co.uk
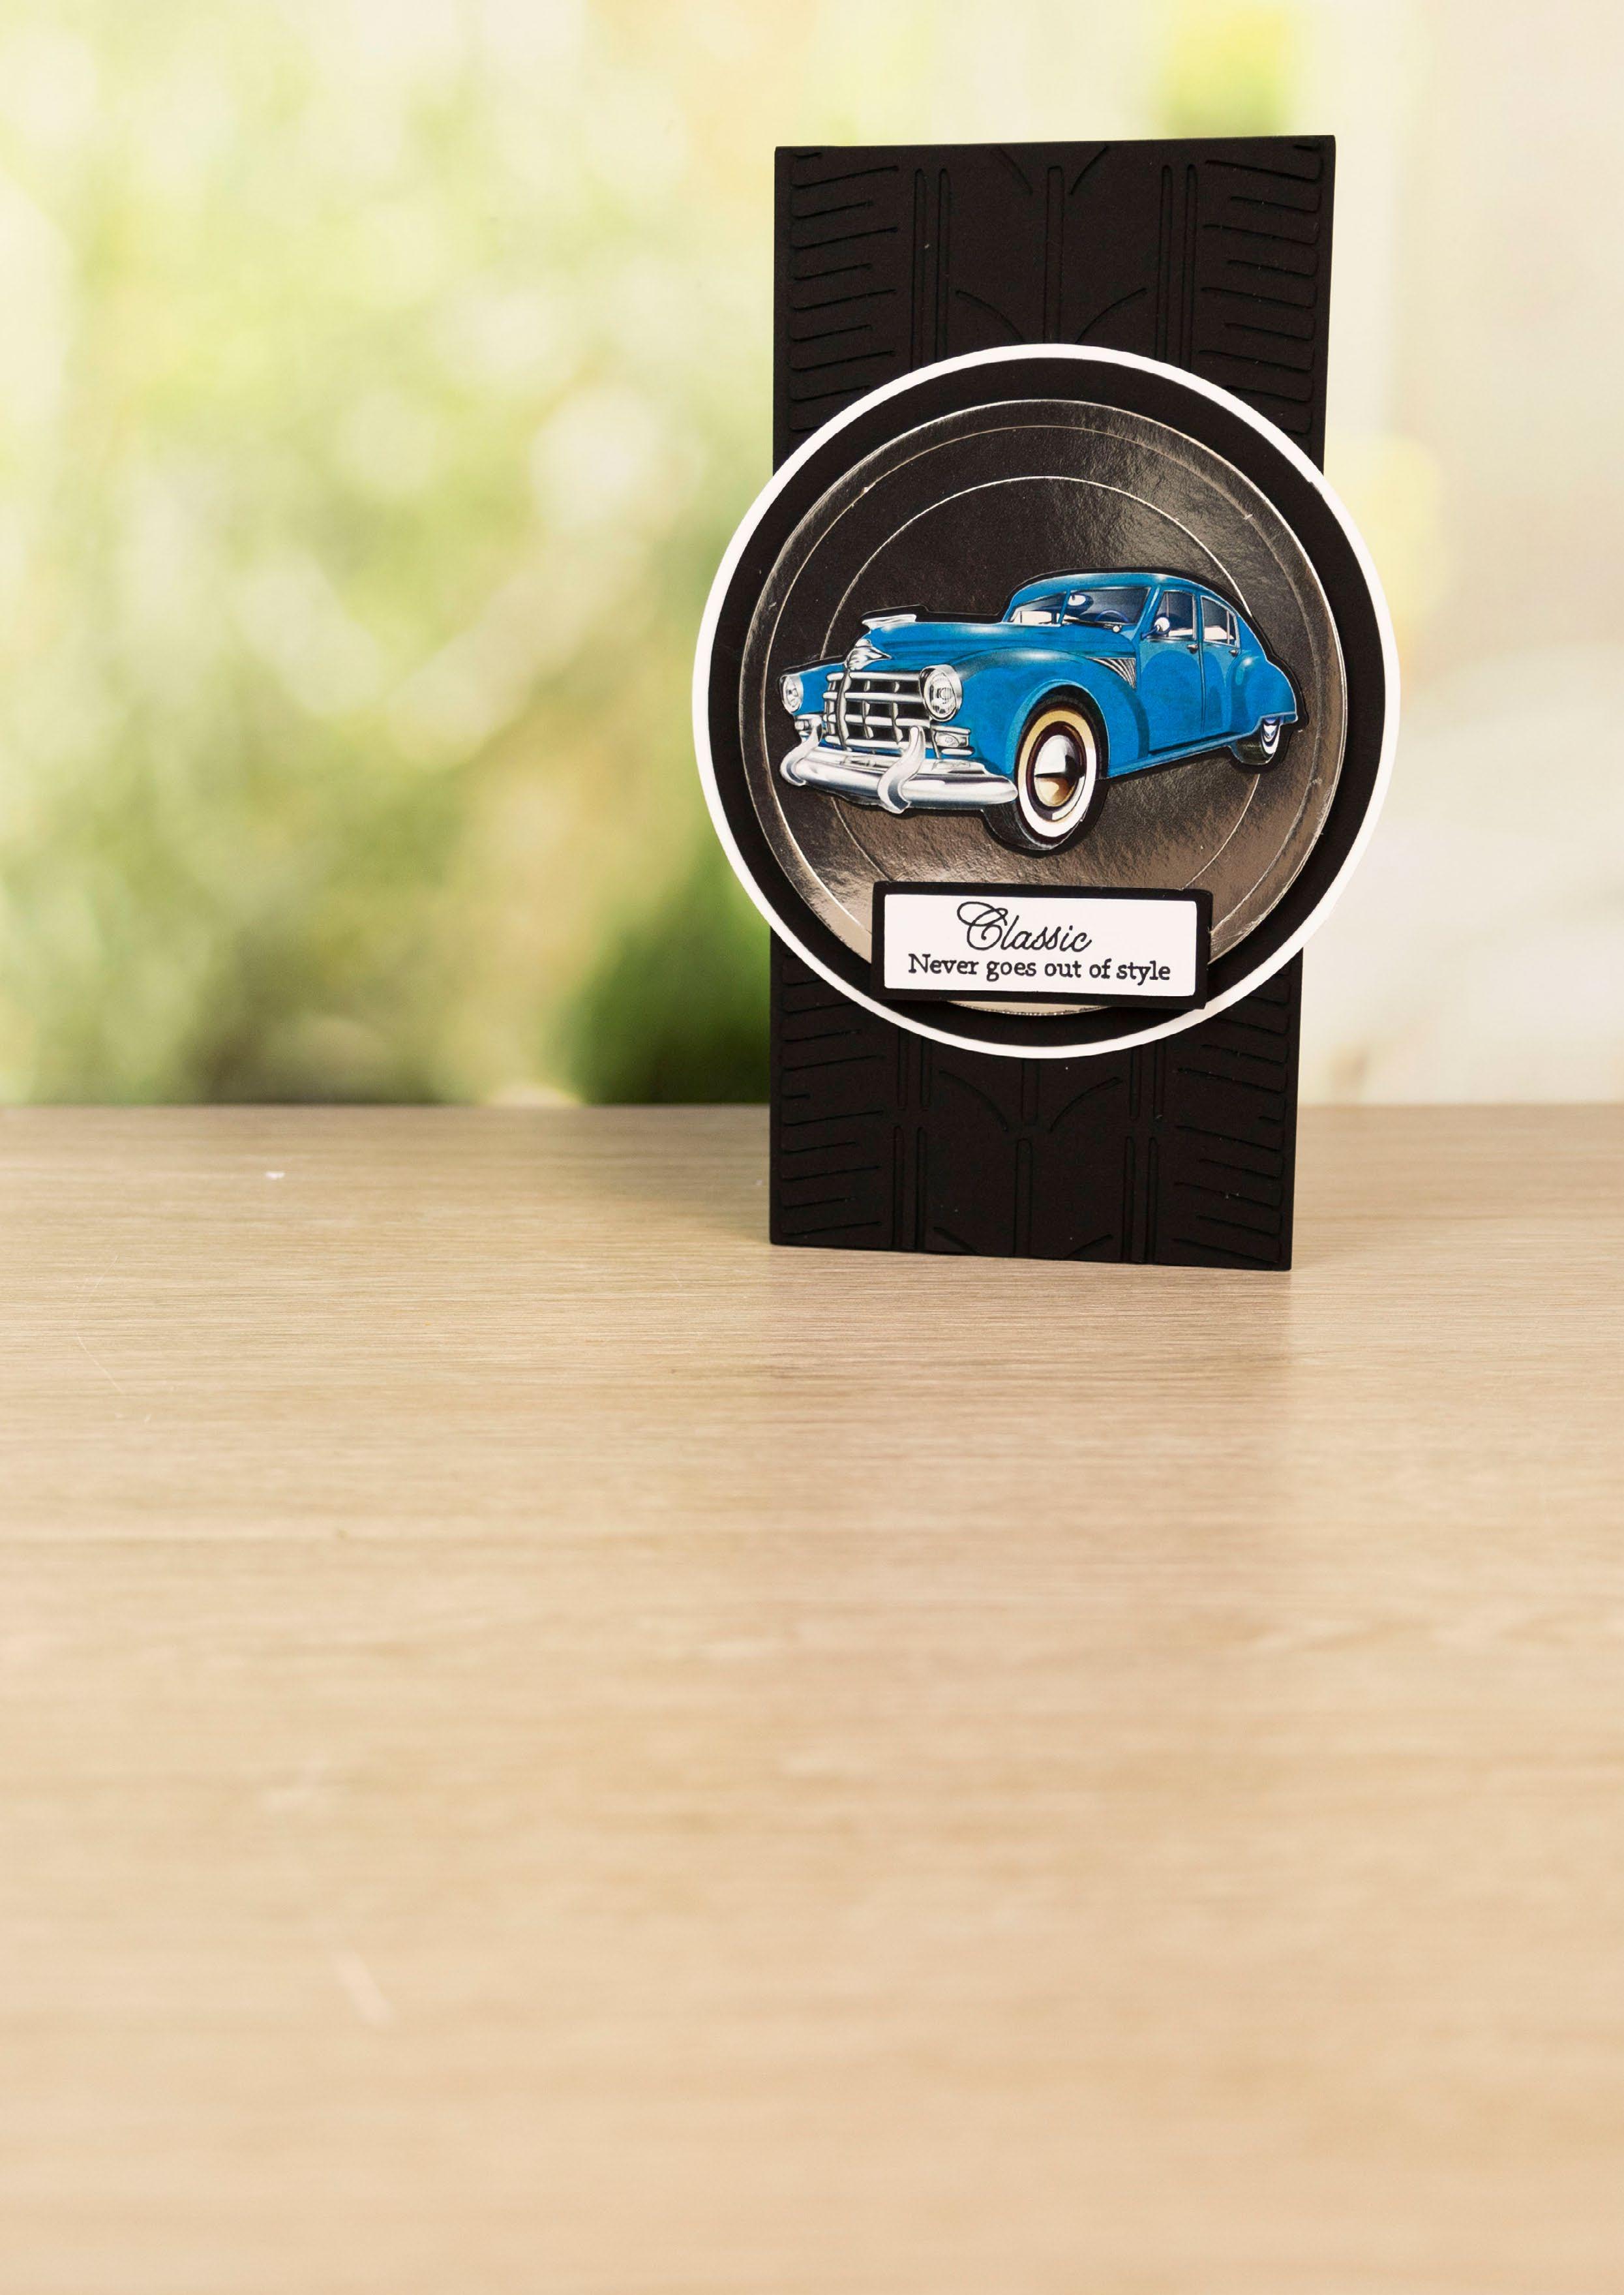
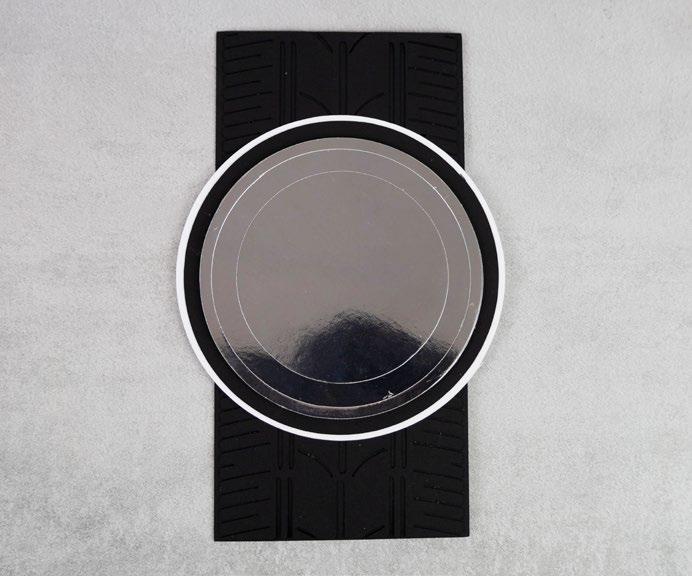
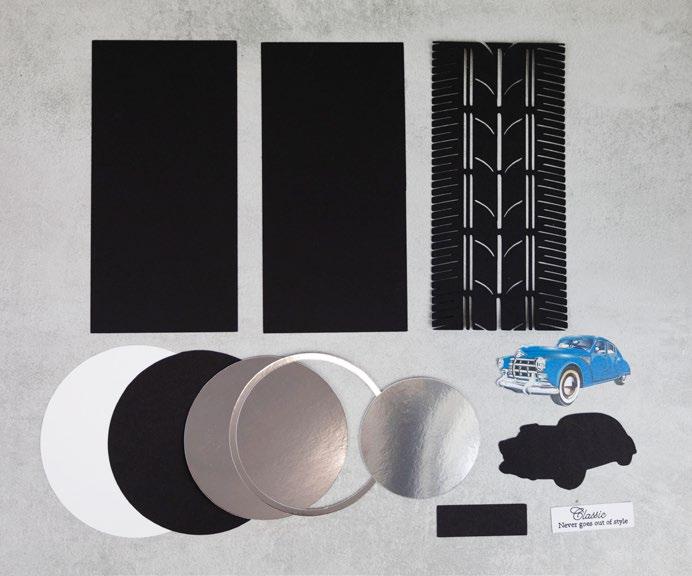
What you’ll need: • 03-03-Vintage Voyage SVG files • Black cardstock • White cardstock • Silver mirror cardstock Step bySteps 1 Cut all the pieces needed to create the project as listed below; From SVG downloads: • From black cardstock: - 1 x VV-3-Emboss - 1 x VV-3-Car Outline • From silver mirror cardstock: - 1 x VV-3-Circle Frame • From charisma: - 1 x VV-3-Charisma From machine memory: • From black cardstock: - 2 x 105mm x 210mm rectangle - 1 x 130mm circle - 1 x 65mm x 23mm rectangle • From white cardstock: - 1 x 135mm circle - 1 x 60mm x 18mm rectangle (with sentiment draw file) • From silver mirror cardstock: - 1 x 116mm circle - 1 x 87mm circle 2 On one of the large black rectangles, measure in 10mm from the left edge and score and fold to create a tab. Attach to the other black rectangle to create a card. Mat the emboss cut onto the front of the card. Mat the black circle onto the white circle and mat onto the card. 3 Mat the silver circle frame onto the large silver circle. Mat the smaller silver circle onto the large silver circle with foam tape, and mat onto the card with foam tape. 4 Mat the car charisma cut onto the black outline and mat onto the card with foam tape. Mat the sentiment rectangle onto the small black rectangle and mat onto the card with foam tape. 1 3 2 4 --------------------------------- EXCLUSIVE GIFT - VINTAGE VOYAGE -------------------------------------CLICK HERE TO DOWNLOAD YOUR SVG CONTENT PROJECT 3 www.tatteredlace.co.uk | 9

What you’ll need: • Vintage Voyage die set • White cardstock • Silver mirror cardstock • Complimentary backing paper • Charisma • Template No.02 --------------------------------- EXCLUSIVE GIFT - VINTAGE VOYAGE -------------------------------------10 | www.tatteredlace.co.uk
bySteps
Cut all the pieces
From SVG downloads:
• From white cardstock: - 1 x VV-4-Card Flap - 1 x VV-4-Flap Mat 2 - 1 x VV-4-Car Outline
to
• From charisma: - 1 x VV-4-Charisma
From machine memory:
• From silver mirror cardstock: - 1 x VV-4-Flap Mat 1 - 1 x VV-4-Flap Mat 3
• From backing paper: - 1 x VV-4-Flap Mat 4 (gradient)
• From white cardstock: - 1 x 280mm x 130mm rectangle - 1 x 45mm square (with sentiment draw file) - 1 x 55mm square
On the large white rectangle, from the left edge, measure in at 100mm and score and fold to create the card front. Mat the cars rectangle onto the
inside front of the card
• From silver mirror cardstock: - 1 x 175mm x 125mm rectangle - 2 x 95mm x 125mm rectangle - 1 x 50mm square
• From backing paper: - 1 x 170mm x 120mm rectangle (cars) - 2 x 90mm x 120mm rectangle (chevron)


one of
mat onto
the left side open to create a pocket. Mat
sentiment square onto the silver
onto the other white square. Mat onto the inside back of the card.
Mat
top tip...
The tab on the inside of the flap slides into the pocket on the inside front of the card to help the card stand.
--------------------------------- EXCLUSIVE GIFT - VINTAGE VOYAGE -------------------------------------www.tatteredlace.co.uk | 11 1
needed
create the project as listed below; Step
1 3 5 2 4 6
2
large silver rectangle and mat onto the inside back of the card. Mat
the chevron rectangles onto one of the smaller silver rectangles, and
the
leaving
the
square, then
3 Attach the card flap to the back of the right side of the card using the tab. Mat the white flap mat 2 onto the silver flap mat 1. Mat onto the inside of the card flap making sure to leave the tab unstuck. 4
the other chevron rectangle onto the other silver rectangle and mat onto the card front. Mat the gradient flap mat 4 onto the silver flap mat 3 and mat onto the front of the card flap. 5 Trim the car charisma cuts as shown in the image. 6 Build up the decoupage and mat together with foam tape. Mat onto the white outline and mat onto the card flap. CLICK HERE TO DOWNLOAD YOUR SVG CONTENT PROJECT 4
What you’ll need: • 05-05-Vintage Voyage SVG files • White cardstock • Black cardstock • Silver mirror cardstock • Black ribbon --------------------------------- EXCLUSIVE GIFT - VINTAGE VOYAGE -------------------------------------PROJECT 5 12 | www.tatteredlace.co.uk


--------------------------------- EXCLUSIVE GIFT - VINTAGE VOYAGE -------------------------------------www.tatteredlace.co.uk | 13 1 Cut all the pieces needed to create the project as listed below; Step bySteps 1 3 5 2 4 6 From SVG downloads: • From white cardstock: - 1 x VV-5-Emboss - 1 x VV-5-Car Outline • From charisma: - 1 x VV-5-Charisma From machine memory: • From white cardstock: - 2 x 210mm x 150mm rectangle - 1 x 90mm x 140mm rectangle - 1 x 48mm circle (with sentiment draw file) • From black cardstock: - 1 x 205mm x 145mm rectangle - 1 x 95mm x 145mm rectangle - 1 x 205mm x 65mm rectangle - 1 x 63mm circle - 1 x 53mm circle • From backing paper - 1 x 200mm x 140mm rectangle (cars) - 1 x 200mm x 60mm rectangle (chevron) • From silver mirror cardstock: - 1 x 58mm circle 2 On one of the large white rectangles, measure down 10mm from the top edge and score and fold to create a tab. Attach to the other large white rectangle to create a tent card. Mat the large cars rectangle onto the large black rectangle and mat onto the car. Mat the 95mm width black rectangle onto the card. 3 Mat the emboss cut onto the white rectangle. Wrap a length of ribbon down the centre of the rectangle, and mat onto the card with foam tape. 4 Mat the long chevron rectangle onto the long black rectangle, and mat onto the card with foam tape. 5 Mat the car charisma cut onto the white car outline with foam tape, and mat onto the card. 6 Mat the sentiment circle onto the smaller black circle. Mat onto the silver circle with foam tape, and onto the larger black circle with foam tape. Mat the circles onto the card. Tie a bow from black ribbon and mat onto the sentiment circle. CLICK HERE TO DOWNLOAD YOUR SVG CONTENT |
Step bySteps 1 2 3 4 5 1 Cut all the pieces needed to create the project as listed below; From SVG downloads: • From charisma: - 1 x VV-6-Charisma From machine memory: • From white cardstock: - 2 x 143mm x 184mm oval - 1 x 76mm x 116mm oval • From backing paper - 1 x 138mm x 179mm oval (gradient) - 1 x 129mm x 169mm oval (cars) - 1 x 86mm x 126mm oval (gradient) • From silver mirror cardstock: - 1 x 134mm x 174mm oval - 1 x 90mm x 131mm oval 2 On one of the large white ovals, from the top edge measure down 15mm and score and fold to create a tab. Trim a straight edge across the bottom. Attach to the other white oval to create a tent card. Mat the large gradient oval onto the card. Mat the cars oval onto the larger silver oval, and mat onto the card with foam tape. 3 Mat the smaller silver oval onto the card with foam tape. Ink around the edges of the small white oval. Mat onto the small gradient oval and mat onto the card with foam tape. 4 Trim the car charisma cuts as shown in the image. 5 Add Decoupage Glaze to the windows, grill, bumper, lights and the hub cap. Build up the decoupage and mat together with foam tape. Mat onto the card with foam tape. Tie a double-loop bow from silver ribbon and mat onto the card. What you’ll need: • 06-06-Vintage Voyage SVG files • White cardstock • Black cardstock • Silver mirror cardstock • Black ribbon • Distress Ink – Weathered Wood • Decoupage Glaze --------------------------------- EXCLUSIVE GIFT - VINTAGE VOYAGE -------------------------------------14 | www.tatteredlace.co.uk CLICK HERE TO DOWNLOAD YOUR SVG CONTENT PROJECT 6
TO...
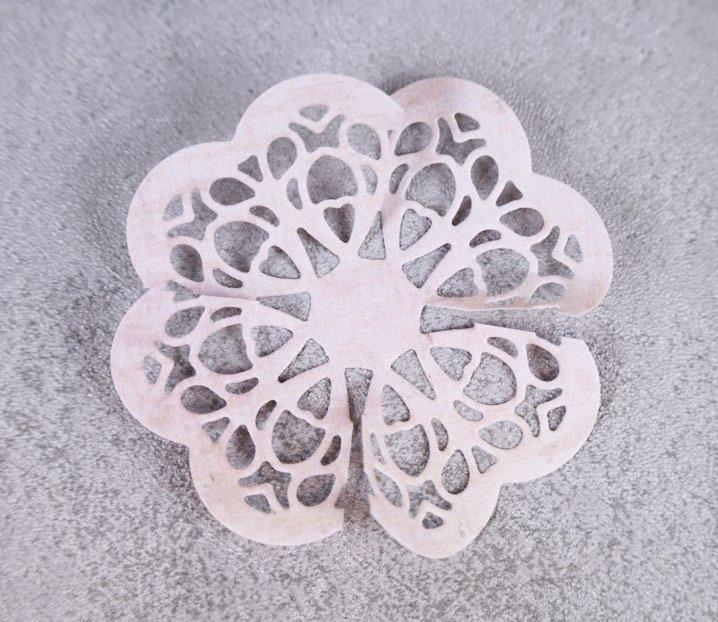
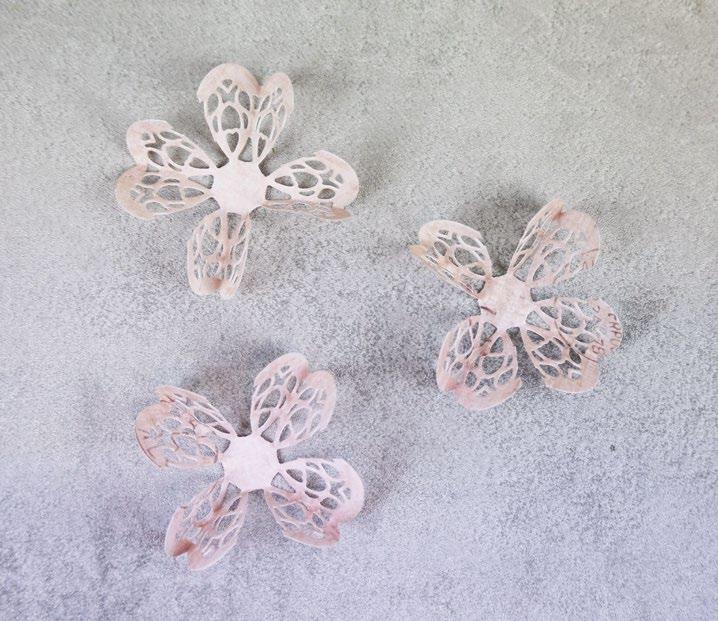
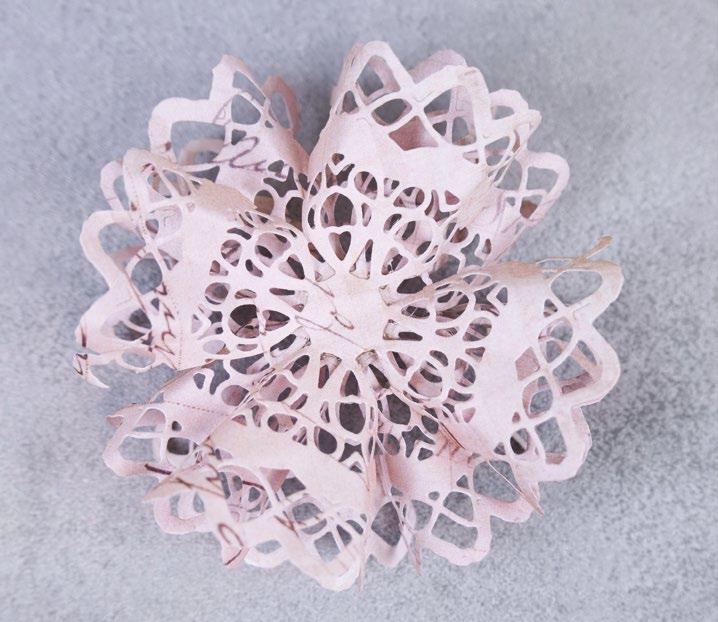
FLOWERS WITH THE CIRCLE INTERLOCKING DIE SET
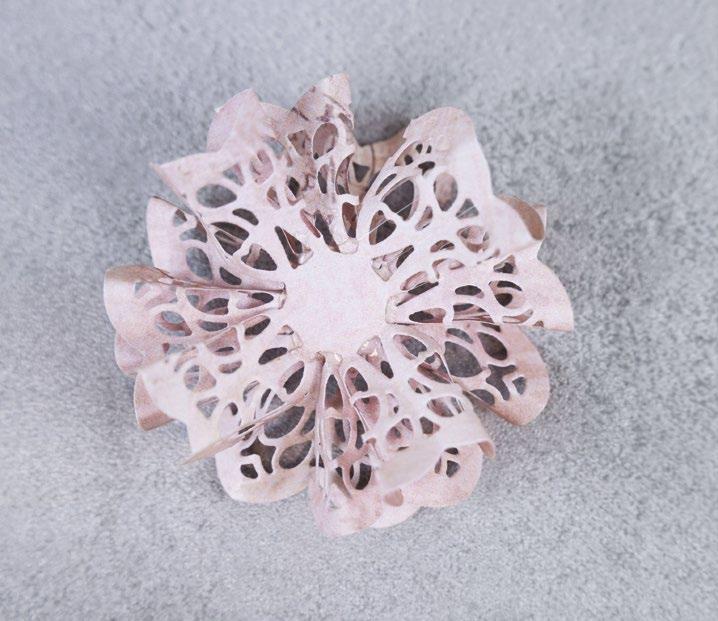
Use
in the
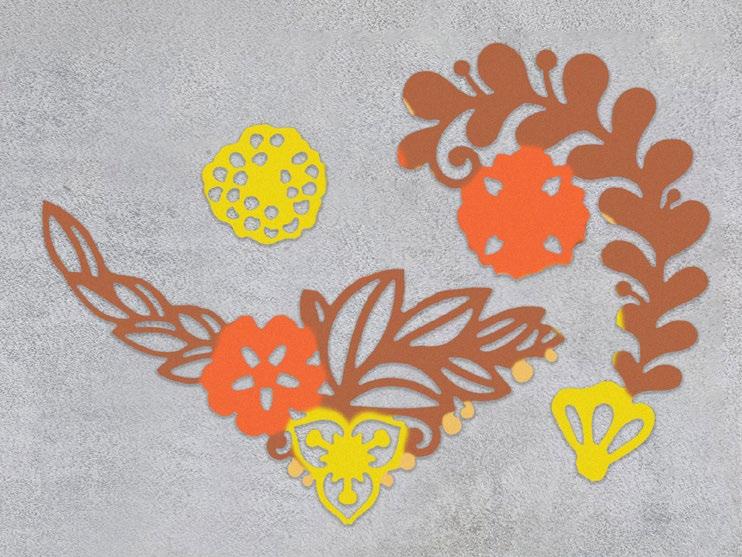
Please note the flowers in this How-To have been made using die-cuts. But the process of making the flowers follows the same steps with SVG files.

Using the Circle Interlocking
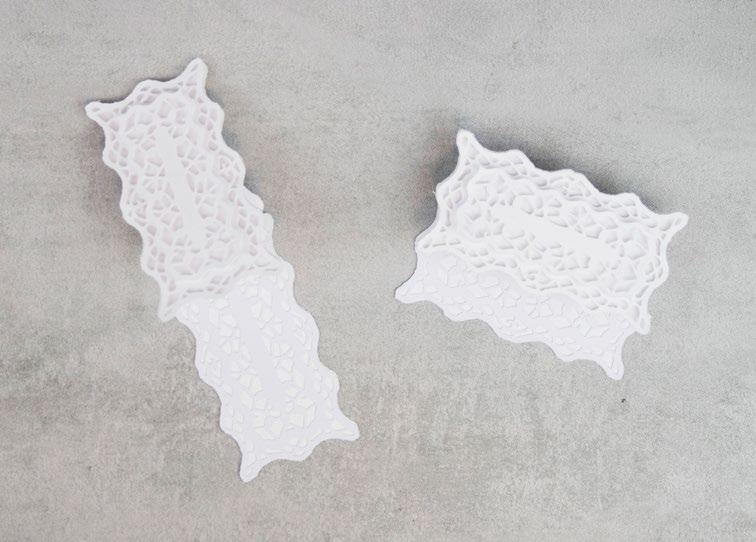
set, cut the No.3 and No.2 dies together three times from complimentary backing paper.
Cut into each cut four times in between the scallops. Make sure you stop cutting before you reach the centre.
Fold each petal on each cut in half.
Gently roll back the edges of each petal. Use a pencil to get a neat curl.
Glue the centres of each cut together to create the flower.
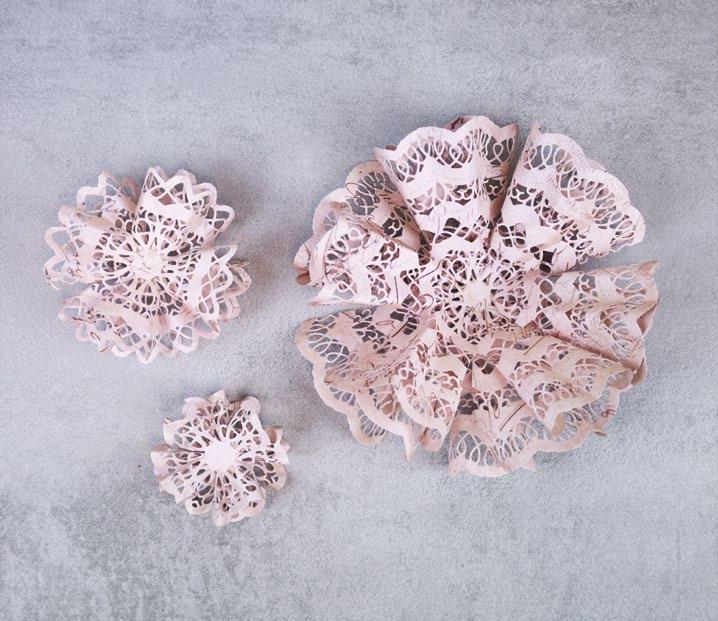
can create a bigger flower
cutting dies the No.5, No.4 and No.2 dies together three times from complimentary backing paper. Make up the flower in the same way as the smaller flower.
Cut dies No.11, No.10, No.7, No.4 and No.2 together three times from complimentary backing paper and repeat the above to create a large flower.

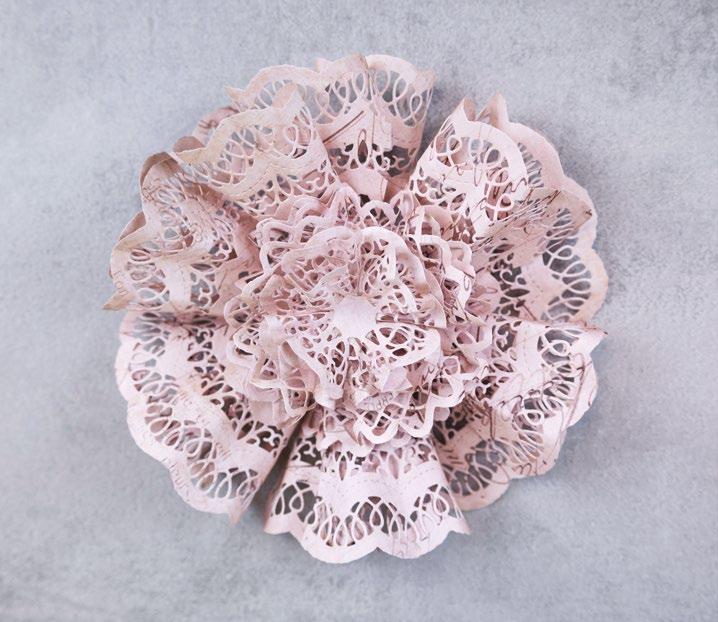
To create an even fuller
can then layer the different sized flowers up.
1
die
2
3
4
5
6 You
by
7
8
flower you
--------------------------------- HOW TO - CREATE PAPER FLOWERS --------------------------------HOW
1 5 7 2 6 8 3 4 MAKE
this How To to help you make the flowers used in the projects made
next few pages.
www.tatteredlace.co.uk | 15
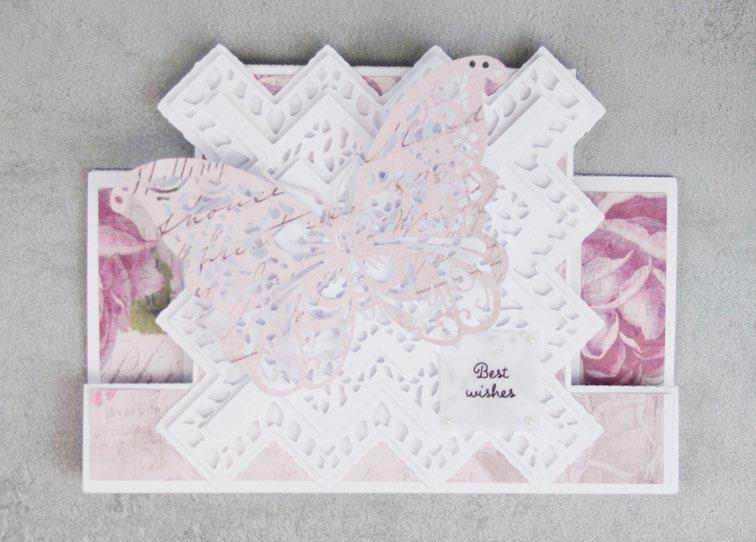
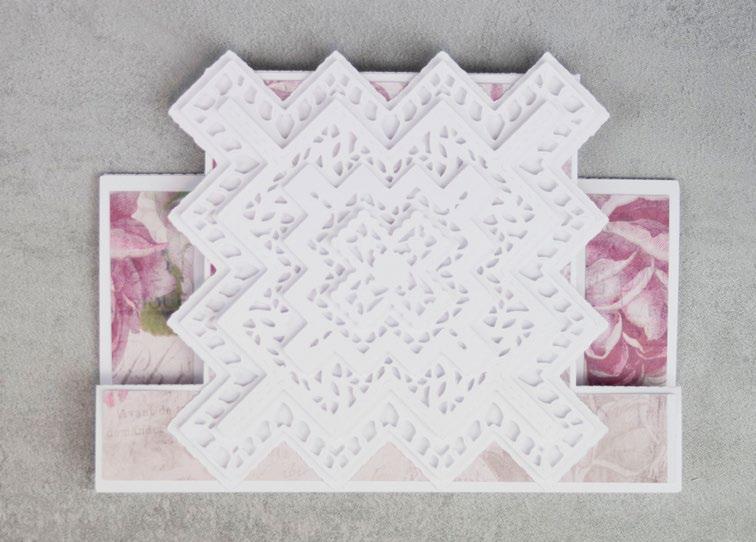
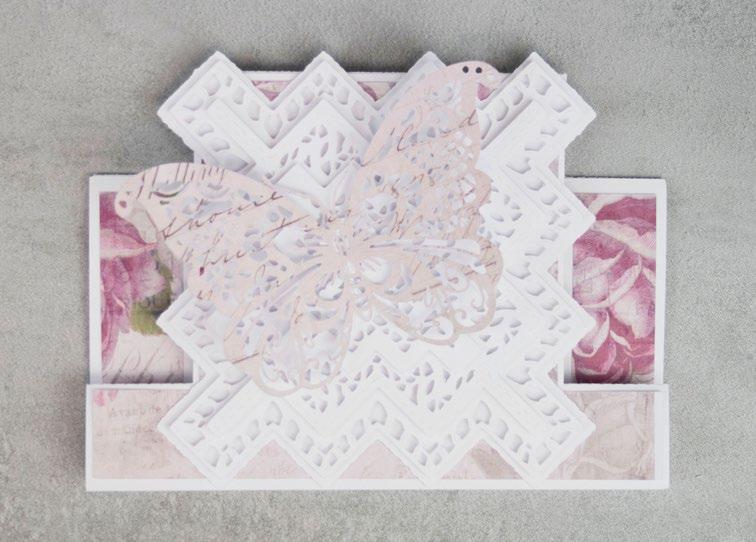
Vintage Heirloom
you’ll need:
all the pieces needed to create the project as listed below;
•
white cardstock:
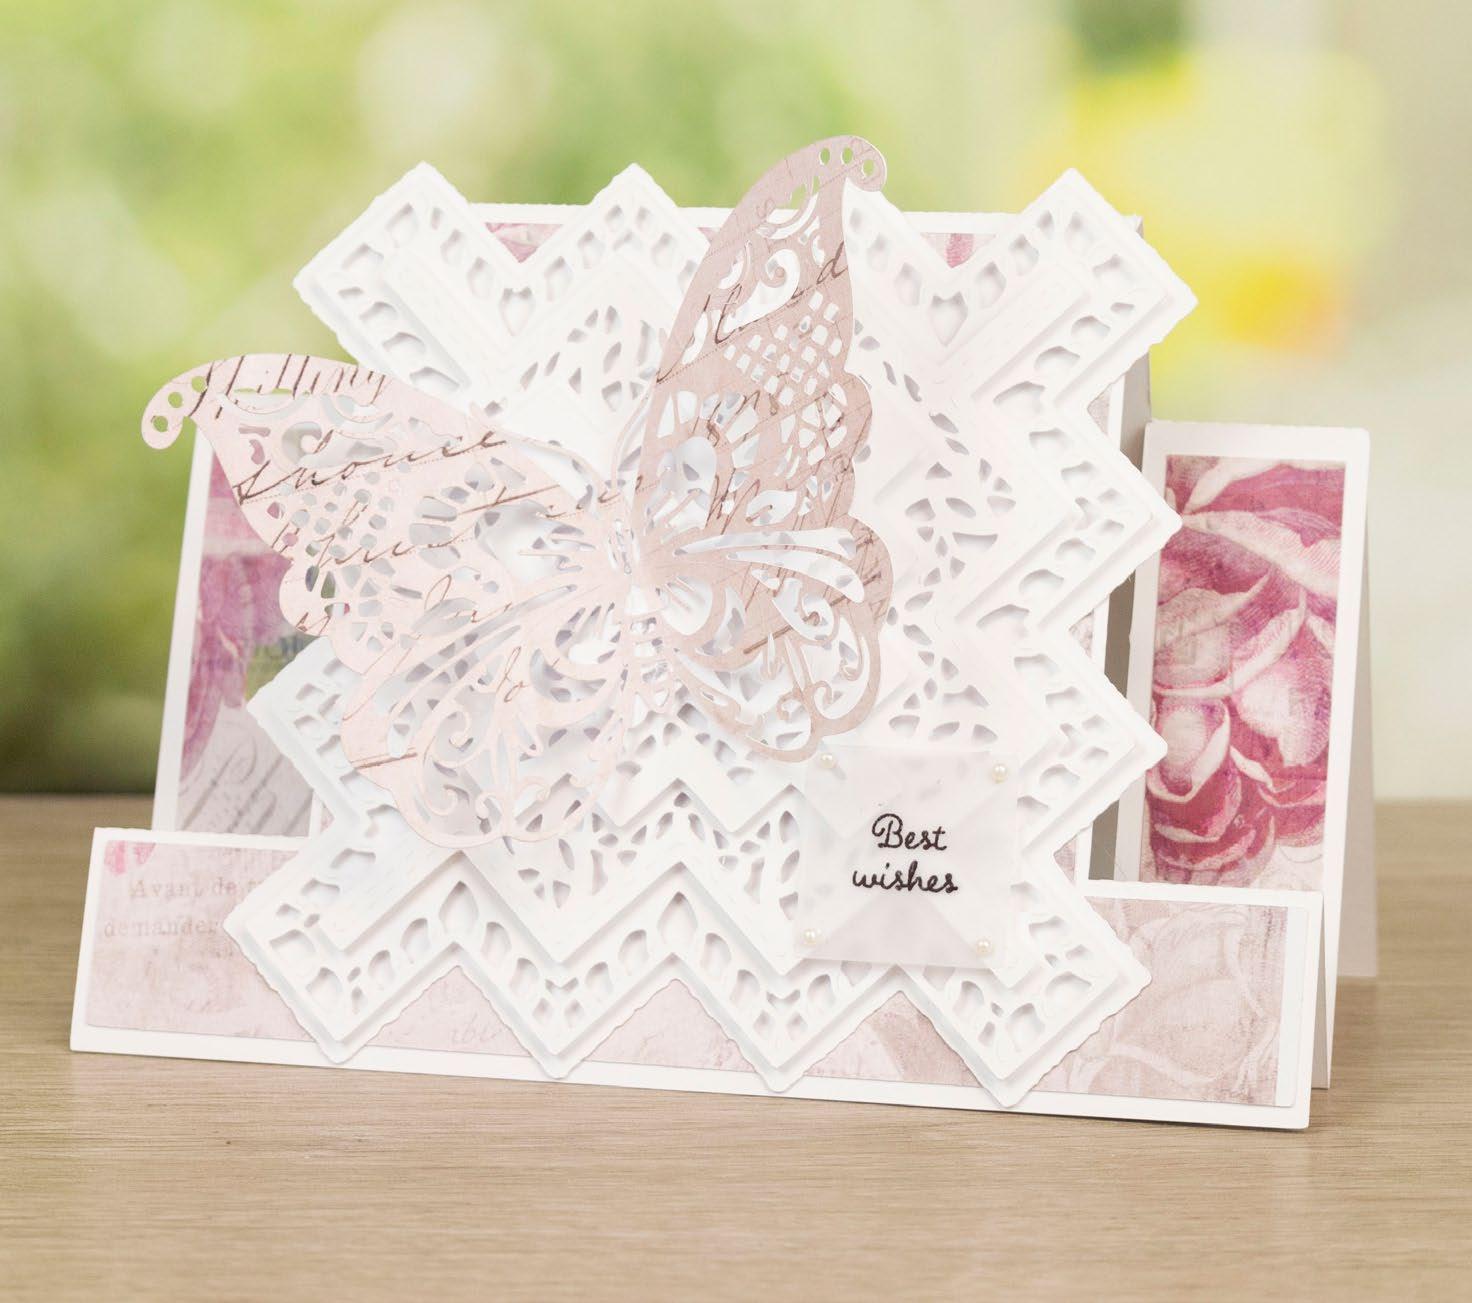
1 x VH-1-Card Base Front
1 x VH-1-Card Base Back
1 x VH-1-Square Mat 1
1 x VH-1-Square Mat 2
1 x VH-1-Square Mat 3
1 x VH-1-Square Mat 4
1 x VH-1-Square Mat 5
•
backing paper:
1 x VH-1-Card Mat 1 (rose)
1 x VH-1-Butterfly (pink script)
From machine memory:
backing paper:
2 x 20mm x 115mm (roses)
•
vellum:
1 x 35mm square (with sentiment draw file)
on the score lines of the card base and mat front and back together using the tabs to create a stepper card. Mat the card mat 1 and the roses rectangles onto the front and side panels of the stepper card.
Mat square mat 2 onto square mat 1 with foam tape and mat onto the card.
Mat square mat 4 onto square mat 3 with foam tape, and mat onto the card with foam tape. Mat square mat 5 onto the card with foam tape.
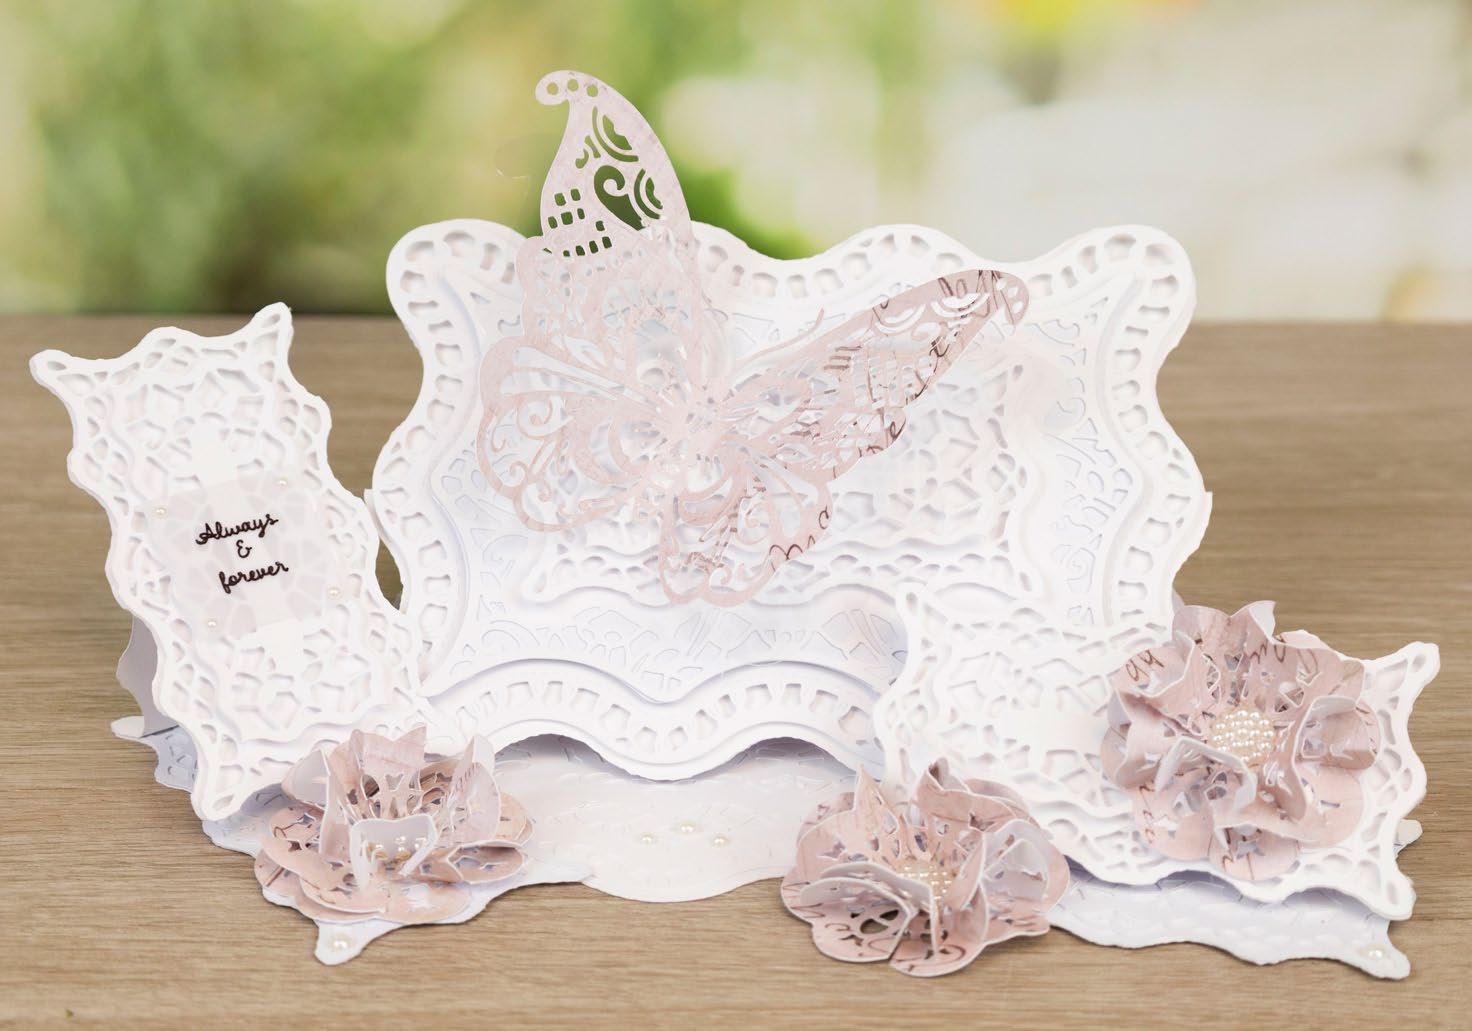
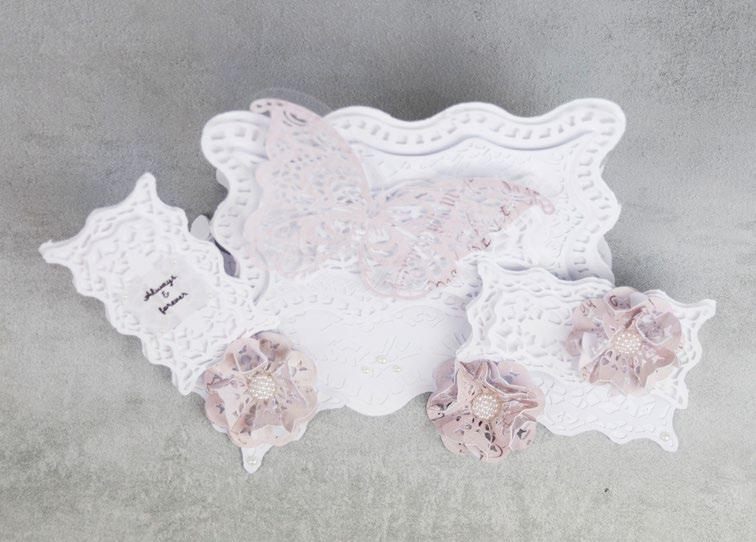
Mat the butterfly onto the card by only sticking the body of the butterfly.
Mat the sentiment square onto the card and add pearl gems into each corner to hide the glue.
---------------------------------------- VINTAGE HEIRLOOM --------------------------------------------What
• 07-01-Vintage Heirloom SVG files • White cardstock • Vellum • Pearl gems 1 Cut
From SVG downloads:
From
-
-
-
-
-
-
-
From
-
-
• From
-
From
-
2 Fold
3
4
1 4 2 5 3 6
5
6
CLICK HERE TO DOWNLOAD YOUR SVG CONTENT PROJECT 7 16 | www.tatteredlace.co.uk
you’ll need:
Cut all the pieces needed to create the project as listed below;
From SVG downloads:
• From white cardstock:
2 x VH-2-Card Base
1 x VH-2-Lace Rectangle 1
- 1 x VH-2-Lace Rectangle 2
1 x VH-2-Lace Rectangle 3
1 x VH-2-Lace Rectangle 4
• From backing paper:
- 1 x VH-2-Rectangle Mat 1 (pink script)
- 1 x VH-2-Rectangle Mat 2 (pink script)
- 1 x VH-2-Rectangle Mat 3 (pink script)
- 1 x VH-2-Rectangle Mat 4 (pink script)
3 x VH-2-Lace Circle (pink script)
From machine memory:
• From white cardstock:
1 x 45mm x 35mm rectangle
1 x 35mm x 25mm rectangle (with sentiment draw file)
• From backing paper: - 1 x 40mm x 30mm rectangle (pink script)
On one of the card bases, measure down 20mm from the top edge and score and fold to create a tab. Attach to the other card base to create a tent card. Mat the lace rectangle 1 onto the rectangle mat 1, and mat onto the card with foam tape.
Mat the lace rectangle 2 onto the rectangle mat 2, and mat onto the card with foam tape.

Mat the lace rectangle 3 onto the rectangle mat 3, and mat onto the card with foam tape.
Mat the lace rectangle 4 onto the rectangle mat 4, and mat onto the card with foam tape.
Using the lace circle cuts, snip into each cut four times from the edge but stop before you get to
the centre. Shape and curl the cuts to resemble petals and mat together onto the card. Add a pearl gem to the centre. Mat the sentiment rectangle onto the pink flowers rectangle and onto the white rectangle. Mat onto the card with foam tape.
What
• 08-02-Vintage Heirloom SVG files • White cardstock • Vellum • Pearl gems 1
-
-
-
-
-
-
-
2
3
---------------------------------------- VINTAGE HEIRLOOM --------------------------------------------4
5
6
1 4 2 5 3 6 CLICK HERE TO DOWNLOAD YOUR SVG CONTENT PROJECT 8 www.tatteredlace.co.uk | 17
What you’ll need:
• 09-03-Vintage Heirloom SVG files
• White cardstock
1
Vellum
Pearl gems
Cut all the pieces needed to create the project as listed below;
From SVG downloads:
• From white cardstock:
- 3 x VH-3-Card Base
- 1 x VH-3-Lace Rectangle 1
- 1 x VH-3-Lace Rectangle 2
- 1 x VH-3-Lace Rectangle 3
- 1 x VH-3-Card Mat
- 3 x VH-3-Lace Rectangle 4
- 3 x VH-3-Lace Rectangle 5
- 6 x VH-3-Small Card Base
- 2 x VH-3-Lace Rectangle 6
• From backing paper:
- 9 x VH-3- Lace Circle (pink script)
- 1 x VH-3-Butterfly (pink script)
• From acetate: - 1 x VH-3-Butterfly Outline
From machine memory:
• From vellum:
- 1 x 35mm square (with sentiment draw file
rectangle 5 cuts, mat together and mat onto the card with foam tape.
3
Mat the two lace rectangle 6 cuts onto two of the small card bases.
with foam tape and mat onto the front of each mini easel with foam tape.
5
2
Mat the lace rectangle 1 onto one of the card bases. This will be the base of the easel. On one of the other card bases, measure down 15mm from the top edge and score and fold to create a tab. Fold in half horizontally and attach to the card base using the tab to create an easel card. Mat the remaining card base to the front of the easel. Mat lace rectangle 2 onto the card mat and mat onto the lace rectangle 3 with foam tape. Mat onto the card with foam tape. Using one of the lace rectangle 4 and one of the lace
On one of the small card bases, measure down 10mm from the short edge and score and fold to create a tab. Fold in half horizontally, and attach to one of small card bases to create a mini easel.
On another small card base, measure down 10mm from the long edge and score and fold to create a tab. Fold in half horizontally, and attach to one of small card bases to create another mini easel. Mat the remaining small card base cuts onto the front of each easel.
4
Mat the remaining lace rectangle 5 cuts onto the lace rectangle 4 cuts
Using the lace circle cuts, snip into each cut four times from the edge but stop before you get to the centre. Mat three circles together to create flowers. Mat one flower onto the base of the portrait mini easel as a stopper. Mat another flower onto the base of the landscape mini easel as a stopper, and the last flower onto the front of the easel.
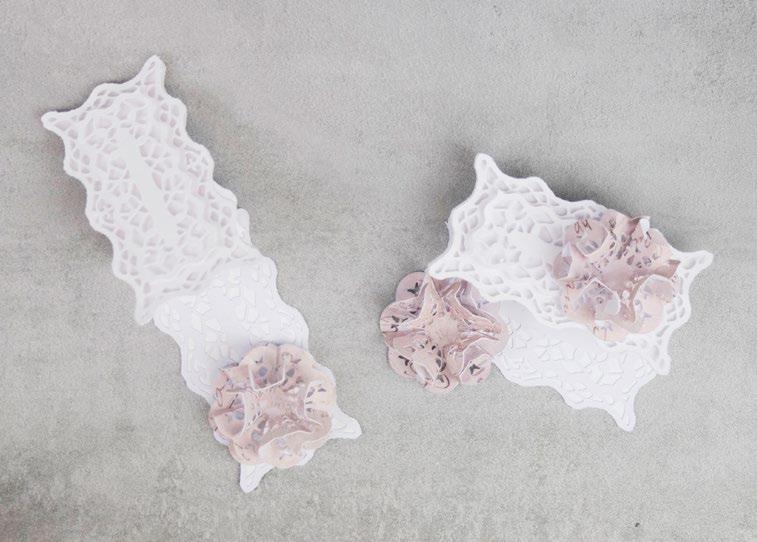
6
Mat each mini easel onto the base of the main easel as stoppers. Add a pearl gem to each flower. Mat the butterfly onto the acetate outline, only sticking the centres and mat onto the card. Mat the vellum sentiment onto the portrait mini easel and add gems to each corner to hide the glue.
•
•
1 4 2 5 3 6 ---------------------------------------- VINTAGE HEIRLOOM --------------------------------------------CLICK HERE TO DOWNLOAD YOUR SVG CONTENT PROJECT 9 18 | www.tatteredlace.co.uk
From
VH-4-Lace
silver mirror
25mm
200mm
white
1 x 200mm
180mm
180mm
2 x 20mm x 180mm rectangle
Fold on the score lines of the card front. Mat the two pink script rectangles onto the two silver rectangles and mat onto the card front on the inside of the folds.
Using the lace circle cuts, snip into each cut four times from the edge, but stop before you get to the centre.
Mat three circles together to create flowers. Snip into the green lace circle to create leaves.
Mat the leaves and flowers onto the middle of the large silver rectangle, and add a pearl gem to the centre of each flower.
Attach the card front to the card back attaching the tabs to the back of the silver rectangle. Mat the large white rectangle onto the back of the card to hide the tabs.
Mat the butterfly onto the acetate outline by only sticking the centres and mat onto the card front.
What you’ll need: • 10-04-Vintage Heirloom SVG files • White cardstock • Green cardstock • Silver mirror cardstock • Acetate • Pearl gems 1 Cut all the pieces needed to create the project as listed below; From SVG downloads: • From white cardstock: - 3 x VH-4-Card Front • From backing paper: - 3 x VH-4-Lace Circle 1 (rose) - 9 x VH-4-Lace Circle 2 (pink script) - 1 x VH-4-Butterfly (rose) • From green cardstock: - 1 x
Circle 1 • From acetate: - 1 x VH-3-Butterfly Outline
machine memory: • From
cardstock: - 2 x
x 180mm rectangle - 1 x
x
rectangle • From
cardstock: -
x
rectangle • From backing paper: -
(pink script) 2
3
4
5
6
1 4 2 5 3 6 ---------------------------------------- VINTAGE HEIRLOOM --------------------------------------------CLICK HERE TO DOWNLOAD YOUR SVG CONTENT PROJECT 10 www.tatteredlace.co.uk | 19
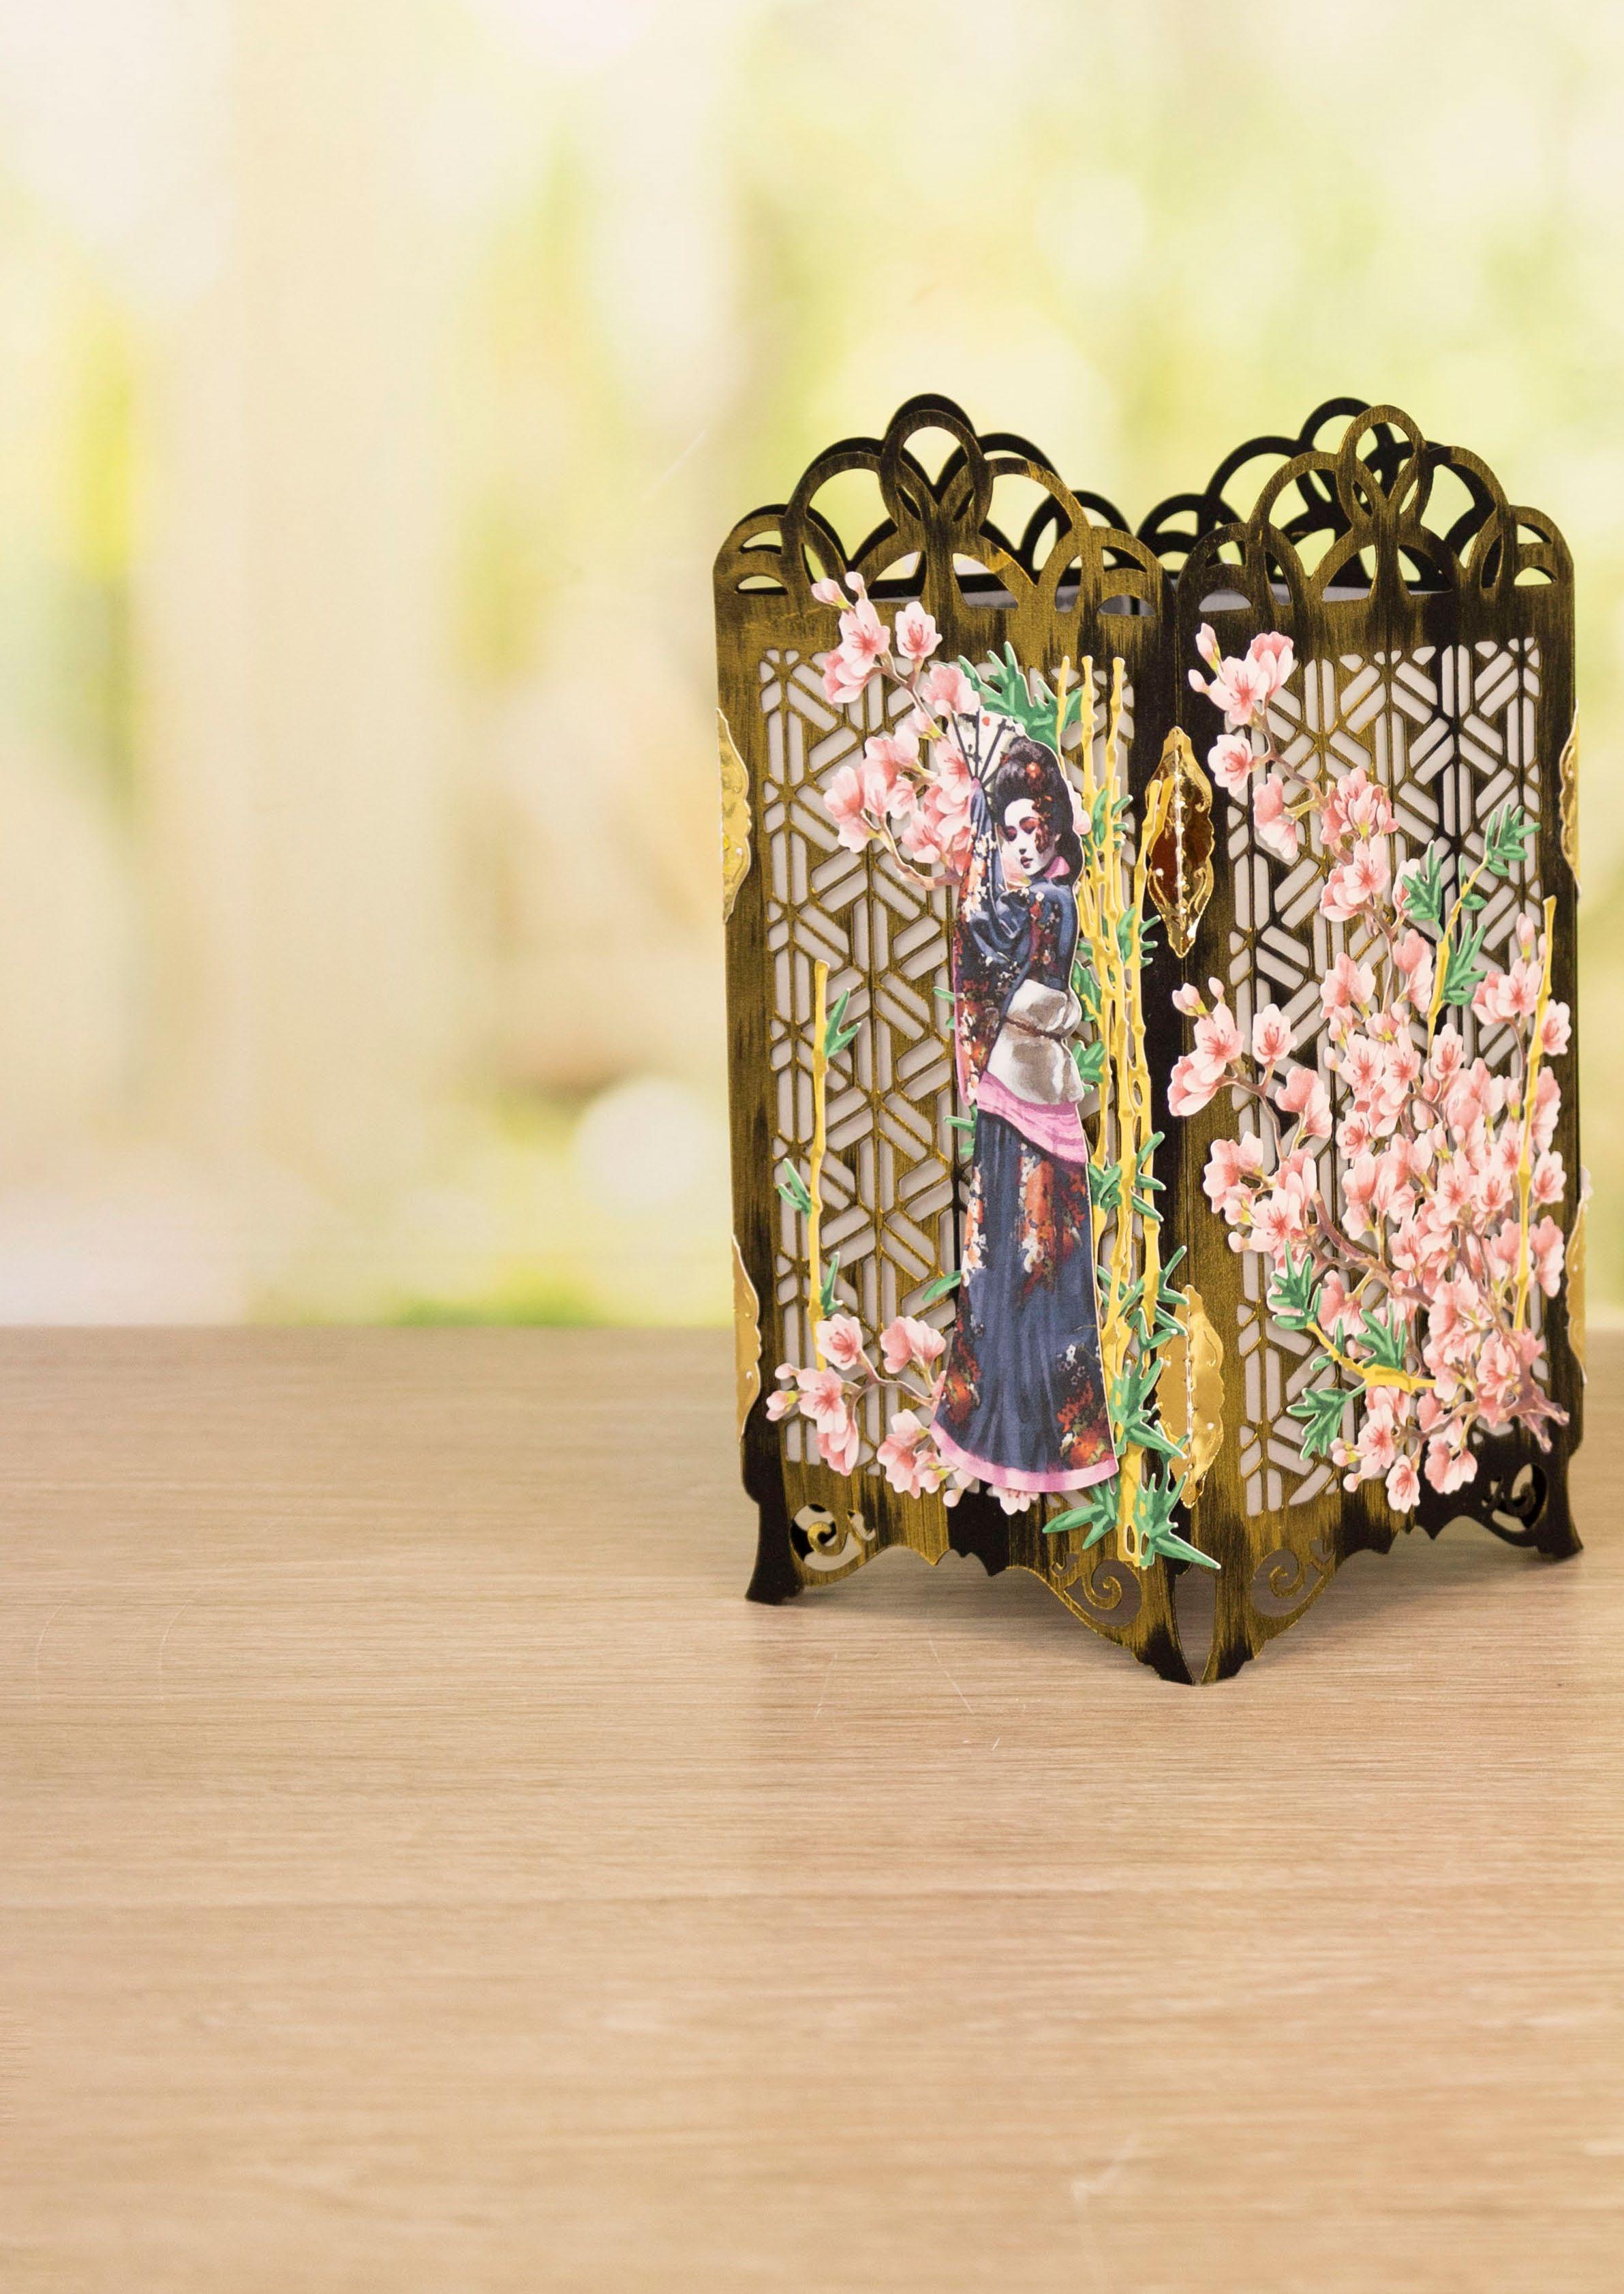
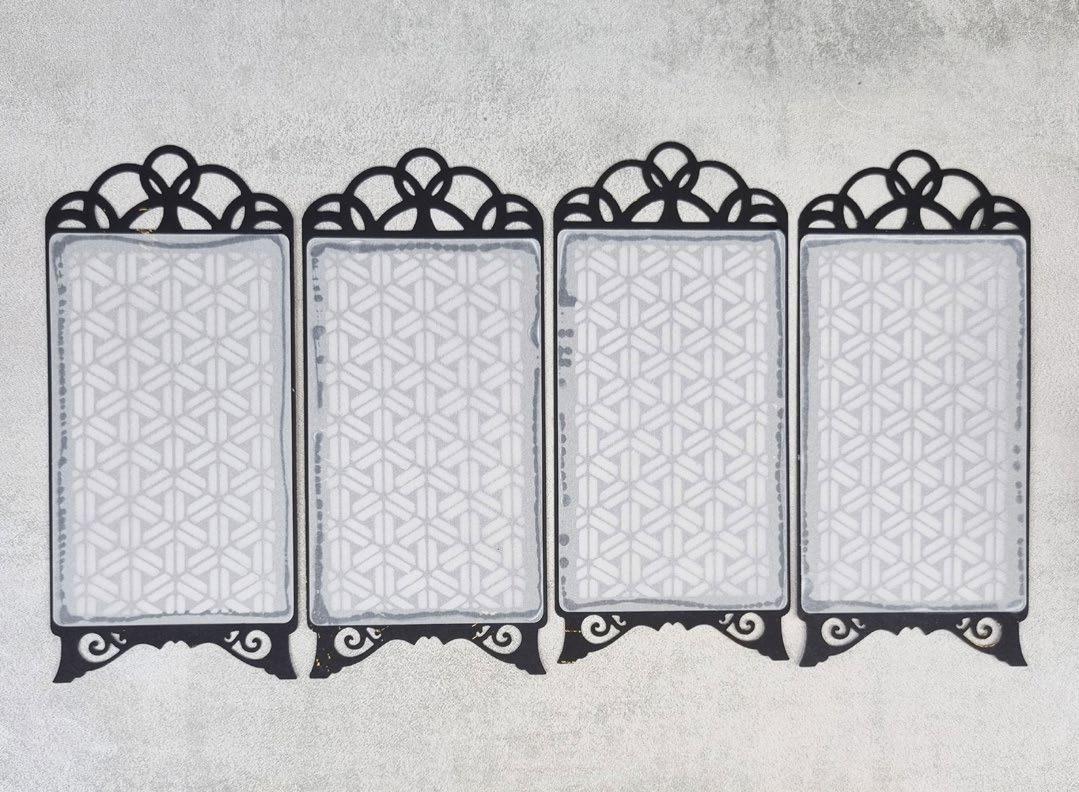
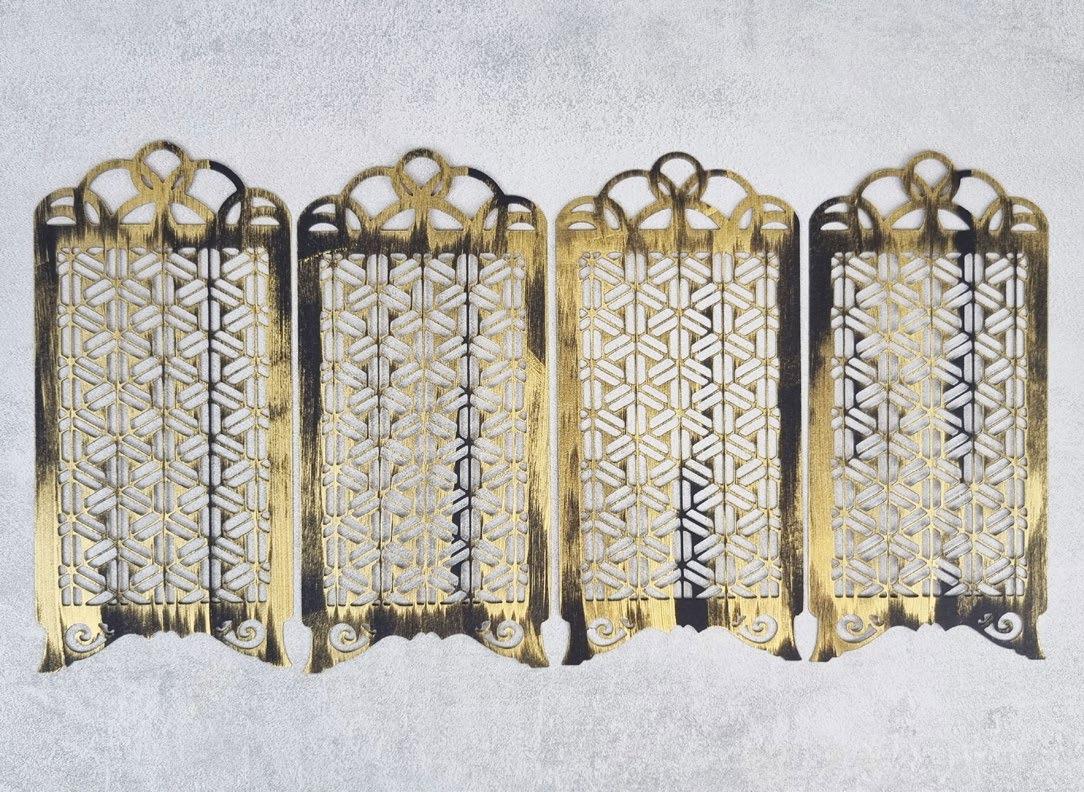
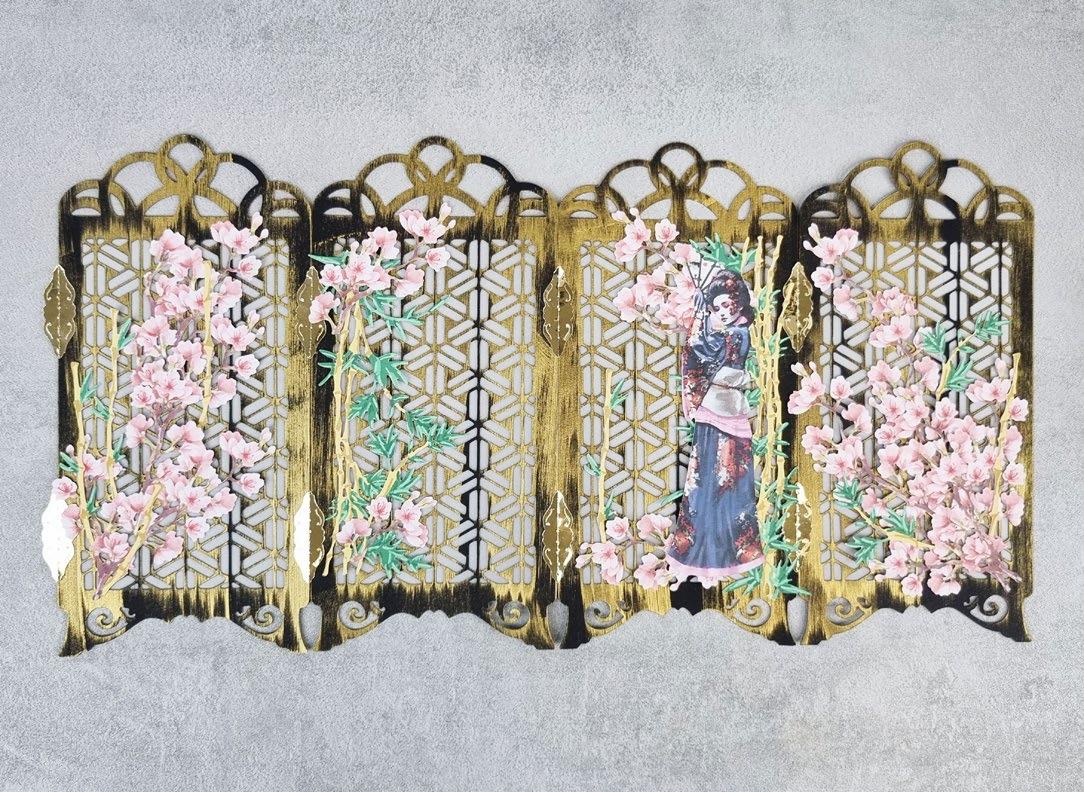
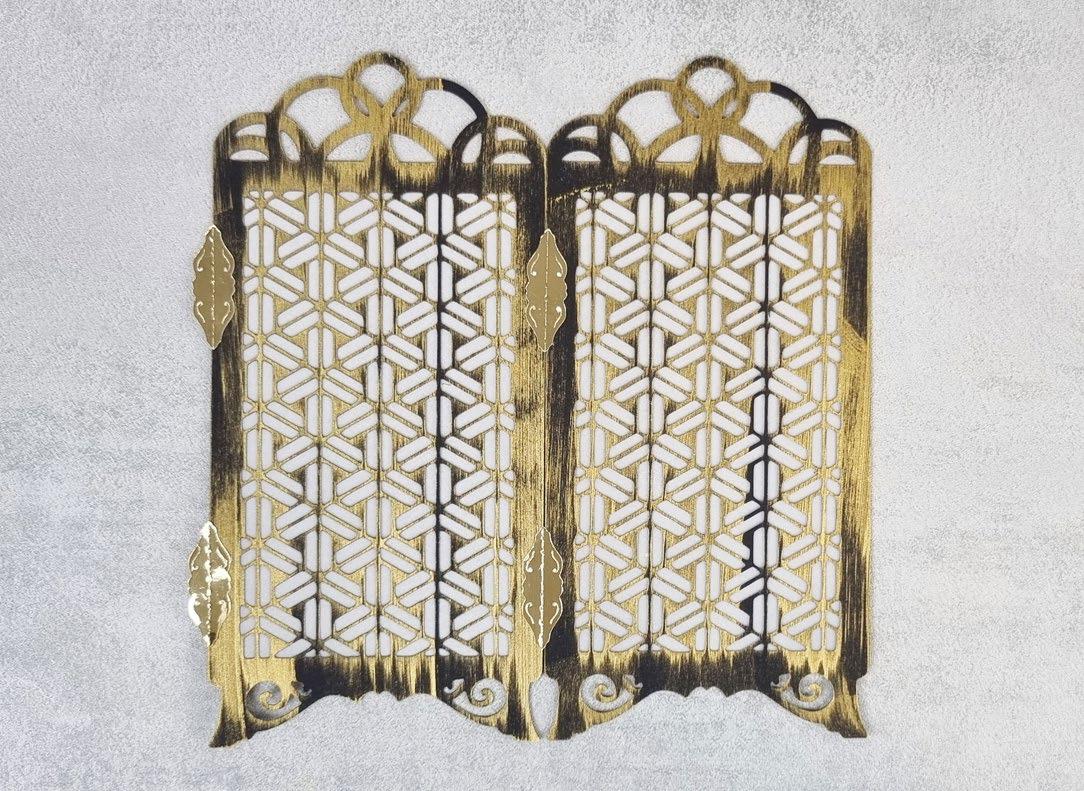
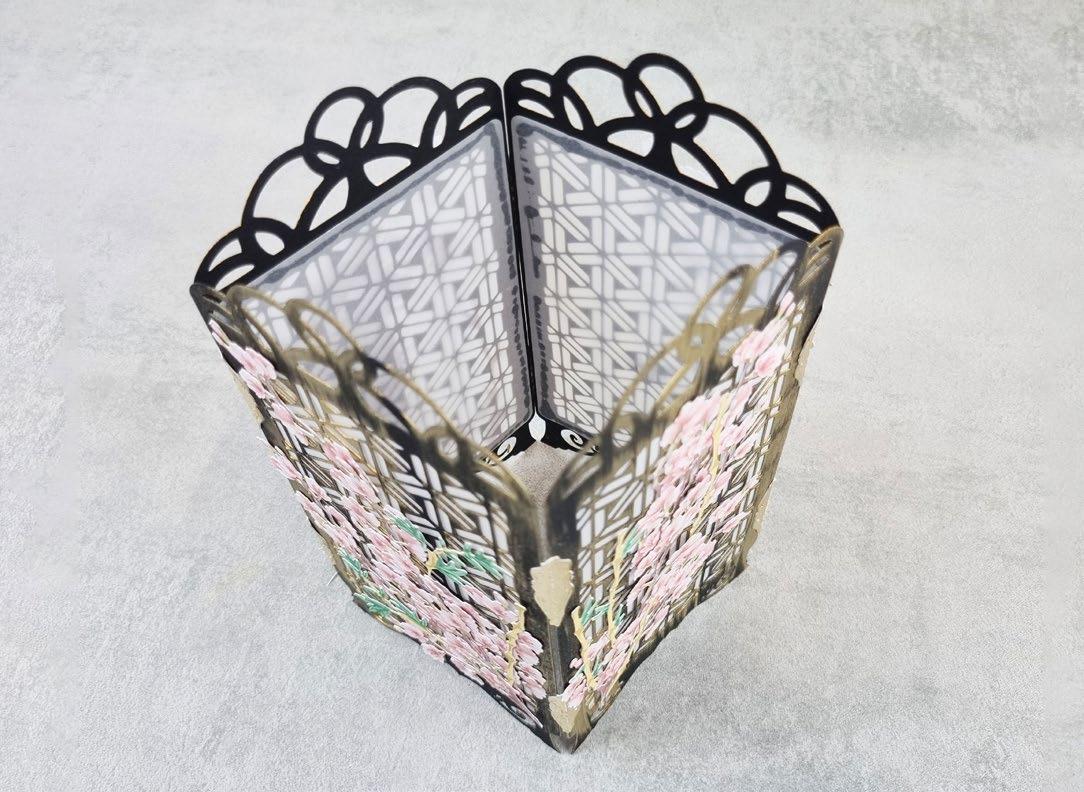
1 Cut all the pieces needed to create the project as listed below; From SVG downloads: • From black cardstock: - 4 x DL-1-Screen 1 • From vellum: - 4 x DL-1-Screen 2 • From gold pearlescent cardstock: - 8 x DL-1-Hinge • From charisma: - 1 x DL-1-Charisma A - 1 x DL-1-Charisma B - 1 x DL-1-Charisma C 2 Using the Cadence Gold Metallic paint, dab paint onto a foam sponge and randomly rub gold paint in streaks down each black screen. 3 Mat the vellum screens to back of each black screen. 4 Mat four hinges onto one screen, two on each side, and attach to another screen. 5 Attach the remaining screens to the ones from the previous step using the rest of the folded hinges. 6 Start adding the charisma cuts onto the screen panels. Trim into the blossom branch to create smaller blossom branches. Continue adding your charisma cuts until you are happy with your decorated panels. 7 Turn the screens over, and fold over the end panels. Attach the two end panels together using the hinges. 8 Let the hinges dry and then open up the lantern to make it stand. What you’ll need: • 11-01-David’s Lantern SVG files • Black cardstock • Gold pearlescent cardstock • Vellum • Cadence Gold Metallic paint Lantern David’s ----------------------------------------- DAVID'S LANTERN ---------------------------------------------top tip... Add craft lights to the inside of the lantern to create a beautiful light up decoration! CLICK HERE TO DOWNLOAD YOUR SVG CONTENT PROJECT 11 20 | www.tatteredlace.co.uk


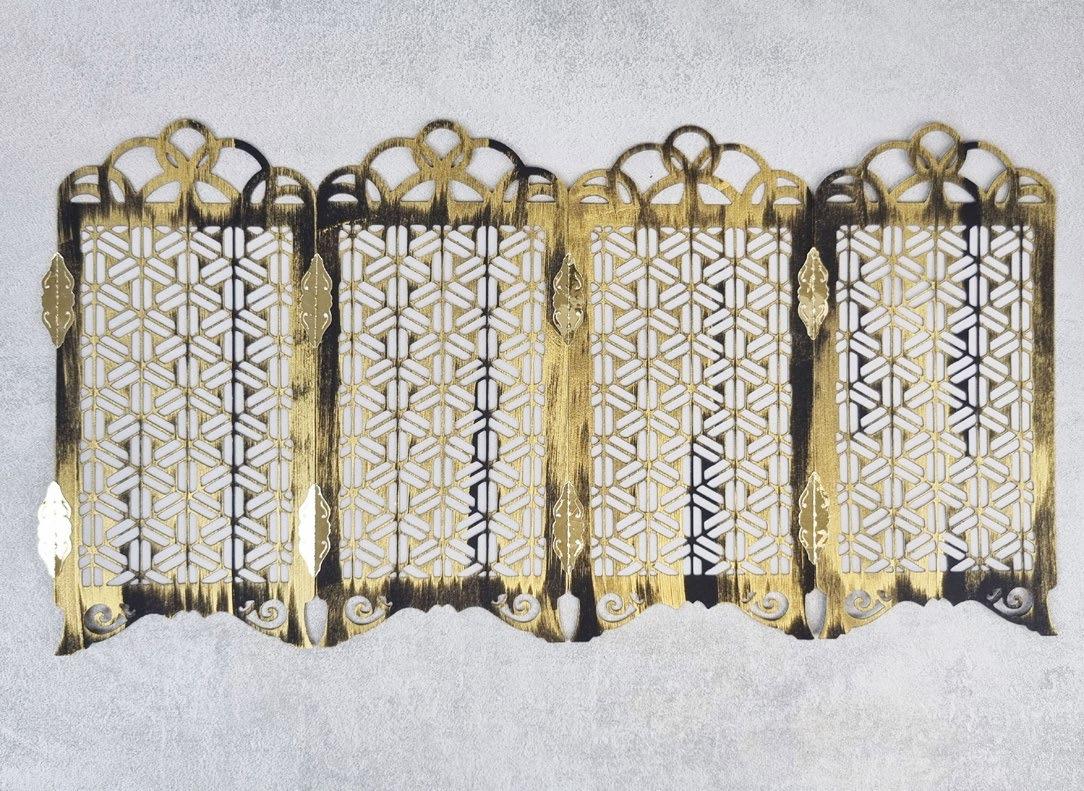
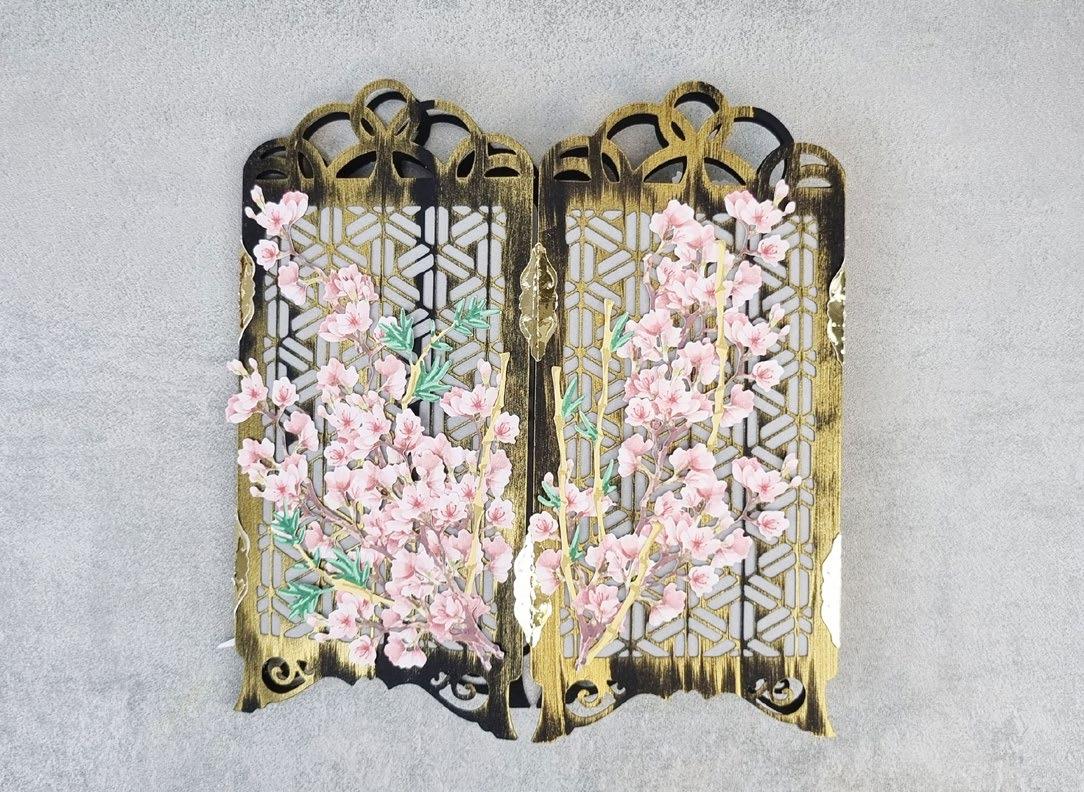
----------------------------------------- DAVID'S LANTERN ---------------------------------------------1 5 3 7 2 6 4 8 www.tatteredlace.co.uk | 21
Pop-Up CardLouise’s What you’ll need: • 12-01-Pop-Up Card SVG files • Black cardstock • Silver mirror cardstock -------------------------------------------- POP UP CARD ----------------------------------------------CLICK HERE TO DOWNLOAD YOUR SVG CONTENT PROJECT 12 22 | www.tatteredlace.co.uk


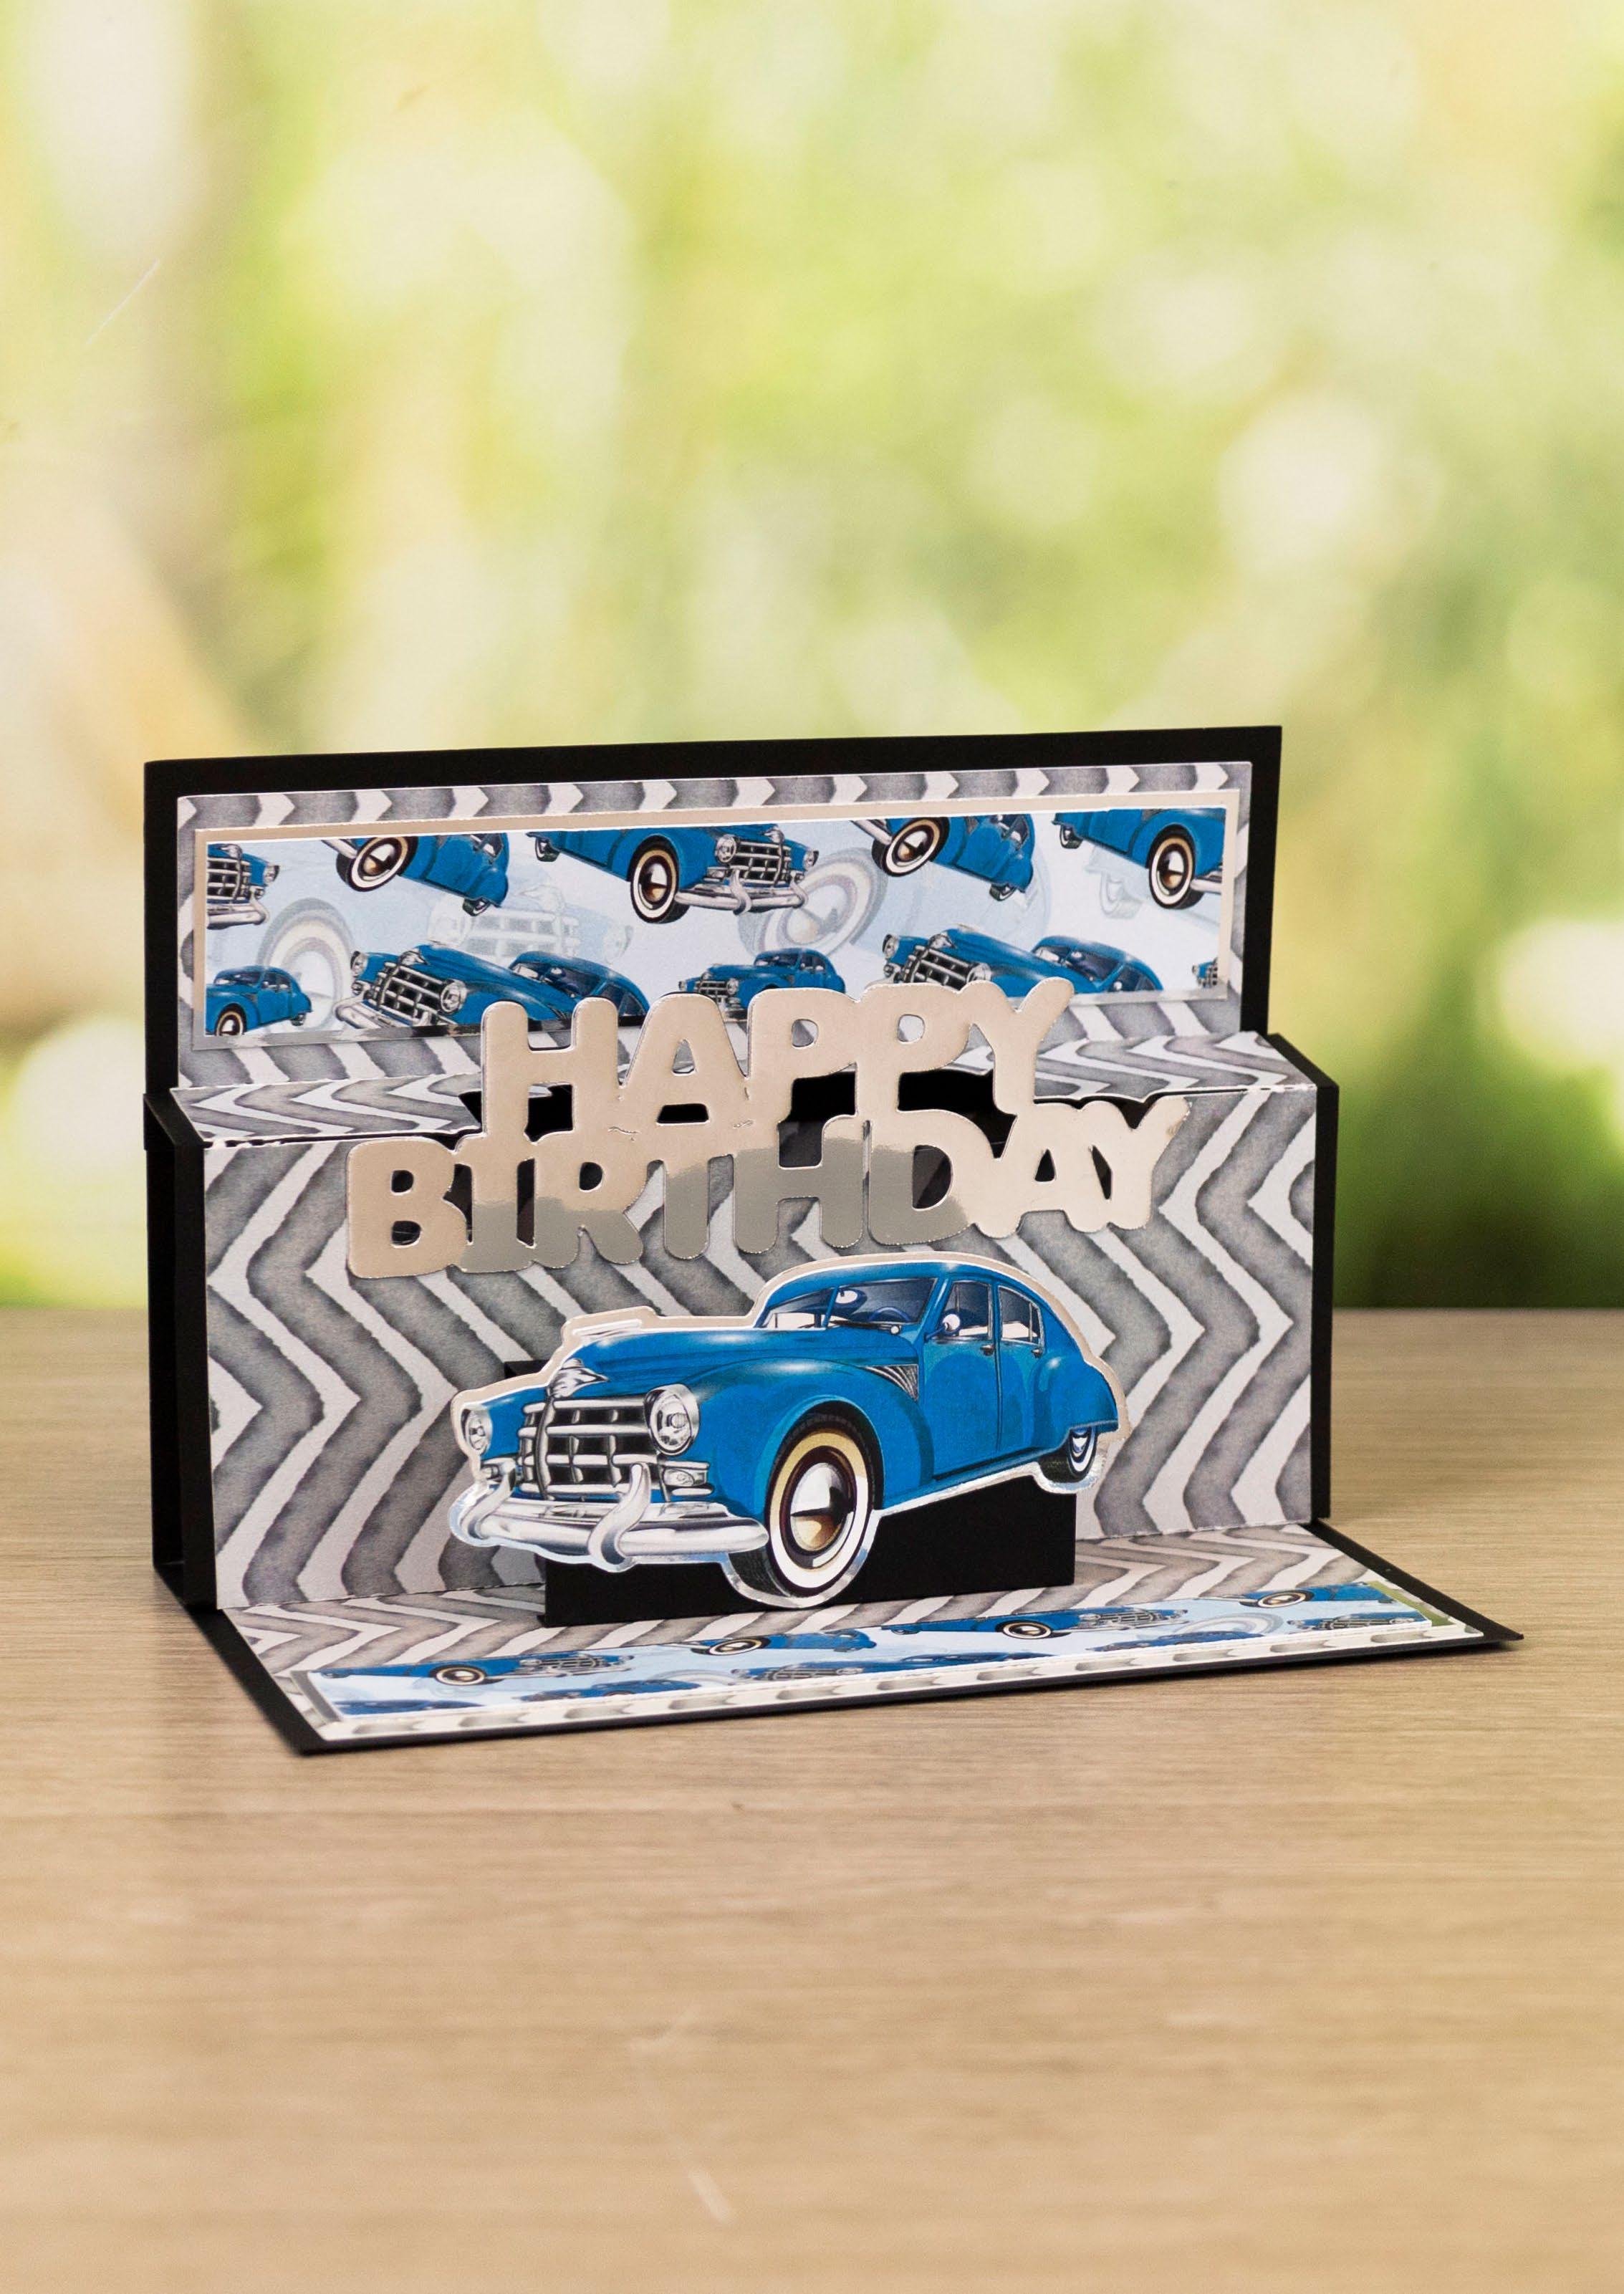
-------------------------------------------- POP UP CARD ----------------------------------------------1 Cut all the pieces needed to create the project as listed below; 1 4 7 2 5 8 3 6 9 From SVG downloads: • From black cardstock: - 1 x PUC-1-Large Pop Up - 1 x PUC-1-Emboss • From backing paper: - 1 x PUC-1-Large Pop Up Mat • From silver mirror cardstock: - 1 x PUC-1-Large Sentiment - 1 x PUC-1-Small Sentiment - 1 x PUC-1-Car Outline • From charisma: - 1 x PUC-1-Charisma From machine memory: • From black cardstock: - 1 x 180mm x 250mm rectangle - 1 x 80mm square - 1 x 105mm square • From silver mirror cardstock: - 2 x 165mm x 35mm rectangle • From backing paper: - 1 x 170mm x 240mm rectangle (chevron) - 2 x 160mm x 30mm rectangle (cars) - 1 x 170mm x 120mm rectangle (cars) 2 Fold the large black rectangle in half horizontally to create a tent card. Fold the large chevron rectangle in half horizontally and mat onto the inside of the card. 3 Mat the cars rectangles onto the silver rectangles and mat onto the inside back and front of the card. 4 Mat the large pop-up mat onto the black large popup and fold on the score lines. Mat the large silver sentiment onto the pop-up. 5 Attach the pop-up into the inside of the card sticking the bottom tab to the inside back of the card and the top tab to the inside front. 6 On the 80mm black square, from the top and bottom edge, measure in 1cm and score and fold to create a tab. Fold in half horizontally. Attach the mini pop-up to the inside of the card by sticking the bottom tab to the inside back of the card and the top tab to the large pop-up. 7 Mat the car charisma onto the silver outline and mat onto the front of the small pop-up. 8 Mat the large cars rectangle onto the front of the tent card. Mat the black emboss cut onto the 105mm width square and mat onto the front of the card. 9 Mat the small silver sentiment onto the front of the card. www.tatteredlace.co.uk | 23
On one of the large white rectangles, measure in 10mm from the left edge and score and fold
black
gold
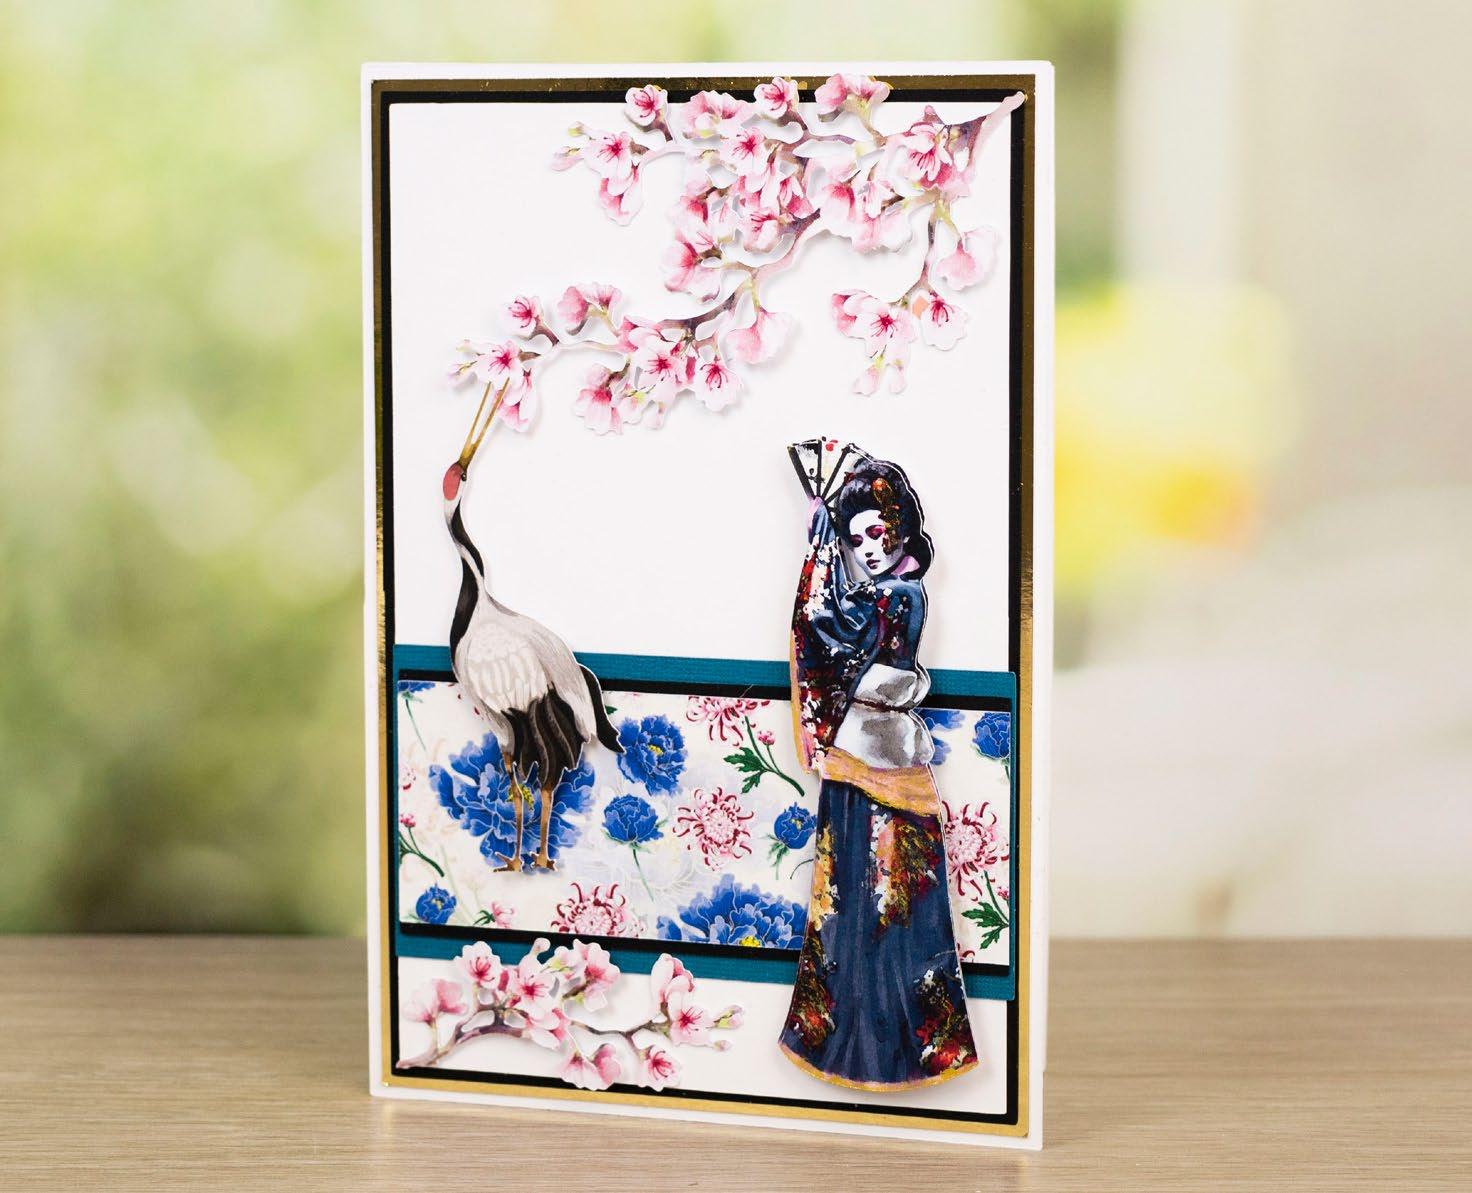
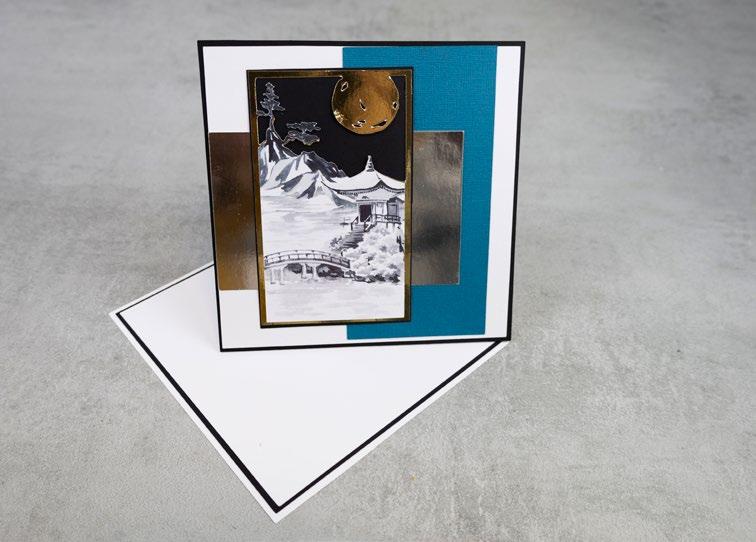
Mat the purple flower rectangle onto the small black rectangle and mat onto the blue rectangle. Mat onto the card with foam tape.
top of the card with foam tape and the trimmed branch onto the bottom.
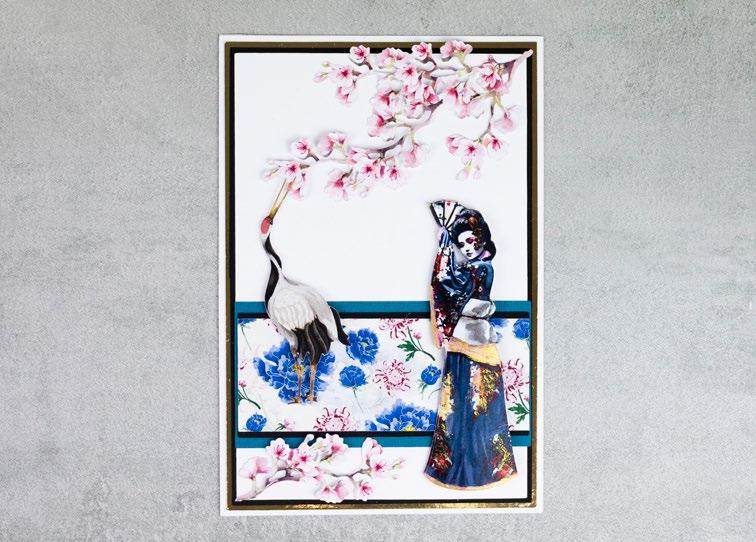
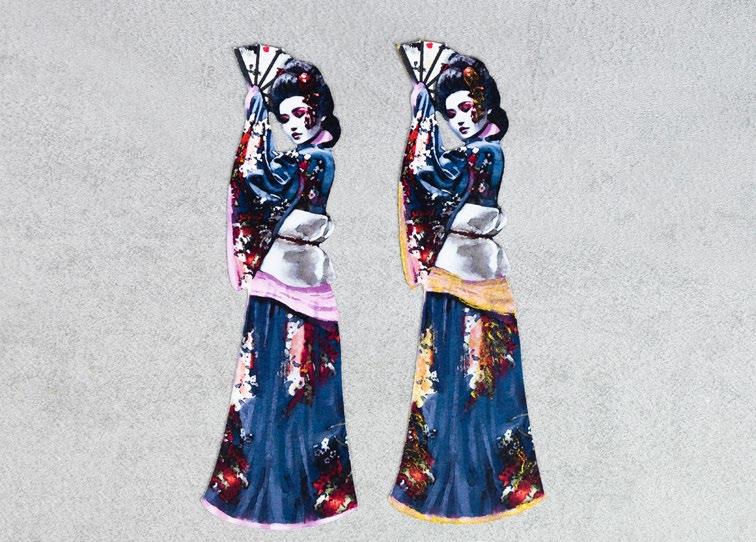
On one of the Geisha charisma cuts, add gilding flakes to elements of the dress and hair.
create a
Attach to the other large white rectangle to create a card. Mat the other white
the
Trim the bottom half away from one of the blossom charisma cuts. Mat the full branch onto the
Mat the Geisha cuts together with foam tape and mat onto the card. Mat the crane charisma cut onto the card with foam tape.
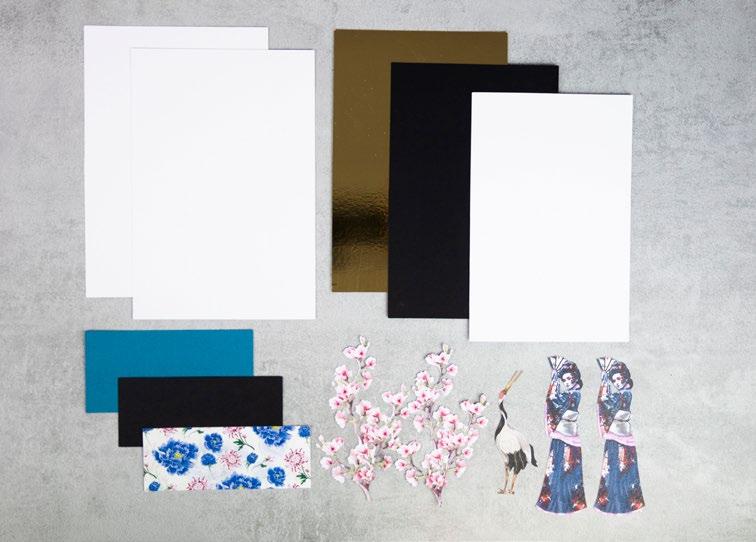
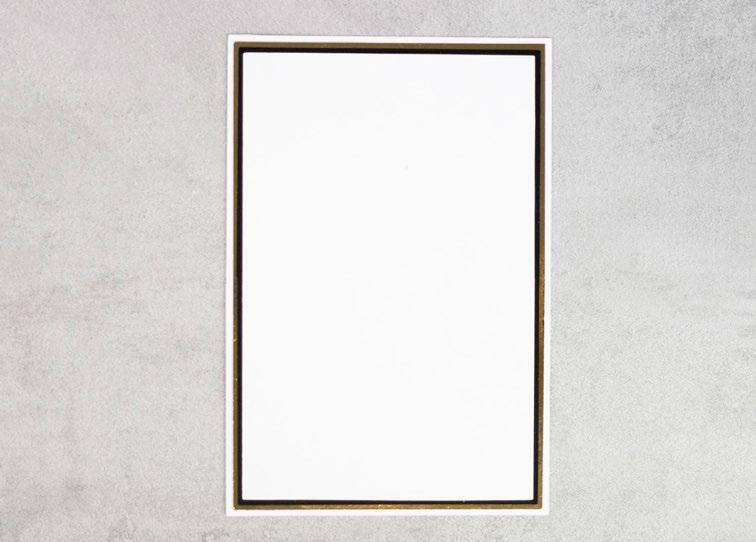
------------------------------------------ FLORAL FACADE ----------------------------------------------What you’ll need: • 13-01-Floral Facade SVG files • White cardstock • Black cardstock • Blue cardstock • Gold mirror cardstock • Gilding flakes 1 Cut all the pieces needed to create the project as listed below; From SVG downloads: • From charisma: - 1 x FF-1-Charisma From machine memory: • From white cardstock: - 2 x 145mm x 210mm rectangle - 1 x 130mm x 195mm rectangle • From gold mirror cardstock: - 1 x 140mm x 205mm rectangle • From black cardstock: - 1 x 135mm x 200mm rectangle - 1 x 130mm x 55mm rectangle • From blue cardstock: - 1 x 130mm x 65mm rectangle • From backing paper: - 1 x 130mm x 50mm rectangle (purple flowers) 2
to
tab.
rectangle, onto
large
rectangle and onto the
rectangle. Mat onto the card. 3
4
5
6
1 4 2 5 3 6 Floral Facade 24 | www.tatteredlace.co.uk CLICK HERE TO DOWNLOAD YOUR SVG CONTENT PROJECT 13
On one of the white rectangle,
and
in 10mm from the
fold to create a
to the other white rectangle
create a
Mat the blue rectangle onto the black rectangle and mat onto the
sides and making sure the middle curves up.
foam tape. Tuck the smaller charisma flowers and leaves into and around the top of the screen and stick.
the
rectangle onto the right side of the
Mat the acetate rectangle
rectangle, only
mat onto
the
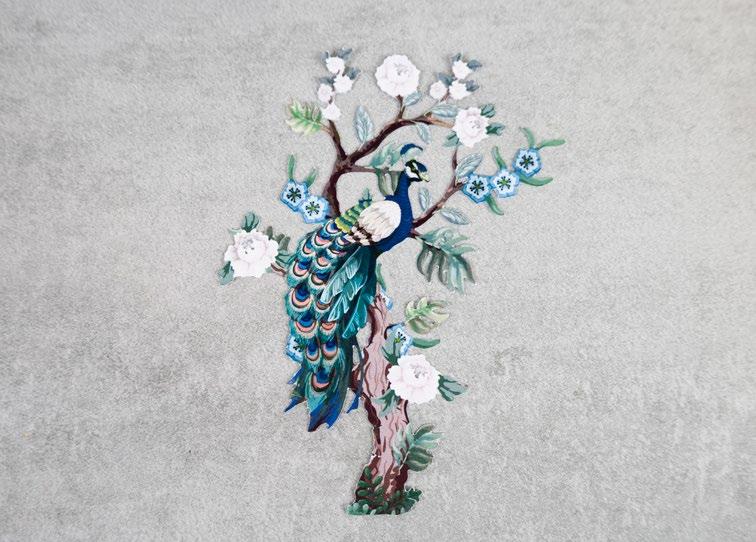
Add gilding wax to elements of the peacock charisma cut and mat onto the card overlapping the frame.

Mat the large charisma flowers onto the top of the card with
Mat the charisma crane onto the screen.
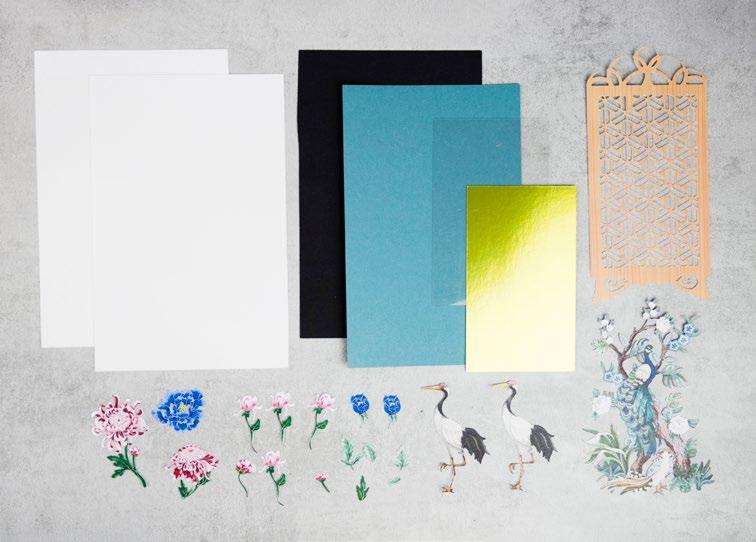
What you’ll need: • 14-02-Floral Facade SVG files • White cardstock • Black cardstock • Blue cardstock • Gold mirror cardstock • Construction acetate • Cadence Dora Gilding Wax – Gold 1 Cut all the pieces needed to create the project as listed below; From SVG downloads: • From charisma: - 1 x FF-2-Charisma A - 1 x FF-2-Charisma B From machine memory: • From white cardstock: - 2 x 155mm x 235mm rectangle • From black cardstock: - 1 x 150mm x 230mm rectangle • From blue cardstock: - 1 x 145mm x 225mm rectangle • From gold mirror cardstock: - 1 x 90mm x 150mm rectangle • From construction acetate: - 1 x 95mm x 150mm rectangle 2
measure
left edge
score and
tab. Attach
to
card.
card. Mat
gold
card. 3
behind the charisma screen and
the gold
sticking
------------------------------------------ FLORAL FACADE -----------------------------------------------
4
5
6
1 4 2 5 3 6 www.tatteredlace.co.uk | 25CLICK HERE TO DOWNLOAD YOUR SVG CONTENT PROJECT 14
•
Cut
1
From
•
•
white
1 x 185mm x 175mm
1 x 175mm square
1 x 170mm square
1 x 165mm square
black cardstock:
1 x 175mm square
1 x 170mm square
1 x 90mm x 145mm rectangle
• From blue cardstock:
1 x 85mm x 165mm rectangle
• From silver mirror cardstock: - 1 x 90mm x 140mm rectangle
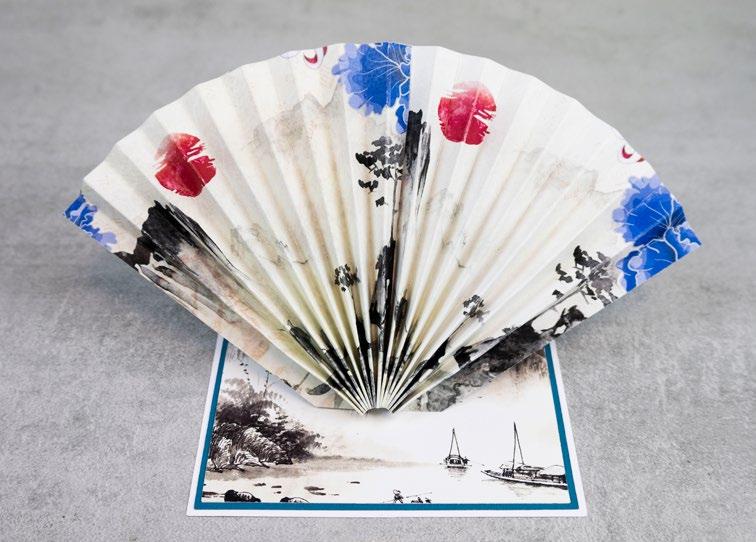
On the white rectangle, measure in 15mm from the left edge and score and fold to create a tab. Attach to right side of the large white square using the tab to create the card. Score diagonally from the bottom of the middle fold to the top right corner. Fold to create a twisted easel card.
Mat the large white square onto the large black square and mat onto the front of the easel. Mat the smaller white square onto the smaller black square and mat onto the base of the easel.
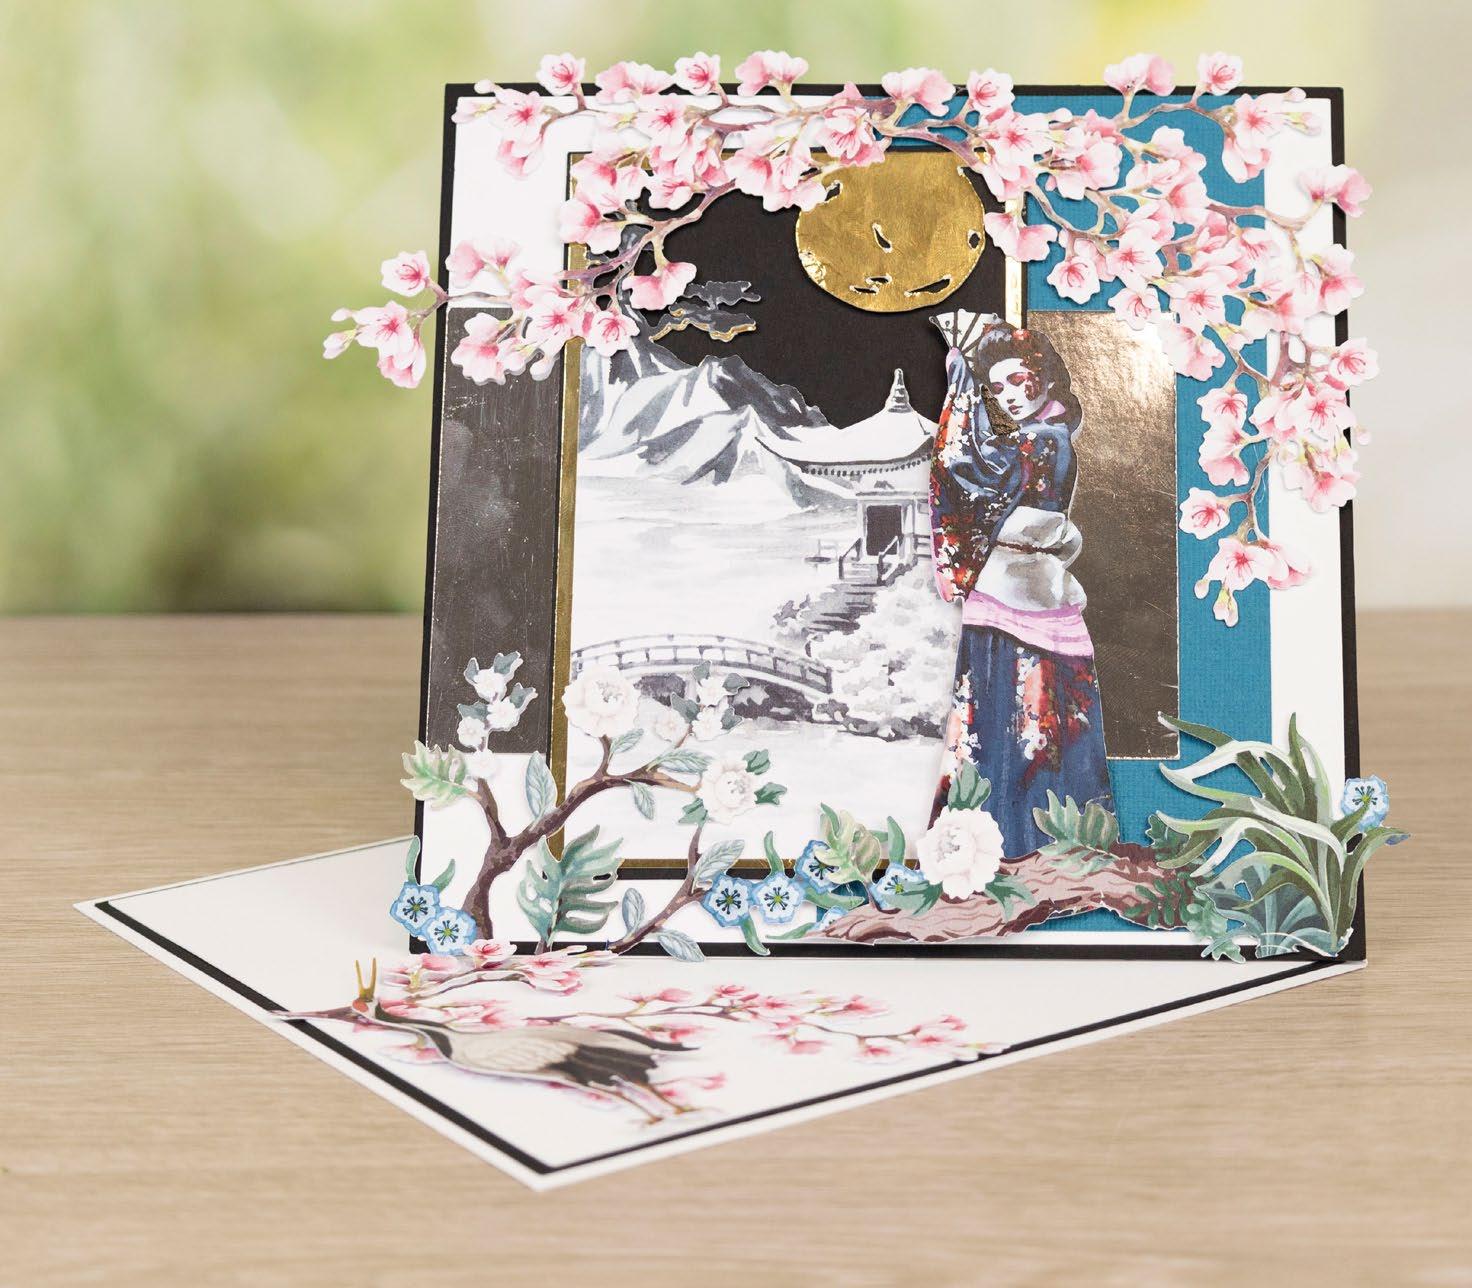
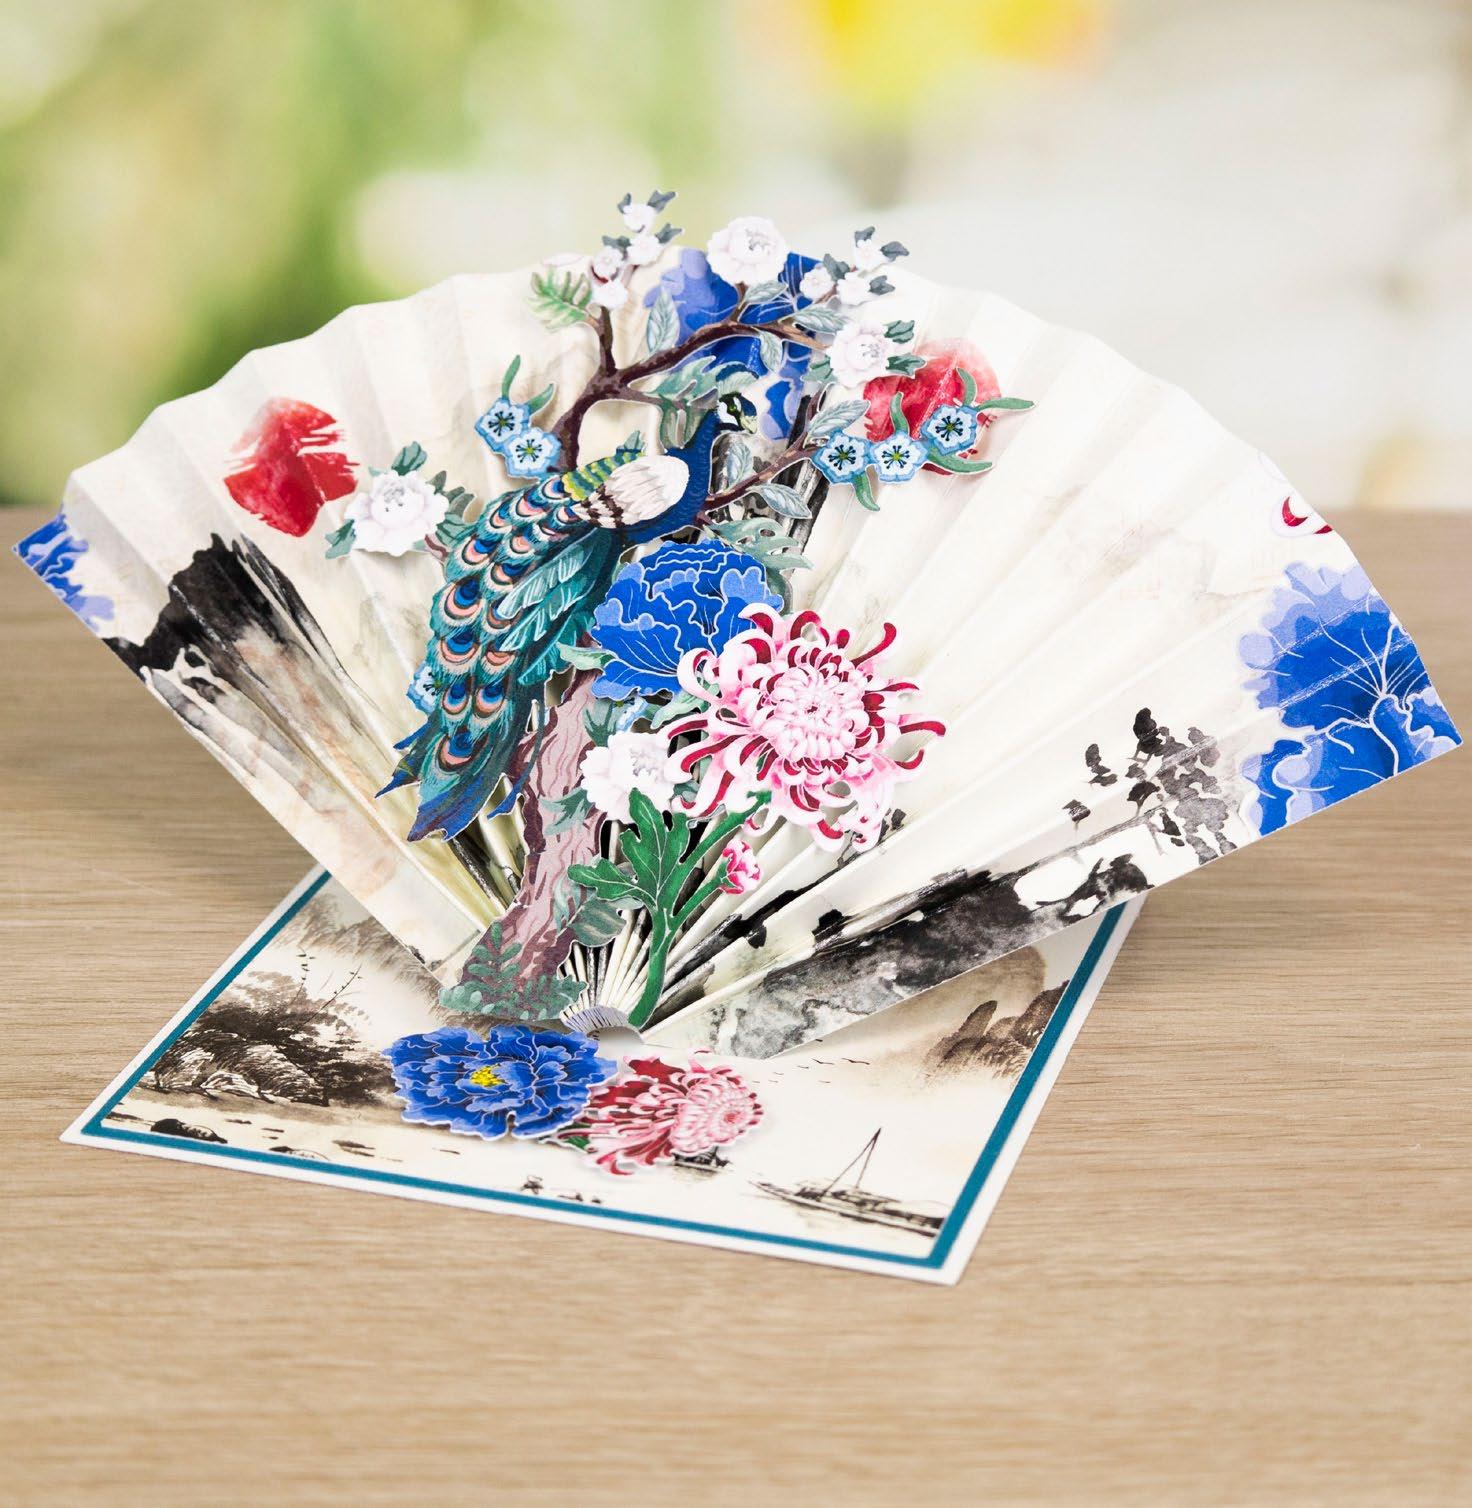
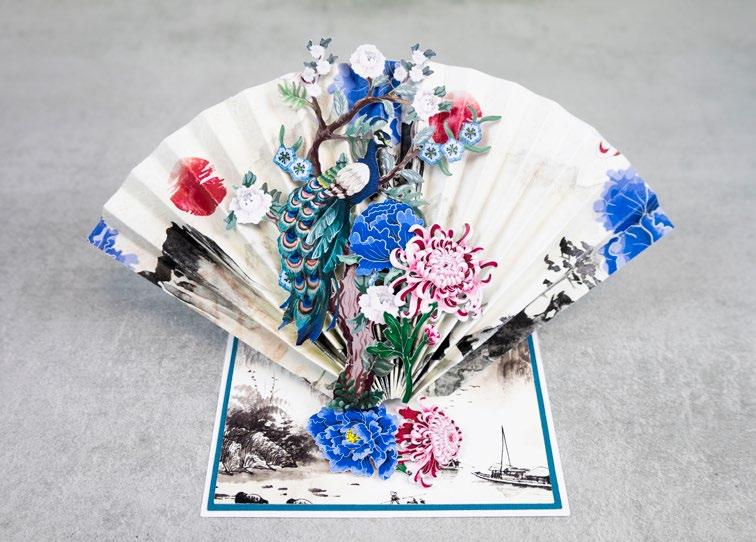
Mat the blue rectangle, pink rectangle and black rectangle onto the front of the easel as shown. Trim the border and the moon off the charisma scene cut and mat onto the gold scene cut. Mat onto the front of the easel.
5
Trim the floral charisma cuts and the peacock cut as shown in the image.
Mat the Geisha cut onto the front of the easel with foam tape. Add the trimmed floral cuts around the edges of the card. Mat a blossom branch onto the base of the easel. Add a decoupage cut as a stopper. Mat the crane onto the base of the card.
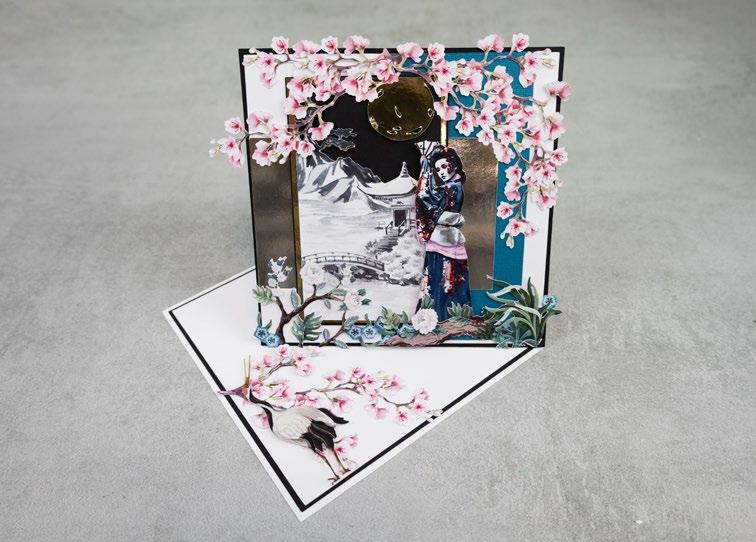
What you’ll need: • 15-03-Floral Facade SVG files • White cardstock • Black cardstock • Blue cardstock • Pink mirror cardstock • Gold mirror cardstock 1
all the pieces needed to create the project as listed below; From SVG downloads: • From gold mirror cardstock: - 1 x FF-3-Scene
From charisma: -
x FF-3-Charisma A - 1 x FF-3-Charisma B
machine memory:
From
cardstock: -
rectangle -
-
-
From
-
-
-
-
2
3
4
1 4 2 5 3 6 26 | www.tatteredlace.co.uk ------------------------------------------ FLORAL FACADE -----------------------------------------------
6
CLICK HERE TO DOWNLOAD YOUR SVG CONTENT PROJECT 15
Cut all the pieces needed to create
project as listed below;
From SVG
•
•
From
•
white cardstock:
FF-4-Easel Front
charisma:
FF-4-Charisma
white cardstock:
x 140mm x 155mm rectangle
x 140mm square
•
•
blue cardstock:
x 135mm square
backing paper:
1 x 130mm square (blossom scene)
1 x 180mm x 140mm rectangle (musical flowers)
- 1 x 165mm x 140mm rectangle (musical flowers)
On the large white rectangle, measure down 15mm from the top edge and score and fold to create a tab. Attach to the back of the white square using the tab to create a tent card. Fold the card front in half horizontally to create an easel. Mat the blossom scene square onto the blue square and mat onto the base of the easel. Mat the easel front onto the front of the easel.
On the two musical flowers rectangles, score vertical lines on both rectangles at about 1.2cm widths. Mat the two rectangles together
attaching the right fold of one rectangle to the left fold of the other. Concertina fold the joined rectangles making sure you start and end on a valley fold.
Attach the concertina rectangle to the front of the easel in a fan shape.
Cut the peacock charisma cut as shown in the image.
Mat the peacock onto the front of the easel. Mat two of the flower charisma cuts onto the front of the easel and mat the other two onto the base of the easel with foam tape as a stopper.
What you’ll need: • 16-04-Floral Facade SVG files • White cardstock • Blue cardstock 1
the
downloads:
From
- 1 x
From
- 1 x
machine memory:
From
- 1
- 1
From
- 1
From
-
-
2
3
4
5
6
1 4 2 5 3 6 www.tatteredlace.co.uk | 27 ------------------------------------------ FLORAL FACADE ----------------------------------------------CLICK HERE TO DOWNLOAD YOUR SVG CONTENT PROJECT 16
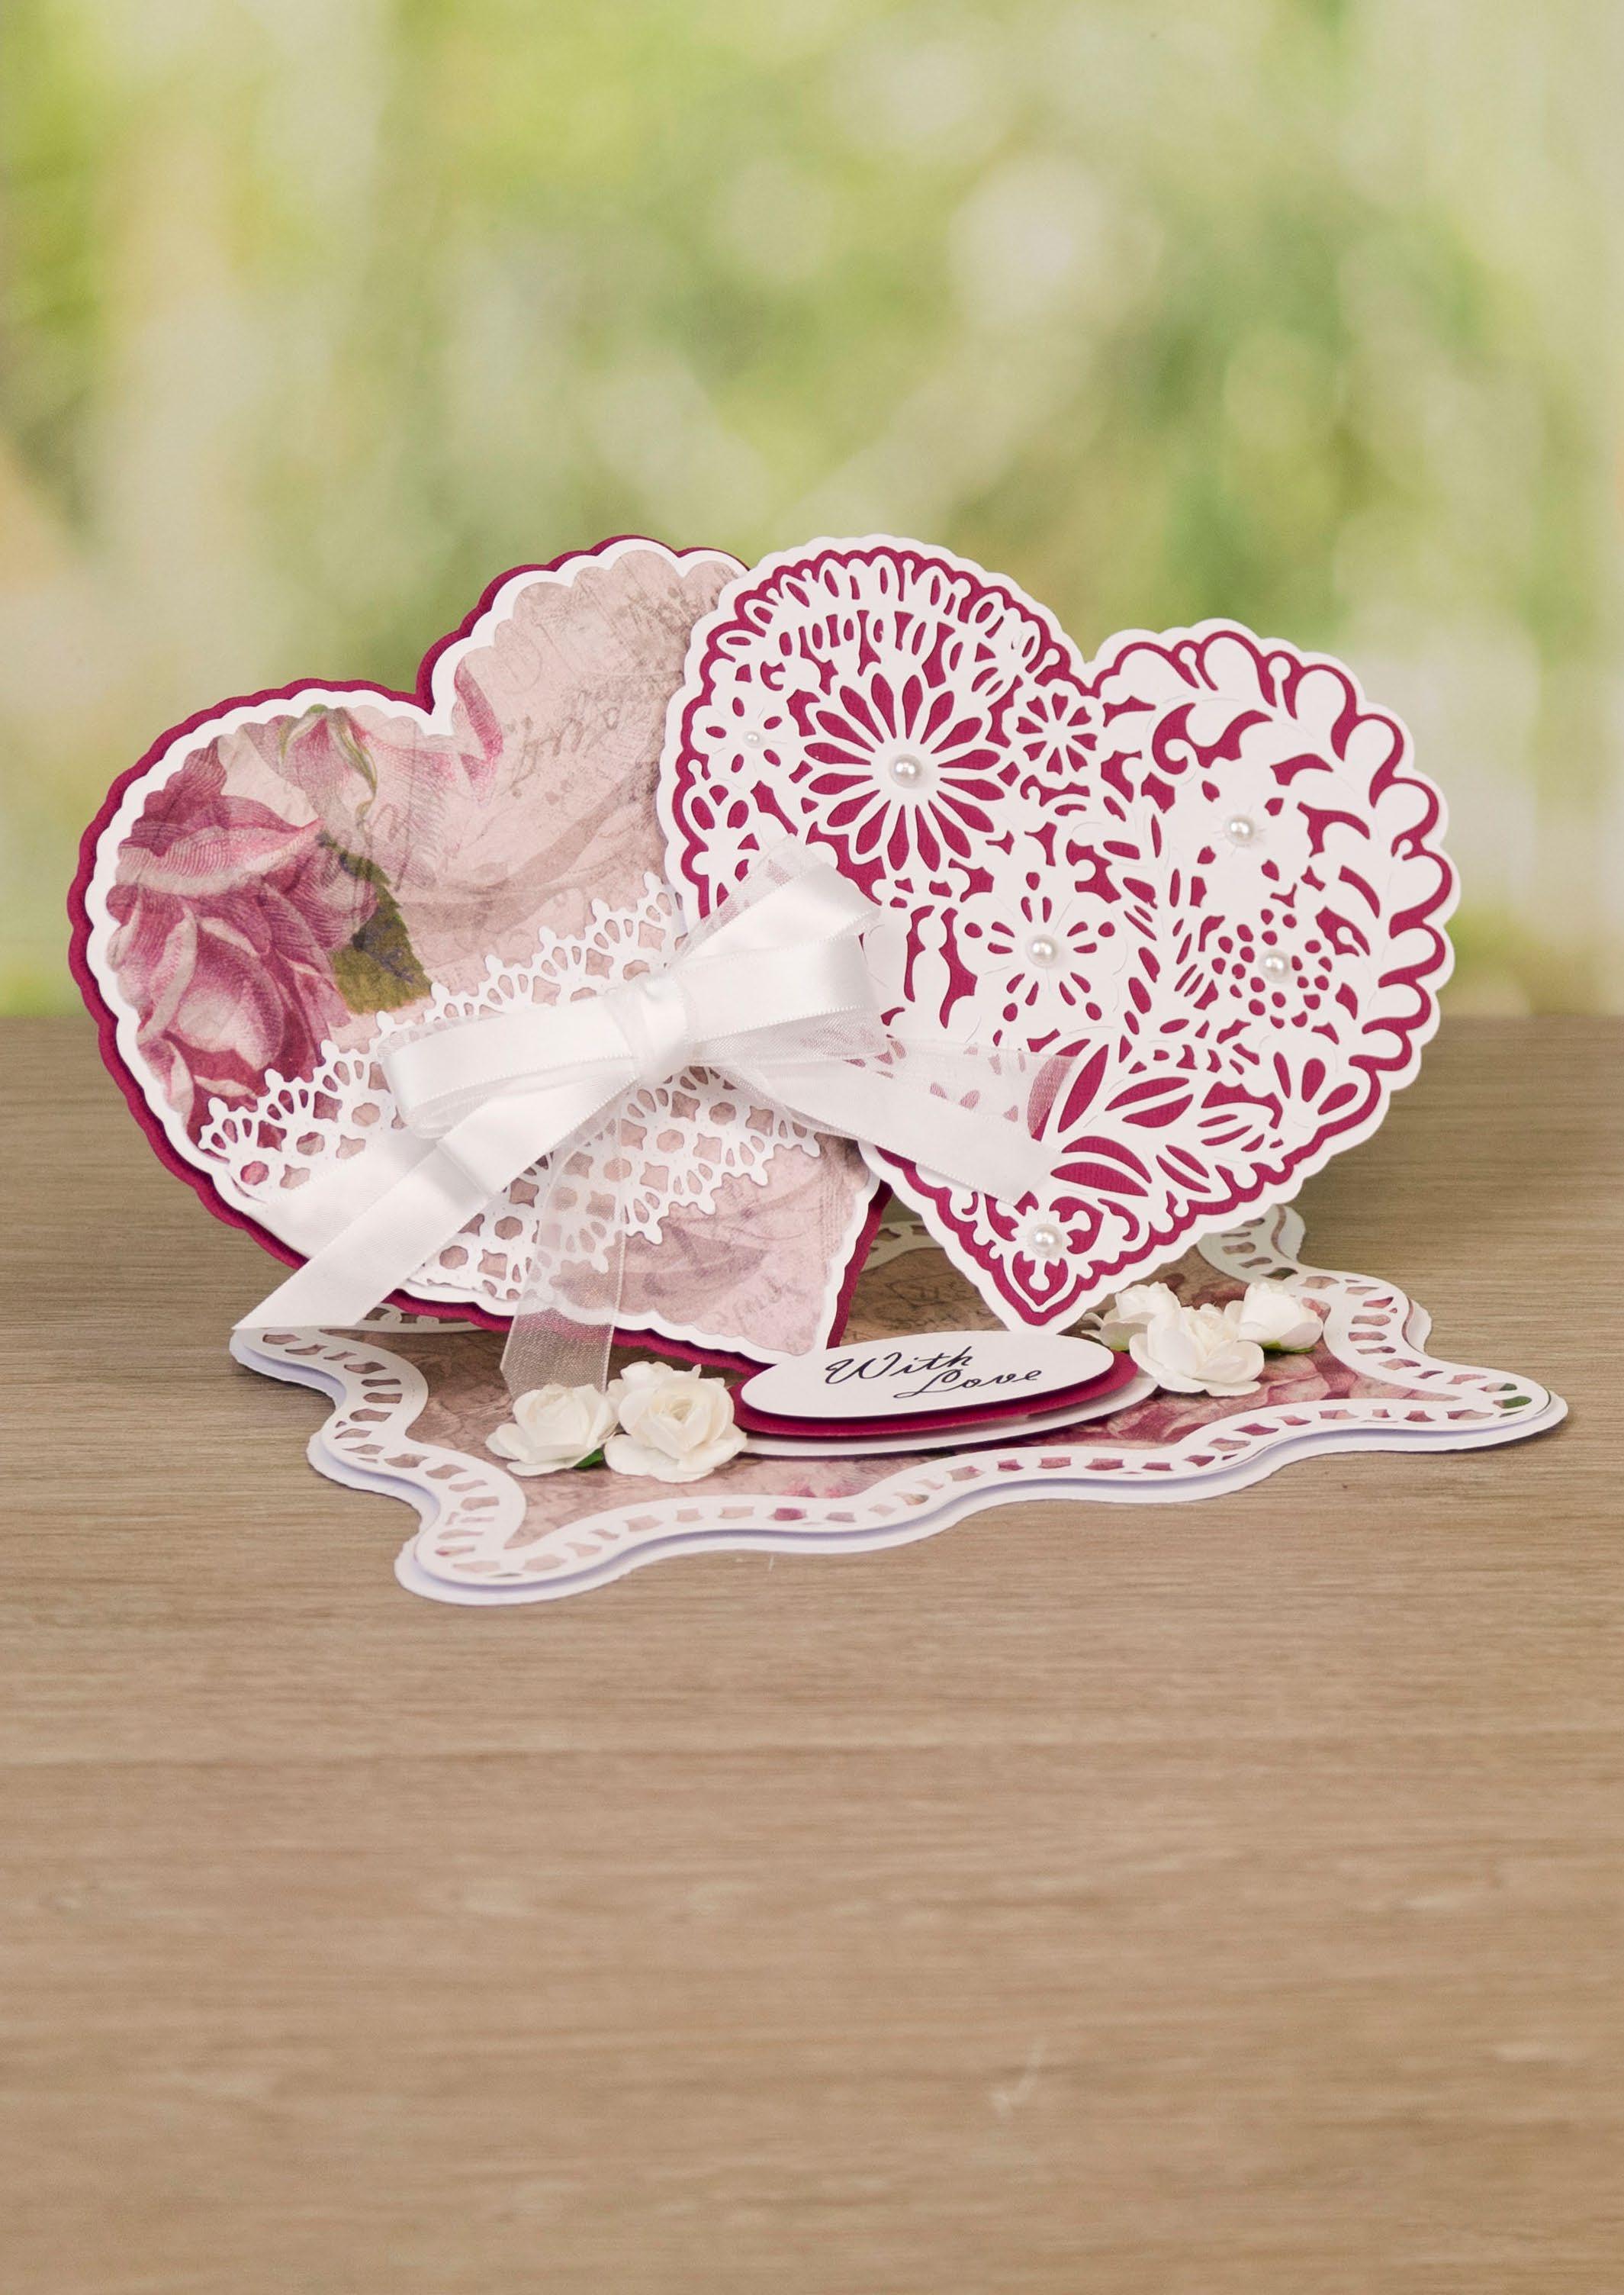
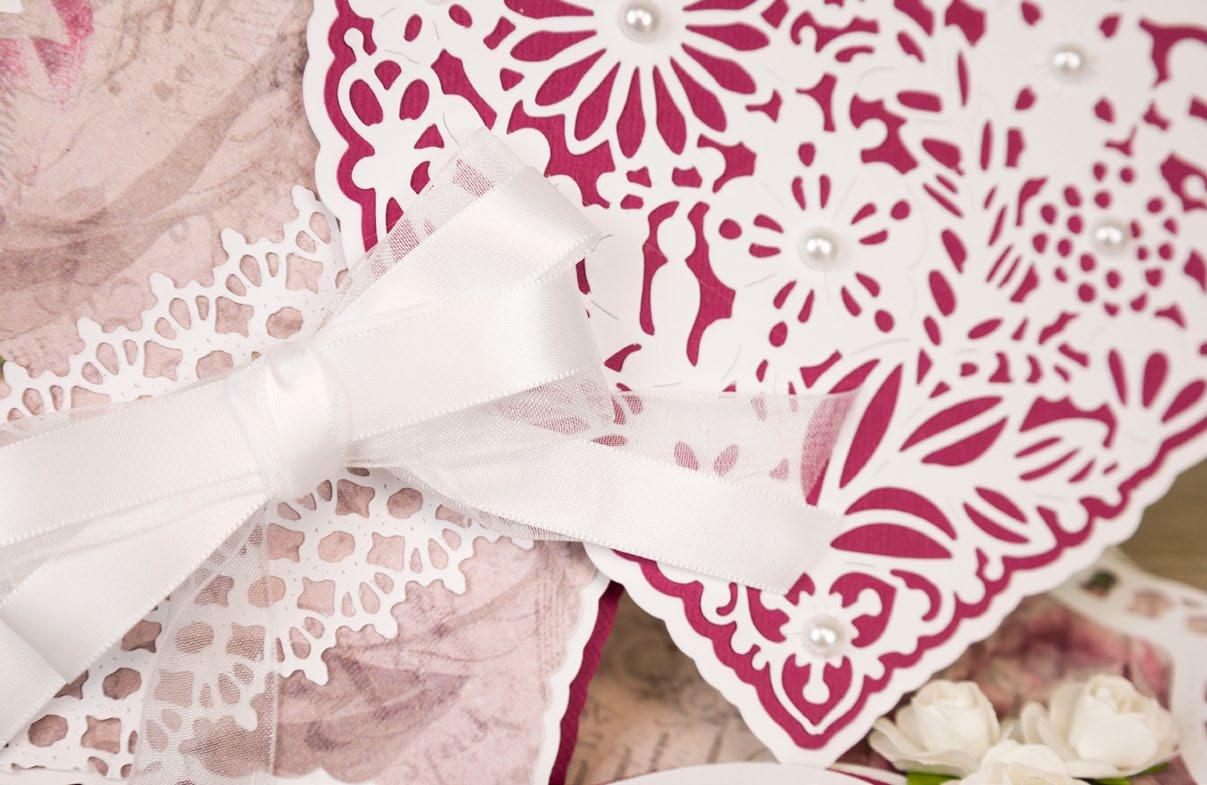
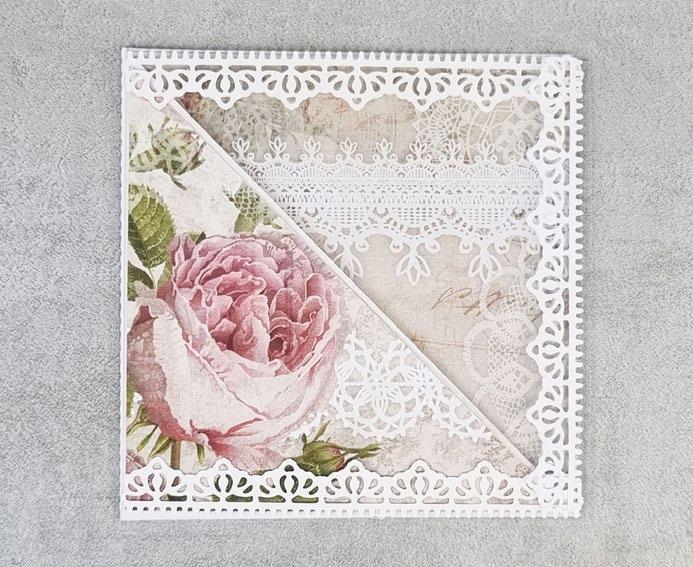
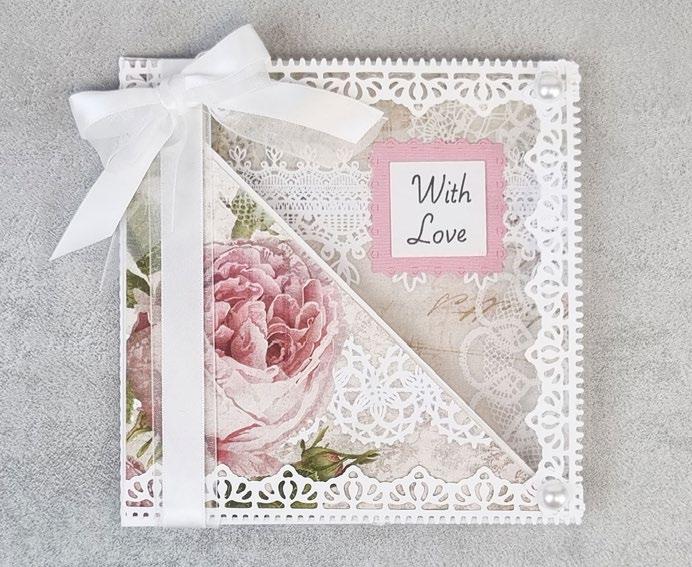
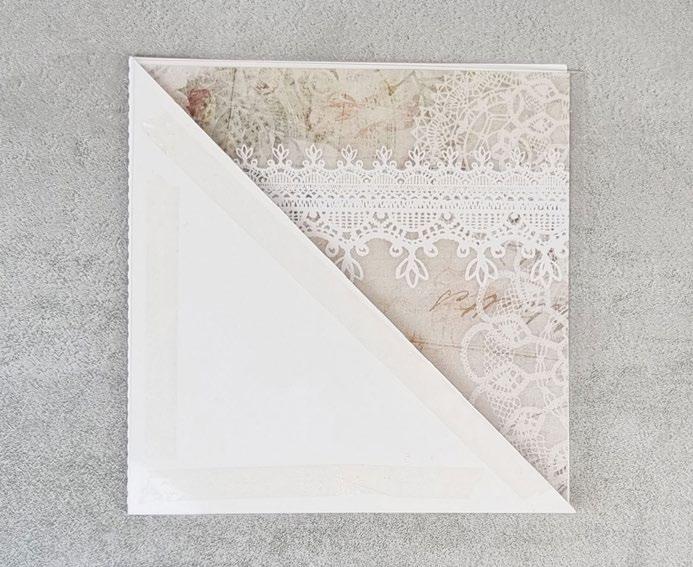
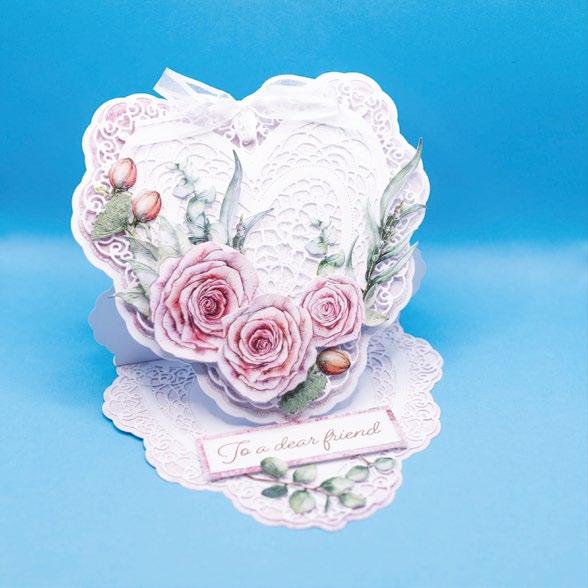
Double Heart EaselLouise’s What you’ll need: • 17-01-Double Heart Easel SVG files • White cardstock • Pink cardstock • Construction acetate • White ribbon • Pearl gems • Paper flowers ---------------------------------------- DOUBLE HEART EASEL ------------------------------------------CLICK HERE TO DOWNLOAD YOUR SVG CONTENT PROJECT 17 28 | www.tatteredlace.co.uk

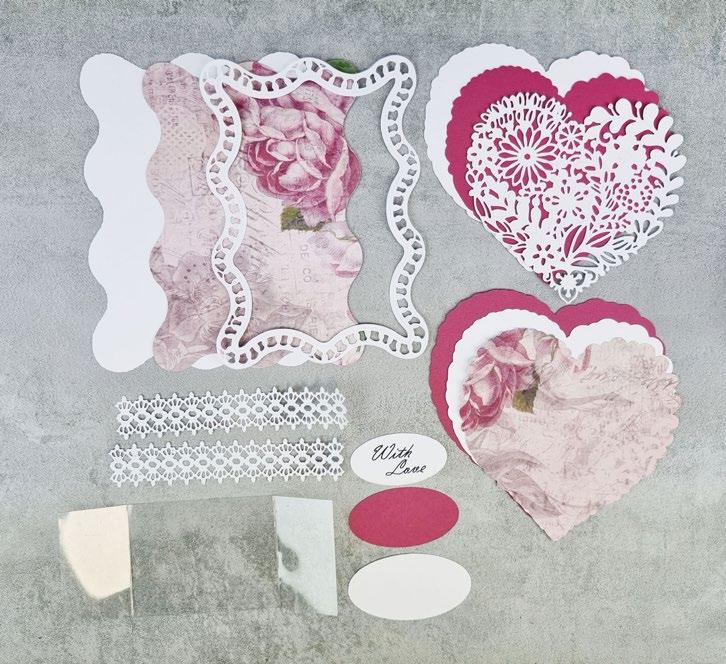
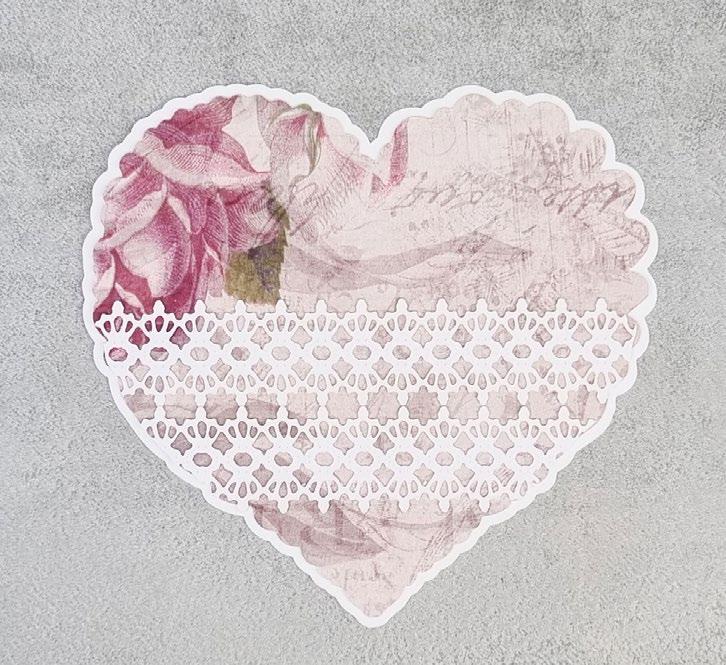
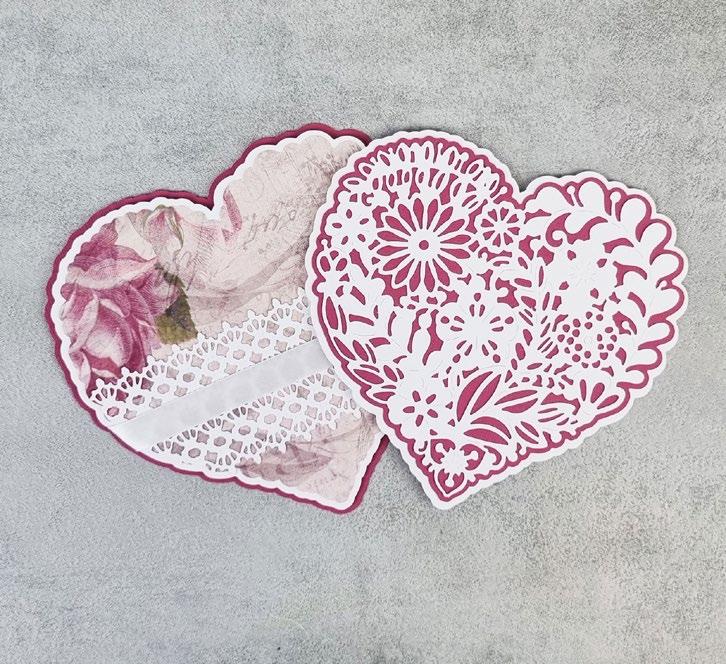
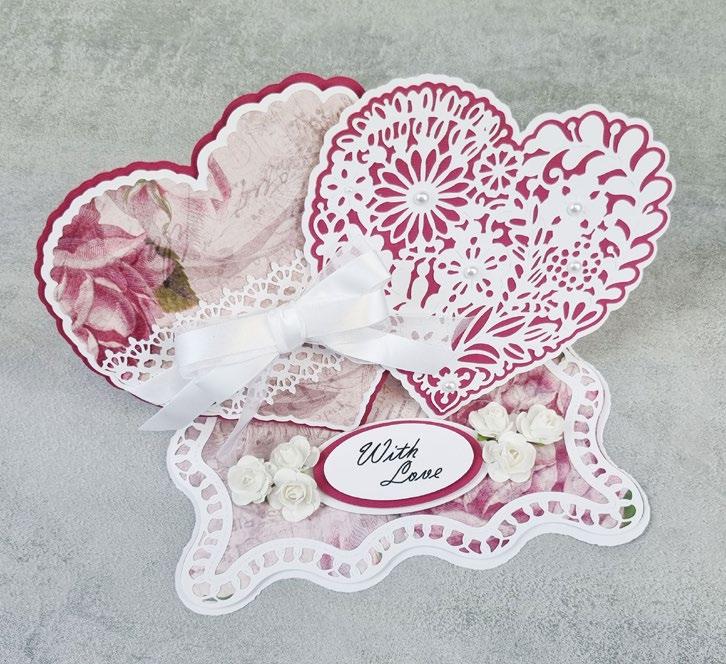
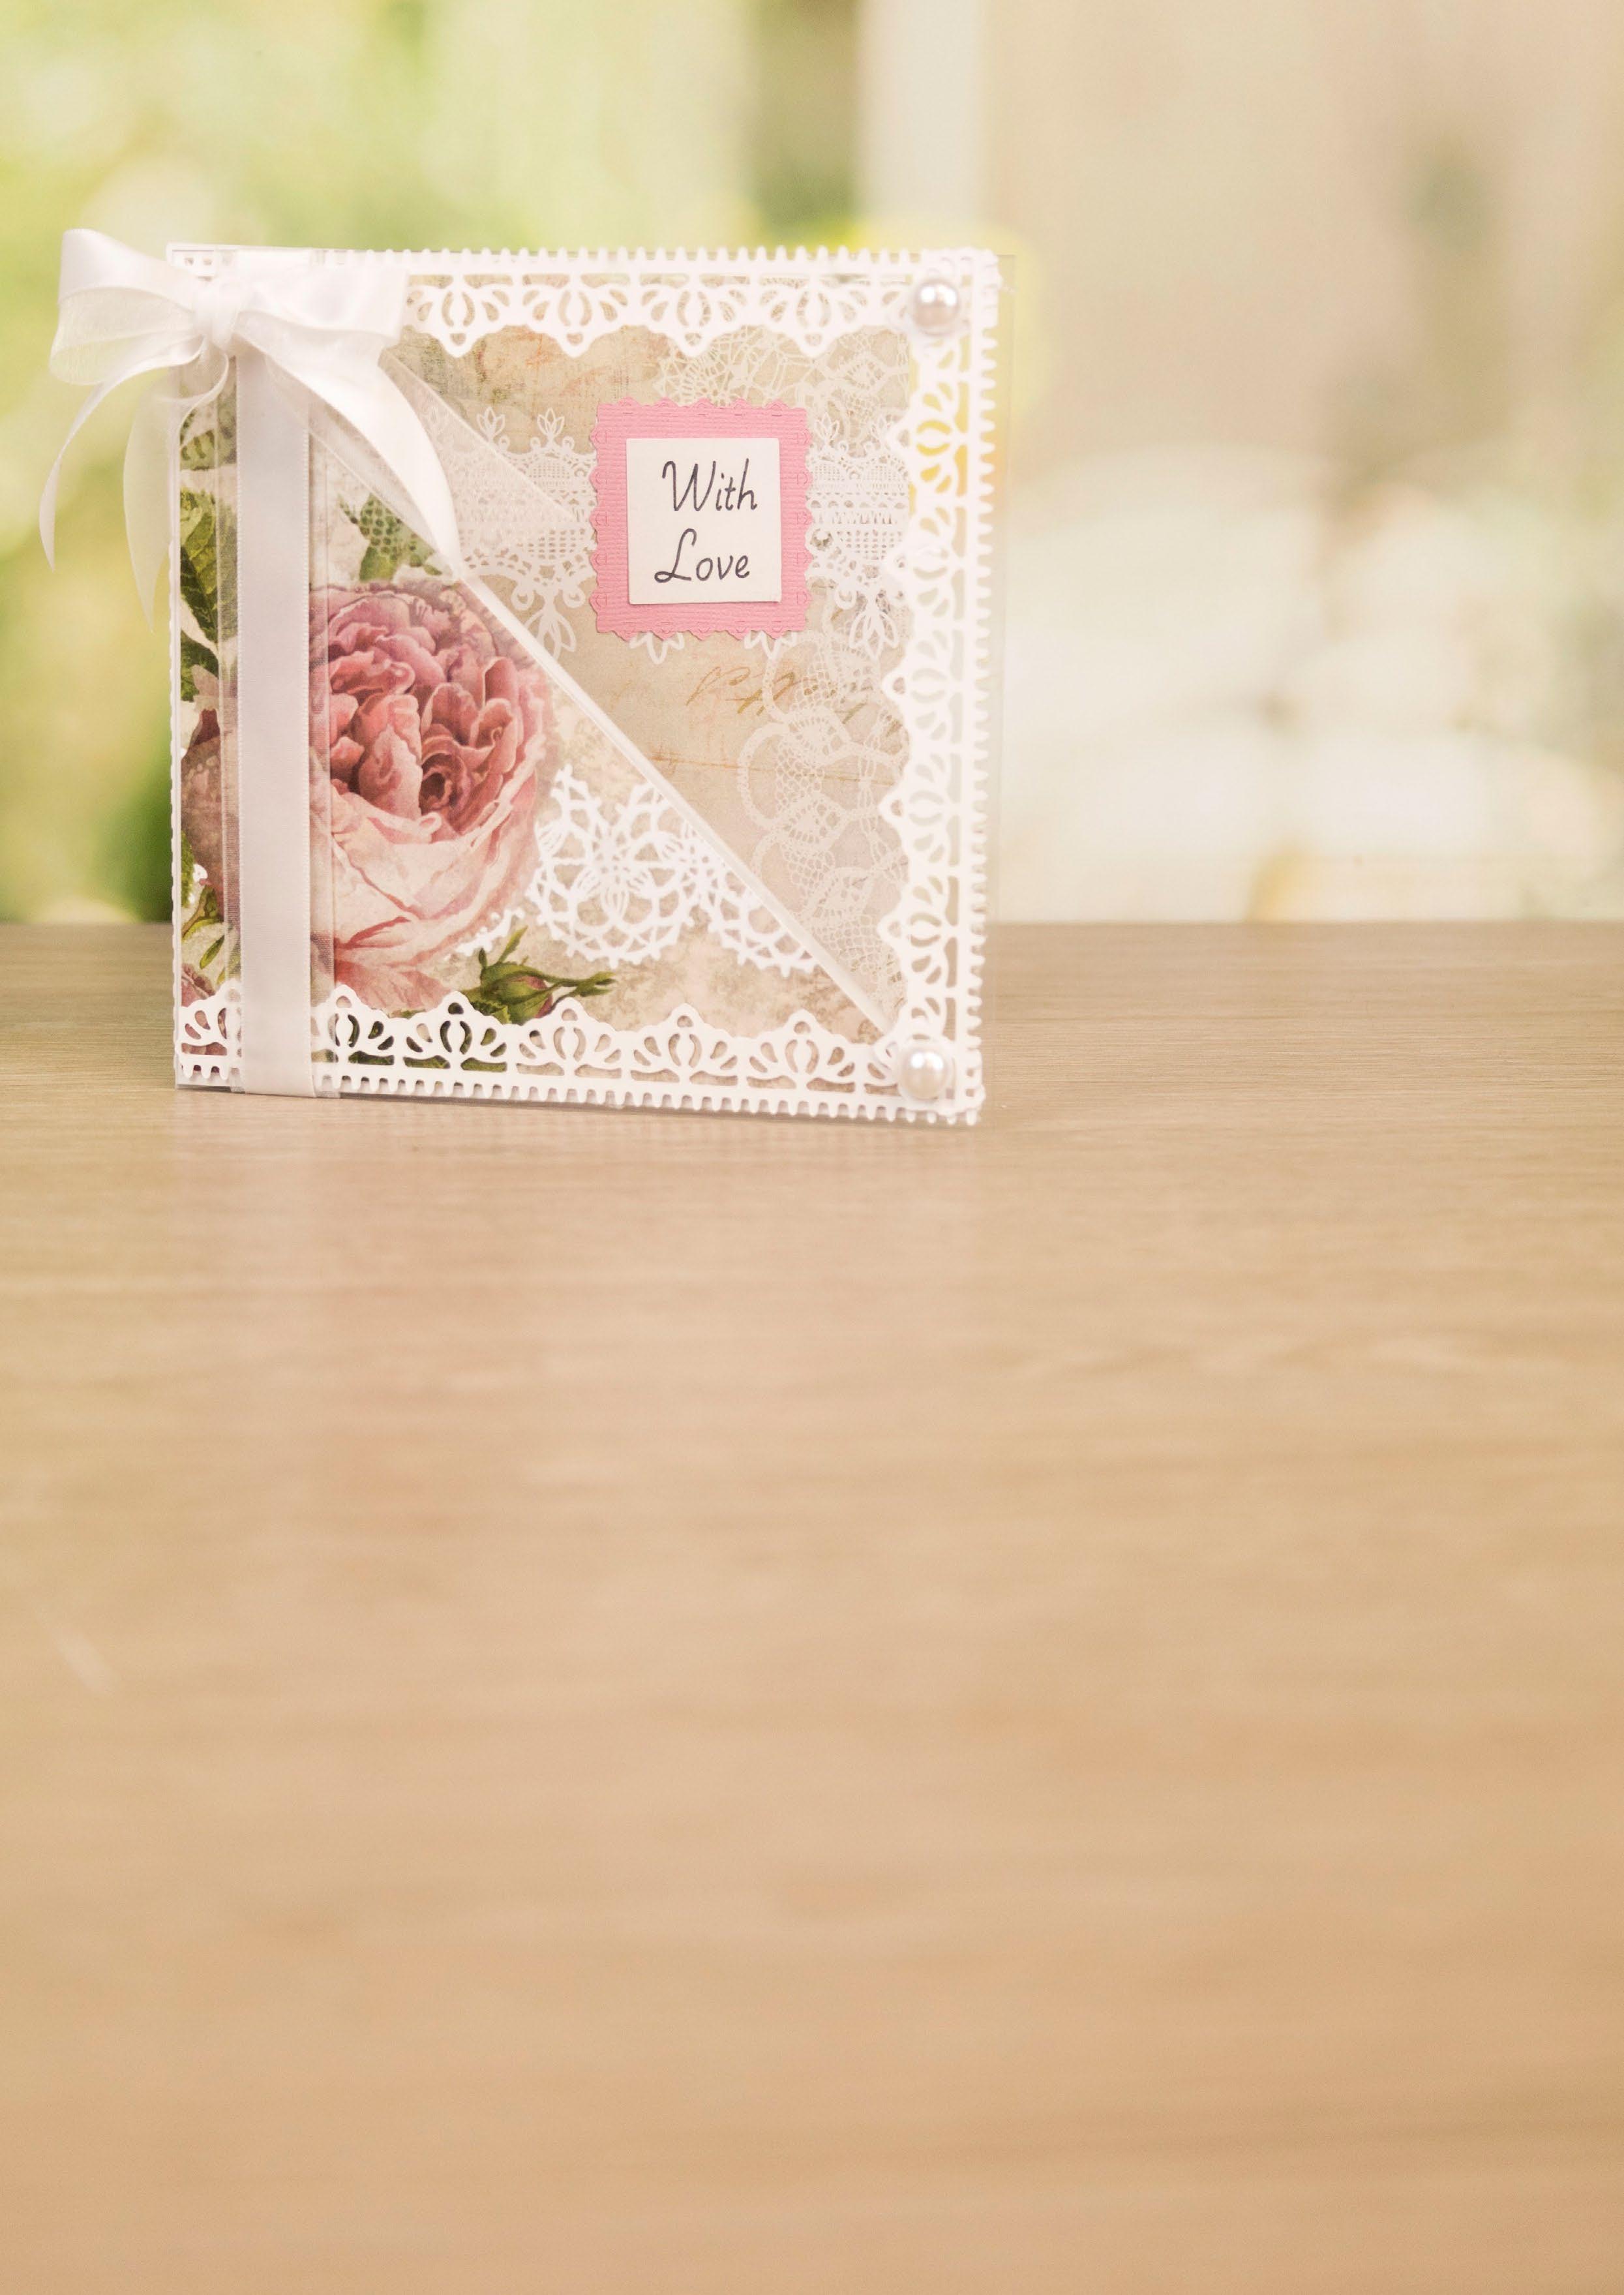
1 Cut all the pieces needed to create the project as listed below; ---------------------------------------- DOUBLE HEART EASEL ------------------------------------------1 4 7 2 5 8 3 6 9 • From pink cardstock: - 1 x DHE-1-Heart Mat 1 - 1 x DHE-1-Heart Mat 3 From machine memory: • From white cardstock: - 1 x 61mm x 33mm oval (with sentiment draw file) - 1 x 78mm x 42mm oval • From pink cardstock: - 1 x 69mm x 38mm oval • From construction acetate: - 1 x 70mm x 170mm rectangle From SVG downloads: • From white cardstock: - 1 x DHE-1-Rectangle Mat 1 - 1 x DHE-1-Lace Rectangle - 2 x DHE-1-Heart Mat 2 - 2 x DHE-1-Lace Border - 1 x DHE-1-Floral Heart • From backing paper: - 1 x DHE-1-Rectangle Mat 2 (floral lace) - 1 x DHE-1-Heart Mat 3 (floral lace) 2 On the construction acetate rectangle, from each end measure in 40mm and score and fold to create tabs. Mat the bottom tab onto the top of the white rectangle mat 1. This will be the base of the easel. 3 Mat the white lace rectangle onto the floral lace rectangle mat 2. Mat onto the base of the easel with foam tape. 4 Mat the lace borders onto the floral lace heart mat 3 and trim away the excess. Mat onto one of the white heart mat 2 cuts. 5 Wrap a length of ribbon around the hearts from the previous step and mat onto the pink heart mat 1 with foam tape. 6 Mat the white floral heart onto the pink heart mat 3. Mat onto the remaining white heart mat 2. 7 Overlap the lace heart onto the ribbon heart and mat together. 8 Mat the hearts onto the top tab of the construction acetate strip to create the easel. 9 Mat the sentiment oval onto the pink oval, then mat onto the other white oval with foam tape. Mat onto the base of the easel as a stopper. Tie a double-loop bow from white ribbon and mat onto the front of the easel. Add pearls onto the front of the easel. Finish by adding paper flowers around the stopper. www.tatteredlace.co.uk | 29
panel.
POW-1-Small
Power Of Words
WISHES
the pieces
From SVG downloads:
cream cardstock:
to create the project as
From machine memory:
• From white cardstock: - 2 x 195mm x 145mm rectangle
large pink sentiment
the pop-up words in the middle of the card. Mat the small sentiments onto the square on the right panel of the card.
multi-loop
adding
from
mat onto the
backing paper:
(shabby
• From cream cardstock: - 1 x 120mm x 70mm rectangle
• From backing paper: - 1 x 115mm x 65mm rectangle (shabby lace)
• From acetate: - 1 x 140mm x 95mm rectangle
the white rectangles, measure down 10mm from the top
across to create a tab. Attach to the other white
tab to create a tent card. Ink around the edges of the
rectangle
the cream rectangle. Mat together and mat
a pearl
in each corner of the rectangle.
---------------------------------------- THE POWER OF WORDS ------------------------------------------The
WITH LOVE What you’ll need: • 20-03-Power Of Words SVG files • White cardstock • Cream cardstock • Acetate • Distress Ink – Vintage Photo • Cream ribbon • Pearl gems What you’ll need: • 18-01-Power Of Words SVG files • Cream cardstock • Pink cardstock • Complimentary backing paper • Distress Ink – Vintage Photo • Pink ribbon • Pearl gem 1 Cut all the pieces needed to create the project as listed below; From SVG downloads: • From cream cardstock: - 1 x POW-1-Card Base - 1 x POW-1-Small Sentiment • From pink cardstock - 2 x POW-1-Rectangle Mat - 2 x POW-1-Square Mat 1 - 1 x POW-1-Square Mat 2 - 1 x POW-1-Large Sentiment - 2 x
Sentiment From machine memory: • From backing paper: - 2 x 75mm x 140mm rectangle (floral lace) - 2 x 30mm squares (floral lace) - 1 x 40mm square (floral lace) 2 Fold on the score lines of the card base to create the card. Ink around the edges of the large floral lace rectangle and the pink rectangle mats. Mat together and onto the left and right panels of the card. 3 Ink around the floral lace squares and the pink square mats, and mat together. Mat the small squares onto the middle panel and the larger square onto the right
4 Mat the
onto
5 Tie a
bow
pink ribbon and
card. Finish by
pearl gems. 1 Cut all
needed
listed below;
• From
- 1 x POW-3-Frame 1 - 1 x POW-3-Sentiment • From
- 1 x POW-3-Frame 2
lace) BEST
2 On one of
edge and score
rectangle using the
shabby lace
and
onto the card front. Add
gem
CLICK HERE TO DOWNLOAD YOUR SVG CONTENT PROJECT 18 PROJECT 20 30 | www.tatteredlace.co.uk
all the pieces needed to
•
•
•
white cardstock:
2 x POW-2-Card Base
backing paper: - 1 x POW-2-Card Mat 1 (raindrops)
red cardstock: - 1 x POW-2-Sentiment
• From orange cardstock: - 1 x POW-2-Sentiment
• From yellow cardstock: - 1 x POW-2-Sentiment
• From green cardstock: - 1 x POW-2-Sentiment
• From blue cardstock: - 1 x POW-2-Sentiment
• From purple cardstock: - 1 x POW-2-Sentiment
• From charisma: - 1 x POW-2-Charisma
On one of the white card bases, measure down 10mm from the top edge and score across to create a tab. Attach to the other white card base using the tab to create a
tent card. Add Decoupage Glaze to the raindrops on the card mat 1 and mat onto the card.
On all but the red sentiment, trim away the word ‘Happy.’ Mat the words onto the card starting with the red cut only sticking the top of the cut and slightly curving up the bottom.

Add Decoupage Glaze to the boots of the charisma cut and mat onto the card with foam tape.
Ink around the edges of the cream frame 1 and the shabby lace frame 2. Mat together and mat the acetate rectangle behind the frame. Mat the frames onto the card with foam tape.
Ink around the edges of the cream sentiment and mat onto the acetate. Tie a triple-loop bow from cream ribbon and mat onto the card. Finish by adding pearl gems.

---------------------------------------- THE POWER OF WORDS ------------------------------------------HAPPY BIRTHDAY What you’ll need: • 19-02-Power Of Words SVG files • White cardstock • Red cardstock • Orange cardstock • Yellow cardstock • Green cardstock • Blue cardstock • Purple cardstock • Complimentary backing paper • Charisma • Decoupage Glaze 1 Cut
create the project as listed below; From SVG downloads:
From
-
From
From
2
3
4
3
4
CLICK HERE TO DOWNLOAD YOUR SVG CONTENT CLICK HERE TO DOWNLOAD YOUR SVG CONTENT PROJECT 19 www.tatteredlace.co.uk | 31
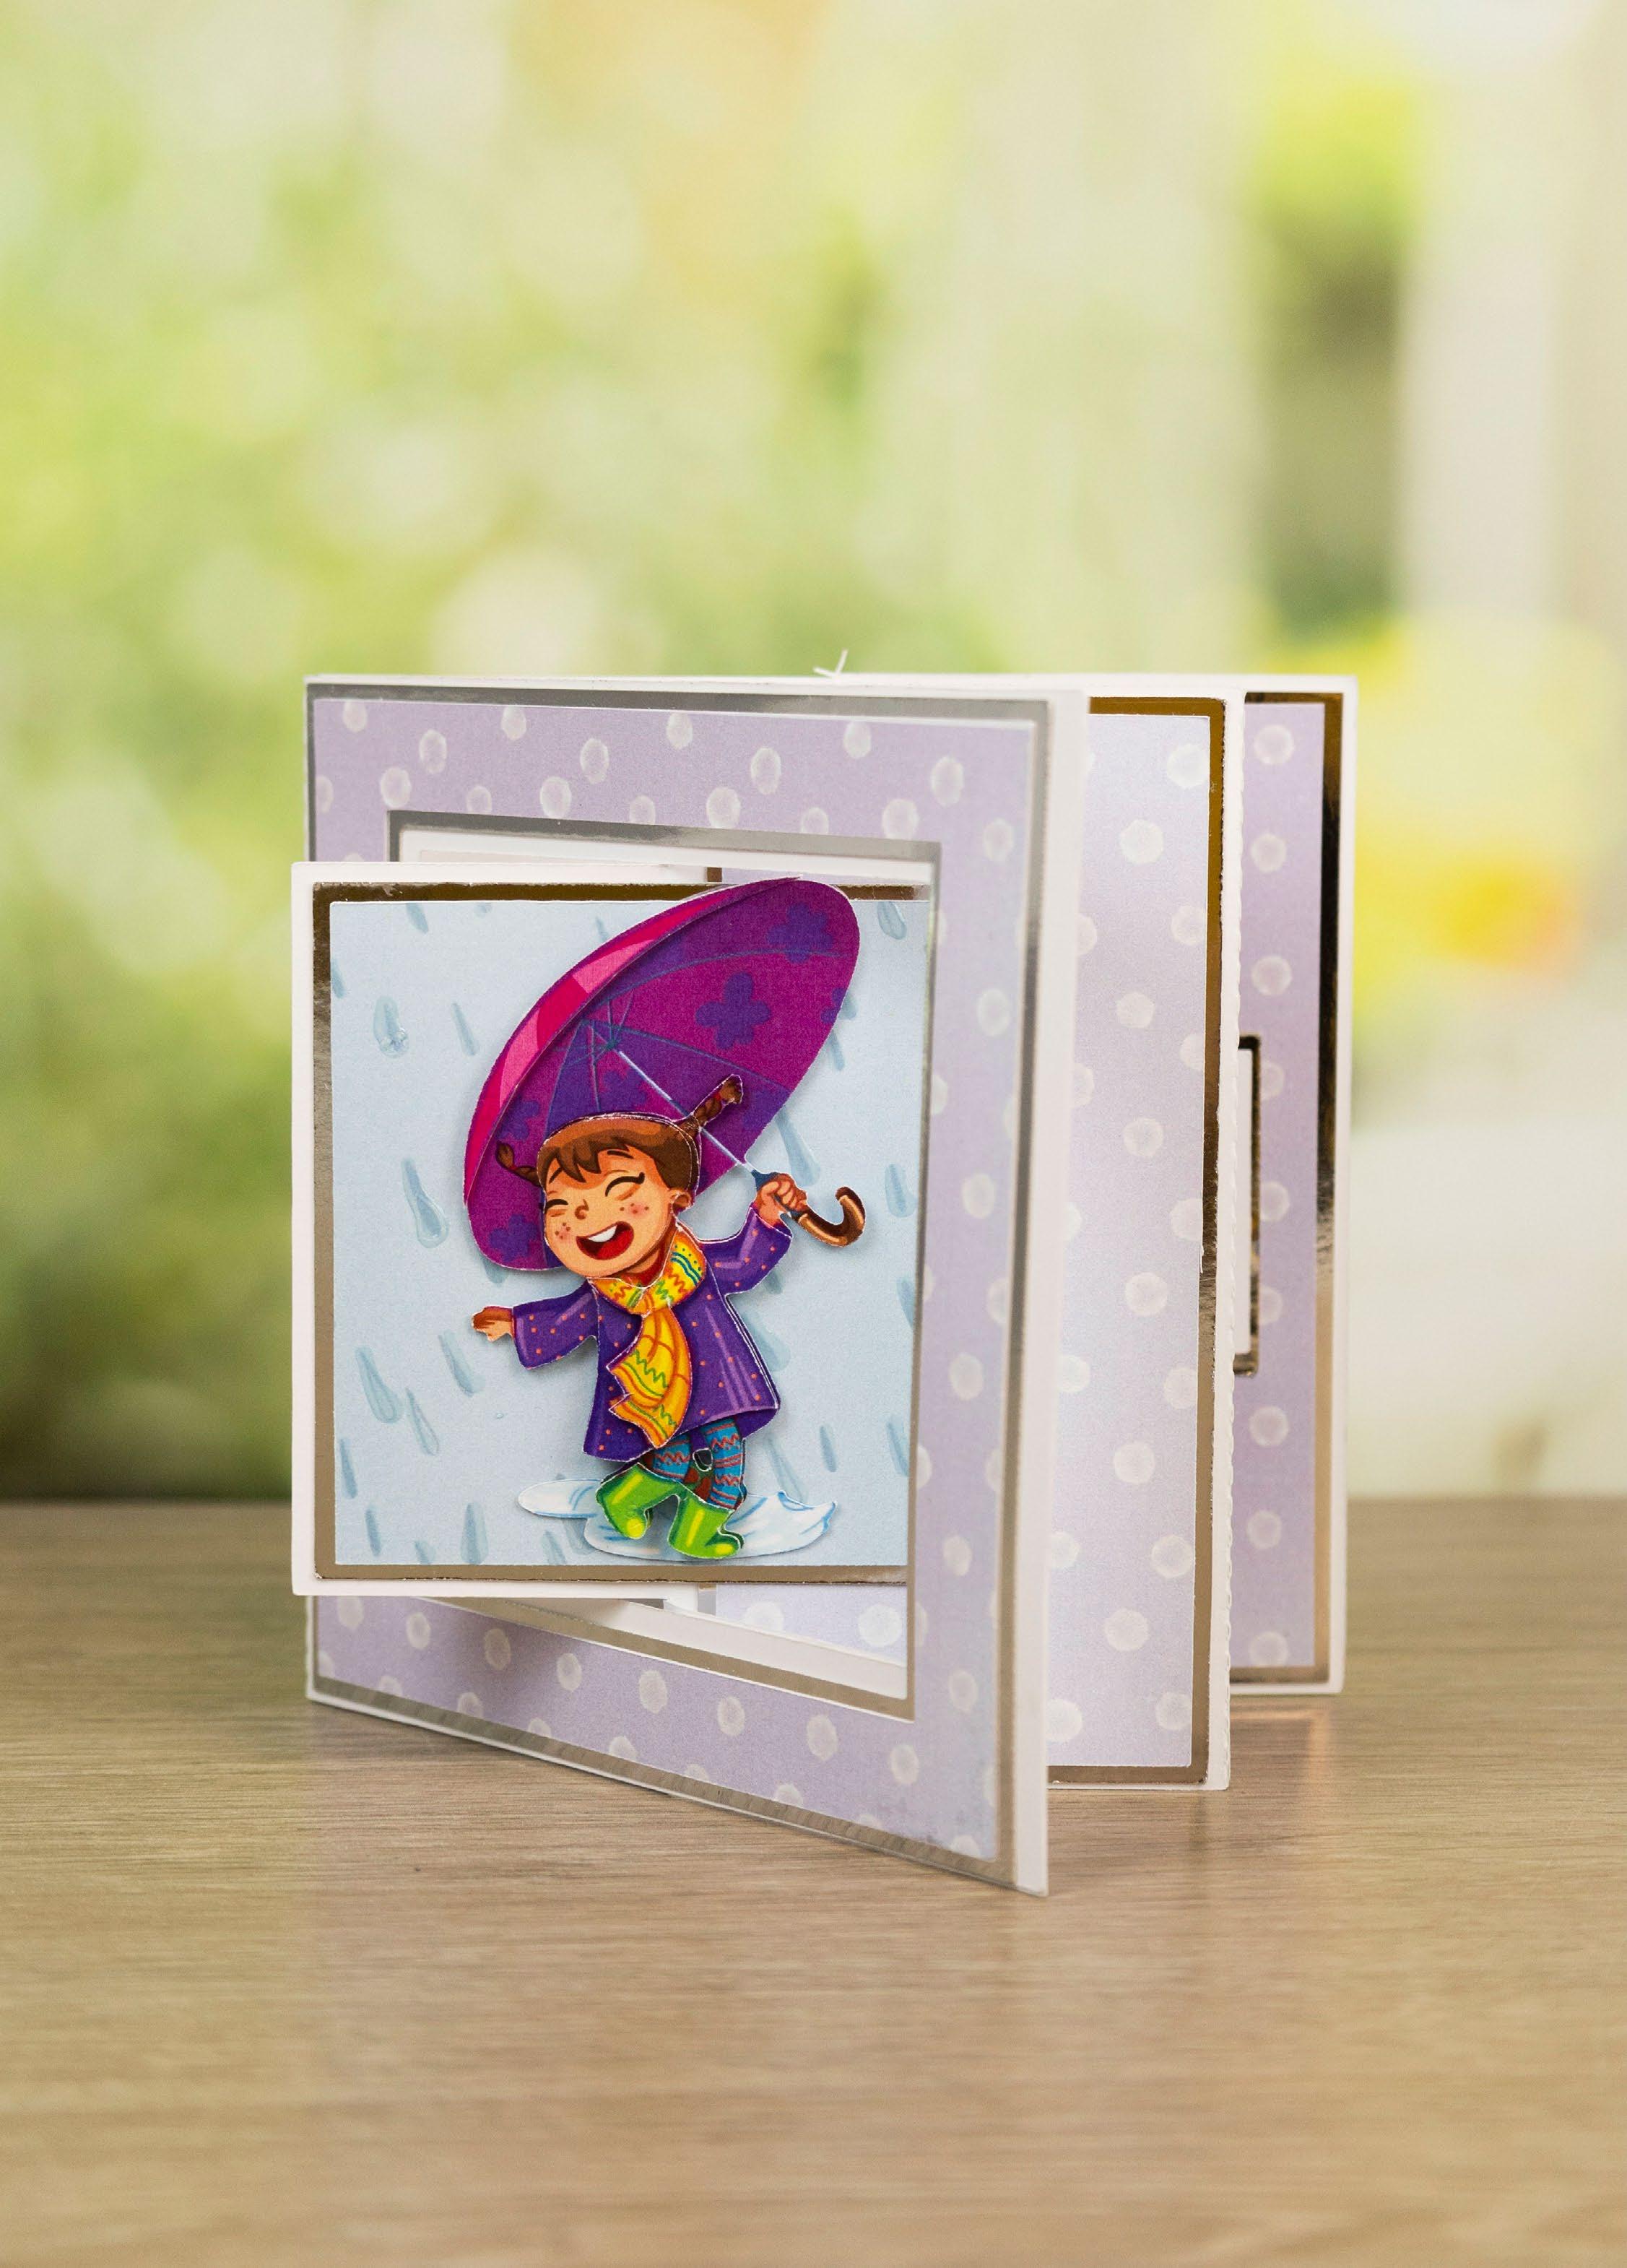
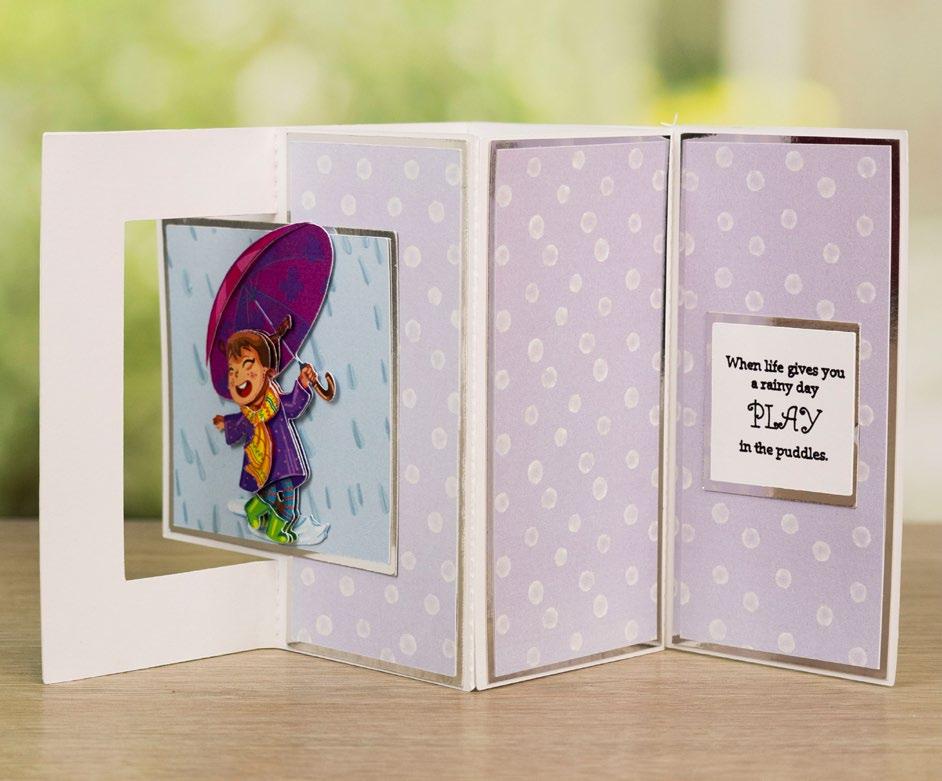

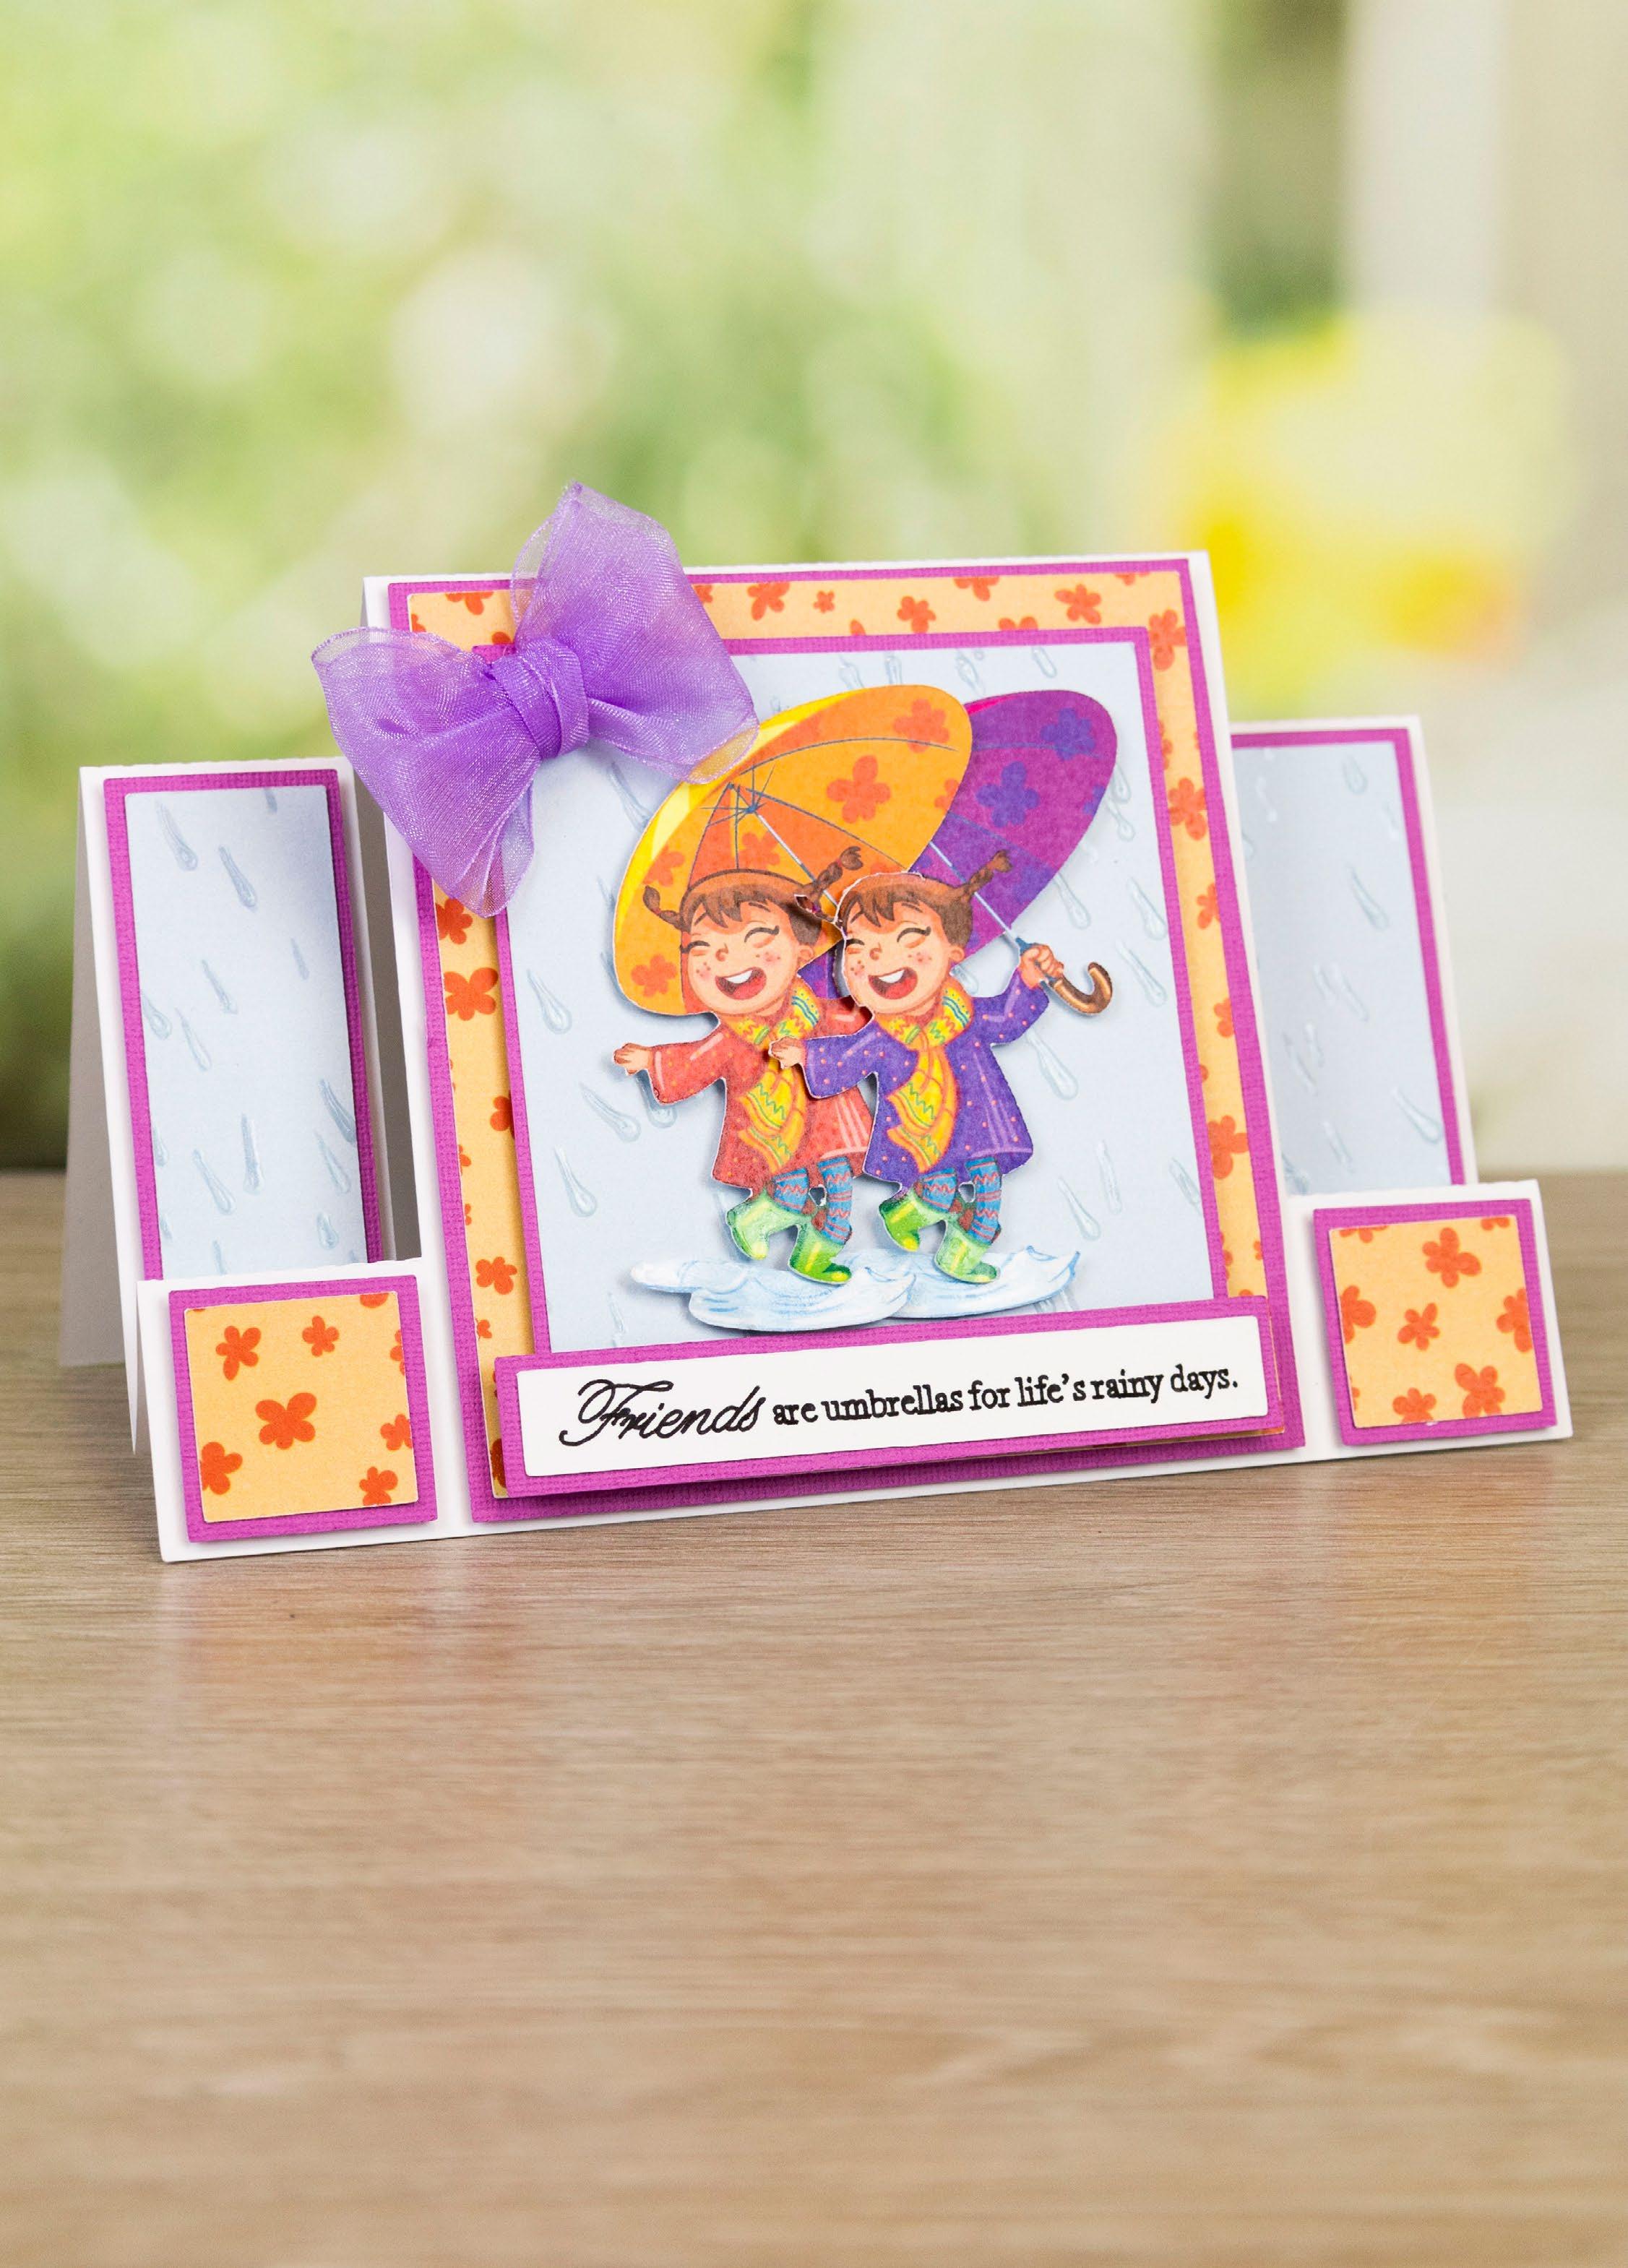
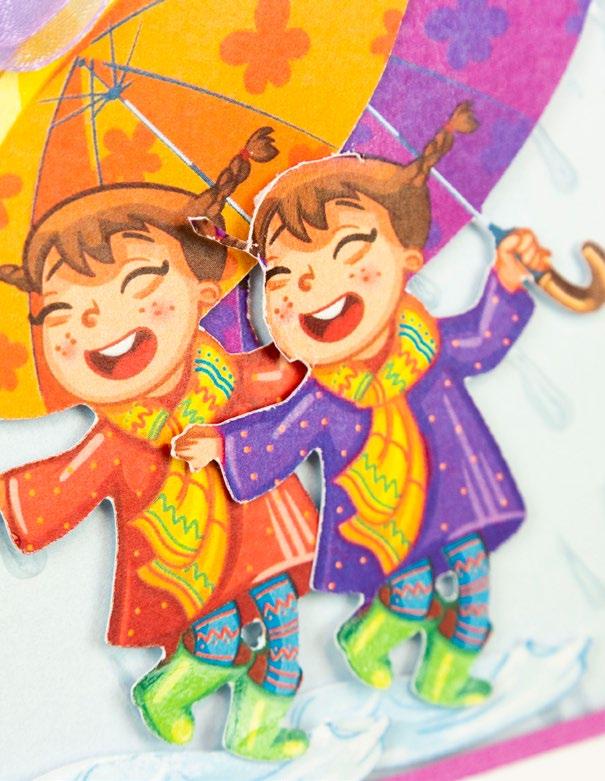
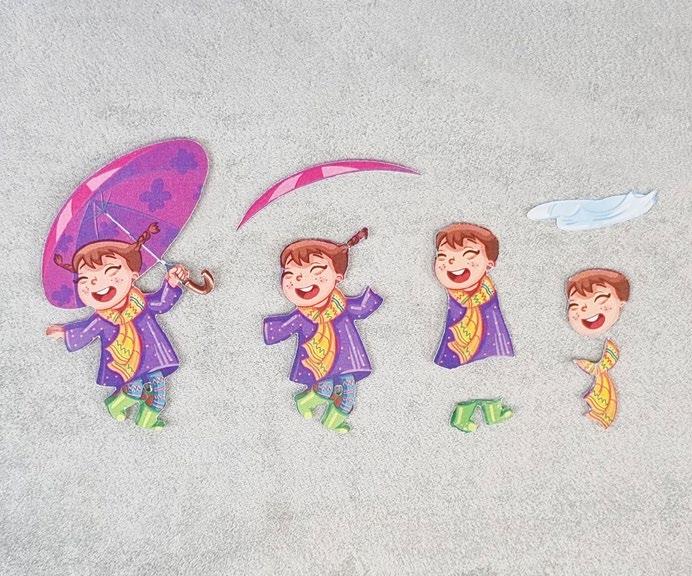
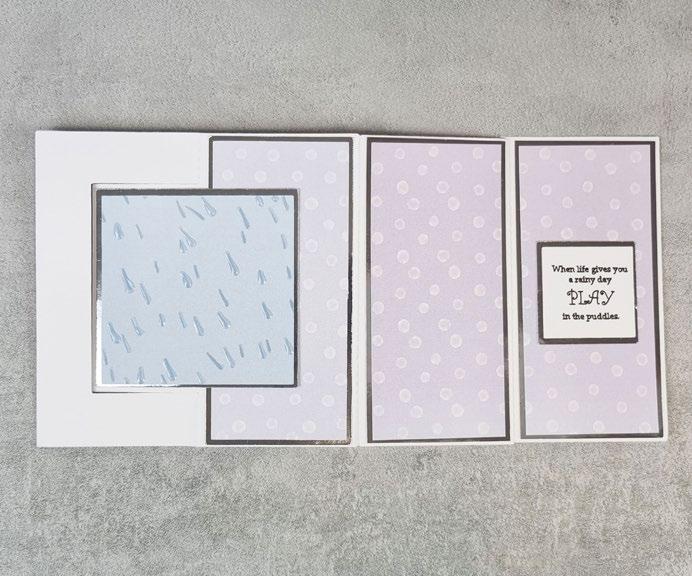
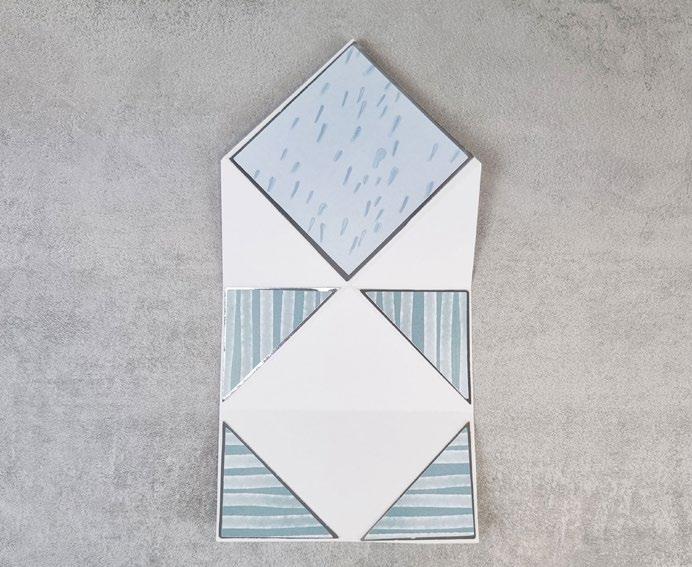
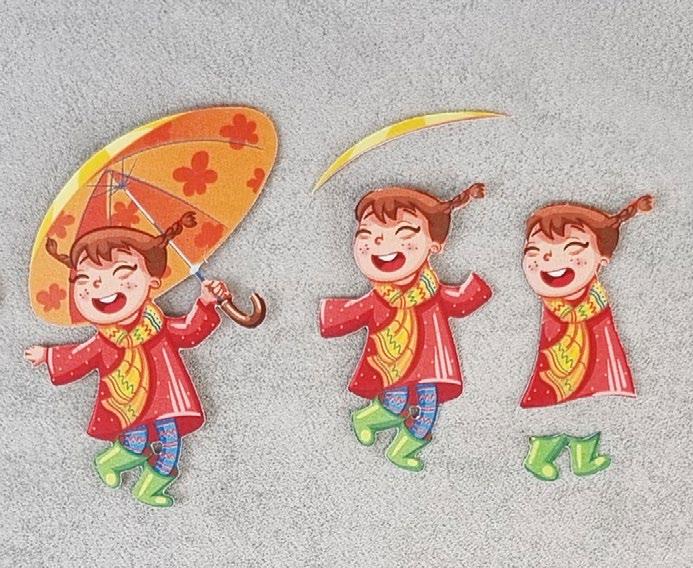
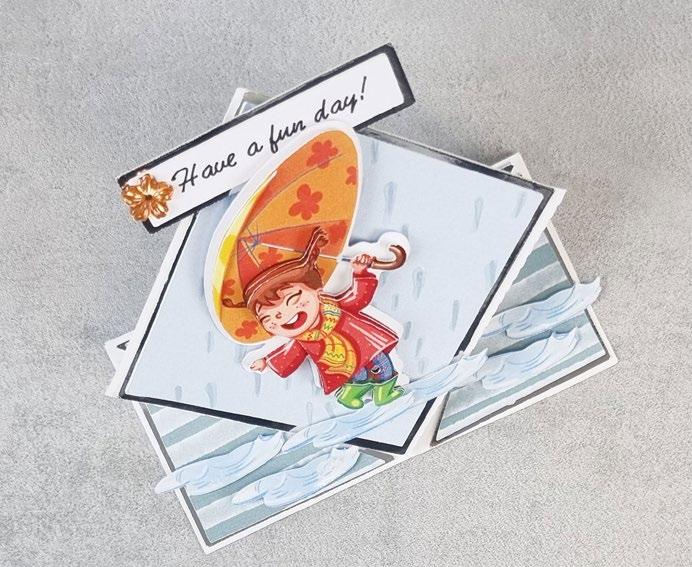
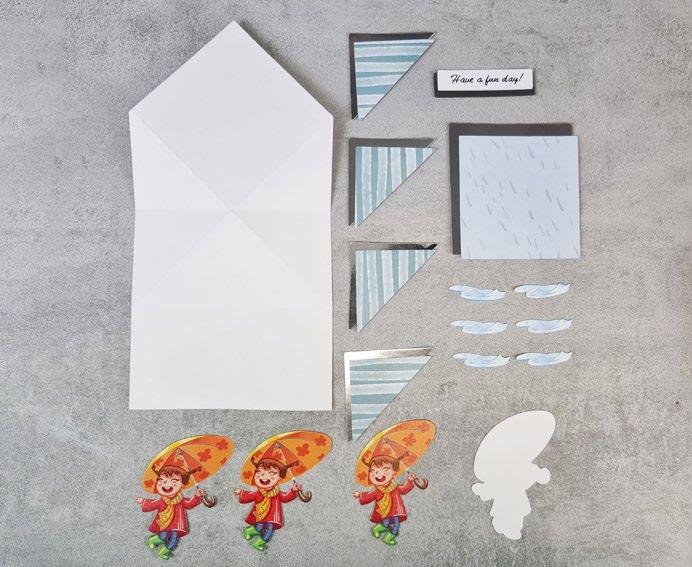
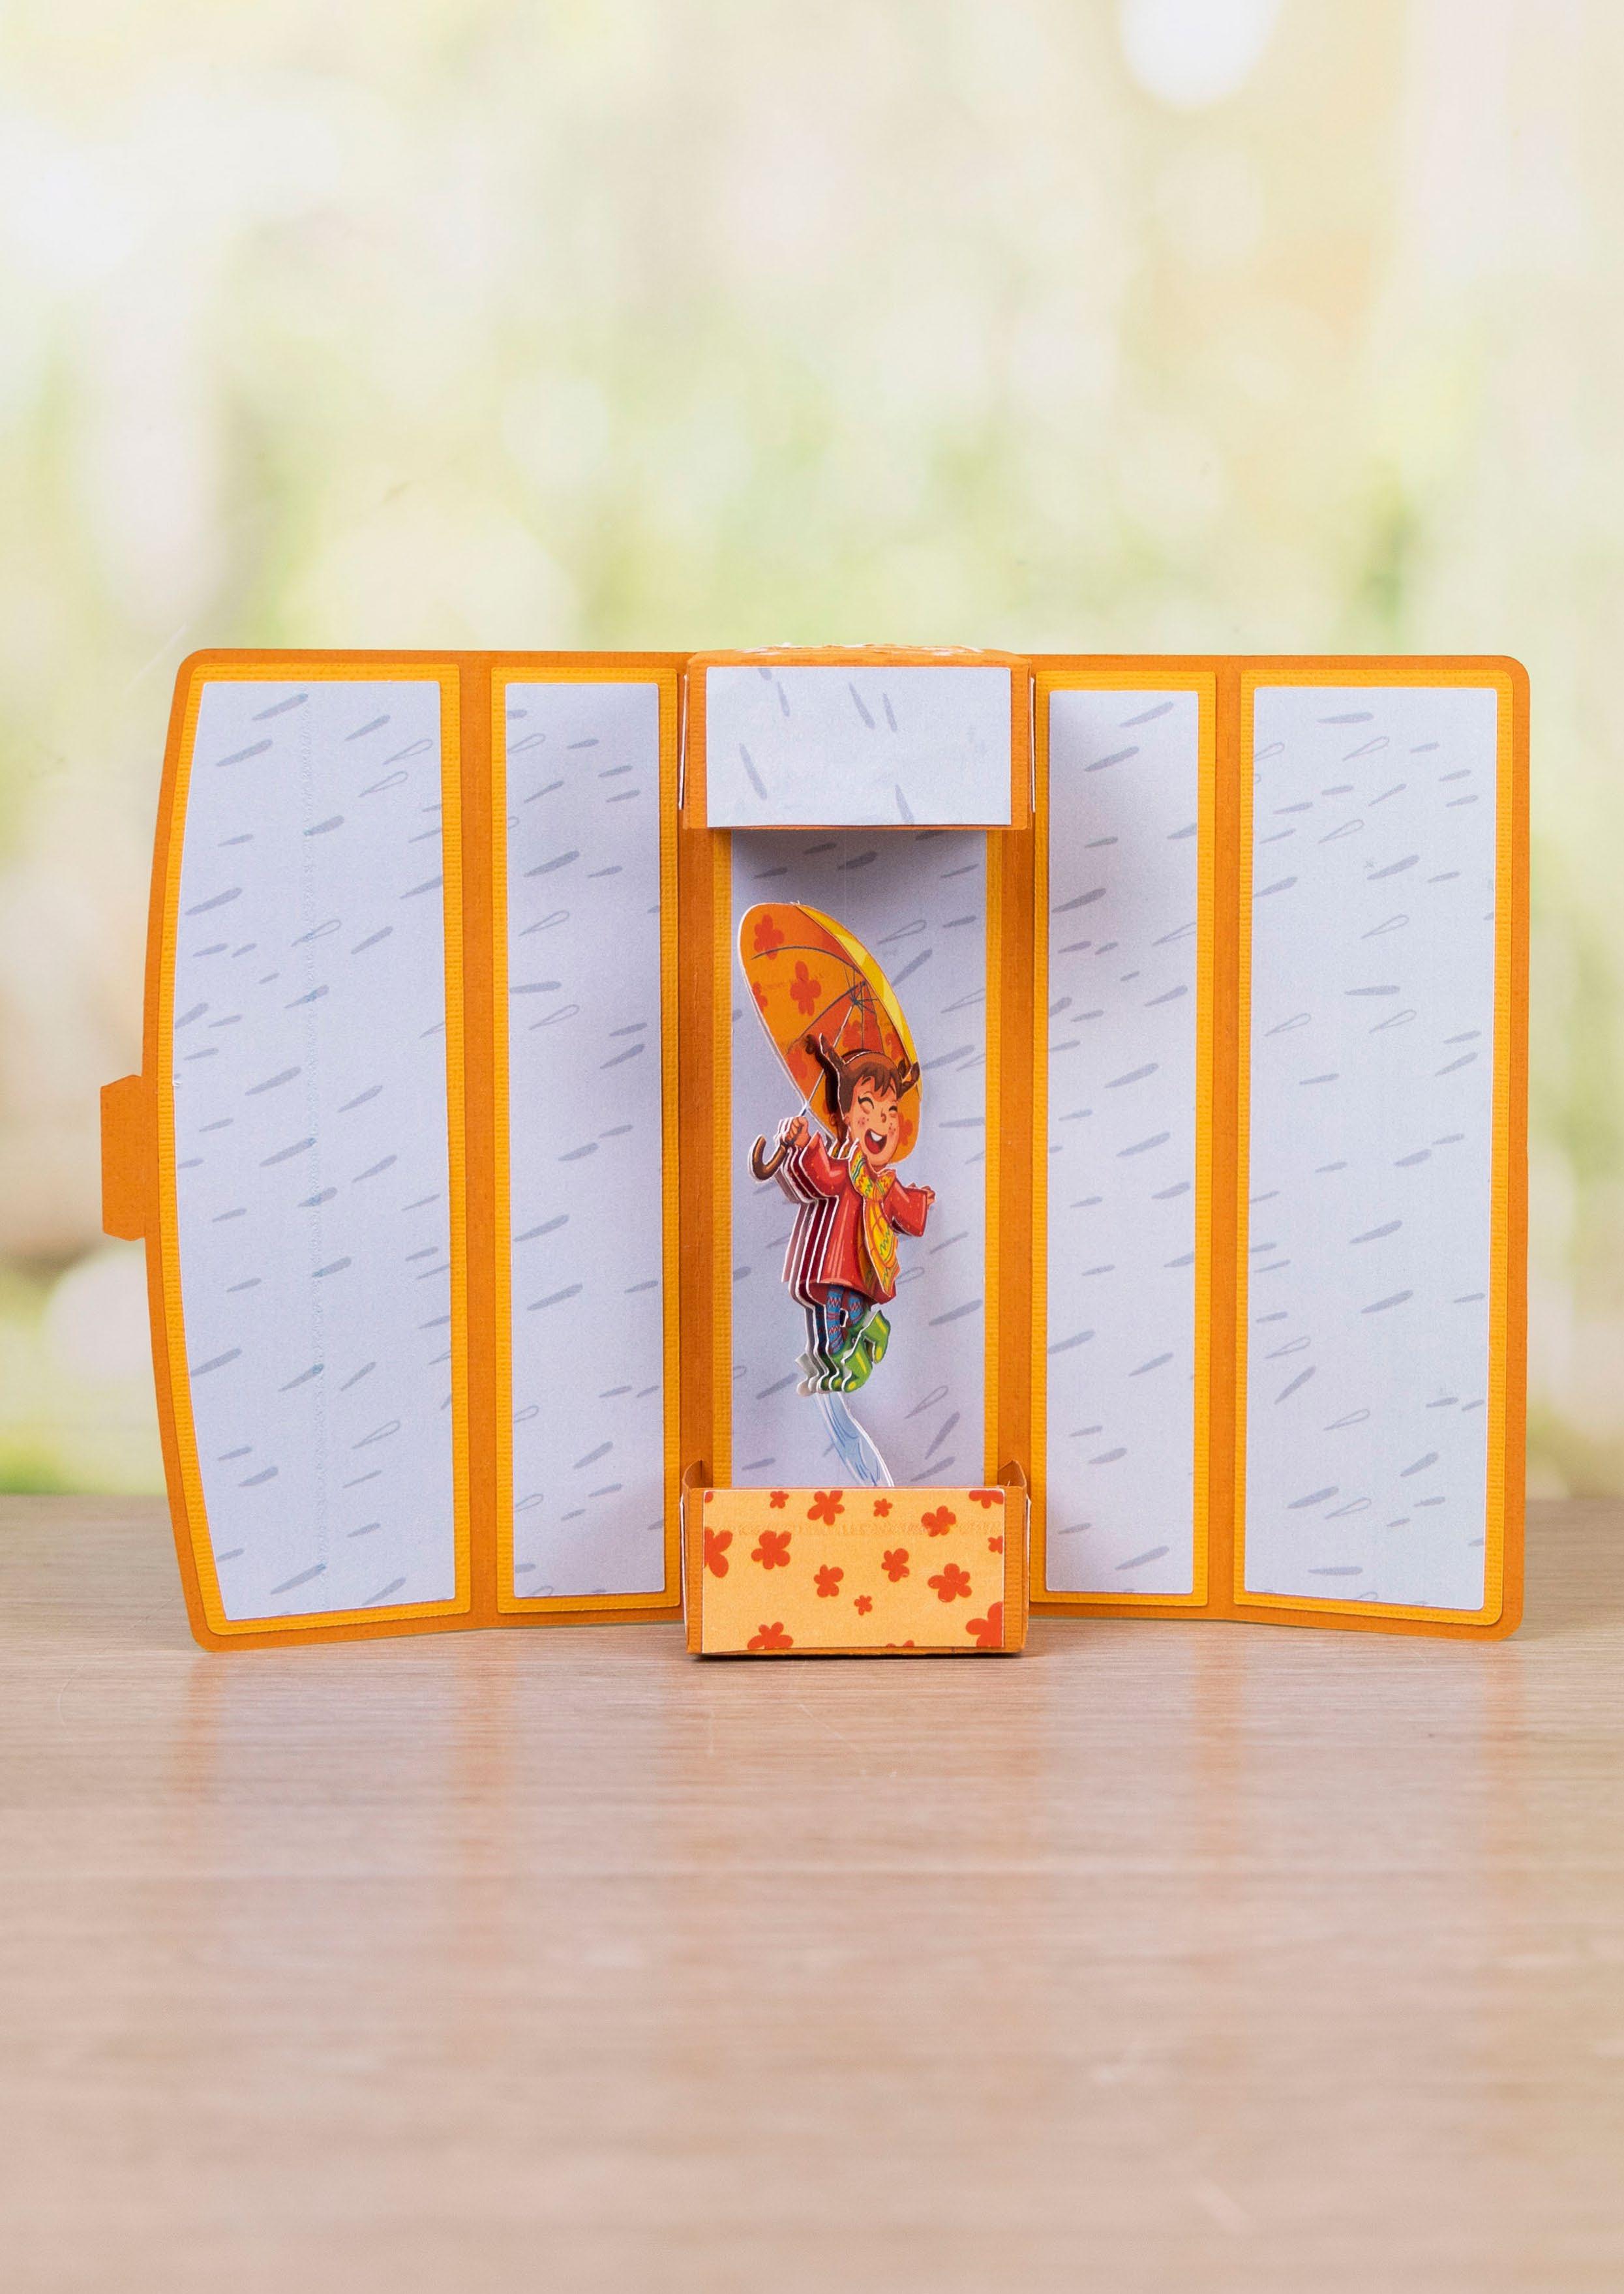
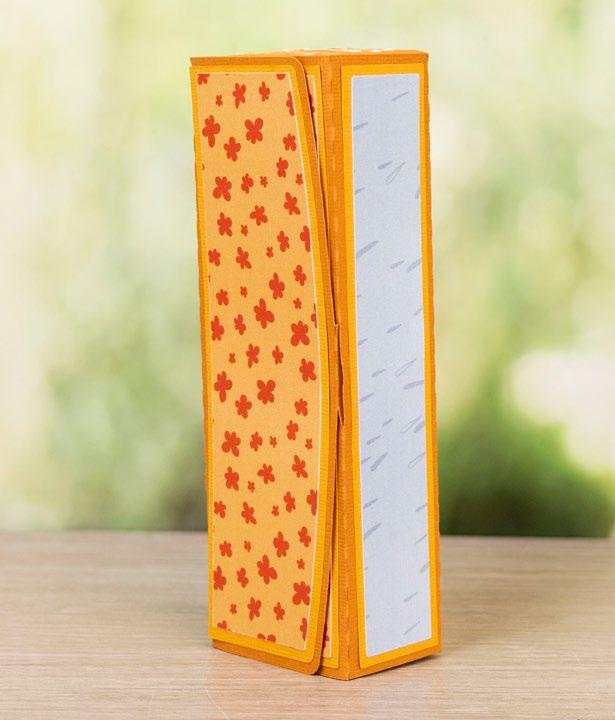
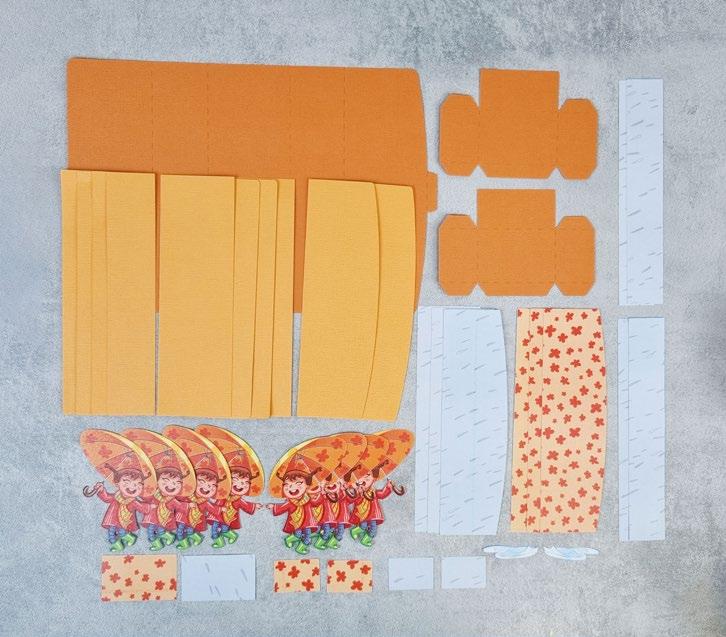
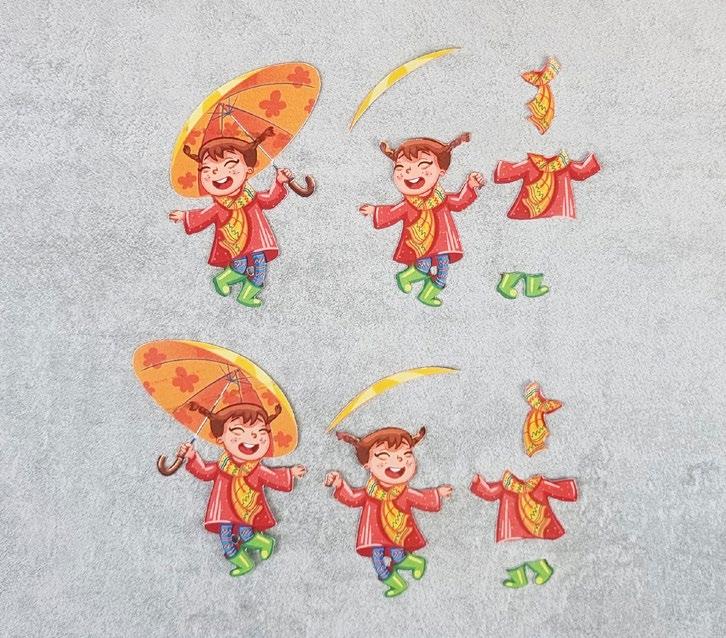
What you’ll need: • 21-01-Dancing In The Rain SVG files • White cardstock • Silver mirror cardstock • Decoupage Glaze ---------------------------------------- DANCING IN THE RAIN ------------------------------------------32 | www.tatteredlace.co.uk
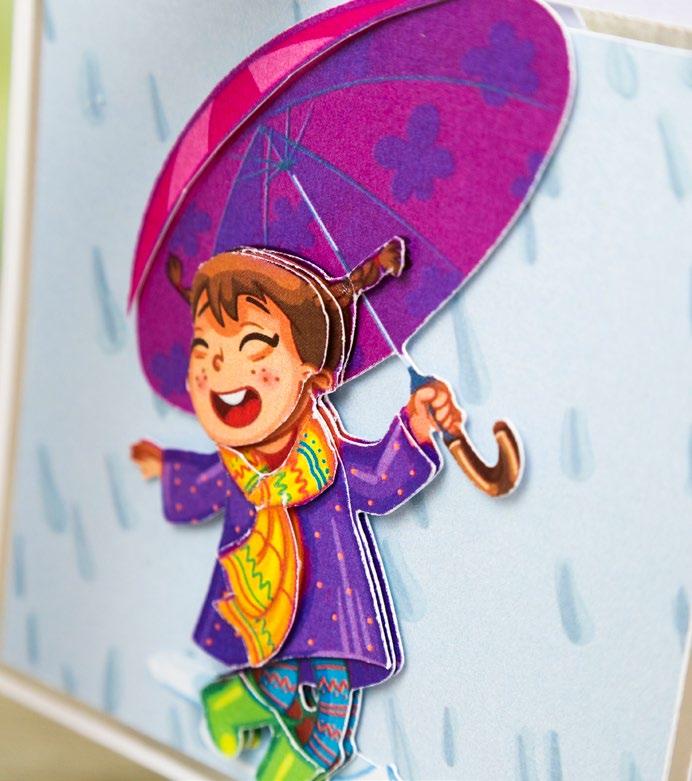
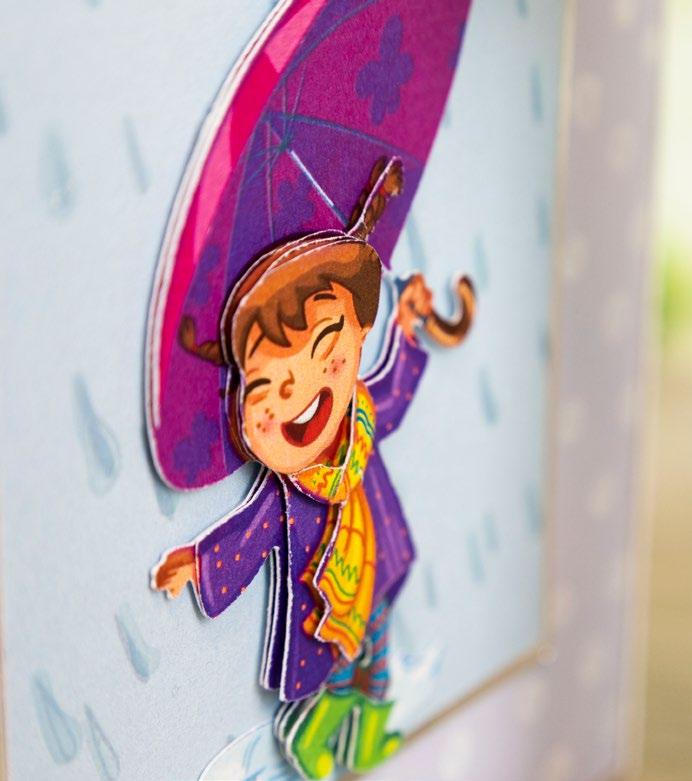
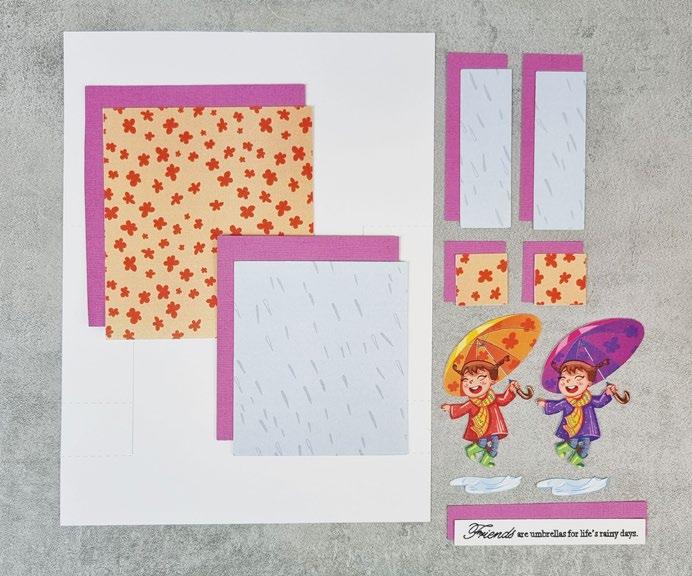
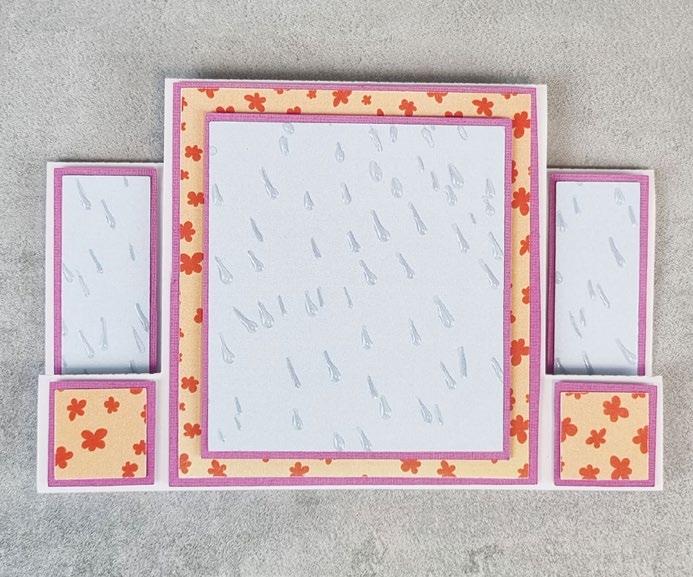
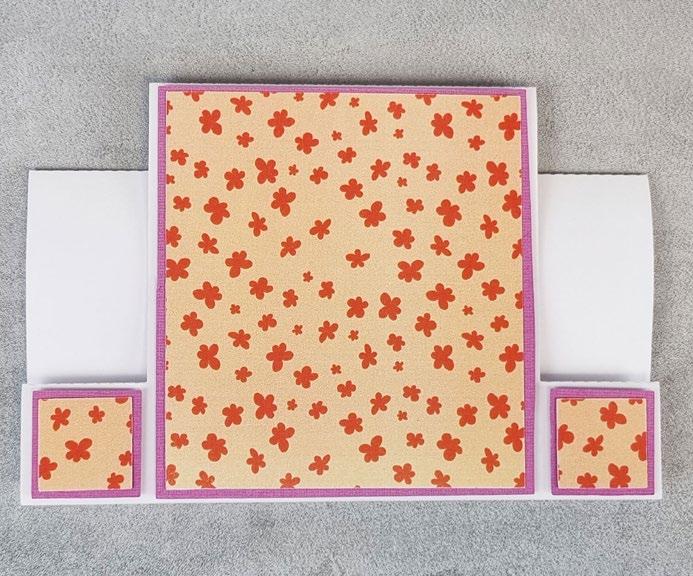
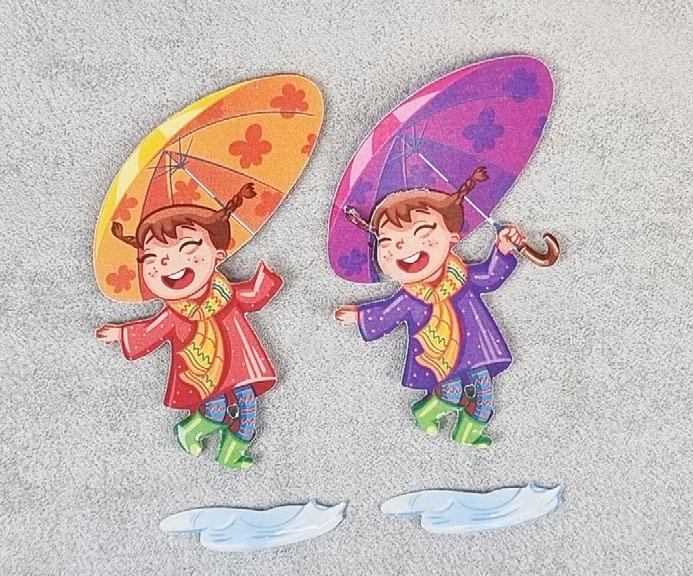

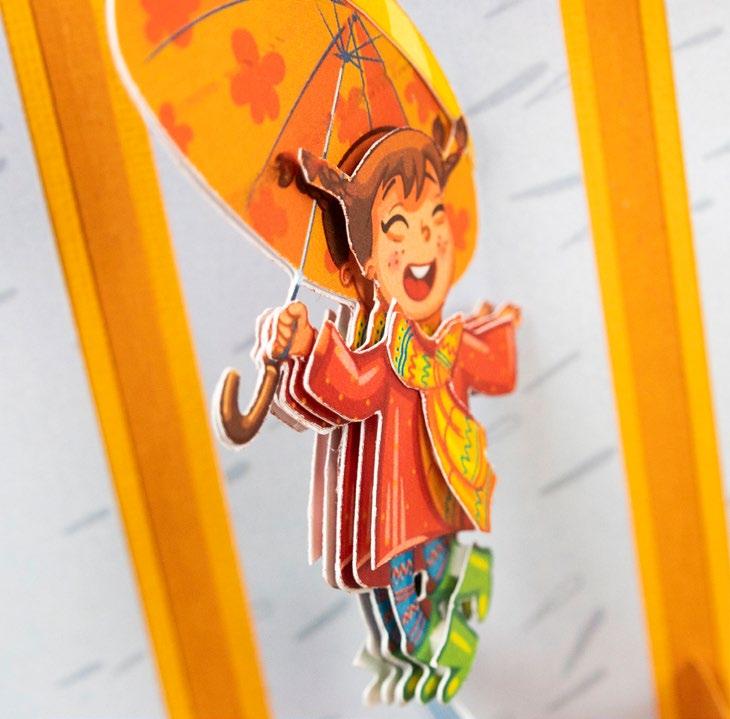
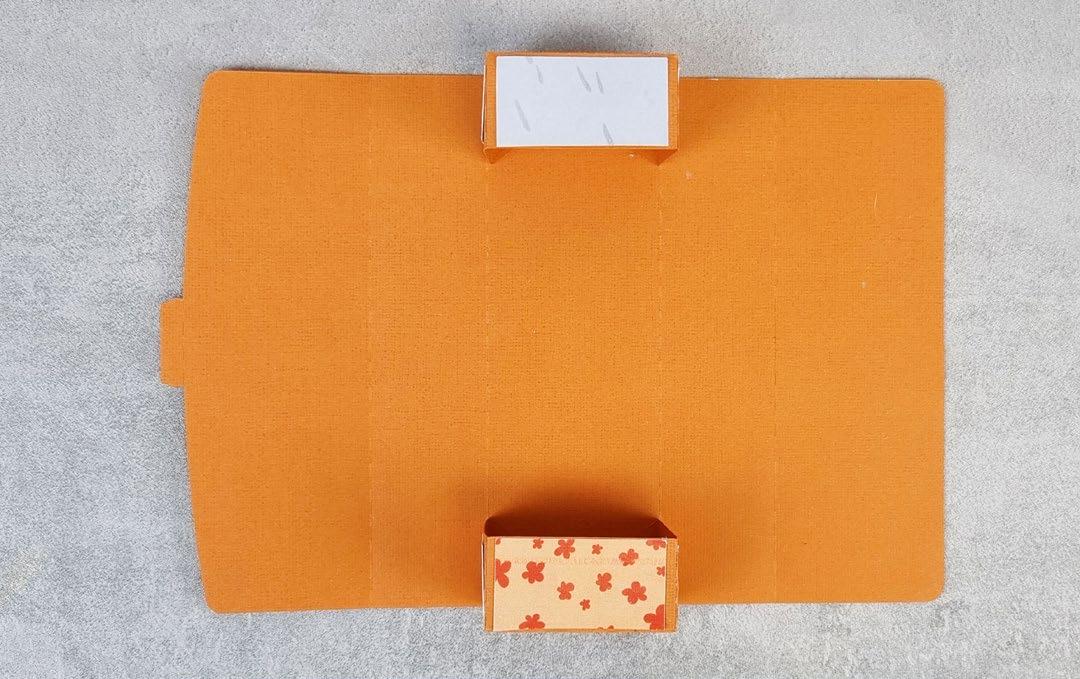
---------------------------------------- DANCING IN THE RAIN ------------------------------------------1 Cut all the pieces needed to create the project as listed below; Step bySteps 1 3 5 2 4 6 From SVG downloads: • From white cardstock: - 1 x DTR-1-Card Base 1A - 1 x DTR-1-Card Base 1B - 1 x DTR-1-Card Base 2A - 1 x DTR-1-Card Base 2B • From silver mirror cardstock: - 1 x DTR-1-Frame 1 • From backing paper: - 1 x DTR-1-Frame 2 • From charisma: - 1 x DTR-1-Charisma From machine memory: • From silver mirror cardstock: - 3 x 70mm x 145mm rectangle - 1 x 95mm square - 1 x 50mm square • From backing paper: - 3 x 65mm x 140mm rectangle (spots) - 1 x 90mm square (rain) • From white cardstock: - 1 x 45mm square (with sentiment draw file) 2 Using the tabs, attach card base 1A & 1B together, and card base 2A & 2B together. Fold along the score lines and stick card base 2 inside card base 1 as shown in the image. 3 Mat the spot frame onto the silver frame and mat onto the front of the card. 4 Mat the spot rectangles onto the silver rectangles and mat onto the three folded panels on the inside of the card. Add Decoupage Glaze to the raindrops on the backing paper square and mat onto the large silver square. Mat onto the left inside panel so it sits within the card front aperture. Mat the sentiment square onto small silver square and mat onto the right inside panel. 5 Trim the charisma cuts as shown in the image. 6 Add Decoupage Glaze to the puddle and the top layer of boots. Build up the decoupage and mat together with foam tape. Mat onto the card with foam tape. CLICK HERE TO DOWNLOAD YOUR SVG CONTENT PROJECT 21 www.tatteredlace.co.uk | 33
What you’ll need: • 22-02-Dancing In The Rain SVG files • White cardstock • Silver mirror cardstock • Decoupage Glaze ---------------------------------------- DANCING IN THE RAIN ------------------------------------------PROJECT 22 34 | www.tatteredlace.co.uk
1
Cut all the pieces needed to create the project as listed below;
From SVG downloads:
• From white cardstock: - 1 x DTR-2-Card Base
• From charisma: - 1 x DTR-2-Charisma
From machine memory:
• From purple cardstock: - 1 x 125mm x 135mm rectangle - 2 x 35mm squares - 2 x 35mm x 95mm rectangle
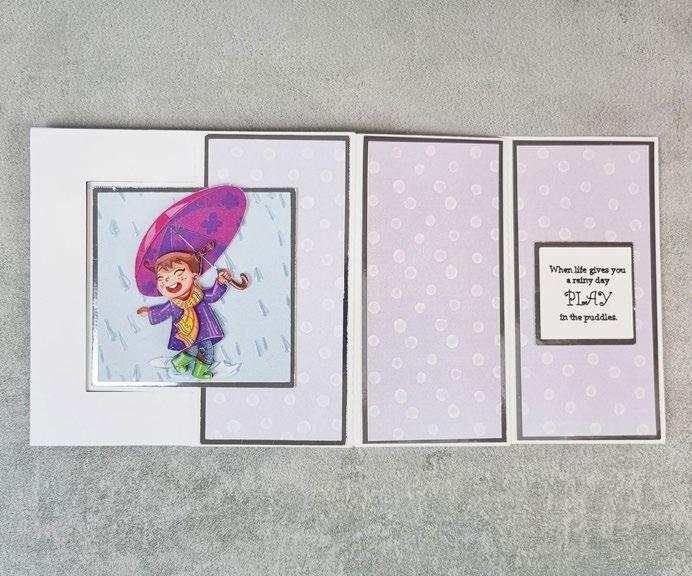
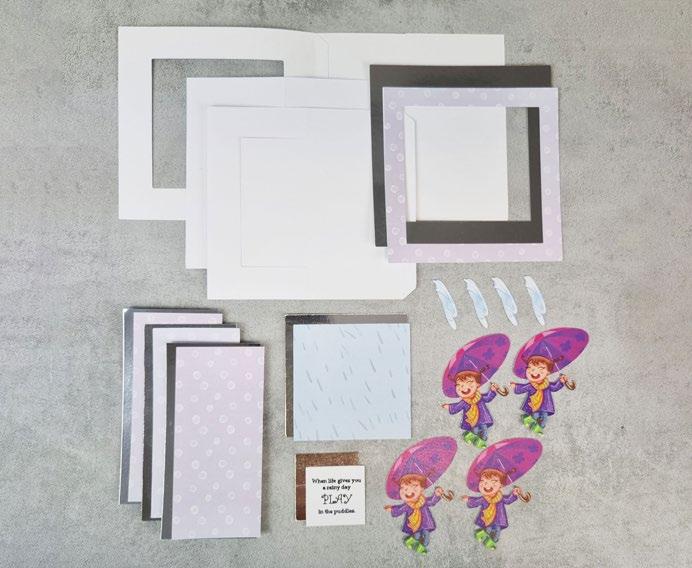
- 1 x 105mm x 115mm rectangle - 1 x 115mm x 20mm rectangle
• From backing paper: - 1 x 120mm x 130mm rectangle (orange flower) - 2 x 30mm squares (orange flower) - 2 x 30mm x 90mm rectangle (rain) - 1 x 100mm x 110mm rectangle (rain)
• From white cardstock: - 1 x 110mm x 15mm rectangle (with sentiment draw file)

Fold on the score lines of the card base to create the stepper card. Mat the large orange flower rectangle onto the large purple rectangle, and mat onto the middle of the stepper with foam tape. Mat the two orange flower squares onto the two purple squares and mat onto the front of the stepper with foam tape.
2
3
Add Decoupage Glaze to the raindrops on the thin rain rectangles and mat onto the thin purple rectangles. Mat onto the sides of the stepper with foam tape.
4
Add Decoupage Glaze to the raindrops on the remaining rain rectangle and mat onto the 105mm width purple rectangle. Mat onto the middle of the stepper card.
5
Trim the charisma cuts as shown in the image. Snip into the purple charisma around the hair so you can overlap the charisma cuts. Add Decoupage Glaze to the boots and puddles.
6
Mat the cuts onto the front of the stepper card with foam tape. Mat the sentiment rectangle onto the remaining purple rectangle and mat onto the card with foam tape. Tie a double-loop bow from purple ribbon and mat onto the card.
Step bySteps
---------------------------------------- DANCING IN THE RAIN -------------------------------------------
1 3 5 2 4 6
CLICK HERE TO DOWNLOAD YOUR SVG CONTENT www.tatteredlace.co.uk | 35
the score
to create
bySteps
of the
panel of the card making sure the stripes go
Mat
other two onto the lower triangle
making sure the stripes go
Decoupage Glaze to the
on the rain square
mat onto the silver square. Mat onto the square panel of the card.
charisma cuts as shown in
Decoupage Glaze to the puddles and top layer of boots.
up the decoupage and mat
with foam tape. Mat the girl onto the outline, and mat this and
puddles onto the top panel of the
and the remaining puddles onto the either side of the bottom
the
onto the silver rectangle and mat onto the
with foam tape. Add a flower
to the
Finish the card
sticking the lower-middle triangle panel to bottom panel of the card.
Step
1 2 3 4 5 1 Cut all the pieces needed to create the project as listed below; From SVG downloads: • From white cardstock: - 1 x DTR-3-Card Base - 1 x DTR-3-Girl Outline • From silver mirror cardstock: - 1 x DTR-3-Triangle Mat 1 • From backing paper: - 1 x DTR-3-Triangle Mat 2 (stripe) • From charisma: - 1 x DTR-3-Charisma From machine memory: • From silver mirror cardstock: - 1 x 95mm square - 1 x 75mm x 20mm rectangle • From backing paper: - 1 x 90mm square (rain) • From white cardstock: - 1 x 70mm x 15mm rectangle (with sentiment draw file) 2 Fold on
lines
card base
the card. Mat the stripe triangle mats onto the silver triangle mats. Mat two onto the bottom
horizontal.
the
panels
vertical. 3 Add
raindrops
and
4 Trim the
the image. 5 Add
Build
together
two
card
panel. Mat
sentiment rectangle
card
gem
sentiment.
my
What you’ll need: • 23-03-Dancing In The Rain SVG files • White cardstock • Silver mirror cardstock • Decoupage Glaze • Flower gem ---------------------------------------- DANCING IN THE RAIN ------------------------------------------36 | www.tatteredlace.co.uk CLICK HERE TO DOWNLOAD YOUR SVG CONTENT PROJECT 23
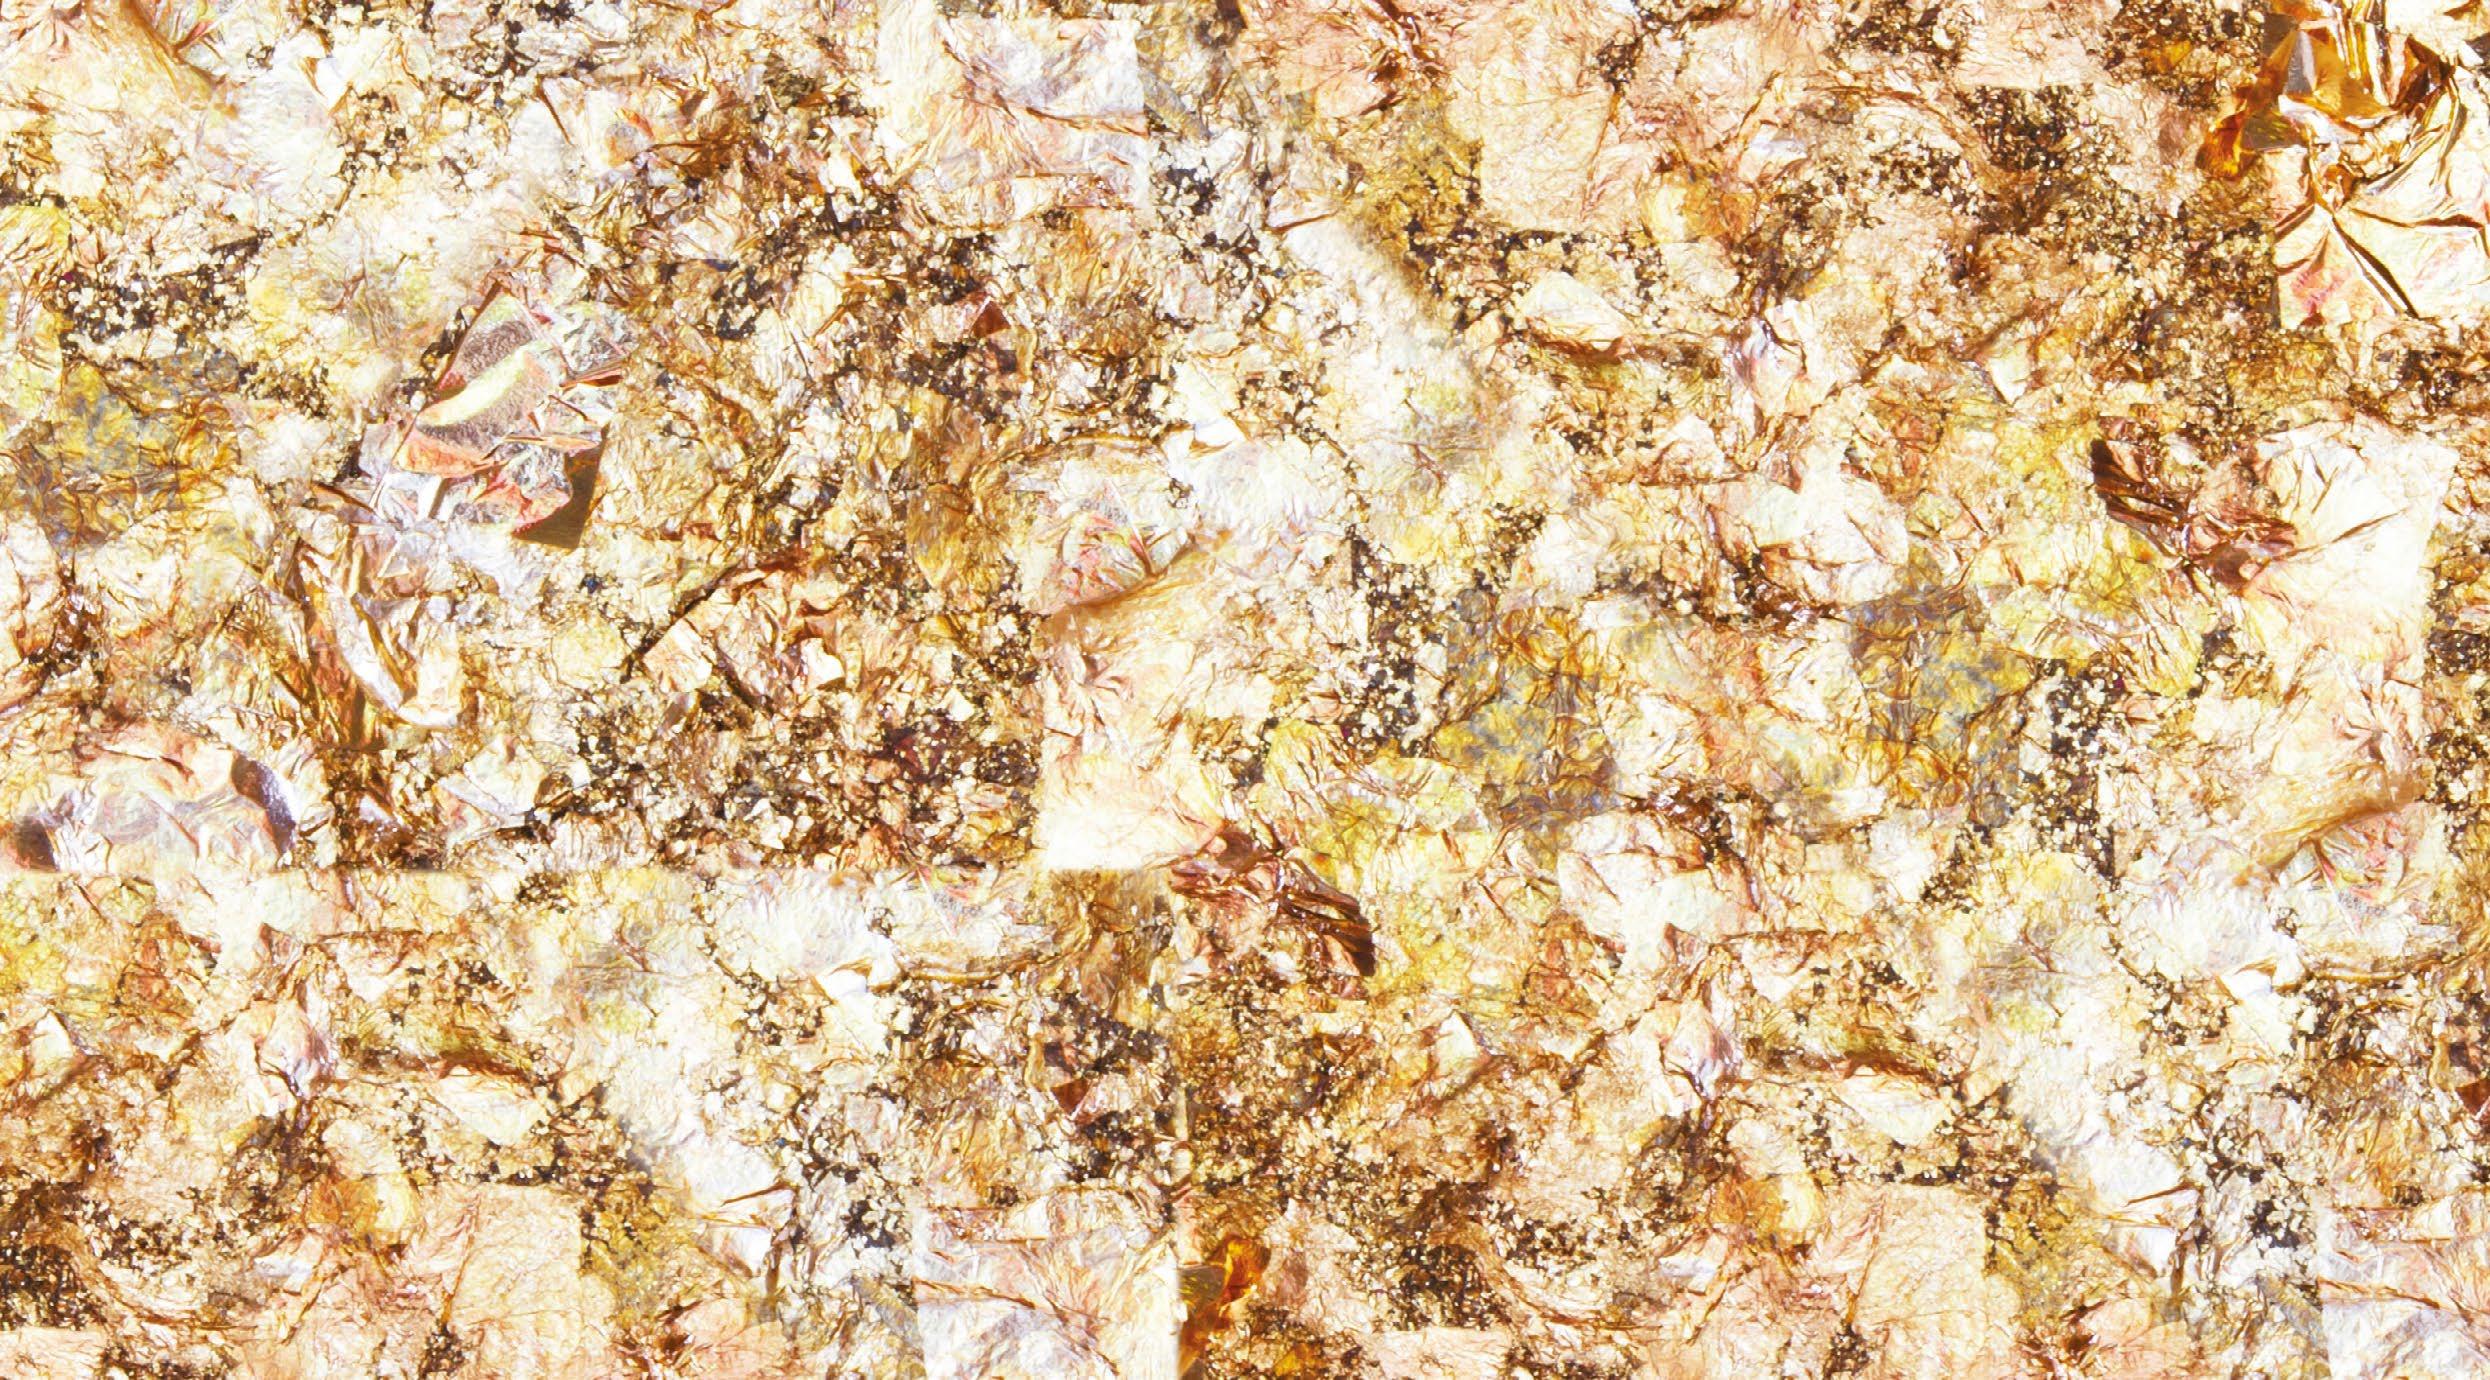
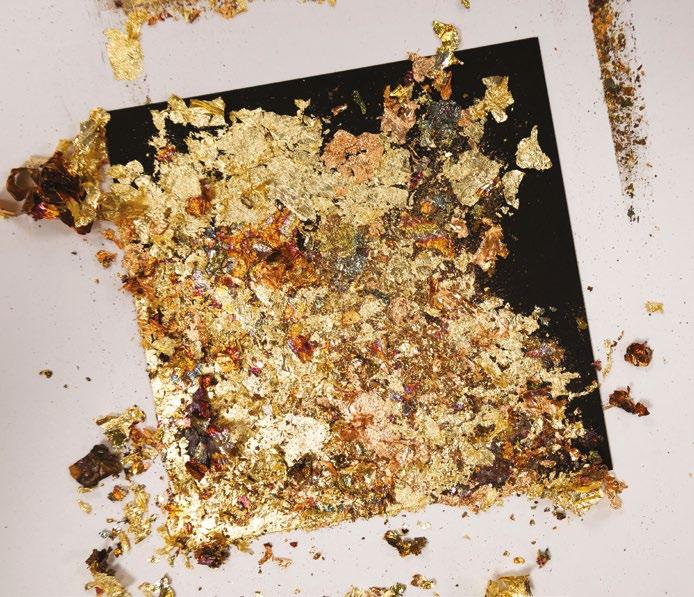
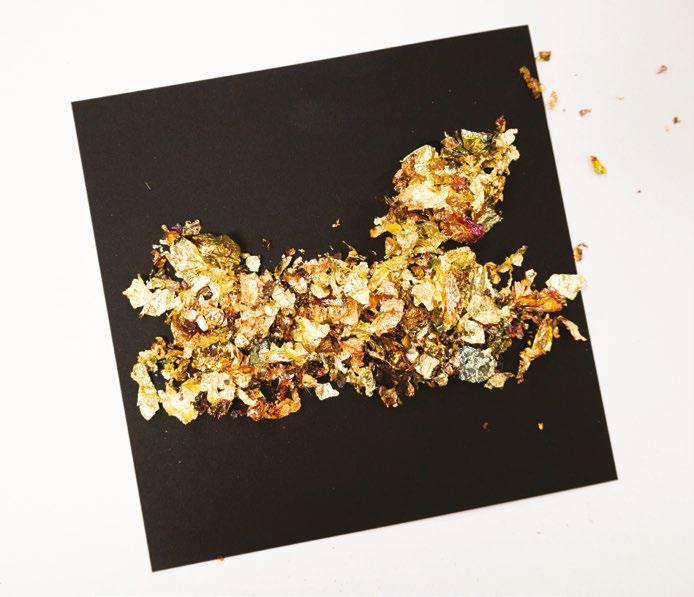
There’s far more to Tattered Lace dies than you first see. By snipping into the dies you can turn them into so much more. Here are a few ideas we have come up with. Why not have a go at these, and then see if you can find any more!


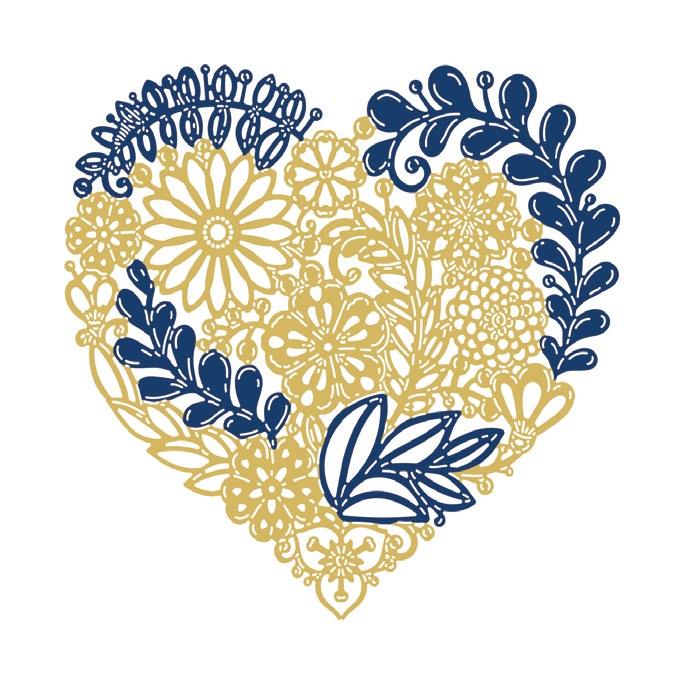


FloralBeautyit DOWN BREAK ---------------------------------- DIE BREAKDOWNS - A LACY SCENE ------------------------------------IDEA 2 IDEA 3 IDEA 1 IDEA 4
www.tatteredlace.co.uk | 37
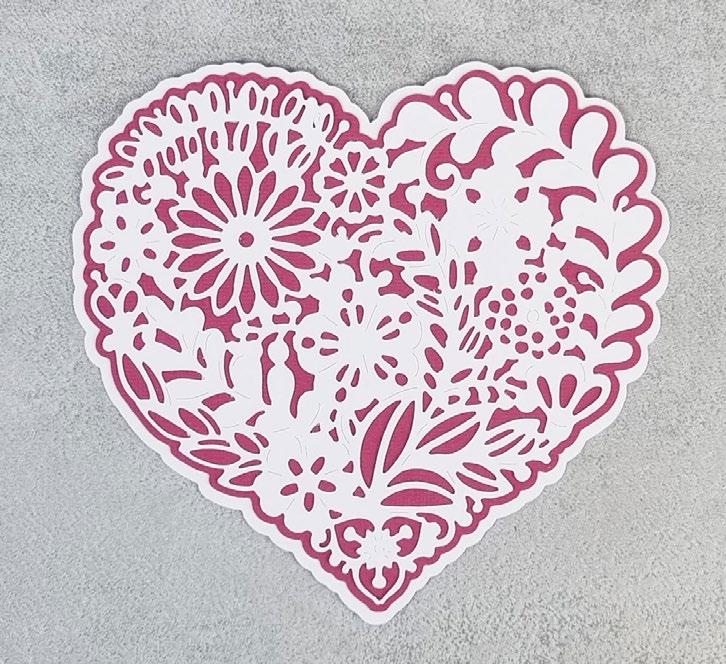
Floral Beauty
From SVG downloads:

• From white cardstock: - 1 x FB-1-Heart Mat 1 - 2 x FB-1-Floral Heart

From pink cardstock: - 1 x FB-1-Heart Mat 2
From machine memory:
From white cardstock: - 2 x 200mm square
- 1 x 185mm square - 1 x 75mm x 20mm (with sentiment draw file)
• From pink cardstock: - 1 x 195mm square - 1 x 80mm x 25mm rectangle
From backing paper: - 1 x 180mm square (pink heart)
On one of the large white squares, measure in 10mm from the left edge, and score and fold to create a tab. Attach to the other large white square to create a card. Mat the pink square onto the front of the card. Mat the pink heart square onto the smaller white square and mat onto the card with foam tape.
Mat the pink heart mat 2 onto the white heart mat 1 with foam tape and mat onto the card with foam tape.
Trim into one of the floral heart cuts, as shown. Mat the flower decoupage onto the whole cut and mat onto the card. Tuck the leaf decoupage under the heart mat, and mat onto the card.
RUSTIC HEART
all the pieces needed to create the project as listed below;
downloads:
From white cardstock: - 1 x FB-3-Card Base - 1 x FB-3-Heart Mat 2
From kraft cardstock: - 1 x FB-3-Heart Mat 1
From backing paper: - 1 x FB-3-Card Mat 1 (shabby lace)
Mat the sentiment rectangle onto the purple rectangle, and mat onto the card with foam tape. Add pearl gems onto the heart. Tie a double-loop bow from white ribbon and mat onto the card
• From charisma: - 2 x FB-3-Charisma
From machine memory:
• From kraft cardstock: - 1 x 195mm x 95mm rectangle
Fold on the score lines of the card base to create an overthe-edge tent card. Mat the shabby lace card mat onto the kraft rectangle, and mat onto the card base with foam tape.
Mat the white heart mat 2 onto the kraft heart mat 2 with foam tape, and mat onto the card with foam tape.
------------------------------------------- FLORAL BEAUTY ----------------------------------------------
HAPPY BIRTHDAY
What you’ll need: • 26-03-Floral Beauty SVG files • White cardstock • Kraft cardstock • Brown ribbon • Pearl gems What you’ll need: • 24-01-Floral Beauty SVG files • White cardstock • Pink cardstock • Pearl gems • White ribbon 1 Cut all the pieces needed to create the project as listed below; 1 Cut
38 | www.tatteredlace.co.uk From SVG
•
•
•
•
•
•
2
3
4
5
2
3
CLICK HERE TO DOWNLOAD YOUR SVG CONTENT PROJECT 24 PROJECT 26
WONDERFUL
you’ll need:
Beauty SVG files
gems
ribbon
Cut all the pieces needed to create the project as listed below;
SVG downloads:
From white cardstock: - 1 x FB-2-Heart Mat 1

• From green cardstock: - 1 x FB-2-Heart Mat 2
From backing paper: - 1 x FB-2-Heart Mat 3 (green lace)

• From charisma: - 2 x FB-2-Charisma
From machine memory:
• From white cardstock: - 1 x 170mm x 300mm rectangle
- 1 x 125mm x 35mm rectangle (with sentiment draw file)
• From green cardstock: - 1 x 165mm x 145mm rectangle - 1 x 165mm x 70mm rectangle - 1 x 130mm x 40mm rectangle
• From backing paper: - 1 x 160mm x 140mm rectangle (green lace) - 1 x 160mm x 65mm rectangle (green lace)
On the large white rectangle, from the bottom edge, measure up at 7.5cm x 15cm, and score and fold to create a stepped card. Mat the large green lace rectangle onto the large green rectangle. Mat the smaller green lace rectangle onto the next large green rectangle. Mat the smaller rectangles onto the front step with foam tape, and the large rectangles onto the back step of the card with foam tape.
Mat the green lace heart mat 3 onto the green heart mat 2. Mat onto the white heart mat 1 with foam tape, and mat onto the front step of the card.
4Trim one of the charisma floral hearts as shown in the image. Mat the floral decoupage onto the whole cut and mat onto the card. Mat the sentiment rectangle onto the small green rectangle, and mat onto the card with foam tape, making sure the foam tape is at the top of the sentiment. Tie a bow from white ribbon and mat to the card. Finish by adding pearl gems.
Trim one of the charisma cuts as shown in the image. Mat the whole cut onto the card and mat the trimmed pieces onto the bottom of the card. Tie a double loop bow from brown ribbon and mat onto the card. Finish by adding pearl gems.
------------------------------------------- FLORAL BEAUTY ----------------------------------------------
DAY What
• 25-02-Floral
• White cardstock • Green cardstock • Pearl
• White
1
From
•
•
2
3
4
CLICK HERE TO DOWNLOAD YOUR SVG CONTENT CLICK HERE TO DOWNLOAD YOUR SVG CONTENT PROJECT 25 www.tatteredlace.co.uk | 39
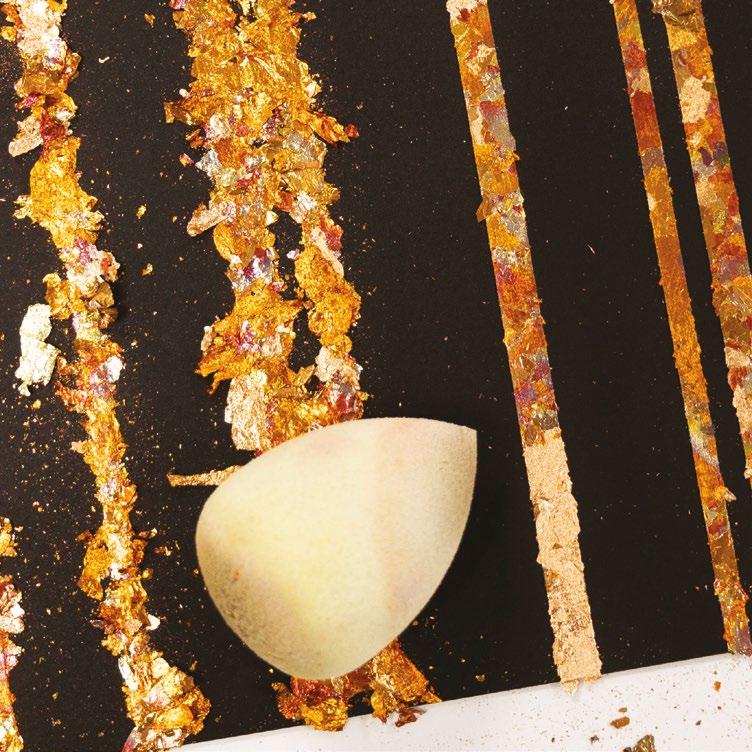
WAYS WITH...
USING TAPE
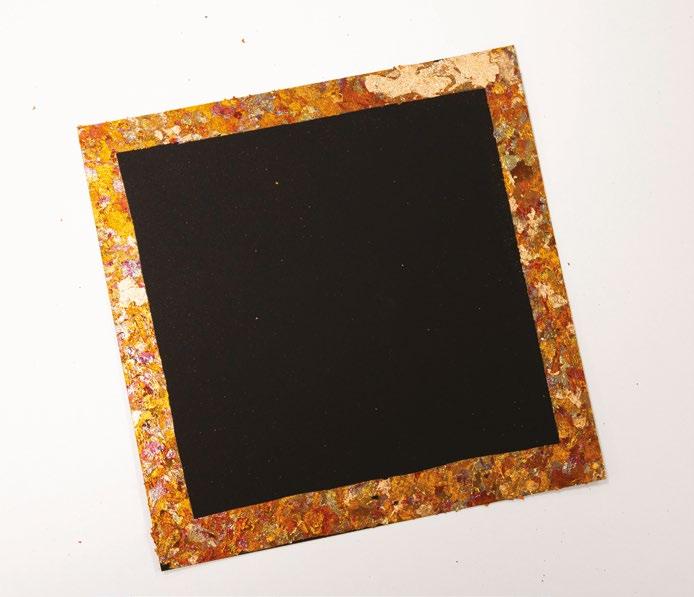
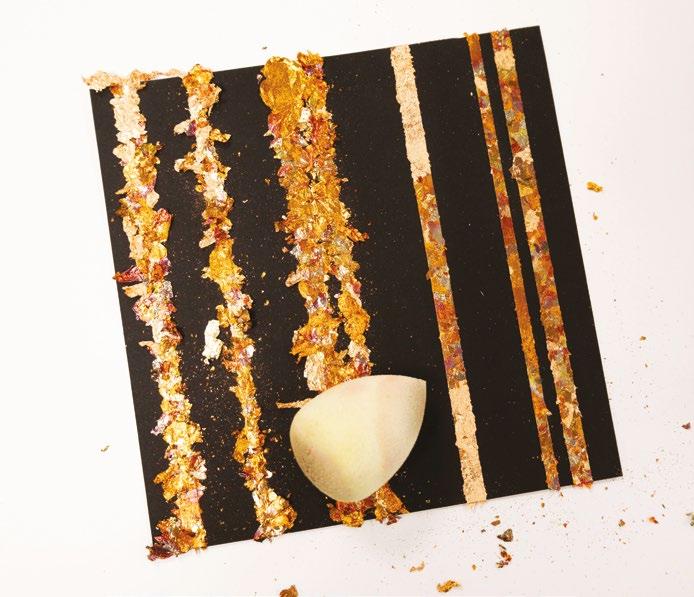
1. Cut your chosen cardstock to the desired size. Add strips of Red Liner tape vertically to your cardstock. It works well if you use different thicknesses of tape.
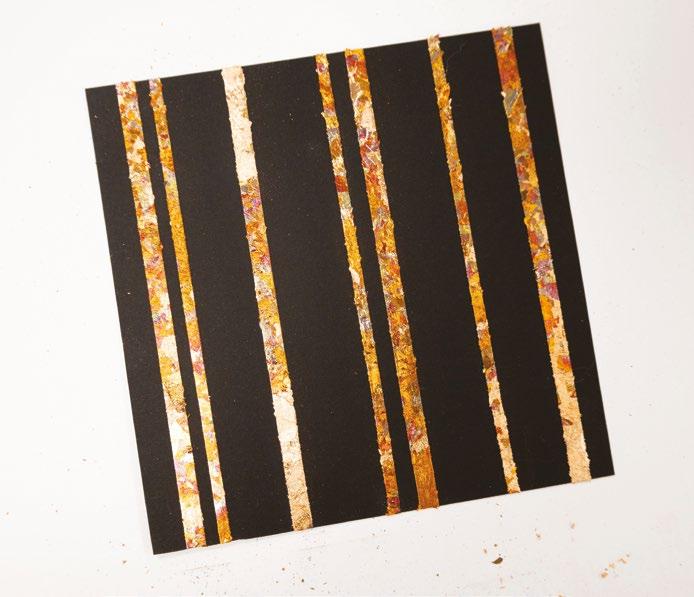
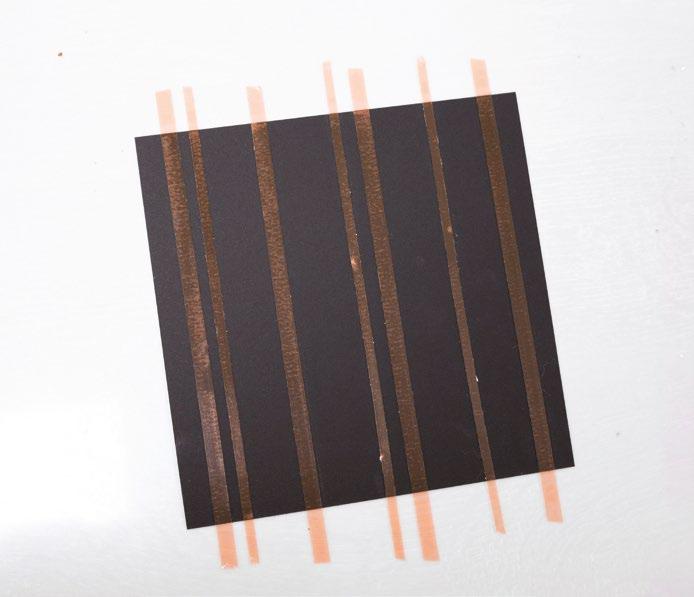
2. Remove the backing from the tape and cover tape in gilding flakes. Gently pat down with your finger to make sure all areas of tape are covered.
3. Using a soft sponge, gently rub over the gilding flakes to rub away the excess from the untaped areas. Return any excess gilding flakes back into your tub.
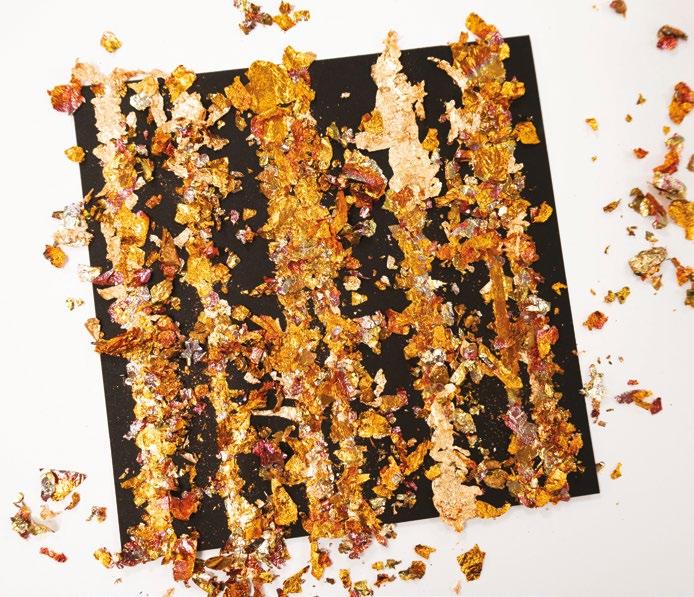
4. Continue until you have rubbed away all the unstuck gilding flakes.

USING A GLUE PEN
1. Cut your chosen cardstock to the desired size. Using a glue pen with a thick flat nip, run a length of glue along each edge of your cardstock.
2. Leave the glue to go tacky, but not completely dry. When tacky, cover the glued areas in gilding flakes.
3. Gently pat down with your finger to make sure all areas of glue are covered.
4. Using a soft sponge, gently rub over the gilding flakes to rub away the excess from the untaped areas. Tip any unstuck gilding flakes back into your tub.
6
40 | www.tatteredlace.co.uk
Gilding
USING A STENCIL
1. Cut your chosen cardstock to the desired size. Spray the back of your stencil with stencil spray and place onto your cardstock.
2. Spray the stencil glue onto your cardstock so the stencil glue goes through the stencil onto your cardstock. Remove the stencil.
3. Cover your cardstock in gilding flakes. Gently pat down with your finger to make sure all areas of spray are covered.

4. Using a soft sponge, gently rub over the gilding flakes to rub away the excess from the unsprayed areas. Tip any unstuck gilding flakes back into your tub.
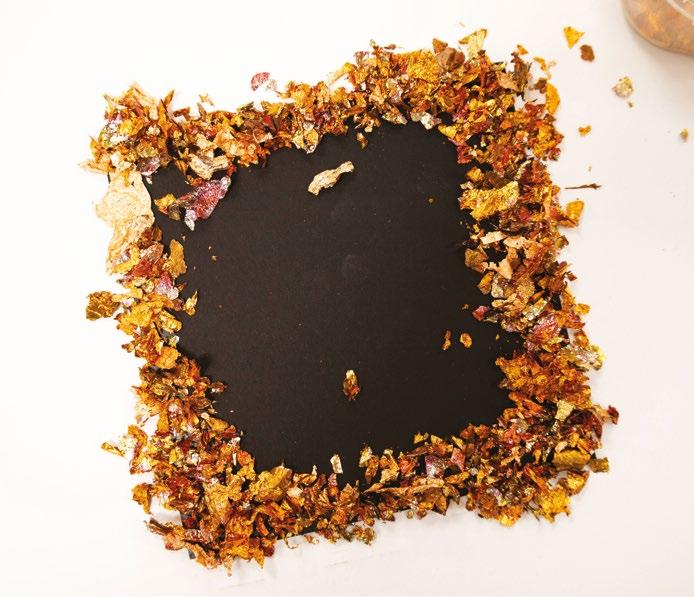
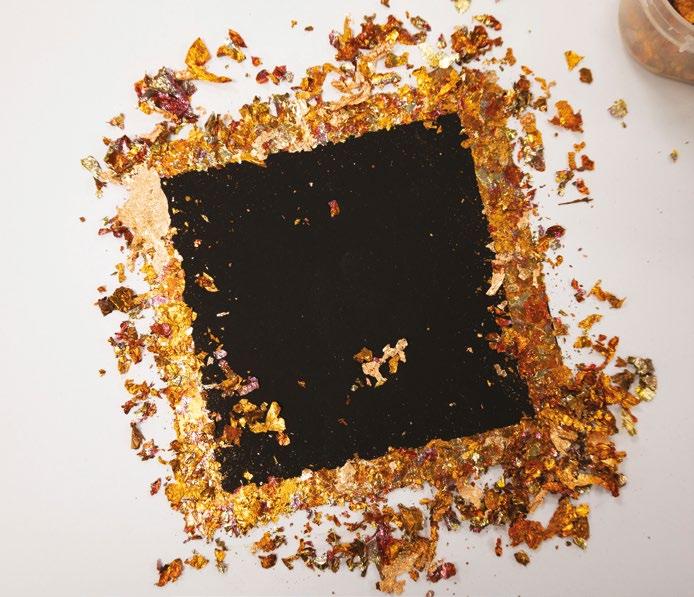
SPREADING GLUE
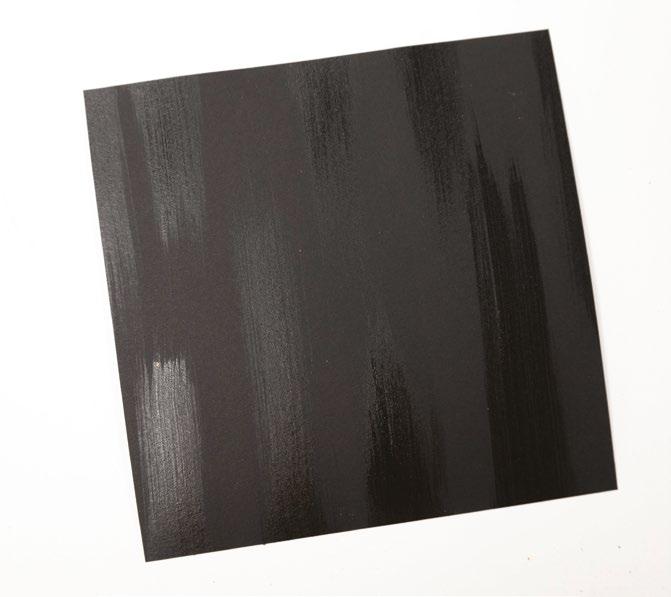
1. Cut your chosen cardstock to the desired size. Dab a small foam sponge into glue and starting off the cardstock, drag the glue down the cardstock not going all the way to the bottom. Turn the cardstock around and repeat from the other side.
2. Cover the your cardstock in gilding flakes.
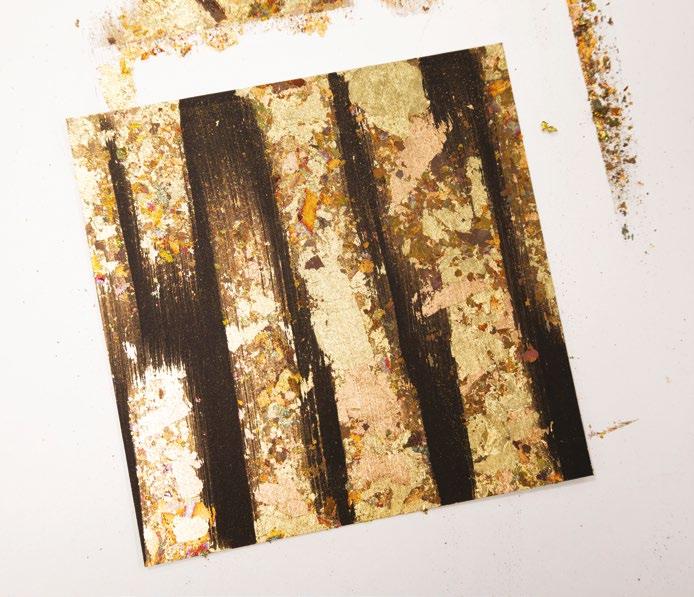
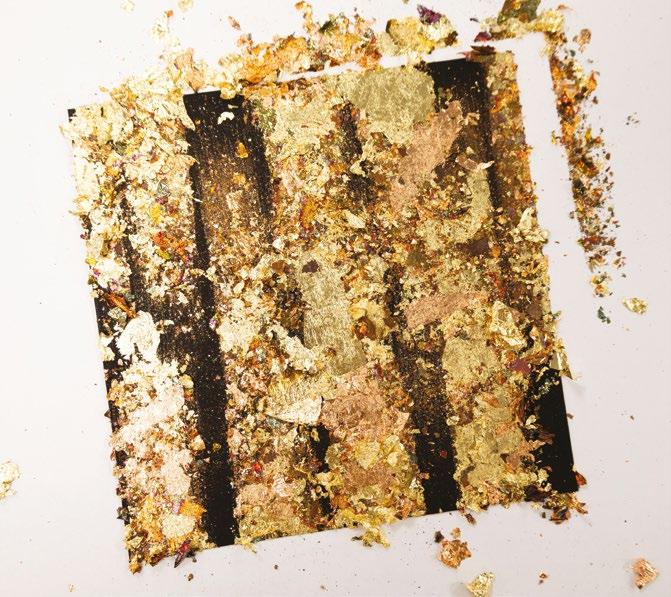
3. Gently pat down with your finger to make sure all areas of glue are covered.
4. Using a soft sponge, gently rub over the gilding flakes to rub away the excess from the unglued areas. Tip any unstuck gilding flakes back into your tub.
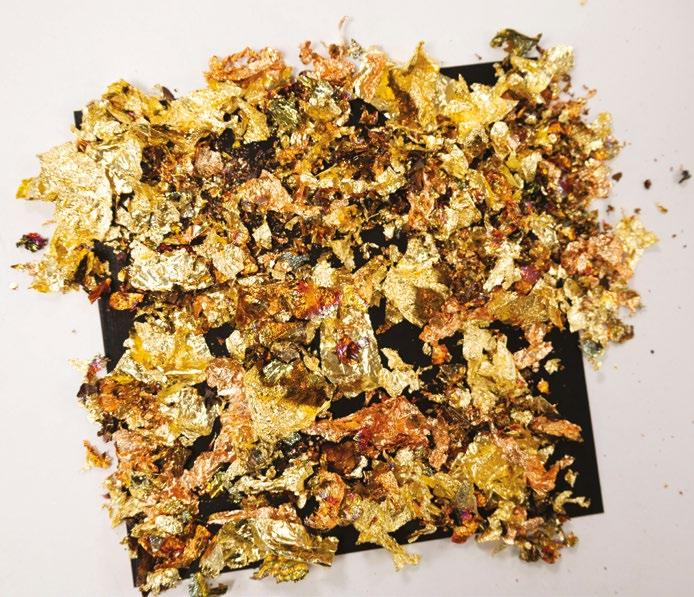
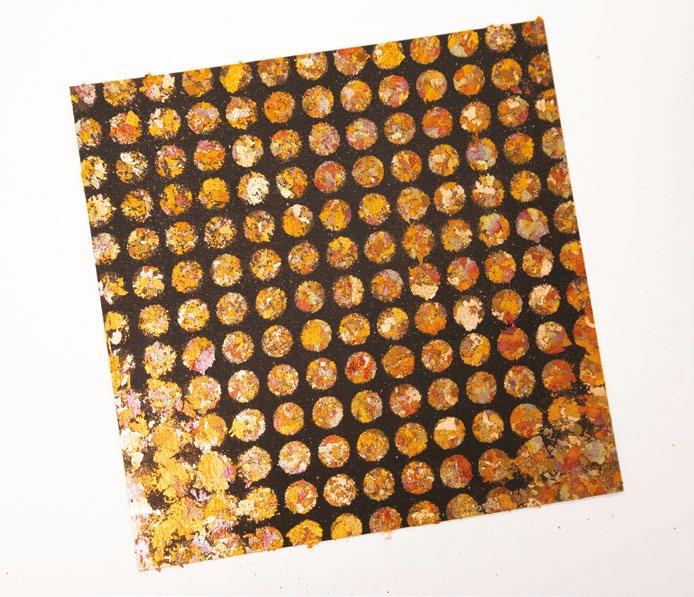
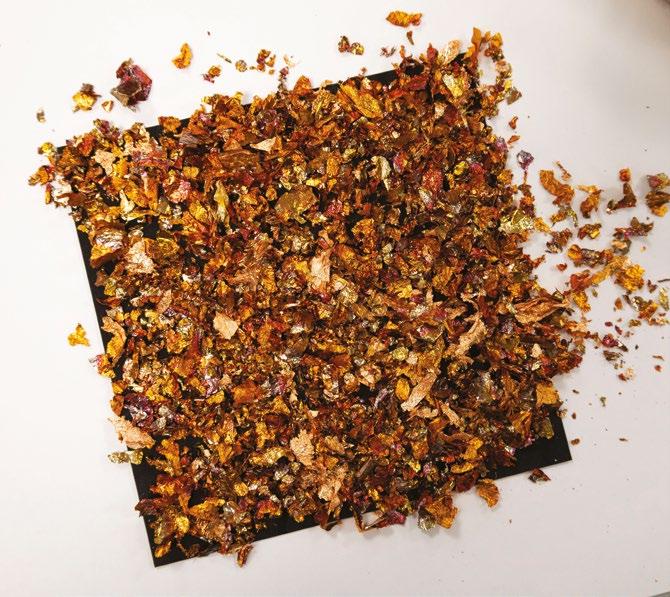
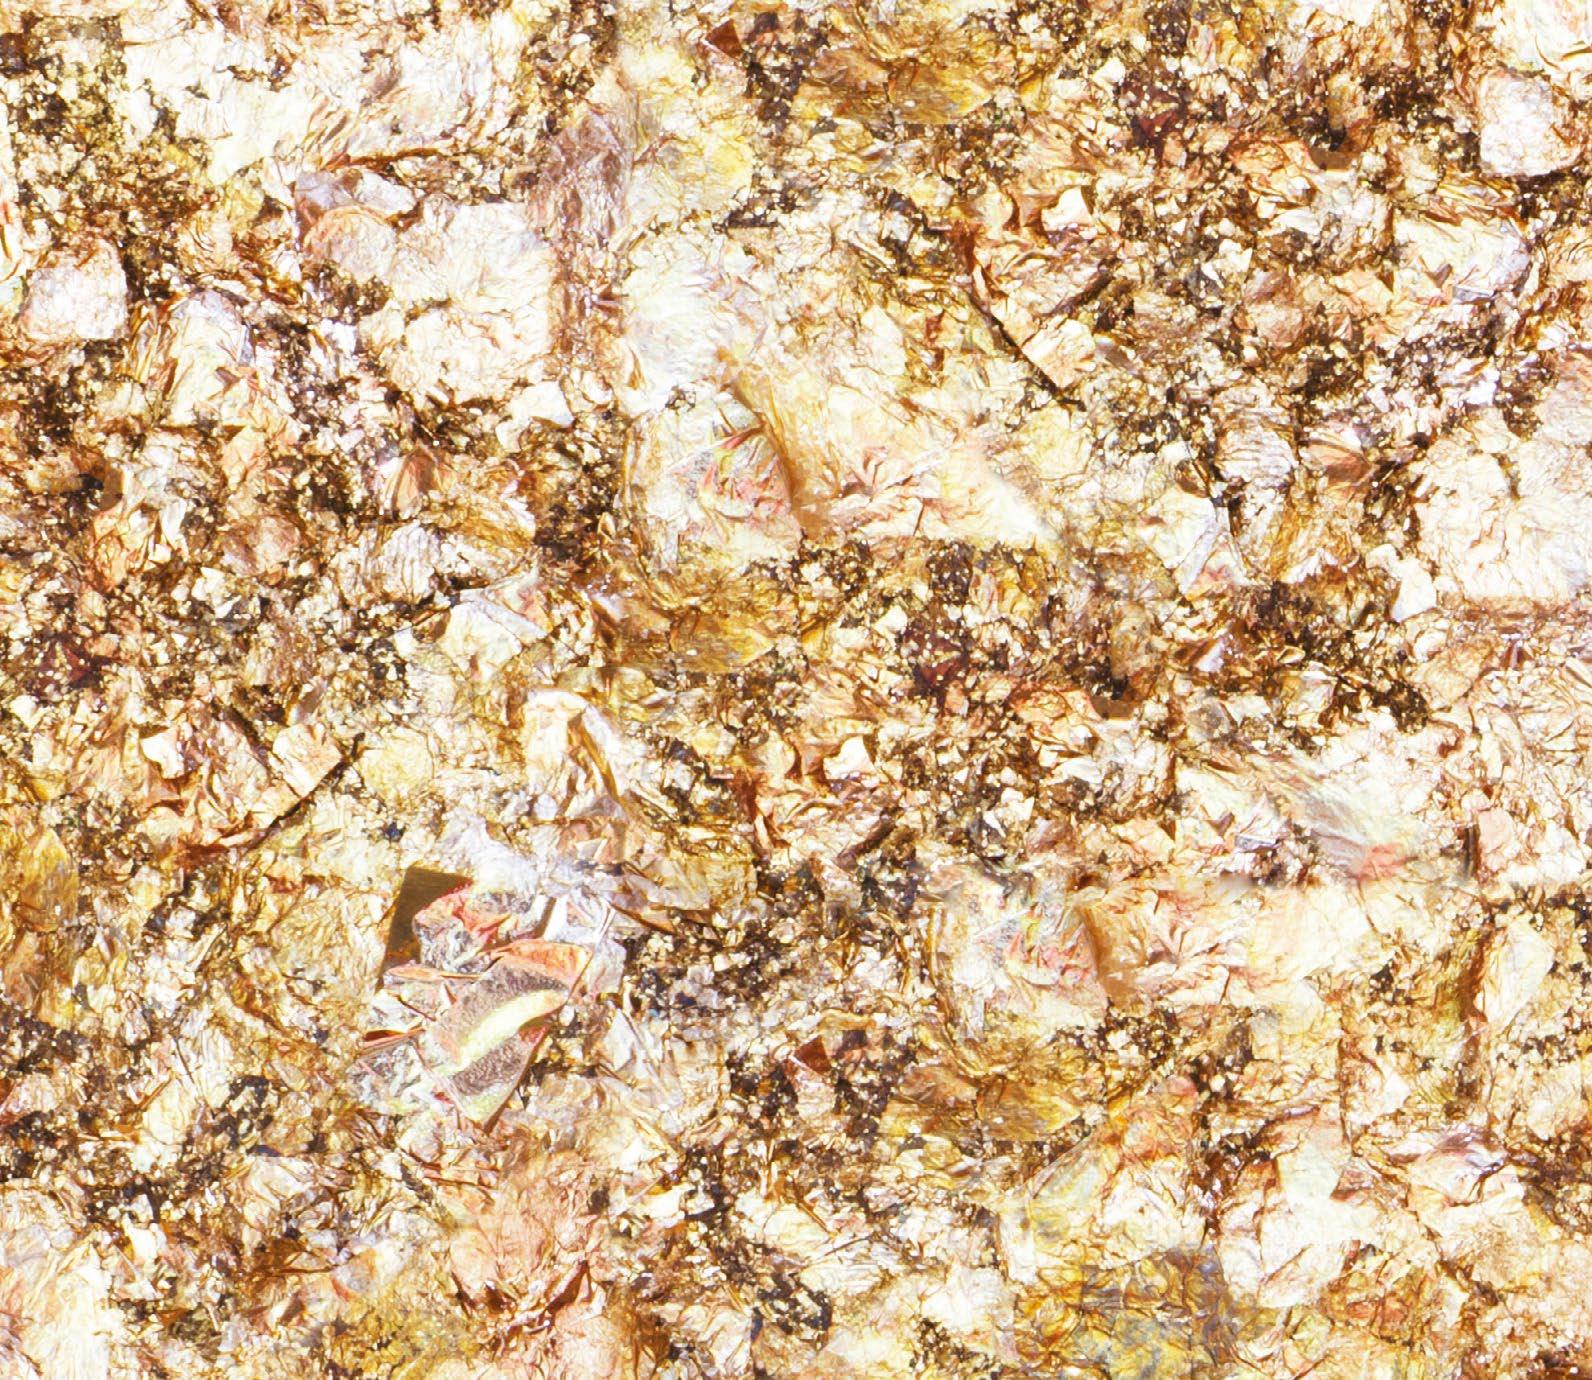
Gilding flakes are another great way of embellishing your projects in an easy and simple way. Here are six fun ideas for you to try!
www.tatteredlace.co.uk | 41
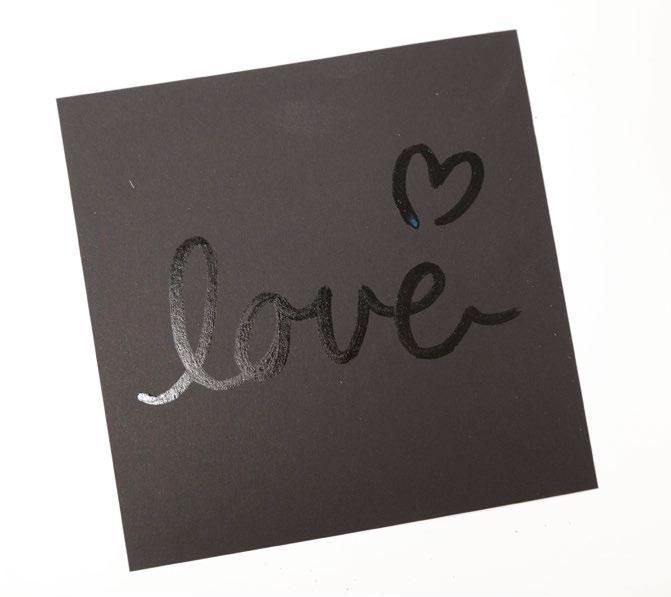
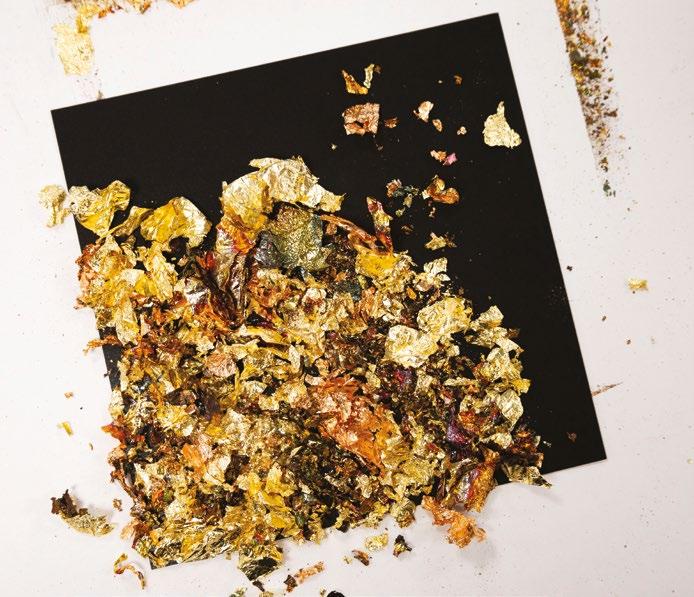
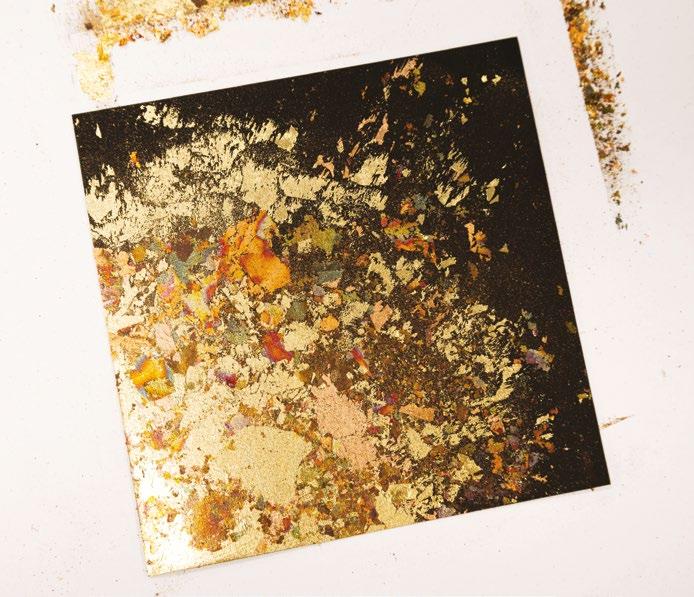
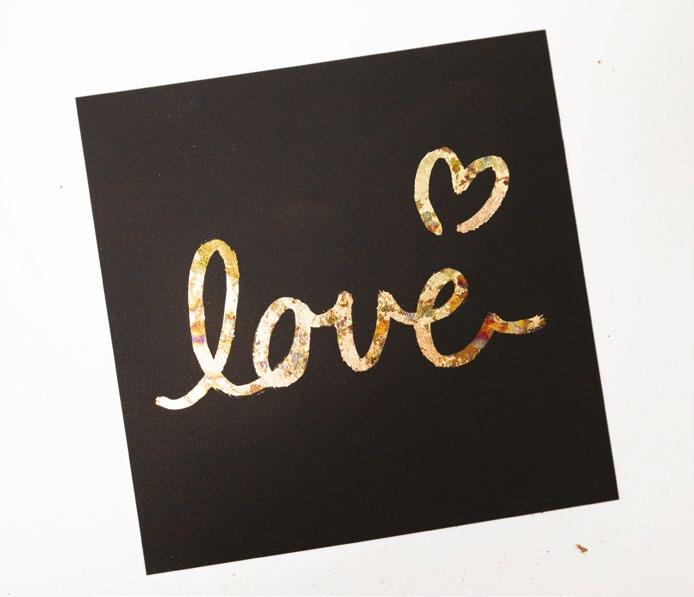
USING STENCIL SPRAY GLUE PEN WRITING 1. Cut your chosen cardstock to the desired size. Hold the stencil spray at one corner of the cardstock and spray across the cardstock. 2. Cover the sprayed corner with gilding flakes. 3. Gently pat down with your finger and spread the gilding flakes out from the sprayed corner to make sure all areas of spray are covered. 4. Using a soft sponge, gently rub over the gilding flakes to rub away the excess from the unsprayed areas. Tip any unstuck gilding flakes back into your tub. 1. Cut your chosen cardstock to the desired size. Using a glue pen with a thick nib, write your chosen word onto your cardstock. Leave the glue to go tacky but not completely dry. Gilding 2. Cover the glue writing in gilding flakes and gently pat down with your finger to make sure all areas of glue are covered. 3. Using a soft sponge, gently rub over the gilding flakes to rub away the excess from the unglued areas. Tip any unstuck gilding flakes back into your tub. top tip... When working with gilding flakes make sure windows and doors are closed and air conditioning and fans are off otherwise it can get very messy! 6 WAYS WITH... 42 | www.tatteredlace.co.uk

What you’ll need:
•
Cut all the pieces needed to create the
as listed below;
From SVG downloads:
• From white cardstock: - 1 x TOL-1-Tree Of Life
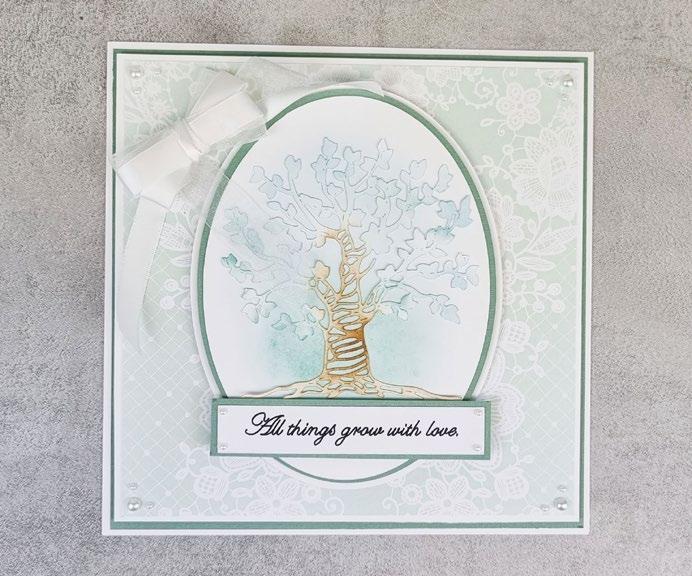
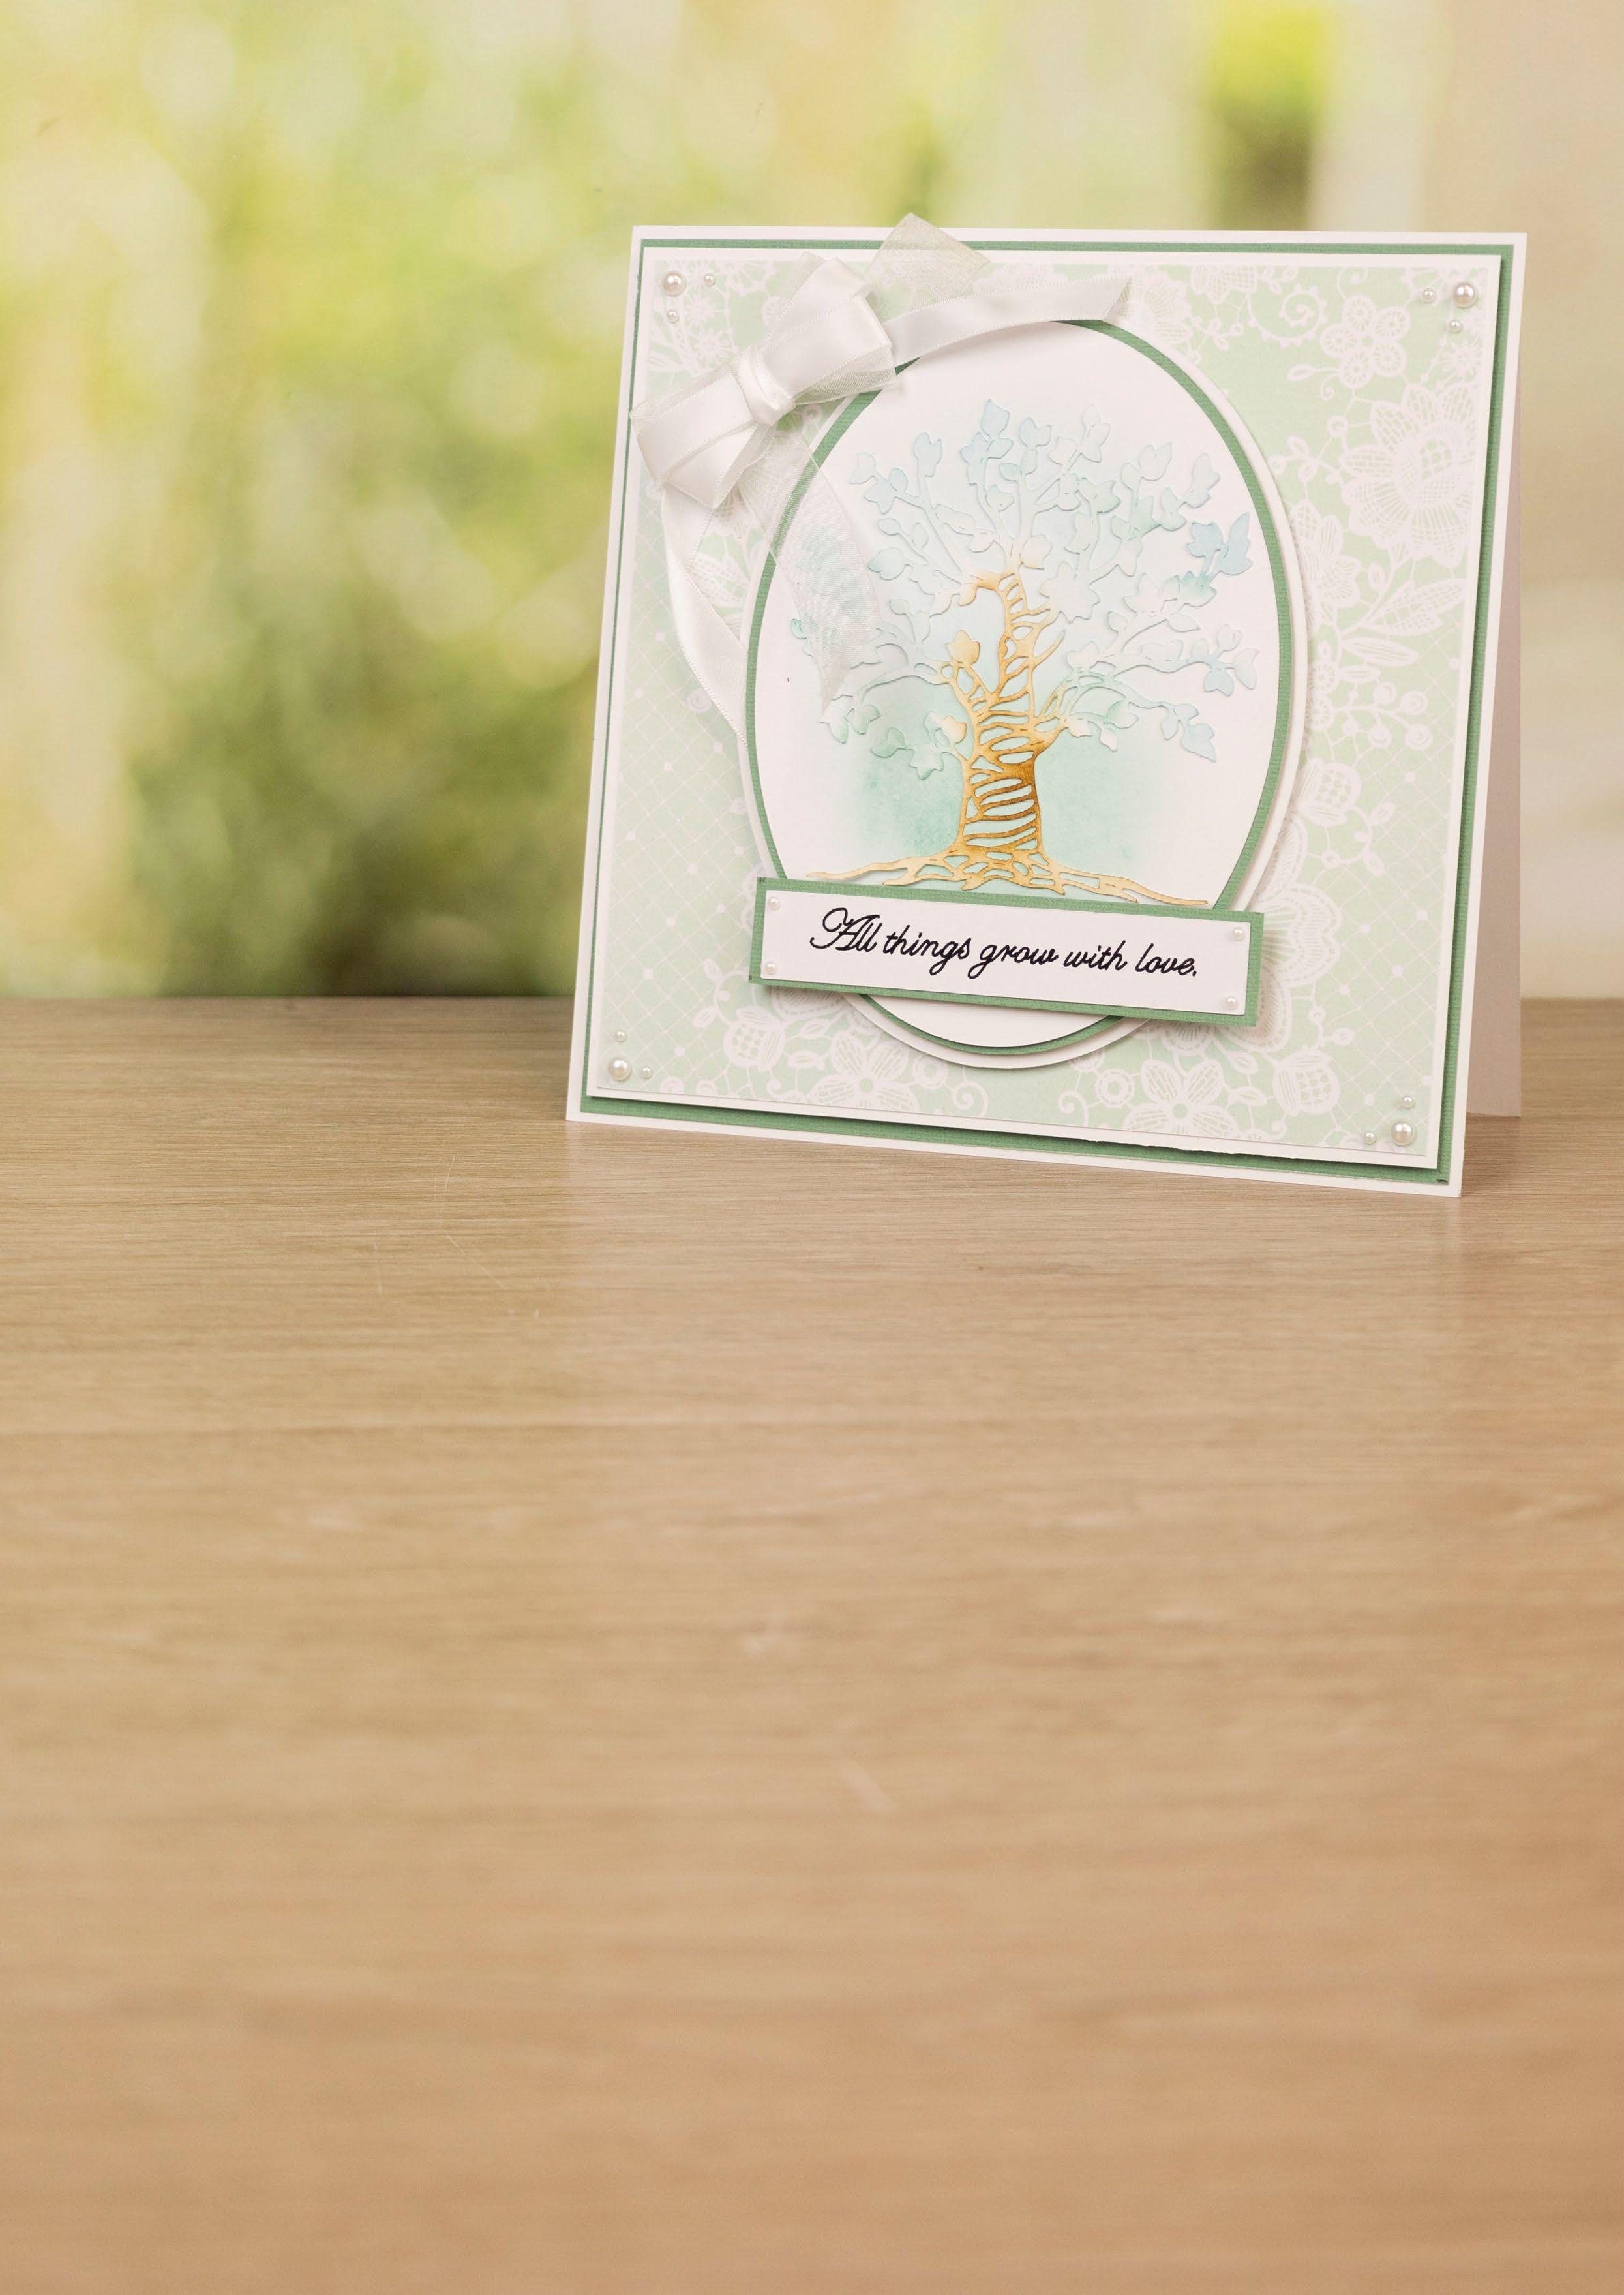
From machine memory:
• From white cardstock: - 2 x 205mm square - 1 x 195mm square - 1 x 130mm x 170mm oval - 1 x 119mm x 160mm oval - 1 x 110mm x 20mm rectangle (with sentiment draw file)
• From green cardstock: - 1 x 200mm square - 1 x 124mm x 164mm oval - 1 x 115mm x 25mm rectangle
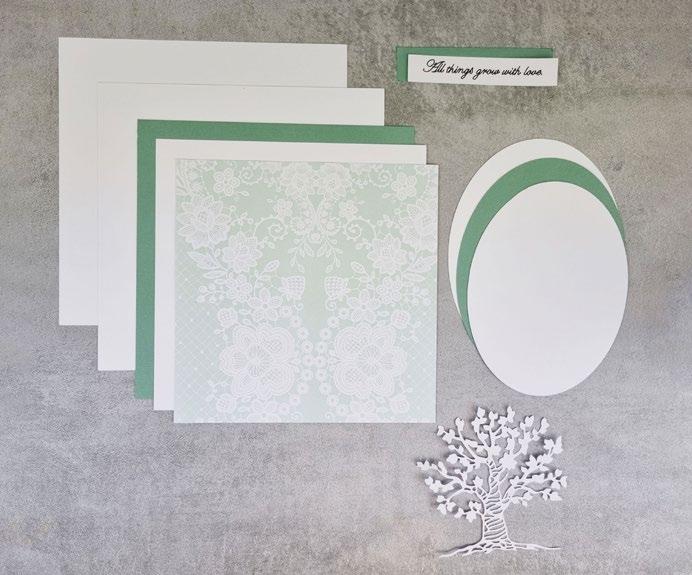

• From backing paper: - 1 x 190mm square (green lace)
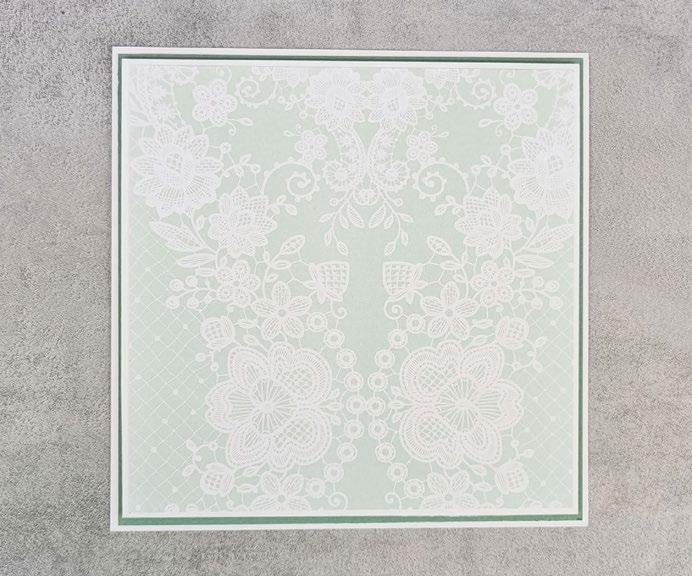
On one of the large white squares, measure in 10mm from the left edge and score and fold to create a tab. Attach to the other large white square using the tab to create a card. Mat the large green square onto the card. Mat the green lace square onto the remaining white square, and mat onto the card with foam tape.
Add ink to the smaller white oval, and mat onto the green oval. Mat onto the other white oval with foam tape and mat onto the card with foam tape.
Colour the tree cut with the inks and mat onto the ovals. Mat the sentiment rectangle onto the green rectangle, and mat onto the card with foam tape. Tie a triple-loop bow from white ribbon and mat onto the card. Finish by adding pearl gems.
Step bySteps
27-01-Tree Of Life SVG files • White cardstock • Green cardstock • Distress Ink – Broken China, Tea Dye and Evergreen Bough • White ribbon • Pearl gems
1
project
2
3
4
1 3 2 4 ------------------------------------------- TREE OF LIFE -----------------------------------------------CLICK HERE TO DOWNLOAD YOUR SVG CONTENT PROJECT 27 44 | www.tatteredlace.co.uk
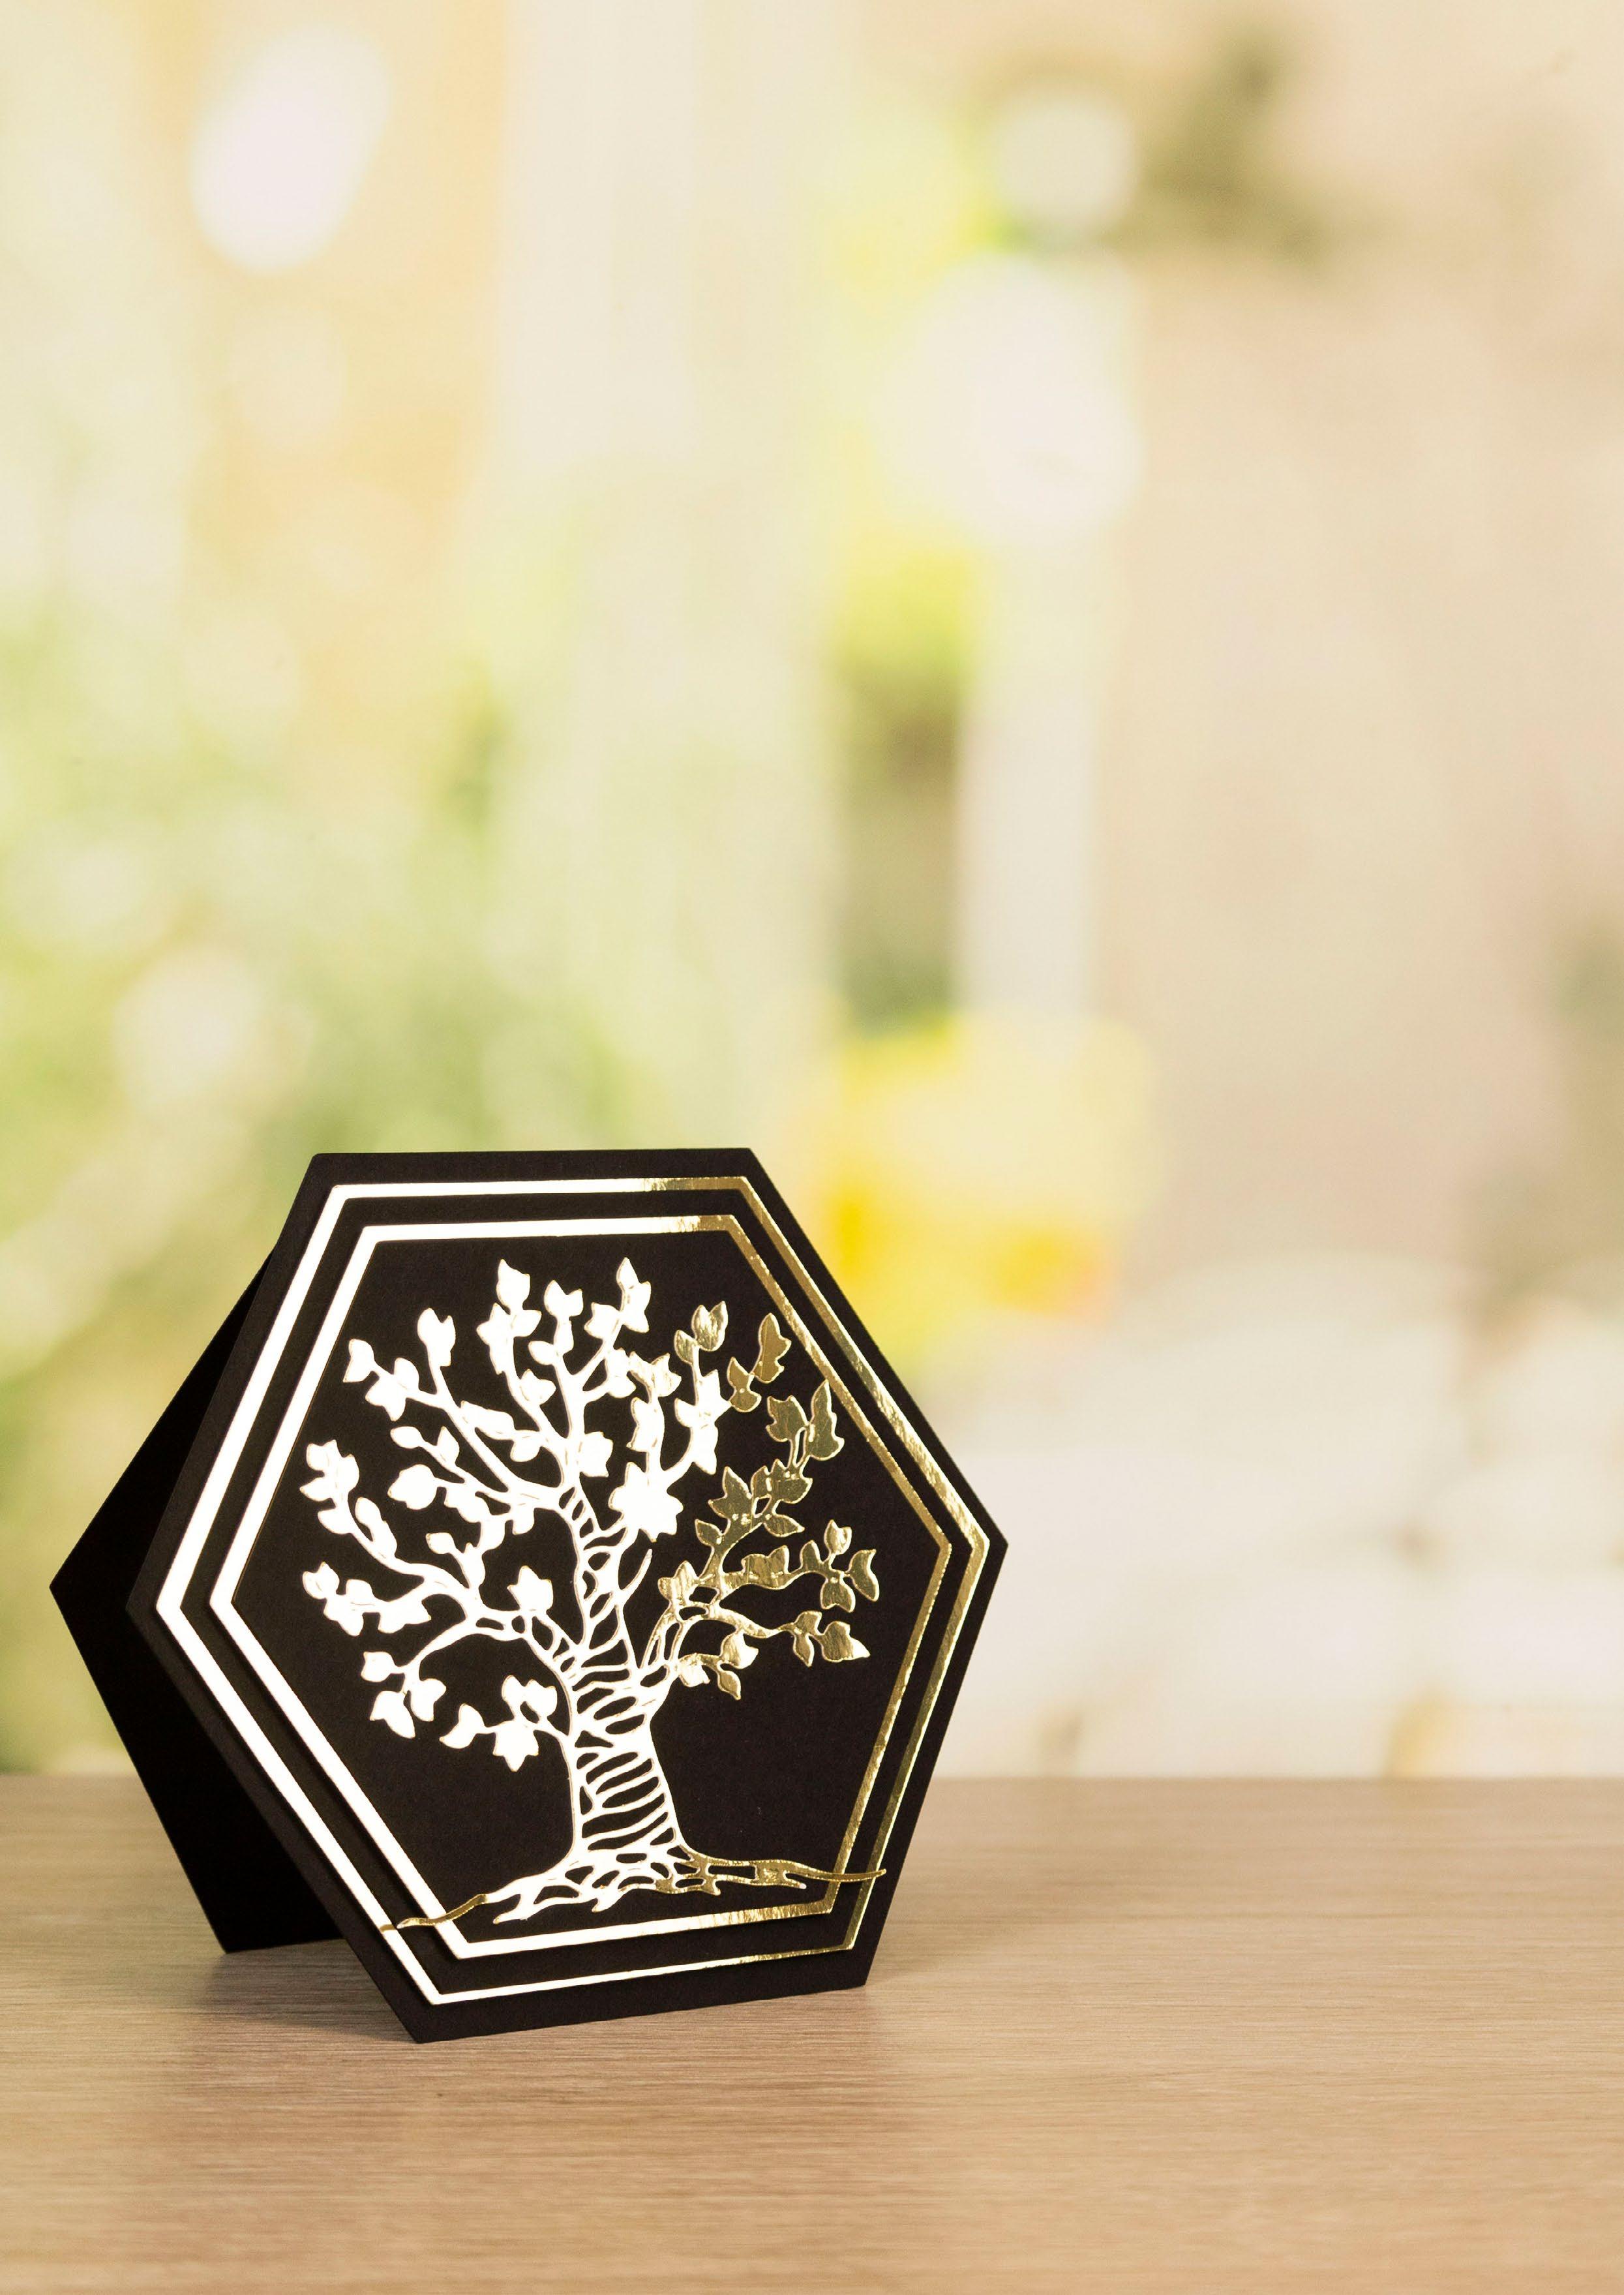
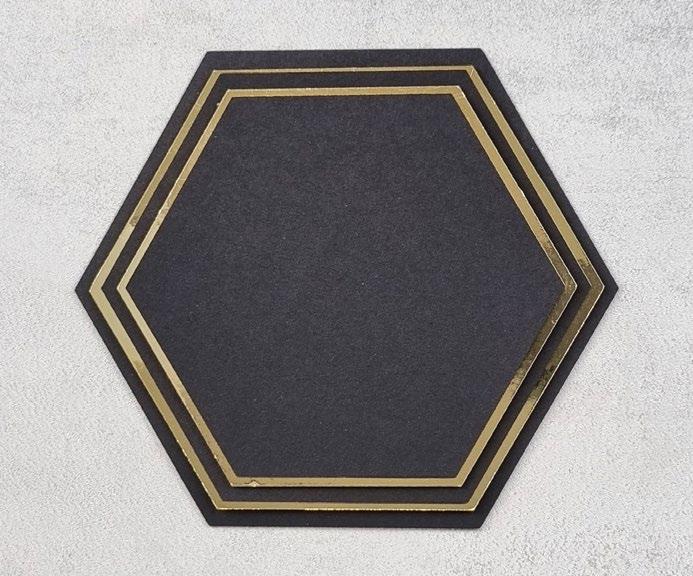
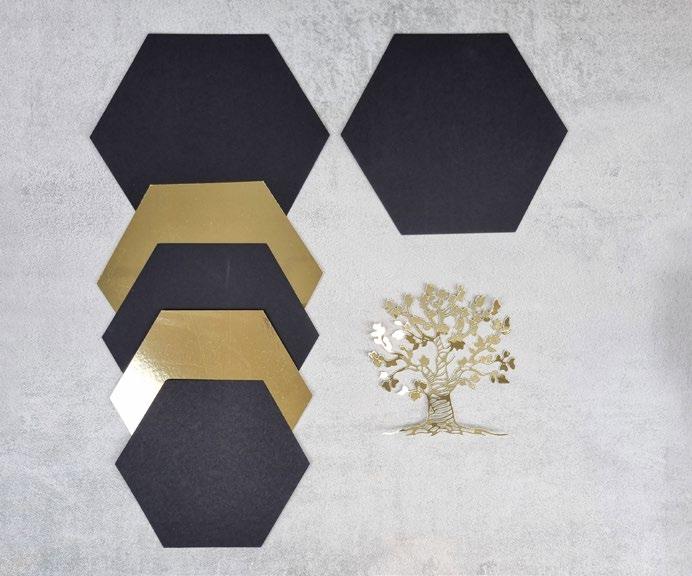
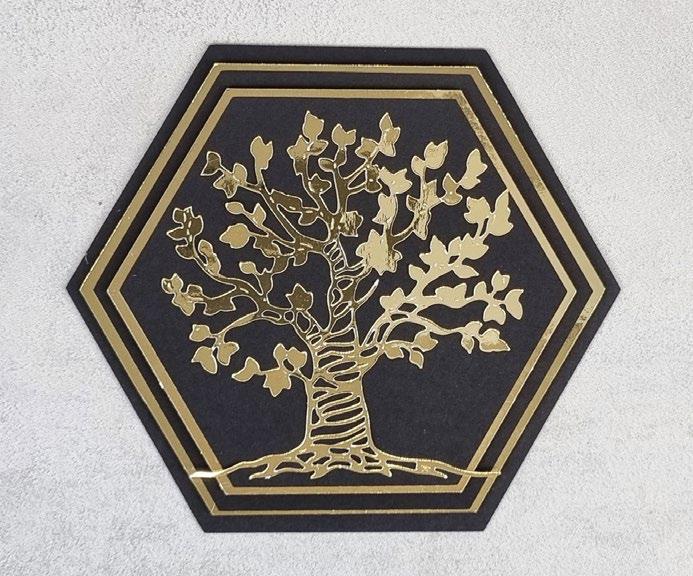
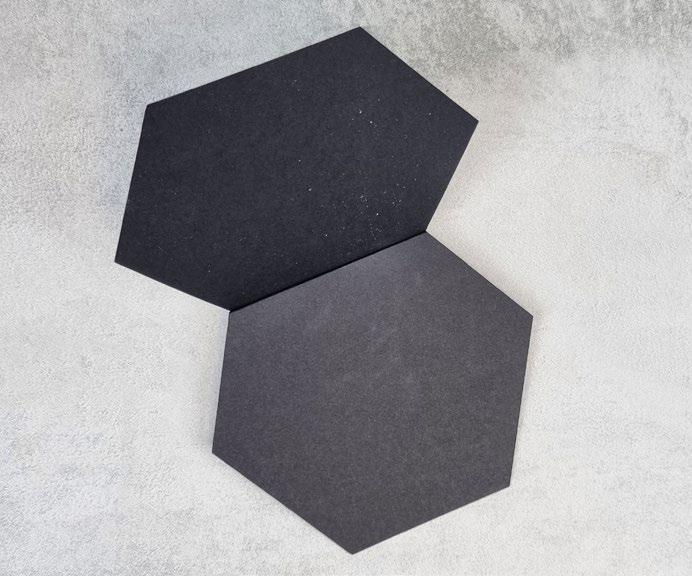
What you’ll need: • 28-02-Tree Of Life SVG files • Black cardstock • Gold mirror cardstock Step bySteps 1 Cut all the pieces needed to create the project as listed below; From SVG downloads: • From gold mirror cardstock: - 1 x TOL-2-Tree Of Life From machine memory: • From black cardstock: - 2 x 167mm x 145mm hexagon - 1 x 150mm x 130mm hexagon - 1 x 133mm x 115mm hexagon • From gold mirror cardstock: - 1 x 156mm x 135mm hexagon - 1 x 139mm x 120mm hexagon 2 On one the of large black hexagons, measure down 15mm from the top edge and score and fold to create a tab. Attach to the other large black hexagon using the tab to create a tent card. 3 Mat the next largest black hexagon onto the large gold hexagon, and mat onto the card with foam tape. Mat the remaining black hexagon onto the last gold hexagon, and mat onto the card with foam tape. 4 Mat the gold tree onto the card. 1 3 2 4 ------------------------------------------- TREE OF LIFE -----------------------------------------------CLICK HERE TO DOWNLOAD YOUR SVG CONTENT PROJECT 28 www.tatteredlace.co.uk | 45
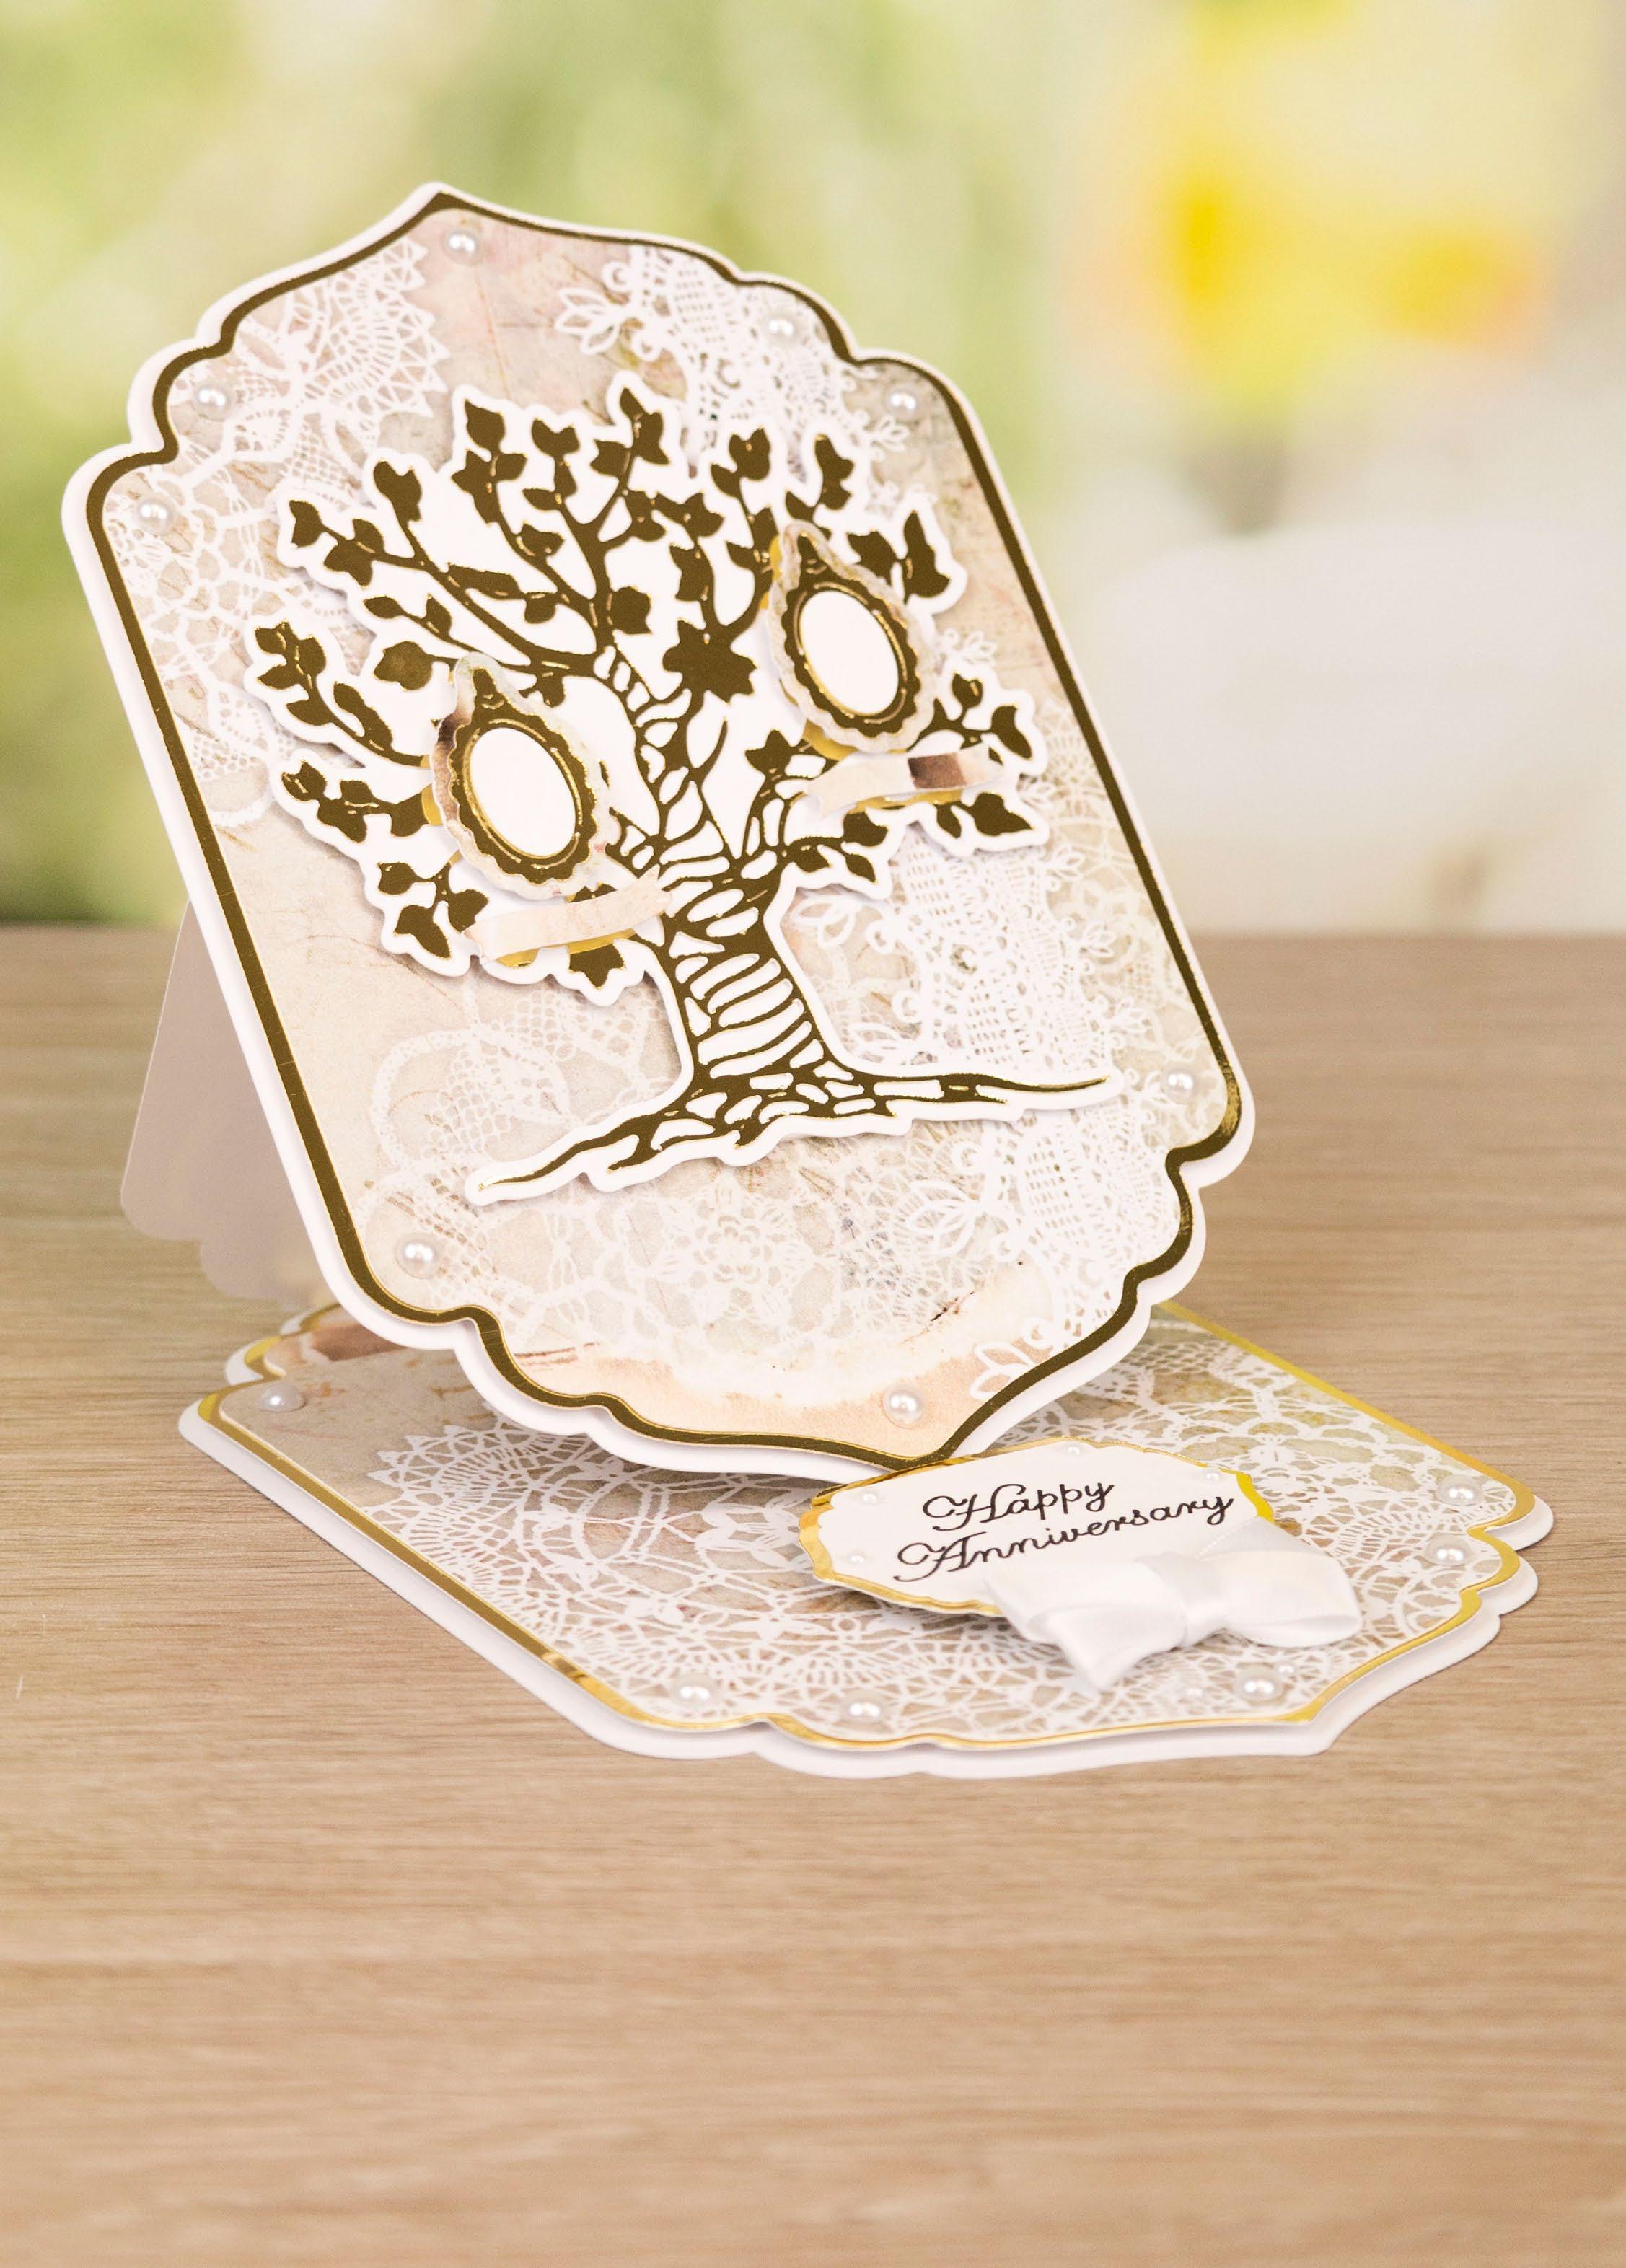
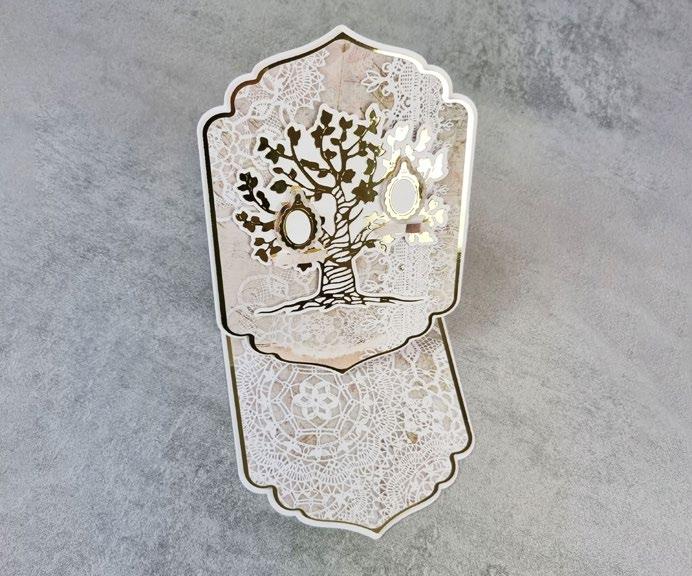
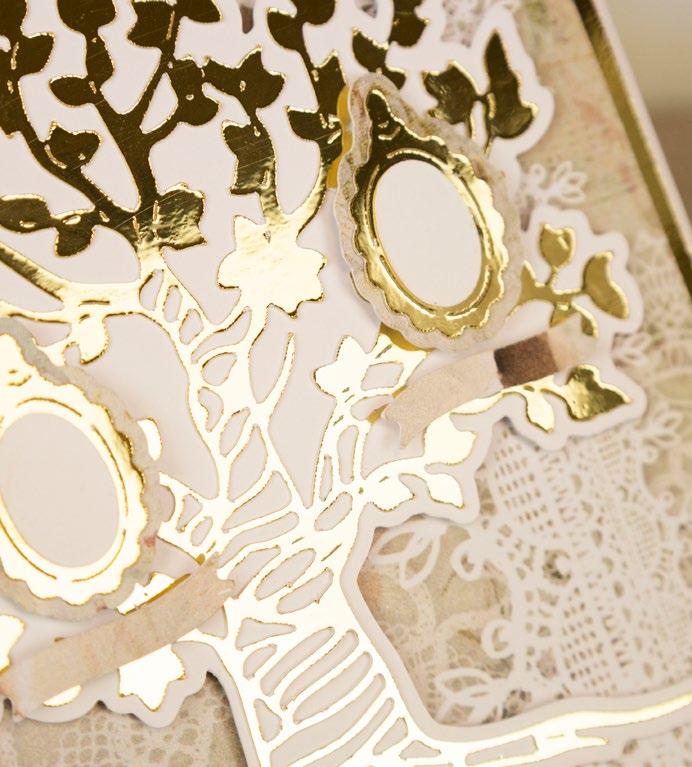
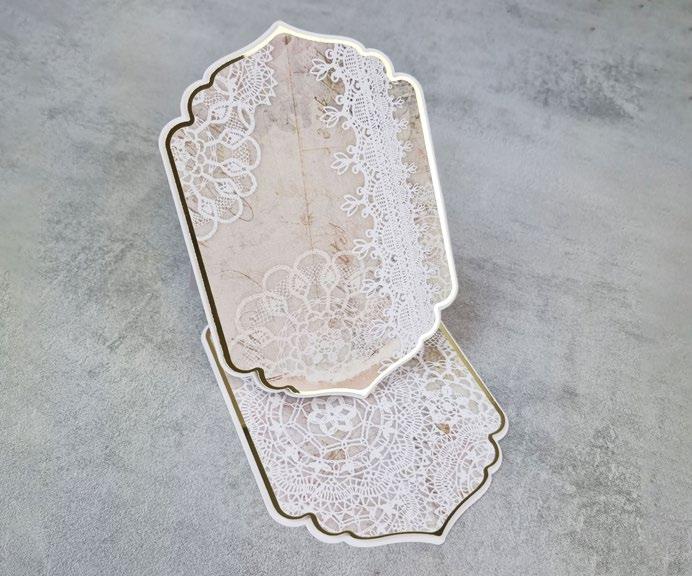
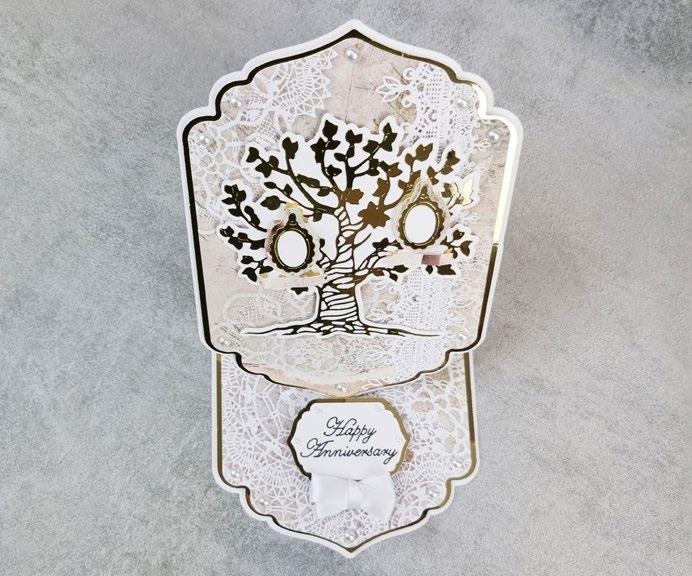
What you’ll need: • 29-03-Tree Of Life SVG files • White cardstock • Gold mirror cardstock • Complimentary backing paper • White ribbon • Pearl gems ------------------------------------------- TREE OF LIFE -----------------------------------------------46 | www.tatteredlace.co.uk
bySteps
• From white cardstock:
3 x TOL-3-Card Base
1 x TOL-3-Tree Outline
1 x TOL-3-Stopper Mat (with sentiment draw file)
From gold mirror cardstock:
2 x TOL-3-Card Mat 1
1 x TOL-3-Tree Of Life
of the shabby lace card mat
2 x TOL-3-Frame - 1 x TOL-3-Stopper
• From backing paper: - 2 x TOL-3-Card Mat 2 (shabby lace)
2 x TOL-3-Frame Outline (shabby lace)
2 x TOL-3-Banner (shabby lace)

• From photos: - 2 x TOL-3-Frame Inner
cuts onto one of the gold card mat
onto one of the white card base cuts with foam tape. This will be the base of the easel.
cuts.
one of the other white card base cuts, measure down
from the top edge, and score and fold to create a tab. Fold the cut in half horizontally and attach to the card base using the tab to create an easel.
the remaining white card base cut onto the front of the easel.
other shabby lace
the other gold card mat
and
gold frames
mat
stopper.
1 Cut all the pieces needed to create the project as listed below; Step
1 3 5 2 4 6 ------------------------------------------- TREE OF LIFE -----------------------------------------------From SVG downloads:
-
-
-
•
-
-
-
-
-
2 Mat one
2
1
Mat
On
1.5cm
Mat
3 Mat the
card mat 2 onto
1,
mat onto the front of the easel with foam tape. 4 Mat the gold tree onto the white tree outline, and mat onto the front of the easel with foam tape. 5 Mat the
onto the frame outlines. Mat the frame inner photos with the gold frames ,and mat onto the tree with foam tape. Write names onto the banners and mat the banners onto the card. 6 Mat the sentiment stopper mat onto the gold stopper, and mat onto the card with foam tape. Tie a double-loop bow from white ribbon and
onto the
Finish by adding pearl gems. CLICK HERE TO DOWNLOAD YOUR SVG CONTENT PROJECT 29 www.tatteredlace.co.uk | 47
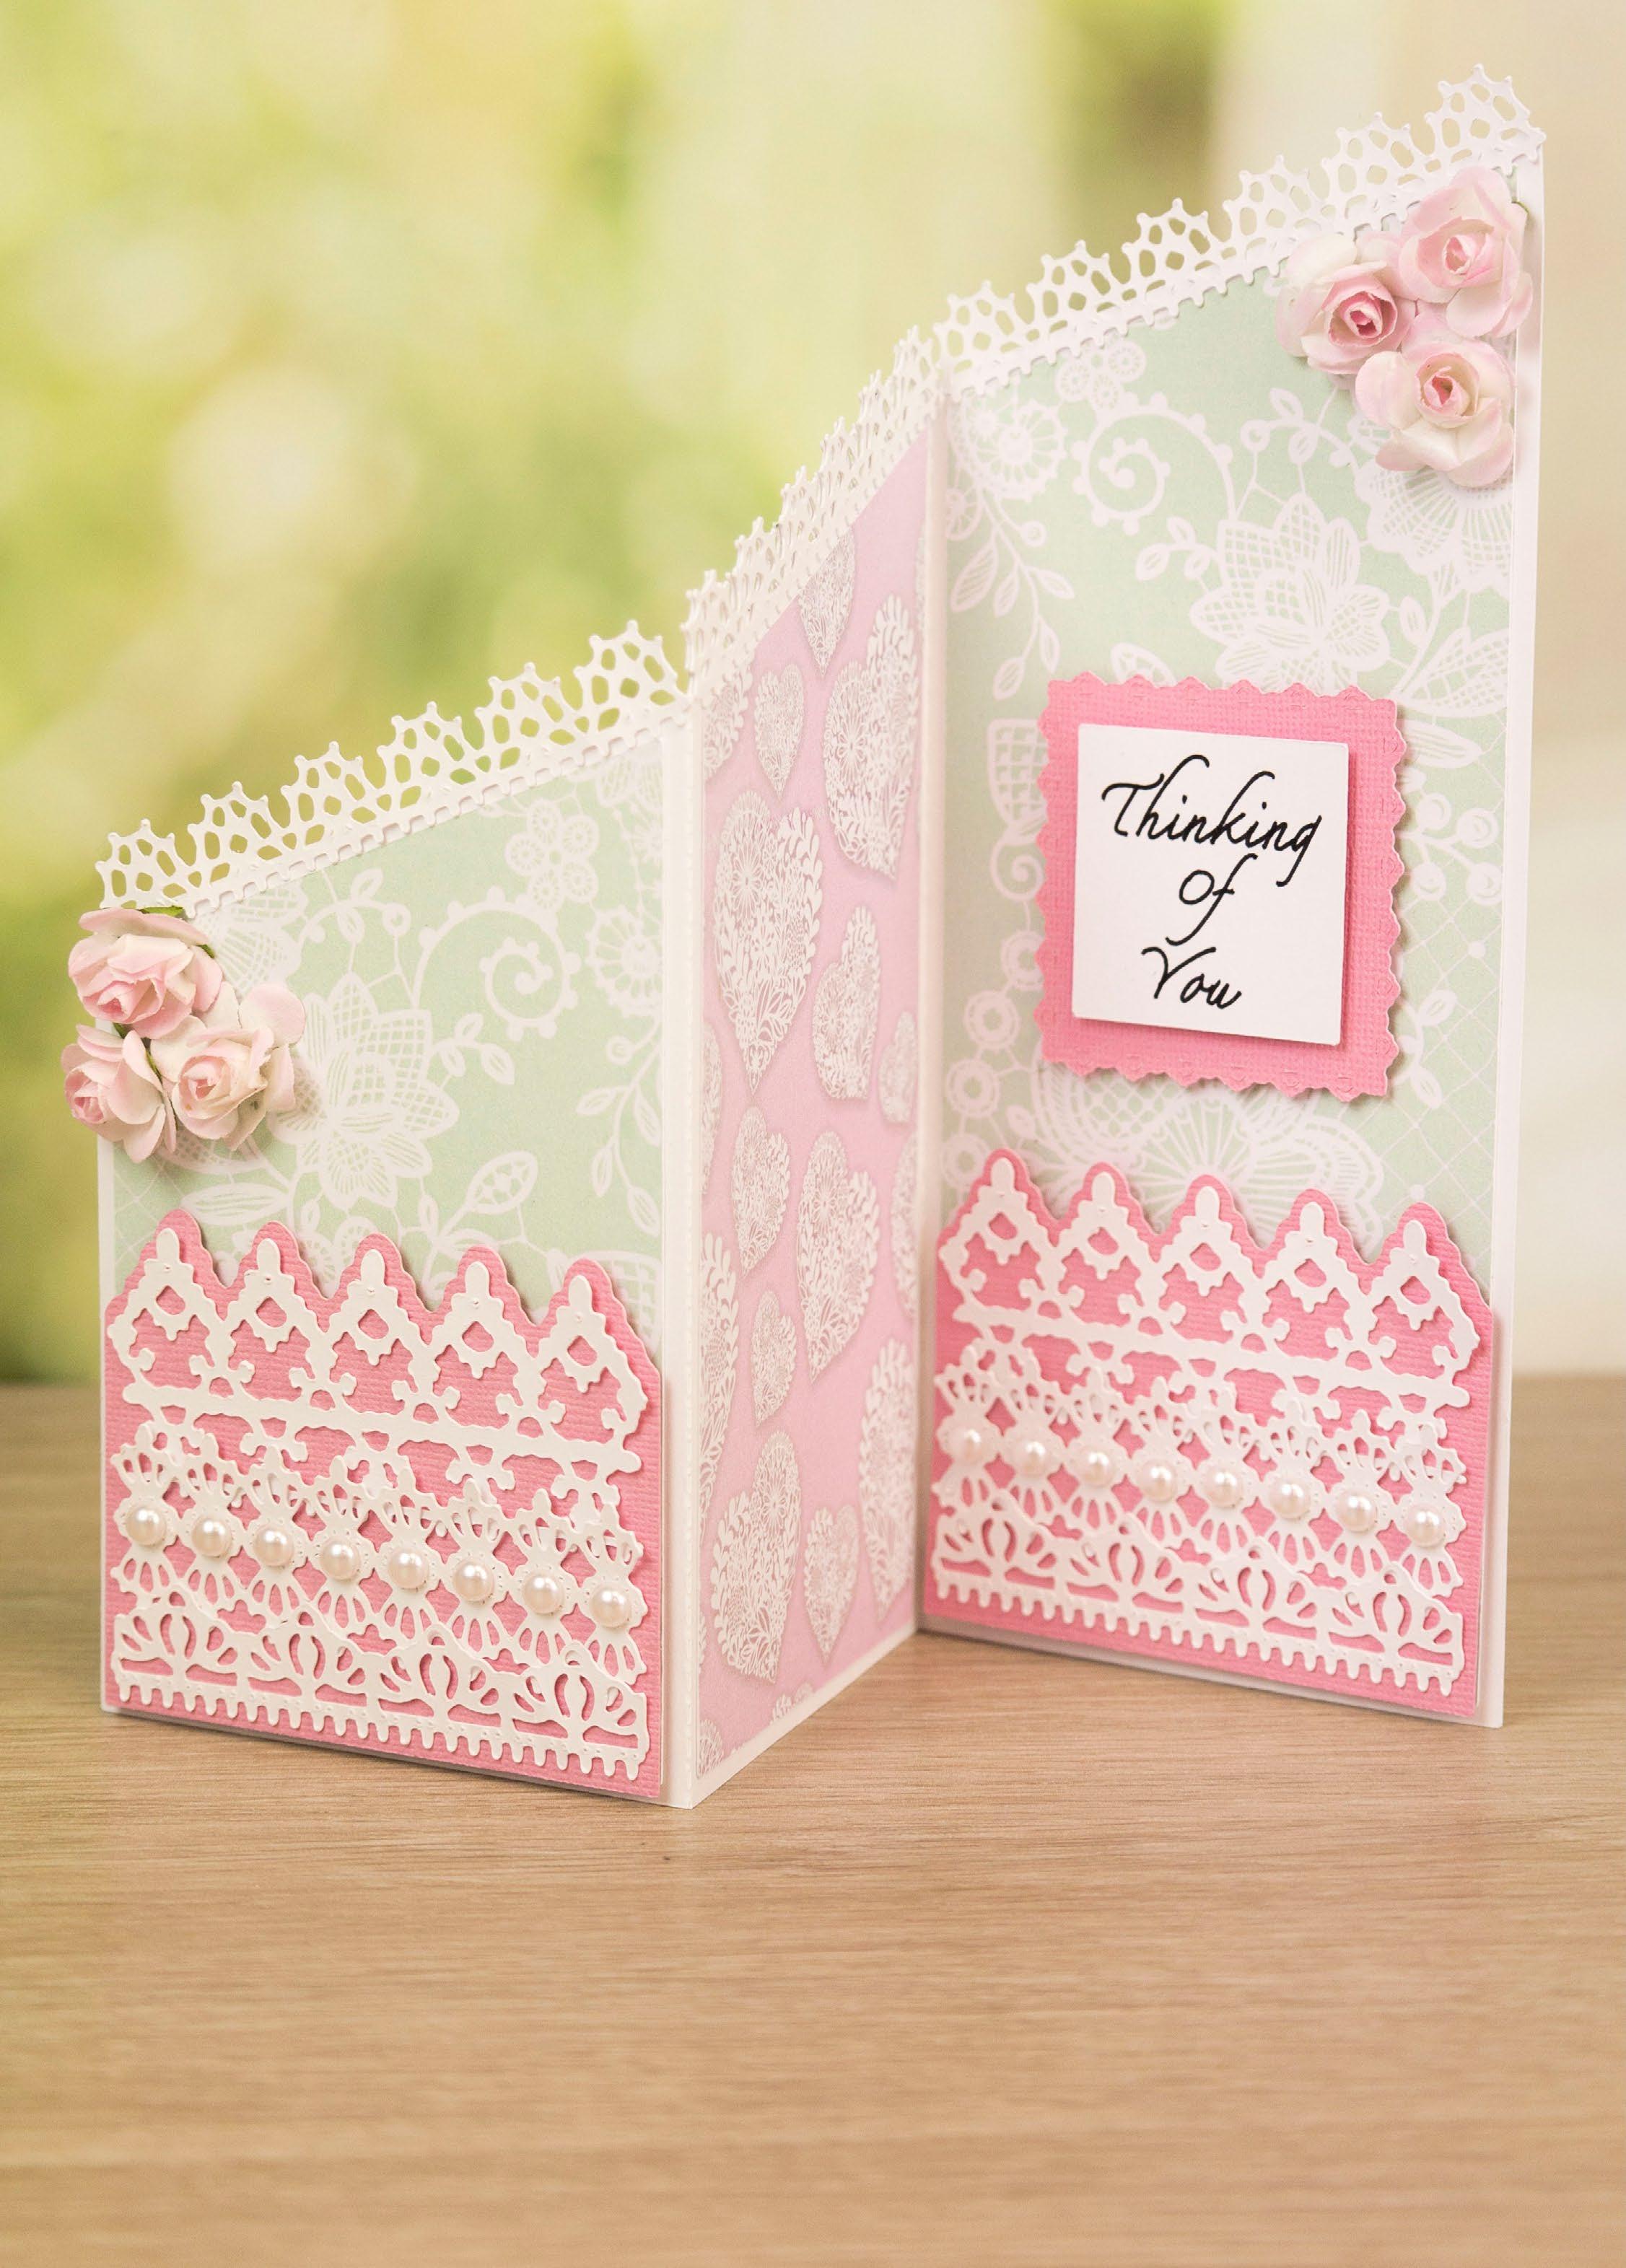
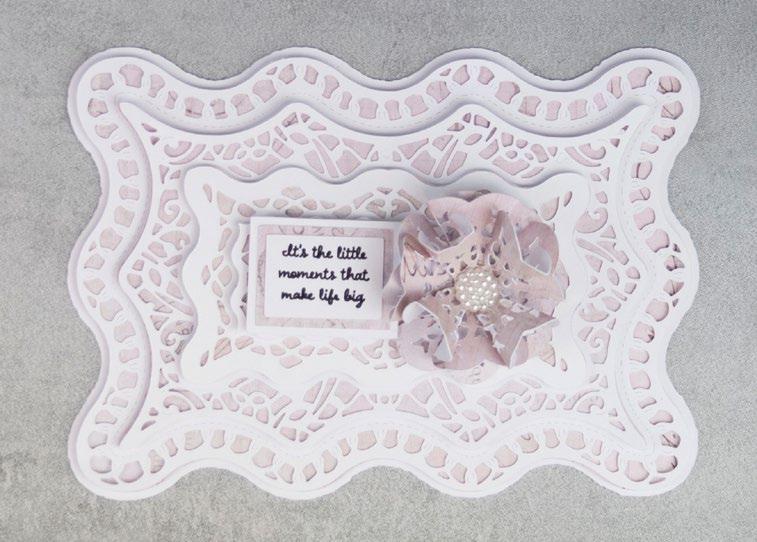
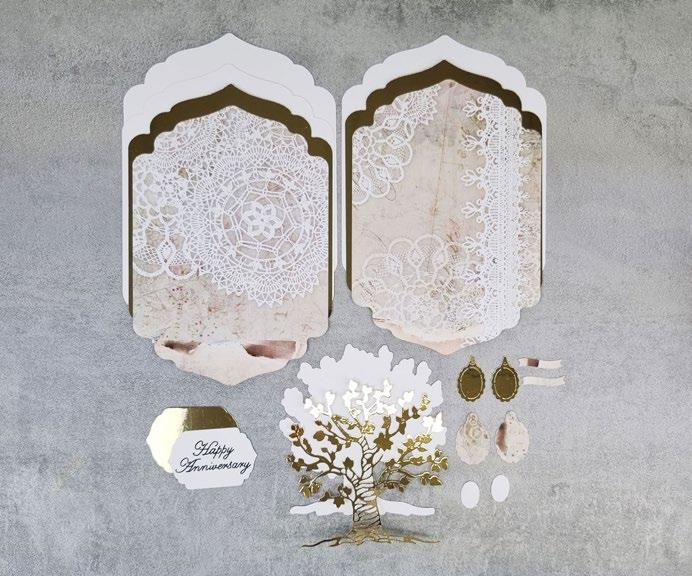
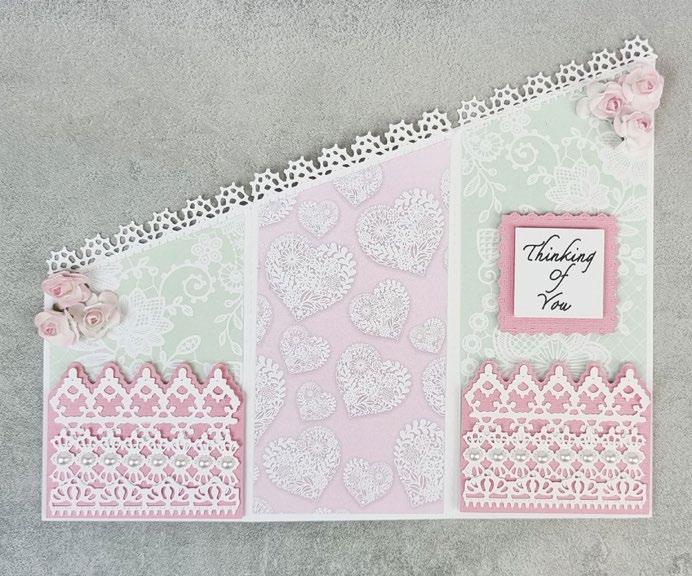
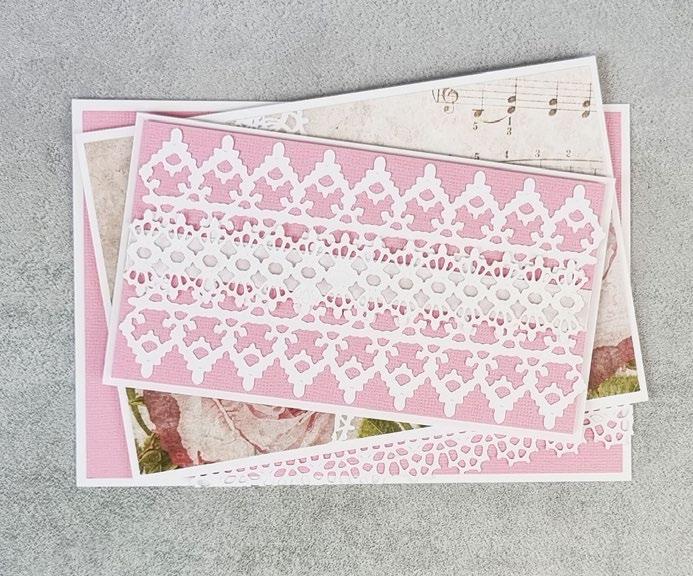
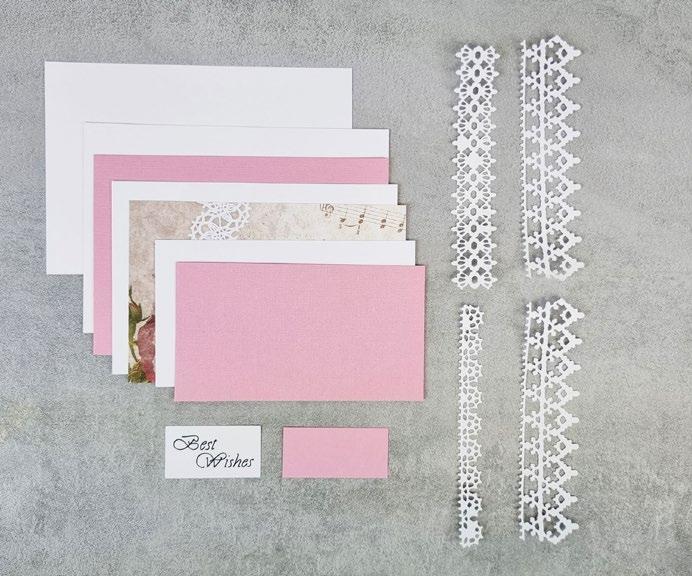
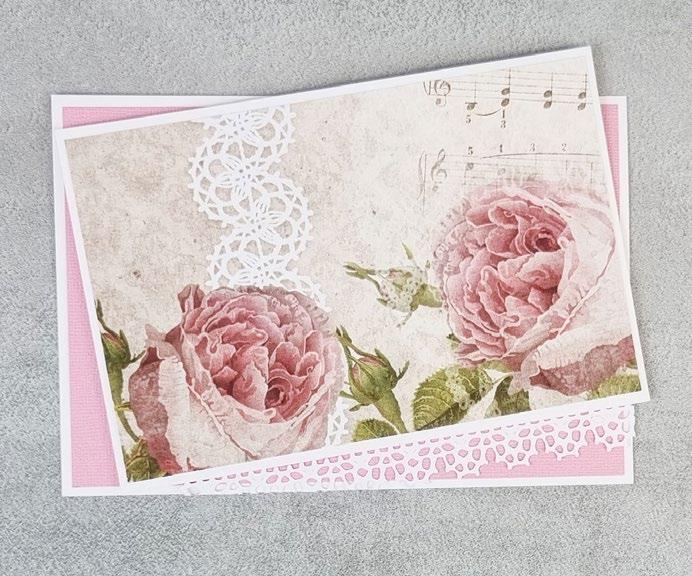
What you’ll need: • 30-01-Borders Of Beauty SVG files ----------------------------------------- BORDERS OF BEAUTY -------------------------------------------• White cardstock • Pink cardstock • Pearl gems • Paper flowers PROJECT 30 48 | www.tatteredlace.co.uk
Cut all the pieces needed to create the project as listed below;
From SVG downloads:
• From white cardstock: - 1 x BOB-1-Card Base - 4 x BOB-1-Border 1 - 2 x BOB-1-Border 2 - 2 x BOB-1-Border 3 - 2 x BOB-1-Border 4
• From pink cardstock: - 2 x BOB-1-Border Mat - 1 x BOB-1-Square Mat
• From backing paper: - 1 x BOB-1-Card Mat 1 (green lace) - 2 x BOB-1-Card Mat 2 (pink heart) – flip one of the files before cutting - 1 x BOB-1-Card Mat 3 (green lace)
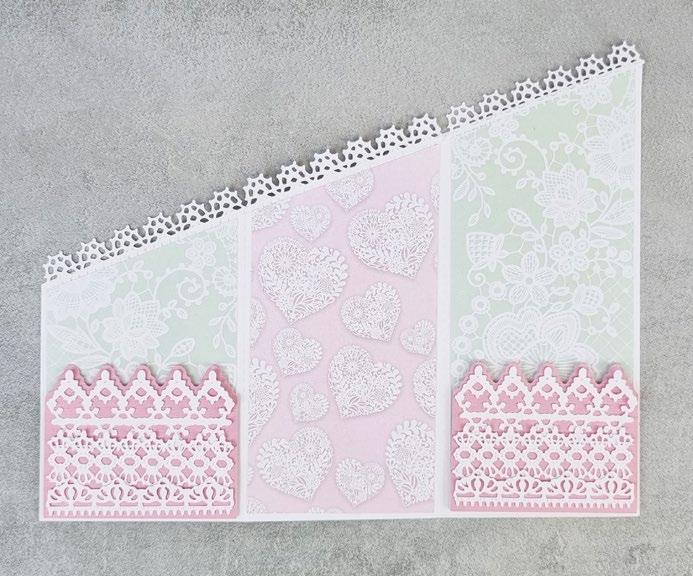
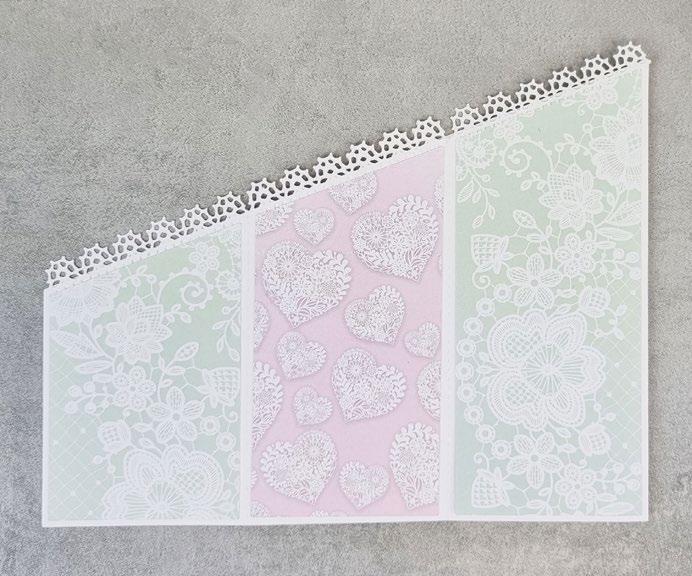
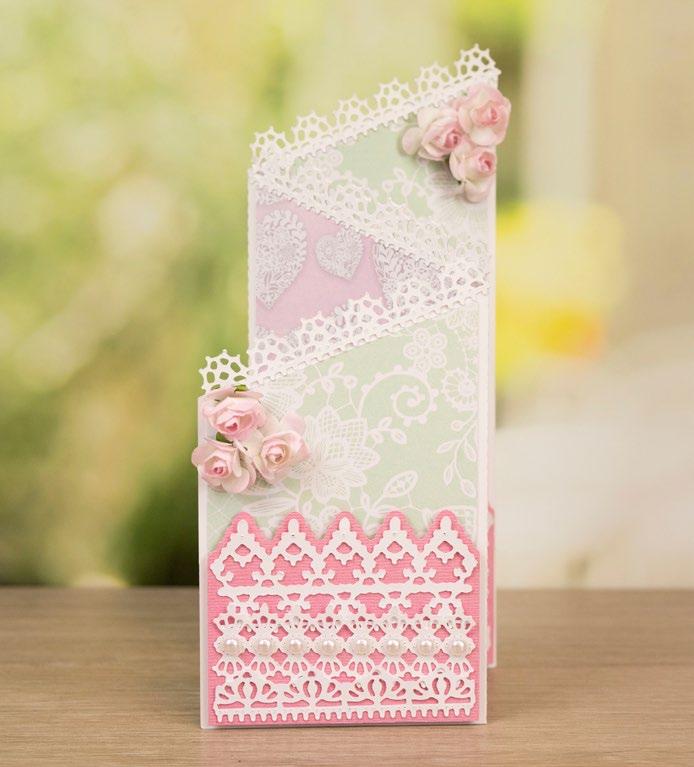
From machine memory:
• From white cardstock: - 1 x 40mm square (with sentiment draw file)
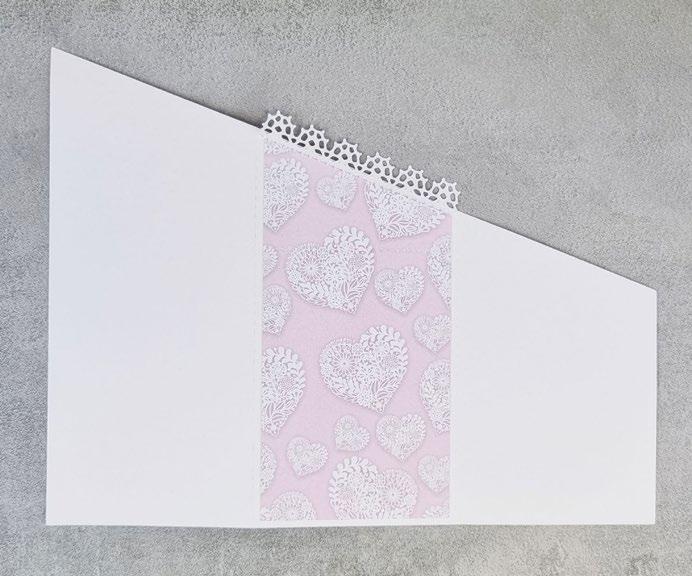
Fold on the score lines of the card base to create the card. Mat the flipped pink heart card mat 2 cut onto the middle panel of the card. Mat one of the white border 1 cuts onto the top of the middle panel.
Turn the card over. Mat the green lace card mat 1 and the green lace card mat 3 cuts onto the outer panels of the card, and the remaining pink heart card mat 2 cut onto the middle panel of the card. Mat the remaining white border 1 cuts onto the top of the panels.

Mat the pink border mat cuts onto the outer panels of the card with foam tape.
Mat one of each of the remaining borders onto the outer panels, only sticking the bottom edges and overlapping the top edges.
Mat the sentiment square onto the pink square mat, and mat onto the right panel with foam tape. Add paper flowers to the outer panels of the card. Finish by adding pearl gems to the bottom lace cuts.
----------------------------------------- BORDERS OF BEAUTY -------------------------------------------1
Step bySteps 1 3 5 2 4 6 www.tatteredlace.co.uk | 49
2
3
4
5
6
CLICK HERE TO DOWNLOAD YOUR SVG CONTENT
bySteps


Step
1 2 3 4 5 1 Cut all the pieces needed to create the project as listed below; From SVG downloads: • From white cardstock: - 1 x BOB-2-Card Base - 3 x BOB-2-Border • From pink cardstock: - 1 x BOB-2-Square Mat • From backing paper: - 1 x BOB-2-Card Mat 1 (shabby lace) From machine memory: • From backing paper: - 1 x 140mm square (floral lace) • From construction acetate: - 1 x 145mm square • From white cardstock: - 1 x 30mm square (with sentiment draw file) 2 Fold on the score line of the card base to create the card. Mat the floral lace square onto the inside back of the card. Mat the acetate square onto the front of the card. 3 Mat the floral lace card mat 1 onto the front of the card. Mat the three white borders around the top, right and bottom edges of the acetate card front. 4 Mat the sentiment square onto the pink square mat, and mat onto the inside back of the card. 5 Wrap a length of white ribbon around the left of the card front. Tie a double-loop bow from white ribbon and mat onto the card. Finish by adding pearl gems. What you’ll need: • 31-02-Borders Of Beauty SVG files • White cardstock • Pink cardstock • Construction acetate • White ribbon • Pearl gems ----------------------------------------- BORDERS OF BEAUTY -------------------------------------------CLICK HERE TO DOWNLOAD YOUR SVG CONTENT PROJECT 31 50 | www.tatteredlace.co.uk
you’ll need:
Cut all the pieces needed to create the project as listed below;
From SVG downloads:
• From white cardstock: - 1 x BOB-3-Border 1 - 2 x BOB-3-Border 2 - 1 x BOB-3-Border 3
From machine memory:
• From white cardstock: - 2 x 175mm x 120mm rectangle - 1 x 165mm x 110mm rectangle - 1 x 150mm x 85mm rectangle - 1 x 55mm x 25mm rectangle (with sentiment draw file)
• From pink cardstock: - 1 x 170mm x 115mm rectangle - 1 x 145mm x 80mm rectangle - 1 x 60mm x 30mm rectangle

• From backing paper: - 1 x 160mm x 105mm rectangle (floral lace)
On one of the large white rectangles, measure down 10mm from the top edge and score and fold across to create a tab. Attach to the other large white rectangle to create a tent card. Mat the large pink pink mat to the card. Mat the white border 1 cut onto the bottom of the card front at an angle, and trim off the overhang. Mat the floral lace rectangle onto the next largest white rectangle, and mat onto the card with foam tape.
Mat the two white border 2 cuts onto the next largest pink rectangle, and wrap a length of ribbon around the middle of the rectangle. Mat the remaining border onto the ribbon and mat onto remaining white rectangle. Mat onto the card with foam tape.
Mat the sentiment rectangle onto the small pink rectangle, and mat onto the card with foam tape. Tie a multi-loop bow from pink ribbon and mat onto the card.
bySteps
What
• 32-03-Borders Of Beauty SVG files • White cardstock • Pink cardstock • Pink ribbon • White ribbon Step
1
2
3
4
1 3 2 4 ----------------------------------------- BORDERS OF BEAUTY -------------------------------------------CLICK HERE TO DOWNLOAD YOUR SVG CONTENT PROJECT 32 www.tatteredlace.co.uk | 51
Hidden Spinner Gift Box What you’ll need: • 33-01-Hidden Spinner Gift Box SVG files • Dark orange cardstock • Light orange cardstock • Invisible string -------------------------------------- HIDDEN SPINNER GIFT BOX ----------------------------------------CLICK HERE TO DOWNLOAD YOUR SVG CONTENT PROJECT 33 52 | www.tatteredlace.co.uk

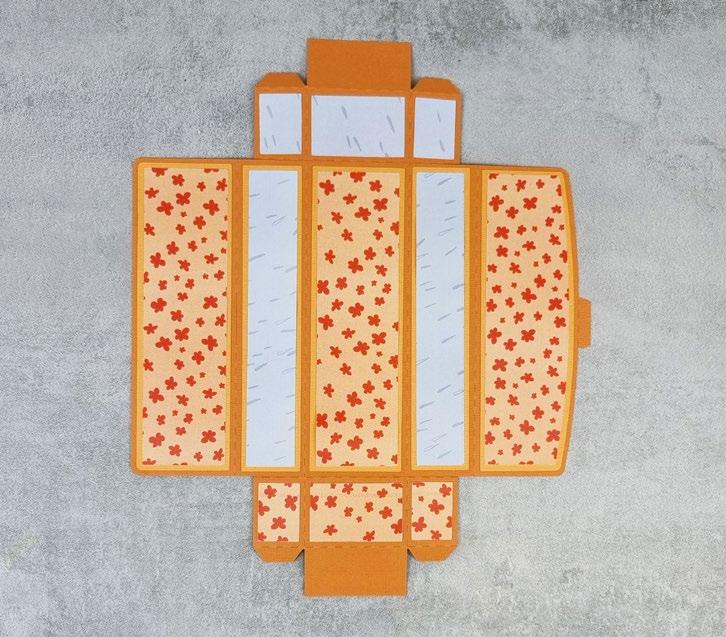
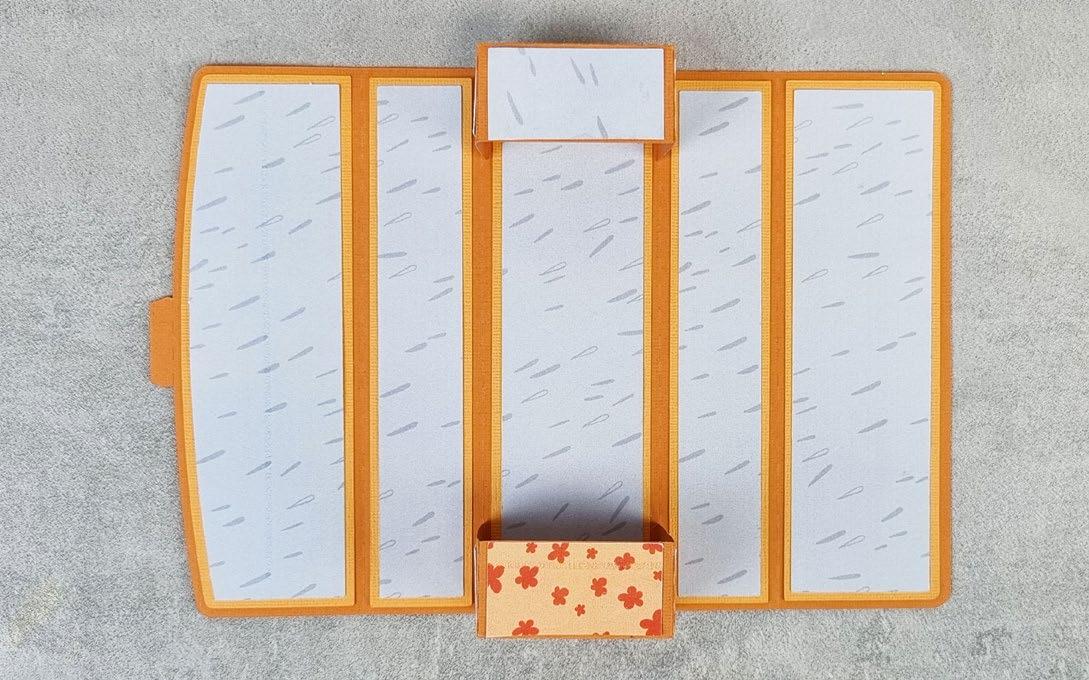

1 Cut all the pieces needed to create the project as listed below; From SVG downloads: • From dark orange cardstock: - 1 x HSG-1-Card Base 1 - 2 x HSG-1-Card Base 2 • From light orange cardstock: - 2 x HSG-1-Outer Mats • From backing paper: - 1 x HSG-1-Inner Mats (mix of raindrops and orange flowers) - 1 x HSG-1-Inner Mats (raindrops) - 1 x HSG-1-Box Mats (orange flowers) - 1 x HSG-1-Box Mats (raindrops) • From charisma: - 1 x HSG-1-Charisma A - 1 x HSG-1-Charisma B 2 Attach the card base 2 cuts to the inside middle panel of the card base 1 cut using the tabs. 3 Turn the card base over. Mat one set of the light orange outer mats onto the folded panels of the card base. -------------------------------------- HIDDEN SPINNER GIFT BOX ----------------------------------------4 Mat a mixture of raindrops and orange flowers inner mats onto the folded panels of the card base. Mat the raindrop box mats onto the top box piece and the orange flowers box mats onto the bottom box piece. 5 Turn the template back over. Fold up the box pieces and attach the box sides together and to the back of the template using the tabs. Mat the other set of light orange outer mats on the folded panels of the card base. Mat the raindrop inner mats onto the folded panels of the card base. 7 Trim the charisma cuts as shown in the image. 8 Build up the decoupage and mat together with foam tape. 9 Add a length of invisible string to the back of one of the decoupaged charismas. Make sure the length of string is longer than the height of the card base. Mat the second decoupaged charisma onto the back of the first so the string is sandwiched in between. Mat two puddles back to back underneath the girl. Fix the string into the card base by sticking it to the inside of the top and bottom box pieces. Pull the string as tight as you can when sticking. 1 4 6 2 7 3 5 8 www.tatteredlace.co.uk | 53


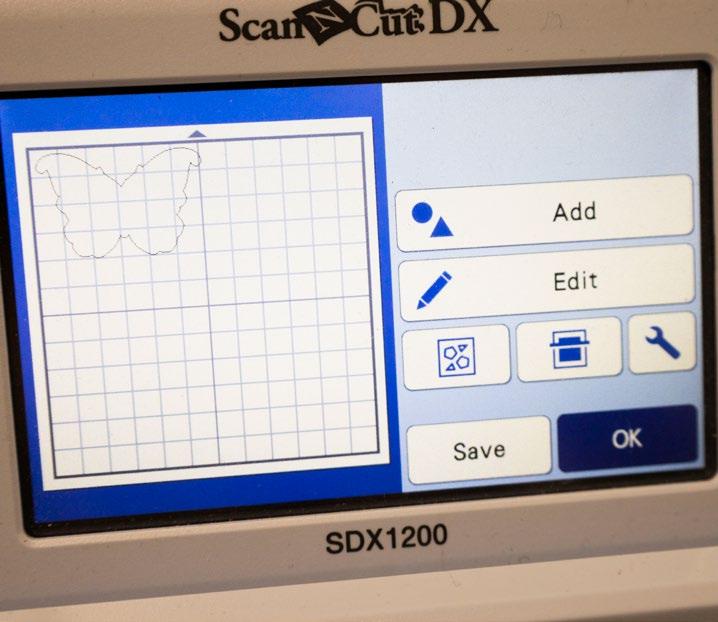
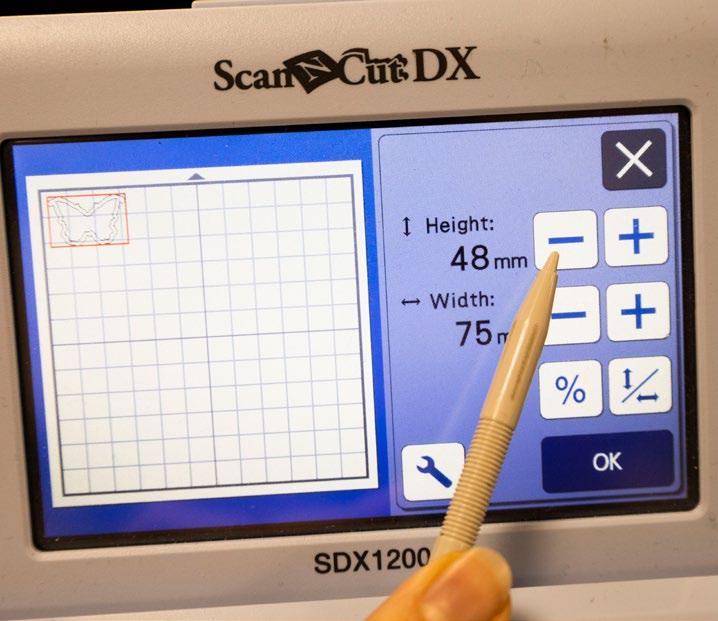
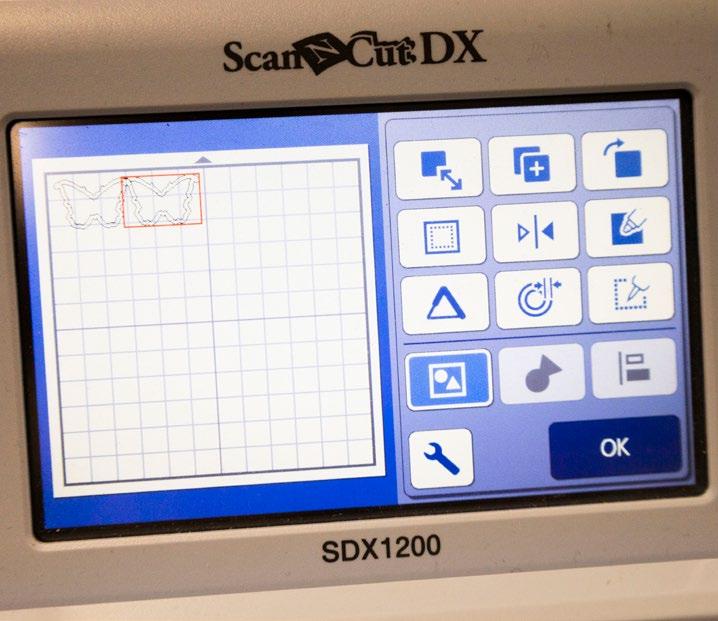

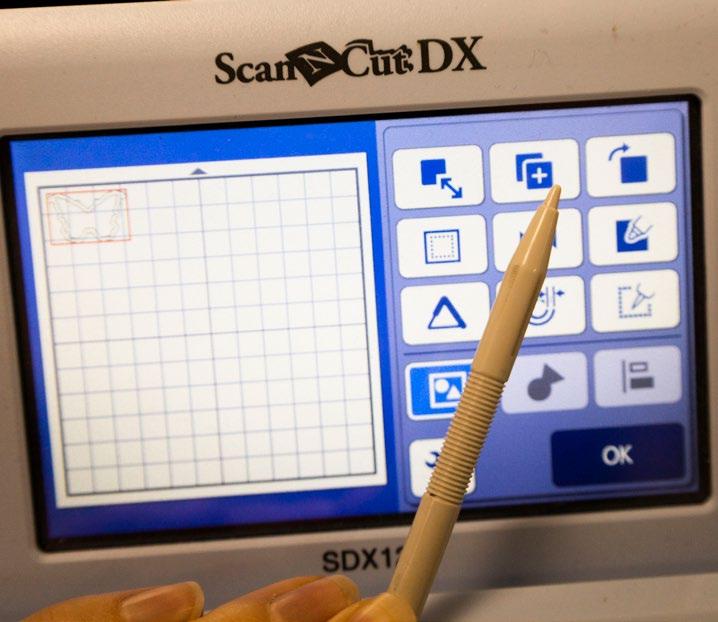
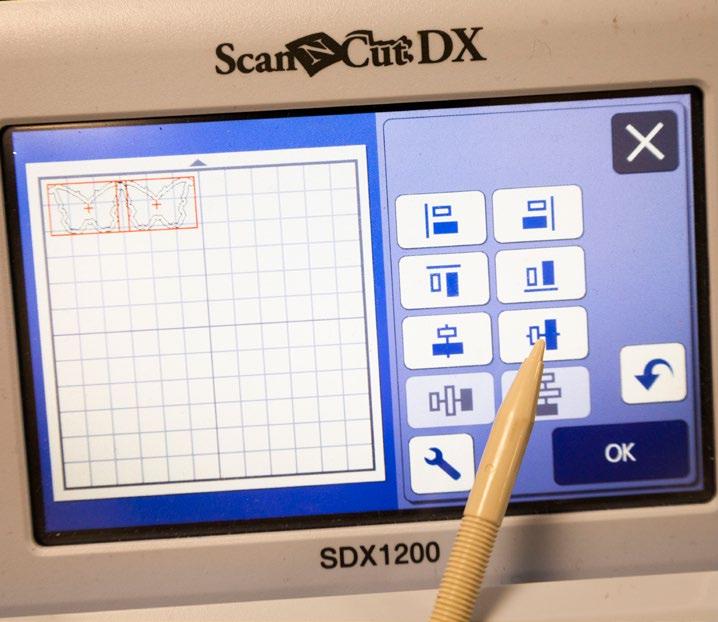
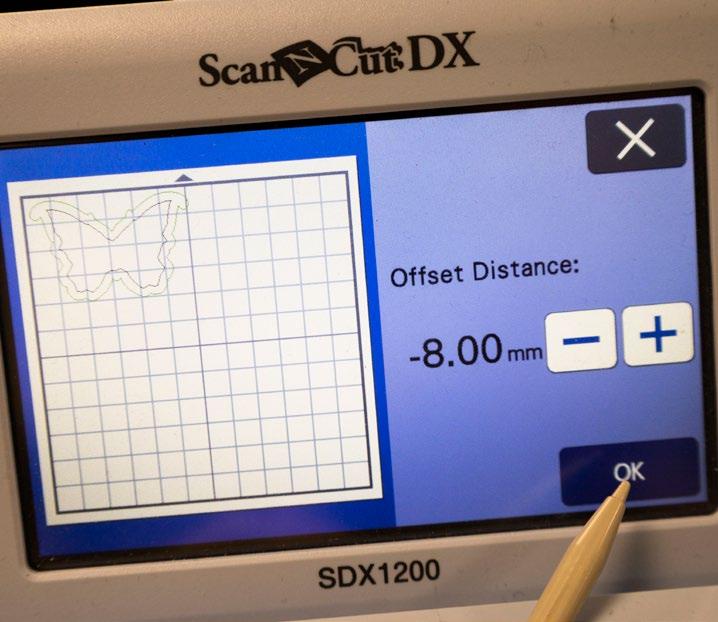
1 From the 09-03-Vintage Heirloom folder, open up the Butterfly Outline file onto the machine. 2 Go into Object Edit and select Offset Path. 3 Set the Offset Distance to -8.0mm and select OK. 4 Select All and Group both the shapes together. 5 Select the Resize function and set the Height to 48mm. 6 Select the Duplicate function. 7 Duplicate the grouped shape once, and move to side of the other one so the tip of the wings are overlapping. 8 Select All and go into the Align function. Select Align Horizontally and click OK. ------------------------------- HOW TO - CREATE A BUTTERFLY STENCIL ------------------------------HOW TO... 1 5 7 2 6 8 3 4 CREATE A BUTTERFLY STENCIL ON THE SCAN N CUT MACHINE 54 | www.tatteredlace.co.uk

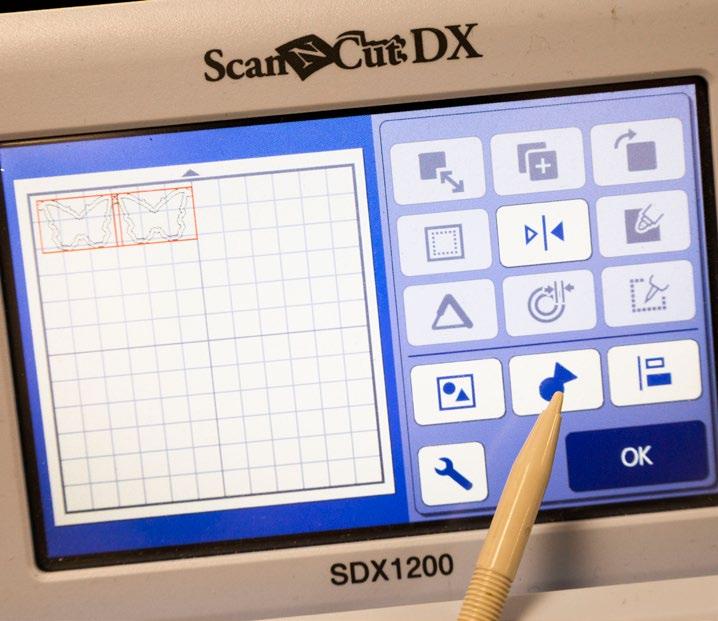


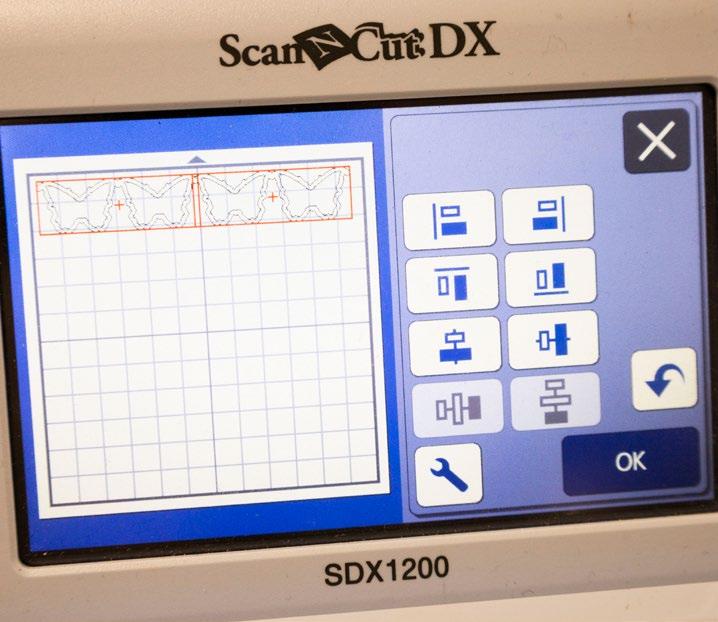

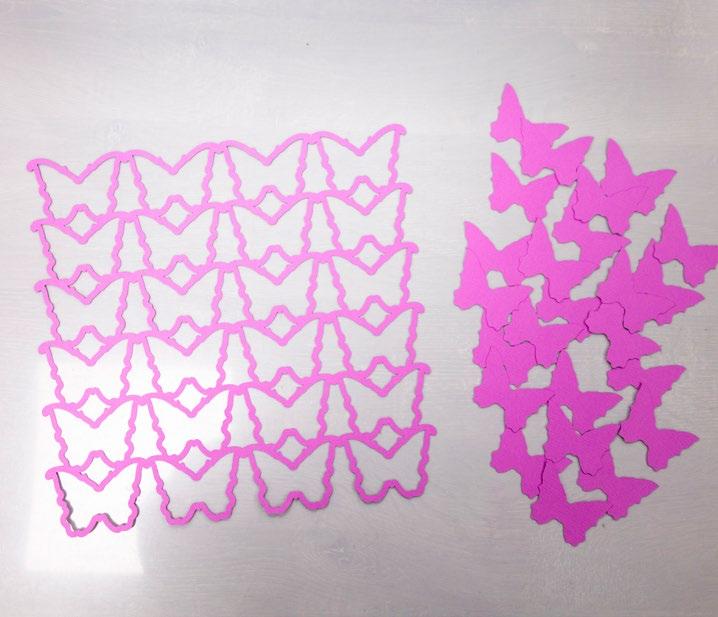
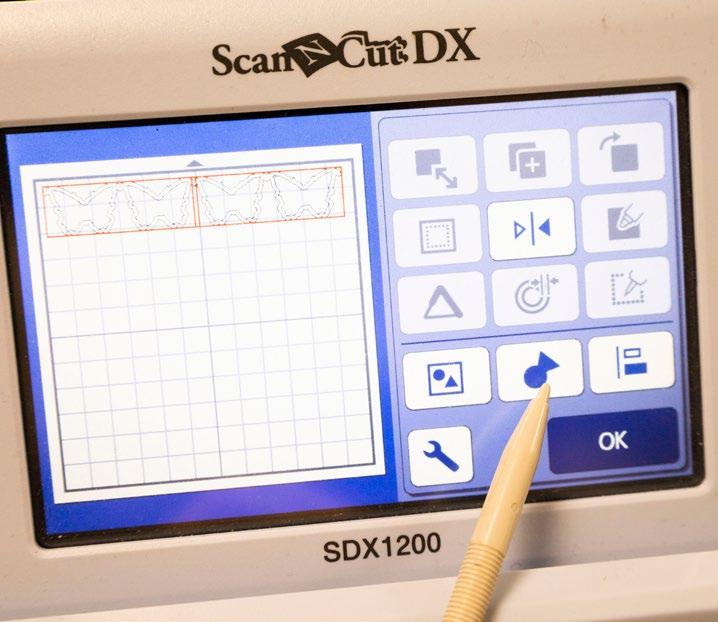

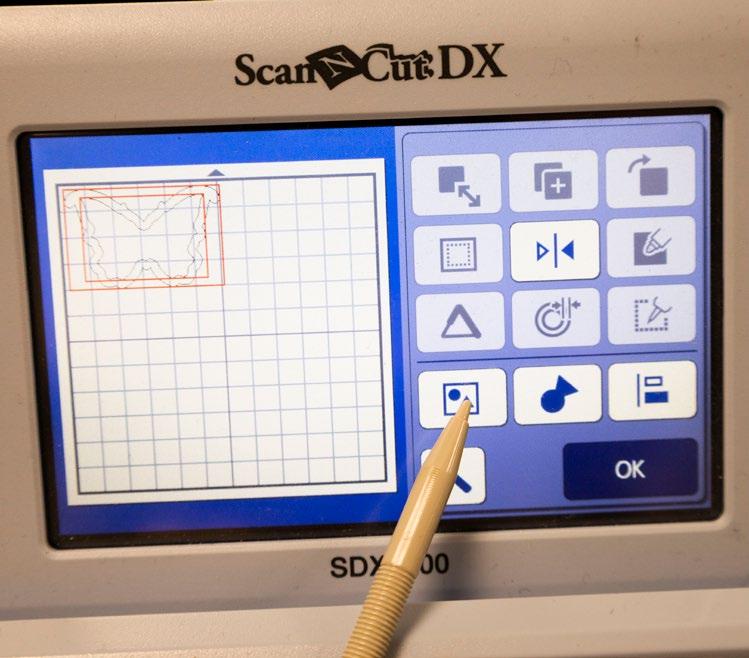
------------------------------- HOW TO - CREATE A BUTTERFLY STENCIL ------------------------------9 13 15 10 14 16 11 12 9 Go into Object Edit and Weld the shapes together. 10Duplicate the welded shape again and move to the side of the other one so the tip of the wings are overlapping. 11Go into Object Edit and Weld the shapes together. 12Duplicate the welded shaped five times and spread the shapes down over the mat. 13Select All and go into the Align function. Select Align Vertically and Distribute Centres. If the shapes don’t quite overlap then move the bottom shape upwards, Select All and Distribute Centres again. 14With all shapes still selected, select Weld to weld the shapes together. 15Position the shape where you want on the mat and cut. 16You now have a cut out butterfly background to use as decoration or as a stencil. You can keep the butterfly drop outs for decoration too! www.tatteredlace.co.uk | 55
COLUMN
The team over at Tattered Lace HQ have given me a page to keep you up to date with me and my crafty antics. So keep an eye out and I’ll be here for a general chit chat, to answer any questions you might have or to share any projects with you that I’ve been working on!
Hi Crafters,
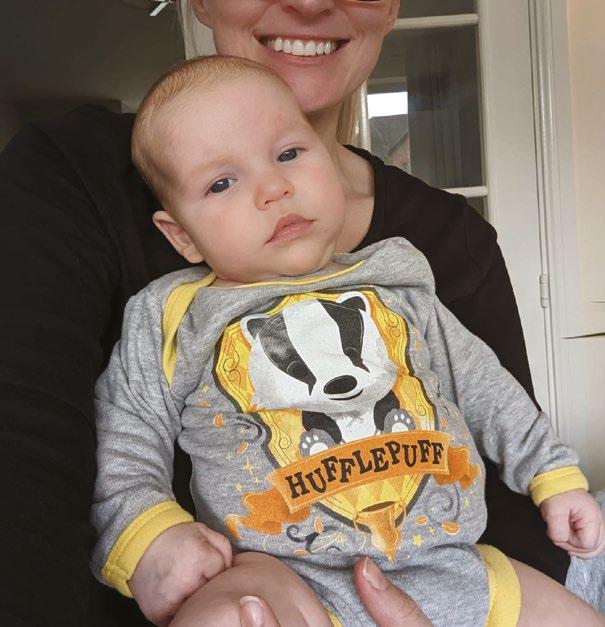
Hope we are all doing well and busy doing lots of crafting! I'm trying my hardest to fit it in around spending time with my precious Noah. He's just so perfect, I can't get enough! Look at how much he has grown already, but that smile hasn't changed! He brings so much joy to our lives.

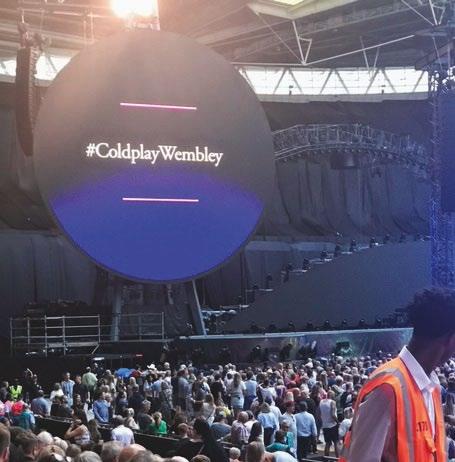
Me and Gordon recently went to see Coldplay
Wembley stadium. Coldplay are one of
bands and they were absolutely brilliant! They put on such a fantastic show!
at
my favourite
Me & Gordon went to Wembley to see Coldplay!
• 34-01-Nancy’s Projects SVG files 1 Cut all the pieces needed to create the project as listed below; • White cardstock • Gold mirror cardstockGolden Tree 6 weeks vs 6 days He's a Hufflepuff!When I saw the dies for this issue how could I resist the Tree Of Life die set. With the new addition to our family this was a lovely set to play with and make some great family cards. I hope you love it too! From SVG downloads: • From gold mirror cardstock: - 1 x NP-1-Tree Outline - 4 x NP-1-Frame • From white cardstock: - 1 x NP-1-Tree Of Life - 4 x NP-1-Frame Inner From machine memory: • From white cardstock: - 2 x 155mm square • From gold mirror cardstock: - 1 x 145mm square • From backing paper: - 1 x 140mm square (blue script wood) 2 On one of the white squares, measure down 10mm from the top edge and score and fold across to create a tab. Attach to the other white square to create a tent card. Mat the wood square onto the gold mirror square and mat onto the card with foam tape. 3 Mat the white tree onto the gold tree outline and mat onto the card with foam tape. Mat the gold frame onto the card and mat the white frame inners into the middle of the gold frames. CLICK HERE TO DOWNLOAD YOUR SVG CONTENT PROJECT 34 56 | www.tatteredlace.co.uk

Tree Of Love • 35-02-Nancy’s Projects SVG files • Blue cardstock 1 Cut all the pieces needed to create the project as listed below; 1 Cut all the pieces needed to create the project as listed below; • White cardstock • Silver ribbon Family Tree • 36-03-Nancy’s Projects SVG files • White cardstock • Gold mirror cardstock • Brown cardstock From SVG downloads: • From white cardstock: - 1 x NP-2-Box Frame - 1 x NP-2-Tree Outline - 1 x NP-2-Frame • From blue cardstock: - 1 x NP-2-Tree Of Life - 1 x NP-2-Frame Outline From SVG downloads: • From brown cardstock: - 1 x NP-3-Box Frame • From gold mirror cardstock: - 1 x NP-3-Tree Outline - 5 x NP-3-Frame Outline • From white cardstock: - 1 x NP-3-Tree Of Life From machine memory: • From white cardstock: - 1 x 140mm square • From backing paper: - 1 x 140mm square (blue script wood) - 5 x NP-3-Frame From machine memory: • From backing paper: - 1 x 170mm square (turquoise script wood) • From white cardstock: - 1 x 60mm x 200mm square 2 Mat the wood square onto the middle of the box frame. Mat the blue tree onto the white tree outline and mat onto the middle of the box frame with foam tape. 3 Fold up the sides of the box frame to create the frame sides. Stick the angled corners onto the full sides to attach the frame sides to one another. 4 Mat the white frame onto the blue frame outline, and write a sentiment on the frame. Mat onto the frame with foam tape. On the white square, measure down 20mm from the top edge and score across to create a tab. Attach to the back of the frame using the tab to create a stand. 2 Mat the wood square onto the middle of the box frame. Mat the white tree onto the gold tree outline, and mat onto the middle of the box frame with foam tape. 3 Mat the white frames onto the gold frame outlines, and mat onto the tree. Fold up the sides of the box frame to create the frame sides. Stick the angled corners onto the full sides to attach the frame sides to one another. 4 On the white rectangle, from the top edge measure down at 5cm, 10cm and 15cm. Fold round and stick the top panel to the bottom panel to create a triangle shape. Attach to the back of the frame to create a stand. CLICK HERE TO DOWNLOAD YOUR SVG CONTENT CLICK HERE TO DOWNLOAD YOUR SVG CONTENT PROJECT 35 PROJECT 36 www.tatteredlace.co.uk | 57


www.tatteredlace.co.uk IS NOW A RETAIL WEBSITE!!! AND SO MUCH MORE AVAILABLE TO BUY NOW AT WWW.TATTEREDLACE.CO.UK MAGAZINES DIE RANGES PAPER PACKS & KITS STAMPS TOOLS & ACCESSORIES 58 | www.tatteredlace.co.uk


STYLISH STENCILS MYSTERY BOX £50 VOUCHER 1 LUCKY WINNER WILL WIN £50 TO SPEND ON ANY PRODUCT AT WWW.TATTEREDLACE.COM 1 X WINNER OF MYSTERY BOX WORTH £50 THIS USB IS FULL OF BEAUTIFULLY CREATED SVG DESIGNS PERFECT FOR EVERY CRAFTER. INCLUDES FOUR FOLDERS INCLUDING FRAMES, BORDERS AND MORE, ALL READY TO USE ON YOUR DIGITAL CUTTING MACHINE. 1 LUCKY WINNER WILL WIN A MYSTERY BOX FILLED WITH CRAFTY ITEMS AND PRODUCTS FROM A VARIETY OF BRANDS! 10 X WINNERS OF STYLISH STENCILS USB Please visit www.tatteredlace.co.uk, click MAGAZINE GIVEAWAY and follow the instructions. Please use code STENCILS22 to enter the competition online. HOW TO ENTER CLOSING DATE: Entries from Issue 22 will end on 31/01/23. The winners will be contacted by phone/email and will also be announced on Tattered Lace® Facebook and Tattered Lace® website the following week.