Representation + Landscape
Landscape Architecure Program Graduate School of Design Harvard University
Fa l l 2 0 2 0
Adobe After Effects Tu t o r i a l 0 1
2
Representation + Landscape
A d o b e A f t e r E f f e c t s : Tu t o r i a l 0 1
CO N T E N TS
i nt roduc t i on
page 0 5
inter face
page 0 7
create composi t i on
page 0 8
i mpor t i mages + f i l m s
page 1 0
layer i n g + edi t i ng
page 1 2
render i ng + compres sio n
page 1 4
3
4
Representation + Landscape
Liam Young Unknown Fields Division Madagscar Expedition Porraits https://vimeo.com/78968063
A d o b e A f t e r E f f e c t s : Tu t o r i a l 0 1
int ro d u c t i o n Adobe After Effects is a digital application that will explored in these tutorials as a means to make short films relating concepts of landscape and time through techniques of compositing, motion graphics, and visual effects. Compositing: the process of combing a range of various elements from different sources into a seamless sequence/space Motion Graphics: to create the illusion of motion through animation Visual Effects: to manipulate and transform images + graphics outside of their original source
Film References Liam Young_ Unknown Fields Division: ● https://vimeo.com/78970031 ● https://vimeo.com/78969965 ● https://vimeo.com/78968063 ● https://vimeo.com/78968063
O n l i n e Tu t o r i a l s Adode After Effects User Guide helpx.adobe.com/after-effects/user-guide.html Lynda.com Lynda.com is now available for all Harvard student, faculty, and staff – FREE of charge through the “LyndaCampus at Harvard” portal. To read more about Lynda.com or to sign up for your FREE account, please go to: http://lynda.harvard.edu/
5
6
Project Panel
Timeline
Representation + Landscape
Composition Preview
A d o b e A f t e r E f f e c t s : Tu t o r i a l 0 1
7
inte r fa ce Wo r k s p a c e The After Effects workspace is comprised of 3
Timeline
primary areas:
The Timeline panel graphically represents a composition as layers in a timeline.
Project Panel
● In the time ruler, a yellow marker—called the
The project Panel displays all of your imported files
current time indicator (CTI)—corresponds to the
in alphabetical order from which you can build your
current frame pictured in the Composition panel.
film:
● A vertical line extending from the CTI makes it easy
● It has a preview section at the top, and the bottom
to see how layers in the composition are situated in
segment identifies the files that can be used in the
time.
composition.
● In the Timeline panel, each layer occupies a row,
● These files can be renamed and duplicated through
and the rows are stacked vertically.
copy and paste actions. The file extension will
● Layers that are higher in the Timeline panel’s
automatically duplicate and can then be renamed
stacking order appear in front of lower layers when
(right click on folder or file to rename)
viewed in the Composition panel.
● The buttons on the bottom include : bin, new
● The Timeline panel offer more than just an
composition, new folder.
alternative view of the composition, it gives you
● As a means of managing multiple files it is
precise control over virtually every attribute of each
recommended that you create folders to organise/
layer in a composition.
manage the content in the panel.
Composition Preview
Wo r k f l o w
This is the main working and viewing area of the composition, it displays the layers of the footage
The basic workflow for After Effects is as follows:
visible in the current frame of the composition.
● Import and organize footage, images, audio into the
● You can use the Compostion Panel to visually
Project Panel.
preview the way a composition’s layers are rendered
● Create, arrange, and composite the files from the Project
within the visible frame as well as how those layers
Panel into layers in a composition.
are placed outside the frame.
● Modify and animate layer properties
● The Compostion Panel is equipped with many of
● Preview
the viewing and time controls present in the Footage
● Render and Export the film
panel and Layer panel, but because the composition
+
is where footage items become layers, the
● note : After Effects generates large files, it is
Compostion panel has several unique features, for
reccomended that these files are compressed post
example, you can move and scale layers and masks
production.
etc. directly in the Compostion panel.
8
Representation + Landscape
cre ate co mposi t i on Crete New Composition When launching the After Effects application, you will be prompted to input format details of the ‘composition’ you would like to produce, this is not dissimilar to creating a new document with ‘Canvas size and settings’ in Photoshop or generating a New document with the Artboards settings in Illustrator. Alternatively, to create a new composition, click on the ‘New Composotion’ button in the Composition Preview panel, or > File > New > New Project > click on ‘New Composoition button in the Composition Preview Panel or > Composition > New Composition
Project A project is a single file that stores compositions and references to all the source files used in the project. Composition The Composition is the framework for the film. It includes a timeline that manages all the images, films, and audio, and graphics such as shapes + text layers created in After Effects.
A d o b e A f t e r E f f e c t s : Tu t o r i a l 0 1
9
Composition Settings Use the following default settings when beginning a new project in After Effects: ● Composition Name : Name File ● Aspect Ratio :Use default HDTV (1920x1080), or 16:9 (general display on television and monitors) note: Aspect ratio will vary according to the device you are planning to show the film on, e.g. iphone 15:10, ipads 4:3(sq) at 2048 x 1536 ● Frame Rate: frames per second (fps), select the standard 24 fps. ● Resolution: set this to Half while we work with the composition to preview the film. When rendering the final work set it this to full resolution. ● Duration: This indicates the length of the video in hours :minutes: seconds: milliseconds.e.g. set duration to one minute 0:01:00:00 ● Background Colour: this is the background colour to the workspace, typically, black or white.
Resolution The dimensions of a film in pixels, measured in width by height. Aspect Ratio The proportional relationship between a film’s width and height.
How to Encode and Export Gorgeous Videos by Story and Heart https://vimeo.com/blog/post/the-ins-and-outs-of-video-encoding
10
Representation + Landscape
imp o r t i ma ges + f i l ms Import Image
Timeline
There are a number of ways to import images:
The Timeline panel is where all your layers are arranged in time, and tasks such as animating layers
● drag and drop images onto the Project Panel
are made.
or
Note: similar to other Adobe software, the top layer
● right click in the Project Panel
is visually displayed first in the Composition Preview
> Import
Panel.
> File or > File
Create Layers in Timeline
> Import
Create Layers in the Timeline using the images and
> File
film files from the Project Panel by doing one of the following: ● drag and drop files into the Composition Panel
Import Film
or
Film/video are imported in the smae way as images:
● drag and drop ifiles into the Timline Panel
● drag and drop film onto the Project Panel or ● right click in the Project Panel > Import > File or > File > Import > File
Each file will create a layer in the timeline, and by default the image will span across the entire length of the composition time.
A d o b e A f t e r E f f e c t s : Tu t o r i a l 0 1
ICT The Composition Time Indicator (CTI) identifies the current time in the Timeline Panel. The current time also appera in the upper left corner of the Timeline Panel.
current time
CTI - Composition Time Indicator
Note: the duration of each newly created layer fills the entire timeline.
The ICT can be dragged manually to scrub through time to preview the composition, or â—? press Spacebar to start ICT and â—? press Spacebar to stop ICT
11
12
Representation + Landscape
L aye r Ed i ti n g Duration Note: For the purposes of this example a number of layers have been created in the Timeline. To adjust the Duration of each layer: > select the layers in the Timeline > click on the Duration column of a layer in the Timeline, a pop-up window will appear, change the duration time. set new duration time (e.g. 2 sec)
the duration of each layer is now set to 2 sec
A d o b e A f t e r E f f e c t s : Tu t o r i a l 0 1
13
Sequence Layers The Duration of each layer and its position in time can be adjusted in the Timeline. To automatically sequence a collection of layers: > select the layers in the Timeline > right click on the layer source name > select KeyFrame Assistant > select Sequence Layers, a pop up window will appear > select OK each layer is organised in sequence
To manually adjust the duration of a layer: > move the ICT in the Timeline > select the layer > select Alt + (right-hand bracket) for PC, select Option+ (right-hand bracket) for Mac
14
Representation + Landscape
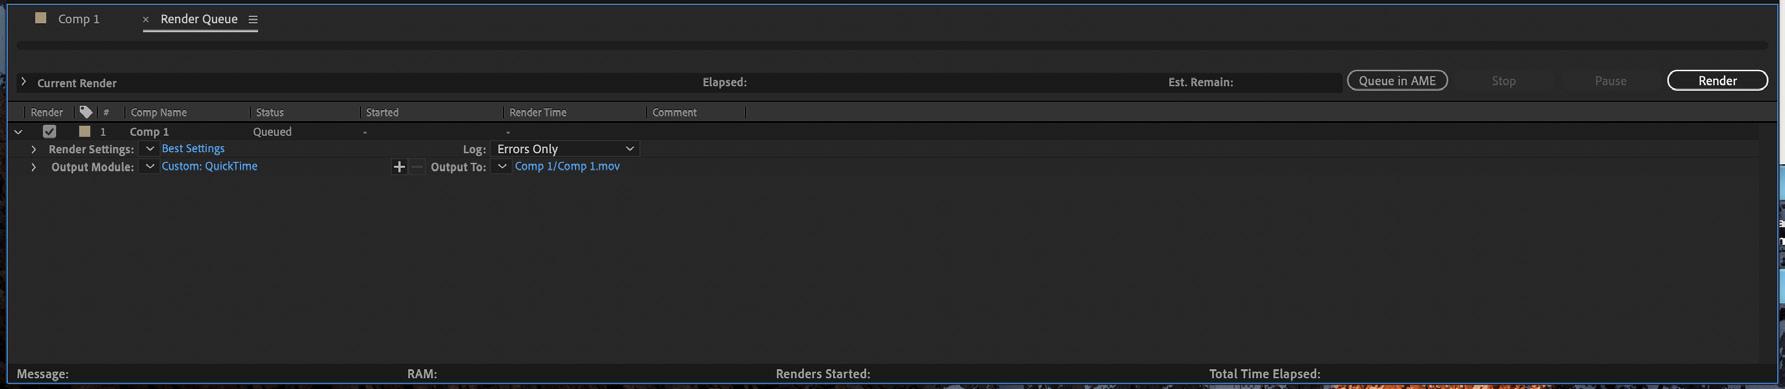
Re n d e r i n g + Compress i on Rendering Rendering refers to the process of publishing your work, which creates self-contained files viewable outside of After Effects. ● Add to render queue > Composition > Add to Render Queue ● Render Settings > Best Settings ● Output Module > Lossless > click on Lossless, the pop-up window ‘Output Movie Settings’ will appear. > Format: Quicktime (selct file format) > OK • Output to: > click on the file name, the pop-up ‘Output Movie To’ window will appear > select output location + name > save • Render Click the Render button in the upper-right corner of the Render Queue panel
A d o b e A f t e r E f f e c t s : Tu t o r i a l 0 1
15
render
16
Representation + Landscape
Compression After Effects can make very large files, use one of the following to compress your film: ● Handbrake ● Adobe Media Encoder
Handbrake This works largely the same in both Mac and Windows, the only difference being the template for Handbrake. To convert a single video, follow this process: ● download and install HandBrake > https://handbrake.fr/ ● Launch Handbrake ● If necessary, click the Source button in the top left, to choose what you want to convert. ● Choose a File, if necessary, click the Source button in the top left, to choose what you want to convert. ● Click the appropriate preset in the sidebar to load it. ● Choose your Destination, click Browse next to the destination box to choose where you want to save the file. ● Convert, Click Start to begin conversion. This can take quite a long time depending on the length of the source video.
A d o b e A f t e r E f f e c t s : Tu t o r i a l 0 1
17
18
Representation + Landscape
Adobe Media Encoder Adobe Media Encoder is a media processing application that allows you to encode(export) audio and video into a variety of formats from applications such as After Effects, Premiere etc. The interface is divided into four panels: ● media browser - allows you to browse a range of formats on your system ● queue - is the main function area of the program. it lists the encoding jobs ● preset browser – a list of possible output file types or create your own presets to use with premiere pro ● encoding - encoding panel monitors the progress of the current encoding job To process files: ● Go to media browser and select the file you want to encode ● Drag the source file to the queue window ● Select a preset in the preset browser window or set a custom version and then drag to the queue window ● Click on the output file if you want to change the name or location ● Press the green start queue button in the top right-hand corner and the media encode will start working ● The encoding window shows the progress of the job ● when the job is complete, click on the output file and it will take you directly to the window of where the output file is located.
A d o b e A f t e r E f f e c t s : Tu t o r i a l 0 1
19
media browser
queue
preset browser
encoding