
ANNUAL NEW ART & ADVICEWORKSHOPS GALLERIES AND MORE! ANDREIA CHRISTOPHEUGRAIYOUNG KEN COLEMANALEX VEDE CABALAR LEFFIES ART STEPHEN SITTON IRYNA KHYMYCH TRISTAN TAITRALPH HORSLEY VOLUME SIX DigitalEdition


Welcome to the very best content from the last year of ImagineFX magazine. Packed with fantastic tutorials to help you master traditional and digital art, interviews with some of the best creators in movies and gaming, and illustrations from some of our favourite contributors, there is something for everyone inside, whether you’re a budding artist just starting out or a seasoned pro looking to brush up on some new skills. On top of all this, we’ve included some brilliant free resources for you to use in your projects, including brushes and start files that enable you to follow the tutorials in the bookazine. There is a link to these online tutorials on page 7. Enjoy!
Welcome to ANNUAL

Future PLC Quay House, The Ambury, Bath, BA1 1UA Bookazine Editorial Editor Charles Ginger Designer Will Shum Senior Art Editor Andy Downes Head of Art & Design Greg Whitaker Editorial Director Jon White ImagineFX Editorial Editor Rob Redman Art Editor Daniel Vincent Production Editor Rachel Terzian Cover images Leffies Art, Alex Vede Cabalar, Ken Coleman, Ghostfire Gaming, Ralph Horsley, Iryna Khymych, Stephen Sitton, Tristan Tait, Andreia Ugrai, Christiophe Young Photography All copyrights and trademarks are recognised and respected Advertising Media packs are available on request Commercial Director Clare Dove International Head of Print Licensing Rachel Shaw www.futurecontenthub.comlicensing@futurenet.com Circulation Head of Newstrade Tim Mathers Production Head of Production Mark Constance Production Project Manager Matthew Eglinton Advertising Production Manager Joanne Crosby Digital Editions Controller Jason Hudson Production Managers Keely Miller, Nola Cokely, Vivienne Calvert, Fran Twentyman Printed in the UK Distributed by Marketforce, 5 Churchill Place, Canary Wharf, London, E14 5HU www.marketforce.co.uk Tel: 0203 787 9001 ImagineFX Annual Volume Six (CTB4568) © 2022 Future Publishing Limited We are committed to only using magazine paper which is derived from responsibly managed, certified forestry and chlorine-free manufacture. The paper in this bookazine was sourced and produced from sustainable managed forests, conforming to strict environmental and socioeconomic standards. All contents © 2022 Future Publishing Limited or published under licence. All rights reserved. No part of this magazine may be used, stored, transmitted or reproduced in any way without the prior written permission of the publisher. Future Publishing Limited (company number 2008885) is registered in England and Wales. Registered office: Quay House, The Ambury, Bath BA1 1UA. All information contained in this publication is for information only and is, as far as we are aware, correct at the time of going to press. Future cannot accept any responsibility for errors or inaccuracies in such information. You are advised to contact manufacturers and retailers directly with regard to the price of products/services referred to in this publication. Apps and websites mentioned in this publication are not under our control. We are not responsible for their contents or any other changes or updates to them. This magazine is fully independent and not affiliated in any way with the companies mentioned herein. ANNUAL Future plc is a public company quoted on the London Stock Exchange (symbol: FUTR) www.futureplc.com Chief executive Zillah Byng-Thorne Non-executive chairman Richard Huntingford Chief financial officer Penny Ladkin-Brand Tel +44 (0)1225 442 244

on
The concept artist showcases his portrait studies and talks through the techniques he’s experimented with the Tokyo-based concept artist’s techniques and inpirations her amazing fantasy Max Dunbar
better artist 42. The art of Final Fantasy Discover how the team behind one
world’s most popular games creates its innovative worlds and characters 54. The art of Dune Art director Paul Vermette shares what it took to bring Frank Herbert’s iconic book back to the big screen Contents 34 18 54 64 70 16 90 10. FXPosé Discover some incredible art from creators around the world Interviews Sketchbook 6
64. Daniel Bolling Walsh
70. Entei Ryu Discover
stop, Marvel
behind
The comic book illustrator shares his incredibly detailed and knowing to legend shares his advice becoming a of the
Dragons character designs 34. Life lessons From experimenting to
Dungeons
illustrations 76.
us
Adi Granov
when


146. Create art with emotional impact
152.
US illustrator
90.
112 134 96 Workshops
154.
Ralph Horsley breaks down his oil painting process into 25 expert tips
Igor Wolski orchestrates a range of characters to tell a story in a busy, detailed scene done in the ligne claire style 112. Create a charactermixed-genre
Twin artists Raide and Leffie reveal how they collaborated on a delightful scene inspired by their childhood art 126. Create anime-stylestrikingart
140. Comic book hero in watercolours
Francois Gautier explains the creative process he goes through when he brings his emotions to life 3 simple tips for proportions
Charlie Pickard continues his series of quick tips on anatomy to improve your figure drawing 25 tips for dynamicfantasy scenes
James Gurney shares his top tips and demonstrates some handy methods for painting smooth gradients
Tristan Tait takes you through some different processes and design ideas that go into creating a boss character for a 2D indie game Draw stylised comicpanel art
106.
Explore one of the methods art director Tonton Revolver uses to make a kickass, anime-inspired illustration Visit https://ifxm.ag/ifx6annual to download this annual’s workshop videos and custom brushes
134. Gradients and how to use them
Ben Harvey walks you through his painting process that combines traditional mediums with a digital sketch to create a portrait
Traditional GET YOUR RESOURCES 7
Illustrator
Alayna Danner shares her method of creating an epic and engaging fantasy landscape using Photoshop Create retro art from 3D scans Ken Coleman mixes scanned action figures and digital painting to create 80s-inspired fantasy production art Improve your bossdesigns
Dave Greco showcases the key techniques behind the creation of a collaborative original character 116. Create your own comic Digital artist Rebekka Hearl teaches us the basics of producing a comic series, for web and for print, in Clip Studio Paint 122. Create a illustrationfantasy
96.
100.
Discover how Christophe Young sketches, lines and paints a compelling concept of a dieselpunk samurai character Paint environmentsunique
84. Sharpen characteryourart


24. Stephen Sitton
10. Dmitry Klyushkin
This Spanish artist is inspired by the silver screen and strives to reflect his love of the cinematic in his stunning artwork
18. Alexander Ngo Alex is a freelance illustrator whose clients include Paizo, Hit Point Press and Green Ronin Publishing
After graduating with a BFA in illustration, Stephen has created artwork for the marketing side of the entertainment industry for a range of big-name clients
28. Iwo Widulinski Iwo is an illustrator and concept artist keen on dark fantasy worlds, dynamic poses and twisted monsters
20. Andreia Ugrai Andreia is a freelance artist who creates dark fantasy characters and illustrations
Inspired by video games like Prince of Persia and films such as The Lord of the Rings, Reza has been working as an artist for eight years
Following some time away from the world of design, this ambitious artist is aiming to go his own way
26. Songmuang Chuaynukoon Song is a freelance illustrator with a passion for Japanese manga and detailed work
FXPosé 14 12 8
16. Alex Vede Cabalar
14. Reza Afshar
12. Justyna Gil Justyna is a fantasy illustrator focusing on imaginative realism with a strong emphasis on colour and light
Dmitry specialises in concept art, having been fascinated by the process of inventing objects
22. Michael DaCruz
30. Iryna Khymych
Originally from Ukraine, Iryna studied English in New York and now spends her days painting strong characters


30 26 28 22 9


“The most appealing part of my work is to imagine the condition of an object.”
LOCATION: Russia MEDIA: Paint Tool SAI, Photoshop WEB: artstation.com/klyushkin
3
Dmitry Klyushkin
“At the time of inventing this character, I had almost no muscular guys in my portfolio, so I decided to draw a broadshouldered strong warrior.” HUNTERS “These characters were invented for a competition. The task consisted of creating opposing people who knew nature and monkeys who wanted to become human”.
1 GOY
2 KAYUN “Magical child of the Moon and Earth, and Princess of the night. The image was created for a competition. Finding the character of the girl wasn’t easy!”
10 THE PLACE TO SHARE YOUR ART 1 2
Dmitry specialises in concept art, having been fascinated by the process of inventing objects.
4 STATION “This was created for my small project ASH. The action takes place at a busy station, where carts arrive and citizens are in a hurry. A boy, dressed in a suit with advertising, wanders by all this.”


DMITRY KLYUSHKIN 11 3 4


“This is the first illustration I’d done after two years in game-dev, creating marketing assets.”
5 MAGIC: THE GATHERING –MADCAP “Behold Lorehold imprudent students! Artwork that appeared on the Audacious Reshapers card.” © Wizards of the Coast
4 FIFTH OATH OF THE RED ARMY “This piece is an experiment where I wanted to perfect a realistic cinematic approach.”
“This is an allegorical image that depicts the human heart subject to the seven deadly sins.”
3 MAGIC: THE GATHERING –DAWNBRINGER AURELIA
LOCATION: Poland MEDIA: Photoshop WEB: artstation.com/gilyoona
2 MAGIC: THE GATHERING –THE ROYAL SCIONS “Fake it till you make it. This piece of fan art was created shortly before I started working officially on MtG.”
Justyna Gil
1 VEIL OF PROTECTION
Justyna is a fantasy illustrator focusing on imaginative realism with a strong emphasis on colour and light. Her clients include Wizards of the Coast, CD Projekt Red, and many more.
12 IMAGINE FX ANNUAL FXPOSÉ 1 2


CoasttheofWizards© © Wizards of the Coast 13 JUSTYNA GIL 4 5 3


DISCOVERY
LOCATION: Iran MEDIA: Photoshop, Procreate WEB: artstation.com/rezaafshar
1 2 14 IMAGINE FX ANNUAL FXPOSÉ
“An illustration for a personal series called Discovery, which is about a group of astronauts looking to find alien civilizations.”
Reza Afshar
1
Inspired by video games like Prince of Persia and films such as The Lord of the Rings, Reza has been working as an artist for eight years. Despite leaning towards science fiction lately, he aims to make his work believable.
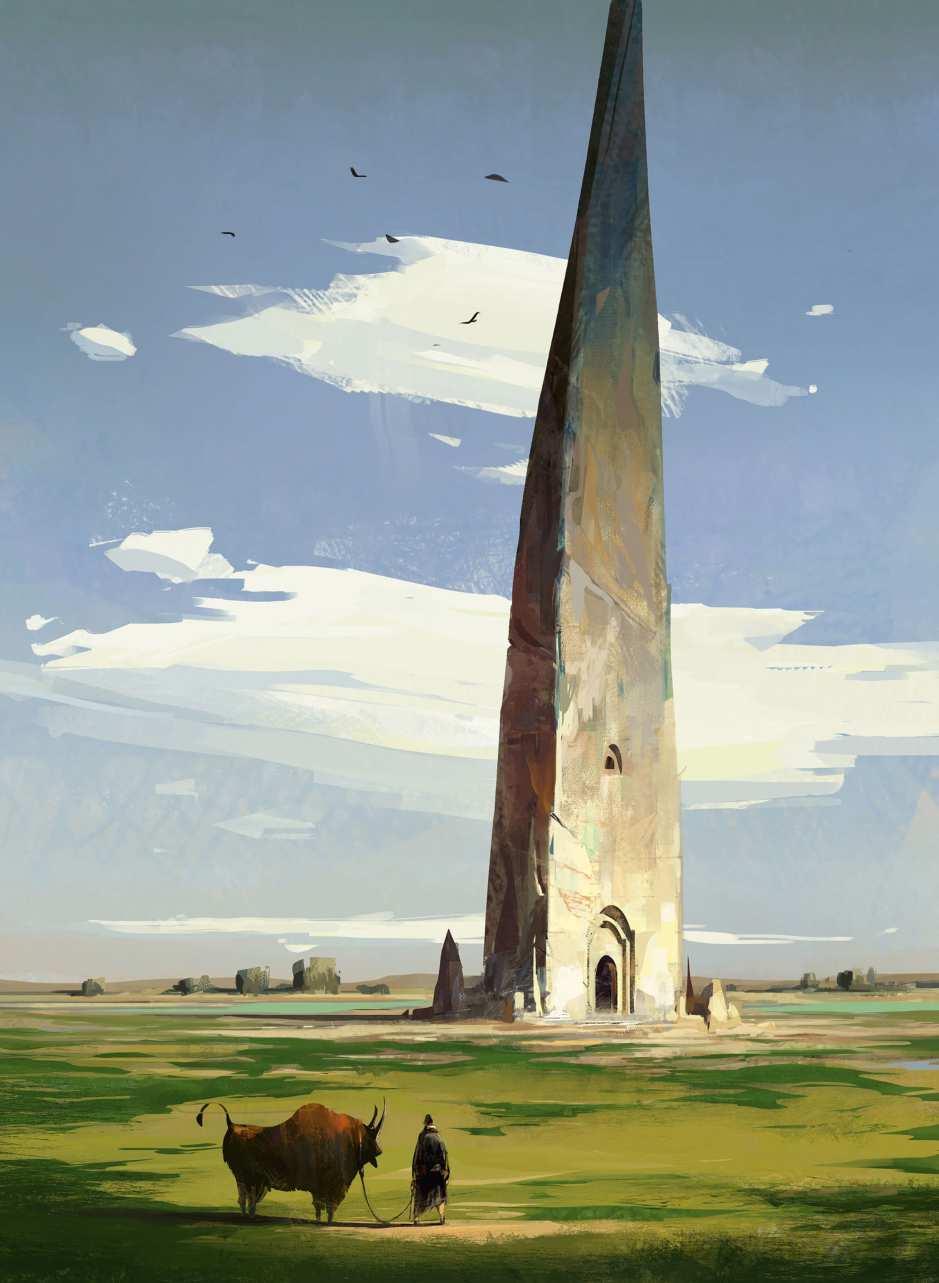
2 MAN, BULL, TOWER “The idea for this came from an old brick kiln in my hometown of Hamedan. The man and the cow are from ancient cave paintings.”
3 FATHER AND SON “An illustration from my steampunk sci-fi series. I wanted to show a father and son’s journey to a futuristic city.”


3 15 REZA AFSHAR

1 THE ASTRONAUT “This is one of my characters. He has a whole story behind him that I hope I can tell someday in a fulllength comic book.” 2 EXPLORERSASTRONAUT “Leaving part of the frame in darkness makes the details and the light more vibrant.” 3 SOMETHING ON THE BEACH “This one was painted over a very small pencil thumbnail. I usually make the best compositions from very fast and small sketches.” Alex Vede Cabalar Alex says: “What inspires me the most is cinema. I always try to make my art as cinematic as possible, seeking movement and dramatic compositions.” LOCATION: Spain MEDIA: Sketchbook Pro, Procreate WEB: alexvede.bigcartel.com 16 IMAGINE FX ANNUAL FXPOSÉ 1 2 3


4 BATTLE IN MOUNT FUJI “Part of a series of illustrations inspired by old Japanese woodprints. I used traditional inks then built up the colour digitally.” 17 ALEX VEDE CABALAR 4

Alexander Ngo Alex is a freelance illustrator whose clients include Paizo, Hit Point Press and Green Ronin Publishing. “I enjoy painting works that have a strong sense of mood,” says the artist. LOCATION: US MEDIA: Procreate WEB: alexvngo.com 1 BULEZAU “I’ve been enjoying character design. Here’s my rendition of a classic D&D monster.” 2 ALL’S LOST “This was my ‘pandemic piece’. I just wanted to capture a feeling of despair and uncertainty.” 3 BLOODCASTER “I’d love to create work for Magic: The Gathering and this was my rendition of one of its cards from the Crimson Vow set.” 1 2 3 4 18 IMAGINE FX ANNUAL FXPOSÉ


5 SOPHIE’S LAB “A fun painting I did for Hit Point Press’s Heckna Project. I enjoyed trying to capture the feeling of a mad scientist in her lab.”
PressPointHit© 5 19 ALEXANDER NGO
4 SPORE ZOMBIE “Another fun character design. Really enjoyed playing with all the different textures in this one.”


GamingGhostfire© GamingGhostfire© Andreia Ugrai Andreia is a freelance artist who creates dark fantasy characters and illustrations. She has worked on card art and book covers for clients like Magic: The Gathering and Iron Helmet Games. LOCATION: Romania MEDIA: Photoshop, Procreate WEB: www.artstation.com/andreiaugrai 1 INDESTRUCTIBLE “Worshippers pay their respects to a powerful creature that is impossible to defeat, which is trapped in a mysterious sphere.” 2 SURVIVOR “Despite the haze, heights and dangers, this determined man managed to survive 15 years in a doomed city.” 20 IMAGINE FX ANNUAL FXPOSÉ 1 2


3 TOYMAKER “The evil, deranged Toymaker. She has a wicked grin on her face and wide unsettling eyes working on a Marie O’Nett puppet.”
21 ANDREIA UGRAI 3 4
UNSTABLE ECTOPLASM “Beware of the destructive influence of this strange, ectoplasm substance as it will audaciously devour and choke you.”
4


2 99TH SOUL “Down inside all of us sits a dark spot, but how should we feed the beast?” This is another concept from the 99th Soul story brewing in the background.”
1 MISHIMA “A concept from my 99th Soul story, though I can’t say much without giving away too much of the Shyamalan ‘twist’, other than he represents something better in the narrative.”
Michael
DaCruz
Michael has been on a bit of a hiatus, “but I am slowly working my way back on to the illustration wagon one drawing at a time, aiming to be a full-time illustrator working on my own narrative art.”
LOCATION: US MEDIA: Photoshop WEB: artstation.com/madsamuri2240
3 AHRIMAN “A concept from an old comic I had been working on back in college, the story fell flat but I kept some of the designs and reworked them accordingly.”
1 2 22 IMAGINE FX ANNUAL FXPOSÉ


3 23 MICHAEL DACRUZ

24 IMAGINE FX ANNUAL FXPOSÉ 1 2
“This is a World of Warcraft inspired commissioncharacterdepicting a High Elf Monk. My goal was to create a bold sense of movement, drama, and foreshortening.” “This is an original character design inspired by cyberpunk and vaporwave aesthetics. Nix is a powerful sea elf mage that works as a bouncer at a high-end nightclub.”
Stephen Sitton
After graduating with a BFA in illustration, Stephen created artwork for the marketing side of the entertainment industry with clients including Disney/ Pixar, Activision, EA Games, and Hasbro.
2
1 WEREWOLF GOD “This was based on a challenge to only use complementary or opposite colours. Limiting the scope of what we create can yield some interesting and unintended results!”
BRIGHTBLOODDANI’ALLIAH
3 NIX
LOCATION: US MEDIA: Photoshop, Blender, Maya WEB: www.artstation.com/stumpyfongo


25 STEPHEN SITTON 3

3 HEALER “Illustration for ‘Dear Year of the Ox, please BE KIND’; a new year project I did to spread a positive message about the Ox year.”
1 2 3 26 IMAGINE FX ANNUAL FXPOSÉ
1 SIBLING WAR “This piece is about fighting between siblings. It might seem to be a little thing for grown-ups, but for kids, it is more than that.”
Songmuang Chuaynukoon
4 SPIRIT OF YOUTH “A depiction of my ideal childhood fairy: a girl whose dress is decorated with toys and stuff from my old memories.”
LOCATION: Thailand MEDIA: Photoshop, pigment ink pen WEB: www.instagram.com/meetmrtwoillust
Song is a freelance illustrator with a passion for Japanese manga and detailed work. “Most of my artworks are themed around childhood moments, antiques, old school toys, and amusing moments that express emotions.”
2 FURY “This image refers to anger. It’s like a fire burning inside people’s minds. Even if it’s hot and makes them suffer, people choose to not let go and keep carrying it with them anyway.”


4 27 SONGMUANG CHUAYNUKOON

IMAGINE FX ANNUAL FXPOSÉ 28 1

1 PATRON “I wanted to show a strong bond between an apprentice and his mentor/protector. I liked the idea of showing the cost of becoming this powerful being. Done for the Evilbook2 project.”
Iwo is an illustrator and concept artist keen on dark fantasy worlds, dynamic poses and twisted monsters. “My tastes were moulded in the fires of 90s pop culture, including Labyrinth, Dark Crystal and The NeverEnding Story.”
Iwo Widulinski´
LOCATION: Poland MEDIA: Photoshop, ZBrush, traditional and colour pencils WEB: www.artstation.com/widulinski
2 SSS’RA “For the upcoming Master Of Magic, developed by MuHa Games. A piece I had great fun producing. It has it all: dragons, VFX, a rocky environment, jewellery. I can render wings for days!”
3 MERLIN “Another piece from MoM. My take on a wellknown wizard. My idea was to depict his strength even in his posture.” © MuHa Games, Slitherine Ltd.
29 IWO WIDULINSKI 3 2


IMAGINE FX ANNUAL FXPOSÉ 30
Iryna Khymych
Originally from the Ukraine, Iryna studied English literature in New York City. “Today, I’m a freelance illustrator who loves to paint strong characters.”
3 KALADIN STORMBLESSED “This painting of Kaladin Stormblessed is based on Brandon Sanderson’s series of fantasy novels, The Stormlight Archive.”
1
2 3 1
LOCATION: US MEDIA: Oil WEB: irynakhymych.com
2 SUNRISE GUARDIAN “In this painting I wanted to depict a priestess who’s guarding an archway to the otherworld.”
PERSEPHONE GODDESS OF SPRING “Persephone at the entrance to the underworld. I wanted to combine the imagery of death and rebirth.”


IRYNA KHYMYCH 31 4 SHALLAN DAVAR “Also based on Brandon Sanderson’s The Stormlight Archive. Shallan bearing her cross, coming to terms with who and what she is.” 4

Interviews 34. Life lessons From experimenting to knowing when to stop, Marvel legend Adi Granov shares his advice on becoming a better artist 42. The art of Final Fantasy Discover how the team behind one of the world’s most popular games creates its innovative worlds and characters 54. The art of Dune Art director Paul Vermette shares what it took to bring Frank Herbert’s iconic book back to the big screen 42 54 32


34 33

IMAGINE FX ANNUAL INTERVIEW


LESSONSLIFEAll images © Marvel THEINSWINGING NEIGHBOURHOOD takeswebslingerThe inreader,theataim variantGranov’sAdi Spider-Man:forcover #1.WaratCity 35 ADI GRANOV legendMarvelstop,towhenknowingtoexperimentingFrom GranovAdi artistbetterabecomingonadvicehisshares


ew artists have had as much impact in the whole of Marvel’s output quite like Adi Granov. He’s best known for his work on Iron Man: Extremis, but he’s also found time to contribute to the biggest Marvel Cinematic Universe movies – Iron Man, Black Panther, Avengers: End Game – as well as video games, including Marvel’s Avengers and Iron Man VR. “It was all an extension of the same thing for me. I never really planned to work in comics specifically, it just happened. I wanted to draw and paint science fiction and action art, so whatever allowed me to do that, I was happy to jump into,” says the legendary artist. Adi tells us his art style translates well across all forms of media, and this was a deliberate decision on his part. “I loved films, comics, games and toys, so never wanted to limit myself to just one,” he says. “I’ve worked in games a lot longer than comics, and have now spent more time on movies than I ever did on anything else, but because comic work is more immediate – from my desk straight to the readers – it’s the thing which is most prominent.”
“I see success as something in the past, while I tend to view failure as a challenge to do better in the future. I suppose I’m driven by the concept of success as well, but I always tend to focus on things I could do better. Nothing ever feels as if it couldn’t have been done at least a little bit better, which is probably a good thing as it keeps me motivated to keep learning and improving.”
THE SECRET TO SUCCESS
1
AND… FIGHT!
STORIES BEHIND THE ART
Adi’s depiction of Iron Man taking on Iron Monger appeared on the cover of The Art of Iron Man. STICKING THE LANDING Boba Fett channels his inner Iron Man, in Adi’s Star Wars #1 Forbidden Planet variant cover.
36 IMAGINE FX ANNUAL INTERVIEW
With such an exhaustive portfolio, does Adi have one cover he covets above all of them? “Not really…” he tells us, but some stick out for personal reasons: “The Galactus [cover] I’m very happy with as he’s one of my favourite characters from childhood and I feel like I did him justice. The Wolverine on the motorcycle feels like my definitive depiction of him – all power and fury. The A New Hope cover was very exciting as I got to do spaceships and then George Lucas bought the original painting, which is very cool. So, yes, there is a story behind many of them which gives them life beyond just what you see in print.” The artist counts Jean Giroud among his inspirations. Hints of the French icon’s style can be seen in Adi’s best work. Syd Mead and Hajime Sorayama are also in the artist’s DNA, as well as Drew Struzan and Richard Amsel. “I started studying their work in college as I got more interested in using airbrushes,” he says. His influences and workload are diverse, which means Adi never relies on one art form to get the job done. His comic covers are all rendered in mostly acrylic paints, while film and video game designs are done digitally in Photoshop, “unless I get bored and do an occasional traditional piece”. Traditional, digital, or sculpting in ZBrush, Adi approaches his work with a sense of freedom. If you want to achieve a career in comic art that’s filled with the variety and opportunities as Adi, then follow his advice…


KNOW WHEN TO WALK AWAY
DON’T LOOK UP Galactus is one of Adi’s favourite comic characters – he portrayed Marvel’s planet-eating villain for the variant cover of 2015’s The Amazing Spider-Man #12.
“I’ve always found sculpture more natural than drawing and painting, so I’m really enjoying ZBrush. I’m not sure I could claim that everyone should do it, but there are also no drawbacks to learning new skills. For me, the most difficult part was just learning the interface and all the various tools and ways of achieving what I want. The actual sculpting part has been really fun.”
“I find that with experience you learn that art is like an elastic band and you can keep stretching it until it breaks, so the trick is knowing where that sweet spot is to leave it under as much tension as possible, but not going overboard. Over the years I’ve killed a lot of paintings by overdoing them, so I try to judge the limit, but it’s always a challenge.”
2 3 37 ADI GRANOV
TAKE THE TIME TO LEARN A NEW SKILL

AGAINST ALL ODDS Keyframe art that Adi created for the film Iron Man 2, that shows a suited-up Tony Stark and War Machine battling against multiple Hammer Drones.
EMBRACE DIVERSITY
LOVE YOUR HEROES
UNEASY RIDER Adi spent time making sure his depiction of Wolverine’s motorbike was accurate, in this painting created for Sideshow Collectibles.
“A lot of my heroes in movies, music and sports looked different from me and as a kid it just seemed natural. Of course, I was naive, but it wasn’t until I moved to the US that I realised all the socio-political issues surrounding race, gender and sexual orientation. My groups of friends have always tended to be very mixed, so it was always natural that all should be represented respectfully. It’s not something that I’ve had to force, but it is something that I’ve tried to embrace.”
“Jean Giraud [Moebius] changed my life. He was my first true hero and he was very versatile with a massive imagination. His work is what gave me the idea that I can do many different things as he worked in comics and movies and in different styles and even under different names. It felt like he was always pushing and exploring. He also did one of my favourite Marvel stories, Silver Surfer Parable, with Stan Lee.”
4 5 38 IMAGINE FX ANNUAL INTERVIEW


CLAWS
6 39 ADI GRANOV
“If there’s one theme to my life as an artist, it’s that I’m obsessed with learning and absorbing as much as I can from anywhere I can. Otherwise it feels like I’m shortchanging myself. I always try to advise young artists to keep their minds open to everything around them, but sometimes it’s hard to convince people that the specific interest they have will only be helped by broadening their horizons.” OUT Black Panther takes on Erik Killmonger in Adi’s dynamic artwork, created for Marvel Studios Fine Art Print line.
KEEP AN OPEN MIND

CHALLENGE YOURSELF
LEARN FROM PAST ERRORS
“I never go back and work on a painting once it’s done, but I do look at them and try to learn from the things I see as deficient and improve on the next one.”
“I really enjoy doing layouts more than I ever did before. Lately I’m having huge fun just sketching ideas. I try to be a future friend to myself as I’m the one who will have to paint them, but I still take pleasure in coming up with challenging layouts to push things beyond the ordinary.”
IT’S… COMPLICATED A tender moment between The Vision and Scarlet Witch. Adi’s art appeared on the variant cover of Deadpool #13. 7 8 40 IMAGINE FX ANNUAL INTERVIEW

CHOOSE COLLABORATORSGOOD
“Make sure that the structure of the layout and the drawings are solid and worked out. You don’t want to be fighting poor foundations after you start rendering. Much better to spend the time early on to get it right, especially in multi-character pieces where there will be a lot of anatomy, posing, perspective, lighting and so on.”
“I’ve done so collaborationsfewwith writers that my experience is limited, but as with anything, working with the right people is important.
For the 600th issue of Daredevil, Adi teamed the blind crime-fighter with the assassin Elektra.
FLYING HIGH Captain Marvel soars in variant cover art from Infinity Countdown #1.
10 9
FOCUS ON THE FOUNDATIONS
41 ADI GRANOV
It’s crucial that the styles gel and there’s an understanding that for it to work, there has to be collaboration.” STRIKE A POSE Keyframe art created by Adi for 2012’s film The Avengers, with a US super-soldier leading the fight against an alien invasion.
RED-LETTER DAY


ENDWALKER JOBS Jobs are the classes players can use in the FFXIV online MMORPG, and art team lead Yusuke Mogi has illustrated them all…
BACKGROUND BY DESIGN Like many, background concept specialist Rokuma Saito knew from an early age he wanted to be an artist. At high school he’d “visually express the landscapes that I imagined in my head.” It was an obsession that led him to “try my hand as an artist in gameTheproduction”.namesofthe places he’s helped create – Thavnair, Eulmore and Abalathia – play on the tongue; the dextrous titles suggest magical, extravagant worlds and they don’t disappoint. Saito-san’s landscapes feature rocky plateaus teetering on crystal points and colourful towns nestled in green mountains that recall southern European villages by way
THE ART OF Final Fantasy is one of the world’s most popular and long-running video games series. Ian Dean discovers how the art team creates its innovative worlds and characters
L 42 IMAGINE FX ANNUAL INTERVIEW
et the art do the talking is something you don’t hear too often in the social media age. A new illustration is often accompanied by interviews, hot takes and reactions. The art team behind Final Fantasy XIV and its latest expansion, Endwalker, are a little more old fashioned. They rarely appear for interviews, safe in the knowledge that the art they create is some of the best in the industry. Speaking exclusively to ImagineFX, we meet some of the talented artists behind one of the longest-running video game series. With Final Fantasy XIV: Endwalker releasing 7 December, the latest expansion for the successful MMORPG, the famously shy artists behind the worlds, creatures and characters reveal their approach to producing consistently beautiful art and game designs.
FINAL FAN


TASY XIV Reserved.RightsAllCO.,LTD.ENIXSQUARE2010–2021©imagesAll


VIERA SAGE Mogi-san’s new Viera concept for Endwalker, created with a line-art style influenced by Akihiko Yoshida.
of Mumbai. The worlds he paints appear to be in motion and inspired by competing influences, but they work together to create innovative spaces for players to become lost in. The artist says he’s inspired by “the scenery of places I’ve visited in the past, photos of places I’ve never been to, pictures by various artists,” as well as films, games, anime and manga. “Like many artists,” continues Saitosan, “I get my inspiration from the things around me. In the last few years I’ve learned a great deal from the Impressionists of the 19th century.” When creating an environment Saito-san will look to the real world but then clash, crush and combine locations to find new ideas. His style is unique in video game concept art because it’s defined and stylistically unique while remaining identifiable as Final Fantasy art. The artist uses vibrant colour to create restless spaces that demand to be explored. He tells us his style was developed early in life, RADZ-AT-HAN (INSIDE) This city region is now new and explorable in FFXIV, Saito-san says it’s a vibrant and colourful space, and paired with intricate details.
EULMORE AETHERYTE Concept art created by Saito-san to illustrate the town of Eulmore, first introduced in Shadowbringers. while still at high school. He read the manga Record of Lodoss War, illustrated by Akihiro Yamada –“that totally blew me away,” he says. This, shares Saito-san, became the starting point for his current art style. The artist clarifies: “The final turning point for me to join the games industry was Vagrant Story, which was released by Squaresoft [prior to the merger] in 2000. I was quite heavily influenced by Akihiko Yoshida, who handled the art for this title.”
BRINGING LIFE TO SCENES The concept art for the city of Radz-atHan inside the land of Thavnair, new to Final Fantasy XIV: Endwalker, showcases Saito-san’s ability to draw in the viewer. The scene is bustling with activity, the characters urge us into the painting, and the use of colour rarely lets the eye settle. We’re forced to scour the scene picking up visual clues and cues as to what this place will be like to roam within.
44 IMAGINE FX ANNUAL INTERVIEW


Saito-san says this is his new workflow: “There used to be a time when I’d complete the production of design and concept art using only traditional ‘analog’ materials,
Saito-san begins a new concept with paper and pencil to come up with the raw ideas. “I don’t often start immediately with drawing digitally. I let the image develop on paper, and when I’m satisfied that I’ve reached a stage where I feel it’ll work – even if it’s not fully drawn – I’ll scan it,” he says. The scan marks the start of the digital phase for Saito-san, who then uses Photoshop mainly for his background paintings and switches to Paint Tool SAI for the character’s lineart, importing these into Photoshop when detail is needed.
45 THE ART OF FINAL FANTASY XIV ENDWALKER
“The impact that colour has in art on the viewer is so great that it can evoke emotions and stories all by itself,”
Humbly, Saito-san says he feels colouring is one of his weakest skills “because during my time as a student, I’d always draw in monochrome”. It’s an area of his art he’s been working hard on since becoming a professional.
ALPHINAUD LEVEILLEUR Namae-san created this concept to show how faithful companion Alphinaud Leveilleur will look in Endwalker, the first redesign of the character since 2013. RADZ-AT-HAN Saito-san’s colourpacked art teases how the new city of Radz-At-Han will look to players of Endwalker.FFXIV: I think that colour can help modellers and designers understand the concept art divulges Saito-san, explaining colour use in concept art is vitally important. “In the case of game production, I think that colour can help modellers and designers understand the concept art. Based on these ideas, I’d say that in addition to ‘enriching the appearance of the picture’, I place importance on ‘conveying the elements contained within, without misunderstanding’.”


As with Saito-san, Namae-san begins most concept art for her game projects using pencils for her linework, “but sometimes with mechanical pencils or ballpoint pens,” she adds, telling us she’ll then digitally paint the scanned sketches. “I’m not very particular about how I draw, and I still haven’t settled on a certain way of drawing because I go through a trial-and-error process every time, depending on the motif, subject matter and technique I want to try at the time,” she reveals. “When I want to minimise the time spent on a design illustration, I leave the ‘analog’ lines in place and only lightly colour and adjust the lines, but when the texture and feel of the materials are important design elements, I may include the texture of dirt and so on in the illustration.”
DANCER Namae-san says: “I often create design illustrations or illustrationspromotionalbyusing a combination of various tools such as pencil, pen, watercolour, and airbrush so that no ‘analog’ lines remain.”
46 IMAGINE FX ANNUAL INTERVIEW
I feel that the touch when drawing and/or the sensation of it feels better for me
Namae-san has been designing characters since 2006’s Final Fantasy XII, but she’s become more known for her work on Final Fantasy XIV and its expansions, concepting and updating some of the main heroes and villains of the online series. Her love of the Final Fantasy series comes through as we delve into
but now I’ve settled on this way of doing things, considering the combination of time, quality and freedom.”
THAVNAIR BUILDING Saito-san says: “The reason I IwhichGenesishugeplacedrawingstartedinthefirstwasduetotheinfluenceofNeonEvangelion,Iwatchedwhenwasayoungboy.”
GIVE ART CHARACTER Lead character concept artist Ayumi Namae has been on a similar journey with her art. There was a time, she tells us, that she would only use Photoshop, but for the past five years Clip Studio Paint has been her go-to software for Final Fantasy XIV designs.
“Functionally,” she begins, “there’s not much difference between the two, but I feel that the touch when drawing and/or the sensation of it feels better for me.”


WHITE MAGE Namae-san says she designed this mage character based on medieval fantasy film costumes and as a reference to the older Final Fantasy pixel art games.
“The designer team, including the 3D team, now has more experience and is able to create designs with a higher degree of freedom than when we were working on Patch 2.0. However, when we were working on the Choral Attire there were many asymmetrical parts and a large area of soft cloth that was difficult to express with polygons, making the production quite a challenging process.”
“The bard’s Tier 1 Artifact Armor, Choral Attire, was designed with Yoshitaka Amano’s design line in the Final Fantasy series strongly in mind.”
“Final Fantasy XIV has many different cultures, so I gather motifs that suit each of them and reconstruct them to create the base of the design,” she tells us, offering an example. The Paladin had an orthodox platemailbased design in the new game. “[It has] a little bit of glamour,” says Ayumi Namae was responsible for the various forms of the Bard’s costume but says the Choral Attire that was created for the 2006 expansion A Realm Reborn is one of her favourites. “It’s a particularly memorable set of gear,” the artist says. “Looking back now, I think it was the first step in incorporating Amano-san’s graceful Final Fantasy design lines into Final Fantasy XIV’s equipment.”
MALE VIERA You’ll be able to play as a male Viera in Endwalker, and Mogi-san gives us a glimpse.
Iconic Final Fantasy artist Yoshitaka Amano became a crucial influence, reflects Ayumi Namae
A DESIGN THAT LOOK TO THE PAST
Now, some years later, the linework and designs of the legendary Final Fantasy artist Yoshitaka Amano are incorporated into, and inspire, much of the work of the Final Fantasy XIV art team. Looking back before A Realm Reborn, Namae-san says: “At that time, the designs were mainly rugged and there were no pieces of gear close to Amano’s design lines. When Naoki Yoshida was appointed to Final Fantasy XIV and during the gear selection process, the idea of Choral Attire was selected for the AF1 series [AF refers to Artifact Armor, gear earned with level increases], which we were working on as the centrepiece under the statement of ‘creating a Final Fantasy’ for Patch 2.0. I was, of course, happy, but at the same time I was confused andSheworried.”continues:
THE AMANO INFLUENCE 47 THE ART OF FINAL FANTASY XIV ENDWALKER
Namae-san’s influences, particularly on her rendering of armour. She has a clear passion for the RPG series, saying “the Job images from the early Final Fantasy pixel art days and Yoshitaka Amano’s design lines in the Final Fantasy series,” have been a major inspiration for her. But Namae-san also looks to the real world, historical fashion and fantasy series such as Game of Thrones and The Lord of the Rings for new ideas.


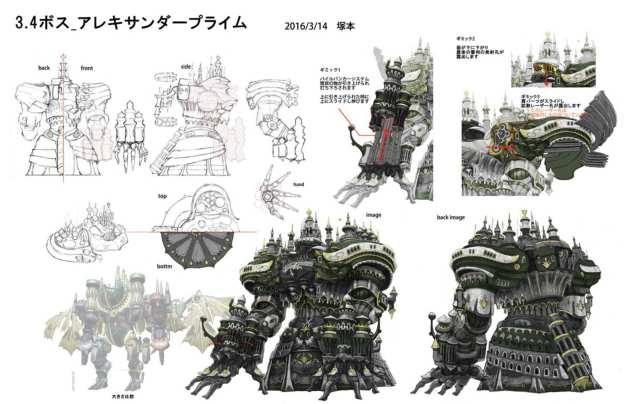
backwardsWork “In the past, when I designed Summons in Final Fantasy XIII and figures based on CruisesafenoPerfectusetransformation’.backwardsemployedmethodologyascombiningtransformation/elementssuchBruteJustice,thethatIwasto‘designfromaftertheIcouldn’tthesametechniqueforAlexander,andIhadchoicebuttotaketheroadandmaketheChaserplugintothebodytoformthehead.” Give it legs “The planning team asked me to give Alexander legs, and I had already designed an Alexander Prime with legs, but it was rejected. So when I accepted the request, they wanted me to transform Brute Justice and Cruise Chaser, and merge the two together.” CREATING THE ICONIC ALEXANDER PRIME Tetsu Tsukamoto details how he approaches concepting the stages of a classic boss 48 IMAGINE FX ANNUAL INTERVIEW


At the heart of Namae-san’s approach is for concept art and character design to tell a story. “Each design is a piece of the world of Final Fantasy XIV, so the task is to create a design that visually expresses the cultural sphere and setting while incorporating elements that are appropriate for that piece. With each update, the world of Final Fantasy XIV expands, so it’s hard to differentiate aspects of the game from the rest, but I’m very happy when I can express it Diggingwell.”deeper into this aspect or constant change, Namae-san explains how working on a game like Final Fantasy XIV that’s forever changing and improving with live updates is both satisfying and challenging. The release cycle of updates is fast and the art team responds to feedback from players to incorporate changes. “I think it’s one of the most rewarding things that you cannot experience for offline titles,” she says.
“There are also a lot of rules for players’ gear, especially when it comes to the length and spread of hems, shoes and gloves,” adds Namae-san, “so that they can be combined Beat the boss?
Each design is a piece of the world of Final Fantasy XIV…
“The rest was done on the game side. Fantastic model data was prepared, and the textures and motion added. The only regret I have is that I wasn’t able to take on the challenge of Alexander Ultimate due to my shortcomings as a player.”
TELLING STORIES
“When [Naoki] Yoshida made the rough selection, he had a vision for the opening act of the trailer,” says Namae-san. His words, she tells us, were: “a ‘Warrior of Light’ in a hooded robe is walking on the moon, looking down, and every step is shown in the shot, and then comes the heavy sound of clanging armour”. She continues: “I expanded on the visuals from those words, bringing to mind the heroic image of the Paladin in the Final Fantasy series.”
transitionsDesigning “As for Brute Justice, I ran out of ideas when I redisassembled the transformed body and replaced the positioning of the arms and legs. To this end, a meeting was held to discuss the transformation and combining process. As a result, we settled on the idea that for Brute Justice would first be separated and absorbed by Alexander Prime, and the arms and legs would then protrude out from the body, which was suggested [by] the team responsible for in-game implementation. This idea didn’t occur to me because I was thinking about Final Fantasy XIII Summons and Brute as a ‘toy’ of sorts, and as such I was thinking about transformations that would be physically possible.”
Creating concept art for an online game comes with its own peculiar difficulties, says Namae-san. The sheer number of players in a game like Final Fantasy XIV, a record-breaking 67,000 concurrent players on PC alone, ensures there are many restrictions on the specifications of assets.
49 THE ART OF FINAL FANTASY XIV ENDWALKER
Namae-san, who says the design was kept more realistic to match the series tone of this final expansion.


“The opportunities to design exclusively for them are quite limited, but since the tail and ears are the most distinctive parts of the design silhouette, including proportional aspects such as height and muscle mass, I try to design them in a way that makes the most of the characteristics of the race and the image associated with them” explains the artist.
“It’s hard for me to name a favourite piece of art because I tend to lose track of what I’ve worked on a short while after delivering them. If I had to pick one, I’d say Kugane, where I was able to let my creativity run wild,” says Saito-san.
KUGANE This vibrant city debuted in the Stormblood expansion and is one of artist Saito-san’s favourites. “It’s where I was able to let my creativity run wild,” he says.
NIDHOGG Tsukamoto-san says he reworked the design of Nidhogg to distance it from the “big-bellied” dragons usually found in FFXIV. This creature first appeared in the FFXIV expansion Heavensward.
“Even if the design seems difficult to implement at the rough stage, the process of looking for loopholes in the specifications and devising ways to create a new impression is an interesting part of the work,” says the artist. “Thanks to the experience we’ve accumulated with the 3D team, we have much more freedom in design now than we did in the early days.”
50 IMAGINE FX ANNUAL INTERVIEW
EARS, TAILS AND MORE
“It was a very interesting idea as a weapon type that hadn’t appeared in Final Fantasy XIV so far, but it was impossible to implement as-is due to
In the case of Alisaie Leveilleur’s costume from new expansion Endwalker, Namae-san reveals this is the first completely original design since the game’s reboot with A Realm Reborn seven years ago. “So I designed it to take advantage of her ears as an Elezen,” reflects Namae-san, “and her delicate, lithe, fairy-like proportions.”
There are more pressures on an artist designing for Final Fantasy XIV than technical specs. The game has a roster of immaculately crafted races and species, and each has unique considerations when designing armour sets, for example. Namae-san says complex designs for characters with tails and ears, such as the fanfavourite Viera, can be challenging.
without odd overlaps with the varieties of gear that increase following each expansion.” Such things don’t dampen the team’s creativity, however, as Namae-san explains all “ideas are freely expressed” without restraint, and are then worked on to meet the needs of the 3D art team.
Weapons are given as much time as characters, and many members of the art team are often drafted in to create a new concept. Nouliths, used by Alphinaud, a Sage in this expansion, are new to Endwalker, and Namae-san details the process of bringing this new item to the game. Several young artists on the team drafted rough ideas based on ideas given by the “battle team”, and one was adopted.
WILD CREATIVITY


ROOM FOR NEW IDEAS
LANDSCAPETHAVNAIR Saito-san’s detailed design for the new area of Thavnair feels inspired by the Indian subcontinent and the Middle East. BALANCED ART Saito-san believes good concept art should be beautiful and also useful, saying: “I think that the skill of the artist itself is how well he or she balances these two aspects.” the specifications,” says Namae-san. Art team lead Yusuke Mogi refined the idea and later, with the 3D production team and motion team, art staff at the studio with experience in mechanical design created the weapon as players will find it in the game. As we discover from speaking with Mogi-san and Tetsu Tsukamoto, this is an art team working together to bring fresh ideas to the“Manygame.staff members are involved in the creation of new weapons for new Jobs, but compared to all the new Job weapons we’ve implemented so far, the design of the sage’s weapon was more difficult and challenging right from concept selection through to incorporating the specifications,” says Namae-san. “Having said that, I believe the end result is that we were able to create a weapon that brings with it a fresh new perspective.”
With so much work involved in every aspect of Endwalker’s design, we pose Namae-san one more question: when do you know a design is finished? Her answer is typically teamfocused, explaining “design completion” happens when everyone involved is happy. On Final Fantasy XIV that means deciding on raw ideas, taking the idea into 3D and creating a clean blueprint of the concept. Each team’s department signs off on the concept, and finally producer and director Naoki Yoshida checks the concept. Yoshida-san himself will often be involved at an early stage to look over ideas.
It’s a process the experienced character concept artist Tetsu Tsukamoto has become familiar with, but We have much more freedom in design now than we did in the early days
51 THE ART OF FINAL FANTASY XIV ENDWALKER


Mogi-san continues: “If there’s anything that should be highlighted for attention, we indicate them directly as notes on the clean drawing. If there’s any movement, we discuss with the animators in advance about what kind of movement mechanics are needed. To this end, a simplified diagram may also be included.”
REAPER The Reaper Job is new to Endwalker, and Mogi-san has had fun creating the shapes and details for this class.
THE AETHEROMATIC AUGER Mogi-san blends his anime and manga influences with more realistic design.
Yusuke Mogi says creating art becomes a collaborative process as he acts on feedback from the game’s broader art team.
CONCEPT ART REBORN
MALE VIERA Characters are designed to consider how players will use and modify them.
“First, we submit thumbnails to the planners, concept artists, modellers and animators,” he says. “After checking them, we get started on ‘clean’ versions of them. While adjusting based on the feedback and such, we’ll make one clean drawing of the idea and a simple three-dimensional drawing.”
By following his workflow Mogisan can prevent errors creeping into his designs that could slow down the animation stage. It’s simpler and cheaper, he says, to make revisions at the thumbnail stage than in-game when models are being created. “However,” shares Mogi-san, “even after the face graphics have been applied to the actual model, they can often look very different in cutscenes and other situations. Consequently, it’s often the case that we’ll adjust the faces of characters and humanoid monsters through trial and error after they’ve been incorporated into the game.”
Art team lead Yusuke Mogi breaks down his concept art workflow for Final Fantasy XIV: Endwalker
52 IMAGINE FX ANNUAL INTERVIEW


53 THE ART OF FINAL FANTASY XIV ENDWALKER
The artists we speak with have a clear passion for not simply this iteration of Final Fantasy, but a love for the series as a whole. They have a deep understanding of its lore, design and concepts, and are given room to create new ideas with a framework that encourages imaginativeFantasypreviousAnimaReflectingteamwork.onTsukamoto-san’sconcept,designedforagame,reworkedforFinalXIVandcreatedfromreferencesandguided by a broad and talented team, it’s typical of the studio’s approach.
Endwalker, as the name suggests, is the finale of the years-long Hydaelyn and Zodiark story arc that has kept players enthralled. “It’s the culmination of everything Final Fantasy XIV has done so far,” comments art team lead Yusuke Mogi. “From the diverse cultural cityscapes to the sinister dungeons, you’ll be able to appreciate a vast world that can be described as representing the essence of the Final Fantasy series.”
Tsukamoto-san enjoys the workflow of combining ideas, styles and even previously ignored concepts. When he was asked to create a “cruel” Summon (the series’ extravagant monstrous special attacks) for Final Fantasy X, he took inspiration from a dark fantasy manga and anime to craft the fanfavourite Anima. “From there I studied the atmosphere produced by artists such as Yasushi Nirasawa and Takayuki Takeya,” he tells us. “I found that both of the rough figures I produced had a good vibe, so I connected them so that one was at the top and the other at the bottom.”
the process doesn’t dampen his creativity or love of stumbling on to creative new designs. Fan-favourite creature Nidhogg is one of Tsukamotosan’s best, and it came about because the studio’s process and his search for inspiration came together. “When it came to Nidhogg,” explains Tsukamoto-san, “I was originally requested to create two figures, comprising a black dragon and white dragon. However, even after showing rough drafts to my superior at the time more than a dozen times, I just couldn’t get the greenlight. The thing that stands out is that in the end I got approval for the first proposal that was initially turned down.”
He continues: “I tried to design Nidhogg and Hraesvelgr as contrasts, incorporating scales and scissorshaped horns into Nidhogg, while placing fur and curled horns on Hraesvelgr. I changed the outline to distinguish them from the big-bellied dragons we had in Final Fantasy XIV thus far. The inspiration for those designs came to me by imagining that I was completely surrounded by their long bodies! At the time, I had just been transferred to the Final Fantasy XIV team from the old Final Fantasy XIII Versus (currently Final Fantasy XV) team, so I had a lot of ideas for attack methods and such.”
The inspiration for those designs came to me by imagining that I was surrounded by their long bodies!
A FRAMEWORK FOR TEAMWORK
Y’SHTOLA Fan-favourite character Y’shtola returns in FFXIV: Endwalker.
EULMORE Saito-san got into art because of the anime Neon Evangelion.Genesis“At the time I was constantly copying the characters drawn by Sadamoto,”Yoshiyukihesays.
RAK’TIKA GREATWOOD The luscious canopy of this wooded area was a fan-favourite in Shadowbringers, and comes alive in Saito-san’s brush-strokes.
The artist tells us: “It makes me incredibly happy to see that Anima is being used again, with the appearance this time in Final Fantasy XIV.”
The work this team has put in over the years represents some of the most inventive in video games, and Mogisan urges us all to play to the end. But don’t take his or our word for how impressive this is. When all is said and done, let the art do the talking…


Art director Patrice Vermette shares what it took to bring Frank Herbert’s iconic book back to the to big screen he spectre of the infamous Dune movie that never was hangs over any production based on Frank Herbert’s iconic novels, but for all the genius of Alejandro Jodorowsky, Mobius and even David Lynch, there’s always room to create something new.
The other creative elephant in the room was Star Wars, and nearly every other sci-fi movie that came after it. The first Dune book was released in 1965, and set the tone for many space operas to come. It was crucial for Patrick that this version steered clear of resembling a galaxy far, far away. Dune is a creative chicken and egg, and a unique puzzle to piece together.
54 IMAGINE FX ANNUAL INTERVIEW
DUNE
“It was important to have a fresh look,” says Dune’s production designer and art director Patrice Vermette, who says he rewatched the Lynch movie and re-read the books, with a clear idea this iteration would be different. A timeless, realistic and bold interpretation, Dune aims to draw on Frank Herbert’s desire to take us to places we’ve never been, a universe that blends science fiction, fantasy, myth and historical influences.


The Dune concept art team took inspiration from whales for the massive sandworms of Arrakis.
reserved.rightsAllInc.EntertainmentBros.Warner2021©imagesAll FILTERING INFLUENCES
SIZE MATTERS
Patrice Vermette designed the city of Arrakeen and the film’s sets to feel stark, harsh, hard and overbearing.
55 THE ART OF DUNE
DETAILED WORLD-BUILDING Patrice created a sketchbook of illustrations and mood boards; this eventually included pictures of every set, prop and costume for all departments to reference.


Patrice explains: “On Arrakis the winds are 150 kilometres an hour, they can tear metal to shreds […] so if I’m going create to a big city, I’m not going to have straight buildings because you’d want the wind to travel easily [over them] so I’m going to make everything angular.”
CALADAN Patrice designed the colour palette of Caladan to be primarily hazy autumnal greens, greys and blues, giving the impression of constant rain.
CRAFTING COSTUMESTHE Costume designers Bob Morgan and Jacqueline West reveal the artistry behind Dune’s costumes is not an illustration, you can’t wear anThisillustration.”isthedifference between designing a costume to be worn and a VFX shot. It’s what makes Bob’s role so interesting. The concepts he’s working with exist – they’re tangible andBobrelatable.continues: “So when you put it on and turn somebody around, or they move in it, and you say, ‘Oh, this could be better or that’s perfect, you know, and you do find your way by distilling all the time, down to that thing, both in colour and style, and texture.”
A team of costume makers were hired and flown to the Budapest set to ensure accuracy.
HARKONNENPROBESHIP
Each house has its own unique ship design –the Harkonnen’s are insect-like in look.
“It was important for us to have a fresh visual approach,” says Patrice, who reveals he’d shown concept art to his son and asked if it reminded him of Star Wars or a video game. “We knew we’d be compared to Star Wars because Frank Herbert’s books influenced Star Wars in so many ways, and Star Wars was an influence on me,” he says.
PAUL ATREIDES’ DRESS UNIFORM Jacqueline West reveals the Atreides costumes were inspired by the Romanovs: “They both were tragic, romantic dynasties.”
Setting this movie apart from anything that had gone before meant studying the book and eking out the “clues and cues” author Frank Herbert offers. It meant crafting worlds built around elemental descriptions.
An artist himself, Bob compares costume creation
56 IMAGINE FX ANNUAL INTERVIEW
Working with concept artist Keith Christensen, veteran costume designer Bob Morgan explains how the outfits for Dune underwent many changes, from concept to prototype, “And we would kind of hone in on what that feeling was and what that idea was,” he says, adding insightfully: “A costume
WORLD BUILDING
DAVID IDAHO’S FLIGHT SUIT
For building worlds like Dune, it meant going back to the source material. Patrice offers the Caladan people as an example. In the book it’s a oceanic world, and the ancestral home of House Atreides. “Their culture, their economics, is about rice and wine and soy and fisheries,” details Patrice. “So you try to put that into the film, and with the medieval aspect of the ancient family tradition, and you try to show that in the world that you’re building in a sense of what you’re designing, so it becomes a real place.”
The film’s production designer shares how his team has stayed close to the book’s descriptions of its worlds, meaning the city of Arrakeen is “the largest humankind has ever seen, which I don’t think we’re seen in the previousComparingmovies”.filmmaking to being in a band, Patrice says: “The production designer is like the bass player, there to support the story.” His belief is that good concept art and production design should be “invisible”. Patrice takes cues from the script to inform his design work, but always with the mantra of “supporting but not overshadowing the story”.
We knew we’d be compared to Star Wars because Frank Herbert’s books influenced Star Wars in so many ways


The exoskeletons of insects and arachnids informed segmentedthelook of the Harkonnen costumes .
Dune’s iconic stillsuit, while fictional, also lends itself to science fact in Bob’s mind. The designer worked on the TV series From The Earth To The Moon where he studied how space suits work. The stillsuit, says Bob, has similar principles. “It’s something that recycles […] In this era, this very timely era where drinkable water is disappearing.”
to distilling form and detail in a painting. And just like painting, a costume designer tussles with the idea of knowing when something is done. “Well, it kind of lines up in my head with the image that I’ve seen.” Bob tells us good costume design is about discovering the character. In Dune this means finding the balance between the competing worlds; House Atreides, House Harkonnen and the Fremen of Arrakis dominate the“Ourstory.challenge and our goal was to make each one unique, to reflect what the world was, and visually be able to see in a moment who each were […] and we did that both in colour and feel,” reflects Bob. “It is wonderful when they are so distinctly different. When you have diametrically opposed cultures and worlds, it does make it easier in some ways, and it does make it more challenging at the same time because you want to do something that’s fresh and yet believable and visually appealing.”
Courtesy of Warner Bros. Pictures and Legendary
INFLUENCESHISTORICAL Jacqueline West has a master’s degree in art history focusing on medieval art. Her love of the era is clear, in these designs for Lady Jessica’s entourage. functional feel. Looking to history and modern culture the costume concept artists created outfits that were built around function and form. Bob reveals how the team looked at how people use wraps in the desert as wearable tools; the wraps keep the body cool and head wraps can be unwound to create yards of material, used as ropes, hammocks and backpacks, forJacquelineexample. used the romantic vision of Lawrence of Arabia as inspiration for when the House Atreides arrive on Arrakis, but also looked to the Tuareg people of the Sahara, particularly for the shape-language and motion of their“I’veclothing.always loved how the Tuaregs changed shape when they’re riding their camels or are walking in the desert. And how instead of having goggles or something protecting their eyes, they wrap gauze across their faces, and with all the wrappings were just their eyes showing. I thought it’s soJacquelineromantic.” even had vials of sand shipped from Jordan to colour match with her designs, and create Tuaregblue wraps to cover the stillsuits.
CLOTHES SHOW Co-costume designer Jacqueline West worked on the Atreides look. “I made them a dark bottle-green because it’s a green planet. They have water resources, it’s quite lush,” she says. “And so then losing it and losing their dynasty I used the Romanovs as an example for the shapes of the costumes. Dune is a post-computer universe, and that ensures the designs have a
Pictures 57 THE ART OF DUNE
HARKONNENRABBAN
BARON ARMOR
The Harkonnen armour was “based on insects” says co-costume designer Jacqueline West.


“Oh my God,” exclaims Patrice as we ask how long it took to decide on this film’s version of the awe-inspiring sandworms. After many concepts the team tore up their ideas and went back to the fundamentals. Patrice explains how he sat down with the storyboard artists to plan how these worms would be introduced, and look on screen.
ARRAKEEN WALL
DESERT VIEW Artist George Hull has described the spice harvester as “an intersection of a blast furnace and a desert scarab”.
58 IMAGINE FX ANNUAL INTERVIEW
And its teeth and mouth… “Does it really need these teeth? We see it more like a whale with these filters that draw out elements in the sand to eat. And then we look at the past of this creature, we show how it has broken and scraped itself on the world; its skin is
For people to believe in the extraordinary you have to set them in a tangible world
It helps that VFX can put up on screen anything an concept artist imagines. Today Patrice tells us it’s a “collaborative effort” and refers to Dune’s VFX supervisor Paul Lambert as “my brother”. It means as a production designer and concept artist Patrice says he needs to think in more detail. It’s not just about designing a ship, but considering how it works, how “the landing gear [and] wings deploy”. It’s about considering the next level of detail, “how the weight of a spaceship affects how it moves [or] how there’s always those additional details that create the sense of realism, like how sand moves and shifts as a sandcrawler lifts off.”
“Like the floors on Caladan,” begins Patrice, “the texture and the way the floor tiles are on slightly different levels… It’s fish scales; it’s designed to be like fish scales as it’s a part of their culture.”
“My references were birds, insects and helicopters,” says Patrice. “The design mutated as we started designing the world of the film, which is very angular and Brutalist.”
The same approach ensures the more fantastical elements of a movie can be brought to life in a believable way. The idea of the massive worms of Arrakis are seeded in beautifully designed murals and teased in the film’s scenery. By the time these god-like creatures emerge we believe they exist. “It’s a build-up,” says Patrice, explaining: “For people to believe in the extraordinary you have to first set them in a tangible and relatable world, you have to be as precise and detailed as possible so that people feel at ease and think, ‘okay, I know where we are and it’s not too crazy’, and then step by step you bring in the more fantastical elements.”
The city of Arrakeen is said to be the largest city in humankind’s history, and the Dune art team were keen to bring that scale to the movie.
MAKING FANTASY REAL
FLIGHT OF FANCY
While Dune catches the eye for its epic scale – cities the size of small countries, worms as large as towering skyscrapers – it’s the small details in the designs that sell believability of these imagined spaces.
From this new beginning the team asked questions: “How does this creature live? When it moves underground, how much of the landscape, because of its sheer size, how much of the landscape should move around it?”
THE WORM


The film has VFX but much of it was done in camera and on location in Hungary, Jordan, Abu Dhabi and Norway.
59 THE ART OF DUNE
DESERT VIEW
LAB ORNITHOPTER PAD Working with Patrice, concept artist George Hull and art director David Doran came up with the film’s ornithopteron-pointdesign.


“Ultimately, I’m there as a tool for the director,” says Patrice. The relationship between Patrice and Dune’s director Denis Villeneuve clearly works, because this is the fifth movie the two have worked together on. Referencing The End from The Beatles’ Abbey Road, Patrices says: “in the end, the love you take is equal to the love you make. And that’s how it is, he’s super generous. He gives you room to make mistakes… and it’s superimportant to make mistakes because that’s how you refocus.”
“I think it’s mostly about creating moods that will support the story as opposed to creating design for design’s sake,” he continues. Interestingly Patrice says good concept artists need to be “psychologists” because when talking with a director you “need to understand what’s really important to them so you can translate that into a Passionvisual”.and hard work is important, as you’d expect, but Patrice says that you needn’t force yourself to do the job. “I see my job as playing, I don’t work,” he laughs. This mindset protects you from criticism, as ultimately concept artists are working to visualise a director’s ideas, and you will “become discouraged easily” if you can’t balance your personal passion for an idea with what the director needs.
Everything in the film is inspired by nature: the light, the wind, the feel of the dust. Even these large vehicles look like giant beasts of burden.
STAY CURIOUS
As Patrice reflects on working with Denis he has one last piece of universal advice: “Don’t try to second guess what people want, just go for it.”
The design team created 200 core soldier outfits and over 1,000 costumes for Dune. COLOUR THEORY
60 IMAGINE FX ANNUAL INTERVIEW
cracked and scarred. And then we looked at roots and tree branches [as visual hooks] and this took us back to Herbert and the themes around ecology. You add, add, add and then it builds and becomes the reality, and what it needs to look like starts to become clear.”
An early choice was made to never show a blue sky – on Arrakis, white skies are harsher. I think it’s mostly about creating moods that will support the story…
THE BOOK’S INFLUENCE
The degree of thought and implied realism found in modern concept art for something as simple as a giant sandworm is incredible. Patrice and his team went so far as to consider the worms’ digestive system. He worked with Weta’s Greg Tozer on different diaphragms, and studied the muscles of the throat to create a believable creature.
WARDROBESEXTENDED
The level of research Patrice goes into in Dune feeds back to his belief that good concept artists “have to be curious”. This can come from all directions; Patrice says many artists working in films today have a background in architecture and design. Patrice himself bucks the trend with a grounding in sound design. But the idea is the same: be curious about how the world works.


The famous stillsuit design needed to be tailored to each actor, and every suit features bespoke details and talismans hand-picked by the cast to lend their characters a backstory. Moulds were made for each actor and each suit took two weeks to build. The suits were created by concept artist Keith Christensen, who had previously worked on Black Panther. “He was obsessed with the book,” says Jacqueline West. “The first drawing that he did of the stillsuit was perfect. I mean, nailed it.” Another Marvel regular, José Fernández at Ironhead Studio, was brought on to create a prototype of the stillsuit. “I love that guy,” says Jacqueline.
STILLSUIT IN ACTION
CULTURE CLASH “It was a real undertaking, because it required creating so many futuristiccostumesfuturisticwithouthavingtheusualreferencepoints,”saysJacqueline.
“Herbert describes the undersuit as being a micro-sandwich of layers of microfibres and cotton that pull the oxygen out of the air for the breathing nose,” explains Jacqueline.
REVEREND MOTHER “For the Bene Gesserit I use the Tarot cards because there’s a real mysticism in Frank Herbert and I used it for Charlotte Rampling,” explains Jacqueline West. “I used the High Priestess in the Tarot cards, and then I combined a lot of Tarot cards. The Queen of Wands, the Queen of Cups.” Jacqueline reveals she really loved using the Tarot of Marseilles as an inspiration, “which has a real medieval feel. I call this movie ‘mod-eval’, because I really went to medieval art and influences to create a world starting over in the future.”
PicturesLegendaryandPicturesBros.WarnerofCourtesy 61 THE ART OF DUNE
ANDAUTHORITYPOWER
The Reverend Mother Mohiam’s costume is a mix of chess board design, Tarot, and a Greek kamilavkaOrthodoxheadpiece.
“We referenced the spice market in Marrakesh in creating their colours, so inevitably they became the spice girls!” jokes Jacqueline Courtesy of Warner Bros. Pictures and Legendary Pictures
“It really shows her medieval queen glory on Arrakis,” says Jacqueline, who explains how costume maker Bryony Tyrrell worked on the chainmail throughout the film’s production. She describes the costume’s influences: “[These designs] are based on Balenciaga and how he took everything from [Diego] Velazquez and Goya but also medieval paintings. There’s a simplicity that’s almost spiritualistic to them.”
CREATING THE STILLSUIT
CUT FROM THE SAME CLOTH
Discover how Jacqueline West had a hand in developing three key costumes from Dune
FORM FUNCTIONFOLLOWS
“Everything followed the function of that suit,” says externalrunningweexplainingJacqueline,it’swhyseecrosswaystubesandthecodpiece.
LADIES-IN-WAITING
GOWN DESIGN Lady Jessica’s costume for her arrival on Arrakis has been described as the “most expensive costume ever made” by Dune’s co-costume designer Jacqueline West. Influenced by medieval fashion and the book’s descriptions, the design features hundreds of hand-made chain links.


techniques and inpirations behind her amazing fantasy illustrations 76. Max Dunbar The
Tokyo-based concept
Sketchbook 64. Daniel Bolling Walsh
and
his incredibly
Dungeons and Dragons character designs 64 70 62
us through the techniques he’s experimented with 70. Entei Ryu Discover
The concept artist showcases his portrait studies talks the artist’s comic book illustrator shares detailed


76 63

Daniel Bolling Walsh LOCATION:IDenmarkhavealways enjoyed drawing and computer games while growing up, and Warhammer was also a big hobby. I grew up in Sydney but moved to Sweden when I turned 21. I decided to pursue concept art and illustration, and I learnt a lot
Artist PROFILE
Daniel BollingWalsh
BREEZE Here is a portrait where I played with some more graphic ways of shading certain elements like the hair and neck, and leaving the details to the face.
POLKA DOT A portrait study practising lineweight and accents. I got a little experimental and added some Posca marker to spotlight the profile.
64
The conceptartist showcases h throughthe techniques he ex


I got a themarkeraddedexperimentallittleandsomePoscatospotlightprofile 65 DANIEL BOLLING WALSH
MOON A profile portrait of a fantasy character. I imagined her as a faun with a confident, untroubled look and prepared for battle.

practice.good Attempting to draw the features at anglesdifferentwasgood practice 66
A set of anatomy studies of the face that I did as a series. Attempting to draw and line up the features of the face at different angles was
STUDIESFACE


I played around with linework in this one, making it much more expressive. You can also see some of my structural linework in the nose and the circular lines to construct the head.
MIRROR
These are some sketches done using Procreate on my iPad; I love this app and its pencil texture type brushes. Here I’m playing with some hatching style and using the pen on its side to control the thickness of the pencil stroke.
67 DANIEL BOLLING WALSH
EARRINGS
GOLDFISH Expressions can be really difficult to get right, here we can see the fish is not as happy.


FLOOFS Here are a mother and cub floof, maybe more. They are curious of what they see. If they want to hide, they fold their ears downwards and hide amongst the mossy rocks.
SOFT LIGHT In these (particularly the right one) I found the anatomy to be much harder to draw as the lighting is much softer, it’s harder to find landmarks to compare distances between details.
68
In Photoshop I love to experiment with the colours to fit the mood of each portrait


These are some sketches done in Photoshop, where I love to experiment with the colours to fit the mood of each portrait.
69 DANIEL BOLLING WALSH
GRAPHIC SKETCHES

70
Entei Ryu LOCATION:EnteiJapanRyu is a concept artist and digital sculptor based in Tokyo, working in the industry.entertainmentAftergraduating from the University of Tokyo with a degree in architecture, Entei has worked for many famous titles of video games and movies around the world, as well as working on art in these scribbled sketches that can inspire me to be creative
WESTERNFANTASY Gold mining canyons floating in the air, mysterious legends, cowboys… no, dragonboys riding flying dragons. Drawn on an iPad with Procreate’s round brushes.
ORIENTAL ILLUSIONS
Inspired by 19th century Orientalism, wizards in the Far East, old men and imprisoned princesses. I used narrative compositions in these scribbled sketches that can inspire me to be creative.
Entei Ryu Discover the Tokyo-based conceptartist’s techniques and inspirations behind these amazingfantasyillustrations
Artist PROFILE


A sketch with the watercolourlike rendering I am used to, while incorporating some sci-fi design elements. Instead of detailed mechanical parts, I used generalised soft and hard lines to distinguish organic and elements.mechanic
RAN
71 ENTEI RYU
A collective of sketches with Oriental elements, mainly Japanese, as the theme. I actually start from a random corner and eventually fill the whole composition. I used abstract decorative lines and shapes to connect the various clusters, inspired by ink splashes.
A creature design drawn for a serial in CGWorld Japan magazine in 2018. A jumping deer with a divine nature, the hair shaping is the fun part.
CREATUREDEERDESIGN
SATURNPRINCESSANDHERGUARDS


DESIGN OF THE DRAGON MERMAID
The initial draft of my sculpture ‘Dragon Mermaid’ was originally conceived as a very complex and twisted dragon’s tail and the upper body of a petite girl, forming a sharp contrast. After turning it into a three-dimensional sculpture, I also made the underwater tail. If you are interested, you can go to my ArtStation to see it.
VEHICLECONCEPTANDRIDERS
I call this kind of sketching without a theme, and just drawing whatever comes to mind, Sketchaos. This unplanned sketching process is more like a kind ofveryentertainment,relaxing.
SKETCHAOS
72
Brainstorm sketches of a group of sci-fi vehicle concept designs, and their girl drivers.


One of my favourite series. I drew fan art while watching the last season (above) when the young Stark actors at the beginning had become adults, and I drew them as they were in the first season. The Battle of Winterfell (right) in the second episode was impressive, and here I recalled and composed the memorable scenes.
GAME OF THRONES FAN ART
Organic mech design. This stage focuses on large shapes rather than readability.
MECHA PROTOTYPE 1
73 ENTEI RYU
PROTOTYPEMECHA 2 A design draft from 2018, at that time I was experimenting with various interesting design workflows. For example, do some very basic random shapes in 3D software, put them in Procreate or Photoshop, and develop them into mechas.


Concept design for a Chinese collectibles statue company. It describes a giant dragon and tiger fighting on floating rocks. The contrast between line and point, big and small, movement and stillness highlights the dramatic confliction. The water and cloud elements act as support for the sculpture. It took me two days to draw this.
74
I just tried to feel the atmosphere of the story: a relaxing way to create THE SONG OF DRAGON AND TIGER

Some sketches of characters.female
Some sketching practice with references. The part worth mentioning is the line sketches, which I drew on my commute to work in the subway in Tokyo, to record people in their various states. I enjoyed the link with strangers during that time.
75 ENTEI RYU
GIRLS
COMPOSITIONSFANTASY
SUBWAYTOKYOPASSENGERS
I used fantasy characters to form a composition like a movie poster. I didn’t think too much about the specific design, I just tried to feel the atmosphere of the story: a very relaxing and enjoyable way to create things.


Artist PROFILE
Max Dunbar
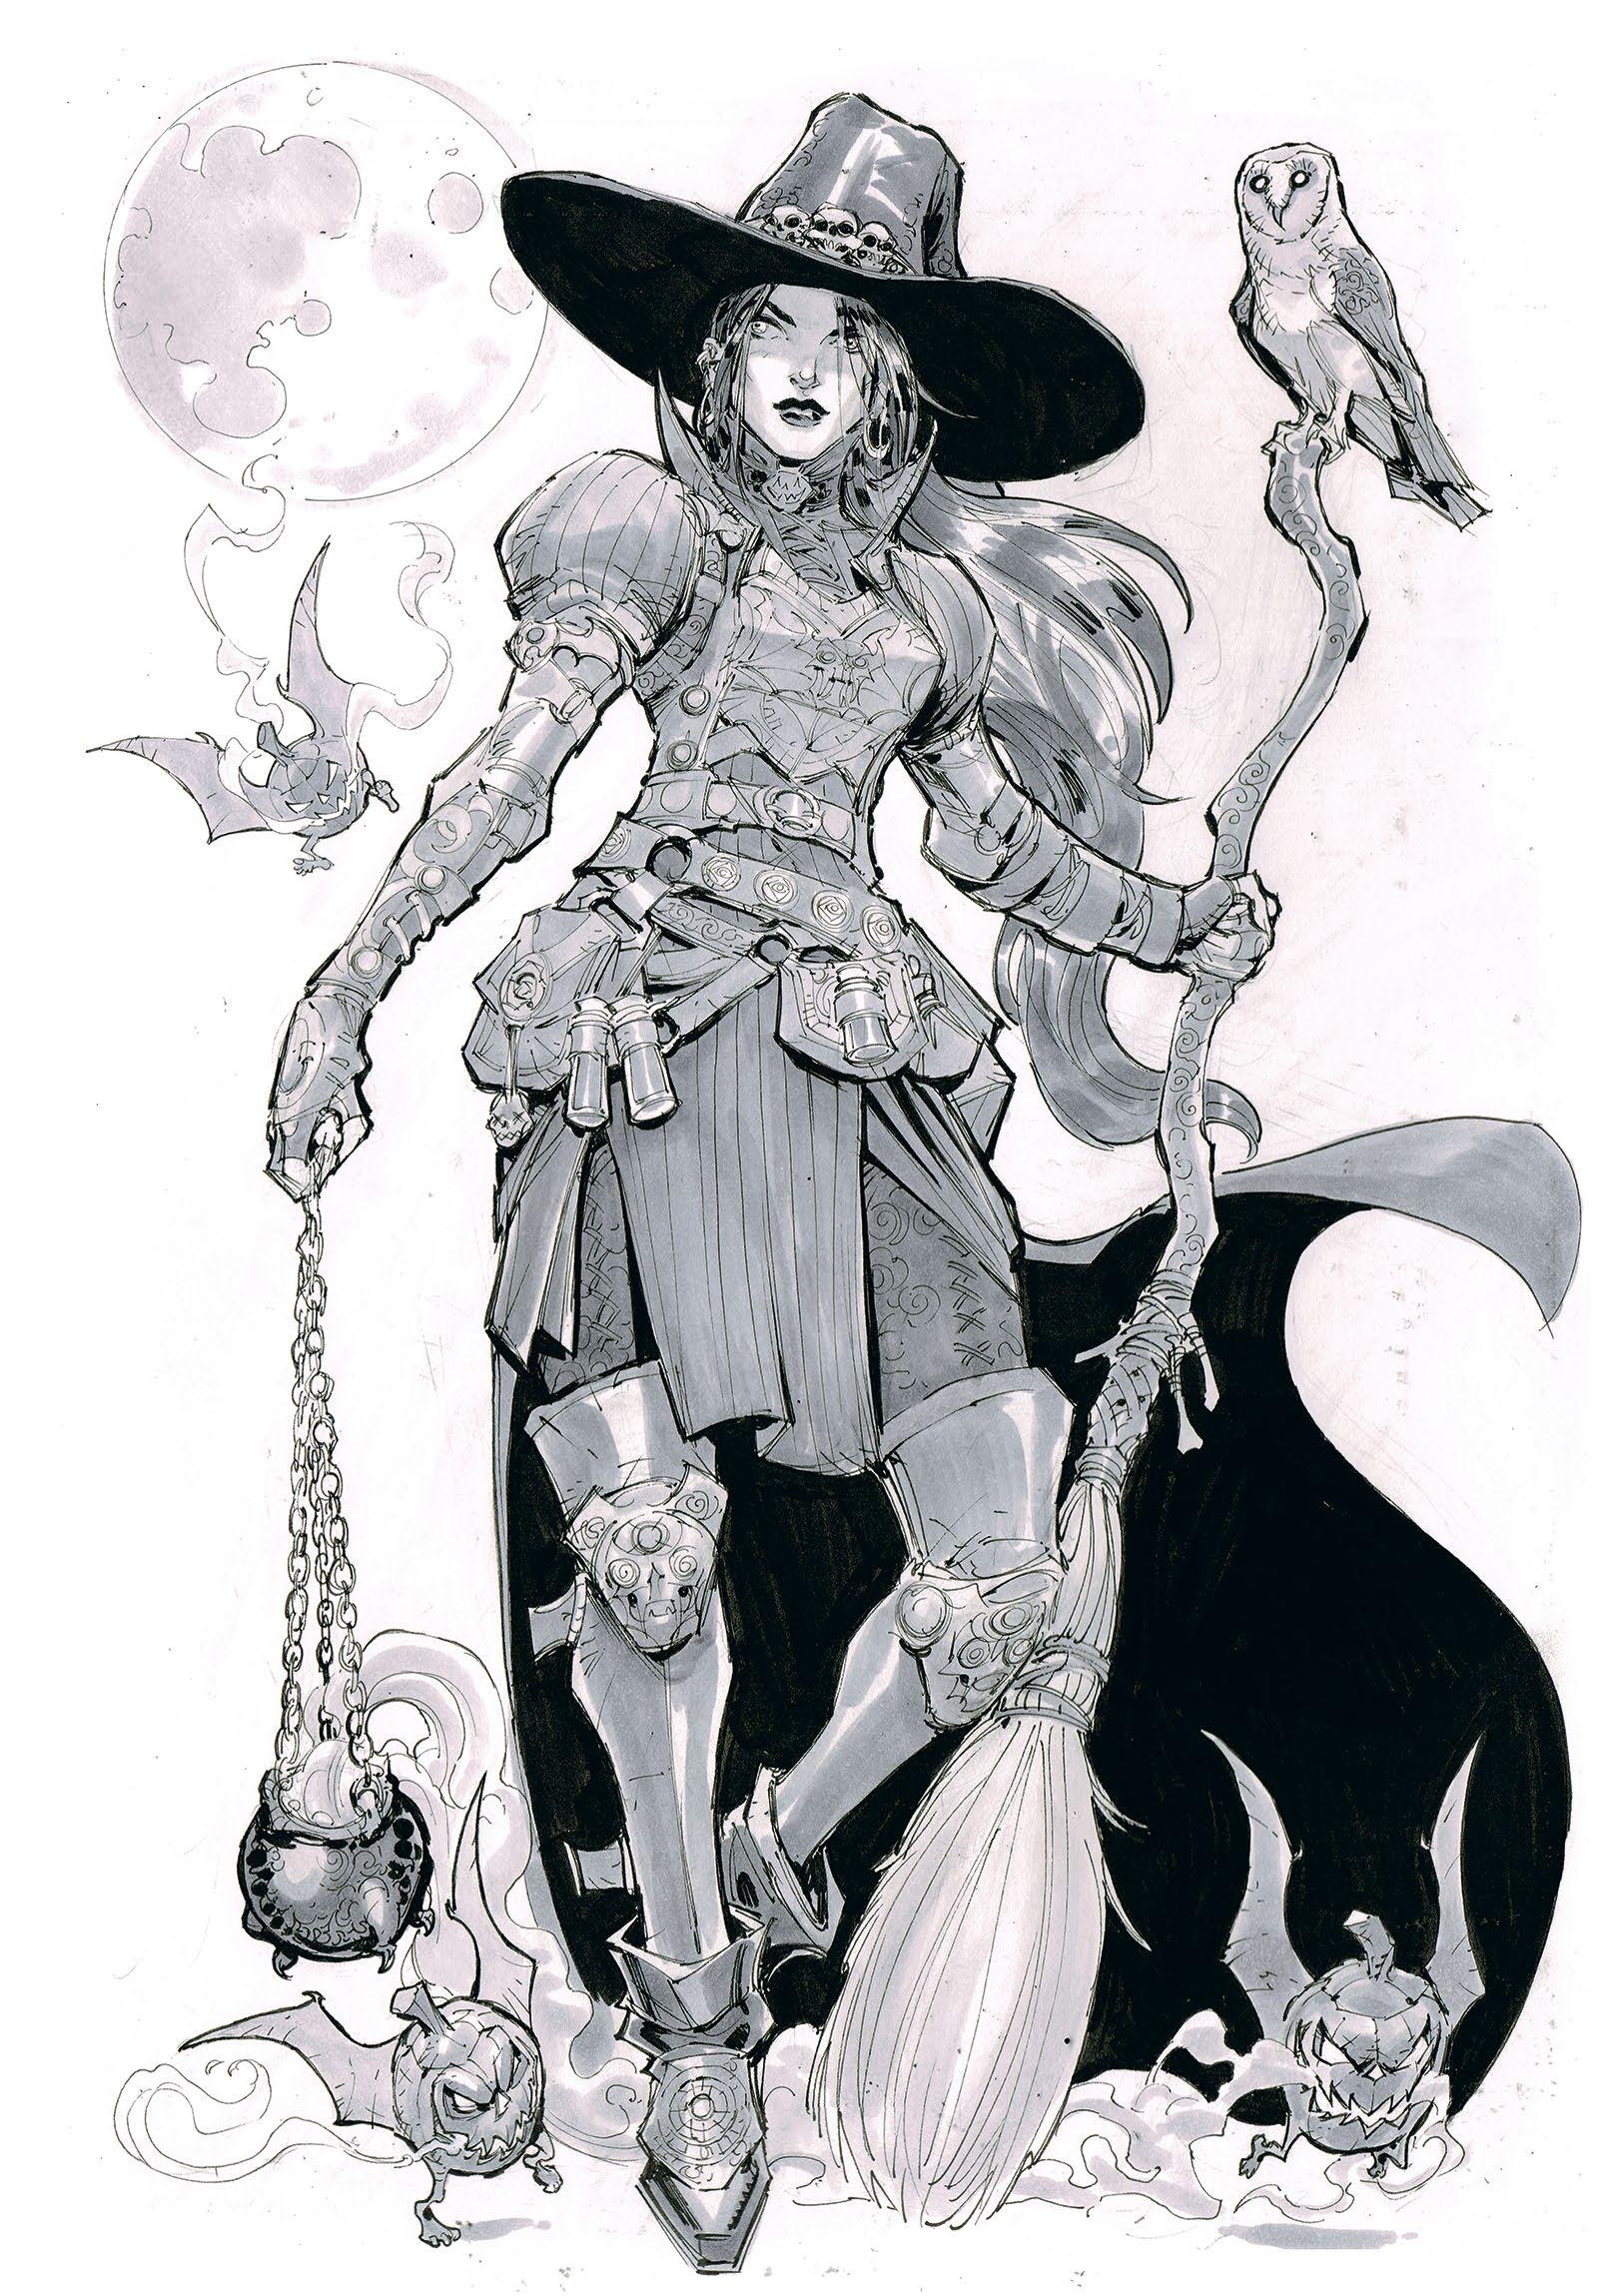
Most of the time, I like to sketch whatever comes to mind or seems fun to draw at the time. It was Halloween and I thought a witch and some weird pumpkin creatures would be fun to design.
The comic book illustrator shares his incrediblydetailed Dungeons and Dragons character designs, and the inspirations behind them
Max Dunbar LOCATION:MaxCanadaDunbar is a Canadian comic book illustrator and concept artist who lives in Vancouver, British Columbia. He has done work for Dungeons & Dragons, Hasbro, DC and Marvel Comics. When not drawing for work, he draws for fun, or hangs out with his wife Claire and their two cats Barney and Lloyd. www.artstation.com/max_dunbar
A WITCH, AN OWL AND SOMEMEPHITSPUMPKIN
HALFLINGFIGHTER Sometimes it’s fun to go against type. This halfling fighter is unpleasant and a bit of a dirtbag, as well as being tough as nails. Animal companions are a great way to add a bit of extra personality 76


77 MAX DUNBAR
ORCHALFPALADIN
Sometimes you find yourself with a whole bunch of time, and it’s fun to spend hours drawing a character from head to toe. I love giving characters animal companions, it’s a great way to add a bit of extra personality to the drawing.
One of my favourite things to do is to noodle away on ornate armour, or all the extra little details on a magic weapon. I usually only have a very loose idea of how it’s going to all turn out.
Bust sketches let me play around with a character idea without committing too much time to the drawing. Sometimes a fun idea pops into your head and you want to get it down on paper as fast as possible.
DRACONIC WIZARD
DRACONIC KNIGHT


Most of these sketches start with a super simple idea or prompt ELF VAMPIRE
Most of these sketches start with a super simple idea or prompt. In this case, I think I just wanted to see what a warrior would look like if they had eternity to acquire the best armour and craziest weapons. Being an elf and a vampire seemed like a good way to go about it.
78


ELF FIGHTER
I love the idea of a tiny little warrior riding a small creature as a mount. In this case, I thought an evil little sprite or brownie riding a bat could be a ton of fun to draw.
I love orcs, and I wanted to draw a character on a mount. I think I settled on a boar pretty quickly… seems like a good fit.
A hunter with her animal companion. I sketched a few different big cats before settling on the idea of making a smaller type of cat much larger (in this case a caracal). A fun way to put a bit of a unique spin on an animal and make it your own.
ELF HUNTER AND DIRE CARACAL
SPRITE ON A BAT
79 MAX DUNBAR
Sometimes I’ll just start moving the pencil on the page and see what starts taking shape. I think it’s a great way of finding out what you want to draw if you don’t always go in with a set plan.
ORC WAR BOAR


FIGHTERHUMAN
DWARF MONSTER HUNTER
OLD ORC My sketchbook has way too many orcs in it. I love them. Sometimes a fun angle for a shot pops into your head (in this case looking over the shoulder). Drawings like this usually go a lot faster with less erasing.
Sometimes you just get an inkling to draw an angrylooking guy holding a couple of weapons. Sometimes it’s that simple.
LONG REST
I really like the idea of seeing what the adventurers are doing when they take a break for the night. Sharpening their swords, making arrows and cooking a meal makes for a fun scene (especially if it involves an orc, a goblin and their vulture buddy).
I love dwarves, and I really enjoy trying different, slightly unexpected character designs with them. A more sophisticated swordsman was a fun angle to sketch out.


WEREWOLFVAMPIRE
81 MAX DUNBAR
ANDORCRAVEN
My D&D character! Haldar is a disgusting, strange character who collects a lot of odd monster parts and relics. He’s been cursed multiple times, so he doesn’t look or smell too great. Brisbee is his fiendish owl familiar.
HALDAR THE DWARF WIZARD AND BRISBEE
Once in a while I’ll get an idea or a visual will pop into my head and it will take a couple of tries before I can figure it out. I thought a mix of a vampire and a werewolf could make for an interesting-looking character, especially if he was decked out in crazy armour.
My love of orcs continues, as does my animal companion obsession. I love the idea of a grizzled orc knight travelling the land with his eldritch raven friend.
My manyhassketchbookwaytooorcsinit.Ilovethem


Twin artists Raide and Leffie reveal how they collaborated on a delightful scene inspired by their childhood art 126. Create anime-stylestrikingart
Explore one of the methods art director Tonton Revolver uses to make a kickass, anime-inspired illustration
96 84 Workshops 82
96.
Dave Greco showcases the key techniques behind the creation of a collaborative original character 116. Create your own comic Digital artist Rebekka Hearl teaches us the basics of producing a comic series, for web and for print, in Clip Studio Paint 122. Create a illustrationfantasy
Tristan Tait takes you through some different processes and design ideas that go into creating a boss character for a 2D indie game 106. Draw stylised comicpanel art
Igor Wolski orchestrates a range of characters to tell a story in a busy, detailed scene done in the ligne claire style 112. Create a charactermixed-genre
90.
100.
Discover how Christophe Young sketches, lines and paints a compelling concept of a dieselpunk samurai character Paint environmentsunique Illustrator Alayna Danner shares her method of creating an epic and engaging fantasy landscape using Photoshop Create retro art from 3D scans Ken Coleman mixes scanned action figures and digital painting to create 80s-inspired fantasy production art Improve your bossdesigns
84. Sharpen characteryourart


126 106 112 100 83


1 Explore poses in the initial sketch In this first sketch, my main focus is to explore different pose options to propose to the editor. Because it’s a cover, I try three or four variations to see how the composition works with the title and placeholder text. I also play with different thematics to drive the design in the second sketch stage. This was the third version, exploring a female dieselpunk, samurai-inspired character.
2 Second sketch stage With the notes from the editor, I restart my sketch. I prefer to restart on a clean slate rather than fiddling with my messy first sketch. This time I take care to draw a nice gesture with proper proportions and anatomy. I change the arms to create a more dynamic pose and block in the diesel generator on her back. These elements will make a strong base for a complex design.
GET RESOURCESYOUR See page 7 now! 84 IMAGINE FX ANNUAL WORKSHOPS
SHARPEN CHARACTERYOURART
As a onvideoandconceptprofessionalartist,Idesignillustratecomplexgamecharactersadailybasis.Asa disclaimer, properly building up to this level of complexity takes time and practice, so don’t be discouraged if the first try Throughoutflops!thisworkshop, I’ll give some insight into my design and illustration process to build a complex and believable fantasy character. Bear in mind that I won’t be going into the specifics of anatomy, perspective, structure, gesture, or composition, but having a strong foundation in these will help a lot in creating a dynamic and balanced image. I strongly believe that the success of a character illustration heavily relies on a strong basic gesture and good underlying anatomy. With this in mind, I’ll demonstrate how to layer on costume elements, props, weapons and a sympathetic facial expression to create a relatable character. I imagine this character as being particularly cheeky and cunning, so we’ll try to sell that personality in the way we draw the portrait. Moreover, I’ll walk you through the colouring and lighting process when rendering the character. We’ll briefly touch on skin tones, colour harmony, and material properties to create the illusion of realism. Finally, I’ll walk you through the last clean up stages of the illustration. Finishing strong is just as important as rigorous planning and a strong initial sketch, so don’t flake on the finishing touches! Let’s get into it!
Photoshop Christophe Young LOCATION: Canada Christophe is a professional concept artist and illustrator working in the video game industry. ifxm.ag/c-young
Discover how Christophe Young sketches, lines and paints a compelling concept of a dieselpunk samurai character
Artist PROFILE


85 CHARACTER ART


CUSTOM
Layering complexity to strengthen the design
3
Used to add subtle texture to areas like specular highlights on skin and fabrics. I love to use this brush for hair and other stringy materials. Creates cool, flowing brush strokes. My all-purpose sketching and painting brush. Very flexible by varying the hardness and size. BRUSHES:
PHOTOSHOP
RAKEDOTS
With the base design drawn, I layer costume elements and props to push the design as far as I can. I try to keep in mind the main gesture lines to place the elements in a way that complements the pose and accentuates the silhouette. I’m also planning ahead where to have areas of rest and areas of details, which helps to create a balanced image.
SOFT ROUND RESOURCES 86 IMAGINE FX ANNUAL WORKSHOPS
4 Refining the drawing In this stage, all the elements have been roughed in. I zoom in one step to refine areas I know I’ll need help with when painting. For example, these mechanical parts on her back are always tricky to paint well if the design isn’t clear in the drawing, so I spend some time fleshing out the different details to guide me when I go in to paint.


I think the most important part of this image is the portrait, so I also spend some extra time in this drawing stage to refine some of the details in the face. I even plot some very soft shadows to guide me when I get round to adding colour and light to the face. I’ll come back on many occasions to tweak the portrait and bring it to life.
87 CHARACTER ART
5
Fleshing out the portrait
6 Silhouette block-in Although this step sometimes feels to me like a passing stage, the importance of blocking in a nice silhouette is paramount to have a successful illustration. I make sure all the primary and secondary shapes are reading clearly, and that there’s a sufficient amount of interesting shapes and rhythms to keep the eye moving around the character.
7 Apply colour flats to the artwork
Blocking in the major elements with flat colours helps me establish my main colour strategy and their hierarchy in the image before detailing everything. I’m trying out a very warm colour palette with a lot of oranges and sand tones, therefore my coolest colour here (the blue shorts) stays very desaturated to harmonise with the other colours.


Once I paint in the general form and lighting of the character, I duplicate the colour layer and bump the highlights using a Levels adjustment to bring out stronger highlights. I can control where they show using the Layer Mask. With this light layer, I paint in the sunlight hitting the diesel generator on her back.
I can use these flat colours to easily select areas and start painting the general light and form. My main goal in this stage is to establish the light scheme and introduce a variety of warm and cool tones all around the image. If you look closely, there’s a bit of a complementary colour scheme with purple-tinted shadows and warmer yellow highlights.
10 Refining the portrait I refine the portrait many times over the course of the painting. Here I decide to tint her hair and eyes a light green to complement the orange and red tones in the rusty metal and skin. I also zoom to work on the eyes, nose and mouth, being careful not to overwork them to stay in balance with the rest of the image’s level of detail.
88 IMAGINE FX ANNUAL WORKSHOPS
9 Lighting the equipment
8 Select flats for the modelling stage


13 Tattoo design
I believe it’s important to slowly build up to your brightest highlights and darkest shadows throughout your painting. In these final stages, I’m bringing out some of the brightest areas with sharper specular highlights. On the leg, I use a grainy brush to emulate skin pores that catch the light. This is one of my favourite parts of the process. My patience is finally rewarded!
89 CHARACTER ART
14 Finalising the image After testing a few different styles of backgrounds, I settled on a more subtle drop shadow in the bottom left to let the head, leading arm and generator contrast with the stark white background at the top. It reinforces a triangular composition and has a nice graphic effect overall. Lately, I’ve been using more minimalistic backgrounds to emphasise my character designs.
This also falls into the detailing stage, but since the tattoo plays such a large role in the design, I give it some extra time and care. I design the tattoo directly on the skin, using curves that follow the form of the arms juxtaposing some rococo-inspired ornamental elements for a sleek and elegant look. I also continued the design down her ribcage and far leg.
12 Adding details and contrast
11 Make corrections Once I’m happy with the colours and level of detail in the head, I make some final tweaks using the Liquify filter. These minuscule adjustments in the size of the features, how the eyes, eyebrows, and mouth are angled, and even tweaking the shape of the head, can really bring an expression to life and make for a much more appealing portrait.


PAINT ENVIRONMENTSUNIQUE Illustrator Alayna Danner shares her method of creating an epic and engaging fantasy landscape using Photoshop Photoshop 90 IMAGINE FX ANNUAL WORKSHOPS

Painting cityscapes or natural environments can be intimidating, but after a couple years’ practice it’s become my favourite thing to do. In this workshop I’ll be working on creating a new fantasy cityscape environment piece from scratch. I don’t use advanced techniques –everything is rendered in Photoshop, exclusively using the Brush tool and different layer modes. You can use any version of Photoshop to follow along with this workshop, or likely any real 2D drawing program of your choice, provided that the software enables you to use layers and you have a pressure-sensitive tablet to hand. I use an old-school technique for creating perspective lines to define architecture, by using a horizon line and vanishing points. I’ll explain how to achieve perspective guidelines in Photoshop and how it can help make your piece look more convincing. I start from a simple inspiring concept and noodle on it, adjusting and evolving as I draw. I try not to stay married to any sort of look or feel until I’m happy with how the piece is going. If you don’t like how something looks then don’t sweat it – just erase or draw over it and keep evolving. Try working this way to not feel burdened by needing perfect thumbnails, colour schemes orIfcompositions.you’rehaving trouble coming up with new ideas for a fantasy environment, go back to your original idea as it can help inform new directions to pursue in your piece. My idea was “city of water mages” and you can check out how I got to this final piece!
GET RESOURCESYOUR See page 7 now! 91 UNIQUE ENVIRONMENTS Alayna Danner LOCATION: US Alayna is a fantasy illustrator based in Seattle. She’s currently working on Magic: The Gathering and Dungeons & Dragons projects. alayna.net Artist PROFILE

HARD
Use this basic texture brush when you’re starting to define rocky or grassy areas. A simple leaf brush for roughly defining trees. I then use a basic Round to erase obvious patterns. This brush is great for blending in areas if you don’t want to just use the Hard Round brush. This is an offshoot of Hard Round. I like to use this for detailing trees and other textured areas.
RESOURCES PHOTOSHOP TEXTURE BRUSH 1 BLENDINGLEAVES
BRUSH WITH TEXTURE
CUSTOM BRUSHES: ELLIPTICAL
3 Keep sketching to refine your vision
2 Reference, reference, reference Grab photos of architecture, landscapes, concept art and paintings you enjoy, and throw them all in a folder. They don’t have to look like what you want to draw, just what inspires you. Here are a couple of example photos that I use, which I took myself. Overall, I gather up about 30 different pieces of reference.
92 IMAGINE FX ANNUAL WORKSHOPS
Look at your reference and just imagine what a fun environment would be. Discard ideas that don’t work and try to focus on what is working for you. Different reference can help you decide what direction you want to take your buildings in. Maybe you want a more sci-fi look, or perhaps you want the city to appear more medieval?
1 Create a fun idea My concept for this piece is “a city of water mages”. How would that look? Who would live there and how would that influence the architecture? I don’t create multiple thumbnail ideas, I just do one image that I continually erase and rework until I like it. This just looks like a bunch of scribbles in the beginning.


Perspective lines Once you have a solid start, you can build perspective lines so your buildings look like they exist on the same plane. Make a new group and one new layer, and draw a horizon line. The line should be where the horizon of the earth meets the sky. Then drop in a series of parallel lines on a new separate layer. These lines will form your vanishing lines to the horizon line. On the parallel lines layer, use the Transform>Distort tool to pinch your parallel lines to meet on your horizon line. These pinched lines now form a set of vanishing lines to give you an idea of where to ground your buildings Now you can draw your buildings along these lines and they’ll look like they fit in the environment. I do this several times to get a bunch of different vanishing points to work with. Horizon line Parallel lines warp to the horizon line
4 Keep planning and changing Keep changing it up if you don’t like the overall look. I change my sketch several times as I go. I prefer this to doing several sketches – just evolving one to a point where I’m happy with it. I add giant trees and foliage (that will later be taken out), but trying new things can help you make a really fun piece.
Evaluate your colour palette
Does the palette evoke what you’d like? Colours and light in both the background and foreground are important for what you want to say. I didn’t like the cloudy sky and light blue mountains so I rework the colours of the background to be a more colourful. I think that helps make the piece a little more engaging; the sun is now definitely hitting the foreground and illuminating it.
93 UNIQUE ENVIRONMENTS
6 Flip your canvas horizontally This helps you to get a fresh perspective! You may see where awkward gaps in your composition are, or where buildings may be leaning oddly. Adjust, erase and redraw until you start to feel your city taking shape. It’s around this point where I’m finally starting to like the direction this piece is going. To get a straight line, hold down Shift while you draw your brushstroke. It’s very helpful for vertical lines on a building.
5
7


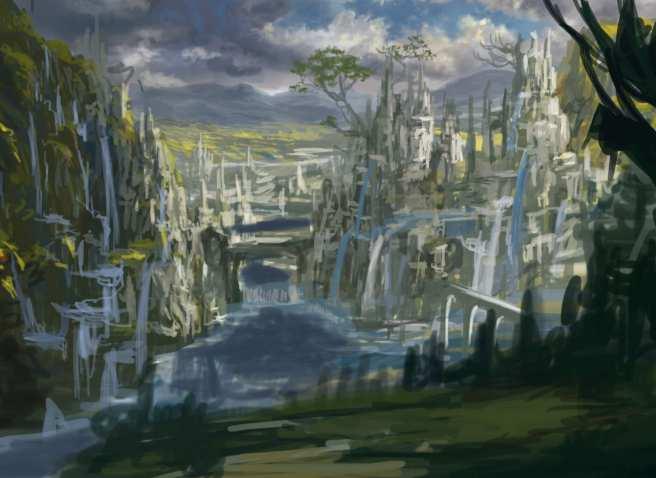
Buildings are usually symmetrical. There isn’t much symmetry in this city, but there is a little in some places. A shortcut for rendering symmetry (if the building is directly facing the viewer, not at an angle) is to render one side and then select it and duplicate it on a new layer. Flip the new layer horizontally, and then you can drag the new layer to the reflected area and paint it in to fit.
8 Details and different shapes bring your piece to life What makes your city interesting? Since my city is water based, my buildings are organic and flow together. I try to imagine what the different areas of the city are. Where do people live? Where is the government and what do those buildings look like? How about schools?
BEFORE AFTER 94 IMAGINE FX ANNUAL WORKSHOPS
10 Symmetrical buildings
9 Keep defining all over This is the most time-consuming part – just keep rendering out details. I continue rendering on the right side and middle section of the city. You must lay that foundation! Toggle your perspective lines on and off often; locking them helps to avoid accidentally drawing on the perspective lines layers. If you need any inspiration, just keep imagining how your society functions and how to render it.


11 Don’t forget the background It’s easy to get lost in the minor details and forget the big picture. Remember to zoom out and make sure your city looks like it exists in the world. This is my favourite part – I can spend forever working on little details. The city is starting to take shape. I render the buildings and turn on the guidelines occasionally to make sure no lines are too wonky.
13 Almost there… I flip the canvas horizontally again. I like the flipped version better and will be using that as the final orientation. I finally work on the foreground. This is where reference of pine trees in my neighbourhood becomes useful. Use foliage brushes sparingly: they serve as a good base, but be sure to create new details in the foliage with the Hard Round and Hard Elliptical brushes afterwards, so that the foliage doesn’t look like a patterned stamp.
14 Ask for critiques and make final changes
95 UNIQUE ENVIRONMENTS
I asked artist friends for feedback (thank you Aaron Miller and Julian Kok!). Having fresh eyes on a piece can really help. They advise to add fog to differentiate the foreground trees and rework the foreground. I add a stream in the foreground to help lead the viewer into the piece instead of falling off the edge of the world. For fog, use a Hard Brush Round and soften it as much as possible using Shift+[, with light opacity, around five per cent or so, and build it up slowly. Then erase the edges of it using the same softened Hard Round brush, around 10 per cent Opacity.
12 Add shadow and light Shadow helps define the depth of the buildings and where they are in space, while adding extra light makes it easier to pop out your focal points. I add these by creating two new groups on top of the layers I have so far (which is about 100 layers). The shadow group comprises some low-opacity Multiply layers and Normal layers (at 25 per cent Opacity), and the Lighting group is a mixture of 100 per cent Overlay and Soft Light layers. Play around with different types of Layer Effects and colours – you may end up with a really great effect!


page
Ken Coleman mixes scanned action figures and digital painting to create 80s-inspired fantasy production art
Artist PROFILE
3 Lighting in KeyShot
Ken Coleman LOCATION: Ireland Ken lectures in game art and design at Clonmel Digital Campus in Ireland. He also designs for clients such as Catalyst Games and Morbid Angel. artofkencoleman.com
ZBrush, KeyShot, Photoshop & Painter
To import the model from ZBrush to KeyShot, I go to the Render menu, select External Render, turn on KeyShot and then press the BPR button. This will import the model directly to KeyShot. Once the model appears in KeyShot I go to Edit>Add Geometry>Sphere. I can then make a light source. To do this, I double-click the sphere model in the scene window in the top right of the screen. When I click the light bulb symbol that opens beneath it, I can change the material to Area Light>Set to Watts. GET RESOURCESYOUR See 7 now!
1 Preparing for the 3D scans I prepare a figure in Daz 3D – I have a favourite for my Masters of the Universe projects called Dark Guard. I combine him with some animal and beast morphs to get the clawed hands and feet. I then export this as an object file to be used in ZBrush. I scan the various parts of the figures with my EinScan-SE 3D scanner. The larger-scale models are great for detail on the face, but the armour parts on the seven-inch scale figures are perfect for blocking in 3D.
CREATE RETRO ART FROM 3D SCANS
2 Building the ZBrush figure I import the Daz 3D model into ZBrush and press T to make sure the model is functioning in the 3D space. Using the Subtool palette on the right of the screen I duplicate the figure and press Import. I select the 3D scanned elements by repeating this process. Every time I duplicate a Subtool and press Import, the new model part will replace the previous one in the composition. I have to be careful to scale the 3D scanned parts using the Gizmo and Transpose tools – not all scanned parts are correct when imported.
96 IMAGINE FX ANNUAL WORKSHOPS
Combining my love of customising action figures and kitbashing 3D models for concepts is exciting for me. Over the past year, I’ve developed a library of 3D scanned assets, including character heads, armour and weapons to composite scenes of my favourite characters from the world of He-Man, Skeletor and the Masters of the Universe. The vintage toy box art, 80s iconic movie poster art and Frank Frazetta are strong influences on the type of finish I go for in my nostalgic imagery. In this workshop I’ll explain my process, from how I 3D-scan and prepare the models, before importing them into ZBrush. I’ll show you how to use basic ZBrush navigation tools such as Gizmo, Transpose, Subtools and Brushes to build a character, combining a model I previously posed and exported in Daz 3D. The workshop will continue on the lighting and rendering of different passes of the model in KeyShot. These KeyShot renders will then be combined in Photoshop to build an image mixed with my own hand-painted backgrounds and textures and then given a final paintover in Corel Painter to get that 1980s-style oil-painted finish.


97 RETRO ART

4 Materials in KeyShot KeyShot enables you to drag and drop a material on to any of the separate Subtool elements to colour it. You can also apply a material to the whole model by dragging the material over to the Scene section and dropping it on to the ZBrush label, which is the model and all its elements. If you do this you must press the Lock button in the bottom window twice and Press Unlink Materials to add different materials individually.
7 Face lift with Camera RAW Photoshop’s Camera Raw filter is a powerful tool for adding a degree of punch to your illustrations. Select the top-most merged layer copy and press Filter>Camera Raw Filter. You can see from the image how I’ve placed my sliders. My approach is always Shadows up, Clarity up, Saturation up slightly and Highlights and Whites down. This extra tweak really gives a burst of colour and detail to your 3D render.
98 IMAGINE FX ANNUAL WORKSHOPS
I use the same materials apart from the character colours to achieve the right look and translucency of light. Skeletor’s face is bone, his skin is electric blue and I use metallic and non-metallic colours for his armour. The other KeyShot materials are GOZ Human Skin and Blue WHITE RIM LIGHT. I export each render as a hi-res PSD file with the clown option turned on to create a silhouette to use for selections in Photoshop.
9 Composing a layout Now that I’m happy with the overall figure, I group all the elements. I create a new file the same size as an ImagineFX page at 22x30cm but at 450dpi for higher resolution. Most of my work is at least A2 in size at 300dpi. I now drag the figure group across and start to place background elements and particles to build a scene. I have folders of hand-painted backdrops, particles and objects to help build scenes quickly.
5 List of KeyShot materials
6 Combining the layers Once my renders have completed I open the basic colour one in Photoshop. Next, I drag the other layers into this file as Smart Layers. I set the GOZ layer and Blue Rim layer to Soft Light Blend mode. Once I’m happy with the level of translucency of all my layers, I select them all, copy them and merge them (the shortcuts are Ctrl/Cmd+J followed by Ctrl/Cmd+E). I duplicate this layer one more time for the next phase.
8 Adding texture and detail I find that using photos of rusty surfaces and stained concrete are fantastic for creating detail and depth in images. The concrete and porous stone is my favourite textures for the skin. I drag these elements on top of the figure and I mask them using the silhouette from the clown layer that I exported from KeyShot. My painted Polyfilla layer is especially useful and fun for creating a bone-like effect on Skeletor’s face.


11 Adding my own particles I create my own particles by taking a photo of baby powder on black craft paper, as well as creating particles with Painter’s Particle brushes. I add these elements by placing them in the scene and setting the Blend mode to Screen. I also create gradients of green by selecting the colour from the glows on the 3D figure’s body. Using the Gradient tool and cloud brushes I create directional light that matches the model.
10 Hand-painted backgrounds I add stock photos of some Irish coastal landscapes and one of my hand-painted backgrounds. I’m lucky that there are many local landscapes and textures to help enhance my work. Using my local environment in my art is important to me. My hand-painted clouds were created on various large canvas, photographed and combined in Photoshop to create a set of various backgrounds that I can drag and drop into my art.
12 Final prep before paintover Before bringing the composition into Painter for a paintover, I click Image> Duplicate to create a copy of the file. I select the figure’s outline, then flatten the image and copy and paste just the figure over itself. I now have options to use Blender brushes on the figure and background separately in Painter. Using large oil brushes for the background and more refined fractal brushes for the skin gives a nice sense of depth.
13 Breaking up the image in Painter or Fresco You can save the file to the cloud so you can open it on an iPad and use blender and fine art brushes in an art app such as Procreate or Fresco. However, I choose to use Painter on the desktop. I use a limited number of Brushes on the merged layers. My favourites are Stencil Oily Blender and Fractal Blender. I also place some white or brightly coloured, thin highlight lines on a new layer with the Spring Concept Creature brush. Shown here: the before and after versions in Painter.
99 RETRO ART
14 Finishing up in Photoshop
I reopen the image in Photoshop and set the highlights to a Soft Light blend mode. I also experiment with the Opacity of the painted layers and sometimes mask off areas where I may have gone overboard with Painter. The idea is to balance the abstract brush work with the detail and silhouette of the final image. Sometimes I merge and duplicate everything on one final layer and use an Unsharp mask set at 200 per cent at 0.2 pixels for clarity. Finally, my 3D scanner is costly, but try experimenting with smartphone apps such as Bellus3D and LIDAR 3D to create 3D models of everyday objects to use in your artwork.


1 Study the brief Before I start drawing out any old boss character, I need to make sure that it’s going to fit into the game world. Our game designer and art director have provided a design brief that gives me a good place to start. I’ve underlined the important features and taken particular note of the style they need: “Colourful and stylised cartoon”. Clearly, my design will need to gel with the rest of the game’s aesthetic.
See page 7 now!
2 Find the mood With the brief in mind, I start collecting images to build up a mood board. I may not reference these directly in my final design, but I want a reminder of the feel of the environment and general vibe that we’re going for. Here I’m feeling lots of gnarled dead trees, warty toads and dark atmospheric swamps.
Images/iStockphotoGetty
100 IMAGINE FX ANNUAL WORKSHOPS
A bristled brush with Flow and Opacity settings. This is my go-to for most work. A simple Round brush with Opacity and Flow settings. Great for soft blending or effects. This basic hard Round brush is perfect for blocking in flat colours and inking lines.
SOFTTT_MAINROUND01
IMPROVE YOUR BOSS DESIGNS
CUSTOM BRUSHES: HARD ROUND INKER
3 Exploring silhouettes Next, I start blocking in silhouettes. I’m looking for an interesting and easy-to-read shape that helps show some key physical attributes of our boss. I’m also keeping in mind the other enemies throughout the level. Our boss will need to feel similar yet more important. Maybe it’s a beefed-up, or a more intelligent and battle-hardened version – something that shows this character is ranked over the others in one way or another.
Every good video game needs a bad guy, and coming up with an engaging boss character can be a fun challenge. They’re bigger and meaner than the rest of the game’s grunts, and it’ll take a bit of work on the player’s side to figure out how to beat them. What makes a good boss character though, and what are some of the different ways we can explore the design to craft and create something memorable? In his workshop, I’m going to run through a few of the different processes and ideas I explore when designing a boss character for a 2D indie game. I’ll also show how it can fit within the development pipeline. Indie game companies are usually only small teams made up of a few people. As a result, it’s pretty common for each member to take on multiple roles within the development pipeline. For the sake of this workshop I’m going to assume the role of art director, concept designer and character artist… so basically I’m telling myself what to do, laying out ideas and then critiquing my own work! So sit back, grab a pen, and follow along by scribbling up your own cartoon monsters and see what your next boss character could be.
Tristan Tait LOCATION: Australia Tristan is an Australian freelance illustrator who enjoys drawing anything that’s a little weird and wild. tristantait.net Artist PROFILE
Photoshop
Tristan Tait takes you through some different processes and design ideas that go into creating a boss character for a 2D indie game
GET RESOURCESYOUR
RESOURCES PHOTOSHOP
Images/iStockphotoGetty


101 BOSS DESIGNS

4 Sketch out some details
I feel that the spiky looking guy has a pretty cool shape, so I lower the opacity and start sketching in some details on a new layer to flesh out his design. I’ve added a few notes to get some key ideas across before showing it to the rest of the team. Revision and communication
5
POWER SOURCE GLOWING DURING POWER UP – CHANGES COLOURS?RETRACTABLE WEAPON SPIKES SOURCEPOWER RETRACTABLEWEAPON VINE ATTACHES HAMMER TO ARM CREATING A RETRACTABLE PROJECTILE 102 IMAGINE FX ANNUAL WORKSHOPS
I submit my sketch to the art director and animator to get their thoughts and to see if it works within the context of the game. Turns out they hate it. It’s not ‘swampy enough’ for the level and the animator has pointed out potential issues with his bulky shoulder pads conflicting with his hammer swings. They did like certain aspects though, so I choose another of my silhouettes and build on it with these notes in mind.


6 Refine the sketch With a newly approved sketch, I build on it while trying to emphasise key visual clues for the player. A boss fight should be a challenge to beat, but not impossible. Visual hints can help prepare the player for what they’re up against. Spikes on top? Better not jump on it. Huge claw? Probably going to swipe you with it. Big glowing orb? That’s probably important
7 Block in the design Keeping the 2D cartoon style in mind, I cel shade the beast to give it some depth. I create a grey base below my line layer and then use Multiply and Soft Light layers to draw in my shadows and highlights. I do this with the same hard Round inker brush I used for the line-work. 01REFINED
DRAFT
8 Develop variations Using my greyscale character as a base, I duplicate and paint in some variations to show our team. They want to see how he might look with armour or different attachments, so I experiment a little and end up mashing a few of the ideas into one for the final version.
SKETCH AND DETAILSFINAL STYLISED LINE-WORK RETRACTED WEAPONSAME EXTENDED POWER PACK (COOL MAKEMAYBEIDEA-ITMOREORGANIC?) 103 BOSS DESIGNS


10 Colour tests I’m now overlaying my greyscale image with different colour variations to see what works best. The brighter green one fits the swamp theme most, so we move ahead with that.
CLAW ATTACK JUMP ATTACK ANTICIPATION ANTICIPATION ATTACK JUMPFALLATTACK PROJECTILE FIRE OPENS WHEN RETRACTED DETAILFRONT DETAILBACK LUMINESCENT NATURALRETRACTEDSTATE WEAPONDETAIL 104 IMAGINE FX ANNUAL WORKSHOPS
Creating a turnaround of the character will help the modeller and animator to see it from every angle, making their job much easier. I’m taking care to point out important features here that must be included in the models. This can then be sent off to the modeller or animator to start building up the base character while we play around with the superficial stuff, such as colours.
11 Sketch key frames of the boss’s attacks
9 Prepare turnarounds for further down the pipeline
To help the animators, I’m sketching up quick key frames to show the melee attack in action. In this case, if our hero gets too close he’s going to be hit with a big ol’ claw swing! If he’s too far away, he’s gonna get jumped on! I recommend creating anticipation phases to help telegraph the boss’s movements. The player will have more fun recognising attacks and planning strategy than just being instantly hit.


REACTIONATTACK (FIREANTICIPATIONUPWARDS)ANTICIPATION(TELEGRAPHEDBYGLOWBUILDUP)
A fun part of a boss fight is the build up of tension as you get closer to winning. This can be done a few different ways, and in this case I represent it visually with a colour change in his power source. You know when he’s in the red phase that you’re close to winning the fight! This could also be emphasised by speeding up his actions to create more intensity.
13 Visualise vulnerabilities Your boss character can’t be invincible, so it’s always good to think of their weaknesses and find ways to show that in their design. To make it a bit of a challenge, I hide his only weak spot on his back. The only time you can see it is after his chain strike. The hero must run along the chain while it’s lodged in the ground to attack. A successful strike will then throw the hero off and trigger the reaction attack that the hero needs to dodge.
12 Break down power moves
15 Draw a key frame sequence to depict defeat
One last set of key frames to help the animator will be for our big dramatic death scene. Keeping in line with his design and the cartoon vibe we have, I think a fun way to send him off would be to extend his reaction attack and have him expel his entire power source until he deflates like an empty sack. And there it is: a bunch of things to play around with when creating your next boss character! Hope you had fun!
14 Health states and phases
ATTACKPOWER BEFORE(HOLDATTACKPOSITIONRETRACTING) ATTACK (Missiles fall from sky) HEALTH (100 PER CENT)HEALTH (50 PER CENT)HEALTH (25 PER CENT) 105 BOSS DESIGNS
I want to emphasise the power of the special attacks and so I use a glow in the power source to ‘charge up’ the moves. Here we have our projectile chain strike and a fun vomit reaction attack. The chain attack is going to be his power move and so I emphasise the glowing power source in this sketch. This will act as a telegraph for the player to prepare for their counter.


106 IMAGINE FX ANNUAL WORKSHOPS


DRAW STYLISED COMIC PANEL ART Igor Wolski orchestrates a range of characters to tell a story in a busy, detailed scene, done in the ligne claire style with dynamic perspective Photoshop 107 COMIC PANEL ART

1 From brain to paper
GET RESOURCESYOUR See page 7 now!
When cramming information into one frame, you have to think about how the viewer’s eyes are going to travel across it, what’s going to pop and what’s going to be subtly hiding in the background. Every element might be just decoration, but can also be a piece of information for the viewer to pick up on. In this workshop I’ll try to break down my process of how I usually go about drawing anything, whether it’s illustrations or comic panels. Both of those visual mediums have an ability to tell a story – that’s why I focus on that aspect in the tutorial. Here, I want to also point out how important it is to be creative not only with the designs, but also with composition and space.
Igor Wolski LOCATION: Poland Igor is an artist from Gdansk. He has over 10 years of experience in the illustration and comics industries, but has also worked on mobile games, film production, board games and commercials. igorwolski.com
Artist PROFILE 108 IMAGINE FX ANNUAL WORKSHOPS
When it comes to creating bigger pieces, proper planning is key. Once I have the idea, I start brainstorming with super-quick sketches, just to find the initial composition and the point of view to bounce off of; these are very rough and often unreadable to a bystander. It’s almost like I’m writing in my own secret language.
The process of creating an artwork is a little like writing a story. While I never sit down with a blank piece of paper without an initial concept, the actual idea of what I’m trying to show is only fully formed once the sketch is done.During that process a character’s position or expression might change them from a protagonist to a villain, or the location moves from inside to outside, because a pillar looks better as a tree. I love going on these imaginative trips, because I never know where I’m going to end up (sometimes it’s nowhere special, but that’s also okay).
After finding the rough composition, I place it at the bottom of the layer stack on a low opacity and start adding details over it. Here I plan the position of the characters and objects. I also put everything in a form of a spiral, from the bottom-left corner to the character in the middle.
Fleshing out the concept and adding details
2


I believe the story in an illustration is told through the expressions and sightlines of its figures, so I check where the main and secondary characters are looking. Our hero has snuck into an event and has been discovered, so while he looks at the spotter, everyone else looks at him.
4 Perspective and a fish-eye view
3 Develop the storytelling in the scene
I draw perspective lines based on my sketch. I start by identifying the horizon and then working out where the middle of my composition is on it. From there I add the vertical and horizontal lines, by estimating where they should be by looking at my sketch. Note that it doesn’t have to be very precise. 5 Models and references I try to use references as much as I can, to help expand my visual library. For people I either just search online for what I need or take a video of myself or my family. For clothes, architecture or other objects I like to include accidental online finds, which ensures that something unexpected ends up in my art.
HORIZON TOP TO BOTTOM LEFT TO RIGHT 109 COMIC PANEL ART
PHOTOSHOP I use the basic, Round brush in Pencil mode (without anti-aliasing), which nicely mimics real-life pens. DEFAULT BRUSH: ROUND BRUSH


6
9 Back to digital I scan the image in at a high resolution (usually 600dpi) as a black and white bitmap. This creates hard, pure black line-art without any anti-aliasing. It may look rough, but it gives the image a unique, gritty feel. Next, I fix any mistakes I’ve done on paper, following my notes.
Inking my line-art
Finishing up the sketch Now I finish up all the details. I like my drawings to seem very cluttered, so I try to never think about any one thing as a standalone object, but more as big clumps of many objects. I usually achieve this by always having my characters and items placed on multiple levels, often sitting or stacked on top of one another
The last thing I do before colouring is to divide the lines that I want to colour from the black ones I wish to leave intact. This means everything in the background, any light sources or patterns, or anything that would benefit from a smoother line. I select the lines I want to separate and put them on different layers.
110 IMAGINE FX ANNUAL WORKSHOPS
7 Printing out the sketch Because I still like to do a large chunk of my work traditionally, at this point I print out the finished sketch on paper in a very light blue colour. Carrying out this stage on paper doesn’t give me any advantage over doing it digitally – it’s just my personal preference.
For line-art, I use Uni PIN Fine Line black ink pens, ranging in size from 0.05 to 1.0mm. The only rule I follow here is that the closer the object is to the viewer, the thicker the line. If I make any mistakes I’ll fix them later in Photoshop; I like to write small notes on the side of the paper to remind myself.
8
10 Dividing the lines


Grouping colours
11
Even though I change a lot of the initial ideas throughout the colouring process, this helps a lot with enhancing the clarity of the entire piece.
111 COMIC PANEL ART
13 Adding shadows I create the shadows as a flat colour on a semitransparent layer, without any form of special colour mixing. The best colour for shading is usually the colour on the opposite side of the colour wheel, but since it’s not always that easy, sometimes I have to just try a bunch of options to see what works best.
14 Making some finishing touches Almost there! At this point I look through the picture and think of what else could benefit from last-minute tweaks. This can include any special effects, some patches of light or deeper shadows. After this, I like to leave the piece for the night to look at it one more time the next day with fresh eyes, and we’re done!
To see if the initial colour palette I have in my head even works, I divide the image in large colour groups, based by their position and role in the illustration.
12 Applying flat colours Finding the right colours is always a challenge. I mainly use flat, simple colours without any gradients or textures, to balance the complex nature of the line art. Especially with crowded pieces like this, I try to keep everything in a similar colour palette and reserve any contrasting colours for either the main characters or key objects of interest.


Over these next few pages I will share a quick overview of my creation process, as well as some important tips and tricks I learnt along the way.
Photoshop
2 Base colour/refine Next I like to do another, more refined sketch on top of the loose one. This allows me to dive into the smaller shape design more and really find the parts that will make the piece work. I use a Multiply layer to wash colour right on top of it, usually setting the tone for the painting.
3 Start the render With the base applied, I like to dive into colour pretty fast. I swap up my brushes quite a bit trying to apply shadow and light to start to bring the piece to life. The best part of digital painting is it’s super easy to just paint over it if you don’t like the current direction.
1 Early sketch In this phase, it’s best to find a nice pencil brush and start sketching with loose lines and shapes. It’s important for me to keep my hand moving pretty fast and not let myself get slowed down by any major details. The painting will only stiffen up as you render, so keep it as loose as possible.
CREATION
112 IMAGINE FX ANNUAL WORKSHOPS
CREATE CHARACTERMIXED-GENREA
In this painting, I wanted to create a small, originalmomentintimatewithmycharacter, Vaele. She was created recently, along with the help from my Twitch community, and was a great exercise on creating an OC. It was fantastic to brainstorm an original idea within a group and then expand on it, live while people watched. Since then, this piece was created as a small thank you to everyone involved for hitting some recent milestones. I was aiming for something that was warm, inviting, and felt like a pleasing, cosy image for a viewer to relax to.
Top tips for…
Dave Greco showcases the key techniques behind the creation of this collaborative original character
Dave Greco LOCATION: US Dave is currently a senior visual development artist for EntertainmentBlizzardand has been working in the game industry for over 18 years. artstation.com/dgreco Artist PROFILE
CHARACTER


113 CHARACTER DESIGN

Bringing characterato life After the recent clean-up, we wanted to really bring the character to life with a more realistic version. The slight tilt of her body as if she was walking or presenting herself in the room was important. This step also gives more time to revise and push the design further.
Characters in full-body view I render each character individually at full-body and on separate layers. This gives me extra flexibility when applying the key art to different media. Sometimes they even show up on consumer products, such as posters or playmats.
Render clean-upand We chose a sketch from the previous set, and worked up a clean render to help further explore some ideas. The warm colours felt great and the small pops of aquamarine helped to add extra visual interest to the character’s armour.
Capturing small moments I really wanted this image to feel like a one-on-one moment with the viewers, something that felt a little more personal. It was important to me to convey this idea of you coming up to talk to her on an outside balcony, then she looks over and you both catch each others’ eyes. Those moments feel very special to me and it is something I am working on capturing better with every piece I create. Find fun in the abstract
PREVIOUS VAELE WORKS FINAL IMAGE 114 IMAGINE FX ANNUAL WORKSHOPS
One thing I always love to do is get lost in the abstract shapes of designing hair. I don’t always feel like it has to be super realistic to be able to fit into a painting. This piece is a great example of just having fun with hair shapes and creating a delightful flow, for the simple reason of just loving how it looks. Embrace the crazy that can come from it!


Face anatomyand
Mixing sci-fi and fantasy
I love using reference! If the angle of the face is causing you problems, it’s great to just pop out your phone and snap a couple of pictures to get the angles right. Embrace using reference, all the professionals do, and so should you.
PHOTOSHOP I use DG_Main for almost all my rendering. It’s really just a square chalk type brush but I love it! I feel like I have so much control and it offers just the right amount of texture to give the piece a little grit.
Lighting To help define the composition and really make a piece pop visually, lighting is extremely important. Creating great hits of light in some of the most important parts of the image is a fantastic way to direct the viewers’ eyes. High contrast is a great way to do that, and then let the viewer move around the piece from there.
I love creating designs that exist between both genres. I am a massive fan of both and they each have amazing motifs to be creative from. If there is a look or style that you feel drawn to, be inspired, and merge that love into your own work.
RESOURCES
CUSTOM DG_MAINBRUSHES:
115 CHARACTER DESIGN

CREATE YOUR OWN COMIC Digital artist Rebekka Hearl teaches us the basics of producing a comic series, for web and for print, in Clip Studio Paint Clip Studio Paint CLIP STUDIO PAINT MAPPING PEN WATERCOLOUROPAQUE My favourite inking pen! The amount of control you can get out of this brush is crazy. I love CSP’s watercolour brushes. I often use this instead of the blur/ smudge tools. A moderately soft brush that offers a lot of control. I like to ink more painterly works with it. DEFAULT BRUSHES: DARKER PENCIL 116 IMAGINE FX ANNUAL WORKSHOPS Rebekka Hearl LOCATION: UK Rebekka is a digital designer and illustrator living in the south of England. She sells her merchandise online and at comic conventions around the country, while working on her webcomic Monster Boy in her spare time. https://linktr.ee/ ParaParano Artist PROFILE


117 CREATE A COMIC

118 IMAGINE FX ANNUAL WORKSHOPS

119 CREATE A COMIC
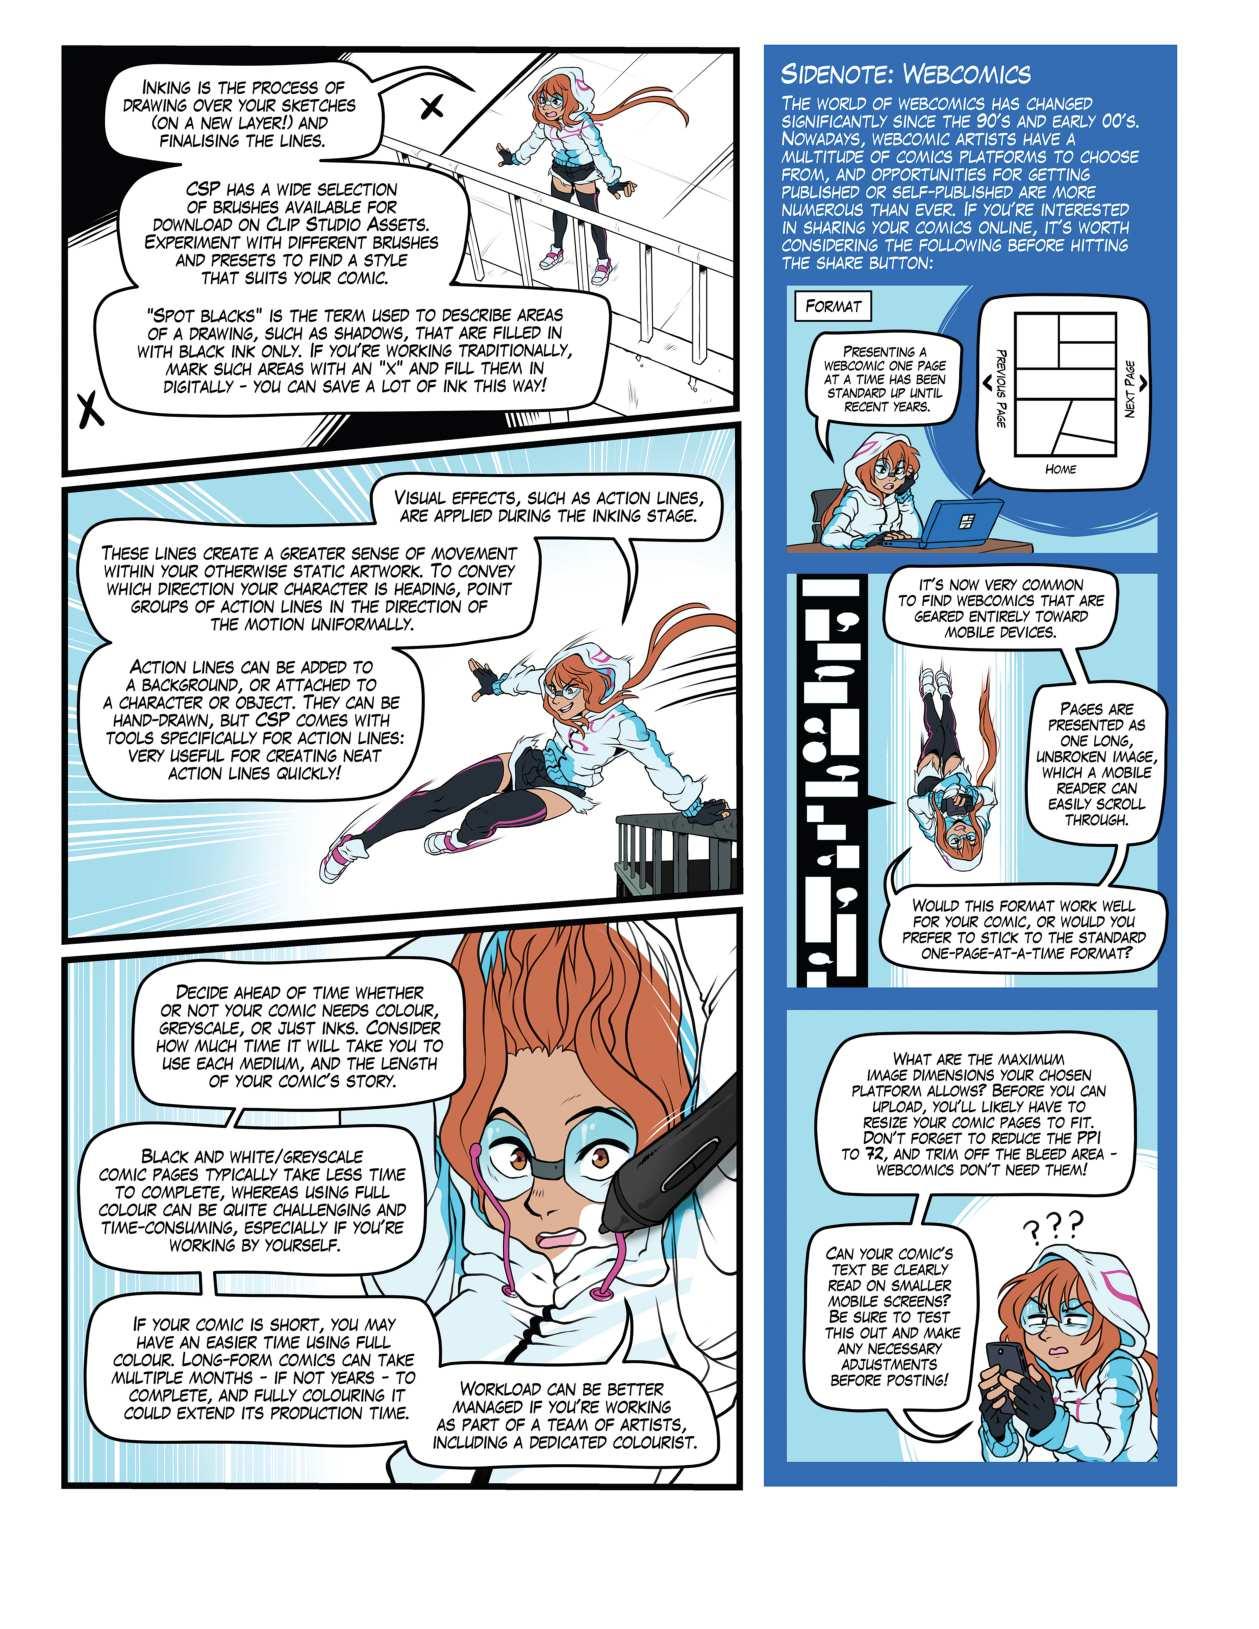
120 IMAGINE FX ANNUAL WORKSHOPS


121 CREATE A COMIC


122 IMAGINE FX ANNUAL WORKSHOPS
CREATE A ILLUSTRATIONFANTASY
ArtRage Vitae
2 Thumbnail sketches Based on those images, we created a series of small and quick drawings. We picked our favourite ones and used them as a guide to create a compositional sketch. 3 Colour key – colour scheme and lighting With the composition in mind, we used different photos from our Pinterest board and edited them together to create a blueprint of our final piece. We used this edit as a reference for our palette.
1
The idea and moodboard For a children’s book project we needed to create a populated forest scene. Browsing through our legacy sketch collections, recurring subjects were owls guarding their individual presents. We collaborated to expand these characters and developed them to bring the forest scene to life. After we have formed a general idea, we like to put together a moodboard. In this case, we saved inspirational images of forest concept artworks, photography and owl designs in a Pinterest board.
GET RESOURCESYOUR See page 7 now!
Twin artists Raide and Leffie reveal how they collaborated on this delightful scene inspired by their childhood art Together collaboratedwe on this project, and in this workshop we’ll take you through our steps, from the initial ideas to the final edits. In this guide, you’ll discover how we created a fantasy illustration featuring an enchanted owl tree. This project was inspired by our childhood artworks: we used to draw owls with matching presents on a large, magical tree. We recently found one of these older drawings and decided it’d be a nice idea to tackle this concept again. The drawing was supposed to be very whimsical, so lighting played an important role. We will demonstrate which blend modes we use to create the enchanting lighting effects, and explain how we created unique character designs for the owls and their matching presents.
Raide and Leffie LOCATION: Germany Raide (@RaidesArt) and Leffie (@LeffiesArt) are twins with German and Portuguese roots. They are freelance illustrators with a passion for character art, and have collaborated with the likes of Ambient Design and HarperCollins. raiffiesart.com Artist PROFILE


123 FANTASY ILLUSTRATION

For the woody texture of the large tree, Raide mainly used a pre-made custom brush called ‘Bristle 6 Blend’. Although we wanted to focus on the foreground, it was important to us that the scene’s background did not look lifeless. So, to add more interest to the forest setting, Raide created her own custom brushes with leaf-like brush heads. She tweaked the relevant settings, for example the dab spacing, in the Custom Brush Designer throughout the process.
5 Textures and custom brushes
4 Background base colours
After we were both happy with the blueprint, Raide started working on the background. She loaded the edited image from earlier into ArtRage as a reference. First, Raide used the lasso tool to outline the silhouettes of the main branches, and then used the paint roller to add the base colours.
124 IMAGINE FX ANNUAL WORKSHOPS
Meanwhile, Leffie explored the character designs of the owls: she wanted each one to stand out and have its own uniquely wrapped present. So, Leffie created a sheet filled with different owl designs. She heavily focused on interesting silhouettes and body shapes. The paint roller was used on a layer below the lineart to quickly add large and bold strokes of colour. The paint roller itself mixes colours nicely together and thus makes it easier to find some interesting and pleasant hues. She made sure the owl‘s colour palettes worked with the overall green tone of the background, by placing a dark green base underneath the drawings.
6 Character design
7 Size and placement In order for Leffie to focus on the placement of the characters, she imported Raide‘s background on a single layer, and added a white layer on top. She set the opacity of this layer to around 80%, so she could still peek at the background. This setup helps her determine the sizes of the characters and their position within the composition.


10 Colour editing and final details At this stage, we noticed that focus was still missing in the piece. To fix this, we made the two central owls larger. The final lighting was also designed to help guide the reader’s eye; the strong yellow sunlight makes the two main owls glow, while the others remain in the shadows. Once happy with the final composition and lighting, we imported the piece into Photoshop to enhance the colours. The darker regions were given a blue tint, while the lighter ones became warmer.
9 Merging our files together Next, Leffie prepared her ArtRage file in order to combine it with Raide’s. To do this, she first merged as many layers as possible. For blend mode layers, she needed to make an exception and export them separately as PNGs, as they would otherwise lose their blend mode effect. Once everything is exported, Leffie named the files chronologically and made a note of which layer should have which blend mode. Raide then imported these PNGs into her ArtRage file, and proceeded to add the final effects.
8 Character shading and lighting
Leffie decided to add base colours with neutral shading first, before she proceeded with the final lighting. To blend the characters into the scene, she used different blend modes to her advantage. She enriched the shadows with a blue colour through the Multiply mode, and increased the brightness by using a yellow colour set to Soft Light. More layers with different blend modes were added to achieve a whimsical look.
SOFT LIGHT SOFT SOFTNORMALLIGHTLIGHT SOFTSOFTMULTIPLYNORMALLIGHTLIGHT SOFTNORMALNORMALLIGHTMULTIPLY MULTIPLYMULTIPLYMULTIPLYNORMAL 1 2 3 4 5 6 7 8 9 10 11 12 13 14 15 16 125 FANTASY ILLUSTRATION


Explore one of the methods art director Tonton Revolver uses to make a kickass, anime-inspired illustration
Tonton Revolver LOCATION: France Art director working in the video game and comic book industries. Some of my recent work includes Suicide Squad: Kill the Justice League, Assassin’s Creed Valhalla, Far Cry, Todd McFarlane’s Spawn and some unannounced IPs. www.artstation.com/ tontonrevolver Artist PROFILE
1 The beginning For me, the process of working on a personal piece is quite straightforward. To start, an idea of a character, story, or framing pops into my mind (in this case: a badass protagonist with a giant sword in the middle of an environment full of pipes). Then I will start working on it without making any sketches. When it’s a personal project, I am going straight into production and letting the creativity do the job. The most important thing at this stage is to block out all the assets; in 3D, I will need to create my piece without any constraints. Here I am modelling a very basic sword in Blender, to achieve the sense of shape/scale I am looking for. No fancy stuff, just a rough blockout. Once I am satisfied with the result, I export an OBJ of the sword and close Blender.
CREATE ANIME-STYLESTRIKINGART
Starting a piece of art can be pretty scary. Fear of failure, a blank sheet, losing patience, thinking that you are lacking skills or that you will never being able to reach the level of quality you are seeking. Then there’s the easy access to several tools, software, advertising, tutorials and videos that make you think you can become Yoji Shinkawa in five minutes. Things can all get pretty confusing very quickly, can’t they? Okay, first things first. There is no such thing as a good or a bad tool, just like there is no software that will magically make you a ‘concept artist’ or an ‘illustrator’. The magical tool does not exist, and no software that will make a good and inspirational piece of art for you with the simple click of a button. In my opinion, nothing can replace good old traditional art knowledge. But! There are some pieces of software that can help you in your journey, and get rid of some of your fears. Still, keep in mind that you will have to find your own creative process and the tools that fit your mindset/art style, and trust me, it might take a while. So, in this tutorial I will show you one of the many ways I create an illustration with a striking composition. This process is probably the one I use the most on a daily basis, using the help of 3D and 2D software to work productively and efficiently.
Blender, Daz, KeyShot & Photoshop GET RESOURCESYOUR See page 7 now!
RESOURCES PHOTOSHOP HARD ROUND 3 SOFT ROUND 300 A standard brush I am mostly using to paint flat colours with hard edges. A perfect brush for painting something with smooth edges. Perfect for linework, this brush is my go-to for digital inking! CUSTOM BRUSHES: HARD ROUND 2 126 IMAGINE FX ANNUAL WORKSHOPS


2 Daz model I can now open Daz and export my sword next to a generic Daz female character (in this case, I’m using the Genesis 8 female figure). Daz is a pretty solid software, and it’s free – I use it all the time when I need to pose a character efficiently in just a few clicks. 127 ANIME-STYLE SCENES


This is one of the most critical parts of the process: making the right pose, indicative of the attitude and mood I am aiming for. What I am looking for when I pose a character is always the same thing… and it’s called ‘MOTION’! Here, my take is to create the feeling that the character is about to move while she is sitting This step can take a while, because I like to keep it organic – you could consider it like a sort of sketch phase; I am moving the gizmo around to get the exact position I want, body part by body part, pixel by pixel. This posing is going to drive the entire flavour of the piece, so I have to be really picky about it. Once I am satisfied with the result, I export an OBJ of the scene (character + sword).
4 Back to Blender
128 IMAGINE FX ANNUAL WORKSHOPS
I can now re-open Blender and import my Daz character. Once again I will start blocking out a few elements, this time on the top of my character. For the sake of efficiency and not wasting too much time in Blender, I decide to re-use some assets I did a while ago (in this case, a pair of shoes and a bomber jacket), dropping them on my character. Then I roughly move some polygons around with the sculpting tool to make my props fit with the anatomy and pose of my character.
5 Environment – foreground
I can now start building my environment. This is a pretty straightforward step: here I am blocking out my foreground using basic cubes. Then, I create some pipes by using the Bezier curve tool, shaping them one by one and making them follow the shape of my initial blockout, and trying to obtain the sense of motion I am aiming for.
3 Pose in Daz


There are a lot of tools in Blender that can help you speed up the creation of this kind of environment. But what I personally love the most is to handcraft all my props – making, on purpose, a few ‘mistakes’ that are going to make my scenery feel more organic and ‘alive’.
8 Linework in Photoshop – background I am now importing my KeyShot renders in Photoshop, then creating two layer groups. One is called ‘Rough Character’ which is our ‘Foreground’ we did previously, and the other is going to be for the ‘Background’. I am always separating background and foreground – this kind of mindset can save your life, trust me. I can now roughly trace over my 3D model, using a two pixel-sized brush and a new layer.
6 Environment – background
7 Frame in KeyShot Next, I am importing the OBJ of the scene I did in Blender and then moving my KeyShot camera into my scene, tweaking FOV, Focal Length, Distance, and so on – once again pixel by pixel – then tweaking the camera to reach the perfect framing for my illustration. This part can take a while for me, because even if I always have a pretty clear idea of the framing I am looking for, I like the fact that by moving my camera around I can sometimes get fresh and even better framing than what I had in mind in the first place. You can, of course, do the same thing in Blender, but in my opinion the camera tool from KeyShot is much more friendly. I can now render two separate 4k screenshots, one for the background and one for the foreground.
129 ANIME-STYLE SCENES


10 Colour scheme My rough linework is done. I can now start adding flat colours, prop by prop, part by part (pipes, legs, arms, shoes, sword parts, etc…) and define the perfect colour grading. Each colour is separated on a different layer, so I can tweak every single colour independently.
I am now using the exact same process as the one in the previous step. Keep in mind that my goal at this stage is just to get an overall sense of the shape language and a strong foundation, so I am not going to spend too much time on the linework quality and the details.
130 IMAGINE FX ANNUAL WORKSHOPS
9 Linework in Photoshop – foreground


14 Fake a global illumination Almost done! This is the very final touch, here I am duplicating all my layers, merging them, and converting them into a smart object. Open the Gaussian Blur filter, fix the Radius to 30 pixels and put this layer in Lighten mode. This simple trick is going to fake some sort of a global illumination.
The painting step is now complete. Next I am tweaking my colour grading here and there on my background and my foreground by using ‘Colour Balance’ and ‘Brightness/Contrast’.
Once I am happy with my colour scheme, I merge the layer of my foreground and my background but still keep them separate. Here I am creating two layers (in Multiply mode), one for the background and another one for the foreground, and start painting my shadows on each of them using a full black colour and two basic brushes (a hard round brush and an aerograph brush).
13 Calibrate whole scene
131 ANIME-STYLE SCENES
12 Paint and polish
I am also adding a bit of smoke on the background to help the separation between the foreground and background, to make my piece more readable.
11 Add shadows
Now I have everything I need to get this scene done! At this stage it’s just about painting, painting, painting, tweaking, fixing, and adding details like decals, splatters and scratches. There is no secret technique for this step: patience, dedication and experience will be your best tools to achieve what you want.


Ben Harvey walks you through his painting process that combines traditional mediums with a digital sketch to create a portrait Create art with emotional impact
146.
watercolours US
Charlie Pickard continues his series of quick tips on anatomy to improve your figure drawing 25 tips for dynamic fantasy scenes
Traditional 134 140 146 134. Gradients and how to use them
James Gurney shares his top tips and demonstrates some handy methods for painting smooth gradients book hero in illustrator
152.
Ralph Horsley breaks down his oil painting process into 25 expert tips
Francois Gautier explains the creative process he goes through when he brings his emotions to life 3 simple tips for proportions
154.
132
140. Comic


154 133

Space Jockey, oil. Note the gradient from warm to cool in the sky and from light to dark on the side of the ship. There are many other smaller gradients throughout this composition. 134 IMAGINE FX ANNUAL TRADITIONAL


2 Try stippling
W
GRADIENTS AND
3 Brushed gradient, background first Using a ruler, or freehand, start by drawing a horizontal rectangle. Create a leaf shape within it –this can be done freehand or by using a compass or dinner plate. Next, you need to lightly dampen the paper to make it receptive. Paint a brushed gradient, starting with the background and painting the ‘leaf’ second. Change the mixture of paint as you move across an area. Remember what’s in the brush at a given time. Use a clean brush if you need pure white or pure black. For large, smooth gradients, use a separate blender brush for each transition
JAMES GURNEY shares his top tips and demonstrates some handy methods for painting smooth gradients and applying them to practical uses
HOW TO USE THEM
James Gurney authored Color and Light, How to Paint What Doesn’t Exist and Dinotopia. He has 450k YouTube subs, 224k on Instagram, and has published over 5k posts on the GurneyJourney blog. jamesgurney.com
135 HOW TO PAINT GRADIENTS
Use heavy watercolour paper and a soft brush. Dampen the entire surface with water, without pooling. Tilt it to even it out. Load the brush with paint and start at the top. Pigment should travel. Add water to dilute the mixture while removing excess liquid from the brush with a rag. Tilt the paper to get pigment to flow in the direction you want. Remove excess buildup of water at the bottom of the painted rectangle with a thirsty brush, to avoid backruns. Try it with various pigments to see what they do.
This is an old-school method used for matte paintings, murals, and landscape painting. Use at least two brushes: a badger blender and a soft round brush. Dampen surface first. Loosely and thickly brush in the stripes of colours. Rapidly tap the surface with a badger hair blender or other flat-tipped soft brush. The brush will carry little dots randomly around to blend the areas. For large, smooth gradients, use a separate blender brush for each transition. A stipple gradient is easier in oil than it is in gouache, acrylic or casein because oil dries so much more gradually, allowing more working time.
1 Make a watercoloursimplegradient
e’re often asked to paint flat swatches in art school, but colours really come to life when they change gradually from one note to another. Unfortunately, smooth gradients aren’t that easy to paint. I’ll share a few different approaches and show how I apply them in specific paintings. The idea is to encourage you to try controlled experiments in the studio and then apply what you’ve learned in the field or on the job. I’ll be using watercolour, gouache, casein and acrylic, but the painting insights shown here are universal and will benefit oil and digital painters as well.
WatercolourCasein Acrylics
Gouache


5 Paint leaves on an overcast day
These densely crowded fern fronds on an overcast day appealed to me for studying soft gradients of light and shadow. The local colour was fairly uniform on the ferns. As a result, the changes in value were the result of changes in the angle of the forms in relation to the sky, and also the degree to which they were overshadowed or occluded by fronds above them. Look for a similar grouping of leaves or ferns, and as you analyse the changes in tone, paint it with transparent gradients or brushed or stippled opaque gradients.
4 Foreground first, then background Paint another leaf shape below that. Use a stipple gradient on the leaf first. Paint the background second, cutting the edge of the shape from the outside in. Materials include: pencil, compass or dinner plate 9” or 10” (22 to 25cm) in diameter, brush, ivory black and titanium white gouache, water cup, rag, ruler. If you do this exercise and the one before, it will help you practise making shapes with the foreground first, then the background and vice versa.
IMAGINE FX ANNUAL TRADITIONAL 136


7 Create an in-brush gradient
An in-brush gradient takes place within the width of a single brush. Use a 1” soft, flat brush for this exercise. Use two additional brushes, one for each of the colours you’ll be blending. Mix the two colours and place them adjacent on the palette. Using the large brush, pick up one colour with one side and the other colour with the other side of the brush. Pull the stroke slowly, letting the gradient happen between the two colours. Turn the brush in your fingertips as needed. Always remember which colour was on which side of the brush.
When two colour sets move together in the same direction, I call it a parallel gradient, such as in this banded cylinder. The red and blue bands and the white cylinder all move from light/warm to dark/cool. Draw the cylinder on watercolour paper freehand or use a large ellipse template. Draw the edges of the bands going around the cylinder. Paint the base tone of the cylinder quickly, blending the gradient from light to shadow. Then paint the red band and the blue band, changing the colour from light to shadow in the same way that you did for the ‘white’ base colour.
137 HOW TO PAINT GRADIENTS
6 Parallel gradients
Start by painting a bird’s eye view of clouds moving over a landscape, casting soft-edged shadows on the ground below. Inside the patches of light, everything is a little warmer and higher in value. That shift happens both to the green grass and the lighter grey road. Try to paint the transitional gradients as simply as possible, using large brushes and moving quickly. Use an in-brush gradient if you can. On a cloudy day the patches of light transition smoothly into shadow. Paint the base tone, blending the gradient from light to shadow
8 Paint cloud shadows in a landscape


3 ADD ACCENTS AND HIGHLIGHTS
IMAGINE FX ANNUAL TRADITIONAL 138
Step by Step: Create the checkerboard cylinder illusion
1 PAINT THE LIGHT TONES
2 WORK ON THE DARK SQUARES
If you want, you can add a thin white line between the squares. In the finished checkerboard cylinder the dark square in light (A) is the exact same colour as the light square in shadow (B). Even though you previously painted it with the same mixture of paint, it’s hard to believe – this is because our visual system is trying to correct for what it believes to be changes in lighting environments.
First, draw the cylinder with pencil on watercolour paper. When you’re ready to paint, use the following colours: cobalt blue, ultramarine blue, cadmium yellow medium, raw sienna, red oxide, quinacridone red, ivory black, titanium white, and neutral grey (about equal to Pantone 424C). Paint the gradients for the light tones first. While painting the cylinder, paint the background tones and cast shadow, too.
When those passages are dry, it’s time to paint the darker squares. The cylinder appears to be lit from the left with a warm light and cool shadows. The light yellow squares become darker and cooler as they transition to the shadow side, becoming a neutral grey. The dark squares also become darker and cooler as they go into shadow. In the light they become that same neutral grey.
10 9 Prime a surface A brayer gradient gives you one of the smoothest transitions with physical paint. Use water-based block printing ink for the right sticky consistency, but mix in some acrylic paint to get the paint layer to seal when it dries. The purpose here is to prime a page of a sketchbook or a smooth panel with an underpainting for gouache. To get good coverage, blend the paint with the brayer on a piece of glass. Make sure to use fairly smooth paper, as if the paper is too rough there will be white spots not covered by the paint. A B


In water, there’s often a gradient that goes from light at the top to dark at the bottom. That large gradient is interrupted by wave action. Using oil paint, I set up the base colour gradient to represent the front planes of the wavelets, the parts of the waves more perpendicular to my line of vision. Then I paint the planes on the backside of each wavelet so that those planes are a little lighter. While all the strokes are wet, I soften a lot of the edges to make the tones flow into each other.
139 HOW TO PAINT GRADIENTS
This plein-air study uses a brayer gradient as the priming colour under everything else. The gradient shifts from blue at the top to warm grey at the bottom. It’s a reminder that the upper elements in a picture are more influenced by the cool sky, and the bottom elements are influenced by the warm ground. After carefully measuring my drawing, I block in the big shapes with a long, flat brush and gradually refine the details. The priming colour influences all the colours that I place over it, even though the top colours are opaque.
11 Use a global gradient for a city scene
James Gurney’s newest video tutorial from Gumroad is called Gradients: Color, Form, Illusion. It walks you through the making of all the art that appears in this article. Angela Sung (VisDev & Art Direction) said: “I never knew gradients could be accomplished simply… I cannot wait to try out these techniques and experiment with my future landscapes.”
gurneyjourney.gumroad.com/l/ElCti
The gradient shifts: blue at the top to warm grey at the bottom
12 Look for interrupted gradients


TrustRocketeerThe©characterOriginal 140 IMAGINE FX ANNUAL TRADITIONAL

MATERIALS WATERCOLOR n Mix of Van Gough n Kuretake WatercolorGansaiSets GOUACHE n Holbein Artists Gouache BRUSHES n Escoda Perla synthetic brushes 12, 8, 2/0, 1, 0 Liner brush n Princeton Art wash brush #1 PAPER n Frabiano Artistico 300lb Watercolor(640gsm)board PEN n Uni-Ball Signo White Gel Pen SOFTWARE n Clip Studio Paint 141 COMIC BOOK HERO
COMIC BOOK HERO WATERCOLOURS
When I first decided to take my craft seriously I knew I needed to branch out into the world of colour theory. This terrified me. Growing up, I was trained primarily in drawing. Occasionally, I was exposed to various painting mediums, but came away thinking they were too cumbersome to handle. Finally, I decided that watercolour would be the most approachable of the lot to get into. The paints last longer than acrylic or oil and it’s far more portable when doing plein air work. Watercolour behaves like no other medium. It can be unforgiving at times while yielding effects and textures that are wholly unique.
Watercolour Gouache
Maintaining a careful balance of water and pigment is the most difficult aspect to master. Persistence is key, along with curbing the urge to oversaturate your brush. Colour shape, form and values should be prioritised along with careful brush strokes to avoid creating a muddy, asymmetrical appearance. The success of your washes depend on the watercolour paper you’re using. I find that a cheaper, cellulose-based paper is much more forgiving when it comes to adjustments compared to a higher quality, cotton-based paper, which can have a death grip on the pigments used. Over time I was exposed to gouache as a secondary medium. This combines the opaque qualities that acrylic and oil offer with the added benefit of being water soluble, similar to watercolours. I enjoy how it enables me to fix or add as I progress through a piece. The mix of both watercolour and gouache combined with a few other mediums makes for a diverse set of tools that can be utilised to tackle even the most advanced of pieces. In this tutorial, we’ll go over creating a portrait from concept sketches to finished piece using traditional and modern digital techniques. Also covered are my methods for gathering reference to achieve a more realistic pose to your character, as well as improving accuracy to the source materials. I hope that you find this tutorial helpful on your journey to finding the mediums that fit well into your tool arsenal and wish you much luck in your future endeavours.
IN
US illustrator BEN HARVEY walks you through his painting process that combines traditional mediums with a digital sketch to create a portrait of the Rocketeer Ben is an illustrator hailing from the US. His clients include IDW Publishing, Valiant Entertainment, BOOM! Studios and IMAGE Comics. Explore his art at benharveyart.com.

142 IMAGINE FX ANNUAL TRADITIONAL
2 Printing on to watercolour board
Once I’ve finalised my layout, I’ll faintly print my layout directly in non-photo blue onto 300lb (640 gsm) Fabriano Watercolor board using my Epson printer. Printing directly onto the board enables me to use a wider variety of paper mediums with a heavier weight. This also reduces the amount of pencil abuse on the board, which can lead to deterioration.
3 Refining and adjusting Next I go over my printout with graphite to finalise and further tighten the figure. In this case, I’ve decide to rotate the character’s head so that he’s looking more toward the viewer. Working off of a printout gives me the luxury of being able to modify and correct before proceeding into colour.
1 Gathering reference materials and digital rough layouts
I start by hopping on to Pinterest to search for inspiration, as well as reference materials for the character. Next, I open Clip Studio Paint to start the digital concept process. This is the most challenging part of my process because the number of poses and angles is nearly unlimited. In this instance, I decide to try something fun with my backdrop that complements the angles created by the character’s pose.


5 Masking the backdrop
6
143 COMIC BOOK HERO
A backdrop helps make my figure stand out from the white paper. I mask the area with 3M’s low-tack painter’s tape, then use my Exacto knife to remove the unwanted tape, making sure not to press too hard where I cut into the paper.
4 Using your references
Prepping for initial wash
Here’s a good example where I notice the hand of the figure could use some quick adjusting. I grab my prop gun and use it as a live model to identify where the fingers should be. Very useful when in a pinch. I’ll often use myself as a model, taking several reference photos of myself to help figure out more advanced poses.
7 Apply an underpainting wash
With my mask in place, I do an initial underpainting to set my tone or value. I gently apply a light and even layer of clean water to the character’s body. When you put water on the paper you want to see a sheen, not a puddle of water. I also take note of where the brightest parts of his costume are. I’ll mark those areas in pencil so that they don’t get lost in the process.
It’s best to prepare your paints as much as possible before continuing in this step. Speed is essential. While keeping the entire prepped area on the character wet I’ll strategically apply areas of warm and cool pigments. Keep these parts light and loose. You don’t want too much definition here. The randomness in your paint patterns will help in later steps.


11 Correction methods When it comes to corrections, I find that it’s best to catch these areas early on. A problem area that’s had more than an hour to dry on cotton paper will be a burden to lift off. However, an area that’s relatively fresh can be re-moistened and dabbed with a towel.
8
10 Creating highlights on the helmet
9 Tone and value continued As I progress I keep in mind where my highlights are on the costume of the character, while adding more value and tone without overcomplicating things. This stage is where I lack the most confidence – I constantly worry about the current look of the piece as well as the various forthcoming steps.
I go into the figure with more tone and value over my initial underpainting wash. Working in watercolour means that, because of the natural transparency of the medium, your underpainting can help set new layers of paint to be either in the warm or cool tonal range. This makes the decision-making process much easier.
144 IMAGINE FX ANNUAL TRADITIONAL
More tone and value
The helmet part of his costume is a challenge. It’s easy to become lost while trying to assess the patterns of highlights and reflections when painting metallic objects. It also doesn’t help that there isn’t a live model to work from. My main goal is not to overcomplicate or muddy what I’ve already put down. Less is more when it comes to brushstrokes.


At this point, I’ve got most areas of the piece figured out and finally breathe a sigh of relief that I can see the light at the end. The time has come to begin tightening the forms and adding details. This is one of the most enjoyable parts of the entire process for me.
12 Adding details
Tightening forms To bring more definition to the piece, I’ll grab a small liner brush and go around the edges of the various forms in either a matching or higher tonal value. Doing this can create some interesting effects like a glow and highlights. Then, using a small amount of gouache, I’ll add additional highlights or corrections if needed.
14
Making final touches As the dust settles I’ll go around the piece with a Uni-Ball Signo white gel pen to bring back any highlights that may have been lost in the painting process. I’ll also use a kneaded eraser to clean up any remaining graphite.
145 COMIC BOOK HERO
13


MATERIALS PAPER n Cason A4, 224g, natural white, fine grain BLACK PEN n Mitsubishi Uni Pin Fine 0.03/0.05/0.1Line, GOLD PEN n Uni-ballMitsubishiSigno
I’m going to take you through the different stages that I go through, starting with the very first idea, the sketches, research, composition, shading, the final realisation and even the way I stage my drawings to take pictures of them. I’ll also go into detail about some of my techniques, as well as the material I use to compose my works.
Art, in all its forms, is for me the best way to convey a message or an emotion. And in traditional black ink drawing, I’ve found the perfect way to convey my emotions is by playing with shapes and symbols, and by drawing on the imagery that surrounds me, such as cinema, comics, horror, tattooing, video games and much more. I want to create a composition that evokes the sense of rebuilding oneself, despite wounds and sadness, and thus being able to move forward.
In this workshop, I’ll teach you how I draw on one of my emotions, thoughts or even fears, and transform it into an illustration, enabling me to confront it.
GOLDEN TOUCH When making a drawing by hand, I work exclusively in ink, sometimes with a few touches of gold. I really like conveying emotions and messages through the symbolism of what I represent, as well as the composition and combinations that I give them, rather than through colour. I use gold ink to highlight certain details of my drawings and this bring a precious dimension to theRegardingwhole. the materials I use, for this composition I’ll use black fineliners, mostly the finest possible (0.03) to enable me to go into as much detail as I can. Sometimes I even try my hand with a magnifying glass. The technique used here is hatching. It works really well with this kind of pen, and I feel it brings character to myItartwork.alsoenables me to work delicately, to bring the volumes and textures that I want. My compositions are mainly based on symmetry and proportions. This means that I also regularly use rulers or even compasses, in order to place each element as accurately as possible on the sheet, and to offer something satisfying to the eye.
François works almost exclusively in black ink. He draws inspiration from metal music, horror, fantasy, manga and games. See more of his art at instagram.com/francois.gautier.art.
FRANÇOIS GAUTIER explains the creative process he goes through when he brings his emotions to life using black and gold ink
Ink CREATE ART WITH EMOTIONAL IMPACT GET RESOURCESYOUR See page 7 now! 147 EMOTIONAL IMPACT


4 Refining the elements
2 Development and research
When the bulk of the composition is fixed, I go over it more precisely and finely, in order to get into the details. The advantage of a pencil is that it enables me to draw lightly several times in the same place to create the exact shape I want to give to a line or a curve. Once this is perfect, I mark it more strongly.
The very first step in my compositions comes from the desire to represent an emotion that I’ve felt. Very often, I write them down in notebooks, then bring them out later and try to bring them to life on paper. And for that, I use a lot of symbolism and vivid representations.
3 Exploring compositions
After choosing the basic subject of the project and making some quick sketches, I look for symbols that can correspond to the theme in question. That could be insects, animals, shapes or materials. I also regularly revisit my notebooks to gain inspiration from past ideas that might work here.
Once the different elements are chosen and the overall idea fixed, the moment comes to compose the realisation. The goal here for me is to work in symmetry, with volumes that are well distributed, and for the overall composition to be harmonious. I never embark on a final piece of artwork without having fixed the composition beforehand.
148 IMAGINE FX ANNUAL TRADITIONAL
1 Birth of an idea


149 EMOTIONAL IMPACT
6 Inking my line-art All the sketching steps are finally complete, letting me know exactly what I want to do, so I can start inking. I don’t work on the same paper as the sketch, but on a new, thicker sheet. A light box enables me to trace my sketch, so my sheet is as clean as possible. I start with the main contours, using a 0.05 black fineliner.
7 Varying the line thickness and black areas
5 Frame and ornamentation I like to place my drawing in a frame; I find that it emphasises it and freezes it. I try to echo the main piece in my framing, by reusing similar shapes or objects. Here, for example, the butterflies are a perfect shape for angles, and are reminiscent of the butterflies that are present on the main drawing.
In my work, some parts are more important than others, and I like to highlight these. For this I use a thicker fineliner (here I’ve used 0.1) to bring them out. I also take this opportunity to fill in the areas that I know will be black, to see them as quickly as possible.


8 Establishing the light source
Light is important when working in black and in a fairly realistic style. It enables me to create volume, to emphasise certain parts, and to give a sense of foreground and background. It’s therefore at this point that I decide where my light source comes from, and when I settle on the main areas of shadow.
11 Apply gold ink I don’t use it in all my artwork, but I seem to be working more and more with gold ink. It enables me to highlight certain parts of the composition, whether that’s an important part, blood, golden pieces and so on. Here I want to highlight the tears, which symbolise sadness and nourish the flower that signifies rebirth.
150 IMAGINE FX ANNUAL TRADITIONAL
10 Frame and backgrounds I often finish with the frames, the ornamentation, and sometimes the background, only to adjust these elements so that they work with the main image.
Sometimes I apply a different texture to what I had initially thought, in order to lighten everything. Here I chose a metallic effect to mimic the sword blades.
9 Details and textures I really like details. This is why I use very fine pens. They enable me to create the most delicate of marks. I use my 0.03 fineliners – the finest that I’ve been able to find – for this level of detail. The fineness of the point ensures that I can work slowly and gradually bring out the textures of stones, small bricks, metals and so on.


The creation is finally finished, signed and varnished. Finally, we come to an important stage in my work: the presentation. For that I have a lot of objects linked to the recurring themes that I use in my drawings. I also use them for reference or as models sometimes.
14 Set up the photoshoot I don’t have a very large workspace, let alone a photo studio. Working on small A4 formats most of the time, I just have a wooden board on my drawing desk. I then place my drawing on it, and build up the staging using different objects that I’ve chosen beforehand. These items evoke themes and elements that appear in the drawing itself.
13 Preparation of the photo
Photography is the very last step in my creative process, and one of the most important. It enables me to present my artwork the way I want it to be seen, as shown here, to highlight it, and to share my creations on my social networks. It is the attention I pay to this final step that made it possible for me to discover my world, and to make drawing my daily work.
151 EMOTIONAL IMPACT
Once the gold ink has been added, it must integrate into the overall artwork. Gold ink added at the end of the process takes precedence over the black ink. And for that, you have to give it volume, shadows and sometimes even textures.
15 The final picture
12 Gold details and shadows


Pubic bone on halfway Balanced idealised body type
Pubic bone above halfway Short torso/long legs body type Pubic bone below halfway Long torso/short legs body type
152 IMAGINE FX ANNUAL TRADITIONAL
One of the first, most important difficulties a student will face as they begin their figure drawing journey is the problem of setting up consistent and solid proportions for every figure. As such, much has been written about ideal proportion systems for the humanManyfigure.ofthese systems are based primarily on the relative size of the head to the figure. These systems, while immensely useful and worth learning, can be limited in their application, only working when the figure is in a full, un-foreshortened view. Alongside this they can be too complex to check quickly, with the most common proportion being an eight-head tall figure. In this month’s article, I will discuss three simple proportional relationships that I have found very useful in my own work. These three relationships, based more on comparisons to the torso, are simple to remember, easy to control and very effective.
CHARLIE PICKARD continues his ten-part series of quick tips on anatomy to improve your figure drawing; this month, he explores effective proportions
ANATOMY–PART2
Pencil
Charlie Pickard is a classically trained fine artist and illustrator. Recently awarded the Philip de László Award for excellence, Charlie continues to work, exhibit and teach out of his studio in London. www.charliepickardart.com
The first of these three proportional relationships, and the one that is most consistently among the first marks that I make in most figure drawings. On any standing figure, this proportion is extremely easy to find and track. This is an easy control for varying body types Of course, as with all of these proportions, they are merely an ideal, a useful proportion to vary from. Bodies come in all shapes and sizes and we should strive to represent these varied characteristics in our work. The real power in this particular proportion lies in just how effective it is for controlling and easily varying the body types of our figure drawings. For example, we can see in the illustration above just how easily we can vary this by simply moving our pelvis in relation to the centre of our figure.
3 SIMPLE TIPS PROPORTIONSFOR
1 Pubic bone is a useful halfway point


3 Arm proportion
153 PROPORTIONS
Our third and final proportion relates to the arms. The first element to consider is that the upper arm ends almost exactly at the bottom of the ribcage. When drawing, we can always consider the arc the arm would make back to the torso to easily check if this proportion works in our drawing. If we consider the halfway point of the arm at the elbow, the forearm is slightly shorter than the upper arm. In fact, the lower arm all the way up to the knuckles of the hand is the same length as the upper arm. The easiest way to remember this is to consider how, if you bend you arm, your knuckles will end up at the top of your shoulder.
The length of the upper arm allows us to transfer the weight into the stronger ribcage, making it easier to carry things!
2 Leg proportion splits the body into 3 equal parts Our second proportion is based on the legs, which will generally be half at the joint of the knee. To be more specific, the lower leg from the bottom of the heel will be equal in height to the full length of the femur from the greater trochanter down to the patella. Even more usefully, this same length will roughly equal the height of the torso down to the start of the pelvis. This breaks down the entire figure into roughly three equal parts. This relationship lets us fold up compact I find a helpful way to remember this particular proportion is to consider how it allows us to fold ourselves up into a squat position. I like to think of this as similar to a three-piece foldaway table. Just like with the table, the three sections of the body need to be a similar size to allow for us to take this efficient, more compact position. So next time you are unsure about the proportions of the legs, consider whether your figure folds up neatly into this shape.
The arm halving at the shoulder is just the right size to let us carry things over our shoulder. Any smaller or larger and this wouldn’t work.
A functional purpose
I like to remember this proportion largely by considering how well it enables the main function of the arm, this being to carry things. Seen above, the upper arm’s alignment with the ribcage allows us to easily transfer the force of a heavy object diagonally into the much stronger muscles of the ribcage, making it easier to carry things. In a similar way, our knuckles ending at our shoulder makes it incredibly easy for us to carry things over our shoulder. If it were any longer or shorter this would be impossible. Form truly does follow function. Understanding how will always be the easiest way to remember these ideas.


154 IMAGINE FX ANNUAL TRADITIONAL

RALPH HORSLEY breaks down his oil painting process into 25 expert tips, explaining how to develop your own fantasy scene with a compelling narrative Ralph is a traditional artist who has successfully forged his passions for gaming and fantasy art into a career painting dragons and www.ralphhorsley.co.ukgoblins.
This painting, ‘The Scribe’, is the back cover to my art book, Ralph Horsley: An Art Adventure. The book is a career retrospective, and this image encompasses the processes and techniques for creating fantastical oil paintings that I have developed over the past 30+ years of my career. These include a dynamic point of view, interesting lighting, storytelling and detail. My work process has evolved through experimentation, trial and a degree of error. I believe that having a clear methodology helps me create stronger work. This article breaks down my approach into a series of tips that lead from the initial idea and thumbnail sketches through to a completed oil painting. I encourage you to think about your own approach, experimentation and decision making. Art has been an exciting journey that has taken me from being a teenager playing Dungeons and Dragons to painting cover artwork for the game. I hope this helps you on your own path.
3 Seek inspiration
It can be hard to resist the temptation to launch into a painting straight away. Introducing some preparatory stages prior to that can feel like adding extra work (and time) onto a project, but good preparation will not only help you create a better picture, it’s also a more efficient way of working. There is a lot of decision making in creating art, and parcelling them up into bite-size chunks does ease digestion of the whole.
2 Write your own brief When working on a commercial assignment I will be given a brief. This will have the physical constraints of the dimensions, trade dress and key elements that need to be included. The latter might include specific characters, setting, and focus of the action. You don’t need to be as prescriptive, but it is useful to give yourself a starting point and establish a brief for your project.
1 Preparation is key
25 TIPS FOR DYNAMIC FANTASY SCENES
Oils
Having created my brief, I looked for elements that would work with it. I trawled pictures of medieval rooms, writing slopes, desks, artists’ studios – my own in particular. This is a fun exercise where you can let your image search engine take you down all kinds of avenues and back alleys. The best of the bunch can be selected as reference material, but the key is to get your brain working creatively by giving it stimulus.
155 FANTASY OIL PAINTINGS


Methodology always helps Okay, so thumbnails let you do whatever you want, however wacky, but following this method helps to guide that exploratory madness. I always cover some basic ground with my thumbnails. Firstly, viewpoint. Try out three different points of view, looking up (worm’s eye), level, looking down (bird’s eye). Each creates a different mood. A figure looming over us can appear more powerful, looking down can make the viewer more of a voyeur. Secondly, depth of field. Foreground, middle ground, background – try each of your elements in those different placements. How does that change the composition of your image?
This is when I put pencil to paper and start sketching. I’ve generated lots of ideas and have piles of reference; this is the stage when I try to make sense of them. These simple sketches are what can be called ‘thumbnails’, small doodles that are about placing the key elements in compositional relationship to each other. The main figure might be shown by a couple of circles, the desk by a rectangle. This is when you have total freedom to explore compositional ideas. It should be a lot of fun; there is no pressure at this stage to get things ‘right’, just the exploration of ideas.
4 Explore ideas
Composition study I filter out the ideas I like and create a scaled drawing a quarter the size of the final piece. This enables me to refine my decisions about placement, perspective and lighting. While not fully detailed, this study should resolve any ambiguity in the thumbnail. Perspective will be resolved, extra detail will be added, figure poses more clearly defined, maybe additional features brought in. This also tells me if something isn’t working.
8 Colour takes the credit… …but value does the work. My preference is to draw my study on toned board. I’ll create a graphite pencil sketch, add linework with a brushpen, mid values with sepia ink, and highlights with white acrylic paint. This technique lets you explore a full tonal range, which is especially helpful in deciding upon the lighting. Lighting defines form, exemplified by rim light. Crucially it also provides focus.
156 IMAGINE FX ANNUAL TRADITIONAL
6
5
7 Be prepared to scrap Realising an element isn’t working is a key part of developing one’s craft. It is important to be prepared to change. That can mean rubbing something out and starting again. This is so much easier to do with a thumbnail or scaled sketch than a final, so it’s important to make that decision early on.

the loss of
10 The base layer
the precious information our sketch has captured. To offset this I will add ink outlines first. Keeping
The surface is the foundation of any traditional painting. I like to paint over my sketch, and that influences the materials I use. This painting was going to be finely detailed, so I chose to work my graphite sketch onto the smooth surface of an art board. The board is robust enough to receive several layers of clear gesso, but priming is required to support oil paints. For my landscapes I often paint on more textured canvas that allows different brush marks. Try experimenting and see how surface affects outcome. sketch is have three easily cause some of the integrity of the sketch this gives more the also make sure to have a scan of the sketch, which can be referred to as additional backup. Lots of hard work has been done by so
MATERIALS SURFACE n sandstonemountboard,Daler-Rowney n Laser print on printer paper PRIMERS n Liquitex, Clear Gesso n Liquitex, Acrylic Matte Medium ACRYLIC PAINTS n Liquitex, Soft and Heavy Body OIL PAINTS n Gamblin, Artist’s Oil Colours n GeorgianDaler-Rowney,OilColours MEDIUMS n M. Graham & Co. Artist’s Oil Medium, Walnut Oil n Winsor & Newton, Oil Colour Mediums, Liquin Light Gel n Winsor & Newton, Oil Colour Mediums, Drying Linseed Oil CLEANING AGENT n PremiumBartoline,Low Odour White Spirit n Domestic liquid soap PENS n Pentel Brush Pen n Sharpie GRAPHITE STICKS n Caran Grafstone,d’Ache,3B BRUSHES n Pro Arte, Sablene, Rounds, 1, 4, 6 n Bristlon, Silver, Filberts, 2, 4 VARNISH n Gamvar,Gamblin,Matt n Gamvar,Gamblin,Gloss MISCELLANEOUS n Stanley knife n Cutting board n Masking tape n Steel ruler n Clear plastic ruler n Mahl stick n Apron n Coffee mug 11 Preserve the sketch My
freedom when you apply
like
going to
now,
9 Where is the focus? Where is the action happening? Where do you want the eye drawn first? ‘The Scribe’ has a gentle spotlight on the table, the lighter pages and skulls offset against the desk. White sleeves and feathers triangulate our attention to the face. The lantern itself adds height, and thereby depth. The shadows do their part by providing contrast and recession. When constructing a picture, keep in mind that you are deciding how you want the viewer to read it.
paint. I
let’s not lose that. 157 FANTASY OIL PAINTINGS
layers of clear gesso added to it, then oil paint applied. Those stages can

13 Choose your palette
18 How wet? I’ve made lots of decisions up to now. What remains is the application of the paint. Oil paints are accompanied by different mediums. Each of those will change the consistency of the paint and accelerate, or retard, drying time. I use walnut oil, drying linseed oil and Liquin. The linseed oil is the mid-range, it adds flow to the paint and reasonable drying time. Walnut oil gives a lovely viscous quality, but stays wet for days; whereas Liquin dries fast, but is gloopy. I use them in different combinations. Walnut plus Liquin gives a nicer paint texture, and dries faster. Each equation has its own merits.
17 One at a time Lots of these tips encourage experimentation. That is how you learn preferences and outcomes. It keeps your creative process fresh and moving forward. Stasis is stagnation. Remember to change only one variable at a time, be it surface, medium or brush – that way you can know what is affecting your results.
14 Reference as visual memory Through creating art one builds up a visual memory, but while we can easily recognise things, reproducing them accurately is more challenging. You can’t be expected to rely on that memory alone, hence the value of reference material. I had lots of everyday objects to hand – bottles, jars, books, skulls, etc – that I could reference directly. For other items, like the lantern, I looked at photos to see how they are constructed then created my own design. The real world is the ideal starting point from which to build the fantastical.
The complementary colours of red and orange will create a different mood to that of clashing purples and greens. I experiment with different combinations on a scaled-down printout of the sketch. I like to use acrylic paint because of its drying time, and flexibility to work into areas with additional layers. This can be a really exciting process; it’s about laying down blocks of colour and not worrying about the details. There are no mistakes, just print out another copy and try something different. One exercise is to try limiting your palette to as few colours as possible.
12 Perspective is the scaffolding As lighting aids focus, so too does perspective. Perspective is the physical rule that makes the pictorial world believable. In ‘The Scribe’ I use three-point perspective to funnel our view onto the figure and his work, adding a sense of drama to an otherwise still picture; another tool to emphasise the focus. The sketch is the framework for the paint, and perspective the scaffolding for the sketch.
158 IMAGINE FX ANNUAL TRADITIONAL
Your painting should have a narrative drive. This one is relatively simple, a scribe creating a book, but that story is embellished by the objects around him. Where did the cyclops skull come from? Or those masks? Is that egg going to hatch? I like to have an easily read, overarching story, followed by lots of side quests and reveals when you look closer. Even the page he is working on echoes the contents of the book that this image is the back cover to. Telling stories is fun.
15 Remember to tell stories
16 Hot and cold Warm and cool colours give an interesting push and pull. The warm reds and browns in ‘The Scribe’ contrast with the cool blue-grey of the window, helping the latter act as a framing device.


23 Check values Before calling a painting done, the main area I will assess is the value range. How do the lights and darks read against one another? A handy technique is to take a photo on your phone, then edit the image to remove all the saturation, turning it into a greyscale image. That helps you read the picture without the distraction of colour. Remember tip #8.
24 Look after your materials If you look after your tools they will look after you. Take care to thoroughly clean your brushes. I use home decorating brush cleaner and liquid soap to remove the oil. Any detergent works well. Brushes will deteriorate, losing their shape over time, but in turn they can generate interesting and different marks.
25 Reflection
I like to keep a finished painting propped up in my studio whilst working on new pieces. This gives me the opportunity to reflect on it, and inform myself as I move forward. One needs to develop a critical eye to assess what could have been improved, but equally important is to credit yourself with what did work well. Take that knowledge and apply it your next painting.
19 Make your mark
In digital art there can be a drive to personalise brushes to generate different marks. The same holds true traditionally. The three classic brush shapes – round, flat and filbert – combined with size and material, each offers their own distinct mark. I’ve already made my decisions about colour through my earlier study, now I can concentrate on how I paint.
21 Side by side
Transitions from one value to another can be accomplished in oils by applying the paints side by side, then use a dry brush to blend them together. This is a very effective blending technique.
Losing the edge Remember we are trying to keep the picture’s focus. That means the focal areas, the figure and desktop, are tightly rendered with clear detail. Conversely, as we move to the edge of the image everything becomes a little softer – edges are lost and merge into the shadows. This is a continuation of one’s lighting choices. Use the blending technique above to soften and lose those edges.
22
20 Mix on the palette I like to mix up my range of colours on the palette before I apply any paint. I lay out my colour selection as decided upon through my colour studies. This makes it much easier to pick from, without mixing as you go. Also by using a palette knife, or old brush, you are keeping your paint brushes in good condition.
159 FANTASY OIL PAINTINGS


Pro tips andtutorialsstep-by-stepandfromdigitalartistsillustrators Master new skills and create beautiful items for your home and family Learn and get andwithcreativedrawingcolouringactivities


DISCOVER OUR GREAT BOOKAZINES From crochet and quilting to painting and Photoshop, pick up a book that will take your hobby to the next level Take your hobby to the next level with expert advice and top tips @futurebookazinesFollow us on Instagram www.magazinesdirect.com


We deliver to over 100 countriesNo hidden costs Shipping included in all prices Secure online payment SUBSCRIBE & SAVE UP TO 61% Choose from over 80 magazines and make great savings off the store price! Binders, books and back issues also available Simply visit www.magazinesdirect.com Delivered direct to your door or straight to your device


ANNUAL The ultimate guide to digital and traditional art, packed with tutorials and workshops to help you master every technique TRADITIONAL SKILLS Perfect your practical art techniques with our expert-led tutorials EXPERT INTERVIEWS We talk to some of the world’s leading creators about what it takes to make it to the top WORKSHOPS Make your art stand out from the crowd with these tips, tricks and techniques SKETCHBOOKS Dive into the minds of these exceptional talents as they share their inspirational concepts9000 9021


