Fundamentals of Nature Photography


To continually preserve the world’s beauty is no small feat. Conservation travel plays a major role in protecting wild places and wildlife by involving local communities, creating local stakeholders, and ultimately adding value to mother nature via tourism dollars.
However, another fantastic way to truly preserve the beauty of our planet lies in a different realm…Photography!
We firmly believe that not only is nature photography an excellent way to save memories of your travels, chronicle your adventures, and have a heck of a lot of fun, but it’s also an increasingly powerful tool to literally preserve the beauty of our world in the ever-lasting medium that is digital photography.
What better way to showcase the wild beauty of a polar bear than snapping a fantastic photo, which you can have, share and cherish for the rest of time?
Photography also connects us with places, people and animals in a way that goes well beyond simple observation. Through photography, we dig into the details, we immerse ourselves, we notice the subtle nuances, and we garner an appreciation that is perhaps not as possible without these amazing modern tools we have in our cameras.
You can tell that we’re wild about photography and believe it has a power so far beyond just capturing an image. Our goal here is to take you on a photographic journey that improves your skills, hones your technique, and gives you the knowledge you need to continually improve as a nature photographer.
This guide is designed to be a primer for all things nature, wildlife, landscape and travel photography to help elevate your skills, which hopefully enhances your enjoyment of nature photography. And in doing so, we hope you will go out there and capture the tremendous beauty across our planet…whether that’s in your own backyard, local park, national park, or somewhere more remote and exotic.
But we’re not just stopping here. Keep an eye out for further eBooks on how to photograph our wild world with lessons from The Natural Photographer.
• The Contents listed above are live links. Click to jump to the desired page.
• Section intro pages (pgs. 5, 42 and 71) have underlined links that jump to each topic in that section.


• Click the header of each page (like “Taking the Shot / COMPOSITION” on pg. 8) to return to the beginning of that section.
• Click “CONTENTS” in the lower right corner to return to this Contents page.
• Other links throughout the PDF are shown in blue, underlined text.

COMPOSITION
APERTURE & F-STOPS
SHUTTER SPEED
EXPOSURE & LIGHT
FOCUSING
From improving your composition to understanding aperture, our section on “Taking the Shot” provides tools, tricks and instruction for photographers at all levels. Want to learn more about how to create that “silky” effect in flowing water? Or perhaps you are new to the world of night photography. Have you ever wondered what the light meter on your camera does? If so, your questions are answered in these sections through photo examples and straightforward explanations. To complement this section, new blog articles will be posted on the Natural Photographer website on specific instances where things like composition, light and focus are critical to getting the best shot. In the end, photography is very subjective, as the most important thing is for you to enjoy your photos. This suite of articles is intended to do just that—offer suggestions and information to help you capture scenes and wildlife that you are supremely happy with.
Composition in photography is arguably one of the most important considerations before, during and after taking the shot. It’s a topic significant enough to warrant entire books (and such books do indeed exist)! However, one of the greatest things about photographic composition is that through only a few simple guidelines and bits of advice, your photography has the potential to improve significantly. After employing a few basic tricks, you may not even be able to explain why your photographs are markedly better, but it will nevertheless be incredibly evident and personally rewarding.
One of the first things to consider when taking photos is that rules are meant to be broken. Never take these guidelines as non-negotiable directions. That being said, however, there are some simple rules that you should consider for most of your photography, especially if you’ve never tried them before. Then, if you decide to ignore basic composition rules, you’ll at least know that you’re breaking them!

The first and greatest rule for composition is what’s known as “the rule of thirds.” It is remarkably simple and effective at the same time. The rule basically begins with overlaying an imaginary (or actual) grid over your viewfinder. “Actual” in the sense that some cameras allow you to push a button to digitally overlay a grid on your screen.
The idea is that photos will look more pleasing if you employ a sense of “division” within the photo, such that the grid becomes meaningful. “Meaningful” is a very general statement, and it’s supposed to be. The grid could lead you in a variety of ways, based on intersecting points or dividing the photo along horizontal or vertical rows.

The best way of explaining this is via examples. In this one below, a pleasing photo of a night scene in Antarctica


As soon as you apply the rule of thirds to this photo, the geometry becomes clear. The primary tent in the foreground is centered near the bottom left intersection of “thirds,” the mountain in the distance is centered on the upper left intersection, and the tent in the background is near the bottom right intersection. Furthermore, the right column contains all of the background elements (the other tent, some snow, a less important part of the mountain range, etc.), whereas the left two columns contain the important foreground elements. The important thing is that the photographer is using the lines and intersections to organize the composition of the photo.
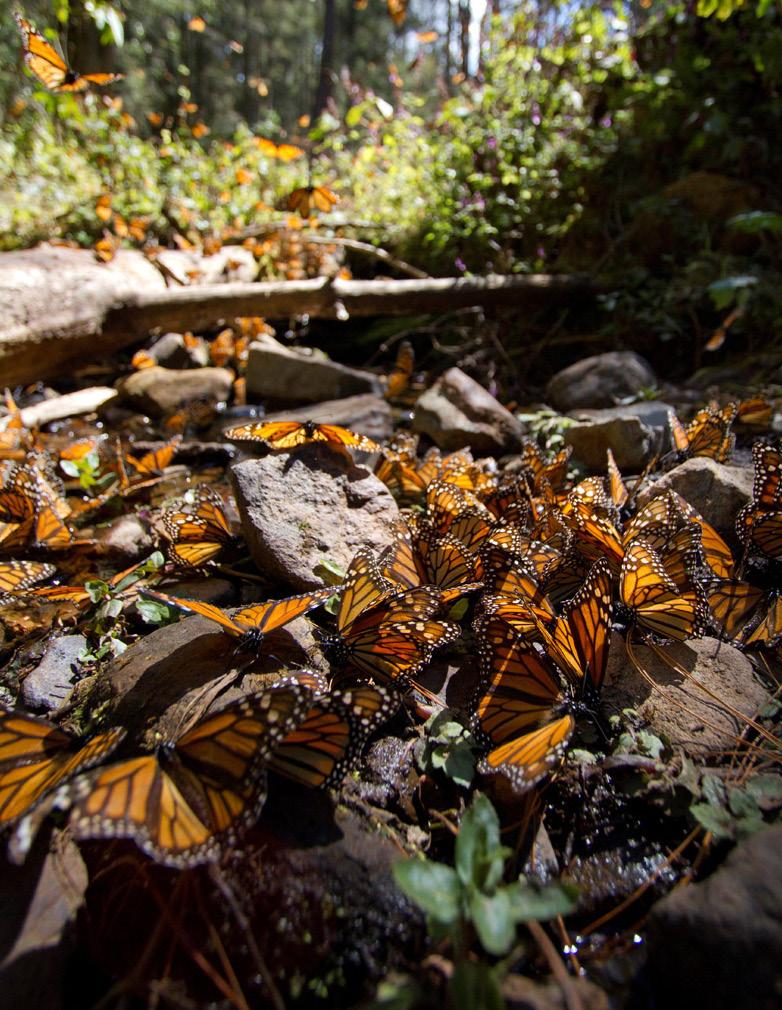
Let’s try another example. Here we have a portrait-oriented photo of monarchs in their overwintering grounds in Mexico. In this photo there are two primary elements: monarchs puddling on the ground and monarchs flying around bushes and through the air. By getting low to the ground, it creates a very evocative scene where one feels as if they are among the butterflies.

If we were to overlay the rule of thirds grid, we quickly see how the composition of the photo is aligned to the grid rather closely. The upper third of the grid is reserved for the bushes and sky, while the lower two thirds of the grid contains the monarchs on the ground. Because the

human eye naturally goes to areas of the photo where “thirds” grid lines intersect, the photographer chose to center the focus on the lower two intersecting points to make those butterflies as sharp as possible.
For our last example, let’s take a look at a more advanced technique to use when composing your photos. While the rule of thirds is arguably the simplest to adopt and the most flexible, another composition tool, known as “the golden ratio,” can yield impressive results. What’s more, it helps really hammer home the idea that photo composition is grounded in mathematics. This is certainly not the place to go into detail on the formulas and reasoning behind this “Fibonacci spiral,” so you’ll just have to trust us for the moment. Hopefully with a few examples of photographs you’ll see why this is so naturally pleasing to the eye.
From what you’re seeing initially, you’re probably thinking that the golden ratio is really just a more precise and exacting rule of thirds. This, in fact, is exactly what it is. However, don’t let this idea stifle your creativity, for, as you know, all rules are meant to be broken—right? Nevertheless, let’s take a look at a couple examples of how this spiral can yield pleasing composition. Here we have a beautiful scene of the Ranomafana cloud forest of Madagascar. It has all the elements of a great landscape shot—vivid color, a contrast in textures (between the flowing river and dotted leaves, branches and stones), and a balance between foreground elements (the pouring water and river rocks) and background elements (the jungle surrounding the river).

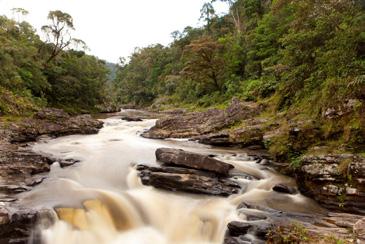
As soon as we apply the golden ratio to the top of it, we begin to make associations with the photo elements and the “nautilus shell” pattern. When we cross check this with the photo above (without the golden ratio overlay), we begin to realize how our eyes naturally follow the lines and are directed to the various key points of the ratio.
First, we see that our eyes naturally trace the outer line of the spiral and focus primarily on the photographic elements below it. That is, we tend to largely ignore the corners and far margins of the photo. Next, you’ll notice that the primary focus of the photo is actually rather near where the spiral centers (i.e., the bottom left of the photo). Now, of course we could choose to flip the spiral such that it converges on the opposite side of the photo, the bottom right. This simply goes to show that the golden ratio is indeed flexible, just as the rule of thirds can be. In other words, there is nothing specifically perfect about the bottom left of the photo vs. the bottom right. It all just depends on what you’re photographing and what you find to be the most visually appealing.
The basic idea with the golden ratio is that when each square, convergence point, and line ultimately can be associated with a prominent feature of the photo, a sense of geometry creates a more visually appealing image. At the end of the day, you should take your own creative license and find associations between features in your photo and features in the golden ratio.
In order to demonstrate that this ratio also works well with wildlife shots, take a look at the below example. Here we have a powerful photo of a chimpanzee in Uganda. It’s subtle yet compelling at the same time.

But then as we overlay the Fibonacci spiral on top of it, you start to see where the prominent features of the ape just so happen to be right where the Fibonacci spiral converges. This isn’t a coincidence and is how aesthetics naturally work. Just as nature adheres to the golden ratio and Fibonacci spiral, so do our eyes as they’re drawn to key parts of a photo.
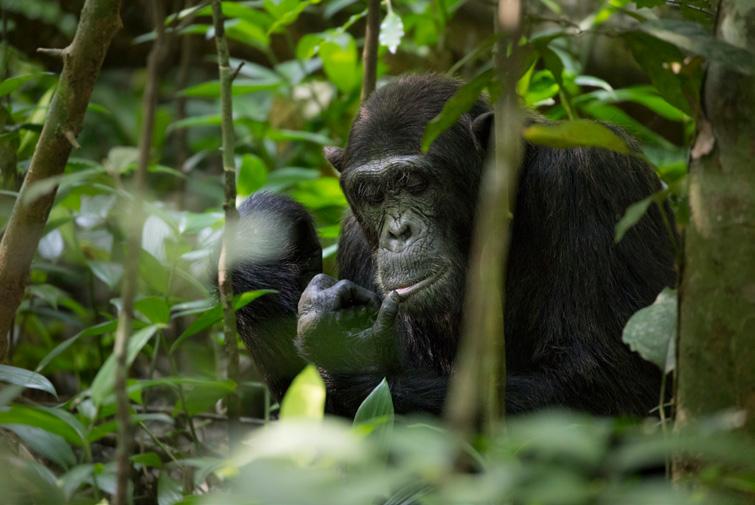
And please note that the Fibonacci spiral can be flipped and rotated, too! It need not be the same orientation…just the same spiral shape.

While the Fibonacci spiral seems relatively complicated, notice how an “easy” version of the same principle is accomplished by simply overlaying the rule of thirds. Hence why the rule of thirds is such a popular way to compose photos…through a simple tic-tac-toe grid, we are aligning ourselves with some major mathematic and aesthetic principles!
Next, we have a beautiful image of a sally lightfoot crab in the Galapagos Islands. It exhibits a wonderful contrast in both colors and textures and is in great focus. And, the composition draws the viewer in to really captivate the audience.

As you’ll see, the below overlay shows that there is again some reasoning behind the composition of the photo. First, the outer curve of the spiral perfectly encapsulates the key parts of the image, drawing the eyes just where the photographer wants you to look. However, the center of the spiral doesn’t seem to be close to the main part of the image. It’s actually right on a blurry piece of lava—what gives!? Furthermore, it’s difficult to associate key parts of the image with the squares, lines, and other parts of the golden ratio.
This one is a bit of a trick question, as there are parts that fit rather well, but in fact this photo was composed more on the rule of thirds dynamic rather than the golden ratio. Does that make it wrong?


Now, all of a sudden, as we look at the photo from a rule of thirds perspective, things seem to be perfect. The subject is right in the middle third, with all four of the intersecting points “squaring” the crab and the upper and lower thirds left open for the brilliant lava texture.
Rules are always meant to be broken. However, there are tricks and tips that one should always consider, so that when you do at least break the rules, you know how and why you’re doing so.
Ultimately, designing and composing a better photo is to make you, the one taking the photo, happier. Through these simple techniques in composition, you will no doubt be more pleased with your own photography and most likely those you are showing your photos to will become even greater fans of the stories your photos tell.
If you’re an enthusiastic amateur at photography and haven’t yet gotten past the “auto” mode on your camera, this is the best place to begin with in expanding your photographic prowess and understanding—by choosing your own aperture to shoot with.
To start with, let’s define what a camera aperture is and what the f-stop designation actually means. A camera’s aperture is basically the diameter of the opening within the lens that allows light to pass through to reach the sensor (or the film, back in the good ol’ days).

Above is a graphic of a side profile of a typical SLR (single-lens reflex) camera, with the lens pointing toward the right. The two small black lines represent the outer openings of the aperture. Since this is a profile graphic, it’s a little difficult to understand what the opening actually looks like, so the graphic on the next page shows the head-on view of a lens aperture.

As you can see, for each diameter of aperture there is a corresponding “f” value. The chart lists all “common” aperture values, as denoted by the corresponding f-values. Between each of these values, most modern cameras will allow you to set values 1/3 of the way between. For example, between 5.6 and 8 there is f/6.3 and f/7.1, too. The “whole” stops of f/5.6 and f/8 have two in-between points that you can dial your camera for.
The key to understanding this all right away is to immediately disregard these numbers as any sort of actual numerical value in relation to one another. In other words, do not start mentally comparing these whole numbers to decimals or trying to make a relationship between these numbers using math. Rather, you’re going to need to memorize each of the f-values (aka “f-stops”) as categories. Just like you would memorize your ABCs from A to G, so should you memorize these numbers (f/2 to f/16).
So, you ask, if I’m to memorize these numbers, what is the significance of all this? Glad you asked. As you can see, the lowest f-stop number, f/2, is the widest opening in the aperture. This means that you are letting more light reach your sensor than f/2.8. Just like a water pipe with a wider diameter allows more water to flow through per second, so does a wider aperture when it comes to letting more light “flow” into the camera’s sensor.
The numbers in the above chart are there for a reason. It certainly seems arbitrary to have these seemingly obscure numbers jumping from 2 to 2.8 to 4 to 5.6 to 8, then 11 and 16. How are these all related? Simple – each “stop” (just a basic term – memorize this jargon, too) going from 2 to 2.8 and then to 4 is allowing half the amount of light into the sensor. Higher

numbers let in less light than the lower numbers. Thus, if you have your camera set at f/4, you are letting in twice the amount of light than if you set it at f/5.6 (i.e., f/4 is one full stop wider aperture). Similarly, f/5.6 lets in twice the amount of light as f/8, and f/11 twice as much as f/16. Remember, don’t worry about these numbers in relation to one another – it’s best just to memorize them for now.
There are two primary ramifications for setting your camera at a particular “f-stop” or “aperture setting” (note: these terms mevan the same thing). The first, which I’ve already identified, is how much light you’re letting through. This is especially important when making sure you are shooting with a fast enough shutter speed. Read the Exposure & Light section for more info on this.
The second ramification is your depth of field, and that will be the focus (pun intended) of the rest of this section.
So, what is depth of field? Basically it determines how much of your photo is in focus. For example, have you seen photos with a beautiful background blur, intentionally left out of focus?

The photo on the previous page exemplifies the intentional use of blur. Even though these rivets on a door in Cusco, Peru, are rather close together, a very wide aperture (i.e., small number, f/2.8) creates this very shallow depth of field.
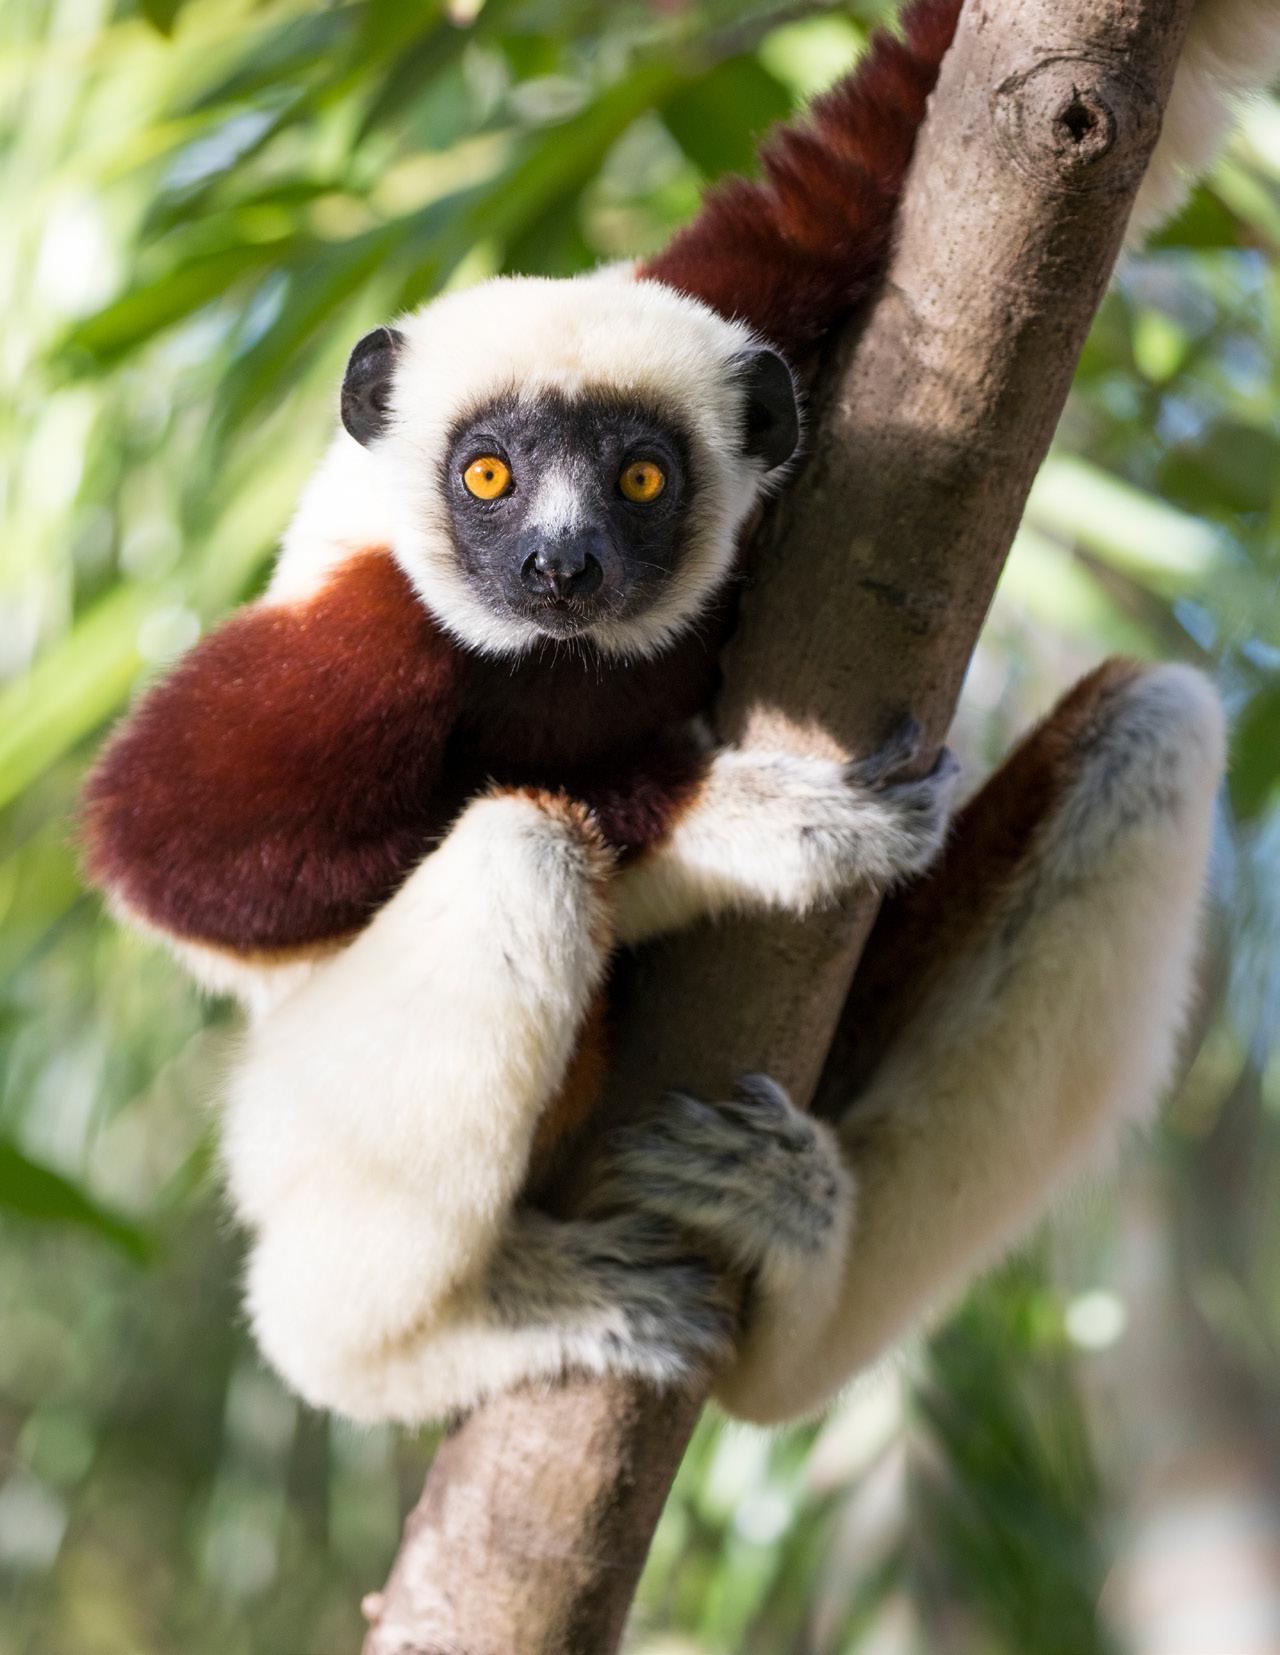
Similarly, the above photo features a lemur in Madagascar with an artistic and pleasing blur surrounding the subject. Because the leaves and other branches are at a greater distance from the photographer than the lemur is, a wide aperture allows for a more narrow (aka shallow) depth of field, yielding a nice blur to the non-important parts of the photo. This allows the viewer’s eyes to be drawn to the main subject – the fascinating lemur (Coquerel’s Sifaka species).

The exact aperture setting or f-stop that will yield such blur is going to depend on many factors. How far away your camera is from the subject and how far away the various parts of the scene are from one another are primary considerations. For instance, if you want to blur branches around an animal (e.g., the lemur photo), the branches need to be outside of the plane of focus by a reasonable amount. The word “reasonable” is ambiguous and so is the exact blur you’ll get from one scene to the next. Practice is truly the only way to get a decent handle on ratios from camera to subject to background, etc.
Aperture settings go the other way, with bigger f-stop numbers allowing more of the scene to be in focus. Rather than go into a physics lesson here
to explain exactly how optical physics will yield a greater plane of focus, just go ahead and blindly follow this tidbit of info. Just like a shallow depth of field (and the resulting blur) will vary based on things like the distance you are from the subject you’re photographing, the same is true of getting everything in focus.
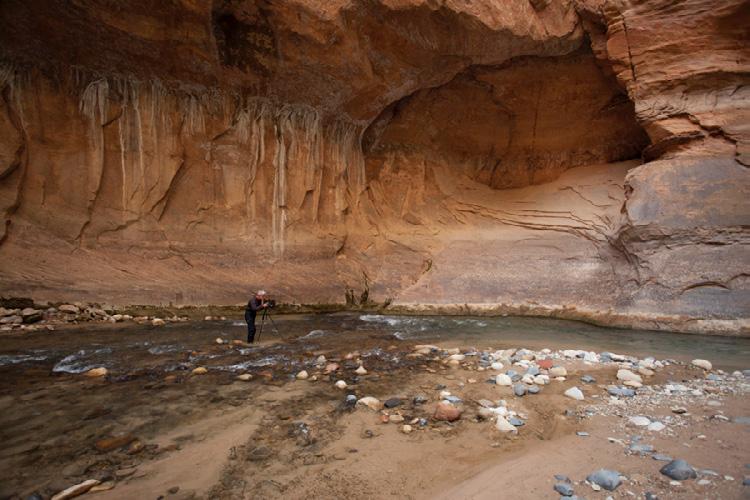
Landscape photography is the most common time to use a very wide depth of field, getting as much of the scene in focus as possible. Rules are always meant to be broken, so not every landscape shot needs to be at a big f-stop number (f/8 and above), but many indeed are.
The above shot of the rim on Bryce Canyon is a great example of needing to use a wide depth of field to make sure everything is in focus. The orange soil and the white soil are actually separated by a small gap of around 50 yards as the canyon rim curves around from left to right. As a result, a shallow depth of field would have caused part of the scene to be out of focus. The white cliff would be out of focus if I focused on the orange, and vice versa. However, with a high f-stop, both are in focus in the above photo as desired.

One rule of thumb for landscape photography is to try and find something in the foreground to focus on. Check out our composition and landscape photography pages for more info on this. But foreground focus can pose challenges when it comes to wide depth of field. Because of the ratio of your camera to the subject (i.e., the foreground element) and from subject to the background, it’s imperative that you use a very, very large f-stop number. F/11, f/16 and even greater are often needed. Even in the above photo you can see how the Manzanita bush is in sharp focus, with the clay hoodoos in the background a bit out of focus.

TAKEAWAY
A large f-stop number will make more of the photo in focus.
Aperture is truly at the heart of photography, so having an understanding of it is critical for advancing the way you shoot. Inherently it is a rather simple process. Changing the aperture is a sliding scale and affects two things – the depth of field and the amount of light let in. However, the ramifications these two things have on your photos are paramount.
When it comes to understanding these ramifications, practice makes perfect. Get outside or on a nature trip and play around. The more shots you take, the better you’ll understand how to use apertures and f-stops to dramatically improve your technique and ultimately the quality of your photos.
• Changing the f-stop or aperture widens or narrows an opening inside your lens that lets light reach the sensor.
• A wide depth of field (more parts of the photo in focus) is achieved by having a narrow aperture (smaller opening), corresponding to a big f-stop (f/8 and above).
• A narrow depth of field will intentionally blur parts of the photo and is achieved by having a wide aperture (larger opening), corresponding to a small f-stop number (f/4 and below).
• F-stop numbers are all relative depending on the distance you are from the things you’re photographing and the proportion of the subject to the overall frame of the shot.
• Practice is critical to properly understand the effects of changing your aperture/f-stop.
Shutter speed may be described in many ways, such as “time value,” “shutter rate,” or “exposure time,” but it all means the same thing – how long the camera’s sensor is being exposed to the scene you’re photographing.

Without getting too complicated, the shutter can be viewed like window blinds, preventing light from passing through unless opened. When you hit the button on your camera to take a shot, this temporarily opens the shutters to allow light in, and thus capture the photograph. Generally, it is only for a split second that the shutter is open, which is often depicted by a number as small as 1/50, 1/100 or 1/200 on your camera. This means that the shutter is open for only 1/50th of a second and so on.
Generally speaking, it is not advisable to manually change the shutter speed on your camera unless you have a specific reason for doing so (or are a seasoned expert and prefer to shoot on manual mode). In this section, we will discuss the several reasons why you would want to manually change the shutter speed in order to capture the shot.
One of the most common reasons to change the shutter speed is to freeze motion of a running animal (or really anything that is moving quickly). In order to do this, the shutter speed must be very, very fast. There is no universal rule for how fast exactly, but generally speaking, you want the shutter speed to be faster than 1/500th of a second. In order to do so, though, there must be ample light. Thus, shooting a fast-moving object indoors, or at dawn or dusk, is more complicated and difficult unless you are very familiar with aperture settings and ISO settings
This bounding African wild dog is a great example of when one would want to manually change the shutter speed to match the photo you’re trying to take. By setting your camera to 1/500, 1/1000, 1/2000 or even faster, you can get an animal running at more than 15 miles an hour in perfect focus frozen in time. Because this was taken in mid day in sunny Africa, there was plenty of light such that even though the shutter was open for a very short amount of time, enough light could come through to properly illuminate the scene.

By no means is this a perfect list of speeds corresponding to animal movement, but this gives you a general ballpark of what you need given the scene in front of you.
• Walking animal – 1/250 to 1/500
• Fast-walking animal – 1/500+
• Really fast or nearly running – 1/1000+
• Rapid movements like sparring or full running – 1/1500 to 1/2000
Freezing motion is not only useful for wildlife photography, but also for landscape shots. Here, water is frozen in time such that it has a very defined texture.
Blurring the motion of animals and landscapes is also a common desire when taking control of the shutter speed. However, it’s a bit more challenging, since slower speeds require more steady hands and in most cases a tripod to make sure the camera is perfectly still. For example, if you are shooting at ½ of a second, and if the photographer moves the camera ever so slightly, it will result in an entirely blurry photo.
But, the results of slow shutter speeds in portraying motion and fluidity can be breathtaking.

In the photo above, instead of freezing motion with a fast shutter speed, as was done with the wild dog photo earlier, this photo is intentionally blurry. This certainly give the photo more of an artistic feel, which may or may not be something you personally like, but it is an option. With the blur of the background and of the dog itself, the photo actually helps to portray the chaos and swiftness of a wild dog hunt, as a pack of these German shepherd-sized animals chased down an impala in Botswana. In this case, we are looking at a shutter speed of approximately 1/10th to 1/25th of a second.
Similarly, we can take the river photo from the previous section and see what it looks like with a slow shutter speed, too.

By using a tripod and setting the exposure to 1 second or slower (tripod is a must), one is able to blur the motion of the water such that it appears very smooth and silky. Ultimately, it’s a matter of preference as to whether you prefer a sharper look to the water or one that is more fluid, but the point is to understand that both are options when understanding the role of shutter speed in your photography.

When light is at a minimum, such as after the sun has gone down like in the photo on the next page of the northern lights in Churchill, Canada, a slow shutter speed is a must in order to allow enough light to come through to the sensor of the camera.
To better understand why a shutter must be open longer to allow in more light, think of light like running water. If there is a slower flow of water (darker), it will take more time to fill a bucket to the same level as if you had a very strong flow of water (bright light).
In the above photo, a tripod is again a must, as this was a 5-second exposure. Should the camera move, or the subject, within that 5 seconds, there will be blur to the photo such that the person in red, or the igloo or anything else wouldn’t appear in focus – a bad thing for photos such as these.

Although it’s not necessarily an everyday occurrence to choose your own shutter speed, it does have great utility. From freezing motion with really quick shutter speeds, to blurring motion by having a slow speed, to choosing an extremely slow shutter speed to capture night photography, understanding how your camera’s shutter speed can affect your photos has wide-ranging applications. So, get out there and experiment, as this is one of the easiest ways to make your photography look very professional, artistic and creative at the same time!
Along with composition, light is one of the most important considerations when taking photographs. After all, photography really is all about light. You could be witnessing the greatest view of the Grand Canyon, but if it’s in the middle of the night, you’re not seeing much – it’s all about light! With new techniques in post-processing programs like Photoshop and Lightroom, it is getting easier to change exposure and lighting after you take the photo, but the fact remains that you will always be happier with the photo if you take it best in the moment. Not just happy because you don’t have to spend lots of time editing a photo, but happy because the photo will look better.
The first thing to consider when dealing with light and exposure in your photography is simple – getting the exposure right. Not too light and overexposed (or “blown out” in photography jargon), and not too dark either. But how, you ask, is it possible to determine this? Digital cameras now afford us the luxury of actually previewing the image just moments

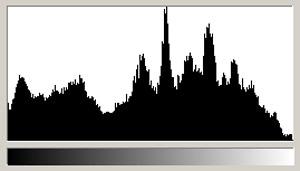
after taking it. This, of course, is a highly valuable tool and always the first way to evaluate the scene and determine the settings to shoot with. But, it can be misleading. Things can get in the way to fool you when doing this. The brightness level of your LCD screen, for example, is one. Then there is the brightness where you’re actually viewing the image (full sun vs. a dark hallway). Between these two things, it’s evident that simply viewing the photo is rather inexact. Fortunately, memory is cheap, and you can get away with taking a few of the same photo at different exposure levels. However, if you want to get scientific and very precise, all digital cameras come with what’s known as a “histogram” function, where you can read the light levels of the photo in a very precise and scientific way.
Histograms, however, are not the be all end all of light measurement. Your eyes should always be your first and last lines of defense. They are, though, a great way to see if there are any major problems going on with a shot.
In looking at the above histogram, the spikes, although relevant in terms of which dark/light profiles are most commonly represented in the photo’s exposure, are irrelevant information for making any changes to the next photo’s exposure. For instance, one might be photographing fall aspen trees, with shades of light gray represented more frequently due to their light-colored bark.
What we’re really looking for in a histogram is any major swing to one end of the graph or the other. That is, a major curve at the extreme dark or light end, which would indicate that the photo is “scientifically” too dark or too light.
The above three histograms illustrate what we’re looking for (the top graph), and two scenarios that would cause us to want to reevaluate the photo and take another shot. When there are too many over or under exposed parts of the photo, data is lost, and not even the fanciest editing program can fix it.

Unless you are photographing on full manual mode (usually designed with an “M”), your camera is choosing the appropriate exposure for you based on the scene. You can manually dial in an exposure compensation in order to correct what the camera “decides” for you. Each camera brand and model will look slightly different, but they will generally resemble the image on the next page, ranging from -2 to +2. Because of the brilliance of digital cameras, most will now allow you to preview the image based on whether you overexpose the shot by +1 or +2 or underexpose it by -1 or -2.
If not, you can always take a trial shot to see the result.

Cameras are smart, and they’re getting smarter with each passing year and with each new model that comes out. From point and shoot, to fullframe DSLR, and most recently mirrorless cameras, they decide what an “evenly exposed” shot ought to be. In the camera world, this even exposure means that the camera perceives 18% gray across the image. This has been determined through years of experimentation from camera engineers to be closest to what the eye sees naturally.
The challenge for the photographer is telling the camera whether it should look at part of the image to meter, use only a small point, or use the whole frame. The reason for not just using the entire image has particular importance with wildlife photography where the subject is the focus and thus prioritized for even exposure, even if at the expense of the background.

A prime example of this in the world of wildlife photography is when the animal stands out significantly from the background. In the case of photographing polar bears, it matters most how the bears are exposed, not so much the background. Although the red and brown willows are neat, they aren’t what you care about most – you want those bears as the centerpiece. In this case, one would want to manually use a metering setting that is in the center of the shot so that the camera doesn’t adjust to the darkness of the background, which would overexpose the white bears. If changing the metering mode is difficult to do (which it can be depending on your camera), the easiest way is to try and take a few different shots at varying exposure levels. Remember, it’s always best to get the shot right in the moment, so if you have to delete photos after you return from the trip, it’s better to do this than to have to make a major correction in Lightroom or another editing program.
For most cameras, there are four types of metering modes that your camera uses to decide which part of the photo it evaluates for proper exposure. As you can see from the red areas, evaluative is the most comprehensive, looking at the entire frame for proper exposure. This is ideal for landscape, scenic and general shots. Center-weighted gives more priority to the middle of the photo and is still appropriate for landscape and general shots. Both partial and spot metering are appropriate for wildlife shots, where the other elements of the landscape are secondary to a singular subject in the photograph. Needless to say, spot is the most pinpoint accurate of the two. But it’s important to remember when using partial or spot metering that where you auto-focus your camera becomes the point your camera exposes for.

Setting exposure metering modes like those on the previous page will best be done by looking at your camera’s manual, but plan on something in your camera’s menu resembling the below.
Most cameras have four metering modes. From the left, these menu icons represent center-weighted, partial, spot, and evaluative.

For a topic as important, and oftentimes confusing, as exposure and light in photography, it’s best to summarize things with some basic rules of thumb:
1. Always consult your eyes first and histogram second for shots that could be over or underexposed.
2. Don’t hesitate to take another shot, compensating for exposure in your camera’s menu with a +1 or -1 setting.
3. Choose the best metering mode for the type of photography that you do, and it will save you time in the long run.
4. Practice makes perfect. Getting comfortable changing your camera’s exposure settings (both modes and compensation) can be challenging. With practice, it will become second nature and you’ll get the shot each and every time – with very little editing to do afterwards!
There are a handful of things that Photoshop can’t fix, and one of the most important with good photography is focus. If you take a photo and your focus is off, the photo is relatively unsalvageable. In addition, experimenting with focus is a very quick and easy way to get more creative and artistic with your photography.
Throughout this section, you’ll see that we mention “aperture” and “depth of field.” Please refer to our Aperture & F-Stops section for more insight on this.
What you choose to focus on has a major impact on the end product of your photography. While it might be tempting to get everything in focus all the time, this is not always the best way to go – especially when it comes to wildlife photography. You actually want some of the photo to be out of the focus. Even with landscape photography, when one would think the

idea is to have the entire scene in perfect focus, there are times when you want to isolate only a certain part of the shot and bring it into focus, leaving the rest of the scene with a beautiful blur, or bokeh, to it.
The above photo of two gentoo penguins in Antarctica is a classic example of getting the subject in perfectly sharp focus, with the background blurred. This serves to draw the viewer’s eye toward the subject (the penguins) and minimize any distractions found in the background. For instance, if everything was in focus, the floating iceberg just behind the penguin on the left might blend in with the outline of the penguin, causing a bit of confusion on the part of the viewer as to what he or she is “supposed” to be looking at. Focus helps to isolate the subject from the background.
Yet there are times when you want everything in focus, usually with landscape scenes.

In the above photo, also from Antarctica, it’s rather critical to have both the foreground glacier and the rough background peaks in good focus. Thus, one would want to employ a very large depth of field to cover the immense distance between the foreground and the background. But the question still remains as to where one should focus. Even if you choose a very large depth of field, you still have to point at something to focus on.
With landscape photography, there is a general rule of thumb that you should focus on a part of the scene about 1/3 of the way from you to the farthest point of the photo.
When looking at a large peak and glacier scene like the one above, it’s quite difficult to figure out exactly where 1/3 of the way is, but generally speaking, you don’t want to focus on the closest thing, nor the farthest thing, as one could compromise the sharpness of the other.
Rules are always meant to be broken, and one should not always look at every landscape scene and try to get everything in focus. While you may indeed want to 9 times out of 10, it could be that 10th shot that finds its way on the cover of your trip’s photo album.

Above is an example of when limiting the depth of field makes part of the scene a bit out of focus. Here, the foreground is blurred, which accomplishes several things. First, it draws the viewers’ eyes to the subject of the shot – the gemsbok in the middle of the photo. Second, it minimizes any distraction from the textures and colors of the grasses in the foreground (further drawing the eye to the subject and the beautiful red and brown mountains in the background). Lastly, and most importantly, it creates a sense of vastness. And, when photographing in the Namibian desert, you certainly want to portray the vast expanse of its wilderness!
When the wildlife is the main part of the scene, you naturally want to get it into great focus. Here, focusing on polar bears, it’s not all that important whether the willows are sharp and in focus. Since they’re a relatively uniform texture and color, they wouldn’t detract all that much from the bears even if they were in perfect focus. Nevertheless, because this was “an action scene,” I needed to increase my shutter speed to freeze motion. As a result, the camera had to compensate by limiting the depth of field such that anything too far away from the camera got out of focus.
It goes without saying that you should focus on the bears for this shot. However, there is a lot of bear in this shot! Should you focus on the paw, the nose, or somewhere in the middle of everything?
While in this particular shot, you could get away with aiming somewhere in the middle, a general rule of thumb when photographing wildlife is to focus on the eye.
If your depth of field is narrow enough that part of the animal is actually out of focus, the eye will be the most important part to get in focus. It creates the connection needed with the viewer.
The above photo is a great example of focus priorities. On first impression of this scene, one would think that it’s absolutely critical to have all parts of the butterfly in focus, from antennae to wing tips. However, in order to blur out the background, a narrow depth of field was chosen, which did end up blurring part of the butterfly. By focusing on the eyes, it’s almost entirely missed that part of the butterfly’s wings are rather blurred. By focusing on the eyes, the rest of the animal becomes less critical for sharp focus.

In summary, focus is critical, as no matter how fancy a computer program you have, you can’t fix improper focus, or sharpen a completely blurred photo. There are several key things to remember when dealing with focus in your photography:
1. Blur can be good in a photo, as long as your subject is in focus.
2. Correct blurring of the background can properly isolate the subject from a distracting background.
3. In landscape photography, blur can showcase depth in a photo.
4. When the entire landscape is of interest, a maximum depth of field will result in sharply focused features.
5. When photographing wildlife, always focus on the eyes of the animal… even if this means part of the animal will be out of focus.
Check out these articles that will help you choose the right photography equipment:

TYPES OF CAMERAS
LENSES FLASHES TRIPODS
The world of photography is dynamic, especially when it comes to the gear we photographers use. From time-honored favorites to new gadgets and gear, this section helps simplify the variety of equipment available in our age of photography. From camera overviews to explanations on the merits of certain lenses, this section is a must-read for anyone thinking of investing in new gear (or who simply wants to better understand gear they already have). To complement this section, we will publish blog articles frequently on new gear so that you are always “in the know” on the latest techniques and equipment.
There are essentially four types or categories of cameras on the market now that consumers have easy access to. Some could argue that film cameras still have a role to play, too, so we will make the argument that these four categories still hold true, with each category coming in a digital or film version. But truthfully, we won’t talk much about film here, as it’s quickly going the way of the dodo.
To summarize, these four categories are as follows: point-and-shoot, mirrorless (sometimes referred to as 4/3s), crop-frame DSLR and full-frame DSLR. For the sake of organization, we’ll break each one down into its own section and discuss the ins and outs of them there.
Photography was truly revolutionized by this category of camera, as they are accessible, easy to use, offered in a range of affordable options, and some even come in waterproof or shockproof housings. It truly is amazing what you can get with these workhorses of the camera world.

Members of the point-and-shoot club range from your basic smartphone camera all the way to some pretty fancy versions that share many capabilities of high-end DSLRs. Some have incredible zoom ranges that go way beyond what you could get with a camera that lets you change lenses. They are flexible and extremely versatile.
While it’s difficult to call out “downsides” to these cameras, as they offer so much to a huge audience of photographers, when compared to higher-end categories of cameras they often lack quality. Most often this is quality of the resulting image, but it might also be build quality (i.e., made of cheaper materials, less durable, etc.).
The fundamental reason for this lack of quality has to do with the technology and parts that go into them. For one, they have a smaller sensor. This critical part to any camera is the eye of the camera – it’s what processes and creates the image you see. Having a smaller sensor means they can’t get the same detail, clarity and overall quality of a camera with a larger sensor.

The second component of their tech is that they generally have a more basic computer inside of them. Their ability to process colors, judge light and dark, achieve perfect focus quickly, etc., is a bit hampered by less computing power.
In the end, point-and-shoots are a brilliant category of camera, both for the beginner and seasoned professional alike. What they may lack in high-
end tech, they make up for in ease of use, flexibility and adaptability. Many pro photographers will actually carry a small point-and-shoot with them alongside their big fancy equipment because of how easy it is to whip out of their pocket and grab that candid shot, or go from shooting a faraway city scape one second to a close up of a flower the next.
As with nearly all things, you get what you pay for, and given the reasonable price tags of point-and-shoot cameras, they come in at an incredibly good value.
In recent years, there has been a “mirrorless revolution” in cameras. While just several years ago one could find fault in the mirrorless system, the primary issues being related to focus speed and view finder quality, mirrorless has a significant leg up on the traditional DSLR. So much so that most of the main camera manufacturers have shifted their entire production, research and development to mirrorless camera bodies and lenses.
The upsides to mirrorless are quite significant. In addition to high megapixel counts, these cameras have some of the latest technology in them to improve all facets of photography, from exposure and dynamic range to extremely versatile, customizable and accurate auto-focus technologies. The absence of a mirror allows more direct-to-sensor capture, which, although it may not mean much to the non-techie out there, allows for game-changing performance, with live views of the scene. This ability to directly capture what you’re looking at in real time has done wonders for integrating high-quality video capture alongside high-quality photography, turning these little computers into some of the most highpowered photographic machines ever to be produced.
Just as with DSLRs, mirrorless cameras now come in both crop-frame and full-frame versions (more on this in the next section).
At one point, these were the top of the game in digital photography. And in many ways they are still major players—especially the higher-end versions that are still directly competing with mirrorless cameras. Being direct descendants from the pre-digital age, DSLRs look, feel and work
very much like a traditional film camera. There are indeed upsides to this technology, which is that the camera bodies work with all previous lens models and their mounts are all the same. In addition, you get an optical view finder, which means you are seeing the actual scene through the viewfinder and not a digital replica. However, because of the mirror in these cameras, there are certain limitations to how quickly the camera can take and process photos. You often have reduced “frame rates,” which equate to how many photos you can take per second. You also do not have the advantage of seeing realtime setting edits in your viewfinder like you might with the mirrorless varieties. That is, if you increase exposure in your camera, you’re still just looking at the actual scene through the optical viewfinder in DSLRs. In mirrorless cameras, the image projection matches the exposure you have dialed in, which can be quite helpful for accurately capturing the photo.
The intro SLR camera (Single-Lens Reflex) has been setting the bar for many years, originating in the film days and progressing nicely into the digital age. Companies like Canon and Nikon have poured huge amounts of money for R&D into these, and the quality shows. Now, new sensors, processors and general tech are making their ways into smaller and lighter cameras that are getting more affordable all the time.
Being the model of what most modern photography is based on, having one of these in your bag means the sky is your limit. You can shoot on extreme time lapses, very high apertures, add on a multitude of accessories and offcamera flashes, and put on highly coveted big zoom lenses to get incredible wildlife shots at astonishingly good quality and resolution.
These cameras are probably responsible for putting many professional photographers out of business due to their relative affordability and superb quality in the hands of dedicated hobbyists and amateurs. In other words, these cameras are great.
However, they now have to compete with the smaller, lighter and potentially more affordable mirrorless cameras described in the previous section. As a result, companies that are firmly vested in the DSLR world are doing everything they can to make these bodies lighter, better quality and generally more attractive.
While the verdict is still out on whether a crop-frame DSLR or a mirrorless camera is the best body with which to upgrade from a point-and-shoot, crop-frame DSLRs are still a standard as one’s “first good camera.”
So what does a “crop-frame” mean? Basically, when lenses were first rated and named, they did so based on a “full-frame” camera. As a result, a 300mm lens is a true 300mm on a full-frame camera. However, because crop-frame DSLRs have smaller sensors than the big full-frame DSLRs, the lens has to be mounted a little bit differently, effectively giving it a multiplier effect. Without going into too much sciency detail, this means that for most crop-frame cameras, you are essentially magnifying your focal length. Thus, for a crop-frame with 1.6X effect, your 300mm would actually be a 480mm – allowing you to get much more zoomed in on the animal. This is great, right? Mostly it is. However, this also means that on your wide-angle end of the spectrum, it’s also multiplied. So a 24mm would actually be closer to a 38mm – becoming less wide and less ideal for landscape shots and the like.
Fortunately, the makers of crop-frame cameras have specialty lenses dedicated to crop-frames. For Canon, the lens is called an “EF-S,” adding the “S” and Nikon affixes the “DX” label onto their crop-frame lenses. As a result, they can only be used on crop-frame sensors, but they do get extremely wide. For example, you can pick up a 10-22mm for a crop-frame, which is effectively a 16-35mm on a full-frame. Thus, very wide. However, because of the making of the lens, that same 10-22mm cannot fit on a full-frame camera. The reciprocal is entirely feasible, though, in that you can always put a full-frame lens on a crop-frame body. It just incurs the multiplier effect.
This isn’t meant to overwhelm you, but this is something to keep in mind when deciding on cameras. If you get a crop-frame DSLR and start collecting specialized lenses, you may have to reinvest significantly should you ever wish to upgrade to a full-frame camera.
These are the big daddies of the camera world — both literally and metaphorically. They are without choice much bigger than a point-andshoot, and they are solid hunks of camera. However, they are also the top tier in the camera world, too, producing the largest, sharpest and most data-rich images out there. They have bigger sensors and come with highbrow tech inside their internal computers. Thus, you are going to get huge megapixels out of them. The newest models at the time of this publishing are 50 megapixels plus.
The first is the price tag – they are not cheap, with most models starting in the couple thousand dollar range (note: both Canon and Nikon now have a sub-$2,000 full-frame).
The second thing is what we already mentioned: They are usually bigger and heavier than other cameras out there. Since they are usually fabricated with a metal body, this heft is also a benefit, as they are generally very durable.
However, the biggest cost is that you lose your multiplying factor for your big lenses. That is, the 300mm that could be a 480mm on your cropframe just got shot back down to earth at 300mm. If you are mostly into

landscape or cultural photography this isn’t a big deal, but for wildlife photographers, it is significant. You now either have to carry a bigger lens, a more expensive lens, settle for a lens with a bigger minimum aperture, or all of the above. If you’re ready to make the splurge on a full-frame camera, be ready to also make a splurge on a new zoom lens.
The upsides to full-frame cameras are monumental if you prioritize image quality. When you take your first photos with a full-frame, you’ll likely gasp at how crisp the resulting photos are and how much you can crop in on them and still retain top quality. It’s difficult to say whether years of photography will make you a perfectionist, or it’s only the perfectionist that is with photography for years, but those who demand the best will reach for a full-frame every time.
Another major benefit is the ability to increase your ISO to rather high levels. While ISO 1600, 2000, 3200 and above tend to get a bit “grainy” with anything else, full-frame cameras tend to retain surprisingly good quality at these higher levels. Ideal for indoor photography, or shooting wildlife at dawn or dusk, the ability to whimsically shoot at ISO 2000 when things are dim, but still get a good shot, is life changing.
These quick summaries of various camera bodies is in no way exhaustive of their various merits, nor their shortcomings. As new tech comes out, the line between each will shift and sway and be drawn again many times over. However, for someone who is new to photography or thinking about upgrading or just simply is curious about the options out there, we hope this will be of help.

Talk to any semi-pro or serious amateur photographer and they will have a wish list of at least three new lenses. They’ll probably tell you about all the various f-stop benefits, or the new image stabilization/vibration reduction it offers. Or, maybe it’s a prime lens, ultra-wide, or mid-range telephoto. Lots of descriptors and jargon, right? Well, here is your source for understanding a little more about how to formulate your own lens wish list and quickly master the language of lens-speak.
For each “category” of lens, there are usually many versions that fluctuate in price and ultimately quality. In many cases, two lenses will be the identical brand and identical focal length (eg, Canon 70-300mm f/4 –5.6), but the quality of the optics and build of the lens differ significantly, resulting in a $1,000 difference between the two. Because there are so so many options out there, this section will not be a review of each lens, but rather a guide for what lens specifications you should be on the lookout for when assembling your ideal travel and nature photography kit. In addition, like understanding wine regions and vintages can improve your ability to find a good wine for dinner, understanding f-stop ranges and focal lengths will allow you to spot a good deal when shopping for your next lens (or formulating your wish list).
An all-purpose lens is generally one that covers the entire spectrum of focal lengths, from wide angle to telephoto. That is, you can take a photo of a group of people in front of you one second and then zoom all the way in to take a photo of a bird in a tree the next. Plus, you can do all this without moving very much, which can be especially helpful when photographing travel experiences where you could be confined to a nature trail, boardwalk to vehicle. While one may initially feel that this multi-purpose lens is the ideal scenario, there can be drawbacks.
Pros: excellent flexibility allowing for a variety of shots; no time needed to change lenses; less to fuss with.
Cons: heavier than most other types of lenses; can sacrifice quality of photos; oftentimes they are expensive to get comparable quality of something less multi-purposed.
“Primes,” as they are often called, are the exact opposite of an all-purpose lens. They have a “fixed focal length” such that they cannot zoom. This means that if you are too close to your subject, you have to back up. Too far? Get closer. For someone not used to prime lenses, this seems to be an unacceptable drawback. But, for those who are perfectionists in their photography, prime lenses offer the very best in terms of the quality of the resulting photo. In addition, because of fewer working parts, they are often lighter and sometimes even less expensive. However, because of their “pro-level” quality, what money is saved by not having the zoom feature is often re-invested into the quality of the glass and components used. Thus, the result is a superior lens.
Lastly, these lenses often offer the widest apertures, allowing for low-light photography and/or beautiful background blur (aka, bokeh).
If you’re looking to experiment with a prime lens, the one that most people start with is a 50mm f/1.8 or f/1.4. Try one out and you will be amazed at the results.
Pros: high-quality lens for extremely sharp photos; because of fewer parts, great value for money; ability to get very wide apertures not possible with other lenses.
Cons: limited flexibility when subject is too near or too far; less versatile than most other lenses.
This is the most common lens out there, and it comes as part of many camera kits. It allows you to get wide-angle shots, along with a little bit of zoom, all in one nice and tidy package. Typical focal lengths are 18-55mm, 24-70mm and 24-105mm. While these won’t allow you to zoom in on an eagle sitting in a tree across the river, they are wonderful “walking around” lenses. They are ideal for cultural and people photography, landscapes and scenic photography, indoor photography, and even macro photography. An added bonus is that they are usually quite small and very convenient when doing things outdoors (e.g., hiking while it’s around your shoulder or neck, keeping it at the top of your backpack for quick access, etc.)
Because these have a more limited focal-length range compared to the multi-purpose lenses discussed previously, they are often either better quality, less expensive, or better in low light. Remember, it’s hard to have all three in one lens, but by reducing your versatility, as demonstrated with the prime lenses, you can get pretty close to having your cake and eating it too with these lenses. Like all things camera-related, there is a significant range of qualities available in this highly-used category of lenses.
Pros: excellent combination of versatility, value, size and weight; an ideal lens to have on your camera when you don’t know exactly what you’ll come across in a city or on a trail.
Cons: not many, a lens that should be in everyone’s bag. But if there are any, it’s that the top-quality ones can get very expensive very quickly.
These lenses would still fall into the “specialty” category, as they are usually something one will acquire after all other basic lens needs are met. However, if you are a dedicated landscape photographer, or you do a lot of indoor photography, you may wish to pick one of these up sooner rather than later.
They are incredibly helpful for nighttime, aurora borealis, or star photography, as they allow you to capture a good bit of the night sky.
Typical focal ranges are 10-22mm, 14-24mm, 16-35mm and 17-40mm, and which one you select depends heavily on whether you have a crop-frame or full-frame camera. We go over this more in the camera section, but you must multiply the focal length by 1.4 or 1.6 on crop-frame cameras to get the actual focal length due to the smaller sensor size. Thus, getting
a 10-22mm on a crop-frame is like getting a 16-35mm on a full-frame. We won’t go too much into this here, but it’s just important to keep this in mind, because with ultra-wide lenses, every millimeter wider will a) cost you more money and b) allow you to shoot even more of your landscape.
Since these lenses go to the extreme wide end of the spectrum, it’s highly unlikely that you’ll find one that allows too much versatility. That is, the limited amount of zoom is really only helpful in composing your shot, not to zoom in on an animal or specific landscape feature too much. Thus, while amazing for big scenic landscapes or skies and tight quarters when indoors, they fall outside of the “all-purpose” category and are truly a specialty lens. Nevertheless, they are a wonderful and welcome component to any outdoor photographer’s bag.
One added and unique bonus to these lenses is the ability to take wideangle macro shots. The effect of getting a wildflower or other small flora or fauna up close with mountains and sky in the background is quite pleasing. A normal macro lens would really only allow you to photograph the subject itself, with minimal background. However, because of the close minimum focusing distance on these lenses, you can get quite close to your subject, but then give it an ultra-wide perspective to incorporate much of the surrounding environment.
Pros: ideal for vast landscapes, sky photography and photography that takes you indoors. Also offer interesting perspective for macro photography.
Cons: a specialty lens with specific purposes; can be costly.
Another must for any nature and wildlife photographer, these lenses are multi-purposed and offer excellent abilities to zoom in on your subject, whether it be a moon rising on the distant horizon or a zebra in the African savanna. Traditional focal lengths are 70-200, 70-300, 55-250, 200-400 and 100-400. As with all lenses, the wider the range (eg, 100-400), the more versatility you have to compose and frame your shot. However, the drawback is that such flexibility will either cost you in dollars or maximum aperture width (which translates into low light sensitivity, fast shutter speed, and background blur).
For example, the Canon 100-400mm is a fantastic focal range. However, its aperture is f/4.5 – 5.6, meaning that as you zoom from 100 to 400mm, the maximum width of the aperture goes from f/4.5 to 5.6. Now, compare
that to the 70-200mm lens made by Canon. For the same price tag, you can get a constant f/2.8 throughout your zoom range. In the world of photography, this is huge. The ability to keep such a wide aperture constant and all the way to 200 is quite a luxury.
So, what you lack in total zoom with the 70-200mm, you gain in aperture, which translates to faster shutter speeds and better abilities in lower light. And with that wide aperture, you also get excellent background blur.
With all things in lenses, there are trade-offs. And nowhere are these tradeoffs more apparent than in this class of lenses – the zoom telephotos. The ideal zoom telephoto has excellent range, optical quality, and a low f-stop. While a compromise is indeed achievable, it often comes at a higher price tag. Otherwise, you’ll have to decide for yourself which of the main tenets you prioritize and what you’re willing to sacrifice—zoom range, quality or a wide aperture.
Pros: an essential lens for every nature and wildlife photographer; it allows you to zoom in for the perfectly composed shot of relatively distant subjects.

Cons: often involves a compromise between quality, zoom range, aperture, and price.
These are the big daddy lenses that make you look like you’re carrying a bazooka. However, the resulting photos are truly stunning and their capabilities are unmatched.

While these lenses have a specific purpose and all in all are quite limited in what they can do, what they can do is zoom in on a faraway subject (generally one that is not easily approachable) and make it fill the frame of your camera. It might sound like small potatoes, but this seemingly simple task makes these lenses some of the most coveted in the world of wildlife and nature photography.
Examples of these lenses are the prime 400mm, 500mm, and 600mm lenses. The wonderful thing about these lenses made by top lens manufacturers like Nikon and Canon is that not only do they allow you to get in close on hard-to-photograph animals, but they are some of the sharpest and highest quality lenses in their lineups. What’s more is that they usually offer some of the widest apertures available, meaning that you can produce a wonderful background blur and shoot in low light, which are both excellent for wildlife photography.
So, what’s the catch, you’re asking? Well, they are quite expensive compared to most other lenses – often in the high four-figure range.
Pros: extremely high quality and the ability to get photos of elusive, skittish, or just plain far away animals. A wide aperture allows for incredible flexibility with low light, as well as fast shutter speeds, which can be critical for fast-moving animals (i.e., African safaris).
Cons: has very specific purposes; a high price tag
The use of flash can be controversial in nature photography for a couple of reasons. First, it can disturb the wildlife you’re viewing, and second, it can affect others trying to photograph the same animal or scene. In fact, some parks and natural areas will prohibit flash photography. Be sure to check with the park rangers or your Expedition Leader to be sure flash photography is permitted. The other controversial part of flash photography is just simply how the resulting photo looks. The animal can look flat, unnatural shadows can appear, and the photo can look a bit fake or contrived. However, when used correctly, flash can be an incredible resource when dim or dark conditions limit our ability to properly photograph an animal or environment. The trick is mastering your flash so that you can use it subtly and preserve the natural look of, well, nature.
When it comes to flash, the adage that moderation is the key to happiness could not be more applicable. New flashes are incredibly powerful and can fully illuminate small birds from 50+ yards away. Despite this feat of human engineering, progress in photo technology does not always equate to getting better photos.
The challenge with flash photography in nature is that a flash coming from a singular point (i.e., your camera) is indiscriminate. It lights the surrounding vegetation just as much as it does the subject. Often this can result in shadows that detract from the naturalness of the scene.

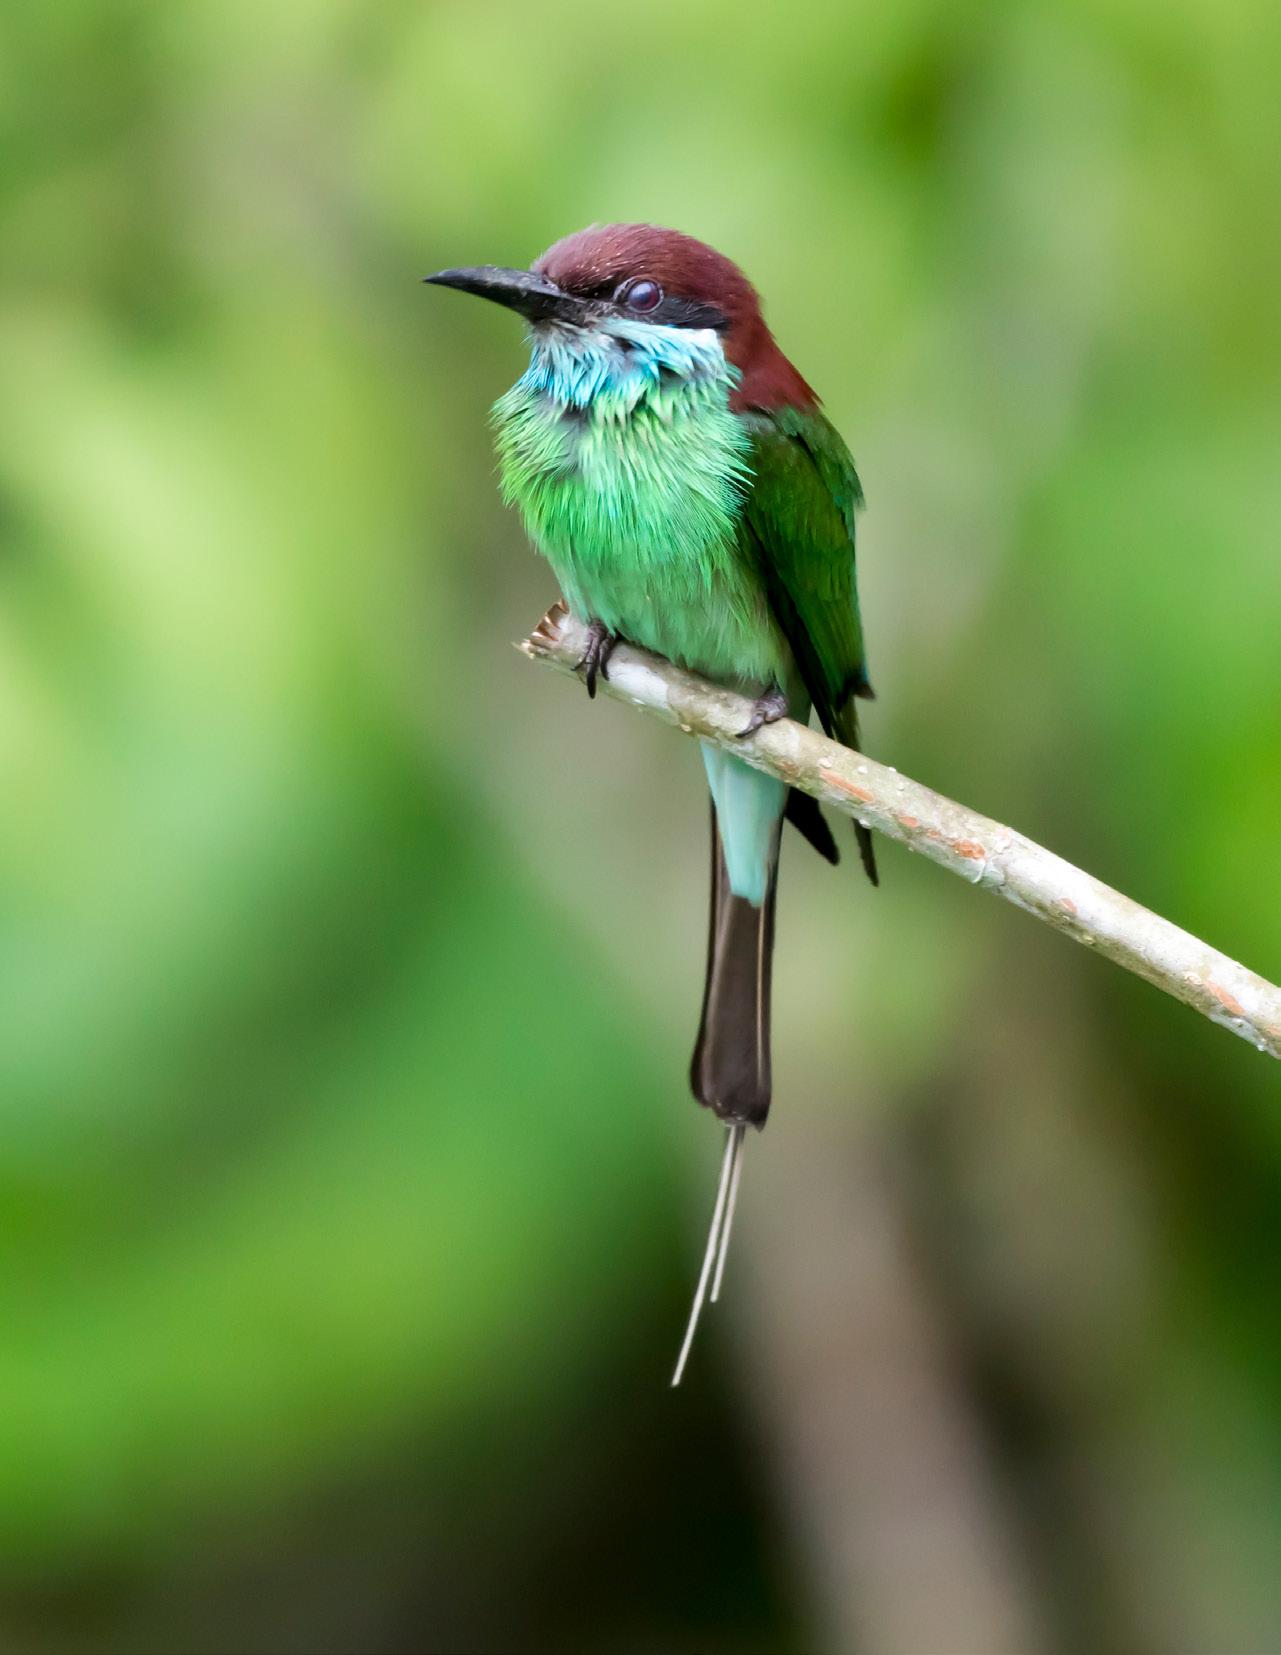
The above photo illustrates the challenge of photographing animals when using flash. On one end, the artificial light provided from the flash allows an impressive depth of field, as shown by the detail and texture on the plant and all parts of the bird here. But on the other hand, the lighting seems a bit…off. The bird and immediate foreground are well lit, but the background is dramatically darker. This is a common problem with bright flash in dim conditions and is known as the Inverse Square Law.
As the distance (measured in meters) from the light increases between the flash and the subject, the amount of light reaching the subject is 1/distance squared (1/d2). That is, in going from 2 to 4 meters from the subject, you are going from 1/4th to 1/16th of the original amount of light reaching the subject. This is a huge drop off in light and results in dark backgrounds. Don’t worry about the math and the calculations – the main point is that light falls off VERY quickly.
So, the way it affects your photo is simple. If you have a bird in front of some vegetation in the background, the light reaching the bird is much brighter than the background. Even if the vegetation is only a few feet behind the bird, it will be much darker because of this square law and light.


If the bird is on a branch and the background is 30 feet away, then the background will be nearly black. This effect is more pronounced when you are photographing something close than when it is far away (because light has already fallen off quite a bit if the subject is far away to begin with).
The fact remains that there are times in which you either use flash and get some sort of photo, or you get nothing at all. This is particularly true with wildlife photography at night. The chance of setting up a tripod and keeping the animal still for 5+ seconds to do a long exposure (see Night Photography) is slim to none.
The above photo of a malachite kingfisher is a great example of all we have talked about so far. First, you can see that the light falls off dramatically, such that the background is very, very dark. In the case of this photo, it actually works quite well with the brilliant blue juxtaposed with the dark black background. So, the effects of light drop off are not always an entirely bad thing.

This is also a great example of when one has no real choice—you either get the photo by using flash, or you get nothing at all. This was taken in very dim conditions at dusk when no camera or lens in the world would have been able to get the shot without flash.
Ultimately, each photographer has their own threshold for how a photo will look with flash or not. The goal here is not to set that threshold for you, but instead to inform you of the major contributors to pushing the limits, and how to avoid doing so.

Being judicious in using flash is the best way to avoid overdoing it, but of course there are always those instances when a photo will look better with more light, or be impossible without flash. Tropical rain forests, dawn and dusk, and macro photography are a few examples of those cases. Learn more about macro photography here.
Limiting the amount of light from your flash is achievable in a few different ways. The first way is by mastering the menu system of your flash (if external) or camera (if part of the camera) to manually lessen the output. It’s not as intimidating as it seems, and is usually little more than turning a dial.
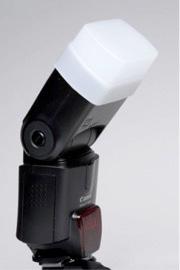
The second way is to accessorize. That is, purchase something that goes over your flash to diffuse it and make the light it emits softer and less harsh.
When searching online for flash diffusers, you’ll likely laugh at the variety and simplicity of the devices for sale, ranging from something that seems like a disposable drink cup to a white piece of paper. That’s because diffusers are indeed very simple! You can certainly make one at home, but should you decide to purchase one, you’ll be pleased to see that their simple form is matched by their simple price. Most flash diffusers are between 10 and 25 dollars. What you’re paying for is ease – they attach easily and stay put. But, if you’re feeling creative, make one on your own and enjoy.
Like all things commercial, there is the ability to go high end with flash diffusers as well, with moldable versions, different colors, and interchangeable sizes. If the topic of flash diffusion is new to you, start with something basic like the one below, simply slipping on top of your flash and creating nice soft effects.
Or, if you have a pop-up flash, carry around a small piece of white plastic or a film canister like the one below and experiment with the results.
The general idea is they spread the light out more evenly so you don’t have one single point of bright white light. Much like clouds help diffuse the sun and lessen harsh shadows, so do flash diffusers. They are not a panacea and won’t allow you to use flash with impunity for every shot you ever take. But, they are a great item for your “tool kit” in photography in your quest for the perfect shot.
Another technique, which you can employ with or without a diffuser, is known as flash bouncing. It sounds like fun – and that’s because it is! The idea is that you are using the flash to illuminate something NOT in the photo but instead using its reflectivity to illuminate your subject more softly. For example, perhaps there is a white building wall behind you when photographing a bird at the entrance of a nature park. Angle your flash behind you to illuminate the wall and essentially turn it into one large, diffuse and less intense flash. If you’ve ever had portraits done of you or your family, you’ll remember large white boxes that would flash when the photo was taken. It’s the same principle – a larger surface will lessen harsh shadows and other undesirables associated with flashes.
However, large white walls are not the only thing to look out for. What about the leaves of a bright spring green tree, or a snow bank? The same thing applies here – aim your flash (obviously needs to be one that you can move, not the ones that pop up on top of your camera) at leaves or snow and have it give you some nice soft lighting, or even incorporate a little green color or side angle to the light!
Macro photography is an entirely different genre of photography, living by different rules in all ways, shapes and forms. The use of flash is no exception. With macro photography, a flash is almost a necessity, as you’ll need to set your camera to a wide depth of field (big f-stop number – read the Aperture and F-stop section if you have time) to get all the detail and texture that makes macro photography so beautiful.

The above photo of a saturniid moth in Papua New Guinea is a great example of how a seemingly “unphotogenic” little brown moth can turn into something quite fascinating when employing macro photography techniques. This also goes to show you that a macro lens is not necessary to take evocative macro photos. The lens used here was with a kit 18-55mm.

We’ll go into more macro photo techniques in the Macro photography section, along with more detail on the types of flashes and accessories one can use.
• Anticipate issues with using flash in nature, both from the wildlife fleeing as well as fellow photographers becoming a bit grumpy with you. Be sure to ask permission from your guide and fellow travelers before using a bright flash.
• Spend some time getting to know your flash, how to increase and decrease the intensity, and the results by doing different things (i.e., angling it to the side or behind you, bouncing it off different surfaces, or using a flash diffuser)
• Moderation is the key to happiness when using flash. If you are using one, always try to take photos with and without flash so that you can compare the results on your computer afterward.
As far as accessories go (i.e., things beyond the camera and lens), having a go-to tripod is one of the most important things to have in your bag. Not every occasion or even every trip requires a tripod, but there are many instances when they are indispensable.
Night photography, landscape photography, and slow shutter speed photography are all prime examples, but as you develop an understanding of your tripod, how to use it, and get out more and more to practice photos with it, you’ll likely find new applications where it quickly becomes one of your favorite tools. Whether a big lens is in your future or you take a liking to macro photography, investing in a good tripod will expand your abilities and interests to a new level.

When it comes to tripods, the adage you get what you pay for is pretty spot on. When you invest a little more money, you’ll get a lighter, easier-touse setup. A better tripod will be sturdier, more compact, or more durable. The trick is to find out what you’re willing to pay, and do the research to get the best combination of the above if you have to compromise. For travel, you will often sacrifice something so that it can be a little lighter and a little more compact.
A tripod is essentially two parts, the legs and the head. When getting something on the fancier end of things ($150+), you’ll likely be picking out each part separately.
When researching tripod legs, there are many, many options out there. Many brands, many price ranges, many materials they’re made of, etc. For travel photography, you will want to choose a tripod that folds down into minimum size and weight. Often, with those tripods with a rigid middle post (inside the three legs that spread out), you’ll find that the minimum size is still rather large. In addition, these extra posts are shortcuts to stability and usually denote a “less-than-stable” tripod. While not a hard and fast rule, this is often the case.
Sticker shock is a common symptom of shopping for tripods. Two tripods that can look identical next to one another can vary by hundreds of dollars. This is usually due to the materials used and the overall quality of
construction. These things will impact the overall stability, durability and packability of the tripod, so looking for the bargain could compromise your overall satisfaction with the tripod.

Carbon fiber is no doubt the cream of the crop, being very stable and very lightweight. In addition, it reduces small vibrations that can transfer from the ground to the camera (but this is really a minor benefit, not worth buying strictly for this reason). The main reason will be it weighs much less than other materials like aluminium.
The overall construction of a tripod is also very important to the lasting quality, not to mention whether you are happy using it from trip to trip or day to day. How precise the rivets are made and how secure the latches are play a big part in overall quality. It’s tempting to purchase camera gear online, and this tends to work just fine with camera bodies, lenses, and other accessories. However, because a tripod is a mechanical accessory, it’s quite important for you to really assess the tripod for its weight, size, and especially moving parts. For instance, do you like the way the legs compress with latches, or would you rather have the legs twist down? Are the legs too small, or is the tripod too short to reach your eye level? (a common thing to think about with smaller travel-style tripods). More than any other piece of camera gear, it’s key to get to your local camera shop and try out the tripod before you buy. You’ll quickly know whether it’ll work for you or not.
The tripod head is even more important for usability, as it’s what you have the most contact with when taking photo after photo. The idea behind a tripod head is that you can move your camera to make minor adjustments without having to fully reposition or readjust the legs. There are several styles of heads, and just like the legs, they can range in size, price and durability. We will outline the basic styles rather than get into specific models (there are literally hundreds!).
No style of head is perfect, so the pros and cons will be addressed in the sections below.
The most popular style is the ball head. The exact latching mechanism to lock the ball into place can vary based on brand and model, but the overall idea is similar to a ball and socket – kind of like what we have in our joints. The ball can move and float freely, with range of motion limited only by the casing. Then, a small screw or bolt can be tightened to lock the ball from moving once the camera is in position. The benefit of this time of head is that it is simple, lightweight and has few working parts that can get damaged or fail over time. The downside is that sometimes it can be cumbersome to hold the camera in one hand to align it and then use the other hand to tighten the bolt. It sounds elementary but it is something to practice with prior to purchasing this style of head.

A style that has adopted the basic function of the ball head but changed how the user loosens and tightens the ball itself is the “pistol grip” or “trigger grip “head. What we have here is the same idea, with a ball and socket design, but instead of the often-cumbersome bolt dial used to tighten and loosen the ball, a simple squeeze mechanism is used, allowing for basically a one-touch tighten and loosen feature. The benefit of this method is that it’s very quick, easy, and reliable to work. The downside is that because of the size, it adds weight to the overall system and is a little less packable when traveling. However, this is indeed the head that the author of this book uses – and highly recommends it!

The third major category of tripod heads lends itself more to the video realm but can be quite effective for those wanting one head to do both

smooth panning for video and small adjustments for photography. This is known as a pan/tilt head. Just as with the above two, there are many versions and iterations of this style of head, but the idea is the same. Sometimes also known as a fluid head, it has internal gears and bearings that buffer against jerky motions when moving up, down, and side to side. While it’s a bit slower to make major adjustments for photography, it does allow for wonderful video work when adding movement to your clip.
The primary benefit of this type of head is that it’s quite versatile. If you take video alongside photos, this offers a singular solution for anything that comes your way. In addition, because the head has built in a certain amount of resistance when moving, it’s great for making easy small adjustments. The downside of this head is that it can be quite heavy and overkill if you have no plans for taking video.
Monopods tend to be a popular consideration when it comes to nature and wildlife trips. For those that are not familiar with them, they are essentially one leg of a tripod with a small mount on top to hold a camera. The primary purpose is to minimize size and weight while allowing for some stabilization and comfort when photographing.
With the advent of new internal stabilization on most lenses and the making of smaller, lighter zoom lenses, monopods are not as necessary or popular as they used to be. However, they are indeed light and easy to pack, and double as a walking stick. Plus, if you plan on holding a large camera and lens for a long time, they can be a life safer. Nevertheless, if

you don’t plan on being in a wildlife blind or open field for a long time with a heavy lens, they don’t really offer enough to bring one in addition to or to replace your tripod.
• With tripods, you tend to get what you pay for.
• When shopping for a tripod, be sure to try it before you buy it, as seemingly simple operation can be difficult when doing so over and over again.
• Invest in a tripod that you enjoy using. If it feels cumbersome now in a store, it will feel much worse when shooting in the wind and snow with a backpack on, trembling from the excitement of having a male polar bear 20 feet from the tip of your lens!

WILDLIFE
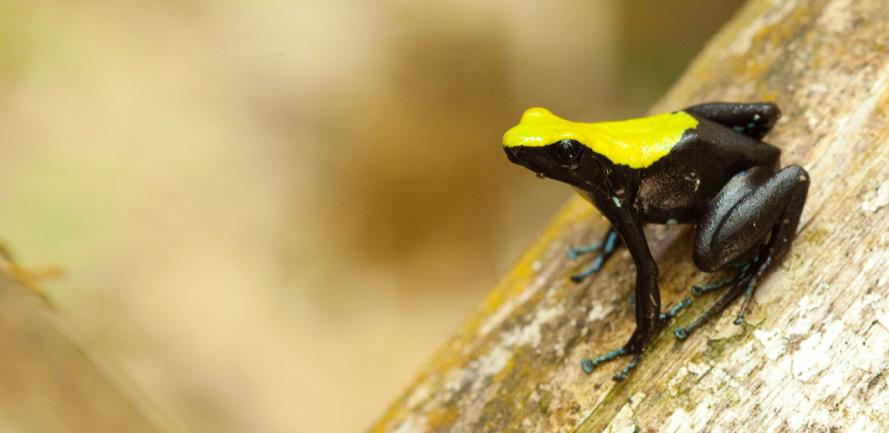
LANDSCAPE
NIGHT MACRO TRAVEL
HDR
While it may seem self explanatory to take a variety of photos while on an adventure, whether it be to your local park or the Okavango Delta, being happy with the assortment of your photos and the story they tell from a particular trip requires a bit of planning. Seeing things from a photographer’s eye takes training. This section breaks down the various types of photography pertaining to nature, wildlife and travel, along with a few specialist sections that discuss night photography and macro photography techniques. In addition to these full articles here, new blog articles will be posted regularly on The Natural Photographer website at Or, strike this last sentence altogether to review specific scenarios in order to ensure that you end up with a photo album and portfolio that accurately portray your range of experiences.

Wildlife photography differs from other forms of photography in many ways. But still, there are many parallels it shares with photographic styles like portrait photography, creative photography, photojournalism, and others. In a way, if the photographer is up to the challenge, wildlife photography can be a combination of many styles of photography all into one.
If we were to break wildlife photography into its components, one could say there are several common “styles” that are immediately adopted by the wildlife photographer. First is what I would term wildlife portraiture, often sharing styles with what one might find in a field guide. In this instance, it is an iconic photo of a particular animal (or plant) that is diagnostic and aesthetic. In general, the surrounding environment is usually not played up very much, but instead, it is the intention of the photographer to do everything in his or her power to draw the viewer into the animal itself. Below is an example of this style. Take notice of how the background is completely blurred with a nice bokeh (can be pronounced like boh-kuh or boh-kay) and the animal is isolated from other landscape elements.
Another derivation of general wildlife photography that has parallels elsewhere in the photographic world is to intentionally incorporate the animal into its surroundings. By featuring the environment, an added level of difficulty comes into play, as composition, lighting, and other photographic techniques become more obvious with more things going on in the scene.
Take the below photo as an example. In many ways, this is a landscapestyle photo that just happens to have African buffalo in it. However, these animals are far from superfluous, as they add much to the photo. They add scale, context and something to draw the viewer’s eye. Without them, one would have little idea of the size of the landscape nor any idea of where in the world this might have been taken. Not that everyone will immediately identify them as African buffalo and know that this must have been shot at Lake Nakuru in Kenya, but you get the picture.

When it comes to the integration of animals into the landscape, it is a vast spectrum. Take, for example, the next photo, which exhibits a prominent animal that is easily identified (similar to the portraiture style mentioned first), but with a zoomed-out approach that features the landscape. However, as you’ll notice, the landscape is not prominent and integral to the photo, but instead it’s complimentary to the animal in focus. Similarly, the animal is not in a position or in proper lighting to dive into the portraiture end of the spectrum and have that “field guide” style of photo. In this photo, the landscape and the animal are complementary. One really cannot exist without the other to make this a good photo. And actually, the animal and the landscape function to make the photo better than just a sum of the parts. It becomes highly evocative and symbolic of the vast landscapes of Namibia and the unique animals that dot the landscape.


This evocative photo of a gemsbok amidst the stark Namibian desert paves the way to discuss the third style of wildlife photography that is sure to yield impressive results – creative photography.
Of course, one could argue that the topics already addressed are creative, such as an appealing composition or unique landscape elements or the use of blur and depth of field constitutes. However, what we’re talking about here is much more outside the box. Take, for example, the photograph below of the skin of a panther chameleon in Madagascar. Endlessly patient, the chameleon sat for virtually every photo desired –guidebook-style photos, ones that integrate an evocative landscape and more. However, some would argue that this seemingly-obscure close-up of the skin is one of the most interesting of all. Combining vivid colors, arresting texture, and plenty of mystery and intrigue, this exemplifies the creative wildlife photography angle. Sometimes these shots may be the first you think of, and other times they come only after every other logical shot has been taken.
In the end, there are many different types of wildlife photography, but the common denominator is, of course, the wildlife itself. Thus, it is key that the subject is composed nicely (see our Composition section), whether it’s on its own, part of a landscape, or creatively arranged in the frame. And regardless of where it is in the frame, it should be in good focus. Again, rules are always meant to be broken, so there are always instances where this is not the case, but 9 times out of 10, you will want the animal to be in

focus. And if the animal is big enough that only part of it can be in focus, be sure to focus on the eye, as this will yield the most solid connection between the animal and the viewer of your photograph.
Here are some questions that you should ask yourself when prepping to take photos of wildlife:
1. Should you isolate the animal from the environment or feature the two together?
2. Do I want this photo to be more of a “field guide style” or arranged creatively in the frame?
3. How can I tell the most interesting story of this wildlife sighting through the eyes of my camera? Should I focus on the texture of its fur, the look in its eye, its place in the environment, or something else?
4. Is my subject in focus, and where should I place it in the frame?
Landscape photography is one of the most varied forms of photography in that it incorporates perhaps the greatest range of techniques. From slow shutters to capture running water to making use of the rule of thirds to “mathematically” create the most pleasing scene, landscape photography has it all.

In this section, we will provide at least one example of major considerations when lining up for the perfect landscape shot.
The most important consideration with landscapes is that it stands out. Because most landscape shots don’t require fancy camera equipment or big zoom lenses, they are accessible to everyone. Thus, it can be difficult to have your photo stand out from the masses. Beach scenes, sunsets and savannas are beautiful in their own right, and when in an exotic locale it’s hard to take a bad shot. But, this is not about taking shots that aren’t bad – it’s about taking GREAT shots and learning to make them better with every trip.
The first thing you must do when ready to take a shot of a beautiful landscape shot is to slow down and look. This might be obvious to look at the shot you’re taking, but it’s critical to take advantage of any nuance in the scene before you. Sure, it’s a great beach with crystal clear water or an endless expanse of evocative tropical jungle. However, what else can you squeeze into the scene? Is there an interesting piece of driftwood lying in the sand, or perhaps a cluster of colorful leaves on a nearby tree in the jungle.
On a beautiful night in Madagascar, the sunset on the Indian Ocean was just sublime. However, in order to make this photo “pop,” a small boardwalk lamp was framed in such a way that the color of the light is wonderfully complementary to the sunset and reflection in the water. The sunset is no less beautiful with the lamp in it, and it provides a bit of intrigue in the shot.

When in areas of overwhelming beauty and color, it’s easy to forget to stop and look around. Would a photo of this restaurant in the Solomon Islands still be beautiful without the silhouetted palms? Of course, look at that amazing water, reef, and color of the clouds! However, when stopping for a second to really analyze the scene, one can find additional features to improve a gorgeous scene even further.

The above photo is a great segue into the next topic—framing your landscape shots. By looking for interesting elements and “leading lines” that direct the viewer’s eyes into the shot, your landscape photo will go from good to great.
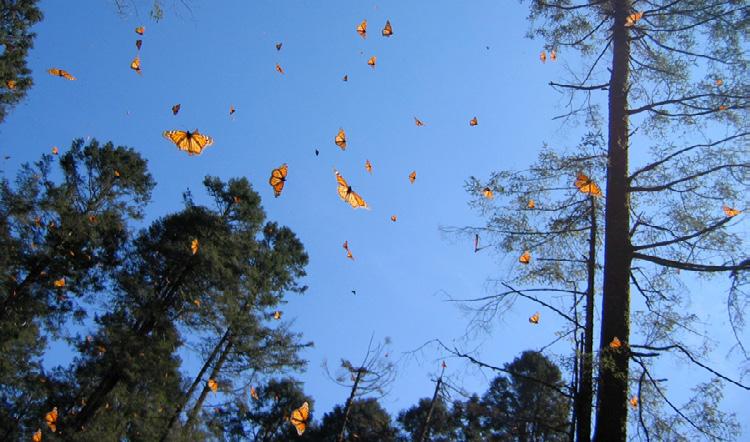
Styles

At mid-day in Sierra Chincua, Mexico, during the monarch butterfly overwintering event each year, butterflies burst from the trees in an amazing display of orange and black. Against a bluebird sky, the colors are incredible and the scene is quite moving. In a way, the zooming butterflies are a beautiful display of chaos. However, creating a bit of order in a scene like this tends to be pleasing to the eye. In the above photo, large fir trees border the photo, drawing the eye into the center of the shot where wellfocused and vibrant monarchs are in perfect view.
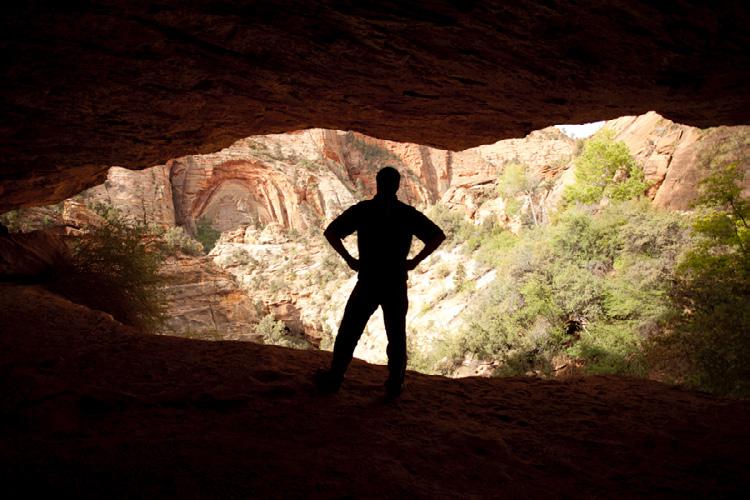
The frame of your photo can be virtually anything you find that provides shape and contrast to the photo. While trees provide a wonderful frame for many shots found in nature, rock formations work very well, too, as in the first of the above photos. Even intangible things like shadows can frame a shot, which served this photo well when attempting to portray the massive and mysterious “narrows” of Zion National Park in Utah.
While it’s often critical to employ rules of composition in your landscape shots to make the most of them, it’s also critical to add gusto to these shots. In addition to using natural features to “frame” your shot, including a foreground element is also a valuable tool.

Foreground elements can come in a variety of shapes and sizes, from rocks in the tidewaters of the beach to a kayaker paddling through icebergs in Antarctica. In fact, one could say that the foreground element becomes the actual subject of the shot, drawing the eye toward it with the landscape in the background just that—in the background. The truth is that for many people that were not with you when viewing a landscape, it can look quite flat with no appreciation for its scale or context. Adding something in the foreground solves this dilemma by providing context and scale in a remarkable way.
One of the most powerful tools to provide context and scale, especially with photography while traveling, is the human element. It can seem counterproductive to take a lovely shot of a natural landscape, the beauty of which lies in the pristine remoteness it exudes onto the viewer, only to put a human right smack dab in the frame. Who wants to look at a person in their wilderness shot? Well, it’s not always the solution to creating a more dynamic shot, but sometimes it can indeed have wonderful effects.

The power that the human element has is that it allows the viewer to imagine themselves there in your scene. And voila, the photo becomes that much more revered because of the relationship the view instantly has with your photo.


Humans are one of the best ways to show scale in a photo. While animals, plants, rocks and other foreground elements work well, too, the human form is much more relatable such that the viewer can instantly appreciate the relative size of the surroundings much better. In the case of the above photo, the girl in the shot gives a clear indication to the size of this slot canyon. And as an added bonus, it allows the viewer to relate to her and imagine themselves in that canyon, awed by its austere beauty just as she is.
Landscapes are some of the easiest things to photograph, yet as a style of photography, one of the most difficult to master. To take your photos from good to show-stopping, it’s critical to add more to the landscapes that sweep you off your feet. By adding creative elements of composition, context, scale and even storytelling by adding the human element, you can make landscape shots multidimensional and endlessly evocative. Through a few simple considerations, you will be well on your way to mastering one of the more venerable forms of photography out there.
• Employ traditional composition rules while keeping your eye out for outside-the-box creativity.
• Consider adding elements to the photograph beyond the landscape itself, especially elements in the foreground.
• Take your shots to the next level by adding complexity and scale to provide context to the scene you’re shooting.
One of the more challenging, but also the more rewarding, photographs one can take is of a beautiful night scene. While this may immediately evoke visions of grand bridges and trails of car lights zooming by with city lights shining in the distance, this is but one of a myriad of scenes you can capture by using some rather basic principles in photography. With these tools and tips below, you may find that early morning sunrises, evening lighting storms, and even dimly lit forests at midday can take on an entirely different look when one concentrates on capturing every bit of light possible from the environment.
Perhaps the most famous of night photographs comes from above— from astronomical origins—the aurora borealis. While just putting the camera down and sitting back to enjoy the northern lights can be equally rewarding, there’s nothing quite like capturing the essence of the aurora to return home with after an expedition.

The tools needed to capture a photo like the one above are simple but imperative. The first thing you need is light. This is one of the most important things in ALL of photography. It sounds patronizing, but you do have to target a specific and worthy light source to be able to photograph well at night. It could be the aurora borealis, or it could be a lone lantern on a dock, or simply the light bulbs shining from a lodge.
What makes these “night” photos different is the proportion of light being captured by the camera. When the ambient or environmental light is at a minimum, as it is in the above photos, the camera will concentrate on the only sources of light and “boost” them to be quite bright.


For instance, the above photo was shot just after the sun went under the horizon, producing a beautiful blue hue in the atmosphere. This is known as the “blue” hour in photography. Because the diffuse light of the blue sky is one of the few light sources, it becomes very pronounced, adding a nice effect to the photo.
The question now is, how do you capture enough light in such dimly lit conditions? The answer is by using a tripod and a slower shutter speed. The slower shutter speed allows enough light to “flow” through to the camera’s sensor, while the tripod ensures that there is no resulting blur from the slow shutter. As an added consideration, it’s best to keep the ISO as low as possible (400 or less) due to the pronounced effect of noise on dark areas of the photo.
The camera settings for shots like the above are actually quite basic, and there isn’t too much room for error or imperfection. It comes down to simply choosing a “moderate” f-stop (no need for a huge depth of field since the background is usually dark) and a shutter speed long enough to capture enough light. Depending on the scene before you, the shutter speed can be highly variable but is usually somewhere between 1 and 10 seconds.
The real technique involved in night photography is properly choosing the scene. It’s essential to have a balance in the light such that one spot isn’t overly bright while the rest of the scene is dark. For that reason, soft

mild lights are always best. Candles and moonlight often work best, but incandescent bulbs and other moderate light sources can work just fine.

The other major consideration is the composition of your photo, which is just as important as any other photo you ever take. The challenge is that you’re trying to compose your photo in an environment that is very difficult to see via the naked eye. In the above photo, sure, those trees and bushes are nicely illuminated, but to the naked eye, they were pitch black, making it very hard to ensure the lines and composition of the photo worked well. One trick is to take the photo a bit more zoomed out (wider angle) than you’d like so that you can crop and straighten the photo on your computer if it’s a bit off angle.
The above photo illustrates one final consideration. When shooting at slow shutter speeds, remember that the camera is picking up any motion in the photo. That might be a person walking or a swaying palm tree. In the above shot, which was shot with a 4 second shutter speed, the palm tree was swaying, giving it a wispy look. Depending on what you’re aiming for, this
could be a desired effect, giving the impression of sea breeze. Or, this might ruin the photo if you view it as a distraction or are trying to get all elements in the photo as crisp as possible. The only way to ameliorate this motion is to speed UP the shutter speed, which requires you to increase your ISO to compensate for the loss of light. With practice, you can find the right balance so that the high ISO doesn’t create a grainy look (similar to old film).
PRO TIPS:
• Look for scenes that have multiple light points so that the scene is evenly lit. Diffuse skies or multiple small light points work best.
• Be sure to bring a tripod. Most shots will be somewhere between 1 and 10 seconds.
• Take the shot wider than normal so that you can crop and straighten the photo in post-processing to reach your desired composition.
• Increase your ISO to increase the amount of light reaching the camera’s sensor. But don’t overdo it. Find a balance, knowing that as you increase the ISO number, you’re decreasing the overall quality of the pixels in the shot.

Simply put, macro photography is fun. There’s nothing quite like making something minute into the grand, or revealing astounding textures in a seemingly basic flower petal.
What’s more, expanding your range in photography helps you tell a better story with your images. Whether you’re just getting into photography with minimal equipment or are a veteran of the photographic arts looking to try something new, macro photography will add a worthy new dimension to your photography. And I can promise that you’ll love it and have fun.
Perhaps the most surprising thing about macro photography is that it does NOT require any fancy camera gear. Of course like all things, there is specialized equipment to make things easier or help you get better as you go down this road. However, a macro lens or macro flash is not something you have to invest in right away if you’re just beginning.
For ones first dabbling with macro, setting the “macro” feature on a point and shoot camera or using the kit lens that came with your SLR (usually an 18-55mm) will get you instant results.


First things first, let’s talk about what it actually means to be shooting a macro photograph or shooting in macro mode. By definition, shooting in macro means that the size of the image on the sensor is the same size as the object in real life (i.e. a 1:1 reproduction ratio). However, let’s not worry about this at all, as it’s a bit misleading and limiting. For our purposes, we’re going to define macro photography as a technique in which the subject is small, but the resulting photograph makes it look larger than life. Popular subjects are flowers, insects, and other miniature flora and fauna.
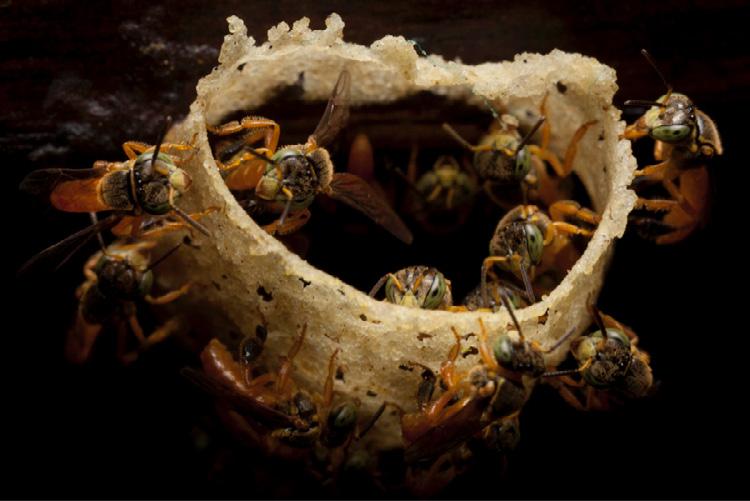
The primary technique for getting great macro shots is to maximize the size of the subject in your camera’s frame. If you have a point and shoot, you’ll have to set the camera on “macro mode” by finding the little flower icon like in the above photo. This will allow you to get very close to the subject, thus increasing the overall size in the photo way beyond what even the biggest zoom could do.
If you have an SLR, you will need to do something a little different. Your camera does not have a button to push to magically configure all settings to macro, so you’ll have to configure the lens manually. But don’t despair SLRs will give macro photographers the widest range of abilities, especially when it comes to depth of field (more on that below). Most wide angle lenses have this same flower icon near the focusing ring of the lens itself, along with the minimum focusing distance listed (e.g., 0.3 meters).
In order to maximize the macro capabilities of your SLR lens, first you must set the focus on manual. Then you must turn your focusing ring to dial in the closest focusing distance. So now you’re probably asking, “how do I focus if I have to keep the camera on manual focus while also keeping the focus only at the closest focusing distance?”.
With macro photography, you will actually have to move yourself to bring the subject into focus. There will be only one sweet spot where the object is in focus, and this corresponds to the largest that the subject will be in your viewfinder and sensor. I like to call this behavior the praying mantis technique, as you’ll likely be swaying slightly back and forth like a praying mantis approaching its prey in order to get the exact focus you need before shooting.
Now, if you are not comfortable with the above technique, you certainly may keep the camera on automatic and just get really close to the flower, insect, or whatever you’re shooting, and just let the camera autofocus per the norm. However, you won’t be maximizing the size of the object on the screen if you don’t get all the way to the minimum focusing distance. Just be aware that the only way to guarantee you’re getting the largest result is to use the above manual technique.


So now that we have the procedure for getting into macro mode, what do you do now? Any special settings? Glad you asked.
If you have a point and shoot, the macro setting (the little flower button) does everything for you. If you have an SLR, you will need to manually maximize the depth of field by setting your camera to a higher aperture number. What this does is give you maximum focus in your shot. Even though, say, the flower petals and the insect in the above shot are only fractions of an inch apart, depth of field is all relative based on the proportion of the frame. That is, a close-up shot naturally has a very shallow depth of field under normal aperture settings. Thus, when the size of a frog’s eye or butterfly’s wing is the majority of the shot, with a shallow depth of field (f/2.8, f/4, f/5.6), you could get only part of the eye in focus, while the rest is blurry. Sometimes this is nice and artistic, but generally, you want as much in focus as possible with macro photography.
Macro photography is often about seeing something relatively ordinary and turning it into something extraordinary by making it very large so that the naked eye can appreciate the fine details, colors, and textures. Take the above seed pod photographed in the rain forest of Honduras. The entire pod is about the size of a thimble, but by using macro photography and increasing the depth of field, it turns into an evocative mosaic. These are the types of scenes that would normally go unnoticed and unphotographed with traditional photographic techniques. However, the world becomes much larger (or smaller?) with macro photography.
Having a very wide depth of field requires either lots of light or a longer shutter speed (and often a bit of both). Learn more about apertures and f-stops, or just take my word for it.
Thus, in dark or dimly lit conditions, like rainforests in Papua New Guinea, where this tropical weevil was photographed, you may have to use flash to inject enough light. Although flash is rarely used in other forms of nature and wildlife photography, it is commonplace to use your flash with macro photography. Again, fancy equipment is not needed to begin your adventure with macro photography, but a good flash can make a significant difference.

Two commonly found accessories in the world of macro photography are macro flashes (above) and dedicated macro lenses. This section will not go into great detail on hard and fast recommendations on either of these things, as the options out there are numerous. However, if you are indeed interested in expanding your capabilities with macro photography, they will work wonders for you in terms of the quality of your shots and the ease with which you’ll get them.

For photographers looking to increase their range of abilities and add great diversity and intrigue to their photo albums, macro photography will delight the senses. Taking minuscule objects, whether wildflowers or insects found on a trail, or even patterns found on fabrics in markets or bazaars around the world, and making them larger than life is always a crowd pleaser. Often, people have never even conceptualized these small things as being “photographable,” further adding to the allure of the resulting photos.
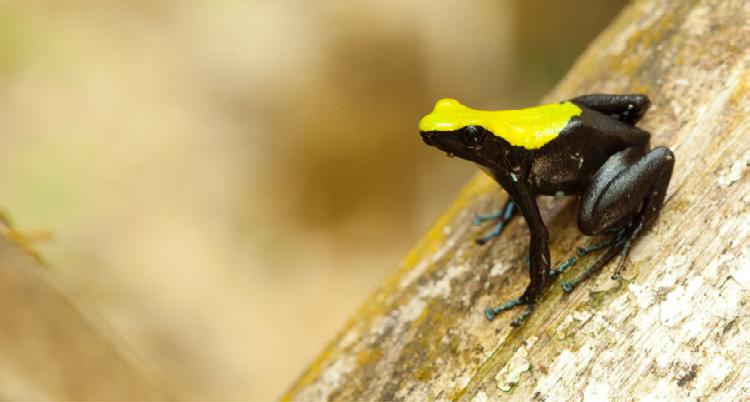
The technique in macro photography can be simple to read about but often takes practice to put into motion. It requires a keen eye for detail, often a steady hand to get the proper focus, and of course, employing all of the standard techniques of proper lighting and composition to maximize the depth of field so that the textures and colors really pop. And having an SLR will significantly improve your chances of getting the best shot.
Not only will adding macro photography to your portfolio of abilities wow your audience, but it’s also quite fun. Not every day on the trail or in the forest promises big wildlife to photograph at close range. However, with an understanding of basic macro photography techniques, you can turn any afternoon in the park into a jungle of wild and inspiring nature.
• Rethink what you can do with your photographic story. With macro, small things become instantly amazing, with colors, textures, and patterns surfacing in an entirely new way.

• Practice putting your camera into “macro mode,” so that it becomes second nature when in the field.
• Increase the depth of field as much as you can, given the light around you. If you have a flash, experiment with it and compare the resulting photo with and without it.
• Remember your basic tenets of photography and your already-incredible macro shot will take on a wonderfully aesthetic feel.
What an ambiguous term, right? Wouldn’t anything photographed while traveling be considered travel photography? Why would this differ markedly from wildlife photography or landscape photography? Well, the answer is yes, travel photography is an overarching term that includes wildlife, landscape and any other photography you do while traveling. The key injection with travel photography is storytelling. While anyone can get an incredible shot of a Sally Lightfoot crab scurrying across jet-black lava in the Galapagos Islands, constituting a great wildlife photo, it’s all about telling the story of your adventure.

But still, travel photography does have its own field of inspiration and creativity, often yielding photos quite different than the perfect waterfall shot or the magnificent lion sitting in the African savanna. It tends to be more evocative and more about the journey.
Take the above photo, for example. It’s certainly not a big bodacious scene of the Galapagos volcanoes or Machu Picchu at sunrise, but this small side street in Peru was part of the journey. Not only is it quite a neat photo, but when combined in a slideshow or album, it’s an evocative part of the story.

In another example, our friend from the Northern Studies Center in Churchill, Canada, was asked to stop building his igloo for a quick photo. Sometimes while on a trip, it’s easier to just go with the flow and take the photos presented before you without asking for any special “poses.” However, one rarely regrets asking someone to hold still for a moment when they get the photo they want, portraying the experience they remember.
The story is yours to be told, but things like meals, local transportation, a funny situation and your fellow travelers are all not-to-be-missed shots while traveling on an adventure.


The essence of travel photography, as opposed to just concentrating on the show-stopping photos, is to think outside the box and document the experience. Because you are photographing rusty snowshoes, or an Expedition Leader taking a breather after hauling up a Zodiac on the shore of Antarctica, the elements of photography like composition, proper focus and lighting are as important if not MORE important. It’s the art behind the photograph that must shine, as the photo doesn’t readily sell itself as a rare shot of wild dogs on a hunt in Botswana would.

Often, taking risks and adding an unnatural tilt to the camera can provide a sense of intrigue in the photo.

Sometimes, deliberately making the photo dark or “under-exposed” can add to the mystery of an already mystifying scene before you.

And don’t forget about interesting angles when you can get close to things. Here, a local beekeeper in Bali shows off his wares at a market.

And don’t forget to get a shot of your fellow travelers! After all, they were a significant part of your trip and the overall story.
Ultimately, documenting your adventure is what we’re all after when photographing during travel. Whether you are trying to preserve the memory of the capuchin monkey you saw in the canopy trees of Costa Rica, or the charming villa you stayed at in the mountains of Central Mexico, your photographs are a permanent record of your trip. By looking for those special opportunities to document aspects of the adventure that aren’t the photo highlight, your memories and photo album will be much richer. Certainly, you don’t want to forgo the amazing vistas on your journey, like the view at sunrise in Bryce Canyon, but after taking a few shots of those, why not look around and tell the rest of the story?

If you’ve spent time around highly technical photographers, read landscape photo magazines or been on a dedicated photo trip, you’ve probably come across the term “HDR” photography. HDR stands for “High Dynamic Range” and is a clever way to deal with challenging lighting conditions (i.e., lots of shadows, highlights, midtones, etc.).

For what is a somewhat complicated-sounding term, it’s a pretty simple concept in practice. Basically, when engaging “HDR mode,” your camera takes three identical photos of the same scene, each with different exposures—one too dark, one too light, and one just right (the Goldilocks of photography, I suppose you could say!). Generally, this is referred to as “bracketing,” and your camera underexposes a shot by -1, then overexposes a shot at +1, and then takes an even shot at 0.
If these numbers and terms don’t mean much to you, you may wish to check out Exposure & Light on page 26 to learn more about your camera’s exposure settings.
Once your camera takes these photos, the magic begins. In newer, fancier cameras, there is internal software that merges these three photos
HDR together and churns out a final, processed image that you can see right away. However, most cameras cannot do this internally and require you to download the photos first and then use a program like Photoshop or Photomatix software on your computer. Usually, these programs give you far more flexibility and produce a better result, but the downside is that you have to wait until you can spend some time on the computer to enjoy the fruits of your labor.
The basic gist is that HDR photography automatically takes bits and pieces of all lighting levels to produce a photo that is very evenly lit. Some believe this is more like what your eye actually sees—with a higher dynamic range than just a single shot.
Peoples’ reactions to HDR photographs often vary considerably. Some people view them as incredibly beautiful, for they show iconic scenes with near-perfect lighting and captivating luminescence. However, sometimes people look at them as a bit “too digital,” almost as if it’s a video game image…just a bit too “altered.” I feel that these polar reactions often have to do with how HDR photos are processed and how much discretion the artist uses when processing them. See, all photo programs have numerous settings and sliders that let you increase the intensity of the “HDR effect,” just as if you’re editing a photo for saturation, contrast, sharpness, etc. In other words, HDR editing can be overdone.
At the end of the day, I do recommend that you at least learn about HDR photography, because in certain cases it can produce show-stopping photos. If you try it and don’t like it, well, you are still a more versed photographer for knowing this widely-followed technique.

1. Set your camera to a -1, 0, +1 bracketing mode. Fortunately, most cameras are capable of bracketing photos, as it’s just an automated way of taking three photos in somewhat quick succession. However, because all cameras have different manufacturers and menu settings, you should consult your camera’s manual to determine how to do this. Simply search for the term “exposure bracketing” and set it to -1, 0, +1.
Above, the shaded Mermaid Falls in Honduras is a great choice for experimenting with HDR. With even lighting, you can let the HDR software do the work to even out the subtle shadows created by all the jungle foliage.
2. Get your camera on a tripod
Because you are merging three photos into one, it’s imperative that the camera not move even a fraction of an inch between physically shooting these three photos. Otherwise, you’ll get a weird “ghosting” effect, where plants, rocks or trees have moved, leaving only a ghostly image in their place.
In my opinion, this is the most crucial step as not all scenes lend themselves to great HDR photography. While HDR is intended to help with scenes that have really dark shadows and/or bright highlights, it isn’t a panacea for plain old bad lighting. The best even lighting still produces the best HDR photographs, so make sure that you photograph early in the day, late in the evening, in the shade or during cloudy intervals so that you don’t have harsh shadows sweeping across your scene.
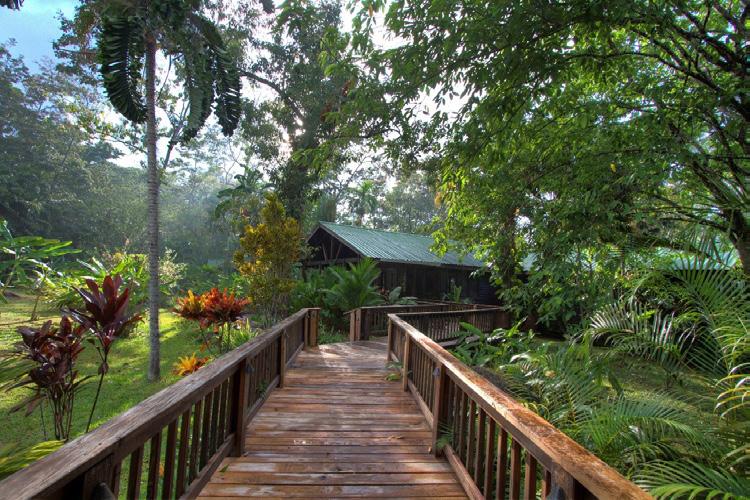
4. Go ultra-wide
Like I advise with night photography, go extra wide with your shot. That is, try and incorporate as much of the scene as possible, so you can afford to crop it later. Sometimes clouds produce incredible HDR effects, and sometimes they don’t. Best to include them, with the later option to crop them out if you’d rather minimize their emphasis in your photo.
Sunsets and sunrises make for potentially interesting HDR opportunities. Because lighting is almost always mixed at these times of day, using HDR processing can help illuminate dim foregrounds and temper the overlybright sky.

5. Get an HDR program and experiment!
Chances are if you’ve paid for a photo processing program, like Photoshop, Lightroom, or similar, it comes with an HDR editor. Some versions are easier than others, and they use different algorithms, so the quality can also differ. And last but not least, the amount of “customization” that different HDR programs offer varies as well. Thus, if you are ready to jump head first into this, you may wish to research some of the programs out there. However, if you’re like most and want to try this out before you go full steam ahead, HDR Efex Pro is a free program from Google that is the best of all worlds. It’s comprehensive, free and pretty darn good.
And the unofficial step #6 is to go out and practice with this. It takes some getting used to, especially on the computer end of things. But equally important is the setup of the photo. The more you try, the better your results will be.
• Be sure to use a tripod for best results, as the three photos you take need to be identical in framing.
• Try both in-camera HDR processing as well as computer post processing to understand the range of effects you can create
• Use HDR techniques judiciously. Even the most well-thought-out HDR shots will often have “that look” of HDR. In some cases, it turns an otherwise dull photo into something truly magical, but in other cases, it can be a little surreal.
• With practice, you’ll begin to train your photographic eye to identify the best opportunities for HDR. These generally include scenes with medium contrast (soft shade and clouded sun) as opposed to intensely high contrast (full sun and full shade).
Natural Habitat Adventures is the world’s first 100% carbon-neutral travel company.