Overview of Steps


•
•
•
•
•
•
to Pick and Ship Orders
Process
Step 1 – Print your Packing Lists
the Shipping Station, print packing lists for open orders.
At
Step 2 – Pick Your Items Track down the items and stage them together.
Step 3 –Reserve or Reject Items
items into register. Reject the ones you don’t have.
Scan
Step 4 – Quality Check and Ship! Make sure you Pack with Love!
Step 5 – Shipping Audits SFS Checkpoints to Avoid Delays
Step 6 – Mail Innovations End of Day! Sort and ship your yellow bag! 2


Print your Packing Lists Do this All at Once, One at a Time OR in Waves Step 1 3


Step 1 To Print Packing Lists: Click Ship from Store Menu at the bottom of the home screen to see SFS options. From there you can: A. Print all new orders B. Print all expedited orders C. Print a wave of 6 orders 4


Step 1 To Print ONE Packing List: • On the Order Worklist, select an order and click View Selected Order. • Click Print Packing List to print an individual packing list. 5


Pick Your Items Pick out your items to put together the order! Step 2 6


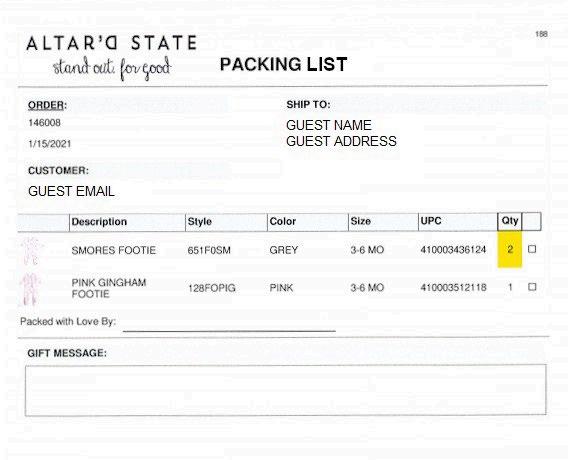
Step 2 Check Off Your Picks Pick the items and put a or an to mark whether you have ALL of the items on your printed Packing List. Be sure to check the highlighted quantity. 7
Missing Items
If you are missing any items, you reject them from the order. If you have none of the items, reject the whole order.
If you reject any items, you will need to reprint the packing list, so it is correct!

8


Reserve or Reject Items Scan your picked items into the ship from store station to get ready to ship! Step 3 9


Step 3 Pull up your first order and hit Reserve and Ship Reserving Items 10


Step 3 Scan your Picks to Reserve Pay attention to Quantity! You will have to scan each individual item in to reserve the product. 11
Select all of the items you don’t have, then click Reject Order to reject the items you don’t have.

Reject Missing Items


Leave all items unselected to reject the entire order.
It is VERY important to reject all items you couldn’t fill. If not, your guest will NOT get those.
12


Quality Check and Ship! Ship Order to Create Label! Step 4 13


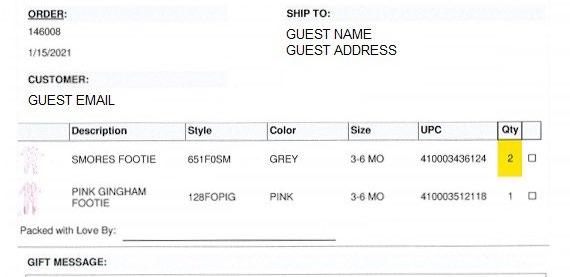


Each order needs to be Packed with Love! Do NOT send Packing Lists with X’s on them! If items were rejected, reprint the packing list. Go through the picks and check off each item and all quantities are correct. Most Important: Sign It with Love at the bottom, to show your Guest you care! Step 4 Process Package with Love! Kaitlyn BAD GOOD 14


Step 4 Check your Contents In your package you should have: 1. The Packing List, with all items ‘d • Signed With Love by Shipper 2. All Items with Correct Quantities Nothing else! No scrap, receipts, etc. Kaitlyn We pack our bags with care to show the Guest she matters. This needs to apply to our SFS orders too! 15


Prepare your Package *Only use approved bags and boxes to ship customer orders Step 4 Before weighing, pick the best packaging for the order: 1. Choose the bag or box that secures the customer’s order. 2. Be sure to use bubble wrap or other “filler” material to prevent the items from bouncing. 3. Place ALL items in the appropriate bag or box BEFORE placing it on the scale. If everything is ready, you’re ready to print your label! 16


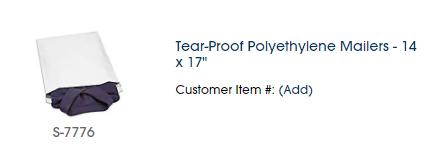


These are the Approved Shipping Boxes & Bags Remember to only order these BRANDED boxes or bags for all orders. Step 4 Small Mailer Bag Large Mailer Bag Small Box Medium Box Large Box 17


Step 4 Select your Package Type
your screen to fully load before selecting which packaging material you will use. Then select which packaging material you used. IT IS IMPORTANT TO SELECT THE ACTUAL PACKAGE TYPE USED TO SHIP THE ORDER. ONLY select “Misc box” if you use a box other than your standard AS box. 18
Allow


Step 4 Weigh your Package It is important to verify the scale says 0.00 before placing the order on the scale. This allows us to get accurate weight for shipping. Now place your package on the scale and complete your order! 19


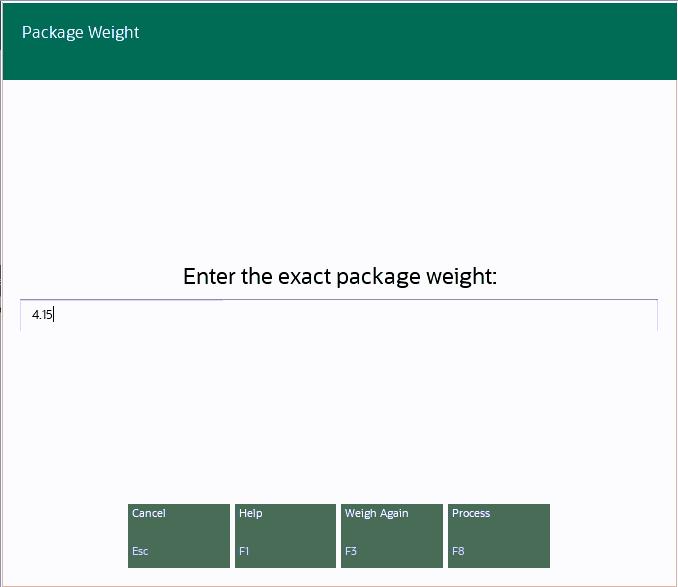
Step 4 Confirm the Weight The scale will automatically load the weight for your package Verify the weight on the scale matches. If it doesn’t click Weigh Again. ONLY enter a manual weight if your scale doesn’t work. If your scale isn’t working, ENTER 1 in the weight field and contact Help Desk BEFORE processing any additional orders. 20


Step 4 NEW - Mail Innovations This message will appear if your order qualifies for the Mail Innovations service.
Innovations
is used to ship packages
or
shipped
small
bag
21
Mail
(MI)
that are 1.9lbs
less and
in a
mailer
. We’ll go over the process in a few pages, but the most important thing to remember is that MI packages all go into a big yellow bag for delivery, or the guest WILL NOT receive their order. If your order qualifies AND you have the supplies to process the order as Mail Innovations press “OK” to continue. If you do not have the supplies, reach out to supplies@altardstate.com
Make sure your label printed. Seal up the order and place the label on the outside of the package. Be sure not to cover up any Altar’d State branding!


Now it's time to place your package in the appropriate location!
Note: If your label doesn’t print, you can click Manually Ship Order’ to use a pre-printed label.

4
your
Step
Collect
Label from Zebra Label Printer
22


Step 4 If your package qualifies for Mail Innovations your label will look like this If your package will ship out UPS, it will look like this Sort your Package for Delivery 23


Place ALL Mail Innovations packages in the yellow bag, or they will not arrive with the guest! Place all other packages in a separate area/container to make sure they aren’t mixed together. It is important to ONLY place the Mail Innovation packages in the yellow bag OR the customer's order will not arrive. Step 4 Sort your Package for Delivery 24


Shipping
SFS Checkpoints to Avoid Delays 25
Step 5
Audits
Step 5 Shipping Audits (cont.)


27


Mail Innovations - End of Day Every yellow bag will need to be shipped out, EVERYDAY! Step 6 28


Step 6 Complete Mail Innovations Form It is important to fill out a Mail Innovations form every time you ship a bag. Follow these steps to complete the form: 1. Sign and date 2. Put the top page in the yellow bag Once the form is completed, place the top page inside the yellow bag. You may keep the yellow copy for your store records. Step 1 29


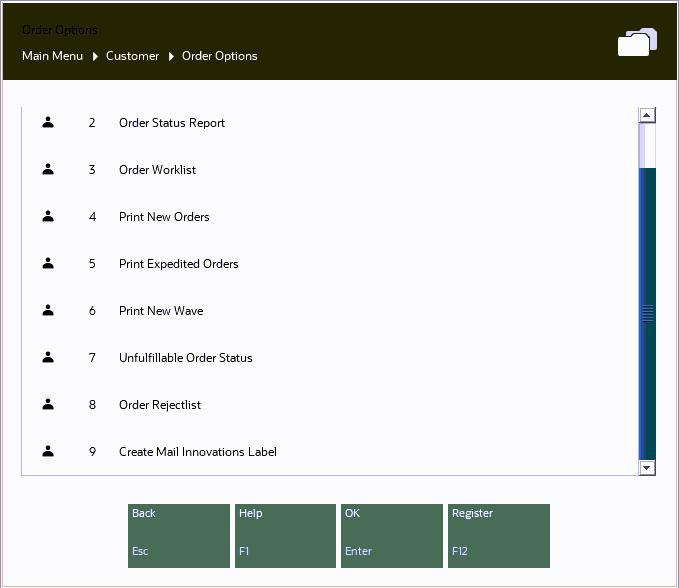

Step 6 Print a Label for the Yellow Bag Go to your SFS Menu, scroll to the bottom and click Create Mail Innovations Label. This will generate a label that will send the yellow bag to the processing center. 30


Step 6 Finish and Ship Place the completed form in the bag, and the label on the outside. You’re now ready to seal up the bag and hand it off to your regular pickup driver. And you’re done! As a reminder, ONLY Mail Innovations packages go in this bag. All other packages are shipped through the normal pickup process. 31


