16 minute read
A quick overview – Lumion's native 3D models
by TD Garden
The Lumion version you have bought will constrain what you have available in each library. The following list gives you a good overview of what is available in Lumion Pro:
• The nature library: As you can see in the following screenshot, in this library, you will find more than trees. The Clusters tab is a lifesaver for when you need to fill the landscape with loads of trees. Since they are far away from the camera, the clusters of trees Lumion provides are good enough to fill the scene.
Advertisement
• The transport library: This library encompasses all sorts of transport, including railway and air transport, which you can see in the following screenshot:
• The sound library: Usually, this library is used later in the project when you want to add nice touches and bring life to your scene using the sounds provided in Lumion. This is not the only way to use sounds in Lumion because there are some effects you can use as well.
• The effects library: This library gives an added touch to your project by providing some particle simulation, as shown in the following screenshot:
• The indoor library: In this library, you can find a good variety of 3D models, but it is highly recommended that you use some extra 3D models to fill the gaps that you will eventually find out about. Here is the screenshot of the indoor library:
• The people and animals library: This library gets better with time. Although the name of the library mentions animals, the reality is that you don't have much variety in this. As you can see in the following screenshot, you not only have 3D models here, but also 2D models that include silhouettes:
• The outdoor library: Some of the most useful models can be found under the Lighting, Furniture, and Utilities tabs. The Buildings tab is a great one for filling the scene around your building.
Creating an Interior Scene with Lumion
• The lights and utilities library: This is a great library for interior scenes. The Spotlights tab gives a preview of each spotlight, helping you decide on the best lighting for your living room.
All this information sounds great now, and perhaps you may be thinking, if I knew I had this 3D model, I wouldn't have wasted time modeling one. Well, if you create a PDF document with screenshots and all the 3D models available, this will definitely help you. This is something that doesn't need to stop here because you can also incorporate this into your own 3D models.
Then, at the beginning of each project, you can view the catalogue of 3D models to determine how much time you have available and how much time you can save. However, now that you have had a closer look at what is available in Lumion, you may wonder if the 3D models are that good.
Balancing Lumion's models with external models
Best practices are not only about techniques, but also about good decisions. If you had an opportunity to have a closer look at the models, you would probably have noticed that some of them don't look so good when they are closer to the camera.
The reason for this is because Lumion is a real-time engine that needs all the resources available to allow real-time feedback. For that reason, they have had to optimize the 3D models and this optimization meant that they created 3D models with low geometry and added details using textures.
This means that if you want to create believable renderings, you need 3D models with far more details closer to the camera. The following screenshot shows you the difference between a Lumion 3D model and an imported 3D model:
Of course, all this detail that you see on the car to the left comes with a cost: the frames per second on the viewport drops and the render will take longer as well. That is why you need to balance the use of 3D models. If the model is close to the camera, you will benefit from more details, but if the model is away from the camera, you may manage with a low geometry model.
Populating the scene with 3D models
What 3D models did you use in your scene? Most importantly, how did you place them? In this example, we will populate the interior of a coffee shop, and could start with the tables, as shown in the following screenshot:
After creating a layer for furniture, you can use the Mass Placement tool to place the row of tables. However, what if, after clicking on the OK button, you realize that for the sake of realism, the tables could have some variation? Do you have to select the tables one by one and then delete them? Not exactly.
Creating an Interior Scene with Lumion
Best practices with the Context menu
The Context menu allows you to select and transform the 3D models present in the scene, as you can see in the following screenshot:

The Selection submenu is one of the best features you can find in Lumion and you should make a habit of implementing it in your workflow. When you click on this menu, the following options are made available to you:
Since we want to select all the tables we previously placed, the best option you can select for this is the Select All Similar option. This will ensure that you only select every single instance of this 3D model.
What about the Select All Similar Category option? The word category should give you a hint to understanding what is possible with this feature. Let's consider a plausible situation where you need to select all the furniture of a living room. The Select All Similar option wouldn't work properly in this situation because we have a vast array of 3D models, but Select All Similar Category selects all the 3D models that fall under a certain category or library, which will help you to quickly organize your scene into layers.
In our scene, we used the Select All Similar option to quickly select the tables and then we deleted them using the Trash object button. The reason why we are doing this is because we need to add some randomness to the tables in order to create a believable scene.
The two options you can keep in mind while working with Mass Placement tool are: Randomize spacing along line and Randomize spacing from line. The next step is to add some chairs around the tables.
Rotating the 3D models with the mouse – the rotate option
While placing the 3D models in the scene, you probably noticed that 3D models keep the same orientation, which in some cases, such as the case of placing chairs around the table, doesn't produce the nicest results. However, as you can see in the following screenshot, there is a quick solution to this problem as well:

Creating an Interior Scene with Lumion
In this case, select all the chairs and select the rotate heading tool from the toolbar. Press and hold the K key while you move the mouse so that the object faces the mouse.
Also, if you are not happy with the result, click on the Undo button that appears next to the toolbar, as you can see in the following screenshot:
This button only appears when you make certain changes, such as moving an object, but don't forget that you can only undo your last action.
Now that we have the four chairs with the correct orientation, does this mean we have to repeat the process for each individual table? Let's have a look at the following section.
Duplicating 3D models with the Alt key
The Ctrl key selects the 3D models you need, which in this case, will be the four chairs. After selecting the Move object tool, you need to press and hold the Alt key to duplicate the objects while moving them. However, when you approach a table, it may be difficult to place the chairs without placing them on top of the table. To overcome this issue, just press and hold the Shift key and this will constrain the movement to keep the chairs at same height.
Alternatively, you could copy the table as well and populate the scene using this technique, but in one way, even if you have to spend some extra minutes placing the chairs, this will provide a randomness that is not possible to achieve even if you adjust each chair.
Editing 3D model properties
Populating a scene with 3D models is a task that needs some thinking about and time in order to achieve a natural look. There is an additional way to add uniqueness to your scene and that is by tweaking the 3D model's properties.
For example, you might have noticed that every time you place a car, each new car has a different color. Actually, the color shown in the library is red, but you hardly get a red car. This is because almost every 3D model in Lumion has some properties that you can change; this helps to make each project unique. Best of all, you can change these properties on multiple 3D models.
For the example in this chapter, some tables and chairs were added, but the look we get is too dull because every chair and table is white. For this interior scene, we need some color to bring cheerfulness to the place and for that, we use the Edit Properties menu.
You can find this menu located on the toolbar if you go to the Objects menu, as shown in the following screenshot:
The workflow is simple—select the object (or multiple objects) and click on the Edit Properties menu. When you select the object pivot, this opens a new window where you can edit the object; in this case, the chair's color.
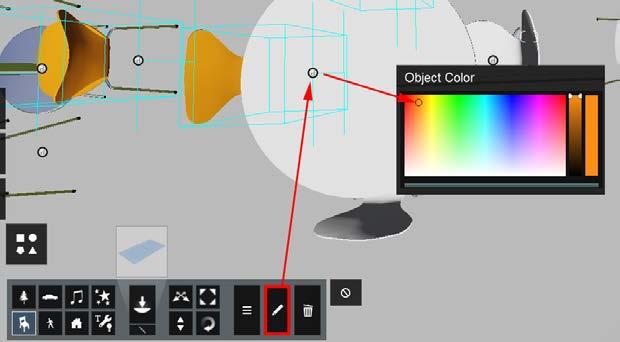
The options you have available with the Edit Properties menu will change according to the type of your 3D model. For example, you can change the color of a tree, but there are no options available for people.
Now, back in our example, we just realized that by mistake, the wrong table was used. This may not sound like the worst case scenario, but we will lose some time correcting this error, or perhaps not.
Creating an Interior Scene with Lumion
The Replace with library selection option
The best practice to solve a problem like this is very simple. Go to the library and select the correct table. Then, use the Context menu to select all the tables with the Select All Similar option. Open the Context menu again and this time, select the Library option, as shown in the following screenshot:
The option you would want to use is Replace with library selection. However, this will only work properly if you select the correct model first and for some reason, there is no undo button here. That means if you do this incorrectly, you will need to repeat the steps again. What about the Select in library option? Good point. Let's have a look at the following section to find out the answer.
Using the Select in library option
While working with complex scenes, it can be difficult to recognize the type of model you have used for the scene. This is most difficult when working with vegetation and when you want to associate a tree in the scene with the thumbnail in the library. Using Select in the library option, you will be able to select the 3D model, but you still need to open the library and select the correct tab to see the model highlighted, as shown in the following screenshot:

Sometimes, it can be difficult to see the halo around the 3D model, but a quick look at the thumbnail above the Place object tool will give you a helping hand.
After placing the 3D models, the next step could be the materials. So, let's see what is available for interior scenes.
A quick overview – Lumion's physically based materials
What exactly does physically based materials mean and what is the impact of this on your scene? Physically based materials mean that the material will actually react to light in the correct way and not how we intuitively think it should react. The end result is more accurate and typically looks more natural.
If you want to learn more about this subject, have a look at https://www.allegorithmic.com/pbr-guide. Allegorithmic have created two guides for the theory and practical of physically based renderings.
Materials are an essential factor for producing believable renders and Lumion's team have done a great job by providing more than 600 materials that can serve as a base for your scene.
The materials were designed to be used on the 3D models you imported. You cannot apply these materials to Lumion's native 3D models.
The Materials library is divided into logical sections, as you can see in the following figure:
Creating an Interior Scene with Lumion
The process for applying the materials is simple: select a surface and then select a material. If you are not happy with the material, select the surface and simply change the material. Since Lumion 5, the interface has been more intuitive and simpler, as you can see in the following screenshot:

The More option let's you choose more advanced parameters that help you tweak the texture to the way you want it to be and the way it reacts to light.
What are the best practices for working with materials in Lumion? In reality, you have three options for working with materials in Lumion:
• The first option is to use the imported materials that you can create on your favorite modeling application
• The second option is to use Lumion's materials
• The third option is to create materials using Lumion's Standard material
The first and third options are very similar, in that you need to create your own textures and assign them to the correct surfaces, which probably involves some UV unwrapping.
However, it doesn't matter which option you use because eventually, you need to tweak the materials within Lumion. So, what are the things you need to keep in mind while tweaking the materials? Let's have a look at this in the following sections.
Small adjustments
One basic and essential adjustment you need to make concerns the texture's scale. Most of the materials that you applied to the surface will need this adjustment and some parameters that can help you with this you are X offset, Y offset, and Z offset, Heading, Pitch, and Bank. You can find these options when you click on the More button.
Colorization is not the same as Saturation. With colorization, you can completely remove the color of the texture, while the Saturation option increases the intensity of all the colors in the material.
Finally, the Relief option works as a bump feature. Each material in Lumion has a normal map and this can be tweaked (using the Relief option) to modify how light reacts to the surface. The material editor automatically creates a relief definition for imported diffuse images, which saves time.
These are some essential adjustments you need to perform to create a believable material. Just because the material has a specific look, that doesn't mean you cannot twist it to meet your needs. Let's explore some useful options.
Reflection and glossiness – make it believable
Reflection and glossiness are two settings that are used to tweak the way the material reacts and how it reflects the light. They are essential if you want your material to look realistic. The Reflection option is the most obvious because if we increase this setting, the surface becomes more reflective. There isn't much we can add on this subject, but what about glossiness? Let's have a look at the following section to get the answer.
Controlling the reflection sharpness
The Glossiness setting is one that can be used to define how sharp the reflections are. With the Glossiness setting, you can tweak the uniformity of the surface (by adding small defects) and this can create a very shiny surface with sharp reflections or a blurry reflection.
Creating an Interior Scene with Lumion
While working with Reflection and Glossiness, you can use the Specular option to balance the effect. Knowing this is great, but what are exactly the best values to use on my material? The answer is very simple: there aren't any. The simple fact is that if you want to make a material believable, you need to compare the material not with what you think is right, but with references. In the beginning, this can be very frustrating because we all like to think that there is a secret formula for a perfect material, but through observation and the use of references, you can create realistic materials. However, there is an additional way to control how light reflects on the surface and that is by using the alpha channel.
Controlling reflections with the alpha channel

This option only works when you import an image as a texture for the material. The alpha channel needs to be created using an image editor, such as Photoshop or GIMP, and you can use it to store grayscale images. As you can see in the following screenshot, this information has a massive impact on how the surface reflects light:
In other 3D applications, this map is called a reflection map and can be based on your main texture. A quick way to create one is by desaturating the image and using it as a reflection map.
However, as mentioned before, you don't have to rely only on Lumion's materials. You can create your own textures and use them in Lumion with the Standard material. Now, we can move on to another equally important section that involves the use of lights to create believable interior scenes.
Working with lights for interior scenes
It is not difficult to perceive that Lumion's main goal is to produce exterior renders, but we have available tools that help you produce good interior renders. You have lights, global illumination, volumetric effects, and a new feature called Hyperlight. However, let's start with the Lights and special objects menu, where you can find all the Lumion interior lights.
Placing a spotlight, omni light, or fill light
If you open the Lights and special objects menu, you will be presented with three tabs, but for now, you only need the first and second tab with the spotlights and fill light.
The process is very simple. You select a light and place the light on the scene just like you do when placing a 3D model, as you can see in the following screenshot:
When you place the light, you need to hold the left mouse button and move up to set the height of the light. This works fine in a situation when the light needs to be pointing down, However, what if you need the light pointing to a specific object?

Creating an Interior Scene with Lumion
If you access the Light properties using the Edit Properties menu, you can see a small icon, as shown in the following screenshot:

Click on this button to access a mode where you can left click in order to control where the light points to. Once you finish, click on the OK button to save the new position.
However, as you can see in the previous screenshot, the control you have over the light doesn't end here. You can tweak the light's intensity along with the Cone Angle option that constrains the area that is illuminated by the spotlight. Use the Show light source option to mimic the glare and overexposed area that a real light would create.
Difference between lights
What is the difference between a spotlight, an omni light, and a fill light? A spotlight comes from theatre lighting and projects a bright beam of light, and the area that is affected by the light is controlled using the cone's angle. The omni and fill lights are very similar and the only difference between them is the intensity. This light emits light equally in all directions, or as the name suggests, fills the area with uniform lighting. Some practical applications of this light include lamp posts.
While placing lights in our scene, it is important to remember that the more lights we have in the scene, the longer the render will take. So, you need to think carefully about how many lights you really need. It is a fact that the light you get from a spotlight may not be sufficient to light the entire room, but you can use the fill light to help you with this.
A fill light creates good and uniform illumination for the entire room, but it doesn't produce any shadows. Keep these things in mind because in Chapter 7, Producing a Still Image with Lumion, you will see how to use the global illumination effect and the Hyperlight feature to drastically improve the lighting in a scene.
Before we finish this chapter, there is something you need to tweak to create an optimized interior scene.
Shadows – accuracy, speed, and memory modes
You might have noticed while placing a spotlight the shadows that it produces, but as soon you finish placing the light, the shadows disappear.
If you need to check the shadows produced by a light or a set of lights, select them by pressing and holding the Ctrl key and select each one to see the shadows produced by that particular light.
There is nothing wrong with your scene; instead, Lumion is trying to save memory by not showing the shadows. The shadow quality is controlled using the Light Properties window, where you can find the following options:
In order to improve the render time, we need to have a balance between the shadow details and quality. The following screenshot shows the comparison between the three different shadow options:

Creating an Interior Scene with Lumion
To get a better perception of how the shadows look, do a render before taking any artistic decisions. The viewport only gives you a rough idea.
With the Accuracy option, the shadows created by the spotlight are updated in every single frame, or in other words, the shadows produced are in real time. These shadows also look more realistic and sharp because a 2048 x 2048 pixel shadow texture is used to create a very accurate and detailed shadow.
The Speed option provides the perfect balance between render time and shadow quality because it only uses a static 512 x 512 pixel texture and the shadows produced are not in real time.
Finally, the Memory option only uses a static 128 x 128 pixel texture, but the shadow quality turns out to be very low.
Summary
Details, good models, and perfect lighting are the key points you should remember from this chapter. In this chapter, you learned that you need to pay close attention to details since interior scenes need more work for them to be believable. You saw the comparison between Lumion's models and external models and how this level of detailing can have a big impact on your scene. After learning some best practices for placing and populating a scene, you were introduced to Lumion's physically based materials and to another key aspect that helps you produce good interior scenes: lights and shadows.
In the next chapter, we will start working on an exterior scene and see some of the best practices for creating complex scenes. This includes the use of the Landscape menu. In the next chapter, we will also explore several ways to create complex terrains in Lumion with the help of sculpt tools and heightmaps.

