10 minute read
Working with Physically Based Materials
by TD Garden
Find this online tool here: http://cpetry.github.io/NormalMap-Online/
• Don't forget to use a good combination of Strength and Blur/Sharp to create a well-balanced map. You need the correct amount of detail; otherwise your normal map will be too noisy in terms of detail.
Advertisement
However, Lumion being a user-friendly application, gives you a hand on this topic by providing a tool to create a normal map automatically from a texture you import.
Creating a normal map with Lumion's relief feature
By now, creating a normal map from a texture is not something too technical or even complex, but it can be time consuming if you need to create a normal map for each texture. This is a wise move because it will remove the need for extra detail for the model to look good. With this in mind, Lumion's team created a new feature that allows you to create a normal map for any texture you import.
After loading the new texture, the next step is to click on the Create Normal Map button, as highlighted in the following screenshot:
Lumion then creates a normal map based on the texture imported, and you have the ability to invert the map by clicking on the Flip Normal Map direction button, as highlighted in the preceding screenshot.
Once Lumion creates the normal map, you need a way to control how the normal map affects the material and the light. For that, you need to use the Relief slider, as shown in the following screenshot:
Using this slider is very intuitive; you only need to move the slider and see the adjustments on the viewport, since the material preview will not be updated. The previous screenshot is a good example of that, because even when we loaded a wood texture, the preview still shows a concrete material.
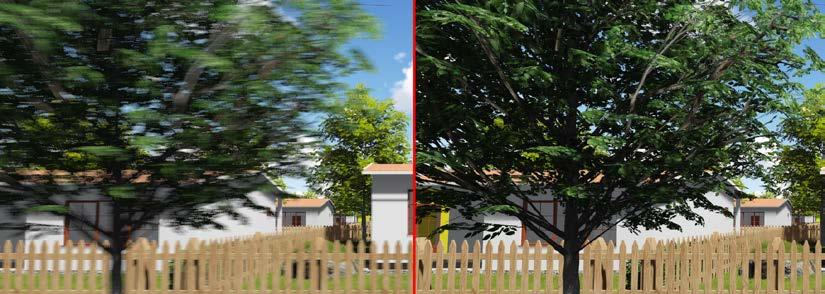
Again, this means you can easily use the settings from one material and use that as a base to create something completely new. But how good is the normal map that Lumion creates for you? Have a look for yourself in the following screenshot:

Working with Physically Based Materials
On the left hand side, we have a wood floor material with a normal map that Lumion created. The right-hand side image is the same material but the normal map was created using the free nDo script for Photoshop. There is a big difference between the image on the left and the image on the right, and that is related to the normal maps used in this case. You can see clearly that the normal map used for the image on the right achieves the goal of bringing more detail to the surface. The difference is that the normal map that Lumion creates in some situations is too blurry, and for that reason we end up losing detail.
Before we explore a few more things regarding creating custom materials in Lumion, let's have a look at another useful feature in Lumion.
Glowing materials and the Emissive setting
Are glowing materials useful? The answer is: yes, in particular situations. In the end, it is attention to detail that contributes to creating a believable image. There are several situations where glowing materials provide the right touch to creating a believable scene. For example, in a scene where light bulbs are glowing, with respect to the particular light spots, adding glowing helps to sell the image as real. Another good example is shown in the following screenshot:
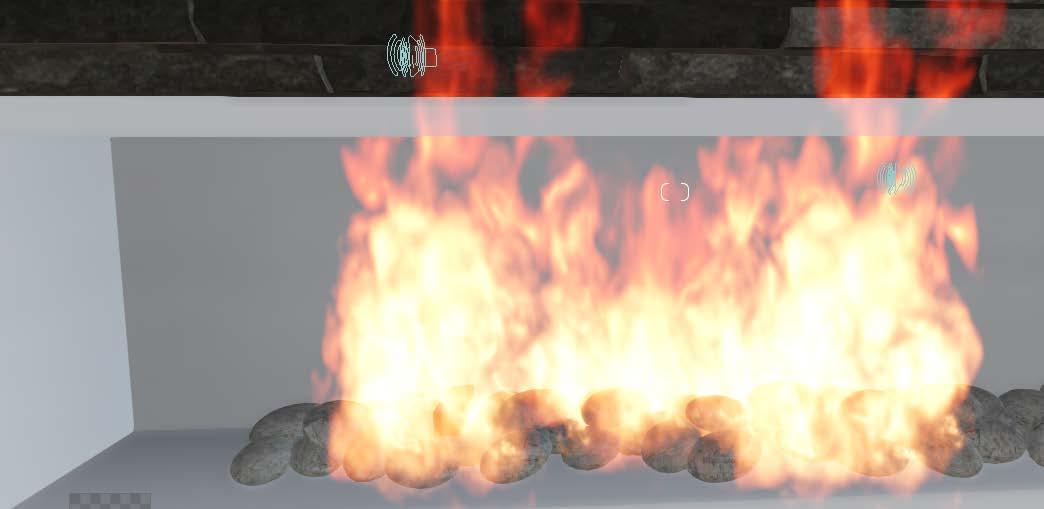
It looks great with the fire but there is something missing in this image: the light and glow produced by the fire and the wood burning.
One simple way to solve this issue is by creating a small geometry such as a cube or a tube, importing that geometry into the scene, and placing it in the fireplace. After assigning a wood material to the imported geometry, you need to tweak the Colorization slider and for this particular situation, select a red-orange color, as shown in the following screenshot:
This will change the overall color of the object but will not create any glow. To create the glow effect, you need to follow the steps shown in the following screenshot:


Working with Physically Based Materials
Click on the More settings button and select the Advanced category, which in turn gives you access to the Emissive slider. The amount of Emissive will depend on your scene, the mood you are trying to achieve, and the lighting present. But as you can see in the following screenshot, a simple technique like this can make a big difference:
Additionally, there are two good practices you can apply while working with materials that will help bring life to your scene. Let's start with the first, which involves how the materials reflect light.
Improving material reflections

We have already mentioned the fact that Lumion, in order to provide real-time feedback on materials, light, and shadows needs to use some shortcuts that have some impact on the final quality.
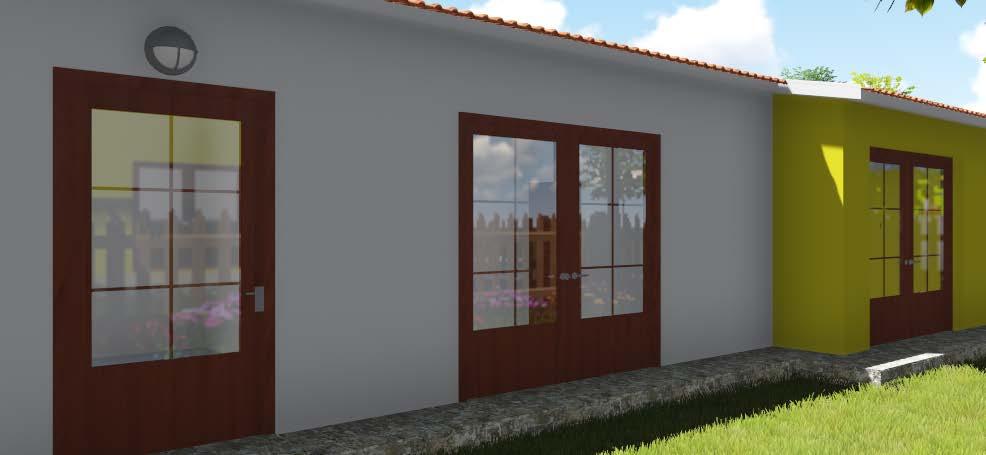
Calculating reflections and glossiness is something that can take a big toll in terms of performance. However, Lumion gives you the opportunity to improve those reflections in all materials, in particular with glass objects. Let's have a look at the following render made with Lumion:
Have a closer look at the windows and see how the reflections don't look that great. They even reflect a horizon that is not visible at all (because we have other houses in the background). This is not the end of the world because you can solve these using two features in Lumion. You can use the Reflection effect with the Photo mode or Movie mode, but that option will be covered later in this book. For now, use the Reflection Control ball which you can find on the Lights And Utilities Library option, as shown in the following screenshot:


Working with Physically Based Materials
One key aspect for this technique to work is where you are going to place this Reflection Control ball. There isn't any specific set of rules for this; it's more like trial and error in order to find a good place that provides good reflections. In the previous screenshot, we need to put the reflection ball higher in order to achieve something like this:
Now we have a proper reflection on the glass and although this situation isn't very noticeable, the reflections on the materials are improved, delivering a natural look. Keep this technique in mind when doing an animation because it will provide balanced quality and, at the same time, not increase the render time.
Next, you will learn a simple technique to add a special touch to your 3D scene, by using a video as a texture.
Using a video as a texture
This is a particularly useful technique for TV and other screens that will look much better if you play a video. It is a simple thing but it helps to sell the scene as real, and the workflow is very simple. You only need to apply a Standard material and click on the Choose Color Map button to load a texture, but instead, select a video that is under 50MB in size. After selecting and importing the video as a texture, the icon changes to a filmstrip indicating that you have now a video, as shown in the following screenshot:
The video will start to play on loop, which means you need to take that into consideration when creating an animation. You will find out that something so simple can actually make a huge difference in the final output, be it a still image or an animation.
However, sometimes Lumion's materials are not enough and you need something more specific. We already saw several options to create normal maps but there are more aspects involved in creating materials to be used in Lumion.

Custom materials for Lumion
As already mentioned, we have at least three options to have materials in Lumion. The first option is the one we just saw: using Lumion's materials. In most cases, the materials available will be enough for your project, but there are always special requests from the client to use a particular material and that leads us to the second and third options.
Creating materials with an external 3D application
The second option is to use the imported materials that you create in your favorite modeling application. This makes a lot of sense, because if you are modeling, it's always a good idea to do the following:
• Do a quick render to check how the geometry is looking and whether there is a need for more work in certain areas. It also helps to see where you can have better highlights.
• Assign a texture to the surface and see how the model and the texture combine and if there is a need for minor adjustments.
Then you can easily export everything using FBX or COLLADA, because once the 3D model is imported, Lumion recognizes the texture.
If you export UVs along with the geometry, don't forget to set the Scale slider to 0 in order for Lumion to use the imported texture coordinates instead of automatically applying the texture coordinates.
You really don't have to do anything else unless there are some reflective materials. Don't forget to use the default material node available in the 3D application, and don't use the materials from V-Ray, Mental Ray, or Corona. Also, there is no point in using a texture to control reflection and glossiness, since Lumion will only recognize the diffuse texture.
If you are wondering what a diffuse texture is, a diffuse texture, in simple words, is the image file with color information that will transform a surface into a wood floor or a brick wall.
What is the third option? The third option is to create materials inside Lumion. Is there a big difference between these two last options? The difference between each option is the technique used. The second option involves a good knowledge of the 3D application you are using to create UVs or something like box mapping to place the textures in the correct location. The third option is slightly easier to use because most of the time Lumion does a good job applying the texture.
Although creating the materials using an external 3D application is one good way to create a material, the truth is that you end up having more options by creating materials inside Lumion. For that, you need to use the Standard material.
Lumion's Standard material
The Standard material can sometimes be overlooked as just a quick way to import and use textures. The interface of this material is not something new because we already used it several times during this book. So, why the need to talk about it again?
There are some important features that you need to take into consideration while working with this material:
• Controlling glossiness with the normal map: This is not something new because in Chapter 3, Creating an Interior Scene with Lumion, you learned how to control reflections with the alpha channel. In this case, you apply the same principle but instead of saving the alpha channel on the diffuse texture, you save the alpha channel of the normal map.
• Reduction flickering with the Flicker Reduction slider: Only use this slider if you are too lazy to correct overlapping surfaces, which means making sure that the surfaces are offset a small amount in your 3D application.
• Using the Texture Alpha option: You can use this option for either of two purposes. They are:
° Color Map Alpha Masks Reflectivity: This means that the alpha channel in your Color Map is used as a Reflectivity mask.
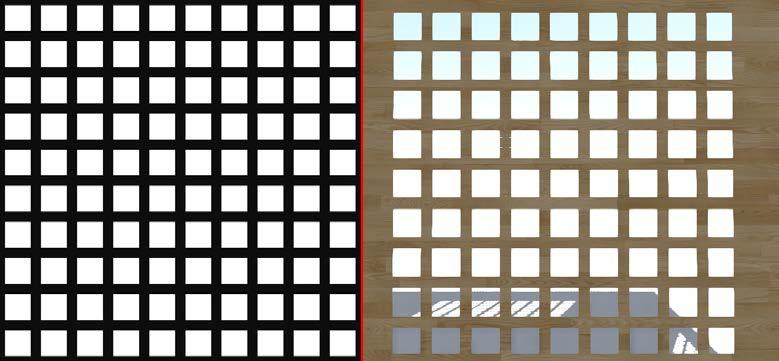
° Color Map Alpha Clips Object: This is a great utility to cut out complex geometry without too much effort. For that, you need to create a texture that is white for transparent areas and black for fully opaque sections. You can get an idea of how it works by having a look at the following screenshot that shows on the left the Alpha map used to create the grid shown on the right hand side:
Working with Physically Based Materials
The Standard material can seem intimidating but, after this brief explanation, you not only see how it works, and what is possible to do but the way for you to learn would be to try it yourself. Create some simple scenes like a cube and test all of the features mentioned in this chapter.
But even with the Standard material, you need textures to use and apply to the 3D geometry. The following sections are going to help you find diffuse maps and create your own reflection and glossiness maps.
Finding textures and eliminating highlights
There are some places on the Internet where we can find good images that can be used, and maybe here we can find what we need. They are:
• Flickr
• Stock.xchg
• iStockphoto
• deviantART
• Textures.com
Another option is to pick up your camera and start creating your own library with various textures. However, it doesn't matter if you download the textures or use your own images, you will always face the problem of uneven lighting and highlights. That is not the end of the world because there are some techniques to create textures with an even lighting.
Fixing highlights on textures
For the sake of simplicity, we are going to stick with Photoshop to explain how the process works. Obviously, the techniques can be applied to other applications so we will try to keep this very simple and basic, as you can see in the following screenshot:
You need to follow these steps:
1. Create a copy of the image.
2. Select the first layer (the one on the bottom) and apply the Average filter found under the Blur menu. This filter takes the average of the colors in the photo and fills a layer with that color, a uniform color.
3. Select the second layer and set the Blending mode to Linear Light and the Opacity to 50 percent.

4. Next, select the HighPass filter and play with the radius (the values will depend on the size and resolution of the texture). Adjust the radius until you get a uniform light on the texture, that is, no dark or bright areas.
However, after this there is something else you need to do in order to use these textures in Lumion, making it seamless.

