
8 minute read
6.5 System Management
6.5.1 General Settings
6.5.1.1 Configuring General Information
Configure the camera name, language and video standard.
Step 1 Select Setting > System > General > General.
Step 2 Configure general parameters.
Parameter Description
The name of the Camera.
Name
Each Camera has a unique name.
Language Select the system language.
Video Standard Select video standard from PAL and NTSC.
Step 3 Click Save
6.5.1.2 Configuring Date & Time
You can set Date and Time format, Time zone, Current Time, DST (Daylight Saving Time) or NTP server.
Step 1 Select Setting > System > General > Date&Time
Step 2 Configure Date & Time parameters.

Table 6-29 Date & Time parameters
Parameter Description
Date Format Date format.
Time Format Configure the time format. You can select from 24-Hour or 12-Hour.
Time zone Configure the time zone that the Camera is at.
Current Time Configure system time. Click Sync PC, and the system time changes to the time on PC.
DST
Enable DST as needed. Select the checkbox to enable daylight saving time. Select DST, and then configure the start time and end time of DST with dates or days of the week.
NTP
When you need the Camera to transmit its time to NTP server, you can select the NTP checkbox to enable it.
Server IP address or domain name of the NTP server.
Port Port number of the FTP server.
Interval Time gap of Camera’s transmission of its current time to NTP server.
Step 3 Click Save.
6.5.1.3 Configuring Position System
Enter the position system information of the Camera in the web to remind you where the Camera locates.
When the Camera with a platform, it will automatically send the position system information to the management platform, and the position system information can be viewed on the platform to help the platform operator track the Camera.
This function is supported on select models.
Step 1 Select Setting > System > General > Position System.

Figure 6-57 Position system
Step 2 Enter the longitude, latitude altitude, and installation height of the Camera. Step 3 Click Save.
6.5.2 User Management
Managing users and groups are only available for administrator users.
● The max length of the user or group name is 15 characters which can only be consisted of letters, numbers and underlines.
● The password is made up of characters for 8–32 digits and the password must contain two of the three forms (number, letter, and the common characters. ' 、 " 、;、:、& are not included.)
Administrator users can modify all the uses’ password.
● You can have 19 users and 8 groups at most.
● You can manage users through single user or group, duplicate user names or group names are not allowed. A user can be in one group at a time and the group users can own authorities within group authority range.
● Online users cannot modify their own authority.
● There is one admin by default which has highest authority.
● Select Anonymous login, and then log in with only IP address instead of user name and password. Anonymous users only have preview authorities. During Anonymous login, click Logout, and then you can log in with other username.
6.5.2.1 Adding a User
You are admin user by default, and you can add user, delete added users or modify their password.
Procedure
Step 1 Select Setting > System > Account > Account.
Step 2 Click Add User
Step 3 Configure parameters.
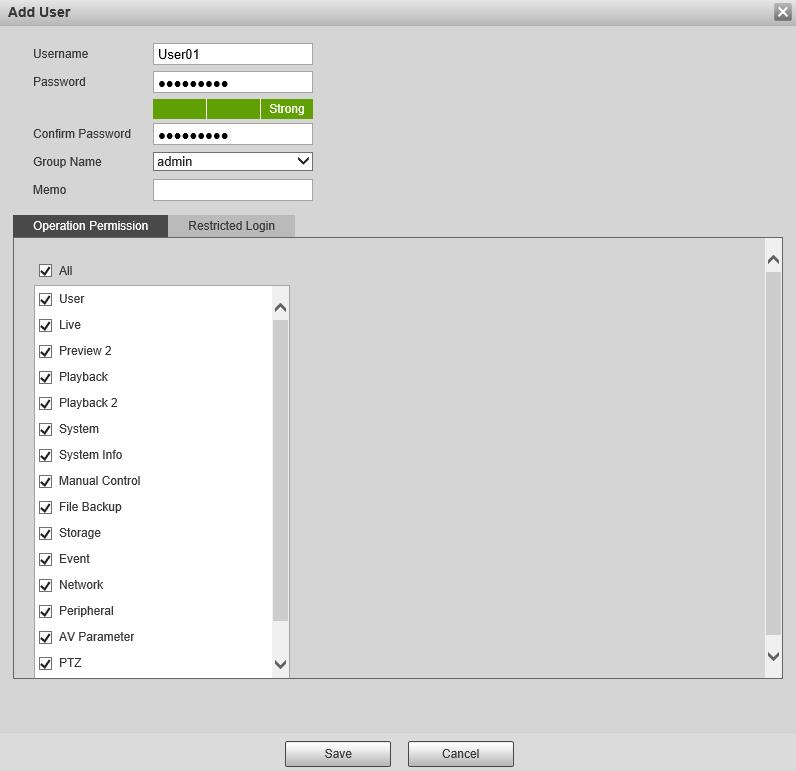

Table 6-30 User parameter description
Parameter Description

Username User’s unique identification You cannot use existing user name.
Password Enter password and confirm it. The two items must be the same.
Confirm Password
Group name The group that users belong to. Each group has different authorities.
Memo Describes the user.
Parameter Description
Set the PC address that allows the defined user to log in to the Camera and the validity period and time range. You can log in to the web with the defined IP in the defined time range of validity period.
● IP address: You can log in to the web through the PC with the configured IP.
● Validity period: You can log in to the web in the configured validity period.

Restricted Login
● Time range: You can log in to the web in the configured time range. Configured as following:
1. Enable IP Address, and then select IP type and set the IP address.
● IP address: Enter the IP address of the host to be added.
● IP segment: Enter the start address and end address of the host to be added.
2. Enable Validity Period, and then set the start time and end time.
3. Enable Period, and then click Time to set the period that allows login. Step 4 Click Save.
The newly added users are displayed in the user list.
Related Operations
● Click to modify password, group, memo or authorities.
● Click to delete the added user, admin user cannot be deleted.
● Click in the admin row to change user name and email address.
6.5.2.2 Adding a Group
You have two groups named admin and user by default, and you can add new group, delete added group or modify group authority and memo.
Procedure
Step 1 Select Setting > System > Account > Account > Group Name
Step 2 Click Add Group
Figure 6-61 User group
Step 3 Enter group name and memo, and then select the group authorities.
Step 4 Click Save.
The newly added group are displayed in the group name list.
Related Operations
● Click to modify group memo or authorities.
● Click to delete the added group, admin group and user group cannot be deleted.
● Click in the row of admin group or user group to modify group memo.
6.5.2.3 Modifying User Password
For data security, we strongly recommend you change the default password of the Camera and modify it regularly, and adopt a complicated and strong password.
Step 1 Select Setting > System > Account > Account > Username

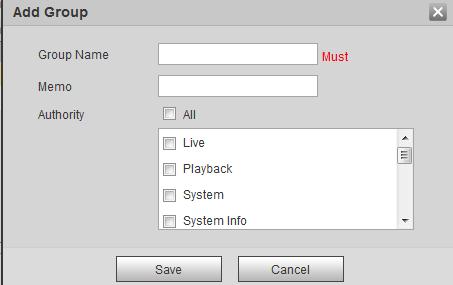
Figure 6-63 Username
Step 2 Click .
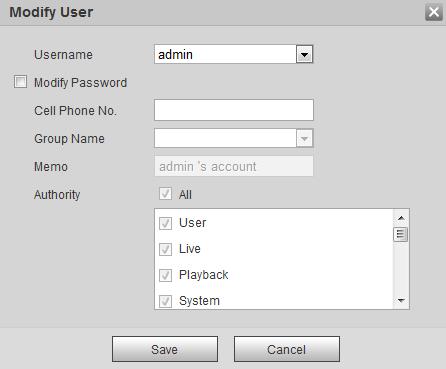

Step 4 Enter the old password, new password and confirm it.
The password is made up of characters for 8–32 digits and the password must contain two of the three forms (number, letter, and the common characters. ' 、 " 、;、:、& are not included.)
Step 5 Click Save.
6.5.3 Adding ONVIF User
You can add, delete ONVIF users, and change their passwords.
Step 1 Select Setting > System > Account > ONVIF User.
Step 2 Click Add User
Figure 6-66 ONVIF user
Step 3 Enter the username, password, confirm the password, and then select group name.


Figure 6-67 Add user
Step 4 Click Save.
6.5.4 Safety Management
Set RTSP authentication, IP filter, system service and HTTPS to secure data transmission and prevent data leakage.
6.5.4.1 Configuring RTSP Authentication
RTSP (Real Time Streaming Protocol) is to secure transmission of streaming media.
Step 1 Select Setting > System > Security > RTSP Authentication.
Step 2 Select an authentication mode.
Step 3 Click Save
6.5.4.2 Configuring System Service
You can set functions such as SSH, password reset, CGI service, Onvif service, genetec service, audio and video transmission encryption and mobile push.
Step 1 Select Setting > System > Security > System Service
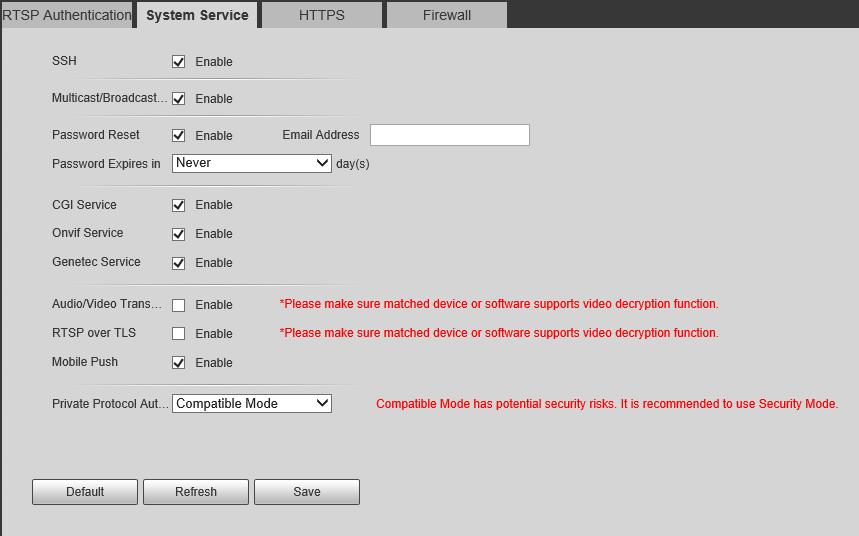
Figure 6-69 System service
Step 2 Enable functions on the System Service page.
Table 6-31 System service parameters description
Parameter Description
It is disabled by default.
SSH
Multicast/Broadc ast Search
SSH (Secure Shell) can encode your data for its transmission. By this way, data leakage can be prevented when you manage your Camera remotely.
Enable this function, and then when multiple users are previewing the device video image simultaneously through network, they can find your device with multicast/broadcast protocol.
Parameter Description
It is enabled by default.
Password Reset
If you disable this function, you can only restore hardware to reset password.
It is enabled by default.
CGI Service
Enable CGI (Common Gateway page) and then you can use your browser to get data from the server.
Onvif Service
Genetec Service
It is enabled by default. Enable Onvif service to connect your Camera to network video products by other manufacturers.
It is enabled by default.
It is disabled by default.
Audio and Video Transmission
Encryption
● If you enable this function, ensure that the matching Cameras or software can decode audio and video that you have encoded.
● Transmission of audio and video between your Camera and the thirdparty platform cannot be encoded. So for data security, we recommend you disable CGI service and Onvif service.
Mobile Push
Step 3 Click Save
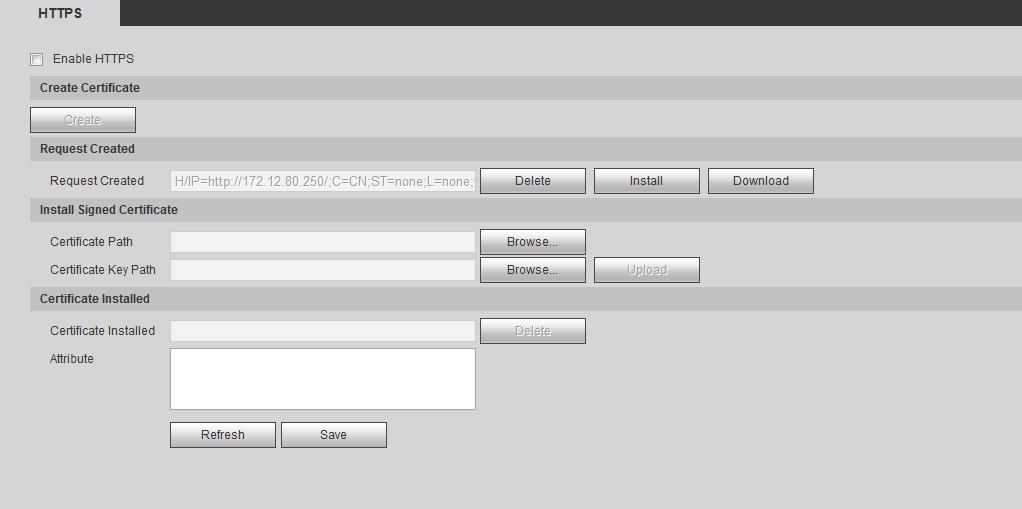
6.5.4.3 HTTPS
It is enabled by default. Snapshots under alarm condition can be delivered to your phone.
Create a certificate or upload an authenticated certificate, and then you can log in through HTTPS with your PC. The HTTPS can protect page authenticity on all types of websites, secure accounts, and keep user communications, identity, and web browsing private.
Step 1 Select Setting > Security > HTTPS
Step 2 Create a certificate or upload an authenticated certificate.

● For creating a certificate, click Create
Figure 6-71 Certificate creating
● For uploading the authenticated certificate, click Browse to select the certificate and certificate key, click Upload to upload them, and then skip to Step5
Step 3 Enter the required information and then click Create
The entered IP or Domain name must be the same as the IP or domain name of the device. Step 4 Click Install

Step 5 Click Download to download root certificate.
Step 6 Click Download Root Certificate

Step 7 Click Open.

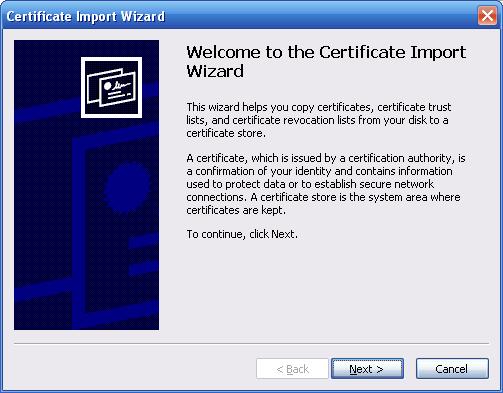


Step 12 Enable HTTPS and a prompt that the Camera needs to be restarted is displayed. After the Camera restarts, enter the IP address of the Camera in your browser and access the Camera through HTTPS protocol.
6.5.4.4 Firewall
Configure firewall to limit access to the camera. You can configure Network Access, PING prohibited and Prevent Semijoin to enhance network and data security.
● Network Access: Set the allowlist and blocklist to limit access.
◇ Allowlist: Only when the IP/MAC of your computer in the allowlist, can you access the Camera. Ports are the same.
◇ Blocklist: When the IP/MAC of your computer is in the blocklist, you cannot access the Camera. Ports are the same.
● PING prohibited: Enable the PING prohibited function, and the Camera will not respond to the ping request.
● Prevent Semijoin: Enable the Prevent Semijoin function, and the Camera can provide service normally under Semijoin attack.
● You cannot set allowlist or blocklist for Camera IP or MAC addresses.
● You cannot set allowlist or blocklist for port MAC addresses.
● When the IP addresses of the camera and your computer are in the same LAN, MAC verification takes effect.
● When you access the Camera through internet, the Camera verifies the MAC address according to the router MAC.
This section takes Network Access as an example.
Step 1 Select Setting > System > Security > Firewall
Step 2 Select Network Access from the Rule Type list, and then select the Enable checkbox.
● Enable PING prohibited and Prevent Semijoin, and click Save. You do not need to configure parameters.
● Enable Network Access, and configure allowlist and blocklist.
1. Select the mode: Allowlist and Blocklist.
2. Click Add IP/MAC.
3. Configure the parameters.
Parameter Description
Select IP address, IP segment, MAC address or all IP addresses.
● P address: Select IP version and enter the IP address of the host to be added.

Rule Type
● IP segment: Select IP version and enter the start address and end address of the segment to be added.
● MAC address: Enter MAC address of the host to be added.
● All IP addresses: Set all IP addresses in allowlist or restricted list.
Device All Ports Set access ports. You can select all ports or the ports in defined areas.

Device Start Server Port
Device End Server Port
● Device all ports: Set all IP port in allowlist or Blocklist. When selecting BlocklList in Mode, and All IP Address in Rule Type, you cannot select the Device All Ports checkbox.
● Device start server port and Device end server port: Set Device start server port and device end server port, and the range is 1–65535.
4. Click OK, and the Firewall page is displayed. Step 3 Click Save


