3 minute read
7 System Maintenance
7.1 Maintenance Requirements
To make sure that the system runs normally, maintain it as the following requirements:
● Check surveillance images regularly.
● Clear regularly user and user group information that are not frequently used.
● Change your password every 3 months.
● View system logs and analyze them, and process the abnormity in time.
● Back up the system configuration regularly.
● Restart the device and delete the old files regularly.
● Upgrade firmware in time.
7.2 Auto Maintenance
You can restart the system manually, and set the time of auto reboot and auto deleting old files. This function is disabled by default.
Step 1 Select Setting > System > Auto Maintain.
Step 2 Configure auto maintain parameters.
● Select the Auto Reboot checkbox, and set the reboot time, the system automatically restarts as the set time every week.
● Select the Auto Delete Old Files checkbox, and set the time, the system automatically deletes old files as the set time. The time range is 1 to 31 days.
When you enable and confirm the Auto Delete Old Files function, The The deleted files cannot be restored, are you sure? notice is displayed. Operate it carefully.
● Click Manual Reboot, and then click OK on the displayed page, the Camera will restart. Step 3 Click OK.
7.3 Backing Up and Restoring
7.3.1 Importing and Exporting
● Export the system configuration file to back up the system configuration.
● Import system configuration file to make quick configuration or recover system configuration.
Step 1 Select Setting > System > Import/Export
Step 2 Import/Export files.
● Click Export and paths of backing up files are displayed.
● Click Import to import files that you have exported and backed up.
7.3.2 Default Settings
Restore the device to default configuration or factory settings.
This function will restore the device to default configuration or factory setting. Step 1 Select Setting > System > Default.
Figure 7-2 Default setting
Step 2 Restore the Camera to default setting.
● Click Default, and all the configurations except IP Address and Account are reset.
● Click Factory Default, and all the configurations are reset.
7.4 Upgrading Firmware
Upgrading to the latest system can optimize the camera functions and improve stability. Step 1 Select Setting > System > Upgrade
Figure 7-3 Upgrade
Step 2 Select upgrading method as needs.
● File Upgrade
1. Click Browse to upload upgrade file. The upgrade file should be a .bin file.
2. Click Upgrade to start the process.
● Online Upgrade
1. Select the Auto-check for updates checkbox. The system checks for upgrade once a day automatically, and there will be system notice if any upgrade is available.
We need to collect the data such as device name, firmware version, and device serial number to proceed auto-check. The collected information is only used for verifying the legality of cameras and upgrade notice.
2. If there is any upgrade available, click Upgrade, and then the system starts upgrading.
Click Manual Check to check for upgrade manually.
7.5 Information
You can view the information, including version, log and online user, and back up or clear log.
7.5.1 Version
You can view device information such as hardware, system version, and web version. Select Setting > Information > Version to view the version information.
7.5.2 Log
You can view and back up logs.
Step 1 Select Setting > Information > Log
Figure 7-4 Log
Step 2
Configure the start time and end time, and then select the log type.
● System: Includes program start, abnormal close, close, program reboot, device closedown, device reboot, system reboot, and system upgrade.

● Setting: Includes saving configuration and deleting configuration file.
● Data: Includes configuring disk type, clearing data, hot swap, FTP state, and record mode.
● Event (records events such as video detection, smart plan, alarm and abnormality): includes event start and event end.
● Record: Includes file access, file access error, and file search.
● Account: Includes login, logout, adding user, deleting user, modifying user, adding group, deleting group, and modifying group.
● Safety: Includes password resetting and IP filter.
Step 3 Click Search.
● Click a certain log, and then you can view the detailed information in Detailed Information area.
● Click Backup, and then you can back up all the found logs to your PC.
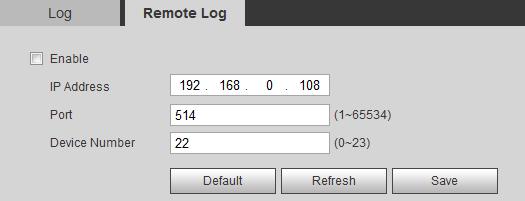
7.5.3 Remote Log

Configure remote log, and you can get the related log by accessing the set address.

Step 1 Select Setting > Information > Log.
Step 2 Select the Enable checkbox.
Step 3 Set address, port and device number.
Step 4 Click Save
7.5.4 Online User
View all the current users logging in to web.


