2 minute read
Mother’s Day Cards


Children can whip up these cheerful cards as easy as 1,2,3!
These cards are great as a quick last-minute make to create with the kids and the sentiments can be changed for any occasion. Plus, you’ll only need a few crafty staples from your stash so you shouldn’t have to buy anything you don’t already own.
Advertisement
If mums were flowers
Kit List
◆ Card stock: light green, cream
◆ Buttons
◆ Alphabet stamps
◆ Ink pad, black
◆ Adhesive foam pads
◆ Washi tape
◆ Glue
◆ Scissors
1 Take the cream card and stamp out If mums were flowers I’d pick you with the black ink and set aside to dry.
2 Fold the light green card in half. Add three lengths of washi tape to the card, trimming at the bottom.
3 At the top of each length of washi tape, fix six buttons with the sticky foam pads in a flower shape. Fix the sentiment to the top of the card with glue.
Kite Kit List
◆ Card stock: light blue, white, orange pearlescent, yellow pearlescent, cream
◆ Alphabet stamps
◆ Ink pad, black
◆ Adhesive foam pads
◆ Adhesive gem
◆ Washi tape
◆ Coloured twine
◆ Glue
◆ Scissors
◆ Pencil
1 Take the cream card and stamp out Happy Mother’s Day in black ink. Set aside to dry.
2 Cut out three clouds from the white card. Cut a kite shape three times, each time making the shape 0.5cm smaller. Use the orange card for the biggest and smallest shape and the yellow for the middle size. Using the adhesive foam pads, layer the kite shapes. Add an embellishment in the centre of the smallest kite shape. Stick a length of twine to the back of the kite.
3 Fold the light blue card in half. Glue the kite and clouds to the card base, arranged as shown in the photo. Adhere the sentiment to one of the clouds with glue. Attach the twine to the card base using different coloured strips of washi tape, winding it around to fit between the other elements. The washi tape strips can be trimmed into bow shapes first if you prefer.
Ha-pea Mother’s Day
Kit List
◆ Card blank, white
◆ Card stock: light green, dark green, cream
◆ Alphabet stamps
◆ Ink pad, black
◆ Adhesive foam pads
◆ Marker pen
◆ Glue
◆ Scissors
◆ Pencil
1 Take the cream card and stamp out Ha-pea Mother’s Day with the black ink.
2 Using the dark green card, cut out a pod shape. Using the light green card, cut out three pea shapes. Add two eyes and a smile on each of the peas with the marker pen.
3 Fold the card blank in half. Fix the pod and the peas to the card using glue. Fix the sentiment to the card using adhesive foam pads.
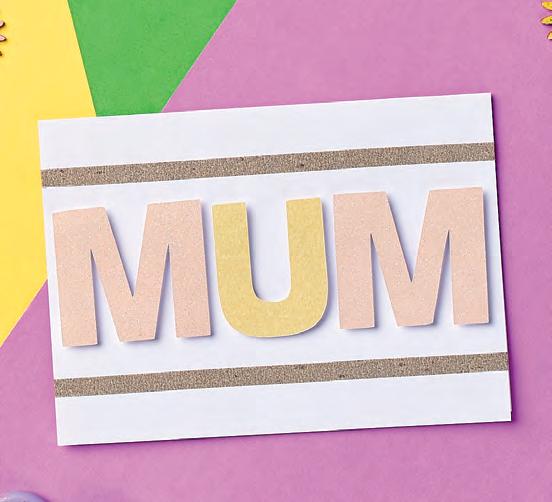
Mum Kit List
◆ Card blank, white
◆ Washi tape, grey
◆ Card stock: glitter, pearlescent
◆ Adhesive foam pads
◆ Pencil
◆ Scissors
◆ Ruler
1 Fold the card blank in half. Mark 2cm from the top and bottom of the card on each side.
2 Where you have marked the card, fix a line of the washi tape across the width and cut off.
3 Cut out two 'M's using the glitter card and a 'U' from the pearlescent card. Fix these in between the washi tape lines with the adhesive foam pads.
Mini makers
Helping Hand
◆ Make sure you help children with any small craft items
◆ You can mix up the design and materials that you use depending on what you have in your stash
◆ Instead of stamping the sentiment, you could print it or write it out free-hand
◆ Foam pads add depth to your cards but you can use glue if you don’t have any


