2 minute read
Die cut layered Easter Cards


Celebrate the arrival of spring and brighten someone’s day with cards and bunting in pretty pastel colours
Think twice before throwing away any damaged books, because you can turn that trash into treasure with a little creativity! Our colourful Easter cards and bunny bunting repurpose old book pages for a chic and eco-friendly vibe.
Advertisement
Bunny bunting
Kit List
◆ Template from the Members Area
◆ Old dictionary or book
◆ Altenew Layered Floral Elements die set
◆ Craft Consortium Let Spring Begin A4 Paper Pad (to buy this go to createandcraft.com and type in product code 594182)
◆ Die cutting machine
◆ Adhesive
◆ Ric-rac, pink
◆ Pencil
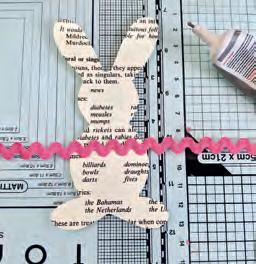
1 Download, print and cut out the template found online in the Members Area. Trace the template onto a dictionary page and cut out. You will need two pieces for each bunny. Make your garland as long or as short as you like [1]
2 Die cut a variety of different flowers and foliage in coloured card. Layer and assemble the flowers, ready for the next steps [2]
3 Use hot glue or a fast-drying adhesive to adhere the bunnies along a length of ric-rac, spacing them out evenly under the ribbon. Ensure more of the bunny hangs below the ribbon than above so that the garland will hang without the bunnies tipping forward [3]
4 Place another bunny on top of each bunny, with the ric-rac ribbon sandwiched between [4]. They should line up perfectly if cut out neatly, but you can tidy up the edges with scissors, if needed.
5 Adhere white pom-pom tails with glue, then decorate the bunnies and gaps between them with die cut flowers and foliage. Leave a length of the ric-rac free at either end for hanging.
Helping Hand
◆ Repurposing pages from damaged books is a great way of adding a special touch to your craft projects – and pages discoloured by age give the finished garland an adorable vintage look too

◆ Save your bunny template for future projects. You never know when it could come handy!
Happy Easter card Kit List
◆ Old dictionary or book
◆ Altenew Layered Floral Elements die set
◆ Craft Consortium Let Spring Begin A4 Paper Pad (to buy this go to createandcraft.com and type in product code 594182)
◆ Card stock: white; Kanban Crafts gold mirri (881389)
◆ Card blank, A6, white
◆ Tonic Studios Layered Mixed Ovals die set
◆ Concord & 9th Perfectly Penned stamp set
◆ Tsukineko VersaFine ink pad: Onyx Black
◆ Washi tape
◆ Adhesive
◆ Paper trimmer
◆ Die cutting machine
◆ Sequins
◆ White ribbon
3 Select a round edge oval die that is one size down from the scalloped one, secure it with a piece of a washi tape on some white card and run it through the die cutting machine.
4 Stamp out the sentiment on the white oval die cut, toward the left-hand side to keep space on the right bottom where the die cut flowers will sit.
5 Select a few different colours of card stock from the paper pad and die cut several flowers and leaves using the Layered Floral Elements die set.
6 Assemble the flowers by adhering the individual corresponding layers together. It’s a good idea to keep the bottom layer of each flower darker than the top layer, but there’s no right or wrong when you create.

1
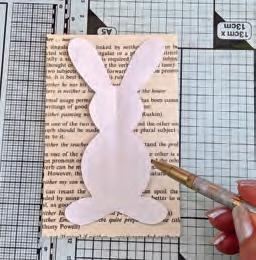
Tear out a page neatly from an old dictionary and cut it to 1" smaller than the card base. Adhere it onto the card base.
2 Select a medium-sized scalloped oval die, secure it on a piece of the gold mirri card with a small piece of a washi tape and run it through the die cutting machine.
7 Adhere the oval die cuts on top of each other, then adhere the panel in the centre of the card base. Arrange and adhere the prepared florals around the bottom and sides of the oval element.
8 Tie a small bow using the white ribbon, snip the ends diagonally and adhere it onto the card by the flower cluster. Embellish with a few sequins.
Upcycled treasure
Author spotlight