3 minute read
4 ways with your paper pack...


Create beautifully coordinated cards with this Paper Pack by Little Robin Redbreast featuring pretty pastel shades.


finally affix the white ovals onto their respective green oval.
4 Cut a piece of green card to 1 3/8" x 8 ¼”, score at 3 ¾”.
5 Adhere one sentiment to the centre of the card. Position the strip from Step 4 inside the card with the shorter end overlapping the card front.
6 Use the sentiment already in place to position the remaining greeting. It should match exactly.
7 Apply adhesive to the bottom of the overhanging strip from Step 5 to secure the sentiment; be careful not to stick it to the sentiment below. Next add glue to the longest part of the green strip and attach it to the inside of the card.
8 Adhere white card cut to the same size of the base to conceal the green strip. Decorate the card with the transfers.
to the 3" mark. Then cut from the 1 ¼" mark to the opposite corner. Discard the scraps from the middle.
5 The triangle is attached bottom left. Adhere green to white, with the white piece slightly in front to create a small border.
6 Repeat Step 5 for the remaining pieces, these adhere to the top right with the shortest side facing left.
7 Stamp a sentiment directly onto the front of the card.
Recessed panel card Kit List
◆ Craft Consortium Little Robin
Redbreast: Paper Pad A4; 12" x 12" pad; 6" x 6" pad ◆ Sentiment stamp ◆ Card stock: white
◆ Pencil, ruler and eraser
◆ Paper trimmer ◆ Adhesive
Embossed card
Kit List
◆ Craft Consortium: Little Robin Redbreast Paper Pad A4; Little Robin Redbreast Embossing Folder; Adhesive Pearls, Gold; Ink Drops Rose Paper Pad; Patina Paper Pad ◆ Clear embossing powder ◆ VersaFine ink, Onyx Black ◆ Adhesive ◆ Heat tool
◆ Craft UK 5" x 7" card blank
◆ Stamping platform ◆ Creative Stamps Wiry words stamp set
◆ Tsukineko VersaMagic Dew Drop Chalk Ink Pads ◆ Aladine Izink Dye Ink Pads, various colours ◆ Microfibre cloth
◆ Dies: mini carnation flower, foliage ◆ Ball tool and foam mat
1 Cut pale pink card to 5" x 7" and gently mist with water. The water should sit on top on
Square easel card
Kit List the card but not saturate it.
2 Place the card into your stamp platform, hover the 3D embossing folder over the top and use it as a guide to position the sentiment. Stamp the sentiment in VersaFine ink.

3 Emboss the card using the 3D embossing folder, then heat set the sentiment with clear embossing powder. Clean the folder immediately.
4 With a light hand, swipe the coloured inks over the embossed areas to add splashes of colour. Use a microfibre cloth to remove ink from the sentiment.
5 Trim the excess non-embossed edges and mount onto the card blank with adhesive.
6Decorate with foliage and double-layered flowers die cut from Patina and Ink Drops Rose Paper Pads, shaped using a ball tool with pearls in the centre.
1
Create a 6" x 6" base and attach a piece of patterned paper to the front with glue.
2
Cut a 6 x 6” square from the A4 pad in pale mint and also from white card.
3 On the left side of the mint piece measure 3" and make a pencil mark. On the right-side measure and mark at 1" and 1 ¼".
4
Lay the green square exactly over the white and place in a trimmer. Cut from the 1" mark
8
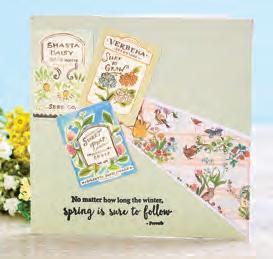
To decorate, fussy cut the seed packets from the front cover of the 12" x 12" pad and arrange on the front of the card.
Buy Now
This versatile pack contains 20 double-sided 200gsm acid– and lignin-free papers in plain colours.
Craft Consortium Little Robin Redbreast Paper Pad A4 (to purchase this head to createandcraft.com and type in product code 551959) Price £6.49
Club Member £5.19
SAVE 20%
◆ Craft Consortium Little Robin Redbreast: Paper Pad A4; 12" x 12" pad; 6" x 6" pad; Washi Tape ◆ Crafter’s Companion Centura Pearl Single Colour A4 card stock, Baby Pink ◆ Square nesting dies, stitched ◆ Craft Consortium Gardener’s Delight A4 Premium Cardstock Paper Pad ◆ Card stock: white
◆ Adhesives: 3D foam pads and glue ◆ Daisy Mae Garden Gnomes Stamp set (for sentiment) ◆ Score board and bone folder
1 Create a 6" x 6" card base out of the pearl card stock, score at 3". Cut a separate square the same size as the base from the same card stock and put aside.
2 Fold and burnish the score line. Lay the base flat and add glue to the lower part of the scored card to secure the extra square.
3 Cut two pieces of dusty pink card from the Gardener’s Delight pad to 5 ¼" square. Cut two pieces of pattern paper from Little Robin Redbreast 6" x 6" pad to 4 ¾", cut one piece of pale pink card from the Little Robin
Redbreast A4 pad to 4" and one topper from the 12" x 12" pad.
4 Attach the matts and layers to the card base.
5 Place a strip of the seed design tape onto white card and cut out four packets. Add foam pads to the back.
6 Stand the top section up and decide how far forward it should come. Arrange the washi ephemera on the base as a stopper.
7 Cut a piece of white card to 5 ½" x 2 1/2", stamp a sentiment and adhere to the centre panel inside the card.