3 minute read
CONFIGURATION GUIDE

TECHNICAL CONFIGURATION GUIDE
SET-UP
• Press and hold the eject button for the duration of this first step.
• Press the record button 2 times.
• Press the stop button 7 times until set ‘SETUP TOP LEVEL’ appears on the LCD screen.
• Use the record button to scroll up and the stop button to scroll down through the menus.
SELECTION OF MENU ITEMS
• On the set-up menu, use the record or stop key to scroll to the menu item of interest
• Press the eject button to enter the first item on this sub-menu. Further operations of the eject button select further items on this sub menu.
Scroll Up / increment
Scroll Down / Decrement
CHANGE OF PARAMETERS
• If a numeric field is flashing then it can be adjusted by increment or decrement. • Press the stop button to increment. Press the record button to decrement.
STORING CONFIGURATION
Any change to a configuration setting is automatically stored by moving on to a display of a new sub menu item. • When in sub-menu, return to the set-up menu by pressing eject when [EXIT] is shown on the bottom line of the sub-menu.
• When in set-up menu, either press record or stop to select [exit] and press eject to exit from configuration routine.
CONFIG. TIME AND DATE SUB MENU
Note: When changing the time and date ALWAYS check or change the TIME ZONE FIRST. The time zone has a major effect on the time and therefore MUST be set prior to changing the time and date. Set day of month: Press record to increment or press stop to decrement the day of the month then press eject button. Set month: Press record to increment or press stop to decrement the month then press eject button. Set Year: Press record to increment or press stop to decrement the year then press eject button. Set hour: Press record to increment or press stop to decrement the hour then press eject button. Set minute: Press record to increment or press stop to decrement the minute. Finally, press eject button. The time now is set and you will be taken to the Top-Level Menu.
TIME ZONE SUB MENU
Note: When changing the time and date ALWAYS check or change the TIME ZONE FIRST. The time zone has a major effect on the time and therefore MUST be set prior to changing the time and date. Set letter of country: • Press record to increment through the alphabet until you reach the first letter of the country in the required time zone. e.g. Increment to B for Britain. • Press stop to decrement through the alphabet. To exit to Top-Level menu cycle through to end of alphabet until [EXIT] then press eject button. Set country: • Press record to increment through the countries beginning with the letter you previously selected until you reach the country in the required time zone. • Press stop to decrement through the countries. To exit to Top-Level menu cycle through to end of alphabet until [EXIT] then press eject. Set city or area: • Press record to increment through the time zones within the country previously selected.
This could be a city or an area. • Press stop to decrement through the time zones with the country.
To exit to Top-Level menu cycle through to end of alphabet until [EXIT] then press eject. Finally, press eject key: This will confirm that the time zone will be altered. However a restart of the system in required.
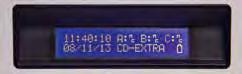
MEDIA TYPE SUB MENU CD-EXTRA SETUP SUB MENU
• Press eject key: ‘XML Enabled’: Press record or stop key to select [ON] or [OFF] operation. • DEFAULT is off. Note: CD-EXTRA records enhanced meta data to the CD. This format is NOT valid for some transcription software. When CD-EXTRA is enabled the finalisation time is approximately doubled. • EXIT sub menu. • Press eject key: This will save and exit from the configuration settings.