Flies


WITH PHIL ROWLEY & FRIENDS
 By Phil Rowley
STILLWATER FLIES WITH PHIL ROWLEY & FRIENDS

Copyright © 2023 Phil Rowley 2023
All rights reserved. No part of this publication can be reproduced, stored in a retrieval system or transmitted, in any form or by any means, without prior permission of the publisher.
OP Media Group LTD
802-1166 Alberni St Vancouver BC V6E 3Z3 www.opmediagroup.ca
Written & Photography by Phil Rowley
Editing by Michaela Ludwig
Design by Arran Yates
Marketing & Distribution by Desiree Miller
ISBN: 978-1-7778764-1-8
Printed in China
Published by
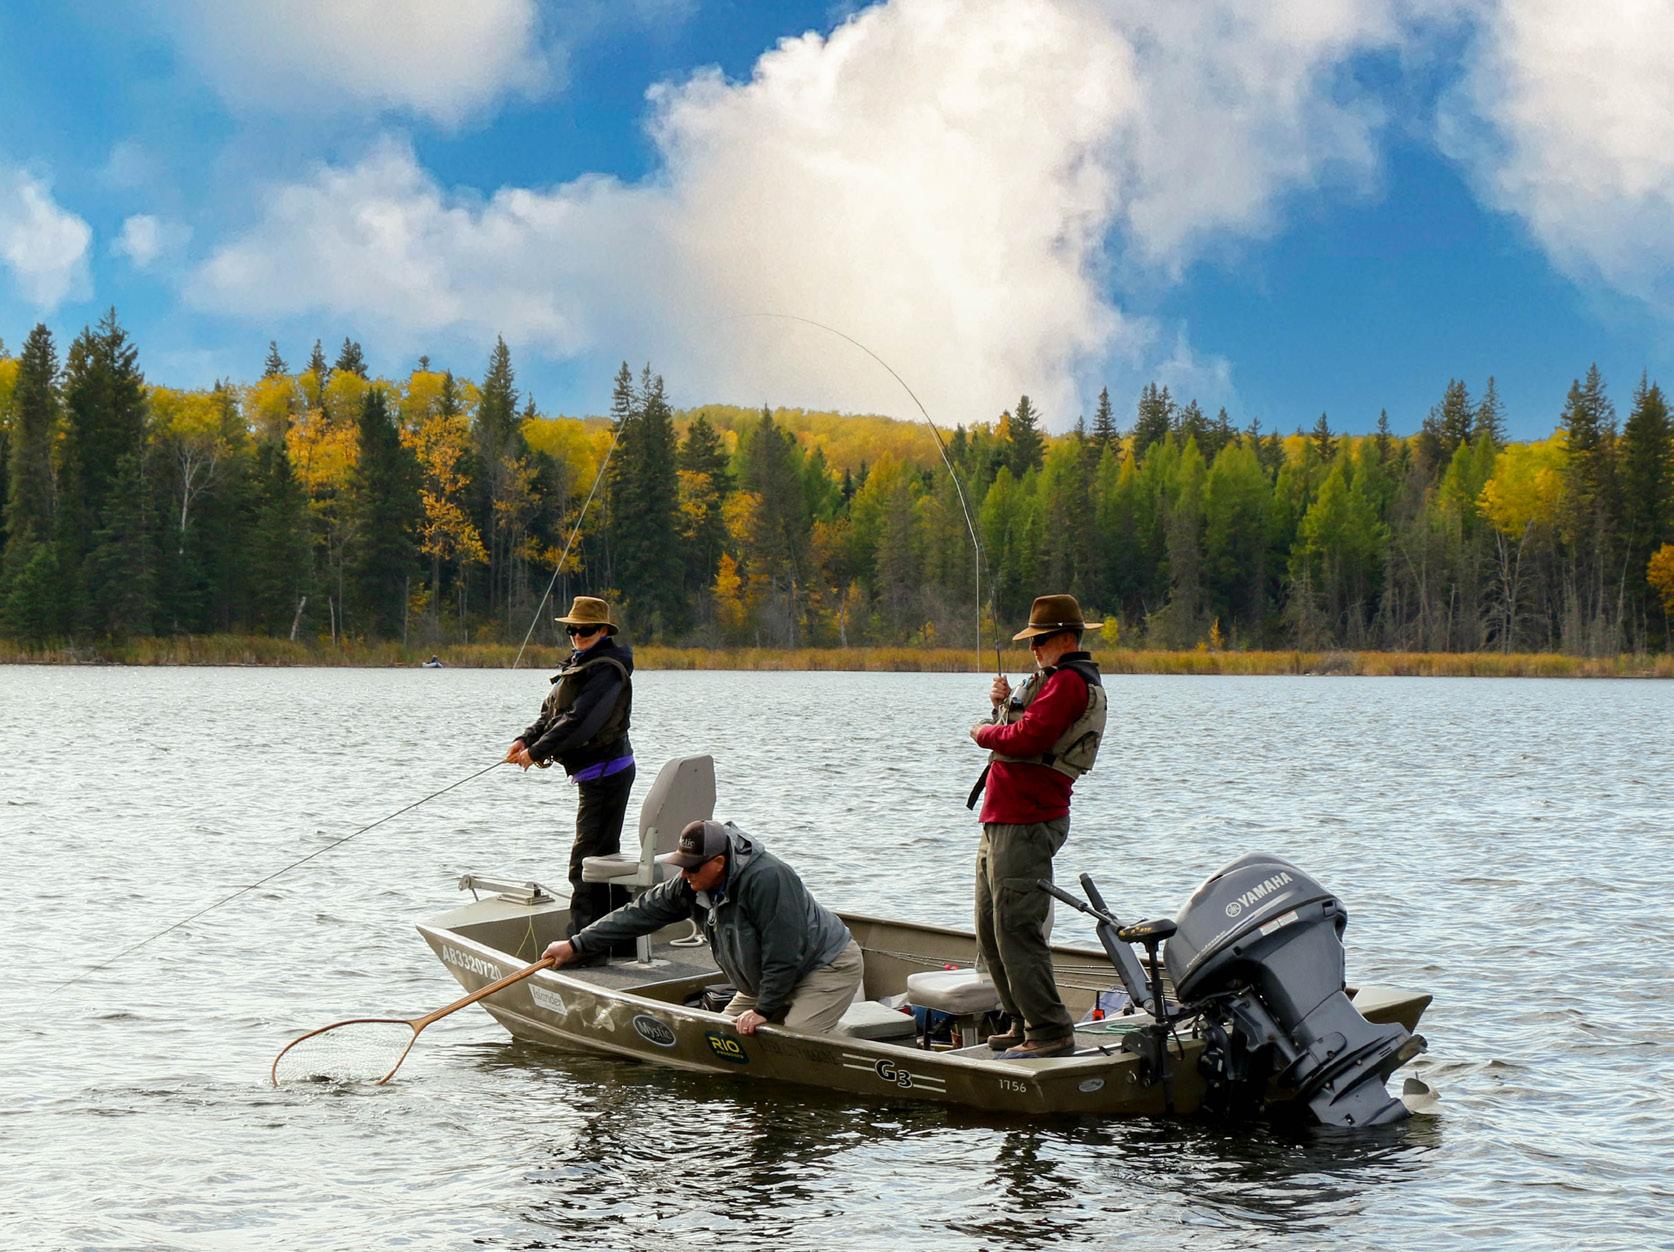
Cover: Bob Vanderwater

7 Contents Contents Chironomids ASB #3 12 Blind Eye Charlie .......... 15 Clear Water Pupa 18 The Collaborator 22 The Enabler 25 Green Back Pheasant 28 Holo Worm ................... 32 Static Interference 35 The Swindler .................. 38 The Copper Chromie 41 Traffic Light Buzzer ........ 44 Biot-Bodied Para Pupa 48 Bristol Hopper 52 Scuds The Crystal Scud 58 Humped-Back Spawner 61 Damselflies Pearly Damsel 66 Strip Tease Damsel 69 Leeches Tri-Lobal Leech ............... 74 The Boogie Man ............ 77 Waste Troll Leech ........... 80 DDH Leech 84 Slough Special 87 Water Boatmen LR Boatman .................... 92 Dragonflies The Fly Fur Dragon ........ 98 Gomphus 101 LR Dragon ...................... 104 Peacock Carey Special 109 King’s Foam Dragon ...... 112 Fly Craft Fullback 116 Mayflies (Callibaetis) Callibaetis Flymph 122 Tail End Charlie 126 Stillwater Callibaetis 130 Attractors Jelly Biscuit FAB 136 Jelly Mop (Wotsit) 139 Pink Dancer 142 Tequila Blob ................... 145 Winged Booby 148

Foreword
I consider myself fortunate to have been the fly-tying columnist for BC Outdoors magazine for over 17 years. I completed my first column in 2005. Within each year, there are at least six columns. Since my initial column, I have featured over 90 different fly patterns
As I began the planning process for this book, we originally considered squeezing every column into a single volume. However, it soon became apparent that there was too much content for a single book. To provide the appropriate space each pattern deserved, I decided to break these columns down into two main categories: lakes and rivers and streams. This book, focused on stillwater fly patterns, is the first in hopefully a series of books featuring all my tying columns.
A primary aspect of each column is to focus on a specific tying challenge or material. The featured fly illustrated how to manage the tying challenge or the material.
On occasion, I also featured specific patterns that might be of interest to readers. Most of these were long-time favourites, such as the Carey Special, Woolly Bugger or Gomphus. patterns with their unique tying challenges, with the added benefit of being cornerstone stillwater patterns.
For the most part, each pattern narrative and recipe remained intact from their original. I also wanted to feature patterns from tyers other than myself. As there are so many creative tyers all working to solve the same presentation challenges, I felt it would be completely selfish to focus on my patterns.
Fly tying is always in a constant state of flux and evolution. Materials come and go, and innovative tyers develop new or different techniques. You can decide to tie these patterns as they were initially portrayed or modify them to suit your tying style or materials palette. Either way, you will still have a fly box full of excellent patterns that will produce on any stillwater or solve any presentation challenge. Please add these patterns to your stillwater fly box as I have. You won’t be disappointed.
Phil Rowley
Bob Vanderwater
9
Foreword
10
Chironomids

11
Chironomids
John Kent has developed a reputation as an innovative fly tyer, and the skill Kent demonstrates doesn’t happen by accident. Kent is particular about the materials he chooses and the way he uses them.
When it comes to chironomid pupa patterns, tying thread is not created equal. A tying thread that lays flat allows minimal securing wraps to create smooth, thin flies -- an essential chironomid pupa pattern feature required to fool fussy, educated trout. For his tying needs, Kent prefers UTC 70 thread.

Each wrap twists the thread. Twisted threads increase bulk, making it challenging to obtain the slender, tapered look chironomid pupa patterns require. If you are right-handed and using a flat profile thread, you can remove thread twist at any point during the tying process by spinning the bobbin counter-
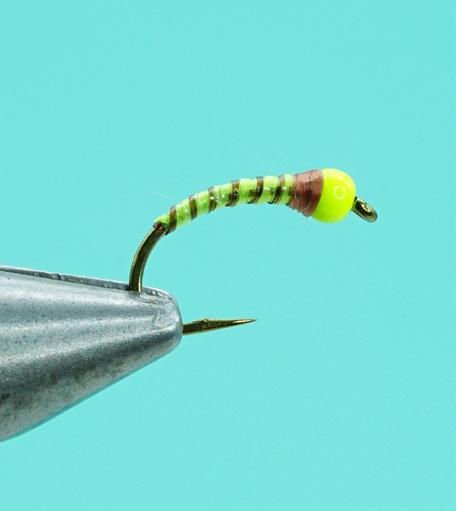
Designed By John Kent
ASB #3
clockwise when viewed from above. Flat threads can also be corded tight to increase thread strength by spinning the bobbin clockwise.
Kent realized that a slender, natural taper was one of the critical traits common to all successful chironomid pupa patterns. To build up a consistent taper, Kent forms an underbody over the front third of the hook shank using tying thread or Uni-Stretch on larger patterns. Under thread tension, Uni-Stretch compresses, reducing bulk, making it an excellent chironomid gill material. Brass or tungsten beads slide over the gill tie-in area without risk or worry.
After sliding the bead onto the shank, narrow end towards the hook eye, Kent attaches the tying thread behind the bead, winding it back to the midpoint of the shank.
Small-diametre beads also
reduce underbody bulk, as it takes less material to expand to the outside diametre of the hole at the rear of the bead.
Kent is a big fan of contrasting ribs, wire or wire and Mylar. Double ribs are tied in together, so they behave as though they were one.
A body is only as smooth as the foundation below. Before winding the body and rib forward, fill any valleys with tying thread. To maintain the thin profile chironomid pupa patterns dictate, keep your thread wraps to a minimum. In our conversations, Kent stressed that every thread wrap has a purpose when he ties.
After tying off wire ribbing, break it using a pulling and twisting motion. This technique prolongs the scissors’ life, eliminates unnecessary thread wraps to cover exposed wire and avoids breaking thread on the sharp ends of the wire. Placing your
12
Chironomids
thumbnail at the tie-off point and pinching the fly expedites the break-off.
As with many tiers, Kent prefers the simplicity of a thread thorax that slopes gently onto the rear of the bead.
Kent uses a variety of gill styles for his beadhead pupa patterns. White beads and beads combined with yarn or Uni-Stretch gills are standard. Another gill option Kent prefers involves applying a small circular dab of white fabric paint to the top of the bead.
With practice and discipline, you can fill your fly boxes with a myriad of realistic, tapered chironomid pupa patterns.


Tying Instructions
Tying Note: Coat the finished fly, including the bead with brushable superglue, Sally Hansen’s Hard As Nails nail polish or a UV cure resin.
Materials
Hook:
Daiichi 1120 or equivalent, #8 to #14
Thread:
70 Denier UTC, black
Underbody
(optional):
White Uni-Stretch
Body:
Anti-static bag
Rib #1:
UTC x-small black wire
Rib #2:
UTC x-small red wire
Thorax:
Tying thread
Bead:
Black tungsten
Gills:
Tulip white fabric paint
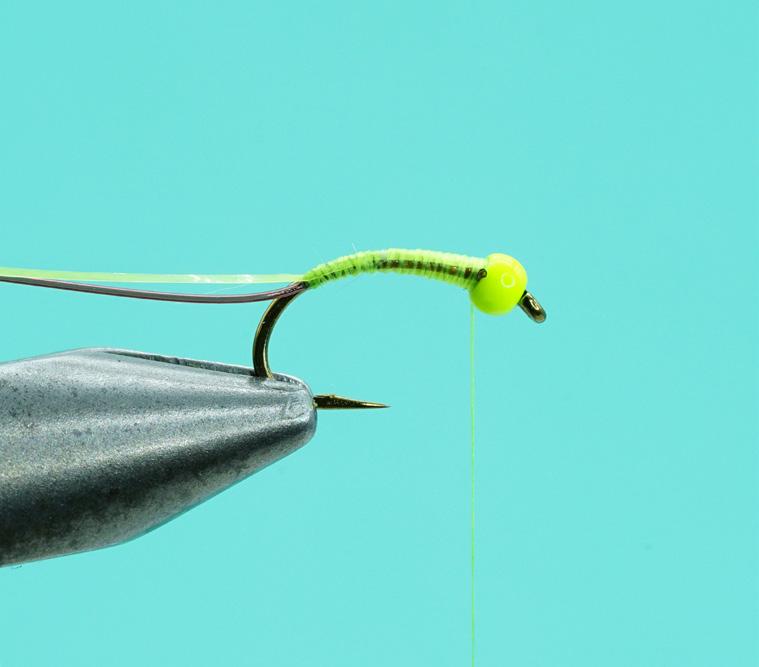
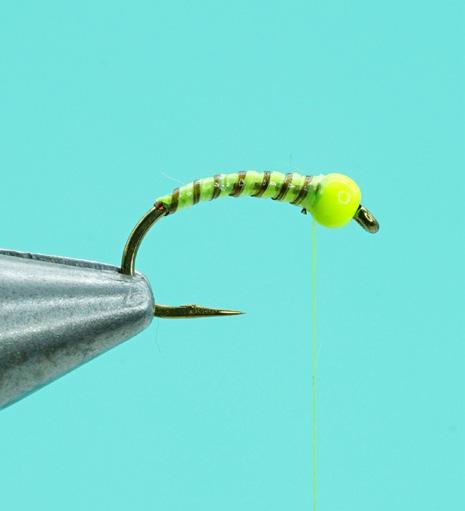
Slide a tapered black tungsten bead onto the de-barbed hook with the narrow end of the bead facing the hook eye. Using white Uni-Stretch on a bobbin, build an underbody over the front third of the shank. The finished taper of the front portion of the underbody should be same diametre as the hole of the tapered bead. As you build the underbody, remember to twist the bobbin as necessary to ensure Uni-Stretch lays flat. Attach the tying thread directly behind the bead and tie off the Uni-Stretch. Remove the excess Uni-Stretch.
1 2
Tie in the wire ribbing together directly behind the bead, along the underside of the shank. Secure both ribs down the underside of the shank into hook bend mark using closetouching turns.
13
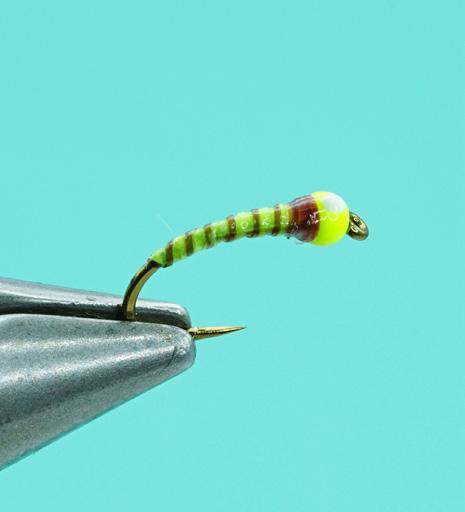
Trim one end of a .5-millimetre anti-static bag strip to a tapered point. Secure the anti-static body material by the point and bind it back to the bend. Using minimal flat wraps, wind the tying thread forward to the rear of the bead. Fill in any valleys along the way to ensure a smooth, tapered underbody foundation.
Form the body by winding the anti-static strip forward to the rear of the bead using close-touching turns. Tie off the body material at the rear of the bead and remove the excess.

Stroke both strands of the wiring ribbing together and wind forward using open turns to the rear of the bead. Use your thumbnail or scissors points to try and keep the wire strands laying against each other. Tie off the wire strands. Using a pulling and twisting motion, break away the excess


Spin the bobbin to remove any thread twist. Build a gradual neat, tapered thread thorax behind the bead. The finished thread thorax should be the same diameter as the outside wall of the bead and extend no further back onto the body than the length of the bead. Form a three-turn whip finish and remove the tying thread.

Add a drop of white fabric paint to the top of the bead. Once the fabric paint is dry, coat the body and bead using brushable superglue, nail polish or UV cure resin.

14 5
7 3 4
6
When trout are fixated on chironomids, trying to replicate or match the emerging pupa through pattern choice and presentation technique is the standard course of action. But what happens when this matchthe-hatch mantra isn’t working? Many fly fishers try smaller imitative patterns, shuffle through colour variations or choose flies with slender, natural profiles with little to show for the effort. Trout are feeding, so what’s the next option?

There are times when coming from the other end of the spectrum works unbelievably well. Exaggeration can be the key to success.
There are four main ways I exaggerate my chironomid pupa patterns: colour, size, pattern mobility and presentation.
Colour exaggerations focus on loud, perhaps even obnoxious, choices. John Kent’s flashy attractor-style chironomid pupa
Designed By John Kent Chironomids
Blind Eye Charlie
patterns, such as his Blind Eye Charlie, take advantage of this form of exaggeration. Kent integrates holographic Mylar and Flashabou with Mirage Opal Mylar or Flashabou into the bodies and ribbing on some of his best attractor patterns. These materials catch and reflect light, attracting fish from a distance. Fluorescent colours are another option, and fluorescent chartreuse and pink beads are also worth trying. Glo Brite floss provides subtle fluorescence when used for thoraxes, wing pads or butts. Flies incorporating fluorescent colours stand out in a crowd, remaining visible at depth.
Exaggerating size is another worthwhile tactic. Perhaps the perceived reward of a large, tasty pupa will be too much for foraging trout to pass up.
The main philosophy when using attractor patterns is having your fly stand out in a crowd, so it triggers a response. Besides
colour and size, pattern mobility is another consideration. Blending natural movement into the fly to suggest life also works at times. Slender marabou tails on chironomid pupa or long, gangly stretch floss legs on bloodworm patterns are two of my favourite options. Mobile patterns suspended under an indicator come to life, animated by the surface chop against the indicator. The indicator’s bouncing motion transfers to the fly via the leader and tippet, providing a powerful trigger to otherwise closemouthed trout.
Presentation technique also factors into the exaggeration equation. Although not a tying technique, proper presentation is the key to any fly, regardless of pattern style, size or type. When it comes to chironomids, most presentation techniques are slow, matching the almost stagnant motion of the natural pupa. At times, a brazen approach is
15
Tying Instructions
more appropriate. When using strike indicators, rather than the usual snail-paced hand twist or letting the fly hang static, use a deliberate, aggressive six to 12inch strip. The rapid strip raises the fly, and the post-strip pause allows it to flutter and settle to its original position.
This motion contrast draws the attention of nearby trout, often triggering a response. Watch for confident takes as soon as the indicator stops and the fly starts to settle.

Although using attractor-style chironomid patterns and presentation techniques doesn’t always work, it is an option worth trying when all other approaches have failed. You can use the four methods of exaggeration I have listed individually, combined in part or blended together. Experiment until you find a combination that works.
Materials
Hook:
Daiichi 1120 or equivalent, #8 to #16
Thread:
8/0 or 70 Denier, chartreuse
Underbody:
Uni-Stretch, white
Body:
Mini Flat Braid or Glacier
Flash, chartreuse
Rib:
Stretch tubing micro, rust brown or black
Thorax: 8/0 or 70 Denier tying
thread, rust brown
Gills:
Fabric paint, white
Bead:
Chartreuse, brass or tungsten
Slide the bead onto the hook, narrow end towards the hook eye. Using white Uni-Stretch, form a neat, tapered underbody over the front half of the shank. Leave the tag end of the UniStretch trailing along the top of the hook. When the underbody is complete, leave the Uni-Stretch hanging at the rear of the bead.
Using open spiral wraps, wind the ribbing forward seven times. Tie off and remove the excess ribbing material.

16
1 4
Tying Note: White Uni-Floss or Uni-Stretch can be used to suggest the gills as opposed to white fabric paint.

Attach the tying thread just behind the bead. Use the tying thread to tie off the Uni-Stretch. Cover the underbody and remove the tag end of the thread and the remaining tag end of the Uni-Stretch. Cover the balance of the hook with tying thread. Bring the tying thread back up to the rear of the bead. Tie in the ribbing material along the near side of the hook and secure down into the bend. As you secure the ribbing down the shank, stretch it to reduce bulk.
Tie in the body material at the rear of the hook. Use only two strands of Glacier Flash. If you are using Flat Braid, fray the ends of the body material. To maintain a slim, slender body, isolate and remove four strands of the Flat Braid by pulling one strand at a time, leaving you with five strands. 5 6 7
Wind the body material forward, navigating it between the ribbing to create a neat slender body. Tie off and trim the excess body material
Using rust brown tying thread tie off and remove the chartreuse thread. Build a tapered thread thorax directly behind the bead. The finished thorax should extend no further back than the width of the bead. Whip finish and remove the tying thread.
Coat the body with brushable superglue. Once the glue has dried, add a finish coating of thin UV resin or two coats of nail polish. Form the gills by placing a small, neat dab of white fabric paint on the top of the bead.
17
2 3
