
EN 01 | ES 12 | FR 23 | IT 34 | DE 45 QUICKSTARTHYDRORISEGUIDE2022

RISE HYDRO 20222 | ORBEA QUICKSTART GUIDE ORBEA |EN3 This Quickstart guide is not the complete Rise Hydro manual nor the General User Manual for Orbea bicycles. You can download the complete Rise Hydro Blue Paper technical manual from our website to access all the relevant information about the use and care of Rise and its components, as well as infomation about spare parts, apps, warranty terms and important components care and main tenance advice, which will allow you to enjoy your Rise to its full potential for a long Accesstime.the 2022 Rise Hydro Blue Paper on our website: Orbea.com > Support > Manuals > Ebike > Bluepaper Rise Hydro 2022 Or scan the QR code to access the Bluepaper technical manual directly: LANGUAGES To read the latest version of this quickstart guide in more languages, you can download a digital version from Or bea´s website: Orbea.com > Support > Manuals > Ebike > Quickstart guide Rise Hydro 2022. Or scan the QR code below to access the digital version directly: COMPATIBILITY NOTE None of the Orbea RS electric system components on Rise Hydro 2022 (internal battery, Range Extender, Smart Charger or cabling) are compatible with Rise Car bon 2021-2022 models. None of the Orbea RS electric system components on Rise Carbon 2021-2022 (internal battery, Range Extend er, charger or cabling) are compatible with Rise Hydro 2022 models. NOTICEIMPORTANT Charge the internal battery and/or the Range Extender completely before using them for the first time. Charge the internal battery and/or the Range Extender as soon as you receive it. If you are not going to use the bike or the Range Extender, make sure the batteries are charged to at least 50% of their capacity every 3 months. QUICKSTART GUIDE CONTENTS 01 TURNING RISE ON/OFF 04 02 CHANGE BETWEEN ASSIST MODES 05 03 CHARGING THE BATTERY 06 04 CHECKING THE BATTERY LEVEL 07 05 SHIMANO ETUBE PROJECT APP. CUSTOMIZE YOUR RISE 08 06 ORBEA RS TOOLBOX. DATA FIELD FOR GARMIN COMPATIBLE UNITS 10 07 EXTERNAL BATTERY RS RANGE EXTENDER 16


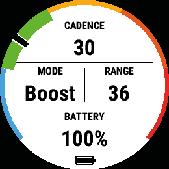
When changing the assist mode, the current mode will be visible on the Shimano EW-EN100 junction (assemblies without display), on the Shimano display and/or your com patible Garmin unit with the Orbea RS Toolbox data field installed and connected to Rise. Read the Orbea RS Toolbox section of this guide and the Rise Hydro Bluepaper to download, unlock and install Or bea RS Toolbox on your compatible device.
Garmin
(Off).
02 CHANGE BETWEEN ASSIST MODES
Press the buttons of the Shimano handlebar remote switch to change between assist to increa se the assist mode up to the maximum available (Boost). to decrease the assist mode down to the No-Assist mode
RISE HYDRO 20224 | ORBEA 3 sec. OFF WALK &ReleaseHoldY 1 sec. YX OFF > ECO > TRAIL > BOOST BOOST > TRAIL > ECO > OFF LED 2 BOOSTOFFECOTRAIL TOOLBOXORBEADISPLAYSHIMANOEW-WN100SHIMANORS 3 sec. OFF QUICKSTART GUIDE ORBEA |EN5 TO TURN RISE H ON Press the power button on the lower part of the frame once. TO SWITCH RISE H OFF Press and hold for 3 seconds the power button on the lower part of the frame until the button´s light fades off. 01 TURNING RISE ON/OFF WALK ASISST
X or Y
modes. Press X
Press Y
CURRENT ASSIST MODE DISPLAY
Y
Release the Y button and press it again to engage Walk Assist. The system will help you push the bike along as long as the Y button is pressed.
To activate Walk Assist, press the handlebar remote lever switch button for 1 second until the word WALK appears on the Shimano display or the LED2 of the EN100 junction shows a dark blue light.


Turn the bicycle on. The Shimano EW-EN100 junction will show in the LED1 the remaining battery charge of the battery(ies). The LED1 will display a green light until the battery charge is below 21%, after which the LED1 will show a red light. When the battery is almost depleted, the LED1 will blink in red.
RISE HYDRO 20226 | ORBEA 100%4321 ERROR! 100% - 21% 20% or less depletedAlmost LED 1 100% - 81% 80% - 61% 60% - 41% 40% - 21% 20% - 1% 0% QUICKSTART GUIDE ORBEA | EN7 03 CHARGING THE INTERNAL BATTERY
The charger´s body LED will turn blue for 2 seconds and then it will start fading in and out cyclically until the battery is completely charged.
3. When the battery is fully charged, the charger´s body LED will light in blue permanently.
WITH SHIMANO EW-EN100 JUNTION
2. Open the bicycle charging port cover and connect the charger aligning the connector correctly. The arrow on the charger connector must be aligned with the top part of the charging port.
4. Disconnect the charger from the bicycle´s charging port carefully pulling from the charger´s connector. Make sure the charging port´s cover is correctly closed. While the charger is connected to Rise, the bicycle can not be powered on. Disconnect the charger from the bike and turn the bike on to check the current battery level if you could not charge the battery completely.
Read how to download and install the Orbea RS Toolbox data field on your compatible Garmin unit in the dedicated section of this manual.
WITH SHIMANO DISPLAYS
04 CHECKING THE BATTERY LEVEL
Turn the bicycle on. On assemblies with the Shimano displays, the battery(ies) charge level will be shown on the screen. COMPATIBLE GARMIN UNITS. ORBEA RS TOOLBOX
1. Plug the RS Smart Charger to the mains outlet. With the charger not being connected to the bicycle, the LED on the charger´s body will blink in blue.
If the charger´s LED lights in red when con necting the charger to the outlet or during the charging process, there is a charging anomaly. Immediately disconnect the charger and read the charger troubleshooting method in the Rise H Bluepaper technical manual. If the pro blem persists, contact an authorized dealer. Before using the internal battery or the Range Extender for the first time, completely charge the batteries. Charge the internal battery and/or the Range Extender as soon as you receive it. If you are not going to use the bike or the Range Extender, make sure the batteries are charged to at least 50% of their capacity every 3 months.
Turn you compatible Garmin unit (having previously down loaded and installed Orbea RS Toolbox on it) and navigate to the RS Toolbox field. Then turn the bicycle on to see the current battery level. If the battery level is not displayed on Toolbox, switch the bicycle off and on again to reset the connection.


Using the Shimano Etube Project Cyclist app for smart phones, you can customize the EP8 RS system to adjust Rise to your needs. Every assist mode can be modified to deliver the exact power for your riding style. Download the Shimano Etube Project Cyclist app from Apple Store or Google Play.
CUSTOMIZE YOUR RISE
The EP8 motor also allows the selection of two different assist profiles. Within each profile, the power output of each assist mode can be modified to achieve the power that you need in every situation.
The assist profile 1 is designed for activities with less steep climbing, slightly reducing the power delivery for a greater available range.
When an error or warning is detected in the system, both LEDs on the Shimano EW-EN100 junction will blink in red. In assemblies with a Shimano display, the error code will be shown on the screen. You can connect your bicycle to the Etube Project app to know the error or warning code and its troubleshooting procedure. Turn the bicycle Off and On again and connect it to the app. The error code and the troubleshooting procedure will be shown in the section Maintenance>Error Log.
the complete Etube Project app manual on Shimano´s website. Etube Project also lets you customize the remote levers buttons, view error reports, update the components firmware, amongst other functions. Read the complete app manual here: https://si.shimano.com/#/en/iUM/7J4MA
You can also read on how to change the assist profiles and modify the assist modes on the Rise Hydro Blue Paper technical manual.
SWITCHING BETWEEN ASSIST PROFILES
SYSTEM WARNINGS AND ERRORS
The assist profile 2 is designed for more demanding activ ities and steeper climbs, delivering more power from the Consultmotor.
On Rise models without a Shimano display, you will need to connect your bicycle to the Etube Project app to select your current assist profile. On models equipped with a Shimano display, you can select the assist profile through the display, although to customize the assist modes you will need to connect your bicycle to the Etube Project app.
RISE HYDRO 20228 | ORBEA BOOST W101 QUICKSTART GUIDE ORBEA |EN9 05 SHIMANO ETUBE PROJECT APP.


3. Select “Data Fields”.
Your bicycle’s barcode is an 11-digit code you will find on the bicycle’s frame:
2. Select “Activities and App Management”.
5. Search “Orbea RS Toolbox” in the Garmin IQ Store. Select Unlock Orbea RS Toolbox. If you cannot see the app Orbea RS Toolbox in the IQ Store, your device is not compatible with the app. We are working to include new devices every day, contact Orbea if you need more information.
Watch the video on how to install and configure Orbea RS Toolbox on Garmin devices: www.youtube.com/watch?v=F-4lUxxOuFs Or scan the QR code below to access the video directly: INSTALL AND UNLOCK ORBEA RS TOOLBOX ON GARMIN DEVICES.
The following method describes how to install and unlock Orbea RS Toolbox on your Garmin device using the smartphone app Garmin Connect through a Bluetooth connection. You can use the same proce dure on your PC or Mac using Garmin Ex press, connecting your device to your com puter using an USB cable. To unlock Orbea RS Toolbox on your Garmin device, you must have registered your new Rise’s barcode on Orbea’s website, which also lets you enjoy the Life Warranty on your new frame. Go to Orbea’s website and regis ter your bike’s barcode, creating an account first if you do not have one yet. www.orbea.com/es-es/access-register Consult the complete Orbea RS Toolbox data field manual on the Rise Hydro Blue Paper technical manual from Orbea´s website.
1. After you have registered your Rise on Orbea´s website, open the Garmin Connect app on your smartphone and connect your device via Bluetooth. You can download and install Garmin Connect from Google Play or Apple Store.
4. Select “Get More Data Fields”.
GARMIN CONNECT APP Orbea RS Toolbox is an app for Garmin compatible devi ces exclusive for Rise owners. It is added to your Garmin device as a data field and allows you to access relevant information of your Rise while riding.
RISE HYDRO 202210 | ORBEA 21 543 QUICKSTART GUIDE ORBEA |EN11 06 ORBEA RS TOOLBOX. DATA FIELD FOR GARMIN COMPATIBLE UNITS


RISE HYDRO 202212 | ORBEA QUICKSTART GUIDE ORBEA | EN13
11. Go to “Activities and App Management > Data Fields” You will see Orbea Toolbox installed on your device. If Toolbox is visible but it is not installed, synchronize your device.
9. Go back to Garmin Connect on your phone. You will notice that the Unlock button is still visible on the Orbea RS Toolbox screen. Type again Orbea RS Toolbox on the search field of Garmin Connect and select Toolbox. Now the Unlock button will have disappeared and only the Download button will be visible. Download Orbea RS Toolbox. A message will inform you that the app will be installed the next time you synchronize your device.
10. Go to Garmin Connect on your smartphone and syn chronize your Garmin device with the app.
6. A message will inform you that you are about to leave the IQ Store. Accept to be redirected to Orbea´s activa tion website. 7. Input your login details to your Orbea account.
8. If you had already registered your Rise barcode, a message will inform you that your Garmin device has been unlocked.
In some watch models and series 30 Edge units, the ecosystem of the IQ Store that you will be sent to from Con nect in order to search for RS Toolbox will only show the Install button. In this case, download RS Toolbox and go back to Connect and synchronize your device. Then select Data Fields > Orbea RS Toolbox and choose “ See in Store” The screen you will be taken to will now show the Unlock button. Follow the unlock process from step 5 of this section. If once you have finished it is not possible to visualize. Toolbox on your device, uninstall Toolbox from Garmin Connect and start again the installation process, select ing “See in Store” once you have installed Toolbox (this could happen because the unlocking process for the first download did not work).


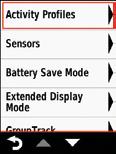
ENABLING ORBEA RS TOOLBOX IN YOUR DEVICE* After downloading and unlocking Toolbox through Garmin Express (PC or Mac) or Garmin Connect (smartphones) and synchronizing your Garmin unit, activate the visuali zation of the data fields in your device.
1. Turn on your bicycle and the unit you have installed Orbea RS Toolbox on, they will pair automatically.
Garmin watches
Garmin watches Garmin Edge units
2. Access Activity Profiles from the Setting menu in your device and choose the profile you want to use your bi cycle with.
3. Select “Data Fields” and the page of the activity profile on which you want to see the data from your bicycle. Enable the data page and choose to see one data field on the page.
Garmin watches
5. With the bicycle turned on, access the activity profile on which you selected to see the data from Toolbox or start recording an activity on this profile with your Garmin unit. Navigate to the page you selected to see Toolbox on to access the real-time data from your bicycle. Garmin Edge units
RISE HYDRO 202214 | ORBEA QUICKSTART GUIDE ORBEA | EN15
Garmin watches Orbea RS Toolbox is not compatible with the use of the Garmin Edge Shima no STEPS native app on Edge 530, 830, 1030, and 1030 Plus devices. Disconnect or delete your bicycle from the sensors list of your Edge unit before trying to connect Orbea RS Toolbox.
Garmin Edge units
Below is shown the method to see the Toolbox data field on both Garmin Edge and watches compatible units.
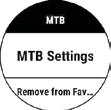
Scroll through the data to be seen on the screen. Select Connect IQ and choose Orbea RS Toolbox.
Garmin Edge units
4.
If you had not turned on your bicycle before setting up Toolbox on your device, the unit will show the message “Searching…” after selecting the Orbea RS Toolbox data field. When you turn on your bicycle and access the page where you chose to see Toolbox, the data from your bicycle will be visible.
* Read more about Orbea RS Toolbox data field manual on the Rise Hydro Blue Paper technical manual from Orbea´s website.


3. Turn the cable´s safety tabs clockwise to lock the cable in place. To disconnect the Range Extender cable or to remove the Range Extender from the bicycle to charge it, turn first the cable´s safety tabs and carefully pull from the cable´s connector.
RANGE EXTENDER ASSEMBLY
CONNECTING THE RANGE EXTENDER TO RISE HYDRO
2. When installing the Range Extender holder, remove the four washers pre-installed on the frame and make sure that, once installed, the Range Extender´s six contact points rest correctly against the downtube.
1. Turn the safety tabs of the Range Extender cable coun ter-clockwise before connecting it to the battery.
RISE HYDRO 202216 | ORBEA 3 5 N.m x6321 31 2 2 13 QUICKSTART GUIDE ORBEA | EN17 07 EXTERNAL BATTERY RS
2. Connect the cable to the Range Extender charging port. Open the bicycle charging port and connect the Range Extender cable.
RANGE EXTENDER
3. Install the Range Extender into the mount and secure it with the side o-ring. The Range Extender bottle holder is compatible with standard bottles when the Range Extender is not installed.
If Rise was On when connecting the Range Extender to the bicycle, the system will turn itself Off and you will need to turn Rise On again by pressing the power button. This hap pens so the system can reboot and recognize the Range Extender as part of the power sys tem when Rise is turned On again. If you were recording an activity with Garmin Connect using Orbea RS Toolbox, this will have no effect on the data recorded in the activity. The Rise data will keep registering when you start using Rise again. Once you turn Rise on, the Range Extender will be op erative. It is not necessary to turn the Range Extender On. If the Range Extender is disconnected when the bicycle is On, the bicycle will turn itself Off and it will be necessary to turn the bicy cle back on. This happens so the system can reboot and recognize the internal battery as the only current power supply.
If Rise was On when connecting the Range Extender to the bicycle, the system will turn itself Off and you will need to turn Rise On again by pressing the power button. This happens so the system can reboot and recognize the Range Extender as part of the power system when Rise is turned On again. If you were recording an activity with Garmin Connect using Orbea RS Toolbox, this will have no effect on the data recorded in the activity. The Rise data will keep registering when you start using Rise again. Once you turn Rise on, the Range Extender will be operative. It is not necessary to turn the Range Extender On. If the Range Extender is disconnected when the bicycle is On, the bicycle will turn itself Off and it will be necessary to turn the bicy cle back on. This happens so the system can reboot and recognize the internal battery as the only current power supply.
1. Install the Range Extender dedicated mount onto the downtube and fix it in place with the original bolts with a recommended torque setting of 5 Nm.
4. When the battery is fully charged, the charger´s body LED will light in blue permanently. Disconnect the charger from the charging port by carefully pulling from the charger connector. If the charger´s LED lights in red when con necting the charger to the outlet or during the charging process, there is a charging anomaly. Immediately disconnect the charg er and read the charger troubleshooting method in the Rise H Bluepaper technical manual. If the problem persists, contact an authorized dealer.
CHARGING THE RANGE EXTENDER
2. Disconnect the Range Extender connection cable to the bicycle charging port (in case it is connected) by turning counterclockwise the cable safety tabs first and careful ly pulling from the cable.
RISE HYDRO 202218 | ORBEA 100% 2431 QUICKSTART GUIDE ORBEA | EN19
1. To charge the Range Extender, plug the RS charger to the mains outlet. With the Range Extender not being connected to the charger, the LED on the charger´s body will blink in blue.
OPERATION OF THE RANGE EXTENDER
STANDALONE RANGE EXTENDER BATTERY LEVEL Press once the Range Extender main button to know the current charge level. The LEDs will show the current charge level in 25% incre ments from right to left for 5 seconds. When the Range Extender is connected to the bicycle and its charge is depleted, the system will show, by means of the available methods (displays, junction or RS Toolbox) the available charge in the internal battery only, accounting for the capacity of the internal battery alone and not the internal battery and the Range Extender sys tem total capacity.
The Range Extender powers the EP8 RS motor directly. When using Rise with a Range Extender connected to the system, the motor will only draw power from the Range Extender until the Range Extender is depleted. When there is no charge left in the Range Extender, the internal battery will start powering the motor if it had any charge left.
3. Connect the charger to the Range Extender correctly aligning the connector pins with those of the Range Ex tender´s charging port. The charger´s body LED will turn blue for 2 seconds and then it will start fading in and out cyclically until the battery is completely charged.
BATTERY LEVEL VISUALIZATION
COMBINED BATTERY LEVEL When a Range Extender is connected to Rise, the system calculates the total capacity of both the Range Extend er and the internal battery (792 Wh) and the remaining battery level information for the system will take into ac count the charge left on both batteries out of the total 792 Wh capacity. The combined charge level will be visible trough the Shimano juntion or display or the Orbea RS Toolbox data field for compatible Garmin devices.
While the Range Extender is being charged, the charge indicator LEDs will show the current battery level. The blinking LED shows the range (in 25% increments) that is currently being charged.


RISE HYDRO 202220 | ORBEA ORBEA | 21QUICKSTART GUIDE EN21

EN 01 | ES 12 | FR 23 | IT 34 | DE 45 GUÍA HYDRORISERÁPIDA2022
O
01 ENCENDIDO/APAGADO DE RISE 24 02 CAMBIO DE MODO DE ASISTENCIA 25 03 CARGAR LA BATERÍA 26 04 COMPROBAR EL NIVEL DE CARGA 27 05 SHIMANO ETUBE PROJECT APP. PERSONALIZA TU RISE 28 06 ORBEA RS APLICACIÓNTOOLBOX.PARADISPOSITIVOS GARMIN 30 07 BATERÍA EXTERNA RS RANGE EXTENDER 36 DECONTENIDOSLAGUÍARÁPIDA
RISE HYDRO 20222 | ORBEA GUÍA RÁPIDA ORBEA |ES3
Orbea.com > Support > Manuals > Ebike >
IDIOMAS Para
guide
directamente:
AVISO
Esta Rápida es el manual completo de Rise ni el Manual de Usuario de las bicicletas Orbea. Consulta el manual técnico completo Blue Paper de Rise Hydro en nuestra web para acceder a toda la información sobre el uso y cui dados de Rise y sus componentes, repuestos, aplicaciones, condiciones de garantía, e información sobre cuidados y mantenimiento de los componentes, que te permitirán conocer a fondo tu Rise y su mantenimiento para sacarle todo el rendimiento y disfrutar mucho tiempo de ella. al Blue Paper de Rise a través de nuestra página web: escanea el código QR para visualizar el Bluepaper directamente: leer la versión más actualizada de esta guía en más idiomas, visita nuestra página web: Quickstart Rise Hydro 2022 escanea el código QR a continuación para visualizar la versión digital AVISO DE COMPATIBILIDAD Ninguno de los componentes del sistema eléctrico Orbea RS de Rise Hydro 2022 (batería interna, Range Extender, cargador o cableado) son compatibles con modelos Rise Carbon Ninguno2021-2022.deloscomponentes del sistema eléctrico Orbea RS de Rise Carbon 2021-2022 (batería interna, Range Extender, cargador o cableado) son compatibles con mo delos Rise Hydro 2022.
Orbea.com > Soporte > Manuales > Ebike > Bluepaper Rise Hydro 2022 O
Accede
Guía
no
IMPORTANTEAVISO Carga completamente la batería interna y/o el Range Extender antes de utilizar la bicicleta por primera vez. Carga la batería interna y/o el Range Extender tan pronto como los recibas. Si no vas a usar la bicicleta o el Range Extender, asegúrate de cargar las baterías al menos hasta el 50% de su capacidad cada 3 meses.
RISE HYDRO 20224 | ORBEA 3 sec. OFF WALK &ReleaseHoldY 1 sec. YX OFF > ECO > TRAIL > BOOST BOOST > TRAIL > ECO > OFF LED 2 BOOSTOFFECOTRAIL TOOLBOXORBEADISPLAYSHIMANOEW-WN100SHIMANORS 3 sec. OFF GUÍA RÁPIDA ORBEA |ES5 PARA ENCENDER RISE H
Pulsa los botones X ó Y de la maneta remota del manillar para cambiar de modo de asistencia. Pulsa X para subir el modo de asistencia hasta el máximo disponible (Boost).
01 ENCENDIDO Y APAGADO DE RISE
Pulsa el botón Y para bajar el modo de asistencia hasta el modo sin asistencia al pedaleo (Off).
parte inferior
WALK ASISST
Para activar el modo de asistencia a la marcha a pie en Rise, mantén pulsado durante 1 segundo el botón Y del mando de cambio de nivel de asistencia hasta que aparez ca la palabra WALK en el display o el LED 2 se ilumine en azul oscuro en la centralita EW-EN100.
cuadro. PARA APAGAR
02 CAMBIO DE MODO DE ASISTENCIA
Deja de pulsar el botón Y del mando remoto y vuelve a presionarlo para activar la asistencia a la marcha a pie. Rise mantendrá activada la asistencia a la marcha a pie mientras sigas presionando el botón Y del remoto.
VISUALIZACIÓN DEL MODO DE ASISTENCIA
Pulsa una vez el botón de encendido de la del RISE H
Al cambiar el modo de asistencia, el modo actual será vis ible en la centralita Shimano EW-EN100 (montajes sin dis play), en el display Shimano y/o en un dispositivo Garmin conectado a Rise que tenga instalado el campo de datos Orbea RS Toolbox. Consulta la sección sobre Orbea RS Toolbox de esta guía rápida y el BluePaper de Rise Hydro para descargar, des bloquear e instalar Orbea RS Toolbox en tu unidad Garmin compatible.
Mantén pulsado durante 3 segundos el botón de encendido de la parte inferior del cuadro hasta que la luz del botón de apague.
AVISO AVISO
CON DISPLAYS SHIMANO En montajes con el displays Shimano, el nivel de carga de la(s) batería(s) se mostrará en la pantalla.
04 COMPROBAR EL NIVEL DE CARGA
CON CENTRALITA SHIMANO EW-EN100
4. Desconecta el cargador del puerto de carga de Rise H tirando con cuidado del conector del cargador. Asegú rate de que la tapa del puerto de carga queda correc tamente cerrada.
3. Cuando la batería esté completamente cargada, el LED del cargador volverá a lucir en azul de manera fija.
RISE HYDRO 20226 | ORBEA 100%4321 ERROR! 100% - 21% 20% or less depletedAlmost LED 1 100% - 81% 80% - 61% 60% - 41% 40% - 21% 20% - 1% 0% GUÍA RÁPIDA ORBEA | ES7 03 CARGAR LA BATERÍA
Mientras el cargador esté conectado al puerto de carga, no se podrá encender la bicicleta. Si deseas conocer el porcentaje exacto de carga restante, desconecta el cargador del puerto de carga y enciende la bicicleta si no has podido cargar la batería completamente. Si el LED del cargador luce rojo al conectar el cargador a un enchufe o durante la carga, existe un problema. Desconecta el cargador inmediatamente y consulta la sección de reso lución de errores del cargador en el Bluepaper de Rise Hydro. Si el problema persiste, con tacta con un distribuidor autorizado Orbea.
1. Para cargar la batería interna de Rise, conecta el carga dor a un enchufe. Sin el cargador conectado a la bicicle ta, el LED del cargador parpadeará en azul.
Carga completamente la batería interna y/o el Range Extender antes de utilizar la bicicleta por primera vez. Carga la batería interna y/o el Range Extender tan pronto como los recibas. Si no vas a usar la bicicleta o el Range Extender, asegúrate de cargar las baterías al menos hasta el 50% de su capacidad cada 3 meses.
DISPOSITIVOS GARMIN COMPATIBLES. ORBEA RS TOOLBOX Enciende tu dispositivo Garmin compatible (habiendo des cargado e instalado primero el campo de datos Orbea RS Toolbox en el mismo). Luego enciende la bicicleta para ver el nivel actual de batería. Si el nivel de batería no es visible en RS Toolbox, reinicia la bicicleta para restablecer la conexión.” Consulta cómo descargar e instalar la aplicación Orbea RS Toolbox en tu dispositivo Garmin en la sección específica de este manual.
Con la bicicleta encendida, la centralita Shimano EWEN100 mostrará mediante el LED1 el nivel de carga de la(s) batería(s). El LED1 lucirá en verde hasta que el nivel de carga sea inferior a 21%, tras lo cual el LED1 lucirá en rojo. Cuando la batería esté a punto de agotarse, el LED1 parpadeará en rojo.
2. Abre la tapa del puerto de carga de Rise y conecta el car gador alineando correctamente el conector con el puer to de carga. La flecha del conector del cargador debe estar alineada con la parte superior del punto de carga. El LED del cargador lucirá en azul de manera fija duran te 2 segundos y luego empezará a encenderse y desva necerse gradualmente de manera cíclica hasta que la batería esté completamente cargada.
ERRORES Y ADVERTENCIAS DEL SISTEMA
También puedes consultar cómo modificar los perfiles y modos de asistencia en el Blue Paper de Rise Hydro en la web de Orbea.
En modelos Rise sin display Shimano, necesitarás conec tar tu bicicleta a la aplicación Etube Project para seleccio nar un perfil de asistencia diferente. En modelos equipados con un display Shimano, podrás seleccionar el perfil de asistencia a través del display, pero deberás conectar tu bicicleta a la aplicación para modifi car los modos de asistencia de cada perfil.
El sistema Shimano EP8, a través de la aplicación para smartphones Etube Project Cyclist, permite la personali zación de los niveles de asistencia para que ajustes Rise a tus Descarganecesidades.laaplicación de Apple Store o Google Play. El motor EP8 también permite la selección de dos perfiles de asistencia. Dentro de cada uno de los perfiles, cada nivel de asistencia puede ser modificado para alcanzar el modo de potencia que más se ajusta a tus necesidades. El perfil 1 está diseñado para actividades con un desnivel menos pronunciado, reduciendo la entrega de potencia del motor y alargando la autonomía. El perfil 2 está diseñado para actividades más exigentes con desniveles más pronunciados, aumentando la entrega de potencia de los niveles de asistencia. Puedes consultar el manual completo de la aplicación Etube Project para smartphones en la documentación de Shimano. La aplicación Etube Project pone a tu disposi ción también funciones como la personalización de los controles remotos, generación de informes de errores, actualización de firmware de los componentes, etc. Consulta el manual completo de la aplicación aquí: https://si.shimano.com/#/es/iUM/7J4MA
Cuando se detecta un error o advertencia en el sistema, los LED de la centralita EW-EN100 parpadearán en rojo. En montajes con displays Shimano, el código de error o advertencia se mostrará en la pantalla. Puedes conectar tu bicicleta a Etube Project Cyclist para conocer el código de error y el método de resolución del error. Reinicia la bicicleta y conectala a la aplicación Shimano Etube Project. En la sección Mantenimiento> Error Log podrías ver el error identificado y una solución para dicho error.
RISE HYDRO 20228 | ORBEA BOOST W101 GUÍA RÁPIDA ORBEA |ES9 05 SHIMANO ETUBE PROJECT APP.
PERSONALIZA TU RISE
SELECCIONAR PERFIL DE ASISTENCIA
3. Selecciona “Campos de datos”.
EN
La matrícula de tu bicicleta es un código de 11 dígitos que encontrarás en el cuadro:
2. Selecciona “Actividades y gestión de Aplicaciones”. AVISO Si no puedes ver la aplicación Orbea RS Tool box en la tienda Garmin IQ, tu dispositivo no es compatible con la aplicación. Trabajamos cada día para incluir más dispositivos compa tibles, contacta con Orbea si necesitas más información.
ORBEA
5. Busca en la tienda IQ Store “Orbea RS Toolbox”. Selecciona “Desbloquear” Orbea RS Toolbox.
INSTALACIÓN
O escanea el código QR a continuación para acceder al vídeo directamente: Y DESBLOQUEO DE RS TOOLBOX DISPOSITIVOS CONNECT APP Orbea RS Toolbox es una aplicación para dispositivos Garmin exclusiva para propietarios de bicicletas Orbea con motor Shimano EP8 que se añade a tu unidad com patible como un campo de datos, y te permite visualizar información relevante de tu bicicleta durante tu ruta.
1. Tras haber registrado la matrícula de tu bicicleta en la web de Orbea, abre la aplicación Garmin Connect en tu smartphone y conecta tu dispositivo mediante Bluetooth. Debes haber descargado e instalado previamente Garmin Connect de Google Play o Apple Store.
RISE HYDRO 202210 | ORBEA 21 543 GUÍA RÁPIDA ORBEA |ES11 06 ORBEA RS TOOLBOX. APLICACIÓN DISPOSITIVOSPARAGARMIN
4. Pulsa en “Obtener más campos de datos”.
Consulta el video sobre como descargar y configurar Orbea RS Toolbox en tu dispositivo Garmin en esta url: www.youtube.com/watch?v=F-4lUxxOuFs
El desbloqueo de Orbea RS Toolbox requie re haber registrado la matrícula de tu nueva bicicleta Orbea con motor Shimano EP8 en la web de Orbea, que además te permitirá disfrutar de las condiciones de la Garantía de por Vida. Dirígete a la web y registra tu matrí cula, creando primero un perfil de usuario si aún no dispones de uno. www.orbea.com/es-es/access-register AVISO AVISO
El siguiente método describe cómo instalar y desbloquear Orbea RS Toolbox en tu dis positivo Garmin utilizando la aplicación para smartphones Garmin Connect mediante co nexión Bluetooth. Puedes seguir el mismo método en tu PC o Mac mediante la aplica ción Garmin Express con tu dispositivo co nectado por cable a tu ordenador. Consulta el manual completo de Orbea RS Toolbox en el Bluepaper de Rise Hydro en la web de Orbea. AVISO
GARMIN. GARMIN
6. Un mensaje te indicará que estás a punto de salir de la tienda IQ. Acepta para ser reconducido a la web de activación de Orbea.
10. Vuelve a Garmin Connect en tu smartphone y sincroni za tu dispositivo con Garmin Connect.
7. Introduce tus datos de acceso a tu cuenta de Orbea.
11. Selecciona “Actividades y gestión de Aplicaciones > Campos de datos”. Verás Orbea RS Toolbox instalado en tu dispositivo. Si Toolbox es visible pero no está instalado, sincroniza tu dispositivo.
RISE HYDRO 202212 | ORBEA GUÍA RÁPIDA ORBEA | ES13
9. Vuelve a Garmin Connect en tu teléfono móvil. Verás que el botón de desbloqueo aún aparece en la pantalla de Orbea RS Toolbox. Vuelve a buscar Orbea RS Tool box en el buscador de Garmin Connect y selecciona la aplicación. Ahora verás que el botón de desbloqueo ha desaparecido y sólo es visible el botón de descarga. Descarga la aplicación. Un mensaje te indicará que la aplicación se instalará cuando sincronices tu dispositivo.
En algunas unidades de pulsera y Edge serie 30, el entorno de la tienda IQ a la que Conect enlaza para buscar RS Tool box, sólo mostrará el botón de Instalar. En este caso, instala RS Toolbox y vuelve a Connect y sin croniza tu dispositivo. Luego accede a Campos de Datos > Orbea RS Toolbox y selecciona “Ver en Tienda”. La pantalla a la que accederás mostrará el botón de Realizadesbloqueo.elproceso desde el paso 5 de esta sección. Si al final del proceso no es posible visualizar Toolbox en tu dispositivo, desinstala el campo de datos desde Garmin Connect y vuelve a iniciar el proceso de instalación, selec cionando “Ver en Tienda” cuando hayas instalado Toolbox (esto podría ser debido a que el desbloqueo de la primera instalación no funcionó).
AVISO
8. Si ya habías registrado la matrícula de tu Rise previa mente, un mensaje te indicará que tu dispositivo Gar min se ha desbloqueado correctamente.
RISE HYDRO 202214 | ORBEA GUÍA RÁPIDA ORBEA | ES15 Dispositivos Garmin Edge Dispositivos Garmin de DispositivospulseraGarmin Edge Dispositivos Garmin de pulsera
Tras haber descargado y desbloqueado la aplicación Orbea Toolbox mediante Garmin Express (PC o Mac) o Garmin Connect (smartphones) y haber sincronizado tu dispositivo, activa la visualización de los campos de datos en tu dispositivo compatible. A continuación se muestra el proceso de visualización del campo de datos para dispositivos Garmin de pulsera y uni dades Edge compatibles. 1. Enciende tu bicicleta y el dispositivo Garmin en el que hayas instalado Orbea RS Toolbox, que se emparejarán automáticamente.
4. Elige la información que quieres visualizar en el campo de Seleccionadatos. Connect IQ y pulsa Orbea RS Toolbox. Si no habías encendido la bicicleta antes de elegir la vi sualización del campo de datos, el dispositivo mostrará el mensaje “Buscando…” tras elegir el campo de datos Orbea RS Toolbox. Cuando enciendas la bicicleta y ac cedas a la página seleccionada en el perfil de actividad en tu dispositivo, los datos de Toolbox serán visibles.
3. Selecciona “Pantallas de datos” y la página del perfil de actividad en el que quieres ver los datos de Toolbox. Activa la página de datos y elige la visualización de un campo de datos único. Orbea RS Toolbox no es compatible con el uso simultáneo de la aplicación Gar min Edge Shimano STEPS nativa en dis positivos Edge 530, 830, 1030 y 1030 Plus. Desconecta o elimina la bicicleta de la lista de sensores de tu dispositivo Garmin antes de intentar usar Orbea RS Toolbox. Esta limitación no depende de Toolbox, sino que viene dada por Garmin. AVISO Dispositivos Garmin de pulsera Dispositivos Garmin Edge Dispositivos Garmin Edge Dispositivos Garmin de pulsera
EN TU DISPOSITIVO*
2. Accede a Perfiles en el menú Ajustes de tu dispositivo y elige el perfil de actividad desde donde quieres acceder a los datos de tu bicicleta.
5. Con la bicicleta encendida, accede al perfil de acti vidad seleccionado para la visualización de datos de Toolbx o comienza una actividad en este perfil. Nave ga hasta la página de datos donde has seleccionado visualizar Orbea RS Toolbox para acceder a la informa ción de tu bicicleta.
* Consulta toda la información sobre Orbea RS Toolbox en el Bluepaper de Rise Hydro en la web de Orbea.
VISUALIZACIÓN DE ORBEA TOOLBOX

2. Conecta el cable al puerto de carga del Range Extender. Abre el puerto de carga del tubo de sillín de Rise H y conecta el cable del Range Extender.
A RISE HYDRO
3. Baja las pestañas de seguridad en ambos extremos del cable para asegurar la conexión.
Para desconectar el cable del Range Extender para des montar la batería o cargarla, levanta primero las pes tañas de seguridad del cable y luego tira con cuidado del conector. Si Rise estaba encendida al conectar el Range Extender al puerto de carga de la bicicleta, el sistema eléctrico se apagará y deberás volv er a encender Rise. Este comportamiento es debido a que el sistema necesita reiniciarse para reconocer a la batería Range Extender como parte del sistema de alimentación. Si estabas grabando una actividad a través de Garmin Connect utilizando la aplicación Orbea RS Toolbox, ésto no tendrá ningún efecto sobre el registro de datos de Rise en Garmin Connect. Los datos de la actividad se seguirán registrando cuando empieces a utilizar Rise de nuevo. Una vez enciendas la bicicleta con el Range Extender conectado, el Range Extender estará operativo. No es necesario encender el Range Extender. Si se desconecta el Range Extender de la bicicleta estando la bicicleta encendida, ésta se apagará y será necesario encender la bici cleta de nuevo para que el sistema reconozca que sólo la batería interna está alimentando el sistema. AVISO
CONEXIÓN DEL RANGE EXTENDER
RANGE EXTENDER
2. Al instalar el portabidón del Range Extender, reti ra las cuatro arandelas premontadas en el cuadro y comprueba que una vez instalado, los seis puntos de contacto del portabidón se apoyan correctamente en el tubo diagonal.
Consulta el manual técnico Bluepaper de Rise Hydro en la web de Orbea para acceder a toda la información sobre especificaciones técnicas, cuidado y mantenimiento, etc de la batería Range Extender. Carga completamente el Range Extender an tes de usarlo por primera vez. Carga la batería interna y/o el Range Exten der tan pronto como los recibas. Si no vas a usar la bicicleta o el Range Extender, asegú rate de cargar las baterías al menos hasta el 50% de su capacidad cada 3 meses. La batería externa Orbea Range Extender RS se conecta al sistema de asistencia para proporcionar 252 Wh de capacidad adicional al mismo, aumentando la capacidad total de Rise H, junto con la batería interna, a 792 Wh. Así, la batería Range Extender aumentará la autonomía conseguida con la batería interna un 50% aproximadamente.
1. Instala el portabidón específico del Range Extender en el tubo diagonal de Rise, instalando los tornillos de fija ción con un par de apriete de 5Nm.
MONTAJE DEL RANGE EXTENDER
AVISO
RISE HYDRO 202216 | ORBEA 3 5 N.m x6321 31 2 2 13 GUÍA RÁPIDA ORBEA | ES17 07 BATERÍA EXTERNA RS
3. Instala la batería Range Extender en el portabidón y asegúrala con la goma de seguridad. El soporte del Range Extender es compatible con el uso de bidones estándar cuando el Range Extender no esté montado en la bicicleta.
1. Levanta las pestañas de seguridad del cable de conexión del Range Extender antes de conectarlo a la batería.
4. Cuando la batería esté completamente cargada, el LED del cargador volverá a lucir en azul de manera fija. Si el LED del cargador luce rojo al conectar el cargador a un enchufe o durante la carga, existe un problema. Desconecta el cargador inmediatamente y consulta la sección de re solución de errores del cargador en el Blue paper de Rise Hydro. Si el problema persiste, contacta con un dis tribuidor autorizado Orbea. AVISO
3. Conecta el cargador al Range Extender alineando correctamente los pines del puerto de carga con los del conector del cargador. El LED del cargador lucirá en azul de manera fija durante 2 segundos y luego empezará a encenderse y desvanecerse gradualmente de manera cíclica hasta que la batería esté completa mente Mientrascargada.elRange
El Range Extender alimenta el motor Shimano EP8 RS di rectamente. Al usar Rise H con el Range Extender conec tado, sólo el Range Extender proporcionará corriente al motor hasta agotar la carga del Range Extender.
1. Para cargar la batería externa Range Extender, conecta el cargador a un enchufe. Sin el cargador conectado a la bicicleta, el LED del cargador parpadeará en azul.
NIVEL DE CARGA DEL RANGE EXTENDER POR SEPARADO Pulsa una vez el botón principal de la batería Range Exten der de Rise H para conocer el nivel de carga. Los LED lucirán mostrando el nivel de carga actual en seg mentos de 25% de derecha a izquierda durante 5 segundos. Cuando el Range Extender, estando este conectado a la bicicleta, haya agotado su carga, el sistema volverá a mostrar, mediante el modo de visualización disponible (displays, centralita o RS Toolbox) sólo la carga disponi ble de la batería interna, teniendo en cuenta la capacidad total de la batería interna y no del conjunto de batería interna y Range Extender.
2. Desconecta el cable de conexión del Range Extender al puerto de carga de la bicicleta (si estuviese conectado) girando primero la pestaña de seguridad del cable del Range Extender y tirando del cable.
Extender está cargando, los LED de indicación de carga de la batería mostrarán el nivel ac tual de carga. El LED parpadeando muestra el tramo (en incrementos de 25%) que está siendo cargado.
CARGAR EL RANGE EXTENDER
RISE HYDRO 202218 | ORBEA 100% 2431 GUÍA RÁPIDA ORBEA | ES19
DELFUNCIONAMIENTORANGEEXTENDER
Tras agotar el Range Extender, la batería interna pasará a proporcionar corriente al motor si tuviese carga restante. En este momento, el display, centralita o Orbea RS Toolbox pasará a mostrar el nivel de carga sólo de la batería interna.
VISUALIZACIÓN DEL NIVEL DE CARGA NIVEL DE CARGA CONJUNTO Con el Range Extender conectado a Rise Hydro (habien do encendido Rise tras conectar el Range Extender), el sistema calculará la capacidad total de ambas baterías (792 Wh) y la información de la carga restante del sistema vendrá dada por la suma de los niveles de carga y capaci dades de ambas baterías.
El nivel combinado de carga de las baterías será visible a través de la centralita o displays Shimano y/o el campo de datos Orbea RS Toolbox para dispositivos Garmin.
RISE HYDRO 202220 | ORBEA ORBEA | 21GUÍA RÁPIDA ES21
EN 01 | ES 12 | FR 23 | IT 34 | DE 45 GUIDE DE PRISE EN MAIN HYDRORISE2022
> Assistance >
> Bluepaper
Vous
>
> Assistance >
LANGUESIMPORTANTEREMARQUE Pour
RISE HYDRO 20222 | ORBEA GUIDE DE PRISE EN MAIN ORBEA |FR3
Ce Guide de prise en main ne constitue pas le manuel complet du Rise Hydro, ni le Manuel de l'utilisateur générique des vélos Orbea. Pour obtenir toutes les informations pertinentes à l'utilisation et à l'entretien du Rise et de ses composants, téléchargez le Manuel technique complet de la série Blue Paper consacré au Rise Hydro depuis notre site Web. Vous y trouverez également les informations relatives aux pièces de rechange, aux applications, à la garantie et à l'entretien et à la maintenance des composants cruciaux afin de pouvoir profiter au maximum de votre Rise le plus longtemps possible. le Manuel Blue Paper du Rise Hydro 2022 sur notre site Web : Orbea.com Manuels E-Bikes Rise Hydro 2022 pouvez aussi scanner le code QR pour accéder directement au manuel technique Blue Paper : lire la version la plus récente de ce guide de prise en main dans d'autres langues, téléchargez la version numé rique depuis le site Web d'Orbea : Orbea.com Manuels
> E-Bikes > Quickstart guide Rise Hydro 2022. Vous pouvez également scanner le code QR ci-dessous pour accéder directement à la version numérique : NOTE DE COMPATIBILITÉ Aucun des composants du circuit électrique Orbea RS du Rise Hydro 2022 (batterie interne, Range Extender, char geur Smart Charger ou câbles) n'est compatible avec les modèles Rise Carbon 2021-2022. Aucun des composants du circuit électrique Orbea RS du Rise Carbon 2021-2022 (batterie interne, Range Exten der, chargeur Smart Charger ou câbles) n'est compatible avec les modèles Rise Hydro 2022. 01 MISE SOUS TENSION/HORS TENSION DU RISE 04 02 SÉLECTION DES MODES D'ASSISTANCE 05 03 CHARGE DE LA BATTERIE 06 04 VÉRIFICATION DU NIVEAU DE CHARGE DE LA BATTERIE 07 05 APPLICATION SHIMANO ETUBE PROJECT PERSONNALISATION DU RISE 08 06 ORBEA RS TOOLBOX. CHAMP DE DONNÉES POUR LES APPAREILS COMPATIBLES GARMIN 10 07 BATTERIE EXTERNE RS RANGE EXTENDER 16 GUIDE DE PRISE EN MAIN TABLE DES MATIÈRES
Consultez
Réalisez une charge complète de la batterie interne et/ou de Range Extender avant de les utiliser pour la première fois. Chargez la batterie interne et/ou Range Extender dès que vous les recevez. Si vous ne comptez pas utiliser le vélo ou le Range Extender, veillez à charger les batteries jusqu’à au moins 50 % de sa capacité tous les 3 mois.
RISE HYDRO 20224 | ORBEA 3 sec. OFF WALK &ReleaseHoldY 1 sec. YX OFF > ECO > TRAIL > BOOST BOOST > TRAIL > ECO > OFF LED 2 BOOSTOFFECOTRAIL TOOLBOXORBEADISPLAYSHIMANOEW-WN100SHIMANORS 3 sec. OFF GUIDE DE PRISE EN MAIN ORBEA |FR5 POUR METTRE LE RISE H SOUS TENSION Appuyez une fois sur le bouton d'alimentation situé sur la partie inférieure du cadre. POUR METTRE LE RISE H HORS TENSION Maintenez le bouton d'alimentation situé sur la partie inférieure du cadre enfoncé pendant 3 secondes jusqu'à ce que la lumière du bouton s'éteigne. 01 MISE SOUS TENSION/HORS TENSION DU RISE 02 SÉLECTION DES MODES ASSISTANCED'ASSISTANCEÀLAMARCHE
AFFICHAGE DU MODE D'ASSISTANCE ACTIF
Lors du changement du mode d'assistance, le mode actif est affiché sur le boîtier de jonction Shimano EW-EN100 (assemblages sans écran), sur l'écran Shimano et/ou sur votre appareil Garmin compatible via le champ de don nées Orbea RS Toolbox activé et connecté à Rise. Consultez le chapitre consacré à Orbea RS Toolbox dans ce manuel et dans le Bluepaper consacré à Rise Hydro afin de télécharger, déverrouiller et installer Orbea RS Toolbox sur votre appareil Garmin compatible.
Pour activer l'assistance à la marche, appuyez sur le bou ton Y du levier de commande au guidon pendant 1 minute jusqu'à ce que le mot WALK (marche) s'affiche à l'écran Shimano ou que la LED2 du boîtier de jonction EN100 s'allume en bleu foncé. Relâchez le bouton Y et appuyez à nouveau sur celui-ci pour engager l'assistance à la marche. Le système vous aidera lorsque vous poussez le vélo tant que le bouton Y est enfoncé. Appuyez sur le bouton X ou Y de la commande au guidon Shimano pour passer d'un mode d'assistance à l'autre. Ap puyez sur X pour augmenter le niveau d'assistance jusqu'au maximum disponible (Boost). Appuyez sur Y pour réduire le niveau d'assistance jusqu'au mode sans assistance (Off).
APPAREILS GARMIN COMPATIBLES
VÉRIFICATION
AVEC UN ÉCRAN SHIMANO Mettez le vélo sous tension. S'agissant des assemblages avec des écrans Shimano, le niveau de charge de la ou des batteries apparaît à l'écran.
ORBEA RS TOOLBOX
RISE HYDRO 20226 | ORBEA 100%4321 ERROR! 100% - 21% 20% or less depletedAlmost LED 1 100% - 81% 80% - 61% 60% - 41% 40% - 21% 20% - 1% 0% GUIDE DE PRISE EN MAIN ORBEA | FR7 03 CHARGE DE LA BATTERIE INTERNE
Mettez votre appareil Garmin compatible sous tension (vous y avez téléchargé et installé au préalable Orbea RS Toolbox) et accédez au champ RS Toolbox. Mettez ensuite le vélo sous tension pour voir le niveau de charge actuel de la batterie. Si le niveau de charge de la batterie n'apparaît pas dans Toolbox, mettez le vélo hors tension, puis mettez-le à nou veau sous tension pour réinitialiser la connexion. Pour découvrir comment télécharger et installer Orbea RS Toolbox sur votre dispositif Garmin compatible, consultez la section dédiée à ce sujet dans ce manuel.
1. Branchez le chargeur RS Smart Chargeur sur une prise secteur. Tant que le chargeur n'est pas branché sur le vélo, la DEL du corps du chargeur clignote en bleu.
Il convient de réaliser une charge complète de la batterie interne et du Range Extender avant de les utiliser pour la première fois. Chargez la batterie interne et/ou Range Extender dès que vous les recevez. Si vous ne comptez pas utiliser le vélo ou le Range Extender, veillez à charger les batteries jusqu'à au moins 50 % de sa capacité tous les 3 mois.
3. Une fois la batterie complètement chargée, la LED du corps du chargeur restera allumée en bleu en continu.
Vous ne pouvez pas mettre le Rise sous tension tant que le chargeur y est connecté. Débranchez le chargeur du vélo et mettez celui-ci sous tension pour vérifier le niveau de charge actuel de la batterie si vous n'avez pas pu réaliser une charge complète. Une LED rouge sur le chargeur lors de la connexion du chargeur au secteur ou pendant la charge indique une anomalie. Débranchez immédiatement le chargeur et lisez la procé dure de recherche de pannes dans le manuel technique Bluepaper du Rise H. Si le pro blème persiste, contactez un revendeur agréé.
4. Débranchez soigneusement le chargeur du port de charge en tirant sur le connecteur du chargeur. Assurez-vous que le couvercle du port de charge est bien fermé.
AVEC BOÎTIER DE JONCTION SHIMANO EW-EN100 Mettez le vélo sous tension. Le boîtier de jonction Shimano EW-EN100affiche la charge restante de la ou des batteries à l'aide de la DEL1. La LED1 s'allume en vert tant que le niveau de charge de la batterie est supérieur à 21 %. En dessous de cette valeur, la LED1 devient rouge. Lorsque la batterie est presque déchargée, la LED1 clignote en rouge.
04 DU NIVEAU DE CHARGE DE LA BATTERIE
2. Ouvrez le cache du port de charge du vélo et branchez le chargeur en alignant correctement le connecteur. La flèche située sur le connecteur du chargeur doit être alignée sur le haut du port de charge. La DEL du corps du chargeur devient bleue pendant 2 secondes, puis l'intensité de la DEL augmentera et diminuera jusqu'à la fin de la charge.
Sur les modèles Rise sans écran Shimano, il faudra connecter le vélo à l'application Etube Project pour choisir votre profil d'assistance actuel.
SÉLECTION DES PROFILS D'ASSISTANCE
Quand une erreur survient dans le système ou lorsqu'un avertissement est émis, les deux DEL du boîtier de jonc tion Shimano EW-EN100 clignotent en rouge. Pour les mo dèles dotés d'un écran Shimano, le code d'erreur s'affiche à Vousl'écran.pouvez connecter votre vélo à l'application Etube Project pour identifier le code d'erreur ou d’avertisse ment et la procédure de dépannage associée. Mettez le vélo hors tension, puis sous tension et connectez-le à l'application. Le code d'erreur et la procédure de dépannage figurent dans la section Entretien>Journal d'erreur.
PERSONNALISATION DU RISE Grâce à l'application Shimano Etube Project Cyclist pour smartphone, vous pouvez personnaliser le système EP8 RS pour adapter le Rise à vos besoins. Vous pouvez modifier chacun des modes d'assistance afin d'obtenir la puissance exacte pour votre pilotage. Téléchargez l'application Shima no Etube Project Cyclist depuis l'Apple Store ou Google Play. Le moteur électrique EP8 vous permet également de choisir entre deux profils d'assistance différents. Au sein de chaque profil, vous pouvez modifier la puissance de chacun des modes d'assistance afin d'obtenir la puissance dont vous avez besoin dans toute situation. Le profil d'assistance 1 est prévu pour les activités au dé nivelé positif moins marqué. La puissance est légèrement réduite afin d'augmenter l'autonomie.
Sur les modèles équipés d'un écran Shimano, vous pouvez choisir le mode via l'écran, mais il faudra connecter le vélo à l'application Etube Project pour pouvoir personnaliser les modes d'assistance.
RISE HYDRO 20228 | ORBEA BOOST W101 GUIDE DE PRISE EN MAIN ORBEA |FR9 05 APPLICATION SHIMANO ETUBE PROJECT.
Le profil d'assistance 2 est prévu pour les activités plus exigeantes avec plus de dénivelé. Le moteur électrique dé veloppe une puissance supérieure. Consultez le mode d'emploi complet de l'application Etube Project sur le site Web de Shimano. Avec l'aide d'Etube Project, vous pourrez également, entre autres, personnaliser les boutons des leviers de commande, consulter les rapports sur les erreurs, mettre à jour le micrologiciel des composants. Le mode d'emploi complet de l'application est disponible ici: https://si.shimano.com/#/fr/iUM/7J4MA Vous pouvez également découvrir comment modifier les profils d'assistance et les modes d'assistance dans le ma nuel technique Blue Paper Rise Hydro.
AVERTISSEMENTS ET ERREURS DU SYSTÈME
5. Recherchez « Orbea RS Toolbox » dans Garmin IQ Store. Sélectionnez Déverrouiller Orbea RS Toolbox. Si l’application Orbea RS Toolbox n’apparaît pas dans IQ Store, cela signifie que votre dispositif n’est pas compatible avec l’applica tion. Nous ajoutons chaque jour de nouveaux dispositifs, aussi contactez Orbea si vous avez besoin d’un supplément d’informations.
3. Sélectionnez « Champs de données ».
RISE HYDRO 202210 | ORBEA 21 543 GUIDE DE PRISE EN MAIN ORBEA |FR11
INSTALLATION ET
06 ORBEA RS TOOLBOX. CHAMP DE DONNÉES POUR LES APPAREILS COMPATIBLES GARMIN
GARMIN CONNECT Orbea RS Toolbox est une application pour dispositif Garmin développée exclusivement pour les propriétaires d'un vélo Rise. Elle est ajoutée au dispositif Garmin sous la forme d'un champ de données qui permet d'accéder aux informations pertinentes de votre Rise pendant que vous roulez. La méthode suivante explique comment ins taller et déverrouiller Orbea RS ToolBox sur votre dispositif Garmin à l'aide de l'application Garmin Connect pour smartphone via une connexion Bluetooth. Vous pouvez suivre la même procédure sur votre PC ou votre Mac via Garmin Express en connectant votre dis positif à l'ordinateur à l'aide d'un câble USB. Pour pouvoir déverrouiller Orbea RS Tool box sur votre dispositif Garmin, vous devez d'abord enregistrer le code-barres de votre nouveau Rise sur le site Web d'Orbea. Vous pourrez aussi profiter ainsi d'une garantie à vie sur votre nouveau cadre. Rendez-vous sur le site Web d'Orbea et enregistrez le codebarres de votre vélo. Si vous ne possédez pas encore de compte, vous devrez d'abord en créer un. www.orbea.com/es-es/access-register
Regardez la vidéo pour découvrir comment installer et configurer Orbea RS Toolbox sur les dispositifs Garmin : www.youtube.com/watch?v=F-4lUxxOuFs Vous pouvez également scanner le code QR ci-dessous pour accéder directement à la vidéo : Consultez la section complète consacrée au champ de données Orbea RS Toolbox dans le manuel technique Blue Paper du Rise Hydro et disponible sur le site Web d’Orbea.
4. Sélectionnez « Pus de champs de données ».
D'ORBEA RS TOOLBOX LES DISPOSITIFS GARMIN APPLICATION
DÉVERROUILLAGE
SUR
Le code-barres de votre vélo est un code à 11 chiffres qui figure sur le cadre du vélo :
1. Après avoir enregistré votre Rise sur le site Web d'Or bea, ouvrez l'application Garmin Connect sur votre smartphone et connectez votre dispositif via Bluetooth. Rendez-vous sur Google Play ou l'Apple Store pour télé charger et installer Garmin Connect.
2. Sélectionnez « Gestion des activités et des applications ».
8. Si vous aviez déjà enregistré le code-barres de votre Rise, un message vous indique que votre appareil Gar min a été déverrouillé.
11. Rendez-vous dans « Gestion des activités et des appli cations > Champs de données ». Vous verrez qu’Orbea Toolbox est installé sur votre dispositif. Si Toolbox est visible, mais pas installé, synchronisez votre dispositif.
6. Une message vous indique que vous êtes sur le point de quitter IQ Store. Acceptez la redirection vers le site Web d’activation d’Orbea.
7. Saisissez vos identifiants de connexion au compte Orbea.
9. Revenez dans Garmin Connect sur votre téléphone. Vous remarquerez que le bouton Déverrouiller est toujours dis ponible sur l’écran Orbea RS Toolbox. Tapez à nouveau Orbea RS Toolbox dans le champ de recherche de Garmin Connect, puis sélectionnez Toolbox. Le bou ton Déverrouiller a disparu et seul le bouton Télécharger est visible. Téléchargez Orbea RS Toolbox. Une message vous indique que l’installation de l’application aura lieu lors de la prochaine synchronisation de votre dispositif.
RISE HYDRO 202212 | ORBEA GUIDE DE PRISE EN MAIN ORBEA | FR13
Pour certains modèles de montre et les appareils de la gamme Edge 30, l'écosystème de l'IQ Store vers lequel Connect va vous envoyer pour recher cher RS Toolbox présentera uniquement un bouton Installer. Dans ce cas, téléchargez RS Toolbox, puis revenez dans Connect et synchronisez votre dispositif. Sélectionnez en suite Champs de données > Orbea RS Toolbox puis, choi sissez « Voir dans Store ». L'écran affichera désormais le bouton Déverrouiller. Suivez la procédure de déverrouillage à partir de l'étape 5 de cette section. Si vous ne voyez pas Toolbox sur votre appareil après l'installation, désinstallez Toolbox depuis Garmin Connect et recommencez l'installation, en sé lectionnant « Voir dans le Store » une fois que vous avez installé Toolbox (cela pourrait se produire en raison d'un échec du déverrouillage pour le premier téléchargement).
10. Ouvrez Garmin Connect sur votre Smartphone et syn chronisez votre dispositif Garmin avec l’application.
Après avoir téléchargé et déverrouillé Toolbox via Garmin Express (PC ou Mac) ou Garmin Connect (smartphones) et synchronisé votre dispositif Garmin, activez l’affichage des champs de données sur votre dispositif.
2. Accédez à l’option Profils d’activité dans le menu Pa ramètres.
3. Sélectionnez « Champs de données » et la page du profil d’activité sur lequel vous souhaitez afficher les données de votre vélo. Activez la page de données et décidez d’afficher un champ de données sur la page. Orbea RS Toolbox n’est pas compatible avec l’utilisation de l’application native Shimano STEPS pour Garmin Edge sur les modèles Edge 530, 830, 1030 et 1030 Plus. Déconnectez ou effacez votre vélo de la liste des capteurs sur votre dispositif Edge avant d’essayer d’établir la connexion à Or bea RS Toolbox. Montres
ACTIVATION D’ORBEA RS TOOLBOX SUR VOTRE DISPOSITIF*
4. Faites défiler la liste des données à afficher à l’écran. Sélectionnez Connect IQ puis, choisissez Orbea RS Toolbox. Si vous n’aviez pas mis votre vélo sous tension avant de configurer Toolbox sur votre appareil, ce dernier af fichera le message « Recherche en cours... » après que vous avez sélectionné le champ de données Orbea RS Toolbox. Quand vous mettrez votre vélo sous tension et accéderez à la page où vous avez décidé d’afficher Toolbox, les données du vélo seront visibles.
RISE HYDRO 202214 | ORBEA GUIDE DE PRISE EN MAIN ORBEA | FR15 Dispositifs Garmin Edge Montres GarminDispositifs Garmin Edge Montres Garmin
1. Mettez votre vélo et le dispositif sur lequel vous avez installé Orbea RS Toolbox sous tension. Le jumelage s’opère automatiquement.
DispositifsGarminGarmin Edge Dispositifs Garmin Edge Montres Garmin
5. Vélo sous tension, accédez au profil d’activité sur le quel vous avez choisi de voir les données de Toolbox ou commencez à enregistrer une activité sur ce profil avec votre dispositif Garmin. Accédez à la page que vous avez choisie pour voir Toolbox afin d’obtenir les données en temps réel de votre vélo.
* Obtenez davantage d’informations sur le champ de données Orbea RS Toolbox dans le manuel technique Blue Paper consacré au Rise Hydro et disponible sur le site Web d’Orbea.
Vous trouverez ci-après la marche à suivre pour afficher le champ de données Toolbox sur les dispositifs Edge et les montres de Garmin compatibles.
07 BATTERIE EXTERNE RS RANGE EXTENDER
RISE HYDRO 202216 | ORBEA 3 5 N.m x6321 31 2 2 13 GUIDE DE PRISE EN MAIN ORBEA | FR17
2. Branchez le câble sur le port de charge du Range Exten der. Ouvrez le port de charge du vélo et branchez le câble du Range Extender.
2. Lors de la pose du support de Range Extender, dépo sez les quatre rondelles préinstallées sur le cadre et assurez-vous que les six points de contact du Range Extender touchent bien le tube diagonal une fois l’ins tallation terminée.
1. Faites tourner les onglets de sécurité du câble du Range Extender dans le sens anti-horaire avant de connecter le câble à la batterie.
Si votre Rise est sous tension au moment de brancher le Range Extender sur le vélo, le sys tème se met hors tension et il faudra à nouveau mettre le Rise sous tension en appuyant sur le bouton d’alimentation. Cela est nécessaire pour permettre le redémarrage du système afin qu’il puisse identifier le Range Extender en tant qu’élément du système d’alimentation lorsque le Rise est à nouveau mis sous tension. Si l’enregistrement d’une activité dans Gar min Connect avec Orbea RS Toolbox était en cours, sachez que cette procédure n’aura aucun impact sur les données enregistrées au cours de l’activité. L’enregistrement des données Rise continuera lorsque vous com mencerez à utiliser le Rise à nouveau. Le Range Extender est actif dès que le Rise est mis sous tension. Il n’est pas nécessaire de mettre le Range Extender sous tension. Si le Range Extender est déconnecté lorsque le vélo est sous tension, celui-ci s’éteindra et il faudra le remettre sous tension. Cela est nécessaire pour que le système redémarre et identifie la batterie interne en tant qu’unique source d’alimentation.
1. Installez la fixation dédiée du Range Extender sur le tube diagonal à l’aide des vis d’origine serrées au couple prescrit de 5 Nm.
MONTAGE DU RANGE EXTENDER
3. Tournez les onglets de sécurité du câble dans le sens horaire pour verrouiller le câble. Pour débrancher le câble du Range Extender ou pour retirer la batterie Range Extender du vélo en vue de la charger, commencez par tourner les onglets de sécu rité du câble, puis tirez doucement sur le connecteur du câble. Si votre Rise est sous tension au moment de brancher le Range Extender sur le vélo, le système se met hors tension et il faudra à nouveau mettre le Rise sous tension en appuyant sur le bouton d’alimentation. Cela est nécessaire pour permettre le redémar rage du système afin qu’il puisse identifier le Range Extender en tant qu’élément du système d’alimentation lorsque le Rise est à nouveau mis sous tension. Si l’enregistrement d’une activité dans Garmin Connect avec Orbea RS Toolbox était en cours, sachez que cette procédure n’aura aucun im pact sur les données enregistrées au cours de l’activité. L’enregistrement des données Rise continuera lorsque vous commencerez à utiliser le Rise à nouveau. Le Range Extender est actif dès que le Rise est mis sous tension. Il n’est pas nécessaire de mettre le Range Extender sous tension. Si le Range Extender est déconnecté lorsque le vélo est sous ten sion, celui-ci s’éteindra et il faudra le remettre sous tension. Cela est nécessaire pour que le système redémarre et identifie la batterie in terne en tant qu’unique source d’alimentation.
CONNEXION DE RANGE EXTENDER
3. Installez le Range Extender sur son support et fixez-le à l’aide du joint torique latérale. Le porte-bidon du Range Extender est compatible avec les bidons standard quand le Range Extender n’est pas installé.
À RISE HYDRO
1. Pour charger le Range Extender, branchez le chargeur RS sur une prise secteur. Tant que le Range Extender n’est pas connecté au chargeur, la DEL du corps du chargeur clignote en bleu.
4. Une fois la batterie complètement chargée, la LED du corps du chargeur restera allumée en bleu en continu. Débranchez soigneusement le chargeur du port de charge en tirant sur le connecteur du chargeur. Une LED rouge sur le chargeur lors de la connexion du chargeur au secteur ou pen dant la charge indique une anomalie. Dé branchez immédiatement le chargeur et lisez la procédure de recherche de pannes dans le manuel technique Bluepaper du Rise H. Si le problème persiste, contactez un revendeur agréé.
2. Pour débrancher le câble de connexion du Range Exten der hors du port de charge du vélo (s’il était connecté), faites tourner les onglets de sécurité du câble dans le sens contraire des aiguilles d’une montre, puis tirez soi gneusement sur le câble.
RISE HYDRO 202218 | ORBEA 100% 2431 GUIDE DE PRISE EN MAIN ORBEA | FR19
3. Branchez le chargeur correctement sur le Range Exten der en alignant les broches du connecteur sur celles du port de charge du Range Extender. La LED du corps du chargeur devient bleue pendant 2 secondes, puis l’intensité de la DEL augmentera et diminuera jusqu’à la fin de la charge. Pendant la charge du Range Extender, les LED d’in dication de charge renseigneront le niveau de charge actuel. La LED clignotante indique la plage en cours de charge (par intervalles de 25 %).
UTILISATION DU RANGE EXTENDER Le Range Extender alimente directement le moteur élec trique EP8 RS. Quand vous roulez sur le Rise avec une batterie Range Extender connectée, le moteur électrique s’alimente exclusivement via le Range Extender jusqu’à ce que celui-ci soit déchargé. Dès que la charge du Range Extender est épuisée, la batterie interne alimente le mo teur électrique, si elle contient toujours une charge.
CONSULTATION DU NIVEAU DE CHARGE NIVEAU DE CHARGE COMBINÉ Quand une batterie Range Extender est connectée à un Rise, le système calcule la capacité totale du Range Extender et de la batterie interne (792 Wh). Les infor mations relatives au niveau de charge restante pour le système tiennent compte de la charge disponible dans les deux batteries sur la capacité totale de 792 Wh. Le niveau de charge combiné est affiché sur le boîtier de jonction ou l’écran Shimano ou dans le champ de données Orbea RS Toolbox pour les appareils Garmin compatibles.
CHARGE DU RANGE EXTENDER
NIVEAU DE CHARGE DU RANGE EXTENDER SEUL Appuyez une fois sur le bouton principal du Range Exten der pour connaître le niveau de charge actuel. Les LED renseignent le niveau de charge actuel par in tervalle de 25 % de droite à gauche pendant 5 secondes.
Quand une batterie Range Extender sans charge est connectée au vélo, le système affiche à l’aide des mé thodes disponibles (écrans, boîtier de jonction ou RS Tool box) la charge disponible dans la batterie interne unique ment en tenant compte de la capacité de la seule batterie interne et non pas la capacité totale du système constitué de la batterie interne et du Range Extender.
RISE HYDRO 202220 | ORBEA ORBEA | 21GUIDE DE PRISE EN MAIN FR21
EN 01 | ES 12 | FR 23 | IT 34 | DE 45 GUIDAHYDRORISERAPIDA2022
Accedi
RISE HYDRO 20222 | ORBEA GUIDA RAPIDA ORBEA | IT3
NOTA SULLA COMPATIBILITÀ dei componenti del sistema elettrico 2022 (batteria i modelli dei componenti del sistema elettrico
>
interna, Range Extender, Smart Charger o cablaggio) è compatibile con
Nessuno
Rise Carbon 2021-2022. Nessuno
> Manuali > Ebike > Guida ra pida Rise Hydro 2022 O scansionare il codice QR qui di seguito per accedere direttamente alla versione digitale:
Orbea RS sulla Rise Hydro
Orbea RS sulla Rise Carbon 2021-2022 (batteria interna, Range Extender, caricabatterie o cablaggio) è compatibile con i modelli Rise Hydro 2022. AVVISOIMPORTANTE AVVISO 01 ACCENSIONE/SPEGNIMENTO DELLA RISE 04 02 PASSA DA UNA MODALITÀ DI SERVOASSISTENZA ALL'ALTRA 05 03 RICARICA DELLA BATTERIA 06 04 VERIFICA DEL LIVELLO DI CARICA DELLA BATTERIA 07 05 APP SHIMANO ETUBE PROJECT. PERSONALIZZA LA TUA RISE 08 06 ORBEA RS TOOLBOX. CAMPO DATI PER UNITÀ COMPATIBILI GARMIN 10 07 RANGE EXTENDER RS CON BATTERIA ESTERNA 16 GUIDA CONTENUTIRAPIDA
LINGUE Per
Prima di utilizzare la batteria interna e/o il Range Extender per la prima volta, caricali comple tamente. Carica la batteria interna e/o il Range Extender non appena li ricevi. Se prevedi di non utilizzare la bici o il Range Extender, assicurati che le batterie abbiano un livello di carica pari ad almeno il 50% della loro capacità ogni 3 mesi.
Questa Guida rapida non rappresenta il manuale completo della Rise Hydro né il Manuale dell'utente generale per le biciclette Orbea. È possibile scaricare il manuale tecnico completo Blue Paper della Rise Hydro dal nostro sito internet per avere accesso a tutte le informazioni rilevanti sull'uso e la cura di Rise e dei suoi componenti, oltre a informazioni sulle parti di ricambio, le app, i termini della garanzia, la cura di componenti importanti e consigli per la manutenzione, che ti consentiranno di goderti la tua Rise al piano delle sue potenzialità per un lungo periodo di tempo. al Blue Paper della Rise Hydro 2022 sul nostro sito internet: Orbea.com Supporto > Manuali > Ebike > Blue Paper Rise Hydro 2022 O scansiona il codice QR per accedere direttamente al manuale tecnico Blue Paper: leggere la versione più recente di questa guida rapida in più lingue, è possibile scaricare una versione digitale dal sito internet di Orbea: Orbea.com Supporto
>
Per attivare la modalità camminata servoassistita, premi il pulsante Y dell’interruttore posto sul manubrio per 1 se condo finché non appare la parola WALK sul ciclocompu ter Shimano o il LED2 della centralina EN100 non mostra una luce blu.
01 ACCENSIONE/SPEGNIMENTO DELLA RISE
PER ACCENDERE LA RISE H
RISE HYDRO 20224 | ORBEA 3 sec. OFF WALK &ReleaseHoldY 1 sec. YX OFF > ECO > TRAIL > BOOST BOOST > TRAIL > ECO > OFF LED 2 BOOSTOFFECOTRAIL TOOLBOXORBEADISPLAYSHIMANOEW-WN100SHIMANORS 3 sec. OFF GUIDA RAPIDA ORBEA | IT5
Premi i pulsanti X o Y dell’interruttore posto sul manubrio Shimano per passare da una modalità di servoassistenza all’altra. Premi X per aumentare la modalità di servoassi stenza fino al massimo livello disponibile (Boost). Premi Y per diminuire la modalità di servoassistenza fino alla mo dalità No-Assist (Off).
Quando si cambia la modalità di servoassistenza, la mo dalità corrente sarà visibile sulla centralina EW-EN100 Shi mano (montaggi senza ciclocomputer), sul ciclocomputer Shimano e/o sull’unità compatibile Garmin con il campo dati Orbea Rs Toolbox installato e connesso alla Rise. Leggi la sezione Orbea RS Toolbox di questa guida e il Blue Paper della Rise Hydro per scaricare, sbloccare e installare Orbea RS Toolbox sul tuo dispositivo Garmin compatibile.
VISUALIZZAZIONEDELLA MODALITÀ SERVOASSISTITA CORRENTE
MODALITÀ
SERVOASSISTITACAMMINATA
02 CAMBIO DE MODO DE ASISTENCIA
Rilascia il pulsante Y e premilo nuovamente per attivare la modalità camminata servoassistita. Fintanto che il pulsan te Y è premuto, il sistema ti consentirà di spingere la bici.
Premi una volta il pulsante di accensione nella parte inferiore del telaio.
PER SPEGNERE LA RISE H
Tieni premuto per 3 secondi il pulsante di accensione nella parte inferiore del telaio finché la luce del pulsante non si spegne.
RISE HYDRO 20226 | ORBEA 100%4321 ERROR! 100% - 21% 20% or less depletedAlmost LED 1 100% - 81% 80% - 61% 60% - 41% 40% - 21% 20% - 1% 0% GUIDA RAPIDA ORBEA |IT7 03 RICARICA DELLA BATTERIA INTERNA
3. Quando la batteria è completamente carica, i LED sul cor po del caricabatterie si accendono con una luce blu fissa.
AVVISO AVVISO
Accendi la bicicletta. Sui montaggi con ciclocomputer Shimano, il livello di carica della/e batteria/e viene mo strato sullo schermo.
4. Scollega il caricabatterie dalla porta di carica della bici cletta con attenzione, tirando delicatamente la spina del caricabatterie. Assicurati che lo sportellino della porta di carica sia chiuso nel modo corretto. Mentre il caricabatterie è collegato alla Rise, la bici cletta non può essere accesa. Scollega il caricabatterie dalla bici e accendi la bici per verificare il livello di ca rica della batteria corrente, qualora non sia possibile ricaricare la batteria completamente. Se il LED del caricabatterie si accende in rosso quando lo si collega alla presa oppure durante il processo di carica, significa che c’è qualche anomalia nella carica. Scollega immediatamente il caricabatterie e consulta il metodo per la risoluzione del problema ri portato nel manuale tecnico Blue Paper della Rise H. Se il problema persiste, contatta un rivenditore autorizzato.
Accendi la tua unità Garmin compatibile (dopo aver prece dentemente scaricato e installato Orbea RS Toolbox sulla stessa) e vai al campo RS Toolbox. Quindi accendi la bicicletta per vedere il livello di carica della batteria corrente. Se il livello di carica della batteria non viene visualizzato sul Toolbox, spegni la bicicletta e accendila nuovamente per ripristinare il collegamento. Leggi come scaricare e installare il campo dati Orbea RS Toolbox sulla tua unità compatibile Garmin nella sezione dedicata di questo manuale. CON CENTRALINA SHIMANO EW-EN100 Accendi la bicicletta. Il LED1 de la centralina Shimano EW-EN100 mostrerà la carica rimanente della/e batte ria/e. Il LED1 mostrerà una luce verde fino a che la carica della batteria è inferiore al 21%, dopodiché il LED1 mo strerà una luce rossa. Quando la batteria è quasi esauri ta, il LED1 lampeggerà in rosso.
1. Inserisci lo Smart Charger RS nella presa di corrente. Mentre il caricabatterie non è collegato alla bicicletta, il LED sul corpo del caricabatterie lampeggerà in blu.
UNITÀ GARMIN COMPATIBILI. ORBEA RS TOOLBOX
Prima di utilizzare la batteria interna o il Range Extender per la prima volta, carica completamente le batterie. Carica la batteria interna e/o il Range Extender non appena li ricevi. Se prevedi di non utilizzare la bici o il Range Extender, assicurati che le batterie abbiano un livello di carica pari ad almeno il 50% della loro capacità ogni 3 mesi.
04 VERIFICA DEL LIVELLO DI CARICA DELLA BATTERIA CON CICLOCOMPUTER SHIMANO
2. Apri lo sportellino della porta di carica della bicicletta e collega il caricabatterie allineando correttamente il connettore. La freccia sulla spina del caricabatterie deve essere allineata alla parte superiore della porta di carica. Il LED sul corpo del caricabatterie diventerà blu per 2 secondi e poi la luce inizierà a svanire ciclicamente fino a quando la batteria non sarà completamente carica.
ERRORI E AVVERTENZE DEL SISTEMA
CAMBIO TRA I PROFILI DI ASSISTENZA
Utilizzando l’app Shimano Etube Project Cyclist per smar tphone, puoi personalizzare il sistema EP8 RS per regolare la Rise secondo le tue necessità. Ciascuna modalità di ser voassistenza può essere modificata per fornire la potenza esatta per il tuo stile di corsa. Scarica l'app Shimano Etube Project Cyclist dall' Apple Store o da Google Play. Il motore EP8 consente anche di scegliere tra due diversi profili di servoassistenza. In ciascun profilo, l’uscita di potenza di ciascuna modalità di servoassistenza può es sere modificata per ottenere la potenza che ti serve in qualsiasi situazione. Il profilo di servoassistenza 1 è progettato per attività con salite poco ripide, riducendo leggermente l’erogazione di potenza a favore di una maggiore gamma disponibile. Il profilo di servoassistenza 2 è progettato per attività più impegnative e salite più ripide, erogando più potenza dal Consultamotore.ilmanuale completo dell’app Etube Project sul sito internet Shimano. Etube Project ti consente anche di personalizzare i pulsanti dell'interruttore, visualizzare rap porti sugli errori e aggiornare il firmware dei componenti, tra le altre funzioni. Consulta il manuale completo dell'app qui: https://si.shimano.com/#/en/iUM/7J4MA È anche possibile leggere come cambiare i profili di servo assistenza e modificare le modalità di servoassistenza sul manuale tecnico Blue Paper della Rise Hydro.
RISE HYDRO 20228 | ORBEA BOOST W101 GUIDA RAPIDA ORBEA | IT9 05 APP SHIMANO ETUBE PROJECT.
Sui modelli Rise senza ciclocomputer Shimano, dovrai col legare la tua bicicletta all'app Etube Project per seleziona re il tuo profilo di servoassistenza corrente. Sui modelli dotati di ciclocomputer Shimano, è possibile selezionare il profilo di servoassistenza attraverso il ciclo computer, anche se per personalizzare le modalità di ser voassistenza sarà necessario collegare la bicicletta all'app Etube Project.
PERSONALIZZA LA TUA RISE
Quando il sistema rileva un errore o un’avvertenza, en trambi i LED sulla centralina SHIMANO EW-EN100 lam peggeranno in rosso. Nei montaggi con ciclocomputer Shimano, il codice di errore verrà mostrato sullo schermo. È possibile collegare la bicicletta all'app Etube Project per scoprire il codice di errore o di avvertenza e la sua procedura di risoluzione. Spegni e riaccendi la bicicletta e collegala all’app. Il codice di errore e la procedura di risoluzione del pro blema sono consultabili nella sezione Manutenzione>Er ror Log.
Consulta il manuale sul campo dati Orbea RS Toolbox completo sul manuale tecnico Blue Paper della Rise Hydro disponibile sul sito di Orbea.
Garmin Connect mediante una connessione Bluetooth. Puoi seguire la stessa procedura sul tuo PC o Mac usando Garmin Express, collegando il tuo dispositivo al computer con un cavetto USB. Per sbloccare Orbea RS Toolbox sul tuo di spositivo Garmin, devi aver registrato il codi ce a barre della tua nuova Rise sul sito inter net di Orbea, il che ti consentirà di godere dei vantaggi della Garanzia a vita sul tuo nuovo telaio. Visita il sito internet di Orbea e registra il codice a barre della bicicletta, creando per prima cosa un account, se non ne avevi uno. www.orbea.com/es-es/access-register
Il codice a barre della tua bicicletta è un codice a 11 cifre che si trova sul telaio:
5. Cerca “Orbea RS Toolbox” nel Garmin IQ Store. Sele ziona “Sblocca” Orbea RS Toolbox. Se non vedi l’app Orbea RS Toolbox nell’IQ Store, il tuo dispositivo non è compatibile con l’app. Lavoriamo ogni giorno per include re nuovi dispositivi, contatta Orbea per avere maggiori informazioni.
3. Seleziona “Campi dati”.
4. Seleziona “Ottieni altri campi dati”.
RISE HYDRO 202210 | ORBEA 21 543 GUIDA RAPIDA ORBEA | IT11 06 ORBEA RS TOOLBOX. CAMPO DATI PER UNITÀ COMPATIBILI GARMIN
AVVISO AVVISO AVVISO
1. Dopo aver registrato la tua Rise sul sito internet di Or bea, apri l’app Garmin Connect sul tuo smartphone e collega il tuo dispositivo via Bluetooth. Puoi scaricare e installare Garmin Connect da Google Play o dall'Apple Store.
2. Seleziona “Attività e gestione Applicazioni”. AVVISO
Guarda il video su come installare e configurare Orbea RS Toolbox sui dispositivi Garmin: www.youtube.com/watch?v=F-4lUxxOuFs O scansiona il codice QR qui di seguito per accedere di rettamente al video: INSTALLAZIONE E SBLOCCO DI ORBEA RS TOOLBOX SUI DISPOSITIVI GARMIN. APP GARMIN CONNECT Orbea RS Toolbox è un’applicazione per dispositivi compa tibili Garmin, disponibile in esclusiva per i proprietari delle biciclette Rise. Viene aggiunta al tuo dispositivo Garmin come campo dati, e ti consente di visualizzare informazio ni rilevanti sulla tua Rise mentre pedali. Il seguente metodo descrive come installare e sbloccare Orbea RS Toolbox sul tuo disposi tivo Garmin utilizzando l’app per smartphone
8. Se hai già registrato il tuo codice a barre Rise, un messaggio ti informerà che il tuo dispositivo Garmin è stato sbloccato.
11. Vai su “Attività e gestione Applicazioni > Campi dati”. Vedrai che Orbea Toolbox è stato installato sul tuo dispositivo. Se Toolbox è visibile ma non installato, sincronizza il tuo dispositivo.
RISE HYDRO 202212 | ORBEA GUIDA RAPIDA ORBEA | 13IT
7. Inserisci i tuoi dati di accesso al tuo account Orbea.
9. Torna su Garmin Connect sul tuo telefono. Noterai che il pulsante “Sblocca” è ancora visibile nella scherma ta Orbea RS Toolbox. Digita nuovamente “Orbea RS Toolbox” nel campo di ricerca di Garmin Connect, e selezionala. A questo punto vedrai che il pulsante di sblocco è scomparso e visualizzerai solo il pulsante “Scarica”. Scarica Orbea RS Toolbox. Un messaggio ti informerà che l’app verrà installata quando sincronizze rai il tuo dispositivo.
10. Vai su Garmin Connect sul tuo telefono e sincronizza il tuo dispositivo Garmin con l’app.
In alcuni modelli di orologio e unità se rie 30 Edge, l’ecosistema dell’IQ Store al quale si viene reindirizzati da Con nect per poter cercare RS Toolbox mo stra unicamente il pulsante “Installa”. In tal caso, scarica RS Toolbox, torna su Connect e sin cronizza il tuo dispositivo. Successivamente, seleziona “Campi dati” > “Orbea RS Toolbox” e scegli “Vedere nello Store”. La schermata alla quale avrai accesso ti mostrerà a questo punto il pulsante di sblocco. Segui la procedura di sblocco dal punto 5 di questa se zione. Se una volta completata la procedura non è pos sibile Toolboxvisualizzaresultuodispositivo, disinstalla Toolbox da Garmin Connect e inizia nuovamente la procedura di installazio ne, selezionando “Vedere nello Store” dopo aver finito (ciò potrebbe essere dovuto al fatto che lo sblocco per il primo download non aveva funzionato).
AVVISO
6. Un messaggio ti informerà che stai per lasciare l’IQ Store. Clicca su “Continua” per essere reindirizzato alla pagina di attivazione Orbea.
polso * Scopri
5. Con la bicicletta accesa, accedi al profilo attività sul quale hai scelto di vedere i dati da Toolbox oppure ini zia a registrare un’attività su questo profilo con la tua unità Garmin. Naviga fino alla pagina che hai scelto per visualizzare Toolbox per accedere ai dati in tempo reale dalla tua bicicletta. da DispositivipolsoGarmin da di più sul manuale del campo dati Orbea RS Toolbox sul manuale tecnico Blue Paper della Rise Hydro disponibile sul sito di Orbea.
3. Seleziona “Campi dati” e la pagina del profilo attività sulla quale vuoi visualizzare i dati della tua bicicletta. Abilita la pagina dei dati e scegli la visualizzazione di un campo dati unico. Orbea RS Toolbox non è compatibile con l’utilizzo dell’app nativa Garmin Edge Shimano STEPS sui dispositivi Edge 530, 830, 1030 e 1030 Plus. Scollega o cancella la tua bicicletta dall’elenco di sensori della tua unità Edge prima di provare a utilizzare Orbea RS Toolbox.
RISE HYDRO 202214 | ORBEA GUIDA RAPIDA ORBEA | 15IT
Dopo aver scaricato e sbloccato Toolbox tramite Garmin Express (PC o Mac) o Garmin Connect (smartphone) e aver sincronizzato la tua unità Garmin, attiva la visualizzazione dei campi dati sul tuo dispositivo. Di seguito viene mostrato il metodo per visualizzare il cam po dati Toolbox sia sui dispositivi Garmin da polso sia sulle unità Edge compatibili.
2. Accedi a “Profili attività” dal menu “Impostazioni” sul tuo dispositivo e scegli il profilo con il quale vuoi utiliz zare la bicicletta.
4. Scorri i dati sullo schermo. Seleziona Connect IQ e sce gli Orbea RS Toolbox. Se non avevi acceso la tua bicicletta prima di impostare Toolbox sul tuo dispositivo, l’unità mostrerà il messag gio “Cercando...” dopo aver scelto il campo dati Orbea RS Toolbox. Quando accendi la bicicletta e accedi alla pagina in cui hai scelto di visualizzare Toolbox, i dati della tua bicicletta saranno visibili.
ABILITAZIONE DI ORBEA RS TOOLBOX SUL PROPRIO DISPOSITIVO*
1. Accendi la bicicletta e l’unità dove hai installato Orbea RS Toolbox, si accoppieranno automaticamente.
Dispositivi Garmin da polso Dispositivi Garmin Edge Dispositivi Garmin Edge Dispositivi Garmin da polso AVVISO Dispositivi Garmin Edge Dispositivi Garmin
Edge Dispositivi Garmin
RISE HYDRO 202216 | ORBEA 3 5 N.m x6321 31 2 2 13 GUIDA RAPIDA ORBEA | IT17
ALLA RISE HYDRO
1. Installa il supporto specifico per Range Extender sul tubo obliquo e fissalo con i bulloni originali a una coppia consigliata di 5 Nm.
3. Ruota le linguette di sicurezza del cavo in senso orario per fissare il cavo.
COLLEGAMENTO DEL RANGE EXTENDER
1. Ruota le linguette di sicurezza del cavo del Range Exten der in senso antiorario prima di collegarlo alla batteria. 2. Collega il cavo alla porta di carica del Range Extender. Apri la porta di carica della bicicletta e collega il cavo del Range Extender.
07 RANGE
MONTAGGIO DEL RANGE EXTENDER
2. Quando installi il supporto del Range Extender, rimuovi le quattro rondelle preinstallate sul telaio e assicurati che i sei punti di contatto del Range Extender aderisca no correttamente al tubo obliquo.
3. Installa il Range Extender sul supporto e fissalo con l’oring laterale. Quando il Range Extender non è installato, il por taborraccia Range Extender è compatibile con le borracce standard.
AVVISO AVVISO
Una volta accesa la Rise, il Range Extender sarà operativo. Non è necessario accendere il Range Extender. Se il Range Extender viene scollegato quando la bici è accesa, questa si spegnerà da sola e sarà necessario riaccenderla. Ciò si verifi ca affinché il sistema si riavvii e riconosca la batteria interna come l’unica fonte di alimen tazione corrente. EXTENDER RS CON BATTERIA ESTERNA Se la Rise è accesa quando colleghi il Range Extender alla bicicletta, il sistema si spegnerà automaticamente e dovrai riaccenderlo pre mendo il pulsante di accensione. Ciò si verifica affinché il sistema si riavvii e riconosca il Range Extender come parte del sistema di alimentazione quando riaccendi la SeRise.stavi registrando un’attività con Garmin Connect utilizzando Orbea RS Toolbox, ciò non avrà alcun effetto sui dati registrati du rante l’attività. I dati della Rise continueranno a esser registrati quando la riaccendi. Una volta accesa la Rise, il Range Extender sarà operativo. Non è necessario accendere il Range Extender. Se il Range Extender viene scollegato quando la bici è accesa, questa si spegnerà da sola e sarà necessario riaccenderla. Ciò si verifi ca affinché il sistema si riavvii e riconosca la batteria interna come l’unica fonte di alimen tazione corrente.
Per scollegare il cavo del Range Extender o per rimuo vere il Range Extender dalla bicicletta per caricarlo, ruo ta innanzitutto le linguette di sicurezza del cavo e tira delicatamente il connettore del cavo. Se la Rise è accesa quando colleghi il Range Extender alla bicicletta, il sistema si spegnerà automaticamente e dovrai riaccenderlo pre mendo il pulsante di accensione. Ciò si ve rifica affinché il sistema si riavvii e riconosca il Range Extender come parte del sistema di alimentazione quando riaccendi la Rise. Se stavi registrando un’attività con Garmin Connect utilizzando Orbea RS Toolbox, ciò non avrà alcun effetto sui dati registrati durante l’attività. I dati della Rise continue ranno a esser registrati quando la riaccendi.
RISE HYDRO 202218 | ORBEA 100% 2431 GUIDA RAPIDA ORBEA | 19IT
CARICAMENTO DEL RANGE EXTENDER
3. Collega il caricabatterie al Range Extender allineando nel modo corretto i pin del connettore con quelli della porta di carica del Range Extender. Il LED sul corpo del caricabatterie diventerà blu per 2 secondi e poi la luce inizierà a svanire ciclicamente fino a quando la batteria non sarà completamente carica. Mentre il Range Extender viene caricato, i LED che indicano la carica mostreranno il livello corrente della batteria. Il LED lampeggiante mostra la gamma (a in crementi del 25%) che viene caricata in quel momento.
4. Quando la batteria è completamente carica, i LED sul corpo del caricabatterie si accendono con una luce blu fissa. Scollega il caricabatterie dalla porta di carica con attenzione, tirando delicatamente la spina del caricatore. Se il LED del caricabatterie si accende in rosso quando lo si collega alla presa oppure durante il processo di carica, significa che c’è qualche anomalia nella carica. Scollega immediatamente il caricabatterie e consulta il metodo per la risoluzione del problema ri portato nel manuale tecnico Blue Paper della Rise H. Se il problema persiste, contatta un rivenditore autorizzato.
LIVELLO DELLA BATTERIA AUTONOMA RANGE EXTENDER Premi una volta il pulsante principale del Range Extender per conoscere il livello di carica corrente.
2. Scollega il cavo di collegamento del Range Extender dalla porta di carica della bicicletta (se collegato) giran do in senso antiorario le linguette di sicurezza del cavo e tirandolo delicatamente.
Il Range Extender alimenta il motore EP8 RS direttamente. Quando usi la Rise con il Range Extender collegato al siste ma, il motore utilizzerà l’energia unicamente dal Range Ex tender finché questo non si esaurisce. Quando non rimane carica nel Range Extender, la batteria interna inizierà ad alimentare il motore qualora abbia ancora carica.
1. Per caricare il Range Extender, inserisci il caricabatterie RS nella presa di corrente. Mentre il Range Extender non è collegato al caricabatterie, il LED sul corpo del caricabatterie lampeggerà in blu.
VISUALIZZAZIONE DEL LIVELLO DI CARICA LIVELLO COMBINATO DELLA BATTERIA Quando un Range Extender è collegato alla Rise, il siste ma calcola la capacità totale sia del Range Extender sia della batteria interna (792 Wh) e l’informazione sul livello di carica rimanente del sistema terrà conto della carica rimasta sulla capacità totale di 792 Wh. Il livello di carica combinato sarà visibile attraverso la cen tralina o il ciclocomputer Shimano o il campo dati Orbea RS Toolbox per dispositivi compatibili Garmin.
Le luci LED mostreranno la carica corrente a incrementi del 25% da destra a sinistra, per 5 secondi. Quando il Range Extender è collegato alla bicicletta e la sua carica è esaurita, il sistema mostra, per mezzo dei metodi disponibili (ciclocomputer, centralina o RS Tool box) la carica disponibile solo nella batteria interna, non tenendo conto della capacità totale della batteria interna e del Range Extender insieme. AVVISO
DELFUNZIONAMENTORANGEEXTENDER
RISE HYDRO 202220 | ORBEA ORBEA | 21GUIDA RAPIDA IT21
EN 01 | ES 12 | FR 23 | IT 34 | DE 45 SCHNELLSTARTANLEITUNGRISEHYDRO2022
Das
Lade den integrierten Akku und/oder den Range Extender vor dem ersten Einsatz vollständig auf. Lade den integrierten Akku bzw. den Range Extender sofort nach Erhalt auf. Wenn du das Fahrrad oder den Range Extender nicht benutzt, stelle sicher, dass die Akkus alle drei Monate auf mindestens 50 % ihrer Kapazität aufgeladen werden.
SPRACHENHINWEISWICHTIGER du die neueste Version Schnellstartanleitung anderen möchtest, kannst du eine digi von der herunterladen: Oder den um die digitale aufzurufen:
folgenden QR-Code ein,
Website unter: Orbea.com > Support > Handbücher > E-Bikes > Blue Paper Rise Hydro 2022 Oder
Hydro von
tale Version
dieser
Orbea.com > Support > Handbücher > E-Bikes > Quickstart Guide Rise Hydro 2022.
Diese Schnellstartanleitung ist weder das vollständige Handbuch zum Rise Hy dro noch die allgemeine Bedienungsanleitung zu Orbea Fahrrädern. Du kannst das vollständige technische Handbuch Blue Paper Rise unserer Website herunterladen. findest du alle nötigen Informationen über den Gebrauch und die Pflege des Rise und seiner Komponenten sowie Informatio nen über Ersatzteile, Gewährleistungsbestimmungen und wichtige Rat schläge zur Pflege und Wartung der Komponenten. So wirst du lange Freude an deinem Rise haben und sein Potenzial voll nutzen können. Blue Paper Rise 2022 findest du auf unserer scanne um dieses
Orbea Website
technische Handbuch direkt aufzurufen:
Sprachen lesen
scanne
den QR-Code,
Darin
Apps,
Wenn
in
HINWEIS ZUR KOMPATIBILITÄT Kein Bestandteil des Motorsystems Orbea RS am Rise Hydro 2022 (integrierter Akku, Range Extender, Smart Charger und Verkabelung) ist mit den Rise Carbon 20212022 Modellen kompatibel. Kein Bestandteil des Motorsystems Orbea RS am Rise Carbon 2021-2022 (integrierter Akku, Range Extender, Ladegerät und Verkabelung) ist mit den Rise Hydro 2022 Modellen kompatibel.
Hydro
RISE HYDRO 20222 | ORBEA SCHNELLSTARTANLEITUNG ORBEA |DE3
Version direkt
01 EIN-/AUSSCHALTEN DES RISE 04 02 WECHSEL DER UNTERSTÜTZUNGSSTUFE 05 03 AUFLADEN DES AKKUS 06 04 ANZEIGE DES AKKU-LADESTANDS 07 05 ETUBE PROJECT APP VON SHIMANO. RISE PERSONALISIEREN 08 06 ORBEA RS TOOLBOX. DATENFELD FÜR KOMPATIBLE GARMIN GERÄTE 10 07 EXTERNER AKKU RS RANGE EXTENDER 16 INHALTSCHNELLSTARTANLEITUNG
Verwende die Knöpfe X und Y des Shimano Unterstüt zungsstufenschalters am Lenker, um zwischen den Unter stützungsstufen umzuschalten. Drücke auf X, um eine höhere Unterstützungsstufe auszuwählen. Die höchste verfügbare Unterstützungsstufe ist die Stufe BOOST. Drücke auf Y, um eine niedrigere Unterstützungsstufe aus zuwählen oder die Unterstützung ganz auszuschalten.
ANZEIGE DER AKTUELLEN UNTERSTÜTZUNGSSTUFE Beim Ändern der Unterstützungsstufe wird die aktuelle Stufe an der Verbindungseinheit EW-EN100 von Shimano (Konfigurationen ohne Display), am Shimano Display und/ oder deinem kompatiblen Garmin Gerät mit dem Orbea RS Toolbox Datenfeld angezeigt, das auf dem Rise installiert und damit verbunden ist. Lies den Abschnitt über Orbea RS Toolbox in dieser An leitung und im Blue Paper Rise Hydro, um zu erfahren, wie du Orbea RS Toolbox auf deinem kompatiblen Garmin Gerät herunterlädst, entsperrst und installierst.
01 EIN-/AUSSCHALTEN DES RISE
Lass den Y-Knopf los und drücke ihn erneut, um die Schiebehilfe zu aktivieren. Die Schiebehilfe des Rise bleibt aktiv, solange du den Y-Knopf gedrückt hältst.
RISE HYDRO 20224 | ORBEA 3 sec. OFF WALK &ReleaseHoldY 1 sec. YX OFF > ECO > TRAIL > BOOST BOOST > TRAIL > ECO > OFF LED 2 BOOSTOFFECOTRAIL TOOLBOXORBEADISPLAYSHIMANOEW-WN100SHIMANORS 3 sec. OFF SCHNELLSTARTANLEITUNG ORBEA |DE5 ZUM EINSCHALTEN DES RISE H Drücke einmal auf den unten im Rahmen befindlichen Einschaltknopf. ZUM AUSSCHALTEN DES RISE H
Halte den unten im Rahmen befindlichen Einschaltknopf drei Sekunden lang gedrückt, bis das Licht am Knopf erlischt. SCHIEBEHILFE Zum Einschalten der Schiebehilfe halte den Y-Knopf des Unterstützungsstufenschalters am Lenker eine Sekunde lang gedrückt. Im Shimano Display erscheint die Anzei ge WALK, bei der Verbindungseinheit EW-EN100 leuchtet LED2 dunkelblau auf.
02 WECHSEL DER UNTERSTÜTZUNGSSTUFE
RISE HYDRO 20226 | ORBEA 100%4321 ERROR! 100% - 21% 20% or less depletedAlmost LED 1 100% - 81% 80% - 61% 60% - 41% 40% - 21% 20% - 1% 0% SCHNELLSTARTANLEITUNG ORBEA | DE7 03 AUFLADEN DES INTEGRIERTEN AKKUS
3. Wenn der Akku vollständig aufgeladen ist, leuchtet die LED des Ladegeräts dauerhaft blau.
2. Öffne die Abdeckung der Ladebuchse am Fahrrad und schließe das Ladegerät an. Beim Einstecken auf die richtige Steckerausrichtung achten. Der Pfeil am Stecker des Ladegeräts muss zur Oberseite der Lade buchse gerichtet sein. Die LED am Ladegerät leuchtet daraufhin zwei Sekunden lang blau, worauf ein lang sames zyklisches Aufleuchten und Ausblenden bis zur vollständigen Aufladung des Akkus folgt.
Wenn die LED am Ladegerät beim Anschluss des Ladegeräts an die Steckdose oder während des Ladevorgangs rot leuchtet, liegt eine Stö rung vor. Trenne das Ladegerät umgehend ab und lies die im technischen Handbuch Blue Pa per Rise Hydro empfohlenen Maßnahmen zur Störungsbeseitigung am Ladegerät. Sollte sich das Problem nicht beheben lassen, setze dich mit einem autorisierten Händler in Verbindung.
Lade den integrierten Akku und den Range Extender vor dem ersten Einsatz deines Fahrrads vollständig auf. Lade den integrierten Akku bzw. den Range Extender sofort nach Erhalt auf. Wenn du das Fahrrad oder den Range Extender nicht benutzt, stelle sicher, dass die Akkus alle drei Monate auf mindestens 50 % ihrer Kapazität aufgeladen werden.
1. Schließe den RS Smart Charger an der Steckdose an. Wenn das Ladegerät nicht mit dem Fahrrad verbunden ist, blinkt die LED des Ladegeräts blau.
Schalte dann das Fahrrad ein, um den aktuellen Akkustand zu sehen. Wenn der Akkustand nicht in Toolbox angezeigt wird, schalte das Fahrrad aus und wieder ein, um die Verbin dung erneut herzustellen. Nähere Informationen zu Download und Installation der Orbea RS Toolbox App auf deinem Garmin Gerät erhältst du im entsprechenden Abschnitt dieses Handbuchs.
VON SHIMANO Schalte das Fahrrad ein. Die LED1 der Verbindungsein heit EW-EN100 von Shimano zeigt den Ladestand des/ der Akkus an. Die LED1 leuchtet grün, bis der Ladestand unter 21 % sinkt. Anschließend leuchtet die LED1 rot. Wenn der Akku beinahe erschöpft ist, blinkt die LED1 rot.
4. Trenne das Ladegerät von der Ladebuchse des Fahr rads, indem du den Stecker des Ladegeräts vorsichtig abziehst. Vergewissere dich anschließend, dass die Ab deckung der Ladebuchse sauber abschließt.
BEI VERBINDUNGSEINHEIT EW-EN100
04 ANZEIGE DES AKKU-LADESTANDS BEI SHIMANO DISPLAYS
Schalte das Fahrrad ein. Wenn ein Shimano Display verbaut ist, wird der Ladestand des/der Akkus am Bild schirm angezeigt.
Schalte dein kompatibles Garmin Gerät ein (auf dem du zuvor Orbea RS Toolbox heruntergeladen und installiert hast) und navigiere zum Feld RS Toolbox.
KOMPATIBLE GARMIN GERÄTE. ORBEA RS TOOLBOX
Während das Ladegerät mit der Ladebuchse verbunden ist, kannst du das Fahrrad nicht einschalten. Trenne das Ladegerät vom Fahrrad und schalte das Fahrrad ein. Falls der Akku nicht vollständig geladen werden konnte, kannst du so den aktuellen Akkustand überprüfen.
RISE HYDRO 20228 | ORBEA BOOST W101 SCHNELLSTARTANLEITUNG ORBEA |DE9 05 ETUBE PROJECT APP VON SHIMANO.
Unterstützungsprofil 1 wurde eher für Fahrten im flachen Gelände entwickelt. Es bietet etwas weniger Motor leistung und eine dafür entsprechend höhere Reichweite. Profil 2 hingegen wurde für intensivere Fahrten mit mehr Auf und Ab ausgelegt und liefert dazu eine höhere Unterstützungsleistung. Weitere Informationen findest du in Shimanos vollständigem Handbuch zur Etube Project App für Smartphones. Über die Etube Project App kannst du unter anderem auch die Belegung des Unterstützungs stufenschalters anpassen, Fehlercodes einsehen oder die Firmware der einzelnen Komponenten aktualisieren. Die vollständige Anleitung zur App findest du hier: https://si.shimano.com/#/de/iUM/7J4MA Informationen zum Wechseln der Unterstützungsprofile und Anpassen der Unterstützungsstufen sind auch im technischen Handbuch Blue Paper Rise Hydro enthalten.
Über die Etube Project Cyclist App fürs Smartphone kannst du die Unterstützungsstufen des Shimano EP8 Mo tors im Rise an deine Bedürfnisse anpassen. Du kannst jede Unterstützungsstufe so verändern, dass sie genau die zu deinem Fahrstil passende Leistung bietet. Lade die Etu be Project Cyclist App von Shimano im Apple Store oder bei Google Play herunter.
RISE PERSONALISIEREN
SYSTEMWARNUNGEN UND -FEHLER
Du kannst dein Fahrrad mit der Etube Project App ver binden, um den Fehler- oder Warncode sowie mögliche Maßnahmen zur Störungsbeseitigung anzuzeigen. Schal te das Fahrrad aus und wieder ein und verbinde es mit der App.
Zudem erlaubt der EP8-Motor die Auswahl von zwei un terschiedlichen Unterstützungsprofilen. In jedem dieser Profile kannst du jede Unterstützungsstufe anpassen, um die Leistung des Rise genau auf deine Bedürfnisse ein Daszustellen.
ZWISCHEN UNTERSTÜTZUNGSPROFILEN UMSCHALTEN Bei Rise Modellen ohne Shimano Display musst du dein Fahrrad mit der Etube Project App verbinden, um dein aktuelles Unterstützungsprofil auszuwählen. Bei Modellen mit Shimano Display kannst du das Unterstützungsprofil über das Display auswählen. Um die Unterstützungsstufen individuell anzupassen, musst du dein Fahrrad jedoch mit der Etube Project App verbinden.
Wenn ein Fehler oder eine Warnung im System erkannt wird, blinken beide LEDs an der Verbindungseinheit EWEN100 von Shimano rot. Ist ein Shimano Display verbaut, wird der Fehlercode im Display angezeigt.
Der Fehlercode und die Vorgehensweise zur Fehlerbe hebung werden im Abschnitt Wartung > Fehlerprotokoll angezeigt.
RISE HYDRO 202210 | ORBEA 21 543 SCHNELLSTARTANLEITUNG ORBEA |DE11
2. Wähle „Aktivitäten und App-Verwaltung“. Falls du die Orbea RS Toolbox App nicht im Garmin IQ Store findest, ist dein Gerät nicht kompatibel zu der App. Wir arbeiten konti nuierlich daran, die App für weitere Geräte zugänglich zu machen. Melde dich bei Or bea, falls du weitere Informationen hierzu benötigst. 06 ORBEA RS TOOLBOX.
4. Drücke auf „weitere Datenfelder abrufen“.
5. Suche „Orbea RS Toolbox“ im IQ Store und wähle „Entsperren“.
1. Nachdem du die Rahmennummer auf der Orbea Web site registriert hast, öffne die Garmin Connect App auf deinem Smartphone und verbinde dein Gerät per Blue tooth. Zuvor musst du Garmin Connect über Google Play oder den Apple Store installiert haben.
Oder scanne den folgenden QR-Code ein, um das Video direkt aufzurufen:
ORBEA RS TOOLBOX AUF GARMIN GERÄTEN INSTALLIEREN UND ENTSPERREN. GARMIN CONNECT APP Orbea RS Toolbox ist eine speziell für Rise-Fahrer verfüg bare App für Garmin Geräte. Du kannst das entsprechen de Datenfeld auf deinem kompatiblen Gerät anzeigen, um wichtige Informationen zu deinem Rise während der Fahrt im Auge zu behalten.ImFolgenden erfährst du, wie du Orbea RS Toolbox auf deinem Garmin Gerät über die Smartphone-App Garmin Connect via Blue tooth-Verbindung installierst und entsperrst. Das Ganze funktioniert auch über die Gar min Express App auf deinem PC oder Mac, wenn du dein Gerät per USB-Kabel mit dei nem Computer verbindest. Um Orbea RS Toolbox zu entsperren, musst du die Rahmennummer deines neuen Rise auf der Orbea Website registriert haben. Da durch kommst du gleichzeitig in den Genuss der lebenslangen Orbea Garantie. Besuche die Orbea Website und registriere deine Rah mennummer. www.orbea.com/es-es/access-register
3. Wähle „Datenfelder“.
In dem folgenden Video erfährst du, wie du Orbea RS Tool box auf Garmin Geräten installierst und konfigurierst: www.youtube.com/watch?v=F-4lUxxOuFs
DATENFELD FÜR KOMPATIBLE GARMIN GERÄTE
Du findest die elfstellige Rahmennummer deines Rades auf dem Rahmen:
Die vollständige Anleitung zum Orbea RS Toolbox Datenfeld findest du im technischen Handbuch Blue Paper Rise Hydro auf der Or bea Website.
9. Kehre auf deinem Smartphone zurück zu Garmin Con nect. Du wirst feststellen, dass die Schaltfläche zum Entsperren weiterhin auf dem Orbea RS Toolbox Fenster zu sehen ist. Suche Orbea RS Toolbox erneut über die Suchfunktion von Garmin Connect und wähle die App aus. Jetzt sollte die Schaltfläche zum Ent sperren verschwunden und nur noch die Schaltfläche zum Herunterladen der App sichtbar sein. Lade die App herunter. Du erhältst eine Nachricht, dass die App sich installiert, wenn du dein Gerät synchronisierst.
Führe den in diesem Abschnitt beschriebenen Entsperr vorgang ab Schritt 5 aus. Wenn die Toolbox im Anschluss nicht auf deinem Gerät angezeigt wird, deinstalliere die Toolbox von Garmin Connect und star te den Installationsprozess erneut, wobei du nach der Installation der Toolbox „Im Store anzeigen“ auswählst. (Dieses Problem kann auftreten, weil der Entsperrvor gang beim ersten Download nicht funktioniert hat.)
6. Du erhältst eine Meldung, dass du im Begriff bist, den IQ Store zu verlassen. Bestätige die Meldung, um zu rück zur Aktivierungsseite von Orbea zu gelangen.
RISE HYDRO 202212 | ORBEA SCHNELLSTARTANLEITUNG ORBEA | DE13
11. Wähle „Datenfelder“ unter „Aktivitäten und App-Verwal tung“. Jetzt sollte Orbea RS Toolbox auf deinem Gerät verfügbar sein. Synchronisiere dein Gerät, falls die App sichtbar, aber scheinbar nicht installiert sein sollte.
Bei manchen Uhrenmodellen und Ge räten der Serie 30 Edge wird im Öko system des IQ Stores, zu dem du von Connect zur Suche nach der RS Toolbox weitergeleitet wirst, nur die Schaltflä che „Installieren“ angezeigt.
7. Trage deine Zugangsdaten zu deinem Orbea Nutzer konto ein.
In diesem Fall lädst du die RS Toolbox herunter, gehst zurück zu Connect und synchronisierst dein Gerät. Wähle dann „Datenfelder“ > „Orbea RS Toolbox“ und schließlich „Im Store anzeigen“. Auf dem Bildschirm, zu dem du nun gelangst, wird die Schaltfläche „Entsperren“ angezeigt.
10. Kehre auf deinem Smartphone zurück zu Garmin Con nect und synchronisiere dein Gerät mit der App.
8. Solltest du die Rahmennummer deines Rise bereits registriert haben, erhältst du eine Nachricht, dass dein Garmin Gerät erfolgreich entsperrt wurde.
Garmin Uhren Garmin Edge Geräte Edge Geräte Uhren Garmin Edge Geräte Garmin Uhren Garmin Edge Geräte Garmin Uhren
5. Greife bei eingeschaltetem Fahrrad auf das gewählte Aktivitätsprofil zu, um die Daten des Fahrrads anzu zeigen oder eine Aktivität in diesem Profil zu starten. Navigiere bis zu der Seite, welche du für die Anzeige von Orbea RS Toolbox ausgewählt hast, um auf die In formationen deines Fahrrads zuzugreifen.
1. Schalte dein Fahrrad ein und aktiviere das Garmin Ge rät, auf dem du die Daten deines Fahrrads anzeigen möchtest. Sie verbinden sich automatisch.
ORBEA RS TOOLBOX DATENFELD AUF DEINEM GERÄT ANZEIGEN* Nachdem du die Orbea Toolbox App über Garmin Express (PC und Mac) oder Garmin Connect (Smartphones) her untergeladen und installiert und dein Gerät synchronisiert hast, kannst du die Anzeige der Datenfelder in deinem kompatiblen Gerät aktivieren. Im Folgenden zeigen wir dir den Vorgang zur Anzeige des Toolbox Datenfelds für kompatible Garmin Uhren und Edge Geräte.
3. Wähle „Datenfelder“ und die Seite des Aktivitätsprofils, auf welcher du die Daten deines Fahrrads sehen möch test. Aktiviere die Datenseite und wähle die Darstellung eines einzigen Datenfeldes. Orbea RS Toolbox ist nicht mit dem gleichzeitigen Einsatz der nativen Gar min Edge Shimano STEPS App auf den Geräten Edge 530, 830, 1030 und 1030 Plus kompatibel. Entkopple oder lösche das Fahrrad aus der Übersicht der verbundenen Sensoren deines Garmin Gerätes, bevor du Orbea RS Toolbox nutzt.
Garmin
* Mehr Informationen über das Orbea RS Toolbox Datenfeld findest du im technischen Handbuch Blue Paper Rise Hydro auf der Orbea Website.
RISE HYDRO 202214 | ORBEA SCHNELLSTARTANLEITUNG ORBEA | DE15
4. Wähle aus, welche Informationen du in dem Datenfeld angezeigt bekommen möchtest. Wähle Connect IQ und drücke Orbea RS Toolbox. Solltest du das Fahrrad vor der Auswahl der Anzeige des Datenfelds nicht eingeschaltet haben, zeigt das Gerät nach der Auswahl des Datenfelds Orbea RS Toolbox die Nachricht „Suche…“. Wenn du das Fahrrad einschaltest und auf die im Aktivitätsprofil deines Geräts ausgewählte Seite zugreifst, siehst du die Daten des Fahrrads.
Garmin
2. Wähle im Einstellungsmenü deines Geräts den Punkt „Profile“ und wähle das Aktivitätsprofil, in welchem du auf die Fahrraddaten zugreifen möchtest.
VERBINDEN DES RANGE EXTENDER MIT DEM RISE HYDRO
2. Schließe das Kabel an der Ladebuchse des Range Extender an. Öffne die Ladebuchse am Fahrrad und schließe das Kabel des Range Extender an. 3. Fixiere das Kabel, indem du die Sicherungslaschen im Uhrzeigersinn drehst. Wenn du die Kabelverbindung des Range Extender lösen oder den Range Extender zum Aufladen vom Fahrrad nehmen möchtest, drehe zuerst die Siche rungslaschen des Kabels und ziehe dann vorsichtig am Kabelstecker. Sollte das Orbea Rise während des Anschlie ßens des Range Extender an der Ladebuchse des Fahrrads eingeschaltet sein, schaltet sich das System ab und muss durch Drücken des Einschaltknopfes neu gestartet werden. Die ser Vorgang ist notwendig, damit das System bei Neustart den Range Extender Akku als Teil des Motorsystems erkennen kann. Solltest du mit der Orbea RS Toolbox App eine Aktivität über Garmin Connect aufzeichnen, hat dieser Neustart keinen Einfluss auf die Aufzeichnung der Daten des Orbea Rise zu Garmin Connect. Die Daten der Aktivität wer den weiter aufgezeichnet, wenn du das Rise wieder nutzt. Wurde das Fahrrad einmal bei verbundenem Range Extender gestartet, ist der Range Extender einsatzbereit. Der Range Extender muss nicht extra gestartet werden. Wird der Range Extender bei eingeschalte tem Fahrrad abgetrennt, schaltet sich das Fahrrad von selbst aus und muss wieder ein geschaltet werden. Das System wird dadurch neu gestartet und erkennt den integrierten Akku als einzige Stromquelle.
RISE HYDRO 202216 | ORBEA 3 5 N.m x6321 31 2 2 13 SCHNELLSTARTANLEITUNG ORBEA | DE17 07 EXTERNER AKKU RS RANGE EXTENDER
1. Drehe die Sicherungslaschen am Range Extender Ka bel vor dem Anschluss an den Akku gegen den Uhr zeigersinn.
2. Entferne vor der Montage des Range Extender Halters die vier am Rahmen vormontierten Unterlegscheiben. Über prüfe nach der Montage, dass die sechs Kontaktpunkte des Range Extender korrekt am Unterrohr aufliegen.
3. Setze den Range Extender Akku in den Halter und fixie re ihn mit dem Sicherungsgummi. Wenn der Range Extender nicht eingesetzt ist, kannst du den Range Extender Flaschenhalter auch für herkömmliche Trinkflaschen nutzen.
MONTAGE DES RANGE EXTENDER
1. Montiere den speziellen Halter des Range Extender am Unterrohr des Rise. Ziehe die Befestigungsschrauben mit einem Drehmoment von 5 Nm an.
Sollte das Orbea Rise während des Anschlie ßens des Range Extender an der Ladebuchse des Fahrrads eingeschaltet sein, schaltet sich das System ab und muss durch Drücken des Einschaltknopfes neu gestartet werden. Dieser Vorgang ist notwendig, damit das Sys tem bei Neustart den Range Extender Akku als Teil des Motorsystems erkennen kann. Solltest du mit der Orbea RS Toolbox App eine Aktivität über Garmin Connect aufzeichnen, hat dieser Neustart keinen Einfluss auf die Aufzeichnung der Daten des Orbea Rise zu Garmin Connect. Die Daten der Aktivität werden weiter aufge zeichnet, wenn du das Rise wieder nutzt. Wurde das Fahrrad einmal bei verbundenem Range Extender gestartet, ist der Range Ex tender einsatzbereit. Der Range Extender muss nicht extra gestartet werden. Wird der Range Extender bei eingeschaltetem Fahrrad abgetrennt, schaltet sich das Fahrrad von selbst aus und muss wieder eingeschaltet werden. Das System wird dadurch neu ge startet und erkennt den integrierten Akku als einzige Stromquelle.
Wenn der Range Extender mit dem Orbea Rise verbun den ist (wenn das Orbea Rise mit verbundenem Range Extender eingeschaltet wurde), berechnet das System die Gesamtkapazität beider Akkus (792 Wh) und liefert die Information über den Ladestand des Systems als Summe des Ladestands beider Akkus.
DESFUNKTIONSWEISERANGEEXTENDER
ANZEIGE DES LADESTANDS KOMBINIERTER LADESTAND
Der kombinierte Ladestand wird über die Verbindungs einheit oder das Display von Shimano oder das Orbea RS Toolbox Datenfeld bei kompatiblen Garmin Geräten angezeigt.
Drücke einmal auf die Haupttaste am Range Extender, um den aktuellen Ladestand zu ermitteln. Die LEDs zeigen daraufhin fünf Sekunden lang den aktuel len Ladestand in 25-%-Schritten an. Wenn der Range Extender mit dem Fahrrad verbunden und seine Akkuladung aufgebraucht ist, zeigt das Sys tem über das Display, die Verbindungseinheit bzw. die RS Toolbox (abhängig von der jeweiligen Installation) nur die verfügbare Ladung des integrierten Akkus an. Es wird also nur die Kapazität des integrierten Akkus und nicht die Systemgesamtkapazität von integriertem Akku plus Range Extender berücksichtigt.
LADESTAND NUR RANGE EXTENDER
3. Verbinde nun das Ladegerät mit dem Range Extender. Achte dabei darauf, dass die Steckerstifte passend zur Ladebuchse am Range Extender ausgerichtet sind. Die LED am Ladegerät leuchtet daraufhin zwei Sekunden lang blau, worauf ein langsames zyklisches Aufleuchten und Ausblenden bis zur vollständigen Aufladung des Akkus Währendfolgt.der Range Extender aufgeladen wird, zeigen die Ladestandanzeige-LEDs den aktuellen Akkustand an. Die blinkende LED zeigt die aktuell aufgeladene Reichweite (in 25-%-Schritten) an.
RISE HYDRO 202218 | ORBEA 100% 2431 SCHNELLSTARTANLEITUNG ORBEA | DE19
AUFLADEN DES RANGE EXTENDER
4. Wenn der Akku vollständig aufgeladen ist, leuchtet die LED des Ladegeräts dauerhaft blau. Trenne das Lade gerät von der Ladebuchse, indem du den Stecker des Ladegeräts vorsichtig abziehst. Wenn die LED am Ladegerät beim Anschluss des Ladegeräts an die Steckdose oder wäh rend des Ladevorgangs rot leuchtet, liegt eine Störung vor. Trenne das Ladegerät umgehend ab und lies die im technischen Handbuch Blue Paper Rise Hydro empfoh lenen Maßnahmen zur Störungsbeseitigung am Ladegerät. Sollte sich das Problem nicht beheben lassen, setze dich mit einem autori sierten Händler in Verbindung.
1. Zum Aufladen des externen Range Extender Akkus schließt du zunächst das RS Ladegerät an der Steck dose an. Die LED am Ladegerät blinkt blau, solange der Range Extender nicht mit dem Ladegerät verbunden ist.
2. Trenne das Verbindungskabel des Range Extender zur Ladebuchse am Fahrrad ab (sofern angeschlossen), in dem du zuerst die Sicherungslaschen am Kabel gegen den Uhrzeigersinn drehst und anschließend vorsichtig am Kabel ziehst.
Der Range Extender versorgt den Shimano EP8 RS Mo tor unmittelbar mit Energie. Beim Einsatz des Orbea Rise mit verbundenem Range Extender versorgt ausschließlich der Range Extender den Motor mit Strom, bis seine Re serven erschöpft sind. Erst im Anschluss daran versorgt der integrierte Akku des Orbea Rise den Motor mit Strom – vorausgesetzt der integrierte Akku verfügt über eine ent sprechende Restladung.
RISE HYDRO 202220 | ORBEA ORBEA | 21SCHNELLSTARTANLEITUNG DE21
WWW.ORBEA.COM


