RFID
1. PROPER SET UP AND CHARGING
2. HARDWARE CONNECTION AND RELEASE
3. START UP AND APP LAUNCH

4. CONNECTING TO WI-FI
5. BLUETOOTH PAIRING
6. CONNECTING ZEBRA HH TO MOBILE X

7. STOCK COUNT
8. SHIPMENT RECEIVING
9. SEARCH
10. STOCK EXPLORER
11. GEIGER SEARCH
12. ENCODING
13. BOPIS
14. BEST PRACTICES & TROUBLE SHOOTING
*The software continues to update which has changed a few of the screenshot layouts and colors. Pleasefollow along with the wording as the options have not changed.
1
PROPER SET UP AND CHARGING
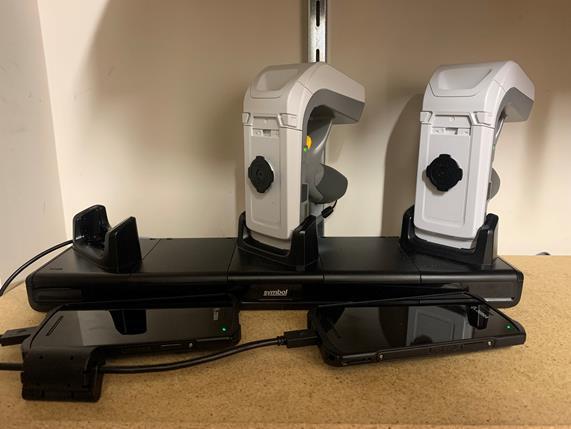
The RFID equipment contains 2 major components, the hardware device as well as the scanning handle. In order to complete a proper charge you will have to keep the 2 pieces separate. Place the handlein the charging cradle and use the provided charging cable for the hardware device.
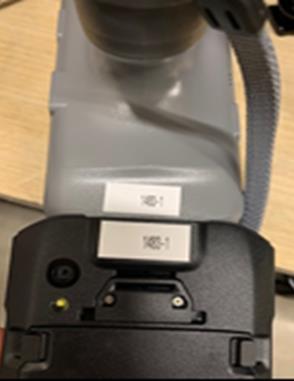
When connecting the pieces back together after charging you must ensure that they are paired correctly. Hardware device #1 MUST be connected to handle#1 in order for them to connect correctly. If you separate the pieces you will need to pair the device again. –pg 6.

2
HARDWARE CONNECTION AND RELEASE

Line up the back of the hardware device with the scanner handle and twist to the right until it locks in place. When connecting the pieces back together after charging you must ensure that they are paired correctly-Hardware device #1 MUST be connected to handle#1 in order for them to connect correctly as stated on the previous page.
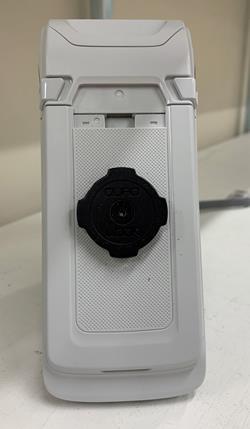
To release the hardware from the scanner handle when complete with a scan, press the release button .
3
START UP AND APP LAUNCH
Click
Clarity Mobile launchthe app.
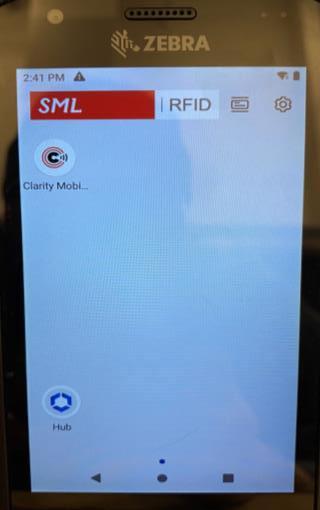
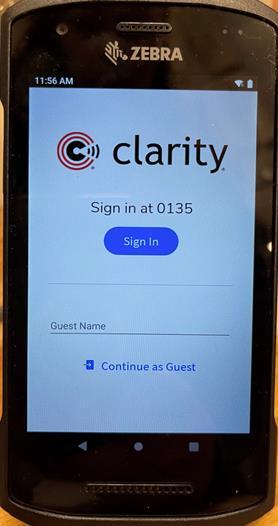
If the device does not power up , press the power button on the top right of the device.
Click Continue as Guest. If you CANNOT Continue as Guest enter the Store #, Employee ID or your name as the Guest Name.
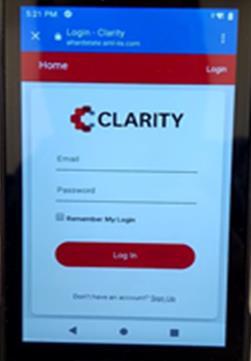
If you receive this screen in error press the X to go back to the main screen.


4
CONNECTINGTO WI-FI
Tap the arrow in the top right corner of your device and tap on settings.


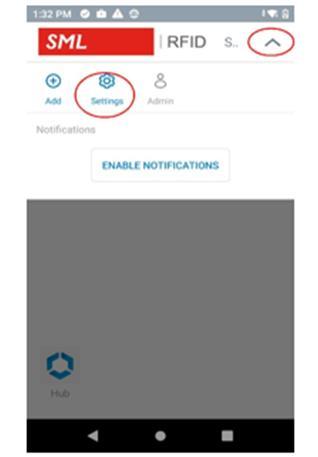
Tap the Wi-Fi option.
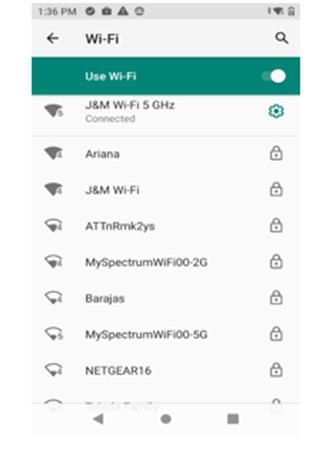
Connect to any available network that you have access to. Once you are successfullyconnected REBOOT the device.

1 2 3
5
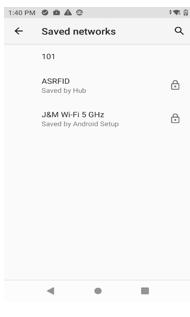
CONNECTINGTO WI-FI
Repeat steps 1 & 2 from the previous page. When you are back at this step (3), scroll to the bottom of the screen and select SAVED NETWORKS.
Select the network ASRFID


6
BLUETOOTH PAIRING
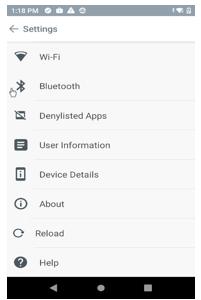
Tap the arrow in the top right corner of your device and tap on settings.


Tap the BLUETOOTH option.
Tap + PAIR NEW DEVICE
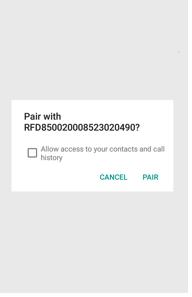
Hold down the Bluetooth button on the top left of the scanner. Tap PAIR then hold down the trigger until the RFID reader beeps.
When pairing is complete the blue LED light will stop blinking.
7
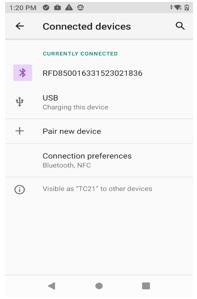
CONNECTINGTHE ZEBRA HANDHELD TO MOBILE X
Clarity will connect to the RFID reader through Bluetooth.
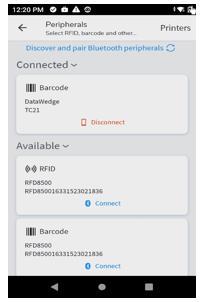
To connect a new device go to SETTINGS and select PERIPHERALS.
If the BARCODE is connected to DataWedge, click disconnect.
Connect to BOTH RFID and Barcode

8
CONNECTINGTHE ZEBRA HANDHELD TO MOBILE X
When the BLUE Connect symbol changes to a RED
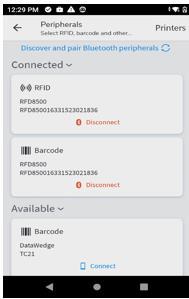
Disconnect you are now connected correctly.
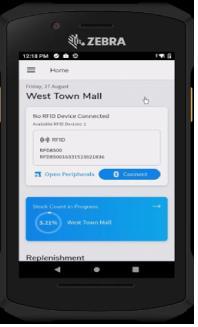
Select the back arrow to go to the main screen. If connected correctly you shouldsee your store location on the home screen.
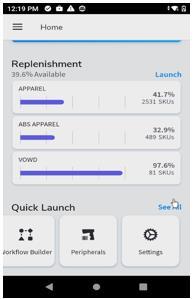
9
STOCKCOUNT
1. To be completeddaily in the PM AFTER THE RESERVE/DAMAGE
WORKFLOW!!!
2. Schedule 1-2 team members for approximately20 minutes basedon square footage.
3. It is a best practice to completethe stock count in the samemanner as a physicalinventory, e.g. perimeterwalls then tables and fixtures. Start with the windows and work your way back.
4. Stock count MUST be launched on only ONE devicebefore the team logs in. You CAN use multiple guns to complete a scan.
5. Ensure range of scanis within a fewfeet of the area desired.
BEST PRACTICE- ALWAYS use the back arrow at the TOP of the screen to go back and not lose your work!
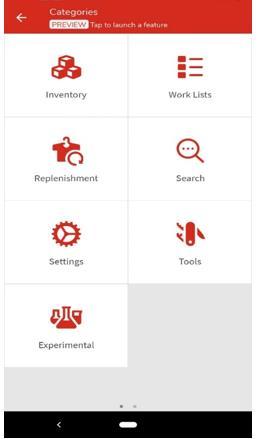
Select Inventoryfrom MainMenu default pageor
Swiperightfor the MainMenu secondpage. This has all QuickLaunch items listed


10
STOCKCOUNT
The following pages are the steps to follow when navigating from the second page of the Main Menu .
Select Stock Count
This screenwillshow all countscurrentlyin progress. Selectthe Start NewCount to createa newstock count.
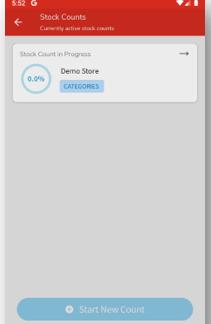
*if a stock countis currentlyinprogress the StartNewCount optionwill be disabled*
11
STOCKCOUNT
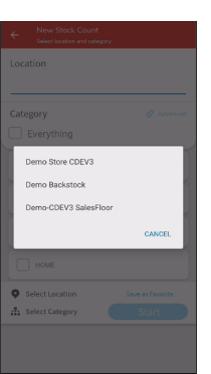
Select Pick a Locationbasedon whatareayouwill be scanningfirst (Salesflooror Backroom)
Oncethelocationis selectedthestart buttonis enabled. Click the Start buttonto startthe count.
*Keeping the locations separate can assist with stock lookups and replenishment but is NOT required as long as the entire store is scanned.
12
STOCKCOUNT
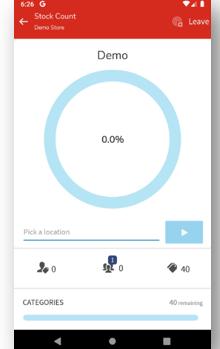
The Stop button will replace the Start button once the Stock count has been started.
Tap to expand: this shows the number of tags that YOU have scanned. Tap to expand: this shows the number of tags that The Team has scanned.

Tap to expand: this shows the total number of tags that are expected after sales are deducted.
13
STOCKCOUNT
Press the STOP button to stop the scanner from continuingto pick up RFID tags for the followingreasons-
SAVE FOR LATERContinue at another time/save and leave (stop for shipment receipt, complete a task)
ABANDON COUNT-This will ERASE ALL COUNTS and allow you to start over
After you choose a “Leave Stock Count” option click the blue LEAVE COUNT option.
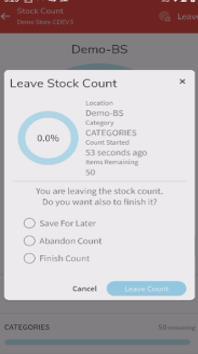
FINISH COUNT-This will finalizeand submit all counts.
*You must ensure that all team members are finished counting before submitting a stock count. If a stock count is FINALIZED during a count all other team members will be kicked out of the scan. The FINISH COUNT can be performed on any gun , not just the leader.*
14
SHIPMENTRECEIVING( Functionto be used at a later date)
From the main menu select the INVENTORY option. Select the SHIPMET RECEIPT tab.

If you get this notificationthere is already a SHIPMENT RECEIPT inprogress and you cannot start another receipt until it is complete.

To begin a scan select START A NEW SHIPMENT RECEIPT
15
SHIPMENTRECEIVING(functionto be used at a later date)
Select START to start a new shipment receipt.
When you start a new SHIPMENT RECEIPT only tags in the new boxes will be downloaded. *ASN
Once ASN’s are loaded this will show the process of scan versus expected amount.


=Advanced Shipment Notification 16
SHIPMENTRECEIVING(functionto be used at a later date)

SAVE AND LEAVE- save shipment received thus far and leave the application.
To add an ASN that is not currently loaded, tap the + sign
Return to the DETAILS screen. The SKU count will be updated with the expected from the ASN’s selected. When finishedpress DONE.

When an option has been chosen select LEAVE SHIPMENT RECEIPT.
You may alsoselect CANCEL to return to the shipment receipt.
PAUSE SHIPMENT RECEIPT- Pause the shipment receipt briefly.
FINISH SHIPMENT RECEIPTwhen you are complete with the receiving process

17
STOCK EXPLORERallows you to explore stock levels in house. Availabiltyto search other
STOCK EXPLORERenhanced stock lookup
SKU EXPLORERproduct details for a specific SKU
SITE EXPLORERproduct details for a specificSKU at another location. TBD
SITE EXPLORER- this option will be available once the entire company is LIVE

SEARCH
18
STOCKEXPLORER
SEARCH- the search bar will accept a scanned or manually entered barcode.

Once a SKU is entered a stock level breakdown will populate by location.
*Press REFRESH to show the last time it was updated to account for sell through*
Click the blue arrow in the top right of the screen for stock details.
The drop down screen will show the availablestock as well as the location.
You may also use the GEIGER option to aid in locating the product. (see page 8)

Click SEARCH ANOTHER STORE to see if the guest’s requested item is available at another location. TBD

19
GEIGERSEARCH
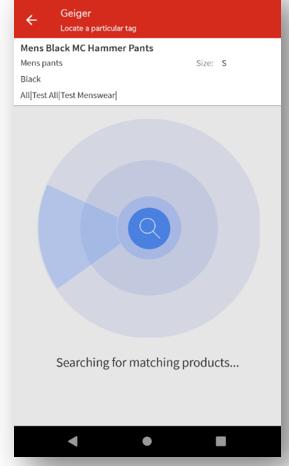
When GEIGER is selected withinthe STOCK EXPLORER you will be able to locate the exact location of the item through the proximity based indicator. It is a best practice to consider the GEIGER as a compass, you will need to follow the direction of the signal on the screen .
20
ENCODING
Press the top right back arrow to get to the home menu screen
Select the TOOLS option
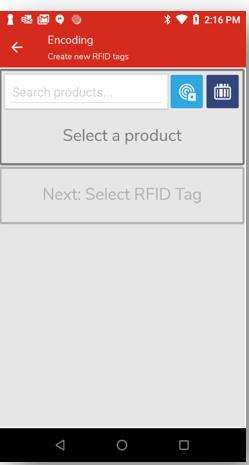
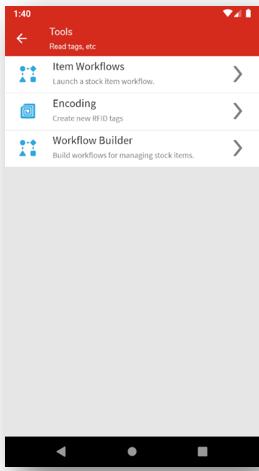
Select the ENCODING option
Scan or manually enter the company barcode.
21
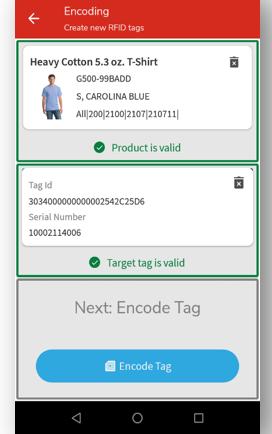
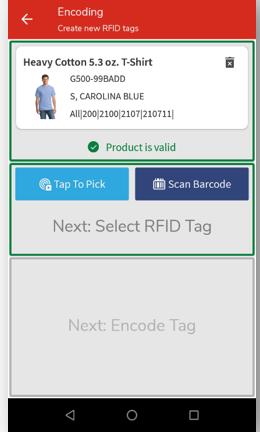
ENCODING
Remember to attachthe RFID barcodeto the tag onthe garment in an orderly and consistent fashionnot covering any pertinent information.
*Avoid foil lettering*
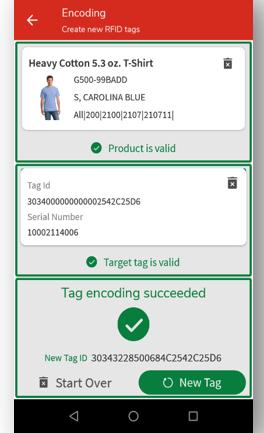
Select SCAN BARCODE Scan the newly placed RFID sticker.
Select ENCODE TAG to begin the encoding process
Ensure that the tag was encoded correctly as indicated by a GREEN CHECKMARK.
START OVER- reset encoding feature , new product or new sku. NEW TAG- encode a new tag with the same product info (multiplesize small , same color and sku)
22
BOPIS(BuyOnlinePick InStore) to be used at a later date
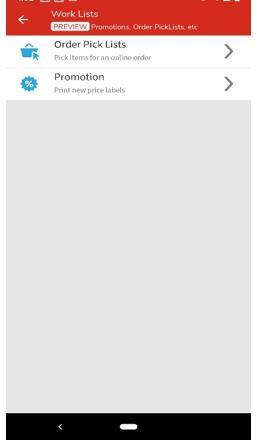
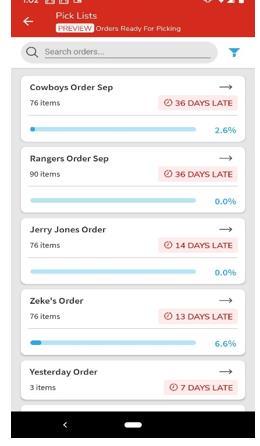
From the home screen menu Select WORK LISTS Select ORDER PICK LISTS Choose an order to pick. The percentage is the amount of the order that has already been picked. If an order is in progress by another scanner a message will be displayed.
23
BOPIS(Buy OnlinePick In Store)to be used at a later date
The BOPIS order items can be filtered by clickingon the funnel.
When an order has been chosen the listof items that need to be picked will appear. This screen will show style, size color and quantity.

Choose the method in which you choose to pick the BOPIS order: none, barcode scan, proximity scan or tap to pick.


You will have the choice to sort the BOPIS items by category or proximity scan. 24
BOPIS(BuyOnlinePick InStore) to be used at a later date
Once items are picked they will be moved to the PICKED TAB. When you have picked your lastitem you will automatically be directed to the FINISH screen.

Clickingon LEAVE will give you these three options:
SAVE AND LEAVE: save work completed so far and go back to the previous screen.
ABANDON: erase work completed so far .
FINISH: complete current pick.
Then choose either CANCEL or LEAVE ORDER PICK LIST

25
TROUBLE SHOOTING
Black or Blank Screen - Option 1: Ensure that the hardware is connected with their corresponding pieceshandheld labeled part 1 attached to the gun labeled part 1.
Option 2: Turn the scanner off and back on using the power button.
Frozen Screen- Close and re-open the application
Bluetooth Connectivity Issues- Contact Home Office Help Desk (not SML)
Wi-Fi Connectivity Issue- Ensure that you are connected to ASRFID
Unknown Error Screen- Contact Home OfficeHelp Desk (not SML)
Invalid tags- possible reasons: other nearby retailers, food items or supplies
BEST PRACTICES
Encoding- immediate action required for: items returned, tag falls off, non-tagged shipment receipt
Geiger- use to locate one off SFS and BOPIS orders/ item location for a guest
Stock Count- start at the window and work your way back through the store
Extra RFID tags- store in a METAL file cabinet drawer to avoid the scanner
STOCK COUNTS – ensure that they are completed in the PM prior to leaving for the evening.
26

