
Academic Authors: Ayushi Jain, Neha Verma
Creative Directors: Bhavna Tripathi, Mangal Singh Rana, Satish
Book Production: Rakesh Kumar Singh
Project Lead: Jatinder Kaur
VP, Learning: Abhishek Bhatnagar
All products and brand names used in this book are trademarks, registered trademarks or trade names of their respective owners.
© Uolo EdTech Private Limited
First impression 2023
Second impression 2024
Third impression 2025
This book is sold subject to the condition that it shall not by way of trade or otherwise, be lent, resold, hired out, or otherwise circulated without the publisher’s prior written consent in any form of binding or cover other than that in which it is published and without a similar condition including this condition being imposed on the subsequent purchaser and without limiting the rights under copyright reserved above, no part of this publication may be reproduced, stored in or introduced into a retrieval system, or transmitted in any form or by any means, electronic, mechanical, photocopying, recording or otherwise, without the prior written permission of both the copyright owner and the above-mentioned publisher of this book.
Book Title: Tekie Computer Science Teacher Manual 3
ISBN: 978-81-984882-8-2
Published by Uolo EdTech Private Limited
Corporate Office Address:
85, Sector 44, Gurugram, Haryana 122003
CIN: U74999DL2017PTC322986
Illustrations and images: www.shutterstock.com, www.stock.adobe.com and www.freepik.com
All suggested use of the internet should be under adult supervision.
Uolo’s Tekie program offers a coding-focused curriculum for grades 1 to 8, preparing students for the technology-driven world. We present a carefully crafted Teacher Manual to assist teachers in delivering effective and engaging lessons to students. Rather than prescribing teaching methods, the manual provides examples and demonstrates how and why teachers can apply these examples in their classes.
The Teacher Manual includes a suggested implementation plan to help teachers navigate the curriculum better throughout the academic year. Within the academic year, the Tekie program prescribes the following types of chapters and sessions:
Familiarisation: this period builds familiarity with the Tekie program and the digital platform.
Theory: these periods are dedicated to the Computer Science Theory chapters. These topics are mostly delivered in the classroom.
Tools: these periods are dedicated to the Computer Tools chapters. These topics involve almost equal numbers of classroom and computer labs sessions.
Coding: these periods are dedicated to the Coding chapters. These topics have more computer lab sessions.
Additional Hands-on Time: these are additional computer lab periods that teachers can use to revise topics or dedicate for completion of projects.
Revision: these are additional classroom periods that teachers can use to revise topics or cover syllabus backlogs.
Each chapter in this manual is structured to provide a comprehensive lesson plan. The chapters are divided into multiple sessions, each following the Warm up, Engage, Build, and Sum up (WEBS) strategy. The Warm up phase sets the stage for learning by connecting to prior knowledge and building curiosity. The Engage phase captures the students’ attention and motivates them to participate actively. In the Build phase, questions from various sections are discussed to build the understanding of the students. Finally, the Sum up phase reinforces learning through easy-to-recall activities and questions. Time duration for each section has been suggested based on the requirements of the students. Additionally, an answer key for every chapter is provided to assist teachers in assessing their students’ understanding and guiding their learning effectively.
Lastly, we understand that the Indian education landscape is quite diverse. To suit the needs of all types of schools, we have built-in extra higher-order chapters in the content books. These extra chapters are clearly marked in the table of contents of this manual. We suggest that the teacher completes the main chapters first and then move to higher-order optional chapters only if there is sufficient time left in the academic year and learners are ready for more challenging content.
We hope that this teacher manual will empower teachers to use the curriculum effectively, support the learning of all students thoroughly, create learning opportunities and design interactive learning environments that cater to the students’ needs and interests.
1 Understanding Computers �������������� 1
Uses and Types of Computers
Hardware 1
Hardware 2
Software
Input Processing Output Cycle
2 Introduction to Operating System ��� 12
Understanding Operating Systems
Windows 10 and Desktop Components
Operations on Desktop
3 Files and Folders ����������������������������� 20
Introduction to Files and Folders and Opening a File
Typing in a File
Saving a File
4 Net Surfing*������������������������������������� 27
Internet and Its Advantages and Disadvantages
Basic Terminologies of the Internet
Opening a Web Page
Be a Good Digital Citizen
5 Let Us Paint!������������������������������������� 36
Introduction to Paint 1
Introduction to Paint 2
Introduction to Paint 3
Introduction to Paint 4 6 Starting with Word Processor ������� 45
Word Processor 1
Word Processor 2
Word Processor 3
Word Processor 4
Word Processor 5
Word Processor 6 7
Editing Text 3
Editing Text 5
6
AI and Uses of AI at Different Places 1
Fun with AI: Can AI Detect Emotions?
Uses of AI at Different Places 2
3.0 I
1 Introduction to Scratch 3�0 ������������ 78
Introduction to Scratch 3.0
Components of Scratch
Coding Challenge
2 Scratch Blocks ��������������������������������� 84
Motion and Looks Blocks
Events, Sound, and Control Blocks
Script to Move and Turn a Sprite
3 Making a Scratch Project ��������������� 90
Naming a Project, Deleting and Adding a Sprite
Positioning and Moving a Sprite
Pen Extension and Drawing a Line
Erasing a Drawing, Adding a Delay, and Saving a Scratch Project
4 Drawing Shapes*����������������������������� 98
Basics of Shapes
Drawing a Rectangle
Using Loops
Drawing a Circle

Mel and Conji are two brave friends who love adventures. One day, they hear exciting stories from Elder Wizard and decide to visit the Hidden Library. Inside the library, Mel finds a computer showing strange pictures. Suddenly, she loses her memory! Conji gets worried and takes Mel to First Elder Wizard, who thinks the evil Lord Ero erased Mel’s memory to hide something important. To help Mel, they learn about computers and how they work. First Elder Wizard sends them to Ms Idea, who knows about natural events in Avora. They visit Ms Idea, who sends them to the Records Room. There, they find an envelope with strange clues and go to First Elder Robot. He teaches them about the internet, which shows that the pictures are of powerful weapons. Knowing this, they visit Mr. Geebal at the Memory Palace. Mr. Geebal helps Conji remember when Mel lost her memory, revealing that Lord Ero used a spell. Conji then uses a drawing and a special counterspell to bring back Mel’s memory. With her memory back, Mel and Conji go to the Sci-Fi Lab. The Elders advise them not to make a weapon but to create a new protective spell using a computer. With this new spell, Mel and Conji confront Lord Ero. In an exciting battle, they use their new spell to stop Lord Ero’s evil plans. Mel and Conji’s bravery and teamwork save Avora from danger. They return as heroes, having learned that knowledge, friendship, and courage can overcome any challenge.
● Mel and Conji have gone to visit a hidden library.
● Mel tells Conji that the library is hiding a lot of secrets.
● Conji cautions Mel and asks her to be careful, as the place may have information on very old magic.
● They both look at the information and pictures shown on the screen.
● Suddenly, darkness surrounds Mel, and she is unable to remember anything.
● Thereafter, they decide to visit First Elder Wizard for his help.
● First Elder Wizard tells them that Lord Ero must have erased Mel’s memory since he did not want Mel to understand things on the computer.
● First Elder Wizard advises them to learn about the basics of computers. He then explains to them about computers from the very start. This chapter is divided into the following classroom sessions
At the end of the session, the students will be able to:
● describe the uses of computers.
● differentiate between the types of computers.
Keywords
● Microcomputers: They are small computers that are used by individuals in homes, schools, offices, shops, and banks.
● Minicomputers: These computers are bigger and faster and are used in places like banks and universities.
● Mainframe computers: These computers are very powerful, big in size, efficient, and very expensive. They are used in places like schools, banks, and airports.
Supercomputers: They are the largest and fastest of all types of computers. They are used in big companies.
Ask the students where have they seen computers in their daily lives.
Explain the uses of the computers by giving real-life examples.
Explain the different types of computers such as microcomputers, minicomputers, mainframe computers, and supercomputers.
● Ask the students where have they seen computers in their daily lives.
● Now, build the concept by discussing about the uses of computers.
Explain the following concepts:
Describe the uses of computers. Explain the uses of computers at various places such as schools, homes, shops, hospitals, etc., to the students by giving real-life examples, as given on page 5.
Distinguish between the types of computers. Tell the students that the computers can be classified into different categories based on their size, speed, storage capacity, and cost. Thereafter, introduce them to the different types of computers: microcomputers, minicomputers, mainframe computers, and supercomputers, as given on pages 5 to 7.
Ask the following questions to the students to check their understanding.
1. Where do you use microcomputers?
Correct Responses: Homes, Schools, Offices, Shops, and Banks
2. Give two examples of mainframe computers.
Possible answers: HP 2100, Honeywell 316, PDP-8, PDP-10, System Z10
Correct answer: PDP-10, System Z10, IBM Z series
● Conduct a group discussion in the class among the students based on the topic, “Are supercomputers only used by big companies?” provided in the Discuss section on page 7.
Possible Response: Supercomputers are not exclusively used by the big companies. These are also used by government agencies, academic institutions, and research laboratories.
● Conclude the session by summarising that computers are used at many places such as homes, schools, and hospitals. Computers can be classified into various categories based on their size, speed, storage capacity, and cost, such as microcomputers, minicomputers, mainframe computers, and supercomputers.
● Assign the following questions from the Chapter Checkup given at the end of the chapter as homework.
B. Tick the Correct Option: Question 5
A. Write two uses of computers apart from those given in the book.
B. Write two features of microcomputers. Give two examples as well.
At the end of the session, the students will be able to:
● define hardware.
● recognise monitor and its types.
● describe the CPU and its parts.
● describe the functions of the keyboard, mouse, touchscreen, scanner, and printer.
Keyword
Ask the students if they can name some physical parts of a computer. Explain to the students what hardware is. Also, explain to them the different hardware devices by showing them the images or the devices themselves. Also discuss the use of each of these hardware devices.
● Hardware: It refers to the physical parts of a computer that you can touch or feel. 5 mins
Action Plan
Group discussion Conclude the concepts
Assign homework
Warm Up
● Ask the students to write the names of the parts of the computer that they can touch in their notebooks.
Engage
Explain the following concepts:
Learning Outcomes
Define hardware.
Recognise monitor and its types.
Explanation
Describe that hardware is the part of the computer that we can see and touch, as given on page 7.
Explain that a monitor looks like a TV screen and shows us all the things that we do on the computer, like playing games, drawing, or writing stories. Also, explain its types, as given on pages 7 and 8.
Describe the CPU and its parts. Explain the concept of the CPU that it is the brain of the computer and manages all the calculations and programs. Also, describe its three main parts, as given on page 8.
Describe the functions of keyboard, mouse, touchscreen, scanner, and printer.
Explain the functions of the keyboard, mouse, touchscreen, scanner, and printer, as given on pages 8 and 9.
● Read aloud question 1 provided in the Do It Yourself 1A section and encourage the students to solve the question. Instruct the students to write the answers in their book.
Correct Response: 1—a
● Name the monitor that is most energy-efficient.
Possible Responses: CRT monitor/LCD monitor/LED monitor
Correct Response: LED monitor
● Tell the number of keys that a standard keyboard can have.
Correct Response: 104 keys
● Name the three main parts of the CPU.
Correct Response: CU, MU, and ALU
● Conduct a group discussion in the class on the topic, ‘Difference between a mouse and a touchscreen’.
Possible Response: A mouse is an input device used for pointing objects. It is used to point, click, and move various on-screen objects. On the other hand, a touchscreen is a display device that allows us to interact with a computer by touching the screen. Devices like tablets and smartphones have a touchscreen. A touchscreen can be used as both an input and output device.
● Conclude the session by summarising that hardware refers to the physical parts of a computer that you can touch or feel. Examples of hardware includes a monitor, keyboard, mouse, CPU, etc.
● Assign the following from the Chapter Checkup given at the end of the chapter as homework.
A. Fill in the Blanks: Questions 1, 3, and 5
B. Tick the Correct Option: Question 2
C. Who Am I?: Questions 1, 2, 3, and 4
D. Write T for True and F for False: Questions 1, 4, and 5
E. Answer the Following Questions: Questions 2 and 3
F. Apply Your Learning: Questions 2, 4, and 5
At the end of the session, the students will be able to:
● describe the functions of the hardware devices: speaker, light pen, and joystick.
● describe the functions of the hardware devices: microphone, compact disc (CD), pen drive, RAM, motherboard, and hard disk.
Now that the students know what hardware devices are; and about some of these devices, ask them if they can name some more hardware devices that they have seen or used.
Explain the various hardware devices. Use images or show the hardware device for your reference.
Also, discuss their uses.
Activity Conclude the concepts Assign homework
5 mins
● Ask the students if they can name some more hardware devices that they have seen or used.
● You can ask various questions to help the students name the hardware devices. For instance, you can ask them to name the device used to listen to music, play games, and draw or write anything on the screen, etc.
15 mins
Explain the following concepts:
Describe the functions of the hardware devices: speaker, light pen, and joystick.
Describe the functions of the hardware devices: microphone, compact disc (CD), pen drive, RAM, motherboard, and hard disk.
Explanation
Explain the functions of various hardware devices like speaker, light pen, and joystick by showing the pictures or the real devices, as given on pages 9 and 10.
Explain the functions of a microphone, compact disc (CD), pen drive, RAM, motherboard, and hard disk by showing the pictures or the real devices, as given on page 10.
● Read aloud Question 2 provided in the Do It Yourself 1A section and encourage the students to solve the question. Instruct the students to write the answers in their books.
Correct Response: 2—b
● Which hardware device is the backbone of a computer system?
Correct Response: Motherboard
● What is the full form of RAM?
Correct Response: Random Access Memory
● Name the input device used for playing games.
Correct Response: Joystick
Build
7 mins
● After the students have learnt about all the hardware devices, ask them to group all the devices into three categories: Input devices, Output devices, and Storage devices.
● You can also ask the students to create another category where some devices can be kept in both input as well as output category.
Note
● You can conduct this small activity in the class itself. It should be an oral activity.
Sum Up
3 mins
● Conclude the session by summarising that there are various other hardware devices, like speaker, light pen, joystick, microphone, compact disc, pen drive, RAM, motherboard, and hard disk.
● Assign the following questions from the Chapter Checkup given at the end of the chapter as homework:
A. Fill in the Blanks: Question 4
B. Tick the Correct Option: Question 3
C. Who Am I?: Question 5
D. Write T for True and F for False: Questions 2 and 3
E. Answer the Following Questions: Question 1
F. Apply Your Learning: Questions 1 and 3
Learning Outcomes
At the end of the session, the students will be able to:
● define a software.
● describe the two types of software.
Keyword
● Software: It is the part of a computer that cannot be touched.
Warm Up Engage Build Sum Up
Ask the students if they have ever heard the term ‘software’.
Explain software and its two types to the students.
Think and Tell Group discussion
Action Plan
Conclude the concepts
Assign homework
Warm Up
● Ask the students if they have ever heard the term ‘software’.
● Build the concept by telling them that software is that part of a computer that they cannot touch.
Engage
Explain the following concepts:
Learning Outcomes
Explanation
Define software. Define software and give some examples of softwares that are commonly used, as given on page 12.
Describe the two types of software.
Explain the two main types of software, which are System software and Application software, and differentiate between the two using some examples, as given on page 13.
Ask the following questions to the students to check their understanding.
1. Define software.
Correct Response:
Software is a set of instructions or programs given to the computer to do some work.
2. Give two examples of application software.
Correct answer: Google Chrome, Paint
● Ask the students to answer the question: “Is software only used on computers?”, asked in the Think and Tell section given on page 12.
Possible Responses: Yes/No
Correct Response: No, as software can be used in mobile phones, smartwatches, automobiles, gaming consoles, and appliances such as microwaves and washing machines, etc.
● Conclude the session by summarising that the software is a set of instructions or programs given to the computer to do some work. Also, revise the two main types of software, that is System software and Application software.
● Assign the following questions from the Chapter Checkup given at the end of the chapter as homework. B. Tick the Correct Option: Questions 1 and 4
E. Answer the Following Questions: Question 5
At the end of the session, students will be able to:
● describe the Input Processing Output cycle.
Keywords
● Input: The data and instructions that you enter using an input device.
● Processing: The CPU works on the input to provide you with meaningful information. This is called processing.
● Output: The meaningful information that you get after processing is known as the output.
Ask the students if they have ever heard the term ‘IPO cycle’.
Describe them about the IPO cycle.
Action Plan
Warm Up
● Ask the students if they have ever heard the term ‘IPO cycle’.
● Build the concept by telling them that the three processes are completed by every computer: InputProcess-Output.
Engage
Explain the following concepts:
Describe the Input Processing Output cycle.
Describe that three processes are completed by every computer: Input–Process–Output, as given on page 12. Then, explain these three processes with the help of real-life examples, as given on page 13.
● Read aloud the questions provided in the Do It Yourself 1C section and encourage the students to solve the questions.
● Instruct the students to write the answers in their book.
Correct Responses:
1. Paper folding Processing; Boat Output; Paper Input
2. Input—Add the given numbers: 7, 5, 6
Output—Answer = 18
Process—7 + 5 + 6
Build 7 mins
● Ask the students to answer the question: “Give a real-life example of IPO cycle.’
Possible Responses:
Input: Pencil and Sharpner
Process: Sharpning pencil
Output: Sharped Pencil (Answer may vary.) Sum Up
3 mins
● Conclude the session by summarising that there are three processes that are completed by every computer: Input–Process–Output.
● Assign the following questions from the Chapter Checkup given at the end of the chapter as homework.
A. Fill in the Blanks: Question 2
E. Answer the Following Questions: Question 4
Mel and Conji are two brave friends who love adventures. One day, they hear exciting stories from Elder Wizard and decide to visit the Hidden Library. Inside the library, Mel finds a computer showing strange pictures. Suddenly, she loses her memory! Conji gets worried and takes Mel to First Elder Wizard, who thinks the evil Lord Ero erased Mel’s memory to hide something important. To help Mel, they learn about computers and how they work. First Elder Wizard sends them to Ms Idea, who knows about natural events in Avora. They visit Ms Idea, who sends them to the Records Room. There, they find an envelope with strange clues and go to First Elder Robot. He teaches them about the internet, which shows that the pictures are of powerful weapons. Knowing this, they visit Mr. Geebal at the Memory Palace. Mr. Geebal helps Conji remember when Mel lost her memory, revealing that Lord Ero used a spell. Conji then uses a drawing and a special counterspell to bring back Mel’s memory. With her memory back, Mel and Conji go to the Sci-Fi Lab. The Elders advise them not to make a weapon but to create a new protective spell using a computer. With this new spell, Mel and Conji confront Lord Ero. In an exciting battle, they use their new spell to stop Lord Ero’s evil plans. Mel and Conji’s bravery and teamwork save Avora from danger. They return as heroes, having learned that knowledge, friendship, and courage can overcome any challenge.
● Mel and Conji went inside the library to find clues to bring back Mel’s memory.
● Mel felt a slight pain in her head when she went close to the computer.
● Mel could recall some of the things she had seen on the computer screen before. But she could not recall everything.
● Conji then tries using the magic spell to bring back Mel’s memory completely. But still, Mel could not remember anything.
● Mel then pointed to the computer screen that had buttons and small objects. Mel identified these objects as icons used in the operating system.
● Mel and Conji then start reading about operating systems and icons.
This chapter is divided into the following classroom sessions
1. Understanding Operating Systems
2. Windows 10 and Desktop Components
3. Operations on Desktop
At the end of the session, the students will be able to:
● describe an operating system.
● describe the User Interface (UI) and its types.
● Operating system: A computer has a special program known as the operating system that manages various tasks, helps us search for files and apps, and makes sure that the computer runs smoothly.
● User interface: A user interface is a bridge between you and the computer system.
Ask the students what tasks a librarian does in order to manage the library.
Ask the students to name the elements or objects they can find on their computer screen (icons, buttons, etc.).
Explain to the students what an operating system is. Explain to them what a user interface is. Also, explain the types of user interfaces and the differences between the two interfaces.
● Ask the students what tasks a librarian does in order to manage the library.
● Tell the students that just like a librarian organises books, helps people find what they need, and makes sure everything runs smoothly, similarly, a computer’s operating system manages various tasks, helps us search for files and apps, and makes sure that the computer runs smoothly.
● Ask the students to name the icons present on their computer screen. Tell them that these icons can be clicked, and that these icons are the part of the user interface.
Explain the following concepts:
Describe an operating system. Tell the students that an operating system manages the computer’s hardware and software, as given on page 23.
Describe the User Interface (UI) and its types.
Explain to the students about the User Interface (UI) and its types—Character User Interface (CUI) and Graphical User Interface (GUI), as given on pages 23 and 24.
● Read aloud the questions provided in the Do It Yourself 2A section and encourage the students to solve the questions. Instruct the students to write the answers in their book.
Correct Responses: 1. Difficult C, Slower G, Text-based commands C, Buttons G
2. GUI: Windows, macOS
CUI: DOS, Unix Shell
● Does operating system provide an interface to the users through which they communicate with the computer?
Possible Responses: Yes/No
Correct Response: Yes
● Name the interface that is user-friendly.
Possible Responses: CUI/GUI
Correct Response: GUI
Build
7 mins
● Ask the students to give the answer to the question, “Which other devices do you think have an OS?” asked in the Think and Tell section on page 23.
Possible Responses: Smartphones and smart TVs.
3 mins
● Conclude the session by summarising that a computer has a special program known as the operating system that manages various tasks, helps us search for files and apps, and makes sure that the computer runs smoothly. A user interface is a bridge between the user and the computer system.
● Assign the following questions from the Chapter Checkup given at the end of the chapter as homework.
A. Fill in the Blanks: Questions 1 and 2
D. Write T for True and F for False: Question 1
E. Answer the Following Questions: Questions 1 and 3
At the end of the session, the students will be able to:
● describe Windows 10 and its features.
● describe the desktop and its components.
Keywords
● Windows 10: It is a popular operating system developed by Microsoft Corporation.
● Desktop: After switching on the computer, the screen that is visible, is called the desktop.
● Icons: The small graphical symbols or images that represent files, apps, or folders are called icons.
Ask the students to name any operating system that they know.
Explain the Windows 10 operating system and its features.
Describe the desktop and its components. Group discussion Think and Tell
Conclude the concepts Assign homework
● Now, that the students know what an operating system is, ask them to name any operating system that they know.
● Tell them that Windows 10 is a popular operating system.
Explain the following concepts:
Explanation
Describe Windows 10 and its features. Explain to the students that Windows 10 is a popular operating system. Also, tell them about its features, as given on page 25.
Describe the desktop and its components.
Explain to the students what a desktop is. Also, explain its components, like icons and the taskbar and various components of the taskbar, as given on pages 25 and 26.
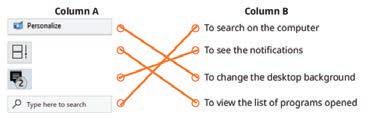
● Name the component of the desktop that is present at the bottom of the screen.
Possible Responses: Icons/Taskbar
Correct Response: Taskbar
● Name the component of the taskbar that shows you a list of all the programs and windows that you have opened.
Possible Responses: Start Button/Search Bar/Task View Button/Notification Area
Correct Response: Task View Button
7 mins
● Ask the students to give the answer to the question, “Can you give an example of an icon you might see on your desktop?” asked in the Think and Tell section on page 27.
Possible Responses: Recycle Bin/ file/Folder, etc.
● Conduct a group discussion in the class based on the topic “What is the purpose of the search button on the taskbar?” provided in the Discuss section on page 28.
Correct Response: It is used to search for files, apps, and settings on your computer.
● Conduct a group discussion in the class on the topic ‘My favourite feature of Windows 10’.
Possible Responses: GUI/multitasking/giving commands by clicking on the images and the menu/ makes the interaction between the computer and the user easy.
3 mins
Sum Up
● Conclude the session by summarising that the Windows 10 is a popular operating system and has many features like GUI, multitasking, etc. Also, summarise by stating that the screen visible after switching on the computer is called the desktop. It has different components like icons and taskbar.
● Assign the following questions from the Chapter Checkup given at the end of the chapter as homework.
A. Fill in the Blanks: Questions 3, 4, and 5
B. Tick the Correct Option: Questions 2, 3, and 4
C. Who Am I?: Question 1
D. Write T for True and F for False: Questions 3 and 4
E. Answer the Following Questions: Questions 2 and 4
At the end of the session, the students will be able to:
● open an application.
● arrange the icons on the desktop.
● sort icons.
● change the background.
● change the screen saver.
Keywords
● Sorting: Sorting means to arrange something in a specific order.
● Wallpaper: The desktop has an image behind all the elements. This image is called the background image or wallpaper.
● Screen saver: The screen saver is an image which pops up on the computer screen whenever a computer is left idle for a certain period of time.
Ask the students how they arrange their backpacks for school and if they know that the desktop icons can be arranged too.
Ask the students if they know what sorting means in general sense.
Explain to the students how to open an application, arrange the desktop icons, sort icons, and change the wallpaper and the screen saver.
Warm Up
● Ask the students how they arrange their backpacks for school and if they know that the desktop icons can be arranged too.
● Ask the students if they know what sorting means in general sense. Tell them that sorting icons help arrange icons on the desktop in a specific order.
Explain the following concepts:
Open an application. Explain to the students the steps to open an application using the Start button, as given on page 27.
Arrange the icons on the desktop.
Explain to the students the steps to arrange desktop icons in an organised way, as given on page 28.
Sort icons. Explain to the students that sorting icons means arranging them in a specific order, and also tell them the steps to sort icons, as given on page 29.
Change the background.
Change the screen saver.
Explain to the students that the desktop has an image behind all the elements. This image is called the background image or wallpaper. Also, tell them the steps to change the wallpaper, as given on page 30.
Explain to the students that a screen saver is an image, which pops up on the computer screen whenever a computer is left idle for a certain period of time. Also, tell them the steps to change a screen saver, as given on pages 30 and 31.
● Read aloud the questions provided in the Do It Yourself 2B section. Encourage the students to solve the questions. Instruct the students to write the answers in their book.
Build
● Conduct a group discussion in the class on the topic “Performing different operations on the Desktop”. Correct Response: We can perform different types of operations on the desktop, like opening apps, arranging icons, sorting icons, changing wallpaper, changing screen saver, etc. 15 mins
Correct Responses: 1. Sum Up
7 mins
3 mins
● Conclude the session by summarising the steps to perform various operations on the desktop such as arranging icons, opening applications and sorting icons. Also, revise with them the definition and steps to change a wallpaper and a screen saver.
● Assign the following questions from the Chapter Checkup given at the end of the chapter as homework.
B. Tick the Correct Option: Questions 1 and 5
D. Write T for True and F for False: Question 2
F. Apply Your Learning: Questions 1, 2, and 3
Mel and Conji are two brave friends who love adventures. One day, they hear exciting stories from Elder Wizard and decide to visit the Hidden Library. Inside the library, Mel finds a computer showing strange pictures. Suddenly, she loses her memory! Conji gets worried and takes Mel to First Elder Wizard, who thinks the evil Lord Ero erased Mel’s memory to hide something important. To help Mel, they learn about computers and how they work. First Elder Wizard sends them to Ms Idea, who knows about natural events in Avora. They visit Ms Idea, who sends them to the Records Room. There, they find an envelope with strange clues and go to First Elder Robot. He teaches them about the internet, which shows that the pictures are of powerful weapons. Knowing this, they visit Mr. Geebal at the Memory Palace. Mr. Geebal helps Conji remember when Mel lost her memory, revealing that Lord Ero used a spell. Conji then uses a drawing and a special counterspell to bring back Mel’s memory. With her memory back, Mel and Conji go to the Sci-Fi Lab. The Elders advise them not to make a weapon but to create a new protective spell using a computer. With this new spell, Mel and Conji confront Lord Ero. In an exciting battle, they use their new spell to stop Lord Ero’s evil plans. Mel and Conji’s bravery and teamwork save Avora from danger. They return as heroes, having learned that knowledge, friendship, and courage can overcome any challenge.
● Mel and Conji visit Ms Idea for her help. They tell her that Mel has lost her memory. She only remembers some pictures and words that look like computer icons.
● Ms Idea encourages them to find the information themselves for a better understanding.
● She hints that the information regarding this is hidden in the Records Room, inside an envelope in a book.
● They enter the Records Room, which is overflowing with records.
● Conji suggests looking in the ‘Puzzles and Symbols’ section, comparing it to organising files in a folder on a computer.
● Mel asks for an explanation about the files and the folders.
● Conji reminds Mel that she had taught him about it once.
● Conji plans to explain the files and the folders to Mel to help her remember.
This chapter is divided into the following classroom sessions
1. Introduction to Files and Folders and Opening a File
2. Typing in a File
3. Saving a File
At the end of the session, the students will be able to:
● describe the basic concepts of files and folders.
● create files and folders.
● open files using different methods.
Keywords
● File: A file is a collection of information.
● Folder: A folder is a container that can store files.
● Icon: An icon is an image on the computer screen that represents a file or a folder.
Ask the students about items they carry to school, such as lunchboxes or backpacks, and what these items contain.
Explain to the students what a file and a folder is.
Explain to them how to create files and folders.
Explain to them the different ways to open the created files.
Group discussion Conclude the concepts Assign homework
● Ask the students about the items they carry to school, such as lunchboxes or backpacks, and what these items contain.
● Tell students that just like they use backpacks and lunchboxes to organise their belongings, computers use folders to store files.
Engage
Explain the following concepts:
Describe the basic concepts of files and folders.
Explanation
Introduce the students to the concept of files and folders. Tell them that a file is a collection of information, and a folder is a container that can store files, as given on page 42. Also, explain the difference between a file and a folder.
Create files and folders.
Open files through different methods.
Describe the steps for creating a file and a folder to the students, as given on pages 42 and 43. Also, explain the term icon, which is an image on the computer screen that represents a file or a folder.
Describe the various ways to open a file to the students, as given on page 44.
● Read aloud the questions provided in the Do It Yourself 3A section and encourage the students to solve the questions. Instruct the students to write the answers in their book.
Correct Responses:
1. a. T b. F c. T
2. Steps to create a folder on the desktop:
i. Right click on the desktop.
ii. Position the mouse pointer over the New option.
iii. Click on the Folder option.
iv. Give it a name.
Build
7 mins
● Conduct a group discussion in the class among the students based on the topics “Do you think it is possible to create a folder inside another folder?” provided in the Discuss section on page 43.
Correct Response: Yes, we can create a folder inside another folder. Just like we have our school bag with different compartments inside, on a computer also, we can make a big folder and then put smaller folders inside it.
3 mins
● Conclude the session by summarising that a file is a collection of information and a folder is a container that can store files. Revise the steps to create files and folders on the computer and the various methods to open the files. Icon is an image on the computer screen that represents a file or a folder.
● Assign the following questions from the Chapter Checkup given at the end of the chapter as homework.
A. Fill in the Blanks: Questions 1, 2, 3, and 4
B. Tick the Correct Option: Questions 2, 3, and 4.
C. Who Am I?: Question 1
D. Write T for True and F for False: Questions 2 and 4
E. Answer the Following Questions: Questions 1, 2, 3, and 4
F. Apply Your Learning: Questions 1 and 2
At the end of the session, the students will be able to: ● type in a text file.
Keyword
● Cursor: Cursor is the black blinking line, using which we can type.
Warm Up Engage Build Sum Up
Ask the students what they do to remember the concepts.
Describe to them how to type in a file.
Group discussion Conclude the concepts
Assign homework 5 mins 15 mins 7 mins 3 mins
Warm Up
Action Plan
Ask the students: “What do they do to remember the concepts?”
Relate the concept of typing in a file to writing in a notebook.
Engage
Explain the following concepts:
Learning Outcome
Explanation
Type in a text file. Tell students that a blinking black line called the cursor is used to type on the white area in the text file. Describe to the students how to type in a file, as given on pages 44 and 45.
● What device do you use to type on a computer?
Correct Response: Keyboard
mins
● Conduct a group discussion in the class among the students based on the topic “What is the first step to start typing in a file on the computer?”
Possible Response: The first step to start typing in a file on the computer is to click on the white area, where a blinking black line called the cursor will appear.
3 mins
Sum Up
● Conclude the session by summarising that you can type in a text file by clicking on the white area.
● Assign the following questions from the Chapter Checkup given at the end of the chapter as homework.
B. Tick the Correct Option: Question 1
C. Who Am I?: Questions 3 and 4
D. Write T for True and F for False: Questions 1 and 5
F. Apply Your Learning: Question 3
At the end of the session, the students will be able to:
● explain the importance of saving a file.
Ask students the question: “Why do you write your work in notebooks instead of loose sheets of paper?” Explain to the students how to save a file.
● save a new file. 5 mins
Group discussion
Conclude the concepts
Assign homework
Ask students the question: “Why do you write your work in notebooks instead of loose sheets of paper?”
Lead them to understand the importance of saving their work or saving files on a computer.
Engage
Explain the following concepts:
Learning Outcomes
Explain the importance of saving a file.
Save a file.
15 mins
Explanation
Discuss with the students that it is important to save a file on the computer so that it can be referred to later in the future, as given on page 45.
Describe to the students how to save a file by explaining the steps, as given on page 45.
● What is the shortcut key to save your work in a file?
Correct Response: Ctrl + S
● Conduct a group discussion in the class among the students based on the topic “What do you need to click to save your work after typing in a file?”
Correct Response: You need to click on the ‘File’ menu and then select the ‘Save’ option. Finally, type the name of your file before clicking on the ‘Save’ button again. Sum Up
3 mins
● Conclude the session by summarising that if we save the file, the text we typed will be saved, even if we turn off the computer. We can open the file later and see our document again.
● Assign the following questions from the Chapter Checkup given at the end of the chapter as homework.
A. Fill in the Blanks: Question 5
B. Tick the Correct Option: Question 5
C. Who Am I?: Questions 2 and 5
D. Write T for True and F for False: Question 3
E. Answer the Following Questions: Question 5
F. Apply Your Learning: Question 4
Mel and Conji are two brave friends who love adventures. One day, they hear exciting stories from Elder Wizard and decide to visit the Hidden Library. Inside the library, Mel finds a computer showing strange pictures. Suddenly, she loses her memory. Conji gets worried and takes Mel to First Elder Wizard, who thinks the evil Lord Ero erased Mel’s memory to hide something important. To help Mel, they learn about computers and how they work. First Elder Wizard sends them to Ms Idea, who knows about natural events in Avora. They visit Ms Idea, who sends them to the Records Room. There, they find an envelope with strange clues and go to First Elder Robot. He teaches them about the internet, which shows that the pictures are of powerful weapons. Knowing this, they visit Mr. Geebal at the Memory Palace. Mr. Geebal helps Conji remember when Mel lost her memory, revealing that Lord Ero used a spell. Conji then uses a drawing and a special counterspell to bring back Mel’s memory. With her memory back, Mel and Conji go to the Sci-Fi Lab. The Elders advise them not to make a weapon but to create a new protective spell using a computer. With this new spell, Mel and Conji confront Lord Ero. In an exciting battle, they use their new spell to stop Lord Ero’s evil plans. Mel and Conji’s bravery and teamwork save Avora from danger. They return as heroes, having learned that knowledge, friendship, and courage can overcome any challenge.
● Mel and Conji found some strange pictures and words on a computer.
● They didn’t understand what these pictures and words meant.
● They remembered seeing them before but needed help to understand them again.
● They asked First Elder Robot for help.
● First Elder Robot said others had tried before but hadn’t been able to figure it out because, in the past, they didn’t have any technology and finding anything was time-consuming.
● Mel thought of using the internet for help because it had lots of information.
● Conji was unaware of the internet and wanted to learn about it.
● Mel agreed to explain about the internet.
This chapter is divided into the following classroom sessions
1. Internet and Its Advantages and Disadvantages
2. Basic Terminologies of the Internet
3. Opening a Web Page
4. Be a Good Digital Citizen
At the end of the session, the students will be able to:
● define the internet and describe its uses.
● describe the advantages of the internet.
● describe the disadvantages of the internet.
Keywords
● Computer network: Two or more computers connected to each other form a computer network.
● Internet: The internet is a network that connects computers all over the world.
Ask the students whether they are able to connect with family and friends while staying far away.
Explain what the internet is and why we use it. Discuss the advantages and disadvantages of the internet.
Warm Up Action Plan
Group discussion Conclude the concepts Assign homework
5 mins
● Ask the students whether they are able to connect with family and friends while staying far away.
● Now, build the concept by saying that they can connect with their family and friends using the internet.
Explain the following concepts:
Define the internet and describe its uses.
Describe the advantages of the internet.
Explanation
Tell the students that an Internet is a network that connects computers all over the world. Also, mention the uses of the internet, as given on page 54.
Tell the students that the internet is very useful if we use it correctly, then discuss the advantages of the internet, as given on page 54.
Describe the disadvantages of the internet.
Tell the students that everything has a good side and a bad side if we do not use it responsibly, and then discuss the disadvantages of the internet, as given on page 55.
1. Read aloud the questions provided in the Do It Yourself 4A section Question 2 and encourage students to solve them. Instruct them to write the answers in their book.
Correct Responses: 2. a. A b. D c. D d. A
1. Imagine you are explaining it to a friend who has never heard of the internet before. How would you describe the internet using simple words?
Correct Response: The internet is a network that connects computers all over the world.
2. Using the internet for a long time affects our health. Justify.
Correct Response: If we are on the screen a lot, it might make our eyes tired and make us feel not so good.
7 mins
● Conduct a group discussion in the class among the students based on the topic “What are some other things that you can do on the internet?” provided in the Discuss section on page 54.
Possible Responses: There are many things you can do on the internet. You can play online, watch videos, read stories and books for free, listen to your favourite songs, or buy things like toys, clothes, or books from online stores without going to a physical store.
3 mins
● Conclude the session by summarising that when two or more computers are connected to each other, they form a computer network. The internet helps us do many fun things like talking to far away friends, watching shows, and buying stuff. But along with advantages it has many disadvantages too, such as the need to be careful because bad people might try to get our personal data if we do not use the internet responsibly, or the risk of spending too much time online, can make us forget important things and might not be good for our health.
● Assign the following questions from the Chapter Checkup given at the end of the chapter as homework.
A. Fill in the Blanks: Questions 1 and 3
B. Tick the Correct Option: Question 1
C. Who Am I?: Question 1
D. Write T for True and F for False: Question 1
E. Answer the Following Questions: Question 3
F. Apply Your Learning: Questions 1, 3, and 5
At the end of the session, the students will be able to:
● describe the basic terminologies of the internet.
Keywords
● Webpage: A web page is a simple document that can be displayed over the internet using a browser.
● Website: A website is a collection of web pages that contain information about a related topic.
● Search Engine: Search Engines like Google, Yahoo, and Bing help us to find information we need on the internet.
● Email: Email stands for electronic mail. It is a way to send messages to people over the internet.
Ask a question from the students: ‘If you think of a notebook, what could a single page represent on the internet? And what could the entire notebook represent?’
Discuss the basic terminologies of the internet, such as the web page, website, web browser, search engine, email, and URL.
Group discussion Conclude the concepts Assign homework
5 mins
● If you think of a notebook, what could a single page represent on the internet? And what could the entire notebook represent?
● Tell them that a single page represents a web page, and the entire notebook represents a website.
Engage
Explain the following concepts:
Describe the basic terminologies of internet.
15 mins
Describe the basic terminologies of the internet to the students. Tell them that a web page is a simple document that can be displayed over the internet using a browser. Give them brief about the website, web browser, search engine, email, URL, etc., as given on pages 55 and 56.
● Read aloud the questions provided in the Do It Yourself 4A section Question 1 and encourage the students to solve the questions. Instruct the students to write the answers in their book.
Correct Responses:Definitions Terms
Two or more computers that are connected to each other.
The network spread across the world.
A collection of web pages.
It helps us view the information present on websites and web pages.
Internet
Website
Web Browser
Computer Network
● Conduct a group discussion in the class among the students based on the topic “Share an example of a URL you have visited”.
Possible Response: An example of a URL is “www.nationalgeographickids.com”. This is a website where you can find lots of fun and interesting facts about animals and nature.
● Conclude the session by summarising that a web page is a simple document that can be viewed on a browser, while a website is a collection of web pages that contain information about a related topic. Web browsers, like Chrome, help us view the information present on websites and web pages. Search engines, like Google, help us find information. Email is an electronic mail that is sent over the internet, and each website has a unique web address called a URL.
● Assign the following questions from the Chapter Checkup given at the end of the chapter as homework.
A. Fill in the Blanks: Questions 2 and 4
B. Tick the Correct Option: Questions 4 and 5
C. Who Am I?: Question 3
D. Write T for True and F for False: Questions 2, 3, and 4
E. Answer the Following Questions: Questions 1, 2, and 4
At the end of the session, the students will be able to:
● open a Web Page.
Keyword
● Address bar: The bar at the top of the browser window where web address is typed is known as an address bar.
Inquire with the students about how they visit places in their neighbourhood.
Engage Build Sum Up
Explain to the students the steps to open a web page. Group discussion Conclude the concepts Assign homework
Action Plan
Warm Up
● Inquire with the students about how they visit places in their neighbourhood.
● Tell students that, similar to how people need to know the address of a place to visit the place, you need to know the web address or the URL to visit a web page.
Engage
Explain the following concept:
Learning Outcome
Explanation
Open a web page. Tell the students that in order to visit a web page, you need to know its web address. Then describe the steps to open a web page, as given on pages 57 and 58.
● In which part of a browser do you type the web address to open a web page?
Correct Response: Address bar
7 mins
● Conduct a group discussion in the class among the students based on the topic “Steps to Open a Web Page”.
Possible Response: To open a web page, follow these steps:
a. Open a web browser, such as Google Chrome.
b. Type the URL in its address bar.
c. Press the Enter key.
● Conclude the session by summarising that to open a web page, we need to open a web browser, type the URL in its address bar and press the Enter key.
● Assign the following questions from the Chapter Checkup given at the end of the chapter as homework.
C. Who Am I?: Question 2
F. Apply Your Learning: Question 4
At the end of the session, the students will be able to:
● describe what it means to be a good digital citizen.
● follow some safety rules to be a good digital citizen.
Keywords
● Good Digital Citizen: Being a good digital citizen means using the internet carefully.
● Cyberbullying: Sometimes people say rude things online. This is called cyberbullying.
Ask the students, “Is safety in daily life, like looking both ways before crossing the road or not talking to strangers, important?”
Explain to the students what it means to be a good digital citizen.
Explain to them the rules to follow in order to become a good digital citizen.
Group discussion Conclude the concepts
Assign homework
5 mins
● Start by asking students, “Do you think practicing safety in daily life, like looking both ways before crossing the road or avoiding talking to strangers, is important?”
● Explain that just as we take precautions to stay safe in our everyday lives, it’s equally important to stay aware of the risks and practice safety during online activities.
Engage
Explain the following concepts:
Learning Outcome
Explanation
Describe a good digital citizen. Tell students that being a good digital citizen means using the internet carefully, as given on page 58.
Be a good digital citizen.
Tell students about the rules to be a good digital citizen, as given on page 58.
● Read aloud the questions provided in the Do It Yourself 4B section and encourage the students to solve the questions. Instruct the students to write the answers in their book.
Correct Responses:
1. Argue with people online. - B
2. Do not share password with others. - G
3. Be kind and respectful. - G
4. Spend unlimited time on the internet. - B
Build
7 mins
● Conduct a group discussion in the class among the students based on the topic “Cyberbullying”.
Possible Response: Sometimes people say rude things online. This is called cyberbullying. For example, sending mean messages, posting hurtful comments, and sharing embarrassing photos or videos without consent.
3 mins
Sum Up
● Conclude the session by summarising the online safety rules: avoid sharing personal details, clicking on unknown ads, etc., and explain that being a good digital citizen involves using the internet responsibly, treating others with respect, and seeking help if something goes wrong.
● Assign the following questions from the Chapter Checkup given at the end of the chapter as homework.
A. Fill in the Blanks: Question 5
B. Tick the Correct Option: Questions 2 and 3
C. Who Am I?: Questions 4 and 5
D. Write T for True and F for False: Question 5
E. Answer the Following Questions: Question 5
F. Apply Your Learning: Question 2
Mel and Conji are two brave friends who love adventures. One day, they hear exciting stories from Elder Wizard and decide to visit the Hidden Library. Inside the library, Mel finds a computer showing strange pictures. Suddenly, she loses her memory! Conji gets worried and takes Mel to First Elder Wizard, who thinks the evil Lord Ero erased Mel’s memory to hide something important. To help Mel, they learn about computers and how they work. First Elder Wizard sends them to Ms Idea, who knows about natural events in Avora. They visit Ms Idea, who sends them to the Records Room. There, they find an envelope with strange clues and go to First Elder Robot. He teaches them about the internet, which shows that the pictures are of powerful weapons. Knowing this, they visit Mr. Geebal at the Memory Palace. Mr. Geebal helps Conji remember when Mel lost her memory, revealing that Lord Ero used a spell. Conji then uses a drawing and a special counterspell to bring back Mel’s memory. With her memory back, Mel and Conji go to the Sci-Fi Lab. The Elders advise them not to make a weapon but to create a new protective spell using a computer. With this new spell, Mel and Conji confront Lord Ero. In an exciting battle, they use their new spell to stop Lord Ero’s evil plans. Mel and Conji’s bravery and teamwork save Avora from danger. They return as heroes, having learned that knowledge, friendship, and courage can overcome any challenge.
● Mel and Conji reach the Memory Palace to ask Mr Geebal for help to bring back Mel’s memory.
● Mr Geebal asks Conji to close his eyes and think of the time when Mel had lost her memory.
● Conji begins to think of the time in the Secret Library.
● On focusing, he sees a dark shadow of Lord Ero in the corner of the room. Lord Ero is saying a spell while looking at Mel.
● Mr Geebal makes Conji open his eyes.
● Conji asks Mr Geebal for a sheet of paper and some paint to draw the memory of the times he has spent with Mel.
● Mr Geebal tells him that he does not have those, but he suggests using Paint to draw the memory.
● Conji then asks what Paint is and how it can be used.
This chapter is divided into the following classroom and lab sessions
1. Introduction to Paint 1
2. Introduction to Paint 2
3. Introduction to Paint 3
4. Introduction to Paint 4
At the end of the session, the students will be able to:
● describe what Paint is.
● start Paint.
● explain different components of the Paint window.
● use Shapes group.
● use Callouts.
Keywords
● MS Paint: MS Paint is like a colouring book on the computer, where you can draw and colour pictures using different tools and colours.
● Drawing Area: Drawing Area is the space where you create drawings.
● Callout: A callout is a shape that is used to write a message.
Ask the students to draw the sun on a paper using a pencil. Discuss what Paint is. Explain to them how they can start using Paint. Also, get them familiar with different parts of the Paint window. Tell them how to draw different shapes using the Shapes group. Explain to them how to draw a callout.
Warm Up
● Ask the students to draw the sun on a paper using a pencil.
● Now, build the concept by introducing them to the Paint.
Explain the following concepts:
Describe what Paint is. Tell the students that we can draw many beautiful things around us, like the sun, mountains, flowers, etc., on a computer without using paper, colour, or pencil, as given on page 70.
Start Paint. Explain the steps to start Paint to the students, as given on pages 70 and 71.
Explain different components of the MS Paint window.
Tell the students about different parts of the Paint window, such as the title bar, drawing area, ribbon, etc., as given on pages 71 and 72.
Use Shapes group. Tell the students that the Shapes tool is used to draw many shapes easily. Also tell them the steps to draw some of these shapes, as given on pages 72 to 74.
Use Callouts. Tell the students that a callout is a shape that is used to write a message. Also tell them the steps to add a callout, as given on pages 74 to 76.
● Read aloud the questions provided in Do It Yourself 5A and encourage the students to solve the questions. Instruct the students to write the answers in their book.
Correct Responses: a. PAINT b. TOOLBAR c. RIBBON d. TITLE BAR
● Conduct a group discussion in the class among the students on the topic, “My Favourite Drawing in Paint”.
Possible Responses: hut, robot, etc.
● Conclude the session by summarising that Paint lets us draw and colour on the computer. Tell the steps to start Paint. Tell them about different parts of the Paint window, such as the title bar, tabs, ribbon, drawing area, etc. Also, instruct them on how to draw different shapes and different callouts.
● Assign the following questions from the Chapter Checkup given at the end of the chapter as homework.
A. Fill in the Blanks: Questions 1, 2, and 3
B. Tick the Correct Option: Questions 1 and 5
C. Who Am I?: Questions 1, 2, and 3
D. Write T for True and F for False: Questions 1 and 2
E. Answer the Following: Questions 1, 2, 4, and 5
F. Apply Your Learning: Questions 1 and 5
At the end of the session, the students will be able to:
● describe what Paint is.
● start Paint.
● explain different components of the Paint window.
● use Shapes group.
● use Callouts.
Keywords
● MS Paint: MS Paint is like a colouring book on the computer, where you can draw and colour pictures using different tools and colours.
● Drawing Area: Drawing Area is the space where you create drawings.
● Callout: A callout is a shape that is used to write a message.
Let the students watch the video or the learning slides related to the topic on the digital panel. Discuss what Paint is. Demonstrate to them how they can start using Paint. Also, get them familiar with different parts of the Paint window. Also, tell them how to draw shapes and add callouts. Attempt the activity on the Assignment page. Conclude the concepts Assign homework
● Instruct the students to go to the Tekie’s Digital platform and open a Lab session on Introduction to Paint 2.
● Show the learning slides one by one and discuss the concepts shown on the slides in the panel.
Engage
Explain the following concepts:
Explanation
Describe what Paint is. Tell the students that we can draw many beautiful things around us, like the sun, mountains, flowers, etc., on a computer without using paper, colour, or pencil, as given on page 70.
Start Paint.
Explain different components of the MS Paint window.
Use Shapes tool.
Use Callouts.
Demonstrate to the students the steps to start Paint, as given on pages 70 to 71.
Tell the students about different parts of the Paint window, such as the title bar, drawing area, ribbon, etc., as given on pages 71 to 72.
Demonstrate to the students the steps to draw shapes, as given on pages 72 to 74.
Demonstrate to the students the steps to add a callout, as given on pages 74 to 76.
● Ask the questions provided on the slides one by one to assess the students' understanding. Discuss the answers to the questions with the students. If necessary, ask additional relevant questions.
7 mins
Build
● Instruct the students to click on the Start practice button on the Assignment page to attempt the activity. Then, click on the Attempt button to open the activity page.
● Instruct the students to click on the Confirm button to submit their work when they are done with the activity.
3 mins
Sum Up
● Conclude the session by summarising that Paint lets us draw and colour on the computer. Tell the steps to start Paint. Tell them about different parts of Paint, such as the title bar, tabs, ribbon, drawing area, etc. Also, instruct them on how to draw different shapes and callouts.
● Assign the additional activity given on the panel to the students as homework.
At the end of the session, the students will be able to: 5 mins
● draw using the Pencil tool.
● write using the Text tool.
● erase mistakes using the Eraser tool.
Ask students how they can draw and colour a flower, butterfly, cat, etc., in Paint.
● draw and paint using the Brushes tool.
● use the Fill with color tool.
● use the Color picker tool.
Explain the various tools in Paint, like Pencil, Text, Eraser, Brushes, Fill with color, and Color picker tool. Also tell the steps to use these tools.
Think and Tell Conclude the concepts
Assign homework
● Ask the students how they can draw, for instance, a flower, butterfly, cat, etc., in Paint.
● Now, build the concept by telling them that these can be drawn by using the Pencil tool. Also, tell them that they can fill the drawing with colours using the Fill with color tool.
15 mins
Engage
Explain the following concepts:
Draw using the Pencil tool.
Write using the Text tool.
Delete mistakes using the Eraser tool.
Draw and paint using the Brushes tool.
Explanation
Tell the students the various steps to draw using the Pencil tool, as given on pages 76 and 77.
Tell the students the various steps to add text to our drawing using the Text tool, as given on page 77.
Tell the students the various steps to erase mistakes in their drawings, as given on page 78.
Tell the students that a Brush tool is used for freehand drawing and painting. Also list the various steps to use the Brushes tool, as given on pages 78 and 79.
Use the Fill with color Tool.
Use the Color picker Tool.
Tell the students that the Fill with color tool is used to fill the drawing with colours. Also list the various steps to use the Fill with color tool, as given on page 79.
Tell the students what Color picker tool is. Also tell the various steps to use the Color picker tool, as given on page 80.
● Read aloud the questions provided in the Do It Yourself 5B section and encourage the students to solve the questions. Instruct the students to write the answers in their book.
Correct Responses:
1. Airbrush tool, Fill with color tool, Text tool
2.
Column A Column B


Build
7 mins
● Ask the students to give the answer to the question, “Can we add text in the blank drawing area?” asked in the Think and Tell section on page 77.
Possible Responses: Yes/No
Correct Response: Yes Sum Up
3 mins
● Conclude the session by summarising that a Pencil tool is used to draw, Text tool helps us add text to our drawing, Eraser tool is used to erase mistakes, Brushes tool is used for freehand drawing and painting, Fill with color tool is used to fill colours in drawings, and Color picker tool is used to select colours from existing drawings and fill other parts of the drawing with the same colour. Also summarise the steps to use these tools.
● Assign the following questions from the Chapter Checkup given at the end of the chapter as homework.
A. Fill in the Blanks: Questions 4 and 5
B. Tick the Correct Option: Questions 2, 3, and 4
C. Who Am I?: Questions 4 and 5
D. Write T for True and F for False: Questions 3, 4, and 5
E. Answer the Following Questions: Question 3
F. Apply Your Learning: Questions 2, 3, and 4
At the end of the session, the students will be able to:
● draw using the Pencil tool.
● write using the Text tool.
● delete mistakes using the Eraser tool.
● draw and paint using the Brushes tool.
● use the Fill with color tool.
Let the students watch the video or the learning slides related to the topic on the digital panel.
● use the Color picker tool. 5 mins
Explain the various tools in Paint, like Pencil, Text, Eraser, Brushes, Fill with color, and Color picker tool. Also demonstrate the steps to use these tools.
Attempt the activity on the Assignment page.
Conclude the concepts
Assign homework
● Instruct the students to go to the Tekie’s Digital platform and open a Lab session on Introduction to Paint 4
● Show the learning slides one by one and discuss the concepts shown on the slides in the panel.
Explain the following concepts:
Learning Outcomes
Draw using the Pencil tool. Demonstrate to the students the various steps to draw using the Pencil tool, as given on pages 76 and 77.
Write using the Text tool. Demonstrate to the students the various steps to add text to our drawing using the Text tool, as given on page 77.
Delete mistakes using the Eraser tool.
Draw and paint using the Brushes tool.
Demonstrate to the students the various steps to erase mistakes in their drawings, as given on page 78.
Tell the students that a Brush tool is used for freehand drawing and painting. Also demonstrate to the students the various steps to use the Brushes tool, as given on pages 78 and 79.
Use the Fill with color tool. Tell the students that the Fill with color tool is used to fill the drawing with colours. Also demonstrate to the students the various steps to use the Fill with color tool, as given on page 79.
Use the Color picker tool. Tell the students what a Color picker tool is. Also demonstrate to the students the various steps to use the Color picker tool, as given on page 80.
● Ask the questions provided on the slides one by one to assess the students’ understanding. Discuss the answers to the questions with the students. If necessary, ask additional relevant questions.
7 mins
Build
● Instruct the students to click on the Start practice button on the Assignment page to attempt the activity. Then, click on the Attempt button to open the activity page.
● Instruct the students to click on the Confirm button to submit their work when they are done with the activity.
3 mins
Sum Up
● Conclude the session by summarising that the Pencil tool is used to draw, Text tool helps us add text to our drawing, Eraser tool is used to erase mistakes, Brushes tool is used for freehand drawing and painting, Fill with color tool is used to fill colours in drawing, and Color picker tool is used to select colours from existing drawings and fill other parts of the drawing with the same colour. Also summarise the steps to use these tools.
● Assign the additional activity given on the panel to the students as homework.
Mel and Conji are two brave friends who love adventures. One day, they hear exciting stories from Elder Wizard and decide to visit the Hidden Library. Inside the library, Mel finds a computer showing strange pictures. Suddenly, she loses her memory! Conji gets worried and takes Mel to First Elder Wizard, who thinks the evil Lord Ero erased Mel’s memory to hide something important. To help Mel, they learn about computers and how they work. First Elder Wizard sends them to Ms Idea, who knows about natural events in Avora. They visit Ms Idea, who sends them to the Records Room. There, they find an envelope with strange clues and go to First Elder Robot. He teaches them about the internet, which shows that the pictures are of powerful weapons. Knowing this, they visit Mr. Geebal at the Memory Palace. Mr. Geebal helps Conji remember when Mel lost her memory, revealing that Lord Ero used a spell. Conji then uses a drawing and a special counterspell to bring back Mel’s memory. With her memory back, Mel and Conji go to the Sci-Fi Lab. The Elders advise them not to make a weapon but to create a new protective spell using a computer. With this new spell, Mel and Conji confront Lord Ero. In an exciting battle, they use their new spell to stop Lord Ero’s evil plans. Mel and Conji’s bravery and teamwork save Avora from danger. They return as heroes, having learned that knowledge, friendship, and courage can overcome any challenge.
● Lord Ero is creating powerful weapons. Mel and Conji decide to use advanced technology to stop him.
● They head to the Sci-Fi Lab to create a weapon that reverses Lord Ero’s actions.
● First Elder Robot, First Elder Wizard, Elder Wizard, and Elder Robot join them in the lab.
● First Elder Wizard suggests using magic instead of weapons and tasks them with creating a new spell.
● When Conji offers to get paper and pen, Elder Robot advises using a word processor instead.
● Conji, unfamiliar with a word processor, learns about it from First Elder Robot and Elder Robot.
At the end of the session, the students will be able to:
● describe what a word processor is.
● know about Google Docs and its features.
● create a document on Google Docs.
● identify the components of Google Docs.
● name a document.
Keywords
● Word processor: A word processor is a software program that allows you to create, edit, and format text documents.
Ask the students how they will write a paragraph on a computer. Explain to the students what a word processor is. Explain them about Google Docs and its features. Also, tell them the steps to create a Google document. Explain the different components of Google Docs. Also, tell them how to name a document. Group discussion
● Google Docs: It is a free online word processor. 5 mins
● Ask the students how they will write a paragraph on a computer.
● Tell the students that a word processor is a software program that allows you to create, edit, and format text documents. Microsoft Word and Google Docs are the two most popular ones.
Engage
Explain the following concepts:
Learning Outcomes
Describe what a word processor is.
Explanation
Tell the students that a word processor is a software program that allows you to create, edit, and format text documents, as given on page 91.
Know about Google Docs and its features.
Create a document on Google Docs.
Identify the components of Google Docs.
Tell the students that Google Docs is a free online word processor. Also tell them the features of Google Docs, as given on pages 91 and 92.
Tell students that to create a document on Google Docs, they need a web browser. Also, explain them the steps to create a Google document, as given on page 92.
Tell the students about different components of the Google Docs window, such as the menu bar, quick access toolbar, document workspace, etc., as given on pages 92 and 93.
Name a document. Tell the students that by default, the name of the document is ‘Untitled document’. Also, tell them the steps to name a document, as given on page 93.
● Read aloud the questions provided in the Do It Yourself 6A section, Questions 1 and 2. Encourage the students to solve the questions. Instruct the students to write the answers in their book.
Correct Responses:
1. a. save b. name c. word d. file e. share
2. a. word b. Google c. docs d. pencil e. air
Build
7 mins
● Conduct a group discussion in the class among the students based on the topic, “What are the different things that you can add in your documents? “provided in the Discuss section on page 92.
Possible Response: Text/Pictures
● Conduct a group discussion in the class among the students based on the topic “Discuss three features which you can apply to your documents if you are working on Google Docs?” provided in the Discuss section on page 96.
Possible Response: Add pictures, share documents with friends, change the font, colour, and size of text, etc.
3 mins
● Conclude the session by summarising that a word processor is a software program that allows you to create, edit, and format text documents. The two most popular ones are Microsoft Word and Google Docs. Google Docs is a free online word processor. When you share a document, multiple people can work on it in real time. It automatically saves our work. There are different components of the Google Docs window, such as the menu bar, quick access toolbar, document workspace, etc. Also summarise how to create and name a Google document.
● Assign the following questions from the Chapter Checkup given at the end of the chapter as homework.
A. Fill in the Blanks: Questions 1, 2, 4, and 5
B. Tick the Correct Option: Questions 1 and 4
C. Who Am I?: Questions 2, 4, and 5
D. Write T for True and F for False: Questions 1 and 2
E. Answer the Following Questions: Question 1
F. Apply Your Learning: Question 4
At the end of the session, the students will be able to:
● describe what a word processor is.
● know about Google Docs and its features.
● create a document on Google Docs.
● identify the components of Google Docs.
● name a document.
Keywords
● Word processor: A word processor is a software program that allows you to create, edit, and format text documents.
● Google Docs: It is a free online word processor.
Let the students watch the video or the learning slides related to the topic on the digital panel.
Explain to the students what a word processor is. Explain them about Google Docs and its features. Also, demonstrate them how to create a Google document. Explain the different components of Google Docs. Also, demonstrate them how to name a document.
Attempt the activity on the Assignment page.
Conclude the concepts Assign homework
Warm Up
● Instruct the students to go to the Tekie’s Digital platform and open a Lab session on Word Processor 2
● Show the learning slides or the video and discuss the concepts shown on the panel.
Engage
Explain the following concepts:
Describe what a word processor is.
Tell the students that a word processor is a software program that allows you to create, edit, and format text documents, as given on page 91.
Know about Google Docs and its features.
Create a document on Google Docs.
Identify the components of Google Docs.
Name a document.
Tell the students that Google Docs is a free online word processor. Also tell them the features of Google Docs, as given on pages 91 and 92.
Demonstrate to the students how to create a Google document, as given on page 92.
Show the students the different components of the Google Docs window, such as the menu bar, quick access toolbar, document workspace, etc., as given on pages 92 and 93.
Demonstrate to the students how to name a document, as given on page 93.
● Ask the questions provided on the slides one by one to assess the students’ understanding. Discuss the answers to the questions with the students. If necessary, ask additional relevant questions.
● Instruct the students to click on the Start practice button on the Assignment page to attempt the activity. Then, click on the Attempt button to open the activity page.
● Instruct the students to click on the Confirm button to submit their work when they are done with the activity.
3 mins
Sum Up
● Conclude the session by summarising that a word processor is a software program that allows you to create, edit, and format text documents. The two most popular ones are Microsoft Word and Google Docs. Google Docs is a free online word processor. When you share a document, multiple people can work on it in real time. It automatically saves our work. There are different components of the Google Docs window, such as the menu bar, quick access toolbar, document workspace, etc. Also summarise how to create and name a Google document.
● Assign the additional activity given on the panel to the students as homework.
At the end of the session, the students will be able to:
● type in a document.
● save a document.
Keyword
● Autosave: Autosave is a feature of Google Docs that automatically saves an open document or file.
Ask the students
“Does Google Docs automatically save your work while you are typing?” Explain the concept of typing text in a document. Also explain the Autosave feature of Google Docs.
Think and Tell Conclude the concepts
Assign homework
Action Plan
5 mins
Warm Up
● Ask the students: “Does Google Docs automatically save your work while you are typing?”
● Tell them that in Google Docs, you do not need to keep track of saving your file because it does it for you automatically.
15 mins
Engage
Explain the following concepts:
Learning Outcomes
Explanation
Type in Google Doc. Explain to the students how to type in a document, as given on page 94.
Save a document. Tell students that Autosave is a feature of Google Docs that automatically saves an open document or file. Also tell them how Autosave works in Google Docs, as given on page 95.
● Read aloud the questions provided in the Do It Yourself 6A section. Encourage the students to solve the questions. Instruct the students to write the answers in their book.
Correct Response:
1. a. Share b. Blank c. Save d. File 2.
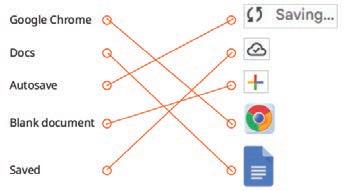
● Ask the students to give the answer to the question “Do you think Autosave will work if your computer is not connected to the internet?” asked in the Think and Tell section on page 95.
Possible Responses: Yes/No
Correct Response: Yes, in Google Docs even if you work offline, work gets saved automatically.
Sum Up
3 mins
● Conclude the session by summarising that we can type text in the document workspace in the Google Docs. Autosave is a feature of Google Docs that automatically saves an open document or file.
● Assign the following questions from the Chapter Checkup given at the end of the chapter as homework.
A. Fill in the Blanks: Question 3
B. Tick the Correct Option: Questions 2 and 3
C. Who Am I?: Question 3
D. Write T for True and F for False: Questions 3 and 4
E. Answer the Following Questions: Questions 2, 4, and 5
F. Apply Your Learning: Question 2
At the end of the session, the students will be able to:
● type in a document.
● save a document.
Keyword
● Autosave: Autosave is a feature of Google Docs that automatically saves an open document or file.
Warm Up Engage
Let the students watch the video or the learning slides related to the topic on the digital panel.
Demonstrate to the students how to type a paragraph in Google Docs. Also tell them how the Autosave feature works.
Attempt the activity on the Assignment page.
Conclude the concepts Assign homework
5 mins
Warm Up
● Instruct the students to go to the Tekie’s Digital platform and open a Lab session on Word Processor 4.
● Show the learning slides or the video and discuss the concepts shown on the panel.
Engage
Explain the following concepts:
Learning Outcomes
Type text in a document.
Understand the Autosave feature in Google Docs.
15 mins
Explanation
Demonstrate to the students how to type a paragraph in Google Docs, as given on page 94.
Explain to students how Google Docs automatically saves their work in real-time without manual intervention. Also demonstrate them how to close a document, as given on page 95.
● Ask the questions provided on the slides one by one to assess the students’ understanding. Discuss the answers to the questions with the students. If necessary, ask additional relevant questions.
Build 7 mins
● Instruct the students to click on the Start practice button on the Assignment page to attempt the activity. Then, click on the Attempt button to open the activity page.
● Instruct the students to click on the Confirm button to submit their work when they are done with the activity.
3 mins
● Conclude the session by summarising that saving your work in Google Docs is simple and efficient because of its Autosave feature, which automatically saves changes in real-time. This eliminates the risk of losing progress. Once the document is saved, you can safely close it without worrying about losing data.
● Assign the additional activity given on the panel to the students as homework.
At the end of the session, the students will be able to:
● search a document.
● open a document.
Ask students: How can you use a file again if you close something on your computer?
Explain to the students the steps to search and open a document.
Group discussion
Conclude the concepts
Assign homework
● Ask the students how they can work on the same document again if they have closed it.
● Tell them that in such a scenario, they can search a file.
Explain the following concepts:
Learning Outcomes
Explanation
Search a document. Tell the students the steps to search for a closed document, as given on page 96.
Open a document. Tell the students the steps to open a document, as given on page 97.
● What are the steps to open a document?
Correct Response: Click on File > Open. Click on the document which you want to open and then click on the Open button.
● Conduct a group discussion in the class among the students based on the topic ‘Significance of using the Recent Documents section of the Google Docs’.
Correct Response: The ‘Recent Documents’ section in Google Docs helps you quickly find and reopen files you recently worked on without searching in the Search bar.
● Conclude the session by summarising the steps to search and open a file in Google Docs.
● Assign the following questions from the Chapter Checkup given at the end of the chapter as homework.
B. Tick the Correct Option: Question 5
C. Who Am I?: Question 1
D. Write T for True and F for False: Question 5
E. Answer the Following Questions: Question 3
F. Apply Your Learning: Questions 1 and 3
At the end of the session, the students will be able to:
● search a document.
● open a document.
Let the students watch the video or the learning slides related to the topic on the digital panel. Demonstrate to the students the steps to search and open a document.
Attempt the activity on the Assignment page.
Conclude the concepts
Assign homework
5 mins
● Instruct the students to go to the Tekie’s Digital platform and open a Lab session on Word Processor 6
● Show the learning slides or the video and discuss the concepts shown on the panel.
Engage
Explain the following concepts:
Learning Outcomes
15 mins
Explanation
Search a document. Demonstrate to the students how to search a closed document, as given on page 96.
Open a document. Demonstrate to the students how to open a document, as given on page 97.
● Ask the questions provided on the slides one by one to assess the students’ understanding. Discuss the answers to the questions with the students. If necessary, ask additional relevant questions.
● Instruct the students to click on the Start practice button on the Assignment page to attempt the activity. Then, click on the Attempt button to open the activity page.
● Instruct the students to click on the Confirm button to submit their work when they are done with the activity. Sum Up 3 mins
● Conclude the session by summarising the steps to search and open a Google Docs file with friends.
● Assign the additional activity given on the panel to the students as homework.
Mel and Conji are two brave friends who love adventures. One day, they hear exciting stories from Elder Wizard and decide to visit the Hidden Library. Inside the library, Mel finds a computer showing strange pictures. Suddenly, she loses her memory. Conji gets worried and takes Mel to First Elder Wizard, who thinks the evil Lord Ero erased Mel’s memory to hide something important. To help Mel, they learn about computers and how they work. First Elder Wizard sends them to Ms Idea, who knows about natural events in Avora. They visit Ms Idea, who sends them to the Records Room. There, they find an envelope with strange clues and go to First Elder Robot. He teaches them about the internet, which shows that the pictures are of powerful weapons. Knowing this, they visit Mr. Geebal at the Memory Palace. Mr. Geebal helps Conji remember when Mel lost her memory, revealing that Lord Ero used a spell. Conji then uses a drawing and a special counterspell to bring back Mel’s memory. With her memory back, Mel and Conji go to the Sci-Fi Lab. The Elders advise them not to make a weapon but to create a new protective spell using a computer. With this new spell, Mel and Conji confront Lord Ero. In an exciting battle, they use their new spell to stop Lord Ero’s evil plans. Mel and Conji’s bravery and teamwork save Avora from danger. They return as heroes, having learned that knowledge, friendship, and courage can overcome any challenge.
● Mel, Conji, and the Elders go to First Elder Wizard and First Elder Robot to take permission for the battle.
● Mel and Conji stand bravely on the battlefield, facing Lord Ero.
● Lord Ero uses his weapon, and there is a huge thunder in Avora.
● The people of Avora are running to save their lives.
● Suddenly, Elder Robot and Elder Wizard appear, who use their magic and technology to stop Lord Ero.
● Mel and Conji use their new spell, but it does not work.
● Then, Elder Robot tells them to go to First Elder Wizard and ask him to help them in fixing the spell.
● Elder Wizard tells them to check if they followed the steps in the right order.
● Conji looks puzzled. He asks Mel if they need to edit the document then.
● Mel tells him about text editing on their way to First Elder Wizard’s office.
This chapter is divided into the following classroom and lab sessions.
1. Editing Text 1
2. Editing Text 2
3. Editing Text 3
4. Editing Text 4
5. Editing Text 5
6. Editing Text 6
At the end of the session, the students will be able to:
● explain what text editing is.
● edit text.
● select text.
Keyword
● Text editing: Text editing is the process of making changes to the text to improve its clarity and accuracy.
Ask the students whether they have written a story on the computer without any mistakes in it.
Explain what text editing is. Tell them how to edit text. Also, explain selecting text using a mouse and a keyboard.
Group discussion Conclude the concepts Assign homework
Action Plan
Warm Up
● Ask the students whether they have written a story on the computer without any mistakes in it.
● Relate it to the concept of selecting text and editing it.
Engage
Explain the following concepts:
Learning Outcomes
15 mins
Explanation
Explain text editing. Explain to the students that text editing is the process of making changes to the text to improve its clarity and accuracy, as given on page 109.
Edit text. Explain to the students that they can edit text in Google Docs by adding some text in it. Also, describe the process of editing the text to the students, as given on pages 109 and 110.
Select text. Explain to the students that they need to select text before making any changes to it. Then, describe the methods of selecting text using a keyboard and a mouse, as given on pages 110 and 111.
Ask additional questions to the students to check their understanding.
1. Define text editing.
Correct response: Text editing is the process of making changes to the text to improve its clarity and accuracy.
2. How can you select a paragraph using a mouse?
Correct response: By triple-clicking anywhere on the paragraph.
Build
7 mins
● Conduct a group discussion in the class among the students based on the topic ‘How can you select the complete document using a keyboard?’
Correct Response: Press the Ctrl + A keys.
Sum Up
3 mins
● Conclude the session by summarising that editing is the process of making changes to the text to improve its clarity and accuracy. Also, tell them how to select and edit text.
● Assign the following questions from the Chapter Checkup given at the end of the chapter as homework.
A. Fill in the Blanks: Questions 1 and 2
B. Tick the Correct Option: Question 2
D. Write T for True and F for False: Question 1
E. Answer the Following Questions: Question 1
At the end of the session, the students will be able to:
● explain what text editing is.
● edit text.
● select text.
Keyword
Let the students watch the video or the learning slides related to the topic on the digital panel.
● Text editing: Text editing is the process of making changes to the text to improve its clarity and accuracy. 5 mins
Warm Up
Describe to the students the importance of text editing. Tell them how to edit text. Demonstrate to them how to select a letter, a word, a block of text, a paragraph, or the complete document.
Attempt the activity on the Assignment page.
Conclude the concepts
Action Plan
● Instruct the students to go to the Tekie’s Digital platform and open a Lab session on Editing Text 2.
● Show the Learning slides or the Video and discuss the concepts shown on the panel.
Engage
Explain the following concepts:
Explain the importance of text editing.
Edit text.
Explanation
Explain text editing to the students, as given on page 109.
Demonstrate how to add some text to an existing document to the students, as given on pages 109 and 110.
Select text. Demonstrate the process of selecting text to the students. Also, tell them that after typing text, they can perform many operations on it, like deleting the text, duplicating the text, etc. For this, they need to first select the text, as given on pages 110 and 111.
Ask the questions provided on the slides one by one to assess the students’ understanding. Discuss the answers to the questions with the students. If necessary, ask additional relevant questions.
Build
7 mins
● Instruct the students to click on the Practice button on the Assignment page to attempt the activity. Then, click on the Attempt button to open the activity page.
● Instruct the students to click on the Confirm button to submit their work when they are done with the activity.
3 mins
Sum Up
● Conclude the session by summarising that editing is the process of making changes to the text to improve its clarity and accuracy. Also, revise them on how to select and edit text.
● Assign the additional activity given on the panel to the students as homework.
At the end of the session, the students will be able to:
● copy and paste the text.
● move and delete text.
Keywords
● Copying Text: Copying text means duplicating the selected text and making it available for another location.
● Pasting Text: Pasting means putting something you copied from one place into another in the same document or another document.
● Moving Text: Moving text means removing it from its original position and placing it at some other position in the document.
Ask students the question: ‘What do you think the meaning of copy and paste would be?’
Describe to the students how to copy and paste text. Explain the concept of moving text from one place to another by using the Cut and Paste commands. Also, tell them how to delete text.
Think and Tell
Conclude the concepts
● Ask students the question: ‘What do you think the meaning of copy and paste would be?’
● Now, build the concept by explaining how to copy and paste the text.
Explain the following concepts:
Learning Outcomes Explanation
Copy and paste the text. Explain the concept of copying and pasting text to the students. Tell them that copying text means duplicating the selected text and making it available for another location, and pasting means putting something you copied from one place into another in the same document or another document. Also tell them how to copy and paste text, as given on pages 111 and 112.
Move and Delete text. Explain the concept of moving text from one place to another in a document using the Cut and Paste commands. Also, describe how to delete text, as given on pages 113 to 115.
● Read aloud the questions provided in the Do It Yourself 7A section and encourage the students to solve the questions. Instruct the students to write the answers in their book.
Correct Responses:
1.

2. a. Select the word that you want to copy.
b. Click on the Copy option.
c. Place your cursor where you want to add that word.
d. Click on the Paste option.
Build
7 mins
● Conduct a group discussion in the class among students based on the topic, “Do you think changing the text colour is also a part of text editing?” provided in the Think and Tell section on page 114. Possible Response: Yes, changing the text colour is a part of text editing.
3 mins
● Conclude the session by summarising that copying text means duplicating the selected text and making it available for another location. Whereas, pasting means putting something you copied from one place into another place in the document. Moving text means removing it from its original position and placing it at some other position in the document. Also, revise them on how to delete the text.
● Assign the following questions from the Chapter Checkup given at the end of the chapter as homework.
A. Fill in the Blanks: Questions 3 and 4
B. Tick the Correct Option: Questions 1, 3, 4 and 5
C. Who Am I? Questions 1 and 2
D. Write T for True and F for False: Questions 2 and 5
E. Answer the Following Questions: Questions 2 and 3
F. Apply Your Learning: Questions 1 and 2
At the end of the session, the students will be able to:
● copy and paste the text.
● move and delete text.
Keywords
● Copying Text: Copying text means duplicating the selected text and making it available for another location.
● Pasting Text: Pasting means putting something you copied from one place into another in the same document or another document.
● Moving Text: Moving text means removing it from its original position and placing it at some other position in the document.
Let the students watch the video or the learning slides related to the topic on the digital panel.
Demonstrate to the students how to copy and paste text. Describe the concept of moving text from one place to another by using the Cut and Paste commands. Also, demonstrate them how to delete text.
Attempt the activity on the Assignment page.
Conclude the concepts Assign homework
● Instruct the students to go to the Tekie’s Digital platform and open a Lab session on Editing Text 4.
● Show the learning slides or the video and discuss the concepts shown on the panel.
Explain the following concepts:
Learning Outcomes
Explanation
Copy and paste the text. Tell students that copying text means duplicating the selected text and making it available for another location, and pasting means putting something you copied from one place into another place in the same document or another document, as given on pages 111 and 112. Also, demonstrate to them how to copy and paste text.
Move and Delete text. Demonstrate to them how to move text from one place to another in a document using the Cut and Paste commands. Also, describe how to delete text, as given on pages 113 to 115.
Ask the questions provided on the slides one by one to assess the students’ understanding. Discuss the answers to the questions with the students. If necessary, ask additional relevant questions.
Build
7 mins
● Instruct the students to click on the Practice button on the Assignment page to attempt the activity. Then, click on the Attempt button to open the activity page.
● Instruct the students to click on the Confirm button to submit their work when they are done with the activity.
3 mins
● Conclude the session by summarising that copying text means duplicating the selected text and making it available for another location. Whereas, pasting means putting something you copied from one place into another place in the document. Moving text means removing it from its original position and placing it at some other position in the document. Also, revise them on how to delete the text.
● Assign the additional activity given on the panel to the students as homework.
At the end of the session, the students will be able to:
● work with Undo and Redo commands.
● find and replace words in Google Docs.
Keywords
● Undo: Undo is the command which can reverse the last action.
● Redo: Redo will reverse the last action of the Undo command.
● Find: Find means to look for a piece of text or a word and discover where it is.
● Replace: Replace means to remove the old text and add a new text in its place.
Ask the students: “Have you ever mistakenly deleted some text and wished it could come back so you wouldn’t have to type it again?”
Explain Undo and Redo commands. Also, describe to them how to find a text or a word, replace the old text, and add a new text in its place.
Group discussion Conclude the concepts Assign homework
● Ask the students: ‘Have you ever mistakenly deleted some text and wished it could come back so you wouldn’t have to type it again?’
● Now, build the concept by explaining the use of the Undo and Redo commands.
Explain the following concepts:
Learning Outcomes
Work with Undo and Redo commands.
Explanation
Tell the students that Undo is the command which can reverse the last action, and Redo will reverse the last action of the Undo command, as given on pages 115 and 116. Also, tell them how to use the two commands.
Find and replace words in Google Docs.
Explain to the students that find means to look for a piece of text or a word and replace means to remove the old text and add a new text in its place, as given on pages 116 and 117.
● Read aloud the questions provided in the Do It Yourself 7B section and encourage the students to solve the questions. Instruct the students to write the answers in their book.
Correct Responses:
1.
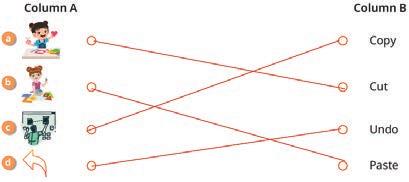
Build
7 mins
● Conduct a group discussion in the class among students based on the topic, “How can you replace text without deleting the original text?” provided in the Discuss section on page 115.
Correct Response: We can use the Find and Replace feature of Google Docs to change text without deleting the original text.
3 mins
Sum Up
● Conclude the session by summarising that Undo is the command which can reverse the last action and Redo will reverse the last action of the Undo command. Also, tell them that find means to look for a piece of text or a word and discover where it is and replace means to remove the old text and add new text in its place.
● Assign the following questions from the Chapter Checkup given at the end of the chapter as homework.
A. Fill in the Blanks: Question 5
C. Who Am I? Questions 3 and 4
D. Write T for True and F for False: Questions 3 and 4
E. Answer the Following Questions: Question 4
F. Apply Your Learning: Questions 3 and 4
At the end of the session, the students will be able to:
● work with Undo and Redo commands.
● find and replace words in Google Docs.
Keywords
● Undo: Undo is the command which can reverse the last action.
● Redo: Redo will reverse the last action of the Undo command.
● Find: Find means to look for a piece of text or a word and discover where it is.
● Replace: Replace means to remove the old text and add a new text in its place.
Let the students watch the video or the learning slides related to the topic on the digital panel.
Demonstrate to the students how to work with Undo and Redo commands. Also, demonstrate to them how to find and replace text in Google Docs.
Attempt the activity on the Assignment page.
Conclude the concepts Assign homework
Warm Up
● Instruct the students to go to the Tekie’s Digital platform and open a Lab session on Editing Text 6.
● Show the learning slides or the video and discuss the concepts shown on the panel.
Engage
Explain the following concepts:
Learning Outcomes
Work with Undo and Redo commands.
Explanation
Tell the students that Undo is the command which can reverse the last action, and Redo will reverse the last action of the Undo command. Demonstrate the steps to Undo and Redo to the students, as given on pages 115 and 116.
Find and replace words in Google Docs.
Demonstrate the steps to find and replace words in Google Docs to the students, as given on pages 116 and 117.
Ask the questions provided on the slides one by one to assess the students’ understanding. Discuss the answers to the questions with the students. If necessary, ask additional relevant questions.
12 mins
● Instruct the students to click on the Practice button on the Assignment page to attempt the activity. Then, click on the Attempt button to open the activity page.
● Instruct the students to click on the Confirm button to submit their work when they are done with the activity. Sum Up
3 mins
● Conclude the session by summarising that Undo is the command which can reverse the last action and Redo will reverse the last action of the Undo command. Also, tell them that find means to look for a piece of text or a word and discover where it is and replace means to remove the old text and add a new text in its place.
● Assign the additional activity given on the panel to the students as homework.
Mel and Conji are two brave friends who love adventures. One day, they hear exciting stories from Elder Wizard and decide to visit the Hidden Library. Inside the library, Mel finds a computer showing strange pictures. Suddenly, she loses her memory. Conji gets worried and takes Mel to First Elder Wizard, who thinks the evil Lord Ero erased Mel’s memory to hide something important. To help Mel, they learn about computers and how they work. First Elder Wizard sends them to Ms Idea, who knows about natural events in Avora. They visit Ms Idea, who sends them to the Records Room. There, they find an envelope with strange clues and go to First Elder Robot. He teaches them about the internet, which shows that the pictures are of powerful weapons. Knowing this, they visit Mr. Geebal at the Memory Palace. Mr. Geebal helps Conji remember when Mel lost her memory, revealing that Lord Ero used a spell. Conji then uses a drawing and a special counterspell to bring back Mel’s memory. With her memory back, Mel and Conji go to the Sci-Fi Lab. The Elders advise them not to make a weapon but to create a new protective spell using a computer. With this new spell, Mel and Conji confront Lord Ero. In an exciting battle, they use their new spell to stop Lord Ero’s evil plans. Mel and Conji’s bravery and teamwork save Avora from danger. They return as heroes, having learned that knowledge, friendship, and courage can overcome any challenge.
● Mel and Conji celebrate with the Elders after saving Avora.
● Elder Robot tells them that they must start repairing everything that was damaged during the fight.
● Suddenly, they hear a loud explosion from the server room. They discover that the servers have been affected by Dark Magic.
● Mel advises that they be fixed before other servers on Avora are affected too. However, the magic spell does not work.
● Elder Robot informs them that they will need to build new servers.
● Mel suggests using AI to help create designs for the servers.
● However, Conji does not know what AI is, so Mel explains it to him.
This chapter is divided into the following classroom and lab sessions
1. AI and Uses of AI at Different Places 1
2. Fun with AI: Can AI Detect Emotions?
3. Uses of AI at Different Places 2
At the end of the session, the students will be able to:
● explain what AI is.
● describe the uses of AI at different places.
Keyword
● Artificial Intelligence: AI is an application that makes computers and robots learn, think, and respond like humans.
Ask the students: Have they ever wished for a friend who is as smart as a computer or a robot?
Explain the concept of AI. Also, describe the uses of AI in different places.
Group discussion
Conclude the concepts Assign homework
Warm Up
● Ask the students, have they ever wished for a friend who is as smart as a computer or a robot?
● Now, build the concept by explaining what AI is.
Engage
Explain the following concepts:
15 mins
Explanation
Explain what AI is. Tell the students that AI stands for Artificial Intelligence, which is an application that makes computers and robots learn, think, and respond like humans, as given on page 127.
Describe the uses of AI at different places.
Tell the students that AI is used in different places such as at homes, in schools, in hospitals, and at shops as given on pages 127 and 128.
1. What is the full form of AI?
Correct Response: Artificial Intelligence
2. What are the uses of AI at home?
Correct Response: Smart assistants, AI in-home security, and AI robots
● Conduct a group discussion in the class among students based on the topic “Where AI can be used other than homes, schools, hospitals and shops?”
Possible Responses: AI can be used in banks, restaurants, offices, etc.
● Conclude the session by summarising that AI is an application that makes computers and robots learn, think, and respond like humans. Also, tell them about the uses of AI in different places such as homes, schools, hospitals and shops.
● Assign the following questions from the Chapter Checkup given at the end of the chapter as homework.
A. Fill in the Blanks: Questions 2, 3, and 4
B. Tick the Correct Option: Questions 1, 2, 3 and 4
C. Write T for True and F for False: Question 1
D. Answer the Following Questions: Questions 1, 2, and 3
At the end of the session, the students will be able to:
● play the Fun with AI game.
Let the students revise the chapter. Demonstrate to the students how to play the game for which the link is provided on the panel.
Attempt the activity on the Assignment page.
Conclude the concepts
Warm Up
● Instruct the students to go to the Tekie’s Digital platform and open a Lab session on Fun with AI: Can AI Detect Emotions?
● Demonstrate to the students how to play the game for which the link is provided on the panel.
Check for Understanding
● Ask additional relevant questions related to the activity.
● Instruct the students to click on the Practice button on the Assignment page to attempt the activity. Then, click on the Attempt button to open the activity page.
● Instruct the students to click on the Confirm button to submit their work when they are done with the activity.
3
Conclude the session by summarising that before starting the activity, students have to turn on their cameras. Then show some expression on the camera so that the AI gets ready to detect your emotion. According to your mood, it will give a prompt.
At the end of the session, the students will be able to:
Ask the students about the uses of AI in different places such as at schools, hospitals, shops, etc.
● describe the uses of AI at different places. 5 mins
Explain to the students the uses of AI in different places. Group discussion Conclude the concepts Assign homework
● Ask the students about the uses of AI in different places such as schools, hospitals, shops, etc.
● Now, build the concept by describing the uses of AI at other places like airports, banks, etc.
Engage
Explain the following concepts:
Learning Outcome
Explanation
Describe the uses of AI at different places. Tell the students that AI is used at different places such as at railway stations and airports, in banks, and restaurants, as given on pages 128 and 129.
● Read aloud the questions provided in the Do It Yourself 8A section and encourage the students to solve the questions. Instruct the students to write the answers in their books.
Correct Responses:
a. sastitsna: assistant
b. bchoatts: chatbots
c. cireusty: security
● Conduct a group discussion in the class among students based on the topic “What is the use of AI at airports”?
Possible Responses: Provides real-time updates on flight schedules and delays and check video cameras to detect unusual activity and enhance safety.
3 mins
Sum Up
● Conclude the session by summarising that AI is used at railway stations and airports during travel and for security reasons. AI helps banks with customer service and loan approval. It is also used in restaurants to place orders and keep track of the stock of food.
● Assign the following questions from the Chapter Checkup given at the end of the chapter as homework.
A. Fill in the Blanks: Question 1
C. Write T for True and F for False: Questions 2, 3, and 4
D. Answer the Following Questions: Question 4
E. Apply Your Learning: Questions 1 and 2
This chapter is divided into the following lab sessions
1. Introduction to Scratch 3.0 2. Components of Scratch 3. Coding Challenge
At the end of the session, the students will be able to:
● explain what coding is.
● describe block-based coding.
● explain about Scratch 3.0.
● create a project.
Keywords
● Coding: A way of giving instructions, to tell a computer what to do.
● Scratch 3.0: Scratch 3.0 is a free and simple platform where we use colourful blocks to create our own games, stories, and drawings.
Let the students watch the video or the learning slides related to the topic on the digital panel.
Explain to them what coding is; tell them about block- based coding; introduce them to Scratch 3.0; also tell them how to create a project.
Attempt the activity on the Assignment page
Conclude the concepts Assign homework
● Instruct the students to go to the Tekie’s Digital platform and open a Lab session on Introduction to Scratch 3.0.
● Show the learning slides one by one and discuss the concepts shown on the slides in the panel.
Explain the following concepts:
Explain what coding is. Tell the students that coding is a way of giving instructions to tell a computer what to do, as given on page 1.
Describe block-based coding. Tell the students that block-based coding is the language in which we use colourful code blocks to tell computers what to do, as given on page 2.
Explain about Scratch 3.0. Introduce the students to Scratch 3.0. Tell them it is a platform that lets you create your own games, stories, and drawings, as given on page 2.
Create a project. Demonstrate to the students the steps to create a project, as given on pages 2 and 3.
● Ask the questions provided on the slides one by one to assess the students’ understanding. Discuss the answers to the questions with the students. If necessary, ask additional relevant questions.
● What is coding?
Correct Response: Coding is a way of giving instructions, to tell a computer what to do.
● Instruct the students to click on the Start practice button on the Assignment page to attempt the activity. Then, click on the Attempt button to open the activity page.
● Instruct the students to click on the Confirm button to submit their work when they are done with the activity.
● Conclude the session by summarising that coding is a language that is used to give step-by-step instructions to computers. Block-based coding, such as Scratch 3.0, employs colourful coding blocks to create games and perform tasks. It’s a free and user-friendly platform that allows individuals to express their creativity by designing games, stories, and art through visual programming. Also, revise how to create a project in Scratch.
● Assign the additional activity given on the panel to the students as homework.
● Assign the following questions from the Chapter Checkup given at the end of the chapter as homework.
A. Fill in the Blanks: Questions 1, 2, and 3
D. Write T for True and F for False: Question 1
E. Answer the Following Questions: Question 1
At the end of the session, the students will be able to:
● identify and define the components of the Scratch window.
Keywords
● Sprite: A sprite can be a character or an object in a Scratch project.
● Stage: The stage is where you can see backdrops and sprites in action.
Let the students watch the video or the learning slides related to the topic on the digital panel.
Explain to the students the various components of the Scratch window.
Attempt the activity on the Assignment page.
Conclude the concepts
Assign homework
5 mins
● Instruct the students to go to the Tekie’s Digital platform and open a Lab session on Components of Scratch.
● Show the learning slides one by one and discuss the concepts shown on the slides in the panel.
15 mins
Engage
Explain the following concepts:
Learning Outcome
Identify and define the components of the Scratch window.
Explanation
Introduce the students to the various components of the Scratch window such as the Menu bar, Tabs, Block panel, Block palette, Script area, Backdrop, etc., as given on pages 3 to 5.
● Ask the questions provided on the slides one by one to assess the students’ understanding. Discuss the answers to the questions with the students. If necessary, ask additional relevant questions.
● Read aloud the questions provided in the Do It Yourself 1A section and encourage the students to solve them. Instruct the students to write the answers in their book.
Correct Responses:
1. Sprite
2. Sprites pane
3. Block panel
4. Script area
5. Block palette
Build
7 mins
● Instruct the students to click on the Start practice button on the Assignment page to attempt the activity. Then, click on the Attempt button to open the activity page.
● Instruct the students to click on the Confirm button to submit their work when they are done with the activity.
3 mins
● Conclude the session by summarising that the Scratch editor holds all the components needed to create and run a Scratch project. Some of these components are the Menu bar, Tabs, Block panel, Block palette, Script area, Backdrop, etc. Revise these components with the students.
● Assign the additional activity given on the panel to the students as homework.
● Assign the following questions from the Chapter Checkup given at the end of the chapter as homework.
A. Fill in the Blanks: Questions 4 and 5
B. Tick the Correct Option: Questions 1, 2, 3, 4, and 5
C. Who Am I?: Question 1
D. Write T for True and F for False: Questions 2, 3, 4, and 5
E. Answer the Following Questions: Questions 2, 3, 4, and 5
F. Apply Your learning: Questions 1, 2, 3, 4, and 5
At the end of the session, the students will be able to:
● solve the given coding challenge.
Let the students revise the chapter. Discuss the given puzzle problem. Attempt the activity on the Assignment page.
Conclude the concepts
● Instruct the students to go to the Tekie’s Digital platform and open a Lab session on Coding Challenge.
Explain the following concepts: Learning
Solve the coding challenge. Explain to the students how to solve the given coding challenge, as given on page 6. Then, ask the students to solve it.
Ask the following question to the students to check their understanding:
● Define backdrop.
Correct Responses: It is the background of the stage. You can add backdrops from the Scratch library or from your computer.
● Instruct the students to attempt the assignment by clicking on the Assignment tab.
● Explain the activity to the students.
● Conclude the session by summarising that we need to follow the instructions to complete the given coding challenge.
This chapter is divided into the following lab sessions
1. Motion and Looks Blocks
2. Events, Sound, and Control Blocks
3. Script to Move and Turn a Sprite
At the end of the session, the students will be able to:
● describe Motion blocks.
● describe Looks blocks.
Keywords
● Motion blocks: These blocks are used to control the movement of the sprites.
● Looks blocks: These blocks are used to control how a sprite looks.
Let the students watch the video or the learning slides related to the topic on the digital panel.
Explain to the students what Motion and Looks blocks do. Attempt the activity on the Assignment page. Conclude the concepts Assign
Warm Up
● Instruct the students to go to the Tekie’s Digital platform and open a Lab session on Motion and Looks Blocks.
● Show the learning slides or the video and discuss the concepts shown on the panel.
Explain the following concepts:
Describe Motion blocks.
Tell the students that Motion blocks control the movement of the sprites. Introduce them to some of the Motion blocks, as given on page 11.
Describe Looks blocks. Tell the students that Looks blocks are used to control how a sprite looks. Introduce them to some of the Looks blocks, as given on page 12.
● Ask the questions provided on the slides one by one to assess the students’ understanding. Discuss the answers to the questions with the students. If necessary, ask additional relevant questions.
● Instruct the students to click on the Start practice button on the Assignment page to attempt the activity. Then, click on the Attempt button to open the activity page.
● Instruct the students to click on the Confirm button to submit their work when they are done with the activity.
● Conclude the session by summarising that motion blocks are used to control the movement of the sprites. Looks blocks are used to control how a sprite looks. Motion blocks are blue in colour and Looks blocks are purple in colour. Tell them about some of the Motion blocks such as move () steps, turn () degrees, go to x() y(). Also, tell them about some of the Looks blocks such as say(), show, hide, etc.
● Assign the additional activity given on the panel to the students as homework.
● Assign the following questions from the Chapter Checkup given at the end of the chapter as homework.
A. Fill in the Blanks: Questions 1 and 3
B. Tick the Correct Option: Questions 1 and 2
C. Who Am I?: Question 1
D. Write T for True and F for False: Questions 1 and 4
E. Answer the Following Questions: Questions 2, 3, and 5
F. Apply Your Learning: Questions 1, 2, and 3
At the end of the session, the students will be able to:
● describe Events blocks.
● describe Sound blocks.
● describe Control blocks.
Keywords
● Events blocks: These blocks are used to tell a computer when to run a script to make things happen.
● Sound blocks: These blocks are used to control the sound.
● Control blocks: These blocks are used to control the scripts.
Let the students watch the video or the learning slides related to the topic on the digital panel.
Explain to the students what Events, Sound, and Control blocks do.
Attempt the activity on the Assignment page.
Conclude the concepts
Assign homework
Action Plan
Warm Up
● Instruct the students to go to the Tekie’s Digital platform and open a Lab session on Events, Sound, and Control Blocks.
● Show the learning slides or the video and discuss the concepts shown on the panel. 15
Engage
Explain the following concepts:
Learning Outcomes
Explanation
Describe Events blocks. Tell the students that an event is something that makes an action happen. Introduce them to when clicked and when this sprite clicked blocks, as given on pages 12 and 13.
Describe Sound blocks.
Describe Control blocks.
Tell the students that Sound blocks are used to control the sound of the sprites. Introduce them to a few sound blocks, such as start sound, stop all sounds, etc., as given on page 13.
Tell the students that Control blocks are used to control the scripts. Introduce them to a few Control blocks such as wait() seconds, repeat(), forever, etc., as given on pages 13 and 14.
● Ask the questions provided on the slides one by one to assess the students’ understanding. Discuss the answers to the questions with the students. If necessary, ask additional relevant questions.
● Read aloud the questions provided in the Do It Yourself 2A section and encourage the students to solve the questions. Instruct the students to write the answers in their book.
Correct Responses:
1. a. Motion blocks b. Events blocks c. Control blocks d. Sound blocks

Pauses the script for the specified
● Instruct the students to click on the Start practice button on the Assignment page to attempt the activity. Then, click on the Attempt button to open the activity page.
● Instruct the students to click on the Confirm button to submit their work when they are done with the activity.
● Conclude the session by summarising that the Events blocks are used to tell a computer when to run a script to make things happen. Sound blocks are used to control the sound and Control blocks are used to control the scripts.
● Assign the additional activity given on the panel to the students as homework.
● Assign the following questions from the Chapter Checkup given at the end of the chapter as homework.
A. Fill in the Blanks: Questions 2, 4, and 5
B. Tick the Correct Option: Questions 3, 4, and 5
C. Who Am I?: Questions 2, 3, 4 and 5
D. Write T for True and F for False: Questions 2, 3, and 5
E. Answer the Following Questions: Questions 1 and 4
F. Apply Your Learning: Questions 4 and 5
At the end of the session, the students will be able to:
● create a script to move and turn a sprite.
Warm Up
Let the students watch the video or the learning slides related to the topic on the digital panel.
Engage Build Sum Up
Demonstrate to the students how to create a script to move and turn a sprite using various code blocks.
Attempt the activity on the Assignment page. Conclude the concepts
Warm Up
● Instruct the students to go to the Tekie’s Digital platform and open a Lab session on Script to Move and Turn a Sprite.
● Show the learning slides or the video and discuss the concepts shown on the panel.
Engage
Explain the following concepts:
Learning Outcome
Create a script to move and turn a sprite.
15 mins
Explanation
Demonstrate to the students the steps to create a script using the Motion and Events blocks, as given on pages 14 and 15.
● Ask the questions provided on the slides one by one to assess the students’ understanding. Discuss the answers to the questions with the students. If necessary, ask additional relevant questions.
● Instruct the students to click on the Start practice button on the Assignment page to attempt the activity. Then, click on the Attempt button to open the activity page.
● Instruct the students to click on the Confirm button to submit their work when they are done with the activity.
3 mins
Sum Up
● Conclude the session by summarising the steps to create a script to move and turn a sprite using the Motion and Events blocks.
● Assign the additional activity given on the panel to the students as homework.
This chapter is divided into the following lab sessions:
1. Naming a Project, Deleting and Adding a Sprite
2. Positioning and Moving a Sprite
3. Pen Extension and Drawing a Line
4. Erasing a Drawing, Adding a Delay, and Saving a Scratch Project
At the end of the session, the students will be able to:
● name a Project.
● delete a Sprite.
● add a Sprite.
Keyword
● Sprite: A sprite is a character or an object that you can move around on the stage and make this object do things.
Let the students watch the video or the learning slides related to the topic on the digital panel.
Demonstrate to the students how to name a project. Also, demonstrate to them how to delete and add a sprite.
Attempt the activity on the Assignment page.
Conclude the concepts Assign homework
Warm Up
● Instruct the students to go to the Tekie’s Digital platform and open a Lab session on Naming a Project, Deleting and Adding a Sprite.
● Show the learning slides or the video and discuss the concepts shown on the panel.
Explain the following concepts:
Learning Outcomes
Explanation
Name a Project. Tell the students that when a new Scratch project gets created, it comes with the default name ‘Untitled’ and we can replace it with a new name, as given on pages 20 and 21.
Delete a Sprite. Tell the students that we can change the default sprite in Scratch; for that, we have to delete it. Describe the steps to delete a sprite, as given on page 21.
Add a Sprite. Tell the students that in Scratch, you can choose to add a sprite from the Sprites pane in four ways, as given on page 21.
● Ask the questions provided on the slides one by one to assess the students’ understanding. Discuss the answers to the questions with the students. If necessary, ask additional relevant questions.
● Instruct the students to attempt the assignment by clicking on the Assignment tab.
● Explain the activity to the students.
● Conclude the session by summarising that we can change the name of the Scratch project by clicking the default name and replacing it with the new name. Also, revise with them the steps to delete, add, and choose a sprite.
● Assign the additional activity given on the panel to the students as homework.
● Assign the following questions from the Chapter Checkup given at the end of the chapter as homework.
A. Fill in the Blanks: Question 1
C. Who Am I?: Question 1
D. Write T for True and F for False: Question 4
E. Answer the Following Questions: Questions 1 and 2
F. Apply Your Learning: Question 1
At the end of the session, the students will be able to:
● position a sprite.
● move a sprite.
Keyword
● Position: A position is a place on the stage where you want a sprite to go.
Warm Up Engage Build Sum Up
Let the students watch the video or the learning slides related to the topic on the digital panel.
Demonstrate to the students how to position and move a sprite. Attempt the activity on the Assignment page.
Conclude the concepts
Assign homework 5 mins 15 mins 7 mins 3 mins
Warm Up
5 mins
● Instruct the students to go to the Tekie’s Digital platform and open a Lab session on Positioning and Moving a sprite
● Show the learning slides or the video and discuss the concepts shown on the panel.
Engage
Explain the following concepts:
Learning Outcomes
15 mins
Explanation
Position a sprite. Tell the students that a position is a place on the stage where a sprite can go. Demonstrate to them how to make a sprite go to the centre of the stage, as given on page 23.
Move a sprite. Tell the students that in order to move a sprite, they can use the move steps block. Demonstrate to the students how to move a sprite forward by some steps, as given on page 24.
● Ask the questions provided on the slides one by one to assess the students’ understanding. Discuss the answers to the questions with the students. If necessary, ask additional relevant questions.
● Instruct the students to attempt the assignment by clicking on the Assignment tab.
● Explain the activity to the students.
● Conclude the session by summarising that a position is a place on the stage where you want a sprite to go. A position on the Scratch stage is made up of two values: x and y. Also, tell them that to move a sprite, they can use the move steps block.
● Assign the additional activity given on the panel to the students as homework.
● Assign the following questions from the Chapter Checkup given at the end of the chapter as homework.
C. Who Am I?: Question 3
D. Write T for True and F for False: Question 3
E. Answer the Following Questions: Question 5.
F. Apply Your Learning: Questions 2 and 3
At the end of the session, the students will be able to:
● add the pen extension.
● draw a line
Keyword
● Pen blocks: They are used to create simple drawings such as lines, shapes, and patterns or more complex drawings such as pictures and animations.
Let the students watch the video or the learning slides related to the topic on the digital panel. Demonstrate to the students how to use pen extensions and draw a line.
Attempt the activity on the Assignment page.
Conclude the concepts
Assign homework
Warm Up
5 mins
● Instruct the students to go to the Tekie’s Digital platform and open a Lab session on Pen Extension and Drawing a Line
● Show the learning slides or the video and discuss the concepts shown on the panel.
Engage
Explain the following concepts:
Add the pen extension.
15 mins
Explanation
Tell the students that pen blocks are green in colour and used to create drawings. Demonstrate to the students how to add the pen extension. Also tell them about some of the Pen blocks, such as pen down, pen up, etc., as given on pages 24 and 25.
Draw a line. Demonstrate to the students how to draw a line using pen blocks, as given on pages 25 and 26.
Ask the following questions to the students to check their understanding:
● Read aloud the questions in the Do It Yourself 3A section and encourage the students to solve them. Instruct the students to write the answers in their book.
Correct Responses:
1. d. when clicked
2. b. Tells the sprite to start drawing
● Ask the questions provided on the slides one by one to assess the students’ understanding. Discuss the answers to the questions with the students. If necessary, ask additional relevant questions.
7 mins
Build
● Instruct the students to attempt the assignment by clicking on the Assignment tab.
● Explain the activity to the students.
Sum Up
3 mins
● Conclude the session by summarising that the Pen Extension in Scratch allows sprites to draw on the stage. The Pen blocks are green in colour and are used to create simple drawings. Commonly used Pen blocks are pen down, pen up, erase all, etc.
● Assign the additional activity given on the panel to the students as homework.
● Assign the following questions from the Chapter Checkup given at the end of the chapter as homework.
A. Fill in the Blanks: Questions 2, 3 and 4
B. Tick the Correct Option: Questions 1, 3 and 4
C. Who Am I?: Questions 2, 4 and 5
D. Write T for True and F for False: Questions 1
E. Answer the Following Questions: Questions 3 and 4
At the end of the session, the students will be able to:
● erase a drawing.
● add a delay.
● save a Scratch project.
Let the students watch the video or the learning slides related to the topic on the digital panel.
Demonstrate the steps to erase a drawing, add a delay and save a project.
Attempt the activity on the Assignment page.
Conclude the concepts
Assign homework
5 mins
● Instruct the students to go to the Tekie’s Digital platform and open a Lab session on Erasing a drawing, Adding a delay and Saving a Scratch project.
● Show the learning slides or the video and discuss the concepts shown on the panel.
Engage
Explain the following concepts:
Learning Outcomes
15 mins
Explanation
Erase a drawing. Demonstrate to the students how to erase the old drawing when the green flag is clicked, as given on pages 26 and 27.
Add a delay. Demonstrate to the students how to add a delay of 1 second between the erasing of the old drawing and the creation of the new drawing, as given on page 27.
Save a Scratch project. Demonstrate to the students the steps to save a Scratch project, as given on page 28.
● Ask the questions provided on the slides one by one to assess the students’ understanding. Discuss the answers to the questions with the students. If necessary, ask additional relevant questions.
● Instruct the students to attempt the assignment by clicking on the Assignment tab.
● Explain the activity to the students.
● Conclude the session by summarising that the erase all block helps delete a drawing, and the wait seconds() block helps add a delay. Also, revise the steps to erase, add a delay to a drawing and save a Scratch project.
● Assign the additional activity given on the panel to the students as homework.
● Assign the following questions from the Chapter Checkup given at the end of the chapter as homework.
A. Fill in the Blanks: Question 5
B. Tick the Correct Option: Question 2
D. Write T for True and F for False: Questions 2 and 5
This chapter is divided into the following classroom and lab sessions
1. Basics of Shapes
2. Drawing a Rectangle
At the end of the session, the students will be able to:
● explain what a shape is.
Keyword
3. Using Loops
4. Drawing a Circle
● Shape: A shape is defined as an object’s boundaries or outline.
Ask the students to draw any shape of their choice in their notebooks. Explain to them what a shape is.
Action Plan
Warm Up
● Ask the students to draw any shape of their choice in their notebooks.
Explain the following concepts:
Learning Outcome
Explain what a shape is.
Explanation
Tell students that a shape is defined as an object’s boundaries or outline.
● Give an example of a shape.
Possible Responses: Rectangle/Circle/Square/Triangle, etc.
● Conduct a group discussion in the class among students based on the topic ‘How do we see shapes in everyday life?’
Possible Responses: a wheel is a circle, a door is a rectangle, etc.
Sum Up
● Conclude the session by summarising that a shape is defined as an object’s boundaries or outline.
● Assign the following additional questions.
A. Fill in the Blanks.
1. A pizza is usually cut into slices, shaped like a
B. Select the Correct Option.
1. Which of these objects is commonly shaped like a circle?
a. Clock
c. Book
Correct Response
A. 1. Triangle
B. 2. a. Clock
b. Door
d. Window
At the end of the session, the students will be able to:
● explain what a rectangle is.
● explain the steps to draw a rectangle in Scratch.
Keywords
● Rectangle: It is a 2D shape with four sides and four corners. The opposite sides of a rectangle are of the same length.
● Turn: It is a change in the direction you are walking, either clockwise or anticlockwise.
Warm Up Engage Build Sum Up
Let the students watch the video or the learning slides related to the topic on the digital panel.
● Degree: A degree is a measure of how much you turn. 5 mins
Warm Up
Explain to the students what a rectangle is. Also, explain to them the steps to draw a rectangle.
Attempt the activity on the Assignment page.
Conclude the concepts
Assign homework
Action Plan
● Instruct the students to go to the Tekie’s Digital platform and open a Lab session on Drawing a Rectangle
● Show the learning slides or the video and discuss the concepts shown on the panel. 15 mins
Engage
Explain the following concepts:
Learning Outcomes
Explain what a rectangle is.
Explanation
Tell students that a rectangle is a 2D shape with four sides and four corners. The opposite sides of a rectangle are of the same length, as given on page 33.
Create a script to draw a rectangle in Scratch.
Now, tell the students the steps to draw a rectangle and to observe a pattern in those steps, as given on page 34.
● Ask the questions provided on the slides one by one to assess the students’ understanding. Discuss the answers to the questions with the students. If necessary, ask additional relevant questions.
● Instruct the students to attempt the assignment by clicking on the Assignment tab.
● Explain the activity to the students.
● Conclude the session by summarising that a rectangle is a 2D shape with four sides and four corners. The opposite sides of a rectangle are of the same length. A turn is a change in the direction you are walking, either clockwise or anticlockwise. A degree is a measure of how much you turn. Also, revise the steps to draw a rectangle.
● Assign the additional activity given on the panel to the students as homework.
● Assign the following questions from the Chapter Checkup given at the end of the chapter as homework.
A. Fill in the Blanks: Questions 1, 2 and 5
B. Tick the Correct Option: Question 3
D. Write T for True and F for False: Question 3
E. Answer the Following Questions: Questions 1 and 2
At the end of the session, the students will be able to:
● explain what a loop is.
● create a script to draw a rectangle using a loop.
Keyword
● Loop: A loop is doing something again and again to complete a task.
Ask the students how loops occur in everyday scenarios. Explain to the students what a loop is. Also, tell them how to draw a rectangle using blockbased coding using the concept of loops.
Group discussion Conclude the concepts
Assign homework
Action Plan
5 mins
Warm Up
● Ask the students how loops occur in everyday scenarios.
● Tell students that loops occur in everyday life when we repeat something over and over, like clapping our hands or skipping rope. Another example is the sun rising and setting every day in the same pattern.
Engage
Explain the following concepts:
Learning Outcomes
15 mins
Explanation
Explain what a loop is. Tell the students that a loop is doing something again and again to complete a task, as given on page 35.
Create a script to draw a rectangle using a loop.
Tell students how to draw a rectangle using code blocks in Scratch, as given on pages 35, 36, and 37.
● Name the block that repeats the instructions in it for the given number of times.
Correct Response: repeat block
● Read aloud the questions provided in the Do It Yourself 4B section, Question 2 and encourage the students to solve the questions. Instruct the students to write the answers in their book.
Correct Response:
2. a.
● Conduct a group discussion in the class among students based on the topic “How is a loop helpful to draw a rectangle?” as given in the Discuss section on page 34.
Possible Response: A loop is helpful for drawing a rectangle because using the repeat block makes it easy and quick to make the script. With the repeat block one does not have to repeat the same steps again and again.
3 mins
● Conclude the session by summarising that a loop is doing something again and again to complete a task. The repeat block repeats the instructions in it for the given number of times.
● Assign the following questions from the Chapter Checkup given at the end of the chapter as homework.
A. Fill in the Blanks: Question 4
B. Tick the Correct Option: Questions 1, 2, and 4
C. Who Am I?: Questions 1, 2, 3 and 4
D. Write T for True and F for False: Question 4
F. Apply Your Learning: Questions 2, 3 and 4
At the end of the session, the students will be able to:
● explain what a circle is.
● create a script to draw a circle in Scratch.
Keyword
● Circle: It is a round shape with no corners or sides.
Let the students watch the video or the learning slides related to the topic on the digital panel. Explain to the students what a circle is. Also, explain to them how to draw a circle using code blocks in Scratch. Attempt the activity on the Assignment page.
Action Plan
Conclude the concepts
Assign homework
5 mins
Warm Up
● Instruct the students to go to the Tekie’s Digital platform and open a Lab session on Drawing a Circle.
● Show the learning slides or the video and discuss the concepts shown on the panel.
Engage
Explain the following concepts:
Learning Outcomes
15 mins
Explanation
Explain what a circle is. Explain to the students that a circle is a round shape with no corners or sides. Also tell them that in order to make a circle, we need to take 360 steps around it, turning 1 degree with each step, as given on page 38.
Create a script to draw a circle in Scratch.
Now, tell the students the steps to draw a circle using the code blocks of Scratch, as given on pages 38 and 39.
● Ask the questions provided on the slides one by one to assess the students’ understanding. Discuss the answers to the questions with the students. If necessary, ask additional relevant questions.
● Read aloud the questions provided in the Do It Yourself 4B section, Question 1 and encourage the students to solve the questions. Instruct the students to write the answers in their book.
Correct Response: 1. b
● Instruct the students to attempt the assignment by clicking on the Assignment tab.
● Explain the activity to the students.
● Conclude the session by summarising that a circle is a round shape with no corners or sides. For example, if you spin around in a full circle, you have rotated 360 degrees. This is called a full turn or a complete circle. If you spin around in half a circle, you have rotated 180 degrees. This is called a half-turn or a semicircle. Also, revise the steps to draw a circle using Scratch code blocks.
● Assign the additional activity given on the panel to the students as homework.
● Assign the following questions from the Chapter Checkup given at the end of the chapter as homework
A. Fill in the Blanks: Question 3
D. Write T for True and F for False: Questions 1 and 2
E. Answer the Following Questions: Questions 3 and 4
F. Apply Your Learning: Question 1
Chapter Checkup
A. Fill in the Blanks.
1. Hardware 2. Output 3. Printer 4. Input 5. CPU
B. Tick () the Correct Option.
1. a. Software 2. d. All of these 3. d. Speakers 4. a. System software 5. c. Microcomputer
C. Who Am I?
1. ALU 2. Printer 3. Mouse 4. Touchscreen 5. Microphone
D. Write T for True and F for False.
1. F 2. T 3. F 4. T 5. T
E. Answer the Following Questions.
1. RAM stands for Random Access Memory. It stores the information temporarily on a computer. It allows the computer to run programs and access the data quickly.
2. The different types of monitors are Cathode Ray Tube (CRT), Liquid Crystal Display (LCD), and Light Emitting Diode (LED).
3. A Central Processing Unit (CPU) is a processing device. It is the brain of the computer that manages all the calculations and programs.
4. An example of the IPO cycle is:
Input: Fabric, Thread, Sewing Machine, and Scissors
Process: Sewing the dress
Output: A stitched dress
5. Software is the part of a computer that cannot be touched. It is a set of instructions or programs given to the computer to do some work.
There are two types of software: System software and Application software.
F. Apply Your Learning.
1. Rahul can use a joystick to play games.
2. Sakshi is using a keyboard as an input device for typing her essay.
3. A microphone is an input device that records your voice and various sounds on a computer. It also allows you to talk with your family and friends on the internet.
4. Suhani’s mother is using a touchscreen.
5. Shivam can create a softcopy of the assignment questions using a scanner.
Chapter Checkup
A. Fill in the Blanks.
1. program 2. interface 3. taskbar 4. icons 5. search
B. Tick () the Correct Option.
1. b. Date modified
2. a. Notifications to see
3. a. All apps present on the computer
4. c. Manage the programs you are using
5. a. Right-click on the desktop and select the Personalize option.
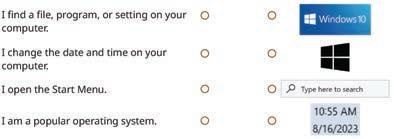

D. Write T for True and F for False.
1. T 2. F 3. T 4. T
E. Answer the Following Questions.
1. An operating system (OS) is a program that manages various tasks, helps us search for files and apps, and makes sure that the computer runs smoothly.
2. The taskbar is a bar at the bottom of the screen. It allows you to manage the programs that you are using.
3. The different types of interfaces are Character User Interface (CUI) and Graphical User Interface (GUI).
4. One feature of Windows 10 is that it provides a Graphical User Interface (GUI).
F. Apply Your Learning.
1. Mia should select the Personalize option.
2. Screen saver
3. Aastha can arrange the icons by sorting them. She must right-click on an empty space on her desktop. Click on the 'Sort by' option and then select "Name" to arrange the icons in alphabetical order.
Chapter Checkup
A. Fill in the Blanks.
1. information 2. files 3. folders 4. computer 5. save
B. Tick () the Correct Option.
1. a. Cursor 2. b. Inside folders 3. b. A container for files 4. b. Icon 5. b. To use the file later
C. Who Am I?
1. File 2. File 3. Cursor 4. Keyboard 5. Saving a file
D. Write T for True and F for False.
1. F 2. F 3. T 4. T 5. F
E. Answer the Following Questions.
1. A file is a collection of information.
2. A folder is a container that stores files.
3. An icon is an image on the computer screen that represents a file or a folder.
4. Go to the desktop and double-click on the file icon to open it.
5. We save a file to keep our work for later use, even after turning off the computer.
F. Apply Your Learning.
1. This image is called an icon.
2. Riya can create a folder to store all the pictures.
3. Sree can create a text file to store name and address.
4. Anish can go to the desktop and double-click on the file icon to open it.
Chapter Checkup
A. Fill in the Blanks.
1. computer network 2. uniform resource locator 3. internet 4. search engine 5. cyberbullying
B. Tick () the Correct Option.
1. d. All of these
2. c. Being kind and respectful online
3. b. Your house address
4. c. Uniform
5. b. Sending electronic message
C. Who Am I?
1. Internet
2. Address bar
3. Web address or URL
4. A Good Digital Citizen
5. Cyberbullying
D. Write T for True and F for False.
1. T 2. T 3. F 4. T 5. T
E. Answer the Following Questions.
1. We use email to send messages to people over the internet.
2. Popular search engines are Google and Yahoo.
3. When we spend a lot of time on the internet, it can distract us from our important tasks, like homework, exercise, cleaning our room, etc.
4. All the websites have a web address. A web address helps us open a website in the browser. This web address is known as a URL (Uniform Resource Locator).
5. If you end up opening a wrong website by mistake, close it immediately.
F. Apply Your Learning.
1. The internet helped Chirag play games online.
2. No, it is not a good thing to do. Do not share personal information, like your address, phone number, photo, school name, etc., with strangers online. If you share these things online, someone might use them to hurt you or trick you. That’s why it’s important to keep your personal information private and safe.
3. A search engine like Google can help Sree find the desired information.
4. Sheetal should use a web browser to open the websites.
5. When we spend a lot of time on the internet, it can distract us from our important tasks, like homework, exercise, cleaning our room, etc. So, Simran should limit her use on the internet.
Chapter-5 Let Us Paint!
Chapter Checkup
A. Fill in the Blanks.
1. Drawing area 2. Shapes 3. Text 4. Erase 5. Colour
B. Tick () the Correct Option.
1. c. Drawing 2. a. Pencil 3. c. Airbrush 4. a. Color picker 5. d. All of these
C. Who Am I?
1. Group 2. Title bar 3. Callout 4. Fill with color tool 5. Brushes
D. Write T for True and F for False.
1. T 2. F 3. T 4. F 5. F
E. Answer the Following Questions.
1. MS Paint, a short form for Microsoft Paint, is like a colouring book on the computer, where you can draw and colour pictures using different tools and colours.
2. There are three types of callouts in Paint: Rounded rectangular callout, Oval callout, and Cloud callout.
3. The Brushes group provides various brush tools for freehand drawing and painting in Paint. Brushes help us apply various strokes and effects to the drawing area.
4. Quick Access Toolbar is a group of tools that helps to perform common tasks like saving a drawing.
5. The Shapes group helps us draw different types of shapes in our paintings, like circles, squares, lines, etc. F. Apply Your Learning.
1. Riya can draw the stars and the moons using the Paint program.
2. Sakshi must use the Eraser tool.
3. Rinku must use the Color picker tool.
4. The Text tool will help Archi write text in the drawing.
5. Atul can draw the shape using the Oval shape tool.
Chapter Checkup
A. Fill in the Blanks.
1. Edit 2. Word Processor 3. Autosave 4. Uniquely 5. Quick Access
B. Tick () the Correct Option.
1. d. All of these 2. a. Document is saved 3. c. Close the document
4. a. Share the document with friends 5. b. Click on the File Menu > Click on the Open Option
C. Who Am I?
1. Search bar 2. Menu Bar 3. Google Docs has an Autosave feature 4. Share
5. Document Workspace
D. Write T for True and F for False.
1. F 2. T 3. F 4. F 5. T
E. Answer the Following Questions.
1. Two features of Google Docs are:
a. It allows us to type words, sentences, and stories in a document.
b. It allows us to share our stories with friends and work on them together.
2. Autosave means that doc will be saved automatically and that you do not have to save it.
3. a. Type docs.google.com in the address bar of the web browser and press the Enter key.
b. Click on the Blank + icon under 'Start a new document'. It will open a blank document with an 'Untitled document' name.
4. Nothing will happen if we do not save the file as the file is saved automatically in Google Docs.
5. The ‘X’ sign on the top-right of your document is used to close the document.
F. Apply Your Learning.
1. Ram can search the document from the recent documents list or can type the name of the document in the Search bar.
2. All the documents in Google Docs are saved automatically, so all his work will be saved there. Therefore, he does not need to save it.
3. The first step to work in a new document is to type docs.google.com in the address bar of the web browser.
4. He can give an appropriate name to his document.
Chapter Checkup
A. Fill in the Blanks.
1. Editing 2. Double-click 3. Duplicate 4. Delete 5. Reverse
B. Tick () the Correct Option.
1. a. Copy 2. c. Paragraph 3. a. Cut and paste 4. c. Removing the text from the document
5. c. Cut
C. Who Am I?
1. Cut 2. Copy and Paste 3. Undo 4. Find and Replace
D. Write T for True and F for False.
1. T 2. F 3. T 4. T 5. F
E. Answer the Following Questions.
1. Text editing in Google Docs is useful because it helps in correcting mistakes, improving readability, and enhancing the overall presentation of a document.
2. Deleting text in a document means removing unwanted words, sentences, or paragraphs to correct mistakes and improve clarity in a document.
3. Using the Copy command will keep the original text in its place. Whereas the text will be removed from its original position if you use the Cut option.
4. The Redo option reverses the last action of the Undo command.
F. Apply Your Learning.
1. Delete key and Backspace key
2. She should first select the paragraph.
3. Ctrl+Z keys
4. Aman should use the Find and Replace feature of the Google Docs.
Chapter Checkup
A. Fill in the Blanks.
1. banks 2. Alexa 3. stock 4. medical
B. Tick () the Correct Option.
1. b. Artificial Intelligence
2. b. By reminding people to take their medicine
3. b. Suggests products based on customer choices
4. b. Provide medical information
C. Write T for True and F for False.
1. F 2. T 3. F 4. T
D. Answer the Following Questions.
1. AI stands for Artificial Intelligence, which is an application that makes computers and robots learn, think, and respond like humans.
2. AI can help at home in many ways. Smart assistants can answer questions, play music, and control devices. Also, AI robots can help with household chores.
3. AI observes customer choice and suggests products.
4. At airports, AI provides real-time updates on flight schedules and delays. It also checks video cameras to detect unusual activity and enhance safety.
E. Apply Your Learning.

2. Do it yourself.

Chapter-1 Introduction to Scratch 3.0 Chapter Checkup
A. Fill in the blanks.
1. Blocks 2. Create 3. Untitled 4. Menu bar 5. Backdrop
B. Tick () the Correct Option.
1. b. Sprites pane 2. b. 3. a. Open the Sound editor 4. a. File menu 5. c. Backdrops pane
C. Who Am I?
C Who Am I?
How Do I Look?


D Write T for True and F for False.
D. Write T for True and F for False. 1. F 2. T 3. F 4. T 5. T
Sprite Script Area
Costumes Tab
Who Am I?
Go button and Stop button Sounds Tab
1 The default project name in Scratch is Project1.
2 You can add and make changes to the sound effects of your sprite and backdrop in the Sound editor.
3 The Go button is used to stop the running project.
E. Answer the Following Questions.
1. Block-based coding is the language in which we use colourful code blocks to tell computers what to do.
2. The Costumes tab opens the Costumes editor where we can change how a sprite looks.
3. The Sounds tab opens the Sound editor to add and make changes to the sound effects of the sprite and to the backdrop.
4. The blocks you put together in the script area are called scripts.
5. The green flag is the Go button. You click on it to run the script. The red button is the Stop button. You click on it to stop the script from running.
B Tick () the Correct Option.
F. Apply Your Learning.
1 Which block is used to move a sprite?
1. Rahul should use this background to make a project related to mountains: c.
2 What is a script in a project?
appearance of the sprite. What should she use? b d
Tick () the Correct Option. 1 Which block is used to move a sprite?
2 Which block is used to make a sprite turn clockwise?
2. The following is a script in a project. c.

of these
name of the sprite. Where should she go?
appearance of the sprite. What should she use? b d
B Tick () the Correct Option. 1 Which block is used to move a sprite?
appearance of the sprite. What should she use?
3 Which block is used to run a script when the sprite is clicked?
3. To change the appearance of a sprite, Sheena should use the Costumes tab. b.
Chapter 1 • Introduction to Scratch 3.0
2 Which block is used to make a sprite turn clockwise?

name of the sprite. Where should she go?
Correct Option. block is used to move a sprite?
backdrop of the Stage. Which option should he choose?
4. Ritu can change the name of the sprite here: b.

name of the sprite. Where should she go?
5. To change the backdrop of the stage, Arun should use the Choose a Backdrop option. d.
2 Which block is used to make a sprite turn clockwise?

3 Which block is used to run a script when the sprite is clicked?
4 Which block can pause a script for 10 seconds?
backdrop of the Stage. Which option should he choose?
B Tick () the Correct Option.
Chapter-2 Scratch Blocks
Chapter Checkup
block is used to make a sprite turn clockwise?
1 Which block is used to move a sprite?
A. Fill in the Blanks.
backdrop of the Stage. Which option should he choose?
1. Scratch blocks 2. Control 3. go to
B. Tick () the Correct Option. 1. c.
wait seconds
Which block is used to run a script when the sprite is clicked?

4 Which block can pause a script for 10 seconds?
5 Which block can repeat a script 5 times?


block is used to run a script when the sprite is clicked?
2 Which block is used to make

C. Who Am I?
1. switch costume to block 2. delete this clone 3. forever block 4. stop all sounds block 5. when I start as a clone block
5 Which block can repeat a script 5 times?
C Who Am I?
block can pause a script for 10 seconds?
1 I change the costume of a sprite to a specified one.
D. Write T for True and F for False.
1. F 2. T 3. T 4. T 5. T
E. Answer the Following Questions.
1. An event is something that makes an action happen.
2. Looks blocks are used to control how a sprite looks.
3. You can use the say block to make the sprite say specified text. You can find this block in the Looks block category.
4. The Sound block category controls the sounds. These blocks are pink in colour.
5. The think for seconds block makes the sprite think of the specified text for a specified number of seconds.
F. Apply Your Learning.


Chapter Checkup
A. Fill in the Blanks.
1. sprite 2. pen down 3. draw 4. pen up 5. erase all
B. Tick () the Correct Option.
1. b. Pen
2. d. wait () seconds
3. a. set pen color to 4. b. Stops drawing
C. Who Am I?

D. Write T for True and F for False.
1. F 2. F 3. F 4. T 5. T
E. Answer the Following Questions.
1. A Sprite is a character or an object that you can move around on the stage and make this object do things.
2. Two ways to add a sprite in your project are:
i. Choose a Sprite: To choose a sprite from the Scratch Sprite Library. ii. Paint: To create a sprite using Paint editor.
3. The Pen blocks are used to create simple drawings such as lines, shapes, and patterns or more complex drawings such as pictures and animations.
4. Pen down blocks Pen up blocks Tells the sprite to start drawing on the stage. Tells the sprite to stop drawing on the stage.

5. To move a Sprite, you can use the block. You can find it under the Motion category in the block panel.
F. Apply Your Learning.
1. The bear Sprite will be visible on the stage.
2. Pihu can use the block to make the sprite move by 300 steps.
3.


A. Fill in the Blanks.
rectangle
Turn
Corners, sides
B. Tick () the Correct Option. 1. a. Control 2. b. 3 3. b. Square 4. d. 20
C. Who Am I?
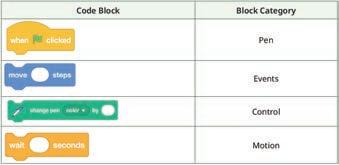
D. Write T for True and F for False.
1. F 2. F 3. T 4. T
E. Answer the Following Questions.
1. A turn is a change in the direction you are walking, either clockwise or anticlockwise.
2. A rectangle is a 2D shape with four sides and four corners. The opposite sides of a rectangle are of the same length.
3. To make a complete circle, we need to use the move block 360 times to draw a circle without the repeat block.
4. To make a semi-circle, we need to turn 180 degrees.
F. Apply Your Learning.
1. The value in the repeat block should be 360.
2. Ritik needs to add the script to the lion sprite.
The script so that the lion can reach the Reindeer sprite is as follows:
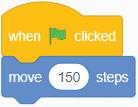
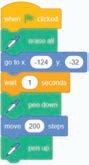
Here x and y coordinates represents the position of the princess sprite.
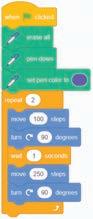
A. Fill in the blanks.
1. motherboard 2. hardware, software 3. website 4. folders
B. Tick () the Correct Option.
1. d. Speakers 2. b. Date modified 3. a. Cursor
C. Write T for True and F for False.
1. F 2. T 3. T 4. F
D. Answer the Following Questions.
1. After entering data and instructions into a computer, the CPU works on the input to provide you with meaningful information. This is called processing.
2. The small graphical symbols or images that represent files, apps, or folders are called icons.
3. The two advantages of the internet are:
a. The internet helps us talk to faraway friends and family.
b. The internet helps us shop online to buy clothes, toys, books, food, etc.
E. Apply Your Learning.
1. Sejal’s mother is using a tablet or a smartphone.
2. Click on the Start button and then click on the Calculator application from the Start menu.
3. No, it is not a good thing to do. Do not share personal information, like your address, phone number, photo, school name, etc., with strangers online. If you share these things online, someone might use them to hurt you or trick you. That’s why it is important to keep your personal information private and safe.
A. Fill in the blanks.
1. title bar 2. AI 3. triple-clicking 4. Siri
B. Tick () the Correct Option.
1. a. Pencil 2. c. Close the document 3. a. Cut and Paste
C. Write T for True and F for False.
1. T 2. T 3. F 4. T
D. Answer the Following Questions.
1. The Color picker tool is used to select colours from existing drawings and fill other parts of the drawing with the same colour.
2. A word processor is a software program that allows you to create, edit, and format text documents.
3. We can delete text in Google Docs by using the Delete key or the Backspace key.
E. Apply Your Learning.
1. Ashi can use the Text tool in Paint to write text in the drawing.
2. Rahul must Copy and Paste the word in another place in his document.
3. In Google Docs, Shivam need not worry about losing the content of his document because it has the Autosave feature that automatically saves an open document or file.
A. Fill in the blanks.
1. script 2. backdrop 3. switch costume to 4. Pen
B. Tick () the Correct Option.
1. c. Go button 2. a. Motion blocks 3. c. Surprise 4. a. Position
C. Write T for True and F for False.
1. T 2. F 3. F 4. F
D. Answer the Following Questions.
1. Coding is a way of giving instructions to tell a computer what to do.
2. Blocks palette is the area where you can see all the blocks for a selected block category.
3. The ‘play sound until done’ block plays a sound and pauses the script until it finishes.
4. The Pen blocks are used to create simple drawings such as lines, shapes, and patterns or more complex drawings such as pictures and animations.
E. Apply Your Learning.
1. ‘Choose a Backdrop’ option from the Backdrops pane.
2. The ‘switch costume to’ block can be used to change the costume of the sprite to the specified one.
3. Select the sprite to be deleted in the Sprites pane and then click the Delete button that appears on the sprite.
ROBOTICS (ABot Kit)
Experiment 2: Bot Movements
A. Tick () the Correct Option.
1. b. Workspace
2. a. True
3. c. Forward
B. Answer the Following.
1. The delay function is used to suspend the execution of a program for a particular time.
2. Robot category blocks are used to control bot movements.
C. Apply Your Learning.
1. In self-driving vehicles.
2. The bot will stop immediately.
Experiment 3: Drawing Shapes
A. Tick () the Correct Option.
1. a. ON
2. c. Right
3. b. Stop for a specified time
B. Answer the Following.
1. The robot needs to turn four times to make a square.
2. Yes, loops helps avoid repeating the same steps multiple times in the code.
C. Apply Your Learning.
1. No, the Repeat while loop is an infinite loop, so we cannot restrict it to 4 times.
2. Used in floor-cleaning robots.
A. Tick () the Correct Option.
1. c. Conditional blocks
2. a. Store values
3. d. High
B. Answer the Following.
1. Variables are used to store information to be referenced and manipulated in a computer program.
2. The purpose of conditional statements in coding is to make decisions and carry out actions accordingly. If the condition given in the if block
is true, then the set of code inside it is executed; otherwise, the code inside the else if or else block is executed.
C. Apply Your Learning.
1. Black objects absorb IR, so they don’t reflect.
2. Used in automatic doors and parking sensors.
A. Tick () the Correct Option.
1. d. Variables
2. a. Using the Settings icon
3. c. 6
B. Answer the Following.
1. The purpose of the “equal operator” block is to compare two values.
2. The “play tone of frequency” block is used to generate a sound from the buzzer.
C. Apply Your Learning.
1. Without delay, the bot may move abruptly.
2. Else ensures alternate actions if the condition is false.
A. Tick () the Correct Option.
1. a. When pressed or touched
2. c. Math
3. b. The sensor will not detect the object near it
B. Answer the Following.
1. Use “stop robot” to halt the bot.
2. The “and” operator block is used to check if two conditions are true at the same time. The program executes the action inside the block only if both conditions are true.
C. Apply Your Learning
1. Used in ATMs and elevators.
2. If the value of the IR_Sensor variable is greater than 400, the IR sensor detects the object, and the bot stops
This answer key has been designed for schools who have opted for the Robotics course.
A. Tick () the Correct Option.
1. a. My Program
2. b. step by step
3. b. move robot in forward direction
B. Answer the Following.
1. The “move robot in” block is used to move the robot in a specified direction for a given time.
2. The “Repeat while” block is used to repeat a set of instructions continuously while a condition is true.
C. Apply Your Learning.
1. A moving robot can be seen in daily life in automatic vacuum cleaners, delivery robots, and toy cars.
2. If the “Repeat while” block is not used, the bot will not continue moving indefinitely and will stop after completing one movement.
A. Tick () the Correct Option.
1. b. stop robot for time
2. a. 4
3. a. To draw shapes
B. Answer the Following.
1. If the value 3000 is given in the “move robot in … direction for … time” block, the bot will move for a shorter distance than when the value is 4000.
2. The “stop robot for time” block stops the robot for a specific time, while the “stop robot” block stops it immediately.
C. Apply Your Learning.
1. Yes, other shapes can be drawn by changing movement and turn values in the code using count loop. For example, rectangle.
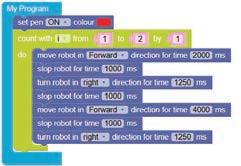
2. No, this code cannot be created using the “Repeat while” loop as it is an infinite loop, and we cannot restrict it to run only four times. However, this code can be created using the “count” block, which is also a loop block.
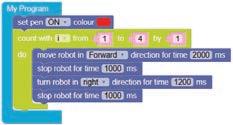
A. Tick () the Correct Option.
1. c. Variables
2. a. 2
3. c. Control
B. Answer the Following.
1. Variables are used to label and store information that can be used throughout a program.
2. The IR sensor is used to detect objects in front of the bot and send signals accordingly.
C. Apply Your Learning.
1. Object detection is used in automatic doors, selfdriving cars, and security systems.
2. If the object is too far away, the robot may not detect it and will continue moving forward.
A. Tick () the Correct Option.
1. b. set to 2. d. Sensor
3. a. settings
B. Answer the Following.
1. The “greater than” block checks if one value is larger than another.
2. The “Print Data” block displays messages or values on the screen.
C. Apply Your Learning.
1. A message can be displayed in a program using the “Print Data” block.
2. One real-life application of an object avoider is self-driving cars that avoid obstacles.
A. Tick () the Correct Option.
1. c. more
2. b. touch
3. c. Display
B. Answer the Following.
1. The “and” block ensures that both conditions must be true for the action to occur.
2. An infrared (IR) sensor is an electronic device that measures and detects infrared radiation in its surrounding environment. Whereas, the
touch sensor works like a push button or a limit switch. It simply gets triggered when it is touched or pressed.
C. Apply Your Learning.
1. A sensor car on the road may face challenges like uneven roads, obstacles, or incorrect sensor readings.
2. Sensor cars can be used in parking assistance systems and automatic guided vehicles (AGVs) in factories.
This answer key has been designed for schools who have opted for the Robotics Plus course.
This teacher manual has been designed to implement Tekie, the storytelling-based Coding and Computer Science program. The manual consists of lesson plans within each chapter that teachers transact within classrooms and computer labs. Each lesson is based on a research-based ‘WEBS’ framework that simplifies pedagogical practices for teachers and enables them to deliver effectively.
• Sharp Lesson Planning: Each lesson plan focuses on specific sub-learning outcomes within a chapter and are designed for delivery within the stipulated class or lab time.
• Real-life and Application-based Questions: Additional questions that link Computer Science to real-life contexts and assist teachers to develop learners’ conceptual understanding and application skills.
Uolo partners with K-12 schools to provide technology-enabled learning programs. We believe that pedagogy and technology must come together to deliver scalable learning experiences that generate measurable outcomes. Uolo is trusted by over 15,000+ schools across India, Southeast Asia, and the Middle East.
• Support and Detailed Solutions: In-depth solutions for in-class and post-class activities to reinforce learning. hello@uolo.com
ISBN 978-81-984882-8-2