14 minute read
How to work with many layers and how the order of the various components work as well


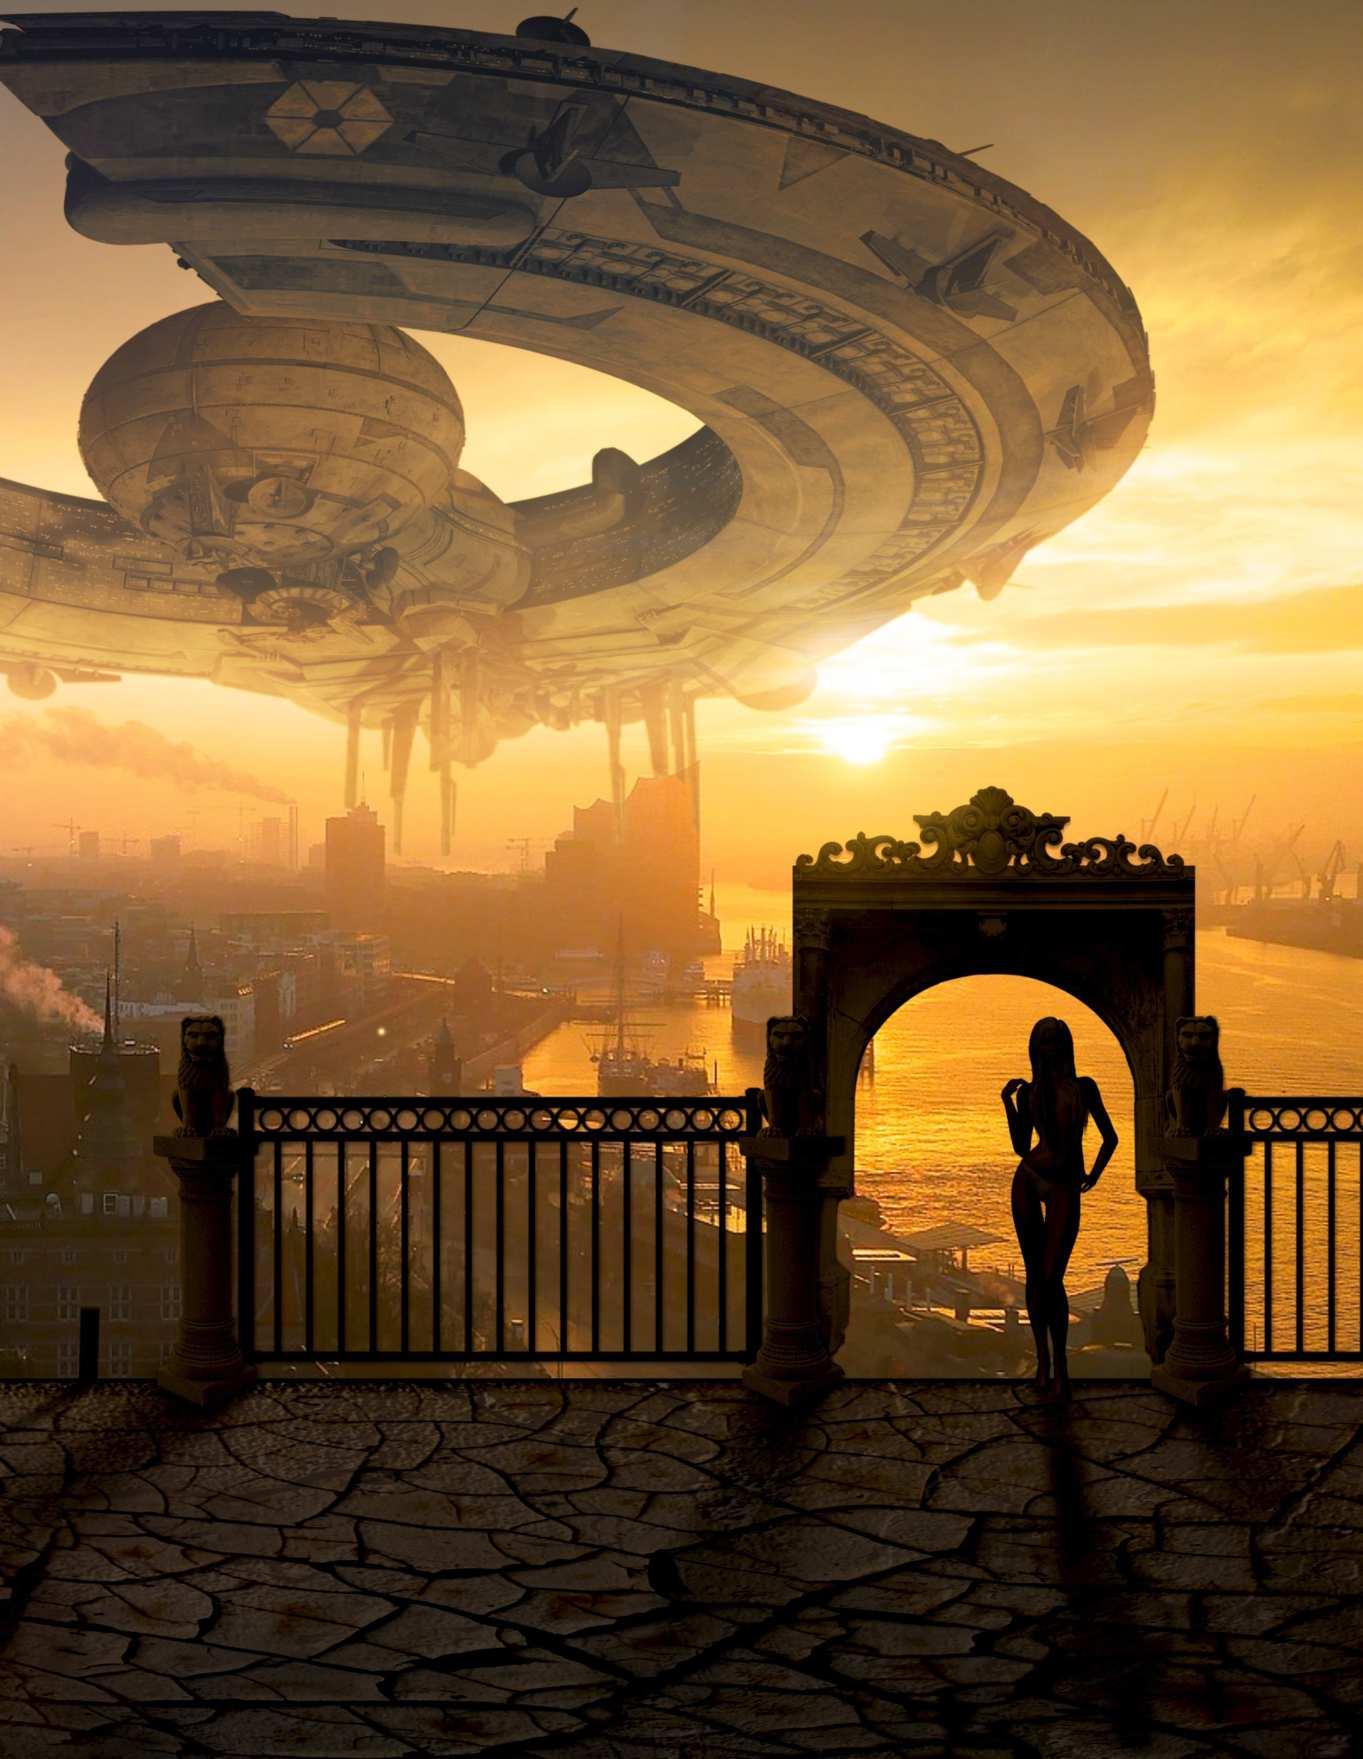
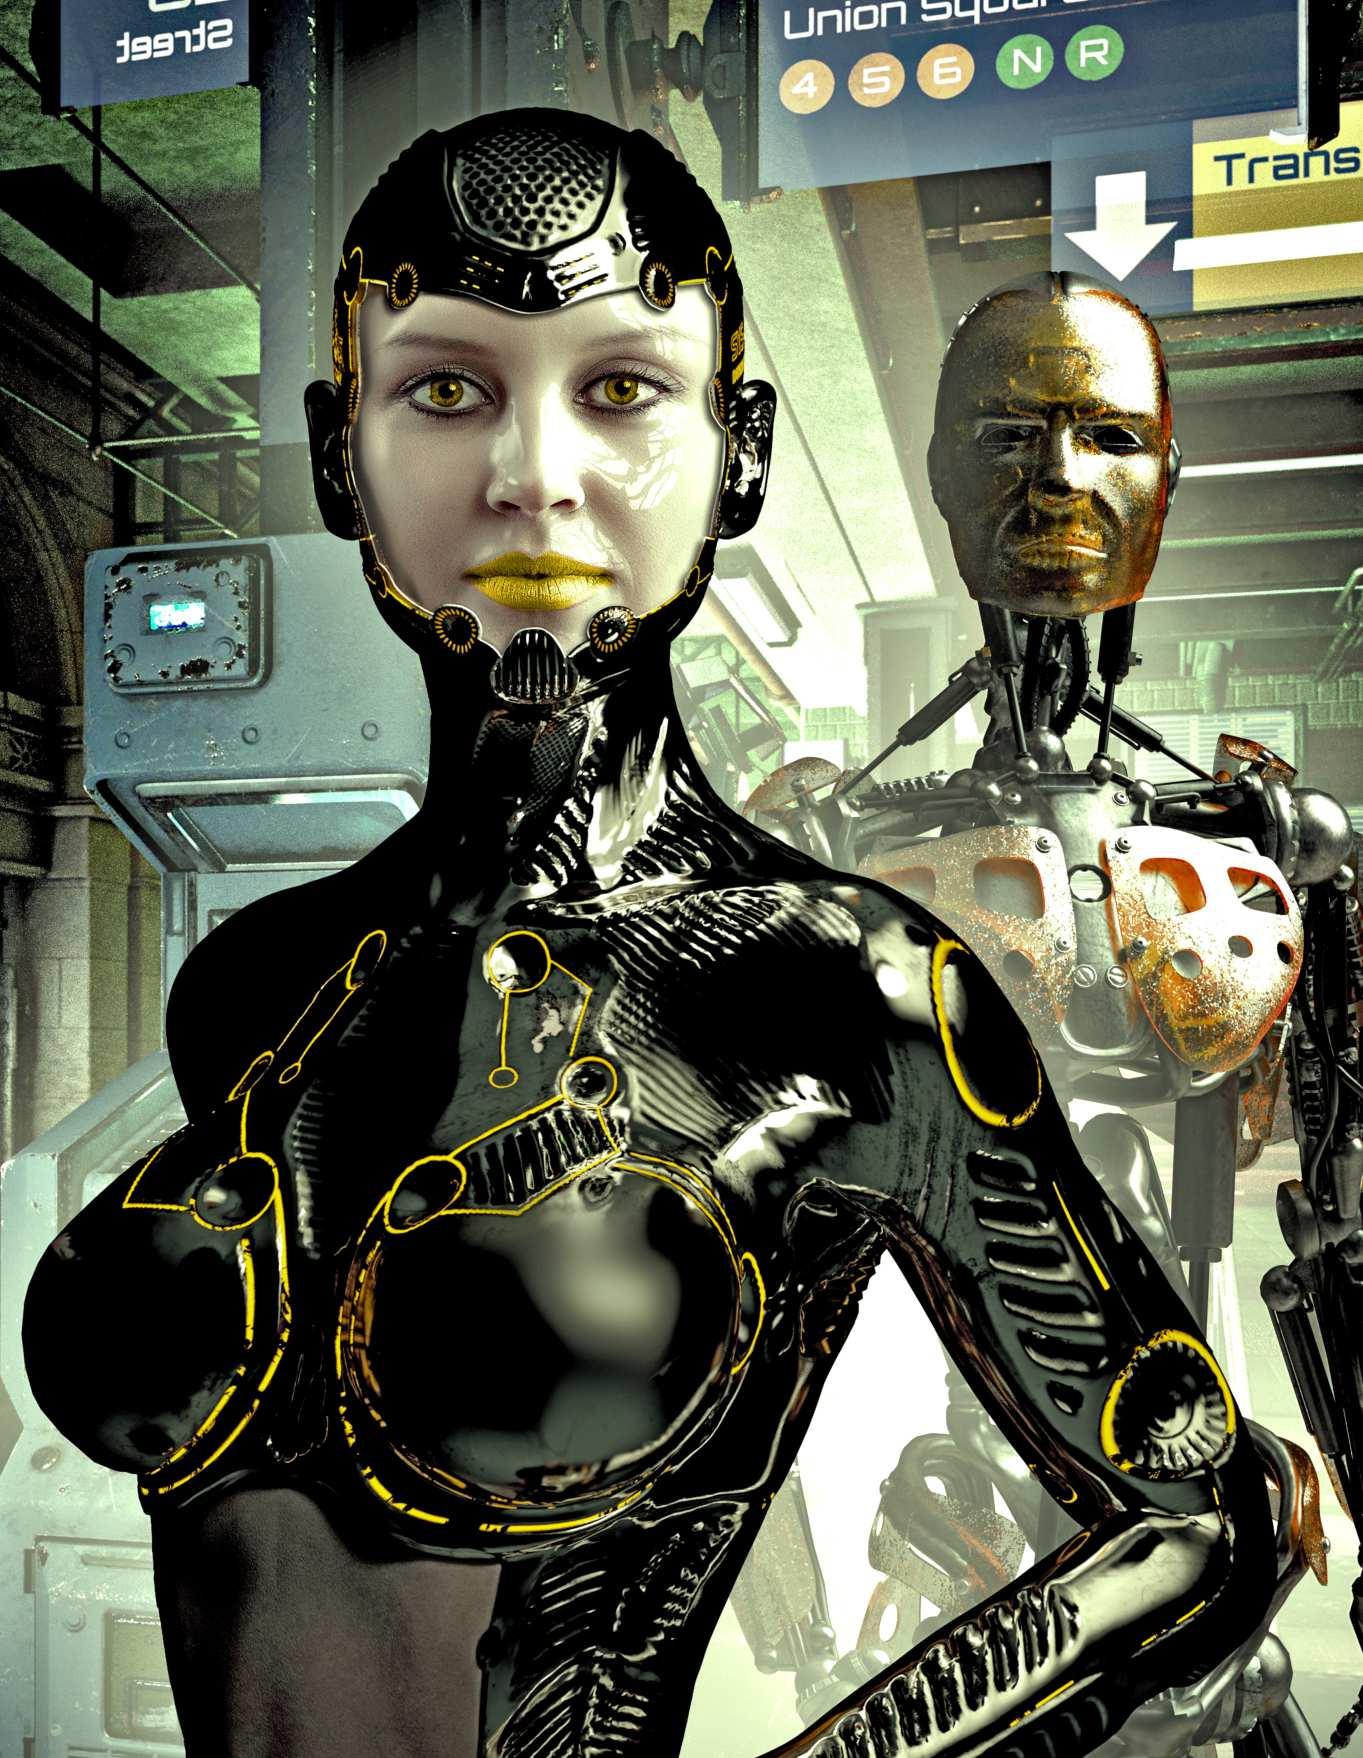
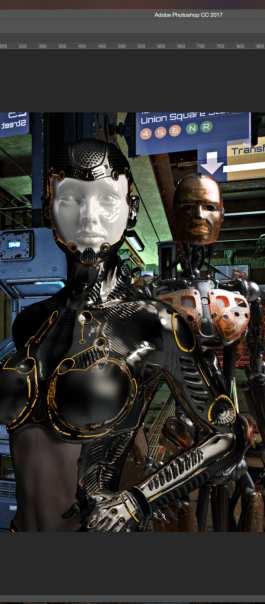
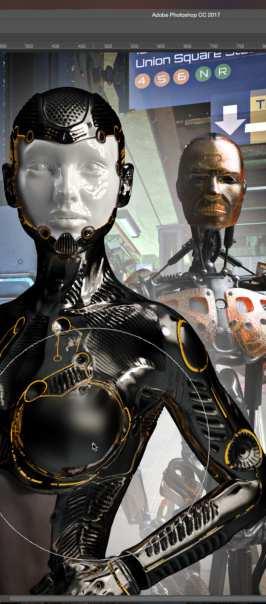
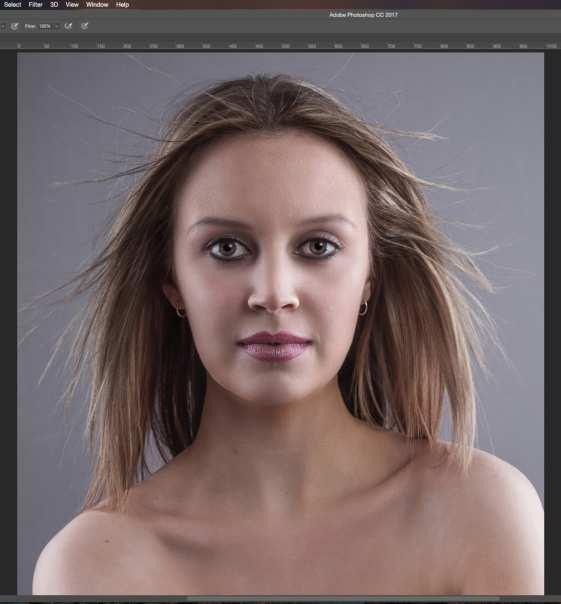
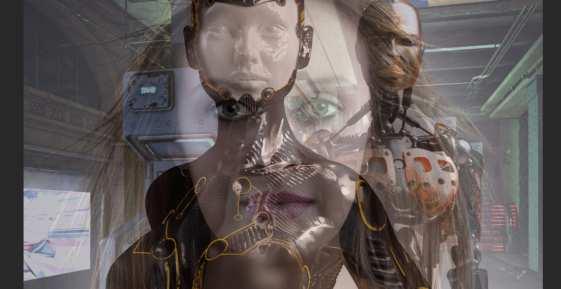
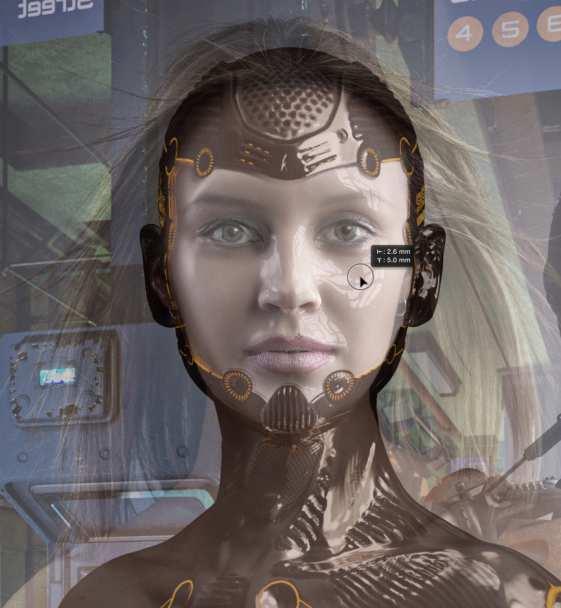
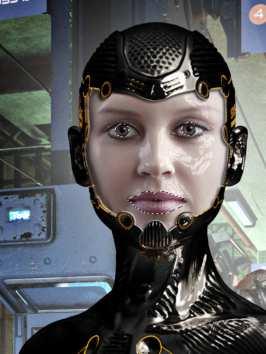
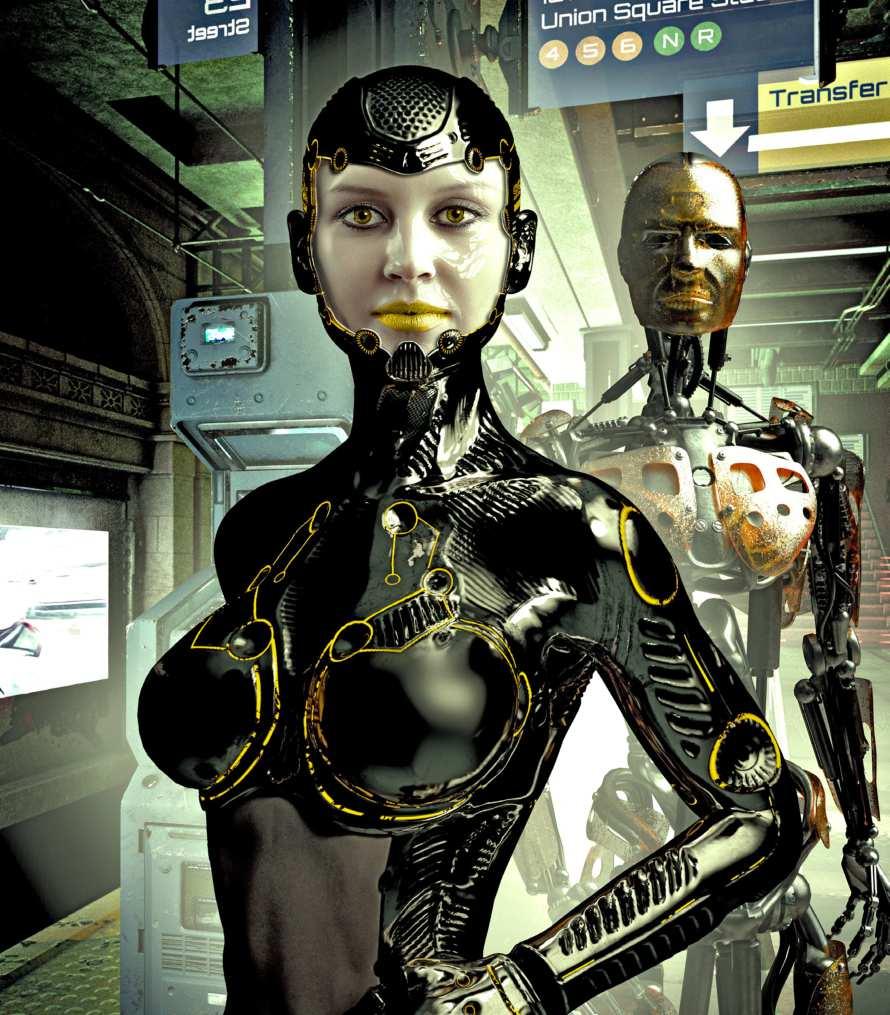
AFTER
Sci-fi Art
Advertisement
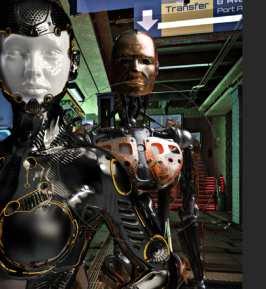
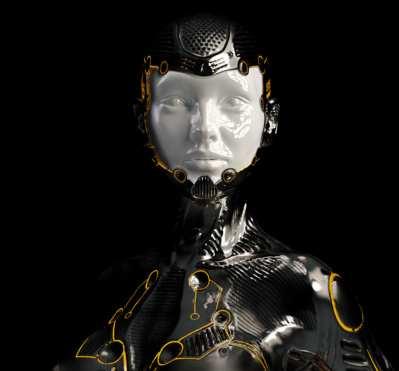
BEFORE
Turn friends and loved ones into mechanical beings
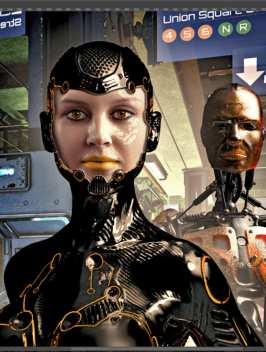
It is often the case that as a digital graphic artist, you sometimes have to work with a number of image components and bring them together to make one final image. This means working with your multiple images over many layers with adjustments and masks; it is a good exercise in being able to manage a larger than usual document. Our example uses a collection of foreground and background images as well as some assets to be used to create a human/cyborg hybrid. This tutorial aims to help you understand a little more about working with many layers and how the order of the various components work as well as masking and adjusting colour, exposure, saturation and layer styles. At the end, you will have a neat little sci-fi image and hopefully learn a few interesting creative tricks along the way.
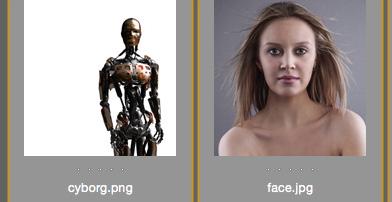
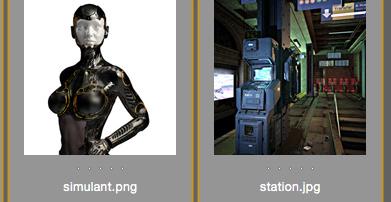
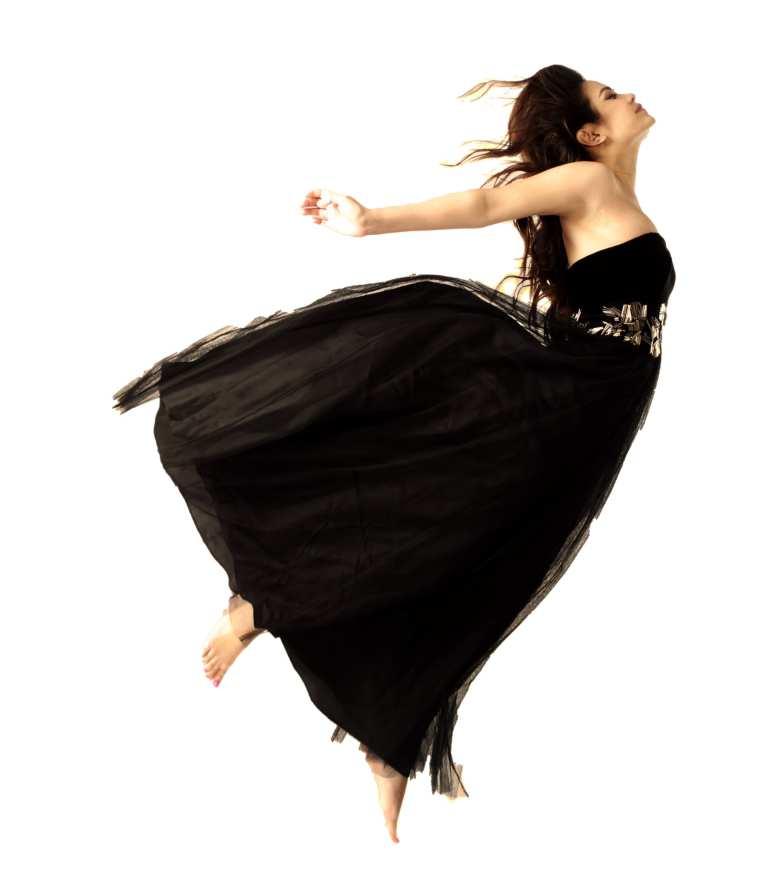
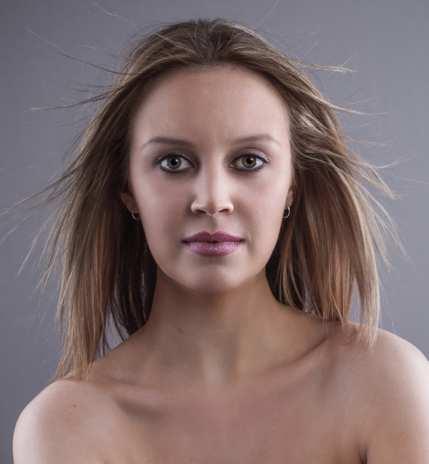
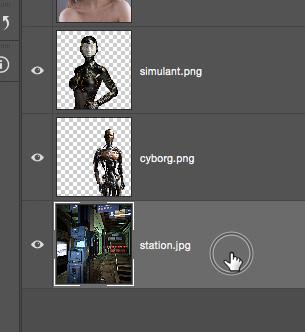
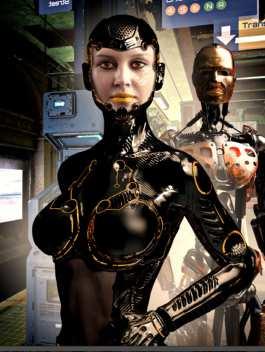
01 We have four main components that will be assembled to create the final piece of art. There is our main character base, a secondary character element, a backdrop and a human portrait. For your attempt, you can find many similar images like these for free on sites like Pixabay.com.
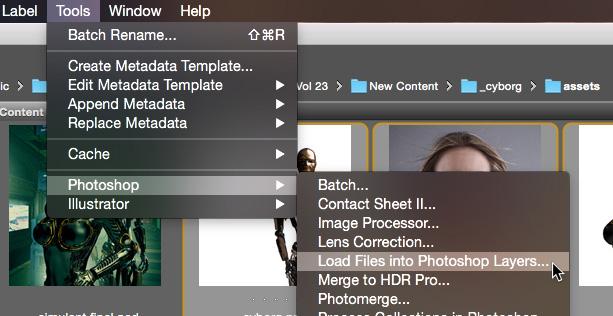
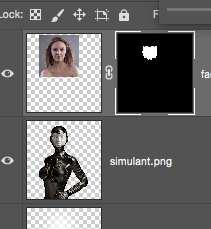
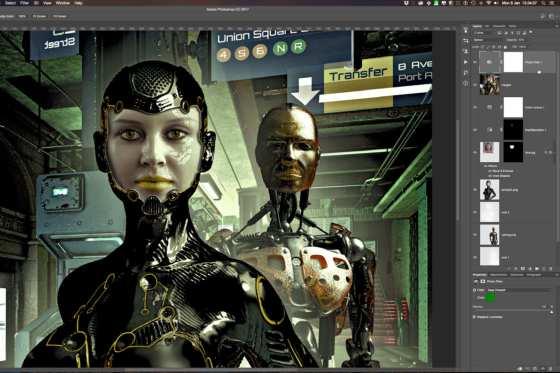
03 At the moment of course, the order of elements is incorrect. In the layers palette, click and drag the layers to reorder them with ‘face’ at the top and ‘simulant’ below that, then ‘cyborg’ and finally ‘station’ at the bottom of the stack. 02 We’re using Adobe Bridge to navigate to the folder where the four images are kept. Highlight all four and then go to Tools > Photoshop > Load Files Into Photoshop Layers. They will be put into a new Photoshop document in alphabetical order.
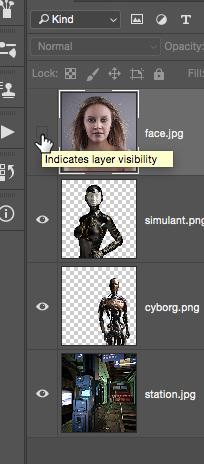
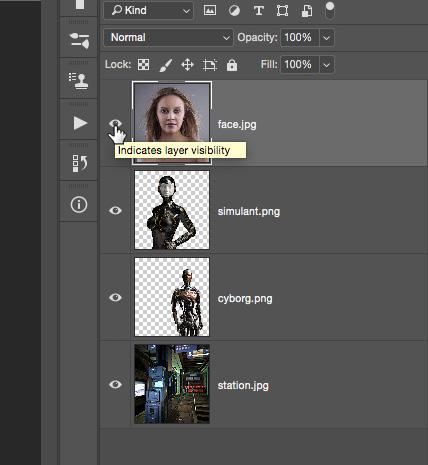
04 For the moment, you don’t need to see the ‘face’ layer yet. Click on the visibility icon to the left of the thumbnail image to turn it off. Now you should see the other three components in their correct order.
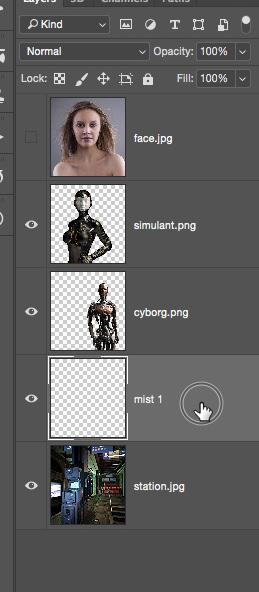
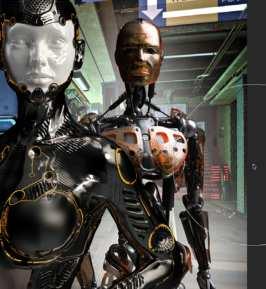
05 First, click on the ‘station’ layer and then go to the bottom of the layers palette and click on the Create A New Layer button. The new layer will be added above the ‘station’ layer you just clicked. Name it ‘mist 1’ and make sure it is active.
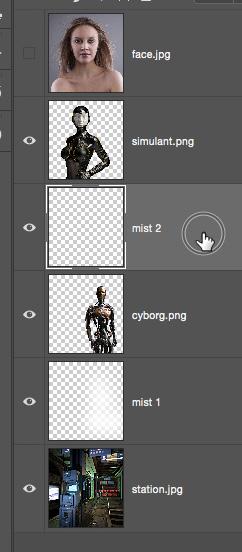
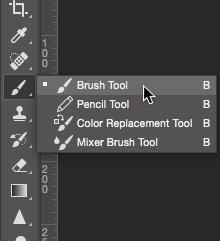
07 Add a second new layer called ‘mist 2’ and place this one between the ‘simulant’ and ‘cyborg’ layers. Using the same large white brush, paint around the main character to create some additional separation between the simulant and cyborg characters. 06 Go to the toolbar and select the Brush Tool (B). Use a large soft brush of about 1800 pixels and make sure the foreground colour is white and Opacity is about 50%. Paint white around the cyborg character to create a little mist that separates him from the background.
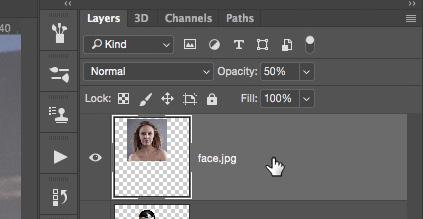
08 Next you need to create our human/simulant and add a human face to the character on the ’simulant’ layer. Go back to the ‘face’ layer and click its visibility icon once more to make it visible again.
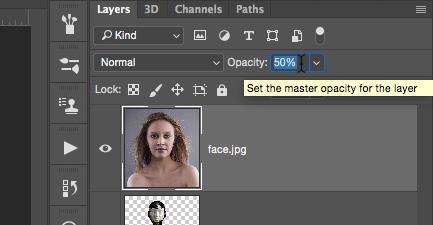
09 In order to be able to match the size and positioning of the human face to the simulant character image, reduce the Opacity of the ‘face’ layer to 50%. You will now be able to see the rest of the image below it.
11 Now you need to make a mask to conceal areas of the human face so it appears to fit exactly over the face of the character on the ’simulant’ layer. Since the facial aperture has some interesting curves, you need to use the Pen Tool and make a path that can then be turned into a selection. 10 Press Cmd + T to use the Free Transform Tool and move and scale the ‘face’ layer image so the main features such as eyes, nose and mouth roughly match the existing features of the simulant character beneath it. Press Enter to commit the changes you’ve made.
12 Keep the ‘face’ layer active and go to the Toolbar and choose the Pen Tool (P). Click once on the edge of the simulant suit face area to add an anchor point and then click and drag further along the edge to add another anchor point.
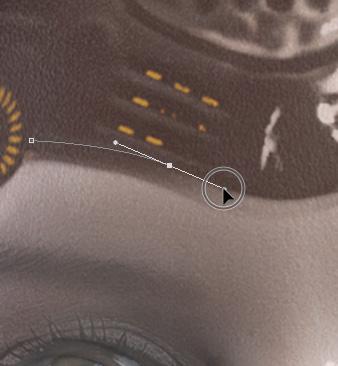
13 You drag your mouse around and will be able to create a curved line between the two anchor points that you added, that matches the curve of the suit. When you have the curve as you want it, you can release the Mouse button.
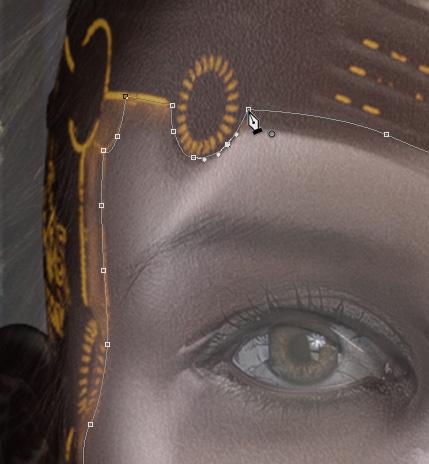
15 Using the Pen Tool you can work your way around the face mask until you’ve gone all the way around and come back to where you started. You can click on your starting point to join up the path you’ve created. 14 You can then move along and add a new anchor point and click and drag that one to continue creating curved areas along the suit face mask. If you don’t want any curves, you can simply click once to add a point and move on and click again to add another.
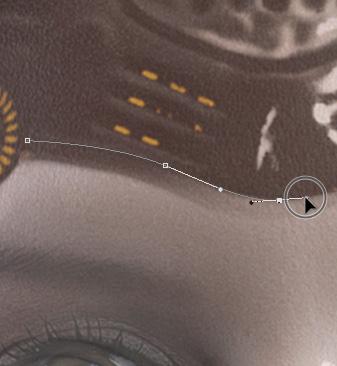
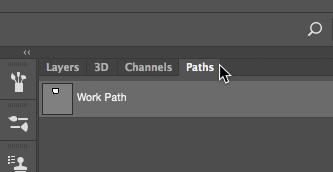
16 Go to the Paths tab above your layer stack and click on it. You will see the path you’ve just drawn as a Work Path. Below are a number of icons. Click on the Load Path As Selection to convert the path to a selection. You will see marching ants appear to confirm this.
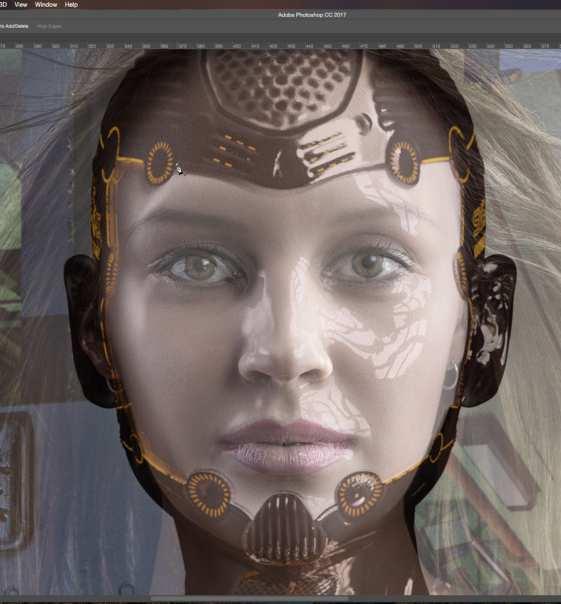
17 Go back to your Layers tab and make sure the ‘face’ layer is still active, go to the bottom of the layers palette and click on the Add Layer Mask button. A mask will be added in the shape of the selection.
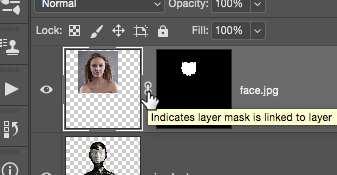
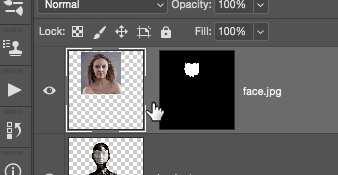
19 Between the ‘face’ layer thumbnail and the mask thumbnail is a small chain link icon. When visible, it means that any move, scale or adjustment to the image will also affect the mask. Click the chain link icon so the image and the layer mask are independent of each other. 18 You can now return the Opacity of the ‘face’ layer to 100% and only the area inside the face mask can now be seen. Everything else outside the selection is hidden by the mask you just added. You may notice that the human face isn’t quite wide enough to fit the face mask.
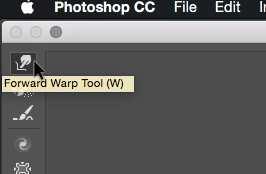
20 Make sure the ‘face’ thumbnail is active and go to Filter > Liquify (Shift + Cmd + X). The Liquify panel will open and you can use the Forward Warp Tool (W) to stretch out the edge of the girl’s face.
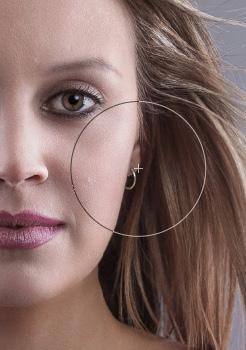
21 Work around the edges of the face by the cheeks and chin. You won’t need to stretch it out too far. Make sure the lips, eyes and nose are unaffected by the stretching. When you’re happy, you can click OK to apply the Liquify effect.
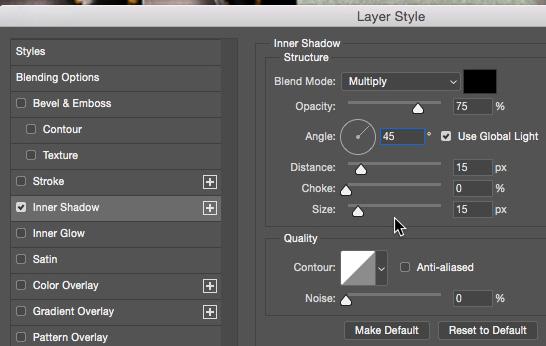
23 Double-click the ‘face’ layer and you will call up the Layer Style panel. Start by checking the Inner Shadow button and use the settings shown to add a small shadow that makes the human face look more a part of the mask.

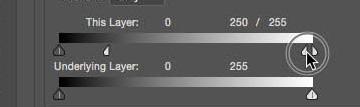
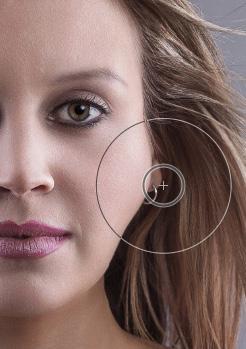
25 Keep the Layer Style panel open and go down to the Blend If section and the white furthest right slider on This Layer. Alt + left-click on the left-hand side of the stop and it will separate into two pieces. Click and drag the left-hand part of the slider to the left. 22 When you return to the document, her face will have been warped so now there is no gap along the side of the face mask. Now you need to better blend her face into the face mask give her flesh the appearance of being less human and more synthetic.
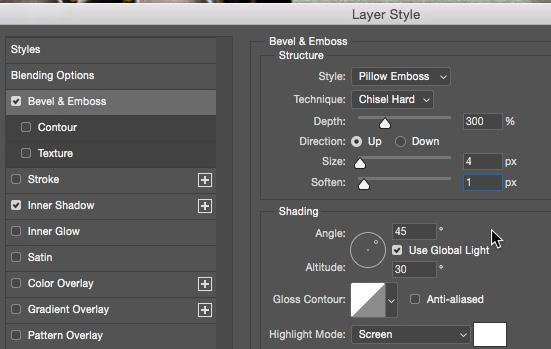
24 You can also check the Bevel & Emboss button and use the settings shown to add a small bevel to the edge of the face mask to give it a more solid feel. Next, you need to blend the human face into the white simulant face below.
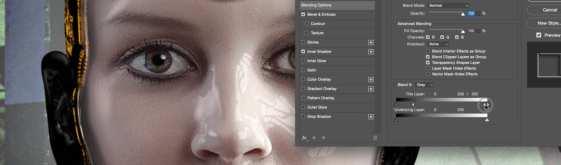
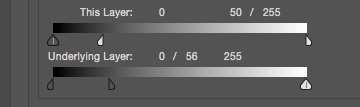
26 When you do, you will see how the ‘face’ layer blends much better with the brightest areas of the white face on the layer below. Do the same with the furthest left slider on Underlying Layer and slide it a little to the right to blend the darker areas.
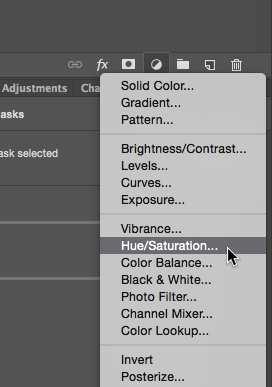
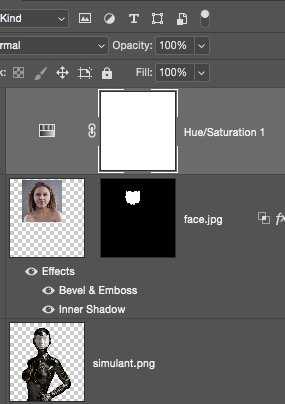
27 Next, click the Create New Fill or Adjustment Layer button and choose Hue/Saturation from the dropdown list. This will add a Hue/Saturation adjustment layer to the top of the layer stack. You can use this to colour her eyes and lips to match her suit.
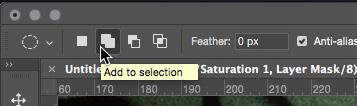
29 In the options menu above, click the Add To Selection button. Click and hold on the centre of one eye and then press the Alt key, you can now draw an ellipse outwards from the point you clicked. Encircle the iris. Then do the same for the other eye.
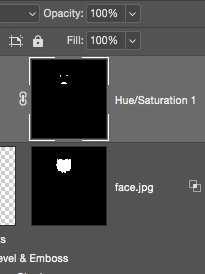
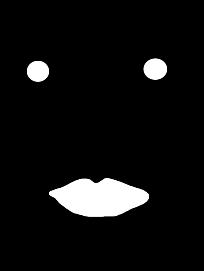
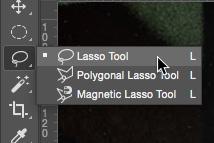
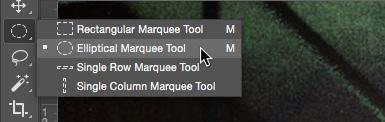
31 Set your background colour to black and then simply hit the delete key. The inverted selection will be replaced with black. The mask should now display the lips and both eyes as white on the black mask. Clear the selection by pressing Cmd + D. 28 Go to the toolbar and choose the Lasso Tool (L) and draw around her lips; when you join back up to the start point, you’ll have a selection of the lips. Next, go to the toolbar again and this time choose the Elliptical Marquee Tool (M).
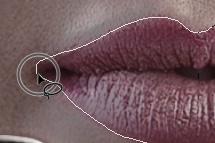
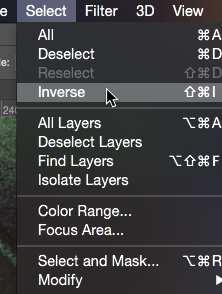
30 The lips and both eyes are now selected. You need the mask to only let the Hue/Saturation layer affect them so you need to invert the selection by going to Select > Inverse (Shift + Cmd + I). The selection will invert, so everything except the eyes and lips are selected.
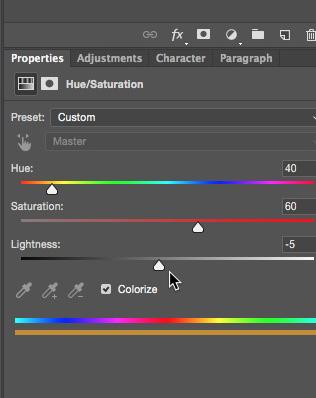
32 Click on the Hue/Saturation layer icon and in its Properties panel make sure Colorize is checked and make Hue 40, Saturation 60 and Lightness about -5. Both eyes and her lips should now be a golden yellow to match the highlights on her suit.
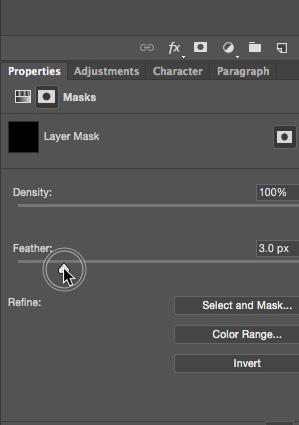
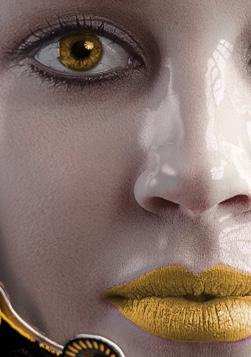
33 If you want, you can click on the layer mask thumbnail and under its Properties, set the Feather value to about 3 pixels. This will blur the mask very slightly to soften the hard edge around her lips and eyes. Now we can experiment with some colour.
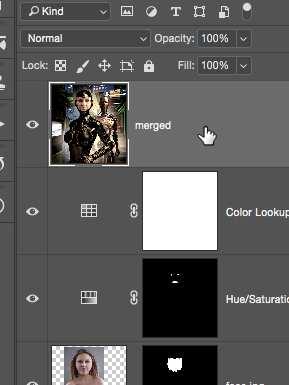
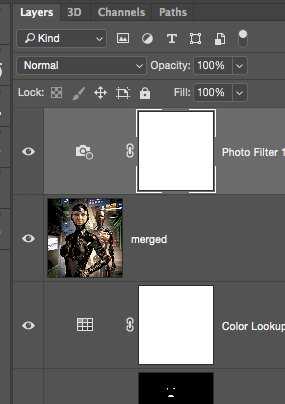
35 We’ve chosen Crisp_Warm.look to create a warm and contrasty look to the image. Next, press Shift + Alt + Cmd + E to create a new layer that is a merged version of all that is currently visible. You can name this new layer ‘merged’.
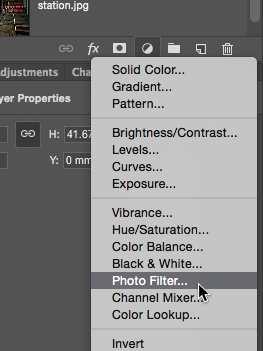
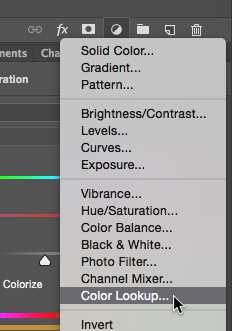
37 This just reclaims some of the areas of the image lost to shadows after the application of the Colour Lookup filter. You can make the image a little more bleak and futuristic looking by adding a Photo Filter. 34 Click on the Create New Fill or Adjustment Layer button again and choose Colour Lookup from the menu. Colour Lookup Tables (LUTs) are colour schemes you can add to a photo. You can choose from the options available in the menu.


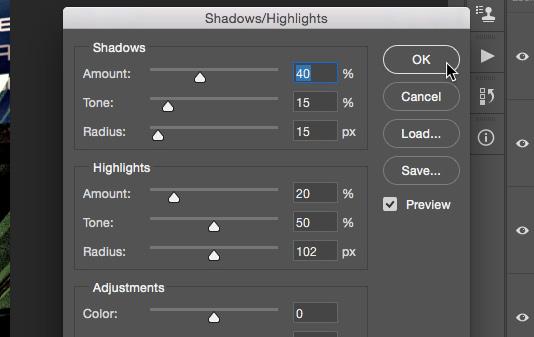
36 Go to Image > Adjustments > Shadows/Highlights and under Shadows make the Amount 40%, Tone 15% and Radius 15%. Under Highlights, make Amount 20%, Tone 50% and Radius 102%. The other values can be kept at zero.
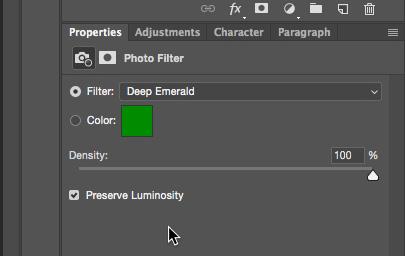
38 Under the Photo Filter 1 properties, set Filter to Deep Emerald, Density to 100% and uncheck the Preserve Luminosity button. The image will go a bright green colour but you can blend it in the next step.
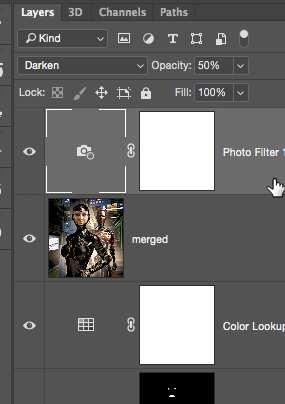
Click the Photo Filter 1 layer to make it active, set its Blend Mode to Darken and drop the layer Opacity to 50%. This blends the green in a more subtle way giving the image a more Matrix-style colour palette.
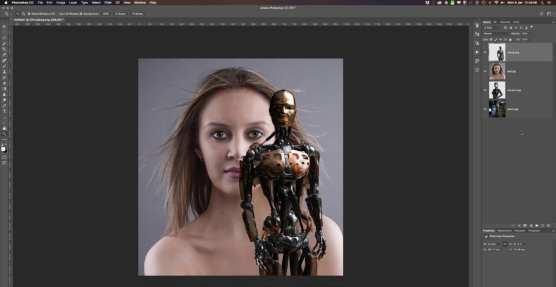
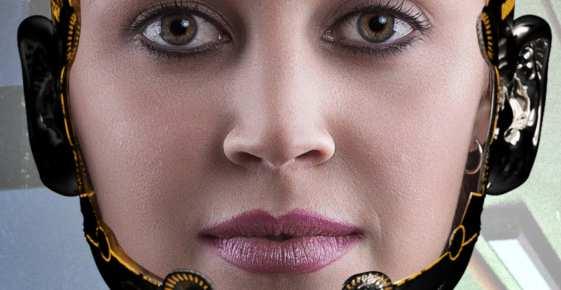
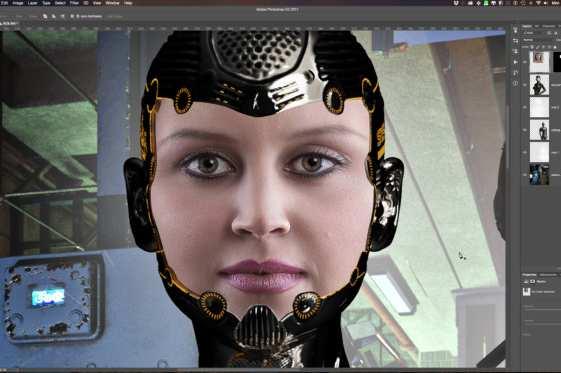
39 Your image is complete. By taking a group of elements and assembling them into a great science fiction image. You’ve also used masks, selection tools and adjustment layers to combine and colour grade the various parts.

Combine, create, and enjoy
Photoshop is there to help you make amazing art.
40
Exploring Photoshop
To learn every toolbox item, technique or adjustment in Photoshop may seem like an insurmountable task. It’s part of the reason we’ve split up the tutorials in order to keep them manageable. Don’t worry though, you’ll be surprised that how quickly they become second nature with a little practice.
Contents
20 Modifying selections 22 Gradient fill and paint bucket 24 The clone stamp tool