11 minute read
Neon Light Tutorial by Jamie Hamel - Smith

from PDFJuneIssue2005f
by Hiba Dweib

Neon Light Tutorial
By Jamie Hamel - Smith (Inspired by Brett Lewis)
Advertisement
Greetings fellow 3D Attackers! Judging from the name of this tutorial I’m sure you already know what we are going to do. The trick in this tutorial that I am going to show you is how to use the “Proximal” shader to create some interesting effects.
There are few ways to create neon lights in 3D; using many lights along a Spline is one, and another is to use Radiosity with a luminous material and let the global illumination system calculate the glows for you. The forementioned techniques can take a much longer time to render than the technique I am about to show you. While this is a “Cheat” and won’t give you the absolute best result for neon lights, it is a very speedy workaround and in my opinion, the results look great!
The great thing is that when you are done with this tutorial you will be able to use the Proximal shader for all sorts of other things! So, let’s examine the Shader in question a little bit. In the CINEMA4D Shader menu, you will find the Proximal shader under the effects submenu. (I am using CINEMA4D R9 for this tutorial. The Proximal shader is in previous versions, but it may have been called ‘BhodiNUTProximal’. Refer to your users manual to see where your Proximal Shader is)
[Image-01]
The shader works by creating luminous points where the origin, points, edges or even polygons of a reference object get close enough to the surface of the object that the material with the Proximal shader is applied to. The following images show a simple example of the Proximal shader in action. The first image shows a luminous spot where each point of the orange plane is, the following image shows the exact same scene but with the “edges” option enabled [Image-02] [Image03] In this case, the ground plane
has the material with the Proximal shader applied to it and the orange plane is defined as the reference object in the Proximal shader properties. So, that should give you good understanding on how the Proximal shader operates.
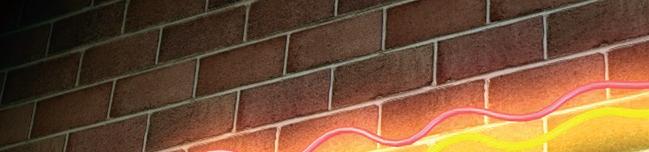
Start by opening the “Start Scene.c4d” file. The scene consists of a camera, 2 lights and a brick wall. The camera has a protection tag on it to prevent you from accidentally moving the camera. Start by creating a SweepNURBS Object, a Text Spline Primitive and a Circle Spline Primitive. Set the Radius of the Circle Spline to 3 and make both Spline Objects children of the SweepNURBS Object.
The Circle Spline should be above the Text Spline in the hierarchy. Now position the SweepNURBS Object so that it is visible in the camera view. The first thing that I do when creating a sweep is to check the interpolation of the splines. The default interpolation is actually quite high. Switch to a wireframe view and notice how dense the mesh is. Select the Circle, and in its object properties make the Intermediate Points “Uniform” and set the number to 1. This gives you an 8 sided circle to work with which is a much more manageable number of sides for this object. Your scene should now look
like this; [Image-04] Now we can rename the Sweep object to something a little more relevant. Something like “Sign Text” should suffice. I’m not really that happy with
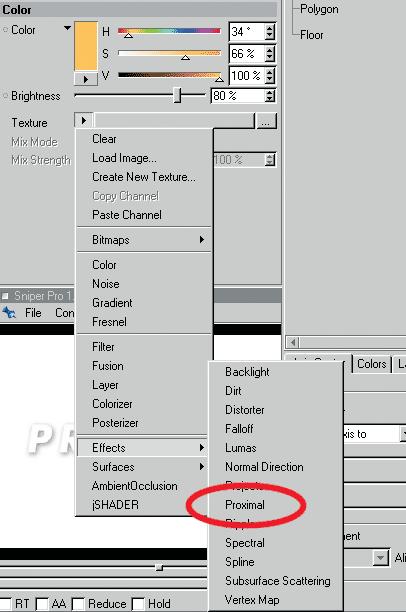
Image 01

Image 02

Image 03 Image 04

Neon Light Tutorial
By Jamie Hamel - Smith (Inspired by Brett Lewis)
the appearance of the Sign right now, we need to add some accents to the sign and also choose a different font for the sign text. We might want to make the sign actually say something relevant! Switch to the front Viewport (F4) and draw a Spline to create some sort of border for the sign. This following image is what I came up with, and I also used the Create Outline Tool with the “Create New Object” option enabled, that way I get another Spline that I can use in a different SweepNURBS object to have 2 differently colored accents. [Image-05]
Duplicate the “Sign Text” SweepNURBS Object twice so that there are 3 Sweeps in total. Delete the splines from under the 2 duplicates of the sweep so that you now have 2 “empty” Sweep NURBS Objects. Rename the 2 Sweeps “Accent 1” and “Accent 2” also rename the 2 Accent Splines accordingly. I used “Accent Spline 1” and Accent Spline 2.” Aneat little technique that I use when doing multiple Sweeps or Extrusions is to create an Instance of the Profile being Swept or Extruded and use it in the other Sweeps or Extrusions instead. This image will clearly show you what I mean. [Image-06] We are almost ready to start textur-
ing the neon tubes. Switch the display to wireframe, notice that the subdivisions on the sweeps are not evenly distributed, they need to be.
The Proximal Shader is going to be using the intermediate points along the Spline to cast ‘samples’onto the wall. The samples will look better if they are uniformly spaced, it will give a more lifelike result. To remedy this problem we need to select the 3 Splines; Text, Accent Spline 1 & Accent Spline 2, then in the attributes manager change the Intermediate Points from Adaptive to Uniform. Notice how the subdivisions are evenly spaced now. [Image-07] Let’s create 3 materials for the 3 neon tubes. Name them Text, Accent 1 & Accent 2 we will be using a little bit of XPresso in a little while, but don’t worry, its simple stuff. We will need a Proximal Material for each color of neon tube. The color of the Neon Tube Material should be the same as the color of the respective Proximal Shader Material.
So, for each Color of Neon Tube, we will have 2 Materials, one for the color of the tube itself and one for the glow on the wall from the tubes. Let’s Start with the Text, Apply the Text Material to the ‘Sign Text’ SweepNURBS Object. Now Create another Material and name it ‘Text Proximal’The first thing that we want to do with this material is disable all the channels except luminance.
The luminance channel is where we will load the Proximal Shader for this Material. Load the Proximal Shader from the drop down menu and click the thumbnail to access the Shader Properties. This is where you tell the Proximal Shader which object it will use to calculate the effect. In our case, it’s the ‘Text’Spline. Drag the Text Spline into the Link List and check the ‘Use Vertices’option. Now

Image 05 Image 06 Image 07


Neon Light Tutorial
By Jamie Hamel - Smith (Inspired by Brett Lewis)
the Shader knows which Spline to use and that it should take the points of the Spline into account when placing samples. Now we need to apply the effect to the brick wall. Drag the Material ‘Text Proximal’onto the ‘Wall’Object, select the texture tag and enable the mix textures option, (this will add the luminance of the proximal material to the existing textures on the brick wall, whatever they may be).
Render to see the results. Your render should look very white and bright. In order to “tone down” the effect we need to go back into the Proximal shader and tweak the ‘End Distance’and ‘Intensity.’Make the ‘End Distance’ 30% and render again, it should look much more like a glow, but it should be much softer, don’t you think? Make the Intensity 5% and render again. Does it look like a soft glow yet? [Image-08] There are a couple things wrong
with this picture…. Firstly, we need to make the color of the Proximal glow the same as the color as the neon tube. The neon tube also doesn’t really look like its glowing right now; we can fix that very easily. I’m going to be a little ambitious here and we are going to use an expression to control the color of the Luminance Channel, and the color of the Proximal Shader. To keep things neat, we will make one XPresso expression for each SweepNURBS Object. Right Click the ‘Sign Text’Sweep and choose CINEMA4D Tags > XPresso. The XPresso Editor should open on the screen. We are going to Output the Color information from the Color Channel of the ‘Text’material and send it to the Luminance Channel of the ‘Text’material it will also be sent to the Luminance Channel of the Proximal Shader so that if we want to change the color of the neon tube, we simply adjust one value and all of the others automatically change to the new color you choose. Here is how it is done; we need the color from the Text material to be output, which is the first step.
Drag the ‘Text’Material from the Material Editor to the XPresso Editor and it should appear as a ‘Node’ [Image-09] The node has 2 colored squares at the top corners, a blue on the left and a red on the right, the
blue square is where you can add input ports, and the red square is where you can add output ports. Click the Red square and you will see a list of the available outputs; all of the Channels of the Material are listed. We want the color of this material to be sent to the Luminance of the very same material.
To do this we need to either make a copy of this node or drag the ‘Text’ Material into the XPresso Editor again, either way will suffice. Now that you have 2 nodes, you can create a link. Alink is created by dragging a wire from an output port to an input port or vice-versa, first we need ports :-) click the red port on the first node and from the list, choose Color > Color > Color > [Image-10] now a port should appear on the right side of the node
and this is the output port that will send the color info to the other color properties.
Next we focus on the copy of the node and this time we will be clicking the Input Port (blue on the left) because we want to control the color of the Luminance Channel, we will choose Luminance > Luminance Color > Luminance Color.
Drag a wire from the color output port of the first Text node to the luminance color input of the second node like this: [Image-11] Awire
should appear and the connection is made. (Make sure that the Luminance Channel is enabled for the Text material. When you enable

Image 08 Image 09 Image 10


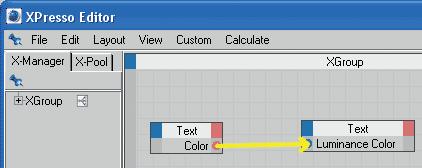
Image 11
Neon Light Tutorial
By Jamie Hamel - Smith (Inspired by Brett Lewis)
the Luminance Channel, take note of the color that it is already! Change the color of the Color Channel and notice how the Luminance Color changes with it!
If you render the scene you will see that the neon tube is now bright and intense, just like it’s supposed to be!
However, we still have that issue of the white glow; we need to connect the color of the Proximal Shader to the Color of the tube… And here is how it’s done; drag the ‘Text Proximal’material from the Material Manager to the XPresso Editor.
Click the blue input port on the ‘Text Proximal’node and choose Luminance > Luminance Color > Luminance Color. Again you have created an input port for the color data of the Luminance Channel.
Drag a wire from the Color output port of the first ‘Text’node to the Luminance Color input port that you just created. [Image-12] The Proximal Shader still won’t come out
colored until we make one more little adjustment, go to the luminance channel of the ‘Text Proximal’material and change the Mix Mode to multiply.
This mix mode uses the color selected in the channel as the color of the Proximal shader. Now you can render and voila! You have a neon tube with a glow that renders very quickly and the color of the entire system can be changed very easily!
You can even animate the color of the neon tube so that it pulses on and off, or pulses with 2 different colors. All you need to do now is repeat the process for the other colors of the neon tubing and you are all set!
By the way, you might have to tweak the End Distance and Intensity parameters in the Proximal shaders for the other neon tubes (due to a different number of points in the spline) alternatively, you could increase the number of intermediate points in the spline properties, it’s all up to you. You can also achieve some very interesting effects by changing the Blend Mode in the Proximal Shader Properties. If you have any questions about this tutorial, you can find me on the 3D Attack Forums.
Happy Rendering! Jamie Hamel-Smith (jamiehs)
If you have questions or problems feel free to contact any of our moderators or admins on the forum:
http://www.3dattack.net

Image 12 Final Result


