13 minute read
C4D to ZBrush and Back by Mark Gmehling
from PDFJuneIssue2005f
by Hiba Dweib
C4D TOZBRUSHANDBACK...
By Mark Gmehling
Advertisement
CHARACTER HEAD by Mark Gmehling
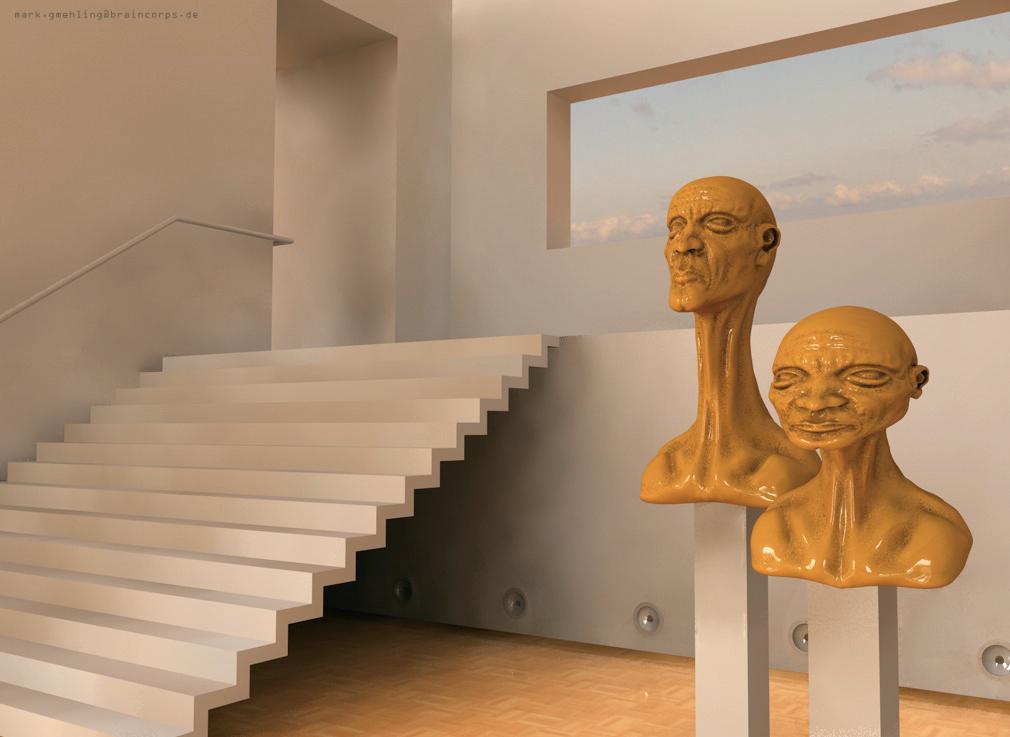
Hi there attackers in this tutorial I want to show the fast workflow ZBrush offers to detail a quite lowpoly mesh created in CINEMA4D. We'll block out a head shape in C4D and export it to ZBrush to give it as much detail a believable head needs. Then we'll export a 16 bit displacement map to render our lowpoly mesh back in C4D with the help of R.9's subpolydisplacement feature.
In the C4D part I'm using some of some new modeling features of C4D R.9, but its all possible with older versions. Don't hesitate to ask me questions via pm or the community on the 3dattack.net forum.The ZBrush part is dedicated to newbies in ZBrush and should be easy to follow, as well as the instruction I give i in CINEMA. Ok- here we go. Let's create a cube(Objects- PrimitivesCube) and adjust its attributes to x:1; y:3 and z:4 segments before we make the object editable via pressing C- pic01.
Select the polys (switch to polymode) shown in pic02 with the live selection (that only selects visible geometry by default) and extrude (D) them 4 times to roughly fit the shape in pic03.
In sideview(F3) adjust the points (switch to point mode) as seen in pic04 to block out the basic head proportions. Use the rectangle selection with only visible disabled in its tool attributes to affect the invisible points too. You can toggle between the move tool (E) and the rectangle selection by hitting the spacebar. Back in perspective view (F1) select the points seen in pic05 and move (E) them along the x-axis to define the neck-shoulder area roughly- pic06. To define the rounding of the head, live-select the edges (edge mode) shown in pic07 and move (E) them along the x-axis. Switch to polymode select the polys as seen in pic08 and move them outward to round the shape- pic09. And one more tweak in edge modelook at pic10/11 where I move the selected edge outward a bit. Now lets create the other half of the head: We switch to front view (F4) and in global mode we move (E) the head along x to line up with the 0point of the coordinates system. I hold the shift key while moving which snaps the movement grid and move it 100m in the right directionpic12. Before we apply a symetry object we've got to delete the polys in the middle of our head- select the polys shown in pic13 and delete them by pressing the backspace key pic14. Now create a symetry object (Objects- Modeling- Symetry) and drag the cube mesh onto it to make it its child- pic15.

C4D TOZBRUSHANDBACK...
By Mark Gmehling
Before we export this rough mesh to ZBrush, we'll do some final tweaks: With the knife tool (K) in line mode only cutting visible- we add two cuts as seen in pic16/17. Now we liveselect the edges shown and melt them away (Functions -melt)pic18.That created two five-sided polys we get rid of by two cuts with the knife tool (K) again- pic19/20. Make sure to let the knife snap at the existing points!
To give our bust more thickness select the polys (poly mode) shown in pic22 and extrude them one timepic23. Notice that you've to delete the two not needed polys in the middle! (Disable the symetry - kill the middle polys and switch symetry on again) Lets round the neck a little. Switch to edge mode- live-select the edges shown in pic24 and move (E) them inward along the x-axis- pic25.
In front view (F4) we tweak the head to fit a the human proportion. Toggle between rectangle selection and the move tool as shown abovepic26/27. Define the proportions further in perspective mode by using the live-selection and the move toolcheck my tweaks in pic28.
Before we export we use the knife
tool(K) to add more subdivision to the head because we want to give the mesh enough points to be able to paint on a high detail level in ZBrush. This time use the loop mode and add a loop next to the 0axis- pic29, two loops along the profile- pic30/31, and two horizontal loops- pic32/33. Make sure to align your knife tool at the 0-axis to make

C4D TOZBRUSHANDBACK...
By Mark Gmehling
sure the knife is cutting through!
You'll notice that the inserting of loops destroys the roundness we tweaked before. To avoid point tweak again, we'll use the brush tool (Structure- Brush) in smooth mode to round up our mesh- adjust the tools radius to about 50m/ its strength to 50%, and make sure you've not selected any points to be able to affect the whole mesh- and don't overdo it- a few strokes are enough- pic34/35. Now we can get rid of the symetry by selecting the symetry object and pressing C to have a full polymodel ready for export. Some general things about exporting to ZBrush: As you see, the mesh we'll export to ZBrush contains no detail and no sharp edges. All polys have to be quads and the mesh has to be closed to avoid trouble in ZBrush. The reason is that our ZBrush mesh will break the million poly mark, so the base mesh should be equally subdivided/ all polys should have quite the same size, because we want to paint detail in ZBrush and each time we subdivide the poly count will be quadrupled.
If we would already create sharp edges by having edges close together we would add polys not needed by each subdivision in ZBrush. So adjust your mesh a little bit to make sure the polys are sized quite equally. Of course the polys of the botin size, but as we are going to model a bust its ok because we want to add most detail onto the head. The level of detail at the shoulders will be lower automatically.
Ok, now we go to File- ExportWavefront and save the file in *.obj format.
Z-BRUSHING DETAILS:
In ZBrush we go to the Tool menu and click the Import Button and select our obj. File. After that we drag over the canvas to paint our mesh on the viewfield. Then we click Tto enter the Edit mode that makes us able to rotate the cam, zoom and move around the mesh- pic37: You rotate the cam by lmb-dragging outside the geometry. You move the cam by alt-lmbdragging. You zoom into the mesh by alt-lmb-dragging and then releasing the alt button. To get the 100% side/top/front view just hold the shift key when you drag the cam and the mesh will snap into an orthogonal view. For adding detail we'll subdivide the mesh one time by going to tool- geometry- divide- pic38. We can switch between the different division levels at any time. On the lower levels rough tweaks are made, going to more and more detail in the higher levels. First we use the draw mode ZBrush is in by

C4D TOZBRUSHANDBACK...
By Mark Gmehling
default and draw our mesh in the desired shape. Use the intensity slider to define the push or pull effect the drawing has. If you've no tablet you'll often change draw size which is available easy by just clicking s. When you hold the alt key while drawing, the mesh will be pushed inward. Holding the shift key pressed will smooth your mesh. Before you start painting hit the x key to enable x symetry! With a few push and pull strokes I

refined the mesh a little bit - look at pic39. Don't try to create a nice, smoothed shape- just block in the main things as eyecavity, nose, a little bit of the jaw bone, add a little chin and some neck-muscle flow. Next to using the draw mode, you can switch to move mode and move polys. Depending on your draw size, you affect polygroups as a kind of soft selections you may know from CINEMA4D. Anice thing to manipulate a final headscuplture to a totally new expression. If you set your draw size to 1 you can move each polypoint like you'd do in C4D.
I don't want to describe every stroke now- ZBrush is the most intuitive tool I know and everybody finds his own way to sculpt his imaginations. Just use the draw and move mode and maybe explore the different transformation tools found in the transform palette. I use to draw by pulling and pushing with alt-key and quite often use the shift key to smooth the transformations- If you're satisfied with the first rough sculpting, go to Tool- Geometry and hit the divide button again to add a third subdivision level- pic39. Notice not to forget to decrease your drawsize while subdividing to make sure you increase the level of detail.
Take a look on pic 40 to check my tweaks. I started to define the basic muscleflow of the face, pulled out the chin a bit more, defined the shoulder area, try to begin pulling out the ear. Notice that it is better to over exaggerate the tweaks because the next subdivision will smooth out some percentage of your adjustments. Don't forget to use the move mode at different draw sizes to softly-move some areas in place. If you like the sculpting so far, divide once more (ToolGeometry- Divide)- pic42. I exaggerated the ear ring and moved it outward at a low draw size in move mode followed by alt-drawing (pushing) the outer fold inward and the

C4D TOZBRUSHANDBACK...
By Mark Gmehling
ear cavity inward and redefined the neck folds by pushing(alt) pulling and smoothing(shift) out. Furthermore, I worked on the mouth area and defined the nose a bit more with lower draw sizes- pic43. Time to divide again- pic44. By the way…if you haven't saved your mesh its time to do it. Hit Ctrl-s and
when the window appears choose save tool. If you want to know the current polycount just move your mouse over the tool symbol and a box with the actual state appearswe're at 56320 polys- no big dealwe'll reach the million poly mark by doing some more subdividing later. Look at pic45 to see where I sculpted detail. To detail the ear I used the move mode quite often to tweak the ear shape in form. I sculpted the global upper and lower eyelid shape
and begun to sculpt the mouth area. The nose was tweaked too, mainly by moving it in move mode.
Ok lets quadruple our polycount again (Tool- Geometry- Divide: Welcome to level 6 with 225280 polys -pic46. Once again, work with the draw and move mode at different draw sizes to define the head more. Defining the area at the bottom of the jaw may become a little bit different because the shoulderneck geometry is visible. Drag a rectangle by ctrl-shift dragging a rectangle filling the geometry you want to stay visible- pic47/48. You will unhide all by using the same shortcut (Ctrl/shift click in the background of your canvas. This masking method avoids calculating invisible geometry, which is nice for your cpu/redraw performance when the polycount is rising.
In pic49 you see my tweaks. You should subdivide once more to give the map we want to export enough detail. If you want, go back to the lower level to move your shape into that expression you're going for. I
lengthened the neck and gave my head an look upwards to exaggerate the sculpture. Ok, lets generate the map CINEMAneeds to calculate the subpolydisplacement. We go back

C4D TOZBRUSHANDBACK...
By Mark Gmehling
to our level three (tool- geometrysubdivision level slider) which counts 3520 polys. That's enough to paint usable weight maps if you want to animate your bust. To be able to generate a displacement map for our level 3 geometry we have to delete the lower levels. Save your tool and click delete lower.
As you can see in pic50 I exaggerated the neck shape a little bit. Do this at the lowest subdivision level with the move tool at a big draw size if you want. The higher levels will be updated automatically.
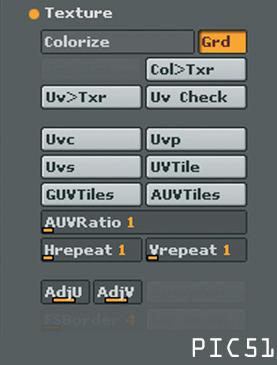
Before we can export a map we have to check the actual Uvstate of our model. Under Tool Texture we can click Check UV's and the UV overlapping will be displayed. The red areas are showing the overlapping- looks quite sad, huh? No problem in ZBrush- just click AUV Tiles button and then the UV to texture button -pic51. Notice that the GUV and AUV mapping ZBrush creates produces optimal maps for displacement and texturing, but these are not really editable in Photoshop for example, because the UVPolys are not connected- they're placed in checkerboard style- so ZBrush is the only app you can paint textures in these maps via using the projection master.
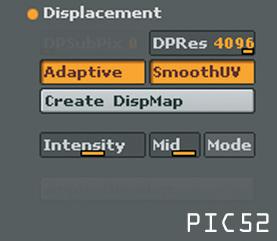
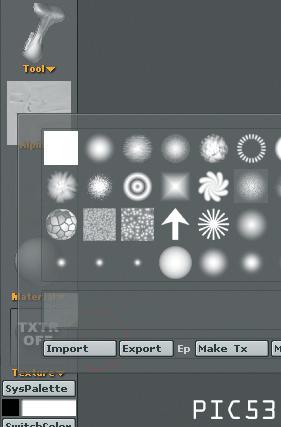
Now we go to Tool- GeometryDisplacement and enable adaptive and smooth uv field and drag the Displacement Image Resolution Slider to the maximum of 4096 pxthe bigger the more detail will be in there. Now just click Create DispMap- pic52. The displacement map is dropped into your alpha palette. Click on the alpha symbol and then onto the dispmap in the bottom row of your alpha palette to make it active. Now export it by clicking the export button- a 16bit psd.file will be saved which we'll load into our displacement channel back in C4D later. Before we switch to C4D, again we'll export the mesh from that we generated our dispMap. Got to tool- and click export- an obj. file will be saved and we're ready to switch back to C4D- pic53.
In C4D we open our exported obj. that comes along with a default material- we open the material managers displacement tab and load the exported dispmap.psd into the texture channel and enable subpolydisplacement. Don't use a hypernurbs to smooth your mesh- just enable the smooth in the displacement dialogue- that works fine- calculating the displacement and hypernurbs smoothing would increase the rendertime dramatically- the SPD inbuild smoothing works fine.
You'll notice that the obj files dimensions are really big- before I adjust the displacement setting I scale(T) down the obj mesh in object mode to a height of ~6000m. (If you work with too big of a geometry you may come into problems with light and its shadowmaps)
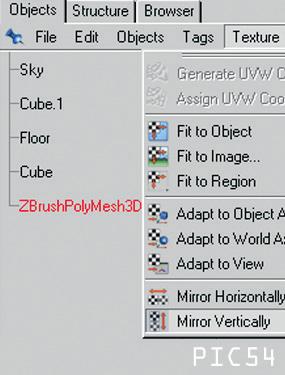
The displacement Height of course is depending on your mesh size, but before you test render select the material tag in the obj manager and go to texture- flip vertical to avoid strange looking renders- pic54. We could have done this in ZBrush too, but in C4D its only one click as well so that doesn't matter.

C4D TOZBRUSHANDBACK...
By Mark Gmehling
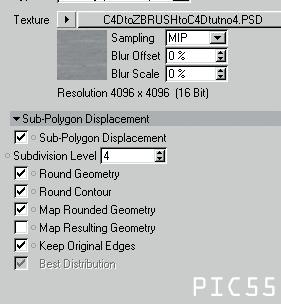
Finding the right displacement height is a back and forth of adjusting and rendering. My final displacement height is at 80m while the obj has an y-size of about 6000m. I used the intensity centered mode as you see in pic55.
OK that's it. I hope you had fun following this tut and some explanations speed up your workflow here and there. If I went too fast in some cases, don't hesitate to send me a pm or post your problem on 3dattack.net. CU on board! Keep attacking!
Mark Gmehling 3DATTACK
