29 minute read
BodyPaint 2 - Character Texturing by Sebastien Florand
from PDFJuneIssue2005f
by Hiba Dweib


Advertisement
BodyPaint 2 - Character Texturing
By Sebastien Florand aka Fluffy
BodyPaint 2 - Unfold and paint a map for a character.
Hello guys and gals,
This month I will introduce you to BodyPaint 2, some of its tools and principles. BodyPaint is the best UV editing tool on the market and shows its power and versatility as soon as you put your fingers on it. It allows you to unfold the UVW coordinates of your model to be able to paint on it seamlessly and without deformation afterward. UVW’s allows also to be deformed with the model, when itself is deformed. That behavior can't be applied to other types of projections, since they will use a fixed set of coordinates to project on the model.
What is UVW? UVW is a specific set of coordinates that is allocated to the texture area. They define the direction of the texture, based on their own axis compared to the object's axis. U and V are used instead of the X and Yaxis terms to avoid confusion for the program, and the W axis is only used for procedural shaders that need a coordinate to be applied in volume over the object (for example, the Wood texture make use of the W axis, a little bit like a depth value). "Regular" textures, like a color map painted by hand, will only use the U and V coordinates, as they only use a set of 2D information's, since the texture is flat. So, in light of this, I will more often use the term UVs to define the texture coordinates during this tutorial, since I only plan to use those.
1 - Think ahead
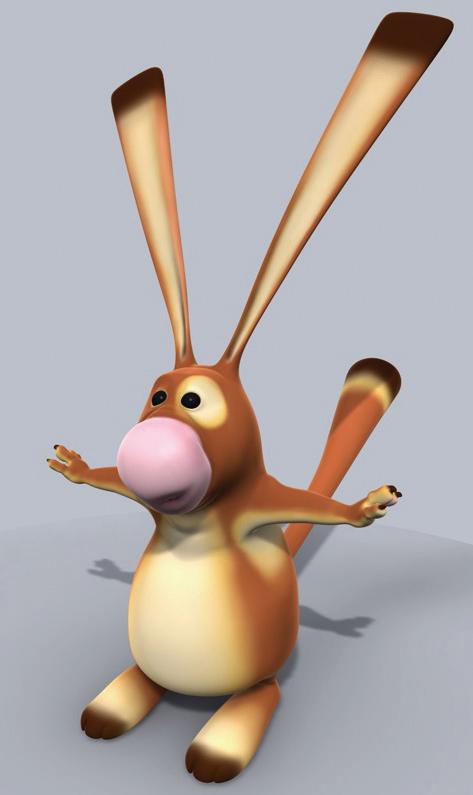
my fantasy squirrel characters so we can have a concrete example to apply these principles to.
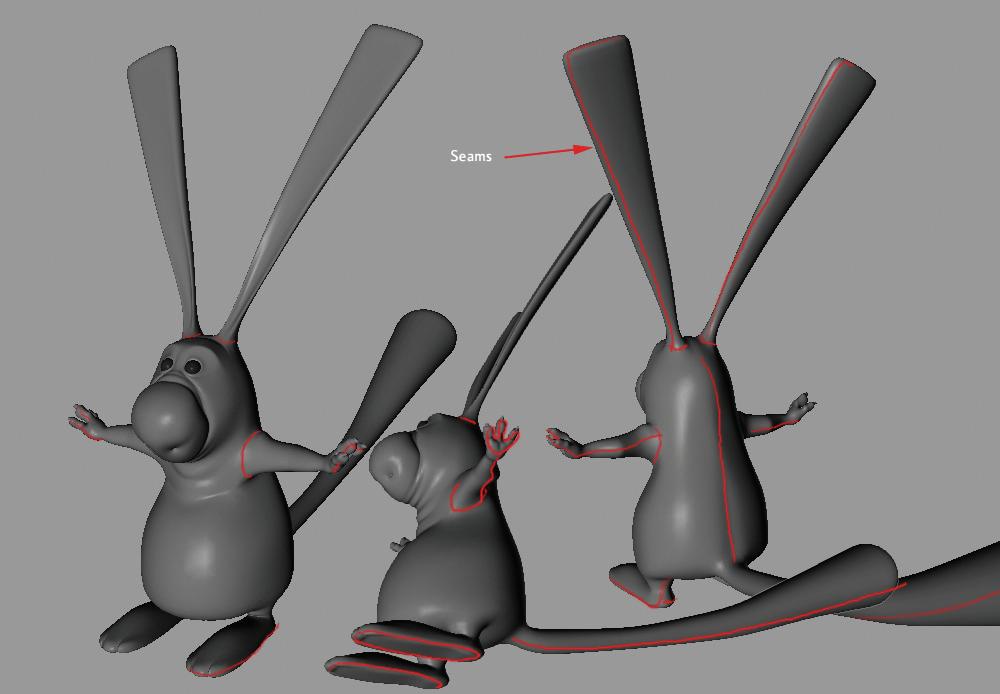
One of the things that will dictate if a mapping is good or bad, are the seams. Seams are areas of the texture that can't be linked together on a flat area, but that are in the object in volume. Since the borders of the textures won't be linked together, it can be tricky to paint by hand a completely seamless texture without painting too much on one side compared to the other. So, seams need to be in a place where we won't notice them much, in case we screw up our manual paint. BodyPaint has a few neat tools to avoid messing up our paint job for these seams anyway, but good planning is always better in any case.
For my squirrel, I will place my seams as follows, along the polygons of my mesh : - one seam along the spine - one along the arms and palms of the hands - one under the feet - one at the bottom of the tail - one behind the ears
Try to model a clean mesh, without too stretched polygons, or non-planar polygons, and without overcrowding some areas, since it will affect the quality of your unfolding and the time you spend on it (more polygons = more things to adjust and tweak). Since I will use one of BodyPaint's features known as interactive mapping, this tool works with polygon selections, so you will need to picture in your head how you want to unfold your UVs and point out your polygons selections. Here is are the selection sets I plan to unfold (one color for each, here) [pic3]:
It is a good idea to prepare and record your selection sets, so you can hide them easily later on when tweaking the unfolded mesh.
Picture 01 Picture 02

Picture 03

BodyPaint 2 - Character Texturing
By Sebastien Florand aka Fluffy
Depending on the method you used to model your character, it won't necessarily have a UVW set of coordinates applied to it already. If you start for a cube primitive, since it is a primitive shape, once you edit it, it will create automatically a UVW tag to your mesh.
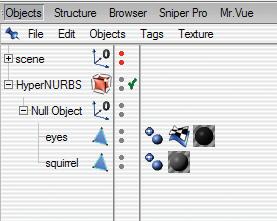
On the other hand, if you use the point-to-point method of modeling, it won't have any. So just create a material in the material manager, apply it to your mesh by dragging and dropping the material on the object, and choose a projection type other than UVW to generate a UVW tag [pic4].
Make sure to edit any symetry you have, since we will use all polygons of your model. Here, I will use a flat projection, just because I think it will create UVs packed together, so it will be easier to move aside later on. Click on the material tag and select "Texture>generate UVW" [pic5].
This will create a UVW tag on you mesh in the object manager and change the material coordinates to "UVW". The command "assign UVW coordinates" is to edit a specific UVW tag with another projection type later on, if need be, but both can be used the same way at this stage (it will also generate a UVW tag).
Picture 04 Picture 05

3 - Unfolding roughly
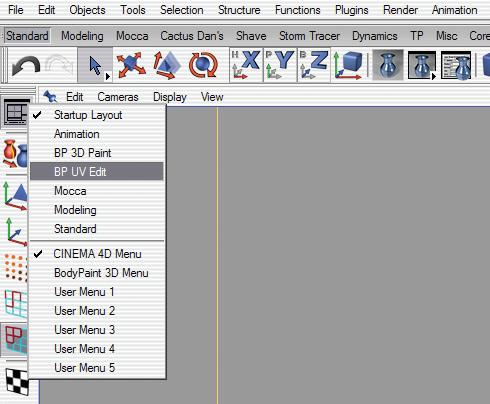
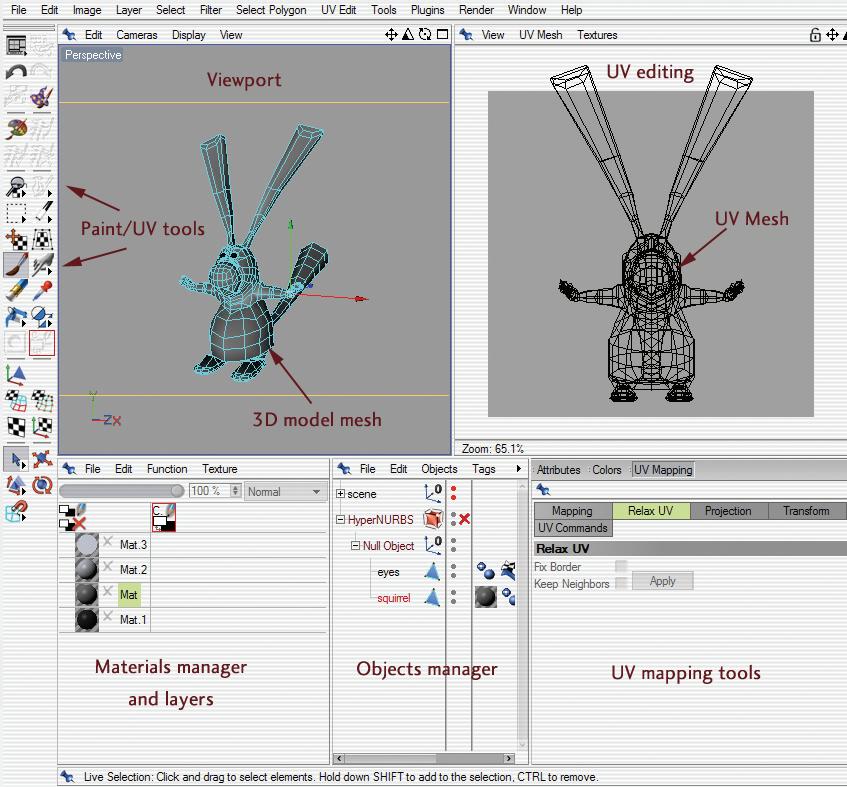
Now that our UVW set is created, we will need to unfold the UV mesh. Switch to the "UV Edit" interface using the icon on the left of the viewport [pic6]. Using this interface, you will notice that a few new windows and tools appeared compared to the standard interface. These are specific to Bodypaint. Here is a quick explanation of what is all this [pic7]:
If the UV window doesn't show anything, just select the menu "UV Mesh>Show UV Mesh" at the top of the window.
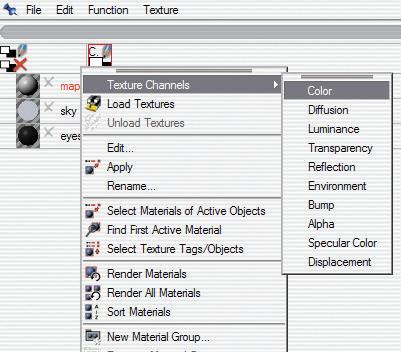
Now, we could start to unfold right away from there, but I want to create a texture space to work with so I won't have to move my UVs later. In the materials manager, create a new material ("File>new material"), then right-click on it and select the color channel to create a texture map on that channel [pic8].
Anew popup window appears displaying some options for the new texture to create. First, rename the texture as you wish, to remember it
Picture 07
Picture 08

BodyPaint 2 - Character Texturing
By Sebastien Florand aka Fluffy
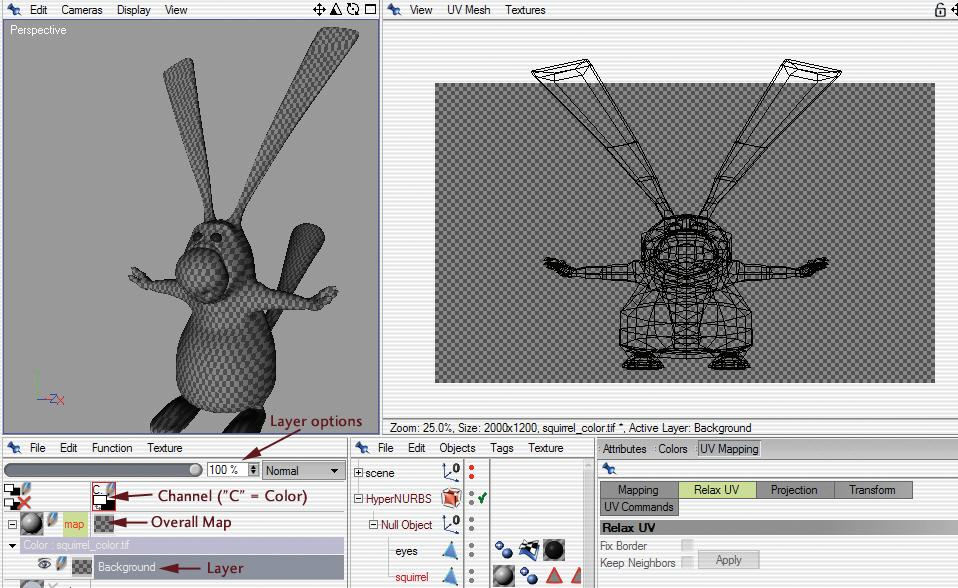
easily, input a size for that map (use a big resolution if you want more details, like wrinkles and such) and choose a background color (Here I choose a transparent background for the moment. This is just the unfolding stage and the default checkboard background material will be helpful, I'll explain why later). [pic9].
This step allowed me to define a texture area to unfold my UVs in, and you notice that the UVs are now stretched since the proportions of my texture are also changed (it sticks to the UV). My 3D mesh now has a checker shader applied to it, which is the default material background, and a background layer has been created in the material manager, for that specific material in the color channel. Just click the "plus" sign at the left of the material icon to unfold the layers. These are similar to Photoshop layers, and shouldn't confuse you a bit [pic10].
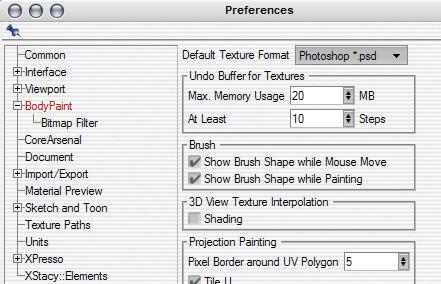
Save your scene now. BodyPaint will ask if you want to save the texture. Click "Yes", since it wasn't saved automatically when we created it. The map is saved by default at the same level as your scene. If you wish to use a specific file format in BodyPaint, you can change the default settings by opening the software preferences (Ctrl+E) and go into the BodyPaint tab to select the file format. I prefer to work with the Photoshop format, since I tweak a bit in Photoshop sometimes [pic11].

Picture 09 Picture 10
Picture 11
Unfolding the body
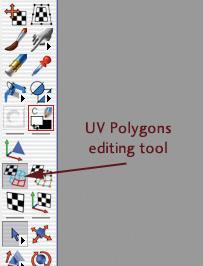
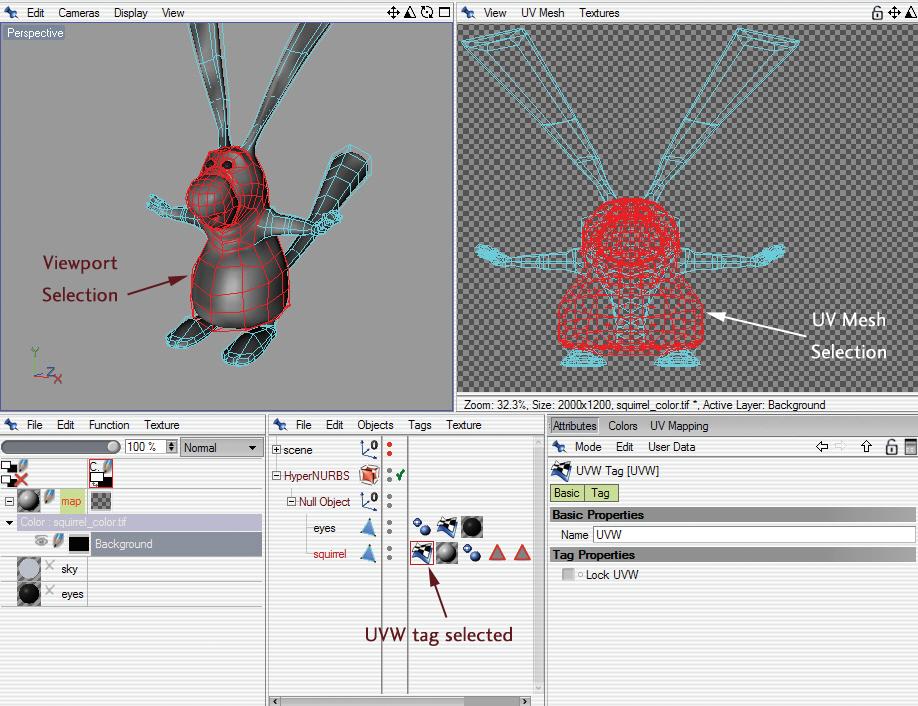
We will now start to unfold our UVs. I will use the "UV Polygon Edit Tool" located on the left tool panel [pic12]. The polygons can now be selected, and I will use my previously done selection sets to isolate the parts I want. First, I will select my main body polygons [pic13]:
Make sure that the UVW tag is selected in the object manager if you want to edit it.
You'll notice that the polygons are also selected in the UV Mesh window. That is nice as it allows us to work real time on the UV mesh and check what it does in concordance with the viewport display (remember, if you do not see the UV Mesh, in the UV Mesh window, check if the UV Mesh display is turned on and if the UVW tag is selected).
Now, we will use one of my favorite BodyPaint functionalities :
Picture 13
Interactive Mapping
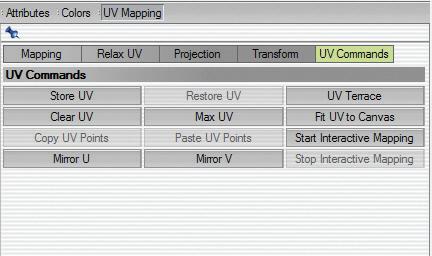
Interactive Mapping allows us to apply a different "automatic" mapping on each selection to orient the UVs the best depending on the shape. Go into the UV Mapping window, enable the "UV Commands" tab and select "Start Interactive Mapping" [pic14].
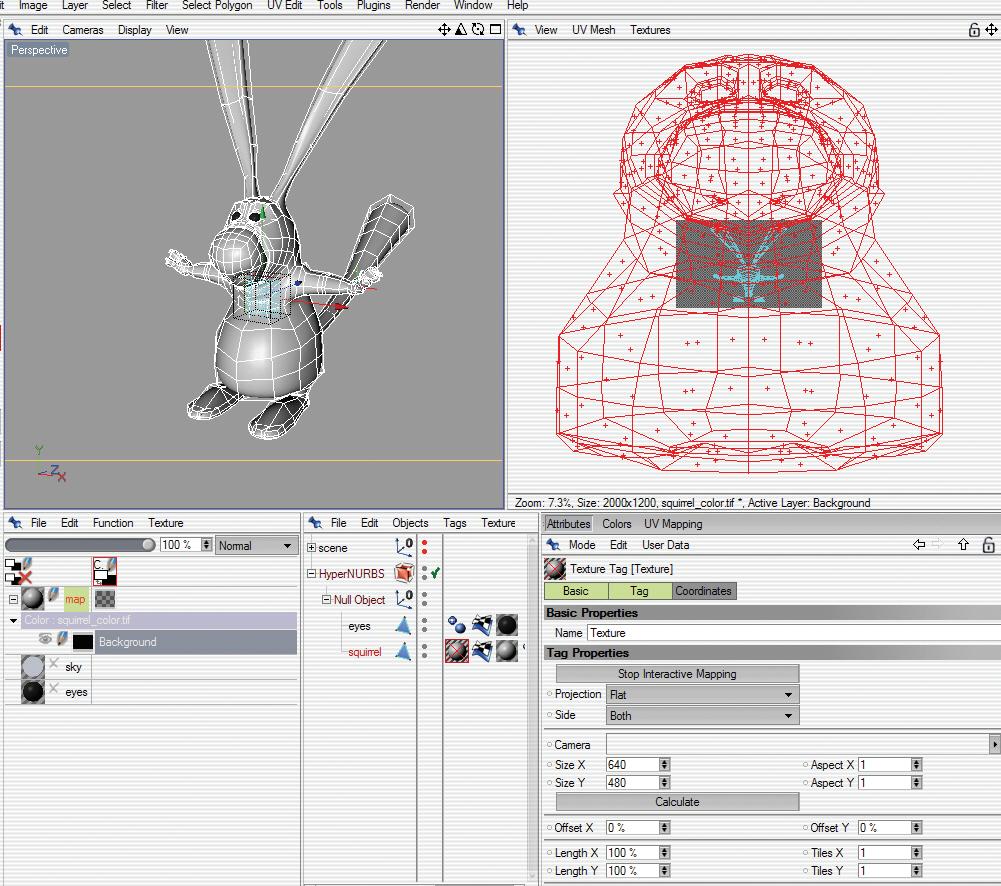
We are now in Interactive Mapping mode, which allows us to select and orient the coordinates of our current selection set [pic15].


BodyPaint 2 - Character Texturing
By Sebastien Florand aka Fluffy
Picture 14
Picture 15
Several things happen now : - The tool jumps to texture mode, which allow you to move, rotate and scale your texture projection - The attribute manager displays several projection modes, that will help us choose the one that fits better for our current selection - The UV Mesh is interactively updating the shape of the UVs, so we can interactively orient them as fit.
So now what we will do is select a cylindrical projection type, and adjust its scale and rotation to make the UV mesh as flat as possible, and easy to paint on. Here, I used a cylindrical projection type, as it is a similar shape than my current selection type, and will unfold all around the 3D mesh, preventing overlapping polygons on my UV Mesh. I scaled and rotated my texture axis, so that the seam of my texture covers the spine of my character, where it won't be noticeable (if the seam is right in the middle of the belly, you would need to pay extra care to apply paint properly, we want to smooth the process as much as possible, so we go for the easiest solution) [pic16].
(Here, I just filled the background layer with black, so you can see better how look the UV Mesh).
Once satisfied, click on the "Stop Interactive Mapping button", and the UVs will be fixed the way you oriented them, the main tool jumping back to Polygon UV Edit Tool.
Now, you can scale, move and even rotate your set of UVs, so they are not in the way when editing the other UVs. Don't pay attention to your texture space, just tuck the current selection on the side, we will put everything back together later.
[Pic17]

Picture 16
Picture 17
Unfolding the ears
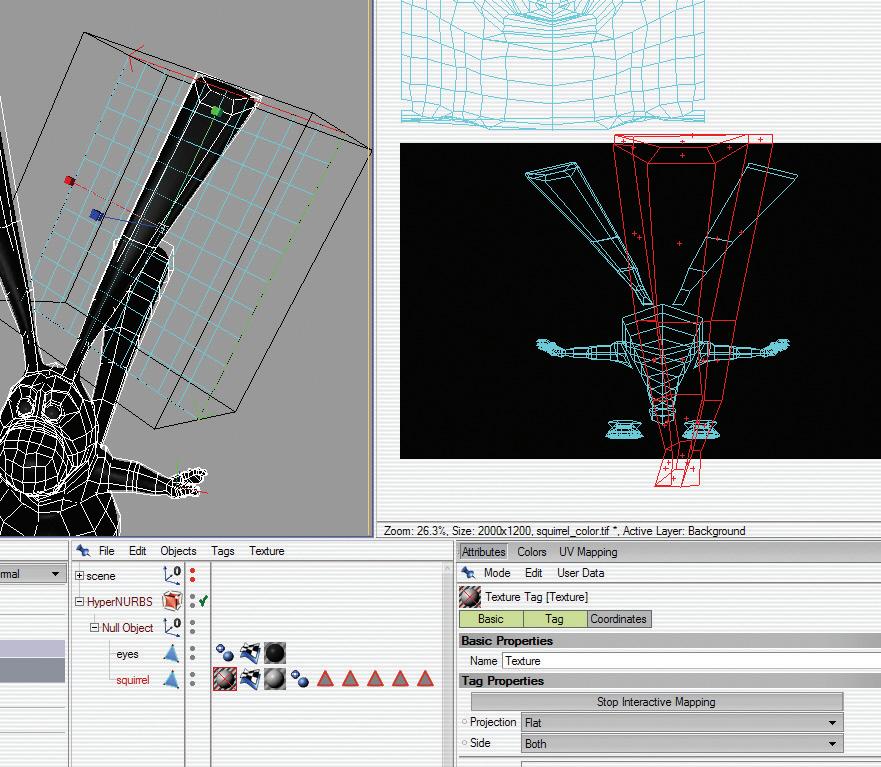
The ears are a bit trickier, since the cylindrical projection doesn't fit for them. So I will need to "open" the mesh to unfold properly at this point and relax the UV set. Select the polygons of one ear, except for the row in the back [pic18]. This is the row that will define the seam area,
and allow us to "open" the UV Mesh. Move this row out of the way in the UV Mesh window. Activate Interactive Mapping by clicking on the "Start Interactive Mapping" button in the UV Commands tab and set the projection type to flat, making sure to orient your projection properly, and scaling it a bit so it is at a proper size [pic19].
Once satisfied, click on the "Stop Interactive Mapping" button to fix the current projection, and move the UV

Picture 18
Picture 19

BodyPaint 2 - Character Texturing
By Sebastien Florand aka Fluffy
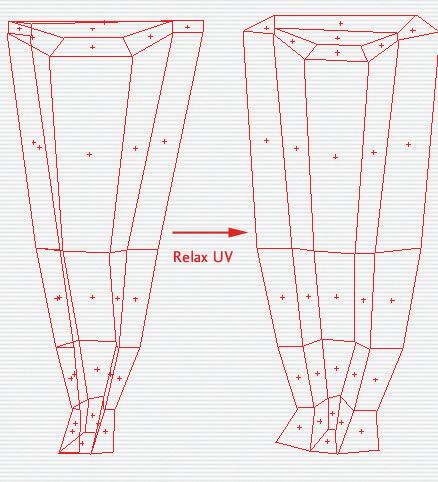
polygons on the side to make sure you won't select unwanted polygons. As we can see, some polygons are overlapping. To prevent this, we will use another neat BodyPaint feature : the "relax UV" function. This function relaxes a UV set, which means it will flatten it so that no polygons will overlap anymore. Right click in the UV Mesh window, and select "relax UV" or select the function directly from the "UV Mapping" window and the UV Relax tab. Leave everything unchecked at this point, and just apply the function [pic20].
As you can see, our ear polygons are nice and flat, not overlapping anymore. We will only need to stitch back our back polygon row, since we didn't include it in our selection to "open" the mesh and allow us to use that Relax UV function.
At this point, we could use the UV Terrace function, which automatically stitch back together selected polygons with their neighbors, but in our case, the base of the ear will be stitched back to the head, which is another polygon set, so we will need to do it by hand for the moment. Select the back polygon row of the ear, move it next to the UV mesh of the ear we just modified, and scale it to the same size, roughly (if you changed the size).
Now, select the UV Point Edit tool, and select one of the adjacent points of the back polygon row in the viewport. This point will be selected in the UV Mesh window also and reflected as a two points selection, since they share the same 3D space. These points need to be stitched back together. Activate the point snapping (in the attribute manager - point mode) to snap points together, and select/move/snap the points together. In the goodies folder you'll find a small video detailing how it works, since it will be easier for me to show it than to explain with my bad english [See vid1].
Repeat the process for the other ear, taking care of reorienting the flat projection to match and make it as symmetrical as possible with the other UV set. Just check out the second little video of the whole process for the other ear [See vid2].
Picture 20
Unfolding the tail
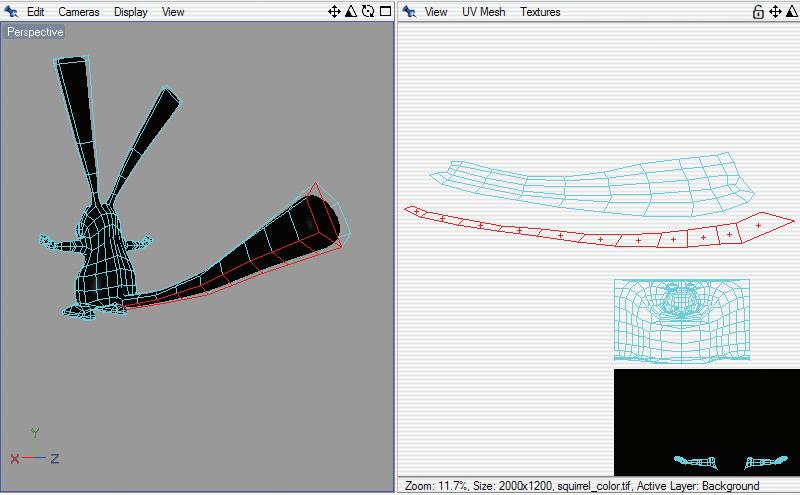
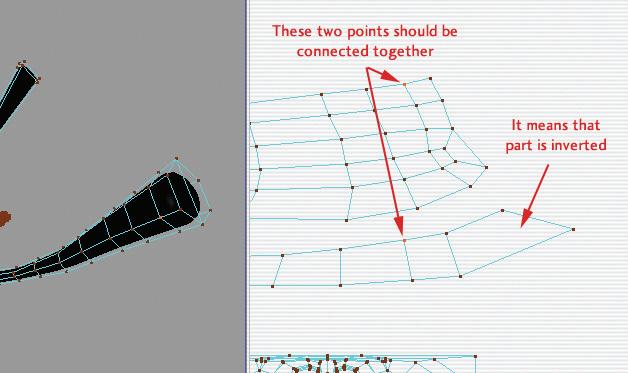
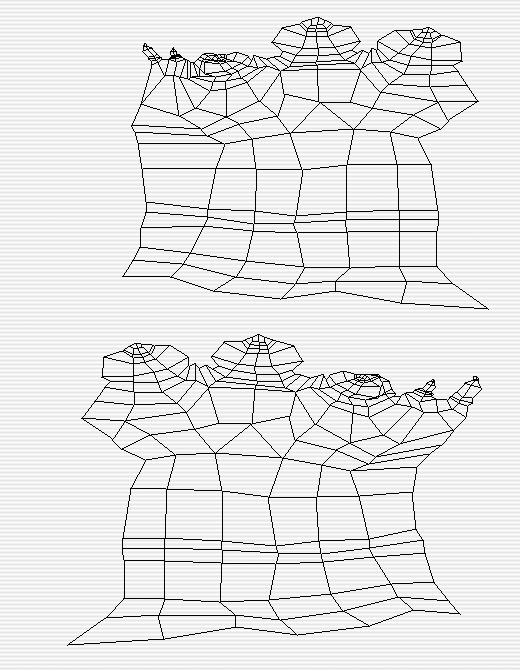
The tail is pretty much setup the same way. Select all polygons except for one row to "open" the UV Mesh, apply a flat projection using the Interactive projection Mapping function and apply a Relax UVs function. Relax the UVs of the independent row we left out earlier, and connected adjacent points together to obtain a flat tail UV Mesh [pic21]. Sometimes, you will notice that the UV mesh seems inverted [pic22].
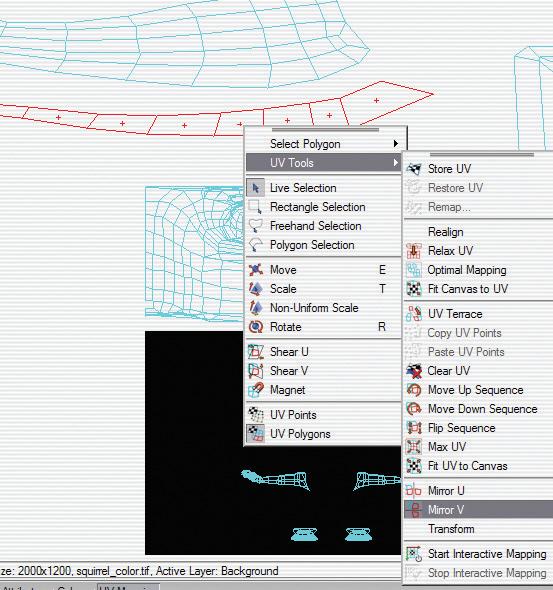
If it's the case (as it is in my example), then just select your inverted polys and right-click in the UV Mesh window, and flip the polygons along the desired axis (here V axis) [pic23]. My polygon selection is now properly oriented.
Snap the corresponding points together and tweak a little bit so the polygons all flow more or less in the same direction, like shown [pic24]. We will take care of the UV mesh layout later on, while in the tweaking phase, as we are still focusing on laying out our basic UV Mesh first.
Picture 21
Picture 22
Picture 23

BodyPaint 2 - Character Texturing
By Sebastien Florand aka Fluffy
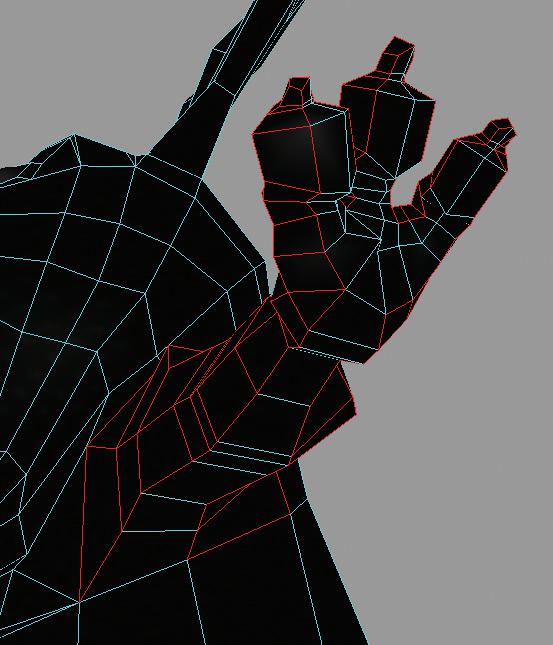
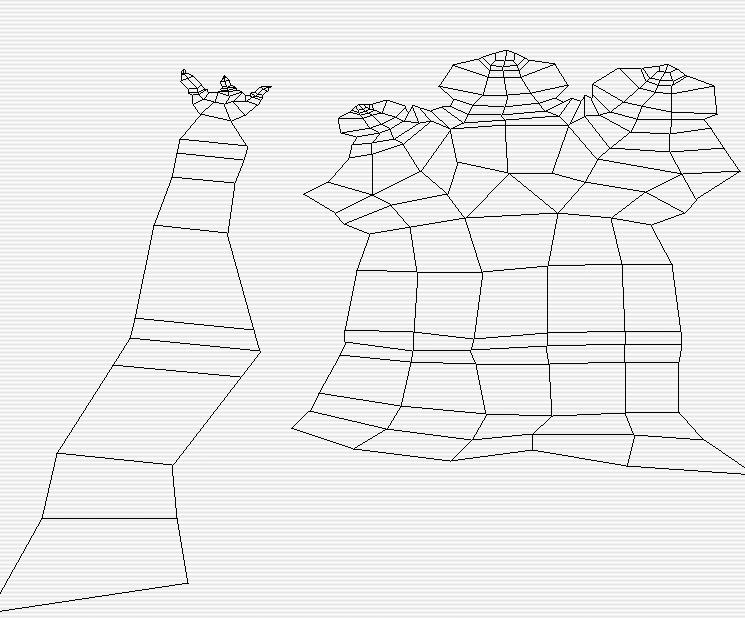
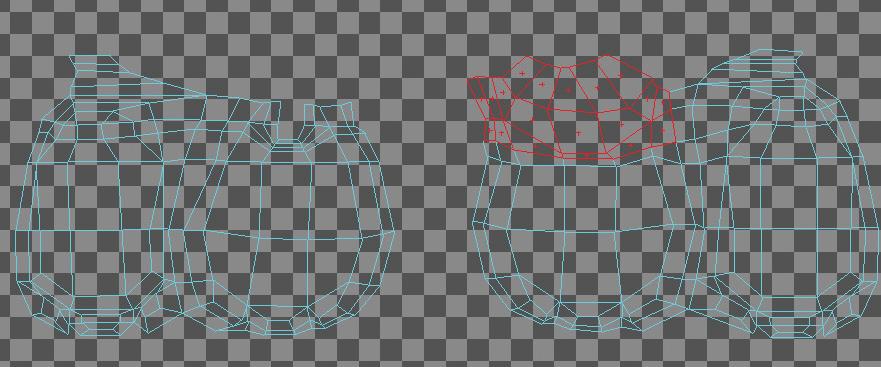
since there is a lot more polygons and different shapes to unfold. I will follow the same principle here, by "opening" the UV Mesh, leaving out the polygons of the palm of the hand, and the row under the arm, since that is where I want my seam to be. Select the polygons of one arm and leave out the polygons of the palm and under the arm [pic25].
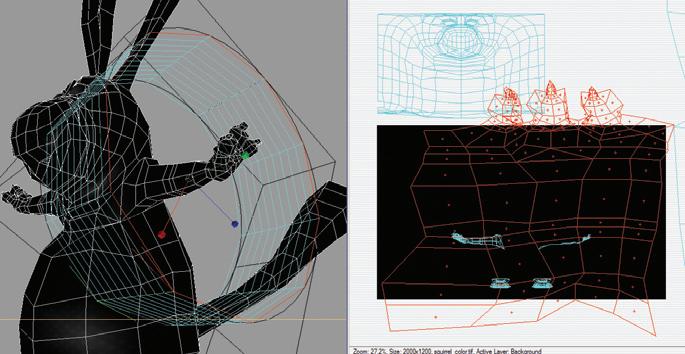
Apply the Interactive Mapping and choose a projection type. Here, a cylindrical projection seems to do the job quite well, so I will use this.
[pic26]
Fix the projection where it is by stopping the Interactive mapping, and relax your set of UVs.
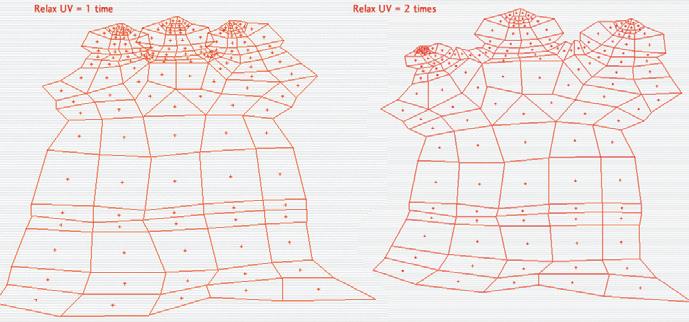
Here, you'll notice that if you apply the relax UV function, some polygons are still overlapping. To fix this, just apply the function one more time, as it will keep relaxing as long as it can [Pic27].
The second applying is good enough for us.
Now, select the polygons we left out earlier and use Interactive mapping to apply another projection. Here, a flat projection is more suited, so we will use this and adjust it so it more or less fits with the other part. Relax the UV Mesh two times, and it should look like this [pic28].
Snap the corresponding points back with the rest of the arm. Here is a video of how I proceeded [vid3]. Ok, so it looks messy and weird right now, but we are mostly focusing on putting our UV sets together, we'll take care of shape and spreading/proportions later on. Repeat the process on the other arm, and try to make it look more or less similar [pic29].
Picture 25
Picture 26 Picture 27
Picture 28
Unfolding the feet
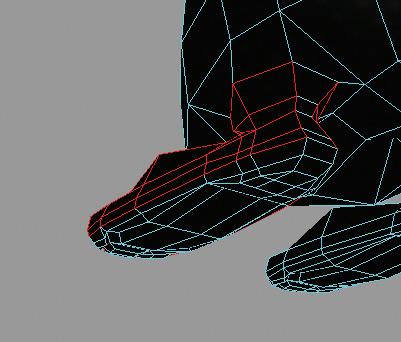
it's boring already). Select everything except the bottom of the foot and one row at the back (once again, to open the UV mesh and create the seam) [pic30]. Use interactive mapping to unfold the mesh. I
used a flat projection here. Relax the UVs. Here, I encountered a problem, as relaxing the UVs kept some overlapping polygons, and wouldn't work even if I apply the function several times. So I just rearrange my points manually, using the magnet tool, set to diameter 0 and checking the "nearest point method" checkbox. Check video 4 to see how I proceeded [see vid4]
Picture 29
Picture 30

BodyPaint 2 - Character Texturing
By Sebastien Florand aka Fluffy
Now, just select the polygons left out once again, apply a different projection type using Interactive Mapping and connect them back to the main polygons of the foot. Repeat the process on the other foot. Once done, it should look like this [pic31]:
One little thing I forgot to point out : whenever you play with Interactive Mapping, you'll notice that previous settings are kept, so I would advise you to take advantage of this and reuse right away your projection type and scale on the symmetrical of the mesh (the similar selection set, but on the other side). That way, you won't lose too much time trying to reorient properly and find the good projection for each part, when they are symmetrical. It just saves a little bit of time, not much, but the shortest time you spend on that kind of thing, the better.
Picture 31
Tweaking
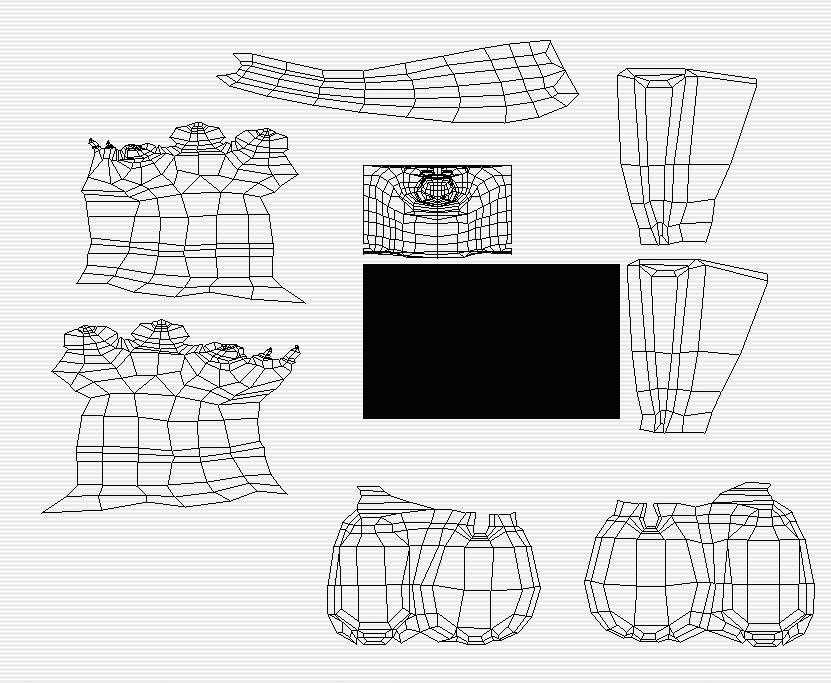
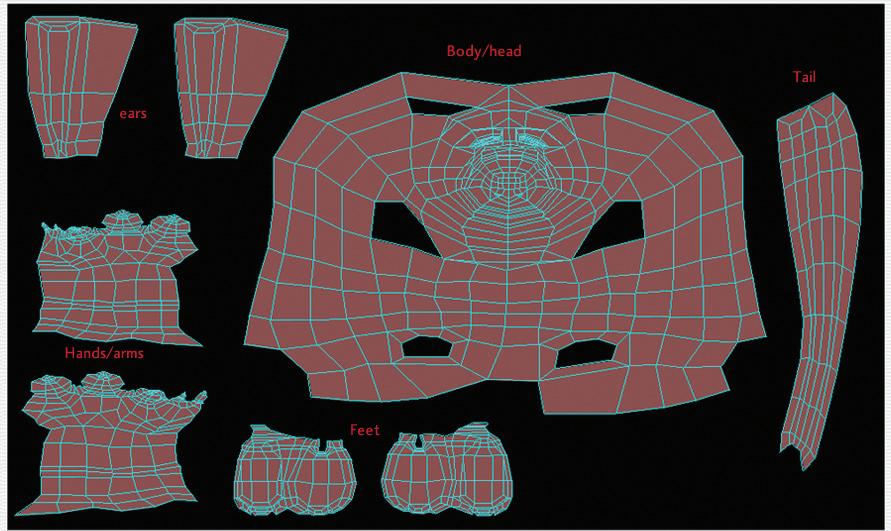
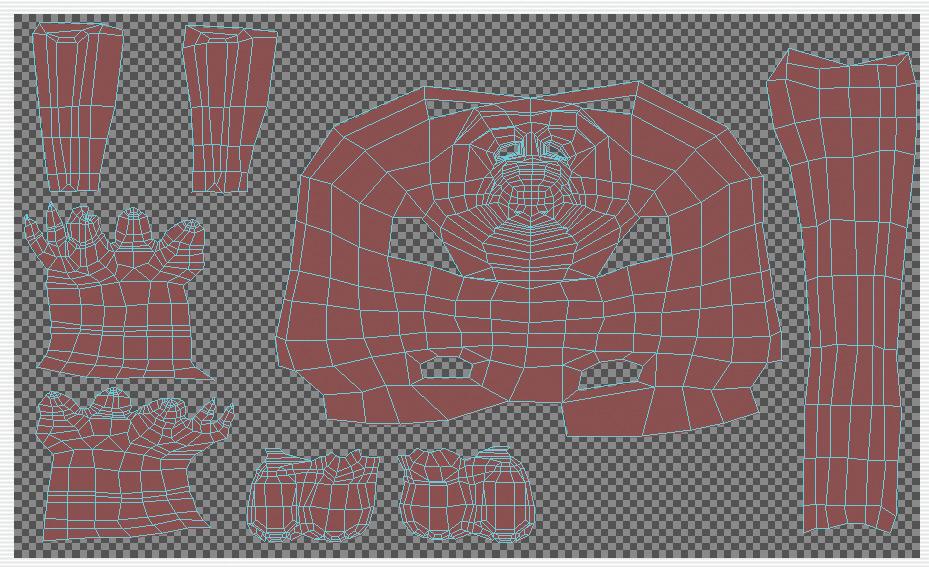
Ok, now our complete UV unfolded mesh should look like this [pic32]. The next thing to do now is to resize everything proportionally one with the other. Scale up the body, and down the rest. Fit everything inside the Texture area too, since it will be where the texture will be applied.
I will take the opportunity to relax the UV for the main body polygons, since I forgot to do it earlier and it still has some overlapping polygons. So here is how it should look at this stage, with each elements resized proportional with one another, and placed properly inside the texture area defined earlier. Leave some space in the canvas, since we still need to move some points around. (Here, I filled the polygons of the UV Mesh with a color, so you can see where the holes are in the structure - to fill polygons, just select the polygons you want to fill, and go to the menu "Layer>Fill Polygons", it will fill them with the foreground color currently active) [pic33]. Now is the longest part of unfolding
a mesh : tweaking. The tweaking process needs to be done to make sure that the UV polygons size and shape are correct, and to clean any deformation that could happen to a texture.
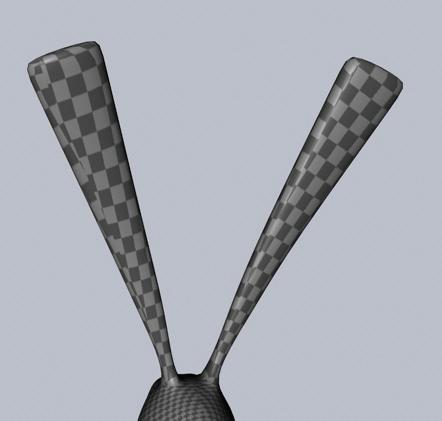
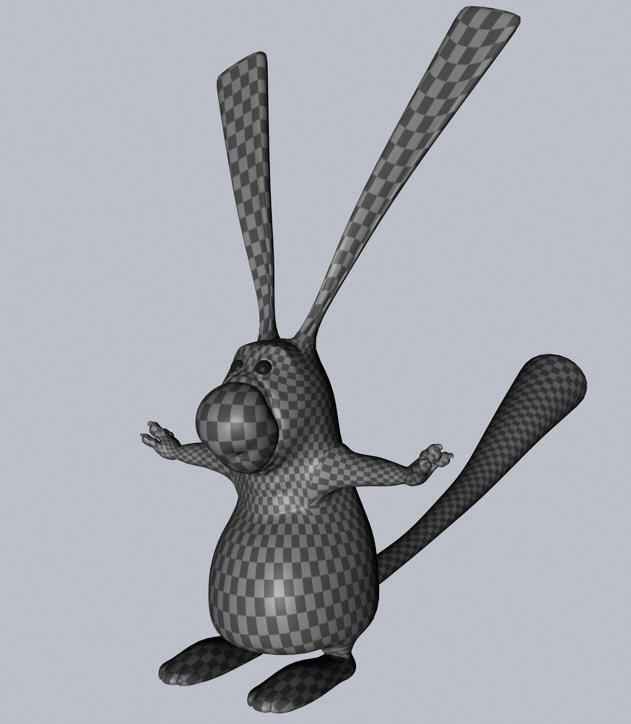
To help in this process, we will need a texture that shows easily deformation. The checker is really good for this, as it displays the size of boxes, as well as a direction of lines. Sometimes, people also make a custom map with different numbers and colors, but still using a checker pattern, to make sure that the UVs are oriented in the good direction, and to check polygon connection, size and map deformation.
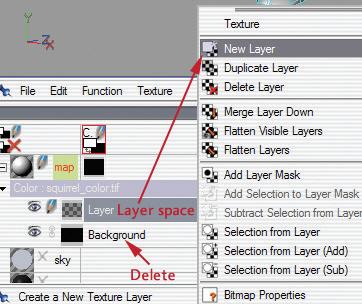
The checker should be enough for us here. The default background has a checker that we will use. If your background layer has a color, then just create a new layer by rightclicking on the layer space in the material manager and add a new layer.
Then, select the background layer, and press the "delete" key to delete it. That way, you will only have a transparent layer, which lets you display the background default checker [pic34]. So now, we can see how the check-
er is applied over the mesh, and we notice some stretching and unwanted deformations. Some polygons seem scaled wrong with one another, so we'll want to fix that as much as possible. Here, no mathematical solution, it's more a matter of a good eye [pic35].
Picture 33 Picture 34
Tweaking the tail
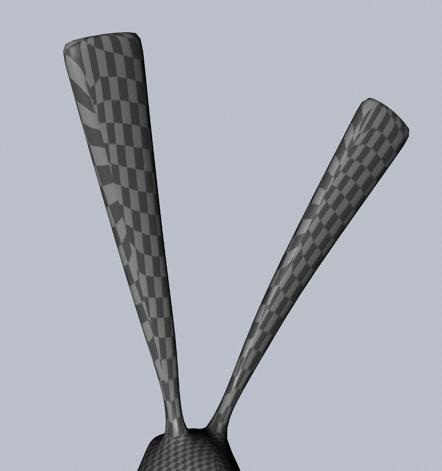
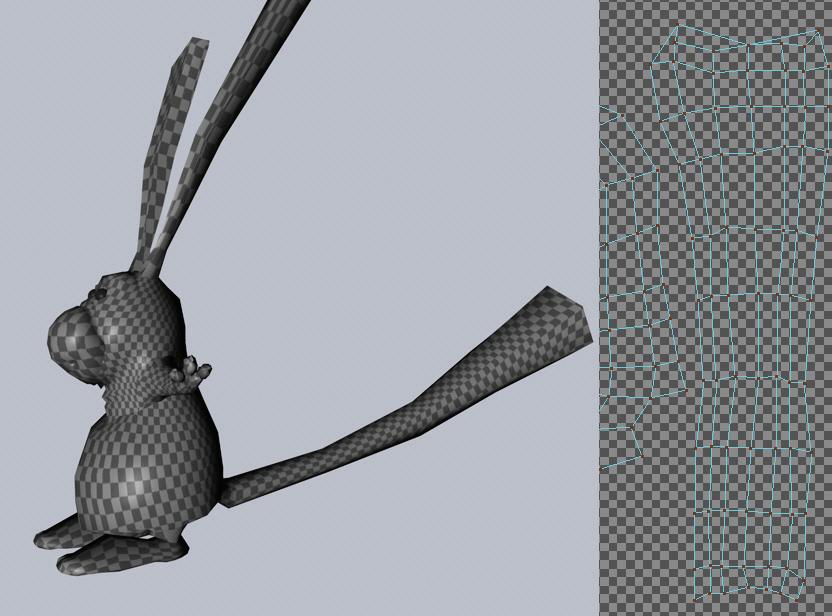
Let's start with the tail. As we can see, there is some stretching of the checker material here, and the scale

BodyPaint 2 - Character Texturing
By Sebastien Florand aka Fluffy
is a bit too big, which means the polygons need more pixel information, which in turn means we need to make the UV Mesh for the tail bigger. So, let's size it up a bit, so it matches roughly the size of the main body checker.
Select a polygon of the tail on the UV Mesh, then right-click in the UV Mesh viewport, and select "select polygons>select connected". Then, using the scale tool, make the whole set bigger, until the checker is small enough for you. Pay attention not to overlap polygons at this stage, and try to remain in the texture area. If you can't, then it means you either need to increase your texture size, or scale everything down (but you will lose pixel quality).
For areas where polygons are stretched out, just move the points around, using the magnet tool as previously described and adjust the points until the checker looks like it’s flowing with the mesh as much as possible. Be careful not to deform further the texture, and be patient. Just keep in mind that wherever the texture is stretched, it means that the polygons need more pixel information, so they need to be bigger. In the case of the tail, the stretching occurs toward the end, so I will widen the points around that area, trying to hold the texture as fluid as possible [Pic36].
Tweaking the face and body
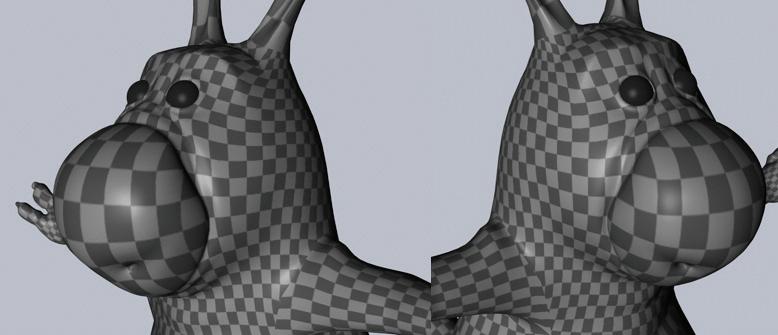
Just apply the same principles here, paying extra care since it will be the area where there will be the most details. You will find another video for the tweaking of the face in the goodies folder [see vid5]. My tweaking on the video is not perfect, and I would need to spend a lot more time fiddling with it, but I think you'll get the point on how it works, and how the UV Mesh interacts with the texture over the 3D Mesh. The Hypernurb interpolation is also important, since it will affect the way the texture is interpolated on the smoothed mesh. "Boundary" is often the best method. Once I spend a bit more time, and I did the other side of the head (and used the proper Hypernurb interpolation), it looks like this [pic37].
At this point, the texture being bigger on the nose is ok, since there are no transitions between color here, and I don't need too many details.
Picture 36
Picture 37
Tweaking the ears
Only the back side of the ears, where the seams are, need to be tweaked. It is a matter of aligning the texture at the seam, as much as possible, by moving points as previously [pic38] [pic39]. Here you notice the seam I was talking about in the beginning. It is sometimes hard to fix since BodyPaint doesn't work really precisely if you don't have a support to snap to, so we just take care of texture deformation, and the alignment will be corrected when we use the BodyPaint Projection Painting tool.
Tweaking the arms and hands
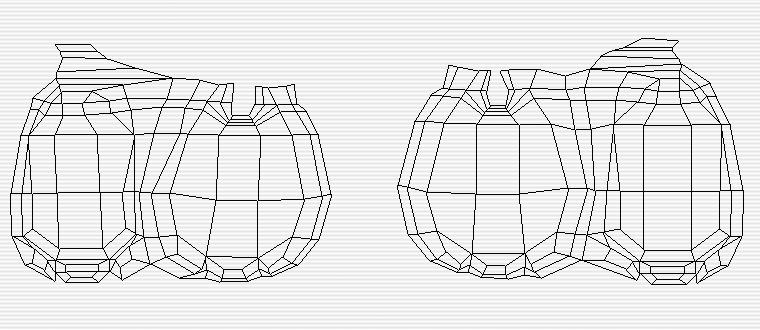
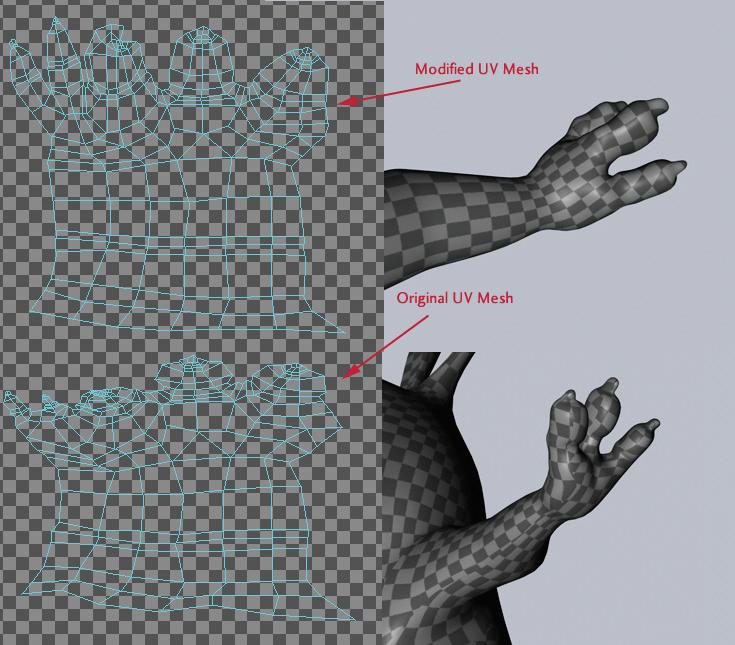
Hardest area of all to tweak, since it has so many polygons and tiny spaces to adjust. The method stays the same, though, and as long as you pay attention, you won't have a problem with it, you'll just need to spend some time. The arms's UVs are laid out pretty well already, we just need to take care of a little stretching on the arm itself and on top of the fingers. The palm is the area that needs the most work, since it needs to be resized a lot, and the seam needs to be as less visible as possible [pic40]. Here is a
Picture 38
Picture 39

BodyPaint 2 - Character Texturing
By Sebastien Florand aka Fluffy
Picture 40
comparison of the UV Mesh once tweaked. I spent roughly 20 minutes moving points around until I was satisfied. The biggest part has been to widen the bottom of the finger and align as much as possible the palm of the hand with the rest.
Tweaking the feet
The feet don't need too much work, as the checker shows. Only the ankle area needs a bit more pixel information, and needs to be scaled in the UV Mesh window. Here is how it looks once done.
[pic41][pic42]
In picture 42, I selected the polygons that have been tweaked. I then just repeat the process on the other foot, and try to match what I've done here. The UV unfolding is finally done! It is not perfect of course, but for a basic use, it should be enough. The important things are that no overlapping areas are left, and that the texture deformation is reduced or eliminated.
The only little kinks left are the seams, and that's where BodyPaint's powerful painting tools are really useful [pic43] [pic44].
Painting
Now is the fun part : painting your map. You can now paint and create any map you want, in any channel, they will all use the same set of UVs and the same projection. To create a new map, refer to the method I explained at the beginning of this tutorial. There are basically two ways of creating a map : with BodyPaint's tools or with an external program (i.e. Photoshop).
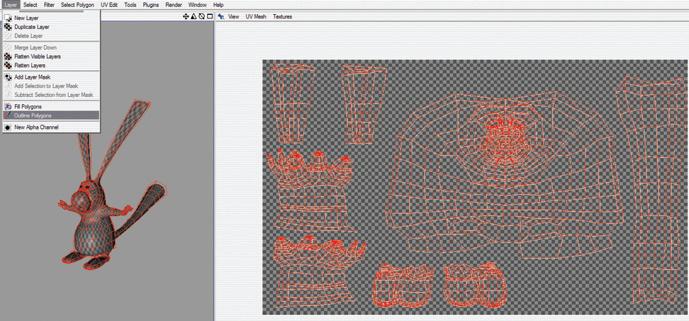
To work with an external program, you would need to export the UV Mesh, so you can see where you are painting. To do this, simply select all your polygons, and select the outline polygon command in the "Layer>Outline Polygons" menu. But beforehand, make sure the brush tool size is set to 1 pixel, its strength 100% and that the color is one visible (white is good, or black, for example). The fill polygon function will use the brush parameters to outline the polygons with [pic45][pic46]
Once done, just save your texture by saving the scene, and open it in your favorite image editing program. The other way is to use BodyPaint to paint your map. BodyPaint has a few tools that give it an edge over a standard image editing software. First, it allows you to paint directly on the 3D model. Second, it has the Projection painting tool, which allows you to paint directly on the model, and seamlessly paint difficult areas like seams or stretched areas that you couldn't get rid of.

Picture 41
Picture 42 Picture 43
Picture 44
Picture 45
Picture 46

BodyPaint 2 - Character Texturing
By Sebastien Florand aka Fluffy
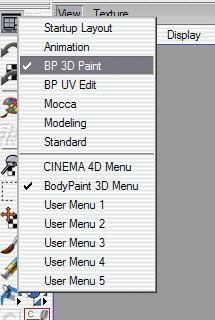
Once a brush strokes applied, BodyPaint will project it against the 3D model, and deform the brush stroke so it is not deformed on the model. Really neat feature. Switch your interface in "BP3D Paint" from the icon on the left of the viewport.
[pic47]
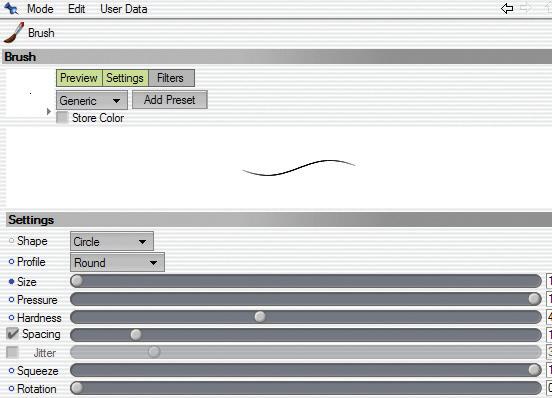
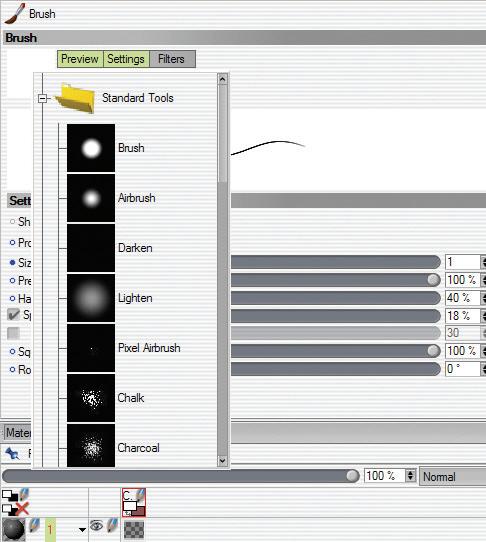
This interface is almost similar to the UV Editing one, except is has more tabs to show paint tools options and settings, as well as a texture window, where you can see and paint on your overall texture. There is also the viewport of course, so what you paint in the viewport on the model will be reflected real time on the texture itself. Here are a few explanations of the interface [pic48]: matically switch to 3D painting mode. You will notice by doing this that the texture preview in the viewport will switch to high resolution, which is really nice to paint details. Once the brush tool’s selected, the Attributes manager will display its options. Here, you can select some preset brushes or adjust its settings manually [pic49]. I won't explain in
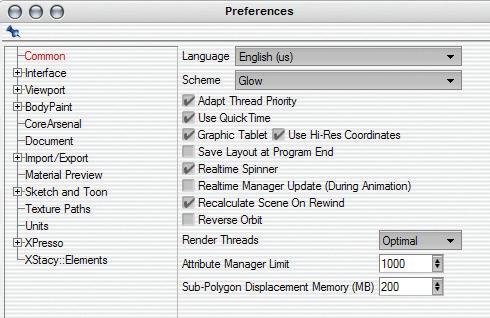
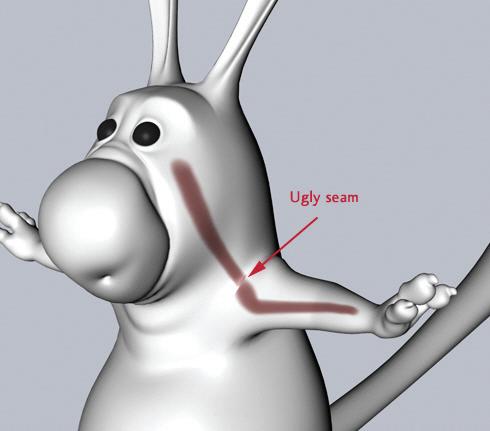
details what the settings do, since it is explained clearly in the manual. Select a color for your brush and start to paint, either on the texture window, or on the 3D Model in the viewport. You will gain a lot by using a Graphic Tablet with BodyPaint, as it allows for more control and finesse when painting than the mouse. Don't forget to check the spin madly, since the tablet's borders won't be pinned to the screen [pic50]. When painting in the viewport, you will notice the size of the brush for the current brush when hovering over the model. If the brush retains its circular shape, then that means the brush strokes won't be deformed and it's a good thing : Here, I start to paint my character and I notice right away a problem : an ugly seam [pic51]
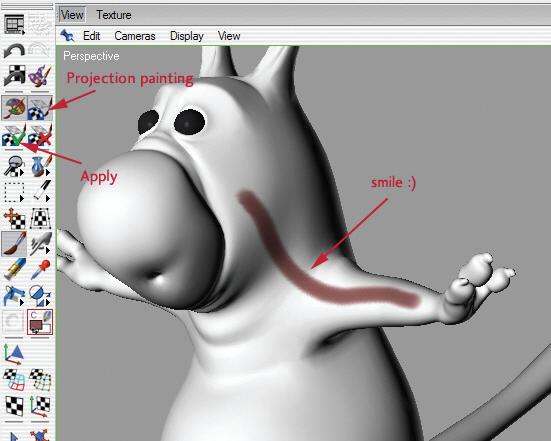
Select the "Projection Painting" mode (the outline of the viewport will turn green when this mode is enabled), and trace the same brush stroke. I refresh my view (either by typing the "A" shortcut or by applying the projected paint by clicking on this icon, and hooray, my brush stroke has been projected properly and without any noticeable seam!
[pic52]
Picture 47

Picture 48 Picture 49
Picture 50 Picture 51

BodyPaint 2 - Character Texturing
By Sebastien Florand aka Fluffy
Here is how it looks in the texture window. BodyPaint calculated automatically how to project that brush stroke, which makes it a whole lot easier for me to paint on my messy UV Mesh. Happy I am. And that's pretty much it for this month to get you started. BodyPaint has a whole lot more features of course, and I would need several tutorials to cover it all, but this tutorial covered enough I think for you to work on almost any project.
Don't be afraid to experiment with it and try out its different functions. This software has a lot of features and needs some getting used to, but is really powerful and rewarding in the end.
Here is my little fellow finished using the same method, have fun and don't hesitate to contact me on the 3D Attack forum if you have any questions regarding this tutorial. In the goodies folder, you will find the squirrel model.
You are free to use and learn from this tutorial, but it is not commercially free. Do not reproduce this tutorial in any manner or form without prior written permission from the author and/or 3D Attack. Thank you for your understanding.
Cheers,
Fluffy
