20 minute read
Lookout Tower Part 4 by Bram van Gerwen

from PDFJuneIssue2005f
by Hiba Dweib

Lookout Tower Tutorial Part 4
By Bram van Gerwen
Advertisement
Welcome to the last part of the Lookout Tower Tutorial, Part 4. In this tutorial we are going to do some basic texturing on the tower and show some different ways to combine and mix textures. Textures needed in this tutorial can be found in the Tex folder inside the TowerPart4Finished folder. Open the TowerPart4Start.c4d file. We'll begin by texturing a bit of the main tower body.
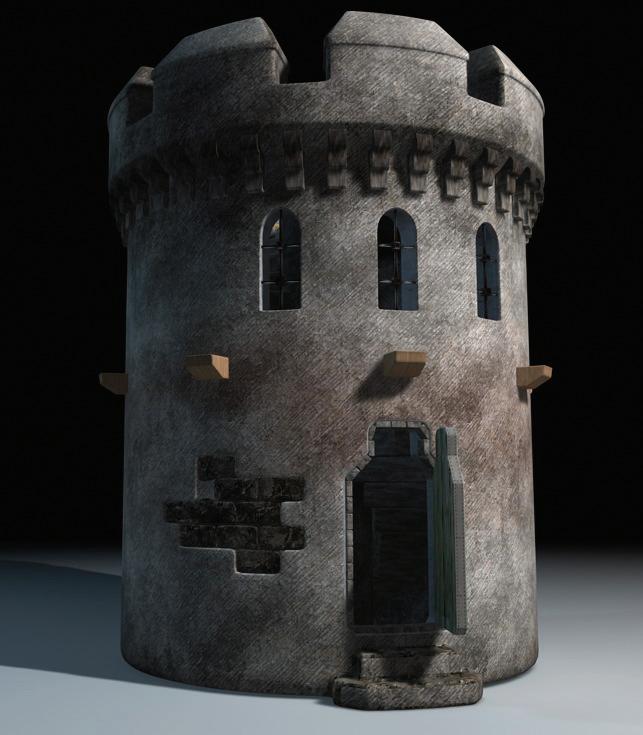
So select the tower body, switch to polygon mode and select the Freehand selection tool. Enable 'Tolerant selection' and 'Only select visible elements' and in Top view draw a circle inside the outer loop of the top floor, Picture 1A. The tolerant selection makes sure that the polygons that don't fall entirely in your selection are selected as well.
Now use Grow selection once, then select the Loop selection tool and while holding ctrl deselect the lower and middle loop of the staircase gap and also deselect the vertical ring on the outer edge of the floor, Picture 1B. Click Set Selection (Selection -> Set Selection) to create a tag that stores the current selection. Click the tag and name it 'top floor'. Create a new material and name it 'Floor Gradient'. Disable the Specular and load a 'Gradient' into the Color Texture field. Click on the Gradient and set the Colors like in Picture 2A and the Type to 2D-V. Now drag the floor gradient to the Tower body object. Click the texture tag that appears behind the object
and move it to the left of the selection tag. Set the Projection to Flat and drag the 'top floor' selection tag to the Selection field in the tag properties. This texture will now be restricted to the selection in that tag. Switch to the Texture Axis Tool.
You will now see a outlined cube with therein a flat plane which is a representation of the flat texture projection we set it to. The gradient will be projected across this plane so we need to move the texture up and scale its Y-axis down to get the gradient effect on the stones of the top floor. Set the Yposition of the texture to 252.95 and the Yscale to 0.6 and apply. These values are very precise as the stones are only a couple of increments high and as you see the miniscule height of the texture puts the gradient nicely from the floor to the top of the stones, the darker grey outlines the stones in a satisfactory manner, Picture 2B. Like this the floor still looks a little flat, we want it to be more realistic. This will be accomplished with a bump texture, we can't just add the bump to the floor gradient material as the projection of the texture is not correct to spread the bump over the floor. We'll mix a loose bump material with a different projection together with the already applied gradient texture.
Create a new material, name it 'Floor Bump'. Disable the color and specular and enable the bump section. In the Bump channel load Noise into the Texture field, click on the noise and set it to Poxo. Now drag the Floor Bump material to the tower body and move its texture tag right of the gradient tag for clarity. Then drag the top floor selection to its Selection field just like with the gradient texture to restrict it to that selection, set its projection to Flat. Set its Yposition to 252, X scale to 200, YScale to 200, Protation to 90 and apply.
The bump texture is now laying flat on top of the tower and is roughly the diameter of the tower itself. If you render now you will only see a black floor, to remedy this enable the 'Mix Textures' option inside the texture tag of the bump material. This will mix it with the underlying materials, render again and you will see both materials being mixed in the given selection.
The bump still looks a bit rough so we'll tone that down a bit next. Go to the noise channel inside the bump material. Click the noise to see its options again, you'll see that Color 1 & 2 are set to hard black and white. Simply change the black to a dark grey and the white to a light grey to soften the bump. Fiddle with these grey values until the effect is to your liking.

Lookout Tower Tutorial Part 4
By Bram van Gerwen
Let's save the rest of the main tower for last, let's move on to texturing some of the smaller details first. Zoom in on the front window, open the Window Bars object inside the window bar group. Select the lowest cylinder, which is the long vertical one. Create a new material and name it 'Bar Metal'. Immediately drop the material on the cylinder object. Set the projection in the tag to Cylindrical and switch to the Texture Axis Tool. Set the scale of the texture to X 4, Y49, Z 4 and apply.
This will scale the texture to roughly the size of the cylinder. We want the bars to be reflective but not so much at the seams. Enable the reflection in the material and load a Gradient into its texture field. Never mind about the percentage setting now, the gradient will take care of this. Right-click the material preview and set it to cylinder, Picture 3A. Now click the gradient and set its Type to 2D-V to set it to top to bottom.
Recreate the gradient as in picture 3B, you can see how the gradient is going to affect the cylinder. Black being non-reflective and White is 100 percent reflective, use nearblack and dark grey in this gradient to get transitions from a little reflective to a dull reflection.
Now go to the color channel, set it to 100 percent and also load a Gradient into this texture field. Set it to 2D-V and enter the colors like in Picture 3B, set the turbulence to 20 percent. Next we'll add a little bump, enable the bump channel and load Noise into the texture field. Click the noise and set it to Poxo, because our texture is stretched along the cylinder we need to lower the length scale of the noise a bit, behind relative scale you see 3 fields, set the second one to 20 percent. And last to create a little bit more flat surface in our bump without protrusions set the Lower Clip to 32 percent. To finish this material go to the Specular channel and set its Mode to Metal and set the Height to 100 and the Width to 51. Now let's do the other bars.
Duplicate the Bar Metal material and rename the new one to 'Small Bar Metal'. Ctrl-drag the texture tag behind the cylinder to the Bar 1 object to copy it there. Now drag the Small Bar Metal material onto this new tag. The texture still has the orientation of the vertical bar, so set its B rotation to 90 percent and apply, also set the YScale to 20 to conform it to the length of this smaller bar. Change the color and reflection gradient of the Small Bars Metal material to the ones given in Picture 3C. When done Ctrl-drag the texture tag of Bar 1 to Bar 2. Because the window bars in the other windows were modeled using instances the textures are also automatically on those bars.
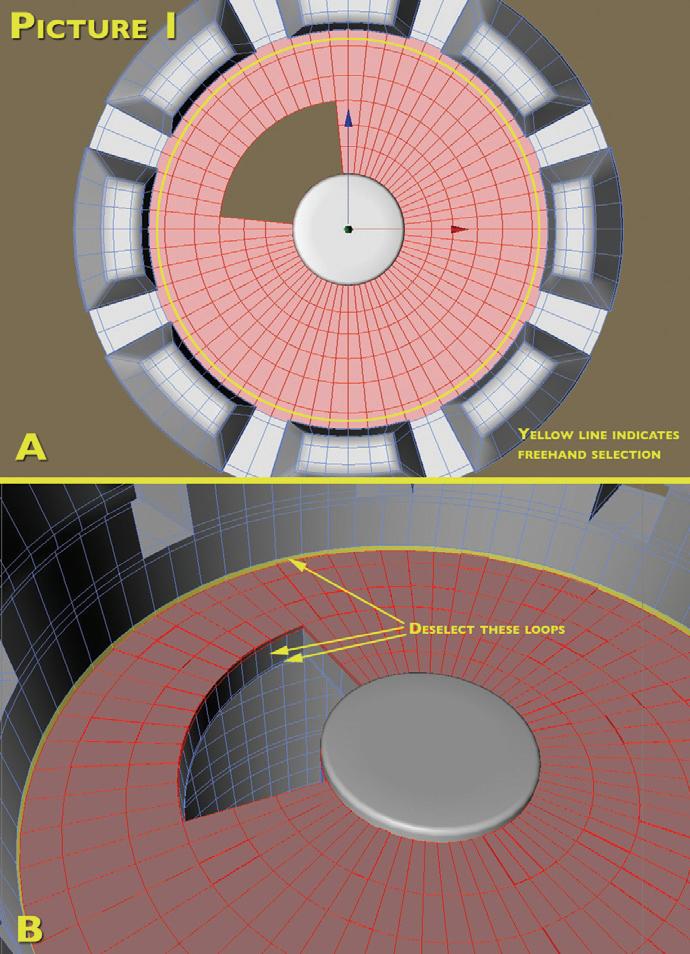
Duplicate the Bar Metal material again and rename the new material to 'Connector Metal'. Change this materials Gradient type for both reflection and color to 2D-Circular and change their gradient colors according to Picture 4. For clarity in your material manager set the preview of the material to Rounded Cube. Drag the connector metal material to the Bar Connector object, set its projection to Cubic and set the texture scale to X 4, Y4, Z 4 and apply. The texturing of the bars is reasonably satisfying now so we'll move on to the next objects.
Create a new material and name it 'StoneA'. Disable the specular and load the image 'asphalt3.jpg' into the Color texture field. Now unfold the Spiral Steps group, scroll down and drag the StoneAmaterial to the Step object. You don't have to change it's projection or position because at default it will stick to the uvw map of the object, which is fine for this primitive. To give the steps some more grit drag the Floor Bump material to the Step object and enable Mix Textures in its tag properties (Don't drag the materials onto tags that are already there, that will replace them while keeping the size and position of that texture).
Next drag the StoneAmaterial onto the Bricks null object, we apply it to the entire group because if we apply it to the single brick primitive inside the group all the bricks will look exactly the same as they are all instances of that primitive. Set its projection to cubic and set the texture position to Y56, and its Scale to X 54, Y54, Z 54 and apply. This will make the texture as wide as the door frame and place the underside

Lookout Tower Tutorial Part 4
By Bram van Gerwen
of the texture in the middle, the texture is set to Tile by default so it will simply continue the texture in a grid in all directions thus also showing up outside of the texture box you see in the viewport.
Duplicate the Stone Amaterial and rename the new material to 'Door Wood'. Replace the texture in the color channel with 'Old Wood.jpg'. Now drag the door wood material to the Tower Door object, set its projection to Cubic and enter the following values for the texture. Position: X -40, Y10, Z 5 and Scale: X 42, Y 85, Z 38 and apply. I'm making you enter these values but of course you'll gather that I come to these by simply pulling on the axis handles in move and scale mode.
Now you'll notice that the projection doesn't go that well on the sides of the door. Make the Tower Door object editable, personally I find it annoying that the make editable function creates separate body, caps and edges objects instead of just one single geometry mesh but in this case it's handy. Unfold the now editable Tower Door object and drag the wood tag to the Rounding 1 object inside of it, then ctrl-drag the tag to Rounding 2, copying it there.
Duplicate the Door Wood material and rename the new one to 'Plating', in its color channel replace the texture with 'plating.jpg'. When you moved the wood texture you might have noticed the wood disappeared from the sides of the door and is now only on the front and back. We want the door sides to be lined with plating so drag the Plating material to the main Tower Door object. Set its Projection to Cubic and enter the following values for the texture, Position: X -40, Z 4 and Scale: X 4, Y23, Z 23 and H Rotation -90 and apply. If we don't rotate it 90 degrees the texture wouldn't line correct on top and bottom of the door because of the cubic projection, you want to watch out for this when using this projection. If you rotate one axis the alignment on the other surfaces won't change, you just have to adjust the sizes of the cubic projection again to correct those. You now see the edges of the door lined with the plating, grab the Move tool and move the texture along it's Yand Z axis to see how cubic projection helps us, Result in Picture 5A.
Next let's texture the array objects. We can drop a texture onto the array object and have a single projection cover the radius of the array but our wood texture is pretty low detail so we'll just drop it onto the cube inside the array object. Duplicate the plating texture and rename the new one to Wood, replace the texture with 'wood.jpg'. Collapse the beam array object until you see the cube geometry.
Drop the Wood texture onto it and set its projection to cubic in the tag properties. With the Texture Axis tool active you can see the texture scale is still much larger than the actual cube itself. Grab the scale tool, make sure all axis' are active and scale the texture down to about the size of the cube. When this is done we need to change the rotation of the texture to aim the wood lines toward the tower. Set the H rotation of the texture to 90 and apply. Since the array consists of instances you can see the changes happen on all the arrayed objects. Now let's move on to the ornament array. For the wooden beams a cubic projection that looks similar on every beam was adequate, the repeat of the texture is hardly noticeable.
The ornament array is a different story, because this array contains lots of object copies the repeat will be clearly visible and won't look very realistic. Therefore we'll drop the texture on the array object itself in this case. This way all copies are interpreted as one object by the texture and will look like it's different on every copy. So duplicate the StoneA material, rename the new one to 'Weathered Stone' and drag it onto the ornament array object and set its projection to Cylindrical and the Tiles X to 12 to wrap it around the tower in 12 patches. The initial scale is fine to make the spacing of the texture look good, we'll only scale the y axis of the cylindrical projection to make it the same height as the ornaments, set the Yscale of the texture to 27 and apply. Now we'll add a downward gradient to make the texture look a bit weathered.
To do this we need to work in layers. Go to the Texture field of the color tab and select layers. This will move the current bitmap in the Texture field into the first layer, you can now ad more stuff to these layers. Click on Shader and select Gradient. Set the mode behind it to Difference and enter a value of 62. Click on the gradient and set its Type to 2D-V, give it a Turbulence of 30 and change the white color to a darker grey

Lookout Tower Tutorial Part 4
By Bram van Gerwen
(somewhere in the middle). When we click back to the layers you can now see the effect the gradient layer has on the texture beneath it, Picture 5B. Difference subtracts the lighter colors in the gradient from the texture beneath it, hence the effect seen.
Last before continuing on the main tower body is the central pillar, This element isn't very important so we'll texture it really easy. Duplicate the StoneAmaterial and rename the new one to 'StoneB'. Replace its Texture with 'Asphalt2.jpg' and drag the material onto the Central Pillar. Set its projection to cubic, this will make it look adequate enough as most of the pillar is not in view anyway.
Now we will continue to texture the remainder of the tower body. First let me explain in short how we'll work with multiple selections as the texturing on the tower progresses. As you know at the beginning of the tutorial we've made a selection of the floor on top of the tower. Usually when texturing objects with multiple parts that need different textures I first make one selection tag of the entire object and name it 'Rest', then every time I texture a part on the object with its own selection tag I subtract that selection from the main Rest selection. This way you don't have to worry about making some weird complicated selection in the end when you've already added multiple selections and didn't add a main texture tag. Let's use this method to finish the tower body texturing.
We only have one selection tag so far (top floor) so creating a Rest tag isn't a problem. Click on the tower body object, go into Polygon mode and Select All (Selection -> Select All). Now that all polygons are selected click on the 'top floor' tag and click on Deselect Polygons in its properties. This will remove the polygons of that selection tag from the current selection in the viewport. Make sure the top floor tag isn't active and use the Set Selection tool. Click on the new tag and rename it to 'rest'. Drag the StoneB material onto the tower body, set its projection to Cylindrical. The texture is way too small to look realistic when it's wrapped around the tower only once, it will look like a stretched blotch.
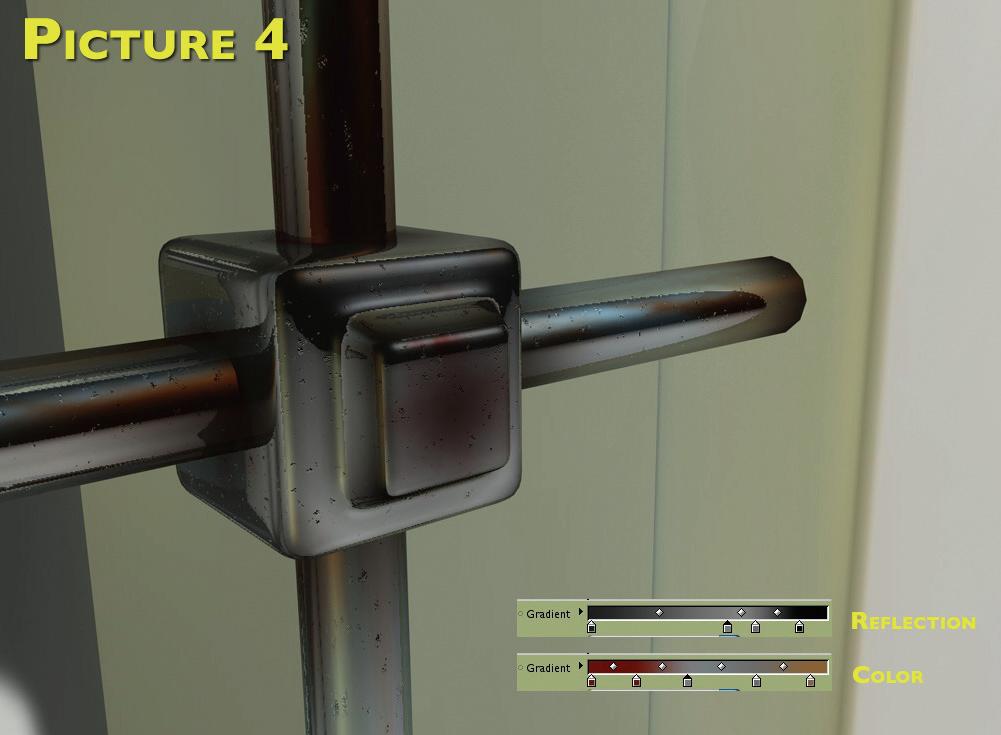
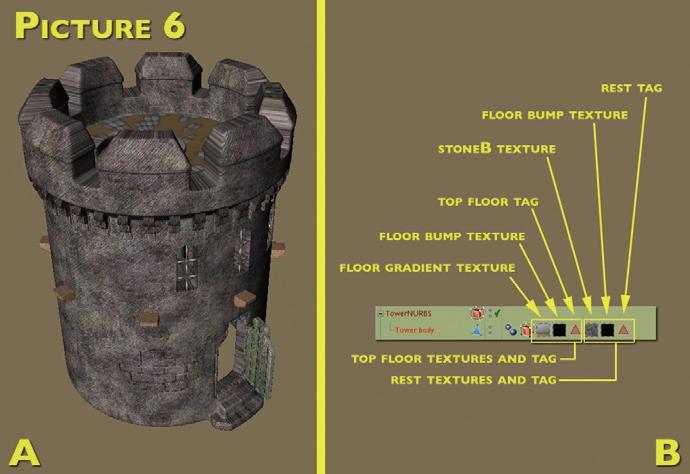
To remedy this set the Tiles X to 6 and the Tiles Yto 2. Also drag the rest tag to the selection field of the texture to link it to that selection. Now the texture will be wrapped around the tower with six patches and 2 patches in height. Go into Texture Axis tool and set the X,Y and Z Scale values of the texture to 220, giving it roughly the same dimensions as the tower, result in Picture 6A. It's very important to keep your tags in good order to be able to see what influences what and you won't get confused. Drag
the tag of the StoneB texture to the left of the 'rest' tag. Now grab the Floor Bump material and drop it onto the tower body object. Drag its tag in between the FloorB texture tag and the 'rest' selection tag. Set this floor bump to Cylindrical and drag the 'rest' tag to the selection field or just enter it by hand, also enable the Mix Textures option to make it mix with the FloorB texture tag next to it. Set the X,Yand Z Scale of this texture to 190. The arrangement of the tags should look like in Picture 6B now.
When we render the tower now you'll notice that because of the cylindrical projection of the rest tag the surfaces pointing inward have no texture definition aside from the color information of the cylindrical projection at that point. We'll single out these areas with selection tags and texture them separately.
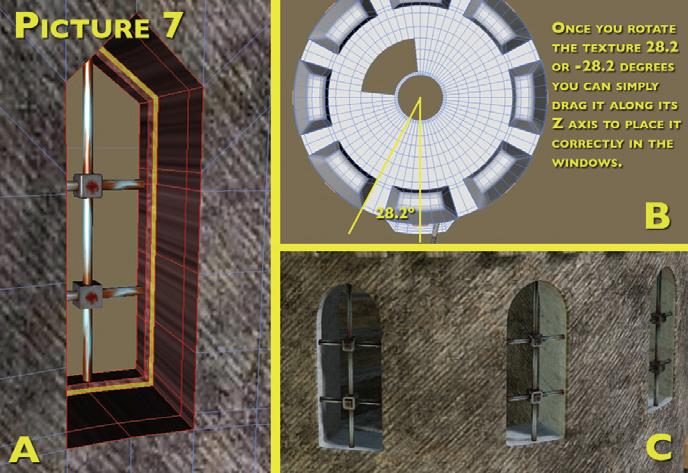
Duplicate the StoneB material and rename the new one to 'Plain Stone'. We'll use this texture to texture some of the loops that point inside the tower like the window frames and stair gap. Replace the texture in the Plain Stone material with 'Stone Surface.jpg' Zoom in on the left window and select the polygon loops with the Loop Selection tool, don't select polygons on the outer and inner wall part, check Picture 7A for selection. When selected make sure you have no selection tags active and use the Set Selection tool. Rename the new
tag to 'leftwindow'. Now drag the Plain Stone material onto the Tower Body, move its texture tag left of the leftwindow tag, drag the leftwindow tag into its selection field and set its
Lookout Tower Tutorial Part 4
By Bram van Gerwen
Projection to Cubic. When you go into Texture Axis mode you'll see that the texture originates at the center of the tower body (naturally for there lies the object axis). But we want it to be in the center of the window so the texture maps the as best as possible to the sides of the window. If you've followed the modeling tutorials as well you'll remember that the objects of the window bars are rotated with a value of 28.2 and 28.2 to place them precisely in the middle of the windows.
This means that the exact middle of the left and right windows lie at 28.2 and 28 degrees from the middle of the tower respectively, see Picture 7B for what I mean here. So if we enter a H Rotation value of -28.2 for the texture it will be exactly aligned with the angle of the window, enter this value now and apply. All we need to do now is move the texture by hand so the texture axis is roughly in the middle of the window. When you're dragging the texture you'll see the projection scrolling along the surfaces you selected so you can check out for yourself when you think it looks good. I placed mine at X -97, Y130, Z -185, I also adjusted the Scale a bit to 41 for X,Yand Z.
Now make a similar selection of the other windows and give them the same texture with cubic projection, make sure you give those selection tags names like middlewindow and rightwindow. The same can be done for the doorframe below it where the texture is stretched, result in Picture 7C.
Let's make a selection of the stretched part between the battlements next. Use the Loop selection tool to make this selection like in Picture 8. Set the selection and name it 'battlements'. You can now drop the StoneB material onto the tower body and link it to the battlement selection. Make it cubic projec-
tion and scale the texture down a little. The battlements now have the same texture as the rest of the tower but its not stretched anymore because of the cubic projection.
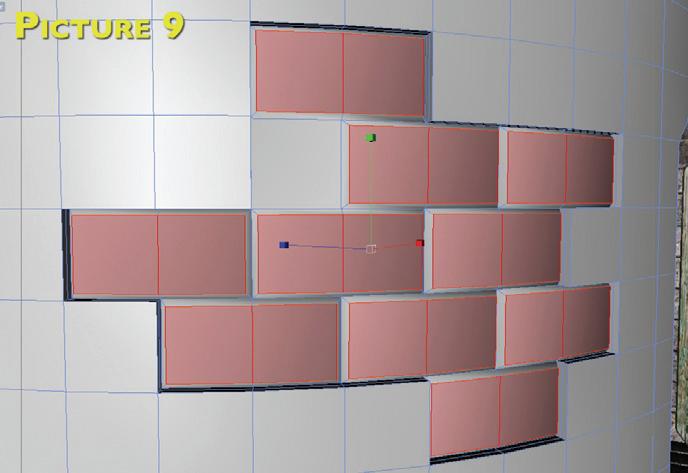
Nearly done now, just a couple of final touches. Select the tops of the protruding bricks like in Picture 9
and use the Grow Selection tool to select their sides. Set the selection and name it 'bricks'. Copy/Paste the StoneB material and rename it to StoneC. Replace its texture with Asphalt4.jpg. Drop this material onto the tower body and link it to the bricks selection. Set the projection to cubic, scale the texture down a little and rotate its H value 45 degrees.
Lastly select the stretched parts on the small steps in front of the door like in Picture 10 and link StoneC to that selection with cubic projection. The steps to do this should be familiar by now.
The tower is finished now with some basic texturing, it has become clear now that many textures can be combined on the same piece of geometry with selection tags, layers and mixing options. This allows us to use many different projection methods at the same time.
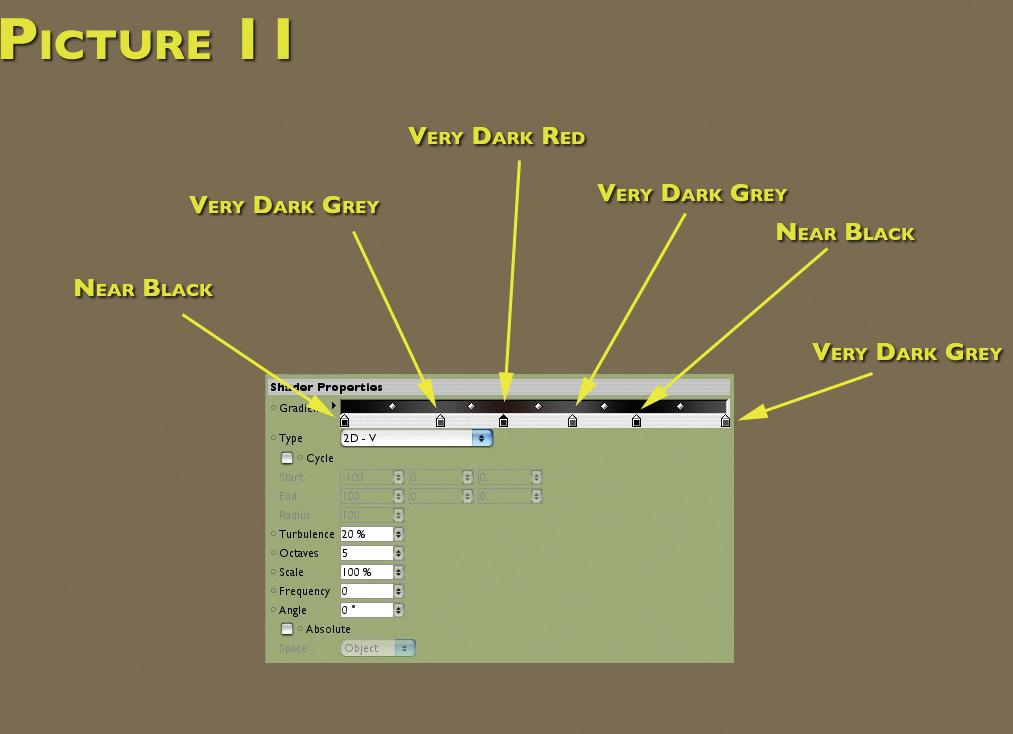
We can add a last mix texture to break up the plain look of the main texture and finish off this scene. Create a new material and name it 'tower gradient'. Disable the specular channel and in the color channel load a Gradient into the texture field. Set it to 2D-V, give it a turbulence of 20 and enter the colors like in Picture 11. Now drop the material onto the tower body, drag its tag
back to the textures belonging to the 'rest' tag. Set its projection to Cylindrical, enable Mix Textures and enter the following Scale values for the texture X 252, Y315, Z 252 and


Lookout Tower Tutorial Part 4
By Bram van Gerwen
also give it a Yposition of 55. Now the texture should encompass the tower nicely, enable the Mix Textures option and render. You'll notice that the dark colors of the gradient give our tower a nice weathered look.
That's it for the basic texturing tutorial. I hope I've been informative on how to combine and mix various textures and use their projections effectively to create simple good looking results. If you have any more questions about texturing or this tutorial please ask them on the 3D Attack forum and I will try to answer them as best as I can.
Thanks, Bram