10 minute read
Rolling Objects by Rui Batista

from PDFJuneIssue2005f
by Hiba Dweib

Rolling Objects
By Rui Batista
Advertisement
Sometimes we have to deal with dynamically driven movements but three things can happen that prevent us from doing it:
1. We don't own the Dynamics module 2. Dynamics are just too slow to calculate or 3. Adjusting Dynamics parameters is just too complex and time consuming.
So, what do we do? We fake it! In this article we will see how to, automatically, place an object above the floor, no matter what orientation it has. I will present two methods: a simpler, not very accurate method and a more complex, but much more accurate method. The first method uses only XPresso and is best suited for objects that are roughly spherical in shape. For example, this apple is mainly spherical [01].
What the XPresso expression will do is to calculate the interception, on the object mesh of a ray that passes through the middle of that object and a point that lies precisely beneath it some distance apart. This may sound too complicated, but check out image [02], Example #1. A"ray" is sent from the center of the apple to a point beneath it (a safe distance away to assure it lays outside of the apple). The distance between the center of the apple and the point where the "ray" hits the surface is the distance that the apple must rise from the ground. This works most of the time (example #1 and #2) but sometimes it fails miserably (example #3). Even so, for simple objects this is good enough method. Let me explain how to "code" it in XPresso. Instead of an apple, create a simpler object. For example, an egg (its simple enough to model). It doesn't have to be a polygonal object so, you can use a Lathe NURBS if you want. Let’s name it Egg_Mesh from now on. Make sure the axis of the Egg_Mesh object is placed where you consider to be the center. Now, clone Egg_Mesh, name it Egg_Dummy and place them both inside a Null. Make sure they are centered in the Null (their coordinates are 0,0,0). Now make the Egg_Dummy invisible both at the editor and to the renderer. You should end up with a hierarchy similar to figure [03].
Add an XPresso tag to the Egg_Dummy object. Drag into the XPresso window, both Egg_Mesh and Egg_Dummy. Now, create a Global Rotation port as an output of Egg_Mesh and a Global Rotation port as an input of Egg_Dummy. Connect them. From now on, when you rotate the Egg_Mesh, the Egg_Dummy object will rotate the same way.
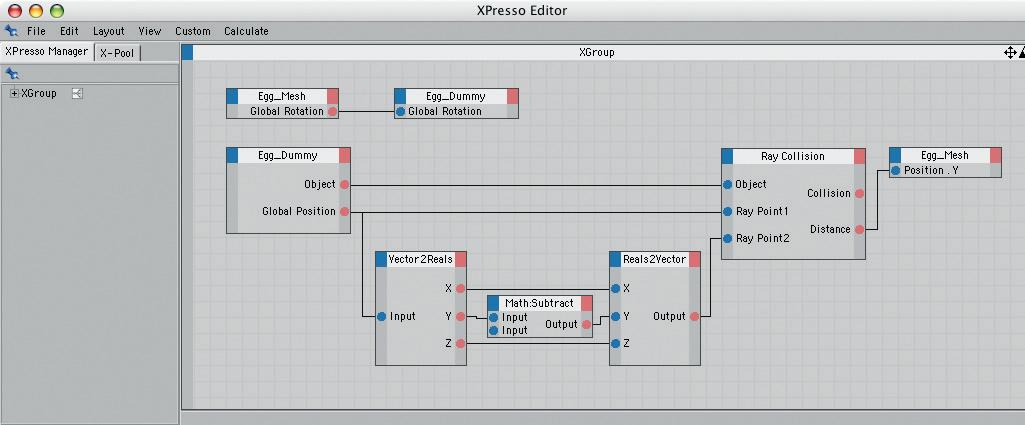
Duplicate the Egg_Dummy node and delete the Global Rotation port. Add it an Object port and a Global Position port as an output. Now, we must subtract a distance from the Y component of the coordinates. So, create a Vector2Reals node and feed the Global Position from the Egg_Dummy into it. Create a Reals2Vector node and connect to it the X and Z values from the Vector2Reals node.
This is because we only need to manipulate the Ycoordinate. Create a Math node and set it to Subtract. Feed the Ycoordinate from the Vector2Reals into the Math node and connect the output of the Math node to the Ycoordinate of the Reals2Vector node. Now, how much to subtract from the Ycoordinate? I set it to 1000, but you can input any large number. Just make sure it is a number larger than the radius of the imaginary sphere around your object. [04]
Now, add a Ray Collision node. Feed it the Object port from the Egg_Dummy, the Global Position port from the Egg_Dummy on the

Image 01 Image 02
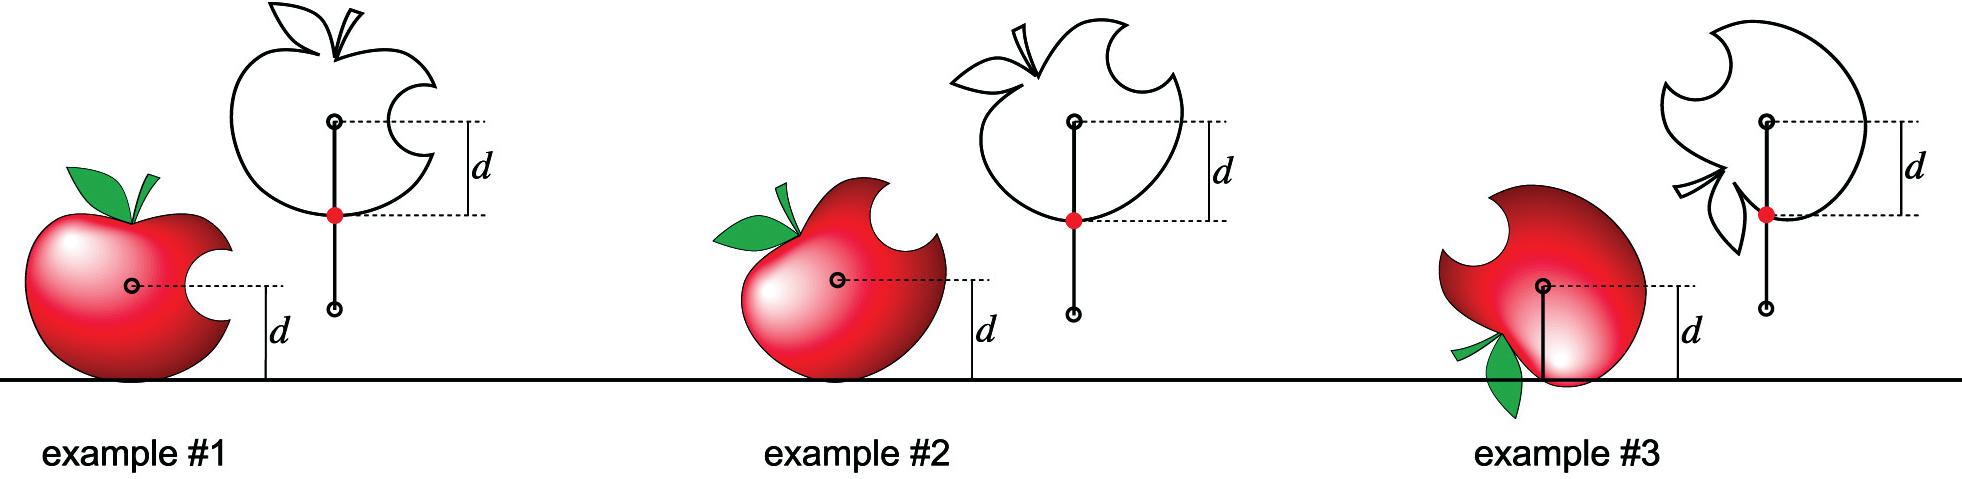
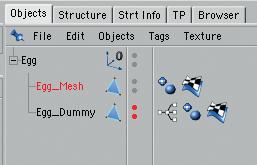
Image 03
Rolling Objects
By Rui Batista
Image 04 Ray Point1 and the result of the Reals2Vector node on the Ray Point2. Create a Distance node at the output of the Ray Collision node. Duplicate the Egg_Mesh node and delete the Global Position port. Create a new Position.Yinput port and feed it with the Distance result from the Ray Collision node. The XPresso expression is finished [05] but it is not working. That is because the Ray Collision node, as a default, starts with the option "Test Only" turned on. To make it really work, turn off this option.
You can now rotate the Egg_Mesh object and it will adjust its Yposition automatically. It will try to stay above the parent Null. So, you can place the Null where you want the floor to be and the Egg_Mesh object will stay above it. You can even animate it, setting keyframes for the rotation and the position will still adjust automatically. If you want to animate the position of the Egg, animate the parent Null. Now, since this method is not perfect, could there be a way to make it more precise? Yes and you can even use the same hierarchy and methodology, but the calculations will have to be done in COFFEE since they become just a little more complex.
Convex objects are the ones that would suffer more, using the first method. Convex objects have surfaces that go in and out, with angles, kinks, grooves, etc. For example, a wine glass is a convex object [07]. So, what we must calculate is the coordinate of the lowest
point of the object and set its Y coordinate to the distance of between that point Ycoordinate and the Ycoordinate of the center of the object. Ok, ok... complicated sentence, but its easier to understand with a graphic. [08 a-b] Before creating an hierarchy similar to the one you created before, lets
see how must we create the dummy object. You only need a rough mesh that surrounds the more detailed object. So, a very simple "shell" can be created and you only need to make sure that nothing of the original object sticks out [09]. Now, create a similar hierarchy using your detailed object and the "outer shell" object. Don't forget to turn off visibili-

Image 07 Image 08a

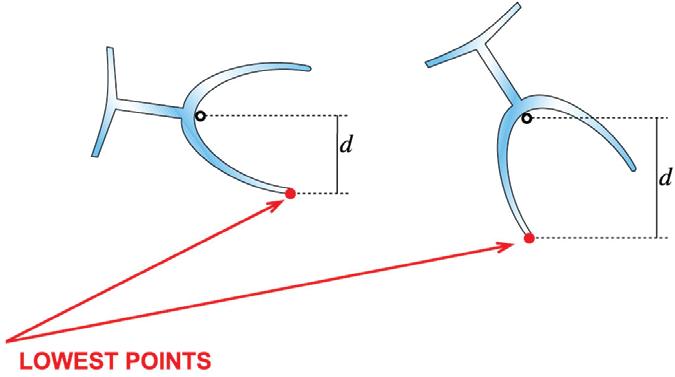
Image 08b
Rolling Objects
By Rui Batista
ty (editor and render) for the shell object. Create an XPresso expression, just like you did before, but this time its much simpler. [10] You still need to pass along the Global Rotation from the detailed object to the shell. You also need a COFFEE node that inputs an object (Link) and outputs a Real. Connect the Object port of the
shell object into the object port of the COFFEE node and connect the Real output port of the COFFEE node to the Position.Yport of your detailed object.
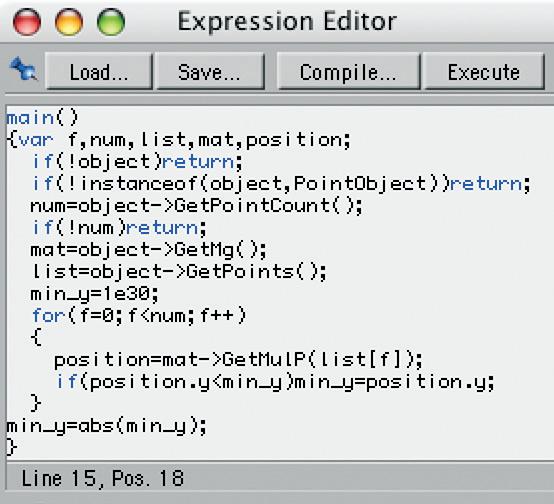
Make sure you give descriptive names to the input and output ports of the COFFEE node because they are going to be used as variables inside the COFFEE code. I named them "object" and "min_y" respectively. Now, in the COFFEE node, type the following code: [11] I will now, explain line by line what the code does:
main() this is required. It tells CINEMA4D that this is the first think to execute in this code. var f,num,list,mat,position; I define all the variables I will be using in the code. The "f" variable will be used to loop through all the
points of the object. The "num" variable will store the number of points of the object. The "list" variable will point to the list of points of the object. The "mat" variable will store the object matrix. It’s a set of data that defines the object position, scale and rotation. The "position" variable will store the coordinates of each point of the object. The "object" and "min_y" variables are already defined by the COFFEE node itself.
if(!object)return; The ! sign means NOT. So, if NOT object, return from the code. In layman terms, it means: if there is no object, do nothing.
if(!instanceof(object,PointObject))ret urn; You already know the meaning of the ! sign. In this case, if the object is not a PointObject, do nothing. A PointObject is a polygonal object. Only these object have a list of points and, if we are not dealing with a polygonal object, there is no sense in going on.
num=object->GetPointCount(); Ok, the object exists and is a polygonal object. So, we find out how many points it has and store that information in "num".
if(!num)return; This one is easy. If there are no points, do nothing. The object could be an empty polygon object, after all.
mat=object->GetMg(); We get the matrix of the object and store it in the "mat" variable.
list=Object->GetPoints(); We get the point list and store it in the "list" variable"
min_y=1e30; Since we want to find out what is the lower Ycoordinate, we start with an insanely big number so that any Ypoint coordinate will be less than this, when compared. 1e30 is scientific notation and means 1x10 raised to the power of 30. In fact, it means a 1 followed by 30 zeros. BIG NUMBER!!!
for(f=0;f<num;f++) We start a cycle that uses the "f" variable as a counter. We start "f" at 0 and go on while it is less than "num". For each interaction of the cycle, we increase the value of "f" (that is what f++ does).
position=mat->GetMulP(list[f]); Wow!! This is complex. First we get a point from the list (list[f]) and multiply it by the matrix (stored in "mat"). What this does is to get the point that is stored in local coordinates (relative to the axis of the object itself) and moves/scales/rotates it to
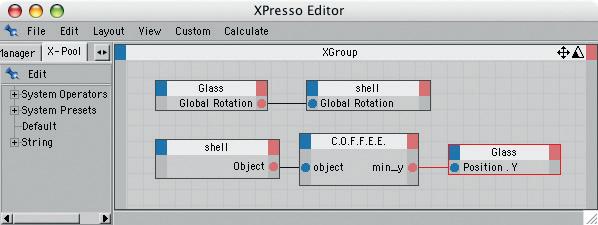
Image 10
Rolling Objects
By Rui Batista
where it is in global space.
The points list is always stored with local coordinates. So, a point in the object that is at coordinates 100,120,200 is ALWAYS stored as 100,120,200, no matter where the object is placed, scaled or rotated. But we only get the REALlocation of the point in space when multiplied by the object matrix. Complex, isn't it? But trust me, its necessary. The modified point coordinates are stored in the "position" variable.
if(position.y<min_y)min_y=position.y ; Now we compare the Ycomponent of the point coordinate with the value of the "min_y" variable. If it is less, we just found a Ycoordinate that is lower than the previous one. So, we update the "min_y" variable.
min_y=abs(min_y); We change the "min_y" to its absolute value. This way, it is always positive. Why? Because the lowest Ycoordinate found could be (usually is) negative. And we want to raise the detailed object by that amount. But raising in the Yaxis is a positive movement. That is why we need the "min_y" variable to be positive. And that's it. Now the "min_y" variable has the value that we must assign to the Ycoordinate of the detailed object.
You can now rotate your detailed object at will and it will keep perfectly above the floor (defined by the XZ axis of the parent NULL). Like with the previous method, to move the object, move the parent Null. To rotate the object, rotate the detailed object. And that's a wrap!! Feel free to contact me at:
rui_mac@ruimac.com if you have any doubts and... Keep on attacking!
Make sure to check the goodies folder for this month at:
http://www.3dattack.net/goodies/
Enjoy!
Check the example video and C4DFiles