
12 minute read
Clothilde Splines by Jamie Hamel - Smith
from PDFJuneIssue2005f
by Hiba Dweib
Clothilde Splines
By Jamie Hamel-Smith
Advertisement
Have you ever wanted to create a dynamic spline? Arope perhaps? Well the easiest way to do it would be to use The Dynamics Module. However, the Dynamics module doesn't do any sort of collision detection where splines are concerned. I have found a workaround to this problem through trial and error and a little bit of XPresso. We needed to create an animated hose for a gas pump and MOCCAIK wasn't cutting it. I already knew that Dynamics would not do the job of collision detection and such, and we don't own Dynamics, so I came up with this solution. I hope you enjoy my tutorial as much as I enjoy squashing these problems like bugs!
The most important part of this tutorial is the Clothilde. Typically intended for things like clothes and sheets draped over things; Clothilde is also extremely useful for creating things like hanging tassels and the great thing is that it supports collision detection. I wanted to create a spline that moved like a 'Clothilde Strip' so that I could use a SweepNURBS Object to create a rope or hose. Here is how it's done; first thing we need to do is create a Clothilde strip that we can attach a spline onto.
The best way that I have found to do this is as follows: Create an empty Polygon object from the Objects menu, Switch to the top view (F2) so that you can get a better view of your straight line of points. If you switch to the Points Tool and Ctrl-Click using the Move Tool in the view port, a point is created. This point's 'index number' is 0… ok I know what you are thinking, "Big Deal!" well, I want you to go to the Window menu and open the Structure Manager. In this window you will see the points belonging to your object, it should only have one point right now of course, your lonely little "Point 0" well it is very important that we create the order of the points on this polygon object, because we will need to call on that order of points for a little favor when we get to the Xpresso stage of the tutorial. So obviously the next point will be point 1, and then point 2... We get the Idea. So we are going to create a vertical line of 10 points in our top view port. [Image 01]
Now we can't just apply Clothilde to any old set of points right? It has to be a polygon mesh, so we need to create another row of points. The point numbering of this second row of points is not important, so we can just select the first 10 points we just created and from the Functions menu choose the Clone function.
Set the number of clones to 1 and set the rotation values to 0. [Image02] This will create an exact copy of all of the selected points that will be numbered 10 through 19, which is perfect because it has left our 0 through 9 points in tact (having the structure manager open during this process will be a great help to show you what's going on.) After cloning all of the points, move them over just a bit. [Image 03] Ok, so now we have 2 nice rows of points that we
can turn into a Polygon Strip. Select the Bridge tool and bridge the points together to create a nice strip of polygons. [Image 04] Now we can add a Clothilde Tag to the polygon strip to make it dynamic! Go to the Object Manager and Right-Click the Polygon Object; choose Clothilde
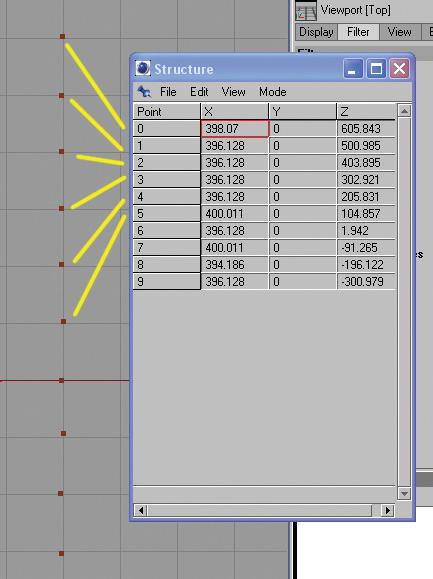
Image 01 Image 02
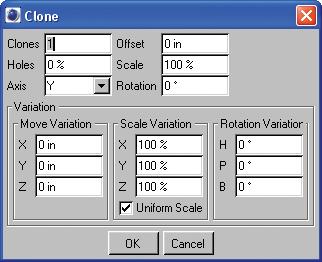
Image 03

Clothilde Splines
By Jamie Hamel-Smith
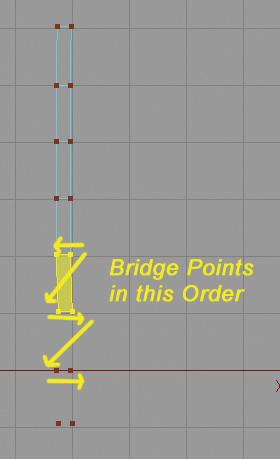
Image 04
Tags > Cloth from the pop-up menu. Acloth tag should appear in the object manager next to the Polygon object. [Image 05] Now you have to click on the Cloth Tag and set a cou-
ple things before you can preview the dynamic action of the Cloth Strip. The Cloth Tag has 5 pages accessible from the tabs at the top of the Attributes Manager. We will be taking a look at the Dresser Page. [Image 06] The Fix Points option will allow us to "pin" certain points of the strip. Clothilde does not calculate gravity for fixed points, so fixing the points at the top of the strip will allow us to hang the strip from those points. Select the 2 topmost points of the strip and click the Set button next to 'Fix Points' on the Dresser page. The points should turn bright pink, indicating that they are now fixed. We need to do one more thing before we switch to the Perspective view port and the XPresso Editor. Create a linear spline with 10 points. Let's create the spline right next to the polygon strip, shall we? [Image 07] Ok, we will now be switching over to the Perspective view port (F1) and we
can hit the play button and watch as the Polygon Strip falls in all of its dynamic glory! Notice that the fixed points are staying put! I'd bet that you seeing that spline just sitting there all static and lame has you thinking, "How do we get the spline to be dynamic too?" We are going to 'pin' the points on the Spline onto the points on the Polygon Strip; here we go into the XPresso Editor!
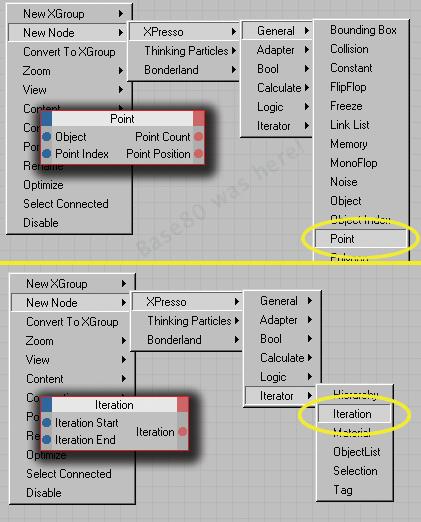
Create an XPresso Expression on the Spline Object by right clicking it and choosing CINEMA4D Tags > XPresso. The XPresso Editor should open up with a large blank grid staring you right in the face! What do we do now? I'll explain the nodes we will be using and how we will be using each one before we even draw one connection! The 2 nodes we will be using are the Point Operator and the Iterate Operator. [Image 08] The point Operator allows you to input or output certain attributes of an objects points. Using
the Point Operator you can choose a point on the object and for instance, get the coordinates of it, or even better, apply those coordinates to another object's points! The Iteration node is quite a useful little fellow. It takes a value and increases it in
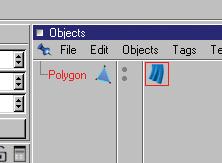
Image 05 Image 06
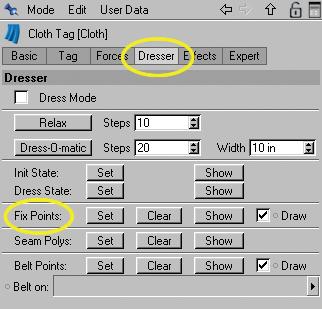
Image 07 Image 08

Clothilde Splines
By Jamie Hamel-Smith
increments of 1 from the Start Value until it reaches the End Value. When it reaches the End Value, it repeats the process. An entire loop takes place in one frame. This node can be used for repeating a process, and counting from 1 to 10 for example, every frame. Here is a basic rundown of how we are going to use these two nodes together to "stick" the Spline to the Polygon Strip; we need to ask the polygon strip the location of its points (politely of course) and then tell the points on the Spline the location so that it can place its points on those locations. This must take place every frame, and if all goes well, we should have a Spline that follows the Polygon Strip's points. Now for the setup, we want to ask the Polygon Strip the location of its row of points that we created. So, we create a Point Node as illustrated in Image-08. Notice that the Point Node has an input on the left side (blue) called 'Object'. This is where we tell the point node what object's points it will be examining.
Time to drag that Polygon Strip into the XPresso Editor, a blank node appears with the same name as the object you just created. Now we need to tell the point node that this is the object that it should examine. Click the red square on the right side of the node and create a port to output the 'Object' information of the Polygon Strip. [Image 09] now we can drag a connection from the 'Object' output port of the 'Polygon' node to the 'Object' input port of the 'Point' node. [Image 10] So, now that we have told the Point node
what object it will be operating on, we can take a look at the options we have; the Point Index input port tells the point node which point it will be operating on. (We will be using this port in just a bit) and the Point Position output port outputs the position of said point.
So, if we create an Iteration node and plug it into the Point Index port, we can ask the location of all the points we want every frame. Sounds overwhelming at first I know… Ok, go ahead and create the Iteration Node and plug its Iteration output port into the Point Index port of the Point node that the Polygon is connected to. [Image 11] Now I want you to click the Iteration node and look at the Attributes Manager.
Notice the parameters for the start and end of the Iteration Loop. If I remember correctly, we have 10 points in total on one edge of the Polygon Strip, and they are numbered 0-9, so 0 will be our Iteration Start and 9 will be our Iteration End. [Image 12] So every frame, the Iteration node will cycle through the points 0-9 and every time it changes the point being examined, the Point node will output the position of that point. Now that we have figured out how to ask the position of the all the points on the edge of the Polygon Strip, we need to send the position information of these points to the Spline. Create another Point node; this one will be for the Spline. We would also need to drag the Spline Object into the XPresso Editor so we can plug the Spline's object output port into the Point node's Object Input Port. [Image 13] Now, we want to send the point position data from the Polygon to the Spline, but
the Spline's Point node has no Point Position port on the input side… well the thing is that it does actually have an input for the point position, its just not visible by default. Click the blue square on the left of the Spline's Point node and add the Point Position input. [Image 14] Now there is very little left to do, we just have to connect the Iteration Node to the Point Index port on the Spline's Point Node and then connect the Point Position output port of
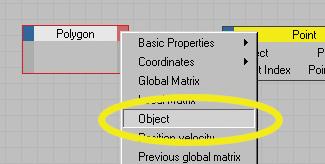

Image 10
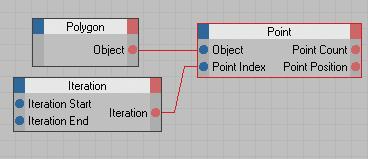
Image 11 Image 12
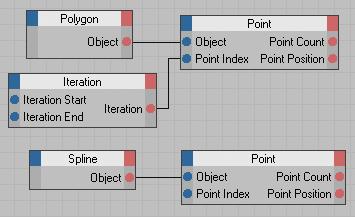
Image 13

Clothilde Splines
By Jamie Hamel-Smith

Image 14
the Polygon to the Point Position input port of the Spline. [Image 15] now if you look at the perspective view port, the points of the Spline
should have 'jumped' to the points on one side of the Polygon Strip! So that's it! The XPresso part of the Tutorial is completed! So basically, every frame, the Iteration node cycles through points 0-9 on both objects and sends the position data from the Polygon's Points to the Spline's Points! Simple! From here, you have a Spline that can be used for anything, I am going to create a SweepNURBS and use a Circle Spline as the Profile.
So I have a swinging rope thing now and it looks pretty good… I am also going to change the Spline type from Linear to B-Spline I also set the Intermediate Points to Uniform and set the number to 5. If we hit the play button now we can see a smooth looking rope swinging back and forth in the view port. Don't forget to turn the visibility of the Polygon off. [Image 16] Now what was that I was saying about collision detection…? Right! Create a cube and position it in the scene so that when the rope swings, the rope passes through the cube. [Image 17] Set the Time slider to 0. Now we have to add a 'Collider' tag to the Cube so that the Polygon Strip hits
the cube and dynamically reacts to it. We need to convert the cube to Polygons so that Clothilde can calculate the interaction. Convert the Cube to Polygons using the Current State to Object command, or using the Make Editable function or simply by using the keyboard shortcut 'C' now that the Cube is a Polygon object, we can add a Collider tag to it. Right Click the Cube in the object Manager and choose Clothilde Tags > Collider. If you play the animation now, you can see that the rope hits the cube in a rather realistic fashion! Notice that the rope probably intersects the cube a bit when it collides.
Go to the Cloth Tag and check out the Expert page, yes we are experts now *winks* increase the Point, Edge and Poly EPS values to something larger. Think of the EPS values as an invisible distance around the cloth that is the 'real' collision object. The larger the EPS Value, the sooner the cube will hit this invisible barrier around the rope. If you set the EPS Value to a large enough value, you will actually see the rope hit the cube before it even gets that close to it. So, I hope that you enjoyed my 'little' tutorial on how to create Dynamic Splines using Clothilde and a little Xpresso! Experiment with all of the settings in the Cloth Tag, try out different forces like wind and gravity, or even adjust the stiffness of the cloth in the Tag page of the Clothilde Tag. Remember that some of the values in the Cloth Tag go above 100% so you can create some very extreme behaviors! And most importantly… Keep on Attacking!
If you have and questions about this tutorial, you can contact me on the 3D Attack Forums. Don't hesitate to ask any questions you may have.
Jamie Hamel-Smith (jamiehs)
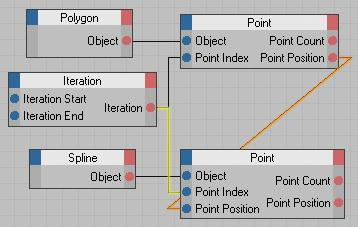
Image 15 Image 16
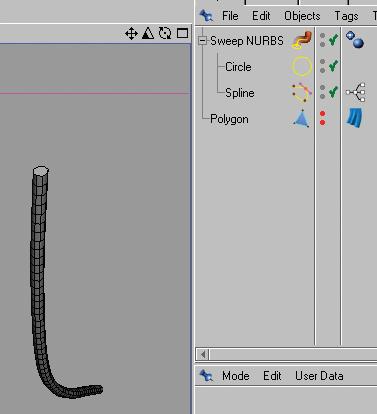
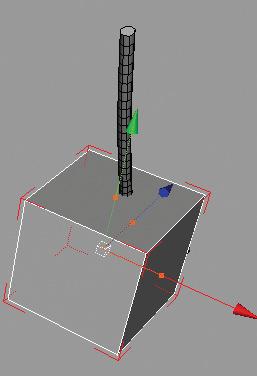
Image 17


