


last-deck requires no staining or sealing, just mild soap and water for cleaning. No warping, splitting, cracking, rotting, molding, lightweight and fire-resistant. LastDeck is available in a multitude of options allowing you to design your own luxury outdoor space.
Manufactured in the Midwest of all American made structuralgrade aluminum – the same as an aircraft; Last-Deck is built with high quality standards from our family to yours.

The 300 series is a patented, watertight product that has the ability to be replaced without having to start at one end. Should you receive damage at the mid-way point of your deck, simply pop up 2 joiner strips, replace the bad plank, snap the joiner strips back down, and your repairs are finished!

300 series easily pop up and snap back down!


I’m aware that I sometimes choose words when I write which I am unlikely to use in normal conversation— words like “aghast.” The truth is I’m generally fortunate not to experience the kind of horror or devastation that evokes such a word, but “aghast” seems to fit my reaction when I see the news reports in the aftermath of Hurricane Helene.
Our magazine is headquartered in central Alabama, so we avoided the direct hit suffered by Florida, Georgia, Tennessee, and North Carlina, but those are our neighbors, and they need our help.
For anyone reading who is somehow unaware of the magnitude of destruction, please understand that entire towns have been leveled to the ground. Dams and bridges have failed,
and neighborhoods have been completely washed away.
Anyone reading a magazine like ours is probably a serious enthusiast about all matters related to their home. I know how it is: You lie awake at night planning your next improvement. You agonize over the endless to-do list, yet you never fail “to do” it because it’s related to your home, and your home is related to your sense of identity. You can understand the utter heartbreak that would come from watching your house literally float away in the floodwaters, as I’ve witnessed on television in recent days.
While I write this, millions are still without power in the Southeast USA. Cleanup has only just begun. These days, the people in Washington D.C. only seem interested in helping people from other countries,
leaving Americans to fend for themselves. So, do what you can to help those in your area. Check locally where to best direct your efforts in the communities closest to you.
If you’d like to make a monetary donation, we recommend the American Red Cross at www.redcross.org. The American Red Cross helps provide food, water, and shelter to people affected by disasters, and 95 percent of the disaster relief workers are volunteers.
Thanks for reading,

EDITOR-IN-CHIEF
MATT WEBER
matt@HIRpub.com
CREATIVE DIRECTOR
WESLEY GLASSCO wesley@HIRpub.com
NATIONAL SALES jeremy@HIRpub.com
EDITORIAL CONTRIBUTERS
COURTNEY KLOSTERMAN
DAVE KILE
SCOTT SITTLER
ADVISORY BOARD
JIM BUTTERS
RANDY STEPHENSON
CALEB STEPHENSON
RICHARD HAMILTON
COPY EDITOR
DIANE WEBER
PRODUCTION MANAGER
SHANNA QUIGLEY
ONLINE AND SOCIAL MEDIA DEVELOPMENT
GLORIA BERRIO

AD DESIGN AND COORDINATION
SPECIALIZED MEDIA SERVICES, INC. ads@HIRpub.com
be reproduced, stored in a retrieval system, or transmitted in any form or by any means, electronic, mechanical, photocopying, recording, or otherwise, without permission. The editorial content is intended to explain and simplify home-improvement tasks. Tools, products, materials, techniques, building codes and local regulations change. We assume no liability for omissions, errors or the outcome of any project. The reader must always exercise reasonable caution, follow current codes and regulations that may apply, and is urged to consult with a licensed professional if in doubt about any procedures.


To help pet owners create a space that's both comfortable for their furry companions and inviting for guests, HVAC expert and IQAir CEO Glory Dolphin Hammes recommends the following strategies for combating pet odors.
Proper Ventilation: Good ventilation is a fundamental step to tackle pet odors. Open windows and use fans to allow fresh air to circulate, minimizing odors in your living spaces.
Have a Regular Cleaning Routine: Having a consistent cleaning schedule is also important. Regularly clean pet bedding, litter boxes, and other pet-accessible areas to prevent odors from settling in.
Effective Air Purification: It's important to use high-quality air purifiers with HEPA filters to remove pet dander, hair, and airborne particles that contribute
Find more at www.iqair.com
to odors.
Odor-Neutralizing Products: We recommend using pet-friendly, odor-neutralizing products like enzyme-based cleaners to break down odor-causing molecules at their source, rather than masking the smell.
Pet Grooming: A well-groomed pet sheds less and is less likely to carry allergens and odors from outdoors into your home.
Strategic Placement of Air Purifiers: Strategic placement of air purifiers near pet items like litter boxes, food bowls, and beds will minimize their impact on the overall ambiance of your home.
Washable and Reusable Fabrics: Use washable, odor-resistant fabrics for pet bedding and furniture covers to make it easier to eliminate odors through regular cleaning.
Although interest rates have recently fallen from their peak of 7.22 percent, this hasn't significantly improved home affordability. New research has revealed the states where house prices have increased the fastest in the last 5 years.
The experts at Pro Tool Reviews reveals the states with the fastest increase in house prices, as well as the most affordable states, and the states with the highest demand for homebuyers by analyzing U.S. housing price data and average salaries.
1 Maine
2
3
4
5 Arizona
Louisiana is the most affordable state in which to purchase a house, with an affordability score of 7.58/10. Based on the average salary for the area, it would take approximately three and a half years to save for a 15-percent down payment.
New Jersey is the least affordable state to buy a house. New Jersey has the ninth-highest average house price and tenth-highest average salary of $62.3K, meaning it would take an average of just over 6 years to save for a down payment.
Ohio has the quickest average save time for a down payment, where based on average wages it would take an average of three years and two months to save enough money for a down payment for a house in the state.
California has the longest average save time for a down payment, based on average wages it would take nine years and almost five months to save enough money for a down payment for a house in the state.

DeckWise, a leading American-made manufacturer of hidden deck fasteners, and Arbor Wood Co., a pioneer in American-made thermally modified wood products, announce a strategic partnership alliance.
The new DeckWise ThermoClip hidden deck fastener is specifically engineered for edge-groove thermally modified wood decking. The ThermoClip is designed to complement the unique properties of thermally modified wood, providing a seamless and secure fastening solution that maintains the integrity and aesthetics of the decking.
Arbor Wood Co. has long been at the forefront of sustainable and durable wood decking solutions. By subjecting the wood to a specialized heat treatment process, Arbor Wood Co. is able to enhance the durability, stability, and rot resistance of the wood, making it an ideal choice for outdoor applications in any climate. Customers can expect enhanced durability, ease of installation, and a sleek, seamless appearance that enhances the natural beauty of the wood.
Find more at www.arborwoodco.com.


ASK MATT
QUESTION: What are the site requirements for a prefabricated tiny home?
ANSWER: The site requirements for a tiny home depend on how small the home is and the nature of its construction. Many prefabricated “tiny homes” are designated as Traveler Trailer RVs. Federal regulations provide that an RV is a vehicle or vehicle structure not certified as a manufactured home. These types of tiny homes are primarily designed as temporary living quarters for recreational, camping, travel or seasonable use, and not as a permanent dwelling.
To prepare for delivery, the site must be level and firm. The foundation can be constructed of concrete, asphalt, or even compacted gravel. In addition, you need an approach to the site that is wide enough and firm enough for the delivery vehicle. If the approach to your site is straight, it should be a minimum of 10 to 12 feet wide with 15 feet of overhead clearance for delivery. Curves will require more width, and steep approaches can pose a problem for delivery. As for utilities, prefab tiny homes are often connected like an RV, with single drops for power, water and sewer in a simple location to access and hook up.
In many cases, no permits are required, but this varies by location, so call your local zoning office for more information.


SAWSTOP CONTRACTOR TABLE SAW
Billed as “the world’s safest mobile saw,” the SawStop Compact Table Saw (CTS) features built-in technology that stops the blade on contact with skin to keep your fingers intact in case of accident. The safety feature works instantly and electronically whenever the blade contacts conductive material. In milliseconds, the 10-in. blade is buried into a metal safety cartridge, stopped cold (akin to the velocity of airbag deployment).
The new CTS is smallest, most portable saw in the SawStop lineup, although not exactly lightweight (68 lbs.). Whereas lightweight table saws seem like


they’d be easier to carry, in my experience they tend to have vibration and stability issues when operating, so I prefer a heavier, more stable saw such as this one. In this case, the weight seems to come primarily from the AC-powered motor, which is powerful and smooth-running. The saw has onboard storage for the included miter gauge, blade guard, pawls, riving knife and rip gauge.
I should note that the CTS is capable of cutting conductive materials—just remember to engage the “bypass mode” so the material doesn’t trigger the safety mechanism.
Our test model arrived with a saw stand, and although this one doesn’t come with wheels like some other brands, this one doesn’t need them. The stand is very lightweight and folds up flat, so it’s easy to carry and occupies less storage space than the larger wheeled stands. It provides a stable, sturdy base for the saw when cutting, and that’s ultimately what matters most.
The SawStop CTS is a quality-built saw with professional features for the handyman-on-the-go or the DIY woodworker. For those new users who don’t have a lot of power tool experience, the safety feature may prove to be a very sound investment. - M. Weber
www.sawtop.com
This 18V Bulldog delivers on the high expectations of a Bosch rotary hammer, providing an outstanding impact-to-weight ratio and superior performance. The GBH18V-28C 18V Brushless SDS-plus Bulldog 1-1/8-in. Rotary Hammer delivers 2.6 ft-lbs. of impact energy (EPTA) and weighs only 7.3 lbs. without battery. The brushless motor maximizes battery runtime. KickBack Control technology helps reduce the risk of sudden tool reactions in binding conditions, and an anti-vibration system provides maximum comfort. The L-shaped design offers better control for both overhead and horizontal drilling applications. The 360-degree side handle provides a variety of grip positions. The hammer features Vario-Lock to rotate and lock the chisel. This hammer also features Bluetooth connectivity (which connects with a Connectivity Tool Module sold separately), linking the free Bosch Toolbox app on any connected device for easy customization of three different working modes (Auto, Favorite, Soft). - M. Weber www.bosch.com


Use this WoodRiver Circle Cutting Router Jig to cut circles from 2-1/2 in. diameter to 32-1/2 in. diameter with most any plunge router equipped to accept a Porter-Cable style guide bushing. Instead of bolting the router to the jig using a dedicated bolt pattern, simply install the included precision guide bushing into your router base and lower the router onto the sealed bearing of the circle jig base. Circles can be cut smoothly and easily as the router glides through the cutting motion without tangled cords or dust collection hose. Cutting radius is adjustable through locking the tailstock along the 1/2-in. steel guide rods. www.woodcraft.com
Venom Steel offers heavy-duty personal preotective equipment (PPE) that’s built to last. Products include Ripresistant Nitrile Gloves, Heavy Duty Barrier Face-masks, and Heavy Duty Beathable Coveralls which are great for paint, cleanup and automotive work. On testing them, the gloves held up with no rips and tears like you get from the cheapies. This also makes them reusable, if you can keep them clean. The masks work well too. I’ve done so much cedar work in recent years that I’ve developed an acute sensitivity to that particular dust, but on the job, I still find myself working with cedar. I’ll mask up around it even if outdoors to prevent the asthmatic-like reaction I get from it. It’s nice to find these Venom Steel masks are engineered with 3X breathability, which makes working with cedar more tolerable for me these days. - M. Weber www.venomsteel.com


DAP offers a new spray texture line for orange peel and knockdown textures. DAP is also introducing a 16-ounce texture repair can for its popcorn texture. Delivering excellent texture match, the new spray assortment provides quick, seamless repairs to wall and ceiling texture in minutes. The new line features an easy, user-friendly spray control grip. It provides strong wall adhesion that resists crumbling when painted due to the thick, sag-resistant formula. With a quick and easy setup time, it also textures and primes in just one step. The spray textures will be available in water-based formulas that feature a 30-minute paint ready time. Orange peel will also be offered in an oil-based formula that is paint ready in five minutes. www.dap.com


Metabo HPT introduces the new 18V MultiVolt Brushless 1-3/4-n. Coil Roofing Nailer, NV1845DA. With the NV1845DA you can tackle roof repairs, vinyl siding installation, vinyl window installation and smaller roofing projects, such as ridge caps, eaves, and gables, without the hassle of dragging out a hose and compressor just to replace a few shingles. The included vinyl siding adaptor and quick depth adjustment make it easy to install vinyl windows and siding with this versatile tool. The NV1845DA also comes with an 18V 2.0 Ah lithium-ion battery with fuel gauge, an 18V/36V lithium-ion battery charger, hex wrench, safety glasses and carrying bag. www.metabo-hpt.com
The newest product from the makers of E6000 is E6000 Premium, which will bond plastics that other adhesives simply can’t. This unique adhesive formula forms a permanent bond to the most difficult items such as most plastics used in 3D printing, polycarbonate, PVC, ABS, acrylics, polystyrene, fiberglass, etc.,

while also providing super strength bonds to other materials such as wood, metal, fabric, ceramic, glass, cement, clay and more. E6000 Premium is an ideal adhesive for hobby/crafts, home-improvement/DIY projects, auto repairs, industrial applications and more. E6000 Premium has extreme flexibility, will withstand extreme temperatures, is waterproof, dries clear, is paintable, and is washer/dryer safe. www.eclecticproducts.com


By Dave Kile
Ask any deck builder the most likely place a deck will fail and, odds are, they’ll point to the ledger board. If not correctly installed and protected, this single structural element can be the Achille’s heel of a deck, resulting in premature deterioration or collapse. In fact, according to the International Association of Certified Home Inspectors, an estimated 90 percent of deck collapses result from ledger-board connection failures.
Over the past 30 years, I’ve seen my share of questionable ledger applications and have identified four common—and easily avoidable— mistakes:
Correct anchoring of the ledger board is crucial to a deck’s composition and safety. The vast majority of ledger connection failures
are due to improper fastening. For optimal support, the ledger board must be attached to the rim joist of the house. It is also important to use the right fasteners (see more on this below).


CHOOSE COATED CARBON OR STAINLESS STEEL
• HIGH STRENGTH COATED CARBON STEEL FOR ENDURANCE
• STAINLESS STEEL FOR SUPERIOR CORROSION RESISTANCE
4 CLIP PROFILES


• PRECISE FIT ELIMINATES LOOSE DECK BOARDS
• INCREASES HOLDING POWER
ELEVATES YOUR DECK BOARDS
• BETTER AIR FLOW REDUCES ROT
• RELIEVES LATERAL LOAD STRESS


Because the weight of a deck is distributed per square foot between the joists and the ledger board, the importance of accurate spacing between joists and beams cannot be overstated. Leaving too much space between these bracing elements is a recipe for disaster. Be sure to follow IRC (International Residential Code) guidelines as well as any instructions provided by materials manufacturers.
This mistake is quite common whether due to misinformation or cutting corners. Improper fastening issues can range from not using approved screws and bolts to not using enough fasteners. For ledger applications, it’s best to use hex or carriage bolts since lag bolts and nails have a tendency to strip out of wood over time. I’ve even heard of cases where builders have been able to pull a deck away from a house with just a good yank because the original installer used nails that had corroded. Look for sturdy metals such as stainless steel or hot-dipped galvanized that are resistant to rust and corrosion. I also recommend applying a butyl joist tape, like Trex Protect, to help keep screws dry and in place.
Easily one of wood’s worst enemies, moisture is a recurring theme across ledger board failures. In most deck installations, there is a gap left between the house and the deck that allows water to seep down onto the ledger board where it can

penetrate the wood and lead to decay. This is why it’s critical to protect the ledger with waterproof flashing. While there are several types of flashing available, only tapes have the ability to create a waterproof seal. These self-adhered membranes also won’t corrode.
Trex Seal represents a new generation of waterproofing membrane that combines the best performance features of metal and tape flashing. This aluminum-lined


tape comes in sizes to protect the entirety of the ledger board. An 11-inch-wide tape provides complete coverage of the ledger board face and also seals any gaps between the ledger and the substructure. A 22-in. sub-ledger tape creates a continuous water-tight seal between the ledger and the housewrap to prevent water from infiltrating the house. Both products feature convenient release liners for easy and accurate application and are Code AAMA711 compliant. These extra layers protect the ledger board on all sides
significantly reducing the likelihood of wood decay and increasing the lifespan of a deck.
HAbout the author: Dave Kile is owner and CEO of IBP, LLC, which manufactures and markets some of the decking industry’s most successful waterproofing innovations, including Trex RainEscape, Trex Protect and Trex Seal under a trademark license agreement with Trex Company, Inc. For more information, visit TrexSeal.com.

The deck-ledger connection is notoriously susceptible to rot, which can dangerously affect the stability and support of the deck. Deck2wall Spacers help prevent rot from occurring by separating the ledger from the supporting structure, providing a path for water and debris to flow harmlessly through the assembly, while promoting circulation and drying. Stacked washers have often been used as spacers over lag bolts, but Deck2wall Spacers have attachment holes to keep them in perfect alignment for faster and easier installation. They offer more bearing surface than washers for better load distribution, and the plastic spacers are non-corrosive. Plus, the one-piece design and installation method provide superior waterproofing. Deck2Wall Spacers also work as a long-lasting solution for attaching shade structures, posts, stair stringers, landings, built-up beams or mechanical equipment. Made in the USA and available in two sizes, the spacers are injection-molded, fiberglass-reinforced polypropylene.

By Gabby Williams


Many homeowners opt for an open-plan concept when remodeling their homes. This design choice creates a sense of spaciousness and fluidity by removing walls and barriers between rooms.
While these spaces offer many advantages, such as increased natural light and better flow, they also present unique challenges when it comes to choosing colors and lighting. The key to successfully designing an openconcept space lies in creating a harmonious and functional environment that feels cohesive yet allows for distinct functional zones.
In this guide, we’ll walk you through choosing the right colors and lighting to enhance your open-concept living space.
Before diving into color and lighting choices, it’s essential to understand the layout and purpose of your open-concept space. Typically, open-concept areas combine the kitchen, dining room, and living room into one large space without walls.
Because of this, the design choices in one area will directly affect the others. The goal is to create a sense of unity throughout the space while still allowing each area to serve its intended purpose effectively.
The foundation of a successful open-concept design is a cohesive color palette. Choose a


neutral base color that will act as the canvas for your space. Neutral colors like white, beige, gray, or soft pastels are ideal because they provide a versatile backdrop that works well with various accent colors. This base color should be consistent throughout the space to tie different areas together.
Select one or two accent colors to make the space more interesting visually. These colors can be used on feature walls, furniture, or decorative accessories. It’s important to distribute these accent colors evenly across the space to maintain balance.

Consider how each area flows into the next. For example, the color you choose for the living area should complement the kitchen cabinetry and the dining room furniture. This creates a seamless transition and avoids any jarring contrasts that could disrupt the overall harmony.
Use color to subtly define different functional zones. For example, a darker shade of your base color can be used in the dining area to create a more intimate atmosphere, while a lighter shade can keep the living room feeling airy and open.
Lighting is crucial in an open-concept living space, as it impacts the mood, functionality, and overall aesthetic. The challenge is to create a lighting plan that is both cohesive and adaptable to different activities and times of day.
Maximize natural light with large windows, skylights, and glass doors. Natural light makes the space feel larger and enhances the colors in your palette. Arrange furniture to allow light to flow freely and avoid blocking windows with heavy drapes or bulky furniture.
Adopt a layered lighting strategy that includes ambient, task, and accent lighting to ensure your space is well-lit and versatile.
Ambient lighting from chandeliers, recessed lighting, or large pendant lights is the primary source of light and should be consistent throughout the space.
Task lighting provides focused illumination for specific areas, such as the kitchen island or reading nook. For example, floor lamps in the living area and pendant lights over the dining room table.
Accent lighting highlights architectural features, artwork, or decorative elements. These can include wall sconces, track lighting, or LED strips.
Choose complementary lighting fixtures to maintain a cohesive look. For example, if you have modern, minimalist furniture, opt for sleek, simple lighting fixtures. If your decor leans toward traditional or rustic, consider fixtures with warmer finishes like brass or bronze.
The way your space looks and feels can change dramatically depending on the time of day and the amount of natural light available. Here’s how to adjust your lighting and colors to adapt to these changes:
In the morning, natural light is at its brightest and coolest, so your space will feel the most open and airy. Use minimal
window treatments and light, reflective colors to enhance this effect.
During the afternoon, natural light becomes warmer and softer. Warmer accent colors and wood flooring will complement this golden hue. Adjustable window treatments, like blinds or shades, can help you control the intensity of the sunlight.
In the evening, natural light fades, and artificial lighting becomes essential. Use a layered lighting plan, including ambient lighting to create a cozy atmosphere, task lighting for specific activities, and accent lighting to add drama or highlight features. A dimmer switch allows you to adjust the brightness according to the mood you want.
Keep the following practical and aesthetic considerations in mind when selecting colors and lighting fixtures:
In high-traffic areas like kitchens and living rooms, choose paint colors and lighting fixtures that are durable and easy to clean. For example, matte finishes can be prone to showing fingerprints and smudges, and lamp shades can accumulate grease and grime. Energy-efficient lighting options like LED bulbs consume less energy and last longer than traditional incandescent bulbs.
Additionally, using natural light during the day can reduce the need for artificial lighting, lowering your energy bills.
Soft, neutral colors and warm lighting can create a relaxing environment, which makes them ideal for sleeping areas and reading nooks. Meanwhile, bold colors and bright lighting can energize and invigorate, making them more suitable for food preparation areas.
Consider size and scale. The size of your furniture and lighting fixtures should be proportionate to the size of the space. In an open-concept area, oversized furniture or light fixtures can overwhelm the room, while toosmall pieces can make the space feel empty and uninviting.
Don’t be afraid to add personal touches and experiment with different colors and lighting arrangements. Use decorative accessories like throw pillows, rugs, and artwork to introduce pops of color, or pick unique lighting fixtures that reflect your personality.
Thoughtful planning and attention to detail will help make your open-concept living area the perfect blend of comfort, style, and functionality. By selecting a cohesive color palette, employing a layered lighting approach, and adapting your design to the natural light available, you can create a space that is inviting, harmonious, and a true reflection of your style. H

Matt Weber
With the popularity of open-concept living spaces, remodels often involve the removal of a load-bearing wall. Removing a wall can connect two rooms into one, opening the flow of the room for a shared living space.
Removing a load-bearing wall can dramatically change your home's layout, but it's a project that requires careful planning, structural understanding, and often professional guidance as it affects the entire framework of the house. Load-bearing walls support the structure above them and are designed to transfer weight from the roof, through the floors and down to the foundation. For example, exterior walls are almost always load-bearing, and walls that run perpendicular to the joists are load-bearing walls. If you have access to the original building plans, these can tell you if the wall supports any weight.
can increase dramatically, and second-story load-bearing walls can cost twice as much. Check with your local building department for necessary permits. This project often requires approval due to structural changes. Some cities require inspections to determine if a wall is load-bearing before removal, and the costs mentioned above do not include permits or inspection fees.
REMOVING A LOAD-BEARING WALL FOR AN OPEN-CONCEPT FLOOR PLAN
The construction costs for removing a loadbearing wall in a single-story home can range from $2,000-$5,000. If the job includes rerouting plumbing and electrical wiring, the cost
When in doubt, hire a structural engineer to assess the wall. They can provide a plan for temporary supports and detail the new structural elements needed. The engineer will calculate the required load capacity and recommend an appropriate beam size.
Plan where the new framing support will go. This might involve installing beams, columns, or even a new wall elsewhere.
The new wall will typically need to be spanned with a load-bearing beam to transfer the load to the floor. A beam built of SPF dimensional lumber must be the same thickness as the wall framing, which requires insertion of 1/2-in. of

insulation or plywood to bring the doubled 1-1/2 boards of the beam to the 3-1/2-in. depth of a typical framed wall. As an alternative, a structural engineer might suggest a beam made of steel or engineered wood.
The beam must be supported from below by solid framing on each end and book-ended by king studs. Consult local code guidelines for additional framing requirements in your area.
If there are any electrical wires, plumbing, or HVAC ducts within the wall, shut off power, water, or heating/cooling systems before

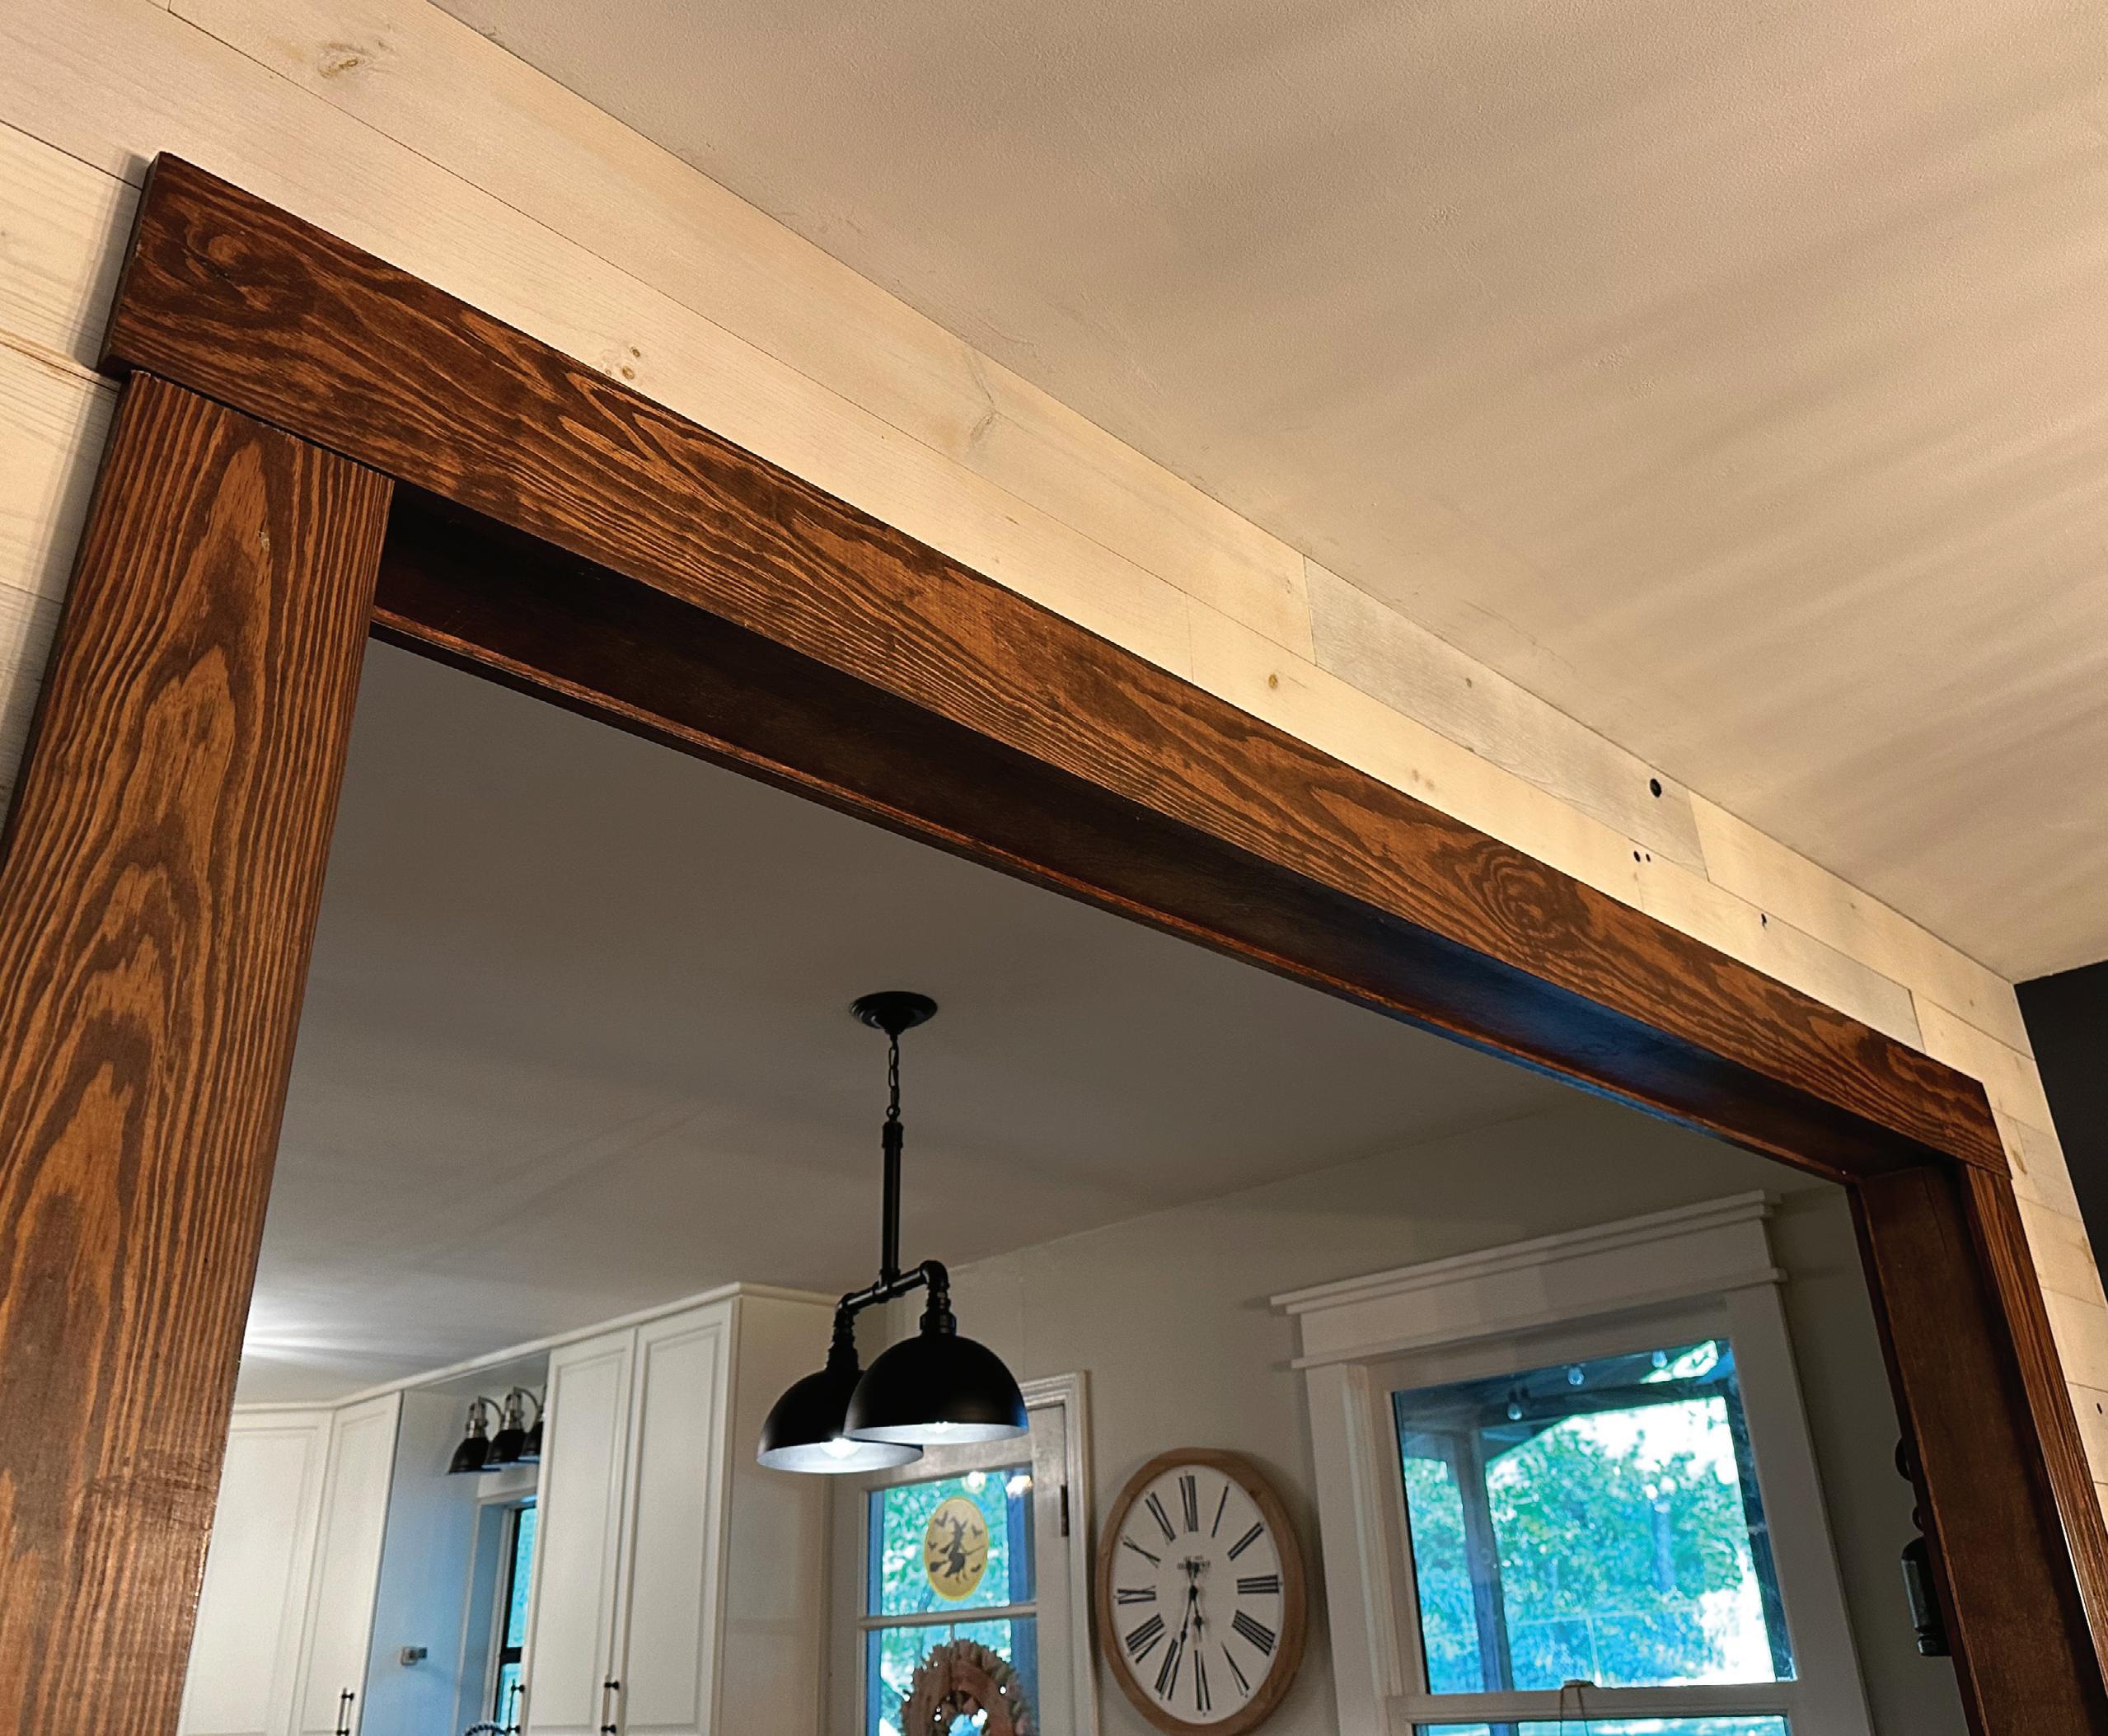
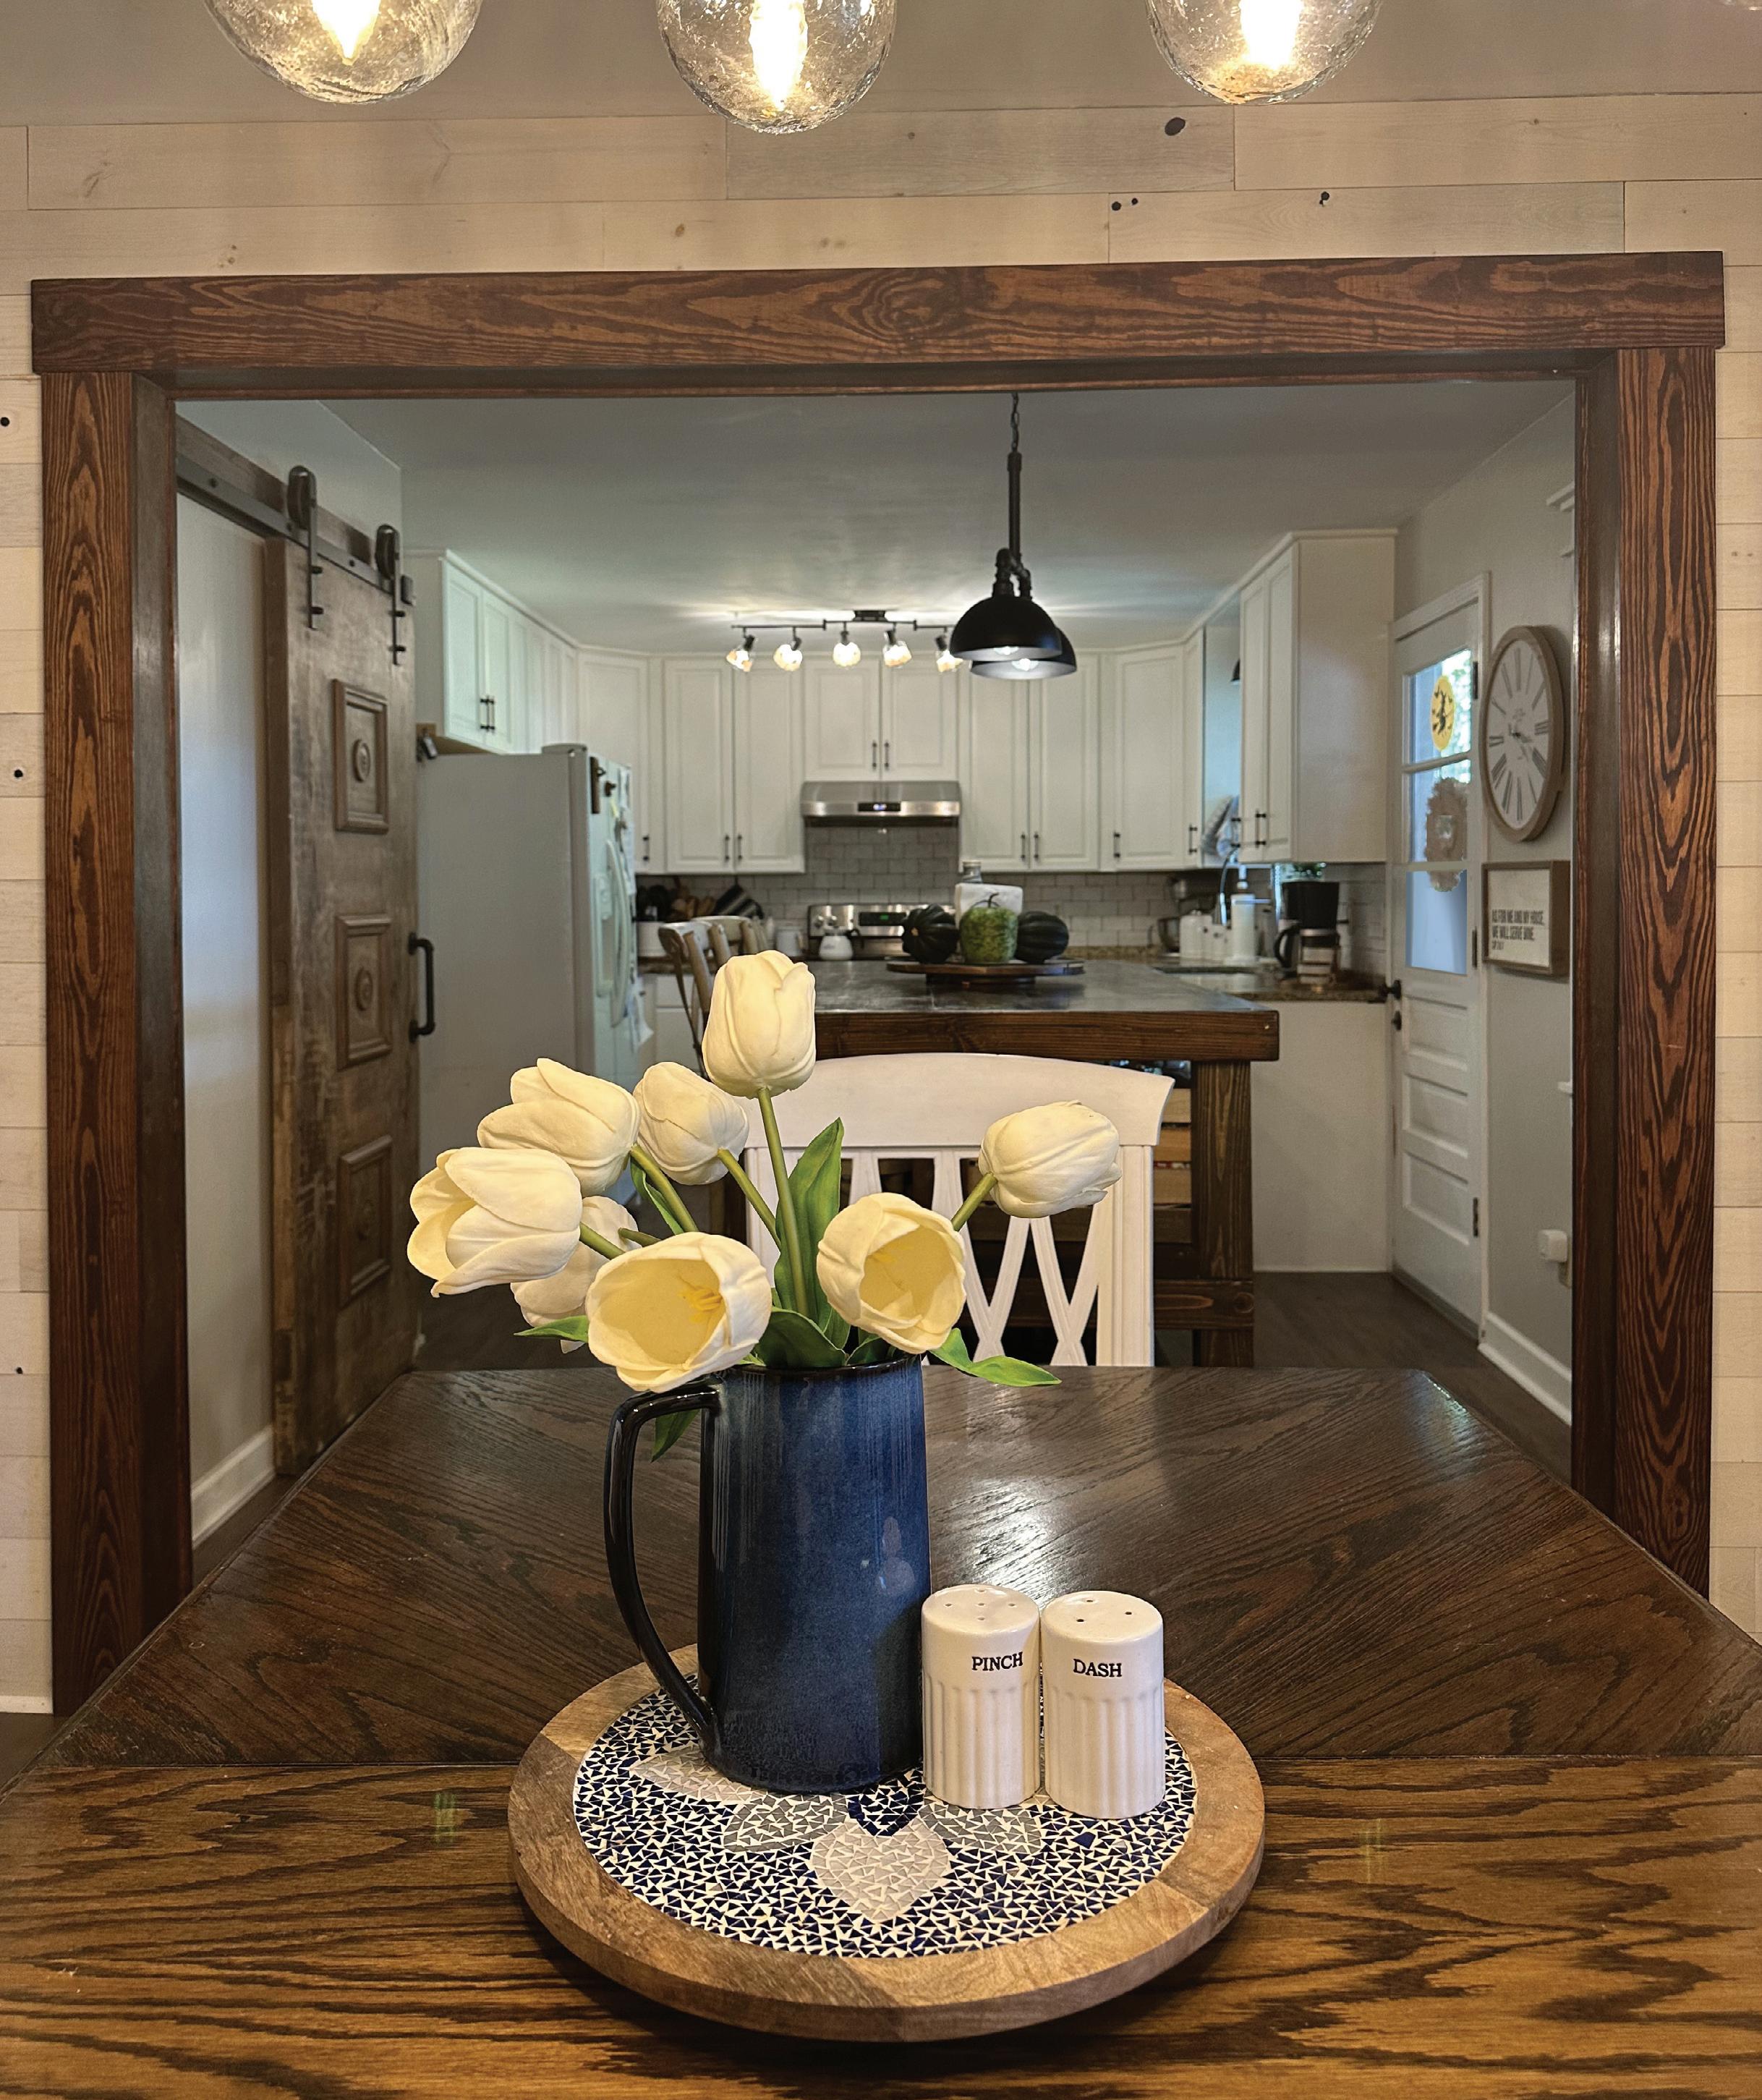
Shown here is a wall dividing a kitchen and dining area which will be removed.
We drove a metal rod through the ceiling into the attic so we could easily pinpoint the work area from inside the attic.

proceeding. Have a licensed electrician or plumber reroute any utilities as necessary. Remove any furniture, decorations, and flooring that might get damaged or obstruct the work area. Close partition doors, mask off the interior with drop cloths, open windows, and set up portable fans to vent dust outside, because drywall demolition is messy work.

We found our rod inside the attic, which helped us find the electrical lines to be relocated. Although this wall ran parallel to the roof trusses like a partition wall, the framing above the door below supported the angled bracing of a hip roof. If the wall you’re removing is load-bearing at any point across its span, it will require temporary ceiling support and a replacement beam for removal.
Gather all tools and construction materials on site before starting the removal process.
Before removing the wall, design and set up temporary supports. This usually involves wood beams or jack posts placed at intervals parallel to the wall. To allow room to work, position the temporary supports approximately 3 to 4 feet on either side of the wall you're removing. These supports essentially comprise a temporary wall
to carry the overhead load as the old wall is being removed and reconstructed. Professionals often use adjustable steel jack-posts to create a temporary wall. Make sure the temporary beams are level and securely fastened, distributing the load evenly. This is essential to avoid sagging or structural issues.
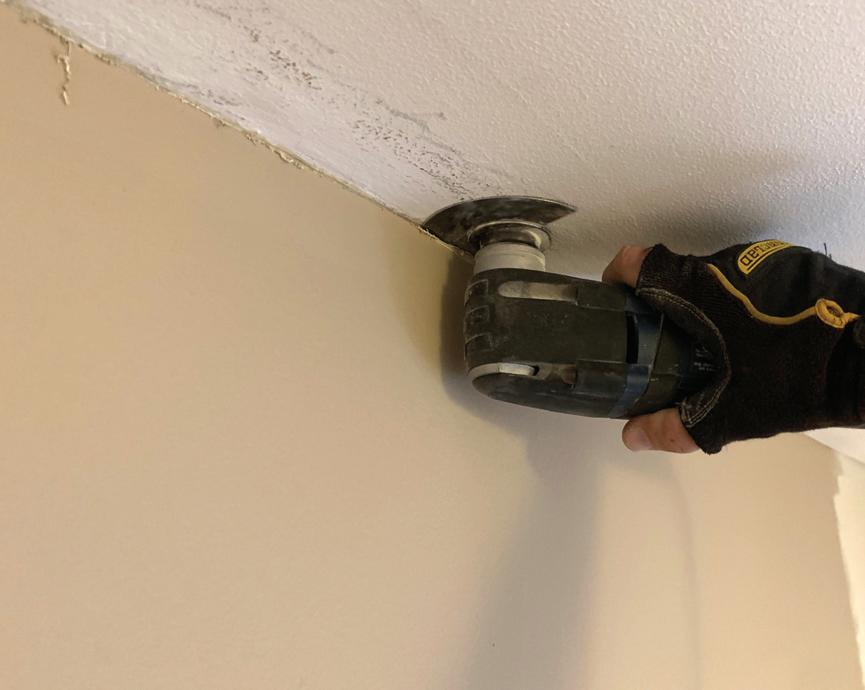
Start by removing drywall or plaster. Note that the smaller the pieces, the bigger the mess and

• STUD FINDER
• HAMMER
• RECIPROCATING SAW
• PRY BAR
• SCREW GUN
• SCREWS AND NAILS
• LEVEL
• TAPE MEASURE
• TEMPORARY SUPPORT BEAMS (ADJUSTABLE JACK POSTS, WOODEN BEAMS)
• NEW BEAM (LUMBER, STEEL, OR ENGINEERED WOOD)
This is a standard temporary support setup for removing a load-bearing wall.
• NEW STUDS OR VERTICAL FRAMING
• CONSTRUCTION ADHESIVE
• BOLTS AND METAL BRACKETS (IF REQUIRED)
• SAFETY GEAR (GLOVES, GOGGLES, DUST MASK)
• PERMITS (IF REQUIRED)
• DRYWALL
• PAINT
• CAULK
more cleanup required. For drywall, use a utility knife or reciprocating saw to carefully cut along the edges and seams. The HIR team recommends cutting strategic holes in the panels and prying the panels away from the wall studs in large pieces rather than smashing them into tiny bits with a sledgehammer.

Next, carefully take out the studs. A reciprocating saw can make quick work of the nails at their tops and bottoms. Keep the area above the wall supported at all times.
If possible, salvage materials like wood or fixtures for reuse. Safely dispose of the drywall, studs, and any other materials. This project generates a lot of waste, so have a plan for disposal.


When removing drywall, you can reduce mess and cleanup by removing large sections of the panels at a time. Less breakage creates less dust. Try to cut the seams and pry the panels from the studs rather than smashing the drywall into small pieces.


If you’re not comfortable with electrical or plumbing work, then hire a pro to relocate any utilities inside the wall.

The door frame carried the roof framing above, and is where we had to concentrate our temporary supports. We nailed temporary studs to the wall’s top plate directly beneath the roof framing and situated them on each side of the wall to serve as placement guides whenever we installed the new beam. Note the cardboard that protects the ceiling. Once the ceiling was supported, we removed the old door header.


The old wall was replaced with a 4x12 beam. Note that this massive beam weighed a boatload once constructed. Hoisting it into place was not an easy task. For this reason, you might consider an engineered wood or steel beam specified by a structural engineer.
Once the wall is removed, install the new beam that will support the load. The beam will span the entire length where the load-bearing wall stood. It should rest on sturdy supports at either end, such as posts or columns that extend down to the foundation. A structural engineer can calculate the required load capacity and recommend an appropriate beam size and type.

Ensure the beam is level and securely fastened at both ends. Follow local guidelines for making the framing connections, which might require using metal brackets and bolts to attach the beam securely to the supporting posts. Apply construction adhesive for added stability.
Be sure to follow the engineer’s specifications for how the beam should be installed. Lifting a heavy beam into place could require construction machinery or professional help.
After the structural work, you might need an inspection to ensure compliance with building codes.


Drive screws through the beam into the ceiling framing to lock everything together.

We shimmed out the studs to strengthen the framing and provide a larger nailing surface for the surrounding drywall and trim we planned to add.
Remove the temporary supports only after everything is secure and inspected. Slowly lower the temporary supports, allowing the weight of the structure to be transferred to the new beam.
Insulate the new space as needed, then drywall or plaster over it. Paint, install trim carpentry, and any other finishing work to blend the new space with the existing area.
Removing a load-bearing wall is pro-grade project that probably exceeds the skillset of many DIY’ers, but the ambitious and experienced might take a whack at it. Removing a

wall is a significant structural change that requires expertise. It’s always a good idea to consult a structural engineer to determine an appropriate plan, even if you plan to do the construction. While this article provides an overview, the actual execution might vary depending on your home's structure. Always prioritize safety and structural integrity, and hire professionals for parts of the project beyond your skill level.
With careful planning and execution, you can successfully open up your living space, enhancing the look, functionality, and overall flow of your home.


The Home Improvement & Repairs team attended the 2024 National Hardware Show, where an interesting approach to an atticaccess ladder caught our eye. We asked about its unique design and met the inventor, Ed Ingalls, CEO of Tri Line Services, LLC, manufacturer of the Safe Step Stairs.
Ed explained its origin: He and his wife had moved to a retirement community, only retirement didn’t sit well with him, so Ed launched a handyman business to service the retirees in his new community.
“As my customer base grew, people began to ask me to get their holiday items out of the storage space above their garage and put them back after the season,” explains Ed. “I quickly found that at 60 years old, it was not easy to navigate the narrow steps and unstable fold-out ladders. I understood
By Matt Weber


why my customers were asking me to do it for them.
“I developed the concept of a set of stairs that were built to the same standards as a regular set of stairs where the run of the step, rise of the step, and angle of the stairs were the same or very similar to what people already navigate and are familiar with.
“After several months of thinking about what would and would not work, I came up with a concept for a set of stairs that was simple and did not require expensive motors, cables, switches, or need to be connected to power to operate. I based the idea on a SUV tailgate being leveraged up and held up, yet easily opened and closed by hand.”
Ed made some basic calculations and ordered a set of industrial gas shocks that were much larger than those of a SUV. He then drew up the concept of a hinge-and-lever system to hold up the stairs from one end

with no cables or other devices impeding the use of the stairs from the bottom to the top.
“After gathering the materials, I found a weekend where my wife was away and built a set of stairs in my garage, then cut a hole in our garage ceiling that was 22 inches wide and 10-1/2 feet long,” says Ed. “I installed the stairs, and my hinge-and-lever system proved the concept that the stairs could be held from one end and would open and close easily.”
“Then my wife came home! She saw the hole and said, ‘I don’t know what you are doing, but you better fix it!’”
It took a year for Ed to perfect the geometry and to design the hinge and other components to construct a viable set of retractable stairs. At that point he started the patent process, which is currently pending.
Tri Line Services, LLC, brought Safe Step Stairs to market, offering them as fully built
sThe first step is to assemble the Safe Step Stairs from the kit, which includes all necessary components except for the lumber.
Installation is a two-man job that requires careful alignment of the staircase during installation. s


stairs including installation in the central Florida market, and now the company offers them sold as a kit across the U.S. and beyond.
The major difference between the Safe Step Stairs concept and conventional attic access methods is that most available options are ladders, not a set of stairs. Ladders are steep and have narrow and shallow steps or rungs for your feet. The design of fold-out attic ladders necessitates that the climber be on their toes, as only about 3 or 4 inches of depth on each step is available. This, along with the steep angle and typical lack of stability, results in a product that can be difficult and possibly dangerous to climb, particularly as we age.
DIY installers should take a cue from pro installers and devise a method to lift and suspend the staircase during installation.
Pro installers make use of a winch secured to the roof framing to facilitate lifting and adjusting the stairs into position when making the hardware connections.
Safe Step Stairs are not a ladder at all but an actual set of stairs that retract to the ceiling with wide and deep steps on an angle, similar to almost all stairs used on a daily basis. Due to the wide and deep steps, users can easily navigate Safe Step Stairs because most of the foot can be firmly planted on each step. Combined with the shallow angle, easily accessible handrails, and an unobstructed pathway, this provides a unique method for easy attic access. The Safe Step Stairs are easy to open with a light pulldown of about 20 lbs. and will stay down. To close them, simply lift them up about two feet, and they will retract to the ceiling and stay closed.
The Safe Step Stairs are designed to install between roof trusses and will require about 10-1/2 feet of unobstructed ceiling access. This

Once installed, the Safe Step Stairs can be trimmed and painted to match the surrounding ceiling.
s

The build process usually takes between three and four hours for first-timers, and installation is a two-person job that normally takes three to four hours.
The installation of Safe Step Stairs does not alter the home structurally in any way, and its design does not involve cutting joists or trusses at all. The stairs are installed between the existing joists or trusses, so only the drywall is cut.
The standard kit is designed for a 24-inch on-center joist/truss system using 2x6 materials for the joists/truss. Customers often install the stairs in wider or narrower applications with up to 2x12 joists/trusses.
means that the orientation of the ceiling framing in relation to the house design might make this attic-access method impractical for some homes, so it’s most appropriate for use in garages, large rooms, and open-concept floor plans.
The kit is designed so anyone experienced in the use of general hand and small power tools can build and install the stairs. A comprehensive installation manual is included, and customers have access to several online instructional step-by-step videos.
The kit includes every component necessary to build and install stairs except the lumber.
Three standard kits are designed to be installed in homes with a floor-to-ceiling height of 7-1/2 to 10-1/2 feet. The kits carry a twoyear unconditional warranty on all included components.
“I have invented other products and always see a problem as an opportunity to find a solution,” says Ed Ingalls. “So, I set out to find a solution for my customers to be comfortable getting into and out of their attic, no matter what their age.”


By Courtney Klosterman
Turning a house into a home can feel incredibly rewarding. But renovating can be tricky even for homeowners with experience—let alone someone without that technical knowledge.
Before you start your next project, consider these tips to help you avoid costly home renovation mistakes.
Nearly two-fifths (39 percent) of homeowners from Hippo insurance company’s annual Housepower Report revealed home upgrades were one of their key priorities. However, renovations or upgrades could impact your insurance coverage limits and might not be covered by your existing policy. It’s important to determine how much homeowner’s insurance you need for your unique circumstance.
Understanding the difference between maintenance, repairs, and renovations can also help inform your decisions. Insurance coverage addresses each of these three major items differently:


Maintenance involves routinely inspecting and servicing your property's systems. This can help you save on insurance costs by allowing you to identify issues early (before they become big problems) and avoid claims altogether.
Repairs, on the other hand, are fixes for damage caused by unexpected events like storms or accidents, and these are often covered by insurance policies (though with potential deductibles or exclusions).
Renovations, which involve substantial home improvements, generally aren’t covered by standard homeowner’s insurance. Major renovations might require specific coverage like builder's risk insurance.
It’s critical that you review your homeowner’s insurance policy carefully to understand its coverage for repairs and renovations—and consider additional coverage if necessary.
Starting a DIY project without understanding the full scope of work is a common home renovation mistake. If you’re not clear on the steps, timeline, or expenses needed to achieve your goal, pause your project and reassess. A realistic understanding of the project's complexity helps you avoid running out of resources or hitting other roadblocks in the middle of a project.
These roadblocks could include changing your mind regarding important decisions halfway through the project, underestimating the amount of demolition work required, or the cost of materials being higher than expected.
To help avoid these pitfalls, first clearly define what you hope to achieve with this renovation. Is it improving aesthetics, increasing functionality, or adding home revalue? The answer to this question will be your north star during the project and help guide your decision-making process.
Make a list of features you want to have and features you need to have. This will help cut down on items that are not necessary if you run into any budgetary or time constraints. Do your research and ask the professionals. Rely on reputable sources and make sure the websites, contractors, and other sources you use are certified or knowledgeable.
Be honest about your own skill level. It’s okay if you are confident in taking on only parts of
the project but not others. Know your limits and recognize when it is time to call a professional.
You may not know everything that’s going on behind your walls, but it’s important to be prepared for surprises—especially if you live in an older home. These issues could include anything the initial home inspection missed, like faulty wiring, structural issues, mold, and pest damage. They can also range in severity and cost, so it’s important to have extra time (and budget) in your DIY project plan to help limit their disruptiveness. Taking care of these hidden surprises will help improve your home more than ignoring the issue.
Before starting, inspect the project area for signs of water damage, mold, pests, structural issues, etc.
Create a contingency budget by allocating a portion of funds for unexpected costs. The amount should depend on the scale of your project, but 5-10 percent of your total project budget can be a good rule of thumb.
Research your home's age and history to help uncover potential problems common to homes built in its time period. These could include things like outdated wiring or lead paint.
Always plan for delays so you’re not surprised if you run into setbacks.
It’s important to consider if your project will alter the footprint of your home. If it does, you could require a permit or inspection before getting started. Skipping a permit or inspection could result in multiple consequences, from lost time to costly fines. It could also damage your home’s resale value, void your homeowner’s insurance, or even lead to potential legal trouble.
Projects that could require permits include cutting holes for new windows and removing or adding plumbing or electrical systems. Each city has its own rules about what requires a permit. Check with your local building department to confirm whether this applies to your specific DIY project.
If you do need a permit, the first thing to do is complete a permit application from your
local building department. Filling out a permit typically involves fees. These permits can range from $20 to thousands. Larger upgrades can cost more than smaller projects.
Make sure to schedule any inspections that are required for your specific permit. These inspections can occur at various points in the project to ensure you comply with your local building codes.
Once everything else is complete, you must wait to gain approval from your municipality. This timeline can vary depending on the project’s complexity and location. Apply for a permit as soon as possible. It’s important to start the process early (at least a few months before your project begins) and factor that time into your overall project plan.
To save time or money on a project, you might try improvising tools or materials. While this can seem like a good idea in the short term, it can lead to wasted time as you struggle with frustrating inefficiencies.
Materials or tools could break, causing subpar results and backtracking to correct the mistake. Worse yet, it could also lead to home damage, re-doing parts of the project, or even safety hazards.
Invest in the right tools and quality materials upfront for an ultimately more successful DIY project. Create a detailed project plan with information on the steps for each part of a project. This will likely take the most time, but it’s helpful to know what tools and materials you will need down the line.
Make a list of all the tools and materials you need to complete the project on time, on budget, and safely and effectively. Once you know what tools you need, consider if these are more specialized tools you’ll only use once or if they’re worth the long-term investment. See if family, friends, or your local home improvement stores would be willing to rent or loan their tools.
Avoid choosing the cheapest option if it’s not the best choice for the job. While finding lower-cost tools or materials is budget-savvy, don’t let it consume your entire focus and compromise the safety or quality of your home.
Ignoring safety precautions is one of the top home renovation mistakes to avoid. It can lead to serious consequences like potential bodily harm, damage to your home, or incurring expensive repair costs.
Always wear safety glasses when using power tools, cutting materials, or working with chemicals. Use tools according to the manufacturer’s instructions and inspect them for damage before or after use.
If you’re working on an electrical system, make sure the power is turned off and use insulated tools.
Inspect ladders beforehand, and maintain three points of contact while climbing to help ensure stability.
Keep a fire extinguisher nearby and know how to use it, especially if there is an elevated risk of generating sparks or overloading circuits.
Open windows or use fans for ventilation when working with paints, solvents, or power tools.
Neglecting proper debris disposal during a DIY project can have financial, environmental, and even legal consequences. Improperly discarded materials can cause pollution and impact local wildlife. There are often strict guidelines governing waste removal and disposal, and violating them can lead to costly fines. Some debris, like old paint or certain appliances, can pose health risks if handled incorrectly. Research local regulations for waste disposal, including disposal sites for specific materials and any required permits.
Simplify the disposal process by categorizing project debris into categories like standard waste, recyclable or reusable materials, donatable items, or hazardous waste. Handle hazardous materials like paint, chemicals, and electronics with care. Contact your local waste management for proper disposal methods.
Consider hiring a junk removal service to handle debris removal efficiently and responsibly. Properly vet the company and ask for receipts to confirm that debris was taken to the proper channels for disposal.
Creating a home that looks beautiful is an important part of loving where you live. However, neglecting practical considerations can result in a space that is ultimately frustrating or inefficient to use.
For example, choosing a visually striking but poorly ventilated kitchen hood might lead to unpleasant odors. And a layout that looks stunning could hinder daily routines by not offering enough space.
Create a list of essential functions for the space before considering aesthetic elements. What do you need it to achieve beyond looking beautiful? Research materials, finishes, and layouts to help determine if they are both aesthetically appealing and realistic for your home or lifestyle. Experiment with different layouts to see which options work best.
If applicable to your project, consider the importance of storage in your space. These solutions can enhance functionality and help reduce clutter.
Focus on the details like proper lighting and comfortable seating. This can help drastically improve someone’s overall experience.
If you’re embarking on DIY projects to meet your financial goals, it’s important to be honest with yourself about whether you should tackle a project on your own. Homeowners who bite off more than they can chew run the risk of costly errors that require professional repairs.
Honestly evaluate your skills and experience level when it comes to the specifics of your project. Break down the project into smaller tasks. Identify which tasks you can confidently handle, and which require specialized skills.
Weigh the potential cost savings of DIY against the potential costs of mistakes or delays. Factor in the cost of renting tools or purchasing specialized materials.
Consider your available time and the project timeline. If time is limited, hiring professionals might be more efficient.
Some tasks, like electrical or plumbing work, require specific licenses and expertise. Prioritize safety by hiring professionals for these tasks. Professionals can often navigate the
complexities of local building codes and permits more efficiently.
For tasks that significantly impact the project's outcome (e.g., foundation work, roofing), consider hiring professionals to ensure quality and longevity.
Just like setting a proper budget is essential, failing to set a realistic timeline for a DIY project is a common pitfall. Underestimating how long renovations will take can result in project delays, which can disrupt daily life and lead to increased stress. Rushing to finish a project can also compromise the overall quality of work and increase the likelihood of errors. You can create a more realistic timeline from the start of your project if you divide the project into smaller, more manageable tasks for a clearer picture of the overall workload. Try using calendars, project management apps, or spreadsheets to help visualize all the tasks in your timeline and track progress. Consult with professionals or experienced DIY’ers for insights into project timelines. Account for potential setbacks like material shortages, weather conditions, or tool malfunctions. Identify critical tasks (like gaining the right permits) and focus on completing those items first. This helps maintain project momentum. Avoid overestimating your own productivity. Always build flexibility into your schedule and prepare for setbacks.
If you decide to outsource specific parts of your home-improvement project, choose the right professional for the job. Rushing to a decision without thoroughly researching their references, portfolio of work, and licensing can result in costly home renovation mistakes. That includes subpar workmanship, project delays, budget overruns, and even legal complications.
Ask friends, family, or your larger community for referrals to trusted professionals. Verify that the contractors you’re considering have the necessary licenses and insurance to protect your interests. Request a portfolio documenting the professional’s previous projects. Check to see if
this work aligns with your goals or desired style. Don’t be afraid to conduct informal interviews to determine their communication skills and professionalism. Ask for a detailed contract that outlines the project scope, timeline, payment terms, and any applicable warranties.
Incorrect measurements are a common and costly DIY mistake. Human error can result in the need for replacement materials and reworking the project, which creates financial losses or dreaded project delays. Working hard on a task only to realize it was a wasted effort can feel incredibly frustrating.
To help avoid this common pitfall, use the correct tools like a tape measure, ruler, or laser distance meter. Don’t “eyeball it” when it comes to measurements.
Measure twice, cut once. This common phrase among DIY’ers and pros alike helps ensure you’re careful now to avoid headaches down the road.
Make sure you’re measuring on an even surface that’s clear of obstacles.
If you can, lean on another person to review your work and help catch any errors you miss. Be patient and methodical when it comes to taking measurements. Rushing this phase can lead to mistakes. Also, be careful if you’re
converting between different measurement systems. Double-check your calculations.
It’s tempting to take on multiple projects at once to speed up the DIY process. However, juggling multiple projects at once can easily lead to overwhelm. This can cause errors, mismanagement of resources, and a decline in the project’s overall quality.
Consider how each project would improve your quality of life or home quality. Prioritize the areas that require the most urgent home upgrades. Set achievable goals for each project, and divide larger projects into smaller, more manageable sub-projects—then only take on one area at a time while thoroughly considering the scope of work for each.
Dedicate specific time blocks for each project to prevent feeling rushed or stressed. Organize materials for each separate space to avoid confusion and clutter. Avoid burnout by scheduling breaks between projects to rest and recharge.
About the author: Courtney Klosterman is home insights expert at Hippo, the home insurance company focused on proactive protection. For more, visit www.hippo.com.
You’ve probably heard of a building permit, but have you heard of a demolition permit? The HIR team encountered this concept when we received an unexpected visit from a building inspector as we were removing an old, rotted deck. The inspector noticed the pile of old boards accumulating in front of the house and stopped to ask if we had a permit for the work.
A permit for what? We explained to him that we had not yet secured a building permit because we were not building anything—in fact, we were doing the opposite.
We were then told flatly: “It doesn’t matter.” The inspector informed us that any change to the property which cost $200 or more required a permit from the city. Since our team had been hired by the homeowner (and it was not the homeowner performing the work), removal of the deck required a permit whether we planned to build a replacement deck or not.
This may or not apply to your locality, but it’s a good idea to learn the rules and regulations for the area where you’ll be performing any work.
For the record, that inspector did not fine us but did require us to secure a permit before continuing the work. The permit cost us $20.
— Matt Weber, editor

By Scott Sittler
Safety looks like a lot of different things in the home-improvement world. It means wearing the proper clothing and PPE, knowing how to use the right tools, and being aware of your surroundings. But on larger projects, you might need to buy or rent a trailer to complete the task. Safety is just as important, if not more so, when you’re out on the road.
So, before heading out to pick up your building materials, furniture, tools, or whatever else you need, check out these practical and critical tips to keep you and everyone safe during your next project.
When planning to haul something, make sure you know your trailer’s Gross Vehicle Weight Rating (GVWR) to determine what
weight you can handle (the combination of both your trailer and the cargo you wish to tow). Look for the GVWR on the VIN label of your trailer.
Next, check the towing capacity of your vehicle. This is the maximum weight it can safely tow, which includes the weight of the trailer and its cargo. Understanding the GVWR of the trailer and the towing capacity of your pulling vehicle helps ensure you maintain safe towing practices.
When getting ready to tow your trailer across your property or across town, there are steps you need to take to ensure a safe trip. One of the most important steps is knowing how to properly hitch and secure your trailer to your tow vehicle.


To hitch a trailer safely, first align your tow vehicle and trailer, then slowly begin to back up so the hitch ball is near or aligned with the coupler. Secondly, lower the trailer’s tongue until the coupler fully engages with the hitch ball. If the coupler and hitch ball won’t line up, adjust your tow vehicle’s position.
Next, secure the latch and engage the coupler locking mechanism. When engaged, this will securely hold the coupler to the hitch ball. Then, insert a safety lock pin through the hole in the locking mechanism. Next, attach the safety chains in a crisscross pattern under the hitch to prevent the trailer from detaching. Connect the electrical plug to ensure brake lights and turn signals work. Finally, raise the trailer jack, ensuring the trailer is level. Double-check all connections before driving. These steps will help you hitch and secure your trailer correctly and safely for smooth towing.
While they may seem like a small detail, safety chains are essential for securing your trailer to your vehicle. Attached from the trailer tongue to the tow vehicle, they act as a backup connection, ensuring that if the primary hitch (ball or coupler) fails, the trailer remains attached to the vehicle.
This prevents accidents and potential damage. Properly crossed and fastened safety chains help control the trailer's movement, keeping it aligned with the tow vehicle. They are a crucial safety feature, mandated by law in many areas, and they enhance your overall towing security. For peace of mind and compliance, always use safety chains when towing a trailer.
Some may be surprised to learn there actually is a right way to load your trailer. Although the type of cargo may vary, your trailer should be loaded heavier in the front of the deck—this should be about 60 percent of your cargo weight. Remember to pack your cargo closely and firmly, using tie-downs or other tensioning devices to keep cargo secure. No small items should be loaded above the height of the sides of the trailer, even if you are only transporting something a short distance.
Once your trailer has been properly loaded, there are some general precautions for towing safety to keep in mind. These apply no matter the size of the job or task you’re up against:
● Avoid distracted driving.
● Do not drive when you are sleepy or fatigued.
● Maintain a speed of 55 miles per hour or less.
● Anticipate stops, brake early, and maintain a safe distance from the car in front of you.
● Slow down before you start driving downhill.
● Do not ride your brakes while going downhill.
● Do not use cruise control or overdrive while towing a trailer.
● Avoid sharp turns.
● Ease off the gas pedal and slow to 25 miles per hour in the event that a wheel goes off a paved road, then gradually steer back onto the road.
● Make routine stops to check and re-tighten lug nuts, check air pressure,
and that the coupler, safety chains, and cargo are still secure.
As always, consult with your owner’s manual or dealer for the most specific loading and towing instructions for your trailer type. By following safe connecting, loading, and towing practices, you can reduce some stress while ensuring a more productive project.
Plus, you’ll also reap the benefits of safeguarding your vehicle and others. Then it’s on to getting that big project completed!
HEditor's Note: For additional trailer safety tips, make sure to check out the resources on the Carry-On Trailer website at www.www.carry-ontrailer.com.


