


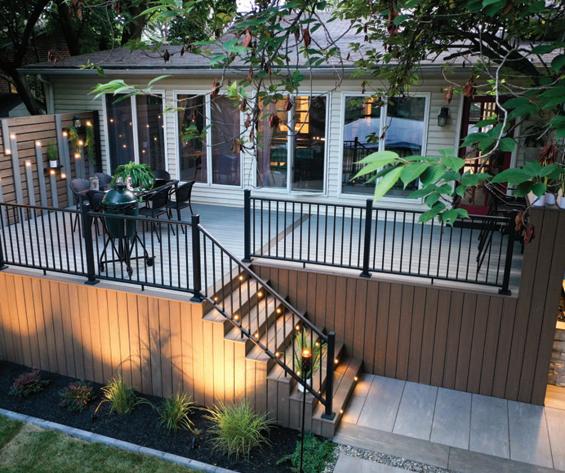
last-deck requires no staining or sealing, just mild soap and water for cleaning. No warping, splitting, cracking, rotting, molding, lightweight and fire-resistant. LastDeck is available in a multitude of options allowing you to design your own luxury outdoor space.
Manufactured in the Midwest of all American made structuralgrade aluminum – the same as an aircraft; Last-Deck is built with high quality standards from our family to yours.

The 300 series is a patented, watertight product that has the ability to be replaced without having to start at one end. Should you receive damage at the mid-way point of your deck, simply pop up 2 joiner strips, replace the bad plank, snap the joiner strips back down, and your repairs are finished!

300 series easily pop up and snap back down!


A “smart” device generally refers to a wired or wireless electronic device capable of performing autonomous computing and connecting to other devices for data exchange. These devices are at the center of the Internet of Things (IoT) and the concept of smart cities.
In this issue’s smart-tech roundup, you’ll see how homeowners can set up smart cameras and sensors to monitor their home around the clock. Smart devices can be programmed for scheduled tasks, such as dimming the lights at night. These devices can also be designed to turn off automatically when not in use for better energy conservation.
Despite their rising popularity, I personally have very few smart devices in my own home. Call me paranoid, but with the convenience
of wireless connectivity comes a few downsides of the technology. The same connections that smart devices use to gather and share data can be susceptible to a range of cyber-attacks. Without having the proper security measures in place, smart devices could serve as openings for hackers. Reliance on the internet is another potential issue, leaving these systems vulnerable to a breach or outage.
With the connection of certain devices to smart power-grid systems, homeowners might also be jeopardizing their autonomy. This summer, for example, customers who enrolled in Portland General Electric’s Smart Thermostat program learned that the electric company could take over control of their regular settings during peak energy hours.
“Your thermostat will adjust 1 to 3 degrees during the Peak Time Event, to reduce strain on the grid when energy demand is high,” according to PGE.
Maybe I’m old-fashioned, but on behalf of a lot of red-blooded American homeowners, I’d like to state emphatically: It’s not smart to mess with my thermostat.
Keep these drawbacks in mind if you’re connecting your home to the Internet of Things. When it comes to “smart” devices, it’s smart to know what you’re getting into.

EDITOR-IN-CHIEF
MATT WEBER matt@HIRpub.com
CREATIVE DIRECTOR
WESLEY GLASSCO wesley@HIRpub.com
NATIONAL SALES jeremy@HIRpub.com
EDITORIAL CONTRIBUTERS
CARTER SWIFT
TOM MATTHEWS
ADVISORY BOARD
JIM BUTTERS
RANDY STEPHENSON
DUSTIN SCHWAIGER
RICHARD HAMILTON
COPY EDITOR DIANE WEBER PRODUCTION MANAGER SHANNA QUIGLEY
ONLINE AND SOCIAL MEDIA DEVELOPMENT
GLORIA BERRIO

AD DESIGN AND COORDINATION SPECIALIZED MEDIA SERVICES, INC. ads@HIRpub.com


If you have a warm season lawn (like St. Augustine, bermuda, zoysia or centipede), summer is prime growing season. That also means it’s prime mowing season!
To mow your lawn less during the summer for warm season grasses, consider these options: Mulch-mow weekly to reduce time by 20 percent, mow and bag every other week to save 50 percent but maintain a clean look, or mulch-mow every other week to save 60 percent in mowing time if a pristine appearance isn’t a priority.
To reduce your total mowing time by about 20 percent, eliminate the time required to stop and bag clippings. If your mower has a mulch setting, use it instead.
If your mower doesn’t have a mulch option, simply mow without bagging. This only works if you mow weekly, as leaving un-bagged clippings can create an unsightly appearance if allowed to dry and accumulate.
Another option is to mow every other week and bag the clippings. This can reduce your mowing time by 50 percent, but you’ll need to bag the clippings to maintain a clean look.
The downside is that if you miss a mowing due to rain or vacation, you’ll need to remove almost twice as much leaf blade the following week. This can be problematic, as removing more than a third of the total leaf blade at once is not advisable.
If you miss a mowing using this strategy, you may need to mow twice the following week, each time removing half as much, to get back to your normal mowing height.
If you’re less concerned about a pristine look and just want to keep your grass presentable, you can mulch and mow every other week. This will save you 60 percent in mowing time.
Regardless of which strategy you choose, it’s recommended you mow your lawn at the highest recommended height for your grass type.
For more professional guidance on lawn care, visit www.sodsolutions.com.
A water heater tray or "pan" is a plastic tray which sits right beneath your water heater tank to catch any water that leaks. It serves as a first line of defense for your flooring if something goes wrong with your water heater. If the pan is collecting water, it indicates a problem. Check for these issues.
Loose plumbing connection: If you spot any dripping pipe connections, you can try tightening the fittings with a wrench or call a plumber to do it for you. Tightening a threaded connection might solve the problem.
Problem with a valve: A tank-style water heater has a drain valve and a temperature-pressure relief (TPR) valve. The drain valve at the bottom of the tank opens to remove any sediment buildup.

Check the drain valve by wiping it with a paper towel. If it dampens the towel, carefully tighten the valve with your hand. If the water stops, then the valve was partially open, and closing it should solve the problem. If the valve is still dripping after you’ve tightened it, you’ll need to replace it.
A leaking TPR valve could be a bigger problem. The TPR valve should open automatically to release hot water when the tank gets too hot or too much pressure builds

up, so avoid touching it directly with your hand.
The TPR valve is found near the top of the tank and is connected to a pipe that runs down toward the floor. Touch the bottom of the downpipe with a paper towel. If it dampens the towel, the valve should be replaced.
Tank corrosion: Inspect the water that’s collecting in the pan. If it has a rusty color, this could indicate internal tank corrosion. If water is breaching the corroded tank, then it's only a matter of time before the problem worsens. It's best to replace the water heater before the tank empties inside the house. The tank can be drained
by first disconnecting the power and water supply, connecting a garden hose to the water heater's drain valve, and running the hose to a drain or a downhill slope outside the house before opening the valve.
Flue condensation: On gas-fired water heaters, combustion causes water vapor which should flow through the flue, but if the flue is too long and doesn't get hot enough to cause evaporation, the vapor will condense and drip whenever the water collects. Condensation can lead to corrosion in the water heater, so if signs are present, call an HVAC technician.
According to the National Association of Realtors, investments made in wood flooring top the list of home improvements that achieve the best return on investment.
Among interior remodeling projects covered in the 2022 Remodeling Impact Report, the cost recovery of refinishing hardwood floors tops the list at 147
percent. Installing new hardwood flooring scores second place at 118 percent. The next three interior projects that score the best cost recovery include insulation upgrade (100 percent), basement conversion to living area (86 percent), and closet renovation (83 percent).
Find the full report at www.nari.org.

DCK Tools has been manufacturing power tools for decades. Already the leading power tool brand in the Asian market, the company has now launched their own line in the U.S., and they’re bringing serious competition. The DCK plan is to “disrupt” the American tool market by offering equal or better-quality tools at a lower price point than the competitors.
The HIR staff got the opportunity to test the new DCK KRH20V-26 cordless rotary hammer, and it is built to deliver. With heavy-duty construction in a compact, lightweight package (7 lbs.), it has a maintenancefree DC brushless motor powered by a 20V 8Ah li-ion battery. It makes quick work of tough jobs, like drilling through concrete slabs or block walls. The DVR Handle Shock Absorption System is designed for comfortable use when working for long hours, and the double anti-twist safety device features a mechanical clutch and electronic anti-twist hand protection.
The KRH20V-26 comes standard with an SDS-Plus quick-change chuck and a KDE20V-16 cordless dust extractor, which is equipped with a HEPA filter. This highquality rotary hammer includes a depth gauge and all the essential accessories, including a carrying case. All DCK power tools are covered by a 3-year warranty against defects in material or workmanship. Find more info at www.dcktool.com.


A new study reveals the leading causes of DIY-related injuries, with ‘falls’ topping the list. The online steel supplier, Steel Products Direct, obtained data from the National Safety Council Injury Facts, focusing on the ‘home injuries’ category. The most prevalent accidents were ranked based on their injury rate per 100,000 people.
“Falls” are the leading cause of DIY-related injuries, with a staggering accident rate of 2,103.50 per 100,000 people. In 2021, 6,981,390 people visited the hospital after suffering from a fall.
If you’re working on roofing projects, it’s crucial to wear protective clothing, such as a hard hat. Always check the roof for damage before starting on your DIY project, and never carry out any roofing projects in unsafe conditions, such as heavy rain. Always ensure ladders are completely secure and avoid using them for any lengthy DIY projects at the risk of losing balance.
The “Stairs, ramps, landing, and floors” category is second on the list, with an accident rate of 825.50 per 100,000 people. In 2021, this category was responsible for 2,727,809 injuries.
These falls are typically caused by unsafe flooring, such as torn carpets, or by using a ladder on stairs without taking safety precautions. If using a ladder on a set of stairs, it’s critical to guarantee that its is firmly secured. Ask someone to hold down the other end for extra protection. Keep the ladder at a suitable height and avoid overreaching. When working over a staircase, it’s worth investing in a ladder-aide or a combination ladder to prevent nasty falls.
“Poisonings” are the third-leading cause of DIYrelated accidents, with an injury rate of 522.60

per 100,00 people. In 2021, poisonings caused 1,734,576 injuries.
Some DIY products contain incredibly toxic chemicals, which can result in injury if mishandled. When handling potentially harmful chemicals, wear gloves and, in some cases, eye protection. Avoid mixing different chemicals unless you have thoroughly researched the product. Certain chemical combinations can result in serious injuries, such as burning eyes, chest pain, and shortness of breath. For example, bleach should never be mixed with ammonia or rubbing alcohol at the risk of causing a toxic gas. Store harmful chemicals correctly and out of reach of children.
For more, visit www.steelproductsdirect.com.

QUESTION: How can I cut a bolt shorter without damaging the threads?
ANSWER: The problem with clamping metal bolts, machine screws, or threaded rod in a vice to cut them to length is the damage caused to the threads. Here’s a better method: Attach a 2-by-2-in. board to a workbench with clamps or screws. Drill a hole horizontally through the board the same diameter as the bolt you plan to cut. Screw a nut onto the bolt or rod, then slide the end of the bolt through the hole in the board. Mark the cutline on the bolt that extends out of the board. Screw a second nut onto the bolt and tighten it against the board to hold the bolt steady while cutting. Use a hacksaw to cut the bolt to length. Unscrew the nut with a wrench, which should remove any metal burrs and reshape any deformed threads left from cutting the bolt.

QUESTION: Can Low-E glass damage my home’s surrounding building materials?
ANSWER: Reflection of sunlight from energy-efficient window products is capable of producing excessive heat on the surface of building materials. Low-emissivity (Low-E) glass is designed to prevent passive heat gain within a structure but can cause unusual heat buildup on exterior surfaces. The reflection of more longwave infrared (IR) energy and shortwave ultraviolet (UV) light can cause damage to plastic surfaces nearby such as vinyl siding, composite decking, patio furniture, and plastic automotive trim. As a result, these products may melt, sag, warp, discolor, increase expansion/contraction, and accelerate weathering. Lawns, turf, shrubs, and other landscaping are also susceptible to damage.
It may be possible to reduce intensity of the reflected heat with the application of window film, which can absorb part of the sun’s longwave IR before it hits the Low-E coating to be reflected outside.


SAVES TIME AND EFFORT WHEN CLEANING SMALL SURFACES, EDGES & GROOVES


By Tom Matthews
Wood flooring adds warmth, beauty and value to a home. Its durability is another big factor; hardwood floors can withstand heavy foot traffic and are relatively easy to maintain compared to other flooring options. Hardwood floors also offer design versatility, complementing both traditional and modern interior aesthetics.
Here’s an overview of how a typical installation will go.
When it comes to selecting your next wood floor, it’s important to understand the types available.
Solid hardwood boards are made of a single piece of wood.
Engineered hardwood flooring is made of a top layer of real hardwood over a dimensionally stable core made from plywood, MDF, lumber core, or stone-polymer composite. This core is less susceptible to warping and gapping than solid wood.
Both options offer beauty and style but can perform differently and require different installation techniques.
Solid hardwood, which is available in unfinished and prefinished options, is not recommended for below-ground areas such as basements or moisture-prone areas such

as bathrooms, whereas engineered hardwood flooring can better withstand moisture exposure.
In terms of longevity, solid hardwood can be sanded and refinished over the years to renew its appearance. Engineered hardwood can be sanded to some degree, but if the thin veneer layer of hardwood is sanded through, then the inner core will be exposed in the floorboard.
Research the installation method for the specific type of wood flooring to decide if it’s a DIY-friendly product or if you should consult a pro installer. Common installation techniques for solid hardwood flooring include nail-down, staple-down, and gluedown. Ambitious DIY’ers might consider renting floor nailers or staplers for installation, but glue-down flooring is best left to the pros.
Engineered flooring is often sold as floating floor systems with click-together installation, which is more DIY-friendly for inexperienced installers.
It is critical to understand that the subfloor must be properly prepped before beginning any new installation. The subfloor must be clean, dry, and level with no hills or dips. Fill any low spots with a leveling compound and sand down any high spots. Check for signs of moisture or water damage and address the underlying issue before installing the floor.
With the subfloor exposed, take the opportunity to walk it over and search for any nail squeaks. If you find any, screw down the subfloor tightly to the floor joists to arrest movement and eliminate the squeak.
For areas with high moisture, such as basements or concrete subfloors, install a moisture barrier over the subfloor. Consult the product specifications of your flooring for specific recommendations. Engineered flooring may require a poly underlayment. Other options are a silicone vapor shield or plywood underlayment.
Prior to installation, it’s important to acclimate your wood flooring. This simply means storing the flooring in the same room it will be installed for about 48 hours (check product recommendations for time duration). This step allows the wood to adjust to the room's temperature and moisture conditions. Doing this helps prevent performance issues over time.
Prior to installation, it's important to store the flooring where it will be installed, so the wood can acclimate to its new environment and ensure long-term performance.


You should fill any low spots with a floor-leveling compound to ensure a flat subfloor. Products are available in self-leveling formulas or as compounds that can be troweled smoothly onto the subfloor.
Installation time will depend on the size of the room, the complexity of the layout, and the method of installation.
If the installation involves stapling or nailing, it’s best to lay flooring perpendicular to the subfloor's joists. If you would rather fasten the flooring parallel to the subfloor joists, you'll need to fasten a secondary layer of 15/32-in. plywood panels to the subfloor using ring-shank nails or screws.
Most flooring installations begin at the longest, most visibly prevalent straight wall, which will serve as a control point for installing the boards. Plan for full-size planks for your first row, because it serves as the floor’s focal point.
Next, measure and mark the expansion space, which is the space between the walls and the flooring. An expansion space allows the wood to expand and contract (which occurs naturally with temperature and humidity changes) without causing
damage to the floor. Plastic spacers can be used to maintain an expansion space around the edges of the floor during installation. The size of the expansion gap depends on the floor's performance and characteristics. Check the Warranty, Installation, and Care (WIC) guide for your flooring’s expansion space measurements.
To guide installation, use a chalk line or a long straight edge to mark along, straight line along the expansion gap which aligns the first flooring row evenly with the wall.
Next, determine the width of the last row by measuring the room and dividing by the width of the boards. If you determine the last row will be too small (a sliver of boards), then rip the first row to a thinner width on a table saw before installing. This will allow more space for the last row, for an attractive, balanced installation once completed.
Plan and note how you’ll install the planks around features such as kitchen islands, fireplaces, doors, cabinets, and

If there’s not enough clearance beneath door casing to fit the new flooring, use a scrap of the new flooring as a blade guide and flush-cut the casing shorter with an oscillating multi-tool. The model shown here is the Dremel Multi-Max.
room transitions. Boards will need to be cut to fit around doorways, corners and HVAC registers. A miter saw or table saw will make this easier, as can a jigsaw or buzz-cutter (oscillating multi-tool).
A buzz-cutter equipped with a flushcutting blade also makes a good tool to undercut door casing which extends downward too far to fit the flooring beneath it. If this is the case, use a scrap of the new
floor as a gauge to guide the oscillating blade and cut the door casing just short enough to fit the new floor.
Using plastic spacers between the boards and the wall, lay the first row of flooring along the guide-line and proceed with installation.
Click-together flooring utilizes a fastenerfree installation method in which tongueand-groove joints connect with the aid of a mallet and tapping block. The click mechanism can vary among type, so refer to the manufacturer’s recommendations for specific guidance. It’s typically easier to connect the long joint first and then follow by connecting the end joints. Always stagger the end joints of the boards by several inches to strengthen the installation and reduce the appearance of repeating patterns.
Some wood flooring is installed with glue or fasteners. When installing tongue-andgroove boards, consult the manufacturer’s information on specific guidance, which might require you to gently push the board back and down to ensure a snug fit. Use a tapping block and mallet to fully engage the tongue and groove.
As you install the sequential boards, fit the groove of each new plank onto

Remember to stagger the end joints of the floorboards by at least 6 inches. At the end of each row, you’ll need to cut the boards to fit against the walls.
the tongue of the previous row. Be sure to eliminate any gaps between the boards.
Space nails according to the manufacturer’s recommended intervals along the length of each board. Avoid nailing too close to the end of the boards, which will cause splitting. If necessary, use a nail set to tap the nail heads below the wood surface.
Many professionals prefer to use the twopronged approach of a flooring stapler, driving the large staples “blind-nail” style into the tongue-and-groove joints, which conceals the fasteners between the floorboards.
At the last row, you may need to use a pull bar to ensure a tight fit between boards. Insert the pull bar into the groove side of the plank and tap it toward the flooring to join the boards and close the joint.
After installation is complete, use wood filler or putty that matches the color of the flooring to fill any visible nail holes.

HA pneumatic flooring stapler or nailer is a compressor-driven tool that is actuated by the tap of a mallet. Rental centers usually have these tools available for flooring jobs, but if you have a lot of flooring to do, consider purchasing your own.


Smart homes and smart home products have become popular trends for several generations and show no signs of slowing down. According to Globe Newswire, the global smart home appliances market size is estimated to reach $63 billion by 2030.
A smart home is a system in which a home automation system monitors and manages various aspects of the home, including lighting, climate, entertainment systems, and appliances. Rapid advancements in wireless communication and IT infrastructure have made it simple to incorporate home appliances compatible with smartphones, laptops, and tablets. This allows users to remotely manage and enhance the functionality of many home appliances, such as refrigerators and air conditioners.


TAPO INDOOR/OUTDOOR HOME SECURITY WI-FI CAMERA
The TP-Link Tapo Indoor/Outdoor Home Security Wi-Fi Camera C120 is a full-featured security camera which offers 2K video, color night vision, intelligent alerts, and built-in spotlights at a budget-friendly price point. Place the camera in your backyard, front door, living room, bedroom, or baby's room for round-the-clock coverage and IP66 weatherproof construction: day, night, rain, or shine. It stores recorded video locally or in the cloud. An embedded 2.4GHz Wi-Fi radio connects the C120 to your home network, allowing you to control the camera from your phone and pair it with Amazon Alexa and Google Assistant so you can use voice commands to view its video stream on an Amazon Echo Show or a Google Nest Hub smart display.
www.tp-link.com
According to one U.S. housing study, one in 12 homes per year experience a plumbing leak. The costs of water damage from common sources can be devastating in terms of building material replacement, remediation, and disruption. When toxic mold results from extended wet conditions, the time and cost required for remediation can quickly multiply.
Water detectors can be placed near or under appliances, plumbing, and at other key locations where leaks or flooding are most likely to occur. Basements are particularly at risk. The detectors produce a loud, audible alarm, alerting occupants to address a leak situation immediately. Even better, sophisticated sensors today can now be connected directly to Wi-Fi networks to deliver email alerts to smartphones.
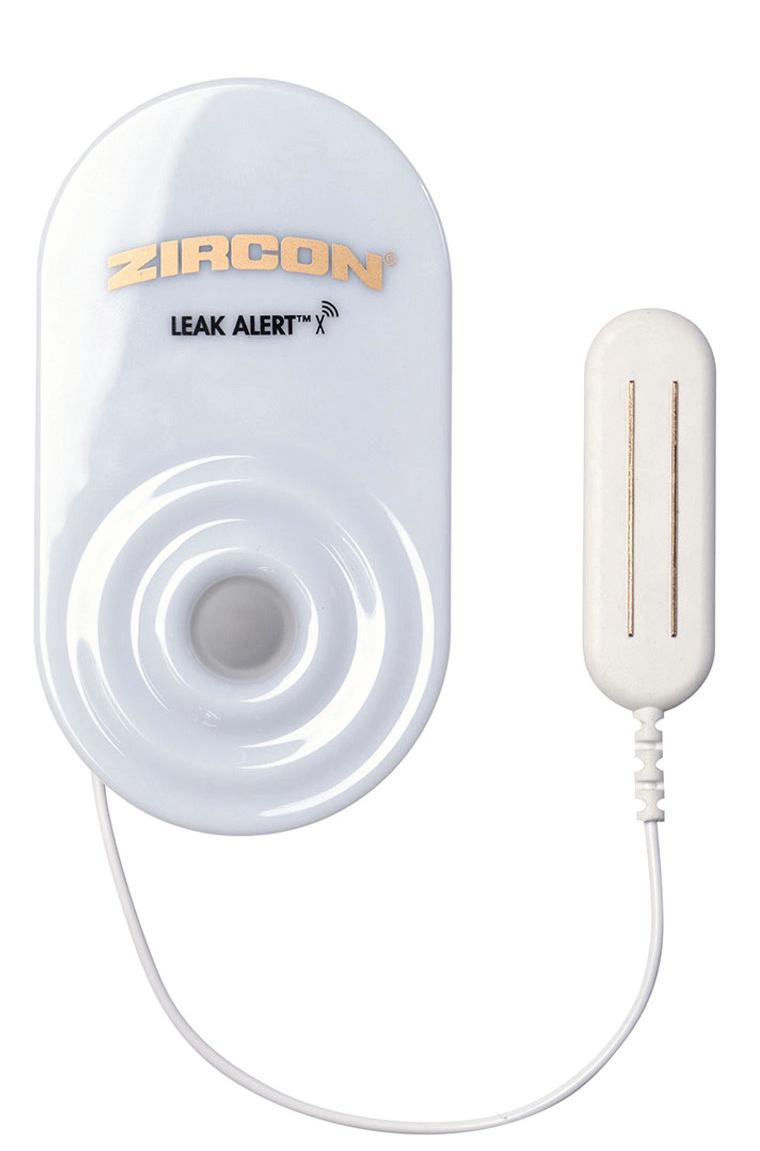
Zircon’s Leak Alert X Smart Water Detector and Leak Alert WiFi devices provide audible, visual, and email alerts when water is detected, warning homeowners of a potential leak. Powered by a 3V lithium battery, the WiFi water detector eliminates the need for a separate hub. The Leak Alert X has an attached 9.8-ft. sensor cable to enable discreet leak detection in areas not typically accessible with a standard sensor.
www.zircon.com
The newest LIFX smart home lighting innovation, the Indoor Integrated LED Flush Mount Multi-Color Smart Wi-Fi Dimmable Ceiling Light, offers 2500-2850 lumens of brightness, innovative visual effects, industry-leading SuperColor technology, and a power consumption of only 47 watts. This streamlined LED ceiling light brings a wider range of lighting experiences into your home within a sleek, minimal footprint, offering an array of lighting effects. Homeowners can choose from a library of exclusive visual effects, such as fluffy clouds, an overhead sky with cosmic meteors streaming past, an invigorating sunrise, or abstract art with shapes that twist and turn. And LIFX’s SuperColor technology offers another level of customization, offering a brightness superiority five times greater than competitors. All these dynamic visual effects are available via the mobile app to set the mood and inspire imagination.
www.LIFX.com

Integrated lighting can adjust in brightness from ambient light to the main lighting in the bathroom with Duravit’s Glowing Smart Mirrors. They include lighted-temperature variation based on Duravit’s circadian rhythm research. This feature adjusts light temperature based on the time of day; cooler-toned light is ideal for waking up in the morning while warmer tone light is best for winding down at the end of the day. The mirrors are equipped with defogging capabilities to avoid disruption of your daily routine. Different shapes are available to choose from, such as the classic circular shape of the Happy D.2 Plus collection and the organic design of Sebastian Herkner’s Zencha mirror.

With a sleek skirted design and integrated flushing system, the Duravit SensoWash U hygienic toilet features an updated spray wand which provides personalized hygienic cleansing with three settings: Rearwash, Frontwash, and Comfortwash. Users can save up to two individualized flushing profiles and adjust the water intensity, temperature, and spray wand positioning to their liking. The SencoWash U can be controlled by the fixture’s touch buttons, or via the SensoWash remote or app.
www.duravit.us


For new construction, this wireless solution is the first in the North American market to control radiant heating and forced-air heating and cooling in multiple zones throughout a structure. Moreover, the system connects to smart home assistants and can be controlled remotely via an app. The wireless technology means installers don’t have to hassle with the cost and time of running thermostat wires. Regarding setup, no internet is required (which comes in handy with new construction projects where the internet is unavailable). The Installation Wizard in the Smatrix Pulse app walks the contractor through the system setup, saving time and ensuring a smooth installation. The system accurately measures air, surface, and floor temperatures in each zone with embedded operative sensors in the thermostats and optional slab sensors.
www.uponor.com
The Brightlayer Home app provides an interface to Eaton’s Wi-Fi smart technologies, allowing users to easily view power usage for connected appliances, control connected devices remotely, and make more informed energy decisions. Eaton’s Wi-Fi wiring devices are also compatible with Amazon Alexa and Google Home, including bilingual voice controls. Once a qualified electrician installs and wires
Eaton devices, intuitive, step-by-step guides in the Brightlayer Home app walk the homeowner through setup via mobile phone. Users may choose the types of devices to add through a Wi-Fi connection, such as smart breakers, switches, dimmers, receptacles or fan speed controllers.
www.eaton.com


Yale’s first retrofit smart security solution is available at an affordable price point. The Yale Approach Lock with Wi-Fi and the wireless Yale Keypad are easy to install on the back of most deadbolts. This solution is billed as “the ultimate do-it-yourself smart lock system for first-time users who typically cannot change their locks.” Yale Approach Lock with Wi-Fi is a discreet, interior-only smart lock that lets users come and go freely thanks to features like Auto-Lock and Auto-Unlock and the ability to control the lock from anywhere with the Yale Access app. This retrofit product requires only a screwdriver and 10 minutes on average to install. Yale Keypad is a wireless accessory that is the companion for key-free convenience when paired with Yale Approach.

www.ShopYaleHome.com


Despite what your Uncle Willy might have told you, building a deck is not a simple project. Constructing a deck that is built to last, up to safety standards, and meets code guidelines requires extensive research and know-how. A good place to start is this rundown of critical mistakes that are commonly made when constructing a deck, so you can make better choices and earn the approval of your local building inspector.
Use the right material. Avoid fundamental mistakes like building with the wrong material. The vast majority of decks in the U.S. are framed with pressure-treated lumber, but all treated lumber is not rated the same. Always check the label on the ends of the boards for ratings and warranty information.
Light Duty lumber is not for structural uses, does not meet code standards for framing applications, and only has a one-year limited warranty. It’s meant for split rail fencing, lattice and landscape timbers.
Lumber rated Above Ground is best suited for areas that are at least 6 inches above ground and are easily replaced or maintained, meaning it’s not suitable for deck joists or near-ground uses. Backed by a limited lifetime warranty when used properly, Above Ground lumber can be used for decking, railing, porch studs, rafters, etc.

Don’t forget fundamentals like board inspection. Eyeball the edges of joists to make sure you install the crown at the top. Check the growth rings of treated deck boards and install them bark-side up to reduce cupping.

To construct the deck’s framing, you’ll need lumber rated for Ground Contact, even if the lumber won’t come into direct contact with the ground. This choice contains additional preservative treatment for use in areas that will experience frequent or prolonged moisture and for items critical to the integrity of the structure, such as beams, joists and stringers. Note that some lumber suppliers offer even more robust options, such as the Critical Structure grade from Prowood Lumber, which is made to withstand the harshest conditions and can be used for ground contact, permanent structures and even saltwater use.
Stay up to code. Building codes change over time, so decks that were installed 20 years ago might not be up to code. If you’re rebuilding an old deck, you shouldn’t necessarily replace everything the way it was first built. Consult code guidelines in your area and contact your building inspector with any questions. Choose fasteners wisely. The options in decking fasteners are vast, and each offers certain benefits and drawbacks. All options must be manufactured for long-term weather resistance.
Always follow manufacturer guidelines for fastener types and sizes. Use galvanized fasteners, stainless-steel (or otherwise weather-coated) fasteners if you are using pressured-treated lumber. Fasteners that don’t have the correct corrosion-resistance rating will fail quickly in lumber treated with preservative.
If you choose nails instead of screws, they must be ring-shank or spiral nails (never smooth).
Anchor support posts using a galvanized post base connected to a concrete pier. The base, which is secured in place with an epoxied concrete anchor, lifts the post off the foundation, protecting the wood against rot by preventing standing water from wicking into the end grain. Fastening the metal base into the sides of the post also increases uplift loads for wind resistance. Furthermore, the ABA post base from Simpson Strong-Tie is adjustable by including a slot around the anchor bolt that makes precise post placement easier. (image © Simpson Strong-Tie)

For the deck’s framing, professionals generally shun screws in favor of nails because screws can break rather than bend with movement in the wood. If you choose to use screws, make sure they’re rated for framing applications, such as Structural Screws.
Hidden deck fasteners in the form of clips or angle-driven screws have become hugely popular among homeowners for achieving a clean, unblemished surface. Available for wood or composite boards, these methods of installation have the added advantage of eliminating penetration of the top sides of the boards where rainwater can more readily penetrate.
Although composite boards can be fastened from the top like treated wood, most manufacturers offer composite boards with a grooved edge designed to be used with a clip fastener system that ultimately hides the fasteners between the boards.
Use the right hardware. The end grain of joists should always be connected with galvanized joist hangers (toe-nailing is strictly prohibited). Using incorrect fasteners for joist hangers is another mistake. For example, deck screws are not a proper way to attach joist hangers, nor are undersized nails.
Installing undersized bolts in 6x6 posts is another common error. Relying only on bolting the beams to the posts can result in failure. The bolt may not shear, but the wood can shred and cause failure. Keep the beam seated firmly atop its support post., and use a galvanizedsteel post cap for extra protection.
Note that the use of any hardware not specified in your local code may be considered an “alternative,” and you might be required to provide any testing and certification information on the “alternative” for your building inspector. Make a proper ledger connection. The most dangerous mistake you can make is improper ledger connection. Decks attached to a house or building are typically supported at the house side by a ledger and at the opposite side by a beam, posts and footings. The cantilevered deck joists are fastened to the ledger, which will carry the weight of the deck. Ledger failure can cause a deck to collapse, so if you don’t know how to properly construct a deck ledger, then it’s critical to hire a professional.
Never bolt ledgers straight to brick, stucco, or EIFS cladding. Never connect a ledger to a rim joist nailed to the end grain of the deck joists.
Proper ledger construction depends on the building type, the cladding material, and the site conditions. A ledger can rarely be treated the same from job to job. Stucco may need to be cut back with a new weep-screed installed, siding might need to be removed, and flashing will need to be installed. Consult all local construction codes for guidance or consider building a freestanding deck, which requires no ledger.
Don’t under-size the footings. A rule of thumb for many pro builders: The footing should be twice the size of the support posts. For example, a 6x6 post should be set on a 12x12 concrete footer. The strongest connection from footing to post can be made with a metal post mount fastened to the concrete with epoxy and threaded rod.
Check for crown. Don’t forget to check the joists for crown. Visually inspect the edge of each joist members for any bow in the wood. If you see a bow or “crown,” then fasten it to the deck with the crown on the top side to avoid any sag in the deck floor. (A small crown isn't a problem, but a bent piece of lumber should not be used.)

Staggered blocking between the joists will stabilize the deck, strengthen its squareness and rigidity, and prevent the joists from twisting.
Check local codes for specifics on guard rail construction. Generally, the full 4x4 (or larger) rail post should be fastened to the deck framing with throughbolts secured with nuts and washers.
Don’t use small joists. The smaller the joist, the more “bounce” the deck will have. Avoid 2x6 joists. Consult a span rating table for the recommended joist size for your deck as well as the recommended spacing for support posts. The smallest joist most pro deck builders use is 2x8, and most prefer using 2x10.
Not treating the end-cuts. When you make a cut in a piece of pressure-treated lumber, you expose the interior untreated wood fiber to water, fungus, and insects that the preservative would otherwise protect
against. Sealing the end-cuts with an approved liquid preservative becomes an important way to protect your investment, so apply sealer after cutting. The liquid treatment can be applied to dry wood by sprayer, roller or brush. Sealing the end-cuts is now a requirement of warranty coverage for most pressure-treated lumber.
Don’t over-span the joists. Floor joists for a deck are typically installed at 16 in. on-center, however this span won’t properly support some composite-decking products when installed on a diagonal pattern. In other words, the composite boards could get hot beneath the sunlight and sag between the joists. Consult the decking manufacturer’s guidelines, which might specify 12-in. joist spacing for composite decking installed at an angle. Additional stair stringers might be required where composite decking serves as the treads.
Don’t forget the blocking. Nail blocking (made of the same board size as the joists) between the joist ends in a staggered pattern. The blocking stabilizes the deck, strengthens its squareness and rigidity, and prevents the joists from twisting. If the joists twist, it will affect the flatness and stability of the deck surface.
Flash the framing. Over the past ten years or so, the trend of applying flashing tape to the

top edges of the deck frame (joists, blocking, rim, etc.) has become a staple of deck construction. This easy-to-apply extra step will help protect the deck frame from water damage and rot in the years ahead.
Attach guard posts correctly. Guard rails are required for any deck 30 inches or more from the ground. Don’t notch 4x4 posts or use nails or screws to fasten them to decking surface. The full 4x4 (or larger) rail posts should be fastened to the deck framing with through-bolts secured with nuts and washers.
Insufficient connection of a guard post to a deck is one of the most dangerous deckbuilding errors. The building code (Table R301.5) requires a guard to be designed and constructed to resist a concentrated load of 200 lb. in the outward and downward directions from its top. In some cases, a strong post-to-deck-frame connection can be made with wood blocking and through-bolts or with metal hold-down hardware. Connect the post to the joists, not only the rim board, because the rim is often not fastened to the joists in a manner capable of transferring the load.
Manufactured guard assemblies will include specific instructions for installation that will cover all code concerns, but if you’re building a guardrail from the deck up, be aware of code compliance. The strength of the guardrail comes from more than just the post-to-deck connection. With a common 5- to 6-ft. distance between the posts, the load must transfer through the connection of the horizontal rails to the post. A continuous top cap that runs across the posts can serve as a horizontal beam to help distribute the load over a larger area. Note that when a post extends through the top of the guard’s cap rail, dividing its continuous run, it weakens the assembly by increasing the leverage the post puts on its connections.
Don’t space your balusters too far apart. U.S. building codes mandate that balusters have no more than a 4-in. gap between them. This is a safety measure intended to prevent a child’s head from getting stuck between the balusters, and it’s often one of the first items checked by a building inspector.

When building a frame for composite deck boards, consult the manufacturer’s guidelines, which might specify 12” joist spacing for composite decking installed at an angle. Additional stair stringers might be required where composite boards serve as the treads.

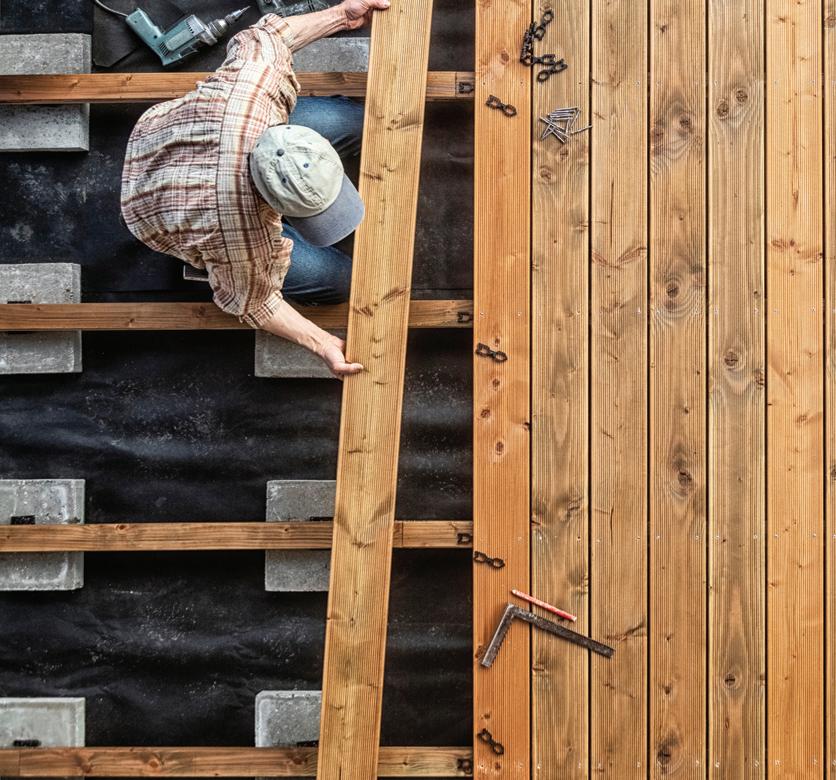
Inspect wood deck boards. When installing pressure-treated decking, it’s smart to check the growth rings at the board ends to determine the “bark side” of the tree. Wood decking should be installed bark-side up to reduce cupping. (Note that some boards which were cut closer to the core of the tree have a straighter grain, so cupping is reduced.)
Reduce butt-joints. Depending on the size off the deck, you may be able to specify full-length boards that run end to end with no splicing between boards. This type of

Depending on the size of your deck, you may be able to specify deck boards long enough for end-to-end installation with no butt joints.
installation achieves a neat and orderly appearance that many homeowners prefer. Deck boards typically come in 8-, 10-, 12-, 14-, and 16-ft. lengths.
If you do need to splice butt-joints between the deck boards, then be sure to stagger the joints from row to row by several feet.
Don’t space treated decking too far apart. Pressure-treated deck boards contain moisture which causes them to swell. A common DIY mistake is to use a nail or similar device to space the deck boards apart during installation with the idea of providing drainage between the boards. The problem is when the boards dry in the sun, they shrink, and these gaps become larger than expected. Therefore, if boards are damp from the treatment plant, they can be installed tightly together. When they shrink, a gap will naturally develop between the boards.
Got bent boards? The uncomplicated design of the Hardwood Wrench Jr. makes it one of the most innovative and easy-to-use board straighteners ever created. This lightweight, economical deck-board tool makes it easy to tame unruly hardwood, thermal wood, pressure-treated, and composite decking. Use when fastening edge-groove clips or when top-screwing on either wood or metal joists. Its universal versatility easily adjusts to fit 1-1/2- to 3-in. wide joists and utilizes a cam-lever action pushing up to 1,100 lbs. of force. This rapidly increases on-site deck installations with more efficiency over typical pry bars or chisels. The patented technology utilizes a rotating, locking cam coupled with an elongated dog-leg, which stabilizes and locks this tool into place. For more, visit www.hardwoodwrench.com.


CHOOSE COATED CARBON OR STAINLESS STEEL
• HIGH STRENGTH COATED CARBON STEEL FOR ENDURANCE
• STAINLESS STEEL FOR SUPERIOR CORROSION RESISTANCE
4 CLIP PROFILES


• PRECISE FIT ELIMINATES LOOSE DECK BOARDS
• INCREASES HOLDING POWER
ELEVATES YOUR DECK BOARDS
• BETTER AIR FLOW REDUCES ROT
• RELIEVES LATERAL LOAD STRESS


Avoid miters in treated decking. The shrink-swell cycle of treated wood tends to open the miter joints and result in an unsightly connection.
Gap composites correctly. Composite decking behaves differently than wood decking. Composite boards expand and contract across their length with changes in temperature.


Although, butting boards tightly together can create a deck with no gaps, doing so may be a mistake. Two boards butted together lengthwise will expand toward each other, causing the boards to be pushed up, out of position and buckle at the ends. A similar problem can happen when boards are butted parallel. Deck boards can bend, bow or break when not given sufficient room for expansion. Consult the composite deck manufacturer’s guidelines regarding the proper spacing guidelines, which will often vary depending on outside temperature.
Deck-building is a huge industry, and a lot of science is involved in proper construction. Safety trumps everything, and you can expect your local inspector to be a harsh grader. This article should provide some advance notice of potential pitfalls, and hopefully get your next project started in the right direction.
Decks built within 30” of the ground typically don’t require a guard rail. They are often built on a series of piers and beams as a freestanding deck that requires no ledger connection to the house.
Deck2wall Spacers help prevent rot from occurring by separating the ledger from the supporting structure, providing a path for water and debris to flow harmlessly through the assembly, while promoting circulation and drying. Stacked washers have often been used as spacers over lag bolts, but Deck2wall Spacers have attachment holes to keep them in perfect alignment for faster and easier installation. They offer more bearing surface than washers for better load distribution, and the plastic spacers are non-corrosive. Made in the USA and available in two sizes, the spacers are injection-molded, fiberglass-reinforced polypropylene. Visit www.deck2wallspacer.com.


Avoid major guardrail connection mistakes, such as nailing a post to the top of the deck surface.
CLIP FROM DECKWISE

Don’t space balusters too far apart. U.S. building codes mandate that balusters have no more than a 4” gap between them.

The shrink-swell cycle of treated wood tends to open miter joints and result in an unsightly connection.
Hidden fasteners in the form of clips or angle-driven screws have become hugely popular among homeowners for achieving a clean, unblemished deck surface. The Ipe Clip from DeckWise features a quick and easy installation process in which all the work is done from the top-side of the deck. (image © DeckWise)
Whether you have a sprawling lawn or a cozy patio, building a water garden can create an enchanting addition to any outdoor space. The sight of flowing water and the sound of cascading falls provide a relaxing atmosphere and a sense of peace that many homeowners enjoy. Water features are often complemented with a variety of plants to create a natural oasis, a beautiful focal point for the landscaping, and even provide a habitat for aquatic life.
Whether you want a small garden fountain or a large waterfall pond, this brief guide will take you through the basic steps to create your own water feature, from planning and design to maintenance tips.
Consider the size and shape of your location, the amount of sunlight it receives, and any existing landscaping features. Keep in mind that larger ponds require more maintenance but offer greater biodiversity.
Choose a spot that receives at least six hours of sunlight per day and is located away from trees to minimize debris falling into the water. Keep the site near an outdoor ground fault circuit interrupter (GFCI) outlet and plan the most direct line possible between the house and the pond for the pump’s power cord.

FROM GARDEN PONDS TO WATERFALLS, WE COVER WHAT IT TAKES


Pondmaster Super-Flex is a flexible polyethylene-based pond liner that is half the weight of traditional EPDM liners.
Pondmaster liners combine the strength of polyethylene liners with exceptional flexibility to conform to the contours and shelves of the pond excavation. This fish-safe liner is ideal for koi ponds, aquatic habitats, water gardens, waterfalls, fountains and streams.
Decide on the style of your water garden, whether it's a formal pond with geometric shapes or a naturalistic pond with irregular edges and native plants.
There are unlimited possibilities for the size and shape of your pond or water garden, but a capacity of at least 15 to 25 gallons is practical.
DIY’ers may want to choose a kit, because the products are already included for a hassle-free

assembly, sparing you several trips to the store. Even if you don’t buy a kit, checking out what’s in the kits can often be helpful when matching parts. Remember to check for parts compatibility when buying different brands for the same project.
For small water features, consider a container garden, which is essentially a large pot of water that contains aquatic plants. Container gardens are a good way to construct a water garden before committing to a larger, permanent pond.
Start with a large ceramic pot, a galvanized tub, a wood barrel lined with plastic, or a preformed rigid pond shell which includes shelves to hold aquatic plants. The rigid pond liners are available in a variety of sizes and are usually constructed of UV-resistant recycled plastic.
Larger, more ambitious water features can be constructed on a slope or hillside to take advantage of the downhill water flow over excavated shelves, which creates a waterfall effect.
Flexible pond liners generally require underlayment or a layer of sand to protect the liner from punctures.
Once you've finalized your design, it's time to start digging. Mark the perimeter of your water garden using spray paint or a rope. Avoid underground pipes, cables, sewer lines, septic fields, etc. Call 811 if in doubt to have the utilities marked. Most small ponds can be dug out with common hand tools—pickaxes, shovels, spades, etc. However, your water feature can be as large as you want, and big projects might require construction machinery. The excavation depth can vary but will need to be at least 18 inches for aquatic plants and fish to thrive. In some communities, 18 inches is the legal depth limit, meaning that if it’s any deeper, some building codes might consider it a swimming pool and require a permit to build it.
(A preformed pond container may not require underlayment but should be installed so its bottom rests on flattened and compacted earth.)
Install flexible pond liners so there are no wrinkles or folds which could cause leaks. Pond liners are available made of polyvinyl chloride (PVC) or ethylene propylene diene monomer (EPDM rubber). These are available in several different sizes, from 7-by-10 to 20-by-25 feet, to accommodate small or large projects. Lap the edges 8 to 10 inches over the edges of the pond, leaving a little extra in case you find a low spot where a leak could occur. Backfill under the rest of the liner and then cover it with soil, mulch, rocks, or plants. Trim back any exposed liner.

You’ll have a significant amount of excavated dirt you can use to build up the sides or shoring of the waterfall. If ground elevation allows, incorporate ledges or overhangs along the path of water to create drop points that will make interesting waterfalls throughout the feature. Construct rock walls or shelves around the perimeter of the pond to accommodate different types of plants.
Flexible pond liners require underlayment or a layer of sand to protect the liner from punctures. If using a 3-in. sand bed, you’ll need to add 3 inches to the excavation depth.
Preformed rigid pond shells include shelves to hold aquatic plants. The rigid pond liners are available in a variety of sizes and are usually constructed of UV-resistant recycled plastic. Shown here is a preformed liner from MacCourt Products, Inc.
For in-ground ponds, you can use a wheelbarrow to add topsoil to help create the berm around the back and edges. The berm will help blend the water feature with the rest of your yard. Construct a retaining wall to hold large berms in place.
Proper filtration and circulation are essential for maintaining water quality and preventing algae growth. Install a pump to gently circulate the water, which helps oxygenate the water and prevents stagnation. Pump capacities vary according to the volume of the water in your pond. Pumps will require hose long enough to

s
Masonry blocks can provide an easy and orderly way to create a pond border.
recycle the water as needed throughout the feature.
Add a biological filter to remove excess nutrients and harmful bacteria from the water, promoting a healthy ecosystem. Consider incorporating a UV clarifier to control algae blooms by sterilizing algae cells and preventing them from reproducing.
Your pond parts will also need to be high efficiency. The pump should turn over the pond’s total gallons of water once every two hours. Research and compare before
choosing the parts that are right for your project.
Install the pond filtration pump according to the manufacturer’s instructions, then fill the pond with fresh water.
Add the finishing touches to your water garden with landscaping elements and aquatic plants. To blend a naturalistic water feature
To keep your water garden healthy and thriving, regular maintenance is key. Here are some essential tasks:
1. Use a skimmer or net to remove debris such as leaves, twigs, and algae from the water surface.
2. Trim and prune aquatic plants to prevent overgrowth, reduce insect infestation, and maintain a balanced ecosystem.

3. Regularly monitor water quality properties such as pH, ammonia, and nitrate levels, making any necessary adjustments.
4. Maintain your filtration system, including cleaning or replacing filter media and checking pump operation.
with the surrounding, landscape pros often recommend incorporating rocks and plants native to the area.
Use larger rocks, such as flat flagstones or irregular boulders, as foundational elements to define the ledges and the outside perimeter. Work in smaller stones as transitional elements. Mixing varying shape and sizes of rock can give a look of depth and variation.
Plug in the pump and watch the way the water falls over the rocks. Place small rocks on the waterfall stone and move them around, observing the changes in the sound and the splashing. Tweak the path of water until you achieve the desired flow effect.
Pro tip: Apply Expanding Landscaping Foam to seal gaps between the stones, the biological filter, and the liner to divert the water over the stones (instead of beneath or between them).

s
The water feature’s pump should have enough capacity to turn over the pond’s total gallons of water once every two hours.
Choose a variety of aquatic plants, including submerged, floating, and marginal plants, to decorate your water feature and provide habitat for fish and insects. Place taller plants at the back and shorter plants at the front to create visual depth. Rocks, gravel, or driftwood around the the pond can protect the edges and complete a naturalistic look.
Pro tip: If using underwater lights, wrap two or three feet of cord around the base of the light and tuck that into the rocks. This
Does your pump need to send water cascading over a waterfall or run a small fountain? Application is important when selecting a pump. Fountains or “spitters” typically require a smaller pump, but waterfalls require more calculation to determine the required size. UV Clarifiers or pressure filters typically come with a manufacturer’s recommended pump size for optimal use. Check the product manual for recommended pump size but understand that head pressure will also be factor.
Water should circulate through the filter at least once every two hours, which means a 1,000-gallon pond needs a pump with a capacity of at least 500 gallons per hour. For fish habitats, professionals recommend doubling the pump capacity to ensure that the water remains clean.
Pump size is not only related to pond size. Head pressure and the desired flow rate will also determine selection. Head pressure refers to the friction created when pumping water uphill or over long distances. Flow rate determines how much water moves through the feature over a given time.
Measuring Head Pressure: Head pressure is calculated and represented in terms of feet. It’s a combination of the length of tubing and the vertical distance from the water surface to the top of the waterfall.
Every vertical foot of distance the return pump moves water equates to 1 foot of head pressure. The effects of friction on head pressure are more difficult to calculate, but roughly every 10 feet of pipe (horizontal and vertical) through which water is traveling adds 1 foot of head pressure. (Every 90-degree bend also adds 1 foot of head pressure, which is one reason why flexible pipe is preferred.)
Therefore, a water feature that is 3 feet tall with 16 feet of tubing would have 5 feet of head pressure.
Note that pipe diameter is important when calculating head pressure. For minimum head pressure, use the largest diameter pipe that fits the pump is best.
Measuring Flow Rate: The average amount of water moving over a waterfall is 1,500 GPH for every 1 foot of width. Therefore, a waterfall that is 2 feet wide would need a 3,000 GPH pump. To achieve a heavier flow, calculate your desired flow rate using 2,000 GPH per foot.
Pumps are sold with head pressure and flow ratings listed among the product specifications, and you will need to choose a pump that offers the capacity required for your project.

HIR Magazine got the opportunity to visit the construction of a huge, elaborate, 50-foot waterfall with a 17-foot lift built by our friends Caleb and Randy Stephenson at the Laney Building in Birmingham, Alabama. This is admittedly a much larger project than most homeowners will attempt, but we couldn’t resist the story opportunity. This project incorporates all the steps mentioned in our article —just on a much grander scale. The amount of earthmoving and boulder-lifting involved in this project required heavy-duty machinery and a skilled operator, but the fundamentals of constructing the water garden remain the same as for the smaller ones.
Contact the Stephensons at: Core Resources 205-612-9021 Coreresourcesal@gmail.com
makes it easier to retrieve the light from the water to change bulbs.
Building a water garden is a rewarding way to enhance the landscape and create a tranquil retreat in your backyard. Follow these steps and incorporate your own creative touches to have your new water feature flowing nicely for years of lowmaintenance enjoyment. H
For a natural look, define the edges using rocks native to the area.


First step is to mark the layout of the water feature with stakes and spray paint to define the edges and indicate shelves to be excavated.

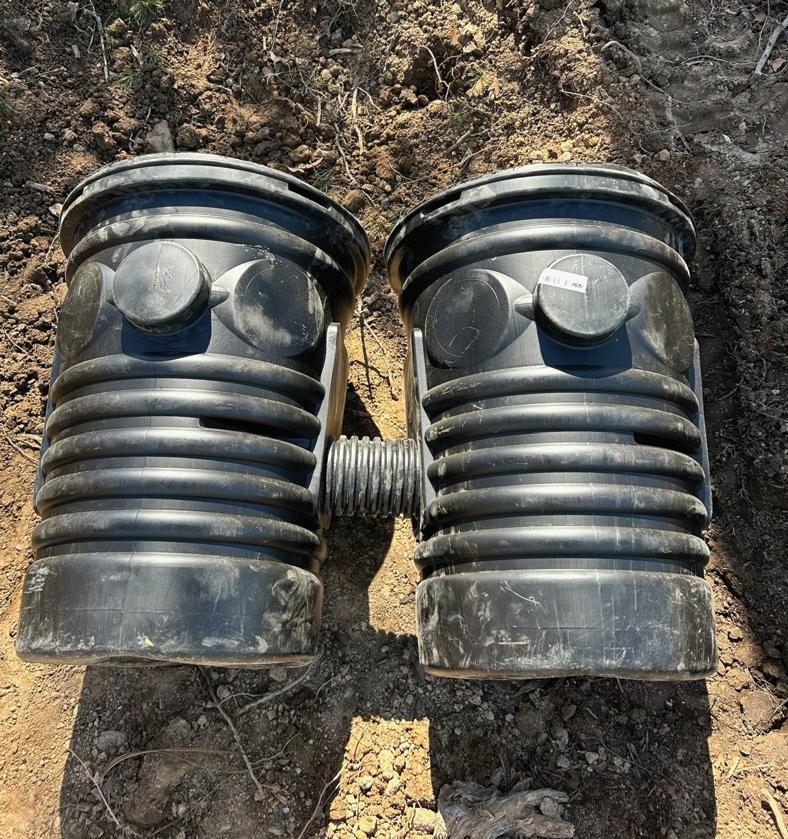
Catch basins can be covered with a grate to screen out sticks, leaves and other small items from the water circulation.


Felt underlayment is installed beneath the pond liner. The filter shown here will be positioned at the top of the waterfall as the return point for the water to flow back downward.
Mini excavators and skid steers are available at rental outlets, but it takes skill and experience to safely and effectively operate one.
This waterfall utilizes catch basins at the lowest point of the feature.
The EPDM liner conforms to the shape of the excavation.

Caleb Stephenson marks the liner with spray paint to help keep track of shelves and the planned flow of water.

To maintain a natural look, boulders were located from other parts of the property to shape the edges of the waterfall.


The water hose is often sold separately from the pump so you can specify the length required for your project.
Larger rocks shore up the edges and determine the bulk of the flow.

Smaller rocks are used to fill gaps and direct water where it’s wanted. Drainage rock lines the bottom of the stream.


Caleb recommends using expanding foam specified for ponds to seal gaps and crevices to redirect the water flow.


Now complete, this beautiful new feature looks like a natural waterfall.
A project like this offers the opportunity to create lots of channels and ledges for cascading effects along the water path.

By Bryce Geib
Many homeowners never think about their water heater until there’s a problem. A leak or equipment failure can grab your attention quickly—and may result in costly emergency repair or unexpected and inconvenient emergency replacement.
When you consider that many water heaters could provide reliable hot water for a decade or longer, choosing one for your home is not a minor decision. Stressful circumstances are not the ideal time for selecting the right water heater to meet your family’s needs. It’s best to think about your next water heater while the one you have is still in good working condition.
Taking time and working closely with a trusted plumbing professional can help homeowners identify a water heating solution designed specifically to meet their needs and maximize comfort and value.
If you’ve never given a lot of consideration to your water heater, you may not be aware of all the options available.
Tank-style—Storage tank water heaters keep a reservoir of water heated and ready for normal, everyday use. There are multiple types of water heaters in this grouping, including heat pump water heaters and indirect water heaters. Instead of generating heat directly, heat pump water heaters shift energy from one place to another to heat your home’s water supply. Indirect water heaters use a home’s space heating system to heat water.
Tankless—Tankless water heaters are another major category. Tankless water heaters directly heat water in response to demand from faucets or appliances, without storing a ready supply until it is needed.
Additionally, water heating technology can rely on one of multiple energy sources. Electric and natural gas are the most common sources of energy for water heaters, but many others are available, including propane and solar.

Each water heater category has specific benefits, depending on your needs and a variety of other conditions. The right solution depends on many factors, including your own personal priorities—energy efficiency, cost, or supplying for a growing family.
It’s important to remember, however, that this is a major decision for your home. A trained and experienced plumber who understands today’s water heating technology and its real-world applications is the best guide through this complex process.
A qualified professional is essential during the process of identifying and installing the right water heater. Skilled and trained professional plumbers can expertly evaluate the various factors that will shape your selection, helping you understand the product specifications and features.
Homeowners and their trusted plumbing professionals should consider the following factors when selecting a new water heater for home installation:
• Sizing: The first factor to consider is size. It’s essential to identify and install a water heater appropriately sized for
the space and demands of your home. How many people live in the home? How many bathrooms are there? Plumbing professionals have access to reliable, up-to-date sizing calculation tools that can help find the right sized equipment for your home. Don’t forget that specialized or luxury appliances and fixtures, such as a hot tub or high-pressure shower head, can affect the calculation.
• Infrastructure: The energy grid supplying your home can determine which products will work best for you and your family. In states and municipalities that are heavily regulating the use of natural gas, demand for electric water heaters is rising. (Editor’s Note: Most electric models require a 220- to 240-volt electrical circuit, so it's important to check the home's electrical panel to ensure it can handle the additional load.) In areas where natural gas is a common energy source, gas water heaters can be a convenient option with excellent longterm value. Often, installation of a different category of water heater may require home upgrades and renovations.

Options in water heaters include tankless styles, conventional tank styles, heat pump water heaters, and more. Image courtesy Bradford White Corp.

Shown are the basic configurations of tank-style water heaters.
• Application: The physical location of the water heater in the home and what it will be used for can play a big role in selecting the right equipment. Tankless water heaters may work well in smaller homes, where space is limited. However, the same tankless water heater may not be able to supply adequate hot water for a family in a larger home with more bathrooms and fixtures that they plan to run simultaneously.
Many homeowners are concerned about both the rising costs of energy and their impact on the global environment, so energy efficiency continues to be a priority. Here are some ratings and guides that can help you identify the most efficient products—but remember that energy consumption will depend on a range of many other factors, so discuss any efficiency claims with your plumbing professional.
• Uniform Energy Factor: Uniform Energy Factor (UEF) refers to a water heater’s efficiency under standardized operating conditions and is determined by a simulated use test specified by the U.S. Department of Energy. When compared to similar products of the same fuel type,
a water heater with a higher UEF rating uses less energy.
• EnergyGuide: EnergyGuide labels are easy to read and relate to. The familiar yellow labels show an estimate of how much energy a water heater uses and how that compares to similar equipment. The label also shows estimated annual operating costs. The estimates are based on typical use patterns and a national average for energy prices.
• Thermal/Recovery Efficiency: Looking more closely at specific products, you’ll notice thermal efficiency ratings or recovery efficiency ratings, which measure how much of the energy generated or transferred by a water heater is expended directly on the heating of water. The higher the number, the more efficient the water heater is. For example, if a water heater is 80 percent thermal efficient, 80 percent of the energy that powers the heater is applied directly to heating water. Highefficiency products can deliver around 90-percent thermal efficiency or higher. For gas water heaters, thermal efficiency depends on the heat exchanger design
of each model. Electric water heaters, on the other hand, provide uniform thermal efficiency of 98 percent.
Water heaters may not be a high priority for many homeowners. But installing a water heater that’s not suited for your home can be a source of stress and inconvenience for several years. Inefficiency could result in unnecessarily high energy costs, and poor configuration could add excess wear and tear, meaning you may have

to replace it sooner. On the other hand, working closely with an experienced qualified professional to find and install the right water heater can help ensure you and your family experience value, comfort, and peace of mind for years to come.
Bryce Geib is team lead – product application specialist at Bradford White Corporation, a leading manufacturer of water heaters, boilers and storage tanks. Visit www.bradfordwhite.com.
An expansion tank is a small secondary tank that is connected to the water supply pipe of the water heater. The expansion tank is designed to handle the thermal expansion of water as it heats up in the water heater, equalizing water pressure throughout the plumbing system to prevent excessive pressure.
Image courtesy Bradford White Corp.
Instead of using electric or gas heating elements in the storage tank itself, indirect water heaters use heat-transfer coils that run between the tank and either a boiler or furnace. The fluid in the coil is heated and then cools off in the water tank, cycling back through to the heat source.
Insulating your hot water pipes reduces heat loss and can raise water temperature 2°F to 4°F hotter than uninsulated pipes can deliver, allowing you to lower your water temperature setting. You also won't have to wait as long for hot water when you turn on a faucet or showerhead, which helps conserve water.
If there are uninsulated water pipes in or near exterior walls, they can burst in freezing weather, which can be catastrophic. Having the insulation done during new construction of a home, during other work on your water heater or pipes, or insulating the pipes yourself is well worth the effort.
In special cases, such as when the fuel used for heating water is very expensive, the distance traveled by the pipes is far, the pipes are exposed to very cold air (in which case they should be insulated anyway to prevent freezing), and if the household uses a lot of water, much higher energy savings can be obtained.
— Source: www.energy.gov


