

HOME IMPROVEMENT AND REPAIRS TM ¢ ¢ ¢ ¢ ISSUE #28 APRIL 2024 HomeImprovementAndRepairs.com INSIDE ENTRYWAY UPGRADE: FROM ONE DOOR TO TWO NATIONAL HARDWARE SHOW HIGHLIGHTS CLASSIC CROWN MOLDING INSTALLATION YOUR ROOFING QUESTIONS ANSWERED SELECTING AND INSTALLING KNOBS, PULLS & HINGES


Last-Deck
THE LAST DECK YOU WILL EVER NEED

last-deck requires no staining or sealing, just mild soap and water for cleaning. No warping, splitting, cracking, rotting, molding, lightweight and fire-resistant. LastDeck is available in a multitude of options allowing you to design your own luxury outdoor space.
Manufactured in the Midwest of all American made structuralgrade aluminum – the same as an aircraft; Last-Deck is built with high quality standards from our family to yours.

last-deck 300 series
The 300 series is a patented, watertight product that has the ability to be replaced without having to start at one end. Should you receive damage at the mid-way point of your deck, simply pop up 2 joiner strips, replace the bad plank, snap the joiner strips back down, and your repairs are finished!

300 series easily pop up and snap back down!


www.lastdeck.com information@lastdeck.com toll free: 866-527-8332 pat# 9,803,376


HOME IMPROVEMENT AND REPAIRS TM ¢ ¢ ¢ ¢ ISSUE #28 APRIL 2024 HomeImprovementAndRepairs.com INSIDE ENTRYWAY UPGRADE: FROM ONE DOOR TO TWO NATIONAL HARDWARE SHOW HIGHLIGHTS CLASSIC CROWN MOLDING INSTALLATION YOUR ROOFING QUESTIONS ANSWERED SELECTING AND INSTALLING KNOBS, PULLS & HINGES INSIDE: LEVEL 1 EVEN FIRST-TIMERS CAN PULL THIS OFF LEVEL 2 WITH THE RIGHT TOOLS AND A LITTLE RESEARCH, YOU CAN DO THE JOB LEVEL 3 THESE CHALLENGING PROJECTS ARE FOR EXPERIENCED DIY’ERS LEVEL 4 DUE TO THE SIZE OF THE JOB, THE EQUIPMENT OR SPECIAL SKILLS REQUIRED, IT’S BEST TO CALL A PRO SKILL LEVEL 2 MODERATE SKILL LEVEL 3 HARD SKILL LEVEL 1 EASY SKILL LEVEL 4 PRO KNOW YOUR SKILL LEVEL: NEW HARDWARE FOR CLASSIER CABINETS 08 32 24 COVER FEATURE 04 Home Improvement and Repairs | The Spring Issue Cover photo courtesy of Top Knobs 20 06 LETTER FROM MATT WEBER 08 START SMART • THE BEST OF IBS AWARD WINNERS ARE IN • WHY IT’S IMPORTANT TO MITIGATE WOOD DUST • SHOP SMART FOR YARD EQUIPMENT • Q&A WITH MATT WEBER 14 TOOL TECH NATIONAL HARDWARE SHOW HIGHLIGHTS 20 SKILL SET CLASSIC CROWN MOLDING: PRO TIP FOR INSTALLATION 32 FROM ONE DOOR TO TWO UPGRADING AN ENTRYWAY 40 SPOTLIGHT YOUR ROOFING QUESTIONS ANSWERED 14

When it comes to the improvements and repairs around my home, I tend to focus on the structure of things while my wife is concerned about how everything looks.
Proper construction or installation techniques should be the
LETTER FROM MATT WEBER
perceptions of the homeowners, but also how the homeowners themselves feel about their home. Interior decorators understand there’s a psychology to décor that is affected by choices in colors, patterns, and materials, which combine to achieve
ability to see how all the disparate elements of a room should tie together visually. I don’t have that, but together we make a pretty good team.
This issue of HIR looks at decorative improvements that impact the look of a house,
PROPER CONSTRUCTION OR INSTALLATION TECHNIQUES
SHOULD
FOUNDATION
foundation for any work done on your home, but you can’t overstate the impact of the décor. From the first impression of exterior curb appeal to the interior style and design, a home’s aesthetics affect not only other people’s
different styles and ambiences.
Although I have a lot more remodeling experience and construction skills than my wife, she has a better eye for the stylish side of things, so I usually defer to her tastes. She has a natural
ranging from new entryways and roofs to interior trim and even new cabinet hardware for DIY’ers.

EDITOR-IN-CHIEF
MATT WEBER matt@HIRpub.com
CREATIVE DIRECTOR
WESLEY GLASSCO wesley@HIRpub.com
NATIONAL SALES jeremy@HIRpub.com
EDITORIAL CONTRIBUTERS
CARTER SWIFT
TOM MATTHEWS
ADVISORY BOARD
JIM BUTTERS
RANDY STEPHENSON
DUSTIN SCHWAIGER
RICHARD HAMILTON
COPY EDITOR
DIANE WEBER
PRODUCTION MANAGER
SHANNA QUIGLEY
ONLINE AND SOCIAL MEDIA DEVELOPMENT
GLORIA BERRIO

AD DESIGN AND COORDINATION
SPECIALIZED MEDIA SERVICES, INC. ads@HIRpub.com
if in doubt about any procedures.
06 Home Improvement and Repairs | The Spring Issue
Home Improvement & Repairs, 130 Inverness Plaza, Suite 226, Birmingham, AL 35242. All rights reserved. Neither this publication nor any part of it may be reproduced, stored in a retrieval system, or transmitted in any form or by any means, electronic, mechanical, photocopying, recording, or otherwise, without permission. The editorial
content is intended to explain and simplify home-improvement tasks. Tools, products, materials, techniques, building codes and local regulations change. We assume no liability for omissions, errors or the outcome of any project. The reader must always exercise reasonable caution, follow current codes and regulations that may apply, and is urged to consult with a licensed professional
DÉCOR.
BE THE
FOR ANY WORK DONE ON YOUR HOME, BUT YOU CAN’T OVERSTATE THE IMPACT OF THE


3X FASTER DECK INSTALL


CHOOSE COATED CARBON OR STAINLESS STEEL
• HIGH STRENGTH COATED CARBON STEEL FOR ENDURANCE
• STAINLESS STEEL FOR SUPERIOR CORROSION RESISTANCE
4 CLIP PROFILES


• PRECISE FIT ELIMINATES LOOSE DECK BOARDS
• INCREASES HOLDING POWER
ELEVATES YOUR DECK BOARDS
• BETTER AIR FLOW REDUCES ROT
• RELIEVES LATERAL LOAD STRESS


USING OUR ELIMINATOR RCSTM PNEUMATIC TOOL! 30 YEAR TRANSFERABLE WARRANTY THE BEST IN THE BIZ FREE
PURCHASE ANOTHER INNOVATIVE PRODUCT FROM SURE DRIVE USA® SUREDRIVE.COM 800-438-5146 • SALES@SUREDRIVE.COM
INSTALLATION TOOLS WITH MINIMUM
STARTSMART

THE BEST OF IBS AWARD WINNERS
“Solstice Shingle by CertainTeed LLC won the Best in Show award because this low-profile solar shingle seamlessly integrates with traditional asphalt shingles while delivering very high photovoltaic electrical conversion. This product comes with a 25-year warranty. It is rated to be installed in any wind zone. And it also carries a Class 3 impact resistance rating. The judges felt that this solar shingle marks a significant advancement in aesthetics, durability and efficiency.”
That’s what the judges had to say about the Best in Show Winner, Solstice Shingle by CertainTeed, LLC, at the 2024 Best of IBS Awards. Winners were announced on the final day of the International Builders’ Show (IBS) in Las Vegas.
CertainTeed’s Solstice Shingle combines aesthetics, high energy efficiency, and durability. It can seamlessly integrate solar technology without compromising style or performance.
The International Builders’ Show recognizes outstanding building products and services from the companies exhibiting at the show. The judges awarded winners in nine categories, including:
Best Business Solution Software: TraceAir by TraceAir
Best Energy
Efficient Product: Solstice Shingle by CertainTeed LLC
Best Home Technology Product: MB-79N Window with Infratherm Technology by Bertrand Windows & Doors
Best Indoor Product: JascoPro Series
SmartCycle Lighting by Jasco Products
Best Kitchen & Bath Product: Empervious by Emser Tile
Best Outdoor Product:
Quick Click 6″ Shadowline Soffit by ChamClad
Check out all the 2024 finalists at BuildersShow.com/BestOfIBS.
Best Window & Door Product:
Pella Installation System by Pella Group
Most Innovative Building Material: Protecto Wall VP by Protecto Wrap Co.
Most Innovative Construction Tool: Integrated Layout System by Flashpoint Building Systems
08 Home Improvement and Repairs | The Spring Issue

WHY IT’S IMPORTANT TO
MITIGATE WOOD DUST
Any DIY’er new to carpentry or woodwork will quickly learn what the pros know well: Wood dust can be a problem beyond just the mess. Prolonged exposure to wood dust can elevate that problem from a nuisance to a hazard. Both the skin and respiratory system can become sensitized to wood dust. When a worker becomes sensitized, he or she can suffer severe allergic reactions (such as asthma or dermatitis) after repeated exposure or exposure to lower concentrations of the dust. Other common symptoms associated with wood dust exposure include skin and eye irritation; nasal dryness and obstruction; and prolonged colds. According to OSHA, certain species of hardwood—such as oak, mahogany,

THE WALLMOUNTED DUST COBRA DUST COLLECTOR WITH EITHER A 30-GALLON DRUM (LEFT) AND 14-GALLON WHEELED BIN.
beech, walnut, birch, elm and ash— have been reported to cause nasal cancer in woodworkers. This is particularly true when exposures are high.
These dust-related problems should make dust collection a high priority. Dust collectors are a type of air-control equipment used in workshops, warehouses and factories. These machines collect and filter dust and particulates that are often released into the workplace. Pros and DIY’ers alike should explore their dust-collection options, because manufacturers offer a range of sizes for large shops as well as small non-motorized units, which DIY’ers can connect to their existing shop vacuums. Visit www.oneida-air.com.

>
Read our magazine online at HomeImprovementAndRepairs.com 09

SHOP SMART FOR YARD EQUIPMENT
With the weather warming up, now is the time to think about how you want your yard to serve your family, pets and wildlife. Maybe you’re aiming to have the best yard on the block, want to install an outdoor family room or outdoor office, or want to expand your space for entertaining.
“Completing big outdoor jobs is always easier with help from outdoor power equipment,” says Kris Kiser, president and CEO of the Outdoor Power Equipment Institute (OPEI). “The right equipment can help you get the work done faster and can help you safely maintain your yard.”
Here are some tips from Kiser to help you select the machinery you need to get the job done.
DEVELOP A WORK PLAN
Draw a sketch of your yard. Include any major features like trees, bushes, an herb or vegetable garden, flower beds, lawn furniture, play or sports equipment, an outdoor patio, or bird bath. Note where maintenance may be required. Will bushes need to be trimmed back from your home or garage? Do you want to put in some flowering bushes or a tree? Are you planning to install a fence and
10 Home Improvement and Repairs | The Spring Issue
STARTSMART
more grass for your pet? Now list the tools and equipment needed to take care of your yard, and what will make the job easier.
CONSIDER EQUIPMENT NEEDED
Wheel out your mower and inspect all the lawn equipment, making a list of what is needed or could be upgraded. Repair anything that needs attention or identify what new machine is required. Large vegetable gardens might require a cultivator or tiller. Riding lawnmowers can make mowing easier for large lawns or hilly terrain. Self-propelled mowers make walk-behind models easier to use at a lower cost and require less storage space than a rider. A string trimmer makes caring for bushes or trimming grass near a fence easier. A pole pruner can help trim limbs too high to reach safely with a saw, and a leaf blower can clear leaves faster than a rake.
RESEARCH EQUIPMENT ONLINE BEFORE YOU BUY
Think about efficiencies of scale. The right equipment can mean more time for other activities, and make doing yard work more enjoyable, too. Outdoor power equipment can be gas-, electric- or batterypowered. Some localities no longer allow use of gas-powered equipment. Technology is rapidly impacting product design. Even robotic lawn mowers are available today. Equipment may be sized to handle a smaller job or a massive one.
ASK QUESTIONS
Speak with knowledgeable staff at the store, ask online about the equipment, and look up customer reviews. In the store, ask to pick up and hold equipment to determine its “fit” for you. Discuss safety
features and ask about manufacturer fueling and care instructions. Find out how often equipment may need to be serviced.
MAKE A PLAN FOR STORAGE AND MAINTENANCE
Store your equipment in a cool and dry place, and service it at the end of the fall and the beginning of the spring. Record the service dates on your calendar with a reminder.
For more information, go to www.opei.org

> Read our magazine online at HomeImprovementAndRepairs.com 11
QUESTION: What’s the best way to stain a concrete floor?
ANSWER: Etching stain is an acid-based product that can change a basic gray, concrete slab into a colored finished floor. Applied as a liquid to a damp concrete floor using a garden sprayer, the stain chemically reacts with minerals in the concrete to create a permanent finish. Coating the stain with a clear sealer will enhance the look and help resist stains.
It is critical to first make sure the floor the floor is clean before staining. Make sure to remove all residue of grease, oil, paint, wax or sealants. Scrubbing the surface with trisodium phosphate (TSP) or baking soda will promote even absorption of the stain and a strong bond with the sealer. Apply water to the concrete and note any areas where water beads on the surface. Clean these areas again until water can be absorbed into the concrete. For heavily soiled surfaces, consider using a cleaneretcher-degreaser such as Bond-Lok from Quikrete. Because the etching stain contains acid, be sure to exercise all necessary safety precautions, including the use of a respirator that filters hydrochloric acid. Remove excess etching residue with water, a scrub brush and a wet/dry vac. Allow the stain to dry completely before applying the clear coat.
Need more info? Visit Matt’s blog at HomeImprovementAndRepairs.com.


STARTSMART < ASK MATT H 12 Home Improvement and Repairs | The Spring Issue PURCHASE DIRECTLY ON AMAZON THERE’S A NEW KING IN YOUR TOOLBOX www.scrigit-scraper.com
PEN-SHAPED DESIGN EASY TO KEEP HANDY UNIQUE ROUNDED TIP BETTER SCRAPER THAN A FINGERNAIL
The Essential Non-Scratch SCRAPER TOOL!
SECOND FLAT-EDGED TIP WON’T SCRATCH LIKE A SCREWDRIVER REMOVE STICKERS, TAPE, CAULK, PUTTY, GRIME & MUCH MORE
SAVES TIME AND EFFORT WHEN CLEANING SMALL SURFACES, EDGES & GROOVES

TOOL TECH

NATIONAL HARDWARE SHOW HIGHLIGHTS
Home centers, independent retailers, online retailers, wholesalers, distributors, and everyone in between attend NHS to discover the newest products, innovations and trends that are shaping the future of the homeimprovement and DIY industry. Here are some of the hottest products that were on display at this year’s show.
DELTA PRO ULTRA BACKUP SYSTEM
The Delta Pro Ultra from EcoFlow is marketed as “the world's most powerful smart hybrid whole-house battery generator and backup system.” Recognized as a 2024 CES Innovation Awards Honoree, EcoFlow Delta Pro Ultra is a residential power backup system designed for

both extended outages and daily use. With singleunit capacity of 6kWh, 7200W output and 5.6kW of solar input, it can run an entire home. Its stackable design allows for quick expansion of
14 Home Improvement and Repairs | The Spring Issue

TOOL TECH
storage and output, while its compatibility with a variety of energy sources, including solar and gas, caters to a wide range of power needs. EcoFlow is also launching Smart Home Panel 2, offering an easy way to fully integrate Delta Pro Ultra with any home for quick gridto-backup transition with auto switch-over. Visit www.ecoflow.com.
NEXGRILL 4-BURNER PROPANE GAS GRILL
The latest Nexgrill 4-Burner Propane Gas Grill in black has a sleek stainless steel main lid. Crafted with precision using polished stainless steel and porcelain-coated steel, this grill is not only stylish but also built for durability. Boasting 567 sq. in. total cooking surface, the Nexgrill 4-burner is perfect for hosting gatherings of up to 6 people. Experience an even heat cooking system, thanks to the combination of stainless steel burners, angled flame tamers, and porcelain-coated cast iron cooking grids. Visit nexgrill.com.


RAPID ROPE
Rapid Rope is literally rope in a can. A canister includes 120 feet of extreme-duty utility rope rated at 1,100-lb. test ideal for countless applications. The shatter-proof canister is small enough to fit into a toolbox or backpack and includes a built-in rope cutter designed for one-handed use. Multiple colors of rope are available, including high-visibility orange. Visit rapidrope.com.
MULE GARAGE FAN
Mule Products has a line of 18-in. ceilingand wall-mounted garage fans—even a mobile fan—that operates by remote control. The fan produces 4,500 CFM and certain models include LED work lights. Visit muleproducts.com.

16 Home Improvement and Repairs | The Spring Issue
NATIONAL HARDWARE SHOW HIGHLIGHTS

JACKERY SOLAR GENERATOR 1000 PLUS
With a capacity of 1264Wh and a 2000W output, the 1000 Plus Solar Generator supports 99 percent of devices. Its expandable design supports up to three add-on battery packs, expanding up to 5kWh and ensuring 1-3 days of home backup power. LiFePO4 battery cells, lasting up to 10 years, provide 4,000 charge cycles. The unit features intelligent control with the advanced app feature, via WiFi or Bluetooth. The 1000 Plus includes a 3-year warranty + 2-year extended warranty. Visit www.jackery.com.
FLYPAD
FlyPad’s unique corrugated texture features glue-filled grooves to catch flies, while the ridged surface stays clean to the touch during setup and disposal. FlyPad employs the Rescue company’s exclusive Visilure Technology to lure flies with colors and patterns. Visit www.rescue.com.


IQ VISE
The IQ Vise from Work IQ Tools features a ball-and-socket design that allows articulation and 360-degree rotation at any angle. It also includes a compression lever in the front that gives the vise even more functionality by allowing it to lay down flat, lock at any angle, or rotate for optimal work positioning. Visit workiqtools.com.
Read our magazine online at HomeImprovementAndRepairs.com 17 >
TOOL TECH

DCK CORDLESS ROTARY HAMMER
Designed for professionals, the DCK KRH20V-26 cordless rotary hammer uses a maintenance-free DC brushless motor powered by the efficient and reliable DCK quick swap batteries. The KRH20V-26 comes standard with the KDE20V-16 cordless dust extractor and SDS-Plus quick-change chuck. Its DVR Handle Shock Absorption System removes discomfort when working for long hours, and the double anti-twist safety provides peace of mind. Despite being able
to drill through 1 inch of concrete, the KRH20V-26 weighs just 7 lbs. An included depth gauge provides extra precision. Visit www.dcktool.com.
SPIRE 3660R 36” BUILT-IN GAS GRILL
The Spire 3660R 36 in. Built-in Dual-Fuel Gas Grill features a full 304 stainless steel construction and offers durability, ease of use, and peak performance. Boasting 904 sq. in. of total cooking space, this built-in can produce up to 73,000 BTUs of quality cooking energy across six premium stainless steel burners and one intenseheat ceramic rear burner. Visit spireoutdoor.com.

18 Home Improvement and Repairs | The Spring Issue
GEAR HUGGER HEAVYDUTY DEGREASER
Gear Hugger Heavy-Duty Degreaser is a water-based, plant-powered, non-toxic solution that is easy to use, fast acting, and safe for people, pets and the planet. Eliminate grease, grime and dirt for a shiny finish with no residue. Gear Hugger makes bio-based alternatives to toxins that deliver superior performance without harming the planet. Visit www.gear-hugger.com.
> NATIONAL HARDWARE SHOW HIGHLIGHTS


DRILL DOCK
Drill Dock was built on the simple idea of being "organized for productivity." Drill Dock creates a specific place for your drill or impact driver with a universal fit, mounting bracket, a strong side magnet, a heavy-duty clip for mounting to a shelf or tool bucket, and a drill-bit sizing guide. Visit www.drilldock.com.

H Read our magazine online at HomeImprovementAndRepairs.com 19

CLASSIC CROWN MOLDING: PRO TIP FOR INSTALLATION
High-density polyurethane is a popular choice for decorative trim, thanks to the wide variety of shapes and profiles and the material’s long-term durability. Some manufacturers of urethane products offer hundreds of pieces of both interior and exterior trim, including crown molding, entrance trim, window trim, shutters, medallions, and other decorative millwork. Because the trim products are manufactured using a mold, rather than milled from solid wood, the profiles can feature artistic patterns and embellishments with the classical appearance of carved wood. To achieve the same intricate cornice moldings with wood trim that are available in urethane, one would have to install multiple sticks of
smaller molding with varying profiles, building up to the overall final shape piece by piece.
The urethane material weighs less than wood but can be nailed, cut, and sanded just like wood. The joints should be fastened with a polyurethane-compatible adhesive. For outdoor use, urethane trim doesn’t have the maintenance problems of wood. It resists insects, cracking, peeling, chipping, swelling, splitting and rotting. Polyurethane molding products are available as double-primed with an exterior grade coating or as finish-painted from the factory.
Randy Stephenson, a professional remodeler in central Alabama, recently shared a tip for hanging classic-style urethane molding that
20 Home Improvement and Repairs | The Spring Issue SKILL SET

minimizes the use of mechanical fasteners and the associated repair work.
Stephenson’s project involved a double course of prefinished classic-style crown molding to decorate the look of a vaulted ceiling.
First step is to set up a stable work surface that supports the lengths of molding to be joined.
Moldings that feature a continuous pattern should be carefully cut so the mating pieces will marry seamlessly to continue the pattern without a visual break in the artwork.
Stephenson’s solution to join the connecting pieces required a clear two-part epoxy applied to the two mating surfaces.


To make sure he didn’t glue the molding to the work table, Stephenson made a jig to support the joints that provided an air space a few inches wide beneath the joint.


22 Home Improvement and Repairs | The Spring Issue SKILL
SET
CLASSIC CROWN MOLDING: PRO TIP FOR
To reinforce the epoxy-joined joints, Stephenson used contact cement to glue a 1/2-in. plywood block to the back of each connection, bridging the seam.

To keep the plywood blocks in a uniform position so they wouldn't shift around while the glue dries, Stephenson measured and marked their positions on the trim and fastened them to the rear of the joints with screws short enough to avoid penetrating the decorative face of the molding.

After the glued joints had completely dried, Stephenson cut the strips of molding to final length then transferred the measurements of the plywood blocks to the wall where the trim would be installed. After marking the block locations, Stephenson made rectangular cutouts in the drywall that would nest the plywood blocks and

allow the molding to install flush against the wall along the ceiling.
To assist with installation, Stephenson fastened a temporary ledger board along the wall, which was positioned to support the molding and align it with the ceiling.
To reduce the need for nailing, Stephenson fastened the molding in place with urethane-compatible construction adhesive and held it in place with a few strategically placed pin nails while the glue dried.
The end result was a professional-grade project that preserved the factory finish of

the crown molding without the need for repairs after installation.
Editor’s note: Special thanks to Randy Stephenson for help with this article. You can reach Stephenson Remodeling at coreresources@yahoo.com
Read our magazine online at HomeImprovementAndRepairs.com 23
INSTALLATION >
H
NEW HARDWARE FOR CLASSIER CABINETS
By Tom Matthews
People with style know how to “accessorize,” and that same cosmetic enhancement is what makes modern cabinet hardware such a hot item for interior decorators. The options in available knobs, pulls, and similar handles number in the thousands, and their prevalence throughout a home makes them a major decorative component.
New knobs and pulls can make an old cabinet look newer and help tie together the design of a room. Modern options include a wide range of metal finishes such as brushed nickel, antique brass, zinc plate, and many more. Retro options include crystal, ceramic and wood-component hardware. Hardware stores and home centers offer a variety of choices for up-close inspection, but for large-scale purchases, online retailers usually offer the best deals and widest selection.
Check out the enormous hardware selection at suppliers like www.leevalley.com, www.woodworkershardware.com, and www.wayfair.com.
REPLACEMENT
When replacing hardware in wood-stained cabinetry, options in the size of replacement pulls will be limited due to the placement of the existing bolt holes. In this case, you will need to purchase new hardware that has mounting holes in the exact same locations, or purchase hardware that conceals the old holes.
Paint-grade cabinetry and furniture can allow for more options in hardware size, because the old mounting holes can be filled, sanded, and repainted before drilling new
SELECTING AND INSTALLING KNOBS, PULLS AND HINGES

> 24 Home Improvement and Repairs | The Spring Issue

Read our magazine online at HomeImprovementAndRepairs.com 25 SKILL LEVEL 2 MODERATE
> NEW HARDWARE FOR CLASSIER CABINETS


holes to mount the new pulls. (This isn’t recommended where woodgrain is exposed, because the repair work generally doesn’t blend and remains noticeable.)
To measure drawer pulls, you must determine three measurements: length, center-to-center distance, and projection/depth. Aside from measuring the overall end-to-end length of the pulls, measuring the center-to-center distance of the holes is very important for installation, especially if you are replacing old hardware.
To find the center-to-center measurement, use a screwdriver to remove your current pulls, then take a ruler or measuring tape and measure from the center of one screw hole to the center of the other screw hole. To find the center-to-center distance of a new pull from your supplier, look for a "Weights & Dimensions" tab on the product page.
Projection (also known as depth) refers to the distance between the cabinet or drawer and the

Decorative cabinet hardware should be measured in overall length, center-to-center distance, and its projection from the cabinet. Shown are new cabinet pulls from Top Knobs.
pull. This is typically the gripping area where you grab the knob or pull. The larger the projection, the more room your hands will have to fit between the pull handle and cabinet. Consider how comfortable it will be to use your cabinet or drawer pulls. If you have large or arthritic hands, a larger projection is ideal. To find the hardware's projection, check the product page's "Weights & Dimensions" section.
When you’re determining an ideal projection for cabinet pulls, open your cabinets and see how close they swing to each other and surrounding kitchen objects. If your doors swing close together or toward another object, consider a smaller cabinet pull to minimize the risk of damage from swinging impact.
Also, test the clearance of drawers that are positioned adjacent to each other. In some cases, a drawer pull with a lot of projection might obstruct an adjacent drawer from opening the way it should.


26 Home Improvement and Repairs | The Spring Issue
s
Available in a wide array of modern metal finishes, knobs are the most versatile hardware option and will complement cabinet doors of any size. s
Mounting pulls of the same size is a simple job that requires only a screwdriver.
Pro Tip: Store the old hardware until the replacement is complete. If the new bolts aren’t the right length, you may be able to substitute old bolts for the installation.
HINGES
When using knobs and pulls with a metal finish, cabinets look best with hinges that match. Not only should the hinge finish match the new hardware, but the hinges should exactly match the size and configuration of the old ones. For example, some cabinets have a frame over the opening which will require face-frame mounted hinges, while other hinges have a recessed overlay to fit a different style of cabinet. Cabinet doors mounted completely on top of cabinet faces will get a full overlay hinge. If there is only a partial overlay, choose a 3/8-inch inset hinge. For no overlay, choose a full inset hinge. Frameless “European” style cabinets have a hidden hinge on the backside of the door, which conceals the hinge from sight when the door is closed.
Pro tip: When removing a door hinge, always remove the lower hinge(s) first, so the door’s weight hangs from the top. When hanging a door, install the upper hinge first for the same reason.
Repair tip: To tighten a loose hinge screw, remove the screw and tap pieces of toothpick into the screw hole. Cut the toothpicks flush with the cabinet face. Reinsert the screw, and the toothpick material should tighten the connection.
FIRST-TIME INSTALLATION
Whether you’re outfitting newly constructed cabinets with hardware, or you’ve refinished old cabinets for a brand-new look, keep the following guidelines in mind for selection and placement of pulls and knobs.
Start by measuring the width of your drawer or height of your cabinet.
Pulls—The length of the pull should be proportional to the size of your cabinet or drawers. Designers generally recommend a pull that is no longer than one-third of the total cabinet door height and no longer than one-half of the total drawer width. Long drawers (36 in. wide or
more) might utilize two pulls—one on each side—to make it easier to open.
According to the experts at Top Knobs, a North American leader in decorative hardware, pulls measuring 3-7 inches long will best suit doors less than 24 inches tall. Cabinet doors 24-36 inches tall are best adorned with pulls 7-12 inches long, while cabinets taller than 36 inches (such as pantries, built-in appliances, and pullouts) look good when accompanied by pulls longer than 12 inches.


sAfter removing the old hardware, take the opportunity to clean the cabinets, make any necessary repairs, and touch up the paint.
When replacing hardware of the same size, it’s most important to match the center-to-center spacing of the mounting holes. s
Read our magazine online at HomeImprovementAndRepairs.com 27
NEW HARDWARE FOR CLASSIER CABINETS
When fixed onto drawers, one pull 3-5 inches in length should be installed at the center of a drawer less than 16 inches wide. Drawers 16-32 inches can utilize two smaller pulls 5-7 inches in length or one larger pull 9-12 inches long. Drawers broader than 32 inches are best suited for pulls longer than 12 inches.
Knobs—The most versatile hardware options, knobs are available in a broad range of styles

sWe recommend installing the hardware with a handheld screwdriver. If you use a cordless driver, make sure to dial down the power to its lowest torque setting.

sCabinets and drawers are constructed in different ways. In the photo, note the face-board that doubles the wood thickness on this drawer compared to the thinner cabinet doors. To make sure you will have fasteners that fit, it’s a good idea to store the old screws for reuse until installation of the new hardware is complete.
and finishes. Standard size knobs range between 1-2 inches in diameter and will complement cabinet doors of any size.
When arranged on drawers less than 16 inches wide, designers recommend installing one knob directly at the center. For larger drawers, two knobs should be installed. For a symmetrical appearance, measure the drawer into thirds and set the knobs in the center of the two outer portions.

sThis photo shows why measuring projection is so important. In this case, the new drawer pulls nearly interfered with the opening function of the adjacent drawers. We narrowly avoid obstruction, but if the handles had projected as much as 1/8-in. further from the door, we would have had a problem.

spulls
>
28 Home Improvement and Repairs | The Spring Issue
Knobs and
are installed 2-1/2 to 3” from the corner of the door.

Drill pilot holes the exact same diameter of the screws to ensure a tight fit.
INSTALLATION
On upper cabinets, knobs are typically installed between 2-1/2 to 3 inches from the lower corner of the cabinet door. For lower cabinets the same measurements apply but on the upper corner. For drawers, knobs go in the center.
For both upper and lower cabinets, the pulls should be installed vertically 2-1/2 to 3 inches from the corner of the door. For drawers, they should be installed horizontally in the center.

To avoid tear-out (splintering the wood with the drill bit), clamp a scrap wood black to the exit side of the door when drilling pilot holes.
It is critical that the placement of all the knobs and pull remains consistent throughout the cabinetry.
Whenever installation requires new mounting holes in the cabinets, make sure to pre-drill the fastener holes to prevent splitting the wood. Pro Tip: To avoid tear-out (when the drill bit splinters the wood as it exits the opposite side of the door), clamp a scrap block against the exit location of the bit.
For the pilot holes, make sure to use a drill bit the exact same diameter as the mounting

s A drill guide such as the DrillBlock from Milescraft can help to keep the bit at 90 degrees to the wood surface.
Read our magazine online at HomeImprovementAndRepairs.com 29
s
s
NEW HARDWARE FOR CLASSIER CABINETS
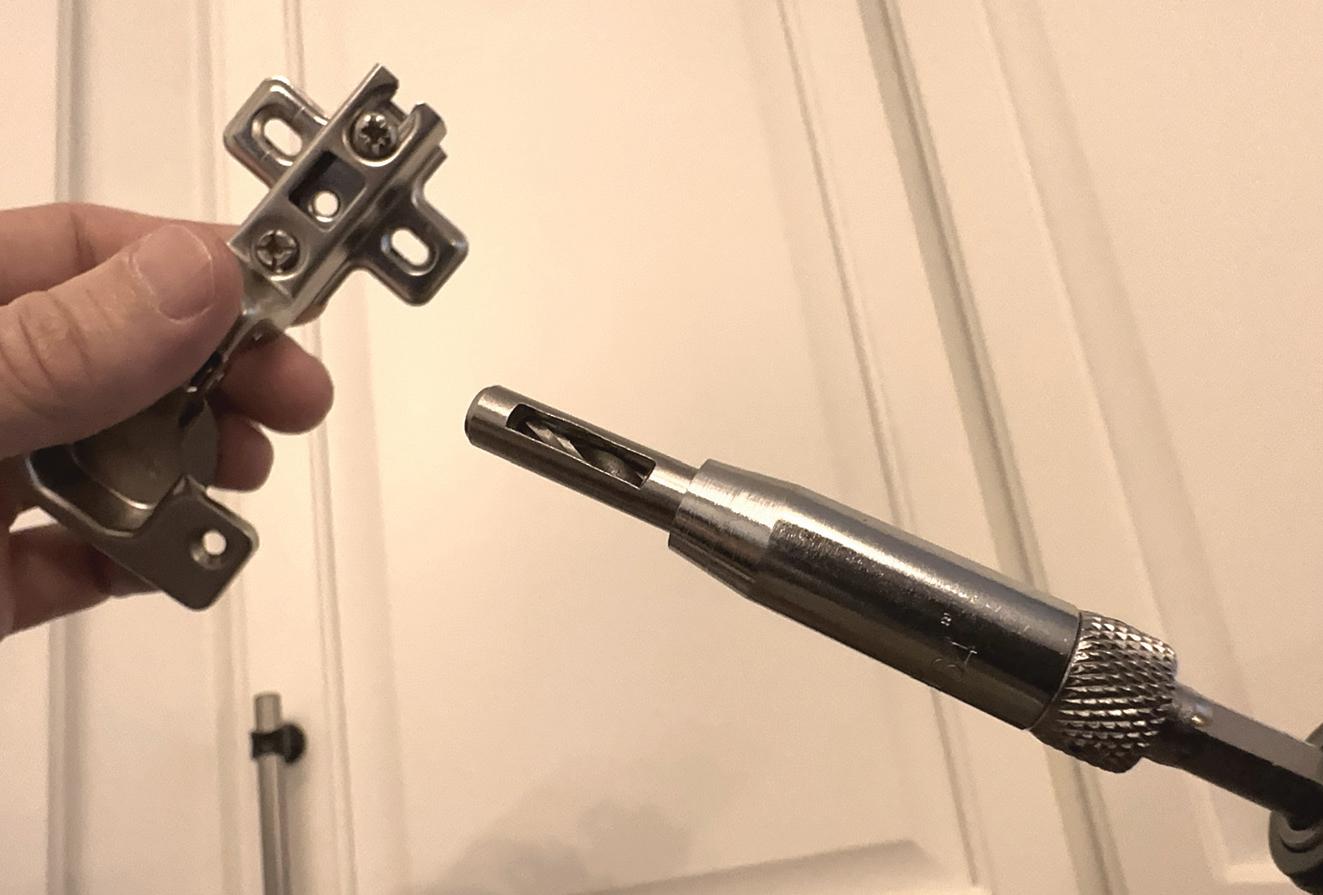
When installing new hinges, you might find it helpful to predrill the screw holes with a “hinge pilot bit.” These specialty drill bits include a retractable metal sleeve that centers the bit inside the hinge’s screw hole, so a misplaced pilot hole doesn’t cause a screw to pull the hinge out of alignment. s
Door Placement Jig
screws to ensure a tight fit with no slop in the hardware.
All that is required for installation of cabinet hardware is a handheld screwdriver. If you use a powered screwdriver, it’s best practice to begin threading the screws with your fingertips to avoid cross-threading. When installing cabinet hardware, always lower the torquesetting of your power-driver to its lowest level to avoid stripping out the screw heads.
HSpecial thanks to Top Knobs for supporting this story. The cabinet pulls installed in this article come from the company’s Dakota collection finished in Pewter Antique and Flat Black. Learn more at www.topknobs.com.
When installing door hinges, clamp a simple jig to the bottom rails to help support the door and gauge it’s installation height as you fasten it in place. The jig is made of a 1x4 block about 10” long. It has a 2” wide rectangular shim screwed lengthwise to the top and aligned along one side. Clamp the jig to the cabinet so the shim is aligned against the bottom rail. The thickness of the shim can vary based on the placement of your cabinet doors. In the photo shown, the shim is only 1/8” thick to provide a very small reveal around the doors. The shims tend to vary 1/8” to 3/8” depending on your cabinets.


> 30 Home Improvement and Repairs | The Spring Issue

twoFROM ONE DOOR TO
By Matt Weber
The Mission: Enlarge the home’s entryway. The Strategy: Remove an existing single door, transom and sidelights, then replace with a taller double doorway.
This project is an excellent way to update the look of a home, boost its curb appeal and enhance the interior décor.
The first step is to select and order a new door, which in this case was a custom ordered pre-hung (jamb attached) model designed to fit within the doorframe of the existing entry. The homeowners wanted a grander front door design, and the elimination of the stationary glass around the old door permitted enough room to fit the two French-style functional doors.
Entry doors vary greatly in overall style, decorative detail, and glass options, so you should research your options thoroughly. Steel or fiberglass doors will best withstand exterior climates, and they typically include interior insulation.
DITCH THE OLD DOOR
To remove a door, begin removing its hinge pins from the bottom, working upward. Set the door aside. It can be donated to a secondhand supply house if it’s in good condition.
Disassembly of the sidelights and transom might require some exploration and experimentation because different manufacturers build them in different ways. Remove any obvious fasteners that hold the components together. Along the sides and top of the doorframe, you’ll need to slice through the caulk beads with a utility knife. Hidden screws might be concealed

> 32 Home Improvement and Repairs | The Spring Issue

Read our magazine online at HomeImprovementAndRepairs.com 33 SKILL LEVEL 3 MODERATE
> FROM ONE DOOR TO TWO
with color-matched wood plugs along the window trim. If you cannot back out the installation screws with a screwdriver, then you might need to use a reciprocating saw to cut through the fasteners.
Do not remove the sidelights from the doorframe until you’ve confirmed that the overhead transom is independently attached to the doorframe or is otherwise supported from below, so it does not come crashing down.
Note that when performing demolition around glass panes, the potential for breakage is high.
Always wear eye protection. Take the additional safety measure of duct-taping the glass panes across their surface, so if they shatter, the broken glass will stay mostly taped together with no dangerous shards flying around.
The new pre-hung door jamb needs to be around 1-2 inches narrower and 2-3 inches shorter than the door frame, allowing room for adjustment and shims. Clear the rough opening of any broken fasteners, insulation or old caulking. (If the opening is too large, you can add boards to the framing, then cover with trim.)
This custom pre-hung double door arrives with the jamb attached to ensure an effective weatherseal and facilitate installation.
Disassembly of the surrounding glass and trim will vary somewhat, but start by cutting through caulk lines and removing visible fasteners.


Wear eye protection and mask the glass with duct tape to keep it intact in case it shatters.
Make sure the foundation is perfectly level and make any necessary accommodations.

34 Home Improvement and Repairs | The Spring Issue

The rough opening should be 1-2 inches wider and 2-3 inches taller than the door unit.
We removed some old shim boards from around the door frame to make sure we had enough clearance to fit the door.

NEW DOOR INSTALLATION
Installing a new door of this size and weight is a two-person job. One installer needs to be on each side of the door to adjust its position. First, remove any cardboard packing or nails that hold the new door to the pre-hung jamb. Do not, however, remove the plug that connects the door latches, because this keeps the doors closed during installation to keep the jamb in its rigid, rectangular shape.

A buzz-cutter equipped with a scraper blade provides a quick way to remove old caulking.

When removing doors, a reciprocating saw usually proves to be an indispensable tool for cutting through nails and old building materials.
If your door includes manufacturer’s instructions, then you should read and follow them to the letter. Otherwise, follow these general guidelines:
Place the door/jamb combo in the rough opening by tilting or sliding it into position. Make sure the hinge side of the doors are perfectly vertical. When you have the unit lined up and have determined no major problems with the fit, apply caulk/sealant beneath the door seal.
Read our magazine online at HomeImprovementAndRepairs.com 35
FROM ONE DOOR TO TWO


Reposition the door along the hinge side and fix it in place by tightly placing shims around the frame to hold its position. (Note: If the entry door is exposed to rain, add a sill pan or extra flashing beneath it to protect the subfloor from water damage.)
With the door in place, start at the top and measure carefully with the level. You can fill any gaps between the door jamb and the rough opening using wood shims. A shim is a thin block or tapered wedge used to fill gaps between the jamb and doorframe, making slight adjustments to achieve plumb and level. When the shim and the frame are correctly positioned, drive a screw through the jamb into the frame to hold it in place.
The rough opening should be completely clear of obstruction and debris in preparation for the new door.
Installing a door of this size will require one person on the inside and another on the outside to help adjust its position. Once it’s aligned with the door frame, drive a screw into the frame at one corner, understanding that you might have to remove this screw to make further adjustments.

The door must be perfectly square and plumb from side to side and front to back, so the doors will open properly along the vertical hinge axis in an even plane that does not bind against the floor or jamb.
>
36 Home Improvement and Repairs | The Spring Issue
Continue the shimming process around the door frame, inserting more as necessary to hold the door jamb securely while checking for plumb and squareness as you go. This may require a lot of readjustment but take your time and do it right.

A 6’ level such as this Kapro model provides the most accurate level measurement of these 8’ doors.

Once you’re confident you can achieve a successful fit, add sealant beneath the door sill. A waterproof, elastomeric product such as DuraMaster by Titebond is a good choice. Doors exposed to rainfall should be fitted with a sill pan to protect the flooring.
Once the frame is held firmly, open and close the door to make sure everything works properly. Inspect the top of the door to make sure it closes correctly with no gap. If you find errors,

Read our magazine online at HomeImprovementAndRepairs.com 37
FROM ONE DOOR TO TWO
To minimize the spackling work, we prefer using finish nails and trim-head screws to secure the jamb around the frame.


Wedge-shaped shims inserted against each other from opposite sides of the door can fill and even widen the gaps between the door jamb and frame.
go back and make adjustments. You might need to add more shims to help the door align correctly.
Use shims at the top center of the jamb, making sure the horizontal top rail is installed level and reinforced with shims or blocking at the midpoint to create a positive connection

Reinforce the hinge locations by supporting them with shims and driving long screws though the hinge and into the door frame.
AIRSHIM MAKES DOOR & WINDOW INSTALLATION EASIER
The AirShim is a contractor-grade inflatable air wedge for door, window and cabinet installations. It’s designed to replace damaging pry bars and temporary wood shims. It allows a single installer to position and hold items in place, saving jobsite time and labor costs by providing a much-needed extra hand in installations. It's perfect for window and door installations, and for positioning appliances and equipment. Use it anywhere you need to lift and align objects. The AirShim is certified for a 300-lb. load rating and has an internal stiffener with a rounded corner, so it fits into tight 3/32-in. gaps without folding. When inflated, its 2-1/2-in. gap-spanning capacity means greater lifting or pushing range and more versatility on the job or around the house. Visit www.calculated.com.


> 38 Home Improvement and Repairs | The Spring Issue
with the overhead door frame. Drive screws through the jamb into the blocking and top frame. This step will prevent the jamb from sagging over time.
Make adjustments until the door closes properly and the gap at the top is even, then fasten through the shims into the stud framing


with finish nails or trim-head screws. To give the hinges extra strength, you can place shims behind them and hold them in place with longer hinge screws driven into the framing.
When the door is fully installed, it’s a good idea to apply expanding foam insulation in the remaining gaps between the jamb and the rough opening. Be sure to use a low-expanding formula specifically designated for doors and windows.
Seal all seams with a flexible, paintable, weather-proof caulk. The new door arrived primed from the factory but required a topcoat of exterior paint. After painting, you can then install your doorknob or handle-set of choice along with a decorative trim package.


Read our magazine online at HomeImprovementAndRepairs.com 39
The double doors included top-side latches to provide the option of keeping one of the doors stationary.
Test operation of the door before driving all the fasteners.
Strengthen the overhead jamb with shims and blocking to prevent sagging over time.
A buzz-cutter makes a handy tool for cutting away excess shim material.
H

YOUR ROOFING QUESTIONS ANSWERED
Are you considering new roofing material for your home but you’re hesitant to call a roofer because you don’t know anything about roofing? This should not be a problem. Most people have never replaced or purchased a roof before. You have roofing questions and need answers before investing in a new roof.
Home Improvement & Repairs turned to the experts at DaVinci Roofscapes, who talk to homeowners every day about their roofing questions. They understand that adding roofing material to your home is a major decision, both financially and aesthetically, impacting the resale value of your home. Making an informed decision is crucial.
The DaVinci teams answers their 11 most common roofing questions:
1.
What is a square?
In roofing, a square isn’t the same space measured for carpet. Rather, a roofing square is 100 square feet (about the same area as an apartment bedroom). For example, if your home is 1600 square feet and only one story, your roof would be roughly 16-18 squares. Of course, because all roofs have a different pitch, the steepness of the pitch will determine if the surface area is greater or less than the square footage of your home. Your roofer will calculate the number of squares on your roof when providing a bid for synthetic roofing materials.
2.
What is a pitch?
The pitch of a roof is your roof’s rise over run. In other words, if your roofer says that
40 Home Improvement and Repairs | The Spring Issue SPOTLIGHT

SPOTLIGHT
your roof is a 7:12, then your roof rises 7 inches for every 12 inches it runs. One of the easiest ways to figure this out yourself is to examine (or measure, if accessible) the profile of your roof.
3. What is a valley?
A valley is where two separate planes of a roof join and water is diverted. The more valleys, the more labor involved. Care must be taken when shingling a valley. If it isn’t done right, you will most certainly have leaks in your synthetic shake or slate roof.

s
DaVinci Slate and Shake have a 1/2-inch profile, which is twice as thick as any other synthetic tile, showing more surface detail on the leading edges from almost any viewing angle.
4. What are open or closed valleys?
Your roofer may suggest an open valley or a closed valley, based on tile placement. A closed valley has tiles touching and no flashing is exposed. An open valley has flashing exposed.
5. What is flashing?
Flashing are pieces of metal used in valleys, vent pipes, chimneys, dormers, and adjoining walls to prevent water from coming into your building or home. The more angles your roof has, the more your labor and material will cost.
6. What is the ridge?
Your home’s ridge is the uppermost horizontal part of your roof where an angle forms from the intersection of two sloping roof planes. The ridge piece is essential because water hits your roof there first and then runs down the slopes. It also tops off your roof and makes your roof look finished.
7. What’s a hip piece?
The hip is the area where two sloping planes come together, whereas the ridge is the very top of the roof. For your home to be protected from the elements and also to have an aesthetically finished look, hip, ridge and starter tiles are essential parts of it.
8. What is a starter tile?
The starter course is the first layer of roofing that is applied at the bottom eave line. Starter tiles are always covered by the first course of shingles.
9.What is needed for the roof deck?
For all DaVinci synthetic shake and synthetic slate roofing projects, the manufacturer recommends that you use 1/2-in. plywood decking to ensure a stable roof. To achieve a Class A fire rating and a Class 4 impact rating, you must use this roof decking in conjunction with the synthetic roofing material.
10. What is underlayment and which product do I need for synthetic roofing materials?
Underlayment is an asphalt-saturated felt or other sheet material installed between the roof deck and the roof covering. Underlayment is used to separate the roof covering from the roof deck, to shed water, and to provide secondary weather protection for the roof area of the building. While there are many different options that can be used to obtain a Class A fire rating, the DaVinci team recommends one layer of Eco Chief Solarhide to achieve the rating.
42 Home Improvement and Repairs | The Spring Issue
11. What is synthetic roofing material?
YOUR ROOFING QUESTIONS
DaVinci Roofscape composite roofing is made of an engineered polymer, which is impregnated with fire retardant and advanced UV and thermal stabilizers, specifically formulated for the demanding conditions tiles are exposed to in all climates throughout the year. DaVinci roof tiles use only virgin resin to ensure consistency, and DaVinci Slate and Shake is backed by a Lifetime Limited Material Warranty.
HIf you’d like to learn more about high-quality synthetic roof products, contact the experts at DaVinci Roofscapes at 1-800-328-4624 or visit www.davinciroofscapes.com.


Read our magazine online at HomeImprovementAndRepairs.com 43
ANSWERED >

