HOME IMPROVEMENT AND REPAIRS


last-deck requires no staining or sealing, just mild soap and water for cleaning. No warping, splitting, cracking, rotting, molding, lightweight and fire-resistant. LastDeck is available in a multitude of options allowing you to design your own luxury outdoor space.
Manufactured in the Midwest of all American made structuralgrade aluminum – the same as an aircraft; Last-Deck is built with high quality standards from our family to yours.

The 300 series is a patented, watertight product that has the ability to be replaced without having to start at one end. Should you receive damage at the mid-way point of your deck, simply pop up 2 joiner strips, replace the bad plank, snap the joiner strips back down, and your repairs are finished!

300 series easily pop up and snap back down!


The United States saw an 18.1-percent increase in homelessness is 2025, according to the Associated Press. This figure is based on tallies required by U.S. Department of Housing and Urban Development which are taken across the country
several parts of the country. That increase comes on top of a 12-percent increase in 2023, which HUD blamed on soaring rents and the end of pandemic assistance.
Owning a home has never been easy, but now it’s harder than ever
year, a time for resolutions and a positive outlook. So, take a moment as you peruse this issue of Home Improvement and Repairs and count your blessings. If you’re reading this magazine, there’s a good chance that you not only have a home,
OWNING A HOME HAS NEVER BEEN EASY, BUT NOW IT’S HARDER THAN EVER FOR MANY TO ACHIEVE FINANCIALLY.
— a number that misses some people and does not include those staying with friends or family because they do not have a place of their own.
Federal officials attribute the dramatic rise in homelessness to a lack of affordable housing, devastating natural disasters, as well as a surge of migrants in
for many to achieve financially. Some people never put forth the effort to earn their own home, some try and do not succeed, and others succeed only to have their dream washed away by a monstrous storm. Life can be brutally unfair.
It’s a tough world out there for homeownership, but it’s a new
but you own it. There’s never been a better time to appreciate what you have and protect it for the future.

EDITOR-IN-CHIEF
MATT WEBER matt@HIRpub.com
CREATIVE DIRECTOR
WESLEY GLASSCO wesley@HIRpub.com
NATIONAL SALES jeremy@HIRpub.com
EDITORIAL CONTRIBUTERS
COURTNEY KLOSTERMAN
CECILIA JOHNSON
CARTER SWIFT
ADVISORY BOARD
JIM BUTTERS
RANDY STEPHENSON
CALEB STEPHENSON
ADAM DAVIS
COPY EDITOR DIANE WEBER

MANAGER SHANNA QUIGLEY ONLINE AND SOCIAL MEDIA DEVELOPMENT GLORIA BERRIO AD DESIGN AND COORDINATION
SPECIALIZED MEDIA SERVICES, INC. ads@HIRpub.com

BY COURTNEY KLOSTERMAN
Many people dream of owning a home, but the combined costs of insurance premiums, property taxes, and ongoing home maintenance may come as a surprise. A recent survey from Hippo found that as a result, current US homeowners are setting distinct financial goals for their houses, including completing regular maintenance to prevent repair issues (45%), reducing monthly expenses (43%), and paying off existing debt (37%).
Here are resolutions homeowners can make to keep home costs down in 2025:
Build a maintenance and repair fund. Nearly half of homeowners have $1,000 or less saved for home upgrades and maintenance costs. That may be enough to cover seasonal maintenance and smaller repairs. However, a larger financial cushion can be a big help when addressing multiple projects at the same time or more extensive projects, like repairing rotted wood, roof damage, or HVAC replacement. Experts recommend saving 1 to 3 percent of your home's value for budgeting purposes.
Prioritize proactive maintenance. Staying on top of maintenance is a good way to help prevent unexpected repairs that may be out of budget and allow more income to be spent on desired home upgrades. Here are a few maintenance tasks to complete:
• Inspect your roof - The last thing you want to deal with is a leaky roof since it protects your home from ice, wind, rain, and hail. A damaged roof can cause mold and structural damage.
• Clean and repair gutters and downspoutsClogged gutters and downspouts prevent water from draining away from the roof and siding. On top of paying $384 on average gutter repair, clogged gutters can lead to issues like mold, foundation damage, or roof damage.
• Prioritize HVAC maintenance - In addition to minimizing wear and tear, routine filter changes, regular checks and maintenance help your HVAC
system operate smoothly and maintain good air circulation in your home. Experts recommend professional HVAC inspection and maintenance at least once per year, ideally in the spring and fall, for efficient service.
• Check other critical systems and protection devices - Purchasing a replacement sump pump to help prevent basement flooding may cost several hundred dollars, but one inch of water can lead to thousands in damage to your home.
Find saving opportunities. Small savings opportunities can add up and help get you closer to your savings goals. Everything from DIY projects to improved financial habits can make a difference. Improving your credit score can help improve your chances for better lending opportunities.
Cut existing expenses. Reexamine your finances to help find areas you can cut back on. Track spending to help cut down on impulsive and nonessential costs. Look into tax breaks that may lower your tax burden
Spend strategically. Spending is unavoidable, but you can help make your dollars count by investing in projects that have long-term value and can help prevent future issues. Prioritize repairs that impact your home’s structural integrity. Gradually make energy-efficient upgrades to help lower utilities. Regularly review your home insurance to ensure it meets your needs.
About the author: Courtney Klosterman is home insights expert at Hippo home insurance. For more, visit www.hippo.com.

The Revinylize Recycling Collaborative is revolutionizing the recycling of vinyl siding and other rigid vinyl building products by creating an innovative one-stop solution for home builders, remodelers, and consumers. This initiative reclaims post-consumer materials from landfills and recycles them into beautiful, new products. The benefits are far-reaching, offering environmental sustainability, cost savings, durability, opportunities for new business development, and innovative new products made from recycled vinyl.
After a two-year pilot program, the Polymeric Exterior Products Association (PEPA) officially launched Revinylize in 2023. The recycling program aims to recycle 5 million pounds of post-consumer rigid vinyl during 2025. As of August 2023, the collaborative has recycled half a million pounds. With formalized partnerships and expanding operations in Louisville, KY, Nashville, TN, and the Northeast, the collaborative aims to ensure that every recycling project makes a meaningful difference. For more information about Revinylize, visit www.revinylizenow.org.

BY CECILIA JOHNSON
The new year is a perfect time to turn your attention to your lawn. Here’s how to boost your outdoor landscape that you and the family can enjoy year-round.
1. Build a cozy fire pit area. Ignite the spark of outdoor camaraderie by setting up a snug fire pit area, perfect for those cool, starry nights. Opt for surrounding
your fiery centerpiece with grass varieties like Empire Zoysia or Celebration Bermudagrass, which offer durability and beauty, enhancing the cozy ambiance of the fire glow.
2. Plan your lawncare calendar. Each season holds key tasks such as mowing and getting ahead of weeds with pre-emergent treatments as the soil starts warm up.
3. Install an efficient irrigation system. Such systems adjust watering based on weather conditions and soil moisture levels, ensuring that your lawn receives the right amount of water at the right time. This not only conserves water but also prevents overwatering and under-watering, promoting a healthier, more resilient lawn.
4. Observe the wildlife for eco-health. By noting visiting bird species and other wildlife, you can gauge the health of your environment— a fun, educational way to connect with nature.
5. Learn about soil health. Testing your soil early helps pinpoint exactly what your green space craves, letting you tailor a fertilization strategy that really hits the mark as the season of growth kicks off.
6. Plan seasonal decorations. Plan for year-round visual interest through strategic plant choices that provide color, variety and texture throughout the year, such as evergreens or winter-blooming plants.
7. Design a functional herb garden. Plan a herb garden that can be started indoors and moved outside as temperatures allow, providing both winter interest and early spring planting.
8. Creative composting. Organize a compost system that can be started in the winter when kitchen scraps are plentiful, but yard waste might be less so, preparing for adding more materials as spring cleanup begins.
9. Convert to droughtresistant landscaping. For those facing arid climates, consider a switch to landscapes that laugh in the face of
drought. Cultivars like NorthBridge Bermudagrass and Sola St. Augustine grass are stellar at conserving moisture, ensuring your garden stays green, without guzzling gallons.
10. Adopt a fertilizer regimen. Adopting a regular fertilizer regimen like Lawnifi delivers nutrients using nanotechnology, reducing environmental impact. Apply it according to the seasonal needs of your lawn to ensure optimal growth and health year-round.
About the author: Cecilia Johnson is content provider for Sod Solutions. For more, visit www.sodsolutions.com.

Scheduled for February 25-27 in Las Vegas, NV, the 2025 NAHB International Builders' Show—the premier, once-a-year event that connects, educates, and improves the residential construction industry—is a hub for new product launches, construction demos, industry thought-leader sessions, workshops, panel discussions, and more. Registration is open, and the people, products, and knowledge shared at the show will help shape home construction for the year to come. For more, visit www.buildersshow.com.


QUESTION: I’m considering adding a spiral staircase from our upper level to the basement. What measurements should I take before ordering the kit?
ANSWER: The most important measurement that you’ll need to know for how to build a spiral staircase is your finished floor to finished floor height. Your finished floor-to-floor height will determine how many steps, or treads, are in your staircase and the rotation of your spiral stair. To determine the height, measure from the bottom floor to the finished floor and include any subflooring or carpeting for the most accurate measurement.
You will also need to determine the size of your well opening (the hole in the floor), which needs to be at least two inches larger than the stair’s diameter. Refer to the dimensions of the available staircase kits to determine the minimum size of the well opening.
QUESTION: Is oil paint the best choice for painting metal?
ANSWER: Choose paint specifically designed for use on metal surfaces, which will provide better protection against corrosion and wear than oil paint. Look for paints that contain protective properties such as rust inhibitors, water repellency, or UV light resistance. Make sure to thoroughly prep the metal surface before painting.
Clean the metal to remove any dirt, grease, rust, or contaminants. Use a wire brush, sandpaper, or scuffing pad to remove any corrosion or old paint. Make sure the metal is completely dry before applying primer and paint.
It’s a good idea to apply a coat of metal-surface primer after you’ve cleaned and prepared the surface. This will promote better paint adhesion and a more uniform finish.


The Essential Non-Scratch SCRAPER TOOL!
SAVES TIME AND EFFORT WHEN CLEANING SMALL SURFACES, EDGES & GROOVES


PEN-SHAPED DESIGN
EASY TO KEEP HANDY
UNIQUE ROUNDED TIP BETTER SCRAPER THAN A FINGERNAIL
SECOND FLAT-EDGED TIP WON’T SCRATCH LIKE A SCREWDRIVER REMOVE STICKERS, TAPE, CAULK, PUTTY, GRIME & MUCH MORE


DIRECTLY


By Matt Weber
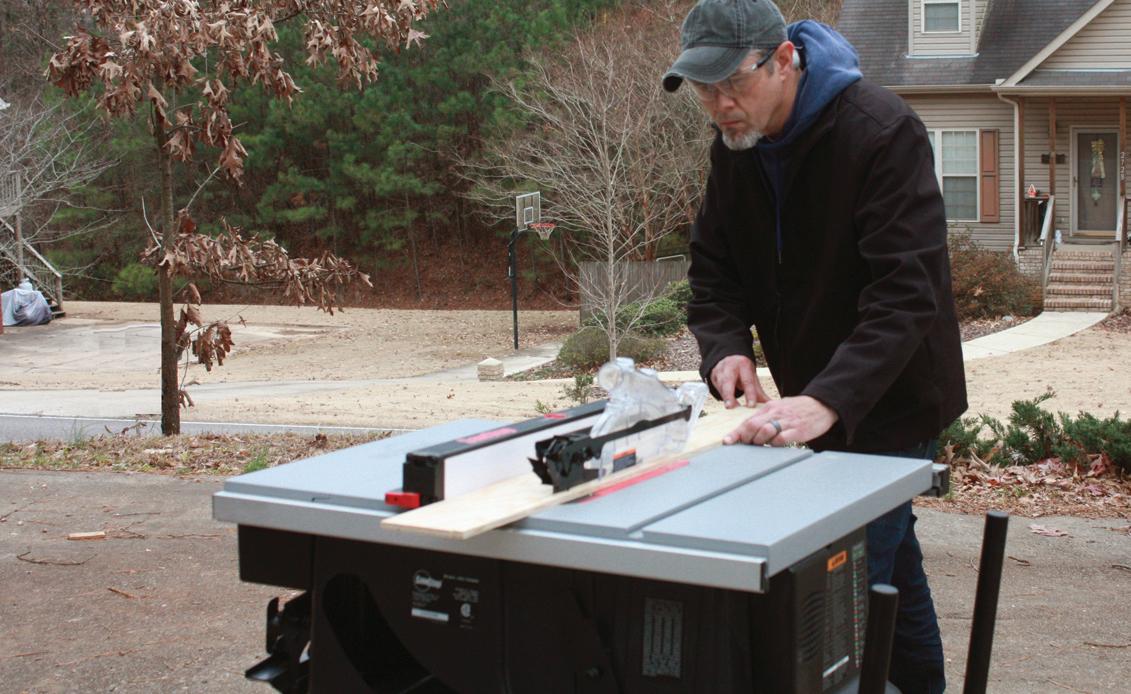
A table saw often serves as the “flag ship” tool of a home workshop. It can be used for crosscutting, miter cutting, bevel cutting, compound miter cutting, ripping, bevel ripping, rabbeting and resawing. Since the user guides the stock into the blade, rather than the blade into the stock, a table saw offers superior control and accuracy for a wide range of cutting applications.
DIY'ers can check out these six handy tablesaw tips to cut with more safety and confidence than ever. Note that in the article shown, the blade gaurd is sometimes removed for the sake of photo clarity, but HIR recommends that users at home always operate a table saw using its blade guard.
When ripping long pieces of material on a table saw, the workpiece should be always be supported from beneath after it passes the blade. Furniture and cabinet makers typically
use a stationary outfeed table for work support, but DIY'ers can rely on a foldaway roller stand to conserve space. A roller stand keeps the workpiece traveling forward smoothly and prevents it from falling off the rear of the table, which can result in blade tearout and impact damage. The height of the adjustable roller should be set at


the same level or just below the surface of the table. We purchased the fold-up model shown from Harbor Freight for less than $20.
To cut sheet goods, arrange a couple of sawhorses as a makeshift outfeed table.

The circular blade of a table saw doesn't cut like scissors but rather removes a line of material, and this line called the "kerf" which refers to the thickness of the saw teeth. The kerf can meaure up to 1/8 inch and should be taken into account when taking accurate measurements.

To make a sight guide for the kerf, position a straight edge flush alongside the saw blade, then use a fine-point pencil to mark both sides of the blade kerf on your saw table. Some manufacturers provide a small window to mark the kerf, but I recommend drawing the lines from the blade all the way to the edge of the table to provide a more useful visual reference. Some carpenters will score this line, but that can get confusing if you use a blade with a different measurement, so we stick with erasable pencil.
Miter gauges are crucial for making crosscuts on a table saw. Most factory-supplied miter gauges, however, are too small to accurately handle workpieces longer than 2 or 3 feet


because of the workpiece's tendency to pivot on either side of the undersized gauge. The solution: Make the miter gauge larger by adding an extension.
The extension shown was made from a 4-in. wide scrap of painted 1x wood trim screwed to the face of the miter gauge flush with the saw table. I first ripped 1/8 in. off one edge of the trim strip to ensure a straight line, then routed that edge with a 1/4-in. roundover bit. The router gives the bottom edge of the extension a slight bullnose so it will easily slide over the table top without catching or chattering. The length of the extension should span the majority of the workpieces you plan to cut and should reach past the blade kerf. Pass the extension over the blade and cut though it to show a

precise kerf location in the extension which can guide your production cuts. The extension not only adds stability and thus accuracy to your cross-cuts, but by backing the workpiece, it also reduces blade tear-out and splintering of the material.


Companies such as Milescraft offer ready-made jigs and accessories for woodwork, including this double featherboard for large workpieces and resawing applications. s
A featherboard is a safety device that applies pressure against a workpiece, keeping it flat against the table or fence. Featherboards can very in shape and size, and you can make a simple version with your table saw. Select a straight-grained, defect-free wood board and cut a 45-degree miter on one end. On the mitered end, cut several parallel cuts in the direction of the grain to create fingers or "feathers" that flex in the direction of workpiece travel.


In any cutting operation where the blade guard must be removed because the blade won’t be cutting completely through the wood, “featherboards” should be used for addtional safety. The featherboard prevents the workpiece from being dragged backward by blade friction. Featherboards can be clamped above and to the side of the workpiece to exert pressure until the cut is complete.


In some cases of very narrow rips, such as less than 2 inches wide, the blade and fence can get dangerously close, impeding visibility and making it difficult to use a push stick. In such a case, you can build an L-shaped “auxiliary fence” about 5-1/2 inches wide and 12 to 22 inches long to fit your table surface. The rectangular sides must be straight and parallel. The L-shaped lip aligns with the rip fence, and
the lower side of the auxiliary fence acts as an extension of the rip fence, only with a lower profile to guide the stock by sliding beneath the guard for closer proximity to the blade.
When ripping narrow stock, another useful table-saw tool is a push block. Like a push stick, it's designed to spare your fingers as you push a workpiece into the blade. A push block, however,


has a low, flat profile that can slide beneath the blade guard and a notch at its rear that catches the workpiece to push it from behind, when a normal push stick is too large to use. To make a push block, use countersunk screws to fasten a 5-in. dorsal handle in a T-shape orientation along the midpoint of the 1/2-in. thick plywood bottom, which has the 3/8-in. deep notch cut into one corner. Aside from the notch projection, the sides of the plywood bottom should be straight and parallel.


Check out Matt’s video review of the the SawStop Jobsite Pro Table Saw.


CHOOSE COATED CARBON OR STAINLESS STEEL
• HIGH STRENGTH COATED CARBON STEEL FOR ENDURANCE
• STAINLESS STEEL FOR SUPERIOR CORROSION RESISTANCE
4 CLIP PROFILES


• PRECISE FIT ELIMINATES LOOSE DECK BOARDS
• INCREASES HOLDING POWER
ELEVATES YOUR DECK BOARDS
• BETTER AIR FLOW REDUCES ROT
• RELIEVES LATERAL LOAD STRESS


The new portable jobsite table saws are designed for DIY’ers who use a table saw for a little bit of everything, and carry it everywhere. I only have room for one large table saw in my workshop, but I also need to transport it from job to job, where I might use it to help install flooring at one house and trimwork at a different one. To make this happen, I need a quality saw with a reliable rolling stand.
With the push of a simple foot lever, the Jobsite Pro Table Saw from SawStop will easily set up from rolling cart position or break down again with one fluid motion. In working mode,

Set up the rolling cart for work in seconds. s
the stand is sturdy, and the saw motor operates smoothly by starting with a handy paddle switch.
The company earns its name from SawStop's finger-saving, flesh-sensing technology. As a stand-out safety feature, the Jobsite Pro detects contact with skin on the blade, and stops and drops the blade in less than five milliseconds. Note: We've tested this feature on a hotdog, and the wiener barely had a nick!
Several key features of the SawStop’s legacy saw are included in the new model, such as a blade-lift handle with One Turn Elevation (other saws required over 25 turns), which is the snappiest way to set blade height we've ever seen on a table saw. The Jobsite Pro model also includes a beefy T-style rip fence with push-button operation for a firm lockdown.


The fence even has a thin hidden shelf that flips out to support the end of a workpiece when the table is extended.
With the Jobsite Pro model, the redesigned rip fence has an additional feature—an adjustable high/low capability for performing cuts close to the saw blade.
The Jobsite Pro model includes a deep work table and an active dust-collection blade guard. The saw includes an on-tool storage cabinet, which stows away accessories including the miter gauge and push-stick right beneath the work table.
The saw’s premiere safety feature is its flesh-sensing technology that stops the blade in milliseconds.
One-turn operation sets the blade height in no time.
A handy paddle switch starts the motor for normal operation or bypass mode.
The sturdy rip fence includes a hidden work-support shelf.


THE DOWNSIDE OF THE JOBSITE PRO IS THE HIGH COST OF THE SAW, BUT IF IT SAVES YOUR FINGERS, IT’S A BARGAIN!
s A shelf for accessories is hidden beneath the work table.
The Metabo HPT MultiVolt is the first hybrid corded/cordless table saw available with a 10” blade. s
The downside of the Jobsite Pro is the high cost of the saw, but if it saves your fingers, it’s a bargain!
The newest SawStop model is the Compact Table Saw, which is the smallest, most portable, and most budget-friendly saw in the company’s lineup.
One note about the SawStop safety technology: To cut electrically conductive materials without triggering the safety mechanism, the saw must be operated in “bypass” mode, which requires an extra step. So, if your work requires cutting a lot of conductive materials (including treated lumber still wet from the plant), then this saw might not be the best choice. Visit www.sawstop.com.
The MultiVolt Table Saw is a cordless/corded hybrid and the first high-powered 36-volt 10-in. table saw on the market. When you’re near an outlet, plug it in. If you’re working somewhere without an AC power supply, use the battery as backup.


Switch from corded AC power to cordless 36V battery power with no drop in performance.
The MultiVolt operates with a powerful brushless motor, and its battery-powered capability offers exceptional worksite versatility for a 10-inch saw. When powered by the 36V battery, the saw shows no decline in cutting performance, so this new hybrid saw can open a whole new dimension

s
The Metabo HPT 36V MultiVolt Table Saw offers best-in-class 35-in. rip capacity. Plus, check out the cool work support bar that extends from the back of the table.
regarding where and when this saw can be put to use.
Standout features include a rack-and-pinion fence adjustment mechanism and an expanding table top that offers the highest rip capacity for a cordless table saw at 35 inches. An accessory fence helps with making thin cuts,

s The rack-andpinion rip fence adjustment ensures easy and accurate control.

and an on-board outfeed support bar extends out the back to help carry the workpiece. Blade tilt allows bevel cuts from 0 to 45 degrees, and an electric brake stops blade rotation within seconds.
Note that we didn’t have the opportunity to test the folding saw stand, but Metabo HPT does have one available for the MultiVolt (Part # 374769). Visit www.metabo-hpt.com.
The most shining endorsment I can give to the Bosch job-site table saw is that fact that I’ve used some version of this saw for the last 16 years. (I suddenly feel very old). The Bosch 4100XC-10
s The rip fence includes an auxiliary attachment for making narrow cuts close to the blade.
performs well at everything from ripping and resawing to cross-cutting and everything in between, the Bosch job-site table saw has been my partner on many remodeling projects, and it shines as an all-around workhorse. I love the SquareLock Rip fence, the wheeled, go-anywhere Gravity-RIse Table Saw Stand, and the dual-arm Smart Guard blade cover. As far as improvements I'd like to see on future models, some solid-core wheels would be nice so I don't have to keep reinflating the tires, and I wish the under-carriage of the folded stand was more contoured to make it easier to drag over my tailgate into my truck bed. Visit www.boschtools.com.


MILWAUKEE WOMEN’S WORKWEAR
www.milwaukeetool.com
Milwaukee enhances their workwear portfolio to include women’s jobsite apparel. This new expansion combines the performance and comfort tradeswomen need on the job in an optimally tailored fit. Milwaukee is introducing three new shirts, a sweatshirt and two pairs of pants for women on the jobsite. A part of the workwear collections, GridIron, FreeFlex, and WorkSkin, these solutions are dedicated to solving frustrations in comfort, movement and protection from the elements. These products are engineered with a focus on the trades, ensuring apparel to benefit productivity in all jobsite conditions.
www.oneida-air.com
At 4 inches tall, Oneida Air Systems’ Dust Deputy Low-Pro lid separator is the most compact separator available from Oneida Air, allowing it to fit underneath a workbench and in other tight spaces. Uniquely designed to offer up to 50 percent more airflow (CFM) and allow debris to pass through unobstructed—two common limitations of other lid-style separators—the Dust Deputy Low-Pro excels in its ability to collect a variety of materials, from wood dust to trash, and more. The new Dust Deputy Low-Pro pre-separates 99 percent of dust and debris before it reaches your vacuum’s filter, eliminating clogging and suction loss while extending the life of your filter. Made in the USA from clear, durable resin and designed for vacuums with 2.5-inch hoses, the Low-Pro lid separator attaches to any standard 5-gallon bucket with two included latches.

www.johnsonlevel.com
The Johnson Extendable Plate Level with a heavy-duty aluminum frame is designed for the professional user. Available in 6- to 10-ft. and 7- to 12-ft. versions, it provides accuracy of 0.029° or 0.5mm/m and that accuracy is backed by a lifetime guarantee. It has high-visibility, impact-resistant block vials, and the plumb vial is positioned at eye level for easy viewing. The locking system provides protection against pinch points. The extendable arm has a measuring scale on both sides for fast setup and positioning, and the level is equipped with ergonomic soft touch dual handle grips.

www.graco.com
Graco Inc. introduces Stellair ACE and Stellair, the only industrial-quality air spray guns to achieve Ergonomics Performance Certification. Advanced testing by United States Ergonomics proves that the manual pressure feed sprayers reduce fatigue potential, increasing productivity for painters. Graco recognized the importance of continual improvements by involving United States Ergonomics, a global ergonomic consulting service and product testing company. Stellair ACE weighs 209 grams (7.4 ounces) —up to 50 percent lighter than almost any other manual pressure feed spray gun—due to its durably unique carbon reinforced polymer construction. Stellair ACE uses up to 25 percent less muscle effort than comparable industrial air spray guns. Stellair, with aluminum metal construction, weighs 410 grams (14.46 oz), still making it among the lightest industrial spray guns available, lessening muscle exertion by up to 18 percent.


www.eclecticproducts.com
This elite-grade formula is designed to withstand harsh conditions outside or inside. It cures to a durable, smooth, crystal clear protective finish. UV rays are no match for Premium Outdoor Glaze Coat. Create beautiful outdoor living spaces with projects that fit your sense of style. Enjoy the stunning, high-gloss finish on tables, lawn décor, patio and kitchen designs and boundless other applications. Use on most any surface, including wood, metal, glass, concrete, tile, ceramic and more. The waterproof coating is scratch-resistant and withstands temperatures up to 135 °F (57 °C) intermittently.

www.harborfreight.com
This Viking 2000 Peak Amp Lithium-Ion Jump Starter and Power Bank delivers as many as 50 jump starts per charge, even in freezing weather. Eight advanced error detections prevent reverse hookups, reverse charging, short circuit, low voltage, overvoltage, overcharge, overtemperature and sparking. The starter holds enough power to jump start engines as large as 8 liters (up to V10) as well as 6-liter diesels. It includes two fast-charge USB-A outlets and a 15-watt input/output USB-C for recharging the jump starter or charging electronic devices. The unit features a large, easy-to-read backlit LCD screen and is IPX3 rated for water resistance.
www.northerntool.com
The Klutch 120-volt, 140-amp max. welder with wire-feed speed control is an inverter-powered welder for MIG and flux-core welding. The inverter-based system offers increased power output from a smaller transformer, resulting in a super-lightweight system that is portable enough to take almost anywhere. It comes complete with a regulator and gas hose for easy connection. Directly connect this unit to 120V household power, and it's ready to go to work. It’s designed for use on mild steel and stainless steel up to 3/16-in. thick.


METABO HPT 36V CORDLESS 6-1/2” TRACK SAW
www.metabo-hpt.com
The Metabo HPT 36V Cordless 6-1/2-in. Track Saw offers users best-in-class cutting depth of over 2-1/2 inches, making it a top choice for users. Combining a German-engineered brushless motor, a 4.0Ah MultiVolt battery with rapid charger, and a stackable hard case; this kit is a woodworker’s dream. Intuitive controls and pro-level ergonomics are designed for ease of use and precise clean cutting. Metabo HPT’s track saw has an adjustable fit for laser-straight cuts on guide rails from Metabo HPT (for user convenience, also works with DeWalt, Makita, Bosch, Mafell and Festool brand track-saw guide rails). Smart features like an electric brake, soft start, variable speed, and enough torque to handle the toughest cuts make this the track saw of choice.


By Carter Swift
The classic look of brick pavers is as popular as ever for residential patios. Interlocking paver patios and sidewalks remain among the most requested projects for hardscape professionals, and with the right materials and building procedures, DIY’ers can even construct their own to enhance the property and increase the value of their home. HIR offers three approaches to construction of your next patio.
A paver patio can be built with two methods of constructing the sub-base. A patio with a rigid base has pavers installed over concrete. A patio with a flexible base is built with sub-layers of compacted gravel and sand.
If you plan to upgrade an existing concrete patio, then half the work will already be done for you. The concrete will need to be flat and intact. Minor cracks and spalling can be repaired by squeegeeing a skim coat of a concrete resurfacing product over the patio, which can help level the surface for even paver installation.

A resurfacing product such as Quikrete Re-Cap is designed for making thin layer repairs to worn or scaled concrete surfaces.

The simplest approach to laying pavers on an existing rigid base is to begin with a soldier course as a border. Use thinner pavers that are 1-3/8 inches thick and made for this purpose. The “soldier course” is a line of bricks glued perpendicular to the edge of the concrete to frame your project and prevent the field bricks from moving around. Use four penny-size dots of masonry adhesive on the bottom of each brick to allow rainwater to pass beneath.
Inside the soldier border, spread a layer of roofing felt over the concrete. Avoid overlapping
the edges of the felt. Next, apply a second layer of felt over the first, oriented perpendicular to the first layer. The felt prevents the pavers from rocking when walked on. Complete the field by laying the pavers and pattern of your choice over the felt. Once finished, fill the joints with concrete sand.
When building from the ground up, the job gets more complicated. In fact, things can get fairly daunting, depending on how large of a patio you want. This is because the project requires a lot of heavy materials and the means to transport those materials. You can plan on a lot of digging and shoveling, so if hard physical labor isn’t your thing, you’d better call a pro. It’s also important to understand that compaction of the patio materials is absolutely critical. For small patios, you can use a hand tamper, but for large areas you’ll need to rent a plate compactor.
Always make sure to build the patio with a consistent slope to drain water away from the home (1/4 in. per foot to allow for drainage).
As a general rule, conventional pavers require about 4 inches of compacted crushed stone as a base for pedestrian use. The depth should measure 4 inches after compaction, which means the base begins with a loose bed about 6 inches deep spread evenly across the patio site. In harsh climates where ice heaving is a problem, the compacted bed should be deeper, even up to 8 inches. (Vehicular use requires a base between 8 and 12 inches deep). It’s a good idea for the bed of crushed rock to extend 6 to 10 inches beyond the finished paver surface.
Before you start digging the site, call 811 to make sure the underground utilities have been located and marked.
Dig deep enough to include the depth of crushed rock, an inch of compacted sand on top of that, plus the thickness of the paver itself. Excavate the site so the surface of the installed pavers will be located just slightly above the ground (typically between 8 and 12 inches deep). One trick is to place a paver at the anticipated patio elevation, then plant some stakes in the ground to lay out tight


Add a bed of crush rock as the base.

Begin construction of a flexiblebase patio by excavating the site and compacting the soil.
Spread the crushed rock evenly and compact it to a minimum of 4 inches. The boards shown will be buried in the gravel and sand to serve as a guide for a screed board.
Add a layer of sand as a leveling bed and compact it. Use a very straight screed board to strike off excess sand and level the bed for the pavers.
Carefully place and level the pavers, using a rubber mallet to set them into the base. In this photo the workers did not use a sand bed, and as a result, it took much longer for them to level the pavers.


Nibs on the edge of interlocking pavers leave consistent joints throughout the patio.
string lines even with paver surface around the site perimeter. Use the string as a depth gauge when digging. Just measure down from the string until you’ve reached your required depth.
Next, tamp down the soil with the hand tamper or plate compactor. Get used to this step, because you’ll need to repeat it each time you add a layer of patio material. Without proper compaction, both the subbase and pavers lack stability, causing shifting and compression. If this happens, some pavers will become higher or lower than others, resulting in an uneven surface. In areas that experience cold temperatures, the freeze/thaw cycle increases paver displacement. To avoid this, a compactor should go over each material layer three or four times to achieve proper compaction. After compacting the soil, spread the gravel and level it, then thoroughly compact the bed to the required depth. When very deep beds of gravel are required, compact the rock every 4 in. layer that you add. (Note: For clay- or silt-based soils, cover the compacted site in geotextile fabric before adding the crushed
Depending on your paver pattern and design of the patio, it might be necessary to cut the pavers. Rental outlets offer masonry wet saws to cut concrete and clay pavers.
Fill the paver joints with concrete sand to interlock the floor, The final paver surface of a flexible-base patio should get two or three passes with the compactor to solidify the patio.
rock to ensure the most long-term durability of your patio base.)
Next comes the layer of sand. Spread it evenly and compact the sand bed. Pro landscapers often use PVC pipe or very straight boards buried in the sand bed to serve as runners for a screed board. The screed board is used to strike off excess sand above the runners and achieve a very smooth surface for the pavers to rest on.
After smoothing the sand, begin laying the interlocking pavers along the edge of the patio. Your choice of brick pattern and patio shape will impact how many bricks will need to be cut. A basket-weave pattern is ideal because full pavers can be used throughout a square or rectangular shaped patio. Using a running bond or 90-degree herringbone pattern in rectangular areas will require half-cuts.
This flexible-base patio was constructed by three generations of the Weber family. Built on a slope, roughly half the patio is elevated over a slope with a segmental retaining wall built of hollow-core blocks, which interlock when the cores are filled with gravel. The walking surface at the opposite end is level with the lawn. The interior of the patio was built using the traditional crushed-rock base, sand bed and paver layer.
Large projects like this one can require machinery to move the heavy landscaping materials. A tractor with a box blade came in handy to move and level the crushed rock and concrete sand.

sContinuously level the pavers during installation to keep a flat walking surface without high spots. Use a rubber mallet to set the pavers firmly. Next, install edge restraints, which can be metal or plastic landscape edging, or even halfburied blocks or vertical pavers.
Compact all the pavers into the sand bed using a piece of scrap plywood, carpet, or a


plastic pad to protect them from chipping. Two to three passes are usually recommended to press the pavers into the sub-base. Once the patio is complete, fill all joints with paver sand to lock them in place. In a week or two, check to see if more sand is needed after it has settled. Joint sand provides the interlock and cushioning between pavers to prevent


paver-to-paver contact and chipping. Concrete sand with coarse and angular particles works better than masonry sand, which has rounder, finer particles. The joints need to be full of sand to function properly and interlock the system.
Although traditional concrete and clay pavers still lead the patio pack, a new alternative system uses synthetic pavers to simplify installation of both flexible and concrete-slab patios. Composite paving stones from suppliers such as Aspire Pavers are made from up to a 95-percent blend of recycled automobile tires and plastic containers. The pavers are also one-third the weight of concrete, making them much easier to move by wheelbarrow.


Composite pavers also come in different thicknesses. The Resurface pavers have a thinner profile to cover old patios, and the Standard Landscape pavers are perfect for new patios and walkways with a flexible base.
The Aspire Pavers also use a grid system that reduces installation time and makes it easier than manually setting and aligning heavy traditional pavers. The 16-by-16-in. grid also ensures straight lines and assists with a level layout. Plus, the composite pavers can be cut using a regular miter saw or jigsaw, so no wet saw is required. Learn more at www.aspirepavers.com.
HAspire Pavers now offer bullnose, transition, and corner pavers for a finished look to a composite patio system.


By Matt Weber
Everyone thinks they know about ladder safety … including the more than 100 people who die each year in ladder-related accidents, as well as the thousands who suffer disabling injuries.
The problem is that ladders are deceptively simple in design, so workers grow accustomed to using them and get lazy about proper usage. Most falls don’t occur at great heights, when workers are more likely to be careful, but instead happen from six to 10 feet from the ground where workers are more comfortable. The two most common ladder accidents are easily avoidable: (1) missing the last step when climbing down, and (2) overreaching, which causes the user to lose balance and fall.
Rather than taking ladder safety for granted, a true professional and any mindful DIY’er should respect basic procedures and learn which ladders work best for the type of work they do.
When choosing a ladder, consider your work environment. For example, if you’re working near sources of electricity, avoid using a metal ladder because aluminum is a conductor. Your body can complete an electrical circuit between the power source, the ladder, and the ground if you contact a live wire. An electrical shock can trigger a fall or stop your heart.
On the other hand, if there are no electrical sources in your work area, an aluminum ladder is the lightest weight option when compared to fiberglass or wood.
Understand that a ladder’s weight rating is the combined weight of the climber and whatever the climber is carrying. Don’t forget to account for equipment or materials you’ll be carrying when selecting a ladder with the proper weight rating.
Keep in mind that a taller ladder does not equate to a higher weight rating. Make sure to take into account the Duty Rating for your ladder. The Duty Rating is the total amount

The Werner Multi-Position Pro functions as five ladders in one and is the lightest weight multi-ladder the HIR staff has ever used.

A-frame ladders such as Stepladders are more stable than straight ladders due to their broader support base at ground level. Unlike a Stepladder that requires level support for all four of its side rails, Extension Ladders require only two level ground support points in addition to a top support—but they must be set up at the proper angle. Extension Ladders should be erected as close as possible to a pitch of 75-1/2
of weight your ladder will support, meaning the sum total of your weight, the weight of your clothing, plus the weight of tools and supplies you’re using.
Avoid using a ladder that is too long or too short. Standing on the top cap of a Stepladder (or the step below it) will cause you to lose your balance. Likewise, the top three rungs of an Extension Ladder are not meant for climbing. An Extension Ladder is too long if it extends more than three feet beyond the upper support point. In this case, the portion of the ladder that extends above the upper support point can act like a lever and cause the base of the ladder to move or slide out.
degrees from horizontal to prevent its bottom from sliding outward and to maintain strength of the ladder. A simple rule for setting-up an extension ladder is to place the base a distance from the wall equal to onequarter of the extended length of the ladder. To prevent tipping the ladder over sideways due to over-reaching, always climb and work with your body near the middle of the rungs. Ladder levelers at the bottom of the rails may be used to achieve equal ground support on uneven surfaces. A stabilizer accessory at the top can be used to secure or tie off the ladder to increase stability.
The HIR staff had the opportunity to test a 17-ft. Werner Multi-Position Pro, which functions as five ladders in one and can be configured into 24 positions. With a telescoping design, the independently adjustable rails allow it to be used on uneven surfaces such as a staircase. As an extension ladder, it stretches to a 15-ft. working height. As a 90-degree ladder, it grants up-close access to

walls and ceiling perimeters. As a stepladder, both sides can be climbed, so two people can use it at once. The ladder also separates into two small stepladders that can be used as scaffold bases—and do so without requiring special hinge accessories.
Additional features of the Werner MultiPosition Pro include protected springs and hinges, as well as shatterproof J-locks that hold the rails in place. Werner’s rigid

PowerLite Rails are easy to carry and set up, and the lighter weight is a welcome improvement to the multi-ladder design. Although multi-ladders offer great versatility, they have traditionally been heavy units to lug around a home or jobsite. The new Werner Multi-Position Pro weighs less than 32 lbs., so users can easily grab it and go, rather than cringe at the thought of hauling it around. Visit wernerco.com.

Use the Werner Multi-Position Pro as a stepladder, a stair ladder, right-angle ladder, extension ladder or scaffold base.
Check out Matt’s video review of the 17-ft. Werner Multi-Position Pro.

Use a straight ladder atop a staircase with the Ladder-Aide accessory. The retrofit attachment functions as a level support base across stairs. It is compact and portable, versatile and fast to set up, plus it’s micro-adjustable to match stair riser height. Ladder levellers and leg extenders make ladders heavier

and can be annoying to carry around. Ladder-Aide fits any straight extension or telescopic ladder (but not for use with step-ladders). The original model fits a ladder with a maximum 19-in. wide ladder base and 4-1/2-in. feet. The larger Ladder-Aide Pro fits a ladder with a 22-in. base and 7-1/2-in. feet. Visit www.ladder-aide.com.
The easiest way to raise a long extension ladder is to do it with two people. One person “foots” the first rung, holding the bottom of the ladder securely to the ground, as the second person walks toward the house with the other end of the ladder, raising it with the first person’s help, as needed.

1. If you need to raise the ladder alone, it needs to be collapsed to its shortest height.
First, brace the foot of the ladder against the wall and walk it slowly toward the base, rung by rung and hand by hand, until the ladder is upright. Rest the top of the ladder against the wall, roof, or other solid surface. Then lift the base out to a slight angle where it can temporarily rest without your support.

2. Extension ladders are equipped with a lanyard and pulley to help extend the ladder. To use the lanyard, first foot the bottom rung, carefully tilt the ladder backward with one hand, and pull the rope with the other to extend the ladder as necessary. Be careful of hazards to nearby power lines or other people.
The No Bull Bullhorn Ladder Stabilizer Bumpers (2-Pack) are heavy-duty, nonskid rubber guards that protect your siding and other work surfaces. Crafted to the demanding specifications of professional contractors, these bumpers cover and fit securely on most standard ladder stabilizers, providing superior durability and toughness. Also available are No Bull Ladder Bumpers (2-Pack) that cover and fit securely on most standard ladder rails. Visit www.nobullproducts.com.


3. An extension ladder should be set with its base 1 foot away from the wall for every 4 feet the ladder reaches, or roughly a 75-degree angle.

The Werner Quick Click Stabilizer protects work surfaces such as roof edges, windows and gutters from damage by an extension ladder. This lightweight accessory is a cinch to attach with a spring-loaded locking latch that bites over the top rung. The stabilizer adds safety, security and peace of mind when working at heights. It offers an ample 44-in. span, and an accessory paint-can hook keeps your paint accessible. Visit www.wernerco.com.

4. Once you’ve got it positioned right, you need to secure the feet. The base of the ladder should rest on level ground with the feet flipped into position. On a wooden deck, you can nail a board down behind the feet to act as a cleat and prevent slippage. When
setting up on uneven ground, it helps to dig a small trench beneath the high foot of the ladder to level the base.
5. Make sure all locks are engaged and that the ladder is supported securely at all contact points. If it seems the least bit unstable, tie ropes to the ladder stiles beneath the lowest rung and anchor them to something solid. You can also secure the top of the ladder using rope or wire fastened to a couple of eye screws mounted into the house’s fascia.


Little Giant puts a new spin on the traditional stepladder. The HIR staff tested the King Kombo 3-in-1 All-Access Ladder Model 6-10. It converts from storage to step-ladder to extension in seconds. When folded flat for storage, the King Kombo also acts as a leaning ladder for tasks like painting, running wire, or accessing a hard-toreach corner. As a leaning ladder, its rotating wall pad accessory works in four positions; stud, corner out, corner in, and wall pad. This lightweight ladder is rated for 375 lbs. and is made of nonconductive, high-strength, lightweight fiberglass ideal for professional applications. The Hi-Viz green fiberglass rails make the ladder more noticeable to prevent accidents, and the wide-flared side offers superior side-tip stability. The bottom safety step makes a distinct noise when stepped on to let the climber know when they’ve reached ground level. Visit www.littlegiantladder.com.

