


HOME IMPROVEMENT AND REPAIRS TM 20 ¢ ¢ ¢ ¢ ISSUE #21 JAN/FEB 2023 HomeImprovementAndRepairs.com INSIDE INSTALLING A RANGE HOOD 4 TIPS TO KEEP YOUR FURNACE EFFICIENT PREVENT PIPES FROM FREEZING STEP BY STEP: PAINTING STONE TILE HOT PRODUCTS


08 START SMART
• 4 TIPS TO KEEP YOUR FURNACE RUNNING EFFICIENTLY THIS WINTER

• 2022 IN REVIEW FOR HOMEOWNERS
• PREVENT PIPES FROM FREEZING
• HOME BUYERS ARE SEEKING SMALLER HOMES

• ASK MATT
30 INSTALLING A RANGE HOOD
39 STEP-BY-STEP PAINTING STONE TILE


08 16
39 16 COVER FEATURE
SKILL LEVEL 2
SKILL LEVEL 3 HARD
SKILL LEVEL 4 PRO
HOME IMPROVEMENT AND REPAIRS TM 20 ¢ ¢ ¢ ¢ ISSUE #21 JAN/FEB 2023 HomeImprovementAndRepairs.com INSIDE INSTALLING A RANGE HOOD 4 TIPS TO KEEP YOUR FURNACE EFFICIENT PREVENT PIPES FROM FREEZING STEP BY STEP: PAINTING STONE TILE HOT PRODUCTS
INSIDE:
MODERATE
LEVEL 1 EVEN FIRST-TIMERS CAN PULL THIS OFF LEVEL 2 WITH THE RIGHT TOOLS AND A LITTLE RESEARCH, YOU CAN DO THE JOB LEVEL 3 THESE CHALLENGING PROJECTS ARE FOR EXPERIENCED DIY’ERS LEVEL 4 DUE TO THE SIZE OF THE JOB, THE EQUIPMENT OR SPECIAL SKILLS REQUIRED, IT’S BEST TO CALL A PRO SKILL LEVEL 1 EASY
KNOW YOUR SKILL LEVEL:
04 Home Improvement and Repairs | The Winter Issue Cover Photo © Trex 30
20 HOT PRODUCTS
06 LETTER FROM MATT WEBER

Over the last twenty years in this business, I’ve been asked the same question many times about my home-improvement magazine: “Do you target professionals or DIY’ers?”
That question is usually asked by some newbie marketing intern fresh out of college who has read a lot books but has never swung a hammer and has yet to own a home. The question has always bugged me because it reflects a profound misunderstanding about the nature of both work and homeownership.
Here's a basic truth that anyone in residential construction already knows: Professionals are DIY’ers. In fact, people in the skilled trades are more likely to attempt a project outside their wheelhouse than most anyone else. Do you think a pro carpenter is going to shy away from replacing their kitchen faucet because he is more accustomed to working with wood? Not likely. In fact, people with a background in the trades likely have experience in a wide range of disciplines in the construction industry, which is why tile-setters are known to install hardwoods and why window
installers might know how to hang drywall. When it comes to working on their own homes, these pros are quick to tackle projects outside their normal field because they often have both the experience and the tools to get the job done without having to pay a contractor.
And what about retired “pros”? They become DIY’ers—the kind with lots of skills and tools at their disposal.
Another truth: Sometimes an experienced DIY’er can do better work than a “pro.” Ever heard of a shady contractor or an inexperienced laborer who screws up a job? Here’s a hint: They’re everywhere. A “professional” is someone who gets paid to do work, but that doesn’t mean they are an expert at the work they do. One would hope that a conscientious remodeler would treat a customer’s house with the same love and respect that they would their own home, but that’s unfortunately not always the case, and some unscrupulous “pros” are known to cut corners. A DIY homeowner, however, can generally be expected to apply their best work to the house they own.
A final truth: Every pro remodeler and DIY homeowner is a unique individual and has different strengths and interests. In some cases, I’ve been amazed by the work of experienced DIY’ers and disappointed by the work of pro contractors. In other cases, I’ve shaken my head at the results of a DIY project gone wrong and been astounded by the beautiful work of a seasoned professional. Whether or not someone will call a pro for their home project depends on their skillset, budget, supplies, physicality, available time, and work preference—factors which differ for practically every individual on the planet. My point is that trying to apply a set of behavioral characteristics to concepts so nebulous as “pro” and “DIY’er” is mostly a waste of time.
That’s why, whenever I’m asked which type of reader Home Improvement & Repairs magazine targets, my answer is always

PUBLISHER JEREMY HOLLINGSWORTH jeremy@HIRpub.com
EDITOR-IN-CHIEF

MATT WEBER matt@HIRpub.com
CREATIVE DIRECTOR
WESLEY GLASSCO wesley@HIRpub.com
NATIONAL SALES MANAGER WARREN PINHEIRO warren@HIRpub.com
ADVISORY BOARD

JIM BUTTERS
RANDY STEPHENSEN
DUSTIN SCHWAIGER RICHARD HAMILTON
EDITORIAL CONTRIBUTERS CARTER SWIFT TOM MATTHEWS
COPY EDITOR DIANE WEBER
AD DESIGN/COORDINATION SPECIALIZED MEDIA SERVICES, INC. ads@HIRpub.com
PRODUCTION MANAGER SHANNA QUIGLEY ONLINE/SOCIAL MEDIA DEVELOPMENT
GLORIA BERRIO
reader must always exercise reasonable caution, follow current codes and regulations that may apply, and is urged to consult with a licensed professional if in doubt about any procedures.
06 Home Improvement and Repairs | The Winter Issue
PINE MOUNTAIN MEDIA GROUP LLC Home
LETTER FROM MATT WEBER
Improvement & Repairs is published by Pine Mountain Media Group LLC, 130 Inverness Plaza, Suite 226, Birmingham, AL 35242. All rights reserved. Neither this publication nor any part of it may be reproduced, stored in a retrieval system, or transmitted in any form or by any means, electronic, mechanical, photocopying, recording, or otherwise, without permission. The editorial content is intended to explain and simplify home-improvement tasks. Tools, products, materials, techniques, building codes and local regulations change. We assume no liability for omissions, errors or the outcome of any project. The

4 TIPS TO KEEP YOUR FURNACE RUNNING EFFICIENTLY THIS WINTER
Winter is here, and temperatures are dropping. Make sure your HVAC system is running efficiently to keep your home warm and comfortable. Fortunately, there are a few simple steps you can take to ensure your furnace runs at its peak performance throughout the cold winter months.
Tip #1: Check your furnace filter monthly and replace it as needed
The filter is responsible for trapping dirt, dust, and other airborne particles that can clog up your system and reduce airflow. It only makes sense to check monthly and replace it if necessary. A clogged filter will not only make your furnace less efficient but can also cause the system to overwork and eventually break down.
To determine when to change your filter, look for signs such as decreased airflow or reduced air quality. When it's time to replace the filter, make sure to choose the correct size and type for your furnace model.
Choosing the wrong size can lead to a decrease in efficiency as well as damage to your furnace.
By Stella Ohler
Additionally, there are many different types of filters available and each has different characteristics. Pick the right one for your needs and consult with an HVAC technician if you’re unsure. Make sure you install the filter correctly to ensure maximum efficiency. If the filter is not properly installed, it won't be able to trap air pollutants efficiently and will decrease your furnace’s performance.
Tip #2: Clean your furnace regularly
Cleaning your furnace helps to keep dust and dirt from accumulating in the vents, which can block air flow and reduce efficiency. It also helps to eliminate any flammable material that could be a fire hazard. Also, it helps to keep your furnace running more smoothly, reducing the chances of unexpected breakdowns.
To properly clean your furnace, you'll need a vacuum cleaner with a long hose attachment, a screwdriver, some rags or paper towels, and a non-toxic cleaner. Start by using the vacuum cleaner to remove all of the dust and debris from the vents and other areas of the furnace. Then use the screwdriver to open up the access
08 Home Improvement and Repairs | The Winter Issue STARTSMART
panel so that you can reach inside and thoroughly wipe down all the surfaces. After that, spray down all of the components with the non-toxic cleaner and let it sit for 10 minutes before wiping it off with a rag or paper towel.
Tip #3: Inspect your ductwork for leaks and seal them as needed
Leaks in ductwork can cause your furnace to work harder than necessary to maintain the desired temperature in your home, leading to higher energy costs and decreased performance. Start by inspecting the areas around the joints and seams of the ducts, looking for any cracks, gaps, or disconnected sections. If any of these are present, you will need to seal them using duct mastic, which is available at most hardware stores and easy to apply.
Before sealing any areas, make sure that the surfaces are clean and dry. Cleaning with a damp cloth will help ensure that the mastic seals properly. Once you have applied the mastic, let it dry completely before turning on your furnace.
Tip #4: Insulate your ductwork to improve efficiency
Insulating the ducts that carry air to and from the furnace can help you save energy and money by preventing heated air from escaping through the walls or roof.
● Measure and purchase the right insulation – You'll want to measure the size of your ducts and then purchase insulation that is appropriate for their size and shape. Make sure to use insulation rated for high temperatures, since this will ensure that your ductwork remains insulated even during the cold winter months.
● Seal all seams – To ensure that your insulation is effective, you'll want to seal any gaps or seams with tape or caulk. Foil tape works better to seal air duct insulation than what is commonly known as "duct tape." This step creates an airtight seal so that heat won't escape.


● Test for leaks – Once you have completed the insulation, you'll want to test for any potential leaks. An easy way to do this is by using a smoke pen or incense stick. If you notice any smoke or smell coming from your ducts, you'll need to fix the leak before using your furnace.
● Regular inspection – Over time, the insulation may start to degrade due to wear and tear or environmental conditions. Regularly inspect your insulation and if it needs to be replaced, do so as soon as possible so your furnace runs efficiently as possible.
Editor’s Note: Stella Ohler is a Senior Content Editor for We Write Best writing for the blog New AC Unit.
>
Read our magazine online at HomeImprovementAndRepairs.com 09
2022 IN REVIEW FOR HOMEOWNERS
This is Home Improvement and Repairs’ first issue of 2023, and now is a good time to reflect on the last year and what we can learn from it. New findings by Hippo Home Insurance revealed that a year of growing economic and financial instability took a toll on homeowners and their well-being.
According to the 2022 Hippo Housepower Report, a national survey of over 1,000 U.S. homeowners, 63% of homeowners surveyed said they made homeimprovement upgrades in 2022. The most common upgrades were interior repainting (40%), replacing plumbing/fixtures (40%), kitchen remodeling (39%) and purchasing new appliances (39%). Of those people, 89% said they went over budget on the home improvements.
Furthermore, escalating factors caused homeowners to put certain tasks on the backburner. Higher prices for gas cut into home project funds for over half of homeowners (54%), and two-thirds of homeowners (64%) concerned with inflation rates say it caused them to delay maintenance. Nearly 40% of those with financial
concerns delayed repairs after losing money in the crypto crash, and 52% of homeowners with financial concerns are holding out on home improvements due to recession concerns.
However, 65% of those who experienced a problem in their homes recognize that it could’ve been prevented with proactive maintenance. On average, homeowners spent nearly $6,000 on home repairs and maintenance in 2022, but few are doing enough ongoing home-maintenance tasks. Less than 1% of survey respondents addressed all necessary maintenance tasks such as clearing tree limbs and cleaning appliance filters within the timeframe.
In 2023, with the housing market cooling off, many homeowners will opt for upgrading their current home vs. moving. According to Hippo, homeowners are budgeting $11,173 on average for home improvements and upgrades in 2023. Yet, after reviewing the expenses and regrets of homeowners in 2022, it appears that prioritizing essential home maintenance might be a better priority for homeowner satisfaction than optional upgrades for a current home.

10 Home Improvement and Repairs | The Winter Issue STARTSMART
PREVENT PIPES FROM FREEZING
As we head into the depths of winter, the sub-zero temperatures are sure to follow. Cold weather can cause sections of your home plumbing to burst, leaving you without running water and potentially a massive repair bill.

Plumbing Expert Sean Richardson, CEO of Complete Plumbing Solutions,has compiled his top tips on how to prevent your pipes from freezing this winter.
“We all know that when water freezes, it expands greatly, and this pressure can then cause your pipe to burst,” notes Richardson. “A burst pipe can cost anywhere from $500 - $2000 to repair depending on the severity of the damage, so it’s advisable to take every precaution you can!”
Keep the Water Running. “The weather forecasts are good at forecasting when there’ll be a particularly harsh drop in temperatures, so if you’re expecting a freeze, turn your taps on and allow just a trickle to come through the pipes—not with all of the taps in the house, but just the ones that are supplied by exposed pipes. The constant movement of the water will go a long way to prevent freezing and relieves any potential pressure buildup that could burst a pipe.”
Insulate Your Pipes. “A length of pipe insulation can be as cheap as $2, so it really is a no-brainer, you could have all of your pipes insulated for less than $100. Focus on the most vulnerable sections of your plumbing, such as the exterior pipes and those located in the unheated areas of your home, like the attic. If there’s cold weather on the way, and you haven’t had your pipes insulated properly, you can DIY it too. Around 50-60 years ago, people used to wrap the pipes in old, bunched-up newspapers and just secured it with duct tape! It may sound funny but it does the job in a pinch.”
Keep the Heat On. “When the temperatures dip, we tend to blast the heat during the day and turn things down at night, but this isn’t helping your internal plumbing. Try to keep your heating at a more consistent temperature over the 24-hour period to help keep the pipes from freezing. Ideally, you should always be at least 54° Fahrenheit/12° Celsius.”
Keep Your Cabinets & Doors Open. “In most homes your plumbing in the kitchen or bathroom is tucked away behind a cabinet door of some sort. During a cold snap you should open up these doors to allow the warm air from inside the house to get around the pipes, keeping them free from blockages.”
Plug the Gaps. “Around this time of year in particular you should be checking around your doors and windows for
any holes and large gaps that are letting all the warm in your home escape and letting cold air inside. Window sills in particular are a common leakage point, and if you have any cabling running externally to internally, examine where it enters the home for gaps. By sealing these gaps you’re helping your overall home insulation, which in turn benefits the plumbing.”
My Pipes Are Already Frozen but Haven’t Burst! What Can I Do? “First things first, shut off the water at the mains. This is usually located either under the sink, basement, or somewhere near your water meter. If you allow the water to continue to flow, you could be making the situation worse by allowing the pressure to build, which would cause a break.”
How do I know the pipes are actually frozen? “If the water is very slowly coming from a tap or stops completely, you’ve got a freeze. If the problem only exists with one tap, it’s a local issue rather than a system-wide problem.”
How do I Thaw a Pipe? “You can use a hair dryer to thaw the pipe slowly, applying heat up and down the affected length of pipe.
“Or, wrap a warm towel around the frozen pipe. This should free up the blockage and not shock the pipe too much. Put down a bucket or some other towels on the ground to catch the excess.”
MY PIPES HAVE BURST! NOW WHAT?
“Turn off the water main as soon as possible. Next step is to call a plumber and see how soon they can get out to see you. From there, try to get rid as much of the water as possible to prevent the growth of mold and mildew.
“If you’ve got the right tools, you can make an emergency fix. You’ll need a clamp, a block of wood and some rubber. Place the rubber over the breakage in the pipe, cover it with a wood block and then use the clamp to keep everything together. This is a very temporary fix and won’t last long. Similarly, you can purchase some pipe repair sleeves, which can be slipped over the affected area to keep the water in the pipe. Again, these won’t last long, so call the professionals."
Editor's Note: Sean Richardson is a plumbing expert and CEO of Complete Plumbing Solutions. Visit the CPS website to learn more.
Read our magazine online at HomeImprovementAndRepairs.com 11 >
HOME BUYERS ARE SEEKING SMALLER HOMES
The Plan Collection, an online source for purchasing home architectural plans, reports new home plans being sought and purchased in 2022 shows square footage shrinking as inflation, building costs and mortgage rates continue to rise. Year over year, searches for house plans for homes ranging between 500 – 1,000 square feet are up 34 percent, and those 1,000 – 1,500 square feet gained 32 percent. Supporting the shrinking home trend, 71 percent of prospective buyers state they are willing to purchase a smaller home to own, according to the recent Bank Of America’s 2022 Homebuyer Insights report.
Another revelation from The Plan Collection’s yearover-year evaluation shows a 43% growth in interest in garages with an apartment. CEO Brian Toolan attributes the increase to the new “granny flat” or accessory dwelling units (ADUs) zoning approvals which can be used as rentable square footage or housing for family members.
Laurel Vernazza, home design expert for The Plan Collection, offers a few home styles and tips to maximize living area in smaller homes as square footage trends downward:
Tiny Spaces with Big Impact. Since interest rates are increasing and homeowners are staying put, owners are reimagining overlooked alcoves, nooks and corners to be redesigned into compact, colorful and inviting spaces. An unremarkable space below the stairs gets revamped with a collection of framed photographs, distinctive art, fabulous lighting, and a vintage cabinet. Or, a dead-end hallway can be transformed into a tranquil meditation space or cozy reading corner.
Affordability (Goodbye Modern Farmhouse, Hello Bungalo). The modern bungalow gets increased attention from millennials and empty-nesters who want to downsize affordably but with style. One-story modern bungalow designs are typically less expensive, offering curb appeal, high ceilings, contemporary open floor plans, larger bathrooms and a 21stcentury exterior.
Staying Put with Floating Sinks and Vanities. Homeowners with fixed-rate mortgages may rethink trading up to a larger home in 2023 and revisit home remodeling instead. Expect kitchen and bath solutions that are attractive and affordable while creating a larger sense of space to be especially popular. In the bath, floating sinks will be the center of attention, especially in small bathrooms and powder rooms. Floating sinks/vanities can make a small space feel larger and enhance the room with their clean lines and sleek look. To learn more, visit www.theplancollection.com.

STARTSMART 12 Home Improvement and Repairs | The Winter Issue

QUESTION: Should concrete screws used in a brick wall be driven into the brick or the mortar joint?


ANSWER: Concrete screws such as Tapcons are suitable for use in a variety of base material, including brick and the mortar joints between the brick. The holding value of the screw depends on the brick itself and the quality (and quantity) of mortar in the joint. As you’ve probably noticed on old buildings, mortar tends to deteriorate faster than brick, and if you see any signs of such deterioration, then you’ll probably get a stronger hold from the brick. Concrete screws require a pilot hole made with a hammer-drill and a masonry bit sized specifically for the diameter screw you’ve chosen. Drill the hole a half inch deeper than the length of the screw and use a wire brush, compressed air, or a vacuum to clean the hole of brick dust before driving in the concrete screw.
QUESTION: What is the easiest way to cut sheet metal?


ANSWER: “Aviation snips” (AKA tin snips) with compound leverage can cut sheet metal up to 18 gauge. Note that snips are designed for cutting either to the left, to the right, or straight, and a novice user will usually get the most versatility from the straight snips. A metal nibbler can often cut sheet metal up to 1/8-in. thick, depending on material, and some of these tools are sold as attachments that fit onto an electric drill. For straight cuts, a metal-cutting circular saw blade with a high teethper-inch count works well. Electric metal shears are another option for the pro who often works with sheet metal.


Need more info? Visit Matt’s blog at HomeImprovementAndRepairs.com.


STARTSMART < ASK MATT H 14 Home Improvement and Repairs | The Winter Issue Available in original 2-packs, 5-packs and new wide blade 3-packs Effort When Cleaning Small Surfaces, Edges & Grooves! ORIGINAL MODEL AND NEW WIDE BLADE FEATURES: ROUNDED TIPS—BETTER SCRAPER THAN A FINGERNAIL FLAT-EDGED TIPS—WON’T SCRATCH LIKE A SCREWDRIVER POINTED TIPS—BETTER THAN A TOOTHPICK FOR CLEANING GROOVES AND CORNERS ! YOUR FAVORITE NON-SCRATCH SCRAPER TOOL JUST GOT Remove stickers, tape,caulk, putty, grime & more! Find us at www.scrigit-scraper.com, local hardware stores, and Amazon! ®
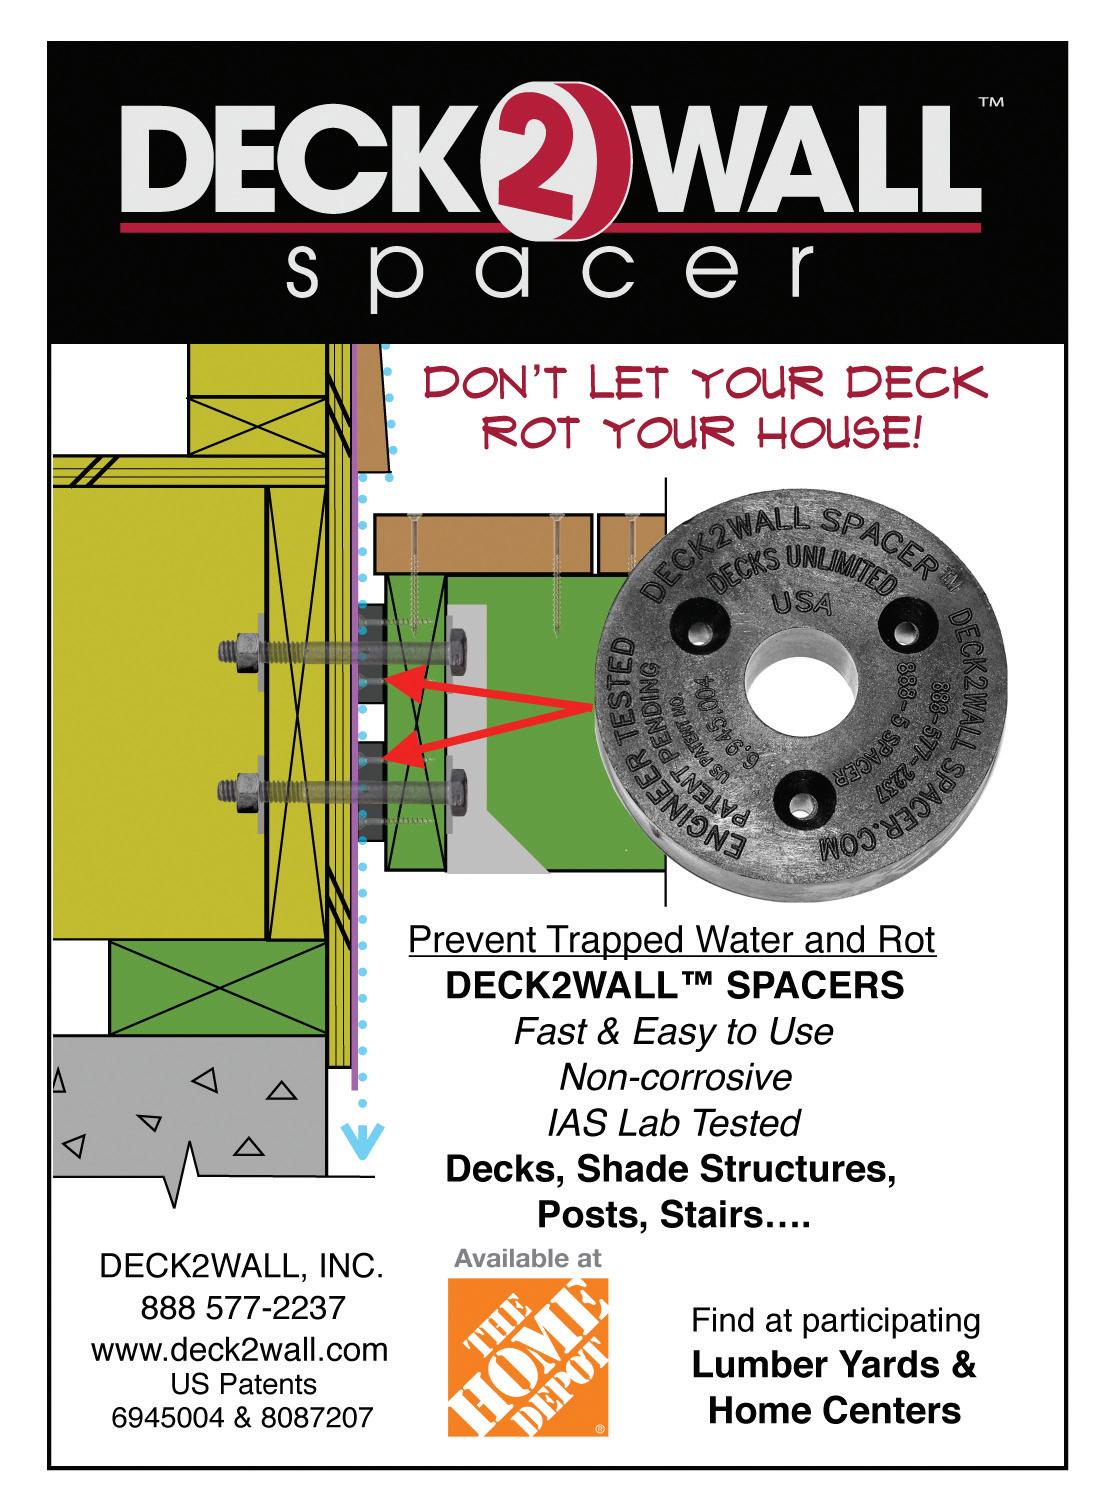
3X FASTER DECK INSTALL

USING OUR ELIMINATOR
CHOOSE COATED CARBON OR STAINLESS STEEL
• HIGH STRENGTH COATED CARBON STEEL FOR ENDURANCE


• STAINLESS STEEL FOR SUPERIOR CORROSION RESISTANCE


4 CLIP PROFILES

• PRECISE FIT ELIMINATES LOOSE DECK BOARDS


• INCREASES HOLDING POWER

ELEVATES YOUR DECK BOARDS

• BETTER AIR FLOW REDUCES ROT
• RELIEVES LATERAL LOAD STRESS
PERFECT FOR USE IN MOST MAJOR COMPOSITE DECK BRANDS ANOTHER


RCSTM PNEUMATIC TOOL! 30 YEAR TRANSFERABLE WARRANTY
THE BEST IN THE BIZ
INNOVATIVE PRODUCT FROM SURE DRIVE USA® SUREDRIVE.COM
20 HOT PRODUCTS
By Carter Smith
DREMEL 8250 HIGH-SPEED BRUSHLESS ROTARY TOOL

Dremel released the 8250 High-Speed Brushless Rotary Tool to help with a variety of projects from home improvement to woodworking, to crafts and more. Dremel’s 8250 offers optimized performance and durability, using an advanced brushless motor and patented high-speed rotary tool technology. The rotary tool is made for heavy-duty applications including cutting rebar, steel, hardwood, as well as grinding metal, sanding wood, carving and more. The 8250 delivers 20 percent higher power versus the Dremel 4300 and 100-percent more runtime versus the Dremel 8220. A red warning LED notifies the user to guard against overload or excessive tool and battery temperatures.
WWW.DREMEL.COM
> 16 Home Improvement and Repairs | The Winter Issue
HERE’S A RETROSPECTIVE LOOK AT SOME INNOVATIVE PRODUCTS THAT MADE AN IMPRESSION AMONG HOMEIMPROVEMENT ENTHUSIASTS IN 2022.
BOSCH 18V FREAK

The Bosch Freak is half impact driver, half impact wrench. This two-in-one 1/4-in. and 1/2-in. Bit/Socket Impact Driver (model GDX18V-1860C) offers a 1/4-in. quick-change hex shank for bits, and a 1/2-in. square drive for sockets. Bits can stay conveniently inserted when using deep sockets, and more torque is transferred directly through the 1/2-in. square drive anvil. There is no more torque loss through socket adapters or broken socket adapters. The powerful brushless motor produces up to 1,860 in.-lbs. of torque and 0-4,100 impacts per minute. In addition to three speed/torque settings, this impact driver also features special modes to prevent work-piece and fastener damage. The presets include modes for self-drilling metal screws and wood screws. In reverse, with bolt mode activated, the Auto Bolt Release stops rotation when there is no load on the tool to help prevent accidentally dropping bolts and nuts during removal.

WWW.BOSCHTOOLS.COM
DURAMASTER ELASTOMERIC CAULK/SEALANT

TheDuraMaster sealant from Titebond offers 100-percent joint-movement capability, so it will flex and stretch and won’t crack or detach from the surrounding building materials. Movement occurs with expansion and contraction of building materials due to temperature changes, settling, wind and seismic events, and this movement is why brittle caulks can crack or fail over time. Typical elastomeric sealants can handle movement of 25 percent of the original joint size and are rated Class 25 (the minimum rating for handling a moderate amount of movement). DuraMaster, however, has earned the highest ASTM C-920 rating for sealant performance, Class 100/50, which means it can handle movement of 100 percent expansion and 50 percent contraction. The Class 100 rating is a testament to the sealant’s durability because, according to Titebond, the new formula tested four times more durable than other water-based sealants. Plus, it will span even large gaps, up to two inches wide. The DuraMaster sealant can be used for interiors or exteriors. Its water-based formulation cleans up easily with water (until the sealant dries). And unlike standard silicone, DuraMaster is a paintable caulk and is sold in 13 colors.
WWW.TITEBOND.COM
Read our magazine online at HomeImprovementAndRepairs.com 17
HOT PRODUCTS
RIDGID POWER AUGER
A new line of Ridgid Outdoor Power is coming to The Home Depot in January 2023, including the Ridgid 18V Brushless Auger. The kit includes dual 18V 4.0Ah Lithium-ion Batteries (and charger) to deliver powerful gas-like performance. Features include high and low speed and reverse operation for increased productivity and an anti-kickback system for better user control. Pair the auger with Ridgid MAX Output batteries for maximum power. Register the auger within 90 days of purchase to qualify for the Lifetime Service Agreement.

WWW.RIDGID.COM
LP WEATHERLOGIC AIR & WATER BARRIER
For new home construction, LP WeatherLogic Air & Water Barrier helps safeguard the house from water intrusion for a tighter building envelope. The system is APA Structural 1 Rated Sheathing and can be used for both wall and roof applications. It installs just like normal sheathing products. WeatherLogic is designed with an integrated water-resistive overlay which protects against water intrusion while still allowing moisture vapor to escape. When properly taped and flashed, the LP WeatherLogic system can contribute to a tighter building envelope while also eliminating the need for housewrap, which increases jobsite efficiency by eliminating the extra step of installing it. Backed by an industryleading 30-year warranty, WeatherLogic is engineered to stand up to extreme conditions.
WWW.LPCORP.COM/WEATHERLOGIC

18 Home Improvement and Repairs | The Winter Issue 20
CAMO CLIPDRIVE
What’s better than a building a deck with hidden fasteners? How about building a deck with hidden fasteners from a standing position? Target screws easily while standing and drive CAMO clips up to 5X faster with the CAMO ClipDRIVE. This contractor-grade tool is designed to give you the best experience fastening grooved decking. For exclusive use with CAMO Universal Deck Clips on leading brands of grooved decking, this labor- and time-saving tool attaches to your drill and features a height-adjustable handle. The weighted nose easily targets the screw head of the CAMO Clips to speed up decking installation.

WWW.CAMOFASTENERS.COM
BEACH HOUSE SHAKE COMPOSITE SHINGLE
Consumers love the iconic look of cedar shingles. However, untreated cedar shingles discolor quickly with unsightly and uneven dark spots. To overcome discoloration, cedar shingles are commonly painted. While coatings offer protection, they cover up the natural cedar’s subtle nuances and beauty, resulting in monochromatic sidewalls. Additionally, natural cedar shingles are time-intensive to install, in limited supply, and require constant upkeep. As an alternative to cedar shingles, Tando Building Products offers Beach House Shake as “the authentic composite shingle.” The architecturally precise 5-in. shingle is made with composite technology recognized for providing realism, durability and longevity in exterior products such as decking, roofing, lap siding, and composite stone. Beach House Shake is available in four natural cedar shades.
WWW.BEACHHOUSESHAKE.COM

> Read our magazine online at HomeImprovementAndRepairs.com 19
20 HOT PRODUCTS

OWENS CORNING PINK NEXT GEN FIBERGLAS INSULATION

Owens Corning PINK Next Gen Fiberglas Insulation was selected as a winner in Good Housekeeping’s 2022 Home Reno Awards in the Biggest Energy Savers category. The new insulation features Owen Corning’s advanced fiber technology to offer enhanced comfort, with superior performance and safe, proven ingredients. With excellent recovery out the package that fits snugly into the wall cavity, the insulation is easy handle, soft as cotton, and cuts cleanly with a single pass. PINK Next Gen Fiberglas makes it easier to manage budgets and timelines, enabling up to 23 percent faster installation compared to previous products. With a visibly superior surface and ability to completely fill the wall cavity, it also helps projects pass inspection. For homeowners, it offers greater comfort and safe ingredients with no need for fire retardants or formaldehyde. It is also UL GREENGUARD certified for low VOCs.
WWW.PINKNEXTGEN.COM
20 Home Improvement and Repairs | The Winter Issue >

TOPZERO RIMLESS SINKS

TopZero is a global brand by Ukinox USA that offers the only true seamless, rimless undermount stainless steel sinks for kitchen and bathrooms. Undermount stainless steel sinks are preferred to drop-in sinks due to their practical advantage, but even undermount sinks have a joint between the countertop and the underside. That joint is sealed to the countertop with silicone, creating a bead which is tough to keep clean. With all the moisture around the sink area, this bead can promote bacteria growth and the eventual degradation of the actual silicone. In response, the TopZero system utilizes a rimless stainless-steel edge that reaches the surface level for a flawless, vanishing-edge appearance against almost any solid surface material, including granite, quartz and engineered stone.
WWW.TOPZERO.COM
BARRETTE DECORATIVE SCREEN PANELS
The Decorative Screen Panels from Barrette Outdoor Living offer an attractive way to customize an indoor or outdoor setting. Enhance a room, patio, garden, or add a stylish solution for under a deck. Panels can also be installed up to three high in the aluminum frame kit, creating a divider screen for increased privacy wherever it is needed.The panels resists warping, rot, twisting, splitting, discoloration and scratching, and can be used as decorative infill in select railing products. The low-maintenance, impact-resistant material ensures stability in extreme climates. Made in the USA and backed with a Limited Lifetime Warranty.
WWW.BARRETTEOUTDOORLIVING.COM

22 Home Improvement and Repairs | The Winter Issue
20 HOT PRODUCTS
FIXD AUTOMOTIVE SENSOR
FIXD is an easy-to-use device with an app that actually tells you what's wrong with your car without having to go to a repair shop. You can even clear the car's alerts with it. Translate over 7000 error codes into plain English, taking the stress out of the check engine light. See how bad your car problem is (minor or major) so you know if it’s safe to keep driving. Get automatic updates when it’s time for routine maintenance based on your make, model and mileage. All of these features are included for free inside the FIXD app when you purchase a FIXD Sensor. There’s no limit to how many times you can use the sensor or how many vehicles you can connect to it. Compatible with all iOS and Android devices.

WWW.FIXD.COM
TREX TRANSCEND LINEAGE DECKING

Trex Transcend Lineage is a new composite deck board that features “subtle, elegant graining that delivers an unmatched natural appearance.” Available in two new color options – Rainier, an airy mountain grey, and Biscayne, a light coastal brown – these new offerings are engineered with heat-mitigating technology in the shell to reflect the sun and keep boards cooler than other composite decking offerings of a similar color. Like all Trex decking, Lineage boards are made from recycled and reclaimed content and engineered with a proprietary, high-traffic formulation and ultra-durable integrated shell that resists stains, scratches and mold. They won’t rot, warp, crack or splinter, and upkeep is hassle-free. No sanding, staining or painting is ever needed, and spills wash off easily with just soap and water.
WWW.LINEAGE.TREX.COM
> Read our magazine online at HomeImprovementAndRepairs.com 23
SENCO FRAMING NAILERS
SENCO launched its latest built-in-the-USA pneumatic framing nailer. The SENCO FN81T1 fires full round head nails and features more power, improved durability, and better ergonomics than comparable framing nailers. The FN81T1 follows the launch of the FN91T1, SENCO’s 34-degree framing nailer which was named Best Framing Nailer in the 2022 Pro Tool Innovation Awards. Both nailers are assembled at SENCO’s Cincinnati production facility. The new FN81T1 fires 20-degree, plastic-collated, full round-head nails. The previously launched FN91T1, fires 34-degree, paper tape-collated, offset round-head or clipped-head nails. The FN81T1 is exceptionally powerful, delivering 18 percent more driving force than comparable framing nailers. It is designed to consistently sink 2-in. to 3-1/2-in. framing nails in dense engineered lumber like LVL and OSB without slowing down. The nailer weighs 8.75 pounds and features a durable magnesium magazine plus a body and belt hook made from heavy-duty aluminum.

WWW.SENCO.COM
DEWALT DW735X 13'' 2-SPEED PLANER
This new DeWalt planer has become indispensable for the HIR magazine crew. We use it to plane boards for all manner of wood projects, including table tops, window shutters, barn doors and more. With a powerful 15-amp, 20,000-rpm motor (10,000-rpm cutterhead speed) the DeWalt DW735X Planer can easily handle large cuts in wide material. The planer features a three-knife cutter designed to deliver 30 percent longer life and make blade changes faster and easier. The two-speed gear box allows users to change the feed speed to optimize cuts per inch at 96 or 179 CPI, for dimensioning boards or for smooth finishing. A fan-assisted chip-ejection system vacuums chips off the cutter-head and exhausts them through an outlet port, which you can connect to a dust collector. Plus, the 19-3/4-in. cast aluminum base is twice as rigid as a standard 10-in. base and folding tables. The DeWalt DW735X includes infeed and outfeed tables and an extra set of knives. Highly recommended for woodworkers.
WWW.DEWALT.COM

24 Home Improvement and Repairs | The Winter Issue 20
HOT PRODUCTS
OSCILLATING BLADES FROM ARROW FASTENER
The all-new professional-grade oscillating blades from Arrow Fastening Company feature state-of-the-art manufacturing technology which ensures a sharp, durable edge capable of tackling any job. And best of all, our universal fit anchor allows for seamless use with major oscillating multi-tool brands such as Dremel, Milwaukee, DeWalt, and more. Arrow’s MultiMaterial Blades are engineered for cutting wood, wood with nails, PVC and drywall. Also available are blades for hardwood, metal-cutting, sanding and scraping, as well as specialty blades for applications such as grout and mortar removal.
WWW.ARROWFASTENER.COM

U2 FASTENERS RE-FINE SCREW
Designed for use in trim work and fine carpentry, the Re-Fine Screw from U2 Fasteners features a very small head that is difficult to notice and easy to conceal. The Tapper Point consists of the Cork Screw Start and Blade Cutting Thread for easy piercing and alleviating strain on the material. The Re-Fine Screw also includes a double twist at the head for drawing strength. It can be used for siding or any delicate project like crown molding, railings and PVC. It’s great for making small adjustments. Like all U2 Fasteners, the Re-Fine Screw features the Tight Star Recess system, which grasps the driver bit tightly so the screw can be installed with one hand.

WWW.U2FASTENERS.COM

Read our magazine online at HomeImprovementAndRepairs.com 25
>
INSPIRE RAILING
To provide DIY homeowners and residential contractors with an aluminum railing that is easy to order and install, Fortress Building Products’ Inspire Railing comes as a ready-toassemble kit for a straightforward, no-fuss installation. Inspire Railing features twist-and-lock balusters and pre-assembled stair panels. Pre-punched posts further support a quick install while guaranteeing consistency and quality along the perimeter of a deck. A durable, low-maintenance building material, aluminum won’t rot, warp, deteriorate or rust, which means Inspire Railing can resist the damaging effects of weathering. Offered in Black Sand and Brown, DIY homeowners and residential contractors can safely enclose a deck in a highquality railing solution that melds style and function. The Fortress Lock powder-coated finish provides enhanced corrosion resistance and UV protection. Inspire Railing is backed by a limited lifetime manufacturer warranty for ultimate peace of mind.

WWW.FORTRESSBP.COM
FROGTAPE HIGH BOND EXTERIOR PAINTER’S TAPE

FrogTape brand introduces High Bond Exterior Painter’s Tape engineered to consistently adhere to difficult surfaces such as self-cleaning paints and rough textures, including stucco, brick and concrete. It is ideal for outdoor projects that require a strong, conformable tape that offers clean removal without shredding. High Bond Exterior Painter’s Tape offers very high adhesion for tough outdoor uses. Not only does it stick to difficult, uneven substrates, but it also adheres well to painted wood, aluminum, steel and vinyl. Plus, its crepe paper backing allows it to conform easily to bends and turns, making a quick task of masking around exterior doorways and windows. This unique, time-saving flexibility makes High Bond Exterior Painter’s Tape an ideal toolbox staple for painting contractors.
WWW.FROGTAPE.COM/CONTRACTORS
26 Home Improvement and Repairs | The Winter Issue 20
>
HOT PRODUCTS

HOT PRODUCTS
PANOLOCK
PanoLock is a one-of-a-kind, multi-point lock that works with off-the-shelf hardware to provide superior home security at an affordable price. The lock installs along the edge of the door with three locking points. It works with most handsets, whether knob, lever or thumb-press via an innovative plug-n-play latch and deadbolt adapters, which mate with multiple brands and styles. PanoLock is compatible brands include: Schlage, Kwikset, Gatehouse, Baldwin, Brinks, and Defiant.

WWW.ENDURAPRODUCTS.COM/PANOLOCK
WISEBOND DEEP POUR EPOXY
WiseBond Deep Pour thick-pouring epoxy is a premium-grade epoxy specially formulated for river table deep pours up to 2 in. deep in a single pour. This Deep Pour epoxy has a 2:1 mixing ratio and can be used indoors without ventilation or bulky respiration equipment. Each 1.5 gal kit includes 1 gal. of A-side resin and 1/2 gal. of B-side hardener. This epoxy is perfect for live-edge river tables, creative table making, wood slabs, woodworking, and object art-casting projects. It will easily pour up to 8 in. thick for object castings. WiseBond Deep Pour epoxy cures to a crystal clear, water-like appearance for an amazing clear cast. Powdered colorants, dyes, and alcohol inks can be mixed into the epoxy for amazing special effects adding vibrancy to any river table, encapsulated object, voids, turning projects, custom wood tables or art projects. Our Deep Pour thick pouring epoxy has been engineered to be low-odor, low heat, low viscosity, and zero VOC. It is designed for a slow, long cure time that prevents cracking with a slow exothermic reaction typically peeking around the 8-hour mark.
WWW.WISEBOND.COM

28 Home Improvement and Repairs | The Winter Issue >
20

INSTALLING A RANGE HOOD
 By Matt Weber
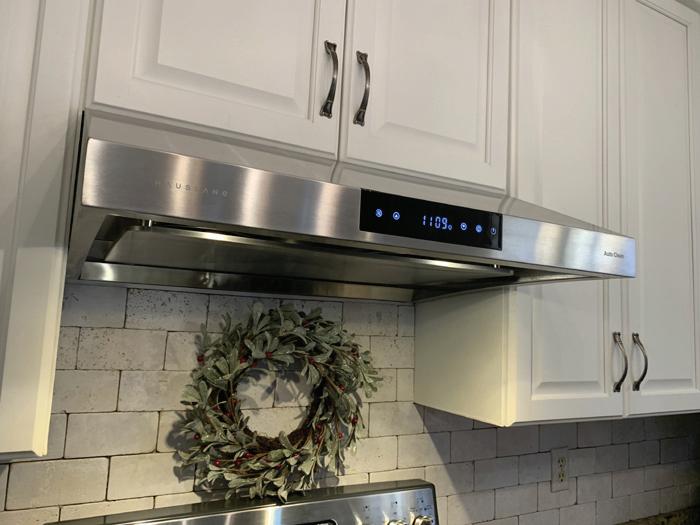
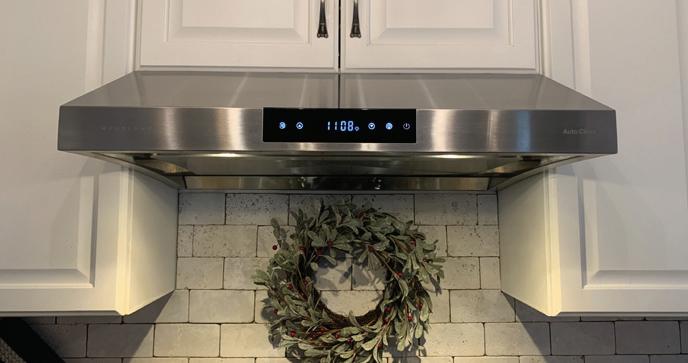
The homeowners on Windwood Drive in Gardendale, Alabama, had never liked the look of their kitchen’s bulky microwave oven/vent-fan combo, which was mounted right above the stove in the center of the room. During a recent remodel, they decided to ditch the clunky microwave and go with a new range hood.
The lady of the house chose the Hauslane UC-PS38 range hood because it’s packed with features to suit the best cook in the kitchen. The under-cabinet extractor fan cleans grease, smoke, fumes, and cooking odors from the air with its six-speed fans. Although most range hoods have trouble capturing smoke from the front burners, the unique panel design of this model creates suction all around the hood to provide maximum coverage for your cooktop. This pro-style vent hood not only cleans the air but can then clean itself. Using an internal water supply, the exhaust fan steam-cleans and rinses its own hood and ventilator fans at the touch of a button with no water line required.
OUT WITH THE OLD
Your situation may not require removal of an old microwave oven, but if you do have to remove any overhead appliance, be sure to recruit an assistant, or else devise a way to support the weight once its mounting fasteners are disconnected.
> 30 Home Improvement and Repairs | The Winter Issue

Read our magazine online at HomeImprovementAndRepairs.com 31 SKILL LEVEL 2 MODERATE
INSTALLING A RANGE HOOD
In our case, we used a cabinet jack to support the oven’s weight. The oven was top-mounted to the cabinet by two carriage bolts, which we removed, but its bottom rear edge was supported by a wall-mounted cleat. Be sure to inspect your appliance carefully because they can be fastened in many different ways.

PLAN AHEAD
Before ordering your range hood, check that you’ll be able to install your model at the correct height. To ensure the best performance for the Hauslane PS38 model shown, the bottom of the range hood must be between 24 and 30 inches from the top of the cooking surface. For gas
ranges, the required distance is 30 inches. Make sure your main electrical voltage is in line with the required voltage outlined on the rating of the hood.
The range hood must be ducted to the outside using 6-inch ductwork, and you’ll need to use an existing duct or have one professionally installed. Avoid connecting the range hood to exhaust ducts that carry any type of combustion fumes like fireplaces, boilers, or any similar items. Use a minimum number of transitions and elbows when running the ductwork.
Note that installation of the range hood will be greatly assisted by using a cabinet jack (or jacks), which you’ll need on site for installation day.


>
32 Home Improvement and Repairs | The Winter Issue
PREPARE THE CABINET
Measure the size of the range hood’s outlet connector relative to the underside of the cabinet. If it is not already done, you’ll need to cut an opening in the cabinet large enough for the outlet adapter pass through. The same goes for the power cable, which is located at the rear corner of this range hood. If you need to cut the cabinet, use a ruler and pencil to measure and mark the area, then cut with a jigsaw. (We cut the power cable passage with a drill and a spade bit.)
Study the range hood’s installation manual to determine its method of mounting. For the PS38 range hood, four screws will be driven through the top of the range hood near each
corner, fastening it to the underside of the cabinet through designated screw holes.


Important note: If you’re installing the range hood under a cabinet with a recessed bottom, you should add 4-in. filler blocks made of plywood or solid wood on each side to stabilize the cabinet for secure mounting. Fiber-board cabinet bottoms don’t have much holding power for the screws, but adding the filler blocks will provide stronger wood grain for a better grip to the screws.

Read our magazine online at HomeImprovementAndRepairs.com 33
INSTALLING A RANGE HOOD
PREPARE THE RANGE HOOD
After you unbox your range hood and confirm that all the necessary parts are included, plug it in and power it up to test all functions before installing.
Refer to the manufacturer’s instructions for specific guidance on preparing the hood for installation. For example, on the model shown, we had to attach an adapter (and rubber gasket ring) at the top of the hood, which connects to a 6-inch duct.
Secondarily, we had to remove the panel filter and bottom cover to gain access to the mounting holes from the bottom of the hood. The panel covers usually snap into place, but refer to your instructions on how to remove it.

FIND A HELPER
Range hoods are best installed by two or more people due to their size and weight. In fact, Hauslane’s user manual recommends that you hire a certified technician for installation to reduce the risk of damage or injury. However, the unit simply plugs into an outlet, so if you can mount it in place, then you can make the connection.
PREPARE THE CABINET JACK
If you are leaving the oven range in place during installation of the hood, place a sheet of plywood (30x24 in.) over the cooktop to avoid possible damage from the cabinet jack.
Incidentally, that 6-in. fitting required us to modify our 8-in. duct with an 8-to-6-inch reducer, which is an accommodation you might also have to make.

Important note: Cabinet jacks are available in a range of sizes that extend and retract to various lengths. Through trial and error, we learned that our shortest cabinet jack was too short to raise the hood into place, while our medium-sized jack was too long to fit between the cooktop and cabinet bottom. Our solution was to screw wood blocking to the bottom of our shortest cabinet jack to provide the necessary reach once extended. The blocking at the

>
34 Home Improvement and Repairs | The Winter Issue
To connect the range hood to the ductwork, we had to remove the old rectangular fitting of the microwave oven and replace it with an 8-to-6" circular reducer.
bottom also broadened the area of the footplate, which provided more stability to the cabinet jack.
You should save time and frustration by first measuring the extended reach of your cabinet jacks, compare it to the reach needed to install the range hood, then make any necessary adjustments. Also, avoid measuring from the cooktop to the lowest edge of the hood, because the cabinet jack will contact the hood’s interior ceiling, which is recessed inside the hood a few inches deeper than its bottom edge.
You should also attach a second piece of plywood on top of the cabinet jack to broaden its contact surface and provide better stability.

Place the cabinet jack (or jacks, if using two)
on the plywood and have your assistant help you lift the range hood onto the cabinet jack.

Carefully raise the jack to lift the range hood into place under the cabinet. Keep the hood steady as you situate it into the proper position.
Make sure the outlet adapter and power cord enter the cabinet openings and that the cord isn’t pinched between the hood and the cabinet.
In the top of the PS38 hood are four keyhole slots, the shape of which suggest they’re designed to slip over the screw heads after they’ve been driven partially into place. However, the size and shape of the hood make it difficult to shift it incrementally. Instead, we recommend you move the range hood into its
final position, ensuring it is level, and then drive the mounting screws with washers through the narrow slots of all four screw holes. To easily reach the mounting holes, use a bit extender for your power drill or impact driver.
Be sure the hood is securely attached before removing the cabinet jack and plywood.

Read our magazine online at HomeImprovementAndRepairs.com 35
INSTALLING A RANGE HOOD
Plug in and turn on the hood to make sure the damper opens and closes freely. Insert the duct into the adapter and tighten the screw to lock it in position. Wrap the joint with aluminum foil tape to make it airtight.
Once you reassemble the filter and cover, the new range hood should be ready for operation.

> 36 Home Improvement and Repairs | The Winter Issue
P db f P s err eref y ed b r ro


Titeb ookto ook t L y o s wh That ebond has Tit dless o Regar ’ tgluef t glue f ortherigh or the righ bondf efe e pr ood glues ar ur w o g ou need t the glue y illlevelinwood our sk tit bond f f y t. tprojec t pr ournex our ne ory or y e than os mor y pr ed b err on et the job done with c epai ing or home r ork bd|18003474583 dw o 1. 7 t e.nfidenc , 3 ir ebond.com | 1-800-347-4583

PAINTING STONE TILE
By Tom Matthews
Changing the color of stone tile can be an easy way to make a big improvement when updating a kitchen. Most popular tile types can be painted, including ceramic, natural stone and unglazed quarry tile. Paint doesn’t easily stick to glazed tile, so any glaze on the tile should first be removed by sanding. No matter what type of stone tile you want to paint, it must be clean and free of dust, dirt and grime. A kitchen backsplash will also have been exposed to cooking oils that leave a residue on the tile, which may be difficult to see with the naked eye. Even if you plan to sand the tile, the surface should first be cleaned, or the residue will clog up the sandpaper. Careful surface preparation will be the key to a successful paint job.

Step 1: Mix dish detergent with warm water then use it to scrub the tile surface with an abrasive sponge, a stripping pad, or a stiff-bristle brush. Rinse the tile thoroughly and allow it to dry.
Step 2: To remove the glaze from tile, sand the surface with 120-grit abrasive. An orbital sander will speed up the process.
Step 3: Remove all sanding dust with a damp rag, rinsing it frequently. Allow the tiles to dry completely. If the tiles are grouted in place, the grout must be dry as well.
Step 4: Use painter’s tape to mask off any
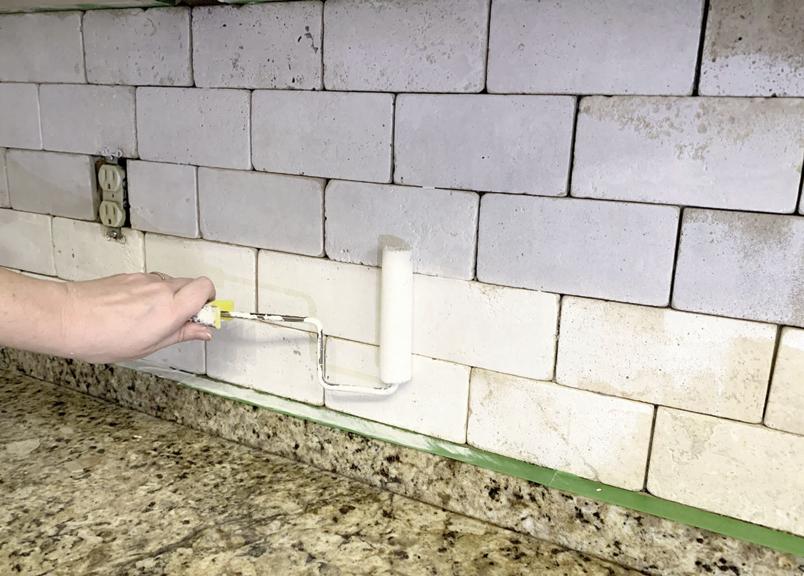
areas you want to protect from paint. We recommend Frog Tape because it creates a seal when it contacts latex paint.
Step 5: Acrylic latex paint will work well, as long as the tiles are porous and clean. Another option for painting tile is latex paint specifically formulated for masonry and stucco. For a total color change, use an acrylic latex primer, especially if you're applying a light color to cover a darker stone.
Experiment with the look of the paint on spare tiles or an inconspicuous area of your project. On the project shown in the photos, we wanted a semi-transparent whitewashed look that allowed some of the natural stone character to show through. To achieve this, we thinned our primer-paint with water until we got the look we wanted.
Step 6: Different tools will achieve different effects when applying the paint. For example, the bristles of a thin brush with help access the grout joints and apply paint to surfaces that have heavy texture or surface relief. On the other hand, a foam roller made for painting doors and trim can lay a flat, thin coat that leaves pits and pinholes unpainted for more visual contrast. Applying primer and/or paint with a sprayer is an option but requires extensive masking and ventilation.
Read our magazine online at HomeImprovementAndRepairs.com 39
H
To speed up the surface cleaning process, we used a scrub brush attached to a reciprocating saw. You can find a variety of similar attachments from Recipro Tools.


40 Home Improvement and Repairs | The Winter Issue
Sand the tile until the entire surface has dulled and all gloss has been removed.
Refer to the paint manufacturer's instructions for specific guidance on thinning the paint (if applicable).
When masking off the project, Frog Tape creates a seal when it contacts latex paint.
For a semi-transparent whitewash, we thinned a primer-paint combo and applied it with a foam roller. We used a brush to touch up the grout joints but left areas of deep surface texture and relief untouched to provide visual detail and character.


Read our magazine online at HomeImprovementAndRepairs.com 41 PAINTING STONE TILE
Paint up to the edge of electrical outlets. You can then roughen the surface of plastic outlet covers with sandpaper and paint them to match the surrounding tile.
Last-Deck

THE LAST DECK YOU WILL EVER NEED
last-deck requires no staining or sealing, just mild soap and water for cleaning. No warping, splitting, cracking, rotting, molding, lightweight and fire-resistant. LastDeck is available in a multitude of options allowing you to design your own luxury outdoor space.

Manufactured in the Midwest of all American made structuralgrade aluminum – the same as an aircraft; Last-Deck is built with high quality standards from our family to yours.
last-deck 300 series
The 300 series is a patented, watertight product that has the ability to be replaced without having to start at one end. Should you receive damage at the mid-way point of your deck, simply pop up 2 joiner strips, replace the bad plank, snap the joiner strips back down, and your repairs are finished! www.lastdeck.com


300 series easily pop up and snap back down!

information@lastdeck.com
toll free: 866-527-8332 pat# 9,803,376