10 minute read
Abstract Squares


PLAY WITH TECHNIQUE
ABSTRACT SQUARES
LESSON 2
IN THIS LESSON, WE ARE GOING TO PLAY AND CREATE WHILE WE
learn. I love creating beautiful things while still practicing. As opposed to the
boxes used in Lesson 1, this exercise is more freeform, and at the end, you will have a completed watercolor painting that is both a lovely abstract creation and a helpful reference. This project is great to come back to at any time and is really fun when you are sampling new colors to see what they can DO. You will learn how to use the different techniques you practiced in Lesson 1, understand why your paint is drying in different ways, and improve your skills as you work in small abstract squares. This is one of my favorite exercises to mindlessly paint when I don’t have a particular vision for a piece but want to create something lovely and simply relax and enjoy the process. It never gets old!
Bloom
Paper-Towel Blotting Wash
Waterdrop Blotting
Dry Paper Texture
Wet-in-Wet
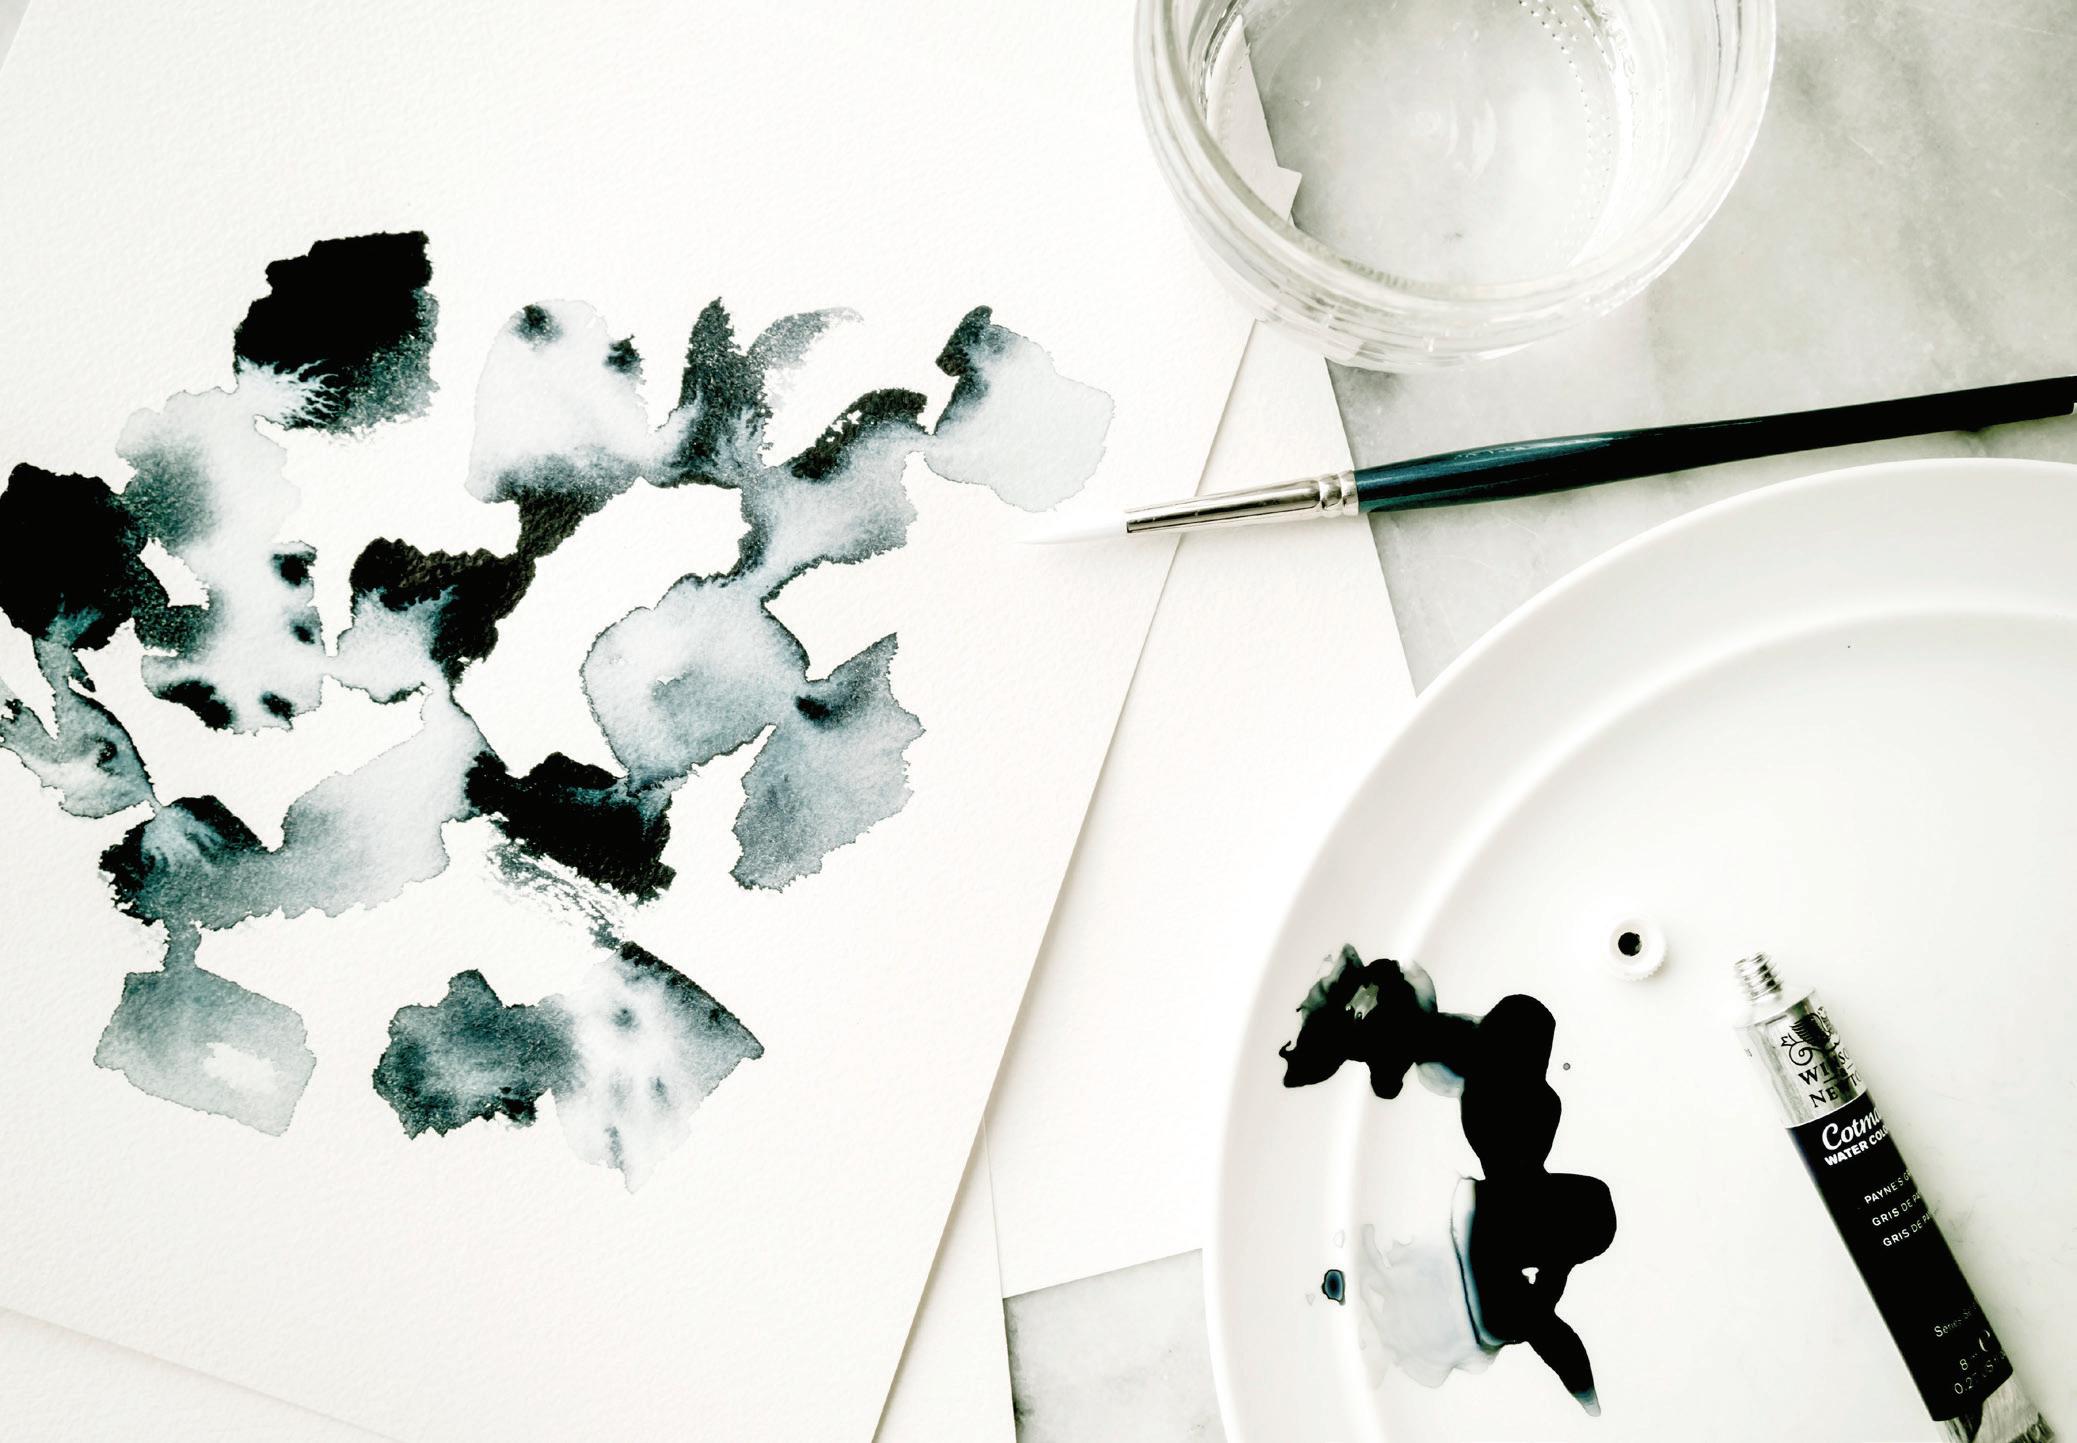
TOOLS
Round watercolor brushes, sizes 4 and 1
140-lb. watercolor paper HB pencil Paper towels 2 Mason jars of water
PAINT PALETTE
PAYNE’S GRAY
challenge If you want to take this one up a notch, select three or four colors and create a lovely cohesive piece with several colors instead of just one!
TE c HNIQUES
Wash
Paper-towel blotting
Bloom Waterdrop blotting
Wet-in-wet
TIPS FOR THIS PROJE c T
Cut a full sheet of watercolor paper in half. Since this is just for practice, you can conserve your paper and create two pieces this way.
AS YOU BEGIN
Ready your Mason jars of water and prime your brush.
Prime your painting palette with paint and water.
Use your brush to transfer water from the Mason jar to the palette, creating the magic sauce of soy sauce with wasabi, 80w/20p consistency, of your
Payne’s Gray paint.
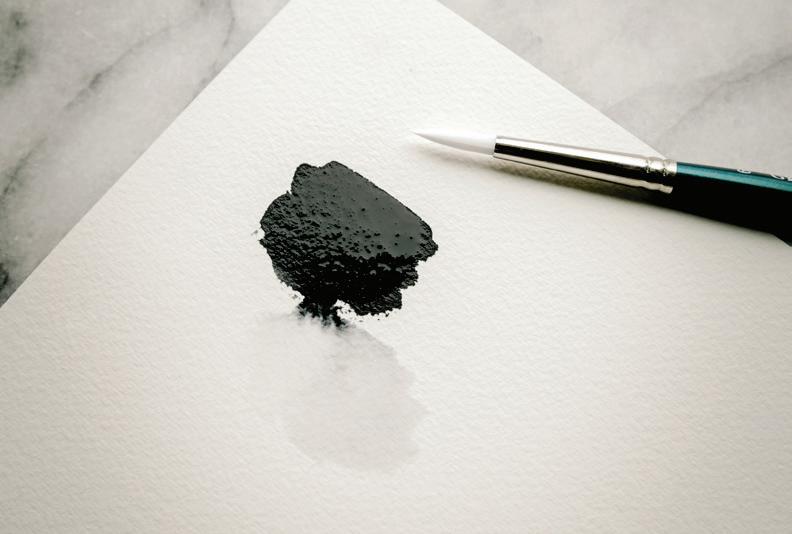
SQUARE 1

WASH
BRUSH: Round 4 PAINT cONSISTENcY: 80w/20p “soy sauce with wasabi”
1Dip your brush into your Mason jar, then back into your 80w/20p consistency of Payne’s Gray. Bring your loaded brush to your watercolor paper.
2With enough pressure to access the bolder and full round dimension of your brush, stroke your brush from left to right four to five times, creating an uneven square boundary. Because this is a wash, ask yourself: Is there enough water so I can see a nice wet shine? Do I see movement in this boundary with a small bead of water forming when I tilt my paper? If not, use your brush to bring a bit more water to the boundary, and blend it into the pigment with your paintbrush.
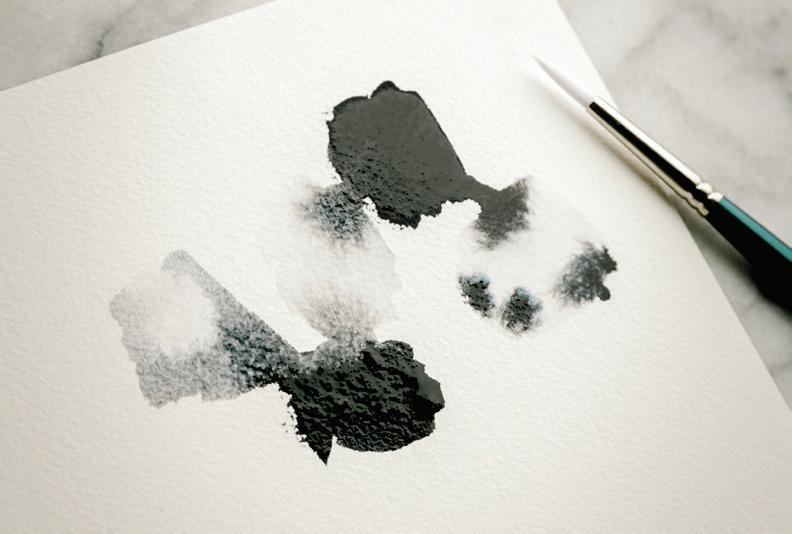
SQUARE 2
c LEAR WASH, c ROSSING BOUNDARIES
BRUSH: Round 4 PAINT cONSISTENcY: wash water only!
1Clean your brush by dipping it first into your already muddied wash water, and then into a jar of clean water to get the bristles primed in clear water. You will create another small square boundary near the first, but this time using only water.
2Again, using enough pressure to access the bolder round dimension of your brush, stroke your brush from left to right a few times, creating an uneven square boundary. You want to cross the first square’s boundary with this square, causing a blended boundary where the color from your first box moves into the clear box. This is called “crossing boundaries.” Because both wash boxes are wet, the paint and water can now move freely between the two.
SQUARE 3

ADDING WET-IN-WET
BRUSH: Round 4 PAINT cONSISTENcY: 50w/50p “heavy cream”
1We are going to prep our palette now, and create a thicker sauce of Payne’s Gray, in a 50w/50p consistency. Using your brush on your palette, pull more paint into your sauce to create that thicker consistency like heavy cream. You will use this sauce to drop into your third square, using the wet-in-wet technique.
2To create your third square boundary, repeat all of the steps for Square 2, starting with cleaning your brush and creating a clear wash with movement and shine.
3Once your third square clear wash is on your paper, cross the boundaries between Square 1 and Square 3. Square 1’s pigment will begin to bleed into Square 1’s clear wash boundary.
4It’s time to bring your brush back to your palette and pick up that thicker 50w/50p consistency of Payne’s Gray. For a bold, wet-in-wet effect, take your full brush to your watercolor paper and with the lightest pressure of your brush, gently dab your bristles into the clear wash of Square 3. Watch and enjoy as the small dabs of paint begin to bleed and create small fireworks of color within your square.
SQUARE 4

ANOTHER WASH
BRUSH: Round 4 PAINT cONSISTENcY: 80w/20p “soy sauce with wasabi”
1 To create the next square, bring your paintfilled brush to your watercolor paper and, with enough pressure to access the bolder round dimension of your brush, stroke your brush from left to right four to five times, creating an uneven square boundary. You want to create a bold wash here, letting the boundary cross over into Square 2. This will create another bleed, since the boundary of Square 2 is still wet.
2 For the last brushstroke of this square, once your brush is running out of water, let it scratch along the natural pebbles of your cold press paper to create a nice textured effect.
SQUARE 5
WASH-WATER WASH, PAPER-TOWEL BLOTTING
BRUSH: Round 4 PAINT cONSISTENcY: 50w/50p “heavy cream”
1 To create Square 5, dip your brush into the Payne’s Gray-tinted wash water to create a new wet boundary with movement and shine. You will notice the coloring of this box is tinted; not quite as dark as when you started a wash with sauce from your palette, but not clear like Squares 2 and 3.
2 With your brush, cross the boundaries of Square 4 with your new Square 5, letting the more pigment-saturated wash from Square 4 bleed into Square 5.
3 Take a paper towel and, pressing down with your thumb, remove the water and pigment from a small area of Square 5. This will give you a small point of light in this square.
Notice my brush bristles are so white and clean here? That’s because I haven’t used them. Once you paint with white-bristled brushes, they take on the color of the paints you’ve used. I like to keep a ‘styling brush’ for photos because it makes my photos pop, and draws the viewers’ eye to the painting.
SQUARE 6

WASH, DAMP-BRUSH BLOTTING
BRUSH: Round 4 PAINT cONSISTENcY: 80w/20p “soy sauce with wasabi”
1 To create Square 6, follow the steps for Square 1, creating a wash with movement and shine.
3 Next, use the damp-brush blotting technique (page 51) to sweep the paint and water out of a spot within the wet boundary of Square 6. Remember to dry the brush along the rim of your water jar to create a “thirsty” brush, and then sweep the color into Square 5 to create a nice light point in Square 6.
4 From here, continue to play, making more squares and repeating the different techniques. Dab, sweep, drop, press, and wash, in whatever order feels good! Continue to blend boundaries and watch what happens as some boundaries begin to dry. For an added challenge, you can even introduce a new color and see what happens with the different bleeds and washes.
WHY ART
LIVING THE UNLIVED LIFE
AS ARTISTS, WE ARE USUALLY AWARE OF THE DESIRE TO cREATE EVEN IF IT IS something we have buried deep inside. It may be a voracious need or a quiet hunger, but we know it’s there. We long to feel the freedom of the creative life and yet we often argue against it. We may talk or dream about it more than we actually sit down and do it.
There are different reasons for everyone: not enough time, none of our own ideas, not enough skills to match the pictures we imagine in our minds. It can lead to a fair amount of discouragement and if we don’t give up outright, we at least push it to the side . . . day after day.
Growing up, I always loved creating—drawing, painting, sketching. Even more, I had no problem thinking of myself as an artist.
Then I became an “adult,” with very “important” grown-up responsibilities and concerns. I headed to college to pursue a practical “dollars and cents” degree, one that would guarantee a career after graduation. There was logic in this: I would be able to pay my bills and survive on my own in the world—a world that measured success in financial terms. Although I dabbled with artistic side jobs as I worked my way through school (my favorite was one where I soldered kaleidoscopes), I mostly stuffed my creative urges down deep inside and worked my way along a safer path. I graduated with a degree in economics and had some fantastic adventures as a young adult. I traveled, began a successful career at a Seattle tech firm, and was “doing well.”
And then one day, I broke my foot.
Confession: I tripped while wearing flip-flops. The most frustrating part of having a broken foot was having to slow down and sit still—definitely not my style. It was during this time that my best friend, Lauren (who had an art degree) insisted that I take advantage of this forced period of rest. “You have to sit still, so you will paint!” she cheered.
Suddenly, I was face-to-face with my resistance and forced to examine the real reason why I fought my artistic urges. Now that I had no reasonable excuses left, why shouldn’t I paint? The truth was that I was afraid. I felt more like an imposter than an artist. What could I say or contribute that hadn’t been said or done before? What if what I created wasn’t good enough—for me? For everyone else?
Lauren simply wouldn’t listen to my excuses. She drove me to the art store and piled supplies in the cart as I crutched along behind her. She added a big tube of white paint. “An artist always needs a good white,” she said. I gulped and confessed that I didn’t know what to paint—I
— Steven PReSSFieLD
didn’t even know what my style was. She suggested that I paint something for my fiancé, Colin, because at least I knew what he liked.
Colin and I often traveled together and visiting art museums was one of our favorite things to do. We loved to wander through rooms of incredible art, soaking up the atmosphere, standing in awe of the Greats—van Gogh, Picasso, John Singer Sargent, or Rembrandt. I knew that one of Colin’s favorite paintings was The Great Wave by Katsushika Hokusai, the Japanese woodblock master and legend. I thought perhaps I could embark on my new painting journey like many before me, by copying a master and hopefully learning a few things in the process.
I dove in, bolstered by Lauren’s belief in me, spending every Saturday on a secret “mystery project.” I didn’t tell anyone that I was painting, just in case it was a total failure. The unveiling happened on Christmas Eve at Colin’s grandparents’ home. Both of our families were there. My heart was beating out of my chest. Colin opened the framed canvas and exclaimed, “Oh my gosh—I love Hokusai! It has all the texture of a real painting—where did you buy this?”
I proudly told him that I painted it; my journey back to art had begun.


