
13 minute read
Single Layer


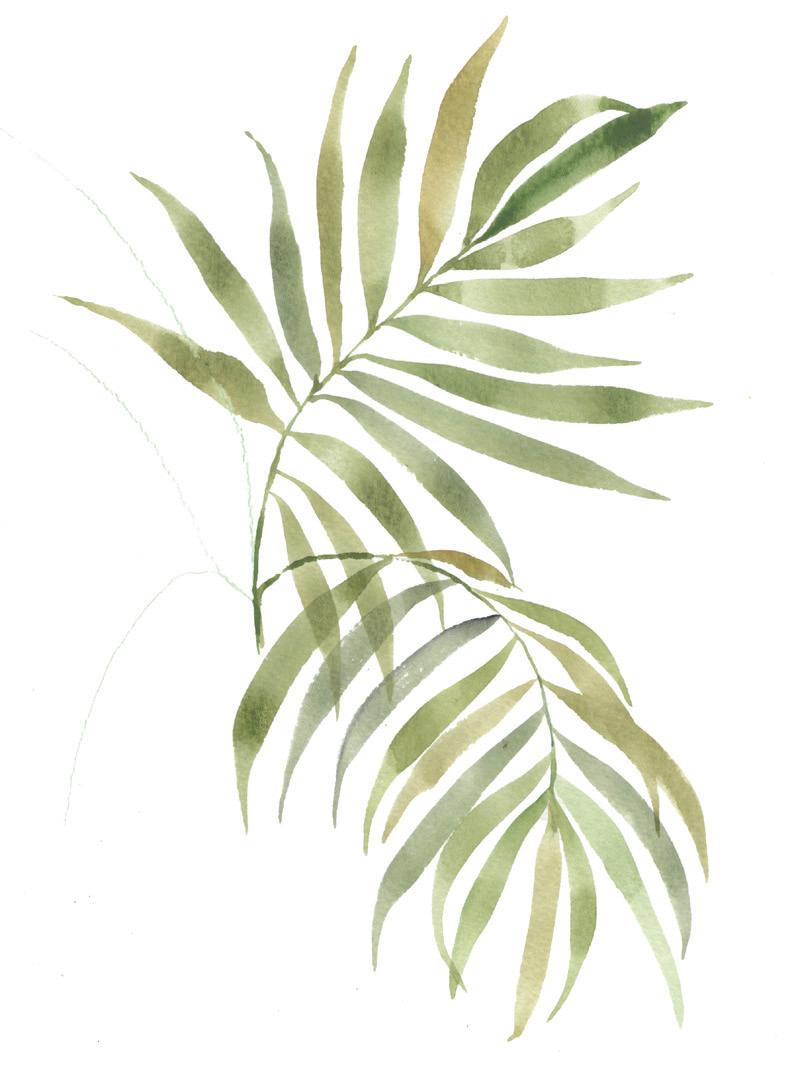
PALM FRONDS
SINGLE LAYER
LESSON 8
WELCOME TO THE LESSON OF THE PALM FRONDS! I DESIGNED
this watercolor plant to practice the immediacy of watercolor, and to celebrate its transparent capabilities. We will use the point-pressure-point (PPP) stroke, incorporate some stunning green colors, and see the beauty of the glazing technique as we overlay one frond, and then another. I would invite you to return to these loose and rhythmic leaves again and again, even after you’ve completed this lesson through the Beginner, Intermediate, and Advanced challenges. The shaping of these leaves and the structure of the plant lend itself to such an enjoyable process. Repeating the longer leaf brushing with the point-pressure-point stroke that we’ve been practicing only encourages you to get better with watercolor and to find your repeated pattern of movement with your own brush.
TOOLS
140-lb. watercolor paper Round watercolor brush, size 4
HB pencil Traceable “Palm Fronds” worksheet (see page 203) Light source for tracing (a well-lit window or a light box) Tape (washi or drafting) Mason jar of water Scrap paper for testing strokes
PAINT PALETTE
PAYNE’S GRAY YELLOW OcHRE
cOLOR REcIPES
SAGE Viridian + Cerulean Blue + Yellow Ochre
PINE Viridian + Cerulean Blue + Yellow Ochre + Lemon Yellow
TEcHNIQUES
Point-pressure-point Washes
TIPS FOR THIS PROJEcT
Pause to observe as you paint, allowing your eye to balance and find the right spot to paint additional leaves. Even if you use leaf markers to help with spacing, this exercise trains your eye to see natural shapes and where positive and negative spaces complement; over time, you will learn to find that aesthetic balance in your work.
The boundaries of each leaf of the fronds will remain wet for only a short period of time, so there is no need to worry about dropping in wetin-wet. These fronds are ONE WASH ONLY!
You will paint quickly by laying down a light wash that slightly varies in color, based on the pigment you have picked up before each leaf creation. Be sure to complete this piece with the fluid motion of point-pressure-point as one wash.
This lesson teaches the fluidity of the pointpressure-point technique, and that once a leaf is down, it is down. Move quickly, and without looking back.
Remember, you are learning, so give yourself grace and the time to build your skills.
BEGINNER
Trace the palm frond stems and the small line to indicate where the next frond should be painted. Make a small dot to indicate where the end of each leaf should fall; this will help you know how long to use the point-pressurepoint method for each leaf. You may also wish to lightly label each palm frond (like on the tracing sheet) to more easily follow the order.
If you are new to watercolor, you may wish to select just one color from the palette. Explore the variety of pigment within that color as you paint your leaves.
ADVANcED
For more experienced artists who are comfortable with a greater level of difficulty, consider letting your eye guide you to place the leaves and fronds, rather than relying on tracing. You may even wish to “plant” your palm fronds in a decorative pot! You may also want to mix your own palette of colors. For a tropical twist, add some blush, deep viridian, or a beautiful sky blue.
AS YOU BEGIN
With an HB pencil or a light green colored pencil and light source, lightly trace the center lines of each palm frond onto your watercolor paper. The lighter you trace, the easier it will be to erase any pencil lines you don’t paint over.
Once your center stems are drawn, use an HB pencil to lightly label each palm frond 1 through 5 as they are on the tracing sheet, so you can follow the painting instructions easier. Then you can erase the numbers when you’re all done!
Ready your Mason jar of water and prime your brush.
Create your painting palette with the paints and color recipes listed.
Prime your palette with water; use your brush to transfer water from the Mason jar to the palette.
Remember, you are mixing a sauce!
PALM FROND 1
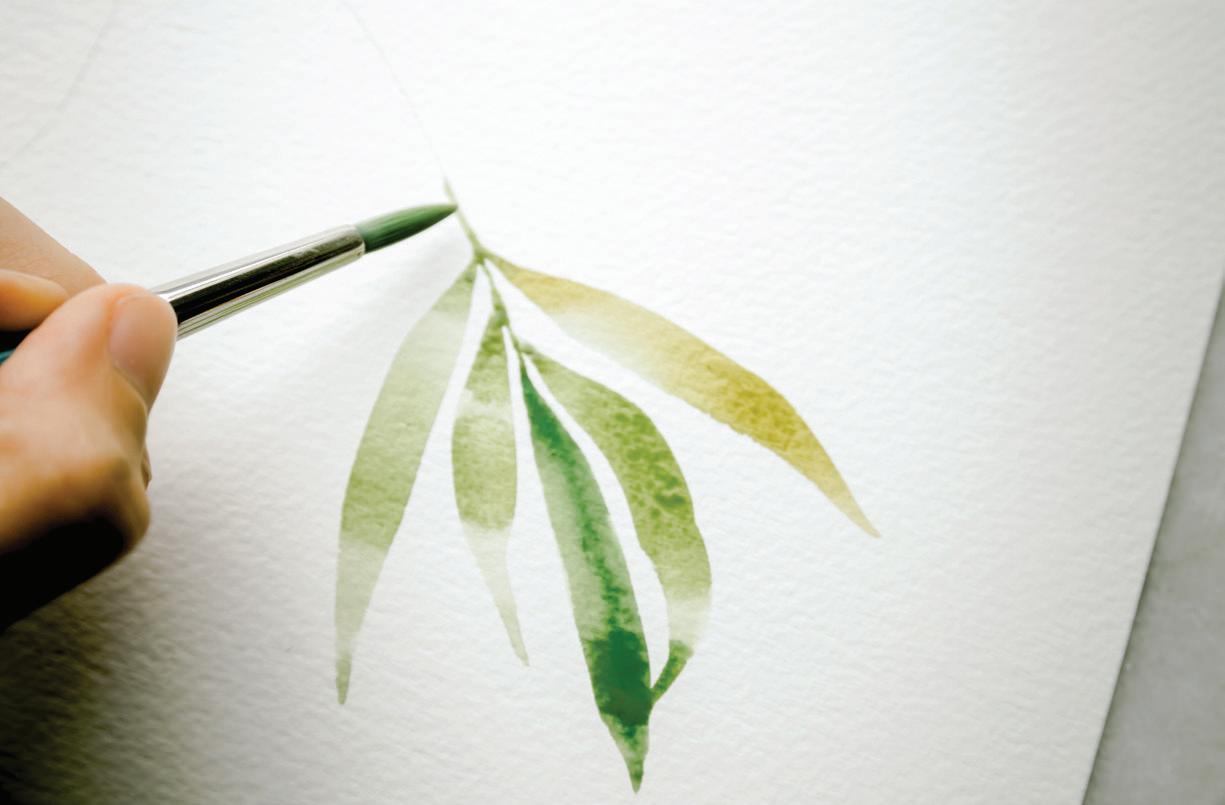
1Before you begin your PPP fronds, feel free to use scrap paper to test a few strokes and check the colors that are animated on your palette. Once you feel confident in your colors and form, it’s time to begin! We begin painting each frond at the end of the stem and work our way into the center of the plant. [A]
2Dip your brush into your water, then into the green wash mixture of your choice, and bring your brush to the paper. Using the PPP method, lightly press the point of your brush to the spot on the paper where the frond connects to the stem. Increase the pressure on your brush as you pull down, creating a long, slim center for the frond. Complete your continuous and fluid stroke by decreasing the pressure on your brush, just accessing the point of the brush, and then lift the brush from the paper. Voila—you have the first leaf on your first frond! As you paint each frond, don’t worry about painting the stems in just yet. We are going to paint each of the leaves on one frond, paint its stem, and then move onto the next frond. 3 Do you like the color, texture, and consistency of your leaf? If not, use practice paper and fill it with point-pressure-point frond leaves until you feel ready to make a mark on your project. If yes—let’s keep going!
4Add the next two leaves. In the picture, notice that these are a bit lighter in color than the first leaf. When I went back to my palette, I rubbed my brush in the mixture closer to the Yellow Ochre for a more yellow tone. I curved the third leaf slightly and ended the PPP motion of this one in the still-wet boundary of the first leaf. This provides a little interest without creating a blob, but still mimics real-life palm fronds. [B]
5Use your PPP motion to complete all of the leaves on Frond 1. Move back and forth on the Frond, alternating sides as you paint. I tend to move my paper and angle it toward me, so I can access PPP, always pulling down.
A B

BRUSH: Round 4 PAINT cONSISTENcY: You’ll pull paint out of the leaves to create the stem
C
STEM
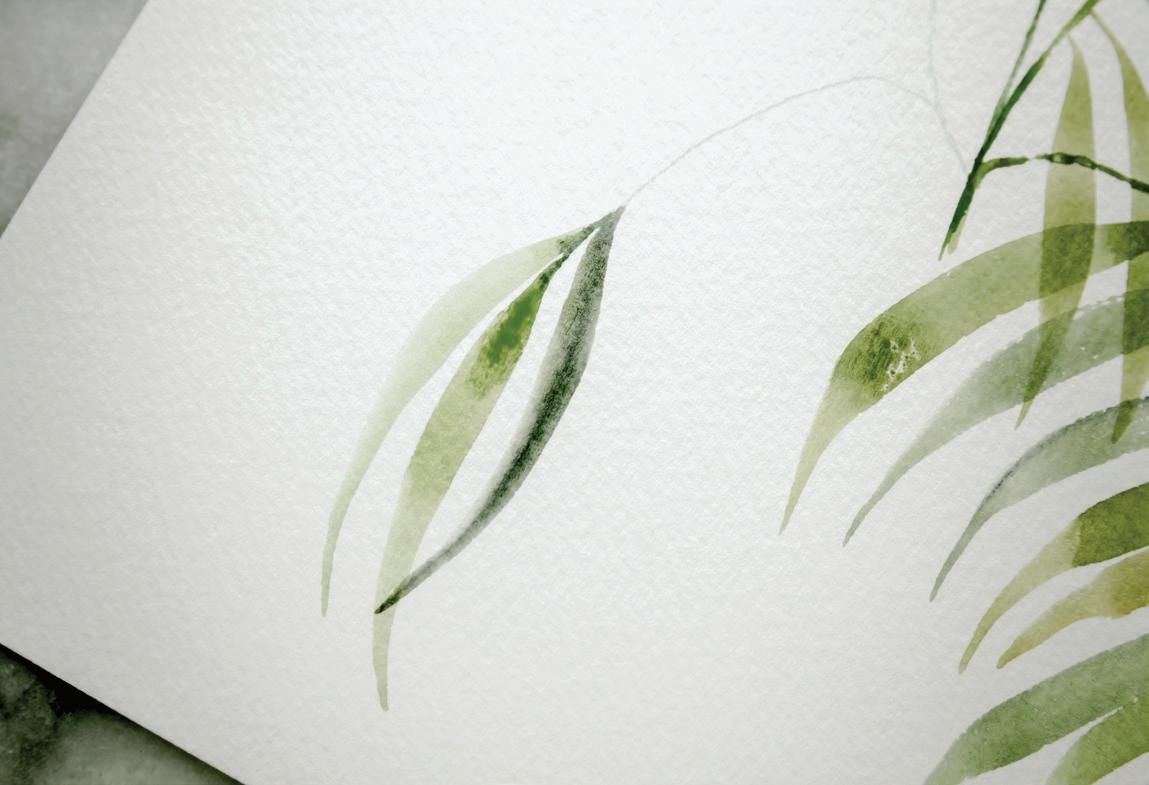
1To create a very thin stem, use very light pressure (accessing just the point of the brush) to lightly drag a bit of the wet/drying paint from the most recent leaves to connect them to the stem, and then to the surrounding leaves. I like to create a thin stem at this point, rather than wait until the very end. Since these palm fronds do not have as much variance in color, a stem painted at the end tends to show up more boldly. By slowly dragging a touch of pigment out of drying leaves, you continue the frond naturally down to the base. [c]
WATER c HE c K

Check to see if any excess water or biodomes are forming within your leaves. If so, lightly press the corner of a paper towel into your biodome to lightly “vacuum” up excess water. By ridding your leaf of this excess water, you ensure that the outside boundary lines will be smooth once dry. Another common problem at this point is “rough patches” where the paper breaks through and affects the shape and hard lines of your leaf. This is a sign of not enough water on the brush. Now, some people really enjoy this variance, but if you want a fuller, richer leaf shape, try soaking your brush in a Mason jar. Ensure the brush is primed and thoroughly soaked by pressing it from side to side (see page 22). If you use a toothier paper, like Arches, your blending will be better within the leaf boundaries, but you may need a bit more water to ensure smooth edges.
PALM FROND 2
1Reorient your paper as you begin to paint the tip of Frond 2. [A]
2Pause and assess. How do the colors of the first palm frond appear as they dry? If you want lighter colors, add more water. If you want bolder leaves, mix more paint into your “soy sauce with wasabi” mixture. (This is a good time to check that you have enough water remaining on the palette to fluidly paint another frond.) [B]
3Start from the tip of Frond 2 and begin to paint your leaves. [c]
4Just like on Frond 1, add a very light stem as you bring the leaves close to the center of the palm plant. [D] 5 As you add leaves, take care to keep white space between your leaves to avoid a leaf blob. By decreasing the length of your leaf with a shorter PPP motion, you can trick the eye into thinking that the leaf is shorter and thus farther away, or perhaps at a different angle. Because this is smaller and closer to the center of the plant, it makes the longer, larger leaves in the forefront of the painting “pop” and appear closer. This gives depth and perspective, adding visual interest. [E]
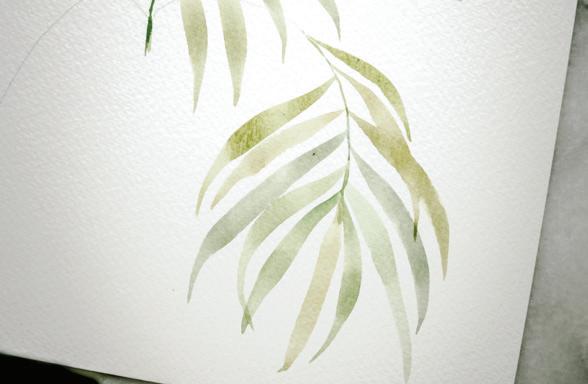
6Overlap a new wet wash of Frond 2 over the dry washed leaves of Frond 1. To tell if the leaves of Frond 1 are dry, lightly move the paper around and look for the shimmer and shine of a wet wash. If the leaves of Frond 1 are still shiny, make yourself some tea or stand up and stretch—be sure to let that first frond dry until there is no longer any shine before you paint another layer. Once dry, add the leaves of Frond 2 over the top of the leaves of Frond 1. One of the key characteristics of watercolor is translucence, so you will see the ghost of Frond 1 beneath Frond 2. Much like a real palm frond when the sun shines behind it, and you see the shadows of the background sister-leaves darkening the color of foreground leaves. [F]
7Note that the very end of Frond 2 is primarily stem. This is the connection to the base of the palm plant, where all of the fronds “grow” from. Keep this bit of stem open on Frond 2 as well. Remember, it will get crowded as you begin to add leaves on the other fronds.
A

F
D
B C E


PALM FROND 3
1As you can see, this frond is unlike the others; it is at an angle, with the leaves reaching up. I painted this frond to show a side view; you will only paint one side of the frond.
2Begin Frond 3 like the others, starting at the tip of the frond and working your way in. Since the leaves of Frond 3 overlap those of Frond 1 and you know they are dry, you can continue your PPP leaf creation almost all the way down the stem. 3 Note that the very end of Frond 3 is primarily stem too. It’s always easier to add extra leaves to a frond at the very end of the piece if it looks a little sparse, but you can’t take them away! Err on the safe side and give yourself plenty of stem to work with.
4By nature, palm fronds are somewhat sparse, so leave room for the “light” to come through.

BRUSH: Round 4 PAINT cONSISTENcY: 80w/20p “soy sauce with wasabi”
PALM FROND 4
1As Frond 3 dries, move to Frond 4. Since Frond 2 is already dry, you should have no problem overlapping leaves here. Begin Frond 4 just like the others, starting at the tip of the frond and working your way in. Notice that here, I used a bit more Payne’s Gray to add some variety to the leaves. You can add interest in your “green” paintings by working in analogous colors that complement the green.

PALM FROND 5
2As you work downward and place your final leaves, be mindful of your placement and color choices. These are your final PPP motions! Notice that the stem of Frond 5 connects into the stem of Frond 4; to emphasize this, I left a bit of white space at the connection point. [B]
3Once you’ve connected the final stem of Frond 5, you’re all done!
This project is an excellent exercise in patience, as it requires steady, fluid point-pressure-point strokes.
One could spend days (years, really!) perfecting this stroke and mastering how to achieve a balance of interesting white space.
Remember, each plant has its own definitive leaves and flowers, as well as distinctive spacing where the leaves connect to the stems and interact with surrounding parts.
Observe the positive and negative space in your favorite plant. Identify easily recognizable characteristics (red juicy fruits or long, lean leaves; clover-shaped flowers or spotted stems) and the plant’s white space.
The more you observe botanical forms in nature, the more true to form your watercolors will become.
A
B

WHY ART
SEEKING MOMENTS OF JOY
HOW DO YOU MOVE PAST FEAR AND INTO A PLAcE YOU cAN cREATE FREELY? For me, the answer is to look for joy in each day.
I’ve learned to savor and look forward to small moments of happiness throughout my day—a new iris bloom ruffling her petals, the way our white bedroom curtains sway in the afternoon breeze, dreamy and slow, the cool dirt around my toes as I water the garden at dusk. Milky tea brewed to perfection. Hearing the waters of the lake lap rhythmically at the shore. Small, gentle moments that fill me with peace, joy, and inspire me to be.
Painting feels like an almost decadent act, especially on busy days. Chores pile up and there are important tasks that must be done. But it is equally essential to seek joy amidst life’s endless requirements, to find ways to feed your soul. I like to look for those small moments of joy within the fabric of everyday life and fit them in where I can. I may step over baskets of laundry waiting to be folded or fail to sweep my kitchen floor as often as I should, but it’s worth it to me to make time for the small joy of watching wet colors swirl on my paper.
When we have eyes for the beauty surrounding us, we add something of value to our life that tends to break the spiral of fear, frustration and resistance. Finding joy in our everyday life begins a new cycle that inspires and beckons us to create—to express ourselves and share the beauty we are seeing and feeling.
These moments when I create space for beauty— for me, gardening and painting—are what make my days feel full and good. I experience quiet. Calm. Peace of mind. Reflection.
How do you experience joy? Joyful moments in our day are not superfluous; joy is what makes the moments of our life count. The drive toward joy is the drive toward life. — vincent van gogh


