
13 minute read
Analogous Colors


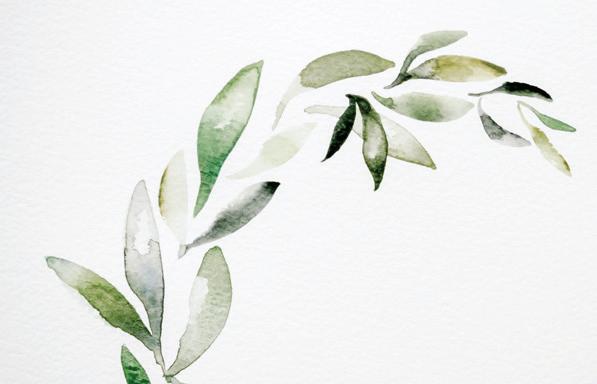
LOOSE LEAFY WREATH
ANALOGOUS COLORS
LESSON 7
lessons and are ready to start creating your botanical pieces. For the rest of the
lessons, I’ve included suggestions on how to make each lesson simpler OR a bit more challenging. Everyone comes to the table with different skill sets, so I encourage you to sit down, read through the lesson you are going to paint, and decide which level feels best for you. Whatever level you work at, I know that once you’ve completed the lessons one by one, in order, your skills and confidence will improve. I am so excited to see your progress, and the beautiful art you create!
We’ll start with one of my favorite botanicals—a wreath. Wreaths have become a way for me to relax and meditatively create without thinking too much. But, I remember that my first wreath took me over five hours to paint and was a source of much struggle and frustration. Now, I paint wreaths to warm up or calm down, and I often find myself returning to them as pieces of comfort. Be patient with yourself and try to enjoy the process. Practicing the techniques in this wreath will only help you watercolor more skillfully as you work through this book and beyond.
BEGINNER
Trace the circle and the leaf shapes on the “Leafy Wreath” worksheet (page 201). Tracing the entire leaf shape can be considered optional, and thought of as “training wheels” for your eyes to teach you about compositional placement. They help train your eye to find where to add leaves, in what direction they should face, how much white space to have between each leaf, and where to overlap leaves.
ADVANcED
Trace only the circle from the “Leafy Wreath” worksheet (page 201), which will become the vine you to which you add your painted leaves.
Challenge yourself with a new color scheme!
TOOLS
Round watercolor brushes, sizes 4 and 1
140-lb. watercolor paper HB pencil Traceable “Leafy Wreath” worksheet (page 201) Light source for tracing (a well-lit window or a light box) Tape (washi or drafting) Mason jar of water
PAINT PALETTE
PAYNE’S GRAY
cOLOR REcIPES
SAGE Viridian + Cerulean Blue + Yellow Ochre
PINE Viridian + Cerulean Blue + Yellow Ochre + Lemon Yellow
TEcHNIQUES
Point-pressure-point
Washes Wet-in-wet
TIPS FOR THIS PROJEcT
As you place your leaves on the center circle/ vine, don’t worry about painting the vine of the wreath and its connecting stems and branches until the end. Trace or paint your leaves around the penciled circle, and then we will add the stems connecting the leaves to the circle of the wreath at the end.
As you place your leaves, do a few leaves on one side of the wreath and then switch to the other side. By alternating sides as you add your leaves, you will create compositional balance.
Add a few leaves at a time, then pull back one or two feet from your work and observe. This will allow your eye to settle and find the right spot to add the next batch of leaves. Often, when we work close to the paper, it feels natural to just add a leaf in the next blank spot. It’s better to step back and see where the next leaf is actually needed. You will find aesthetic balance in your work if you continue to pull back and assess your next steps as you go.
AS YOU BEGIN
With your HB pencil and light source, lightly trace the forms you plan to use for this lesson onto your watercolor paper.
When you trace the circle of the wreath, feel free to close it into a circle, or leave an opening at the top, a bit off to one side, as I’ve done in the photos. This lightly traced circle will act as a guide for you. Pretend it’s a real vine of a plant that you’re adding leaves to as you create your wreath.
Once your center circle is lightly drawn, trace your leaf shapes, if you so choose.
Ready your Mason jar of water and prime your brush.
Create your painting palette with the paints and color recipes listed.
Prime your palette with water; use your brush to transfer water from the Mason jar to the palette.
Remember, you are mixing a sauce!
WATERCOLOR LEAVES
1Use your brush to bring clean water from your Mason jar to your palette and create your 80w/20p consistency for all of the green colors you will use for your piece. Keep in mind that you will need to continue to reanimate the colors on your palette as you go in order to maintain the movement and shine you want to transfer to your paper.
2Dip your brush in your Mason jar of water, then soak up your 80w/20p consistency of Sage and bring it to your watercolor paper. Start with a leaf near the middle of the circle—if the circle were a clock, I like to start at 8 o’clock. 3 Add your first leaf using the PPP method (see page 100). Begin at the outside point of the leaf and pull the shape down, increasing the pressure for the middle fullness of the leaf, and decreasing the pressure to create the slender stem. End your PPP leaf stem near the penciled circle line. You will eventually add a stem to attach the leaf to the circular vine. [A, B]
4Find another spot on the opposite side of your circle to add another leaf. By popping around the wreath using a similar wash color, all of the leaves in one area will not be the same green wash. This way, when the piece is complete, the eye will register the pattern of analogous colors as they move around the wreath, giving the piece balance and a rhythm that guides the eye around the wreath with color. [c]
5Remember, each leaf is its own boundary, its own tiny little painting. This is the dynamic stage when you are painting, as you need to make quick decisions for creating more interest and depth within your leaves. You can decide if you’d like to pick up a darker shade of paint and drop it into your leaf, to add a deeper pigment with the wet-in-wet method. Or, you can decide if you’d like to remove a bit of the paint by blotting with a paper towel to create a point of light on that leaf. You can also drop in a bead of clear wash water to create a little light point within your leaf boundary, and then use your paper towel to soak up that space using the waterdrop method (page 52).
D
A
B C


WAT c H YOUR WATER
Are your leaves flooding into biodomes? It can be tricky to find the right balance of water to paint for this piece. You want enough water to allow the paint to move on your paper within its wet boundary, but not SO much water that every leaf is threatening to overflow. And you don’t want to overuse your paper towel, which can give a bleached-out look in your final piece because you prevent the paint from fully settling into the wet boundary, losing a lot of your painting work. If you were to tip your paper, would all of your leaves flood out of their boundaries and head down the page as raindrops? Then you’re using just a touch too much water. Bravo for getting water onto your paper, but be aware that with smaller leaf boundaries, like the leaves on this wreath, using a little less water will give you the movement and shine without a biodome.
Both the adding and removing of pigment creates depth on each leaf boundary, and by mindfully giving each leaf its own character, you add to the richness of your final piece. [D]
6As you move around your wreath, you will use different colored washes from your green palette for the different leaves. You’ll see that I placed a darker leaf near my lighter-washed leaves. I am still using the same paint duo of green colors, but I have mixed in the deeper shade of Payne’s Gray on my palette. [E] 7 You also want your leaves to have generally the same shape but be different lengths and widths. This indicates a pattern to the eye and is aesthetically pleasing. Consistently shaped leaves indicate that it’s a wreath of olive tree branches or sage bush branches. Wreaths made up of different leaf shapes and colors can be very beautiful, too, and work best when you choose three or four shapes and repeat them throughout the circle.
8Avoid having all your leaves pointing up or all pointing down. If you happen to be observing a live branch, you’ll notice that there is a natural symmetry, but leaves move in the wind, grow in odd angles as they follow the sun, or are connected at different angles than their sister-leaves next to them. By angling your leaves differently around your wreath, you’re mimicking nature. Also, while observing a branch in nature, note that new growth is generally near the end of the vine. Use a Round 1 brush to create smaller leaves that echo the shapes of your larger leaves, using the same PPP method.
9As you paint around your wreath, continue to reorient your paper. You are not on a solid plane—you can move your paper upside down if you need to in order to best utilize the point-pressure-point method of pulling your brush down toward you. 10 It’s nice to leave interesting white space between leaves. Leaving smaller or larger white spaces allows you to give the eye a pause, or rest, between areas of color. Notice the two wreath examples shown here. One has large white spaces and fewer overall leaves, and the other is the opposite. Both are lovely, but different. [F, G]
11 Overlapping a few leaves here and there also imitates nature. To achieve this effect, make sure the base leaf boundary is completely dry and use the wet-on-dry method (page 53). Once you’re sure your first leaf is dry, painting a darker leaf over it will give you the natural overlapped look without any blending of boundaries. [H]
E
F G H

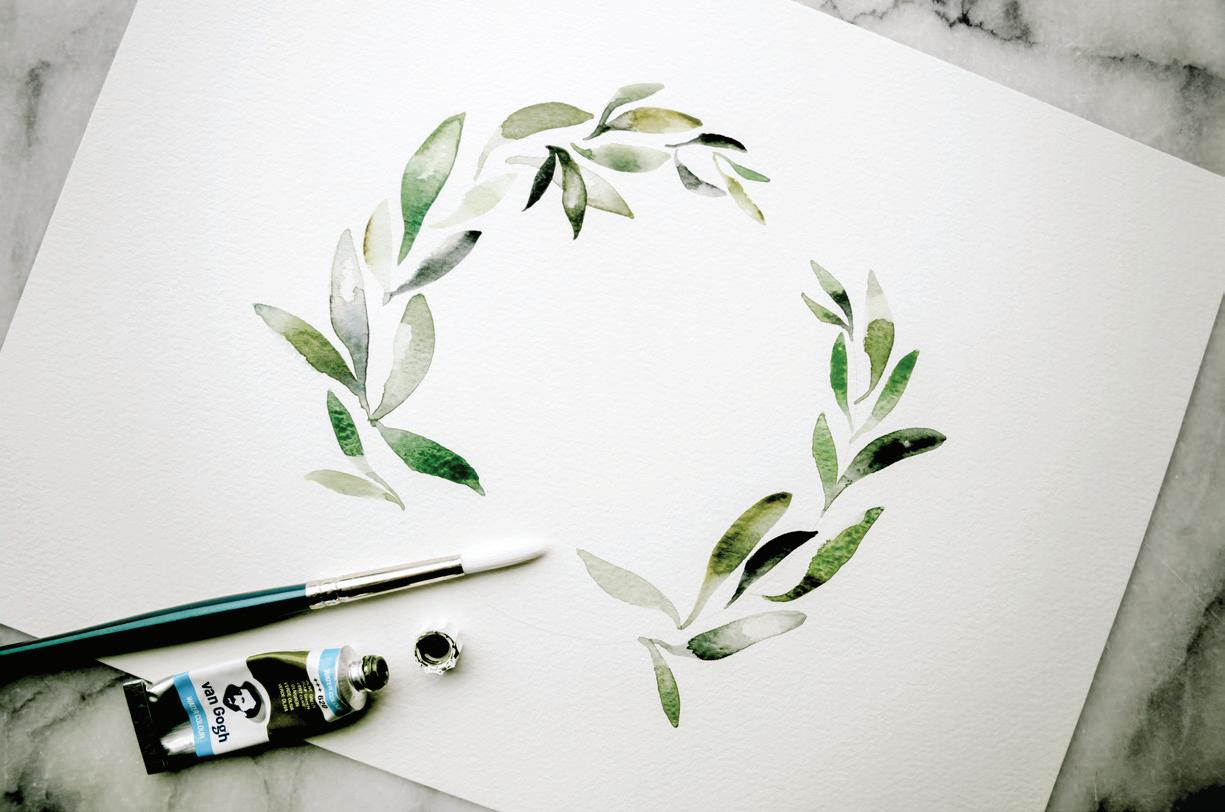


VINE & STEMS
B
1Once you’ve added all of your leaves, it’s time to paint your vine and attach your vine to your leaves with small stems. Use your Round 1 for this delicate task. Be aware of wet areas on your piece, as you don’t want to smudge your leaves with your hand as you work.
2Load up your Round 1 brush with just the 80w/20p mixture of Sage from your palette. If you find that the 80w/20p consistency is a bit too wild and uncontrolled for your taste on these small boundaries, bring more paint to your palette to take the consistency closer to a 50w/50p “heavy cream” mixture. Load your brush with your paint mixture and bring it to your watercolor paper. [A]
3Choose the bottom tip of one leaf and paint a thin line to gently connect it to a sister leaf or to the vine. Work slowly, rotating your paper as you connect leaves to stems to vine. In some places, the most natural way to paint the vine is by following your penciled circle. In other spots, leaves overlap the vine and you’ll need to use your eye to discern the next natural connection point. [B]
4Step back and enjoy your piece! Wait a few hours (I wait overnight) to let everything dry; then you can go in and erase any pencil lines.

SMOOTH & ROUGH EDGES
As you use your PPP method, sometimes the paper texture will come through in parts of the leaf, or along the edges. This is a sign that your brush is running out of your water-and-paint sauce. On some leaves, I enjoy this texture and I leave it. On others, I go back to my palette, pick up more of the 80w/20p mixture from my palette, and add a second wash to this original leaf boundary to smooth and blend hard edges.
To achieve smoother lines, add water. To make rougher, textured strokes, use less water.
Alternating between leaving some leaves with the paper texture showing and others with a smooth-edged wash is another way to add dimension to your painting.
A

FIXING BLOBS
Don’t panic if you overlap leaves and your perfect leaf lines begin to bleed, and your two lovely leaves start to turn into one giant blob. Grab your paper towel and try to soak up as much paint and water as you can from both leaves. Move on to other parts of your wreath until the leaf blob has dried.
Once the leaf blob is really dry (be sure this time!), use PPP to add another wash of watercolor to the base leaf. You will get your hard lines again. And once this leaf is really dry, go ahead and overlap with a darker wash. People often try to fix their mistakes while the problem area is still wet. This just leads to problem areas getting bigger and bigger, since water will continue to move the paint. The best thing to do is sop up as much paint and water from a mistake as possible and wait until things are completely dry to repaint.
WHY ART
CREATE, FOR THE JOY OF IT
AS GOOD AS IT MAY FEEL TO SELL A PIEcE OF YOUR WORK OR TO GET SOME solid “likes” on social media, I am here to tell you that the accolades and praise you receive for your work will not be enough to keep you creating. The worth of your art, and your journey as an artist, are not defined by other people’s opinion or measurement of it. If you love to create, there is a fountain deep inside of you that must flow wildly free. A wellspring, as I like to say, that needs to be expressed.
Think about the great artists throughout history. Many of them did not sell many pieces of work during their lifetime. Some were even ridiculed, yet they persisted because they simply had to create. They showed up for the day with brush in hand because the work demanded to be created. They were essentially a channel and had to bring something new into the world, acknowledged by others or not. Van Gogh, El Greco, Vermeer, and so many others—they each have a unique story to tell. So often, we allow busyness to consume us. We allow it to be our excuse to not create. Work harder, work more. Achieve. But in our efforts to do, what if we forget that we are meant to grow and evolve, to become? If you lose track of who you want to be . . . pause, breathe, and look at the path you are on. Create something for the joy of it—for the thrill of seeing something come from your hands, a shape or color that would not exist but for you. Paint for the joy of moving your paint with a brush. To pursue a passion, to feel a deeper purpose, to create rather than consume. This is why we paint. Pause in the busyness, and you will find time to make something the world needs from you, and simultaneously, you refuel your soul. This is a path worth traveling, even if it’s “just” something you do on the side. Work with your hands, open the channel of creativity, and let it flow. This is your journey. Embrace the learning process: the awkward shapes, wobbly lines, and the frustrating gaps between what your mind sees and what you paint. You are growing. You are creating.


