13 minute read
Layered Watercolor & Gouache


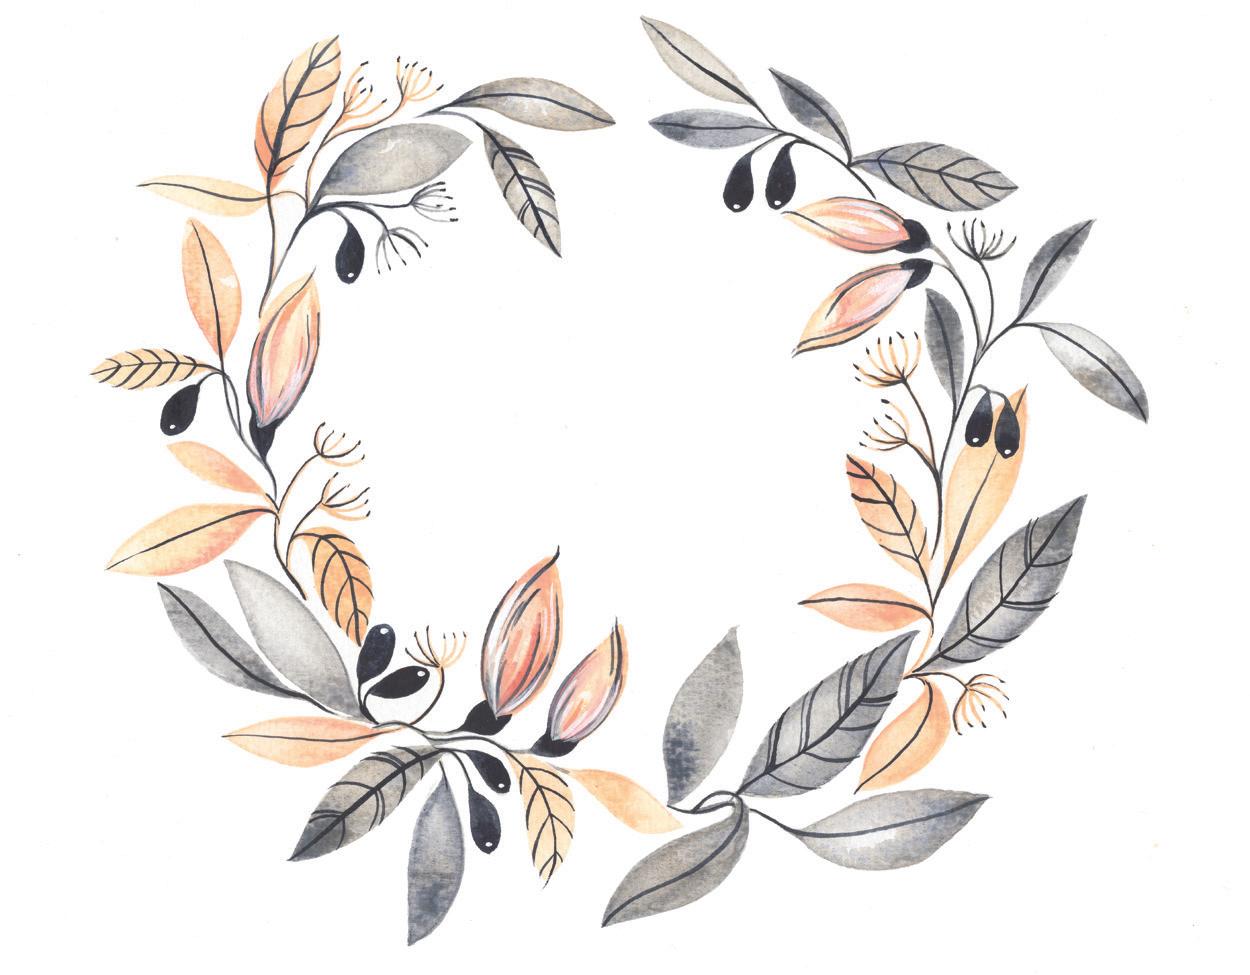
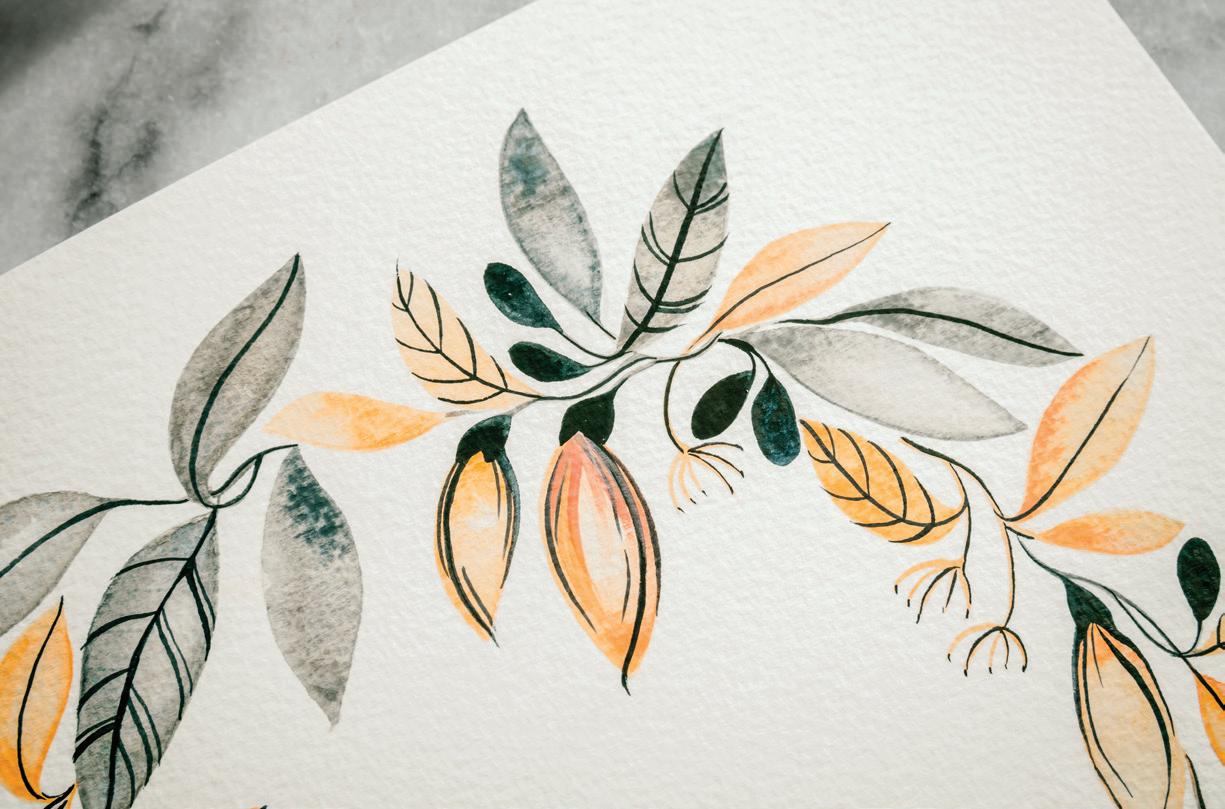
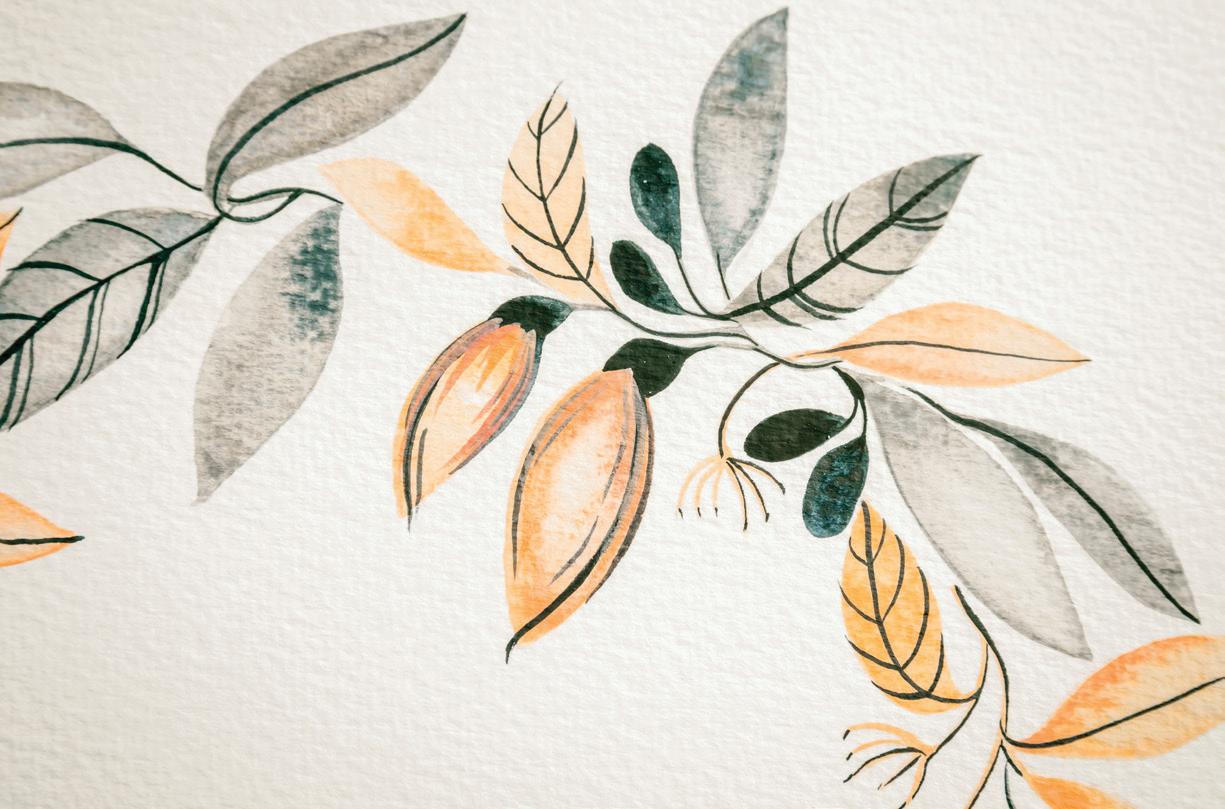
LAYERED WREATH
LAYERED WATERCOLOR & GOUACHE
LESSON 14
WREATHS ARE SOME OF MY FAVORITE PIECES TO PAINT IN
watercolor. They allow you to practice a few skills and techniques repeti-
tively and can teach you a lot about color harmony. Learning how to position and place pointed or rounded elements, balancing proportions of big and small, and mastering color combinations are all useful skills to have in your watercolor practice. Wreaths can be adapted into leafy half-circle boughs, used to frame another focal point or celebrate a festive season, used as a border on a page, or simply featured as the main attraction. At the end of this lesson, I share some of my favorite wreaths I’ve created.
TOOLS
Round watercolor brushes, sizes 4 and 1 (and 0, or smaller, if you have them) 140-lb. watercolor paper Colored pencils, in blush and gray Traceable “Layered Wreath” worksheet, beginner or advanced (see page 213) Light source for tracing (a well-lit window or a light box) Tape (washi or drafting) 2 Mason jars of water Paper towel Scrap paper
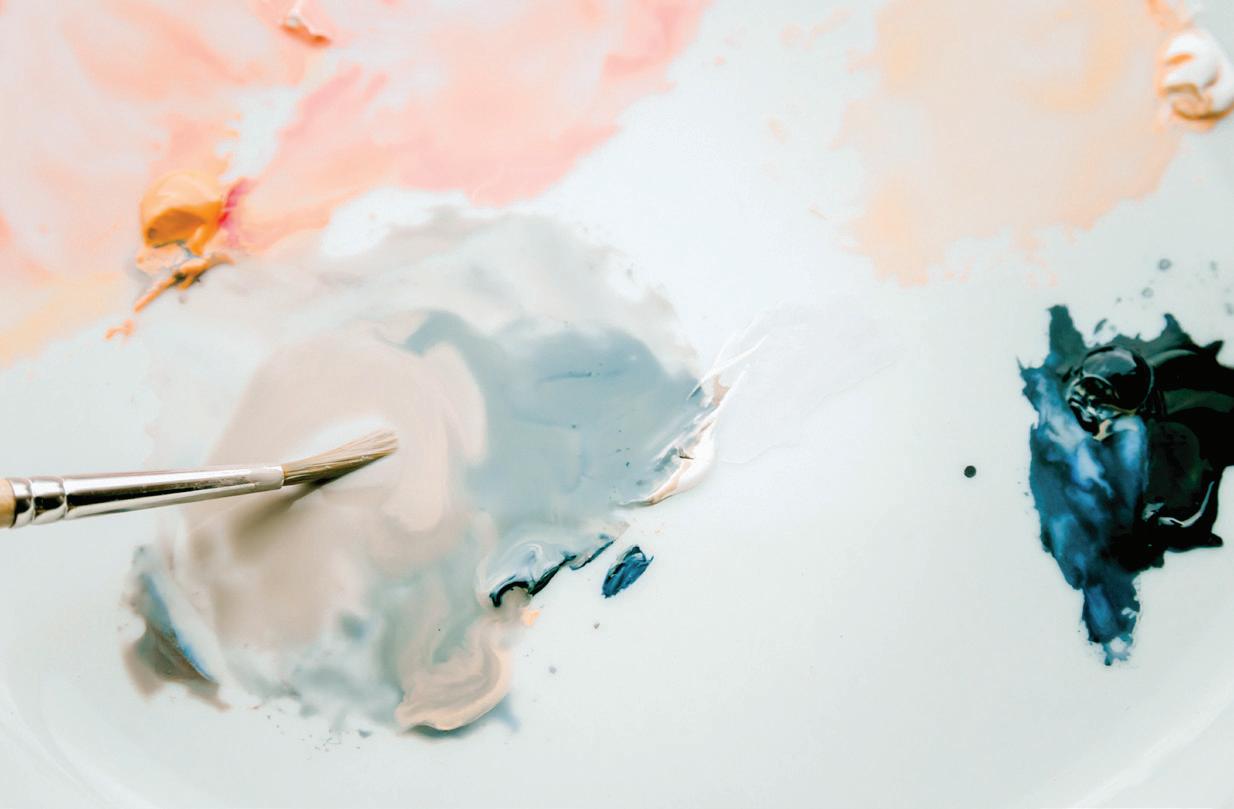
PAINT PALETTE
PAYNE’S GRAY
cHINESE WHITE OR DR. PH. MARTIN’S BLEEDPROOF WHITE PEAcH
c OLOR RE c IPES
DUSK Chinese White + Peach + Payne’s Gray
ROSE Chinese White + Peach + Rose Madder
BLUSH Crimson + Yellow Ochre + Peach
TE c HNIQUES
Fine-line ink work
Washes
Wet-in-wet Point-pressure-point
Blotting, waterdrop and paper towel
TIPS FOR THIS PROJE c T
Keep scrap paper nearby to test your colors as you work.
The wreath you painted in Lesson 7 was more of a loose-leaf watercolor style, where you didn’t worry about rough edges or perfectly smooth washes. This lesson encourages a more refined leaf, so you’ll smooth out rough edges and hone the details and coloring of each leaf.
When we use ink to create a boundary, we bring our paintbrush up to the edge of the ink to fill in the boundary. When we use colored pencils, as in this lesson, the lines are meant to be looser guidelines. I encourage you to paint over them— the coloring within the colored pencil line will dissolve into the paint, instead of forming a hard line.
Remember, all the changes of color gradation and points of light (created when you remove color from your boundary using your paper towel or your brush) need to be made while your wash is still wet.
AS YOU BEGIN
Tape your papers together to secure your watercolor paper to your tracing sheet. This way, you can move and reorient your paper while tracing without having to realign the marks every time.
Use a light source, such as a window or a light box, to view your traceable design through your watercolor paper as you trace.
Using your blush colored pencil, lightly trace the dashed lines on your Layered Wreath worksheet onto your watercolor paper. The lighter you trace them, the easier it will be to paint over them.
Then use your gray colored pencil to trace over the solid lines, again tracing very lightly—dark enough to see, but light enough to paint over.
BEGINNER
Feel free to trace a simpler version by leaving out the large floral buds.
ADVAN c ED
This is a wonderful time to design your own wreath. Botanical wreaths like this can be altered for every season, both in the foliage you choose to include and the color palette you select. Take a moment to observe the natural flora in your own corner of the world.
Depending on where you live, and how diverse the seasons are, you could find some very stunning inspiration in the leaves and flowers all around you.
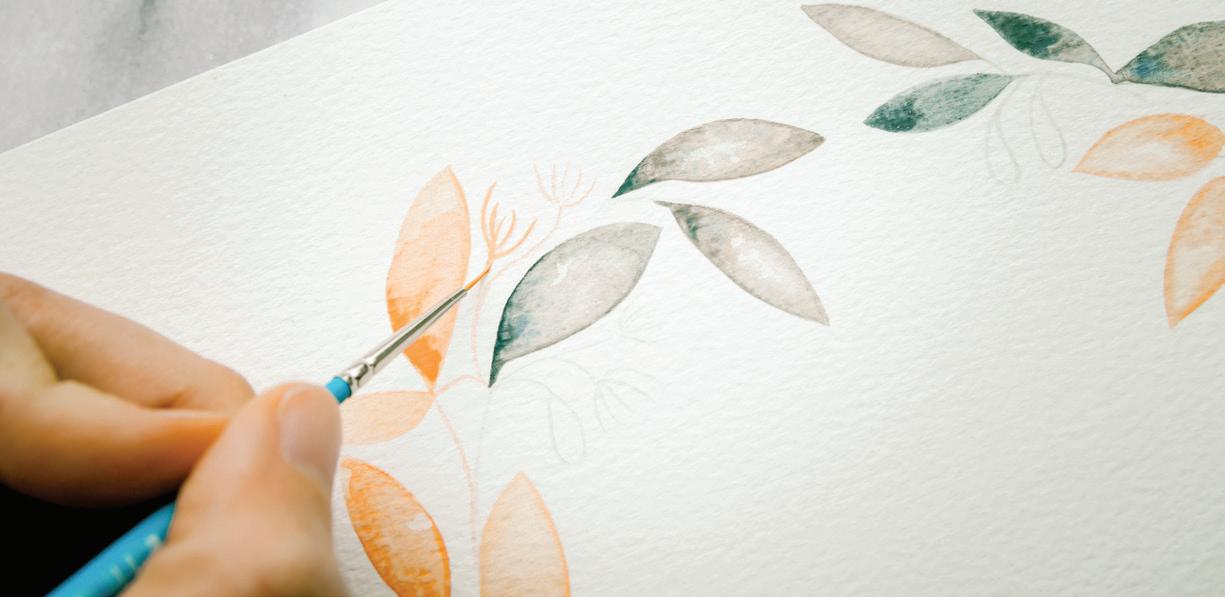
BRUSH: Round 4 PAINT cONSISTENcY: 50w/50p “heavy cream,” moving toward an 80w/20p consistency of “soy sauce with wasabi”
Prime your brush with water and use your brush to bring water from your Mason jar to your palette to create a 50w/50p consistency of your Blush and Rose color recipes.
POINT-PRESSURE-POINT BLUSH LEAVES & BUDS

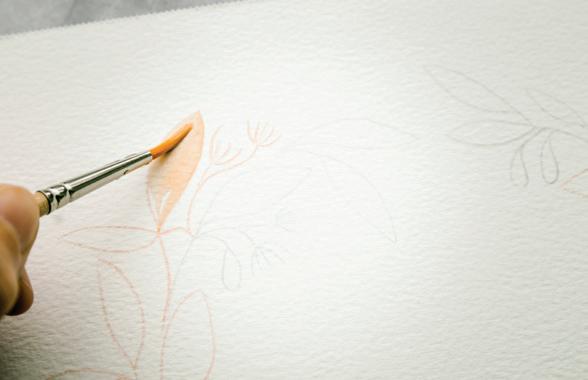
1Dip your brush in water and fill it with your 50w/50p consistency of Blush and bring it to your watercolor paper. Working from the top left, begin your PPP motion on your Blush shapes. (You will come back to paint the little wisps and stems, so just ignore these for now, as they require a smaller brush.) [A]
2Three or four fluid movements of PPP should cover each Blush leaf and bud. You should be able to make two PPP motions before needing to reload your brush. [B]
3After you fill in a boundary, dip your brush in your wash water and use the point of your brush to smooth the fine edges of the boundary while it’s still wet. [c]
4Continue to paint each Blush leaf and bud, following the same steps. [D] 5 As you work, paint a few, pause, and then make subtle changes to the coloring of each while they are still wet. You can pull color out of the center by dropping in water and then blotting with a paper towel. [E]
6You can also drop in a bit of the Rose color recipe to achieve a pinker tint, using the wet-in-wet technique. Use your brush to pick up the 50w/50p consistency of Rose and carefully drop it into an edge of a leaf or bud. [F] 7 Depending on how faintly you traced your colored pencil lines, they should be dissolving as you add character to each leaf and bud. If they are not dissolving, don’t worry too much. You can deal with them later. 8 Work your way around the wreath, continuing to rotate your paper, painting in all of your blush buds and leaves and adding color interest as you see fit.

D E
B F
A C


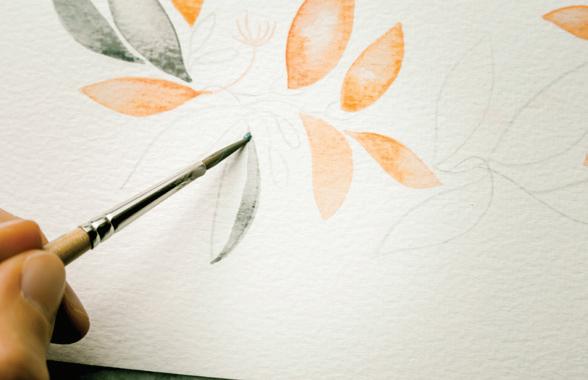
BRUSH: Round 4 PAINT cONSISTENcY: 50w/50p “heavy cream,” moving toward an 80w/20p consistency “soy sauce with wasabi”
Prime your brush with water and use your brush to bring water from your Mason jar to your palette to create a 50w/50p consistency of your Dusk color recipe and your Payne’s Gray paint.
POINT-PRESSURE-POINT DUSK LEAVES
1Dip your brush in your 50w/50p consistency of Dusk and bring your loaded brush to your watercolor paper. Begin working in the top left, where your wreath is the driest, and start your PPP motion on your Dusk shapes. Ignore the little wisps, berries, and stems for now. [A] 2 Three or four fluid movements of PPP should cover each Dusk
leaf. [B, c, D]
3By dipping your brush into your water jar and using the point of your brush with just the tiniest bit of wetness, ensure the edges are smooth. 4 As you work, paint a few, pause, and then make subtle changes to the coloring of each while they are still wet. You can pull color out of the center by dropping in water and then blotting with a paper towel. [E]
5You can also drop in a bit of Payne’s Gray using the wet-inwet technique. Use your brush to pick up the 50w/50p consistency of Payne’s Gray and carefully drop it into the corners of a leaf to give it a deeper tint. You can also use the damp-brush technique to sweep the color away from the center. [F]
A
D


B C E F

BRUSH: Round 1 (or smaller, if you have it) PAINT cONSISTENcY: 50w/50p “heavy cream,” moving toward 10w/90p “mustard”
Now it’s time to paint the fine lines of the wisps and the stems and attach your encircling wreath vine to your leaves with small stems. You’ll use your Round 1 (or smaller!) brush for this delicate task. Be aware of wet areas on your piece, as you don’t want to smudge your leaves with your hand as you move around your page.
You’ll use your 50w/50p consistency of Dusk and Blush from your palette, as you want very thin lines for the most control.
FINE LINES OF WISPS, STEMS & VINE
1Fill up your brush with your Dusk consistency and bring it to your watercolor paper. Begin in the top left again and, with the lightest pressure, gently paint in the first wisp and connect it to the vine with the thinnest of lines. Artistically alternate between Dusk and Blush as you paint in the wisps and connect stems to the vine. [A]
2Work slowly, rotating your paper as you connect leaves to stems to vine. In some places, the most natural way to paint the vine is by following your pencil-traced circle. [B] 3 In other spots, leaves overlap the center vine. Jump over these and allow your eye to dictate the next connection point.

4Often, the center circle becomes a wisp, so follow the natural course, delicately and slowly painting the thin tentacles that make up your wisps.
A
B
BRUSH: Round 1 (or smaller)
Now it’s time to add your Payne’s Gray accents to the leaves, berries, and flower buds. A Round 1 brush will do the trick, but if you have a smaller size, like a 0 or a 5/0, use it! Smaller brushes have fewer bristles, and therefore soak up less water, allowing for more control.
WET-ON-DRY LAYERING
1Prime your brush in water and use your brush to bring water to your palette to create your 10w/90p consistency of Payne’s Gray. You do not need to add much water for this task, as you want very thin lines and more control with your paint.
2Some leaves can just have a center line, and others can have a center line plus more down the halves. [A] 3 While you’re detailing your leaves, you can go ahead and add the extra tips to your wisps and highlight some of your vine stems.
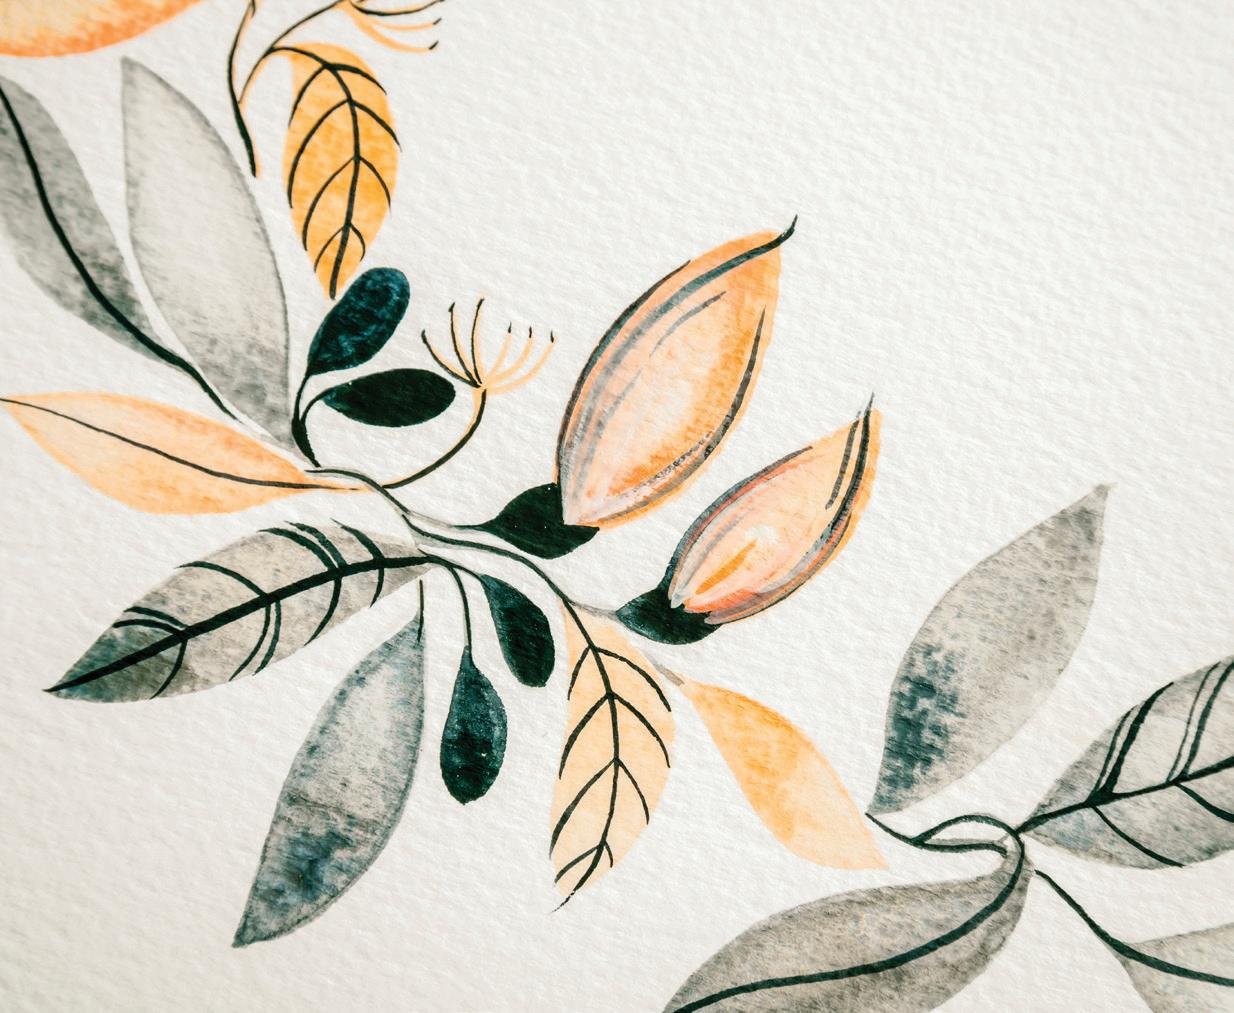
4To complete your berries, dip your Round 1 in your Mason jar and pick up your 10w/90p “mustard” consistency of Payne’s Gray. We want these to appear deep and solid in color, so this thicker consistency is your magic sauce. 5 Paint several lines of varying lengths of Payne’s Gray on your buds as well. Notice that these lines flow at a slight curve, which seems to suggest that the bud is swollen in the center, about to open in bloom. The curved sweeping lines help suggest movement and the promise of a new flower! For the best result, turn your paper upside down, and pull your paint down from the stem, through the bud, and lift your brush as the line leaves the edges of the flower. The paintbrush strokes will have a more natural look this way. [B] 6 Dip your brush in your wash water and bring water to your palette to create a 10w/90p consistency of your Rose, Peach, and White.
7Using the same upside-down orientation and curved stroke, add both thicker and thin alternating lines of Rose, Peach, and White to give each bloom its own unique look. Use your Dr. Ph. Martin’s Bleedproof White for the bolder white lines or Chinese White for the more blended white look.
A
continues on next page

B

8I suggest adding the white accents last, as they provide the most “pop” for your piece. [c–F]
9Keep in mind that overusing Chinese White can begin to muddy up all of your lines, blending the defined Payne’s Gray lines into your peach tones. If this happens, use the waterdrop blotting technique to bring clear water to your muddy colors, use your brush to scrub the area lightly, and blot with your paper towel to soak up the water and paint. [G]
10 Then, once the boundary is dry, repaint your wet-on-dry lines as needed.
C
DETAIL WORK
As you prepare to add wet-on-dry layering as detail lines to your piece, consider what patterns you would like to create on your leaves. Do you prefer those lines to be straight or curved? Angle toward the points of the leaves, or head straight to the edges?
E F

D G

WHY ART
MINDFULNESS WITH WATERCOLOR
EXTENSIVELY EXPLORED AND RESEARcHED, THE DEFInition of Mindfulness may include paying attention, living in the present moment, and finding contentment in a nonjudgmental awareness of yourself and your environment.
While we can practice mindfulness in a myriad of ways (gardening, yoga, meditation, dancing, and more) it is my watercolor practice that has taught me—and continues to reveal to me—the benefits of slowing down and being mindful. The rhythmic, repetitive motions are comforting, therapeutic even, and the required concentration evokes a feeling of calm. As I paint, worries tend to melt away as I focus solely on the task in front of me. The opposite of multitasking, this unique kind of focus can even reduce stress and anxiety. Perhaps I’m biased, but I believe in the magic of painting. When my paintbrush moves just right and creates a beautiful image on the paper, it is as though I grab hold of a dream and bring it to life. When the paint flows and my hands create things beyond what my mind can imagine, it’s as though I can make time stand still. When I’m fully engaged and present in my artwork, painting can whisk me away into a creative space that is all my own.
With any endeavor, strength develops through repeated practice. If you regularly practice this type of calm focus on a single task, you will create a habit of peacefulness. You can rewire your brain through patterns of mindful activity. Ask yourself, “What do I want to strengthen in my life?”
Of course, how you practice makes a difference, too. As you learn to paint—or to learn any new skill—you must give yourself grace. When practiced, lines and shapes that present a challenge today will feel fluid and natural in a month. Learn with intention; be kind to yourself and embrace the ups and downs in your journey. Celebrate that you are on the path of a lifelong learner, using your means and abilities to acquire new skills and knowledge. Rejoice in stretching your creative muscles to see the world in a new way. Delight in the sense of satisfaction that comes with each new technique or completed lesson. Grant your spirit love, care, and encouragement in this new journey.
What a gift to be able to experience the world through new eyes with watercolor, and in turn become alive to new sensations and experiences. You’re on your way to becoming an artist—and a happier, more grounded person, too, as you experience the profound effects of mindfulness in art. Pretty cool, right?


