16 minute read
Watercolor, Ink & Gouache


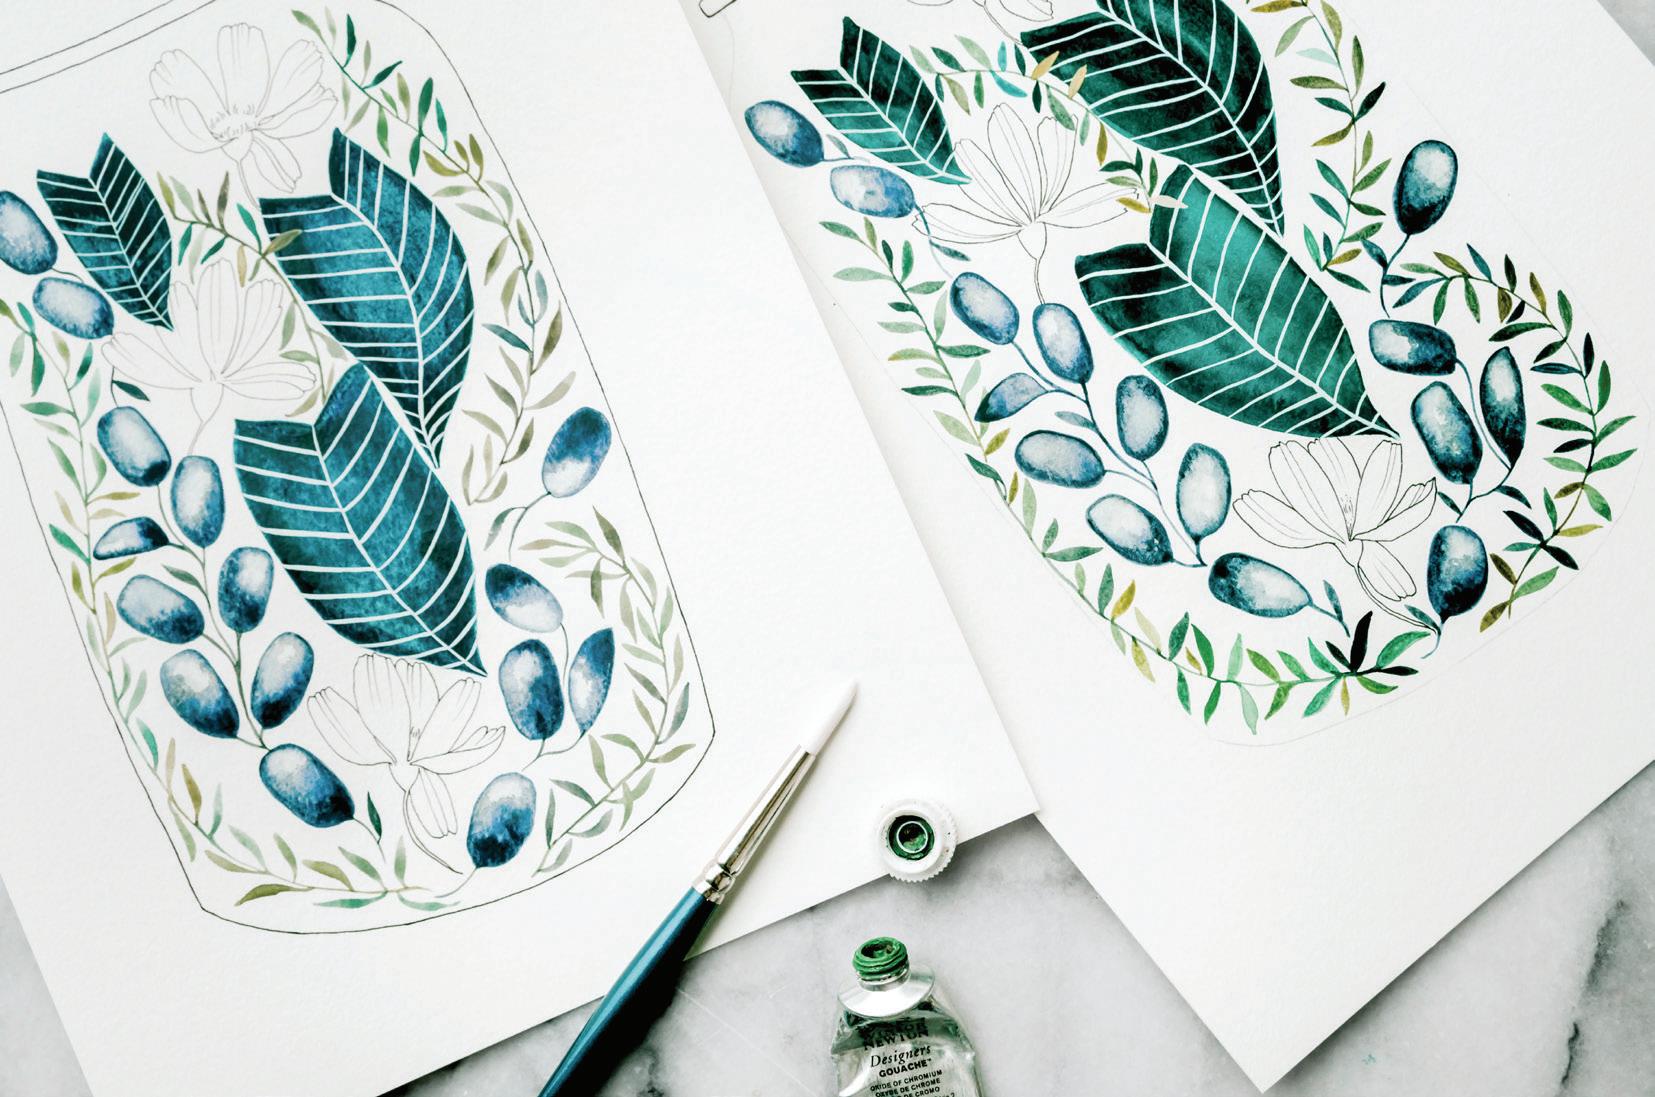
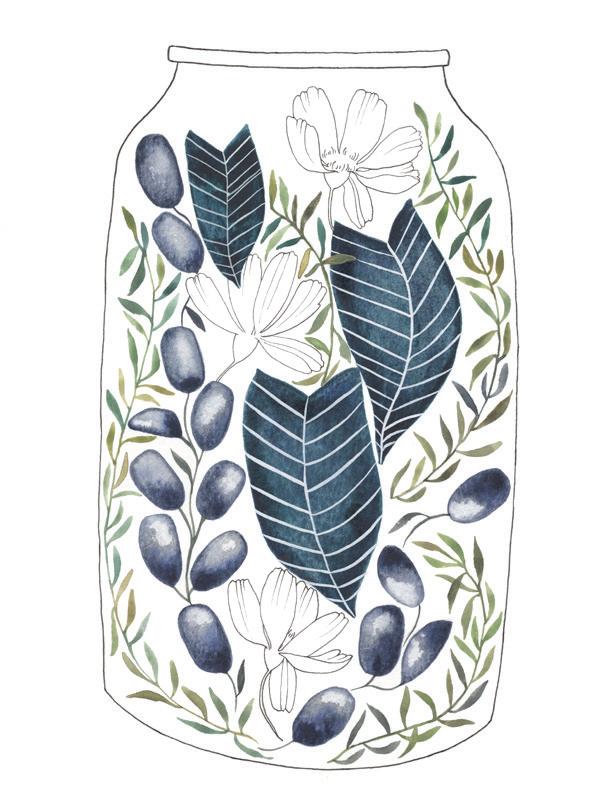
TROPICAL TERRARIUM
WATERCOLOR, INK & GOUACHE
LESSON 13
THIS LESSON COMBINES ALL OF THE WATERCOLOR SKILLS WE HAVE
learned so far, and incorporates more fine ink lines with the walls of the terrarium
and your delicate cosmos flowers. And we are mixing it up by adding another layer of skills to our piece—with gouache! Those bright lines on the dark leaves are gouache, and we are going to break this piece down step by step. Every lesson has been building your skill set, setting you up to combine these mediums in a wonderful culmination of this piece, the Tropical Terrarium.
TOOLS
Round watercolor brushes, sizes 1 and 4 (and smaller fine-liners if you have them: 0, 00, 5/0, 10/0)
140-lb. watercolor paper HB pencil Micron pens, sizes 005 and 05 or 03 Traceable “Tropical Terrarium” worksheet (page 211) Tape (washi or drafting) Light source for tracing (a well-lit window or a light box) Artgum Eraser Paper towel Scrap paper 2 Mason jars of water
PAINT PALETTE
cHINESE WHITE OR DR. PH. MARTIN’S BLEEDPROOF WHITE PAYNE’S GRAY
YELLOW OcHRE VIRIDIAN
c OLOR RE c IPES
MONSTERA Viridian + Payne’s Gray
PINE Viridian + Cerulean Blue + Yellow Ochre + Lemon Yellow
TE c HNIQUES
Fine-line ink work Wet-in-wet
Washes Blotting, waterdrop and paper towel
TIPS FOR THIS PROJE c T
As you trace and paint, remember that you are not on a solid plane. Continually shifting the orientation of your piece will allow you to access different angles and help keep your marks sure and strong.
You will notice that the completed example has multiple lines on each of the large leaves, added on top of the watercolor, in gouache. I left these lines off of your traceable so you can create your own. Do more or do less—totally up to you! Keep a scrap paper nearby to test pen tips and watercolor brush marks, to ensure you make your marks in your desired size.
You will have the most control over your lines when you pull your pen or brush down toward you. Reorient your paper so you can continue to pull lines, marks, and strokes toward yourself.
PRO TIP
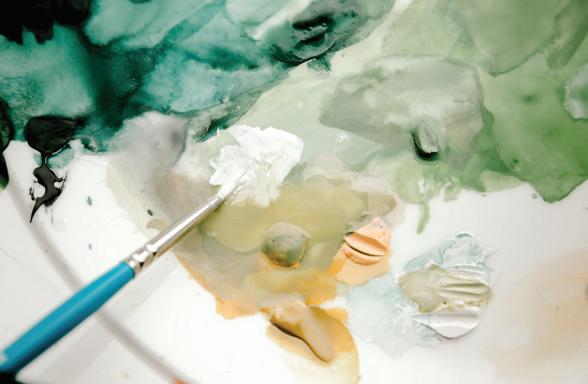
I will often work out of a dried palette in the right tones to create the very petite leafy vines like the ones in this lesson. I find that dried watercolor paint that has already blended with other colors, and then lightly reanimated, makes for some really interesting palettes. If you want to do this, you can squeeze out some of your colors the night before you start the project, and then allow them to completely dry overnight. By reanimating this mixture with just 10 percent water when you’re ready to paint, you will get some lovely, unique, varied color tones within your main pigmented colors.
BEGINNER
Feel free to trace a simpler version by leaving out the smaller leafy vines. Or, perhaps you might include them, but paint them in one color, rather than the analogous yellow, green, and blue colors suggested on the following pages.
ADVAN c ED
This is your opportunity to fill a terrarium with all of the natural flora (and fauna!) that you can imagine. Trace the terrarium lines and, using a pencil, draw out your own designed pattern of terrarium life, filled to the brim with your own choice of botanicals.
TERRARIUM JAR: PENCIL & INK
1Tape your papers together to secure your watercolor paper to your tracing sheet. This way, you can move and reorient your paper while tracing without having to realign the marks every time.
2Use a light source, such as a window or a light box, to view your traceable design through your watercolor paper as you trace.
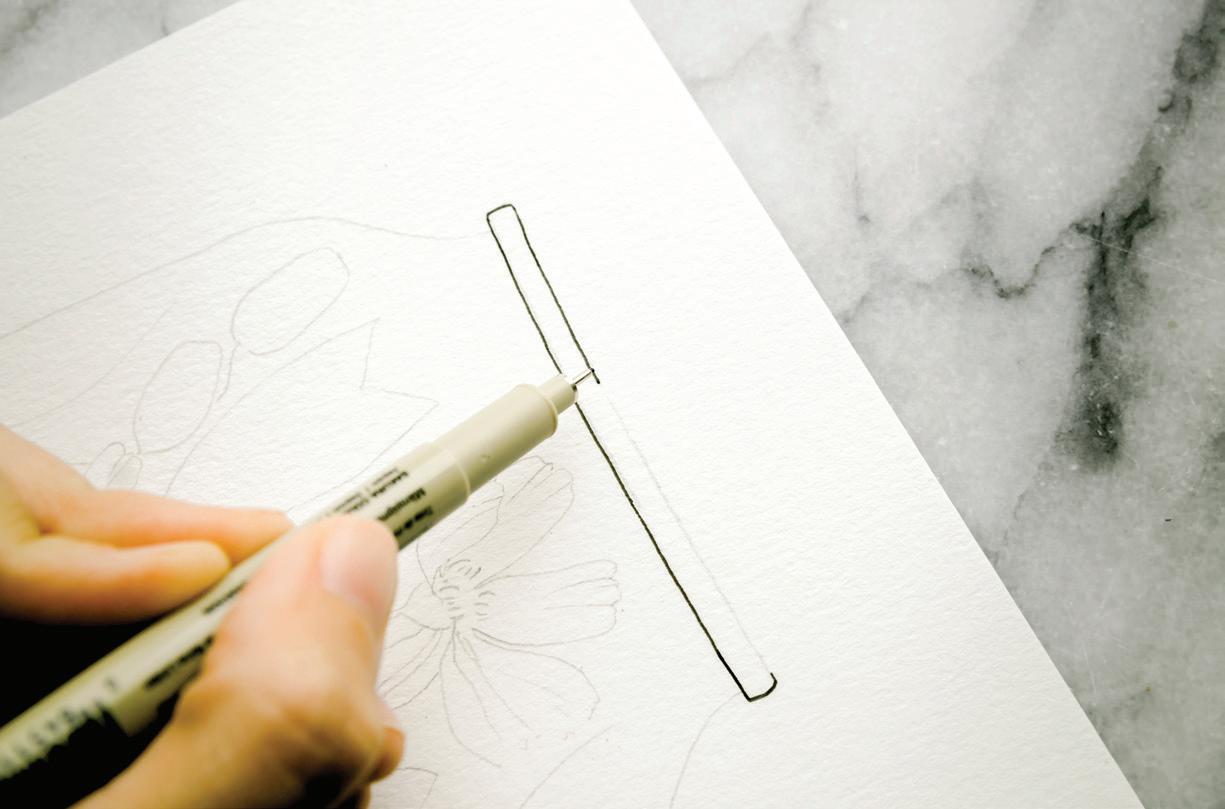
3Using your HB pencil, lightly trace the terrarium onto your watercolor paper. The lighter you trace, the easier it will be to erase the pencil lines once you ink and paint over them.
4After you trace the outline of the terrarium design in pencil, ink the outline of the terrarium using your Micron pen in size 03 or 05 for the thicker line of the outer terrarium and its upper lip. These terrarium lines are the easiest to mess up, so don’t wait until the end! If you can get those done first, even if you have a few false starts, without putting work into inking the other elements, you won’t be frustrated if you end up with a smudge or a wiggly line on the terrarium and have to start over.
5For these long black lines, I find it helpful to draw a line a few inches along the pencil line and stop. I pull down, reorienting the paper so I have the most control. Then, to continue the seamless line, I place the tip of the pen back within the already drawn line and continue the ink mark without the interruption of a new starting point. If you’re familiar with embroidery, it’s almost like creating a “running stitch” with your pen.
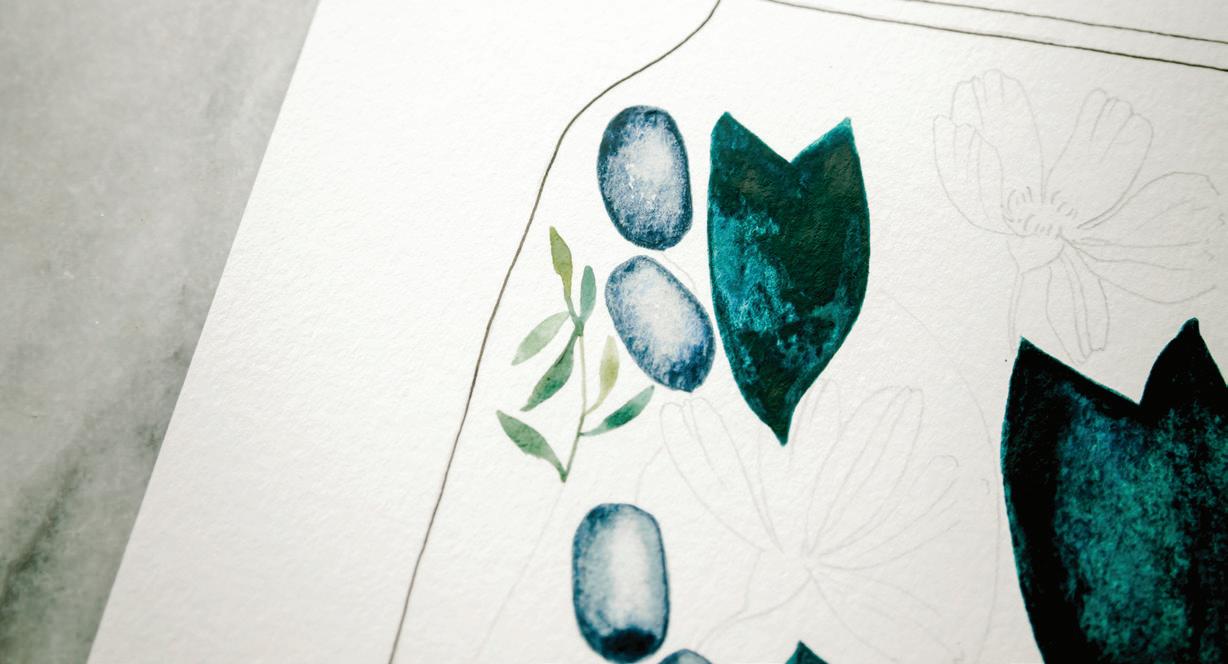
6Once you have inked solid lines for your terrarium, switch back to your HB pencil and continue to lightly trace all the inside details of your terrarium. Remember, you build up muscle memory by drawing shapes in repetition. If you trace all of the similar objects in a row, your drawing knowledge will naturally grow. [A,B]
7Although the cosmos flowers need to be inked as well, you won’t do this until the final step. It’s nice to keep the cosmos flower lines in pencil as you work so you can erase and reposition them if needed, depending on what happens with the paint on the leaves, which can shift or bleed a bit during the painting process. [c]

C
A B

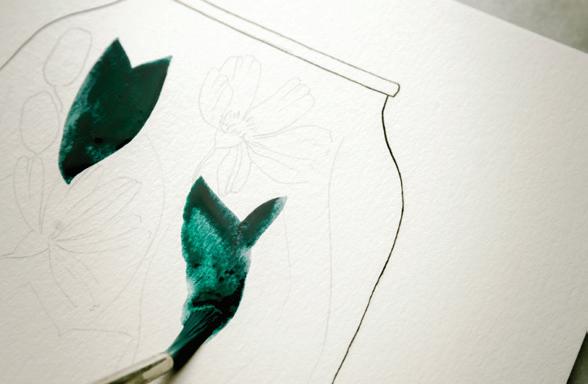
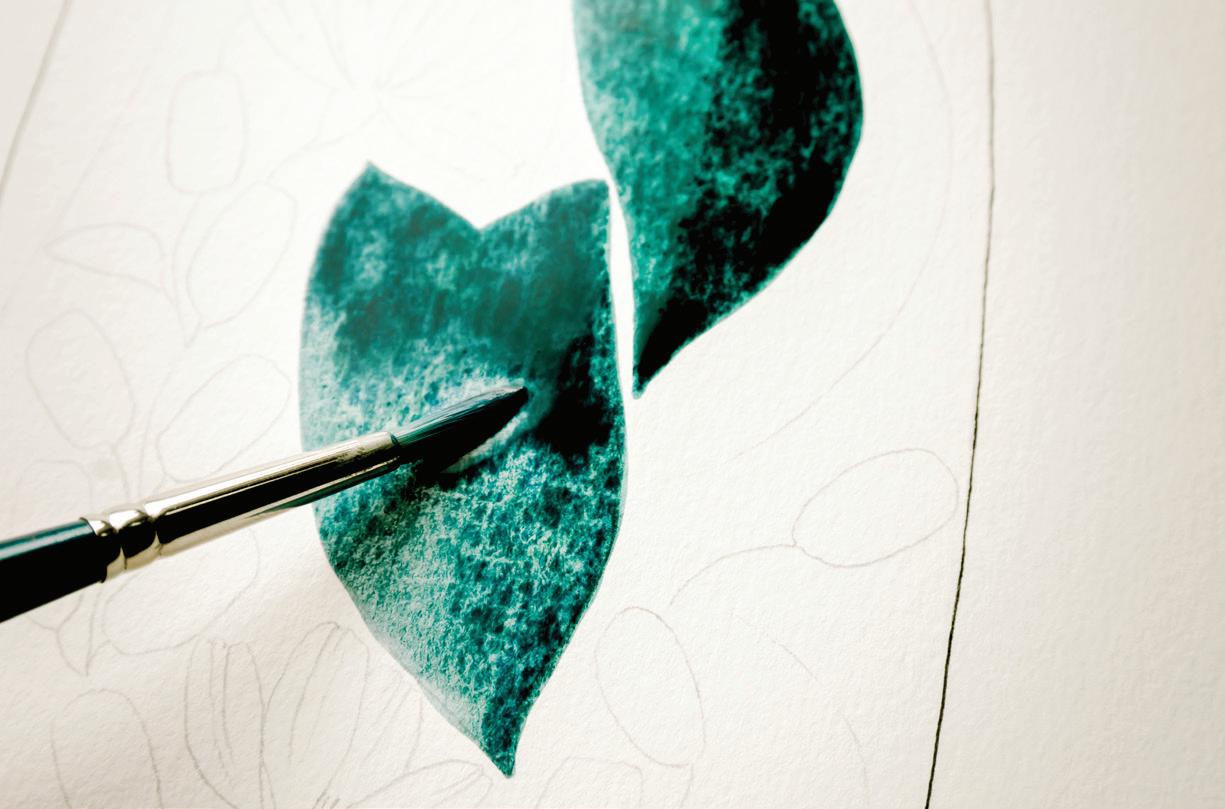
Prime your brush with water and use your brush to bring water from your Mason jar to your palette to create a 50w/50p consistency of Monstera. Because the boundaries of the leaves are not very large and you are after a deep green color, the 50w/50p consistency is the “magic sauce” for this step.
LARGE TROPICAL LEAVES
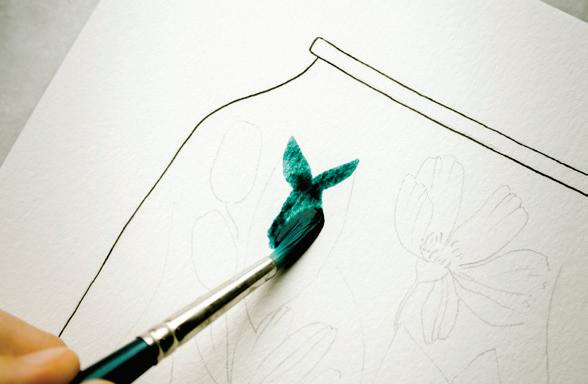
1Load your brush with the 50w/50p Monstera color mixture and bring it to your watercolor paper to begin painting the base wash of your tropical leaves. Start with the upper left leaf and work your way down the page, rotating your paper as needed so you can best access each leaf. You’re aiming to use enough water and paint to create an even, dark-toned wash with no hard lines. You want shine, but not a lot of movement. [A, B]
2You will be layering gouache on top of this base wash in the form of the fine white lines later, so you want the base leaf wash to be dark and smooth. If you want a darker color than you see on the first wash, remember that you can keep adding in more pigment while the base layer is still wet with the wet-in-wet method. Use your Round 1 brush to drop in a 10w/90p consistency of Viridian to get some really dark shadowing for the leaves. [c]
3Or, once your first wash layer is dry and not dark enough, since watercolor dries lighter, you can add another layer of color by glazing on another wash of Monstera. [D]
A B D
C

You’ll use the smaller Round 1 brush for these leaves, as the boundaries are much smaller and the smaller brush gives you more control. You’ll focus on painting all of the oblong leaves, and not worry about their stems until later.
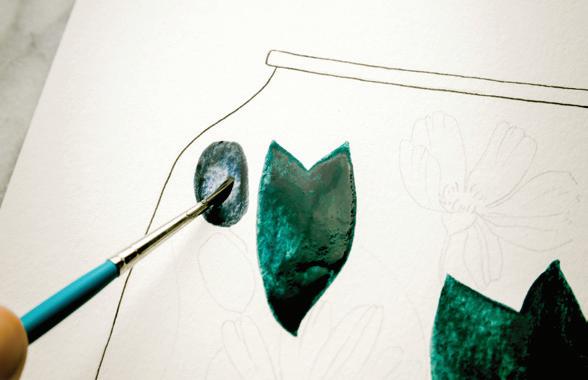
Prime your brush with water. Use your brush to bring water from your Mason jar over to your palette to create your 50w/50p consistency of Payne’s Gray.
OBLONG LEAVES
1Fill your brush with your Payne’s Gray mixture and bring it to your watercolor paper. With your first stroke, outline the shape and define the leaf boundary of your first oblong leaf. [A]
2For the second stroke, dip your brush in your Mason jar for water, pick up the 50w/50p consistency of Payne’s Gray from your palette, and fill in the leaf with a simple wash. This second stroke needs to be completed VERY quickly following the first—otherwise, the outline of your first stroke will dry and leave an “o” mark around your leaf. You want your leaves to have some sheen—enough water so there are no hard lines, but not so much water that you overfill the small leaf boundary edges. [B] 3 If your leaf appears to have the “o” outline effect, it’s either because you didn’t have enough water in your first and second strokes, or you needed to move a bit quicker between the strokes. If that happens, use your brush to bring more of your Payne’s Gray paint-and-water mixture over to the leaf and use a light scrubbing motion to rub out the hard boundary line, much like we did in Lesson 12 with the Plant Lady’s jeans (see page 149). [c]
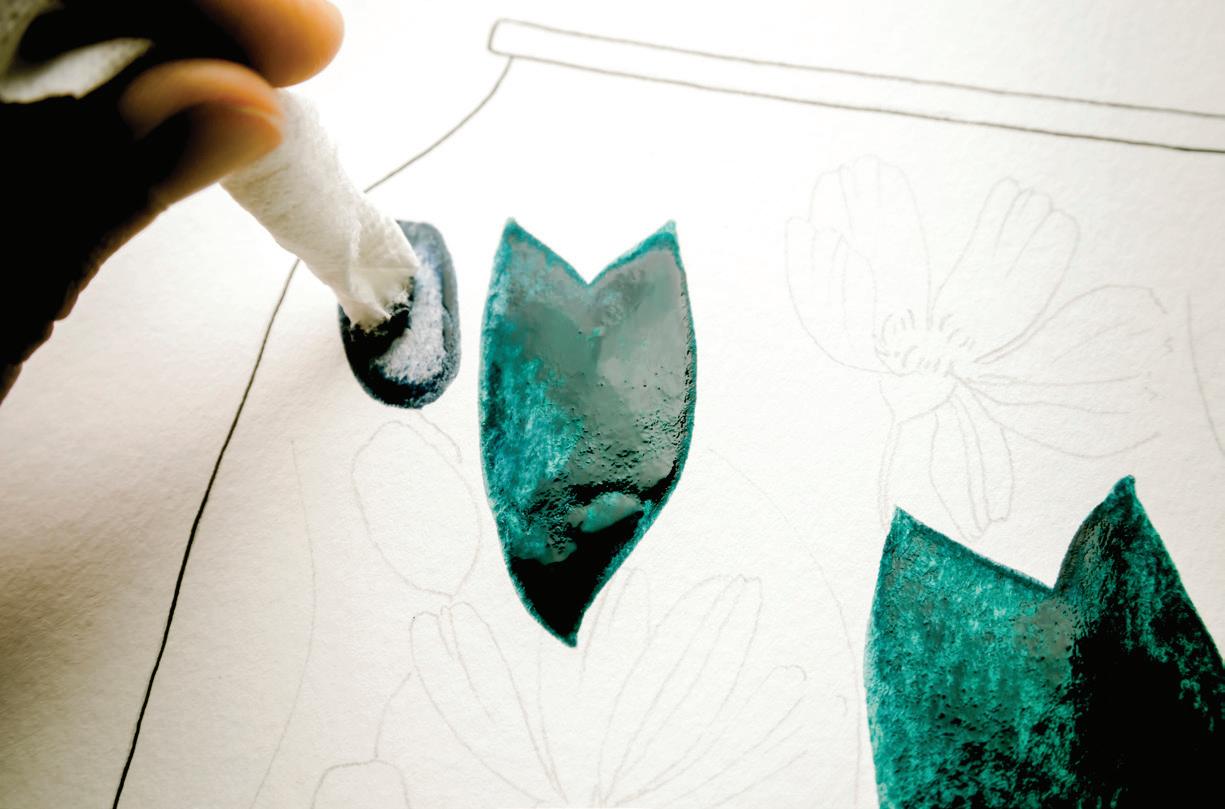
4After you have a nice wash in your little oblong leaf, use the waterdrop technique to drop in water and move the paint over with your brush, creating a highlighted spot. [D]
5To enhance the highlighted effect, use your paper towel to blot extra paint and water from that spot. This must be done while the base wash is still wet, in order to avoid any water blooms or hard lines within your small leaf boundary. [E]
6To increase the contrast in this small leaf, you can use the wetin-wet technique to add in a dark spot to contrast the light. Dip your brush in your Mason jar of water and bring more water to your palette to create an 80w/20p of Payne’s Gray. Load your brush with the mixture and
A
D

B C


bring it to your wet leaf wash, gently dropping in the darker paint on the left side of the leaf. Let the added paint blend in slowly and naturally. Use a small amount of clear water on your brush to smooth any hard edges between the light and dark contrasting spots on your leaf. [F]

7You’ve now painted one beautiful oblong leaf! Repeat this process to paint the rest of these leaves in the terrarium. I start in the upper left-hand corner and move down, rotating and reorienting my page to better suit what angle I need to access. I treat each of these leaves as an individual painting, spending time on every single one to make them unique. [G] 8 These steps may seem time intensive, but after you finish one leaf they are really quite simple! Here’s a short breakdown to reference as you go: Outline
Wash fill
Drop in water to move paint away from a highlight spot Paper-towel blot that highlighted area Wet-in-wet drop in a dark spot to contrast the light Smooth
Let it dry, and work on the next leaf!
9Remember to leave the stems for now. You will fill these in after you’ve painted the leafy vines. [H]
E
F G H


In this section you’ll focus on painting a few of the leaves, then the stem of those leaves, and then move to the next set of leaves.
LEAFY VINES
A
1Prime your brush with water and use your brush to bring water from your Mason jar to your palette to create a 10w/90p consistency of your Yellow Ochre and White watercolor, plus reanimated Pine. Reanimating your palette now, from the evening before when you poured the fresh wet tube paint, works wonderfully. But adding a few more paint dabs at this point so you can get a thicker consistency works well too. I put my paint dabs near one another, so the water I bring over ends up mixing the colors for some interesting combinations. [A] 2 You’re practically painting with only pigment. You want just enough water to smoothly guide the paint out of your brush and onto your paper. Too much water will flood the boundaries and turn your small leaves into blobs. I like to keep scrap paper near me at this point to ensure the consistency I’m bringing to my paper is the right ratio of water to paint.
3Dip your brush in the 10w/90p consistency of the color you want for your first leaf and use a point-pressure-point stroke to create your first leaf. Depending on your preference, you can start on the point of the leaf and work your way into the stem, with the last point being the connection to the stem, or vice versa.
4If you’ve traced the leaf indication lines onto your vines, it might be easiest to begin your first point at the stem, on the indicator line, and pull down while applying pressure to create the center of the leaf, and then move to the final light pressure point to finish the tip of the leaf.
5After you’ve painted one small leaf, change your paint color. Add variety to your small leafy vine by moving from light-toned colors to dark-toned colors and back again. If you stay within the analogous color palette, choosing three to four colors that are close to one another on the color wheel, the leafy vines will bring your piece together harmoniously at the end.
6Once you’ve painted a few small leaves, pick up the 10w/90p consistency of one of your leaf colors and bring it to your watercolor paper to paint a very fine stem line. Connect the leaves to one another and draw the painted line down to connect it to the next leaf you plan to paint. You can see in this picture that the stem changes in color as I draw the line down. This is because I am using the paint from the palette, and as it combines with the wet boundaries of the small leaves, the colors move within the wet boundary forming in the stem, changing color as I draw it down. [B]
7You can see here that I overlapped one of the leafy vine leaves with a large jungle leaf. Because the larger leaf below is dry, the small leaf will not blur or bleed into it. The white of the gouache shows up on top of the large leaf boundary. [c]
8Continue to paint your small leafy leaves using the PPP stroke, alternating colors, and adding to the stem line. I like to start in the upper left area of my painting and move down and around the terrarium, painting leafy leaves and using the lightest pressure to connect to their vines. [D]
B D
C

BRUSH: Round 1 (or thinner)
Now that you’ve painted all your leaves, it’s time to connect the stems to your Payne’s Gray oblong leaves. These stems will be very similar in consistency to the vines you just completed for your leafy vines.
Prime your brush in water and use your brush to bring water from your Mason jar to your palette to create a 10w/90pconsistency of Payne’s Gray.
FINE LINES & SMALL STEMS: WET-ON-DRY
1Using a Round 1, 0, 00, 5/0, or an even thinner brush, like a Round 10/0, pick up the 10w/90p consistency of Payne’s Gray and carefully paint along your pencil-drawn stem lines. If you find your paint is “catching” and not flowing as easily as you would like, try adding a tiny bit more water to your consistency on the palette. Likewise, if you find that water is pooling and your stems aren’t as thin as you’d like, add a bit more pigment to your palette consistency. This is a great time to have a scrap paper nearby so you can practice getting the exact thickness you want before bringing the paintbrush to your actual piece.
2Once you’ve painted all of your Payne’s Gray stems, you’re ready to move to your thin white lines on your jungle leaves.
3Prime your Round 1 or 10/0 brush in water and use your brush to bring water from your Mason jar to your palette to create a 10w/90p consistency of White. You can use Chinese White; however, if you want the opaquest, brightest, most vivid white, stick with Dr. Ph. Martin’s Bleedproof White. Load your brush with your 10w/90p consistency of White and bring it to your watercolor paper.
4Using light pressure, paint a line right down the middle of the first tropical leaf. From here, draw your lines from this middle line out, refilling your brush as needed. You should be able to make two to three thin white lines before needing to reload your brush. [A]
5Move slowly. Continue to pull back from your work, ensuring that you like the thickness and the placement of your white lines. If you decide they are too thick, or perhaps too close together, never fear. Just rewet the entire leaf boundary and use a paper towel to blot out the white (a bit of the green will come up too). Once the leaf boundary is dry, you can repaint the whole leaf to get it to the desired green color again, and then you are ready to try your white lines again once the area is completely dry. [B]
A
INKING THE c OSMOS
1Hooray—you’re almost done with your newest masterpiece! All that’s left are the very fine lines of the three cosmos flowers.
2Use a Micron with a 005 or 01 tip to make your flower lines thin and delicate, contrasting nicely with the thicker outline of the terrarium jar. Before you mark your final piece with your pen, practice on your scrap paper. When you feel confident about making fine lines, proceed. [c]
3Once all of your lines are inked and painted, the last step is erasing any unwanted remaining pencil lines. Wait until your piece is completely dry (ideally twenty-four hours) before running the eraser over your piece.
B C


