19 minute read
Watercolor & Ink


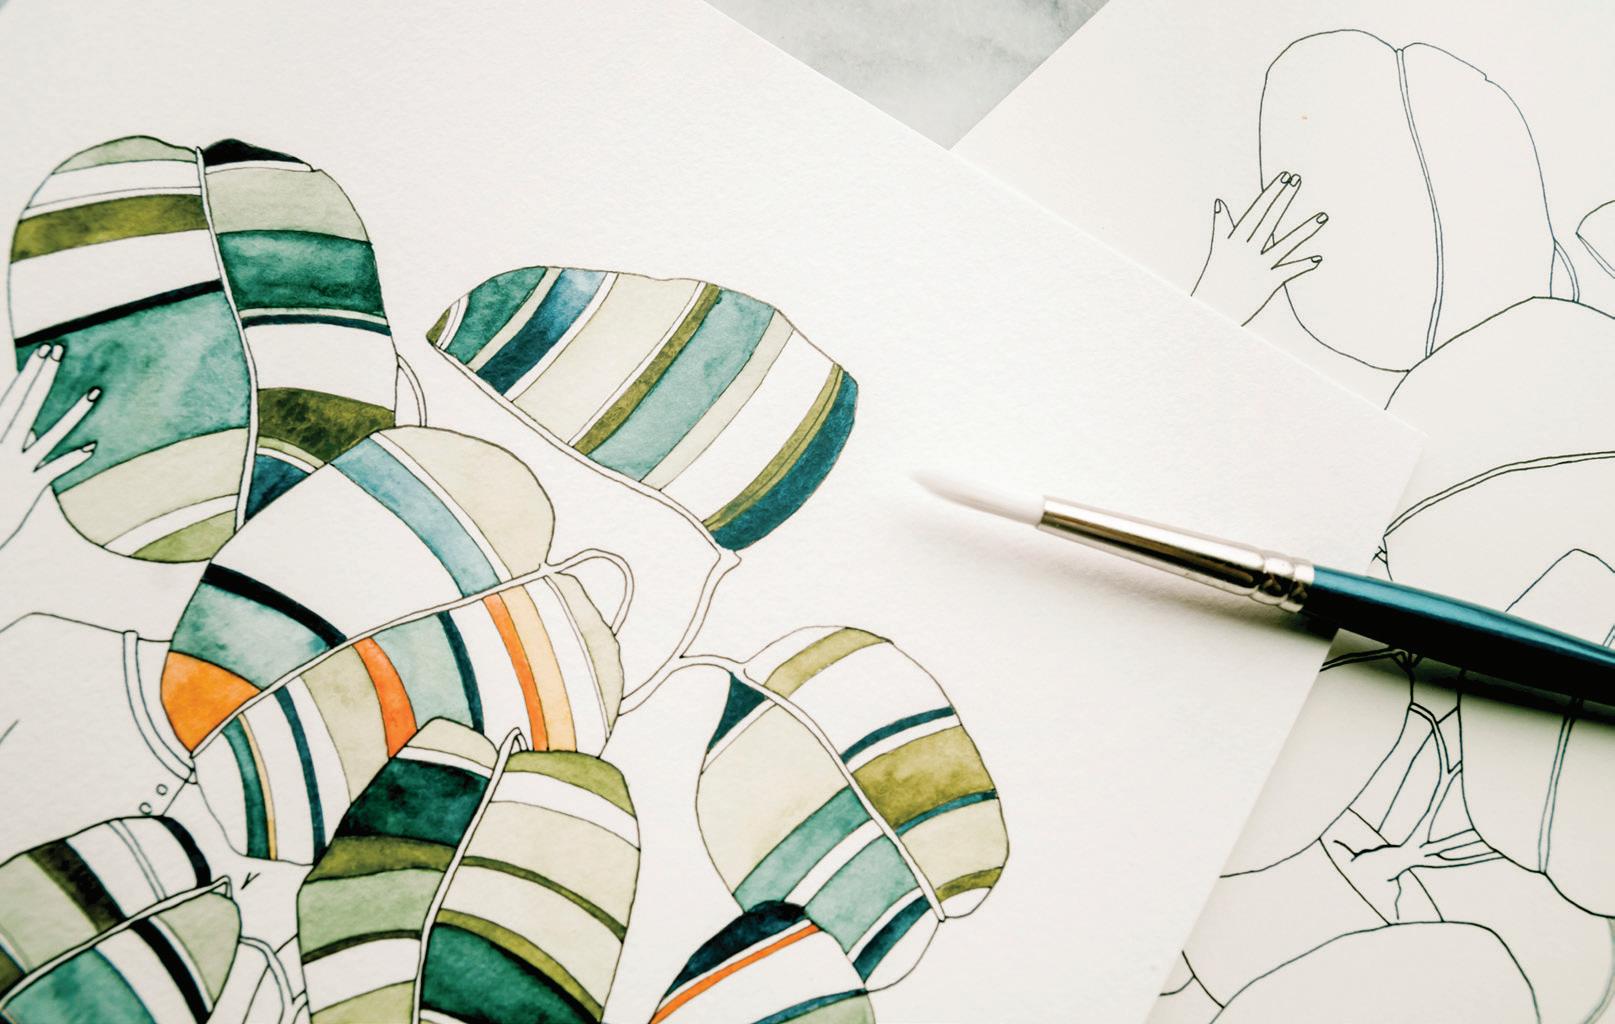
PLANT LADY
WATERCOLOR & INK
LESSON 12
THIS PLAYFUL, COLORFUL PIECE FEATURES A CHARACTER WHO HAS
shown up in my work for years: Florence. If you scroll through my Instagram,
you’ll find Florence in many of my paintings—holding plants, chickens, leaves, eggs in a skillet, and more. In fact, Florence was how I first started sharing my work online. The anonymity of her simple body, hidden face, and neutral clothing allowed her to serve as an interesting framework for the central focus of my pieces, and she quickly became a recognizable character my followers grew attached to. In this project, Florence will be the “plant lady” framing this striking abstract tropical plant. This lesson is all about playing with color—some of the leaves are in analogous green colors, while others feature a rainbow of complementary colors. You’ll be lightening and darkening pigments throughout the lesson to get the desired color effect. This is also an excellent lesson for practicing washes in different sizes and shapes of boundaries.
TOOLS
Round watercolor brushes, sizes 4 and 1
140-lb. watercolor paper HB pencil Micron pens, sizes 005, 01, and 02 Traceable “Plant Lady” worksheet (page 209) Tape (washi or drafting) Light source for tracing (a well-lit window or a light box) Eraser
2 Mason jars of water (one for dark colors and one for light) Paper towel Scrap paper
PAINT PALETTE
PAYNE’S GRAY YELLOW OcHRE BURNT SIENNA
c OLOR RE c IPES
PINE Viridian + Cerulean Blue + Yellow Ochre + Lemon Yellow
PAPAYA Peach + Yellow Ochre + Crimson
TE c HNIQUES
Washes
Wet-in-wet Working in ink
TIPS FOR THIS PROJE c T
As you trace and paint, remember that you are not on a solid plane. Continually changing the orientation of your piece will allow you to access your art from different angles and keep your marks sure and strong.
You can add visual interest by alternating the thicknesses of your leaf lines while drawing with your Microns. Try a few lines near one another in a 005 size, and then make a bold line with a size 02. Just make sure that the spaces you make aren’t too small to paint within, as you will be adding a light wash to these small segments.
You can always add more lines to create more segments later.
Test your pen tips on your scrap paper as you work to ensure you make your marks with the best size.
You will have the most control over your lines when you pull your pen down toward you.
Move your paper as you work so you can continue to pull lines, marks, and strokes down toward yourself.
If you prefer larger boundaries, leave off the petite leaf lines when you trace, and practice watercolor washing with wet-in-wet color fireworks (see page 47) instead.
As you paint your piece, continue to pull back by two or three feet and check the progress while things are still wet. Let your eye assess where the next color needs to go. Doing this as you work ensures that you will love the overall look once it’s all complete.
BEGINNER
Trace a simpler version by leaving off
Florence the Plant Lady, and/or do not draw in the individual leaf lines. Or draw a few lines on every leaf, but perhaps not so many!
ADVAN c ED
Can you imagine a different outfit for
Florence the Plant Lady? Dress her up in your own style. Or perhaps you’d like to paint these rainbow leaves in a different color scheme, or a completely different leaf shape.
Remember, to find the complementary color of a pigment, jump across the color wheel (see page 31). When it comes to complementary color, opposites DO attract!


PENCIL & INK
1Tape your papers together to secure your watercolor paper to your tracing sheet. This way, you can move and reorient your paper while tracing without having to realign the marks every time.
2Use a light source, such as a window or a light box, to view your traceable design through your watercolor paper as you trace.
3Using your HB pencil, lightly trace Florence the Plant Lady onto your watercolor paper. The lighter you trace, the easier it will be to erase the pencil lines once you ink over them.
4Trace over your pencil lines with your Micron pens. I suggest using the 005 or the 01 sizes for Florence’s finer lines (her hands, fingers and nails, sandals, and outfit details) and the 01 for the finer lines of the branches. I use the 02 size for Florence’s outline and the leaf outline.
5Alternate between the 005, 01, and 02 sizes for the lines on the leaves to give each one unique depth and interest. Each leaf is its own little creation!
6Once all of your art is inked, begin erasing your pencil marks where the ink is driest, which is where you first began tracing. Go slow.
7You’re ready to begin painting! Prime your brush and ready your Mason jars of water.
Notice how unsure my first black lines were? I think it’s wonderful to be able to look back and see the progress we make in our artistic journeys! I use #FlorenceAndHerFascinations to document all of my Florence characters I’ve created and shared on Instagram.

MY FIRST FLOREN c E
Florence was the girl who began it all.
It was five in the morning and I was sitting at my great-grandmother’s writing desk. I had a new set of watercolor paints and I had just finished feeding my two-month-old baby girl. While she was snoozing contentedly, I stayed and watched the sunrise instead of rolling back into bed. We have a few beautiful eucalyptus trees in our backyard, and I was struck by how the light danced off the small round sage-green leaves whenever they shook in the breeze. I decided to paint a few of the monochromatic green colors I saw and then thought to myself, what a lovely plant this is—should I draw a vase to hold these branches? Or maybe a person? And Florence was born.
Her arms embraced my leafy eucalyptus boughs and because there was so much greenery, her face was hidden behind the leafy branches. After I penciled in her body, I loved the contrast of the soft watercolor botanicals with the simple, stark lines of her body, and I decided to draw her in ink. The next day, I drew another Florence, this time holding one of our chickens. Naturally, the chicken was a bit larger than life, and commanded a lot of attention, but Florence was there in her subtle neutrality, cradling yet another fascinating hobby. I was hooked.
I posted my Florence drawings on Instagram and my followers took a liking to her and encouraged me to share more. From then on out, I would draw Florence’s shape in ink, and then watercolor in a new fascination: eucalyptus leaves, chickens, an egg in a skillet. I tried new paint and tested new techniques, with her as my constant.
Florence is Every Girl. She is anyone who has ever wanted to try something new. She is someone who loves the adventure of a new fascination. She pursues people and excitement in earnest. She dives into new pursuits and loves to share. And I love sharing her with you now.
BRUSH: Round 1 PAINT cONSISTENcY: 50w/50p “heavy cream,” moving toward 80w/20p “soy sauce with wasabi” as you add water to dilute the colors, tinting them to their analogous versions.
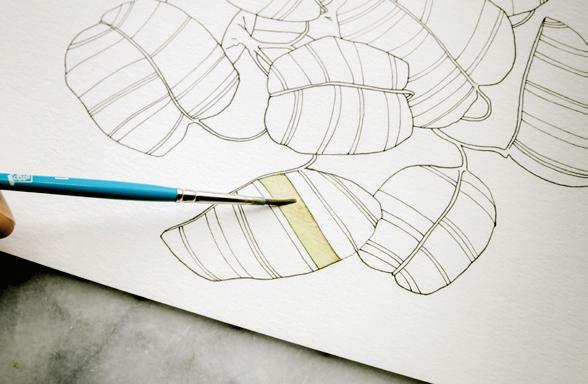
Use your brush to bring clean water from your Mason jar to your palette and create your 50w/50p consistency of the Pine color recipe. Because each boundary is so small, we’re not going to worry about creating a wet-in-wet effect within them. Like we did in Lesson 11, you want to use enough water and paint within each to create an even wash with no hard lines, but not so much water that you flood the small boundary. When you have your desired consistency, dip your brush in water and then load it with your Pine color mixture.
ANALOGOUS & RAINBOW LEAVES
1Starting with a leaf of your choice, bring your brush to your watercolor paper and begin painting the leaves on the right. Paint a fine sheen of your Pine wash into your chosen segment. [A]
2Fill in a few of the small boundaries with your Pine color, rotating your paper as you work so you can access different angles. [B]
3Now to add some pops of rainbow! Dip your brush into your designated dark Mason jar to clear the Pine out of your brush, and then dip it into the clear water of the light Mason jar. Use your brush to pick up your 50w/50p consistency of your Papaya color recipe and add a band of light and brighter color to one of your small leaf segments. If a boundary is wet, let it dry completely before you try to add another wet color right next to it, to prevent bleeding between leaf segments. [c]

4To lighten the color within any of your boundaries, blot with a dry paper towel. To darken, add another layer of transparent color.
5It may take a couple strokes to watercolor the larger segments and cover the entire boundary. But for many of the small boundaries, it will take just one stroke to color the entire boundary. Don’t overthink it; get a fun color down on a boundary and move on to another. [D]
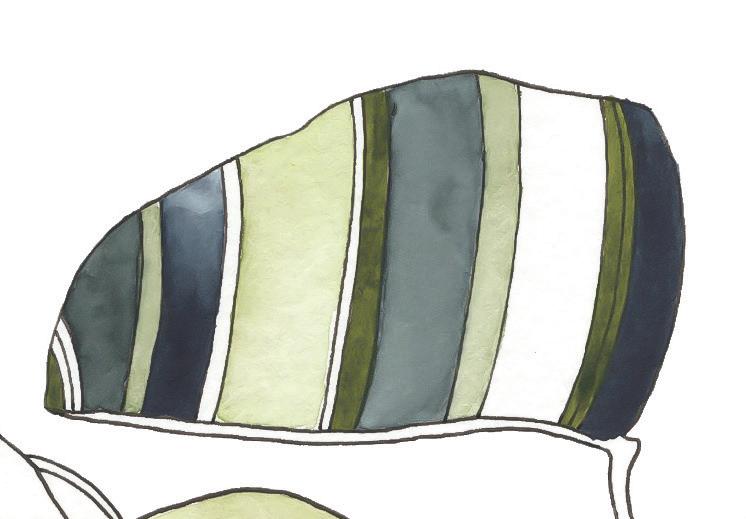
6Next, it’s time to paint your analogous leaves. For these, you will work on a sliding scale of color. This means Pine will be your featured pigment, and you will lighten it in varying degrees on your palette by adding water and darken it in varying degrees on your palette by mixing in Payne’s Gray. 7 Maintaining a 50w/50p “heavy cream” consistency for most of your sauce mixing on the palette will help you stay within these small leaf boundaries. However, as you begin to lighten your Pine recipe with water, you will move closer to an 80w/20p consistency, and that’s ok. Notice, the lighter parts of my leaves are usually the larger of the leaf segments, so I had room to add
B
continues on next page
D
A C


the wetter consistency. Mix up your analogous colors on your palette by watering down your Pine recipe to create the lighter green color (which is tinting), and darkening your Pine recipe by mixing in Payne’s Gray (which is toning). Feel free to test the range of green colors you can create on a scrap paper. Once you have a few, you’re ready to begin painting an analogous leaf. [E]

8Continue painting the segments of your analogous leaves using your own color placement or pattern. Some leaf segments can be very dark, toned deeply with Payne’s Gray, and some can even be left blank, letting the white of the paper shine through as a nice break in color. [F] 9 Alternate your leaves as you paint, making some with a rainbow theme, and others with the analogous color theme. As you paint, be careful not to overlap wet boundaries because, as you know, the colors will bleed into one another. [G] 10 Your leaves can be as understated or as wild as you like! By following different color harmonies, you can create calm leaves or leaves that are truly the life of the party! [H]
E
INK LINES AREN’T BOUNDARIES
Does the Micron pen act as a water-repellent border, keeping the paint within the boundary?
The answer is no.
The ink lines do not provide a border for your paint to stop. Use the ink lines as guidelines to direct your paintbrush. They will not bleed with your watercolor, but they are not going to stop your paint from flooding a boundary either. Try, instead, to paint within the lines you’ve drawn, which will require some practice and training of your hand on the brush.
But also remember that this is art! You’re human, and imperfection is what makes your style and piece your own. This lesson suggests you stay within the lines as much as possible, but you could always go your own way and treat the lines as simply that—black lines—and watercolor right on over and through them! Do what feels best. Just remember, the ink lines are NOT the same as a wet boundary.

F
G
H
PLANT POT
1To paint the pot, you will create a simple wash using your Round 1. You can paint the pot in any color you like. For the example, I used a watered-down shade of Payne’s Gray from my analogous color scale, adding just a touch of Yellow Ochre on my palette to get a cement-like color. Be sure to use a piece of scrap paper to test your colors before you bring them over to your watercolor paper.
2Before you paint, make sure all the boundaries around the pot are dry, to prevent leaf colors from blending or bleeding into your pot boundary.
3Dip your brush in your Mason jar, pick up the 50w/50p consistency of your chosen pot color, and begin to fill the pot boundary with a wash. Come back with a paintbrush or two of the lighter wash water to fill in the entire boundary. Again, you are not looking for too much movement in this wash, just a nice wet sheen.
BRUSH: Round 1, Round 4 PAINT cONSISTENcY: 50w/50p “heavy cream”
First, you’ll paint Florence’s sandals in Burnt Sienna. Dip your Round 1 brush in your clear water and bring it to your palette to create a 50w/50p consistency of Burnt Sienna.
FLORENCE
1Bring your loaded brush to your watercolor paper and fill in the sandals using light pressure with your brush to create a consistent wash—a little sheen to ensure there are no hard lines, but not so much water that your paint bleeds over the lines of the sandals.

2Switch to your Round 4 brush. To create the color for Florence’s jeans, bring water from your Mason jar to the Payne’s Gray on your palette until it turns to your preferred shade and blends into a 50w/50p consistency.
3Bring your loaded Round 4 to your watercolor paper and cover the majority of the jeans boundary with your wash. [A]

4Since you’re using such a light wash on a small boundary, your jeans wash will dry quickly. See that hard line forming? To get rid of any hard lines, you can use your wet brush in a side-to-side scrubbing motion to essentially rub the beginnings of hard-drying lines out. 5 Continue to use water and more of your 50w/50p sauce consistency to fill in all of the boundary for Florence’s jeans, and bring the water-and-paint mixture up to all of the lines, filling in the smaller spaces near her waistline and the pot and leaves. [B] 6 True to my original idea of Florence, I like to leave a decent amount of her in purely ink, so she remains simple and uncomplicated. I also left color out of the stems of my potted rainbow plant. But feel free to color her in according to what your imagination prefers!
A B
WHY ART
THE CREATIVE CYCLE
WE cREATE IN cYcLES. THERE ARE DAYS OF FEVERISH INSPIRATION, WHEN ideas are prolific, and they bump around in your mind and heart, distracting you from everything else until you finally express them on paper. And there are days (sometimes weeks) of drought, seemingly devoid of any original creative thought. In those slumps, you wonder if it is gone forever, or worse—you were never an artist at all.
Don’t believe that for a minute! The dreaded Imposter Syndrome lurks around every creative lull. We all experience these highs and lows in our journey, and you never know how long either will last. Remember, it’s a cycle—both the highs and lows are part of the creative process.
That being said, I do believe there are two types of slumps we face and it’s important to recognize the difference.
TAKE A BREAK (AND AVOID BURNOUT)
This slump typically comes when I’ve created at a frenetic pace, pouring myself out on the page for an extended amount of time. Then suddenly I’ve completed the piece and it feels like I’ve hit a wall. The gushing well of yesterday’s creativity is all dried up. In this type of slump, I must allow myself to take a break.
My theory is that these are meant to be rest periods. A time to let old ideas fade, and prepare oneself for the birth of new ones. In this phase of the cycle, taking a few days to rest and gratefully recall the magic that was created is good for me. It makes the creation of those earlier pieces that much more special. It’s a high like no other to create something that makes you smile every time you see it; it’s also important to acknowledge that every day and every piece you attempt cannot be a masterpiece.
Here’s a personal suggestion: when you’re in the Creative Slump part of your cycle, do not go to the Internet for inspiration. Everyone shares their wins on the internet—which I’m not against; it is exciting and we should share our wins! But, when you’re feeling unimaginative and doubting your talent, and then you start scrolling online in this state? Of course, the most natural feeling to follow is comparison and a sense of failure, more personal doubt, and even hopelessness. It’s not pretty.
If you’re exhausted and need to recharge, step away from trying to produce and instead do something to nurture your creative self! Remember those tiny moments of joy? Now it’s time
to seek them even more earnestly. Spend your free moments in nature, digging in a community garden, soaking in the sunshine, walking barefoot on the earth and feeling growing-things ty garden, soaking in the sunshine, walking barefoot on the earth and feeling growing-things beneath your feet. Speak and commune with other humans who have different passions, and beneath your feet. Speak and commune with other humans who have different passions, and viewpoints and come from different walks of life. Laugh with friends, a good and hearty laugh viewpoints and come from different walks of life. Laugh with friends, a good and hearty laugh that makes your cheeks ache. Play your favorite song at the highest volume you can, and dance that makes your cheeks ache. Play your favorite song at the highest volume you can, and dance it out. Read the old poets who long ago tracked the familiar ground you are now traversing, it out. Read the old poets who long ago tracked the familiar ground you are now traversing, learning about their journey and how their lives were day to day. Walk, run, garden, read*, emlearning about their journey and how their lives were day to day. Walk, run, garden, read*, embroider, speak with an encouraging friend that believes in you and your talent. Get offline for a broider, speak with an encouraging friend that believes in you and your talent. Get offline for a few hours, or days. Whatever it takes to remember: it’s your unique voice that is worth sharing, few hours, or days. Whatever it takes to remember: it’s your unique voice that is worth sharing, and it WILL BE BACK! and it WILL BE BACK!
Do something else that slows you down, engages your hands, and helps you feel accomDo something else that slows you down, engages your hands, and helps you feel accomplished. Once you’ve rested and you begin to feel those urges and ideas trickle in again, you’ll plished. Once you’ve rested and you begin to feel those urges and ideas trickle in again, you’ll be better and stronger than you were before. be better and stronger than you were before.
SHOW UP (AND RESIST THE CREATIVE BLOCK)
The second slump is different than the first because I want to paint; I have the energy and desire, I’m just fresh out of ideas. Saying we want to paint and actually sitting down with a wet brush are two very different things, aren’t they? Sitting down to paint when we don’t feel inspired takes discipline but we must show up for the proverbial Muse to alight. It’s not a guarantee; inspiration doesn’t come every day or every time I show up to paint. We cannot control the Muse, but we can prepare for it and try to be worthy of it when it arrives.
On days like these, when I’m fresh and excited but am not sure the direction to take, I start with exercises. Often, with a leafy wreath. The lessons in this book are so helpful this way: they provide you with prompts, tracings, ideas, and technique. As you show up and practice, you build your technique and knowledge, so on the day when your own unique idea strikes, you have the transferrable skills needed to communicate your own idea beautifully. You can think about technique and shaping leaves, and how to create that flowing wet-in-wet sauce, but the magic really happens when you show up and learn the skills.
I enjoy painting and drawing so much more when I show up without any expectations of grandeur or magic. I come to my desk with open hands, enjoying the act of creating itself. I’ve learned that, in the end, it is not the quality of the paint that makes or breaks a piece but the heart and discipline of the painter.
*I’ve included a Reference section in the back of this book, listing some of my all-time favorite books to read that have helped me during the slumps. One that I obviously enjoy that I’ve been quoting from is The War of Art by Steven Pressfield. He takes apart the creative cycle in small, one-page chapters, and helps you identify what’s holding you back. And once you can see the cycle, and give a name to the obstacles, it doesn’t feel as intimidating.


