7 minute read
Analogous & Complementary Colors


LOOSE PEONY
ANALOGOUS & COMPLEMENTARY COLORS
LESSON 9
LOOSE, FLOWING FLOWER PATTERNS—PEONIES AND PETALS AND
dark, contrasting leaves . . . oh my! As we have learned, watercolor painting is
like a dance between the artist and her work, taken one fluid step at a time. creating a continuous piece like the one in this lesson allows you to play with timing as you mix your magic sauce and incorporate your wet-in-wet method, adding pops of color to make each flower unique. This lesson is also a wonderful way to experiment with wet and drying boundaries, playing with consistency and learning when you can still add a bit more paint, and . . . when you should walk away and let the paint dance itself out on your page!
TOOLS
Round watercolor brushes, sizes 1 and 4 140-lb. watercolor paper (preferably Arches or Hahnemühle cold press) Colored pencils, in blush and gray Traceable “Loose Peony” worksheet (page 205) 2 Mason jars of water Paper towel Tape (washi or drafting) Light source for tracing (a well-lit window or a light box)
PAINT PALETTE
PAYNE’S GRAY YELLOW OcHRE PEAcH
cRIMSON
c OLOR RE c IPE
BLUSH Crimson + Yellow Ochre + Peach
TE c HNIQUES
Wet-in-wet
Wash Blotting
PPP Point-pressure-point
AS YOU BEGIN
Determine whether you will be tracing the flowers as I’ve laid them out or, if you’d like, arranging and placing them in your own artful composition.
If you are tracing, tape the traceable to the watercolor paper. This allows you to move the papers as one piece as you trace your lines.
Use a light source, such as a window or a light box, to view the traceable design through your watercolor paper as you trace.
With your blush colored pencil, lightly trace the floral lines onto your watercolor paper. The lighter you trace, the easier it will be to blend the lines into your paint as you wash over them.
Now, using your gray colored pencil, and referencing the design, identify and trace the leaves, stems, and stamen (the small central elements of a flower) of your piece.
Prime your brush and ready your Mason jars of water.
Prepare your painting palette by reanimating the
Blush recipe on your light palette, adding extra dabs of paint as needed.
TIP FOR THIS PROJE c T
As you trace and paint, remember that you are not on a solid plane. Continually turning your piece’s orientation will allow you to access different angles of your art and keep your brush marks strong. It will also help you avoid running your hand through wet paint!
BEGINNER
Trace the design lightly with colored pencils—a light blush for the petals and a light gray for the supporting foliage—so you’re not worried about drawing the shapes as you are painting. Approaching this lesson as a Beginner and using the tracing sheets allows you to focus on creating the right consistencies for blending your watercolors.
Concentrate on the consistencies and blending, and use my guides as your lines.
ADVAN c ED
Study the design with your artistic eye, and begin to create the shapes in paint only— without tracing the designs beforehand.
Let your hand translate what your eye sees onto your paper, creating your own designs.
Also, if you’d like a further challenge, create a complementary color scheme of your own. Test out your colors on some scrap paper, using the recipes we have created in Lesson 3. Review what we learned about finding triadic colors, or use analogous color harmony for your flowers and a neutral (like
Burnt Sienna or Payne’s Gray) for the foliage.
Perhaps a Blue-Violet-Red color scheme would be stunning as a darker version of this design.
BRUSH: Round 4, Round 1 PAINT cONSISTENcY: 80w/20p “soy sauce with wasabi,” moving toward to 50w/50p “heavy cream”
LARGE BLUSH PETALS
2Once your Blush paint recipe is primed and ready, rinse your brush in the Mason jar of clear water and load up the bristles for your clear water wash.
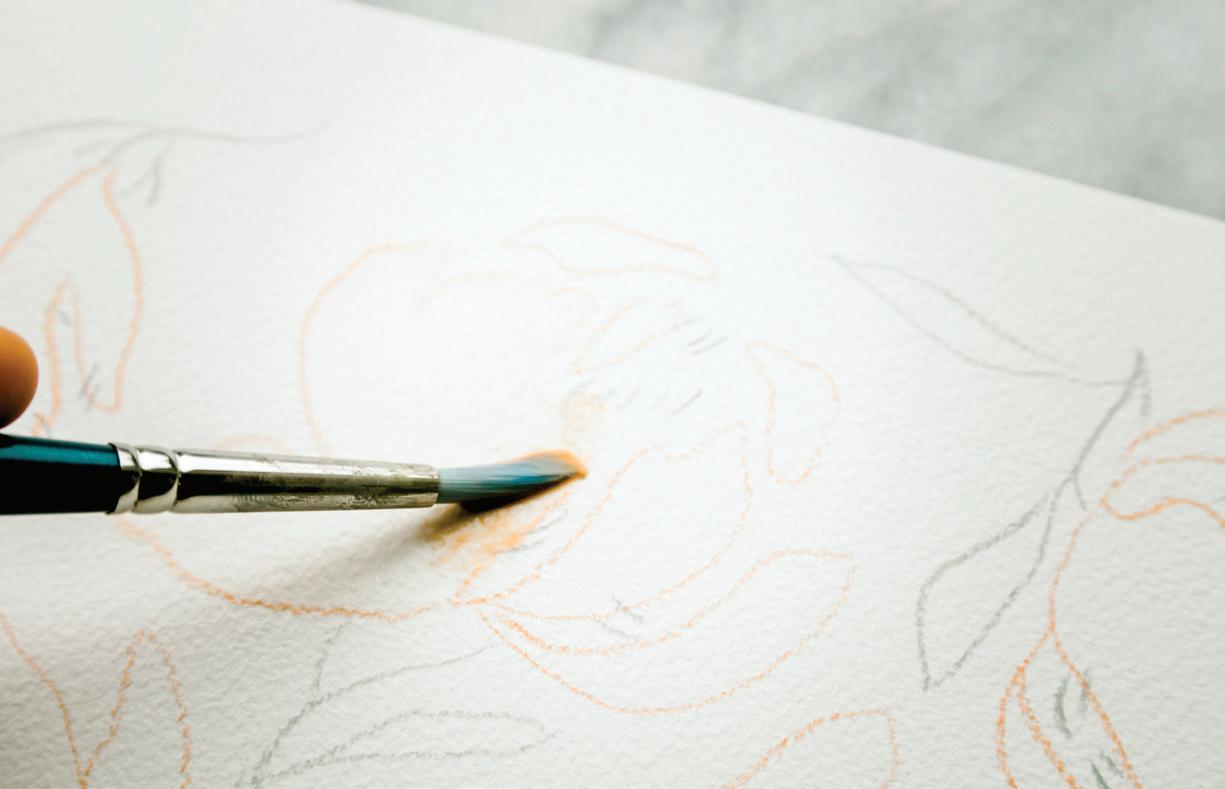
3Bring your brush to your watercolor paper and fill in your first large flower boundary with a clear wash, working from left to right, and using your paintbrush to lightly “scrub” the paper texture in a backand-forth motion. [A]
4Once your first flower has a nice sheen, it’s time to add your Blush paint recipe. Bring your brush to your palette and load it with your 80w/20p Blush mixture. [B]
5Take your fully loaded brush to your wet flower boundary, using the wet-in-wet method to drop in the Blush at different points of the flower—both the edges and where the lines intersect. Let the color bleed out, creating its own masterpiece within your flower shape. [c]
6As you watch the paint move and bleed within your watery boundary, pick up your Round 1 brush, prime it with water, and bring some water over to animate the pure pigment colors of Yellow Ochre, Peach, and Crimson on your palette, in order to drop in some additional color. Aim for a 50w/50p consistency, which works best for dropping in pigment with the wet-inwet method.
7A lighter point will naturally form within your petal, usually near the large center area, depending on how much paint color you add to the edges and points of your flower. You can accentuate this light point by using one or a few of the blotting methods you learned on page 50. By blotting your paper towel in the center of your petal or using the waterdrop method to increase the light spot on your petal, you’ll accentuate the light point and add more interest to your petal.
8You can also add a clear waterdrop (see page 52). Depending on your timing, the clear waterdrop will simply diffuse the paint color where you drop it in or, if your petal has begun to dry, the waterdrop will create a watercolor bloom within the petal as the water encounters the drying Blush paint.
B
C
A


BRUSH: Round 4, Round 1 PAINT cONSISTENcY: 50w/50p “heavy cream,” moving toward 10w/90p “mustard”
LEAVES, STEMS & STAMENS
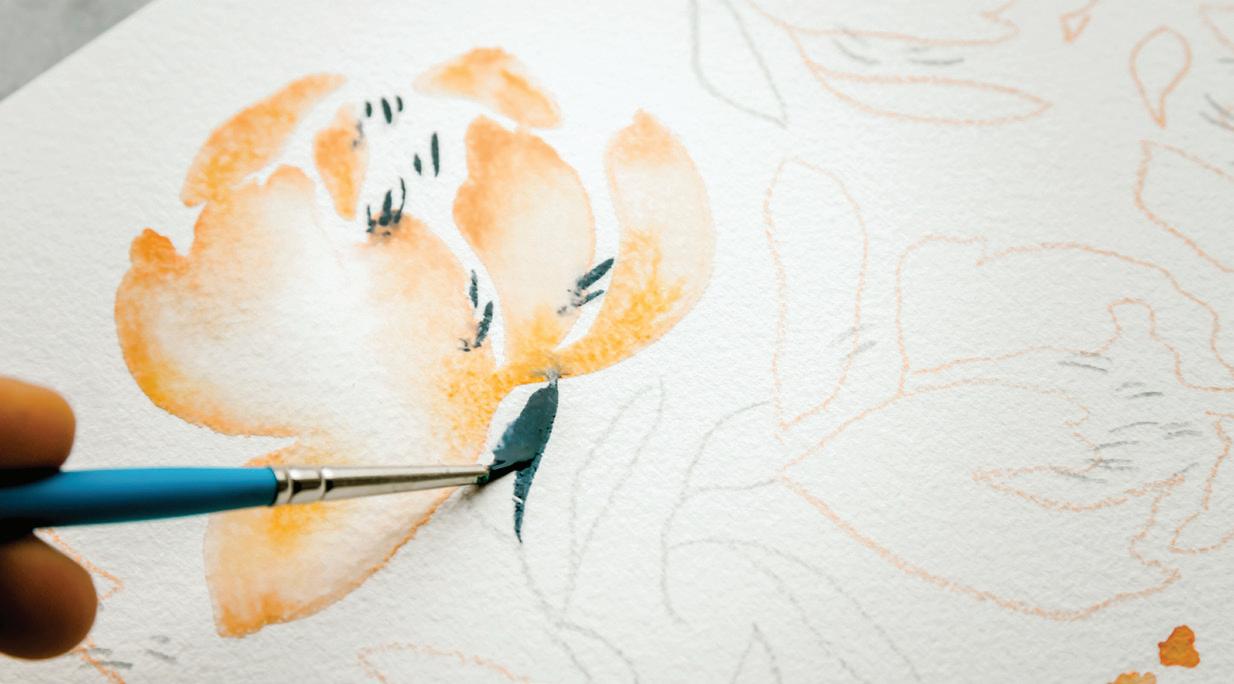
1We are going to begin with the smaller stamping marks in the centers of the flowers, the stamens. Prime your Round 1 brush with water. Mix your Payne’s Gray paint on the palette, bringing in more paint from your pure paint dab to move toward the thicker 10w/90p “mustard” consistency.
2Paint the fine lines of the stamen, dragging your Round 1 from the white watercolor paper into the wet Blush petal boundary. Blending these boundaries will cause some bleeding and veining. [A, B] 3 Use your brush to bring clean water from your Mason jar to your palette and create your 50w/50p “heavy cream” consistency of Payne’s Gray. Because you’ll be working within small boundaries for your leaves and stems, you want a thicker consistency for these steps, but with a bit more movement and shine, since the leaves are larger than the flower stamens.
4You can use a Round 1 or 4 to fill in this boundary, depending on how comfortable you are with the shape. A smaller brush will give you more control, but it will take longer to fill the space. 5 Bring your loaded brush to your watercolor paper. Using the side-to-side motion of your brush, fill in the stem boundary, allowing the Payne’s Gray to come into contact with your still-wet Blush petal boundary and bleed together. [c, D]
6Using the PPP motion (see page 100), paint your leaves. [E, F]
7You will continue painting the petals, stems, leaves, and stamens of each flower following the previous steps. 8 Remember to pause and take the time, while the petal is still wet, to make each one a little painting masterpiece. Drop in color with the wet-in-wet method, nudge the colors around with a damp brush, but ultimately let the water do the work of moving the paint for you. You are only suggesting where color should be as you drop in Blush in one spot and Yellow Ochre in another, but the water will move the paint within each boundary.
D E
A B


C F