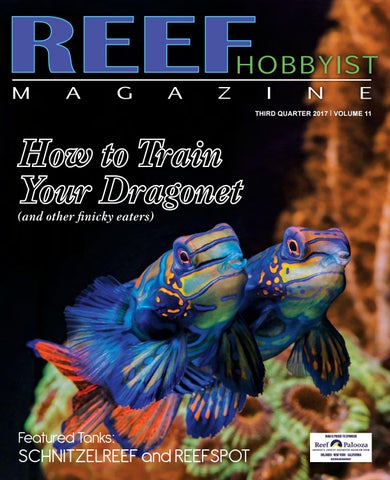
Reef Hobbyist Magazine Q3 2017

Page 1

THIRD QUARTER 2017 I VOLUME 11

How to Train Your Dragonet (and other finicky eaters)

Featured Tanks:

SCHNITZELREEF and REEFSPOT

Reef Hobbyist Magazine

1


FEATURES

6

FOLLOWING THE DREAM: MY RISING TIDE INTERNSHIP Following his dream, Zachary Mueller was granted an internship with Rising Tide Conservation, one of the leading projects in captive marine fish breeding. Join him as he shares his successes and failures in the rigorous world of real science.

10

COPEPODS FOR EVERYONE: CULTURING MADE EASY Gordon Greenley is an accomplished marine aquarist and breeder specializing in rare invertebrates and syngnathids. Feeding live copepods to reef tanks is highly nutritious and economical. Gordon details the culture requirements for two important species here.

16

SCHNITZELREEF Nick Frick is a 10-year veteran reefer better known online as Schnitzelreef. Nick's 8-foot reef tank is truly a showpiece of reefkeeping splendor, and hearing all that went into its creation is a great education in what it takes to build a world-class reef.

26 ON THE COVER HOW TO TRAIN YOUR DRAGONET

(AND OTHER FINICKY EATERS )

Jared Burbank, owner of My Reef To Yours, has been reefing since the mid 90s. Feeding our fish correctly is always of primary importance, but some of the hobby's most popular fish are also difficult to wean onto regular aquarium foods. Discover the secrets of this process for a couple of the most notably picky species. Cover image by Sabine Penisson

30

KILLER COLOR BUBBLE -TIPS Sergio "Surge" Vasquez is an avid aquarist, private collector, and owner of Anemone Crazy. The bewildering array of new fancy Bubble-Tip Anemone strains has created a collector frenzy. Here, Sergio shares some of his favorites, in addition to valuable tips on caring for these exotic nems.

36

CRYPTOCARYON IRRITANS

PRACTICAL MANAGEMENT IN THE HOME AQUARIUM

John Griffioen is a budding aquatic veterinarian in his final year at N.C. State's College of Veterinary Medicine. Marine Ich has plagued aquarists for decades. Learn the best methods to rid your fish of this disease in this detailed article.

42

4

REEFSPOT Paulo Oliveira is the owner of Top Corals and Testing 4 You in Portugal. Keeping a beautiful and thriving reef tank is never simple. This veteran aquarist shares his secrets in this look at an unconventional protocol. www.reefhobbyistmagazine.com

THIRD QUARTER 2017 | Volume 11 Copyright © 2017 Reef Hobbyist Magazine. All rights reserved.

ANNOUNCEMENTS

• Care to share your reefing, fragging, breeding, or husbandry success with the world? Email us your article ideas through the "Contact Us" tab on our website.

RHM-SPONSORED EVENTS

Our latest issues are available at sponsored events. Contact us through our website to have your event sponsored. • MAMAX 2017: September 23, Chesapeake, VA www.midatlanticmas.org/mamax-2017/ • Reef League: September 23, St. Augustine, FL www.reefleague.com • Reef-A-Palooza (Los Angeles): October 7-8, Anaheim, CA www.reefapaloozashow.net • Southwest Florida MAS Reef Conference: October 21-22, Ft Meyers, FL www.reefconference.com • Reef-A-Palooza (Orlando): April 7-8, 2018, Orlando, FL www.reefapaloozashow.net • Reef-A-Palooza (New York): June 23-24, 2018, Secaucus, NJ www.reefapaloozashow.net

DIGITAL & HARD COPY SUBSCRIPTIONS Scan this QR code to register for your free digital subscription, which gives you full access to archives on our website. You can also sign up for your new hard copy subscription for home delivery.

WANT RHM IN YOUR STORE? Increase your store’s foot traffic by offering Reef Hobbyist Magazine to your customers! We educate hobbyists on new products, husbandry techniques, and livestock. Plus, we never publish e-tailer ads! Contact one of our distributors below or email us through the "Contact Us" tab on our website to get stocked. • • • • • • • • •

A&M Aquatics – www.amaquatics.com All Seas Marine – www.allseaslax.com DFW Aquarium Supply – www.dfwaquarium.com FedkoPet – www.fedkopet.com Exotic Reef Imports – www.exoticreefimports.com Pacific Aqua Farms – www.pacificaquafarms.com Quality Marine – www.qualitymarine.com Reef Nutrition – www.reefnutrition.com Segrest Farms – www.segrestfarms.com

VISIT OUR WEBSITE FOR MORE! www.reefhobbyistmagazine.com

Find full access to RHM archives. Download any issue in PDF for your computer or mobile device. Sign up for a hard copy subscription or FREE digital subscription. Watch exclusive videos and shows. Search for articles by topic, author, or keyword. Find us on Facebook at www.facebook.com/reefhobbyistmag

RHM STAFF President Harry T. Tung Executive Editor Jim Adelberg Art Director Yoony Byun Advertising@rhmag.com

Photography Advisor Sabine Penisson Graphic Designer Dave Tran Proofreader S. Houghton

COMMENTS OR SUGGESTIONS? Contact us on our website!


Reef Hobbyist Magazine

5


FOLLOWING THE DREAM: MY RISING TIDE INTERNSHIP

Blue Tang broodstock | Image by Roy Yanong

M

y name is Zach Mueller, and I'm currently a sophomore at the University of West Florida, majoring in marine science and minoring in environmental science. I want to tell you about a very exciting opportunity I had a few years ago in hopes of encouraging you to follow your dreams, wherever they may lead.

As long as I can remember, I have been drawn to marine aquariums. This was due to my initial passion for marine biology. I loved the idea of working to save coral reefs, and I was captivated by the thought of owning a little reef in my home. I started out in the hobby when I was a freshman in high school, and my first tank was 55 gallons. I knew that balancing my high school life and caring for this reef would be a challenge. But somehow, I managed this balancing act, and from there the addiction progressed into a few more tanks and eventually evolved to a small breeding setup. In 2012, I attended my first Marine Breeding Initiative workshop, and not much later, I started experimenting with various species of zooplankton and phytoplankton. I focused on making sure I was able to culture these species correctly and sustain them for long periods of time in case any of my fish decided to breed. At one of the MBI workshops, I discovered the Rising Tide Conservation project when Eric Cassiano gave a presentation on

6

www.reefhobbyistmagazine.com

ZACHARY MUELLER their work. I immediately wanted to know more about Rising Tide and began following its blog. After some time, I worked up the courage to submit a question I had been wondering about: How do I get my anthias to spawn? Not expecting a response, I was ecstatic when an email from Judy St. Leger appeared in my inbox a week later. And even more than that, she had sent my email off to Matt Wittenrich and Eric Cassiano. I was excited to be having conversations with these experts in the captive breeding of marine


Yellow Tang broodstock | Image by author

fish, scientists I truly admired and had seen giving presentations at a conference. My world changed that day. Time went by and I continued to work hard at developing my competency in breeding and raising marine fish, with admittedly mixed success. About a year later, during my sophomore year in high school, I sent an email to Judy about the possibility of touring RT's Tropical Aquaculture Laboratory (TAL), as I would be in Florida for winter break. I was told that it wasn't possible since no one would be in the lab except a couple of people caring for the fish. Although I was disappointed, Judy asked if I had plans for the summer, as I could possibly work in the lab. I spent a few days scrambling to get a resume together and sent it off. Unfortunately, I was only a sophomore at the time, and she recommended I wait a year. So I went back to my little breeding setup and the work of another year of high school. But now, I had the hope of joining the real Eric Cassiano's copepod system | Image by author

Reef Hobbyist Magazine

7


Eric Cassiano's algae room | Image by Roy Yanong

scientists soon. I read scientific papers during school lunch breaks and in my free time with the goal of expanding my knowledge and preparing myself for what lay ahead. The months passed, and the next year, I asked if I could intern the summer before senior year started. To my amazement, I was accepted and allowed to join the Tropical Aquaculture Laboratory under the tutelage of Dr. Matthew DiMaggio and Eric Cassiano. Finally, in the summer of 2015, I found myself at the Tropical Aquaculture Lab in Ruskin, Florida. At the beginning of my internship, Dr. DiMaggio directed me to shadow Eric Cassiano throughout his part of the lab, which consisted of all the "bugs." This was my favorite part of the facility. The first room was the copepod cultivation room. Each species of copepod was cultured in a separate container, which was raised off the ground. This allowed for easy collection of copepods and for quick water changes on these very large containers. In this culture facility, eliminating contamination of the cultures was one of the highest priorities and was quite a challenge. The culture vessels were scrupulously sanitized, incoming water was sterilized, and all work was carried out with strict protocols designed to keep the cultures separate and monospecific. Any cultures that became contaminated would likely have to be destroyed, and this could be a waste of months of hard work. The other room Eric was in charge of was the algae cultivation room. This room was kept colder than the rest of the facility. The culture bags, as seen in the picture above, were hung vertically, with airline tubing running through the top of the bag to provide air to the cultures. In order to make sure everything was free from contamination, each bag was sealed airtight. After introducing me to Eric's lab and learning how it worked, Dr. DiMaggio asked me to help conduct research for an experiment. The experiment was on three species of copepods: Pseudodiaptomus

8

www.reefhobbyistmagazine.com

Eric Cassiano and Kevin Barden's pelagic egg collection system | Image by Roy Yanong

pelagicus, Parvocalanus crassirostris, and Oithona sp. The experiment was to see how much ammonia the nauplii could withstand in 24-, 48-, and 72-hour periods. Throughout the experiment, I ran into numerous pitfalls and had very few successes. After conducting this experiment for 2 weeks, we took the different stock solutions to the mass spectrometer to check the various ammonia levels in each container. All of them were low—very low. They were so low that we remixed the solutions six times, first with just me remaking them, then with Dr. DiMaggio watching over me, and finally, Dr. DiMaggio making the solutions himself. Despite this, we could not get the levels we wanted. We even tried ordering new ingredients for making the solution, but to no avail. We eventually abandoned the experiment. The second lesson I learned about doing research is that experiments take time, and you will fail many times before you succeed. Reading about these difficulties was one thing, but actually having it occur right in front of my eyes, despite doing my best to prevent it, was certainly emotionally draining. Once that experiment was abandoned, I switched gears to learning all I could from Kevin Barden, who oversaw the broodstock in the facility. The fish were kept in two different sized containers: ~10,000-liter tubs (used for each species) and cement coffins. The fish at the lab included Yellow Tangs, angelfish, melanurus wrasses, and Blue Tangs, along with a few others. Each of the large tubs were run into an overflow system with a standpipe, allowing for the collection of pelagic eggs. While under Kevin's supervision, I learned how to make and use pelagic egg collectors, as well as how to set up the newly collected eggs in containers for hatching. After a few days of shadowing Kevin, I had an idea for an experiment of my own: I decided to see what was spawning in the various aquariums at the Florida Aquarium, carefully collect the eggs, and try to raise them. We selected our tank, and it was consistently giving us 80 to 150 eggs per day. The aquarium was filled with


The larval room at Rising Tide | Image by author

wrasses, but in the end, the eggs were coming mostly from a pair of Spanish Flags (Gonioplectrus hispanus). By the time my internship had ended, we had only gotten the larvae to live a few days—another failure. However, I had come to understand that real science experiments rarely succeed 100 percent of the time and that even failed experiments are opportunities to learn.

Thanks in part to this experience, I've decided that my goal in life is to have a career focusing on conservation of the environment, mainly relating to marine biology. I would like to thank Judy St. Leger, Dr. Matthew DiMaggio, Eric Cassiano, Kevin Barden, and everyone else in my life who has helped me reach this point. Without them, I would have never imagined my own potential. R

Reef Hobbyist Magazine

9


This female Apocyclops panamensis is carrying a clutch of eggs.

GORDON GREENLEY Images courtesy of Reed Mariculture

COPEPODS FOR EVERYONE: CULTURING MADE EASY

O

ne of the latest advancements in the aquarium hobby is the ability of aquarists to easily and cheaply source and culture several species of marine copepods. Live copepods are a uniquely useful and healthy food for almost all species of fish and some invertebrates, and the ability to culture them easily has led to significant advancements in the captive breeding of marine fish. Most larval marine fish will not accept prepared foods but will eat live copepods with gusto. Other fish are picky and notoriously difficult to feed even as adults, such as Mandarin Dragonets and syngnathids (seahorses and pipefish). However, with the help of a healthy copepod culture, these picky eaters can be more easily sustained and sometimes trained to eat other types of food. Live copepods

10

www.reefhobbyistmagazine.com

are also an advantageous food source for almost all corals. Many are the perfect size for small-polyp stony corals to catch and ingest and are easily captured by large-polyp stony corals as well. The regular addition of live copepods to the diet of a coral reef aquarium will benefit almost every organism within the system. Commonly called "Tiger Pods," Tigriopus californicus is unquestionably the easiest marine copepod to obtain and culture. Another new species hitting the aquarium scene is Apocyclops panamensis, which is quickly proving to be nearly as easy to culture as T. californicus. These two species of copepods are great choices for any hobbyist due to their adaptability, their willingness to accept non-viable algal feeds, and their availability. Food for cultures, such as new algal feed products developed by Reed Mariculture and


Male Tigriopus californicus have claspers on their heads, which are used to hold onto females during mating.

Algagen, are readily available and can last years in a freezer and be thawed as needed for feeding. This allows for the culture of these copepods without the need to also culture live phytoplankton. While it may be easier and more practical for the average hobbyist to culture one species of copepod, some prefer to culture more than one due to the differences in size and nutritional profiles of the multiple species. This is especially useful for captive-breeding efforts. In this article, I will introduce and explain the basic culturing methods for T. californicus and A. panamensis to demonstrate that culturing copepods is within every hobbyist's reach. TIGRIOPUS CALIFORNICUS T. californicus is found from the coast of Baja California, Mexico, to southern Alaska in splash-zone tide pools. It is not an open-ocean species and is very adaptable and robust under a wide range of conditions. It is a larger species of copepod, ranging from 1,000 to 1,500 microns in length. T. californicus moves with a quick darting movement that effectively triggers the predatory response of fish and invertebrates. Contrary to popular belief, T. californicus is not a temperate species and can withstand temperatures close to 104˚ F (40˚ C) for short periods of time. It can be cultured very successfully at temperatures between 68˚ F and 80˚ F (20˚ C and 27˚ C). There are many different ways to culture T. californicus, but I will present one of the easiest and simplest methods, which has been very successful for me. To use this method of culturing T. californicus, only four items are required: a culture vessel, saltwater, a starter culture of T. californicus, and an algal food source. The type Reef Hobbyist Magazine

11


This female Tigriopus californicus is carrying a large clutch of eggs.

A close-up view of a Tigriopus californicus egg clutch. Females have often been observed carrying up to 14 eggs in a clutch.

of culture vessel needed for culturing these copepods is not critical; if it is non-toxic and holds water, it will work. Most people use 2-liter soda bottles with the tops cut off for smaller cultures or 5-gallon buckets for larger cultures. I prefer white 5-gallon buckets because they are cheap, easy to obtain, easy to clean, and provide contrast for viewing the copepod population within. Saltwater is obviously a very important component of any copepod culture operation, but T. californicus is not picky when it comes to water parameters. These copepods will happily reproduce in water that has a specific gravity of 1.024 to 1.030, perhaps slightly higher, but it is best to aim for the lower end of the range so that there is room for the salinity to creep higher if top-offs are infrequent. For simplicity's sake, the cultures can be kept around room temperature, eliminating the need for a heater. Slight seasonal temperature swings are not a problem for these copepods, as long as extremes are avoided.

to add additional food once the bottom becomes clearly visible again. Once a culture becomes established, this process becomes predictable and regular.

To start culturing T. californicus, obtain a culture vessel and source a starter culture from either a local fish store or hobbyist. The starter culture should be temperature acclimated before being added to the culture vessel. Lastly, you'll need a food source to sustain a healthy breeding population. The easiest and cheapest food sources to use for culturing T. californicus are non-viable phytoplankton mixtures. These products are available from companies such as Reed Mariculture and Algagen and have a long shelf life in the refrigerator. Some even have the ability to be frozen and then thawed without degradation. There are many different blends of phytoplankton types and species available, each having different nutritional benefits. Fortunately, T. californicus is not picky and will accept a variety of different blends. Feeding a culture is easy and only requires the addition of food whenever the water starts to clear from the last feeding. When using white 5-gallon buckets, it is easy to know when to feed based on the visibility of the bottom of the bucket. Typical recommendations are to feed just enough to obscure the bottom of the bucket and

To harvest copepods from a culture, it is recommended that a copepod sieve be used. Since adults and nauplii (the larval stage of a copepod) are different sizes, use a sieve with a mesh size of around 70 microns to capture all ages of T. californicus. A 300 micron screen will catch adults only.

12

www.reefhobbyistmagazine.com

Only some simple regular maintenance is required to keep the population growing. About every 2 weeks, a copepod culture should be split and receive a water change. A split can mean that a large amount of copepods are removed for feeding of an aquarium, or it may mean that the culture is divided in half and used to start a new culture while also keeping the old one. Whether making an additional culture or harvesting from a single one, the old culture vessel should be replaced with a clean vessel, and about half of the water should be removed and replaced with new, clean saltwater. This will allow the culture to continue reproducing without reaching its carrying capacity and stalling.

Natural light from a window or an artificial light source will cause the copepods to take on an orange-red coloration, making them more visible to predators. You can also add an open-ended, rigid airline for slight aeration of the culture and to keep the food suspended in the water. With this simple and easy to follow culture process, hobbyists of all levels can have access to a nearly endless supply of live T. californicus copepods. APOCYCLOPS PANAMENSIS While T. californicus copepods have been widely available for years, the hottest new species becoming available to hobbyists


Reef Hobbyist Magazine

13


This female Apocyclops panamensis is carrying a clutch of eggs.

Apocyclops panamensis nauplii are much smaller and differently shaped than adults.

is A. panamensis. This copepod has been used in commercial and institutional aquaculture but only recently has made its debut in the general aquarium hobby. Its great appeal is its smaller size compared to T. californicus, yet it has very similar culture requirements. A. panamensis is found along the Atlantic Coast of the Americas and the west coast of Africa, typically in estuarine environments, but may also be found in full salinity. Adults reach a size of about 600 to 700 microns. This smaller size makes them another ideal food for tiny fish and corals that have small polyps. A. panamensis is also easy to culture since it will accept non-viable algal feeds.

be successful with this species if they follow a few simple guidelines. Like T. californicus, A. panamensis is very adaptable and durable, but it is best cultured at a specific gravity of about 1.010, which is about half of what T. californicus prefers. Another difference is that A. panamensis is best cultured with slight aeration from an openended airline at a rate of about two to three bubbles per second. The other culture requirements of A. panamensis are the same as those of T. californicus. Culture vessels can be of varying sizes and types, with 2-liter bottles or 5-gallon buckets working very well. The proper specific gravity should be maintained with the addition of reverse-osmosis, de-ionized water on a regular basis.

While a best culture method is still being fine-tuned for A. panamensis, the general requirements are well understood, and hobbyists can

As mentioned earlier, a very appealing aspect of these copepods is their ability to consume non-viable algae. A. panamensis will readily

14

www.reefhobbyistmagazine.com


This Apocyclops panamensis nauplius is magnified 100×, with the internal structures clearly visible.

feed on the same non-viable algae products as T. californicus. Add enough food so that you barely see the bottom of the culture vessel. Then add more once the bottom becomes visible again. Splitting a culture also follows the same method. However, you will need a sieve with a 41-micron mesh to catch all ages of these copepods. In terms of temperature, the optimum range seems to be between 73.4˚ F and 81˚ F (23˚ C and 27˚ C) for maximum culture yield. CONCLUSION Growing your own copepod food source is not only a smart financial undertaking, but it is also a satisfying accomplishment for the aquarium hobbyist. While many hobbyists and professionals enjoy accumulating special pieces of equipment for their aquarium systems and food-culturing setups, copepod cultures do not require complicated equipment and, in fact, the simple approach will yield

incredible results. This is especially evident when culturing copepods on a small scale. These organisms are extremely tolerant of a wide range of conditions and can withstand a little abuse if the cultures are briefly neglected. With the recent advancements in starter culture availability and the development of non-viable food sources, more and more hobbyists of all experience levels are jumping on the trend of culturing their own copepods. Whether you're culturing a single species with the goal of feeding your corals a healthier food or planning to become the next marine fish breeding all-star, if you are able to keep a marine aquarium, you can culture your own live copepods. Special thanks to Chad Clayton of Reed Mariculture for consulting on this article and providing culture protocol guidance. R References: - Cano, R., Ráudez S., Hooker E. 2004. The Natural Diet of Apocyclops panamensis at a Shrimp Farm on the Pacific Coast of Nicaragua. Zoological Studies. 43(2): 344-349. - Kelly, M. W., Sanford E., Grosberg R. K. 2011. Limited Potential for Adaptation to Climate Change in a Broadly Distributed Marine Crustacean. Proceedings of the Royal Society. B. 279: 349-356. - Powlik, J., 1999. Habitat Characters of Tigriopus californicus (Copepoda: Harpacticoida), with Notes on the Dispersal of Supralittoral Fauna. Journal of the Marine Biological Association of the United Kingdom. 79(1): 85-92. - Sun, P. Y., Foley H.B., Handschumacher L., Suzuki A., Karamanukyan T., Edmands S. 2014. Acclimation and Adaptation to common Marine Pollutants in the Copepod Tigriopus californicus. Chemosphere. 112: 465-471.

Reef Hobbyist Magazine

15


Schnitzelreef

M

y name is Nick, but most people know me by my online screen name, Schnitzelreef. I started in this hobby a little over 10 years ago. My first tank was a used 90-gallon, fish-only system that had a bio wheel as its main filtration. I kept everything: sharks, rays, tangs, even an octopus.

Fast forward a couple of years and I had become a home owner. This, of course, meant it was time for a new tank. I started with a 55-gallon, fish-only tank; it had a sump, skimmer, and T5 lighting. Eventually, I acquired some live rock that happened to have a Majano Anemone (Anemonia manjano) on it from a local fish store. To my disappointment, I discovered that my prized coral was considered a pest. Once I saw how awesome corals were, I was hooked. But first, I needed to upgrade. I wanted a larger tank and better lighting. It was at this time that I discovered online forums. They were my go-to reference for any questions or help that I needed. I spent hour upon hour researching online about lighting, filtration, nitrates, calcium, and alkalinity. I felt like I was taking a crash course in marine biology and chemistry. I then started a 90-gallon reef tank but quickly moved on to a 6-foot, 180-gallon tank. With every new tank came hours and hours of research. Once I became successful

16

www.reefhobbyistmagazine.com

NICK FRICK

PC Superman


I went with a ~262-gallon (96" × 30" × 21") tank made of Starphire glass with a recessed eurobrace and an external Beananimal overflow. The tank was started in February 2014 with DIY LEDs and T5 supplements. The lighting then evolved to EcoTech Radions with T5 supplements. Currently, I’m running two dimmable ATI 8 × 54-watt fixtures with two 48” Reef Brite XHO LED strips. It seemed as though I tried every trick in the book to get my corals to thrive with only LEDs, but I just couldn't make it happen. I never had a hard time getting corals to color up under LEDs but was frustrated by the lack of growth. Only a month after installing the ATI fixtures, I saw a huge improvement in my corals. Now, a year later, I couldn’t be happier with the colors and growth I have seen since making the switch to T5s. Each ATI fixture is running the following ATI bulbs: six Blue+, one Coral+, and one Purple+. I change my bulbs once every 12 months. My lighting schedule is as follows: Reef Brite XHOs: 7 A.M. to 9 P.M. (4) ATI Blue+: 9 A.M. to 7 P.M. (8) ATI Blue+, (2) Coral+, (2) Purple+: 10 A.M. to 6 P.M. at keeping corals, it seemed as though I couldn't fill my 180 fast enough. My tank was a mixed reef, but SPS (small-polyped stonies) really intrigued me. SPS were harder to keep than other corals, but there were so many amazing colors. As I purchased more and more SPS, while not knowing about the importance of dipping corals, the odds were building against me. It wasn't long before I encountered acro-eating flatworms (AEFW). I started a separate tank to house my SPS while I did weekly coral dips to eradicate the AEFW. In the meantime, my wife and I had decided to do some remodeling on the house, and when you have to break down a tank to install new floors, it's time for an upgrade (at least that's how I sold it to the wife).

My sump was built by Advanced Acrylics and consists of three chambers: skimmer, refugium, and return. The first chamber houses my ATB 1050a skimmer and two 250-watt Jager heaters. The middle chamber functions as a small refugium. I've always believed in getting any extra help I can in nutrient export. The refugium is just big enough to hold a couple of rocks and a big ball of Chaetomorpha. The third chamber houses my Fluval SP6 return pump. This pump is large enough to give me plenty of flow to run a manifold, which means fewer pumps and less maintenance.

I decided my new tank would be larger and SPS dominant. This was my first brand-new tank, and I wanted something unique.

Reef Hobbyist Magazine

17


The third chamber is also where I have my Avast Marine ATO float switch and where the pH and temperature probes are mounted. My ATO is gravity fed from a 65-gallon reservoir that I keep in my reef shed. My RO/DI unit is automatically turned on and off by two horizontal float switches in the reservoir. The float switches are connected to my Apex, which controls a solenoid that opens and closes depending on the water level inside the reservoir. This allows my tank to be topped off without me lifting a finger. The more time

18

www.reefhobbyistmagazine.com

I get to spend enjoying my reef tank, the more enjoyable the hobby is for me. For alkalinity and calcium, I use a Geo CR624 calcium reactor. I use the manifold to feed the reactor and have a Sicce Syncra 1.5 as the main reactor recirculation pump. With the amount of alkalinity and calcium my tank consumes, I feel a calcium reactor is a must. There was a steep learning curve to fully understand how it worked


Reef Hobbyist Magazine

19


Shades of Fall Jedi Mind Trick

20

www.reefhobbyistmagazine.com

ORA Red Planet


Reef Hobbyist Magazine

21


ASD Rainbow Milli

22

www.reefhobbyistmagazine.com


and how to properly tune the reactor to match my alkalinity and calcium needs, but once I got it figured out, it truly was a set-andforget piece of equipment. I also added a second chamber to my reactor to help scrub excess CO2 from the effluent. This helped to stabilize my tank's pH. Having a quality CO2 regulator and needle valve makes adjusting my calcium reactor very easy. Most hobbygrade regulators are cheaply made and can make fine-tuning a reactor almost impossible. I have a Matheson dual-stage CO2 regulator with all Swagelok fittings, an Ideal low-flow needle valve, and a Burkert solenoid. In an SPS-dominant tank, creating proper flow is a necessity, and having an 8-foot tank makes that difficult. Currently, I am using two Vortech MP60s, two Tunze 6095s, and two Tunze 6105s attached to Sea Sweeps. The Sea Sweeps oscillate 90 degrees and really help create random flow in the tank. As SPS grow, they require more and more flow, so my pump selection seems to be ever evolving. It has proven to be one of the harder challenges of having an 8-foot SPS tank. Reef Hobbyist Magazine

23


Vivid's Rainbow Delight

My maintenance schedule is pretty simple. I try to do water changes twice a month, but I have gone 3 to 4 months between water changes when work got busy. Over the past few months, I have been using Fritz RPM salt. I have seen an improvement over other salts I've used in the past. Fritz mixes fast, and it keeps my mixing

container clean, which means less maintenance for me. It also matches the parameters of my tank, which is a plus when doing large water changes. My skimmer cup is drained by a peristaltic pump that I control with my Apex. Once a year, the T5 bulbs are changed and the ATI fixtures are thoroughly cleaned. As far as dosing goes, the only product I use now is KZ Pohls Xtra Special. I dose magnesium weekly by hand and keep potassium and iron around in case I go too long between water changes. My ATO, CO2 solenoid, sump water level, RO/DI reservoir, return pump, and skimmer drain are all monitored and controlled by the Apex. It really gives me peace of mind while I am away at work or on vacation. Although my tank is 3 years old, I still see it as a young tank. I hope to keep this tank running for many years and see my corals thrive and grow into large colonies. I want to thank Reef Hobbyist Magazine for featuring my tank; it is a real honor. It has taken many hours of work and research to get it to where it is today. I don’t believe I would be as successful without online forums like Reef Central and Reef 2 Reef where I regularly visit to learn and share experiences. Thanks to my amazing wife for putting up with this crazy hobby and being supportive of my addiction. R AOA Event Horizon Milli

24

www.reefhobbyistmagazine.com


How to Train Your Dragonet

Image by Sabine Penisson

(and other finicky eaters)

JARED BURBANK Images by author except as noted

W

hy are some of the most gorgeous fish in this hobby also the most finicky eaters? A prime example is the Mandarin Dragonet, one of the most stunning fish available but commonly thought to eat only live copepods. Ordinarily, you wouldn't think of adding one to a system that wasn't a year or two old and teeming with live copepods. Even then, you may be required to add live copepods every month or two to keep the fish fat and happy. You will see your dragonet hunting for copepods all day long, picking at the rocks for any they can find. This behavior quickly decimates a pod population in a smaller system. Fortunately, there are strategies that make these finicky feeders easier to manage, and many of these fish can be trained to eat frozen foods and thrive in your system with the simple use of a feeding station. DRAGONET FEEDING STATION Training your dragonet to eat frozen food is fairly straightforward when following these easy steps:

26

www.reefhobbyistmagazine.com

• Cover a petri dish or other small, shallow container with a finehole mesh, such as ladies' stockings. The holes in the mesh need to be large enough to allow the copepods to escape but not so large that they get washed out easily. • Make a small hole in the top or side of the container and insert a small tube (airline tubing or a straw will work). You've now completed your feeding station. • Secure the feeding station in your aquarium in a low flow area where your dragonet usually hangs out. • Using a turkey baster, suck up live copepods and/or live baby brine shrimp and squirt them into the tube to transfer them into the feeding station. The copepods and brine will quickly work their way around the dish and begin crawling through the mesh, and it shouldn't take long for your dragonet to find this treasure trove of food. • After your dragonet has become accustomed to eating from its feeding station, start adding frozen brine shrimp and/or mysis shrimp on top of the screen, in addition to the live food offerings squirted under the screen.


Image by Sabine Penisson

My dragonet feeding station

• Watch your dragonet during feeding time and note when it starts successfully eating the frozen offerings. Slowly cut back on the proportion of live food until it is eating frozen food exclusively. Ultimately, your dragonets will transition from live food to frozen food, but you will need to be patient since this process can take anywhere from a few days to a couple of months. I have had great success using this method, and now my dragonet will readily eat frozen mysis and brine shrimp even away from the feeding station. My dragonet now eats frozen food out of the water column.

Reef Hobbyist Magazine

27


COPPERBAND BUTTERFLY FEEDING STATION Another popular finicky eater is the Copperband Butterfly, which eats live worms and Aiptasia off rocks in the wild. They won’t naturally eat free-floating foods in our tanks, so to train them, you will have to give them what they want. Follow these steps to set up a feeding opportunity similar to what they are accustomed to in their natural habitat: • Place appropriate frozen foods such as mysis, bloodworms, or very thinly sliced raw clam on a piece of live rock. • Take a couple of layers of mesh material such as plastic gutter guard and rubber-band it to the rock, covering the food. • Place the rock in your tank in an area where your Copperband usually hangs out. • Because of the unique beak-like shape of the Copperband's mouth, it can reach down through the holes in the mesh to pick at the food while other fish will have a harder time getting to it. To reduce competition, feed the rest of your tank first so that your other fish will be less interested in the feeding station. • The Copperband will pick out food pieces from the mesh and quickly grow accustomed to eating frozen foods. You'll often find that within a matter of days, your Copperband will readily eat frozen foods right out of the water column with the rest of your fish. Since my other fish are faster eaters, I still use the feeding station every few days to ensure that my Copperband gets sufficient food. Use good quality frozen foods to feed your fish. There are many high-quality frozen foods on the market that are much healthier

28

www.reefhobbyistmagazine.com

than the commonly used pellets and flakes. These frozen foods are mixed and enriched just for our fishy friends. I like to offer a variety of foods at each feeding so that my fish get different frozen foods (and their accompanying nutrients) every day. I even keep frozen roe on hand for new fish, which tend to be somewhat shy about eating in a new system.


TLF My Copperband Butterfly feeding station

Dragonets, Copperbands, and other finicky eaters lack sufficient access to their natural food sources in home aquaria, which leaves them at risk for malnutrition. Creating feeding stations for these specialized feeders can take a little work, but it will ensure that they remain healthy and thrive in your system. Don't be afraid to try different kinds of foods until they start eating regularly. R

My Copperband eats while the other fish watch.

Reef Hobbyist Magazine

29


KILLER COLOR

BUBBLE-TIPS Surge Vasquez

Supernova | Image courtesy of Mak Corals

B

ubble-Tip Anemones have really gained popularity over the past year. More and more hobbyists are now taking on the challenge of keeping different strains of exotic BTAs. There are a few factors to consider when keeping a collection of these amazing animals. To help explain and understand these factors, I like to break BTAs down into two main categories.

AQUACULTURED EXOTICS Aquacultured exotics (captive propagated) include, but are not limited to, the Reefer's Cove Spitfire, Sexy Corals Signature BTA, CC Supernova, Mak Corals Supernova, Inferno, Flame Tip, Pau Gonzalez Colorado Sunburst, Anemone Crazy California Sunburst, AC California Sunset, AC Dragon’s Breath, AC Copperhead, AC Purple Passion, Nelson's Candy Corn, Black Widow, and Sherman

30

www.reefhobbyistmagazine.com

Images by Jorge Vasquez except as noted

Rose. These BTAs are fully accustomed to life in captivity with artificial lighting. They also tend to have a weaker sting compared to wild BTAs, hold color better, and (to me) look more attractive. As a precautionary measure, you should take care not to let the high-dollar exotics touch other BTAs. Unfortunately, there is no compatibility chart to follow, so it's always better to err on the side of caution. WILD BTAs Wild BTAs include Acid Rain, Ice Tip, Green Passion, Wild Purple Passion, and many other strains. The drawback to wild BTAs is that they don't always acclimate as well to life in captivity. Considering that they usually pass through the same supply chain as other livestock, it is also good practice to quarantine them. If there are signs of ill health (gaping mouth or protruding mesenteries), they might require a medicated treatment with an antibiotic like


Sexy Corals Signature BTA | Image courtesy of Sexy Corals

Ice Tip

ciprofloxacin. Wild BTAs usually pack a stronger sting, so it's also a good idea to handle them with gloves.

I feed new nems powdered reef foods like Reef Roids and Reef Frenzy while acclimating them to their new rock. A few days later, I'll introduce frozen foods. Feeding thawed frozen foods should be done bi-weekly to ensure the BTAs aren't overfed. Utilizing acclimation boxes for the first few weeks is a good way to get new BTAs accustomed to the rock, lighting, and water parameters before introducing them into the display. Another critical practice is to cover your powerhead intakes with sponge covers and your overflows with a plastic mesh material. This will help prevent nems from going into your powerheads or overflows. I have one nem that goes for nightly walks, and half of it ended up in an overflow once.

Mixing different types of BTAs from different geographic locations can induce chemical warfare between anemones. A reactor with a large amount of carbon and an ultraviolet sterilizer is a good precautionary measure. Some people let anemones attach to the main rockwork of their tank, but I recommend using smaller, portable rocks that you can move around or remove if necessary. If a BTA has a nice hole to put its foot and part of its body into, it will be more inclined to stay anchored.

Reef Hobbyist Magazine

31


Reefer's Cove Spitfire (juvenile)

Copperhead clone

Dragon’s Breath

California Sunburst

One of my favorite BTAs is the Reefer's Cove Spitfire. When fully mature, its yellow tips, maroon-colored tentacles, and oral disk are a real eye catcher. My juvenile Spitfires are slowly coloring up but have a while to go before they reach their potential. The Dragon's Breath BTA is another one of my favorites. The tentacles feature red streaks that lead into a dark base/oral disk. It reminds me of Dragon's Breath macroalgae with the flaming tips. The Copperhead BTA looks similar to many orange anemones except that this strain exhibits an interesting copper hue that blends into a green color toward the base of the tentacles. Can you see the difference between the Copperhead pictured above and the others? My California Sunburst earned its name from its vivid bright-orange coloration. This strain has proven to be relatively hardy and is guaranteed to be one of the brightest nems in any collection. You can see the difference in brightness compared to other similarly colored nems. The California Sunset BTA is another nice orange strain that isn't as bright as the Sunburst but has proven to hold nice color. My juveniles have started to develop greenish tips, as shown in the image above.

32

www.reefhobbyistmagazine.com

California Sunset (juvenile)

Wildfire | Image courtesy of Mak Corals


Reef Hobbyist Magazine

33


Cali Sunburst clones getting used to their new rock

The Orange Sunburst is a new Bubble-Tip strain that I'm working with to see how it matures. This strain has a more yellowish-orange hue compared to the other anemones in this article, which makes it unique in its own way. Keeping a diverse Bubble-Tip tank can be a very rewarding experience if you plan accordingly and take the necessary safety Orange Sunburst with an Ultra Rainbow BTA

34

www.reefhobbyistmagazine.com

precautions to protect your nems. Try not to add too many nems to a system at once as this can complicate things. Stay on top of water changes, and make sure to cover all of your powerhead intakes and overflows. Seeing all the movement from differentcolored anemones is a beautiful, eye-catching display. In many ways, they're easier and more forgiving than a tank full of SPS, so if you get a chance, give them a try! R


R

Reef Hobbyist Magazine

35


Image by Sabine Penisson

Cryptocaryon irritans:

Practical Management in the Home Aquarium

M

uch akin to the scourge of Ich (Ichthyophthirius multifiliis) for freshwater hobbyists, Marine Ich causes frequent headaches for marine aquarists. This condition, also known as white spot disease, is caused by an infection of the protozoal parasite, Cryptocaryon irritans. Its most classic clinical symptom is the appearance of white pinpoint-size masses on the fish's skin, fins, and gills, but it can present in a variety of ways in the home aquarium. In order to properly prevent and treat this disease, it's important to review the life cycle of the parasite and what the disease looks like, in addition to preventative and treatment options. DISEASE PREVENTION Though classic white spots are found in many cases, there are a variety of other indicators common among C. irritans infections. Spots may form larger nodules or plaques and may mimic other diseases. Other signs include increased mucus covering the fish, changes in skin color, cloudy eyes, thin body condition, ragged fins, and/or pale gills. You may also see the fish rubbing itself against rocks, substrate, or aquarium walls (aka flashing), abnormal swimming, lingering at unusual depths, or an increased respiration rate (aka gilling). It is important to remember that even without

36

www.reefhobbyistmagazine.com

JOHN GRIFFIOEN white spots, a C. irritans infection may be present if there are other indications, especially on naturally pale fish. Certain species, like the Regal Blue Tang (Paracanthurus hepatus), are more susceptible than others, while elasmobranchs (sharks, rays, skates) appear to be resistant to infection. LIFE CYCLE Understanding the life cycle of parasites is paramount in treatment. Cryptocaryon irritans has a simple life cycle with no requirement for an intermediate host, as it spreads directly from fish to fish. The time necessary for a complete life cycle varies depending on the parasite strain, temperature and salinity of the water, and fish species. The average life cycle is completed in 1 to 2 weeks, but it can take as long as 11 weeks in some cases. There are four primary stages of the cycle: trophont, protomont, tomont, and theront. The trophont stage begins when the parasite attaches to the fish, embeds underneath the fish's scales, and is somewhat protected from treatment. Trophonts roll and rotate all over the body, which is irritating, causing flashing and excessive mucous production. Trophonts feed on body fluids and cells for 3 to 7 days before becoming protomonts. Protomonts change shape and live in the


substrate for 2 to 18 hours, then harden to become cysts (tomonts) over a period of 8 to 12 hours. Tomonts, the encysted stage, take anywhere from 3 to 72 days to divide and produce infective stages called theronts. Tomonts are very hardy and can survive low levels of dissolved oxygen for several weeks and can go dormant in colder water. Both protomonts and tomonts are resistant to treatment. Theronts are the infective, free-swimming stage and will typically invade a fish's skin within 5 minutes of being released from the cyst but remain infective for at least 8 hours post-release. This is the best stage to target for treatment since theronts are the most susceptible of the life stages. DIAGNOSIS Confirming a diagnosis of C. irritans can be challenging due to the variety of clinical signs. Visually identifying the protozoa under a microscope is necessary to ensure a definitive diagnosis. As mentioned before, other diseases can cause similar symptoms but may require vastly different treatments. It is possible that the protozoa may only be on the gills, which is challenging to see with the naked eye. While C. irritans is often treated based on outward appearances of the fish, this is a great time to utilize a veterinarian who has experience with fish. PREVENTION Prevention is the mainstay of many aquatic health programs because it is far easier on both the fish and the aquarist if infection never occurs. Due to the complexity of the life cycle of C. irritans, the protozoa often become established in an aquarium and can be very perplexing to eliminate.

Regal Blue Tangs with Cryptocaryon infection | Image by PhotobyMark

The cornerstone of the prevention program is proper quarantine. Quarantine systems should be operated on a completely separate filtration and water system, which prevents free-living theronts from moving through the water column and into the display aquarium. The quarantine period should be a minimum of 3 to 6 weeks due to the variability in tomont maturation. The recommended water temperature is 75 to 80.6° F as this may cause the life cycle to complete more quickly than at lower temperatures. There should be no substrate unless absolutely necessary since the protomont and tomont stage can take residence in the substrate, leading to continual reinfection. It is also important to remember that anything moving into the display aquarium should undergo quarantine, including fish, plants, coral, invertebrates, substrate, and equipment, as they may all harbor different stages of parasites, bacteria, and fungi. Reducing stress during quarantine is also important and can be optimized by reducing lighting (unless required by coral or plants) and placing the quarantine system away from areas with high activity. TREATMENTS If C. irritans has already made its way into your display or is discovered during quarantine, there is a tremendous variety of options for treatment. Unfortunately, none of these methods is guaranteed to eradicate C. irritans from your system. Remember to consult local, state, and federal regulations regarding the disposal of waste water from systems treated with some of the chemicals and drugs commonly used to treat the disease. Reef Hobbyist Magazine

37


Ultraviolet Sterilization Ultraviolet (UV) sterilization is a technique that uses UV light to induce permanent changes to algal, bacterial, and parasite cells so they are unable to reproduce. Sterilizers are available as hangon or inline units. It is important to remember that only the water that flows through the sterilizer is treated, so inline models tend to be more effective because a more consistent flow is established. However, due to the life cycle of C. irritans, only the free-swimming theronts are affected by UV sterilization, and only theronts that pass through the sterilizer are rendered sterile. Due to the large multiplication factor of this organism (100 to 1,000 theronts per tomont), UV alone is not an effective treatment. This method may be used in conjunction with other treatments to reduce the number of infective theronts in the water column. Copper Copper remains both the most common and most effective treatment available for C. irritans. The most available form is copper sulfate pentahydrate (CuSO4•5H2O, also known as "blue copper"). Once dissolved, approximately 25 percent of the treatment solution exists as active copper (Cu2+), which kills protozoal parasites like C. irritans. Because copper is a toxin to both protozoa and animals such as fish, the treatment should be gradually introduced into the aquarium over a period of 2 to 3 days. This acclimates the fish to the copper and reduces the likelihood of toxicity during treatment. It is critical to use a copper testing kit during the treatment period, ideally testing copper levels in the aquarium twice daily. The recommended concentration in the aquarium is between 0.15 to

Ocellaris clownfish with C. irritans | Image by PhotobyMark

0.20 mg/L of free (active) copper. Too high a dosage will lead to toxicity and potentially the death of the fish in treatment, and too low a dosage will be ineffective in clearing the fish of the parasite. Treatment should last between 3 and 6 weeks. Treatment with copper should ideally be performed in a quarantine-type setup to limit collateral toxicity to other organisms in the aquarium. Copper is particularly toxic to invertebrates, including corals, and should not be used in systems containing these animals. A different form of copper known as "chelated" or "bound" copper is also available for treatments, but there is significantly more variability in the safety and efficacy of these products. It is recommended to follow manufacturer's guidelines closely or contact the company representative for troubleshooting with these compounds. Moving Affected Fish Some schools of thought suggest that moving affected fish from one aquarium to another every 3 days is an effective way to stop re-infection. Depending on the temperature, this may require three to five separate moves. While this method is effective for halting the maturation of tomonts and greatly limiting the number of infective theronts in the water column, there are several factors to consider. Firstly, this method requires several separate systems, and if aquariums are to be re-used in the process, they must be appropriately dried and disinfected (discussed below). Also, water quality in the series of aquariums should be checked frequently, as most aquarists are unlikely to have sufficient time to cycle each aquarium before placing fish. Lastly, frequent moving may add considerable stress to the fish, which is paramount to consider given the importance of stress in disease development. Hyposalinity Reducing the salinity or performing freshwater dips or baths is an effective method to control many types of marine parasites. C. irritans appears to be more difficult to control using this method than other parasites. Some studies have shown that trophonts on fish were unaffected after 18 hours in fresh water; this is believed to occur largely due to differences in strains of the parasite. Other research has suggested some strains can be killed with 48 hours of exposure to a salinity of 15 g/L or less. The utility of this treatment

38

www.reefhobbyistmagazine.com


Reef Hobbyist Magazine

39


veterinarian to ensure good stewardship of medication (important in human medicine as well). Some sources indicate the use of malachite green for treatment of C. irritans, but due to the controversy and legal issues surrounding its use as an antimicrobial in the United States, its use is not recommended. Disinfection

This tang is heavily infected with C. irritans. | Image by Dan VanGenechten and Roy Yanong

will vary greatly depending on the species of fish requiring treatment and its sensitivity to changes in salinity. This treatment is likely to create significant stress and even death in species very sensitive to changes in salinity and should be used with great caution. If treatment with this method is chosen, a protocol suggesting some effectiveness is to reduce salinity 5 to 10 g/L per day until a level of 15 g/L is reached, which is then maintained for 21 to 30 days before gradually returning back to the preferred salinity. Chloroquine Once largely available to hobbyists, chloroquine phosphate is making a comeback as a reasonable treatment choice for C. irritans. A derivative of quinine, this drug is typically used in human medicine to treat malaria, but it can be used as an anti-protozoal in a variety of applications, including in the home aquarium. Most treatments involve prolonged baths in a solution containing the drug. This medication is only available through a veterinarian, and he or she will be able to help formulate an appropriate treatment plan for each individual case. While it is generally non-toxic to fish and some aquarium bacteria, it can be particularly toxic to some algae and invertebrates and should therefore be used in a quarantine-type system. Chloroquine has also been shown to improve in efficacy when used in conjunction with hyposalinity. Other Treatments A variety of other treatments have been tried with varying success. One is to increase the temperature of the entire system in an effort to speed up the life cycle of C. irritans. This makes the most sense to try with concurrent treatments in a quarantine system. This method has also been tried in display aquariums where quarantine is not feasible, but the results were mixed. As with any change in water parameters, sensitive fish and invertebrates may react poorly to these changes, and the risks must be weighed before treating an entire system. There are also a variety of medicated feeds available; garlic is a popular option. These feeds may have some secondary benefits but should not be relied upon for primary treatment. Feed-based treatments also require that the fish is eating regularly, which may not be the case with a sick fish. Medicated feeds containing antibiotics, such as metronidazole, should be used under the supervision of a

40

www.reefhobbyistmagazine.com

Disinfection is an important part of treating for C. irritans, and there are several effective methods. Any equipment, including filters, aquariums, nets, etc., that have come in contact with the affected fish or water should be disinfected. Methods suggested to reduce free theronts include a 1-hour exposure to 2.4 mg/L of chlorine, 1-hour exposure to 100 mg/L benzalkonium chloride, or 1-hour exposure to greater than 104° F. Tomonts can be appropriately killed with a 1-hour exposure to greater than 104° F, 1-hour exposure to 100 mg/L benzalkonium chloride, or 24-hour exposure to 60 mg/L chlorine. Drying completely can also be an important secondary disinfection step. As with all disinfectants, follow manufacturer guidelines for safety and personal protection equipment. Finding Marine Ich in your aquarium doesn't have to be the end of the line for the affected aquarium. Due to the complexity of the parasite's life cycle and the variability in strains, several treatments may need to be attempted to clear an infection from the system. Preventing the parasite from entering a display tank is paramount, and proper quarantine procedures are the backbone of C. irritans management. Copper remains the most effective and available treatment, but caution should be used to reduce toxicity and protect sensitive tank inhabitants like invertebrates. Aquatic veterinarians can be important partners in creating the most effective plan to treat C. irritans if you find your fish succumbing to the dreaded white spots. R References: - Yanong, R.P.E. 2015. Cryptocaryon irritans infections (Marine White Spot Disease) in Fish. - Program in Fisheries and Aquatic Sciences, SFRC, Florida Cooperative Extension Service, Institute of Food and Agricultural Sciences, University of Florida, Gainesville, FL. http:// edis. ifas.ufl.edu/FA164 (accessed February 12, 2017) - Cheung, P.J., R.F. Nigrelli, and G.D. Ruggieri. 1979. Studies on cryptocaryoniasis in marine fish: effect of temperature and salinity on the reproductive cycle of Cryptocaryon irritans Brown, 1951. Journal of Fish Diseases, 2: 93–97. - Colorni, A. 1987. Biology of Cryptocaryon irritans and strategies for its control. Aquaculture, 67: 236–237. - Colorni, A. and P. Burgess. 1997. Cryptocaryon irritans Brown 1951, the cause of “white spot disease” in marine fish: an update. Aquarium Sciences and Conservation, 1:217–238. - Dickerson, H.W. 2006. Ichthyophthirius multifiliis and Cryptocaryon irritans (Phylum Ciliophora). Pages 116–153 In Woo, P.T.K., ed. Fish diseases and disorders vol.1: protozoan and metazoan disorders. 2nd ed. CAB International. Cambridge, MA. - Noga, E.J. 1996. Fish disease: diagnosis and treatment. Mosby-Year Book, Inc., St. Louis, MO. 67 pp. - Stoskopf, M.K. 1993. Fish medicine. W.B. Saunders, Philadelphia, PA. 992 pp.


Reef Hobbyist Magazine

41


REEFSPOT

M

y adventure in this hobby started in 2010 when I set up a freshwater display with discus. I kept this amazing discus tank for a year. Then one day, I saw a reef tank in person, and the vision of that tank changed everything. In 2011, I set up my first saltwater tank in a ~35-gallon cube. I kept the freshwater system as well, so I had a saltwater and a freshwater tank to care for. One day, in a conversation with a few friends, I decided to sell all my discus and freshwater equipment and start the first ReefSpot. The original ReefSpot, born April 2012, was ~166 gallons. It was a completely new world to me; this was a big saltwater tank with big responsibilities, and my knowledge of the hobby was still very limited at the time. Fortunately for me, I had a friend that taught me everything I needed to know in order to keep my reef tank healthy. This good friend is Carlos Mota, of Fragário do Norte, the best reef shop here in Portugal. Then in June 2013, I found the courage to upgrade ReefSpot to a ~200-gallon tank. I used the same rock and same layout but gained additional space for my corals to grow. It was in this tank that I tested LEDs for the first time. I abandoned an ATI 8 × 80-watt fixture and put on a Vertex Illumina, but things didn't go as well as I had expected. After 3 months of LED lighting,

42

www.reefhobbyistmagazine.com

I started to lose some Acropora. In total, I eventually lost nearly 80 corals. At that time, I almost quit the hobby, not because of the financial loss but because of the love I had for all my lost corals. I never understood the real reason for this loss because all of the parameters were stable and the corals were all well acclimated. But one day, they just started dying one after the other. After 4 months of LEDs and many corals lost, I realized the only decision possible was to get back my old ATI T5s, so I did. Within a few weeks, I saw an amazing recovery from the corals that had survived. In February 2016, I upgraded to my current tank of 285 gallons. This one started again with the same rock and same layout. In this setup, I always try to keep the sump tidy; if you look carefully, you won't see any plumbing. It's as neat as possible and quite different from most sumps that often have lots of cables and pipes everywhere. The current ReefSpot went through a lot of changes, and it was only after 6 or 7 months post-upgrade that the side effects caused by the upgrade subsided and the tank stabilized. I now started getting great colors again, even with low light. My 8 × 80-watt fixture was a bit short for the 1-meter-wide tank, and the idea of an upgrade remained on my mind. I tried to update with six Ocean Revive LED fixtures, but to my eye, the T5s looked far better than the LEDs, so I decided to go with all T5s. In January 2017, I upgraded my lighting


PAULO OLIVEIRA

Reef Hobbyist Magazine

43


ATI 16 Ă— 80-watt T5s

to 16 Ă— 80-watt T5s, and the corals' reaction has been great. I hadn't seen so much polyp extension for a long time. MAINTENANCE Currently, I do two water changes every week with natural sea water. I change 20 percent every Tuesday and another 20 percent every Friday. It's around 159 gallons (600 L) of natural sea water every week. You may think I'm crazy, but I'm a clean freak. The corals' colors and polyp extension are better, and in general, the reef tank is more stable. In Portugal, natural sea water is perfect for reef tanks, so a lot of people use it in their tanks and avoid expensive buckets of salt. Even with all these water changes, I still dose supplements. I've used Aquaforest products for almost a year now, and I love them. In this reef tank, I use Pro Bio S and NP Pro for nitrate and phosphate

44

www.reefhobbyistmagazine.com

reduction. For coral feeding, I use AF Amino Mix, AF Build, AF Energy, and AF Vitality. I do the Aquaforest Balling method: calcium, magnesium, KH buffer, and AF Reef Mineral Salt, with trace elements added with AF Components Strong. In addition to all of this, I use a product that I created: Coral Vibe SPS. It's a sort of all-in-one product that has a combination of amino acids, minerals, and vitamins. I use this to feed my corals and help their coloration. It's rich in potassium and iodine, which help corals stay healthy. My maintenance routine is as follows: - Do water changes two times per week - Add liquid supplements and coral foods daily - Change carbon on the first day of every month - Clean tank glass three times per week - Test parameters weekly - Feed fish three or four times daily


Reef Hobbyist Magazine

45


FISH FOOD For my fish, I only want the best. Currently, I feed my fish Aquatica by Sparos, a premium food made with the best products on the market. Since I started using Sparos, the growth and colors of my fish have been great. Now, with the introduction of an Acanthurus achilles in my tank, I've added nori algae to my feedings. PARAMETERS Calcium: 420 ppm Magnesium: 1275 ppm Carbonate Hardness (KH): 7 Potassium: 410 ppm Nitrate: 2 ppm Phosphate: 0.03 ppm pH: 8.3 Specific Gravity: 1.025 Temperature: 77.9° F After the last tank upgrade, I initially had a lot of trouble with nitrates. At times, they reached 10 ppm, which in my opinion, is a lot for SPS. I tried to use all-in-one bio pellets, but the dust from the pellets drove me crazy. I tried to understand the origin of the nitrates and realized that I didn't have enough live rock in the system. Even with the addition of carbon and bacteria, the rock was not enough to complete the denitrification process. Over the next 4 or 5 months, I gradually added live rock. If you look in the tank, you don't see it

46

www.reefhobbyistmagazine.com


Reef Hobbyist Magazine

47


48

www.reefhobbyistmagazine.com


at first, but I have a lot more rock than in my initial layout. I started with 20 kg from the last tank, and now, I have almost 40 kg; but the layout stays practically the same since the corals hide the changes. FISH & INVERTEBRATES -(9) Green Chromis (Chromis viridis) -Mandarin Goby (Synchiropus splendidus) -Sohal Tang (Acanthurus sohal) -Lined Surgeonfish (Acanthurus lineatus) -Yellow Tang (Zebrasoma flavescens) -Achilles Tang (Acanthurus achilles) -Green Parrotfish (Scarus quoyi) -Orchid Dottyback (Pseudochromis fridmani) -Fire Shrimp (Lysmata debelius) -Blue Tuxedo Urchin (Mespilia globulus) Reef Hobbyist Magazine

49


CORALS At a certain point, I lost count of the corals I added. I normally tell my friends that I have a lot of Acropora, but the truth is that I never have enough. I've had a green staghorn with me since the first tank, but the other corals were either bought along the way or acquired in trades with friends. I really don't know all the species I have in my reef tank. I'm crazy for SPS corals, so I buy what I like or what I imagine will be a great coral and a good addition to my reef tank. In the last 2 years, I sold frags of my corals just so I could buy some new species or some rare corals. It may appear as if my corals don't grow quickly, but they really do; I just frag a lot. As a resolution for 2017, I decided I would only frag a coral if it touched another one or when it touched the side of the tank. I've already acquired my must-have corals, so now I just have to wait and let them grow. SYSTEM Tank: ~285 gallons Sump: ~101 gallons Skimmer: Vertex 250

50

www.reefhobbyistmagazine.com

Return Pump: Jebao 8,000 L/h Circulation Pump: (2) Vortech Mp40 QD Lighting: (2) ATI Sunpower 8 Ă— 80W Dosing Pump: GroTech Tec III NG 3 channel Temperature Controller: STC1000+ Heaters: (2) 300W and (1) 150W Eheim For cooling, I have a forced air intake on the sump that turns on some fans and lets the cold air come from the outside into the sump. In the summer, it's connected to an air conditioner to maintain the temperature. UPCOMING I had thought that in the summer of 2017, I would upgrade the tank again to a bigger one. I dream of a 500+ gallon reef tank, but I'm going to put off this upgrade for a year. This project will be for the summer of 2018. I will see how these corals grow instead of spending another year stabilizing a new tank. So this year's resolution is simply to let the tank grow in. I will keep the tank and corals stable and try for better colors and great growth on my corals. R


52

www.reefhobbyistmagazine.com


Turn static files into dynamic content formats.

Create a flipbook
Issuu converts static files into: digital portfolios, online yearbooks, online catalogs, digital photo albums and more. Sign up and create your flipbook.