
Academic Authors: Ayushi Jain, Neha Verma
Creative Directors: Bhavna Tripathi, Mangal Singh Rana, Satish
Book Production: Rakesh Kumar Singh
Project Lead: Jatinder Kaur
VP, Learning: Abhishek Bhatnagar
All products and brand names used in this book are trademarks, registered trademarks or trade names of their respective owners.
© Uolo EdTech Private Limited
First impression 2023
Second impression 2024
Third impression 2025
This book is sold subject to the condition that it shall not by way of trade or otherwise, be lent, resold, hired out, or otherwise circulated without the publisher’s prior written consent in any form of binding or cover other than that in which it is published and without a similar condition including this condition being imposed on the subsequent purchaser and without limiting the rights under copyright reserved above, no part of this publication may be reproduced, stored in or introduced into a retrieval system, or transmitted in any form or by any means, electronic, mechanical, photocopying, recording or otherwise, without the prior written permission of both the copyright owner and the above-mentioned publisher of this book.
Book Title: Tekie Computer Science Teacher Manual 6
ISBN: 978-81-984882-5-1
Published by Uolo EdTech Private Limited
Corporate Office Address:
85, Sector 44, Gurugram, Haryana 122003
CIN: U74999DL2017PTC322986
Illustrations and images: www.shutterstock.com, www.stock.adobe.com and www.freepik.com
All suggested use of the internet should be under adult supervision.
Uolo’s Tekie program offers a coding-focused curriculum for grades 1 to 8, preparing students for the technology-driven world. We present a carefully crafted Teacher Manual to assist teachers in delivering effective and engaging lessons to students. Rather than prescribing teaching methods, the manual provides examples and demonstrates how and why teachers can apply these examples in their classes.
The Teacher Manual includes a suggested implementation plan to help teachers navigate the curriculum better throughout the academic year. Within the academic year, the Tekie program prescribes the following types of chapters and sessions:
Familiarisation: this period builds familiarity with the Tekie program and the digital platform.
Theory: these periods are dedicated to the Computer Science Theory chapters. These topics are mostly delivered in the classroom.
Tools: these periods are dedicated to the Computer Tools chapters. These topics involve almost equal numbers of classroom and computer labs sessions.
Coding: these periods are dedicated to the Coding chapters. These topics have more computer lab sessions.
Additional Hands-on Time: these are additional computer lab periods that teachers can use to revise topics or dedicate for completion of projects.
Revision: these are additional classroom periods that teachers can use to revise topics or cover syllabus backlogs.
Each chapter in this manual is structured to provide a comprehensive lesson plan. The chapters are divided into multiple sessions, each following the Warm up, Engage, Build, and Sum up (WEBS) strategy. The Warm up phase sets the stage for learning by connecting to prior knowledge and building curiosity. The Engage phase captures the students’ attention and motivates them to participate actively. In the Build phase, questions from various sections are discussed to build the understanding of the students. Finally, the Sum up phase reinforces learning through easy-to-recall activities and questions. Time duration for each section has been suggested based on the requirements of the students. Additionally, an answer key for every chapter is provided to assist teachers in assessing their students’ understanding and guiding their learning effectively.
Lastly, we understand that the Indian education landscape is quite diverse. To suit the needs of all types of schools, we have built-in extra higher-order chapters in the content books. These extra chapters are clearly marked in the table of contents of this manual. We suggest that the teacher completes the main chapters first and then move to higher-order optional chapters only if there is sufficient time left in the academic year and learners are ready for more challenging content.
We hope that this teacher manual will empower teachers to use the curriculum effectively, support the learning of all students thoroughly, create learning opportunities and design interactive learning environments that cater to the students’ needs and interests.
1 Types of Computers and Languages
1
Categories of Computers
Computer Languages Translator Programs
2 Services on the Internet ���������������� 10
What is the Internet?
Popular Services on the Internet
Potential Threats of Using the Internet and Netiquette
3 Features in a Presentation ������������ 18
Applying Animation and Transitions 1
Applying Animation and Transitions 2
Advanced Features of Google Slides 1
Advanced Features of Google Slides 2
Advanced Features of Google Slides and Viewing a Presentation 1
Advanced Features of Google Slides and Viewing a Presentation 2
4 Editing and Formatting Data in Google Sheets ���������������������������������� 32
Introduction to Google Sheets and Entering Data 1
Introduction to Google Sheets and Entering Data 2
Editing and Formatting Data in Google Sheets 1
Editing and Formatting Data in Google Sheets 2
5 Learn to Think Using Algorithms �� 44
What is an Algorithm?
What is a Flowchart?
6 Let Us Design in Canva! ������������������ 50
Introduction to Canva and Adding Shapes and Graphics 1
Introduction to Canva and Adding Shapes and Graphics 2
Editing Images 1
Editing Images 2
7 Creating Mind Maps with Canva ��� 61
Introduction to Mind Maps and Creating a Mind Map in Canva 1
Introduction to Mind Maps and Creating a Mind Map in Canva 2
Editing and Formatting Text 1
Editing and Formatting Text 2
Adding Branches to a Mind Map 1
Adding Branches to a Mind Map 2 8 Introduction to Robotics ���������������� 75
Introducing Robots and their Types
Famous Indian Robots
Robotics & AI and Robotics
Computer Vision* ���������������������� 82
Introduction to Computer Vision
Fun with AI: Using Google Translate
Introduction to Python 1
Introduction to Python 2 2 Operators in Python
Using Operators in Python
Algorithm and Flowcharts
Writing a Python Program and Using the Math Library
3 Conditional Statements in Python* ��98
Conditional Statements 1
Conditional Statements 2
Conditional Statements 3
Introduction to HTML �������������������
HTML 1 HTML 2
Introduction to CSS �����������������������
Introduction to CSS
CSS Colour Properties
CSS Font Properties
CSS Border Property

35
38
39
In Avora, a magical world, Mel, Conji, and Eva face a dangerous virus blending magic and technology, causing robots to malfunction. The virus, created by the villain Cyborg, threatens the harmony of Avora. The Trio learns about the Enigmus, a powerful tool held by Ms. Idea, who guides them in fighting the virus. With the Enigmus, they spread awareness, decode secret files, and uncover Cyborg’s plan to attack the Server Room.
Using teamwork and problem-solving, they confront challenges, solve puzzles, and create mind maps to strategise. In the final battle, Conji defeats Cyborg with a powerful spell, restoring peace to Avora. The Trio repairs the affected robots, ensuring the co-existence of magic and technology.
● Mel and Conji are flying to the Computer Lab to submit their project.
● Mel sees that something is wrong with the screen. Conji agrees and says all these machines are acting strange.
● Eva rushes over to join them, looking concerned about the machines.
● Conji says these are strange numbers and says 0.1.1... seems like a virus.
● Eva says, “Yes, a virus! A mix of magic and technology that is causing all of this chaos.”
● Mel says, “What if someone has tried to change the computer language? A tiny change in the computer language could have led to this situation.”
● Eva asks,"Can a small change set off such a chain reaction?"
● Conji says, “We should learn more about computer languages, and understand how this happened.”
This chapter is divided into the following classroom sessions
1. Categories of Computers
2. Computer Languages
3. Translator Programs
At the end of the session, the students will be able to:
● describe supercomputers.
● describe mainframe computers.
● describe minicomputers.
● describe workstations.
● describe personal computers.
● describe tablets and smartphones.
Keywords
● Supercomputers: These are super-fast and large computers. They can do lots of tasks very quickly.
● Personal computers: PCs are the most common type of computer and are designed for individual use. They include desktop computers and laptops.
Ask the students about different types of computers they have seen such as laptops, desktops, tablets, etc.
Describe different categories of computers such as supercomputers, mainframe computers, minicomputers, etc.
Group discussion Conclude the concepts
Assign homework
5 mins
Warm Up
● Ask the students about different types of computers they have seen such as laptops, desktops, tablets, etc. Then, discuss the different categories of computers.
15 mins
Engage
Explain the following concepts:
Learning Outcomes
Explanation
Describe supercomputers. Tell the students that supercomputers are super-fast and very big computers, as given on page 5.
Describe mainframe computers. Tell the students that mainframe computers are also big and super-fast, but smaller than supercomputers, as given on page 5.
Describe minicomputers. Tell the students that minicomputers are smaller than mainframes but still offer significant computing power, as given on page 6.
Describe workstations.
Tell the students that workstations are high-performance computers used for specialised tasks like professional photo and video editing, 3D design, scientific modelling, and software development, as given on page 6.
Describe personal computers. Tell the students that PCs are the most common type of computer and are designed for individual use, as given on page 6.
Describe tablets and smartphones.
Tell the students that tablets and smartphones are portable devices that combine computing capabilities with touchscreens, as given on page 6.
● Read aloud the questions provided in the Do It Yourself 1A section and encourage students to solve them. Instruct them to write the answers in their book.
Correct Responses:
Tablet and smartphones
Supercomputer
Mainframe computer
Minicomputer
Build
Smaller than mainframes
Need a lot of power and specialised cooling to stay cool
Can be carried anywhere
Performance is meaured in FLOPS
7 mins
● Ask the students to give the answer to the question “What other tasks can be performed using personal computers?" asked in the Think and Tell section on Page 6.
Possible Responses: Finding information on a topic, listening to songs, watching films, organising data, etc.
● Conduct a group discussion in the class among students on the topic 'Why Tablets and Smartphones Are More Popular?'.
Possible Response: You can carry tablets and smartphones anywhere you want, they serve as phones, cameras, music players, etc.
● Conclude the session by summarising that the supercomputers are super-fast and very big computers; mainframe computers are also big and super-fast, but smaller than supercomputers. Minicomputers are smaller than mainframes but still offer significant computing power. Workstations are high-performance computers used for specialised tasks like professional photo and video editing, 3D design, scientific modelling, and software development. PCs are the most common type of computer and are designed for individual use. Tablets and smartphones are portable devices that combine computing capabilities with touchscreens.
● Assign the following from the Chapter Checkup given at the end of the chapter as homework.
A. Fill in the Blanks: Questions 1, 2, and 3
C. Who Am I?: Questions 4 and 5
D. Write T for True and F for False: Questions 1, 2, 3, and 4
E. Answer the Following Questions: Questions 2 and 3
F. Apply Your Learning: Questions 2 and 3
At the end of the session, the students will be able to:
● define computer languages.
● describe first-generation languages and their advantages and disadvantages.
● describe second-generation languages and their advantages and disadvantages.
● describe third-generation languages and their advantages and disadvantages.
● describe fourth-generation languages and their advantages and disadvantages.
● describe fifth-generation languages and their advantages and disadvantages.
Keyword
● Computer Language: It can be defined as a set of instructions that computers can understand and follow.
Ask the students about different communicating languages. Explain to the students the concept of computer languages and five generations of computer languages. Also, discuss their advantages and disadvantages. Group discussion Conclude the concepts
Assign homework
● Ask the students about different communicating languages.
● Now, build the concept by discussing that as humans communicate using different languages, computers also have their own languages to understand and follow instructions.
Explain the following concepts:
Learning Outcomes Explanation
Define computer languages. Tell the students that a computer language can be defined as a set of instructions that computers can understand and follow, as given on page 7.
Describe first-generation languages and their advantages and disadvantages.
Describe second-generation languages and their advantages and disadvantages.
Describe third-generation languages and their advantages and disadvantages.
Describe fourth-generation languages and their advantages and disadvantages.
Describe fifth-generation languages and their advantages and disadvantages.
Tell them that a first-generation language is also called machine language or low-level language. Also, tell about its advantages and disadvantages, as given on page 8.
Tell them that second-generation language is also called assembly language. It is also a low-level language. Also, tell about its advantages and disadvantages, as given on page 8.
Tell them that third-generation languages are called high-level languages. Also, tell about its advantages and disadvantages, as given on pages 8 and 9.
Tell them that fourth-generation languages are called non-procedural languages. They are very high-level languages. Also, tell about its advantages and disadvantages, as given on page 9.
Tell them that fifth-generation languages are used for creating programs for Artificial Intelligence. Also, talk about its advantages and disadvantages, as given on pages 9 and 10.
● Give some examples of third-generation languages.
Correct Responses: FORTRAN, COBOL, C, C++, Java, C#, etc.
● Which generation language uses simple mnemonic code?
Correct Response: Second-generation languages
● What is the advantage of 5GL?
Correct Response: 5GLs require less code to accomplish tasks.
Build
7 mins
● Conduct a group discussion in the class among students on the topic 'Evolution of Computer Languages From Fourth Generation to Fifth Generation'.
Possible Response: Fourth-generation languages are very high-level languages. These languages were created to reduce the time, expense, and effort required for creating various software applications. Whereas fifth-generation languages are used for creating programs for Artificial Intelligence. Sum Up
3 mins
● Conclude the session by summarising that computer language can be defined as a set of instructions that computers can understand and follow. Also, revise the students about all the generations of computers.
● Assign the following questions from the Chapter Checkup given at the end of the chapter as homework.
A. Fill in the Blanks: Questions 4 and 5
B. Tick the Correct Option: Questions 1, 2, 4, and 5
C. Who Am I?: Questions 1 and 2
D. Write T for True and F for False: Question 5
E. Answer the Following Questions: Questions 1 and 5
F. Apply Your Learning: Questions 1 and 4
At the end of the session, the students will be able to:
● describe what a translator program is.
● differentiate between compiler, interpreter, and assembler.
Keywords
● Compiler: A compiler is a language processor that reads the source programs written in high-level language and converts them into an equivalent program written in machine code in one go.
● Interpreter: Interpreter is a translator program that converts high-level language code to machine language line by line as the program runs.
● Assembler: A translator, called an assembler, is used to convert assembly language code into machine language code.
Ask the students the meaning of translation. Tell them about translator programs. Also, discuss about the three main types of translator programs: compiler, interpreter, and assembler.
Group discussion
Conclude the concepts
Assign homework
5 mins
Warm Up
● Ask the students the meaning of translation then introduce them to translator programs.
● Tell them that translation is the process of converting text or speech from one language to another while preserving its meaning. Similarly, in computers, translator programs enable the computer to understand various languages.
15 mins
Engage
Explain the following concepts:
Learning Outcomes
Describe what a translator program is.
Explanation
Tell the students that a translator program helps the computer to understand various languages, as given on page 10.
Differentiate between compiler, interpreter, and assembler.
Tell students about three main types of translator programs namely, compiler, interpreter, and assembler, as given on pages 10 and 11.
● Read aloud the questions provided in the Do It Yourself 1B section and encourage students to solve them. Instruct them to write the answers in the book.
Correct Responses:
1. a. Assembler b. Fifth-generation
2. a. T b. F
Build
7 mins
● Conduct a group discussion in the class on the topic: 'The Difference Between a Compiler and an Interpreter'.
Correct Response: Interpreter is a translator program that converts high-level language code to machine language line by line as the program runs. Whereas a compiler is a language processor that reads the source programs written in high-level language and converts them into an equivalent program written in machine code in one go.
3 mins
● Conclude the session by summarising that a translator program converts instructions written in a computer language into something the machine can understand. A compiler translates the source code written in a high-level language into machine language in one go. An interpreter is a translator program that converts high-level language code to machine language line by line as the program runs. An assembler is used to convert assembly language code into machine language code.
● Assign the following questions from the Chapter Checkup given at the end of the chapter as homework.
B. Tick the Correct Option: Question 3
C. Who Am I?: Question 3
E. Answer the Following Questions: Question 4
F. Apply Your Learning: Question 5
In Avora, a magical world, Mel, Conji, and Eva face a dangerous virus blending magic and technology, causing robots to malfunction. The virus, created by the villain Cyborg, threatens the harmony of Avora. The Trio learns about the Enigmus, a powerful tool held by Ms. Idea, who guides them in fighting the virus. With the Enigmus, they spread awareness, decode secret files, and uncover Cyborg’s plan to attack the Server Room.
Using teamwork and problem-solving, they confront challenges, solve puzzles, and create mind maps to strategise. In the final battle, Conji defeats Cyborg with a powerful spell, restoring peace to Avora. The Trio repairs the affected robots, ensuring the co-existence of magic and technology.
● Mel Conji and Eva are at the Computer Lab, pondering the virus in the system.
● They decide to create a plan and head to the Records Room to find an ancient magical tool.
● Concerned about time, they realise the internet might offer a faster solution than searching through physical documents.
● Sceptical, Conji questions how the internet can solve magic and tech issues when the local computers are malfunctioning.
● Mel explains that the internet is like a vast digital library with information on everything.
● They decide to go to Elder Robot’s Office to access the internet and find a solution to the virus threatening Avora.
This chapter is divided into the following classroom sessions
1. What is the Internet?
2. Popular Services on the Internet
3. Potential Threats of Using the Internet and Netiquette
At the end of the session, the students will be able to:
● define what internet is.
● describe history of internet.
● elaborate advantages of internet.
● discuss disadvantages of internet.
Keyword
● Internet: The internet is a network that connects computers all over the world.
Think about your favourite online game or app. Do you ever wonder how did it get to your device? Elaborate with the students about History of the internet, advantages and disadvantages of the internet. Think and Tell Conclude the concepts Assign homework
Warm Up
● Think about your favourite online game or app. Do you ever wonder how did it get to your device?
● Now, relate the concept that these games or apps are available because of the Internet.
Explain the following concepts:
Define what internet is. Discuss with the students, internet is a network that connects computers all over the world, as given on page 20.
Describe history of internet. Tell the students that in the early 1960s, the U.S. military laid the groundwork for the internet by creating ARPANET, a network for sharing information between universities, as given on page 20.
Communication: The internet has revolutionised the way we communicate. It allows people to connect instantly through email, social media, video calls, and messaging apps, making it easy to stay in touch with family, friends, and colleagues worldwide.
Communication: The internet has revolutionised the way we communicate. It allows people to connect instantly through email, social media, video calls, and messaging apps, making it easy to stay in touch with family, friends, and colleagues worldwide.
Elaborate advantages of internet. Tell them various advantages of the internet from instant connections across continents to virtual classrooms and convenient shopping, the internet has irrevocably changed how we communicate, learn, navigate, shop, and manage finances, as given on pages 20 and 21.
Discuss disadvantages of internet.
Online Learning: The internet offers access to a vast number of educational resources and online courses. Students and learners of all ages can acquire new skills, take courses, and earn degrees from the comfort of their homes.
Online Learning: The internet offers access to a vast number of educational resources and online courses. Students and learners of all ages can acquire new skills, take courses, and earn degrees from the comfort of their homes.
Describe the different disadvantages of the Internet: that it leads to addiction and neglecting personal health; unsecured connections expose us to cyber threats; while misinformation and cyberbullying can have emotional impacts, as given on pages 21 and 22.
Maps and Navigation: Online maps and GPS services help people find addresses, get directions, and navigate unfamiliar places effortlessly. Services like Google Maps provide real-time traffic updates and even public transportation options.
Online Learning: The internet offers access to a vast number of educational resources and online courses. Students and learners of all ages can acquire new skills, take courses, and earn degrees from the comfort of their homes.
Maps and Navigation: Online maps and GPS services help people find addresses, get directions, and navigate unfamiliar places effortlessly. Services like Google Maps provide real-time traffic updates and even public transportation options.
Online Shopping: E-commerce platforms have made shopping more convenient than ever before. People can browse and purchase products from a wide range of retailers, without leaving their homes. Online shopping also offers the advantage of comparing prices and reading reviews.
Communication: The internet has revolutionised the way we communicate. allows people to connect instantly through email, social media, video calls, messaging apps, making it easy to stay in touch with family, friends, and colleagues worldwide.
Maps and Navigation: Online maps and GPS services help people find addresses, get directions, and navigate unfamiliar places effortlessly. Services like Google Maps provide real-time traffic updates and even public transportation options.


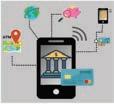
Online Payment: The internet has streamlined financial transactions through online payment systems like PayPal and Paytm, and digital wallets. Such services make it secure and easy to send and receive money, pay bills, and make online purchases.
Online Shopping: E-commerce platforms have made shopping more convenient than ever before. People can browse and purchase products from a wide range of retailers, without leaving their homes. Online shopping also offers the advantage of comparing prices and reading reviews.
Online Learning: The internet offers access to a vast number of educational resources and online courses. Students and learners of all ages can acquire new skills, take courses, and earn degrees from the comfort of their homes.
Online Payment: The internet has streamlined financial transactions through online payment systems like PayPal and Paytm, and digital wallets. Such services make it secure and easy to send and receive money, pay bills, and make online purchases.
Maps and Navigation: Online maps and GPS services help people find addresses, get directions, and navigate unfamiliar places effortlessly. Services like Google Maps provide real-time traffic updates and even public transportation options.
Online Shopping: E-commerce platforms have made shopping more convenient than ever before. People can browse and purchase products from a wide range of retailers, without leaving their homes. Online shopping also offers the advantage of comparing prices and reading reviews.
Despite many advantages, the internet has some disadvantages too. Wastage of Time: The internet has a lot of information that can kill people’s time while surfing the internet. Impact on Health: People may become addicted to using the internet. It can disturb their minds and affect their physical health in the long run. Spending an excessive amount of time on phones, laptops, or other such devices can cause health problems such as reduced eyesight, lower backache, and neckache.
Online Payment: The internet has streamlined financial transactions through online payment systems like PayPal and Paytm, and digital wallets. Such services make it secure and easy to send and receive money, pay bills, and make online purchases.
7 mins
Cybersecurity Threats: The internet, if not used correctly, can be a bit like leaving your front door unlocked. Some not-so-nice people may try to sneak into your personal networks and systems and cause harm for their gain or just for fun. If your computer is not secured, they can gain unauthorised access to your personal documents and other information such as stealing your bank account details and using them for their benefit.
Despite many advantages, the internet has some disadvantages too.
● Ask the students to give the answer of the question “Is using the internet an advantage or a disadvantage?” asked in the Think and Tell section on page 22.
Online Shopping: E-commerce platforms have made shopping more convenient than ever before. People can browse and purchase products from a wide range of retailers, without leaving their homes. Online shopping also offers the advantage of comparing prices and reading reviews.
Online Payment: The internet has streamlined financial transactions through online payment systems like PayPal and Paytm, and digital wallets. services make it secure and easy to send and receive money, pay bills, make online purchases.
Wastage of Time: The internet has a lot of information that can kill people’s time while surfing the internet.
Possible Response: The internet has advantages, aiding quick information access for school projects, but it can also be a distraction, requiring a balance in usage to ensure effective learning without neglecting other tasks.
● Read aloud the questions provided in the Do It Yourself 2A section and encourage the students to solve the questions. Instruct the students to write the answers in the book. Sum Up
Despite many advantages, the internet has some disadvantages too.
Impact on Health: People may become addicted to using the internet. It can disturb their minds and affect their physical health in the long run. Spending an excessive amount of time on phones, laptops, or other such devices can cause health problems such as reduced eyesight, lower backache, and neckache.
Wastage of Time: The internet has a lot of information that can kill people’s time while surfing the internet.
Despite many advantages, the internet has some disadvantages too.
Wastage of Time: The internet has a lot of information that can kill people’s time while surfing the internet. Impact on Health: People may become addicted to using the internet. It can disturb their minds and affect their physical health in the long run. Spending an excessive amount of time on phones, laptops, or other such devices can cause health problems such as reduced eyesight, lower backache, and neckache. Cybersecurity Threats: The internet, if not used correctly, can be a bit like leaving your front door unlocked.
42 Communication: The internet has revolutionised the way we communicate. It allows people to connect instantly through email, social media, video calls, and messaging apps, making it easy to stay in touch with family, friends, and colleagues worldwide.
Cybersecurity Threats: The internet, if not used correctly, can be a bit like leaving your front door unlocked. Some not-so-nice people may try to sneak into your personal networks and systems and cause harm for their gain or just for fun. If your computer is not secured, they can gain unauthorised access to your personal documents and other information such as stealing your bank account details and using them for their benefit.
Impact on Health: People may become addicted to using the internet. It can disturb their minds and affect their physical health in the long run. Spending an excessive amount of time on phones, laptops, or other such devices can cause health problems such as reduced eyesight, lower backache, and neckache.
3 mins
● Conclude the session by summarising that the internet is a network that connects computers all over the world. The history of the internet goes back to the early 1960s when the U.S. military laid the groundwork for the Internet by creating ARPANET, a network for sharing information between universities. The internet has irrevocably changed how we communicate, learn, and navigate. The internet’s vast amount of information can be a time sink, leading to addiction and neglecting personal health. Unsecured connections expose us to cyber threats.
Some not-so-nice people may try to sneak into your personal networks and systems and cause harm for gain or just for fun. If your computer is not secured, they can gain unauthorised access to your personal documents and other information such as stealing your bank account details and using them for their benefit.
Cybersecurity Threats: The internet, if not used correctly, can be a bit like leaving your front door unlocked. Some not-so-nice people may try to sneak into your personal networks and systems and cause harm for their gain or just for fun. If your computer is not secured, they can gain unauthorised access to your personal documents and other information such as stealing your bank account details and using them for their benefit.
● Assign the following questions from the Chapter Checkup given at the end of the chapter as homework.
A. Fill in the Blanks: Questions 1 and 4
D. Write T for True and F for False: Question 1
E. Answer the Following Question: Question 1
11/16/2023 2:28:26 PM
F. Apply Your Learning: Question 1
At the end of the session, the students will be able to:
● describe about email and its features, advantages, and disadvantages.
● define Google Drive.
● explain about e-commerce.
● elaborate online payments.
● describe blogging.
● define podcasting.
Keywords
● Email: Email stands for electronic mail. It is a way to send messages over the internet to other people.
● Google Drive: It is a cloud storage service that lets you store files online and access them from anywhere using the internet.
● E-commerce: It refers to buying and selling of products and services online.
● Blog: It is a website where people can write about their thoughts, experiences, and interests.
● Podcasting: It involves creating and sharing audio content.
Ask the students about some earlier methods of sending messages to friends or relatives.
What’s your favourite store? Could you ever buy something from them without leaving your house?
Tell the students about different services of the internet like email, Google Drive, e-commerce, podcasting, blogging. Also describe about the online payments.
Think and Tell Conclude the concepts Assign homework
● Ask the students about some earlier methods of sending messages to friends or relatives.
● What’s your favourite store? Could you ever buy something from them without leaving your house?
● Now, relate the concept by describing different services of the internet.
Explain the following concepts:
Describe about email and its features, advantages, and disadvantages.
An email is a short form for electronic mail which lets you share messages across the internet. Also tell about its features, advantages and disadvantages as given on pages 22 and 23.
Define Google Drive. Tell the students that Google Drive is their personal vault, which lets you store any file online and access it from anywhere with an internet connection as given on page 23.
Explain e-commerce. Define that e-commerce is an online shopping wonderland which lets you browse and buy anytime, anywhere, as given on pages 23 and 24.
Elaborate online payments. Explain to the students that online payments are the convenient way to pay for goods and services over the internet without the need for cash or checks, as given on page 24.
Describe blogging. Discuss with the students that a blog is your own corner of the internet, a platform where you can share your thoughts, experiences, and passions with the world, as given on page 25.
Define podcasting. Tell students that podcasts are like radio on demand, but with a twist. Instead of one-size-fits-all broadcasts, you get to choose your own story, as given on pages 25 and 26.
● Ask the following questions to the students to check for understanding.
1. What is an email?
Correct Response: Email stands for electronic mail. It is a way to send messages to other people over the internet.
2. Name some of the online modes of payment.
Correct Responses: Credit Card, Debit Card, Net Banking, Mobile Wallet, UPI
Build
7 mins
● Ask the students to give the answer of the question “Is using email a more convenient way to send or receive messages than the traditional mail?” asked in the Think and Tell section on page 23.
Possible Response: An email offers quick communication, while traditional mail takes longer. Preferences depend on the situation, with email for speed and traditional mail for meaningful experiences.
● Conclude the session by summarising Email is a short form for electronic mail, which lets you share messages across the internet. Google Drive is their personal vault, which lets you store any file online and access it from anywhere with an internet connection. E-commerce is an online shopping wonderland which lets you browse and buy anytime, anywhere. Online payments are a convenient way to pay for goods and services over the internet without the need for cash or checks. A blog is your own corner of the internet, a platform where you can share your thoughts. Podcasts are like radio on demand, but with a twist. Instead of one-size-fits-all broadcasts, you get to choose your own story.
● Assign the following questions from the Chapter Checkup given at the end of the chapter as homework.
A. Fill in the Blanks: Questions 2, 3, and 5
B. Tick the Correct Option: Questions 1, 2, 3, and 5
C. Who Am I?: Questions 1, 2, 3, and 5
D. Write T for True and F for False: Questions 2 and 3
E. Answer the Following Questions: Questions 2, 3, and 5
F. Apply Your Learning: Questions 2 and 4
At the end of the session, the students will be able to:
● define various potential threats and risks.
● describe netiquette.
Keyword
● Netiquette: It refers to a set of rules and regulations for behaving politely and respectfully online.
Can you think of a situation where someone might try to trick you into sharing personal information online? How would you recognise and avoid such a scenario?
If you accidentally come across inappropriate content while using the internet, what steps would you take, and why is it important to report such incidents?
Tell the students about the potential threats and risks associated with the use of internet.
Also tell them about the netiquette.
Group discussion Conclude the concepts
Assign homework
Warm Up
● Can you think of a situation where someone might try to trick you into sharing personal information online? How would you recognise and avoid such a scenario?
● If you accidentally come across inappropriate content while using the internet, what steps would you take, and why is it important to report such incidents?
● Now, build the concept that there are various potential threats when you use the internet, and to avoid them you should follow certain guidelines.
Explain the following concepts:
Define various potential threats and risks.
Describe netiquette.
Tell students that there are various risks related to the use of the internet, starting from malware hiding in the shadows to fake links phishing for your personal information, the online world can be a minefield for the unwary, as given on page 26.
Discuss with them netiquette refers to a set of rules and regulations for behaving politely and respectfully online, that means being polite, avoiding unnecessary drama, and respecting privacy, as given on pages 26 and 27.
● Read aloud the questions provided in the Do It Yourself 2B section and encourage the students to solve the questions. Instruct the students to write the answers in their book.
Correct Responses: 1. B 2. G 3. B 4. B 5. G
Build
7 mins
● Conduct a group discussion in the class among students based on the topic ‘What is personal information and why it’s important to keep it private online?’
Possible Response: Personal information includes details like name and address. Keeping it private online is vital to stay safe, preventing issues like identity theft and unwanted attention from strangers.
Sum Up
3 mins
● Conclude the session by summarising that the internet is as vast and wonderful as it is, comes with its own set of dangers. From malware hiding in the shadows to fake links phishing for your personal information, the online world can be a minefield for the unwary. Netiquette refers to a set of rules and regulations for behaving politely and respectfully online, which means being polite, avoiding unnecessary drama, and respecting privacy.
● Assign the following questions from the Chapter Checkup given at the end of the chapter as homework.
B. Tick the Correct Option: Question 4
C. Who Am I?: Question 4
D. Write T for True and F for False. Questions 4 and 5
E. Answer the Following Questions: Question 4
F. Apply Your Learning: Questions 3 and 5
In Avora, a magical world, Mel, Conji, and Eva face a dangerous virus blending magic and technology, causing robots to malfunction. The virus, created by the villain Cyborg, threatens the harmony of Avora. The Trio learns about the Enigmus, a powerful tool held by Ms. Idea, who guides them in fighting the virus. With the Enigmus, they spread awareness, decode secret files, and uncover Cyborg’s plan to attack the Server Room.
Using teamwork and problem-solving, they confront challenges, solve puzzles, and create mind maps to strategise. In the final battle, Conji defeats Cyborg with a powerful spell, restoring peace to Avora. The Trio repairs the affected robots, ensuring the co-existence of magic and technology.
● The trio, Mel, Conji, and Eva, are curious about the Enigmus and seek knowledge in the Anywhere Room.
● They find a door labelled ‘VOID’ and use it to enter the Void, a mysterious and seemingly scary place with floating rocks.
● Eva tells them to be careful of Drakon, infamous for his power to attack.
● Ms Idea, a guardian of the Void, welcomes them and reveals her connection to the place.
● Mel and Conji express amazement at Ms Idea’s existence in the Void.
● Ms Idea presents the Enigmus, a source of wisdom and magic, in response to the trio’s quest for knowledge about the virus affecting Avora.
● The trio is impressed by the beauty of the Enigmus and wonders about its use in solving the problems in Avora.
● Ms Idea informs the trio that the Drakon has escaped from the void. She also explains that the Enigmus is like a magical encyclopedia and suggests spreading awareness about it in Avora.
● The trio decides to use presentations to make the Enigmus known to everyone in Avora.
● Eva recommends making the presentations attractive to ensure widespread reading.
● Mel suggests going to the Elder Robot’s office to show them different ways of creating an interesting presentation.
This chapter is divided into the following classroom and lab sessions
1. Applying Animation and Transitions 1
2. Applying Animation and Transitions 2
3. Advanced Features of Google Slides 1
4. Advanced Features of Google Slides 2
5. Advanced Features of Google Slides and Viewing a Presentation 1
6. Advanced Features of Google Slides and Viewing a Presentation 2
At the end of the session, the students will be able to:
● describe animation and apply animation effects in Google Slides.
● determine the use of transitions and how to apply them in Google Slides.
Keywords
● Animation: Animation is a special visual effect that you add to text and different objects on a slide.
● Transition: Transition is the way one slide follows the other on the screen in a presentation.
Ask the students: Have you ever thought about how moving effects are added to the objects and slides in a presentation?
Explain to the students what animation is and how it can be applied in Google Slides. Also, tell them how to apply transition effects. Group discussion Conclude the concepts Assign homework
● Ask the students a few questions like: Have you ever thought about how moving effects are added to the objects and slides in a presentation?
● Now, build the concept that animations are used to add moving effects to the objects on the slides in a presentation.
● Also discuss with the students that they can also apply special effects to slides which are known as slide transition effects.
Engage
Explain the following concepts:
Describe animation and apply animation effects in Google Slides.
15 mins
Tell the students that the animations are special visual effects that they add to the text and different objects on a slide. Also tell them how to apply animation effects in Google Slides, as given on pages 38 and 39.
Determine the use of transitions and how to apply them in Google Slides.
Discuss with the students that the way one slide follows the other on the screen in a presentation is called a transition. Also tell them how to apply transitions to a presentation, as given on pages 40 and 41.
● Read aloud the questions provided in the Do It Yourself 3A and 3B sections and encourage the students to solve the questions. Instruct the students to write the answers in their book.
Do It Yourself 3A
Correct Responses:
1. F 2. T
Do It Yourself 3B
Correct Responses:
1. You can preview the transition by clicking the Play button in the Transition sidebar.
2. The Apply to all slides Button is used to apply the same transition effect to all slides in the presentation.
Build
7 mins
● Conduct a group discussion in the class among students on the topic “How do animations add life to videos and presentations?” as given in the Discuss section on page 39.
Possible Response: Animations add life to videos and presentations by making objects move, change their size, or appear and disappear in a fun and interesting way.
● Conduct a group discussion in the class among students on the topic "When you make a presentation on Google Slides, what is the most common transition that you use and why is it your favourite?", as given in the Discuss section on page 41.
Possible Response: Dissolve, Fade, Cube, etc.
Sum Up
3 mins
● Conclude the session by summarising that animation effects are like magic tricks for text, images, or other objects on a computer screen. They make objects move, change size, or appear and disappear in a fun way. The way one slide follows the other on the screen in a presentation is called transition.
● Assign the following additional questions as homework.
A. Fill in the Blanks.
1. are special visual effects that you add to text and different objects on a slide.
B. Write T for True and F for False.
1. To apply transition, in the menu bar, click on Slide and then select Transition.
At the end of the session, the students will be able to:
● describe animation and apply animation effects in Google Slides.
● determine the use of transitions and how to apply it in Google Slides.
Keywords
● Animation: Animation is a special visual effect that you add to the text and different objects on a slide.
● Transition: Transition is the way one slide follows the other on the screen in a presentation.
Warm Up Engage Build Sum Up
Let the students watch the video or the learning slides related to the topic on the digital panel.
Demonstrate the steps to apply animation and transition effects in a presentation.
Attempt the activity on the Assignment page.
Conclude the concepts
Assign homework
Warm Up
● Instruct the students to go to the Tekie’s Digital platform and open a Lab session on Applying Animation and Transitions 2.
● Show the learning slides or the Video and discuss the concepts shown on the panel.
Engage
Explain the following concepts:
Learning Outcomes
Describe animation and apply animation effects in Google Slides.
Explanation
Tell the students that the animations are special visual effects that you add to the text and different objects on a slide. Also demonstrate to them how to apply animation effects in Google Slides, as given on pages 38 and 39.
Determine the use of transitions and how to apply them in Google Slides.
Discuss with the students that the way one slide follows the other on the screen in a presentation is called transition. Also demonstrate to them how to apply transitions to a presentation, as given on pages 40 and 41.
● Ask the questions provided on the slides one by one to assess the students’ understanding. Discuss the answers to the questions with the students. If necessary, ask additional relevant questions.
7 mins
● Instruct the students to attempt the assignment by clicking on the Assignment tab.
● Explain the activity to the students.
3 mins
● Conclude the session by summarising that animation effects are like magic tricks for text, images, or other objects on a computer screen. They make objects move, change size, or appear and disappear in a fun way. The way one slide follows the other on the screen in a presentation is called transition. Also revise them the steps to apply animation and transition effects in a Google Slide.
● Assign the additional activity given on the panel to the students as homework.
At the end of the session, the students will be able to:
● explain how to use action buttons in a presentation.
● import external data into a presentation.
● describe how to add comments into a presentation.
● explain the use of a dictionary in Google Slides.
Keyword
● Importing data: Importing data into a presentation is the process of bringing external content or data into your own presentation.
Ask the students: Have you seen buttons in presentations which make the presentation more interactive?
Explain to the students the concept of action buttons, importing data, adding comments and using dictionary in Google Slides.
Think and Tell
Discussion
the concepts
● Ask the students: Have you seen buttons in presentations which make the presentation more interactive?
● Now, relate the concept that we can insert action buttons to make presentations more interactive. We can also move from one slide to another and play media files using action buttons.
Explain the following concepts:
Learning Outcomes
Explain how to use action buttons in a presentation.
Explanation
Explain to the students that action buttons are used to move from one slide to another and play media files. Also tell them the steps to use action buttons, as given on pages 42 and 43.
Import external data into a presentation.
Describe how to add comments into a presentation.
Explain the use of a dictionary in Google Slides.
Discuss with the students that importing data into a presentation is the process of bringing external content or data into your own presentation. Also discuss with them the steps to import data from Google Sheets, as given on pages 44 and 45.
Explain to the students that comments facilitate collaboration among multiple authors or reviewers working on the same presentation. Also tell them the steps to add comments in a presentation, as given on page 46.
Describe to the students that they can learn more about words or phrases used in the presentation with the help of a dictionary. Also tell them the steps to access dictionary in a presentation, as given on pages 46 and 47.
● Read aloud the questions provided in the Do It Yourself 3C, 3D, and 3E sections and encourage the students to solve the questions. Instruct the students to write the answers in their book.
Do It Yourself 3C
Correct Responses:
1. Insert
2. To test the action button, click on the Slideshow button at the top right-hand corner of Google Slides and go to the slide containing the action button that you have created. Click on this button to see it in action.
Do It Yourself 3D
Correct Responses:
1. T 2. F
Do It Yourself 3E
Correct Responses:
1. T 2. F
Build
7 mins
● Ask the students to give the answer to the question, “In what ways can importing data benefit the presenter?” in the Think and Tell section given on page 45.
Possible Response: Importing slides helps to add slides from another presentation to your current presentation. You can also import data from Google Sheets into your Google Slides presentation.
● Conduct a group discussion in the class among the students on the topic “In your opinion, what is more beneficial while giving feedback or taking notes, written comments or verbal comments?” asked in the Discuss section on page 46.
Possible Response: In my opinion, written comments are more beneficial when the feedback needs to be precise, formal, or revisited later.
● Conclude the session by summarising that we can set action buttons to open external content, such as a website, another PowerPoint presentation, a document, a spreadsheet, and much more. Also, tell the students that there are many interesting tools in Google Slides that are used to import data, add comments, search for information about a word, and many more.
● Assign the following questions from the Chapter Checkup given at the end of the chapter as homework.
A. Fill in the Blanks: Questions 2 and 3
B. Write T for True and F for False: Questions 2 and 4
C. Explain the Functions of the Icons: Question 1
D. Answer the Following Questions: Questions 1, 2, and 4
E. Apply Your Learning: Questions 3 and 4
At the end of the session, the students will be able to:
● use action buttons in a presentation.
● import external data into a presentation.
● add comments into a presentation.
● use a dictionary in Google Slides.
Keyword
● Importing data: Importing data into a presentation is the process of bringing external content or data into your own presentation.
Let the students watch the video or the learning slides related to the topic on the digital panel.
Demonstrate to the students how to use action buttons, import external data, add comments, and use dictionary in Google Slides.
Attempt the activity on the Assignment page.
Conclude the concepts
Assign homework
● Instruct the students to go to the Tekie’s Digital platform and open a Lab session on Advanced Features of Google Slides 2.
● Show the learning slides or the video and discuss the concepts shown on the panel.
Engage
Explain the following concepts:
Explain how to use action buttons in a presentation.
Explanation
Explain to the students that action buttons are used to move from one slide to another and play media files. Also demonstrate to them the steps to use action buttons, as given on pages 42 and 43.
Import external data into a presentation.
Describe how to add comments into a presentation.
Explain the use of a dictionary in Google Slides.
Discuss with the students that importing data into a presentation is the process of bringing external content or data into your own presentation. Also demonstrate to them how to import data from Google Sheets, as given on pages 44 and 45.
Explain to the students that comments facilitate collaboration among multiple authors or reviewers working on the same presentation. Also demonstrate to them how to add comments in a presentation, as given on page 46.
Describe to the students that they can learn more about words or phrases used in the presentation with the help of a dictionary. Also demonstrate to them how to access dictionary in a presentation, as given on pages 46 and 47.
● Ask the questions provided on the slides one by one to assess the students’ understanding. Discuss the answers of the questions with the students. If necessary, ask additional relevant questions.
7 mins
Build
● Instruct the students to attempt the assignment by clicking on the Assignment tab.
● Explain the activity to the students.
3 mins
● Conclude the session by summarising that we can set action buttons to open external content, such as a website, another PowerPoint presentation, a document, a spreadsheet, and much more. Also, tell the students that there are many interesting tools in Google Slides that are used to import data, add comments, search for information about a word, and many more. Also revise them the steps to use action buttons, import external data, add comments, and use dictionary in Google Slides.
● Assign the additional activity given on the panel to the students as homework.
At the end of the session, the students will be able to:
● use ink annotations in a presentation.
● zoom a slide.
● rearrange slides in a presentation.
● describe how to view a presentation.
Ask the students: Have you ever used a highlighter to emphasise important points? How did it help you understand better? Explain to the students the concept of ink annotation, zooming a slide, rearranging slides, and viewing a presentation.
Group Discussion Conclude the concepts
Assign homework
● Ask the students: Have you ever used a highlighter to emphasise important points of your notes? How did it help you understand better?
● Tell them that just like we use a highlighter to emphasise important points of your notes, similarly you can use the ink annotation in presentations to draw or highlight things to show everyone what is really important.
Explain the following concepts:
Learning Outcomes
Use ink annotations in a presentation.
Explanation
Elaborate to the students that ink annotations in presentations is like drawing or writing on the slides with colourful pens, just like we do on Paper. Also tell them the steps to use the ink annotation feature, as given on page 48.
Zoom a slide. Discuss with the students that slide zoom in presentations makes a small part of the slides look enlarged on the screen. Also tell them the steps to use the slide zoom feature, as given on pages 48 and 49.
Rearrange slides in the presentation. Tell students that rearranging slides means changing the order of your slides in your presentation. Also tell them how to rearrange slides in a presentation, as given on pages 49 and 50.
View a presentation. Discuss with the students that viewing a presentation means to watch the slides in action. Also tell them how to view a presentation, as given on page 50.
● Read aloud the questions provided in the Do It Yourself 3F section and encourage the students to solve the questions. Instruct the students to write the answers in their book.
Correct Response:
1. Open your presentation in Google Slides
2. Click on View
3. Run a slideshow
4. Navigate through slides
5. End the slideshow
● Conduct a group discussion in the class among students based on the topic ‘The Role of Zoom Features in Enhancing Digital Presentations and Audience Engagement’.
Possible Response: The zoom feature plays a significant role in presentations by helping adjust the size of slide content for better clarity. The zoom in feature makes the content on a slide appear larger whereas the zoom out makes the content on a slide appear smaller.
Sum Up 3 mins
● Conclude the session by summarising that the ink annotation in presentations is like drawing or writing on the slides with colourful pens. Slide zoom in presentation makes a small part of your slides look enlarged on the screen. Rearranging slides means changing the order of your slides in your presentation. Viewing a presentation means to watch the slides in action.
● Assign the following questions from the Chapter Checkup given at the end of the chapter as homework.
A. Fill in the Blanks: Questions 1 and 4
B. Write T for True and F for False: Questions 1 and 3
C. Explain the Functions of the Icons: Questions 2 and 3
D. Answer the Following Questions: Question 3
E. Apply Your Learning: Questions 1 and 2
At the end of the session, the students will be able to:
● use ink annotations in a presentation.
● zoom a slide.
● rearrange slides in a presentation.
● view a presentation.
Let the students watch the video or the learning slides related to the topic on the digital panel.
Demonstrate to the students how to use the ink annotation feature, zoom a slide, rearrange slides, and view a presentation. Attempt the activity on the Assignment page.
Conclude the concepts Assign homework
● Instruct the students to go to the Tekie’s Digital platform and open a Lab session on Advanced Features of Google Slides and Viewing a Presentation 2.
● Show the learning slides or the video and discuss the concepts shown on the panel.
Explain the following concepts:
Learning Outcomes
Use ink annotations in a presentation
15 mins
Explanation
Elaborate to the students that ink annotations in presentations is like drawing or writing on the slides with colourful pens, just like we do on Paper. Also demonstrate to them how to use the ink annotation feature, as given on page 48.
Zoom a slide
Rearrange slides in the presentation
View a presentation
Discuss with the students that slide zoom in presentations makes a small part of the slides look enlarged on the screen. Also demonstrate to them how to use the slide zoom feature, as given on pages 48 and 49.
Tell students that rearranging slides means changing the order of your slides in your presentation. Also demonstrate to them how to rearrange slides in a presentation, as given on pages 49 and 50.
Discuss with the students that viewing a presentation means to watch the slides in action. Also demonstrate to them how to view a presentation, as given on page 50.
● Ask the questions provided on the slides one by one to assess the students’ understanding. Discuss the answers of the questions with the students. If necessary, ask additional relevant questions.
7 mins
Build
● Instruct the students to attempt the assignment by clicking on the Assignment tab.
● Explain the activity to the students. Sum Up
3 mins
● Conclude the session by summarising that the ink annotation in presentations is like drawing or writing on the slides with colourful pens. Slide zoom in presentation makes a small part of your slides look enlarged on the screen. Rearranging slides means changing the order of your slides in your presentation. Viewing a presentation means to watch the slides in action.
● Assign the additional activity given on the panel to the students as homework.
In Avora, a magical world, Mel, Conji, and Eva face a dangerous virus blending magic and technology, causing robots to malfunction. The virus, created by the villain Cyborg, threatens the harmony of Avora. The Trio learns about the Enigmus, a powerful tool held by Ms. Idea, who guides them in fighting the virus. With the Enigmus, they spread awareness, decode secret files, and uncover Cyborg’s plan to attack the Server Room.
Using teamwork and problem-solving, they confront challenges, solve puzzles, and create mind maps to strategise. In the final battle, Conji defeats Cyborg with a powerful spell, restoring peace to Avora. The Trio repairs the affected robots, ensuring the co-existence of magic and technology.
● The three friends create a presentation to address chaos in Avora.
● Mel shares the presentation citywide, reaching everyone in Avora.
● Elders discuss the trio’s progress and worry about Drakons escape.
● Elders decide to send the trio a secret file for decoding.
● Trio receives appreciation in the Council Room for their efforts.
● Elders ask Mel if she has decoded the file. She explains that yes, it is a Google Sheets file, and they need to edit and format it to decode it.
● Conji asks, "What is editing and formatting?" Mel takes the lead to explain.
This chapter is divided into the following classroom and lab sessions
1. Introduction to Google Sheets and Entering Data 1
2. Introduction to Google Sheets and Entering Data 2
3. Editing and Formatting Data in Google Sheets 1
4. Editing and Formatting Data in Google Sheets 2
At the end of the session, the students will be able to:
● define Google Sheets and its features.
● start Google Sheets.
● describe components of Google Sheets.
● enter the data in sheet.
● select cells in the sheet.
● Worksheet: It is like a digital notebook where data is organised neatly into rows and columns.
Warm Up Engage Build Sum Up
Imagine you have a list of your favourite movies with information like title, release year, and genre. How would you organise this information on a sheet of paper? What challenges might you face?
Describe to students the Google Sheets and its features.
Tell them how to start the Google Sheets.
Also explain its components. Explain to them how to enter the data and select cells in the sheet.
Group discussion Conclude the concepts Assign homework
Warm Up
● Imagine you have a list of your favourite movies with information like title, release year, and genre. How would you organise this information on a sheet of paper? What challenges might you face?
● Now, build the concept that before the arrival of computers, people used to arrange information similarly, using pen and paper. In Google Sheets, we do it electronically, but the basic idea is the same.
Explain the following concepts:
Define Google Sheets and its features.
Describe that Google Sheets is a web-based application program that helps you to manage information, do calculations, and display data graphically using charts. The features of Google Sheets include easy editing and formatting, and printable sheets as given on page 59.
Start Google Sheets. Tell students that to open Google Sheets on your computer, ensure internet connectivity, open a web browser like Google Chrome and sign in to your Google account. Either type sheets.google.com and press Enter as given on page 59.
Describe components of Google Sheets.
Google Sheets is a versatile tool for data management and analysis, comprising essential components. Some of its components are spreadsheet title, menu bar toolbar, formula bar, cells, and many more as given on page 60.
Enter the data in sheet. When creating a spreadsheet, the initial step is entering the data, whether numerical or textual. This is achieved by clicking inside a cell and typing the desired information as given on page 61.
Select cells in the sheet. Google Sheets offers versatile options for selecting cells, rows, columns, or entire sheets as given on pages 61 and 62.
● Read aloud the questions provided in the Do It Yourself 4A section and encourage the students to solve the questions. Instruct the students to write the answers in their book.
1 Match the following.
Correct Responses:
Column A
Ctrl + Spacebar key
Shift + Spacebar key
Enter key
Default Title
2 Identify and write the cell addresses of the following.
a First cell of the column D
Column B
Untitled spreadsheet
Used to move down to the next cell
Used to select a row
Used to select a column
B. 1. Menu bar: The menu bar contains a range of drop-down menus, including File, Edit, View, Insert, Format, Data, and more. These menus offer access to a wide variety of functions and tools for working with your spreadsheet.
b Fifth cell of the tenth row
2. Formula bar: Located just below the toolbar, the formula bar displays the contents of the currently selected cell. You can use it to input and edit cell contents, including formulas.
c Last cell of the spreadsheet
7 mins
Build
d First cell of the spreadsheet
● Conduct a group discussion in the class among students based on the topic ‘Some real-life situations where Google Sheets can be useful.’
Editing means changing data values in your sheet. You can do this to fix mistakes or update information. For example, you may need to change numbers or add text to a cell.
To edit data:
Possible Responses: Google Sheets aids in collaborative class projects, promoting teamwork and real-time editing. For science experiments, students use Sheets to input and analyse data, enhancing their understanding of scientific processes.
● Conclude the session by summarising that Google Sheets is a web-based tool for managing, calculating, and visually presenting data through charts. Accessed via a web browser, it offers features like easy editing, printable sheets, formulas, and charts. The spreadsheet components include a customisable title, a menu bar for various functions, a top toolbar for quick commands, a formula bar for input/editing, and cells at column-row intersections containing text, numbers, or formulas. Multiple sheets in one document ease organisation and data entry involves selecting a cell, typing, and navigating with Enter. Versatile cell selection options enhance user control in data management.
● Assign the following questions from the Chapter Checkup given at the end of the chapter as homework.
A. Fill in the Blanks: Questions 1 and 2
B. Tick the Correct Option: Questions 1, 2, 4, and 5
C. Who Am I?: Questions 1, 2, 3, and 4
D. Write T for True and F for False: Questions 1 and 2
E. Answer the Following Questions: Questions 1, 2, 3, and 4
F. Apply Your Learning: Questions 1, 2, and 3
At the end of the session, the students will be able to:
● define Google Sheets and its features.
● start Google Sheets.
● describe components of Google Sheets.
● enter the data in sheet.
● select cells in the sheet.
Keyword
● Worksheet: It is like a digital notebook where data is organised neatly into rows and columns.
Let the students watch the video or the learning slides related to the topic on the digital panel.
Describe to students the Google Sheets and its features.
Tell them how to start the Google Sheets.
Also explain its components.
Explain to them how to enter the data and select cells in the sheet.
Attempt the activity on the Assignment page.
Conclude the concepts
Assign homework
● Instruct the students to go to the Tekie’s Digital platform and open a Lab session on Introduction to Google Sheets and Entering Data 2.
● Show the learning slides one by one and discuss the concepts shown on the slides in the panel.
Explain the following concepts:
Define Google Sheets and its features.
Describe that Google Sheets is a web-based application program that helps you to manage information, do calculations, and display data graphically using charts. The features of Google Sheets include easy editing and formatting, and printable sheets as given on page 59.
Start Google Sheets. Tell the students that to open Google Sheets on your computer, ensure internet connectivity, open a web browser like Google Chrome and sign in to your Google account. Either type sheets. google.com and press Enter as given on page 59.
Describe components of Google Sheets.
Enter the data in sheet.
Select cells in the sheet.
Google Sheets is a versatile tool for data management and analysis, comprising essential components. Some of its components are spreadsheet title, menu bar toolbar, formula bar, cells, and many more as given on page 60.
When creating a spreadsheet, the initial step is entering data, whether numerical or textual. This is achieved by clicking inside a cell and typing the desired information as given on page 61.
Google Sheets offers versatile options for selecting cells, rows, columns, or entire sheets as given on pages 61 and 62.
● Ask the questions provided on the slides one by one to assess the students’ understanding. Discuss the answers to the questions with the students. If necessary, ask additional relevant questions.
● Instruct the students to attempt the assignment by clicking on the Assignment tab.
● Explain the activity to the students.
● Conclude the session by summarising Google Sheets is a web-based tool for managing, calculating, and visually presenting data through charts. Accessed via a web browser, it offers features like easy editing, printable sheets, formulas, and charts. The spreadsheet components include a customisable title, a menu bar for various functions, a top toolbar for quick commands, a formula bar for input/ editing, and cells at column-row intersections containing text, numbers, or formulas. Multiple sheets in one document ease organisation, and data entry involves selecting a cell, typing, and navigating with Enter. Versatile cell selection options enhance user control in data management.
● Assign the additional activity given on the panel to the students as homework.
At the end of the session, the students will be able to:
● edit data in Google Sheets.
● copy and move cell data.
● change column width and row height.
● use Undo and Redo.
● insert cells, columns, rows.
● delete cells, columns, rows.
● apply text effects.
● apply italics effect.
● add and format cell borders.
● freeze rows and columns.
● Editing: Editing means changing values in your sheet.
Imagine you are organising a school event and using Google Sheets to keep track of attendees. How would you apply bold formatting to highlight the names of volunteers?
In a sports tournament spreadsheet, you want to emphasise the teams that have advanced to the next round.
How would you use the cell border feature in Google Sheets for this purpose?
Tell the students about how to copy and move cell data.
How to change column width and row height.
Use of undo and redo option.
How to insert and delete cells, columns or rows.
How to apply text effects, apply italics effect, add and formatting cell border.
How to freeze rows and columns.
Group discussion Conclude the concepts
Assign homework
Warm Up
● Imagine you are organising a school event and using Google Sheets to keep track of attendees. How would you apply bold formatting to highlight the names of volunteers?
● In a sports tournament spreadsheet, you want to emphasise the teams that have advanced to the next round. How would you use the cell border feature in Google Sheets for this purpose?
● Now, build the concept that editing means changing data values in your sheet. You can do this to fix mistakes or update information.
Explain the following concepts:
Edit data in Google Sheets.
Copy and move cell data.
Change column width and row height.
Describe to the students that editing means changing data values in your sheet and explain the steps to edit data as given on page 63.
Tell the students that moving data rearranges information, making it disappear from its original spot, while copying duplicates information at both the source and destination as given on pages 63 and 64.
Describe that if your data doesn’t fit well in a column, you can make it wider. Just move your mouse to the right edge of the column, and when it turns into a double arrow, drag it to your preferred width. You can also adjust the height of row as given on page 64.
Use Undo and Redo. Tell the students that if a mistake occurs, use the Undo feature by clicking the Undo button. To redo an action, click Redo as given on page 64.
Insert cells, columns, rows.
Delete cells, columns, rows.
Explain to the students that you can easily insert cells, columns, or rows to customise your data layout as given on pages 65 and 66.
Tell the students that deleting cells, columns, or rows is straightforward. These options grant efficient control over data removal while adjusting the spreadsheet layout as given on pages 66 and 67.
Apply text effects. Tell the students that you can enhance text presentation by changing font, size, and colour as given on pages 68 and 69.
Apply italics effect. Tell the students that to italicise cell data in Google Sheets, select the desired cells and either click the Italics button on the Toolbar as given on page 69.
Add and format cell borders.
Freeze rows and columns.
Describe that adding borders around cells is simple. Select the target cells, click the Borders button on the Toolbar, and choose the desired border type as given on page 69.
Explain to the students that freezing rows or columns keeps them visible while scrolling. Choose the row/column, go to View, select Freeze, and choose the number of rows or columns to freeze as given on page 69.
● Read aloud the questions provided in the Do It Yourself 4B and Do It Yourself 4C sections and encourage the students to solve the questions. Instruct the students to write the answers in their book.
Correct Responses: Do It Yourself 4B
1. a. Press F2 b. Ctrl + C
2. a. This will insert the row above the selected row.
b. This will insert the row below the selected row.
Do It Yourself 4C
1 Arrange the following steps in the correct sequence to apply border in Google Sheets.
1.
Click the Borders button from Toolbar.
Select the cells containing data where you want to put borders.
Choose the type of border you want to apply.
2 Write the use of the following shortcut key combinations.
a Ctrl + B
b Ctrl + I
7 mins
● Conduct a group discussion in the class among the students based on the topic “What happens if we press the Delete key after selecting a cell, row, or column?“ provided in the Discuss section as mentioned on page 67.
Possible Responses: If you select a single cell and press the Delete key, it will delete the content (data) within that specific cell.
2. a. Bold b. Italics Sum Up
1 Google Sheets is a web-based application program that helps you to manage information, do calculations, and display data graphically using charts.
If you select an entire row or column and press the Delete key, it will delete the entire row or column along with its contents.
2 A spreadsheet is a file containing multiple sheets, each consisting of columns (identified by letters) and rows (identified by numbers).
3 Cells are the basic units where data is entered, identified by the coordinates of the intersecting column and row (cell addresses).
3 mins
4 You can select a cell, row, column, or an entire sheet by using a mouse or a keyboard.
5 Editing means changing data values in your sheet.
● Conclude the session by summarising Google Sheets provides Cut, Copy, and Paste commands for efficient data handling. Moving data rearranges it, making it vanish from its original place, while copying duplicates it at both locations. Adjusting column width and row height is easy by dragging the column or row borders. Undo and Redo features help correct mistakes, and inserting or deleting cells, columns, or rows is straightforward. Customise text presentation with font, size, colour, bold, and italics options. Adding borders enhances visual appeal, and freezing rows or columns in Google Sheets keeps them visible while scrolling, providing efficient data organisation.
6 Moving data helps you rearrange information; and when you move it, it disappears from its original place.
7 The Undo feature is used to cancel the last changes.
8 The Redo feature reverses the actions performed using the Undo feature.
9 You can delete a cell, row, or column from a sheet.
● Assign the following questions from the Chapter Checkup given at the end of the chapter as homework.
10 You can make your sheet more presentable by applying one or several formatting features.
A. Fill in the Blanks: Questions 3, 4, and 5
11 Freezing rows in Google Sheets allows you to pin data in place so that you can see it while scrolling.
B. Tick the Correct Option: Question 3
C. Who Am I?: Questions 5
D. Write T for True and F for False: Questions 3, 4, and 5
E. Answer the Following Questions: Question 5
F. Apply Your Learning: Question 4
A. Fill in the Blanks.
At the end of the session, the students will be able to:
● edit data in Google Sheets.
● copy and move cell data.
● change column width and row height.
● use Undo and Redo.
● insert cells, columns, rows.
● delete cells, columns, rows.
● apply text effects.
● apply italics effect.
● add and format cell borders.
● freeze rows and columns.
● Editing: Editing means changing values in your sheet.
Let the students watch the video or the learning slides related to the topic on the digital panel.
Tell the students about how to copy and move cell data.
How to change column width and row height.
Use of undo and redo option.
How to insert and delete cells, columns or rows.
How to apply text effects, apply italics effect, add and formatting cell border.
How to freeze rows and columns.
Attempt the activity on the Assignment page.
Conclude the concepts
Assign homework
● Instruct the students to go to the Tekie’s Digital platform and open a Lab session on Editing and Formatting Data in Google Sheets 2
● Show the learning slides one by one and discuss the concepts shown on the slides in the panel.
Explain the following concepts:
Edit data in Google Sheets.
Copy and move cell data.
Change column width and row height.
Use Undo and Redo.
Insert cells, columns, rows.
Delete cells, columns, rows.
Describe students that editing means changing data values in your sheet and explain the steps to edit data as given on page 63.
Tell students that moving data rearranges information, making it disappear from its original spot, while copying duplicates information at both the source and destination as given on pages 63 and 64.
Describe that if your data doesn’t fit well in a column, you can make it wider. Just move your mouse to the right edge of the column, and when it turns into a double arrow, drag it to your preferred width. You can also adjust the height of row as given on page 64.
Tell the students that if a mistake occurs, use the Undo feature by clicking the Undo button. To redo an action, click Redo as given on page 64.
Explain students that you can easily insert cells, columns, or rows to customise your data layout as given on pages 65 and 66.
Tell the students that deleting cells, columns, or rows is straightforward. These options grant efficient control over data removal while adjusting the spreadsheet layout as given on pages 66 and 67.
Apply text effects. Tell the students that you can enhance text presentation by changing font, size, and colour as given on pages 68 and 69.
Apply italics effect. Tell the students that to italicise cell data in Google Sheets, select the desired cells and either click the Italics button on the Toolbar as given on page 69.
Add and format cell borders.
Freeze rows and columns.
Describe that adding borders around cells is simple. Select the target cells, click the Borders button on the Toolbar, and choose the desired border type as given on page 69.
Explain to the students that freezing rows or columns keeps them visible while scrolling. Choose the row/column, go to View, select Freeze, and choose the number of rows or columns to freeze as given on page 69.
● Ask the questions provided on the slides one by one to assess the students’ understanding. Discuss the answers to the questions with the students. If necessary, ask additional relevant questions.
12 mins
Build
● Instruct the students to attempt the assignment by clicking on the Assignment tab.
● Explain the activity to the students.
● Conclude the session by summarising that Google Sheets provides Cut, Copy, and Paste commands for efficient data handling. Moving data rearranges it, making it vanish from its original place, while copying duplicates it at both locations. Adjusting column width and row height is easy by dragging the column or row borders. Undo and Redo features help correct mistakes, and inserting or deleting cells, columns, or rows is straightforward. Customise text presentation with font, size, colour, bold, and italics options. Adding borders enhances visual appeal, and freezing rows or columns in Google Sheets keeps them visible while scrolling, providing efficient data organisation.
● Assign the additional activity given on the panel to the students as homework.
In Avora, a magical world, Mel, Conji, and Eva face a dangerous virus blending magic and technology, causing robots to malfunction. The virus, created by the villain Cyborg, threatens the harmony of Avora. The Trio learns about the Enigmus, a powerful tool held by Ms. Idea, who guides them in fighting the virus. With the Enigmus, they spread awareness, decode secret files, and uncover Cyborg’s plan to attack the Server Room. Using teamwork and problem-solving, they confront challenges, solve puzzles, and create mind maps to strategise. In the final battle, Conji defeats Cyborg with a powerful spell, restoring peace to Avora. The Trio repairs the affected robots, ensuring the co-existence of magic and technology.
● Mel, Conji, and Eva examined the glowing pattern, and Conji identified the server room as the next target.
● Eva was surprised and asked why the Drakon would target the server room.
● Mel explained that the Drakon aimed to stop robots from using Engimus’s magical powers.
● Mel added that the Drakon opposed the harmony of magic and technology in Avora and informed them that the Elders were on their way.
● The Drakon suddenly arrives and acknowledges their discovery.
● Mel said they wouldn’t let him harm their home, but the Drakon mocked their efforts, claiming the virus would destroy the robots.
● The Elder Wizard suddenly appeared, blocking the Drakon’s attack, and urged the trio to stop the virus.
● Rushing into the server room, Conji noted the vast number of glowing servers.
● Mel proposed using the algorithm to locate the source of the virus.
● Eva was unaware of the algorithms. Mel asked them to listen carefully.
This chapter is divided into the following classroom sessions
1. What is an Algorithm?
2. What is a Flowchart?
At the end of the session, the students will be able to:
● describe what an algorithm is.
● explain the real life examples of algorithm.
Keyword
Ask the students how they start their day. Tell them to brief it step by step.
Explain to students what an algorithm is, tell them the steps to write an algorithm and give real-life examples of algorithms.
Group discussion Conclude the concepts Assign homework
● Ask the students how they start their day. Also, ask them to brief it step by step.
● Now, build the concept of the algorithm.
● Algorithm: An algorithm is a set of step-by-step instructions designed to perform a specific task or solve a particular problem. 15 mins
Engage
Explain the following concepts:
Describe what an algorithm is.
Explain the real-life examples of the algorithm.
Explanation
Describe the algorithm to students and tell them how to write an algorithm, as given on page 78.
Discuss with students the real-life examples of algorithms, as given on pages 78 and 79.
● Read aloud the question provided in the Do It Yourself 5A section and encourage the students to solve the questions. Instruct the students to write the answers in the book.
Correct Responses:
1. Step 1: Start.
Step 2: Write a list of items to buy.
Step 3: Get shopping bags and payment ready.
Step 4: Go to the store by walking or driving.
Step 5: Buy the items and return home.
Step 6: Stop.
2. Step 1: Start.
Step 2: Gather all ingredients.
Step 3: Prepare the baking tin.
Step 4: Mix dry and wet ingredients separately.
Step 5: Combine all ingredients into a batter.
Step 6: Pour the batter into the tin and bake.
Step 7: Stop.
Build
7 mins
● Conduct a group discussion in the class among students based on the topic “Role of algorithms in everyday life”.
Possible response: Getting ready for school, organising books in the library, traffic lights on the road, etc.
3 mins
Sum Up
● Conclude the session by summarising that an algorithm is a set of step-by-step instructions designed to perform a specific task or solve a particular problem. Also, tell them how to write the algorithm and give them real-life examples of an algorithm.
● Assign the following questions from the Chapter Checkup given at the end of the chapter as homework.
A. Fill in the Blanks: Question 1
B. Tick the Correct Option: Question 4
C. Write True and False: Question 3
D. Answer the Following Questions: Questions 1 and 3
E. Apply Your Learning: Question 1
At the end of the session, the students will be able to:
● describe the flowchart and its symbols.
● creating a flowchart.
● explain the real-life examples of flowcharts.
Keyword
● Flowchart: A flowchart is a pictorial representation of an algorithm. A flowchart uses symbols and shapes to represent various elements such as inputs, outputs, and decisions.
Warm Up
Ask the students the names of different mathematical shapes.
Explain to students what a flowchart is, what flowchart symbols are, and how to create a flowchart. Also, give them real-life examples of flowcharts.
Action Plan
Group Discussion Conclude the concepts
Assign homework
Warm Up
● Ask the students the names of different mathematical shapes.
● Now, build the concept by telling them about the flowchart and its symbols.
Explain the following concepts:
Learning Outcomes
Describe the flowchart and its symbols
Creating a flowchart
Explain the real life examples of flowchart
Explanation
Describe the flowchart to students and tell them commonly used flowchart symbols as given on page 80.
Describe the students' how to create a flowchart by giving the example of bake a cake, as given on page 81.
Discuss with students' the real life examples of flowchart, as given on page 81.
● Read aloud the question provided in the Do It Yourself 5B section and encourage the students to solve the questions. Instruct the students to write the answers in the book.
Correct Responses:
1. a. Read three numbers a, b and c b. Start Read F
2. Algorithm:
Step 1: Start.
Step 2: Check the traffic light color.
Step 3: If the light is green, proceed to move forward.
Step 4: If the light is yellow, slow down and prepare to stop.
Step 5: If the light is red, stop and wait for the green light.
Step 6: Repeat Steps 3 to 6 until you reach your destination/end.
Step 8: Stop.
Flowchart Start
Read the number
Is the number divisible by 2?
Print “Odd number”
Print “Odd number”
● Conduct a group discussion in the class among students based on the topic “Importance of Flowchart”.
Possible Response: Flowcharts simplify complex processes, improve understanding, and help identify errors for better problem-solving.
● Conclude the session by summarising that a flowchart is a pictorial representation of an algorithm. A flowchart uses symbols and shapes to represent various elements such as inputs, outputs, and decisions. These symbols are connected by arrows to show the logical flow of the process. Also, tell them how to create/design a flowchart using different symbols and give them real-life examples of flowchart.
● Assign the following questions from the Chapter Checkup given at the end of the chapter as homework.
A. Fill in the Blanks: Questions 2,3 and 4
B. Tick the Correct Option: Questions 1,2 and 3
C. Write True and False: Questions 1 and 2
D. Answer the Following Questions: Questions 2 and 4
E. Apply Your Learning: Questions 2 and 3.
Mel and Conji start their summer vacation with a visit to the Computer Museum, learning about the history of computers. At the Library, they search for a book on Avora’s creation but find it missing. Elder Wizard and Elder Robot suggest looking online, introducing them to the internet as a vast information network. They visit Eva, who’s struggling to organize her birthday party. Mel teaches her to use Google Docs and Slides, and with help from Ms Idea at the Idea Centre, they settle on a robotic theme. Eva creates stunning invitations using Google Slides, and Elder Wizard and Elder Robot teach them to manage a budget using Google Sheets. As the party plans wrap up, they receive a surprise gift for Eva from Mr Fate and a life lesson about happiness. Later, a mysterious message leads them to the “Enchanted Doorway,” where they discover a magical game room. Playing “Space Explorer,” they learn about AI, sparking excitement to explore more of their magical world.
● The trio goes to the main server.
● Eva thinks that if the main server is attacked by Drakon then how they will save all the robots.
● Mel believes that they will have to shut down their server for some time.
● Eva looks at some random pictures on the screen attached to the main server.
● They speculate that the pictures are puzzles which they need to solve to access the main server.
● Mel suggested editing and arranging pictures using Canva, an online design tool with graphics, templates, and editing capabilities.
● Mel then goes on to teach them everything they need to know about editing and designing on Canva.
This chapter is divided into the following classroom and lab
1. Introduction to Canva and Adding Shapes and Graphics 1
2. Introduction to Canva and Adding Shapes and Graphics 2
3. Editing an Image 1
4. Editing an Image 2
At the end of the session, the students will be able to:
● describe the concept of Canva.
● open Canva.
● create a poster and identify the components of the Canva Editor window.
● apply templates in Canva.
● apply styles in Canva.
● add shapes and graphics in Canva.
Keywords
● Canva: It is a user-friendly online tool that allows you to create and edit images, design cards, and make various visual projects.
● Templates: These are the ready-made designs available in Canva to help you start your project.
Ask Students: Imagine you are creating a poster for the upcoming school talent show. How would you make the poster eye-catching and exciting? Have you ever used any apps to edit photos or create collages?
Tell students about Canva and how to open it.
Elaborate on the steps to create a blank poster and explain the components of the Canva editor window.
Explain the steps to add templates and apply styles in Canva. Also, discuss the steps to add shapes and graphics.
● Ask students: Imagine you are creating a poster for the invitation to your birthday party. How would make the poster eye-catching and exciting?
● Have you ever used any apps to edit photos or create collages?
● Tell students that Canva is a user-friendly online tool that allows you to create and edit images, design cards, and make various visual projects.
15 mins Engage
Explain the following concepts:
Describe the concept of Canva.
Explain to the students that Canva is a user-friendly online tool that allows you to create and edit images, design cards, and make various visual projects. Also tell them the uses of Canva and and things you can make in Canva, as given on page 92.
Open Canva. Tell them how to open Canva, as given on page 92.
Create a and identify the components of Canva Editor window.
Apply templates in Canva.
Apply styles in Canva.
Add shapes and graphics in Canva.
Describe to the students the steps to create a poster. Also, describe them the components of the Canva editor window such as the Canvas, Design, Elements, Text tools, etc., as given on pages 93 and 94.
Tell them that templates are the ready-made designs available in Canva to help you start your project. Also, tell them the steps to create a design using a template, as given on page 94.
Explain to them that Canva’s Styles feature enhances the visual appeal of your projects by offering unique colour combinations and font styles, as given on page 95.
Tell them that in Canva, the addition of lines, shapes, and graphics help design and modify the template used in your design, as given on page 96.
● Read aloud the questions provided in the Do It Yourself 6A section and encourage the students to solve the questions. Instruct the students to write the answers in the book.
Do It Yourself 6A
Correct Responses:
Match the component of Canva with its correct description.
1 Notes Different types of templates and styles
2 Design Wide range of design elements
3 Canvas Notes to keep track of ideas, reminders, etc.
4 Elements Central workspace
By adding lines, shapes, and graphics in Canva, you can design and modify the template used in your design. These can be lines that go straight or curvy, shapes like circles or stars, and pictures or icons that make your work interesting.
Follow the given steps:
● Conduct a group discussion in the class among the students based on the topic, “Imagine you are designing a Christmas card for your best friend. What elements would you include in the card, and how would you make it special?” provided in the Discuss section, as mentioned on page 97.
Possible Responses: To create a special Christmas card for a best friend, you can include a wide range of design elements, including photos, videos, stickers, shapes, and icons. You can search and browse for elements to enhance the visual appeal of your project. To make it special, you can add a heartfelt message expressing gratitude and friendship.
● Conclude the session by summarising that Canva is a user-friendly online tool that allows you to create and edit images, design cards, and make various visual projects. There are many components of the Canva Editor window, such as Canvas, Design, Elements, Text tools, Zoom Controls, etc. Templates are the ready-made designs available in Canva to help you start your project. Canva provides you with special colour combinations and font styles that you can use to make your project look appealing and special. By adding lines, shapes, and graphics in Canva, you can design and modify the template.
● Assign the following questions from the Chapter Checkup given at the end of the chapter as homework.
A. Fill in the Blanks: Questions 1, 2, 3, and 4
B. Tick the Correct Option: Questions 1, 3, and 4
C. Who Am I?: Questions 1, 2, and 4
D. Write T for True and F for False: Questions 1, 2, 3, and 4
E. Answer the Following Questions: Questions 1 and 4
F. Apply Your Learning: Questions 1 and 4
At the end of the session, the students will be able to:
● describe the concept of Canva.
● open Canva.
● create a poster and identify the components of the Canva Editor window.
● apply templates in Canva.
● apply styles in Canva.
● add shapes and graphics in Canva.
Keywords
● Canva: It is a user-friendly online tool that allows you to create and edit images, design cards, and make various visual projects.
● Templates: These are the ready-made designs available in Canva to help you start your project.
Let the students watch the video or the learning slides related to the topic on the digital panel.
Tell students about Canva and how to open it.
Demonstrate to the students how to create a blank poster and explain the components of the Canva editor window.
Demonstrate to the students how to add templates and apply styles in Canva. Also, demonstrate the steps to add shapes and graphics.
Warm Up
● Instruct the students to go to the Tekie’s Digital platform and open a Lab session on Introduction to Canva and Adding Shapes and Graphics 2.
● Show the learning slides or the video and discuss the concepts shown on the panel.
Explain the following concepts:
Describe the concept of Canva.
Explain to the students that Canva is a user-friendly online tool that allows you to create and edit images, design cards, and make various visual projects. Also tell them the uses of Canva and and things you can make in Canva, as given on page 92.
Open Canva. Tell them how to open Canva, as given on page 92.
Create and identify the components of the Canva Editor window.
Apply templates in Canva.
Demonstrate to the students how to create a poster. Also, describe the components of the Canva editor window such as the Canvas, Design, Elements, Text tools, etc., as given on pages 93 and 94.
Tell them that templates are the ready-made designs available in Canva to help you start your project. Also, tell them how to create a design using a template, as given on page 94.
Apply styles in Canva. Explain to them that Canva’s Styles feature enhances the visual appeal of your projects by offering unique colour combinations and font styles. Also demonstrate to them how to apply styles in Canva, as given on page 95.
Add shapes and graphics in Canva.
Tell them that in Canva, the addition of lines, shapes, and graphics helps design and modify the template used in your design, as given on page 96.
● Ask the questions provided on the slides one by one to assess the students’ understanding. Discuss the answers to the questions with the students. If necessary, ask additional relevant questions.
● Instruct the students to attempt the assignment by clicking on the Assignment tab.
● Explain the activity to the students. Sum
● Conclude the session by summarising that Canva is a user-friendly online tool that allows you to create and edit images, design cards, and make various visual projects. There are many components of the Canva Editor window, such as Canvas, Design, Elements, Text tools, Zoom Controls, etc. Templates are the ready-made designs available in Canva to help you start your project. Canva provides you with special colour combinations and font styles that you can use to make your project look appealing and special. By adding lines, shapes, and graphics in Canva, you can design and modify the template.
● Assign the additional activity given on the panel to the students as homework.
At the end of the session, the students will be able to:
● define what editing an image means.
● change colour scheme and style.
● flip an image.
● auto-adjust, change the foreground and background of the image.
● adjust the brightness of the image.
● crop and rotate the image.
Keywords
● Editing an image: It means making changes to a picture to make it look better or different.
● Flipping an image: It means creating a mirrored or reversed version of the original image.
Ask students if they have ever tried editing an image in a word processor or Paint. Tell students what editing an image means. Also tell them how to change colour sheme and style, flip and auto-adjust an image, change foreground background,and brightness of image. Also tell them the steps to crop and rotate an image.
Think and Tell Conclude the concepts
Assign homework
● Cropping an image: It means removing the unwanted parts from your image so that you can focus on the important area of your image. 5 mins
Warm Up
● Ask students if they have tried editing an image in a word processor or Paint.
● Now, tell students that they can edit an image using Canva too to make changes to the image.
Explain the following concepts:
Define what editing an image means.
Change colour scheme and style.
Flip an image.
Auto-adjust, and change the foreground and background of the image.
Adjust the brightness of the image.
Crop and rotate the image.
Discuss with the students that editing an image in Canva means making changes to a picture to make it look better or different, as given on page 97.
Tell them to make any changes to the image, you need to upload it onto your canvas. You can select any image that is saved on your computer to upload it and then click on the Edit image button on the editing menu, as given on pages 97 and 98.
Elaborate to them that flipping an image means creating a mirrored or reversed version of the original image, as given on page 98.
Explain to them that there are many options that you can apply to your design to make it attractive. You can change the foreground and background of the image. Also, you can select the option to auto-adjust various aspects of your image, as given on page 99.
Tell students that to adjust the brightness of the image, various options are available in Canva, as given on pages 99 and 100.
Tell students that they can also crop and rotate their images in Canva. Cropping means removing the unwanted parts from your image so that you can focus on the important area of your image, as given on page 100.
● Read aloud the question provided in the Do It Yourself 6B section and encourage the students to solve the question. Instruct the students to write the answer in their book.
Correct Responses:
Flipping an image means creating a mirrored or reversed version of the original image. Cropping means removing the unwanted parts from your image so that you can focus on the important area of your image.
● Ask the students to answer the question “Suppose you have taken a picture using your digital camera. How could you use Canva to enhance it or add a creative touch?” asked in the Think and Tell section, as given in page 100.
Possible Responses: Using Canva, you can enhance a digital camera photo by uploading it, applying templates for style, and adding colours, fonts, and fun elements from the Styles and Elements tabs. You can also change the foreground and background of the image and adjust its brightness. Canva’s user-friendly features allow students to turn a regular photo into a creative masterpiece effortlessly.
● Conclude the session by summarising that editing an image in Canva means making changes to a picture to make it look better or different. To make any changes to the image, you need to upload it onto your canvas. You can select any image that is saved on your computer. Flipping an image means creating a mirrored or reversed version of the original image. You can change the foreground and background of the image. To adjust the brightness of the image, various options are available. Cropping means removing the unwanted parts from your image so that you can focus on the important area of your image.
● Assign the following questions from the Chapter Checkup given at the end of the chapter as homework.
A. Fill in the Blanks: Question 5
B. Tick the Correct Option: Questions 2 and 5
C. Who Am I?: Questions 3 and 5
D. Write T for True and F for False: Question 5
E. Answer the Following Questions: Questions 2, 3, and 5
F. Apply Your Learning: Questions 2, 3, and 5
At the end of the session, the students will be able to:
● define what editing an image means.
● change colour scheme and style.
● flip an image.
● auto-adjust, change the foreground and background of the image.
● adjust the brightness of the image.
● crop and rotate the image.
Keywords
● Editing an image: It means making changes to a picture to make it look better or different.
● Flipping an image: It means creating a mirrored or reversed version of the original image.
● Cropping an image: It means removing the unwanted parts from your image so that you can focus on the important area of your image.
Let the students watch the video or the learning slides related to the topic on the digital panel.
Tell students what editing an image means. Also demonstrate to them how to change colour sheme and style, flip and auto-adjust an image, change foreground background, and brightness of image. Also demonstrate to them the steps to crop and rotate an image.
Warm Up
● Instruct the students to go to the Tekie’s Digital platform and open a Lab session on Editing Images 2.
● Show the learning slides or the video and discuss the concepts shown on the panel.
15 mins
Explain the following concepts:
Define what editing an image means.
Change colour scheme and style.
Flip an image.
Auto-adjust, and change the foreground and background of the image.
Adjust the brightness of the image.
Crop and rotate the image.
Discuss with the students that editing an image in Canva means making changes to a picture to make it look better or different, as given on page 97.
Tell them to make any changes to the image, you need to upload it onto your canvas. Demonstrate to them how to change the colour scheme and style of an image, as given on pages 97 and 98.
Elaborate to them that flipping an image means creating a mirrored or reversed version of the original image. Also demonstrate to them how to flip an image, as given on page 98.
Explain to them that there are many options that you can apply to your design to make it attractive. Demonstrate to them how to change the foreground and background of the image. Also, demonstrate to them how to auto-adjust various aspects of their image, as given on page 99.
Tell students that to adjust the brightness of the image, various options are available in Canva and demonstrate to them how to use these options, as given on pages 99 and 100.
Tell students that they can also crop and rotate their images in Canva. Demonstrate to them how to crop and rotate an image, as given on page 100.
● Ask the questions provided on the slides one by one to assess the students’ understanding. Discuss the answers to the questions with the students. If necessary, ask additional relevant questions.
7 mins
Build
● Instruct the students to attempt the assignment by clicking on the Assignment tab.
● Explain the activity to the students.
3 mins
● Conclude the session by summarising that editing an image in Canva means making changes to a picture to make it look better or different. To make any changes to the image, you need to upload it onto your canvas. You can select any image that is saved on your computer. Flipping an image means creating a mirrored or reversed version of the original image. You can change the foreground and background of the image. To adjust the brightness of the image, various options are available. Cropping means removing unwanted parts from your image so that you can focus on the important area of your image.
● Assign the additional activity given on the panel to the students as homework.
Using teamwork and problem-solving, they confront challenges, solve puzzles, and create mind maps to strategise. In the final battle, Conji defeats Cyborg with a powerful spell, restoring peace to Avora. The Trio repairs the affected robots, ensuring the co-existence of magic and technology.
● The Trio reaches the Idea Centre.
● Mel said that to Ms. Idea we want to read The Enigmus once again.
● The trio looks into the Enigmus and searches for the symbol in it. The same symbol that we saw on the screen attached to the main server.
● The group decided to use mind maps to defeat evil powers.
● Lord Ero attempted to strip Conji of his powers, but Eva sacrificed herself.
● Despite Eva’s sacrifice, the group resolved to defeat Dark Forces and restore her magic.
This chapter is divided into the following classroom and lab sessions
1. Introduction to Mind Maps and Creating a Mind Map in Canva 1
2. Introduction to Mind Maps and Creating a Mind Map in Canva 2
3. Editing and Formatting Text 1
4. Editing and Formatting Text 2
5. Adding Branches to a Mind Map 1
6. Adding Branches to a Mind Map 2
At the end of the session, the students will be able to:
● describe the concept of mind maps.
● create a mind map and blank canvas in canva.
● add shapes.
● add text.
Keyword
● Mind Maps: They provide a creative way to visually organise and connect ideas using text, shapes, colours, and lines.
Ask students why might it be helpful to represent ideas or concepts using different shapes in a visual format?
Tell the students about mind maps, and how to create a mind map by adding shapes, and text.
Group discussion Conclude the concepts Assign homework
Warm Up
● Ask the students why might it be helpful to represent ideas or concepts using different shapes in a visual format?
● Now, build the concept that Canva helps you represent your information by using shapes in the form of mind maps.
Engage
Explain the following concepts:
Learning Outcomes
Describe the concept of mind maps.
Explanation
Describe to the students that mind maps provide a creative way to visually organise and connect ideas using text, shapes, colours, and lines as given on page 110.
Create a blank canvas.
Ask students that creating a blank canvas in Canva for mind mapping involves initiating a fresh workspace to design your mind map from scratch, as given on page 111.
Add shapes. Discuss with the students that adding shapes to a mind map helps visually represent and categorise ideas. It enhances the organization and clarity in the mind map, as given on pages 112 and 113.
Add text.
Adding text is an essential step while creating a mind map, as it allows you to convey your ideas clearly, as given on pages 113 to 114.
● Read aloud the question provided.
1. Describe mind maps and its uses.
Possible response: Mind maps provide a creative way to visually organise and connect ideas using text, shapes, colours, and lines. Mind maps serve various purposes, including organising information, brainstorming ideas, note-taking, understanding relationships between concepts, enhancing creativity, project planning, and catering to visual learners.
7 mins
Build
● Conduct a group discussion in the class among the students based on the topic “Discuss the role of a background in a mind map. How does it contribute to the overall design?” provided in the Discuss section, as mentioned on page 114.
Possible Responses: The background in a mind map adds visual appeal, helps organise ideas, represents themes, encourages creativity, aids memory, and enhance the learning experience.
3 mins
● Conclude the session by summarising that mind maps provide a creative way to visually organise and connect ideas using text, shapes, colours, and lines. Also, tell them the steps to create a mind map in Canva and how to add shapes and text.
● Assign the following questions from the Chapter Checkup given at the end of the chapter as homework.
A. Fill in the Blanks: Questions 1 and 3
B. Tick the Correct Option: Questions 1 and 3
D. Write T for True and F for False: Questions 1 and 2
E. Answer the Following Questions: Question 1
F. Apply Your Learning: Questions 2 and 3
At the end of the session, the students will be able to:
● describe the concept of mind maps.
● create a blank canvas..
● add shapes.
● add text.
Keyword
● Mind Maps: They provide a creative way to visually organise and connect ideas using text, shapes, colours, and lines.
Ask the students to watch the video or the learning slides related to the topic on the digital panel.
Tell the students how to create a mind map by adding shapes and text.
Attempt the activity on the Assignment page Conclude the concepts Assign homework
Warm Up
● Instruct the students to go to the Tekie’s Digital platform and open a Lab session on Introduction to Mind Maps and Creating a Mind Map in Canva 2.
● Show the learning slides or the video and discuss the concepts shown on the panel.
Engage
Explain the following concepts:
Learning Outcomes
Describe the concept of mind maps.
Explanation
Describe to the students that mind maps provide a creative way to visually organise and connect ideas using text, shapes, colours, and lines as given on page 110.
Create a blank canvas.
Demonstrate students that creating a blank canvas in Canva for mind map involves initiating a fresh workspace to design your mind map from scratch, as given on page 111.
Add shapes. Demostrate to the students that adding shapes to a mind map helps visually represent and categorise ideas. It enhances the organization and clarity in the mind map, as given on pages 112 and 113.
Add text. Adding text is an essential step while creating a mind map, as it allows you to convey your ideas clearly, as given on pages 113 to 114.
● Ask the questions provided on the slides to assess the students understanding.
● Discuss the answers of the questions with the students. If necessary, ask additional relevant questions.
12 mins
● Instruct the students to attempt the assignment by clicking on the Assignment tab.
● Explain the activity to the students.
3 mins
● Conclude the session by summarising that mind maps provide a creative way to visually organise and connect ideas using text, shapes, colours, and lines. Also, tell them the steps to create a mind map in Canva and how to add shapes and text.
● Assign the additional activity given on the panel to the students as homework.
At the end of the session, the students will be able to:
● apply font style.
● change font size.
● change text colour.
● apply text formatting.
Keyword
● Editing Text: Editing text means making changes to the text.
● Formatting Text: Formatting text means moving and resizing the text box and applying the font style, font size and other effects such as bold, italic and underline.
Can you think of a poster or flyer you have seen that caught your attention? What elements do you think make it visually appealing? How do you think the way text is presented contributes to the overall impact of a visual message, whether it is a social media post or a school project?
Explain to the students how to edit and format text and shapes in Canva.
Group discussion
Conclude the concepts
Assign homework
Action Plan
5 mins
Warm Up
● Can you think of a poster or flyer you have seen that caught your attention? What elements do you think make it visually appealing?
● How do you think the way text is presented contributes to the overall impact of a visual message, whether it is a social media post or a school project?
● Now, build the concept by explaining different editing and formatting options in Canva.
Explain the following concepts:
Change case (aA): The Change case option is used to make all the letters capital if they are small and vice versa. The capital letters can be used for headings or to convey a strong message in your mind map. Click the More icon on the right side of the top bar. Select the Change case aA icon to apply the desired text case.
Apply font style. Describe to the students how to change a font style in Canva by, clicking on the text box and find the font style option at the top of the canvas, as given on pages 114 and 115.
Change font size. Describe to them, how to adjust the font size in Canva, by simply clicking on the text box and locate the font size option at the top of the canvas. Once found, click on it to reveal a range of size options, and select the desired font size, as given on page 115.
Change text colour. Describe to the students how to customise the text colour in Canva, click on the text box, and find the Text Colour option on the top bar. Upon clicking, a colour palette appears in the left-hand side panel. From there, choose any desired colour as given on page 116.
Apply text formatting. Describe to the students about text formatting options such as bold (B), italic (I), underline (U), strikethrough (S), and change case (Aa) are available to enhance the visual presentation of your text, as given on pages 116 to 118.
● Ask the questions provided in the Do It Yourself 7A section and encourage the students to solve the questions. Instruct the students to write the answers in their book.
Do It Yourself 7A
Correct Responses:
Match the following.
Column A
Column B
Change case Text
Italic
Bold
Strikethrough
Underline
● Conduct a group discussion in the class among students based on the topic “How to make a text more effective.”
You can apply various text effects to the text given in the mind maps. For example, you can change the text alignment, apply styles, adjust letter and line spacing, and so on. Let us learn about them.
Possible Responses: In Canva, various effects can be applied to the text in mind maps. This includes basic formatting like bold, italics, underlining, changing font styles and sizes, adjusting text colour and using effects such as outlines, shadows, and background colours.
Text alignment in Canva refers to the position of the text within a text box or a shape. This option determines how text is arranged horizontally within defined boundaries. Proper alignment enhances the visual appeal and readability of your designs.
● Conclude the session by summarising that in Canva, you can customize the text by selecting the text box and choosing the font styles, sizes, and colours from the top menu. Additional formatting options like bold, italic, underline, strikethrough, and change case are easily applied or removed using the icons.
● Assign the following questions from the Chapter Checkup given at the end of the chapter as homework.
A. Fill in the Blanks: Questions 2 and 4
B. Answer the Following Questions: Questions 2 and 4
C. Apply Your Learning: Questions 1 and 4
D. Who Am I?: Questions 1, 2 and 3
E. Write T for True and F for False: Question 3
At the end of the session, the students will be able to:
● apply font style.
● change font size.
● change text colour.
● apply text formatting.
Keyword
● Editing Text: Editing text means making changes to the text.
● Formatting Text: Formatting text means moving and resizing the text box and applying the font style, font size and other effects such as bold, italic and underline.
Let the students watch the video or the learning slides related to the topic on the digital panel.
Demonstrate to the students how to edit and format text and shapes in Canva.
Attempt the activity on the Assignment page
Conclude the concepts
Assign homework
● Instruct the students to go to the Tekie’s Digital platform and open a Lab session on Editing and Formatting Text 2.
● Show the learning slides or the video and discuss the concepts shown on the panel.
Engage
Explain the following concepts:
Learning Outcomes
Explanation
Apply font style. Demonstrate to the students how to change a font style in Canva, click on the text box and find the font style option at the top of the canvas, as given on pages 114 and 115.
Change font size. Demonstrate to them, how to adjust the font size in Canva, simply click on the text box and locate the font size option at the top of the canvas. Once found, click on it to reveal a range of size options, and select the desired font size, as given on page 115.
Change text colour. Demonstrate to the students how to customise the text colour in Canva, click on the text box, and find the Text Colour option on the top bar. Upon clicking, a colour palette appears in the left-hand side panel. From there, choose any desired colour as given on page 116.
Apply text formatting.
Demonstrate the students about text formatting options such as bold (B), italic (I), underline (U), strikethrough (S), and change case (Aa) are available to enhance the visual presentation of your text, as given on pages 116 to 118.
● Ask the questions provided on the slides one by one to assess the students’ understanding. Discuss the answers of the questions with the students. If necessary, ask additional relevant questions.
12 mins
Build
● Demonstrate the students to attempt the assignment by clicking on the Assignment tab.
● Explain the activity to the students. Sum Up
3 mins
● Conclude the session by summarising that in Canva, you can customize the text by selecting the text box and choosing the font styles, sizes, and colours from the top menu. Additional formatting options like bold, italic, underline, strikethrough, and change case are easily applied or removed using the icons.
● Assign the additional activity given on the panel to the students as homework.
At the end of the session, the students will be able to:
● add branches to a mind map.
Keyword
● Branch: It connects the main idea of a mind map with other related aspects or its subtopics.
Warm Up Engage Build Sum Up
Ask the students to explain the term ‘branches’, what do you think it might refer to?
Tell the students how to add branches to a mind map. Group discussion Conclude the concepts Assign homework
5 mins 15 mins 7 mins 3 mins
5 mins
Warm Up
● Ask the students to explain the term ‘branches’, what do you think it might refer to?
● Now, build the concept that adding branches to a mind map means creating links between the main topic and the subtopics.
15 mins
Engage
Explain the following concepts:
Learning Outcome
Explanation
Add branches to a mind map. Discuss with the students that adding branches to a mind map, involves creating connections between the main topic and its subtopics as given on pages 119 to 120.
● Ask the questions provided in the Do It Yourself 7B section and encourage the students to solve the questions. Instruct the students to write the answers in their book.
7 mins
● Conduct a group discussion in the class among students based on the topic “Uses of Branches in Mind Maps”.
Possible Responses: They help organise information, connect ideas, add details, provide a visual representation, highlight key points, create a map of ideas, make it easy to read, express creativity, and break down big topics.
Sum Up
3 mins
● Conclude the session by summarising that adding branches to a mind map involves creating connections between the main topic and its subtopics, enhancing understanding.
● Assign the following questions from the Chapter Checkup given at the end of the chapter as homework.
B. Tick the Correct Option: Questions 2 and 5
C. Who Am I?: Question 4
D. Write T for True and F for False: Question 4
E. Answer the Following Questions: Question 3
At the end of the session, the students will be able to:
● add branches to a mind map.
Keyword
● Branch: It connects the main idea of a mind map with other related aspects or its subtopics.
Let the students watch the video or the learning slides related to the topic on the digital panel.
Demonstrate the students how to add branches to a mind map.
Attempt the activity on the Assignment page
Conclude the concepts Assign homework
5 mins
● Instruct the students to go to the Tekie’s Digital platform and open a Lab session on Adding Branches to a Mind Map 2.
● Show the learning slides one by one and discuss the concepts shown on the slides in the panel.
Explain the following concepts:
Learning Outcome
Add branches to a mind map.
10 mins
Explanation
Demonstrate to the students that adding branches to a mind map, involves creating connections between the main topic and its subtopics, enhancing understanding, as given on pages 119 to 120.
● Ask the questions provided on the slides to assess the students’ understanding. Discuss the answers of the questions with the students. If necessary, ask additional relevant questions.
● Demonstrate the students to attempt the assignment by clicking on the Assignment tab.
● Explain the activity to the students.
Sum Up
3 mins
● Conclude the session by summarising that adding branches to a mind map involves creating connections between the main topic and its subtopics, enhancing understanding.
● Assign the activity given on the panel to the students as homework.
In Avora, a magical world, Mel, Conji, and Eva face a dangerous virus blending magic and technology, causing robots to malfunction. The virus, created by the villain Cyborg, threatens the harmony of Avora. The Trio learns about the Enigmus, a powerful tool held by Ms. Idea, who guides them in fighting the virus. With the Enigmus, they spread awareness, decode secret files, and uncover Cyborg’s plan to attack the Server Room. Using teamwork and problem-solving, they confront challenges, solve puzzles, and create mind maps to strategise. In the final battle, Conji defeats Cyborg with a powerful spell, restoring peace to Avora. The Trio repairs the affected robots, ensuring the co-existence of magic and technology.
● Eva insists they still need to destroy the virus completely.
● Mel says they must fix the affected robots and gadgets.
● Conji suggests exploring the Enigmus for a solution to save the robots.
● Mel agrees and opens her copy of the Enigmus on her tablet.
● Mel explains that the Enigmus discusses the evolution of robots, created by the first elder robot.
● Mel adds that with the introduction of AI, technology in Avora has become more advanced over time.
● Eva asks how this has happened.
● Mel explains that robots have become smart enough to analyze their surroundings and interact accordingly.
● The elder wizard advises Conji and Eva to learn more about robots first to find a solution to their problem.
● Mel offers to teach them about the robot kind.
This chapter is divided into the following classroom sessions
1. Introducing Robots and Their Types
2. Famous Indian Robots
3. Robotics & AI and Robotics
At the end of the session, the students will be able to:
● describe robots.
● describe the components of robots.
● explain about different types of robots.
Keyword
● Robot: Robots are smart machines that behave like humans.
Warm Up Engage Build Sum Up
Have you ever seen a robot in a movie or a cartoon?
Tell the students about the robots, and describe the components of a robot. Also, explain about different types of robots.
Group discussion
Conclude the concepts Assign homework 5 mins 15 mins 7 mins 3 mins
Warm Up
Action Plan
● Have you ever seen a robot in a movie or a cartoon?
● Now, build the concept by explaining what robots are.
Engage
Explain the following concepts:
Learning Outcomes
5 mins
15 mins
Explanation
Describe robots. Tell the students that robots are smart machines that behave like humans. They are programmed to do specialised tasks, as given on page 129.
Describe the components of robots.
Explain to the students about various components of robots such as sensors, actuators, controllers, etc., as given on page 129.
Explain about different types of robots.
Differentiate between natural and artificial intelligence.
Describe to the students that there are different types of robots such as humanoid robots, service robots, industrial robots, medical robots, exploration robots, and entertainment robots, as given on pages 130 and 131.
Discuss the difference between natural and artificial intelligence based on learning, emotions and consciousness, flexibility, physical presence, etc., as given on pages 153 and 154.
● Read aloud the questions provided in the Do It Yourself 8A Question 1 and encourage the students to solve the questions. Instruct the students to write the answers in their books.
Correct response:
1. a. Industrial Robots: These robots are generally used for manufacturing purposes in factories. These robots are automated, programmable, and capable of doing movement in three or more axes. They help build things like cars by welding, painting, or assembling parts.
b. Entertainment Robots: These robots are made for fun and play. For example, robotic pets that can move and respond to touch, or toys that can dance and sing.
● Conduct a group discussion in the class among the students based on the topic “Where else can entertainment robots be used?” as given in the Discuss section on page 131.
Possible Responses: Themes parks, hotels, resorts, museums, etc.
Sum Up
● Conclude the session by summarising that robots are smart machines that behave like humans. They are programmed to do specialised tasks. Tell them about various components of robots such as sensors, actuators, controllers, etc. Also, tell them about various types of robots such as humanoid robots, entertainment robots, industrial robots, service robots, etc.
● Assign the following questions from the Chapter Checkup given at the end of the chapter as homework.
A. Fill in the Blanks: Questions 1, 2, and 4
B. Tick the Correct Option: Questions 1 and 3
C. Write T for True or F for False: Questions 1 and 2
D. Answer the Questions Following: Questions 1 and 2
E. Apply Your Learning: Questions 1, 2, 3, and 4
At the end of the session, the students will be able to:
● describe famous Indian robots.
Ask the students if they know the names of any Indian robots.
Tell the students about famous Indian robots. Think and Tell Conclude the concepts Assign homework 5 mins 15 mins 7 mins 3 mins
● describe the field of robotics. 5 mins
Warm Up
● Ask the students if they know the names of any Indian robots.
● Now, build the concept by explaining about famous Indian robots.
Explain the following concepts:
Describe famous Indian robots. Tell the students about famous Indian robots which include MITRA, Robo-Buddy, MANAV, KIRAN, and RASHMI, as given on page 132.
Describe the field of robotics. Tell the students that robotics is the study and creation of robots—machines that can do tasks on their own, as given on page 133.
● Read aloud the questions provided in the Do It Yourself 8A Question 2 and encourage the students to solve the questions. Instruct the students to write the answers in their books.
Correct response: RASHMI is the world’s first Hindi-speaking and India’s first realistic lip-syncing humanoid robot. Rashmi is designed to assist in various tasks, including serving as a guide and providing information in public spaces.
● Ask the students to answer the question “In what other tasks can Robo-Buddy help you at home? asked in the Think and Tell section on page 132.
Possible Responses: Robo-buddy can help in reminding appointments, tasks, or medication schedules.
Sum Up 3 mins
● Conclude the session by summarising famous Indian robots which include MITRA, Robo-Buddy, MANAV, KIRAN, and RASHMI,
● Assign the following questions from the Chapter Checkup given at the end of the chapter as homework.
A. Fill in the Blanks: Question 3
B. Tick the Correct Option: Questions 2 and 4
C. Write T for True or F for False: Questions 3 and 4
E. Answer the Following Questions: Question 3
At the end of the session, the students will be able to:
● describe the field of robotics.
● Describe AI and robotics.
Ask the students if they know what robotics is. Tell the students about the field of robotics and AI and robotics. Group discussion Conclude the concepts Assign homework
Warm Up
● Ask the students if they know what robotics is.
● Now, build the concept by explaining the field of robotics.
Explain the following concepts:
Describe the field of robotics. Tell the students that robotics is the study and creation of robots—machines that can do tasks on their own, as given on page 133.
Describe AI and robotics. Tell the students that artificial intelligence (AI) and robotics are fascinating and increasingly important areas of study that are shaping the future of technology and innovation, as given on page 133.
Ask the following question to the students to check their understanding: 1. What is robotics?
Possible response: Robotics is the study and creation of robots—machines that can do tasks on their own.
2. What happens when AI and robotics combine?
Possible response: When AI and robotics are combined, they create intelligent robots capable of learning from their experiences and adapting to new situations.
● Conduct a group discussion in the class among the students based on the topic “What is the relation between AI and Robotics”.
Possible response: AI enables robots to think and act intelligently, while robots give AI a physical form to interact with the real world. Sum Up 3
● Conclude the session by summarising that robotics is the study and creation of robots—machines that can do tasks on their own. Also, tell them that artificial intelligence (AI) and robotics are fascinating and increasingly important areas of study that are shaping the future of technology and innovation.
● Assign the following questions from the Chapter Checkup given at the end of the chapter as homework.
D. Answer the Following Questions: Question 4
In Avora, a magical world, Mel, Conji, and Eva face a dangerous virus blending magic and technology, causing robots to malfunction. The virus, created by the villain Cyborg, threatens the harmony of Avora. The Trio learns about the Enigmus, a powerful tool held by Ms. Idea, who guides them in fighting the virus. With the Enigmus, they spread awareness, decode secret files, and uncover Cyborg’s plan to attack the Server Room. Using teamwork and problem-solving, they confront challenges, solve puzzles, and create mind maps to strategise. In the final battle, Conji defeats Cyborg with a powerful spell, restoring peace to Avora. The Trio repairs the affected robots, ensuring the co-existence of magic and technology.
● In the Elder Robot’s office, Conji and Eva are curious about Mel’s actions.
● Conji asks Mel about her plan.
● Mel explains that robots and gadgets have sensors in their cameras, which can be used to defeat Lord Ero.
● Eva asks how this is possible.
● Mel says the sensors will help analyze the virus causing robots and gadgets to malfunction.
● Conji asks for more details, and Mel explains that cameras can capture the damage done to machines and robots.
● She adds that computer vision will help identify the problem and find a solution.
● Eva asks what computer vision is, and Conji jokes about whether computers have eyes.
● Mel clarifies that computer vision is a domain of AI and offers to explain it further.
This chapter is divided into the following classroom and lab sessions.
1. Introduction to Computer Vision
2. Fun with AI: Using Google Translate
At the end of the session, the students will be able to:
● describe what computer vision is.
● explain working of computer vision.
● explain the applications of computer vision.
Keywords
● describe augmented reality.
● describe virtual reality.
● Computer Vision: Computer Vision (CV) is a domain of artificial intelligence that focuses on enabling computers and machines to interpret and understand visual information from the real world, typically through cameras.
● Augmented Reality: Augmented Reality (AR) is a technology that blends digital content with the real world in real time.
● Virtual Reality: Virtual Reality (VR) is a technology that immerses users in a completely digital or virtual environment.
Ask the students if they can name the domains of AI.
Tell the students about computer vision its working and applications. Tell them about augmented reality and virtual reality.
Action Plan
Group discussion Conclude the concepts Assign homework
Warm Up
● Ask the students if they can name the domains of AI.
● Now, build the concept by explaining about computer vision.
Explain the following concepts:
Learning Outcomes
Describe what computer vision is.
Explanation
Tell the students that computer Vision (CV) is a domain of artificial intelligence that focuses on enabling computers and machines to interpret and understand visual information from the real world, typically through cameras, as given on page 140.
Explain the working of computer vision.
Explain the applications of computer vision.
Describe augmented reality.
Describe to the students the working of computer vision, as given on page 140.
Describe to the students about various applications of computer vision such as object recognition, face recognition, autonomous vehicle, medical imaging, and robotics, as given on page 141.
Tell the students that augmented reality (AR) is a technology that blends digital content with the real world in real-time, as given on page 142.
Describe virtual reality. Tell the students that Virtual Reality (VR) is a technology that immerses users in a completely digital or virtual environment, as given on page 142
● Read aloud the questions provided in the Do It Yourself 9A section and encourage the students to solve the questions. Instruct the students to write the answers in their books.
Possible response: Parking assistance
Build
7 mins
● Conduct a group discussion in the class among the students based on the topic “Difference between augmented reality and virtual reality.”
Possible Responses: Augmented Reality (AR) is a technology that blends digital content with the real world in real-time whereas, Virtual Reality (VR) is a technology that immerses users in a completely digital or virtual environment.
3 mins
● Conclude the session by summarising that computer Vision (CV) is a domain of artificial intelligence that focuses on enabling computers and machines to interpret and understand visual information from the real world, typically through cameras. Also, describe their working and applications of computer vision. Tell them that augmented reality (AR) is a technology that blends digital content with the real world in real-time whereas, virtual reality (VR) is a technology that immerses users in a completely digital or virtual environment.
● Assign the following questions from the Chapter Checkup given at the end of the chapter as homework.
A. Fill in the Blanks: Questions 1, 2, 3, and 4
B. Who Am I? Questions 1, 2, 3 and 4
C. Write T for True or F for False: Questions 1,2, 3, and 4
D. Answer the Following Questions: Questions 1, 2, 3 and 4
E. Apply Your Learning: Questions 1 and 2
At the end of the session, the students will be able to:
● play the fun with the AI game.
Let the students revise the chapter. Demonstrate to the students how to play the game for which the link is provided on the panel.
Attempt the activity on the Assignment page. Conclude the concepts Assign homework
● Instruct the students to go to the Tekie’s Digital platform and open a Lab session on Fun with AI: Using Google Translate.
● Demonstrate to the students how to play the game for which the link is provided on the panel.
Ask the questions related to the activity.
● Instruct the students to click on the Practice button on the Assignment page to attempt the activity. Then, click on the Attempt button to open the activity page.
● Instruct the students to click on the Confirm button to submit their work when they are done with the activity.
● Conclude the session by summarising that you will experience real-time translation between different languages using the Google Translate app thereby leveraging the power of computer vision.
This chapter is divided into the following classroom and lab sessions
1. Introduction to Python 1
2. Introduction to Python 2
At the end of the session, the students will be able to:
● explain what programming is.
● describe Python.
Keywords
● explain features and applications of Python.
● know syntax and built-in functions of Python.
● Programming: It is the process of giving instructions to tell a computer to perform a specific task.
● Syntax: Programming languages have their own set of rules for writing. These rules called syntax tell us how to define structure and organise code in a programming language.
● Function: It is a block of code used to perform a specific task.
Ask the students if they are familiar with programming. Explain to them what programming is; tell them about Python; Discuss the features and applications of Python with them; Explain the built-in functions of Python. Think and Tell Conclude the concepts Assign
● Ask the students if they are familiar with programming.
● Now, build on the concept that programming is the process of giving instructions to tell a computer to perform a specific task. Also tell them that Python is a high-level programming language that is easy to learn and simple to use.
Explain the following concepts:
Explain what programming is.
Introduce the concept of programming to the students by telling them that programming is the process of giving instructions to tell a computer to perform a specific task, as given on page 1.
Define Python. Tell them that Python is a high-level programming language that is easy to learn and simple to use, as given on page 1.
Explain features and applications of Python.
Introduce different features of Python, like easy to code, cross-platform compatible, open-source, used to create GUI apps, and interactive and dynamically typed language, as given on pages 1 and 2.
Also tell them about different applications of Python, like programming and coding, web development, data analysis, Artificial Intelligence applications, and scientific research applications, as given on pages 2 and 3.
Know syntax and built-in functions of Python.
Tell them that every programming language has its own set of rules for writing programs which is known as syntax, as given on page 3.
Also discuss with them that built-in functions are the functions that are already defined in Python. Also tell them about the different built-in functions of Python, as given on pages 3 and 4.
● Read aloud the questions provided in the Do It Yourself 1A section and encourage the students to solve the questions. Instruct the students to write the answer in their book.
Correct Response: may vary based on user input
Build
7 mins
● Ask the students to give the answer of the question “Will a syntax error stop a program from running?” asked in the Think and Tell section given on page 3.
Possible Response: Yes, a syntax error stops the program from execution.
Sum Up
3 mins
● Conclude the session by summarising that programming is the process of giving instructions to tell a computer to perform a specific task. Tell them that Python is a high-level programming language that is easy to learn and simple to use. Python has several features like, easy to code, cross-platform compatible, open-source, used to create GUI apps, interactive and dynamically typed language.
● Assign the following questions from the Chapter Checkup given at the end of the chapter as homework.
A. Fill in the Blanks: Questions 1, 4, and 5
B. Tick the Correct Option: Questions 1 and 4
C. Write T for True and F for False: Questions 1, 2, and 3
D. Answer the Following Questions: Questions 1, 2, and 5
E. Apply Your Learning: Question 3
At the end of the session, the students will be able to:
● discuss the different data types in Python.
● explain the concept of variables.
● describe the concept of dynamic typing.
Keywords
● Data type: It specifies the type of value a variable can contain.
● Variable: A variable is a reference name given to a location in a computer’s memory.
Let the students watch the video or the learning slides related to the topic on the digital panel.
Demonstrate how data types and variables are used in Python. Attempt the activity on the Assignment page.
● Identifier: The name given to a variable is known as an identifier. 5 mins
Warm Up
Conclude the concepts Assign homework
● Instruct the students to go to the Tekie’s Digital platform and open a Lab session on Introduction to Python 2
● Show the learning slides or the video and discuss the concepts shown on the panel.
Explain the following concepts: Learning
Discuss the different data types in Python.
Introduce students to the different data types in Python, like int, float, and string, as given on page 4.
Explain the concept of variables. Tell the students that a variable is a reference name given to a location in a computer’s memory. Also tell them how to create and initialise a variable. Also, tell them the rules for naming a variable, as given on pages 4, 5, and 6.
Describe the concept of dynamic typing.
Discuss with the students that dynamic typing in Python means that you can assign a value to a variable, and the variable automatically takes the data type of that assigned value at runtime, as given on pages 6 and 7.
● Ask the questions provided on the slides one by one to assess the students’ understanding. Discuss the answers to the questions with the students. If necessary, ask additional relevant questions.
● Read aloud the questions provided in the Do It Yourself 1B section and encourage the students to solve the questions. Instruct the students to write the answers in their book.
Correct Responses:
1. <class ‘int’>
<class ‘float’>
<class ‘float’>
2. Graphical User Interface
● Instruct the students to attempt the assignment by clicking on the Assignment tab.
● Explain the activity to the students. Sum Up
7 mins
3 mins
● Conclude the session by summarising that Python supports different data types, including int, float, string, etc. Also discuss with the students that a variable is a reference name given to a location in a computer’s memory. Dynamic typing in Python means that you can assign a value to a variable, and the variable automatically takes the data type of that assigned value at runtime.
● Assign the additional activity given on the panel to the students as homework.
● Assign the following from the Chapter Checkup given at the end of the chapter as homework.
A. Fill in the Blanks: Questions 2 and 3
B. Tick the Correct Option: Questions 2, 3, and 5
C. Write T for True and F for False: Questions 4 and 5
D. Answer the Following Questions: Questions 3 and 4
E. Apply Your Learning: Questions 1, 2, 4, and 5
This chapter is divided into the following lab sessions
1. Using Operators in Python
2. Algorithm and Flowcharts
3. Writing a Python Program and Using the Math Library
At the end of the session, the students will be able to:
● describe operators.
● describe the types of operators.
● explain operator precedence.
Keywords
● Operator: An operator is a symbol that is used to perform operations on variables or values.
● Expression: The combination of operands and operators is called an expression.
Let the students watch the video or the learning slides related to the topic on the digital panel.
Describe operators to the students. Explain the different types of operators and operator precedence. Attempt the activity on the Assignment page
Conclude the concepts Assign homework
Warm Up
● Instruct the students to go to the Tekie’s Digital platform and open a Lab session on Using Operators in Python
● Show the learning slides one by one and discuss the concepts shown on the slides in the panel.
Explain the following concepts:
Describe operators. Describe operators to the students. Tell them what an operators, operand, and expression are, as given on page 10.
Describe the types of operators.
Explain operator precedence.
Describe to them that the Python language supports arithmetic operators, assignment operators, relational/comparison operators, and logical operators, as given on pages 10 to 12.
Explain to them that if there are more than one operator in an expression, then we need to follow operator precedence to evaluate the expression, as given on pages 12 and 13.
● Ask the questions provided on the slides one by one to assess the students’ understanding. Discuss the answers to the questions with the students. If necessary, ask additional relevant questions.
● Read aloud the questions provided in the Do It Yourself 2A section and encourage the students to solve the questions. Instruct the students to write the answers in their book.
Correct Responses: 1. 22 2. True 3. 100 4. 6
● Instruct the students to attempt the assignment by clicking on the Assignment tab.
● Explain the activity to the students.
● Conclude the session by summarising that an operator is a symbol that is used to perform operations on variables or values. The Python language supports arithmetic operators, assignment operators, relational/comparison operators, and logical operators. Operator precedence describes the order in which operations are to be performed on the operand.
● Assign the additional activity given on the panel to the students as homework.
● Assign the following questions from the Chapter Checkup given at the end of the chapter as homework.
A. Fill in the Blanks: Questions 2, 3, 4, and 5
B. Tick the Correct Option: Questions 1, 2, 3, 4, and 5
C. Who Am I?: Questions 3, 4, and 5
D. Write T for True and F for False: Questions 1, 2, 3, and 5
E. Answer the Following Questions: Questions 1, 2, 3, and 5
F. Apply Your Learning: Question 1
At the end of the session, the students will be able to:
● describe an algorithm and the rules to write an algorithm.
● describe the flowcharts and symbols used for a flowchart.
Keywords
● Algorithm: An algorithm can be defined as a logical, step-by-step procedure for solving a problem.
● Flowchart: A flowchart is a graphical or visual representation of an algorithm that uses various symbols, shapes, and arrows to show a process or program.
Let the students watch the video or the learning slides related to the topic on the digital panel.
Explain the concept of algorithms and flowcharts to the students.
Attempt the activity on the Assignment page
Conclude the concepts Assign homework
Instruct the students to go to the Tekie’s Digital platform and open a Lab session on Algorithm and Flowcharts
Show the learning Slides one by one and discuss the concepts shown on the slides in the panel.
Engage
Explain the following concepts:
Describe an algorithm and the rules to write an algorithm.
Describe to the students that any problem can be solved if a specific sequence of steps is followed. Also, tell them the rules for writing an algorithm, as given on pages 13 and 14.
Describe the flowcharts and symbols used for a flowchart.
Describe to the students that the primary goal of using aflowchart is to evaluate various ways to solve a problem. Also demonstrate to them the various symbols used to draw a flowchart, as given on pages 14 and 15.
● Ask the questions provided on the slides one by one to assess the students’ understanding. Discuss the answers to the questions with the students. If necessary, ask additional relevant questions.
● Read aloud the questions provided in the Do It Yourself 2B section and encourage the students to solve the questions. Instruct the students to write the answers in their book.
Correct Responses: Algorithm
Step 1: START
Step 2: Take three integer variables L, B and P.
Step 3: Assign the value to the variables L and B.
Step 4: Do operation = 2*(L+B), where L = length of rectangle and B = breadth of rectangle
Step 5: Assign the result of step 4 in P i.e., P = 2*(L+B)
Step 6: STOP
● Instruct the students to attempt the assignment by clicking on the Assignment tab.
● Explain the activity to the students.
● Conclude the session by summarising that an algorithm can be defined as a logical, step-bystep procedure for solving a problem. You need to provide a set of inputs to the algorithm, and the algorithm will provides you with the output. A flowchart helps a user readily understand a problem and then provide various ways to solve it.
● Assign the additional activity given on the panel to the students as homework.
● Assign the following questions from the Chapter Checkup given at the end of the chapter as homework.
A. Fill in the Blanks: Question 1
D. Write T for True and F for False: Question 4
F. Apply Your Learning: Questions 4 and 5
At the end of the session, the students will be able to:
● write a Python program.
● use the math library in Python.
Keyword
Let the students watch the video or the learning slides related to the topic on the digital panel.
Demonstrate to them how to write a Python program and tell them about the math library in Python.
● Syntax: Syntax is like the grammar rules for writing code in a programming language. 5 mins
Attempt the activity on the Assignment page
Conclude the concepts Assign homework
Warm Up
Instruct the students to go to the Tekie’s Digital platform and open a Lab session on Writing a Python Program and Using the Math Library
● Show the learning slides one by one and discuss the concepts shown on the slides in the panel. 15 mins
Engage
Explain the following concepts:
Learning Outcomes
Write a Python program.
Use the math library in Python.
Explanation
Describe to the students that in the Python language, you need to follow certain rules for writing programs. These rules are called syntax. Demonstrate to them how to write basic Python programs, as given on page 16.
Describe to the students that the math library is used to store various mathematical operations for which Python has many built-in methods, as given on pages 17 and 18.
● Ask the questions provided on the slides one by one to assess the students’ understanding. Discuss the answers to the questions with the students. If necessary, ask additional relevant questions.
● Read aloud the questions provided in the Do It Yourself 2C and Do It Yourself 2D section and encourage the students to solve the questions. Instruct the students to write the answers in their book.
Correct Responses:
Do it Yourself 2C
celsius = float(input(“Enter temperature in Celsius: “))
fahrenheit = (celsius * 9/5) + 32
print(“The temperature in Fahrenheit is:”, fahrenheit)
Do it Yourself 2D
1. # Input five numbers
num1 = float(input(“Enter first number: “))
num2 = float(input(“Enter second number: “))
num3 = float(input(“Enter third number: “))
num4 = float(input(“Enter fourth number: “))
num5 = float(input(“Enter fifth number: “))
# Find the minimum number minimum = min(num1, num2, num3, num4, num5)
# Display the result print(“The minimum of the given numbers is:”, minimum)
2. result = 6 ** 3 print(“6 raised to the power of 3 is:”, result)
Build
● Instruct the students to attempt the assignment by clicking on the Assignment tab.
● Explain the activity to the students.
Sum Up
7 mins
3 mins
● Conclude the session by summarising that an algorithm can be defined as a logical, step-bystep procedure for solving a problem. You need to provide a set of inputs to the algorithm, and the algorithm will provides you with the output. A flowchart helps a user readily understand a problem and then provide various ways to solve it.
● Assign the additional activity given on the panel to the students as homework.
● Assign the following questions from the Chapter Checkup given at the end of the chapter as homework.
C. Who Am I?: Questions 1 and 2
E. Answer the Following Questions: Question 4
F. Apply Your Learning: Questions 2 and 3
This chapter is divided into the following lab sessions
1. Conditional Statements 1
2. Conditional Statements 2
3. Conditional Statements 3
At the end of the session, the students will be able to:
● describe control statements.
● define conditional statements.
Keywords
● Control statements: Control statements are used to manage the sequence of execution within a program.
● Conditional statements: These statements enable you to execute various sections of code based on whether a given condition is true or false.
Let the students watch the video or the learning slides related to the topic on the digital panel.
Explain control and conditional statements to the students. Attempt the activity on the Assignment page. Conclude the concepts Assign homework
● Instruct the students to go to the Tekie’s Digital platform and open a Lab session on Conditional Statements 1.
● Show the learning slides one by one and discuss the concepts shown on the slides in the panel.
Explain the following concepts:
Describe control statements. Discuss with the students that control statements in the Python programming language are used to manage the sequence of execution within a program, as given on page 21.
Define conditional statements.
Describe to them that conditional statements enable us to execute various sections of code, based on whether a given condition is true or false, as given on page 21.
● Ask the questions provided on the slides one by one to assess the students’ understanding. Discuss the answers to the questions with the students. If necessary, ask additional relevant questions.
● Instruct the students to attempt the assignment by clicking on the Assignment tab.
● Explain the activity to the students.
● Conclude the session by summarising that the control statements in the Python programming language are used to manage the sequence of execution within a program. Tell them that the main types of control statements in Python are sequential, conditional, and iterative statements, or loops. The conditional statements enable you to execute various sections of code based on whether a given condition is true or false.
● Assign the additional activity given on the panel to the students as homework.
● Assign the following questions from the Chapter Checkup given at the end of the chapter as homework.
E. Answer the Following: Questions 1 and 2
At the end of the session, the students will be able to:
● use the if statement.
● use the if-else statement.
● use the if-elif-else statement.
Keyword
Let the students watch the video or the learning slides related to the topic on the digital panel.
● Indentation: Indentation refers to the space at the beginning of a code line. 5 mins
Explain the different types of conditional statements. Attempt the activity on the Assignment page.
Conclude the concepts Assign homework
Instruct the students to go to the Tekie’s Digital platform and open a Lab session on Conditional Statements 2.
Show the learning slides one by one and discuss the concepts shown on the slides in the panel.
15 mins
Engage
Explain the following concepts:
Explanation
Use the if statement. Explain to the students that the ‘if’ statement is used to evaluate a condition and execute a code block if the condition evaluates to true, as given on page 21. Also, demonstrate to them how to use the if statement in a program, as given on page 22. Also, show them the use of indentation in a program, as given on page 22.
Use the if-else statement.
Use the if-elif-else statement.
Discuss with them that using the if-else statement, the block of code after the if statement is executed if the condition is true, and the block of code after the else statement is executed if the condition is false, as given on page 22. Demonstrate how to use it in a program, as given on pages 22 and 23.
Explain to them that the if-elif-else statement allows you to check multiple conditions in a program. Python checks each condition until any one of them is true, as given on page 24. Show them the use of the if-elif-else statement in a program, as given on page 25.
● Ask the questions provided on the slides one by one to assess the students’ understanding. Discuss the answers to the questions with the students. If necessary, ask additional relevant questions.
7 mins
Build
● Instruct the students to attempt the assignment by clicking on the Assignment tab.
● Explain the activity to the students.
Sum Up
3 mins
● Conclude the session by summarising that the ‘if’ statement is used to evaluate a condition and execute a code block if the condition evaluates to true. Using the if-else statement, the block of code after the if statement is executed if the condition is true, and the block of code after the else statement is executed if the condition is false. The if-elif-else statement allows you to check multiple conditions in a program. Python checks each condition until any one of them is true.
● Assign the additional activity given on the panel to the students as homework.
● Assign the following questions from the Chapter Checkup given at the end of the chapter as homework.
A. Fill in the Blanks: Questions 1, 2, 3, and 4
B. Tick the Correct Option: Questions 1, 2, 3, 4, and 5
C. Who Am I?: Questions 1, 2, and 3
D. Write T for True and F for False: Questions 1, 2, 3, and 4
E. Answer the Following Questions: Questions 3, 4, and 5
F. Apply Your Learning: Questions 1, 2, 3, 4, and 5
At the end of the session, the students will be able to:
● use nested if statement.
● solve the given examples.
● attempt the coding challenge.
Let the students watch the video or the learning slides related to the topic on the digital panel.
Explain nested if statements, solve the given examples and attempt the coding challenge.
Attempt the activity on the Assignment page.
Conclude the concepts Assign homework
5 mins
Instruct the students to go to the Tekie’s Digital platform and open a Lab session on Conditional Statements 3.
Show the learning slides one by one and discuss the concepts shown on the slides in the panel.
15 mins
Explain the following concepts:
Learning
Use nested if statement. Explain to the students that sometimes in programming, we need to make complex decisions which depend on multiple conditions. For those decisions, we use an if-elif-else statement inside the body of another if-elif-else statement. This is called nesting of statements. Give example for the same, as given on pages 25 and 26.
Solve the given examples.
Explain the students how to write the code and help them to solve the examples given on pages 26 and 27.
Attempt coding challenge. Explain the students how to solve the coding challenge given on page 27.
● Ask the questions provided on the slides one by one to assess the students’ understanding. Discuss the answers to the questions with the students. If necessary, ask additional relevant questions.
7 mins
Build
● Instruct the students to attempt the assignment by clicking on the Assignment tab.
● Explain the activity to the students. Sum Up
3 mins
● Conclude the session by summarising that we can use an if-elif-else statement inside the body of another if-elif-else statement. That is called nesting of statements. Help them solve the given examples and attempt the coding challenge.
● Assign the additional activity given on the panel to the students as homework.
This chapter is divided into the following classroom and lab sessions
At the end of the session, the students will be able to:
● describe HTML and its advantages and disadvantages.
● explain about web browsers.
● describe the basic structure of an HTML document.
● design web pages in HTML.
● create the structure of an HTML document.
Keywords
● HTML: HTML stands for HyperText Markup Language. It helps you to display colourful text, images, and attractive backgrounds to your web page.
● Web browser: A web browser is a software application that processes HTML and other web technologies to display web pages to users.
Ask the student to define web browser.
Describe to the students what HTML is. Tell its advantages and disadvantages. Explain them what a web browser is.
Describe the basic structure of an HTML document. Also, explain how to design web pages in HTML. Tell them how to create the structure of an HTML document.
Think and Tell Conclude the concepts
Assign homework
● Ask the student to define web browsers. Tell them that web browsers are used to process HTML and other web technologies to display web pages to users.
Explain the following concepts:
Describe HTML and its advantages and disadvantages. Tell the students that we use various computer languages or technologies to create web pages. HTML is one of the technologies used to create web pages, as given on pages 31 and 32.
Explain about web browsers. Describe to them what a web browser is. Tell them that Google Chrome, Mozilla Firefox, and Microsoft Edge are some common examples of web browsers, as given on page 32.
Describe the basic structure of an HTML document.
Describe the basic structure of an HTML document, which includes a header section and a body section, as given on page 32.
Design web pages in HTML. Describe the steps involved in designing a web page in HTML are open an editor, write HTML code, save a file, open a browser, and check the web page, as given on page 33.
Create the structure of an HTML document.
Describe to them that to create an HTML document, you need to know about a few essential elements, such as doctype HTML, HTML, head, etc. To create a basic HTML document structure, refer to pages 33 and 34 for the necessary elements.
● Read aloud the questions provided in the Do It Yourself 4A and Do It Yourself 4B sections and encourage the students to solve the questions. Instruct the students to write the answers in their book.
Correct Responses: (Do It Yourself 4A)
● Ask the students to give the answer to the question “What type of websites do you want to create using HTML?” asked in the Think and Tell section given on page 32.
Possible Responses: Game websites, news websites, and social networking websites
● Conclude the session by summarising that HTML helps you display colourful text, images, and attractive backgrounds to your web page. Describe its advantages and disadvantages. Explain to them what a web browser is. Also, revise that HTML contains two sections: a head section and a body section. Also, explain how to design web pages in HTML. Tell them how to create the structure of an HTML document.
● Assign the following questions from the Chapter Checkup given at the end of the chapter as homework.
A. Fill in the Blanks: Question 3
B. Tick the Correct Option: Question 1
C. Who Am I?: Questions 1 and 4
D. Write T for True and F for False: Questions 1, 2, and 3
E. Answer the Following Questions: Questions 1, 2, 3, and 5
F. Apply Your Learning: Question 2
At the end of the session, the students will be able to:
● describe basic terminologies in HTML.
● explain different types of tags.
● explain more html tags like <em>,<sub>, <sup>, etc.
Keywords
● Tag: A tag is a keyword that tells the browser how to display a piece of text or content.
● Container tags: These tags consist of an opening tag as well as a closing tag. This start tag and end tag pair are known as the ON and OFF tags and are used to open and close the document.
Warm Up Engage Build Sum Up
Let the students watch the video or the learning slides related to the topic on the digital panel.
Describe to them the basic terminologies in HTML. Explain about different types of tags.
Attempt the activity on the Assignment page.
Conclude the concepts Assign homework
Instruct the students to go to the Tekie’s Digital platform and open a Lab session on HTML 2. Show the learning slides one by one and discuss the concepts shown on the slides in the panel.
Explain the following concepts:
Describe basic terminologies in HTML.
Explain different types of tags.
Explanation
Describe basic terminologies of HTML, such as tags, elements, attributes, as given on page 35.
Describe types of tags, such as container tags and empty tags. Also, tell them about basic tags in HTML, as given on pages 35 to 37.
Explain more html tags like <em>,<sub>, <sup>, etc.
Demonstrate to them the use, syntax, and code for some more HTML tags, such as <em> tag, <strong> tag, <sub> tags. Also, help them solve the coding challenge as given on pages 38 to 40.
● Ask the questions provided on the slides one by one to assess the students’ understanding. Discuss the answers to the questions with the students. If necessary, ask additional relevant questions.
● Read aloud the questions provided in the Do It Yourself 4C section and encourage the students to solve the questions. Instruct the students to write the answers in their book.
Correct Responses:
7 mins
● Instruct the students to attempt the assignment by clicking on the Assignment tab.
● Explain the activity to the students.
3 mins
● Conclude the session by summarising that a tag is a keyword that tells the browser how to display a piece of text or content. Tell them about elements and attributes. Describe to them the various types of tags, such as paragraph, break, body, head, etc. Also, introduce them with more html tags such as <em> tag, <strong> tag, <sub> tag, <sup> tag, <section> tag, and <article> tag. Also, demonstrate the complete project.
● Assign the additional activity given on the panel to the students as homework.
● Assign the following questions from the Chapter Checkup given at the end of the chapter as homework.
A. Fill in the Blanks: Questions 1, 2, 4, and 5
B. Tick the Correct Option: Questions 2, 3, 4, and 5
C. Who Am I?: Questions 2, 3, and 5
D. Write T for True and F for False: Questions 4 and 5
E. Answer the Following Questions: Question 4
F. Apply Your Learning: Questions 1, 3, 4, and 5
This chapter is divided into the following classroom and lab sessions
1. Introduction to CSS
2. CSS Colour Properties 3. CSS Font Properties
CSS Border Property
At the end of the session, the students will be able to:
● explain what CSS is.
● describe CSS syntax.
● use inline CSS.
● use internal CSS.
● use external CSS.
Keywords
● CSS: Cascading Style Sheets (CSS) is a language used to incorporate styles like background colour, font colour, and font size in web pages.
● Selector: It is any HTML element to which you want to apply a style, like <p>.
● Property: It is like an HTML attribute, like colour, which adds additional features to an element.
Warm Up
Let the students watch the video or the learning slides related to the topic on the digital panel.
Engage Build Sum Up
Discuss with the students about CSS, its syntax, and different methods to use it.
Attempt the activity on the Assignment page.
Conclude the concepts
Assign homework
5 mins
Warm Up
● Instruct the students to go to Tekie’s Digital platform and open a Lab session on Introduction to CSS.
● Show learning slides one by one and discuss the concept shown on the slides in the panel.
Engage
Explain the following concepts:
Learning Outcomes
15 mins
Explanation
Explain what CSS is. Explain to the students that Cascading Style Sheets (CSS) is a language used to incorporate styles like background colour, font colour, and font size in web pages, as given on page 44.
Describe CSS syntax. Demonstrate to the students that style rules are made up of selectors, properties, and values. All style rules are enclosed within curly brackets {}, as given on page 44.
Use inline CSS. Demonstrate to the students that the purpose of inline CSS is to apply CSS style rules only to a particular element in an HTML document, as given on page 45.
Use internal CSS. Demonstrate to the students that they can use the internal CSS method to apply CSS style rules to multiple elements or an entire web page, as given on page 45.
Use external CSS. Demonstrate to the students that the external CSS method allows you to apply style rules to multiple web pages of a website, as given on pages 45 and 46.
● Ask the questions provided on the slides one by one to assess the students’ understanding. Discuss the answers to the questions with the students. If necessary, ask additional relevant questions.
● Read aloud the questions provided in the Do It Yourself 5A section and encourage the students to solve the question. Instruct the students to write the answer in the book.
Correct Responses:
1. a. F b. F c. T
2. Values of the href and rel attributes are wrong. The correct code is: <link rel=”stylesheet” href = “style.css”>
Build
● Instruct the students to attempt the assignment by clicking on the Assignment tab.
● Explain the activity to the students.
7 mins
● Conclude the session by summarising that Cascading Style Sheets (CSS) is a language used to incorporate styles like background colour, font colour, and font size in web pages. Style rules are made up of selectors, properties, and values. There are three methods to use CSS in an HTML document: inline, internal, and external.
● Assign the following questions from the Chapter Checkup given at the end of the chapter as homework.
A. Fill in the Blanks: Questions 1, 2, and 3
B. Tick the Correct Option: Questions 1 and 2
C. Who Am I?: Questions 1, 2, and 5
D. Write T for True and F for False: Questions 1, 2, 3, and 5
E. Answer the Following Questions: Questions 1, 2, and 5
F. Apply Your Learning: Question 2
At the end of the session, the students will be able to:
● use CSS colour properties.
Let the students watch the video or the learning slides related to the topic on the digital panel.
Demonstrate how to use colour properties of CSS.
Attempt the activity on the Assignment page
Conclude the concepts
Assign homework
5 mins
Warm Up
● Instruct the students to go to Tekie’s Digital platform and open a Lab session on CSS Colour Properties.
● Show learning slides one by one and discuss the concept shown on the slides in the panel.
Engage
Explain the following concepts:
Learning Outcome
Use CSS colour properties.
15 mins
Explanation
Demonstrate to the students how to use colour and background-colour properties. The colour property applies colour to the text of an element. The background-colour applies a colour to the background of an HTML document, as given on pages 46 and 47.
● Ask the questions provided on the slides one by one to assess the students’ understanding. Discuss the answers to the questions with the students. If necessary, ask additional relevant questions.
● Instruct the students to attempt the assignment by clicking on the Assignment tab.
● Explain the activity to the students.
Sum Up 3 mins
● Conclude the session by summarising that CSS provides two colour properties: colour and background-colour. The colour property applies colour to the text of an element. The backgroundcolour property applies colour to the background of an HTML document.
● Assign the additional activity given on the panel to the students as homework.
● Assign the following questions from the Chapter Checkup given at the end of the chapter as homework
A. Fill in the Blanks: Question 5
B. Tick the Correct Option: Questions 3 and 4
C. Who Am I?: Question 3
E. Answer the Following Questions: Question 3
At the end of the session, the students will be able to:
● use CSS font properties.
Ask students if they have ever wondered how the text on the web page looks well formatted.
Explain to the students the various CSS font properties.
Group discussion
Conclude the concepts
Assign homework
Warm Up
● Ask students if they have ever wondered how the text on the web pages looks well formatted.
● Tell students that they can use the various CSS font properties to format text on web pages.
Explain the following concepts:
Learning Outcome
Explanation
Use CSS font properties. Tell students that the CSS font properties are used to format text on web pages. Also tell them how to use the font properties like font-family, font-size, font-weight, text-align, text-decoration, and line-height, as given on pages 47 and 48.
● Read aloud the questions provided in the Do It Yourself 6B section and encourage the students to solve the question. Instruct the students to write the answer in the book.
Correct Responses: Match the CSS property with its possible value.
CSS Property Value
background-colour 14pt
font-size red
text-align double
text-decoration justify
border-style overline
● Conduct a group discussion among the students in the class on the topic “Different ways to format text on a web page”.
A Fill in the Blanks.
Possible Response: We can format text on a web page by setting its various font styles and sizes, changing the thickness of characters, aligning text, underlining, changing the spacing between the lines of text, etc.
Hints .css # style font-weight structure
1 The main purpose of CSS is to separate the styles from the of the web pages.
2 rules are made up of selectors, properties, and values.
3 CSS file is saved with the extension.
● Conclude the session by summarising that the CSS font properties are used to format text on web pages. There are various font properties like font family, font size, font weight, text align, text decoration, and line height
4 The property of CSS specifies the thickness of characters.
● Assign the following questions from the Chapter Checkup given at the end of the chapter as homework.
5 The symbol is used at the beginning of hexadecimal code.
A. Fill in the Blanks: Question 4
B Tick () the Correct Option.
B. Tick the Correct Option: Question 5
C. Who Am I?: Question 4
1 Which of the following brackets is used to enclose style rules with a selector?
F. Apply Your Learning: Questions 1, 3, and 4
2 Which of the following is not a method of using CSS in an HTML document?
3 Hexadecimal codes are made up of: a six characters b four characters c two characters d eight characters
4 What does R stand for in RGB? a Rich b Red c Real d Rose
5 The property sets the size of the text in pixels, points, percentage, or em.
At the end of the session, the students will be able to:
● use CSS border property.
Let the students watch the video or the learning slides related to the topic on the digital panel.
Demonstrate to the students how to use the border property of CSS.
Attempt the activity on the Assignment page
Conclude the concepts
Assign homework
5 mins
Warm Up
● Instruct the students to go to the Tekie’s Digital platform and open a Lab session on CSS Border Property.
● Show learning slides one by one and discuss the concepts shown on the slides in the panel.
Explain the following concepts:
Learning Outcome
15
Explanation
Use CSS border property. Tell students that the border property allows them to add a border around an HTML element. It is a shorthand property that allows them to set the width, style, and colour of the borders. Demonstrate to them how to use border property, as given on pages 48 and 49.
● Ask the questions provided on the slides one by one to assess the students’ understanding. Discuss the answers to the questions with the students. If necessary, ask additional relevant questions.
● Instruct the students to attempt the assignment by clicking on the Assignment tab.
● Explain the activity to the students.
Sum Up 3 mins
● Conclude the session by summarising that the border property allows you to add a border around an HTML element. It is a shorthand property that allows you to set the width, style, and colour of all four borders (top, right, bottom, and left).
● Assign the additional activity given on the panel to the students as homework.
● Assign the following questions from the Chapter Checkup given at the end of the chapter as homework.
D. Write T for True and F for False: Question 4
E. Answer the Following Questions: Question 4
F. Apply Your Learning: Question 5
Chapter Checkup
A. Fill in the Blanks.
1. FLOPS 2. Mainframe 3. Personal 4. binary 5. mnemonic
B. Tick () the Correct Option.
1. b. A way in which computers understand instructions. 2. a. Binary 3. b. Interpreter 4. d. Fifth-generation 5. d. Fourth-generation
C. Who Am I?
1. Assembly language 2. Binary language 3. Translator program 4. Workstation 5. Tablets/Smartphones
D. Write T for True and F for False.
1. T 2. F 3. F 4. F 5. F
E. Answer the Following Questions.
1. A computer language can be defined as a set of instructions that computers can understand and follow.
2. Based on their size and functionality, the computers can be categorised into supercomputers, mainframes, minicomputers, workstations, personal computers, smartphones, and tablets.
3. The features of mainframe computers are:
● Mainframe computers are big and super-fast, but they are smaller than supercomputers.
● They can do lots of jobs quickly.
● They are used in places where high precision is required, such as in banks to handle money transactions or in aeroplane guidance.
● Mainframes are super reliable, and they can work for a long time.
● Examples: IBM z15, IBM z14, Unisys ClearPath Libra, Fujitsu GS21 360, and Hitachi VOS3.
4. A compiler is a language processor that reads the source programs written in high-level language and converts them into an equivalent program written in machine code in one go. On the other hand, the interpreter is a translator program that converts high-level language code to machine language line by line as the program runs.
5. Assembly language is a second generation language. This language uses simple mnemonic codes instead of binary numbers to communicate with computers.
On the other hand, machine language is a first-generation language. This language is dependent on machines. It uses binary numbers, i.e., 0s and 1s to communicate with computers.
F. Apply Your Learning.
1. She must have used high-level languages, for example, C, C++, and Java.
2. Supercomputers
3. Laptop
4. Fifth generation
5. Translator program
Chapter Checkup
A. Fill in the Blanks.
1. internet 2. email 3. blog 4. 1960s 5. sell
B. Tick () the Correct Option.
1. d. Television
2. a. A writer’s thoughts and opinions on a particular topic
3. a. An audio or video recording that is published online and can be downloaded or streamed
4. c. Share personal information about yourself or others
5. a. Podcasting
C. Who Am I?
1. E-mail 2. Blog 3. Podcast 4. Netiquette 5. UPI
D. Write T for True and F for False.
1. T 2. F 3. T 4. F 5. T
E. Answer the Following.
1. The internet is a network that connects computers all over the world.
2. Email stands for electronic mail. It is a way to send messages over the internet to other people. Emails can be used to send textual content, photos, documents, and others as attachments.
Following are the advantages of an email:
● Most email services are free and easy to use.
● You can send a message in real time to a person anywhere across the globe.
● Emails are personal and are secured with passwords.
3. Podcasting is a way to create and distribute audio content. This content can include discussions, interviews, storytelling, music, and more.
4. Following are the netiquette one should follow while online:
● Treat others on the internet the way you want to be treated. Do not say or write mean or hurtful things.
● Write in a way that is easy to understand, and avoid using all capital letters (LIKE THIS) or unnecessary punctuation (!!!! Or *!?*#), which can seem like shouting or being rude.
5. Examples of Modes of Online Payments:
Credit Card: Customers can make online payments using their credit cards. The customers need to enter card details like their card number, expiration date, and CVV code for transactions.
Debit Card: Debit cards are another popular option for making online payments. These cards allow users to pay online by entering debit card information, and the transaction amount is deducted directly from their bank account.
F. Apply Your Learning.
1. Nishi can search for information on the internet that offers access to a vast number of educational resources and online courses.
2. Mihir can list email, social media, instant messaging, and video conferencing as ways people communicate online.
3. No, she should not share her personal information. The potential threats she can be exposed to include: financial fraud, identity theft.
4. Blogs
5. ● Write in a way that is easy to understand, and avoid using all capital letters (LIKE THIS) or unnecessary punctuation (!!!! Or *!?*#), which can seem like shouting or being rude.
● Do not be mean or make fun of others online. Cyberbullying hurts people, just like physical bullying.
● Emojis can help show emotions, but do not use too many. It can be confusing.
● Sometimes, people on the internet may not respond right away. Be patient, and give them time.
Chapter Checkup
A. Fill in the Blanks.
1. View, Zoom menu 2. Dictionary 3. Comment 4. Slide Sorter
B. Write T for True and F for False.
1. F 2. T 3. T 4. F
C. Explain the Functions of the Icons.
1. The comments facilitate collaboration among multiple authors or reviewers working on the same presentation.
2. The Slide zoom feature in presentations makes a small part of your slides look enlarged on the screen.
3. The Eraser tool in the bottom left viewer menu that appears while using the ink annotation feature in Google Slides, helps erase annotations.
D. Answer the Following Questions.
1. Using the “Dictionary” feature in presentations can help you learn more about words or phrases used in your presentation. This allows you to quickly access definitions, explanations, and other relevant information about a word or phrase within your presentation.
2. Action buttons are used to move from one slide to another and play media files. You can set action buttons to open external content, such as a website, another PowerPoint presentation, a document, a spreadsheet, and much more.
3. Ink annotation in presentations is like drawing or writing on the slides with colourful pens. It helps to make your presentation interactive and interesting because you can draw or highlight things to show everyone what is really important.
4. Importing data into a presentation is the process of bringing external content or data into your own presentation. Importing slides helps you add slides from another presentation to your current presentation. You can also import data from the Google Sheets into your Google Slides presentation.
E. Apply Your Learning.
1. Mahima can use the Ink Annotation feature of the Google Slides.
2. To zoom in on a presentation slide, Keerat can use the shortcut key Ctrl + =.
3. Reena can use the Dictionary feature to find the meaning of the word.
4. To reply to a comment, click on it and type your response in the comment box. Click on the Reply button.
Chapter Checkup
A. Fill in the Blanks. 1. worksheet 2. cell 3. Ctrl + Z 4. Font 5. scrolling
B. Tick () the Correct Option.
1. c. organising and analysing data
b. Name box
C. Who Am I?
1. Google Sheets 2. Cell 3. Formula bar 4. Ctrl 5. Copying data
D. Write T for True and F for False.
1. T 2. F 3. T 4. F 5. T
E. Answer the Following Questions.
1. The features of the Google Sheets are: ● Easy editing and formatting of data
● Use of formulas and functions
● Printable sheets
● Use of charts for data analysis
2. Row-5 Column-H
3. Types of data you can enter into a cell are: Numbers and words
4. To select a row in a Google sheet, click the number of the row or the row heading you want to select or press Shift + spacebar keys.
5. Formatting is a crucial feature in Google Sheets. Formatting helps change the appearance of cells, text, and data, by adjusting fonts, colours, borders, and number styles to make the sheet more organised and easier to read.
F. Apply Your Learning.
1. Do it yourself 2. Do it yourself 3. Do it yourself 4. Do it yourself
Chapter Checkup
A. Fill in the Blanks.
1. problem-solving 2. pictorial 3. Flow lines 4. start or stop
B. Tick () the Correct Option.
1. c. oval 2. d. All of these 3. d. Decision making statement 4. c Start
C. Write T for True and F for False.
1. T 2. F 3. T
D. Answer the Following Questions.
1. An algorithm is a set of step-by-step instructions designed to perform a specific task or solve a particular problem.
2. A flowchart is a pictorial representation of an algorithm, using standardised symbols.
3. Packing your school bag: While packing your school bag, first you check your timetable and then pack the books and notebooks according to that timetable. You also pack the necessary stationery items, your school diary, etc. Thus, for packing your bag, you follow a step-by-step algorithm.
4. In the project planning process, the flowchart could include steps such as project initiation, planning, execution, monitoring, and closure.
F. Apply Your Learning.
1. Factorial algorithm:
Step 1: Start
Step 2: Input number n.
Step 3: Set factorial = 1.
Step 4: Multiply factorial by each number from 1 to n.
Step 5: Display factorial.
Step 6: Stop
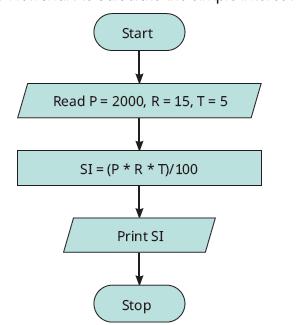
3. Dr. Mehta can use a flowchart to outline the steps from assessing these symptoms to conducting tests, diagnosing the condition, and planning the treatment.
4. The flowchart symbol for terminator, i.e., 'Start' is missing. Every flowchart begins with it.
Chapter Checkup
A. Fill in the Blanks.
1. Canva 2. Text 3. design 4. zoom 5. Flipping
B. Tick () the Correct Option.
1. a. creating and editing images
2. b. Selecting the part you want to keep
3. d. It is the working area where you create your project
4. c. Elements
5. a. Uploads
C. Who Am I?
1. Notes 2. Draw Tool 3. Flipping 4. Canvas 5. Smart Crop
D. Write T for True and F for False.
1. F 2. F 3. T 4. T 5. F
E. Answer the Following Questions.
1. Canva is a user-friendly online tool that allows you to create and edit images, design cards, and make various visual projects. You can use Canva for creating posters, designing invitations, making social media posts, combine photos in a collage, creating personalised cards, etc.
2. Editing an image in Canva means making changes to a picture to make it look better or different. It includes editing the colour scheme and style, cropping, and flipping an image.
3. Flipping an image means creating a mirrored or reversed version of the original image, whereas cropping means removing the unwanted parts from your image so that you can focus on the important area of your image.
4. The purpose of applying templates in Canva is to provide a ready-made design framework that helps users start their projects quickly and easily. Templates act as pre-designed outlines, allowing users to focus on customising the design with their preferred colours, text, and details, rather than creating everything from scratch.
5. Two flipping options are: Flip horizontal or Flip vertical
F. Apply Your Learning.
1. Lisa should follow the given steps to create a blank canvas:
Step 1: On the home page of Canva, click on the Create a design button.
Step 2: Select any design from the suggested list. Again, click on Create New Design. The Canva editor window with a blank canvas for designing will open.
2. Jake should choose the ‘Flip horizontal’ option to flip the image horizontally to create a mirrored effect.
3. Mike must use the ‘Edit image’ button.
4. James must use the Styles tab to change the font style and colour of the text.
5. Sofia must use the following steps to crop the image:
Step1: Select the image.
Step2: Click on the Edit image button to open the editing menu.
Step 3: Click on the Crop tab.
Step 4: Click and drag the handles to select the part of the image that she wants to keep and adjust the cropping area
Chapter Checkup
A. Fill in the Blanks.
1. workspace 2. Editing 3. Elements 4. formatting
B. Tick () the Correct Option.
1. b. To enhance organisation and clarity
2. b. Elements
3. b. Type ‘mindmap’ in the Search box
4. c. Text
5. b. Branches
C. Who Am I?
1. Font Style 2. Effects 3. Bold 4. Branches
D. Write T for True and F for False.
1. F 2. F 3. T 4. T
E. Answer the Following Questions.
1. Mind maps provide a creative way to visually organise and connect ideas using text, shapes, colours, and lines.
2. When the Strikethrough formatting option is applied to a text, horizontal line is shown passing through the middle of the text. It is used to indicate that a word or phrase is no longer valid or has been replaced.
3. Adding Branches to a mind map means creating links between the main topic and subtopics. Branching helps us understand the topic better.
4. Underline effect has a horizontal line beneath the text. Underlining is commonly used for headings or to emphasise on specific points.
F. Apply Your Learning.
1. To change the font size, click on the text box. Look for the Font size option at the top of the canvas and choose the appropriate font size.
To change the font style, click on the text box. Look for the Font style option at the top of the canvas and choose the appropriate font type.
2. Steps to add a shape to the mind map are:
Step 1: Click on the Elements tab on the left menu.
Step 2: Select any of the available shapes to start with and then click on it.
Step 3: The shape appears on the canvas.
Step 4: You can resize the shape by dragging the side handle of the shape.
Step 5: You can also change the colour of the shape. Click on the shape to select it and then click the colour icon at the top of the canvas. Select the desired colour to fill in the shape.
Step 6: Add more shapes and make the changes, as required for creating the mind map.
3. Steps to add text:
Step 1: Click the Text option in the left-hand menu.
Step 2: Click Add a text box.
Step 3: A text box appears on the canvas.
Step 4: Click the text box that appears to select it and then type the text that you want to add.
Step 5: Add more text boxes for other shapes, as required.
4. Hello can use the italic I icon to apply the italic effect to regular text.
Chapter Checkup
A. Fill in the Blanks.
1. sensors 2. actuators 3. hospitals 4. robots
B. Tick () the Correct Option.
1. a. Humanoid Robot
2. a. Robo Buddy
3. c. Industrial Robot
4. d. MANAV
D. Write T for True and F for False.
1. F 2. T 3. T 4. F
E. Answer the Following Questions.
1. Different components of robots are sensors, actuators, controllers, power supply, frame, and software.
2. Exploration robots go to places where humans can’t easily reach, like other planets or deep oceans. They help scientists learn new things about those places.
3. MITRA is a humanoid robot designed to assist with tasks like answering questions and engaging with visitors at various locations, such as museums, exhibitions, and educational institutions. MITRA’s primary goal is to improve human-robot interaction.
4. Robotics is the study and creation of robots—machines that can do tasks on their own. It involves designing robots, making their parts, and programming them to perform different jobs. Robotics combines knowledge from engineering (to build the robots), computer science (to develop their software), and electronics (to power and control them).
F. Apply Your Learning.
1. Service robot 2. Industrial robot 3. Exploration robot 4. Humanoid robot
Chapter Checkup
A. Fill in the Blanks.
1. visual 2. eyes 3. digital 4. virtual
B. Who Am I?
1. Computer vision 2. Augmented reality 3. Medical Imaging 4. Virtual reality
C. Write T for True and F for False.
1. F 2. F 3. T 4. T
D. Answer the Following Questions.
1. Computer Vision (CV) is a domain of artificial intelligence that focuses on enabling computers and machines to interpret and understand visual information from the real world, typically through cameras.
2. Virtual Reality (VR) is a technology that immerses users in a completely digital or virtual environment.
3. Face recognition is used to recognise individuals based on their facial features in applications, such as security and surveillance systems.
4. Computer vision has applications in the fields of object recognition, face recognition, autonomous vehicles, medical imaging, robotics, and many more.
E. Apply Your Learning.
1. Augmented Reality (AR) is a technology that blends digital content with the real world in real-time whereas, virtual reality (VR) is a technology that immerses users in a completely digital or virtual environment.
2. Naina will describe the workings of computer vision to her little brother with the following example: Just think about how we see things and recognise them. When we see things, our eyes capture visual information, which is then transmitted as signals through our optic nerves to the brain. The brain processes these signals, allowing us to recognise and interpret the images we see.
Similarly, in computer vision, cameras act as the “eyes” of AI systems. They capture visual data, which is converted into signals by sensors. These signals are then processed by AI algorithms or programs, enabling the system to identify objects or images.
Chapter-1 Introduction to Python
Chapter Checkup
A. Fill in the Blanks.
1. Guido van Rossum
B. Tick () the Correct Option.
type()
identifiers
string
syntax
1. c. English
d. All of these
C. Write T for True and F for False.
1. F 2. T 3. T 4. F 5. F
D. Answer the Following Questions.
1. The prompt is a message that is displayed on the screen to instruct the user on what input is expected.
2. Two features of Python are:
Easy to code: The language used to write Python code is similar to the English language, making it easy for programmers to write and understand code.
Cross-platform compatibility: Python can be used on various operating systems, including Windows, macOS, and Linux.
3. int data type: Positive or negative whole numbers (without any fractions or decimals) are examples of int data type. Example: 30, 180, 89, etc.
float data type: Any real number with decimal points is the example of the float data type.
Example: 6.3, 9.5, 320.0, etc.
4. Dynamic typing in Python means that you can assign a value to a variable, and the variable automatically takes the data type of that assigned value at runtime.
5. In the field of AI, Python helps create computer programs that can chat with you, recognise your voice, etc., making computers smarter.
E. Apply Your Learning.
1. Output of the following programs:
a. <class ‘str’>
<class ‘str’>
<class ‘str’>
b. apple
c. Namit 6
2. Rules for naming a variable:
● Spaces are not allowed when naming variables. You can instead use an underscore (_) symbol.
● A variable name can contain only alphanumeric characters (all the letters of the alphabet and numbers) and underscores (_).
● Variable names cannot contain any special characters or symbols.
● A variable name must start with a letter or an underscore (_) symbol. This name cannot start with a number.
● Variable names are case-sensitive.
3. Shivam can use the print() and the type() functions to simplify and speed up the development of programs.
4. Data types of the values:
a. int b. str
5. Errors in the following statements:
a. 123var1=10
Error: The name of a variable cannot start with a number.
b. Name1=Seema
Error: The string should be enclosed in a set of single or double quotes.
Chapter Checkup
A. Fill in the Blanks.
1. Algorithm 2. Operator 3. Precedence 4. Logical 5. pow(x, y)
B. Tick () the Correct Option.
1. b. x**y 2. b. // 3. b. ii, i, iii, iv, v, vi 4. b. 1 5. d. Parentheses
C. Who Am I?
1. Syntax 2. sqrt() 3. Exponential Operator 4. Relational Operators 5. Modulus
D. Write T for True and F for False.
1. T 2. F 3. F 4. T 5. T
E. Answer the Following Questions.
1. The * operator is a multiplication operator. It multiplies two operands. Whereas, the ** operator is an exponentiation (Power) operator, it raises the first operand to the power of the second.
2. Assignment operators are used to assign values to variables.
3. You need to follow the PEDMAS rule for evaluating the mathematical expressions. The PEDMAS rule is as follows:
● P—Parentheses
● E—Exponentiation
● D—Division
● M—Multiplication (Multiplication and division have the same precedence.)
● A—Addition (Addition and subtraction have the same precedence.)
● S—Subtraction
4. Min ()
x = min(5, 10, 25)
print(x)
Output = 5
Max()
y = max(5, 10, 25)
print(y)
Output = 25
5. Floor division divides the operand on the left by the operand on the right and returns the quotient by removing the decimal part. Sometimes, it is also called integer division. For example, output of print(100//3) is 33. Here, '//' is the operator used for floor division.
F. Apply Your Learning.
1. 100 + 200 / 10 − 3 * 10 = 100 + 20 − 30 = 120 − 30= 90
2. Program to convert the distance entered in metres to kilometres: distance_in_mtrs = float(input("Enter distance in meters:")) distance_in_kms = distance_in_mtrs / 1000 print("The distance in kilometers is:", distance_in_kms)
3. Program to calculate your body mass index (BMI): weight = float(input("Enter your weight in kilograms:")) height = float(input("Enter your height in meters:")) bmi = weight / (height ** 2) print("Your Body Mass Index (BMI) is:", bmi)
4. Algorithm for making a vegetable sandwich:
Step 1: Take two slices of bread.
Step 2: Spread butter on the slices of the bread.
Step 3: Place lettuce leaves on one slice of the bread.
Step 4: Add sliced tomatoes, cucumbers, onions, and bell peppers on top of the lettuce.
Step 5: Place the other slice of the bread on top of the vegetables to make a sandwich.
Step 6: Serve the vegetable sandwich immediately.
5. Flowchart for showing the progress of a plant’s growth:
Take a pot, some soil and a seed.
Fill the pot with soil.
Immerse a seed in the soil.
Water the soil.
Keep the pot in the sunlight for a few days.
Fully grown plant Has the plant sprouted? No Yes
Start Stop
Chapter Checkup
A. Fill in the Blanks.
1. hierarchy and structure 2. any one 3. Code block 4. none of the conditions
B. Tick () the Correct Option.
1. c. To execute when the condition is false
2. d. if-elif-else Statement
3. c. if
4. c. Indentation error
5. c. Error
C. Who Am I?
1. if statement 2. if-elif-else statement 3. else
D. Write T for True and F for False.
1. F 2. T 3. T 4. F
E. Answer the Following Questions.
1. Control statements in the Python programming language are used to manage the sequence of execution within a program. They allow you to make decisions, repeat actions, and control the overall flow of your code.
The three main types of control statements in Python are:
● Sequential Statements
● Conditional Statements
● Iterative Statements or Loops.
2. Conditional statements enable you to execute various sections of code, based on whether a given condition is true or false.
In Python, there are three types of conditional statements that allow us to make decisions in our programs. These include:
● if Statement ● if...else Statement
if-elif-else Statement
3. Indentation refers to the space at the beginning of a code line. In Python, indentation is used to define blocks of code. It is a fixed number of spaces added at the beginning of each line of code. It is used to define the hierarchy and structure of the code. The statements at the same level of indentation are considered to be a part of the same block.
4. The ‘if’ statement is used to evaluate a condition and execute a code block if the condition evaluates to true. Otherwise, the code block will be skipped. On the other hand, using the if...else statement, the block of code after the if statement is executed if the condition is true, and the block of code after the else statement is executed if the condition is false.
5. The if-elif-else statement is an extension of the if...else statement. The if-elif-else statement allows you to check multiple conditions in a program. Python checks each condition until any one of them is true.
Syntax : if condition1: Statement1 elif condition2: Statement2 elif condition 3: Statement3 else:
Final_Statement
Explanation:
● If condition1 becomes true, then the statement1 is executed, and the rest of the statements are ignored.
● Otherwise, the interpreter moves on to condition2. if it becomes true, then it executes Statement2.
● This process continues until a true condition is found. Otherwise, the ‘else’ statement is executed if none of the conditions are true.
F. Apply Your Learning.
1. Program that checks if a given number is even or odd and prints an appropriate message. num = int(input("Enter a number:")) if num % 2 == 0: print(num, "is even.") else:
print(num, "is odd.")
2. Program that prints the absolute value of a given number after checking its sign. num = float(input("Enter a number:")) if num >= 0:
print("The absolute value of", num, "is", num) else:
print("The absolute value of", num, "is", -num)
3. Program that determines whether a given year is a leap year or not and prints the result. year = int(input("Enter a year:")) if (year % 4 == 0 and year % 100 != 0) or (year % 400 == 0): print(year, "is a leap year.") else:
print(year, "is not a leap year.")
4. Program to check whether it is possible to make a triangle or not. angle1 = float(input("Enter the first angle in degrees:")) angle2 = float(input("Enter the second angle in degrees:")) angle3 = float(input("Enter the third angle in degrees:")) if angle1 + angle2 + angle3 == 180:
print("It is possible to form a triangle with these angle measurements.") else:
print("It is not possible to form a triangle with these angle measurements.")
5. #Input: Age and membership status age = int(input("Enter your age:")) is_member = input("Are you a member (yes/no)? ").lower()
# Check eligibility for discounts if age >= 60: if is_member == "yes":
print("You are eligible for a 20% discount.") else:
print("You are eligible for a 10% discount.") elif is_member == "yes":
print("You are eligible for a 5% discount.") else:
print("You are not eligible for any discount.")
Chapter-4 Introduction to HTML
Chapter Checkup
A. Fill in the Blanks.
1. Angular brackets 2. element 3. Microsoft Edge 4. <body> 5. Text paragraph
B. Tick () the Correct Option.
1. b. A markup language
2. d. All of these
3. d. To create a horizontal line
4. c. Additional information that can be added to a tag
5. c. <section>
C. Who Am I?
1. Web browser 2. <!DOCTYPE html> tag 3. Attribute 4. HTML 5. <i> tag
D. Write T for True and F for False.
1. T 2. T 3. F 4. F 5. T
E. Answer the Following Questions.
1. HTML stands for HyperText Markup Language. It helps you to display colourful text, images, and attractive backgrounds to your web page. Some features of HTML are:
● HTML is a simple and easy language to learn.
● HTML can create web pages that run on any device (computers, mobiles, and tablets).
● HTML helps you to add video, image, and audio files to web pages. This feature enhances the experience for website visitors.
● Using HTML, you can link various web pages with each other. It allows users to click text or images and navigate to various websites.
2. A web browser is a software application that processes HTML and other web technologies to display web pages to users. For example, Google Chrome, Mozilla Firefox, Microsoft Edge, etc.
3. Container Tags: These tags consist of an opening tag as well as a closing tag. This start tag and end tag pair are known as the ON and OFF tags and are used to open and close the document.
Syntax: <tag_name>.......</tag_name>
Example: <B> tag is a container tag in HTML.
Empty Tags: An empty tag is a tag without a closing tag.
Syntax: <tag_name>
Example: <img> tag is an empty tag in HTML.
4. The basic structure of an HTML document is: <!Doctype html> <html> <head> <title>My Web Page</title> </head> <body> </body> </html>
5. <sub> Tag: This tag is used to represent text as a subscript. A subscript is the text that is below the baseline of the surrounding text. For example, 2 in H2O is a subscript.
Syntax: <sub>Block of text</sub>
<sup> Tag: This tag is used to represent text as a superscript. A superscript is the text that is above the baseline of the surrounding text. For example, 2 in E = mc2 is a superscript.
Syntax: <sup>Block of text</sup>
F. Apply Your Learning.
1. To underline text in HTML, Shreya can use the <u> tag.
2. Anmol can use the <section> tag to divide his web page into several sections.
3. To make the web page visually appealing, you would typically use the following tags:<h1>, <h2>, <h3> for headings. <p> for paragraphs. <ul>, <ol>, <li> for lists. <img> for adding images.
4. A web page showing information about your favourite sports persons.
<!DOCTYPE html>
<html lang=”en”> <head>
<title>Favourite Sports Persons</title> </head> <body>
<h1>Favourite Sports Persons</h1>
<section>
<h2>Basketball</h2>
<p>LeBron James - LeBron Raymone James Sr. is an American professional basketball player for the Los Angeles Lakers of the National Basketball Association (NBA).</p> </section> <section>
<h2>Football</h2>
<p>Lionel Messi - Lionel Andrés Messi is an Argentine professional footballer who plays as a forward for Paris Saint-Germain and the Argentina national team.</p> </section> <section>
<h2>Tennis</h2>
<p>Roger Federer - Roger Federer is a Swiss professional tennis player. He has been ranked world No. 1 in the ATP rankings a total of 310 weeks – including a record 237 consecutive weeks – the most in the Open Era.</p> </section> </body> </html>
5. An HTML page with the title as ‘Formulae in Maths’.
<!DOCTYPE html>
<html lang=”en”> <head>
<title>Formulae in Maths</title> </head> <body>
<h1>Formulae in Maths</h1> <section>
<h2>Area of a Circle:</h2>
<p>The area of a circle is given by the formula:</p>
<p>Area = πr<sup>2</sup></p>
<p>Where r is the radius of the circle.</p> </section>
<section>
<h2>Area of a Square:</h2>
<p>The area of a square is given by the formula:</p>
<p>Area = side<sup>2</sup></p>
<p>Where side is the length of a side of the square.</p> </section>
<section>
<h2>Area of a Rectangle:</h2>
<p>The area of a rectangle is given by the formula:</p>
<p>Area = length × width</p>
<p>Where length is the length of the rectangle and width is the width of the rectangle. </p> </section>
<section>
<h2>Area of a Triangle:</h2>
<p>The area of a triangle is given by the formula:</p>
<p>Area = (base × height) / 2</p>
<p>Where base is the base of the triangle and height is the height of the triangle.</p>
</section> </body> </html>
Chapter Checkup
A. Fill in the Blanks.
1. structure 2. style 3. .css 4. font-weight 5. #
B. Tick () the Correct Option.
1. a. {} 2. b. Outline 3. a. six characters 4. b. Red 5. b. font-size
C. Who Am I?
1. Colon(:) 2. Inline CSS method 3. color property 4. line-height 5. External CSS method
D. Write T for True and F for False.
1. F 2. T 3. F 4. T 5. F
E. Answer the Following Questions.
1. Cascading Style Sheets (CSS) is a language used to incorporate styles like background colour, font colour, a font size in web pages. CSS is mainly used to enhance the look of web pages by applying various formatting styles to the elements or the entire web page.
2. CSS consists of style rules. Style rules are made up of selectors, properties, and values. All style rules are enclosed within curly brackets {}.
The syntax for using CSS is as follows: selector{property: value;} where,
● a selector is any HTML element to which you want to apply a style, like <p>. Always remember that an HTML element is written without angle brackets while creating CSS style rules.
● a property is like an HTML attribute, like colour, which adds additional features to an element.
● a value is similar to an attribute’s value assigned to a CSS property.
3. <style> h1 { color: #0066cc; } </style>
4. The various values of the border-style property are solid, dotted, dashed, double, etc.
5. Three methods of using CSS style sheets: a. Inline CSS b. Internal CSS c. External CSS
1. Web page to display the text within the <div> tag:
<DOCTYPE html>
<head>
<title>Styled Div</title> <style>
.red-div { background-color: red; color: white; padding: 20px; font-family: Arial, sans-serif; } </style> </head> <body>
<div class="red-div">
This text is inside a div with a red background and Arial font family. </div> </body> </html>
2. Sangeeta can use the External CSS method to apply the styles to the multiple web pages.
3. Romi can use the “text-align” property in CSS to align text to the right edge on a web page.
4. Create a .css file and specify the properties of the <font> element in it. First, create an external style sheet and type the following text in it: font { font-family: Arial, sans-serif; font-size: 16px; color: #333; }
Now, save this file with the name “styles.css” and then refer to this file in another document as shown below:
<!DOCTYPE html>
<html lang=”en”> <head>
<title>Styling the Font Element</title>
<link rel=”stylesheet” href=”styles.css”> </head> <body>
<font>This text will be styled according to the properties specified in the CSS file.</font> </body> </html>
5. Sharvi can use the “border” property in CSS to apply a border to an HTML element.
A. Fill in the Blanks.
1. Supercomputers 2. Internet 3. Content/ Data 4. Formula bar
B. Tick () the Correct Option.
1. c. Workstations 2. c. Maps and Navigation 3. a. Dictionary 4. b. Cell
C. Write T for True and F for False.
1. T 2. T 3. F 4. F
D. Answer the Following Questions.
1. Advantages of Fifth-generation Languages
● Fifth-generation languages focus on the logic of the problems rather than the implementation.
● They often allow programming in a more natural language like syntax.
● 5GLs require less code to accomplish tasks.
● These languages are well-suited for AI and expert system development, where rule-based and symbolic reasoning is essential.
Disadvantages of Fifth-generation Languages
● 5GLs are often specialised and may not be suitable for all types of programming tasks.
● 5GLs can be complex to learn.
● Depending on the implementation, 5GLs may not always offer the same level of performance.
2. Google Drive is a cloud storage service that lets you store files online and access them from anywhere using an internet connection.
3. Adding comments is a helpful feature for collaboration and feedback. It allows you to annotate your presentation slides with notes, feedback, or explanations. Comments facilitate collaboration among multiple authors or reviewers working on the same presentation.
4. The Undo feature is used to cancel the last changes. The shortcut key for Undo is Ctrl + Z. Whereas, the Redo feature reverses the actions performed using the Undo feature. The shortcut key for Redo is Ctrl + Y.
E. Apply Your Learning.
1. Mainframe computer 2. Online banking 3. Freeze Row
A. Fill in the Blanks.
1. Algorithm 2. Canvas 3. Augmented Reality 4. Robots
B. Tick () the Correct Option.
1. a. Preview 2. b. Object recognition 3. c. Controller
C. Write T for True and F for False.
1. T 2. T 3. T 4. F
D. Answer the Following Questions.
1. Flowcharts can be used in customer service complaint resolution process. The flowchart would show steps like receiving the complaint, evaluating it, providing a solution, and following up with the customer.
2. Flipping an image means creating a mirrored or reversed version of the original image.
3. Mind maps provide a creative way to visually organise and connect ideas using text, shapes, colours, and lines.
4. RASHMI is the world’s first Hindi-speaking and India’s first realistic lip-syncing humanoid robot. Rashmi is designed to assist in various tasks, including serving as a guide and providing information in public spaces.
E. Apply Your Learning.
1. Decision 2. Crop 3. Underline 4. Service robots
A. Fill in the Blanks.
1. Expression 2. Indentation 3. Web Browser 4. Red
B. Tick () the Correct Option.
1. d. Font weight 2. c. <em> 3. d. Parentheses 4. a. print()
C. Write T for True and F for False.
1. T 2. F 3. T 4. F
D. Answer the Following Questions.
1. Python can be used on various operating systems, including Windows, macOS, and Linux.
2. Using the if...else statement, the block of code after the if statement is executed if the condition is true, and the block of code after the else statement is executed if the condition is false.
Syntax: if condition:
#Statements to be executed if condition becomes True else:
#Statements to be executed if condition becomes False
3. An empty tag is a tag without a closing tag. Example, <img> tag is an empty tag in HTML. Whereas, container tags consist of an opening tag as well as a closing tag. This start tag and end tag pair are known as the ON and OFF tags and are used to open and close the document. For example, <B> tag is a container tag in HTML.
E. Apply Your Learning.
1. length = 12 width = 8
cost_per_metre = 25 perimeter = 2 * (length + width) total_cost = perimeter * cost_per_metre print("The total cost to fence the garden is ₹", total_cost)
2. <head> <title>Soil and Its Types</title> <style> body { font-family: Arial, sans-serif; color: #333; background-color: #f0f0f0; } </style> </head>
<style>
body { background-color: lightblue; }
div { border: 2px solid black; padding: 10px; } </style>
ROBOTICS (ABot Kit)
Experiment 1: Bot Movements Using Motor Control
A. Tick () the Correct Option.
1. b. Workspace
2. a. True
3. b. Right
B. Answer the Following.
1. Time delay function is used to suspend the execution of a program for a particular time.
2. Motor category blocks control motor movements.
C. Apply Your Learning.
1. In self-driving cars, toy robots, etc.
2. The bot will stop after executing the last block.
Experiment 2: Object Avoider
A. Tick () the Correct Option.
1. d. Variables
2. a. Using the Settings icon
3. c. 6
B. Answer the Following.
1. The equal operator block checks if two values are the same.
2. The “play tone of frequency” block is used to generate a sound from the buzzer.
C. Apply Your Learning.
1. Without a time delay, actions may execute too fast for proper response.
2. The else block ensures a different action happens when the condition is false.
Maker Board Kit
Experiment 1: Count till 10
A. Tick () the Correct Option.
1. b. Store and label data
2. c. My Program block
3. b. Wait block
B. Answer the Following.
1. Variables store and label data in a program.
2. To transfer code to the Maker Board for execution.
C. Apply Your Learning.
1. Speed in online games, traffic signals, digital wristwatches.
2. Change the loop range from 1-10 to 1-5.
Experiment 2: TV Remote
A. Tick () the Correct Option.
1. b. An action that triggers a response
2. c. Repeat while block
3. b. Police Light animation
B. Answer the Following.
1. An event is an action that causes something to happen. We can use events to tell programs under what circumstance(s) a particular action or set of actions should happen.
2. Pressing the “W” key in the program displays a Basketball animation.
C. Apply Your Learning.
1. Two real-life examples of remote controls are: Television Remote – It controls power, volume, and channel selection.
Gaming Console Remote – It controls character movement and game actions.
2. To make the Maker Board show a Heart animation when the “W” button is pressed instead of the Basketball animation, first, open the program and locate the block that detects the “W” button press. Next, remove the existing “Show Animation” block displaying the Basketball animation and replace it with a new “Show Animation” block from the Display category. Then, select the Heart animation from the available options. Finally, run the program and press “W” to verify that the Heart animation appears instead of the Basketball animation.
A. Tick () the Correct Option.
1. c. A two-dimensional bitmap image or animation
2. d. Create Sprite button
3. c. “Game Over”
B. Answer the Following.
1. X and Y coordinates define the position of the sprite on the LED matrix.
2. To move the sprite right when the “D” key is pressed, use the Move Sprite block with the right direction.
C. Apply Your Learning.
1. One example of a video game that uses sprites is Super Mario. In this game, sprites are used for characters, enemies, coins, and obstacles. The main character, Mario, is a sprite that moves, jumps, and interacts with other objects based on player input.
2. To create a sprite that moves left when the “A” key is pressed and stops at the left edge, first, create a sprite using the “Create Sprite” button. Then, use an “If” block to check if the “A” key is pressed and add a “Move Sprite” block to move it left. Next, use another “If” block to check if the sprite touches the left edge; if true, stop its movement by setting its position or speed to zero.
Experiment 4: Burglar Alarm
A. Tick () the Correct Option.
1. b. Sound Sensor
2. a. Hz
3. d. Both a and c (Home Security System & Smart Doorbells)
B. Fill in the Blanks.
1. Hardware
3. 1
C. Apply Your Learning.
2. 1000 Hz
4. GND
1. A burglar alarm system is useful for someone who travels frequently because it alerts them remotely if an unauthorized entry is detected in their home. This helps in ensuring security even when they are away.
2. Reducing the Hz value lowers the alarm tone.
Experiment 5: Guest Counter
A. Tick () the Correct Option.
1. c. Infrared radiation
2. b. Active infrared sensor
3. c. Visitor
B. Answer the Following.
1. Active infrared sensors both emit and detect infrared radiation. When an object comes close to the sensor, the infrared light from the LED reflects off of the object and is detected by the receiver. Whereas, Passive infrared sensors only detect infrared radiation and do not emit it from the LED.
2. The pin direction for the IR sensor on the Maker Board needs to be set to “Input” because the sensor detects infrared signals and sends data
to the board. Setting it as input allows the Maker Board to receive and process the sensor’s readings correctly.
C. Apply Your Learning.
1. Two real-life examples of IR sensors are:
Automatic Doors – IR sensors detect movement and trigger the doors to open automatically.
Parking Systems – IR sensors detect the presence of vehicles and update parking availability.
2. To modify the program to count cars passing by instead of guests, first, replace the guest detection IR sensor with a roadside IR sensor. Then, update the condition in the If block to detect vehicle movement. Next, modify the display label to show the count as “Cars” instead of guests. Finally, test the program by running it on the Maker Board to ensure it correctly counts cars passing by.
Experiment 6: Servo Sweep
A. Tick () the Correct Option.
1. b. To move to a specific position at a specific speed
2. c. Controller
3. b. Brown wire
B. Answer the Following.
1. The motor provides the mechanical power to move or rotate the shaft. The sensors measure the position and the speed of the shaft. And the controller works like the brain of the servo motor. It tells the motor how much to move and in which direction.
2. The wait block is used after moving the servo motor to allow it time to complete its movement smoothly.
C. Apply Your Learning.
1. Car wipers use servo motors to control their movement, and boom barriers use them to lift and lower at controlled speeds.
2. To adjust the servo motor’s range of motion from 0° to 90°, modify the values in the count with block to limit movement within this range.
Experiment 7: Wandering Sprite 1 Using AI
A. Tick () the Correct Option.
1. c. Create sprite block
2. b. Right
3. d. Peace
B. Answer the Following.
1. To move the sprite forward when the speech command “forward” is recognized, use the “if” block to check for the command, then apply the “Move Sprite” block in the forward direction.
2. To prevent the sprite from moving out of the cage, add “Touching Edge” blocks to detect when the sprite reaches a boundary and stop its movement.
3. The AI model recognizes different gestures by analyzing the hand poses using trained labels like Palm, Fist, ThumbsUp, and Peace.
C. Apply Your Learning.
1. To add more speech commands such as “up” and “down” for sprite movement, first, use an “If block” to check if the recognized speech
command is “up”. Then, add a “Move Sprite” block to move the sprite upward. Similarly, use another “If block” to check if the command is “down”, and add a “Move Sprite” block to move it downward. These conditions should be placed inside the Repeat while loop so they continuously check for voice input
2. If a player uses the “ThumbsUp” gesture to control the sprite, an “If block” should be used to check if the detected gesture is ThumbsUp. Inside this block, add a “Move Sprite” block to make the sprite move in the assigned direction, such as moving forward or upward. This allows the sprite to respond to the player’s hand gesture in real-time.
This answer key has been designed for schools who have opted for the Robotics course.
Experiment 1: Bot Movements Using Motor Control
A. Tick () the Correct Option.
1. b. My Program
2. b. Step by step
3. a. Both motors clockwise
B. Answer the Following.
1. To move the robot in the right direction, configure the motor at Port4 and Port3 as anticlockwise.
2. The Repeat while block is used to repeat a set of instructions as long as a certain condition is true.
C. Apply Your Learning.
1. Moving robots are used in automatic vacuum cleaners and delivery robots.
2. Without the Repeat while block, the robot will execute the instructions only once and stop.
A. Tick () the Correct Option.
1. b. set to
2. d. Sensor
3. a. Settings
B. Answer the Following.
1. The greater than block compares two values and checks if the first value is larger than the second.
2. The Print Data block is used to display messages on the bot’s screen (i.e., the Programmable Display Screen).
C. Apply Your Learning.
1. You can display a message using the Print Data block with a Text Box inside it.
2. One real-life application of object avoiders is automatic vacuum cleaners.
A. Tick () the Correct Option.
1. a.

2. c. IR Sensor
3. c. They allow code reuse and improve readability
B. Answer the Following.
1. A function is a reusable block of code designed to perform a specific task. It takes input, processes it, and returns an output. Functions help structure code, reduce repetition, and make programs more readable.
2. The door opens automatically when the IR sensor detects an object.
C. Apply Your Learning.
1. This experiment demonstrates how sensors detect motion to trigger an action.
2. Automatic doors help people with disabilities by allowing them to enter and exit buildings without needing to push or pull the door. This makes it easier for people who use wheelchairs, have difficulty walking, or carry heavy items to move independently without needing assistance.
A. Tick () the Correct Option.
1. a.
2. d. Time
3. a. 0
B. Answer the Following.
1. Steps to arrange the blocks:
i. Click on the Control category from the Blocks panel.
ii. Drag the My Program block to the workspace to begin your program.
iii. Click on the Variables category.
iv. Click on the Create variable button. A pop-up box appears asking you to create a new variable name.
Enter a suitable variable name, “IR_Sensor”.
Click on the OK button.
vi. Drag the set to block from the Variables category and drop it inside the My Program block.
vii. Drag the number block from the Math category and attach the block to the set to block.
2. Steps to arrange the blocks are:
i. Click on the Control category from the Blocks panel.
ii. Drag the My Program block to the workspace to begin your program.
iii. Drag the if block from the Control category and place it inside the My Program block.
iv. Click on the settings icon of the if block. A pop-up box appears.
v. Drag the else block and place it below the if block in the pop-up box.
vi. Click on the settings icon to hide the pop-up box.
C. Apply Your Learning.
1. A sensor helps self-driving cars detect obstacles and open the parking door.
2. Boom barriers at railway crossings automatically lower to block vehicles when a train is approaching, preventing accidents and ensuring safe passage.
Experiment 5: Soccer Bot AI
A. Tick () the Correct Option.
1. b Natural Language Processing
2. c. Print Data
3. a. Fist
B. Answer the Following.
1. The purpose of Natural Language Processing (NLP) in this experiment is to recognise voice commands like “arm”, “forward,” “backward,” “left”, and “right”, and convert them into actions that the robot can perform.
2. The Move Motor at block is used to control the movement of the robot by specifying the motor port, direction, and speed of the motor.
C. Apply Your Learning.
1. To stop the bot when there is no command, you can modify the code by adding a condition using the if block to check if no speech command is detected. Then use the Move Motor at block to stop the motors. For example, the following blocks of code will stop the bot when there is no hand gesture:
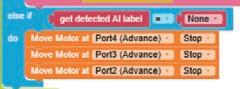
2. Two real-life examples of AI domains are:
i. NLP: Virtual assistants like Alexa and Siri
ii. Computer Vision: Face recognition in smartphones and Google Lens
Maker Board
Experiment 1: Count till 10
A. Tick () the Correct Option.
1. b. Store and label data
2. c. My Program block
3. b. Wait block
B. Answer the Following.
1. Variables are used to store information to be referenced and manipulated in a computer program. They also provide a way of labelling data with a descriptive name, so our programs can be understood more clearly by the reader and ourselves.
2. The Maker Board should be connected using a USB cable to run the program on the hardware.
C. Apply Your Learning.
1. Real-life examples of variables:
i. Temperature in a Digital Thermometer: The variable stores the current temperature value and updates continuously as the temperature changes.
ii. Score in a Video Game: The variable stores the player’s score, which increases when the player earns points during the game.
iii. Steps Count in a Fitness Tracker: The variable stores the number of steps taken by the user and updates each time a step is detected.
2. Steps to make a program count to 5 on the Maker Board instead of 10:
i. Drag and drop the My Program block from the Control category.
ii. Create a variable named count using the Variables category and set its value to 1.
iii. Use the Count with block from the Loops category, set the range from 1 to 5 skipped by 1.
iv. Add the Show Number block from the Display category to display the value of the variable.
v. Set the brightness and color from the options available.
vi. Add a Wait block to give a delay of 700 milliseconds between each count.
vii. Save, compile, and burn the program onto the Maker Board.
A. Tick () the Correct Option.
1. b. An action that triggers a response
2. c. Repeat while block
3. b. Police Light animation
B. Answer the Following.
1. The purpose of an event in coding is to trigger an action when a certain condition occurs.
2. When the “W” key is pressed, the Maker Board displays the Basketball animation.
C. Apply Your Learning.
1. Real-life examples:
a. Television remote: Controls TV channels
b. Gaming remote: Controls characters in video games
2. Steps are as follows:
i. Click on the Control category from the Blocks panel.
ii. Drag and drop the My Program block to start your program.
iii. Drag and drop the repeat while block from the Loops category inside the My Program block to create an infinite loop.
iv. Go to the Button category and drag the If button block into the repeat while block.
v. Select “W” from the drop-down list of the If button block to set the condition for the W button press.
vi. Drag the show animation block from the Display category and place it inside the If button block.
vii. Select the Heart animation from the available options in the show animation block.
viii. Save, compile, and burn the program onto the Maker Board.
Experiment 3: Wandering Sprite
A. Tick () the Correct Option.
1. c. A two-dimensional bitmap image or animation
2. a. draw sprite block
3. c. “Game Over ”
B. Answer the Following.
1. X and Y coordinates define the position of the sprite on the LED matrix display. You can make the sprite move in steps, change its direction, and set its position through x and y points.
2. To move the sprite to the right, use the move sprite block and move the sprite by 1 step.
C. Apply Your Learning.
1. Example: Pac-Man uses sprites to display characters and obstacles.
2.
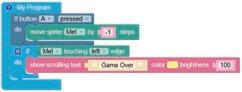
Experiment 4: Burglar Alarm
A. Tick () the Correct Option.
1. b. Sound Sensor
2. a. Hz
3. d. Both a and c
B. Fill in the Blanks
1. Hardware 2. 1000
3. 1
C. Apply Your Learning.
4. GND
1. A burglar alarm helps travelers by detecting unauthorised access to their homes or belongings when they are away. If any unusual activity is detected, the alarm automatically alerts the owner through a loud sound or notification.
2. Reducing the frequency (Hz) will produce a lower-pitched sound.
Experiment 5: Guest Counter
A. Tick () the Correct Option.
1. c. Infrared radiation
2. b. Active infrared sensor
3. c. visitor
B. Answer the Following.
1. Active infrared sensors emit and detect infrared radiation, while passive infrared sensors only detect it.
2. The pin direction is set to Input so the Maker Board can receive signals from the IR sensor.
C. Apply Your Learning.
1. Real-life examples: Automatic doors: Detect people Robotic vacuums: Detect obstacles
2. To modify the program to count cars passing by instead of guests, we will create a variable like ‘Car_Count’ instead of ‘visitor’.
Experiment 6: Servo Sweep
A. Tick () the Correct Option.
1. b. To move to a specific position at a specific speed
2. c. Controller
3. b. Brown wire
B. Answer the Following.
1. i. The motor provides the mechanical power to move or rotate the shaft.
ii. The sensors measure the position and the speed of the shaft.
iii. The controller works like the brain of the servo motor. It tells the motor how much to move and in which direction.
2. The wait block is used to create a pause, allowing the motor to reach the desired position.
C. Apply Your Learning.
1. Applications:
i. Car wipers: Servo motors help car wipers move back and forth automatically at different speeds to clear rainwater from the windshield, improving visibility.
ii. Boom barriers: Servo motors are used in parking lots and railway crossings to lift and lower barriers automatically, controlling the entry and exit of vehicles.
2. To adjust the range, use the count with block and set the range of the angle between 0° and 90°.
Experiment 7: Wandering Sprite 1 Using AI
A. Tick () the Correct Option.
1. c. Create sprite block
2. b. Right
3. d. Peace
B. Answer the Following.
1. The following blocks of code are executed when the speech command “forward” is recognised:
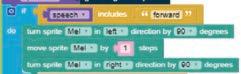
2. To not allow the sprite to move out of the cage, we restrict the sprite from touching any edge of the LED Matrix. If the sprite touches any edge, then scrolling text “Game over” gets displayed on the LED matrix.
3. Computer Vision enables the Maker Board to recognise hand gestures using the camera and move the sprite accordingly.
C. Apply Your Learning.
1. Drag the includes block from the Text category. To its left part, drag and drop the speech variable block (you need to create the speech block by clicking on the Variables category and then clicking on the Create variable button). To its right empty part, type text “up” or “down”.
2. The following code blocks will be used to make the sprite move in a specific direction for the ThumbsUp gesture.
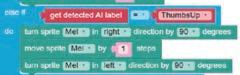
This answer key has been designed for schools who have opted for the Robotics Plus course.
This teacher manual has been designed to implement Tekie, the storytelling-based Coding and Computer Science program. The manual consists of lesson plans within each chapter that teachers transact within classrooms and computer labs. Each lesson is based on a research-based ‘WEBS’ framework that simplifies pedagogical practices for teachers and enables them to deliver effectively.
• Sharp Lesson Planning: Each lesson plan focuses on specific sub-learning outcomes within a chapter and are designed for delivery within the stipulated class or lab time.
• Real-life and Application-based Questions: Additional questions that link Computer Science to real-life contexts and assist teachers to develop learners’ conceptual understanding and application skills.
Uolo partners with K-12 schools to provide technology-enabled learning programs. We believe that pedagogy and technology must come together to deliver scalable learning experiences that generate measurable outcomes. Uolo is trusted by over 15,000+ schools across India, Southeast Asia, and the Middle East.
• Support and Detailed Solutions: In-depth solutions for in-class and post-class activities to reinforce learning. hello@uolo.com
ISBN 978-81-984882-5-1