Teacher Manual
Grade 6

NEP 2020 aligned ICSE compliant Digital coding platform included


1. Introduction
1. Styling an HTML Tag and Properties of CSS
2. Hex Codes
3. Styling Text I
4. Styling Text II
5. Styling Images
4 CSS II
1. The CSS Box Model
2. The Div Tag
3. Classes
4. Project – II
5. Coding Challenge

Note: Use the following points to prepare for the session beforehand. Avoid reading the points in the class.
● Mel and Conji were back in Avora after learning about how Avora came to be.
● They learned about the spell they could use to protect Eva from Lord Ero.
● They managed to shield Eva but realised that there was a risk involved as they found themselves drifting far away from Avora.
● Mel and Conji are at their school’s tech fest.
● Conji tells Mel about different types of computers.
● Conji also tells Mel how to communicate with computers.
The content covered in this chapter is aligned with the following CSTA Standard
● 1B-CS-01 - Devices
This chapter is divided into the following classroom sessions
1. Computing and Evolution of Computers
2. Types of Computers
3. Types of Computer Languages
4. Types of Translators and Fourth-Generation Language (4GL)
In this session, students will learn about –
● Computing
● The difference between a calculator and a computer
● The evolution of computers
Keywords
● Computing: using computers to follow instructions, process data, and perform calculations to solve problems and complete tasks
● Calculator: a small electronic device used for mathematical calculations

● First-Generation Computers: computers from 1940–1956 that used vacuum tube circuits
● Second-Generation Computers: computers from 1956–1963 that used transistors, consumed less power, took up less space, and were more durable
● Third-Generation Computers: computers from 1963–1971 that used integrated circuits (ICs)
Recap the story covered in the previous grade
Read or invite the students to read the story aloud
Action Plan
● Recap the story covered in the previous grade.
● Read or invite two students to read the story aloud from Page 1 to Panel 3 on Page 3 up to Mel’s words “. . .grow up a little more.”
Engage
● Say: Let’s learn how to compute or calculate, the difference between a calculator and a computer, and how computers evolved.
● Explain the CS concepts as mentioned in the table below:
Computing
As given in Panel 1 on Page 2
Differences between a Calculator and a Computer As given in Panel 5 on Page 2 and Panel 1 on Page 3
Evolution of Computers As given in Panel 4 on Page 3
● Present the scenario: Imagine you are in a book shop and have selected some books to buy.
● Discuss:
■ Which device will you use to find the total cost of the books?
Possible Responses: Calculator; Smartphone; Computer
■ If you choose to use a computer, which software or applications will you use for finding the total cost?
Possible Responses: Spreadsheet software (e.g., Microsoft Excel, Google Sheets); Calculator App; Online calculator tools
■ Which generation of computers used transistors?
Possible Response: Second generation
■ Which generation of computers used integrated circuits?
Possible Response: Third generation Note
● If time permits, discuss all four questions, or the first two.
● Conduct Fill up! on Page 13:
■ Say: Let’s help Conji answer some questions to revise the concepts we have learned.
■ Read Q1 and 2 aloud, one by one.
■ Invite some students to share their answers and others to validate their peers’ answers.
■ Instruct students to fill in the final answers in their books.
● Conduct Short answers on Page 14:
■ Say: Let’s do one more question.
■ Read Q3 aloud.
■ Invite some students to share their answers and validate their answers.
■ Instruct students to write the final answers in their notebooks.
● Conclude: Today, we learned about computing and how calculators are different from computers. We also learned about the evolution of computers.
● Ask the following probing questions:
■ Think of the time when people used typewriters instead of computers for typing. How do you think computers are better for typing?
Possible Responses: Computers allow editing; Formatting is easier on computers; Computers facilitate easier sharing of documents
■ What can be the advantages of using computers instead of calculators for numerical calculations?
Possible Responses: It computes faster; It has a larger storage capacity; It stores answers for future reference
Chapter 1 • Categories of Computer and Computer Languages
In this session, students will learn about types of computers and their features.
● Supercomputer: powerful computers for fast calculations, used in predicting weather and advanced research
● Mainframe Computer: big computers with lots of storage, shared by many users in offices and universities
● Mini Computer: smaller computers for a few users in groups or departments
● Workstation: fast and powerful computers for complex tasks like animation and video editing
● Random Access Memory (RAM): computer memory for quick reading and writing, but loses data when turned off
● Personal Computer: small computers (laptops or desktops) used by people daily at home, offices, and schools
Recap the story covered in the previous session
Read or invite the students to read the story aloud
● Recap the story covered in the previous session.
● Read or invite two students to read the story aloud from Panel 2 on Page 4 to Panel 1 on Page 7 up to Mel’s words, “. . . I just know the basics.”
● Say: Let’s learn about the different types of computers and their features.
● Explain the CS concepts as mentioned in the table below:
Types of Computers
Type 1 – Supercomputer
Type 2 – Mainframe Computer
As given in Panel 3 on Page 4
As given in Panel 4 on Page 4
As given in Panel 1 on Page 5
Type 3 – Mini Computer As given in Panel 1 on Page 5
Type 4 – Workstation As given in Panel 1 on Page 6
Type 5 – Personal Computer
As given in Panel 2 on Page 6
● Present the scenario: Imagine you went into a Computer Store with your father to buy a computer. The salesman wants to understand your requirements and asks you a few questions.
● Discuss:
■ What will be your primary usage of the computer?
Possible Responses: Work; School; Gaming; Entertainment
■ Do you need a portable computer that you can carry with you?
Possible Responses: Yes; No
■ Do you prefer a larger screen or a more compact size?
Possible Responses: Large screen; Compact size
■ Do you need a computer that can turn into a tablet and a laptop too?
Possible Responses: Yes; No
● If time permits, discuss all four questions, or the first two.
● Conduct Fill up! on Page 13:
■ Say: Let’s help Conji answer some questions to revise the concepts we have learned.
■ Read Q3 and 4 aloud, one by one.
■ Invite some students to share their answers and others to validate their peers’ answers.
■ Instruct students to fill in the final answers in their books.
● Conduct Find the truth! on Page 14:
■ Say: Let’s help Mel and Conji identify if the statement given in Q5 is True (T) or False (F).
■ Read Q5 aloud.
■ Invite some students to share their answers and others to validate their peers’ answers.
■ Instruct students to write the final answers in their books.
● Conduct Short answers on Page 15:
■ Say: Let’s do two more questions.
■ Read Q4 and 5 aloud, one by one.
■ Invite some students to share their answers and others to validate their peers’ answers.
■ Instruct students to write the final answers in their notebooks.
● If time permits, discuss Fun Time from DIY on Page 15, or assign it as homework.
● Conclude: Today, we learned about different types of computers and their features.
● Ask the following probing questions:
■ Which type of computers are used in our computer lab?
Possible Responses: Workstations; Personal Computers; Mainframe
■ What makes a smartphone a personal computer?
Possible Responses: Single-user computer; Compact; Built using GPU, CPU, and RAM; Fast; Accurate; Versatile and cost-efficient; Performs daily tasks with high accuracy
In this session, students will learn about –
● Types of computer languages
● High-level languages
● Low-level languages
● Machine Language: a low-level language using the binary system (0s and 1s) understood by computers
● Assembly Language: a low-level language translated to machine language, simplifying binary coding
● High-Level Language: a programmer-friendly language (e.g., BASIC, JAVA, C/C++, PYTHON) enabling computer-independent program development
Discuss different types of computer languages and their features Conclude the session 5 min 12 min 10 min 3 min
● Recap the story covered in the previous session.
Fill
● Read or invite two students to read the story aloud from Page 7 with Conji’s words “I have another question.” to Panel 2 on Page 9 up to Mel’s words “Very good.”
● Explain the CS concepts as mentioned in the table below:
Types of Computer Languages
Low-Level Language
Features of Low-Level Language
High-Level Language
Features of High-level Languages
Hierarchy of Computer Languages
As given in Panel 2 on Page 7
As given in Panel 3 on Page 7 and Panel 2 on Page 8
As given in Panel 2 on Page 8
As given in Panel 3 on Page 8
As given in Panel 3 on Page 8
As given in Panel 2 on Page 9
● Present the scenario: Imagine you are making a game using a programming language.
● Discuss:
■ What are the instructions that are given as a piece of code called?
Possible Response: Source code
■ What do you think will be translating your code into machine language?
Possible Responses: Compiler; Translator; Assembler
■ Can you think of any examples of high-level languages used in everyday life or in games?
Possible Responses: Python; C++
■ Which computer language is easier to write and understand?
Possible Response: High-level language
● If time permits, discuss all four questions, or the first two.
Build 10 min
● Conduct Fill up! on Page 13:
■ Say: Let’s help Conji answer a fill in the blank to revise the concepts we have learned.
■ Read Q5 aloud.
■ Invite some students to share their answers and others to validate their peers’ answers.
■ Instruct students to fill in the final answers in their books.
● Conduct Find the truth! on Page 13:
■ Say: Let’s help Mel and Conji identify if the statements are True(T) or False(F).
■ Read Q3 and 4 aloud, one by one.
■ Invite some students to share their answers and others to validate their peers’ answers.
■ Instruct students to write the final answers in their books.
● Conduct Long answers on Page 15:
■ Say: Let’s discuss two more questions.
■ Read Q2 and 3 aloud, one by one.
■ Invite some students to share their answers.
■ Discuss and validate their answers.
■ Instruct students to write the final answers in their books.
● Conclude: Today, we learned about different types of computer languages that can help us communicate with the computer.
● Ask the following probing questions:
■ Why do you think high-level languages were developed?
Possible Responses: To make programming easier and more user-friendly; To make programming independent of a particular type of computer; To make programmers focus more on problem-solving rather then worrying about low-level details
■ Do you think learning machine language helps us in understanding high level language?
Possible Responses: May be; May be not; Yes, it gives us a deeper understanding of how computers process instructions
In this session, students will learn about –
● Translating a high-level program into low-level program
● Compiler, Interpreter, and their difference
● Fourth-generation language and its features
Keywords
● Compiler: a special program that translates high-level language program into machine code and lists the errors in one go
● Interpreter: a program that executes high-level language instructions directly, line by line, stopping at errors
● Fourth-generation Language: a very high-level language where the user specifies “what is required” instead of “how it is to be done”
Recap the story of the previous session
Read or invite the students to read the story aloud
Discuss the translation process, compiler, interpreter, their difference, the fourth generation language and its features
Find the truth! – Q1, 2 Short answers – Q1, 2 Long answers – Q1
Warm-Up
● Recap the story covered in the previous session.
Conclude the session
5 min
● Read or invite two students to read the story aloud from Panel 2 on Page 9 with Conji’s words “But there’s . . . ” to Page 11.
12 min
Engage
● Say: Let me explain the types of translators, their differences, and fourth-generation language.
● Explain the CS concepts as mentioned in the table below:
Translating a high-level program into low-level Program
Compiler
Interpreter
Difference between a compiler and an interpreter
Fourth-generation language (4GL)
Features of 4GL
As given in Panel 1 on Page 10
As given in Panel 2 on Page 10
As given in Panel 2 on Page 10
As given in Panel 2 on Page 10
As given in Panel 2 on Page 11
As given in Panel 2 on Page 11
● Present the scenario: Imagine that you have written a code for a game.
● Discuss:
■ What do you think will happen when you run the code?
Possible Responses: Code will get converted into machine code; Computer will run the game
■ What program will be translating your code into machine code?
Possible Responses: Compiler; Interpreter; Assembler
■ What do you think will happen when you run the code?
Possible Responses: Execution; Output; Gameplay
■ What program will be translating your code into machine code?
Possible Responses: Compiler; Transpiler
● If time permits, discuss all four questions, or the first two. Build
● Conduct Find the truth! on Page 13:
■ Say: Let’s help Mel and Conji identify if the statements are True (T) or False (F).
■ Read Q1 and 2 aloud, one by one.
■ Invite some students to share their answers and others to validate their peers’ answers.
■ Instruct students to mark the final answers in their books.
● Conduct Short answers on Page 15:
■ Say: Let’s discuss two short questions.
■ Read Q1 and 2 aloud, one by one.
■ Invite some students to share their answers and others to validate their peers’ answers.
■ Instruct students to write the final answers in their books.
● Conduct Long answers! on Page 16:
■ Say: Let’s discuss a long-answer question.
■ Read Q1 aloud.
■ Invite some students to share their answers.
■ Discuss and validate their answers.
■ Instruct students to write the final answers in their books.
Chapter 1
• Categories of Computer and Computer Languages
● Conclude: Today, we learned about different types of translators and the fourth-generation languages.
● Ask the following probing questions:
■ What do you think is better for translating programs: interpreter or compiler?
Possible Responses: Compiler as it generates intermediate machine codes; Interpreter as it helps to rectify errors line by line; Compiler is faster in executing programs than Interpreter
■ What other fourth-generation languages have you heard of? Give more examples of fourth-generation language (4GL) for programming.
Possible Responses: Scratch; Python; JavaScript; Java; Visual Basic; SQL
● Conduct the remaining activities/questions in the revision classes.
Note: Use the following points to prepare for the session beforehand. Avoid reading the points in the class.
● Mel and Conji visited their school’s Tech Fest.
● Conji asked Mel about the devices and Mel explained that they are computer devices.
● Mel also told Conji about the multiple uses of computers.
● Conji wanted to know more and asked Mel about the evolution of computers.
● The Elder Wizard tells Mel and Conji that the situation is getting worse in Avora.
● Joy adds that the anomaly has caused the system to mutate to alarming levels.
● Conji gets worried and says he won’t let that happen.
● Joy tells Conji to relax as the Elder Wizard has found the solution of transferring files to the cloud to increase security.
The content covered in this chapter is aligned with the CSTA Standard
● 2-DA-08 Collection Visualisation & Transformation
This chapter is divided into the following classroom and lab sessions
1. File Management — I
2. File Management — II
3. File Management — III
In this session, students will learn about –
● File management
● Files and folders
● Creating a folder
● Cloud storage
● Google Drive and sharing a file using it
Keywords
● File Management: the process of organising, storing, naming, and deleting a file properly
● Cloud Storage: method to store and share files in the digital world by using the Internet
● Google Drive: an online cloud storage service provided by Google where we can store our data safely
Recap the story and the concepts covered in the previous session
Invite students to brief the class on the story and CS concepts covered in the chapter
Discuss files, folders, and file management systems. Explain Cloud storage, Google Drive, and sharing a file using Google Drive
Fill up! - Q1, 3 Find the truth! – Q1, 2 Short answers! – Q1, 2 Long answers! - Q1
Warm-Up
● Recap the story and revise the concepts covered in the previous chapter.
● Say: Let’s learn how the story moves ahead.
Conclude the session
5 min
● Read or invite three students to read the story aloud from Page 18 to Panel 2 on Page 24 up to the words “. . .on their computer.”
12 min
Engage
● Say: We will be learning about file management while reading the story.
● Explain the CS concepts as mentioned in the table below:
File Management
Files and Folders
Creating a Folder
Cloud Storage
Google Drive
Sharing a File Using Google Drive
As given in Panel 6 on Page 19
As given in Panel 2 on Page 20
As given in Panel 4 on Page 20
As given in Panel 1 on Page 21
As given in Panel 1 on Page 22
As given in Panel 2 on Page 22 to Panel 1 on Page 24
● Present the scenario: Imagine that you are planning a birthday party for your friend and want to share the planning details with your other friends.
● Discuss:
■ How can you use file management in planning a birthday party?
Possible Response: Organising and keeping track of party-related files such as guest lists, party games, and decorations
■ What are some examples of files you might use for party planning?
Possible Responses: Guest list; Party schedule; Invitation templates; Party games ideas; Decoration ideas
■ How can cloud storage be useful in sharing party planning details with friends?
Possible Response: Uploading and sharing files with friends through cloud storage platforms; Making it easier for everyone to access and contribute to the planning
■ How can you share the party planning details using Google Drive?
Possible Responses: Uploading files to Google Drive and sharing the folder link with friends; Individually sharing specific files with each friend
● If time permits, discuss all four questions, or the first two.
● Conduct Fill up! on Page 33:
■ Say: Let’s help Mel and Conji fill in the correct answer.
■ Read Q1 and 3 aloud.
■ Invite some students to share responses.
■ Discuss and validate the answers with the whole class.
■ Instruct: Write the final answers in your books.
● Conduct Find the truth! on Page 33:
■ Say: Let’s help Conji mark these statements as True (T) or False (F).
■ Read Q1 and 2 sentences one by one aloud
■ Invite some students to share responses.
■ Discuss and validate the answers with the whole class.
■ Instruct: Mark the final answers in your books.
● Conduct Short answers! on Page 35:
■ Say: Let’s help Mel and Conji answer these questions in short.
■ Read Q1 and 2 aloud.
■ Invite some students to share their responses.
■ Discuss and validate the answers with the whole class.
■ Instruct: Write the final answers in your books.
● Conduct Long answers! on Page 35:
■ Say: Let’s help Conji answer these questions in short.
■ Read Q1 aloud.
■ Invite some students to share their responses.
■ Discuss and validate the answers with the whole class.
■ Instruct: Write the final answers in your books.
● If time permits, discuss Fill up! Q4 on Page 33 and Tick the correct answer! on Page 34, or assign it as homework.
● Conclude: Today, we learned about file management, files, folders, and Google Drive.
● Ask the following probing questions:
■ Which option can be used to share files online?
Possible Responses: Cloud storage; Data sharing
■ What holds one or more files?
Possible Responses: Files; Folders
In this session, students will learn about –
● Steps to download a file from Google Drive
● Steps to upload a file to Google Drive
● Upload: sending a file from your computer to a different place
● Download: receiving a file from a different place onto your computer
● Revise the concepts learned in the previous class.
● Say: What is Google Drive?
● Invite one or two responses from the students.
● Say: We will be learning about ‘downloading and uploading files on Google Drive’.
● Show the video or slide on a projector with the title ‘File management – Google Drive’.
● Open your Google Drive and demonstrate the following on the projector:
■ steps to download a file from it
■ steps to upload a file to it
● Present the scenario: Imagine you have just finished creating a beautiful drawing on your computer, and you want to save it to Google Drive so you can access it from anywhere and share it with your friends.
● Discuss:
■ Why would you want to save your drawing to Google Drive?
Possible Response: To access it from anywhere and share it with others
■ How can you upload your drawing to Google Drive?
Possible Response: Click on the “New” button in Google Drive, select “File Upload,” and choose your drawing from the computer.
min
● Conduct Long answers! on Page 35:
■ Say: Let’s help Conji answer the question.
■ Read Q2 aloud.
■ Invite some students to share their responses.
■ Discuss and validate the answers with the whole class.
■ Instruct: Write the final answers in your books.
● Conclude: Today, we learned about how to upload and download a file from Google Drive.
● Ask the probing questions:
■ What types of files can you upload and download from Google Drive?
Possible Response: Documents (like Microsoft Word or Google Docs); Pictures (like JPEG or PNG); Video
■ Using which gadget, do you access your files on Google Drive from different devices?
Possible Response: Computers; Smartphones; Tablets
In this session, students will learn about –
● How to switch between different applications
● Wildcard characters – asterisk (*) and question mark(?)
● File extensions
Keywords
● Wildcard characters: special keyboard characters that are used to search for a file or folder
● File extensions: set of end characters of a file name that specify the type of information stored (.mp3, .jpg, etc.)
Recap the story and the concepts covered in the previous session
Read or invite the students to read the story aloud
Discuss how to switch between different applications, wildcard characters, and file extensions
Find the truth! – Q4, 5 Tick the correct Answer!
– Q4, 5 Short answers! – Q4
Fill Up from DIY Activity –Q2, 4
● Recap the story and revise the concepts covered in the previous session.
Conclude the session
● Read or invite two students to read the story aloud from Panel 2 on Page 29 to Panel 5 on Page 31 up to the words “. . .meet Elder Wizard and Elder.”
Engage
● Say: We will be learning about more concepts in file management.
● Explain the CS concepts as mentioned in the table below: CS Concepts Explain
How to switch between different applications
Wildcard characters
File extensions
As given in Panel 5 on Page 28 and Panel 1 on Page 29
As given in Panel 1 on Page 30
As given in Panel 1 on Page 31
● Present the scenario: Imagine that you want to edit an article on your computer.
● Discuss:
■ How can you switch between different applications on your computer?
Possible Response: Using the taskbar or Alt+Tab keyboard shortcut
■ What do we use to replace more than one letter in a file or folder name?
Possible Responses: * (asterisk); Replace symbol
■ What will we use to replace one character in a name?
Possible Responses: * (asterisk); ? (question mark)
■ What helps us store different file types on the computer?
Possible Responses: File name; File extensions
● If time permits, discuss all four questions, or the first two.
● Conduct Find the truth! on Page 33:
■ Say: Let’s help Conji mark these statements as True (T) or False (F).
■ Read Q4 and 5 aloud
■ Invite some students to share responses.
■ Discuss and validate the answers with the whole class.
■ Instruct: Mark the final answer in your books.
● Conduct Tick the correct answer! on Page 34:
■ Say: Let’s help Mel tick the correct answer.
■ Read Q4 and 5 aloud.
■ Invite some students to share their responses.
■ Discuss and validate the answers with the whole class.
■ Instruct: Tick the final answers in your books.
● Conduct Short answers! on Page 35:
■ Say: Let’s help Mel and Conji answer these questions in short.
■ Read Q4 aloud.
■ Invite some students to share their responses.
■ Discuss and validate the answers with the whole class.
■ Instruct: Write the final answers in your books.
● Conduct Fill Up from DIY Activity on Page 36:
■ Say: Let’s help Mel and Conji fill the correct answer.
■ Read Q2 and 4 aloud.
■ Invite some students to share responses.
■ Discuss and validate the answers with the whole class.
■ Instruct: Fill the final answers in your books.
● If time permits, discuss Match me on Page 36, or assign it as homework.
Sum-Up 3 min
● Conclude: Today, we learned about more concepts in file management.
● Ask the following probing questions:
■ What are the different file extensions we have?
Possible Responses: JPEG; PNG; txt
■ What is the name of the file extension that helps us save audio files or songs?
Possible Responses: MP3; aac; wav; flac
● Unattempted questions from previous and current sessions can be attempted during revision classes.
Note: Use the following points to prepare for the session beforehand. Avoid reading the points in the class.
● The Elder Wizard told Mel and Conji that the situation was getting worse in Avora.
● Joy added that the anomaly had caused the system to mutate to alarming levels.
● Conji was worried and said he wouldn’t let that happen.
● Joy told Conji to relax, as the Elder Wizard had found the solution of transferring files to the cloud to increase security.
● Elder Robot tells Elder Wizard how Mel and Conji managed to save the central system from crashing.
● Elder Robot wants to celebrate it with Conji and Mel and plans a party with Elder Wizard.
● Conji wonders how a grand feast can be organised in such a short time.
● The duo move towards the computer lab to get help from the Internet.
The content covered in this chapter is aligned with the CSTA Standard
● 2-IC–20 Culture
This chapter is divided into the following classroom and lab sessions
1. Online Surfing – I
2. Online Surfing – II
3. Online Surfing – III
4. Online Surfing – IV
In this session, students will learn about –
● The Internet
● Web browser
● Web pages, websites, and WWW
● Netiquette
■ Unethical practices
● Intellectual property rights
● Internet: a global network of computers linked together by cables and telephone lines
● Web browser: an application program to look for information on the Internet and interact with it
● Webpage: a single document on the web that has a unique address
● Website: a website is a collection of multiple linked web pages
● WWW: stands for ‘World Wide Web’ and refers to all the public websites that users can access
● Netiquette: describes the rules of conduct for respectful and appropriate communication on the Internet
Recap the story and the concepts covered in the previous session
Invite the students to brief the class on the story and CS concepts covered in the chapter
Discuss the Internet, web browser, web page, website, WWW, netiquette, and unethical practices
Fill up! – Q1, 2 Tick the correct answer! - Q1
Short answers – Q5
Long answers - Q2
Action Plan
Warm-Up
● Recap the story and revise the concepts covered in the previous chapter.
● Say: Let’s see how the story moves ahead.
Conclude the session
● Read or Invite three students to read the story aloud from Page 38 to Panel 1 on Page 39.
5 min
● Say: We will be learning about the Internet, web browser, web page, website, WWW, netiquette, unethical practices, and intellectual property rights.
● Explain the CS concepts as mentioned in the table below:
CS Concepts Explain
Internet
Web browser
Webpage
Website
WWW
Netiquette
Unethical practices
Intellectual property rights
As given in Panel 2 on Page 39
As given in Panel 3 on Page 39
As given in Panel 3 on Page 39
As given in Panel 3 on Page 39
As given in Panel 3 on Page 39
As given in Panel 2 on Page 40
As given in Panel 4 on Page 40 to Page 41
As given in Panel 1 on Page 42
● Present the scenario: Imagine that you want to complete your homework and want to get help from the Internet.
● Discuss:
■ How can the Internet help you with your homework?
Possible Response: By providing access to information, resources, and educational websites
■ If we want to look for information using the Internet, what should we use?
Possible Responses: Website; Web browser
■ What do we call a collection of web pages present on the Internet?
Possible Responses: Web browser; Website
■ What do we call it when someone attempts to break into your computer and take your homework?
Possible Responses: Hacking; Phishing
● If time permits, discuss all four questions, or the first two.
● Conduct Fill up! on Page 53:
■ Say: Let’s help Conji fill in the blanks.
■ Read Q1 and 2 aloud, one by one.
■ Invite some students to share their answers and others to validate their peers’ answers.
■ Instruct: Fill in the final answers in your books.
● Conduct Tick the correct answer! on Page 53:
■ Say: Let’s help Mel tick the correct answer.
■ Read Q1 aloud.
■ Invite some students to share their responses.
■ Discuss and validate the answers with the whole class.
■ Instruct: Tick the final answers in your books.
● Conduct Short answers on Page 54:
■ Say: Let’s help Conji answer the questions in short.
■ Read Q5 aloud.
■ Invite some students to share their responses.
■ Discuss and validate the answers with the whole class.
■ Instruct: Write the final answer in your books.
● Conduct Long answers on Page 54:
■ Say: Let’s help Conji answer the questions in long.
■ Read Q2 aloud.
■ Invite some students to share their responses.
■ Discuss and validate the answers with the whole class.
■ Instruct: Write the final answer in your notebooks.
Note
● If time permits, conduct FunTime! from DIY Activity on Page 56, or assign as homework:
■ Say: Let’s help Conji and Eva to make arrangements for Mel’s birthday.
■ Read the question, aloud.
■ Invite some students to share responses.
■ Discuss and validate the answers with the whole class.
■ Instruct: Fill the answers in your books.
Sum-Up
3 min
● Conclude: Today, we learned about the Internet, web browser, webpage, website, WWW, netiquette, unethical practices, and IPR.
● Ask the following probing questions:
■ What is the set of rules for appropriate communication on the Internet called?
Possible Response: Netiquette
■ Name some unethical practices.
Possible Responses: Phishing; Hacking
In this session, students will learn about -
● Email and its advantages
● Steps to open an existing Gmail account
● Sending an Email
● Features of an Email compose window
Keywords
● Email: also known as “electronic mail”, is a way to send and receive messages and digital documents over the internet
Recall the concepts covered in the previous session
Play the video or slides on the projector to introduce the concepts to be covered in this session
Discuss Email and its advantages, steps to open an existing Gmail account, creating and sending an Email, and the features of an Email compose window
Tick the correct answer! – Q2
Short answers! – Q4
Long answer – Q1
● Recap the story and revise the concepts covered in the previous session.
Conclude the session
Assign the homework
● Say: We will be learning about Email while reading the story.
● Explain the CS concepts as mentioned in the table below:
If you are teaching without a projector
If you are teaching with a projector Open Gmail (with Internet) on your computer system
What is Email and its advantages?
Steps to open an already existing Gmail account
Creating and sending an Email
The features of an Email compose window
As given in Panel 3 on page 42
As given in Panel 2 on Page 43 and Panel 1 on Page 44
As given in Panel 3 on Page 44
As given in Panel 2 on Page 45
OR
Show what an Email is and explain the advantages
Show steps to open an already existing Gmail account
Show creating and sending an Email
Show the features of an Email compose window
● Present the Scenario: Imagine you want to send an Email to your friend to invite them to your birthday party.
● Discuss:
■ How can you open an existing Gmail account?
Possible Response: Go to the Gmail website, enter your Email address and password, and click “Sign In.”
■ Which button is used to send Email?
Possible Responses: Send button; Submit button; Confirm option
Build 10 min
● Conduct Tick the correct answer! on Page 53:
■ Say: Let’s help Conji and Mel tick the correct answers.
■ Read Q2 aloud.
■ Invite some students to share their answers and others to validate their peers’ answers.
■ Instruct: Tick the correct answer in your books.
● Conduct Short answers on Page 54:
■ Say: Let’s help Conji write the answers.
■ Read Q4 aloud.
■ Invite some students to share their responses.
■ Discuss and validate the answers with the whole class.
■ Instruct: Write the final answers.
● Conduct Long answers! on Page 55:
■ Say: Let’s start with the activity.
■ Read Q1 aloud.
■ Invite some students to share their answers and others to validate their peers’ answers.
■ Instruct: Perform the activity.
● Conclude: We learned how to open, create, and send an Email.
● Ask the following probing questions:
■ Which option can be used to have safe communication to send and receive messages?
Possible Responses: Facebook; Email
■ List the features of an Email compose window.
Possible Responses: Compose Emails; Draft Emails
● Assign Long answers – Q4 on Page 55, as homework.
In this session, students will learn about –
● Google Drive and how to open it
● Google Sheets
● Google Slide
● E-commerce
● Advantages of buying and selling online
● Disadvantages of E-commerce
Keywords
● E-commerce: buying or selling of goods online using the Internet
Recap the story and the concepts covered in the previous session
Invite the students to brief the class on the story and CS concepts covered in the chapter
Discuss Google Drive, how to open Google Drive, Google Sheets, Google Slides, E-commerce, advantages of buying and selling online, and disadvantages of E-commerce
Fill up! – Q4 Tick the correct answer! – Q3, 5
Find the truth! – Q1, 2 Short answers! – Q3
Action Plan
Conclude the session Assign the homework
● Say: We will be learning about Google Drive, Google Sheets, Google Slides, and E-commerce while reading the story.
● Explain the CS concepts as mentioned in the table below:
Google Drive
How to open Google Drive
As given in Panel 3 on Page 46
As given in Panel 1 on Page 47
File As given in Panel 2 on Page 47
Folder As given in Panel 2 on Page 47
Google Sheets As given in Panel 2 on Page 47
Google Slides As given in Panel 2 on Page 47
E-commerce As given in Panel 2 on Page 48
Advantages of buying and selling online As given in Panel 2 on Page 48
Disadvantages of E-commerce As given in Panel 1 on Page 49
● Present the scenario: Imagine that you want to store your pictures online.
● Discuss:
■ What is the name of the service provided by Google to store files online?
Possible Responses: Google Drive; Online storage
■ What do we use to store data in an organised way?
Possible Responses: Files; Folders
■ How can you access your online pictures from different devices?
Possible Responses: Internet connection; Login to the storage service; Syncing with multiple devices
■ Can you organise your pictures into albums or categories in online storage?
Possible Responses: Yes; Albums; Categories; Tags
Note
● If time permits, discuss all four questions, or the first two.
● Conduct Fill up! on Page 53:
■ Say: Let’s help Conji fill in the blanks.
■ Read Q4 aloud.
■ Invite some students to share their answers and others to validate their peers’ answers.
■ Instruct: Fill in the final answer in your books.
● Conduct Tick the correct answer! on Page 53:
■ Say: Let’s help Mel and Conji tick the correct answers.
■ Read Q3 and 5 aloud.
■ Invite some students to share their responses.
■ Discuss and validate the answers with the whole class.
■ Instruct: Tick the final answers in your books.
● Conduct Find the truth! on Page 54:
■ Say: Let’s help Mel mark these statements as True (T) or False (F).
■ Read Q1 and 2 aloud.
■ Invite some students to share their responses.
■ Discuss and validate the answers with the whole class.
■ Instruct: Mark the final answers in your books.
● Conduct Short answers on Page 54:
■ Say: Let’s help Conji write the answer.
■ Read Q3 aloud.
■ Invite some students to share their responses.
■ Discuss and validate the answers with the whole class.
■ Instruct: Write the final answers.
● Conclude: Today, we learned about Google Drive, files, folders, Google Sheets, Google Slides, and E-commerce.
● Ask the following probing questions:
■ What is an interesting feature of the Internet?
Possible Responses: Data sharing; E-commerce
■ Name any example of an E-commerce platform.
Possible Responses: Amazon; Flipkart
● Assign Long answers – Q3 on Page 55 as homework.
In this session, students will learn about –
● Digital payment
● Banking cards
■ Debit card
■ Credit card
● UPI (Unified payment interface)
● Mobile Wallets
● Mobile and Internet banking
● Blogs
● Podcasts
● Digital payment: a payment that takes place using different online mediums
● Blog: an online journal or informational website run by an individual, group, or organisation
● Podcast: a radio programme that is stored in digital form
Recap the story and the concepts covered in the previous session
Discuss digital payment, blogs, and podcasts
Tick the Correct answer! –
Action Plan
5 min Warm-Up
● Say: Today, we will be learning about digital payment, blogs, and podcasts.
● Say: We will be learning about digital payment, blog, and podcast while reading the story.
● Explain the CS concepts as mentioned in the table below:
Digital payment
Blog
Podcast
As given in Panel 3 on Page 49 and Panel 1, 2, 3 on Page 50
As given in Panel 2 on Page 51
As given in Panel 3 on Page 51
● Present the scenario: Imagine that you see your Mom making a payment for groceries bought on the Internet.
● Discuss:
■ How did your Mom make the payment for the groceries?
Possible Responses: Digital payment; Online payment
■ How can you store money digitally for making payments?
Possible Responses: Mobile wallets; Internet banking
■ What do we call an online journal or informational website?
Possible Responses: Blog; Podcast
■ What will we use to listen to songs online where all radio programmes are stored?
Possible Responses: Podcast; Radio
● If time permits, discuss all four questions, or the first two.
● Conduct Fill up! on Page 53:
■ Say: Let’s help Conji fill in the blanks.
■ Read Q3 and 4 aloud, one by one.
■ Invite some students to share their answers and others to validate their peers’ answers.
■ Instruct: Fill in the final answers in your books.
● Conduct Tick the correct answer! on Page 53:
■ Say: Let’s help Mel tick the correct answer.
■ Read Q4 aloud.
■ Invite some students to share their responses.
■ Discuss and validate the answers with the whole class.
■ Instruct: Tick the final answers in your books.
● Conduct Find the truth! on Page 54:
■ Say: Let’s help Conji mark these statements as True (T) or False (F).
■ Read Q3, 4, and 5 aloud.
■ Invite some students to share their responses.
■ Discuss and validate the answers with the whole class.
■ Instruct: Mark the final answers in your books.
● Conduct Short answers on Page 54:
■ Say: Let’s help Conji write the answers.
■ Read Q1 and 2 aloud
■ Invite some students to share their responses.
■ Discuss and validate the answers with the whole class.
■ Instruct: Write the final answers.
● Conclude: We learned about digital payment, blogs, and podcasts.
● Ask the following probing questions:
■ What do we call the process of performing banking transactions online?
Possible Responses: Mobile wallets; Internet banking
■ What is used for digital transactions?
Possible Responses: Debit card; Credit card
● Assign Long answers! – Q5 on Page 55 as homework:
● Unattempted questions from previous and current sessions can be attempted during revision classes.
Note: Use the following points to prepare for the session beforehand. Avoid reading the points in the class.
● Elder Robot tells Elder Wizard how Mel and Conji managed to save the central system from crashing.
● Elder Robot wants to celebrate it with Conji and Mel and plans a party with Elder Wizard.
● Conji wonders how a grand feast can be organised in such a short time.
● The duo move towards the computer lab to get help from the Internet.
● As Eva reads about Cyborg, Lord Ero appears and casts a spell on her.
● Eva disappears into the mirror dimension.
● Mel and Conji return from the Memory Palace and tell everyone about Eva.
● Mel and Conji move towards the computer lab to make a plan to save Eva.
The content covered in this chapter is aligned with the CSTA Standard
● 2-IC-20 Culture
This chapter is divided into the following classroom and lab sessions
1. Images and Animations – I
2. Images and Animations – II
3. Videos and Action Buttons – I
4. Videos and Action Buttons – II
Objectives
In this session, students will learn about –
● Google Slides
● How to create a new presentation
● Adding and editing a new slide
● Types of views in Slides
● Adding animation in Google Slides
Keywords
● Google slide: an online presentation application
● Fade In: allows for images and text to appear gradually on the slide
Recap the story and the concepts covered in the previous session
Read or invite the students to read the story aloud
Discuss Google Slides, adding and editing a new slide, types of views in Google Slides, adding animation in Google Slides
Fill up! – Q5
Find the truth! – Q1, 3 Tick the correct answer! –Q1, 3, 4
Long answers – Q2
Short answers – Q1
Action Plan
Warm-Up
● Recap the story and revise the concepts covered in the previous chapter.
● Say: Let’s learn how the story moves ahead.
Conclude the session
5 min
● Read or invite three students to read the story aloud from Page 58 to Panel 1 on Page 60 up to the words “. . .worked on it a little.”
12 min
Engage
● Say: We will learn about Google Slides while reading the story.
● Explain the CS concepts as mentioned in the table below:
Google Slides
How to open Google slides
How to start a new presentation
Updating the title and the first slide
Adding a new slide
Adding images in a slide
Types of views in slides
How to add animation in Google Slides
As given in Panel 2 on Page 60
As given in Panel 4 on Page 60
As given in Panel 4 on Page 60
As given in Panel 2 on Page 61
As given in Panel 1 on Page 62
As given in Panel 1 on Page 63
As given in Panel 3 on Page 63 to Page 64
As given in Panel 2 on Page 65 and Panel 1, 2 on Page 66
● Present the scenario: Imagine that you have to create a presentation on your computer.
● Discuss:
■ What is the name of the service provided by Google to create a presentation?
Possible Responses: Google; Google Slides
■ How do you add images to the slides?
Possible Responses: Insert; Set
■ How do you add text to the Google Slides?
Possible Responses: Click on insert; Click on text
■ Name some animations present in Google Slides.
Possible Responses: Fly in from left; Fade in
● If time permits, discuss all four questions, or the first two.
● Conduct Fill up! on Page 75:
■ Say: Let’s help Conjil fill in the blanks.
■ Read Q5 aloud, one by one.
■ Invite some students to share their answers and others to validate their peers’ answers.
■ Instruct: Fill in the final answers in your books.
● Conduct Find the truth! on Page 75:
■ Say: Let’s help Conji and Mel mark these statements as True (T) or False (F).
■ Read Q1, and 3 aloud, one by one.
■ Invite some students to share their responses.
■ Discuss and validate the answers with the whole class.
■ Instruct: Mark the final answers in your books.
● Conduct Tick the correct answer! on Page 76:
■ Say: Let’s help Conji tick the correct answer.
■ Read 1, 3, and 4 aloud
■ Invite some students to share their responses.
■ Discuss and validate the answers with the whole class.
■ Instruct: Tick the final answers in your books.
● Conduct Long answers on Page 76:
■ Say: Let’s help Conji write detailed answers.
■ Read Q2 aloud.
■ Invite some students to share their responses.
■ Discuss and validate the answers with the whole class.
■ Instruct: Write the final answer in your notebooks.
● Conduct Short answers on Page 77:
■ Say: Let’s help Mel write the answers.
■ Read Q1 aloud.
■ Invite some students to share their responses.
■ Discuss and validate the answers with the whole class.
■ Instruct: Write the final answers.
● If time permits, discuss Fun time from DIY Activity – Q1, 2, and 4 on Page 78, or assign it as homework.
3 min
● Conclude: Today, we learned about Google Slides.
● Ask the following probing questions:
■ Which option can be used to make the images and text appear gradually?
Possible Responses: Fade in; Fade
■ What are the three types of views that Google Slides offer?
Possible Responses: Filmstrip view; Grid view; Slideshow
● In this session, students will revise the previous session concepts.
● Google Slides: an online presentation application
Recall the concepts covered in the previous session
Play the video or slides on the projector to introduce the concepts to be covered in this session
Discuss Google Slides, adding and editing a new slide, types of views in slides, and adding animation in Google Slides
Action Plan
● Revise the concepts learned in the previous class.
● Say: What are Google Slides?
● Invite one or two responses from the students.
● Say: Let’s understand Google Slides.
● Show the video or slide on a projector with the title “Google Slides”.
8 min Engage
● Say: We will be learning about how to create a presentation on Google Slides while reading the story.
If you are teaching without a projector
If you are teaching with a projector, open Google Sheets on your computer system
What are Google Slides and how to open it
How to start a new presentation
Updating the title and the first slide
Adding a new slide
As given in Panel 1 on page 60
Show what are Google Slides and how to open it
As given in Panel 4 on Page 60 How to start a new presentation
As given in Panel 2 on Page 61 Show how to update the title and the first slide
As given in Panel 1 on Page 62 Show how to add a new slide
● Present the Scenario: Imagine you have been assigned a class presentation, and you decide to use Google Slides to create your slides.
● Discuss:
■ What is Google Slides?
Possible Response: It is an online presentation software that allows you to create, edit, and share slideshows.
■ How can you access Google Slides?
Possible Response: Go to the Google Slides website or open the Google Slides app on your computer or mobile device.
Build 14 min
● Conduct Technology in our daily life Activity given in the Panel:
■ Say: Students, let us make a new presentation.
■ Instruct: Click on the Assignment section and attempt the activity.
■ Walk around in the classroom and observe the activity done by the students.
Note
● If time permits, conduct a, b, and c of the Lab activity on Page 79:
■ Say: Let’s start with the activity.
■ Read a, b, and c aloud
■ Instruct: Perform the activity.
● Conclude: Today, we developed a presentation using the knowledge we gained in the previous class.
● Ask the following probing questions:
■ Can you insert images into your Google Slides presentation?
Possible Response: Yes, we can use the ‘Insert’ menu to add multimedia elements to your slides.
■ How can you create a new slide in Google Slides?
Possible Response: Click on the ‘New Slide’ button or use the keyboard shortcut (Ctrl + M on Windows, Command + M on Mac) to add a new slide.
● Assign DIY Activity: Short Answer – Q3 on Page 77 as homework
In this session, students will learn about –
● More animations in Google Slides -
■ Fly in from bottom
■ On click dropdown
● Adding transitions
● Adding video clips to a slide
● Adding action buttons
● Importing slides
Keywords
● Transitions: special effects that happen when we move from one slide to the other
Recap the story and the concepts covered in the previous session
Read or invite the students to read the story aloud
Fill
up! – Q4 Tick the correct answer! – Q5 Long answers – Q3
● Read or invite three students to read the story aloud from Page 65 to Panel 3 on Page 73.
Action Plan 5 min Warm-Up 12 min
● Say: We will learn how to add animations, transitions, video clips and action buttons to a slide. Additionally, we will understand importing slides while reading the story.
● Explain the CS concepts as mentioned in the table below:
Fly in from bottom
On click dropdown
How to add transitions
Adding video clips to a slide
Adding action buttons
Importing slides
As given in Panel 1 on Page 67
As given in Panel 2 on Page 67 to Panel 1 on Page 68
As given in Panel 2 on Page 68
As given in Panel 2 on Page 69
As given in Panel 2 on Page 70 to Panel 1 on Page 71
As given in Panel 1 on Page 72
● Present the scenario: Consider that you are creating a presentation for your science fair project. You want to add animation and transition in it.
● Discuss:
■ Which button is used to perform an action in the presentation?
Possible Responses: Action button; Next button
■ What is the shortcut key that helps us to add a new slide in the presentation?
Possible Responses: Ctrl + M; Ctrl + Y
■ What is the shortcut key to open an existing file?
Possible Responses: Ctrl + O; Ctrl + I
■ What helps us to add movements to an existing image or text?
Possible Responses: Animation; Slide show
● If time permits, discuss all four questions, or the first two,
Build 10 min
● Conduct Fill up! on Page 75:
■ Say: Let’s help Conjil fill in the blanks.
■ Read Q4 aloud.
■ Invite some students to share their answers and others to validate their peers’ answers.
■ Instruct: Fill in the final answers in your books.
● Conduct Tick the correct answer! on Page 76:
■ Say: Let’s help Conji tick the correct answer.
■ Read Q5 aloud.
■ Invite some students to share responses.
■ Discuss and validate the answers with the whole class.
■ Instruct: Tick the final answer in your books.
● Conduct Long answers on Page 76:
■ Say: Let’s help Conji write detailed answers.
■ Read Q3, aloud.
■ Invite some students to share their responses.
■ Discuss and validate the answers with the whole class.
■ Instruct: Write the final answer in your books.
● If time permits, discuss Fun time from DIY – Q6, 7, and 8 on Page 78, or assign it as homework.
Sum-Up 3 min
● Conclude: We learned about fly in from bottom, on click dropdown, how to add transitions, adding video clips to a slide, adding action buttons, and importing slides while reading the story.
● Ask the following probing questions:
■ What is the shortcut to paste?
Possible Response: Ctrl + V
■ What is the shortcut key to print?
Possible Response: Ctrl + P
In this session, students will revise the previous session concepts.
● Transitions: special effects that happen when we move from one slide to the other
● Revise the concepts learned in the previous session.
● Say: What are animations and transitions?
● Invite one or two responses from the students.
● Say: Animation helps the movement of the images and text, whereas transitions are used from one slide to another.
● Say: Let’s understand animations and transitions.
● Show the video or slide on a projector with the title “Animations and Transitions”.
Engage
● Say: We will put what we learned in the previous class into practise today.
8 min
If you are teaching without a projector
If you are teaching with a projector, open Google Sheets on your computer system
How to add animation in Google Slide
Fly in from left to right and fade in
Fly in from bottom
On click dropdown
How to add transitions
Adding video clips to a slide
Adding action buttons
Importing slides
As given in Panel 2 on page 62
As given in Panel 1, 2 on Page 66
As given in Panel 1 on Page 67
As given in Panel 2 on Page 67
As given in Panel 2 on Page 68
As given in Panel 2 on Page 69
As given in Panel 2 on Page 70
As given in Panel 1 on Page 72
OR
Add animation in Google Slide
Show fly in and fade in
Show fly in from bottom
On click dropdown
Show how to add transitions
How to add video clips to a slide
How to add action buttons
How to import slides
● Present the Scenario: Imagine you are creating a presentation on endangered animals using Google Slides. You want to enhance your presentation by adding animations, transitions, video clips, and interactive elements.
● Discuss:
■ How can you make text or objects fly in from the bottom in Google Slides?
Possible Response: Select the text or object, click on the “Animations” menu, choose “Fly in,” and select the “From bottom” option
■ What is an on-click dropdown in Google Slides?
Possible Response: It is a feature that allows you to reveal additional content or options by clicking on a dropdown arrow during the presentation
● Conduct Seven Wonders of the World given in the Panel:
■ Say: Students, let us build a new presentation.
■ Instruct: Click on the Assignment section and attempt the activity.
■ Walk around in the classroom and observe the activity done by the students.
● If time permits, conduct d, e, and f of Lab Time on Page 79:
■ Say: Let’s start with the activity.
■ Read d, e, and f aloud
■ Instruct: Perform the activity.
● Conclude: Today, we learned to add animation, video clips, action buttons to a slide.
● Ask the probing questions:
■ How can you make text or objects fly in from the bottom in Google Slides?
Possible Response: Select the text or object, click on the “Animations” menu, choose “Fly in,” and select the “From bottom” option
■ What are action buttons in Google Slides?
Possible Response: Action buttons are interactive elements that you can add to a slide to perform specific actions, such as navigating to another slide or opening a website
● Assign DIY Activity: Short answers – Q5 on Page 77, as homework
Note
● Unattempted questions from previous and current sessions can be attempted during revision classes.
Note: Use the following points to prepare for the session beforehand. Avoid reading the points in the class.
● As Eva reads about Cyborg, Lord Ero appears and casts a spell on her.
● Eva disappears into the mirror dimension.
● Mel and Conji return from the Memory Palace and tell everyone about Eva.
● Mel and Conji move towards the computer lab to make a plan to save Eva.
● Mel asks Conji about Eva as she has not been coming to school for the past couple of days.
● The duo checks Eva’s house but she is not there.
● They inform the Elders that Eva is missing.
● The Elder Wizard tells them to go to the Memory Palace to find answers.
● At the Memory Palace, Mr Geebal tells them to learn more about Google Docs to unlock the doc files.
The content covered in this chapter is aligned with the CSTA Standard
● 2-DA-08 Collection, Visualisation & Transformation
This chapter is divided into the following classroom and lab sessions
1. Tables – I
2. Tables – II
3. Formatting Tables – I
4. Formatting Tables – II
In this session, students will learn about –
● Google Docs
● Adding a table and entering data in it
● Google Docs: a tool that is used to create and edit text documents online
● Tables: a grid of cells arranged in rows and columns
Recap the story and CS concepts covered in the previous session
Invite the students to brief the class on the story and CS concepts covered in the chapter
Discuss Google Docs, tables, and inserting a table, adding information to a table, deleting columns and rows, adding rows and columns
Fill up! – Q1, 2, 5 Tick the Correct answer! – Q1, 4
Find the truth! – Q1, 4
Short answers – Q3, 4
Action Plan
Warm-Up
● Recap the story and revise the concepts covered in the previous chapter.
● Say: Let’s learn how the story moves ahead.
Conclude the session Assign the homework
5 min
● Read or invite three students to read the story aloud from Page 81 to Panel 4 on Page 83 up to Conji’s words, “. . . things I love about it.”
12 min
Engage
● Say: We will learn about Google Docs, tables, adding a table, and entering data in a table while reading the story.
● Explain the CS concepts as mentioned in the table below:
Google Docs
CS Concepts Explain
As given in Panel 5 on Page 83
Tables As given on Page 84
Adding a table
Entering data in a table
As given on Page 84
As given on Page 84
● Present the scenario: Consider that you want to create a timetable for your school.
● Discuss:
■ What tool is used to edit a text document online?
Possible Responses: Word; Google Docs
■ What do we call a grid of cells arranged in rows and columns?
Possible Responses: Tables; Cells
■ Which tab do we have to select for adding a table?
Possible Responses: Insert tab; Add a table
■ Which option is used to insert a row in a table?
Possible Responses: Insert; Insert a row
● If time permits, discuss all four questions, or discuss the first two.
● Conduct Fill up! on Page 92:
■ Say: Let’s help Mel and Conji fill in the blanks.
■ Read Q1, 2, and 5 aloud
■ Invite some students to share their responses and others to validate their peers’ answers.
■ Instruct: Fill in the final answers in your books.
● Conduct Tick the correct answer! on Page 92:
■ Say: Let’s help Conji and Mel tick the correct answers.
■ Read Q1 and 4 aloud
■ Invite some students to share their responses.
■ Discuss and validate the answers with the whole class.
■ Instruct: Tick the final answers in your books.
● Conduct Find the truth! on Page 93:
■ Say: Let’s help Conji mark these statements as True (T) or False (F).
■ Read Q1 and 4 one by one aloud
■ Invite some students to share their responses.
■ Discuss and validate the answers with the whole class.
■ Instruct: Mark the final answers in your books.
● Conduct Short answers on Page 93:
■ Say: Let’s help Mel and Conji answer these questions in short.
■ Read Q3 and 4 aloud.
■ Invite some students to share their responses.
■ Discuss and validate the answers with the whole class.
■ Instruct: Write the final answers in your books.
● If time permits, discuss Long answers - Q1 on Page 94, or assign it as homework.
● Conclude: Today, we learned about Google Docs, tables, adding a table, and entering data in a table.
● Ask the following probing questions:
■ Which option can be used to insert a column?
Possible Responses: Insert a column; Insert
■ Which option do we select to delete a table?
Possible Responses: Delete; Delete table
In this session, students will learn about –
● Adding a table and entering data in it
● Google Docs: a tool that is used to create and edit text documents online
● Tables: a grid of cells arranged in rows and columns
Recall the concepts covered in the previous session.
Play the video given in the panel to introduce the concepts to be covered in this session
● Say: Do you remember what we learned in the previous session?
● Invite responses from some students.
● Say: Let’s revise what we have learned.
● Instruct: Go to the panel and open Lab on Tables - II.
● Show slides one by one and discuss the concepts shown on the slide in the panel.
Engage
8 min
● Present the scenario: Imagine you are creating a report for your science project and need to organise your data in a table. You want to learn how to add a table and enter data into it effectively.
● Discuss:
■ How can you add a table to your project report?
Possible Response: Click on the “Insert” menu and select the option to insert a table
■ How do you remove a table from your project report?
Possible Response: Select the table, right-click, and choose the option to delete or remove it
● Invite answers from as many students as possible.
● Address any other doubts students may have related to the concepts presented in the slides.
● Open and explain the activity: School timetable on the assignment page in the panel.
● Instruct the students to attempt the activity.
● Walk around in the classroom and observe the activity done by the students.
● Guide students if they are struggling with the activity name.
Note
● If time permits, conduct the additional activity given on the Tekie panel.
● Open and explain the activity: Emergency Contact List on the Assignment page in the panel.
● Instruct the students to attempt the activity.
● Walk around in the classroom and observe the activity done by the students.
● Guide students if they are struggling with the activity name.
● Conclude: We learned about adding tables and entering data to it.
● Ask the probing questions from the following:
■ What can you enter in a table?
Possible Response: Names, numbers, or any other data you want to organise.
■ How do you add information to a table?
Possible Response: Type the information in the cells.
In this session, students will learn about –
● Applying border colour
● Adding shade to a cell
● Splitting a cell into rows and columns
● Merging cells
● Advantages of mail merge
● Google Docs: a tool that is used for editing text documents online
● Tables: a grid of cells arranged in rows and columns
● Split cell: a function used to split a cell into rows and columns
● Merge cell: a function used to delete a cell and join it with a neighbouring cell
● Mail merge: fetches every name from the list and sends the Email to all the people
Recap the story and the concepts covered in the previous session
Invite the students to brief the class on the story and CS concepts covered in the chapter
Discuss how to apply border colour, add shades to a cell, split a cell into rows and columns, and merge cells.
Talk about the advantages of mail merge
Action Plan
Warm-Up
● Recap the story and revise the concepts covered in the previous session.
● Say: Let’s learn how the story moves ahead.
● Read or invite three students to read the story aloud from Page 83 to Panel 5 on Page 90.
● Say: We will learn about applying border colour, adding shade to a cell, splitting a cell into rows and columns, merging cells, and the advantages of mail merge, while reading the story.
● Explain the CS concepts as mentioned in the table below:
CS Concepts Explain
Applying border colour
Adding shade to a cell
Splitting a cell into rows and columns
Merging cells
Mail merge
Advantages of mail merge
As given on Page 85
As given in Panel 1 on Page 86
As given in Panel 1 on Page 87
As given on Page 87 and Panel 1 on Page 88
As given in Panel 3 on Page 89
As given in Panel 1 on Page 90
● Present the scenario: Consider that you want to create a timetable for your school.
● Discuss:
■ What do we have to select first to apply a border colour?
Possible Response: Table properties
■ Which property is used for splitting cells into rows and columns?
Possible Responses: Split cells; Splitting into rows and columns
■ Which property is used for joining a cell with a neighbouring cell?
Possible Responses: Merge cell; Join cell
■ Which is one of the fastest ways to produce hundreds of personalised emails?
Possible Responses: Mail Merge; Send to all
● If time permits, discuss all four questions, or discuss the first two.
Build 10 min
● Conduct Find the truth! on Page 93:
■ Say: Let’s help Conji mark these statements as True (T) or False (F).
■ Read Q5 aloud.
■ Invite some students to share their responses.
■ Discuss and validate the answers with the whole class.
■ Instruct: Mark the final answer in your books.
● Conduct Short answers on Page 93:
■ Say: Let’s answer this question in one line.
■ Read Q5 aloud.
■ Invite some students to share their responses.
■ Discuss and validate the answers with the whole class.
■ Instruct: Write the final answer in your books.
● Conduct Long answers on Page 94:
■ Say: Let’s answer these questions.
■ Read Q2 and 3 aloud
■ Invite some students to share their responses.
■ Discuss and validate the answers with the whole class.
■ Instruct: Write the final answer in your books.
● Conclude: We learned how to format a table. Also, we understood the advantages of mail merge.
● Ask the following probing questions:
■ What are the three main components of mail merge?
Possible Responses: Document; The data source; The merged document
■ What operation can you do with a table in Google Docs?
Possible Responses: Split; Merge
In this session, students will learn about –
● Applying border colour
● Adding shade to a cell
● Splitting a cell into rows and columns
● Merging cells
Keywords
● Split cell: a function used to split a cell into rows and column
● Merge cell: a function used to delete a cell and join it with a neighbouring cell
Recall the concepts covered in the previous session
Play the video given in the panel to introduce the concepts to be covered in this session
Discuss table editing School timetable - II Conclude the session Assign the homework
Warm-Up
● Say: Do you remember what we learned in the previous session?
● Invite responses from some students.
● Say: Let’s revise what we have learned.
● Instruct: Go to the Panel and open Lab on Tables and Mail Merge – IV
● Show slides one by one and discuss the concepts shown on the slide in the panel.
● Discuss the questions given on the slide.
7 min
5 min
● Present the scenario: Imagine that you are creating a table to display information about different animals in your science project.
● Discuss:
■ How can you merge cells together in the animal table?
Possible Response: By selecting the cells you want to merge and choosing the option to merge cells from the table tools
■ How can you apply a border colour to the cells in your animal table?
Possible Response: By selecting the cells and choosing a colour from the border colour options
● Open and explain the activity: School Timetable - II on the Assignment page in the panel.
● Instruct the students to attempt the activity.
● Walk around in the classroom and observe the activity done by the students.
● Guide students if they are struggling with the activity name.
Note
● If time permits, conduct the additional activity given in the Tekie panel.
● Open and explain the activity: Name - Place - Animal - Thing on the Assignment page in the panel.
● Instruct the students to attempt the activity.
● Walk around in the classroom and observe the activity done by the students.
● Guide students if they are struggling with the activity name.
● Conclude: Today, we learned about how we can edit a table.
● Ask the probing questions:
■ Why would you want to split a cell into multiple rows in the table?
Possible Responses: To display information in a vertically organised manner; To display the contents clearly
■ What does adding shade to a cell mean?
Possible Responses: Filling it with a different colour or pattern; To make it stand out
● Assign DIY Activity: Match the Following – Q3, 4 on Page 94 as homework.
Note
● Unattempted questions from previous and current sessions can be attempted during revision classes.
The content covered in this chapter is aligned with the following CSTA Standard
● 2-AP – 10 Algorithms
This chapter is divided into the following sessions
1. Introduction
2. Structure of an HTML Document
3. Text Formatting
4. Comments
5. Adding Images
6. Hyperlinks
In this session, students will learn about –
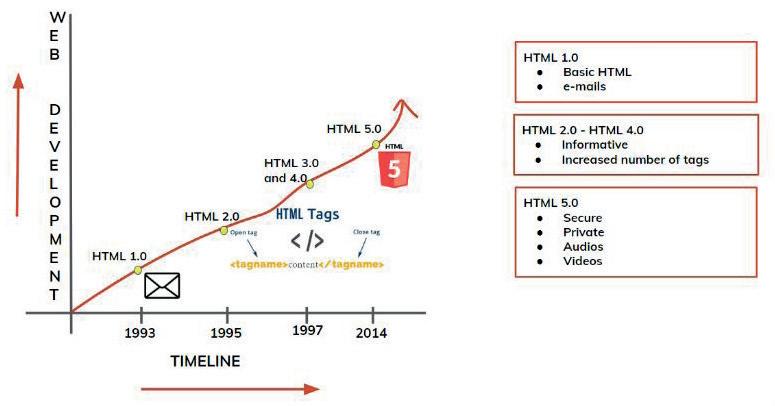
● Introduction to Web Development and HTML
● Term related to Web Development
● Web Page: is a simple document that is displayed by a browser
● Website: a set of related web pages or a collection of webpages
● HTML: hypertext markup language is used for writing web pages
● CSS: cascading Style Sheets is used to define design and layout styles for a web page
● Javascript: is a text-based programming language used to add interactive elements to a webpage
● Tags: are the basic elements of an HTML document
● Paired tags: these contain both opening and closing tags in HTML
● Unpaired tags: has only the opening tag and no closing tag. It can also be called an empty tag
Action Plan
● Invite students to briefly explain the term Web Development.
● Say: We can define Web Development as the process of creating, organising, and structuring websites.
Engage
● Say: Let me explain what Web Development is, and HTML.
Introduction to Web Development
Introduction to HTML
Terms related to HTML
As given in Tekie Panel 1
As given in Tekie Panel 1
As given in Tekie Panel 2 and 3
● Present the scenario: Consider that you have to create a website for your mother who creates and sells art and craft items.
● Discuss:
■ What languages can you use to create a Webpage?
Possible Responses: HTML; Javascript; CSS; Python
■ What are the different elements that you would want to see on the first webpage or the home page?
Possible Responses: Images; Tabs; A logo; Header and Footer; Text; Links to other pages of the website
■ What are the related topics that we can include in a website?
Possible Responses: Craft items; Art items; Art gallery
■ What tags will you use for creating an HTML page?
Possible Responses: Paired tags; Unpaired tags
Note
● If time allows, discuss all four questions, or discuss the first two.
10 min
● Ask students to create an infographic in their notebooks.
3 min
● Ask the following probing questions:
■ What do you need for writing HTML code?
Possible Responses: A text editor like notepad; Browser link Google Chrome or Microsoft Edge.
■ Do you know the names of any programming languages?
Possible Responses: Basic; Java; C++; C; QBasic
● Assign the following project as homework:
■ Ask the students to research and make a list of programming languages apart from Javascript. Note
● The project is optional. Assign it if feasible.
In this session, students will learn about –
● Basic tags in HTML
● Structure of an HTML program
● Tags: are the basic elements of an HTML document
● <html> tag: holds all other HTML elements
● <head> tag: holds all the information about a webpage
● <body> tag: contains the content of an HTML document to be displayed
● <p>: is used to add a paragraph
Revise the concepts covered in the previous session
Play the video given in the Tekie panel to introduce the concepts to be covered in this session
Discuss what tags are and how the structure of an HTML program is written
Activity given in the Tekie panel My First HTML Page
Conclude the session Assign the homework
● Ask: Do you remember what we learned in the previous session?
● Summarise the previous class concepts.
● Instruct: Go to the Tekie Panel and open the Lab on “Structure of HTML Document.”
● Play the video given on the Tekie panel.
● Discuss the Quiz questions given on the Tekie Panel.
● Invite answers from as many students as possible.
● Conduct the activity My First HTML Page given in the Tekie Panel:
■ Say: Let’s write our first page in HTML.
■ Instruct: Click on the Assignment section.
■ Instruct: Click the Go to Practice button to attempt the activity.
■ Walk around in the classroom and observe the activity done by the students.
Note
■ Instruct: Click on the Yes button to submit the activity.
● If time permits, conduct the additional activity given in the Tekie panel.
● Ask the following probing questions:
■ What kind of page would you like to create using HTML?
Possible Responses: Football Club; Art Gallery; E-learning portal; List of my Favourite stars; My time-table; and so on
■ What type of websites have you visited or seen?
Possible Responses: E-learning websites; Games; Creative; Shopping
● Assign the following project as homework:
■ Ask the students to create a page in HTML that prints or displays a quote on the screen.
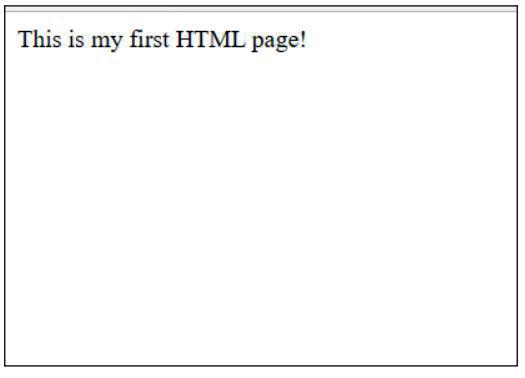
Note
● The project is optional. Assign it if feasible.
In this session, students will learn about –
● What is text formatting?
● Formatting: is a method of arranging the contents of a web page
Revise the concepts of the previous session
Play the video given in the panel to introduce the concepts to be covered in this session
Discuss about text formatting Activity given in the Tekie panel
Conclude the session Assign the homework
● Ask: Do you remember what we learned in the previous session?
● Summarise the previous class concepts.
● Instruct: Go to the Tekie Panel and open the Lab on Text Formatting
● Play the video given in the Tekie panel.
● Discuss the Quiz questions given in the Tekie Panel.
● Invite answers from as many students as possible.
● Conduct the activity Formatting Text given in the Tekie Panel:
■ Say: Let’s format text in an HTML page.
■ Instruct: Click on the Assignment section.
■ Instruct: Click the Go to Practice button to attempt the activity.
■ Walk around in the classroom and observe the activity done by the students.
■ Instruct: Click on the Yes button to submit the activity.
● If time permits, conduct the additional activity given in the Tekie panel.
Sum-Up
● Ask the following probing questions:
■ Name the tags that we have learned today.
Possible Responses: Bold; Italics; Underline; Size of text; Colour of text
■ How many sizes of header tags are available in HTML?
Possible Responses: <H1>; < H2>; <H3>; <H4>; <H5>; < H6>
● Assign the following project as homework:
■ Ask the students to create a page that displays the formula (x+y)2 = x2 + y 2 + 2xy
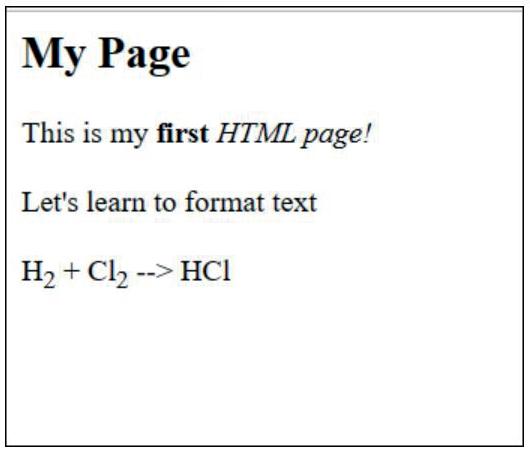
Note
● The project is optional. Assign it if feasible.
3 min
In this session, students will learn about –
● Comments
● Benefits
Keywords
● Comments: are used to add documentation to the code to make it easier for programmers to understand
Warm-Up Engage Build Sum-Up
Revise the concepts learned in the previous session
Show the slides on Comments on the Tekie Platform
Discuss what comments are and why we write them
Activity given in the Tekie panel Writing Comments
Action Plan
Warm-Up
● Ask: Do you remember what we learned in the previous session?
● Summarise the previous class concepts.
● Instruct: Go to the Tekie Panel and open the Lab on Comments
● Play the video given in the Tekie panel.
Conclude the session Assign the homework
min
7 min
5 min Engage
● Discuss the quiz questions given in the Tekie Panel.
● Invite answers from as many students as possible.
● Conduct the activity Writing Comments given in the Tekie Panel:
■ Say: Let’s write comments in our HTML code.
■ Instruct: Click on the Assignment section.
■ Instruct: Click the Go to Practice button to attempt the activity.
■ Walk around in the classroom and observe the activity done by the students.
■ Instruct: Click on the Yes button to submit the activity.
● If time permits, conduct the additional activity given in the Tekie panel.
● Ask the following probing questions:
■ Why should a good programmer write comments?
Possible Responses:
For other programmers to understand the code;
The programmer will not always work on the same code and other programmers would want to make changes to the previous code and hence to make it human readable, comments should be added;
It is a good habit to make the code clear
■ Where would you add a comment in your code?
Possible Responses:
At the beginning to state what is being done;
Before every section that performs a specific task;
To show how we expect the output to be
● Assign the following project as homework:
■ Ask the students to create a page that prints details about the students like their names, class, roll number, name of school, and so on. They should add comments wherever necessary.
● The project is optional. Assign it if feasible.
In this session, students will learn about –
● Image tag
● Attributes of image tag
■ src
■ alt
● <img>: is used to add an image on the web page
● src: is an attribute of image tag that is used to specify the source of the image
● alt: is an attribute of image tag that is used to specify the alternate text that will appear on the screen in case the image does not appear
Revise the concepts covered in the previous session
Play the video given in the panel to introduce the concepts to be covered in this session
Discuss what adding images is Activity given in the Tekie panel
Add Images
Action Plan
● Ask: Do you remember what we learned in the previous session?
● Summarise the previous class concepts.
Conclude the session Assign the homework
● Instruct: Go to the Tekie Panel and open the Lab on Assignment Statement.
● Play the video given in the Tekie panel.
● Discuss the quiz questions given in the Tekie Panel.
● Invite answers from as many students as possible.
● Conduct the activity Add Images given in the Tekie panel:
■ Say: Let’s add images to our page.
■ Instruct: Click on the Assignment section.
■ Instruct: Click the Go to Practice button to attempt the activity.
■ Walk around in the classroom and observe the activity done by the students.
Note
■ Instruct: Click on the Yes button to submit the activity.
● If time permits, conduct the additional activity given in the Tekie panel.
Sum-Up
● Ask the following probing questions:
■ When does alternate text appear?
Possible Responses:
When the image is missing from the source;
The name of the image is incorrect;
The internet connection is slow;
There is no access to view the image file
■ Name a few empty tags.
Possible Responses: <img>; <hr>; <br>
● Assign the following project as homework:
Note
3 min
■ Ask the students to add an image from their computer on their webpage. [They can use an image from the pictures folder of the computer.]
● The project is optional. Assign it if feasible.

In this session, students will learn about –
● What are hyperlinks?
● How do we use hyperlinks?
● Target attribute
● Hyperlinks: links are elements that when clicked take us to a destination link which may be another webpage, document, or other online content
● <a> tag: anchor tag is used to define a hyperlink
● Target attribute: determines where the linked web page should navigate
Revise the concepts taught in the previous session
Play the video given in the panel to introduce the concepts to be covered in this session
Warm-Up
● Ask: Do you remember what we learnt in the previous session?
● Summarise the previous class concepts.
● Instruct: Go to the Tekie Panel and open the Lab on Hyperlinks.
● Play the video given in the Tekie panel.
Engage
● Discuss the quiz questions given in the Tekie Panel.
● Invite answers from as many students as possible.
● Conduct the activity Links in HTML given in the Tekie Panel:
■ Say: Let’s work with links in HTML.
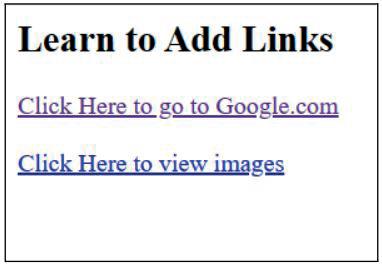
■ Instruct: Click on the Assignment section.
■ Instruct: Click on the Go to Practice button to attempt the activity.
■ Walk around in the classroom and observe the activity done by the students.
■ Instruct: Click on the Yes button to submit the activity.
● If time permits, conduct the additional activity given in the Tekie panel.
● Ask the following probing questions:
■ What are the different elements that can be used as links in HTML?
Possible Responses: Text; Images; Button
■ What happens when you click on a hyperlinked text like “Click Here?”
3 min
Possible Responses: When we encounter “Click here” it generally navigates to another page; To find more information about something, we click on the text underlined in blue that navigates us to another page; and so on
● Assign the following project as homework:
■ Ask the students to create a link that when clicked takes us to the Nasa website. [Link → https://www.nasa.gov/]
● The project is optional. Assign it if feasible.
The content covered in this chapter is aligned with the following CSTA Standard
● 2-AP–12 Control
This chapter is divided into the following lab sessions
1. Unordered Lists
2. Ordered Lists
3. Nested Lists
4. Bookmarking
5. Project - I
In this session, students will learn about –
● Unordered Lists
Keywords
● Unordered Lists: list of items without any order
Recall the concepts covered in the previous coding session
Play the video given in the panel to introduce the concepts to be covered in this session
Discuss if statement and application
Attempt the activities related to Unordered Lists
● Say: Do you remember what we learned in the previous session?
● Invite responses from some students.
● Revise the topics learned in the previous class.
● Instruct: Go to the Tekie Panel and open the Lab on Unordered Lists.
● Play the video given in the panel.
Engage
● Discuss the Quiz questions given in the Tekie Panel.
● Invite answers from as many students as possible.
● Instruct: Open the topic Unordered Lists on Page 11.
● Discuss the concept of the Unordered Lists in the book.
Conclude the session Assign the homework
● Conduct the activity given in the Panel:
■ Say: Make a list of things required for a birthday party.
■ Instruct: Click on the Assignment section.
■ Instruct: Click the Compare output button to attempt the activity.
■ Walk around in the classroom and observe the activity done by the students.
■ Instruct: Click on the Play button to check the output of the activity. Note
● If time permits, conduct the additional activity given in the book.
3 min
● Ask the following probing questions:
■ What do you do on Sundays?
Possible Responses: Have breakfast; study; Play in the garden; Go out with the family
■ Make a list of your favourite sweets.
Possible Responses: Rasmalai; Gulab Jamun; Malai Sandwich
In this session, students will learn about –
● Ordered Lists
● Reserved Attribute
● Ordered Lists: list of items arranged in numbered, alphabetical or roman numeral order
● Reversed Attribute: it reverses the list and marks the last item as the first item
Recall the concepts covered in the previous coding session
Play the video given in the panel to introduce the concepts to be covered in this session
Discuss the ordered lists and reversed attribute
Attempt the activities related to the ordered lists and reversed attribute
Conclude the session Assign the homework
● Instruct: Go to the Tekie Panel and open the Lab on ordered lists.
● Play the video given in the panel.
● Discuss the quiz questions given in the Tekie Panel.
● Invite answers from as many students as possible.
● Instruct: Open the topic Ordered Lists on Page 12.
● Discuss the concept of the ordered lists from the book.
● Instruct: Open the topic Reversed Attribute on Page 14
● Discuss the concept of the reversed attribute from the book.
min
● Conduct the activity given in the Tekie Panel:
■ Say: You are the captain of the football team and your coach has asked you to make a list of all the members of the team. Make sure to put your and your coach’s name into reverse order.
■ Instruct: Click on the Assignment section.
■ Instruct: Click the Compare output button to attempt the activity.
■ Walk around in the classroom and observe the activity done by the students.
■ Instruct: Click on the Play button to check the output of the activity.
● If time permits, conduct the additional activity given in the book.
● Ask the following probing questions:
■ Let’s make a list of things to be packed for your favourite staycation.
Possible Responses: Camera; Clothes; Earpods; Ipad; Biscuits
■ Let’s make a list of groceries asked by your mom.
Possible Responses: Biscuits; Dal; Rice; Wheat; Oil
In this session, students will learn about –
● Nested Lists
● Nested Lists: one list inside another list (list can be any list)
Recall the concepts covered in the previous coding session
Play the video given in the panel to introduce the concepts to be covered in this session
Discuss the nested lists from learning slides given in Tekie Panel
Attempt the activities related to the Nested lists
Conclude the session Assign the homework
● Instruct: Go to the Tekie Panel and open the Lab on Nested Lists.
● Play the video given in the panel.
● Discuss the quiz questions given in the Tekie Panel.
● Invite answers from as many students as possible.
● Conduct the activity given in the Tekie Panel:
■ Say: Elfy wants to create a car game and he wants to display the option below on the menu page of the game. Use an ordered list to display the options. You can use one list tag inside another list tag to get a nested list.
■ Instruct: Click on the Assignment section.
■ Instruct: Click the Compare output button to attempt the activity.
■ Walk around in the classroom and observe the activity done by the students.
■ Instruct: Click on the Play button to check the output of the activity.
Sum-Up
● Ask the following probing questions:
■ Help your teacher to make a list of activities to be included in your annual sports day.
Possible Responses: Sack race; Running race; Kabaddi game
■ State your favourite staycations.
Possible Responses: Malaysia; Thailand; Paris; Dubai
In this session, students will learn about –
● Bookmarking
● Id Attribute
● Bookmarking: creates bookmarks on an HTML page
● Id Attribute: helps to identify HTML elements on the web page
Recall the concepts covered in the previous coding session
Play the video given in the panel to introduce the concepts to be covered in this session
Discuss bookmarking and id attribute
Attempt the activities related to bookmarking and id attribute
Conclude the session Assign the homework
● Instruct: Go to the Tekie Panel and open the Lab on Bookmarking
● Play the video given in the Panel.
● Discuss the quiz questions given in the Tekie Panel.
● Invite answers from as many students as possible.
● Instruct: Open the topic Bookmarking on Page 15
● Discuss the concept of bookmarking in the book.
● Instruct: Open the topic Id Attribute on Page 15.
● Discuss the concept of Id Attribute from the book.
● Conduct the activity given in the Tekie Panel:
■ Say: Make an HTML Page of an Avenger story and bookmark the stories of the characters from the Avengers.
■ Instruct: Click on the Assignment section.
■ Instruct: Click the Compare output button to attempt the activity.
■ Walk around in the classroom and observe the activity done by the students.
■ Instruct: Click on the Play button to check the output of the activity.
● If time permits, conduct the additional activity given in the book.
3 min
● Ask the following probing questions:
■ List books you have read halfway.
Possible Responses: The Giver; The Lightning Thief; Out of My Mind
■ List 5 electronic devices you use daily.
Possible Responses: Laptop; Mobile Phone; Television; Ipad; AC
In this session, students will make –
● The project given in the panel
Recall the concepts covered in the previous coding session
Introduce the concepts to be covered in this session
Discuss the project
● Instruct: Go to the Tekie Panel and open the Lab on Project - I.
● Play the video given in the panel.
● Discuss the quiz questions given in the Tekie Panel.
● Invite answers from as many students as possible.
● Conduct the activity given in the Tekie Panel:
■ Say: Design a webpage mentioning your top 5 DC Movies and add hyperlinks to them using the instructions given.
■ Instruct: Click on the Assignment section.
■ Instruct: Click the Compare output button to attempt the activity.
■ Walk around in the classroom and observe the activity done by the students.
■ Instruct: Click on the Play button to check the output of the activity.
● Ask the following probing questions:
■ List the names of your favourite movies.
Possible Responses: Avengers; Avengers Endgame; Thor; Captain America; Iron Man
■ State 5 gifts you would love to receive on your birthday.
Possible Responses: Ipad; Sneakers; Skating Shoes; Bicycle; Bat
The content covered in this chapter is aligned with the following CSTA Standard
● 2-AP-14 Modularity
This chapter is divided into the following lab sessions
1. Styling an HTML Tag and Properties of CSS
2. Hex Codes
3. Styling Text I
4. Styling Text II
5. Styling Images
In this session, students will learn about –
● What is CSS?
● How to use CSS to style and HTML tag?
● Properties of CSS
● CSS: cascading Style Sheets used to define styles for web pages
● Cascading: styles can fall from one style sheet to another, enabling multiple style sheets to be used on one HTML document
Recall the concepts covered in the previous coding chapter
Play the video given in the panel to introduce the concepts to be covered in this session
● Say: Today, the session topic is “CSS”. What does the word “CSS” stand for?
● Invite a few responses from the students, but don’t give the correct answer yet.
● Say: Let’s watch a video together and understand better.
● Play the video given in the Tekie Panel titled “Styling HTML Tag and CSS Properties.”
● Say: Let’s learn about styling HTML tag and CSS properties together.
Styling an HTML Tag
Properties of CSS
As given on Page 17
As given on Page 17 and 18
● Discuss the Quiz questions given in the Tekie Panel.
● Invite answers from as many students as possible.
● Conduct the activity given in the Tekie Panel:
■ Explain the activity to the students.
■ Instruct: Click on the Practice button on the Assignment page to attempt the activity.
■ Instruct: Click on the Attempt button to open the activity page.
■ Walk around in the classroom and observe the activity done by the students.
■ Assist the students if any of them are struggling.
■ Instruct: Click on the Yes button to submit the activity and run the code.
● If time permits, conduct the additional activity given in the Tekie Panel.
● Conclude: Today, we learned about styling HTML tags using CSS and the properties of CSS.
● Ask the following probing questions:
■ Which property will be used to add a green colour to the background of the webpage?
Possible Responses: Background colour
■ Why do we use CSS?
Possible Responses: To define styles for the web page; Create styled web pages easily
● Assign the following project as homework:
■ Create a webpage with a yellow background. The Heading (h2) will be red in colour and the paragraph will be black in colour.
■ h1: CSS Homework
■ p: Learning about CSS is fun. We will learn more styling properties later.
● The project is optional. Assign it if feasible.
In this session, students will learn to use Hex codes in CSS to specify the colours.
● CSS: cascading Style Sheets used to define styles for web pages
● Hex Codes: 6 digit alphanumeric codes that are used to represent colours
Recall the concepts covered in the previous coding chapter
Play the video given in the panel to introduce the concepts to be covered in this session
● Say: Do you remember what we learned in the previous session?
● Invite responses from some students.
● Revise the concepts learned in the previous class.
● Say: Let’s watch a video together and understand better.
● Play the video given in the Tekie Panel titled “Hex Codes.”
● Say: Let’s learn about hex codes.
Hex Codes
As given on Page 18
● Discuss the quiz questions given in the Tekie Panel.
● Invite answers from as many students as possible.
● Conduct the activity given in the Tekie Panel:
■ Explain the activity to the students.
■ Instruct: Click on the Practice button on the Assignment page to attempt the activity.
■ Instruct: Click on the Attempt button to open the activity page.
■ Walk around in the classroom and observe the activity done by the students.
■ Assist the students if any of them are struggling.
■ Instruct: Click on the Yes button to submit the activity and run the code.
● If time permits, conduct the additional activity given in the Tekie Panel.
Sum-Up 3 min
● Conclude: Today, we learned about styling HTML tags using CSS and the properties of CSS.
● Ask the following probing questions:
■ What is the Hex code for black?
Possible Responses: #000000
■ How do Hex codes help us?
Possible Responses: Efficient; Easy to use; Represent millions of colours; Easier to recall
● Assign the following project as homework:
■ Use the internet to find the Hex codes for the following colours and write it down in your notebook:
Red, Blue, Green, Pink, Golden, Purple, Silver, Yellow
● The project is optional. Assign it if feasible.
In this session, students will learn about –
● The margin property
● The padding property
● The text-align property
Keywords
● Hex codes: six-characters, alpha-numeric codes used to represent colours
Recall the concepts covered in the previous coding session
Play the video given in the panel to introduce the concepts to be covered in this session
Discuss the text styling that deal with the layout of the content
Conduct the activity given in the Tekie Panel from the Coding Booklet, Example: Adding both margin and padding
Conclude the session Assign the homework
● Say: Do you remember what we learned in the previous session?
● Invite responses from some students.
● Revise the concepts learned in the previous class.
● Show the video, “Styling Text I” in the Tekie Panel.
● Discuss the quiz questions given in the Tekie Panel.
● Invite answers from as many students as possible.
● Conduct Example: Adding both margin and padding given in the Coding Booklet on Page 20:
■ Explain the activity to the students.
■ Instruct: Click on the Practice button on the Assignment page to attempt the activity.
■ Instruct: Click on the Attempt button to open the activity page.
■ Walk around in the classroom and observe the activity done by the students.
■ Assist the students if any of them are struggling.
■ Instruct: Click on the Yes button to submit the activity and run the code.
● If time permits, conduct the additional activity Example: to align text left, center and right given in the Coding booklet on Page 20 and 21.
● Conclude: Today, we learned about the margin property, padding property and text align property to style text in CSS.
● Ask the following probing questions:
■ What property deals with placing the text at a particular position on the screen?
Possible Responses: Text-align property
■ Why do we use the padding property?
Possible Responses: To create space around the elements of contents, inside defined borders
● Assign the following project as homework:
■ Set margins of 50 px around the words “Welcome to our Computer Lab!” Background colour: light green; Font colour: Black.
● The project is optional. Assign it if feasible.
In this session, students will learn about –
● The text-shadow property
● The font family property
● The text-decoration property
● The span tag
● Text Properties: different attributes of text that correspond to how the text will show in the output
Recall the concepts covered in the previous coding session
Play the video given in the panel to introduce the concepts to be covered in this session
Discuss more text styling properties given in the Coding Booklet
Action
Conduct the activity given in the Tekie Panel from the Coding Booklet, Example given on Page 25
● Say: Do you remember what we learned in the previous session?
● Invite responses from some students.
● Revise the concepts learned in the previous class.
● Show the video, “Styling Text II” in the Tekie Panel.
min
● Discuss the quiz questions given in theTekie Panel.
● Conduct Example given on Page 22 and 23:
■ Explain the activity to the students.
■ Instruct: Click on the Practice button on the Assignment page to attempt the activity.
■ Instruct: Click on the Attempt button to open the activity page.
■ Walk around in the classroom and observe the activity done by the students.
■ Assist the students if any of them are struggling.
■ Instruct: Click on the Yes button to submit the activity.
● If time permits, conduct the Example (text shadow property) given in the Coding Booklet on Page 22.
● Conclude: Today, we learned about how to style texts using text-shadow property, font-family property, text-decoration property and span tag.
● Ask the following probing questions:
■ Which tag do we need to use to style a group of content together?
Possible Responses: Span Tag
■ What are the four values of text-shadow property?
Possible Responses: Vertical distance; Horizontal distance; Blur radius; Colour of shadow
● Assign the following project as homework:
■ Example (span tag) given in the Coding Booklet on Page 25
● The project is optional. Assign it if feasible.
In this session, students will learn about –
● The width and height properties
● The float property
● The background-image property
● Float: places an element on the left or right-hand side of its container, allowing text and inline elements to wrap around it
Recall the concepts covered in the previous coding session
Play the video given in the panel to introduce the concepts to be covered in this session
Discuss the various properties to style images in CSS
Conduct the activity given in the Coding Booklet, Example on Page 27.
Conclude the session Assign the homework
● Say: Do you remember what we learned in the previous session?
● Invite responses from some students.
● Revise the concepts learned in the previous class.
● Show the video, “Styling Images” in the Tekie Panel.
● Discuss the quiz questions given in the Tekie Panel.
● Invite answers from as many students as possible.
● Conduct Example given on Page 27:
■ Explain the activity to the students.
■ Instruct: Click on the Practice button on the Assignment page to attempt the activity.
■ Instruct: Click on the Attempt button to open the activity page.
■ Walk around in the classroom and observe the activity done by the students.
■ Assist the students if any of them are struggling.
■ Instruct: Click on the Yes button to submit the activity.
● If time permits, conduct the Example given in the Coding Booklet on Page 26.
Sum-Up 3 min
● Conclude: Today, we learned about how to style texts using the text-shadow property, fontfamily property, text-decoration property and span tag.
● Ask the following probing questions:
■ What is the unit used to specify height and width of an image in CSS?
Possible Responses: Px; Pixels
■ Which property will be used if you want your image to be aligned to the right on the webpage?
Possible Responses: Float
● Assign the following project as homework:
■ My house:
Create a web page to write a paragraph about your house with a house image in it.
1. Use the header tag to display the heading “My House”.
2. Set the background color of the page to be light blue.
3. Use the image property to place the image to the right side of the page.
4. Add a small paragraph describing your house in a few lines.
● The project is optional. Assign it if feasible.
The content covered in this chapter is aligned with the following CSTA Standard
● 2-AP-16 – Program Development
This chapter is divided into the following lab sessions
1. The CSS Box Model
2. The Div Tag
3. Classes
4. Project - II
5. Coding Challenge
In this session, students will learn about –
● The CSS Box Model
● The CSS Box Model: a box that wraps around every HTML element. It consists of margins, borders, padding, and the actual content
Recall the concepts covered in the previous coding session
Play the video given in the panel to introduce the concepts to be covered in this session
Conclude
the session
Action Plan 7 min Warm-Up
● Play the video given in the panel.
Engage
● Discuss the quiz questions given in the Tekie Panel.
● Invite answers from as many students as possible.
● Conduct Set My Layout given in the Tekie Panel:
■ Say: Students! Today we will learn how to set the layout of a web page using the CSS Box Model.
■ Instruct: Click on the Assignment section.
■ Instruct: Click on the Go to Practice button to attempt the activity.
■ Walk around in the classroom and observe the activity done by the students.
■ Instruct: Click on the Yes button to submit the activity.
● If time permits, conduct the additional activity: Change My Colour. [Students can use properties to change the colour of the background of the web page.]
Sum-Up
3 min
● Conclude: Today, we learned about the CSS Box Model which is required to set the layout of a web page.
● Ask the following probing questions:
■ What will happen if we don’t use the CSS Box Model?
Possible Responses: The layout of our web page might not be in our desired format
■ What does the CSS Box Model consist of?
Possible Responses: It consists of: margins, borders, padding, and the actual content
In this session, students will learn about –
● The Div Tag
● The Div Tag: also known as division tag. It is a container tag and used in HTML to make divisions of content in the web page like, text, images, header, footer, etc.
Recall the concepts covered in the previous coding session
Play the video given in the panel to introduce the concepts to be covered in this session
Discuss the Div Tag Perform the activity given in the Panel – Divide Me in Parts [Students may design their web page to display the content in different colourful l parts.]
● Instruct: Go to the Tekie Panel and open the Lab on The Div Tag.
● Play the video given in the panel.
● Discuss the quiz questions given in the Tekie Panel.
● Invite answers from as many students as possible.
● Conduct Divide Me in Parts given in the Tekie Panel:
■ Say: Students! Today we will learn how to divide the content of a web page into different parts to make it legible.
■ Instruct: Click on the Assignment section.
■ Instruct: Click on the Go to Practice button to attempt the activity.
■ Walk around in the classroom and observe the activity done by the students.
■ Instruct: Click on the Yes button to submit the activity.
● If time permits, conduct the additional activity – Show Multiple Boxes. [Students will use more than 1 <div> tags to display content in multiple boxes.]
Sum-Up
3 min
● Conclude: Today, we learned about the <div> tag and how to use it to divide the content of a web page in different sections.
● Ask the following probing questions:
■ How can we use different background colours for different sections of a web page?
Possible Responses: We can use different <div> sections to set different background colours s for each section
■ Is <div> tag: an empty tag or a container tag?
Possible Responses: It is a container tag
In this session, students will learn about –
● Classes
● The Border-Style Property
● The Border-Width Property
● The Border-Colour Property
● The Border-Radius Property
Keywords
● Classes: are a way to define a group of HTML elements to apply unique styling and formatting to them
Recall the concepts covered in the previous coding session
Play the video given in the panel to introduce the concepts to be covered in this session
Discuss Classes, the border-style, borderwidth, border-colour, and the border-radius Properties
Perform the activity given in the Tekie Panel – Design Me as Asked [Students will follow the instructions given in the panel and design their web page.]
Conclude the session Assign the Homework
● Instruct: Go to the Tekie Panel and open the Lab on Classes.
● Play the video given in the panel.
● Discuss the quiz questions given in the Tekie Panel.
● Invite answers from as many students as possible.
● Conduct Design Me as Asked given in the Tekie Panel:
■ Say: Students! Today we will learn to make divisions and name their classes by following the instructions given in the Panel.
■ Instruct: Click on the Assignment section.
■ Instruct: Click on the Go to Practice button to attempt the activity.
■ Walk around in the classroom and observe the activity done by the students.
■ Instruct: Click on Yes button to submit the activity.
● If time permits, conduct the additional activity – Solve Example 1 given on Page 32.
● Conclude: Today, we learned about how to make divisions and name their classes.
● Ask the following probing questions:
■ Why do we use a class attribute?
Possible Responses: It allows us to identify particular elements and what they are designed for
■ How do we style a class in CSS?
Possible Responses: By using a dot (.) followed by a class name
● Assign the following project as homework:
■ Solve Example 2 given on Page 32 — 33
● The project is optional. Assign it if feasible.
In this session, students will –
● Create a project as given in the Tekie Panel.
● The CSS Box Model: a box that wraps around every HTML element. It consists of margins, borders, padding, and the actual content
● The Div Tag: also known as division tag. It is a container tag and used in HTML to make divisions of content in the web page like, text, images, header, footer, etc.
● Classes: are a way to name or label the HTML elements with some meaningful name
Recall the concepts covered in the previous coding session
Play the video given in the panel to introduce the concepts to be covered in this session
● Instruct: Go to the Tekie Panel and open the Lab on Project – II.
● Play the video given on the panel.
● Discuss the quiz questions given in the Tekie Panel.
● Invite answers from as many students as possible.
● Conduct Project – II given in the Tekie Panel:
■ Say: Students! Today we will develop Project – II as instructed in Tekie.
■ Instruct: Click on the Assignment section.
■ Instruct: Click on the Go to Practice button to attempt the activity.
■ Walk around in the classroom and observe the activity done by the students.
■ Instruct: Click on the Yes button to submit the activity.
If time permits, conduct the additional activity given in the panel.
● Conclude: Today, we learned about how to develop a project in CSS.
● Ask the following probing questions:
■ Mention different border styles available in CSS.
Possible Responses: Solid; Dashed; and Double
■ How can we assign value for the colour in the border-colour property?
Possible Responses: By using Hex Codes or Colour Name
In this session, students will learn about –
● Coding Challenge
● The CSS Box Model: a box that wraps around every HTML element. It consists of margins, borders, padding, and the actual content
● The Div Tag: also known as division tag. It is a container tag and used in HTML to make divisions of content in the web page, like text, images, header, footer, etc.
● Classes: are a way to name or label the HTML elements with some meaningful name
Recall the concepts covered in the previous coding session
Play the video given in the panel to introduce the concepts to be covered in this session
Discuss Coding Challenge Crack Coding Challenge as given in Tekie Panel
Conclude the session
● Instruct: Go to the Panel and open the Lab on Coding Challenge.
● Play the video given in the panel.
● Discuss the quiz questions given in the Tekie Panel.
● Invite answers from as many students as possible.
min
● Conduct Coding Challenge given in the Tekie Panel:
■ Say: Students! Today you will use your knowledge to crack the coding challenge.
■ Instruct: Click on the Assignment section.
■ Instruct: Click on the Go to Practice button to attempt the activity.
■ Walk around in the classroom and observe the activity done by the students.
■ Instruct: Click on the Yes button to submit the activity.
● If time permits, conduct the additional activity given on the panel.
Sum-Up
● Conclude: Today, we got the winner of the coding challenge.
● Ask the following probing questions:
■ Why do we use HTML and CSS?
Possible Responses: We use them for website development
■ Mention latest versions of HTML and CSS.
Possible Responses: HTML5 and CSS3
3 min
This Teacher Manual has been designed to implement Tekie, the storytelling-based Coding and Computer Science program. The manual consists of lesson plans within each chapter that teachers transact within classrooms and computer labs. Each lesson is based on a research-based ‘WEBS’ framework that simplifies pedagogical practices for teachers and enables them to deliver effectively.
• Sharp Lesson Planning: Each lesson plan focuses on specific sub-learning outcomes within a chapter and are designed for delivery within the stipulated class or lab time.
• Real-life and Application-based Questions: Additional questions that link Computer Science to real-life contexts and assist teachers to develop learners’ conceptual understanding and application skills.
• Support and Detailed Solutions: In-depth solutions for in-class and post-class activities to reinforce learning.

Uolo partners with K12 schools to bring technology-based learning programs. We believe pedagogy and technology must come together to deliver scalable learning experiences that generate measurable outcomes. Uolo is trusted by over 8,000 schools with more than 3 million learners across India, South East Asia, and the Middle East.