NEP 2020 aligned Digital coding platform included
Web Development l


Web Development is the process of creating, structuring and organising a website. Web refers to a website and Development refers to building it from scratch.
Web Development includes two phases of development:
1. Front-end Development
2. Back-end Development
Front-end development deals with the look and feel of the application, whereas Back-end development deals with managing and storing data which users need not know about.
We will be learning about front-end development in this course.
HTML stands for HyperText Markup Language. It is the oldest language used to create web pages. It is a combination of Hypertext and Markup language.
Where Hypertext is the link between web pages, markup language defines the text document within the tags defining the structure of web pages.
Most markup languages are human-readable. These languages use tags to define what the text should look like and where it will go.
In 1991, Tim Berners-Lee created HTML and made the first website. Tim BernersLee created the web to make the information available online for all.
The first ever website made by Tim Berners-Lee

The first-ever version of HTML was HTML 1.0, but the first standard version released was HTML 2.0, in 1995. HTML 5.0 is the latest version which was released in 2014.

Below are the important terms related to web development:
Web Page A hypertext document page typically written in HTML to display certain information on WWW
Website A collection of web pages
HTML Stands for HyperText Markup Language
Describes the structure of a Web page with a series of elements that tell the browser how to display the content on a web page
Defines design and layout styles for a webpage
Helps in adding variations to display webpages for different devices and screen sizes
JavaScript A text-based programming language
Used to add interactive elements to web pages to make them more engaging
HTML Tags Used to indicate the beginning and end of an HTML element in an HTML document
There are mainly two types of HTML elements: Paired Tags and Unpaired Tags.
A paired HTML tag contains three main parts: opening tag (<>), content, and closing tag (</>). Another name for a paired tag is a container tag.
An unpaired HTML tag doesn’t have a closing tag. An unpaired tag is also called an empty tag.
Below is the list of basic HTML tags.
Tag Purpose
<html> </html> holds all other HTML elements
<head> </head> stores all the information about the webpage. It contains the metadata (data about the data) of a HTML document, and is not displayed on the page. The <head> tag is placed after the <html> tag and before the other tags.
<title> </title> defines the title of the document. The title is shown in the browser’s title bar or in the page’s tab.
<body> </body> contains all the contents of an HTML document. There can only be one <body> element in an HTML document.
Heading Tags
HTML heading tags are used to add headings and subheadings in the content you want to display on a webpage. HTML has six levels of headings from <h1> to <h6>. The <h1> heading tag is used to add the most important and heaviest heading in the content. The <h6> heading tag is used to add the least important and lightest heading in the content.
<p> </p> is the Paragraph tag used to add a paragraph


The structure of an HTML document mainly includes the Head and Body parts. The title added inside the Head will be shown on the Title bar and the content inside the Body part will be visible inside the browser.
Example: Display all types of headings using the heading tags.
<html>
<head>
<title>Eye Checkup Chart</title>
</head>
<body>
<h1>Heading Tag 1</h1>
<h2>Heading Tag 2</h2>
<h3>Heading Tag 3</h3>
<h4>Heading Tag 4</h4>
<h5>Heading Tag 5</h5>
<h6>Heading Tag 6</h6>
</body>
</html>
We have already seen the basic tags that we need to make a website. To format text in an HTML document we have the following tags:
Unpaired Tags are the HTML elements without closing tags.

Tag Purpose
<br> Inserts a single line break
<hr> Adds a horizontal line to separate the information
We add comments in an HTML document to help other programmers understand what the code is all about. This also helps us to structure and organise our document. Comments are not part of the actual code. So
when the browser runs the HTML document, it ignores the content within the comment tags.
The following are few benefits of adding comments:
● You can use a comment to remember what a particular part of code does.
● When you are doubtful about some code, you can keep it as a comment and come back later to correct, replace or remove it.
Syntax: <! --- ---> Example
<h3>Text Formatting</h3> <hr>
This is in <b> bold </b>, we use the b tag. <br> This is in <i>italics </i>, we use the i tag. <br> This is <u> underlined </u>, we use the u tag. <br> This is <del> strikethrough</del>, we use the del tag. </body>

The <img> tag is used to add an image in an HTML document. HTML tags may have attributes. Attributes help us modify tags or add additional information to it.
The <img> tag has the following attributes:
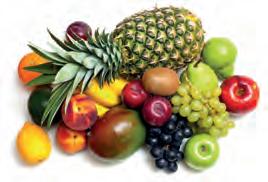
1. src: src stands for source. The src attribute is used to provide the location of an image to be added. Example: …./images/apple.jpg
2. alt: alt stands for alternative. The alt attribute is used to display alternative text describing the image, for times when the image does not load on the webpage.
This can happen in the following cases:
● The image is missing from the location
● The image name is incorrect
● The internet connection is slow
● Access restricted to the file
It is also useful for visually impaired people who use screen reader software.
Syntax: <img src = “URL of the image” alt = “alternate text”>
Note: The <img> tag does not have a closing tag.
Example with correct location:
<img src=”/image/fruits.jpg” alt=”Various fruits”> </body> </html>
Example with incorrect naming of image:
<img src=”/image/fruits1.jpg” alt=”Various fruits”> </body> </html>
On a webpage, a hyperlink (or link) is an element, like a text or a button, that points to another location. When you click on a link, it will take you to the destination of the link, which may be another webpage, document, or any other online content. Both images and text can be used to create a hyperlink.
The anchor <a> tag is used to create a hyperlink, and the link’s destination is specified within the href attribute of the <a> tag.
The anchor <a> tag has a closing </a> tag.
Syntax
<a href=”url” >Link Text</a>
<body>
<h2>HTML Links</h2>
<a href=”https://en.wikipedia.org/wiki/HTML”>Know more about HTML</a>
The target attribute determines where the linked web page or document should open. It can have the following values:
_blank: The linked document will open in a new tab or window.
_self: The linked web page will open in the same tab that we are currently in.
Syntax
<a href=”url” target=”_blank”> Link Text </a>
<!DOCTYPE html> <html>
<head> <title>
HTML target Attribute </title> </head> <body> <center>
<a href=”https://www.tekie.in/” target=”_blank”>Tekie </a> </center> </body> </html>
A list represents information in points. In HTML, we can create two types of lists: ordered and unordered.
An unordered list is a list of items without any order.
The <ul> tag is used to create an unordered list. Each list item is added within a <li> and </li> tag.
Unordered list items are displayed with a bullet. The default bullet is a dot, which is a small black circle.
We can change the bullets with other styles available such as a circle, or a square.
The bullet style of the list can be specified in the ‘type’ attribute of the <ul> tag.
Description
disc Sets the list item marker to a bullet (default)
circle Sets the list marker to a circle
square Sets the list item marker to a square
none The list items will not be marked
Syntax
<ul type = ‘circle’>
<li>item 1</li>
<li>item 2 </li>
</ul>
<h4>Unordered list with default bullet style</h4>

<ul>
<li>English</li>
<li>Math</li>
<li>Science</li>
</ul>
<h4>Unordered list with circle bullets</h4>
<ul type = ‘circle’>
<li>English</li>
<li>Math</li>
<li>Science</li>
</ul> </body> </html>
An ordered list is a list of items arranged in a numbered order. We use the <ol> tag for creating an ordered list.
The type of numbering of the list items can also be changed, like numbers, letters, roman numerals and so on. This can be specified in the type attribute of the <ol> tag.
Syntax
<ol type = “a”>
<li>item 1</li>
<li>item 2 </li>
</ol>
type=”1” The list items will be numbered with numbers (default)
type=”A” The list items will be numbered with uppercase letters
type=”a” The list items will be numbered with lowercase letters

type=”I” The list items will be numbered with uppercase roman numbers
type=”i” The list items will be numbered with lowercase roman numbers
<h2>Ordered Lists</h2>
<h4>Numbered with numbers (default)</h4>
<ol>
<li>English</li>
<li>Math</li>
<li>Science</li>
</ol>
<h4>Numbered with lowercase letters</h4>
<ol type = ‘a’>
<li>English</li>
<li>Math</li>
<li>Science</li>
</ol>
We can also reverse the ordered list using the reversed attribute of the <ol> tag. With this, the list items are numbered in the reverse order, the last item being numbered as 1, a, A, etc.
Syntax
<ol type=’1’ reversed>
<li>item 1</li>
<li>item 2 </li>
</ol>
<h4>Unordered list with circle bullets</h4>
<ul type = ‘circle’>
<li>English</li>
<li>Math</li>
</ul>
<h4>Ordered list with lowercase roman</h4>

<ol type = ‘i’>
<li>English</li>
<li>Math</li>
</ol>
<h4>Ordered list reverse numbering</h4>
<ol type = ‘1’ reversed>
<li>English</li>
<li>Math</li>
<li>Science</li>
</body> </html>
</ol>
The id attribute is used to identify the HTML elements in a web page. The id is always unique for an HTML tag, hence no two tags can have the same id.
The id attribute specifies a unique identifier for an HTML element. The value of the id attribute must be unique within the HTML document.
Syntax
<h1 id=”id_name”> My Header </h1>
Example
<p id=”paragraph1”> This is an Apple </p> <img id=”image1” src=”apple.jpeg”>
This is an Apple
HTML Hyperlinks can be used to create bookmarks across a page. This is helpful when a page is very long and we want the user to jump directly to a specific part of the page.
To create a bookmark, we first need to create a link using the <a> tag and then inside the href attribute we write # followed by the id of the HTML element we want the user to jump to. The id acts like the address of each tag.
Syntax
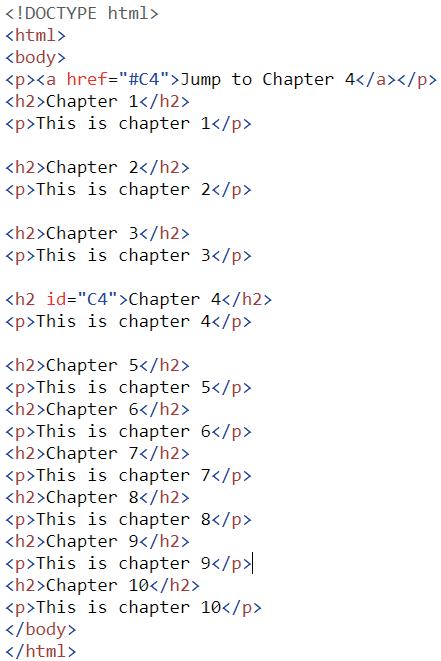
<a href = “#C10”> Jump to Chapter 10 </a>
<h2 id = “C10”> Chapter 10 </h2>
Examples
1. A program to jump to Chapter 4 within the same page.
Upon clicking “Jump to Chapter 4”, the page will scroll down to Chapter 4.


CSS stands for Cascading Style Sheets. CSS is used to define styles for your web pages. We use the <style> tag, inside the <head> tags of an HTML page to add CSS for our web page. Inside these <style> tags we add different CSS properties for each HTML element.
Consider how you want to style the paragraph tags (<p> </p>). This is how we can style it:
<style>
p{
css-property1: value of property1;
css-property2: value of property2; }
<style>
Note: It is necessary to add a semicolon after the value of a property in CSS to denote the end of the property.
Now that we know how to add CSS to our HTML, let’s learn about the following properties of CSS:
1. font-size: The font-size property sets the size of the text. We use pixels (px) as the unit for font size.
2. background-color: The background-color property sets the background color on the element.
3. color: The color property sets the font color of an element.
body{ font-size:30px; background-color: lavender; color: crimson;
It is highly unlikely for someone to remember the names of all the shades of a colour, and this is when using hex-codes comes in handy. They are the medium of representing the colors format that a computer could read and display.

HEX codes start with a “#” and are followed by six alpha-numeric characters. Since these are hexadecimal characters, each character ranges from 0-9 or A to F.
● The first two characters in the Hex code represent the intensity of the Red colour.
● The 3rd and 4th characters together represent the intensity of Green.
● The last two characters represent the intensity of Blue.
The hex code for black is #000000 and that for white is #FFFFFF, Whereas #0000FF is displayed as blue, because the blue component is set to its highest value (FF) and the others are set to 00.
For a particular shade, all the three colours need to have some intensity. Like #ADD8E6 which is the hex colour code of light blue

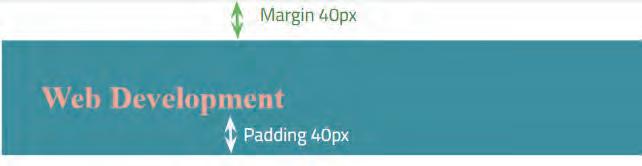
The CSS margin properties are used to create space around elements. It is completely transparent and doesn’t have any background color. It clears an area around the element.


<style>
h1 { color:#F4A896; background-color:#358597; margin:40px; }
</style>
Padding is used to create space around an element’s content, inside of any defined borders. It is affected by background colours.
Syntax
<style>
h1 { color:#F4A896; background-color:#358597; padding:40px; } </style>
Example: Adding both margin and padding
<html> <head> <title> Web Development </title> <style>
CODE
h1 { color:#F4A896; background-color:#358597; padding:40px; margin: 40px; } </style>
</head> <body> <h1>Web Development</h1>
OUTPUT
We can change the horizontal placement (alignment) of the text in an element using the text-align property. We can align the text in the Centre, Left or Right.
Syntax
text-align : left;
<html> <head> <style>
h2 {text-align:left;}
h3 {text-align:center;}
h4 {text-align:Right;}
</style>
20 Web Development I
Left </h2>
<h3> Center </h3>

<h4> Right </h4>
The text-shadow property adds shadow to the text.
There are four values that we specify in this property:
1. The first one is the horizontal distance of shadow from the text.

2. The second one is the vertical distance of the shadow from the text.
3. The third one is the blur radius, which determines how blurred the shadow has to be.
4. The last one is the colour of the shadow.
Syntax:
text-shadow: 3px 4px 2px #add8e6;
<html> <head> <style> h1{
text-shadow:3px 4px 2px #F00000; }
h2{ color:steelblue; } </style> </head>
<body>
<h1>This is crimson color. </h1>

<h2>This is steelblue color. </h2> </body> </html>
The font-family property controls the font of the text. Some examples of font families are “Times new roman”, “Courier new”, “Arial”, etc.
Syntax
font-family : “<family-name>”;
<html> <head> <style> h1 {
font-family: "Times New Roman"; }
h2 {
font-family: "Arial"; }
h3 {
font-family: "Courier New";
h4 {
font-family: "Comic Sans MS";
h5 {
font-family: "Georgia";
</style>
</head>
<body>
<h1>Times New Roman</h1>

<h2>Arial</h2>
<h3>Courier New</h3>
<h4> Comic Sans MS </h4>
<h5> Georgia </h5>
</body> </html>
The text-decoration property adds an underline, overline, line-through, or a combination of these to the selected text.
Syntax
text-decoration: underline; Example
h1{
text-decoration: underline;
h2{
text-decoration: overline;
}
h3{
text-decoration: line-through; }
h4{
text-decoration: underline wavy; }

</style>
</head>
<body>
<h1>underline</h1>
<h2>overline</h2>
<h3>line-through</h3>
<h4>underline wavy</h4>
</body>
</html>
The span tag is used to group content or other HTML elements together, so they can have the same style. Span itself does not have any effect on its content unless you style it.
Syntax
…
<span> …
</span>
<html> <head> <style> span{ color: crimson; } </style> </head> <body> <h3> This is <span> crimson </span> color. </h3> </body> </html>

The width and height properties help us resize any image on the webpage.
Syntax <style> img { width:500px; height:300px; }
</style>
Note: Width and height values are specified in pixels (px).
The CSS float property specifies how the image should be aligned (positioned) on the webpage.
It has two values - left and right. By default, the value of float is left.
Syntax:
<style> img { float:right; }
</style>
Example
<html>
<style>
img { width:500px; height:300px; float:right; }
</style>
<body>
<h2>Fruits</h2>


<img src=”fruits.jpg” alt=”Various fruits”>
</body>
</html>
The background-image property adds a background image behind any HTML element. The background image can be applied on the entire page or to a specific portion of the webpage.
If the image is smaller than the element it is applied on, it will by default repeat itself to fill the entire element.
The address of the image is mentioned through a url, and it is put inside parentheses and quotes.
Syntax
background-image: url(“address of the image”);
Example
<html>
<head>
<style>
body {
background-image: url("background.png");

}
</style>
</head>
<body>
<h1>Background Image</h1>
<p> This example has a background image applied to the body element.</p>
</body>
</html>
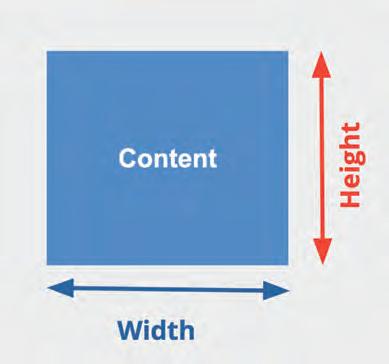
A CSS box model, simply put, is a box that wraps around every HTML element. It consists of: margins, borders, padding, and the actual content.

The div tag is known as Division tag. The div tag is used in HTML to make divisions of content in the web page like text, images, header, footer, etc.
It is used to group HTML tags together so that they can be styled together. Div tag has both opening (<div>) and closing (</div>) tags. It is mandatory to close the tag.
<h4>Developing a website for the Internet</h4> </div>
<html> <style> div{
background-color:#F4A896; }
</style>
<body> <div>
</body> </html>
<h1>Web Development</h1>
<p>Developing a website for the Internet</p> </div>
Classes are a way to name or label the HTML elements with some meaningful name. Every HTML element can have a class attribute. It allows us to identify particular elements and what they are designed for.
Multiple elements of HTML can share the same class name. By making elements part of the same class, we can apply the same styling to all of the labelled elements at once in CSS.
Syntax to add class to any html element
<div class = “class-name”>
</div>
Syntax to style a class in CSS

.class-name { }
Note: write a dot(.) followed by a class name
The border-style property specifies what kind of border to display.
Syntax
.class-name{
border-style: value;
There can be different styles of border as:

1. solid
2. dashed
3. double
The border-width property sets the thickness of an element’s borders. Its value is specified in pixels.
Syntax
.class-name{
border-width: <value>px;
The border-color property sets the color of an element’s border.
Syntax
.class-name{
border-color: <hex-value> / <colour-name>;
The border-radius property defines the radius of the element’s corners. Its value is specified in pixels.
.class-name{
border-radius: <value>px
Example 1: Make a division and name its class as “border-properties”. Design the div using the following instructions.
1. Add <h2> tag with “CSS Border properties” as text in it
2. Set the border style to solid
3. Set border width to 20px

4. Set the border colour to #FFCC00
5. And, border radius to 25px
Solution
<html> <head> <style>
.border-properties{ border-style: solid; border-width: 10px; border-color: #FFCC00; border-radius: 25px }
</style> </head> <body> <div class=”border-properties”> <h2>CSS Border properties</h2> </div> </body> </html>
Example 2: Perform the following tasks to design a web page.
● Make a <h2> tag with class name “city” and text as “Paris” inside it.
●
Make a <p> tag with class name “city” and text as “Paris is the capital of France.” inside it.
● Style the “city” class as follows:
■ Background-color astomato
■ Color of the text as white
■ Border style set to solid
■ Border width of 10px
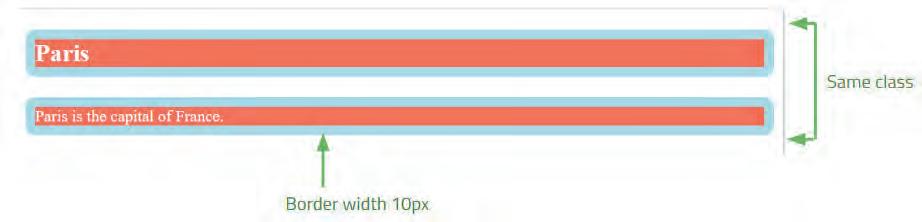
■ Color of the border as light blue
■ And, border radius as 10px
Solution
<html> <head> <style> .city { background-color: tomato; color: white; border-style: solid; border-width: 10px; border-color: lightblue; border-radius: 10px }
</style>
</head> <body> <h2 class=”city”>Paris</h2> <p class=”city”>Paris is the capital of France.</p> </body> </html>
About this book
This coding book is supplementary to the main “Mel n Conji” content book. This book represents a 21st-century approach to learning coding concepts and developing computational thinking and problem-solving skills. To prepare students for the digital age, the curriculum is interwoven with well-thought-out concept graduation with real-life examples and practice problems.
• Illustrative approach: Concepts in coding and computer science are delivered through pictorial representations and learner-friendly approaches.
• Learning through real-life examples: Age-appropriate examples that enable learners to relate to the concept and learn about the unknown from the known.
• Extensive practice: Multiple practice scenarios to reinforce learnings.
• Coding Challenges: Includes projects through which learners can demonstrate their learning outcomes in coding and computer science.
About Uolo Explore more
UOLO partners with K12 schools to bring technology-based learning programs. We believe pedagogy and technology must come together to deliver scalable learning experiences that generate measurable outcomes. UOLO is trusted by over 8,000 schools with more than 3 million learners across India, South East Asia, and the Middle East.
hello@uolo.com