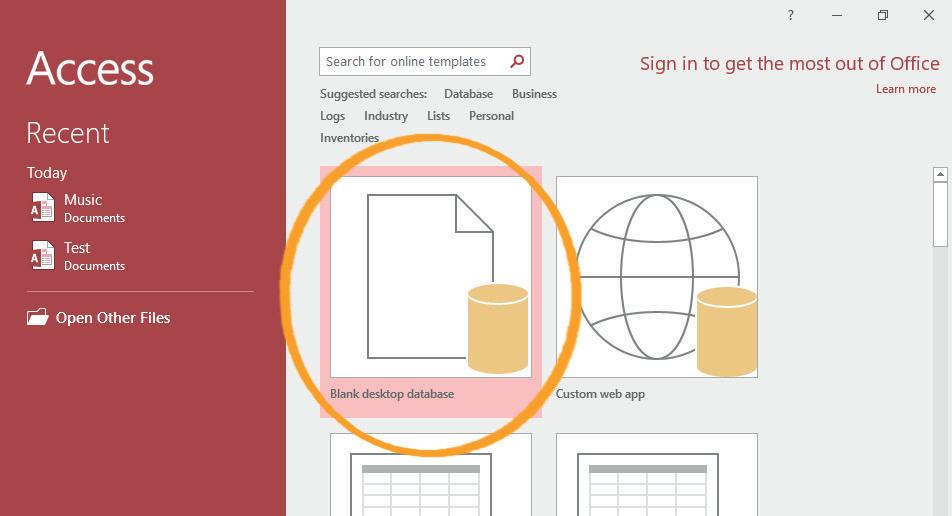
Teacher Manual Grade 8

NEP 2020 aligned ICSE compliant Digital coding platform included


Note: Use the following points to prepare for the session beforehand. Avoid reading the points in class.
● The kids travelled to the Idea Centre, to learn about the monster Cyborg.
● Lord Ero was manipulated as a child and shook hands with the monster Cyborg.
● Now the kids are on a mission to get Lord Ero on their side.
● Lord Ero rejects Mel and Conji’s requests to join the mission and save Avora.
● Later he confronts Cyborg for fooling him.
● Lord Ero knows about Cyborg’s birth at the Idea Centre.
● Cyborg tells Lord Ero that the Dark Lord chose him.
● Lord Ero is on a mission to avenge the insults of all the dark wizards.
The content covered in this chapter is aligned with the following CSTA Standard
● 2-CS-02 Hardware & Software
This chapter is divided into the following classroom sessions
1. Types of Software
2. Introduction to Operating Systems
3. Functions of Operating Systems
4. Types of Operating Systems
In this session, students will learn about –
● System software and its subtypes
● Application software and its subtypes
Keywords
● Software: instructions or programs that tell the hardware what to do
● Drivers: programs that let the software and hardware interact with each other
● Utilities: programs that supplement the working of the software

Invite students to brief the class about the story and the CS concepts covered earlier
Discuss hardware & software, system & application software along with their subtypes
Fill Up – Q1 Tick the Correct Answer – Q2 Find the Truth – Q1 Short Answers – Q1, 2
Action Plan
Conclude the topics Assign the homework
min Warm-Up
● Invite a student to brief the class about the backstory.
min Engage
● Say: Let me explain the two types of software.
CS Concept Explain
System Software
Application Software
As given in Panel 1 on Page 3
As given in Panel 2 on Page 3
● Present the scenario: Imagine you want to edit your photos using Adobe Photoshop. You first turn on your PC and log in to Windows/IOS. Then you open the required app, that is, Adobe Photoshop.
● Discuss:
■ What is the type of software that helps the computer do its job?
Possible Responses: System software
■ What are some examples of application software?
Possible Responses: Adobe Photoshop; MS Word; The specific games played by the students
■ What are the 3 types of application software?
Possible Responses: General purpose; Specific purpose; Utility software
■ What is the difference between hardware and software?
Possible Responses: Hardware consists of the physical parts of a computer while software consists of the internal programs
● If time allows, discuss all four questions, or discuss the first two.
● Conduct Fill Up on Page 10:
■ Say: Fill in the blanks to help Conji recover his memory.
■ Read Q1 aloud.
■ Invite some students to share their answers and others to validate their peers’ answers.
■ Instruct students to write the final answer in their books.
● Conduct Tick the Correct Answer on Page 10:
■ Say: Tick the correct answer to help Conji remember more details.
■ Read Q2 aloud.
■ Invite some students to share responses.
■ Discuss and validate the answers with the whole class.
■ Instruct students to mark the final answer in their books.
● Conduct Find the Truth on Page 11:
■ Say: State true or false to clarify the facts for Conji.
■ Read Q1 aloud.
■ Invite some students to share their answers and others to validate their peers’ answers.
■ Instruct students to mark the final answer in their books.
● Conduct Short Answers on Page 11:
■ Say: Answer these questions to make sure Conji has recovered his memory.
■ Read Q1, 2, 3 and 4 aloud, one by one.
■ Invite some students to share their answers.
■ Discuss and validate their answers.
■ Instruct students to write the final answers in their notebooks.
● Conclude: Today, we learned about various types and subtypes of software.
● Ask the following probing questions:
■ What kind of software is the game you play on your PC?
Possible Responses: Application Software
■ How will you tell if a computer component is hardware or software?
Possible Responses: If the component is physical and we can touch it; Then it is hardware; If it is an internal program then it is software
Objectives
In this session, students will learn about –
● Basics of operating system
● GUI
● Need for an operating system
Keywords
● User interface: place where humans and computers interact with each other
● Task: operation performed by a computer
Recap the story Recap types of software
● Brief the students about the concepts and story from the previous class.
Conclude
session
● Ask the students if their PCs have Windows/IOS/Linux or some other operating system.
Engage
CS Concept Explain
Definition of OS
History of OS
GUI
Need of OS
As given in Panel 2 on Page 4
As given in panel 4 of page 4 and panel 1 on page 5
As given in panel 5 on page 5
As given in panel 2 on page 6
12 min
● Present the scenario: Imagine you want to watch a movie on your PC. You turn on the device and play the movie. Suppose you press the spacebar to pause the movie. What software tells the computer to pause the movie when you hit the spacebar?
● Discuss:
■ What is the software that helps the hardware and software components of a computer to interact with each other?
Possible Responses: Operating System
■ What are some commonly used OS?
Possible Responses: Windows; Linux; MacOS
■ How are modern-day OS better than older ones like GMOS?
Possible Responses: Modern-day OS do not require massive machines; They are faster and more efficient; They can perform more tasks
● If time allows, discuss all three questions or the first two.
Build
● Conduct Fill Up on Page 10:
■ Say: Fill in the blanks to help Conji recover his memory.
■ Read Q3 and Q4 aloud, one by one.
10 min
■ Invite some students to share their answers and others to validate their peers’ answers.
■ Instruct students to write the final answers in their books.
● Conduct Tick the Correct Answer on Page 10:
■ Say: Choose the correct answer to help Conji remember more details.
■ Read Q1, 3 and 4 aloud, one by one.
■ Invite some students to share their answers.
■ Discuss and validate their answers.
■ Instruct students to mark the final answers in their books.
● Conduct Find the Truth on Page 12:
■ Say: State true or false to get the facts clear for Conji.
■ Read Q2 and 3 aloud, one by one.
■ Invite some students to share their answers and others to validate their peers’ answers.
■ Instruct students to mark the final answers in their books.
Sum-Up
● Ask the following probing questions:
■ How does GUI make the use of devices easy?
Possible Responses: It makes it easier to identify applications using their icons
■ What software tells the computer to pause the movie when you hit the spacebar?
Possible Responses: Operating system
■ What will happen if a device does not have an OS?
3 min
Possible Responses: Hardware and software will not be able to interact; The device will not be able to function
● Assign the following questions as homework:
■ Brain Teasers: Short Answers – Q5
■ Brain Teasers: Long Answers – Q1
Objectives
In this session, students will learn about –
● Some functions of OS
● Process Management
● Memory Management
● Device Management
● Security and Protection
Keywords
● Input: any information/instruction given to the computer by the user
● RAM: random Access Memory is the temporary memory in a PC which is used for running applications and storing unsaved work
● User interface: place where humans and computers interact with each other
Recap the previous concepts Discuss process management, memory management, device management, security and protection
● Brief the students about the previous concepts
● Say: Let me explain all these functions to you
CS Concept Explain
Process Management
Memory Management
File Management
Device Management
Security and Protection
As given in Panel 4 on Page 6
As given in Panel 1 on Page 7
As given in Panel 1 on Page 7
As given in Panel 1 on Page 7
As given in panel 1 on page 7
● Present the scenario: Suppose your friend is at your house and you are playing a multiplayer game. While playing the game, you are also downloading a movie simultaneously in the background.
● Discuss:
■ What are the various functions of the OS involved in the scenario?
Possible Responses: Process management; Memory management; Device management; File management; Security and protection
■ How will the OS ensure that the downloaded movie file is safe to use?
Possible Responses: The OS provides inbuilt antivirus protection. It will scan the downloaded file for any potential threats. The user is warned in case a threat is found
● If time allows, discuss all three questions or the first two.
● Conduct Find the Truth on Page 11:
■ Say: State true or false to clarify the facts for Conji.
■ Read Q4 and 5 aloud, one by one.
■ Invite some students to share their answers and others to validate their peers’ answers.
■ Instruct students to write the final answers in their books.
● Conduct Long Answers on Page 11:
■ Say: Help Conji fight Ero’s efforts to erase his memory by answering this question.
■ Read Q2 aloud.
■ Invite some students to share their answers.
■ Discuss and validate their answers.
■ Instruct students to write the final answer in their books.
● Ask the following probing questions:
■ What will happen if the OS fails to manage the various devices connected to the PC?
Possible Responses: The system will not be able to coordinate input and output; Suitable output won’t be received for the corresponding input; The device won’t be able to function
■ Why is file management important?
Possible Responses: We create a lot of folders in our PCs and store a lot of data in the form of documents, videos, photos, audio etc. It is necessary to keep track of the information regarding the saving, copying and deletion of these files
Objectives
In this session, students will learn about –
● Types of OS
■ Single-user OS
■ Multi-user OS
■ Multiprocessor OS
■ Multi-tasking OS
■ Multi-threading OS
Keywords
● Threads: program instructions
Recap the previous story and concepts.
Single-user OS, Multi-user OS, Multiprocessor OS, Multi-tasking OS, Multithreading OS
Action Plan
● Recap the previous concepts and story.
● Name the various types of OS.
● Say: Let me explain the various types of OS.
CS Concept Explain
Single-user OS
Multi-user OS
Multiprocessor OS
Multi-tasking OS
Multi-threading OS
As given in Panel 2 on page 8
As given in panel 2 of page 8
As given in panel 2 of page 8
As given in panel 2 of page 8
As given in panel 2 of page 8
● Present the scenario: Suppose you are visiting your friend’s house. You are intrigued by the different types of devices present there and you start inquiring about them from your friend.
● Discuss:
■ What are the operating systems that the devices at your friend’s house have?
Possible Responses: Ubuntu; MacOS; Windows 11
■ What are some single-user operating systems?
Possible Responses: MS-DOS; Palm OS
■ What are some multi-user operating systems?
Possible Responses: Windows; MacOS
■ How many CPUs does a multitasking OS have?
Possible Responses: Only one CPU
● Conduct Long Answers on Page 11:
■ Say: Help Conji fight Ero’s efforts to erase his memory by answering these questions!
■ Read Q3 aloud.
■ Invite some students to share their answers.
■ Discuss and validate their answers.
■ Instruct students to write the final answers in their books.
● Ask the following probing questions:
■ What are the benefits of multi-user operating systems?
Possible Responses: More than one user can use the computer without hindering the work of the other users; They maintain privacy among the users using the same device
■ What is the benefit of having a multi-threading OS?
Possible Responses: It makes the processes faster and more efficient; Decreases the load on the CPU
● Assign the following questions as homework:
■ Fill Up – Q2, 5
■ Tick the Correct Answer – Q5
Note: Use the following points to prepare for the session beforehand. Avoid reading the points in class.
● Lord Ero rejected Mel and Conji’s requests to join the mission and save Avora.
● Later he confronted Cyborg for fooling him.
● Lord Ero knew about Cyborg’s birth at the Idea Centre.
● Cyborg told Lord Ero that the Dark Lord had chosen him.
● Lord Ero was on a mission to avenge the insults of all the dark wizards.
● Mel and Conji discuss how, even after learning the truth, Lord Ero is still on Cyborg’s side.
● The muses visit Avora to meet Mel and Conji.
● Mel and Conji ask them about Cyborg’s escape from the void.
● The muses tell the kids about the void, the strongest force on Nexus.
● They conclude that Cyborg must be feeding stories to Ero.
The content covered in this chapter is aligned with the following CSTA Standard
● 2–AP–13
This chapter is divided into the following classroom and lab sessions
1. Intro to Apps
2. Categories and types of Apps
3. Creating Apps in Scratch I
4. Creating Apps in Scratch II
In this session, students will learn about –
● What are Apps?
● Smartphones
● Android and iOS
● Types of Apps
● App: software designed to perform specific tasks
● Smartphones: handheld devices that can be used to browse the internet and run software programmes like computers
● Android: an operating system developed by Google for use in all touch-screen devices
● iOS: an operating system based on Mac OS
Recap the backstory Invite students to brief the class on the story and CS concepts covered in the chapter
Discuss what apps are, smartphones, android, iOS and types of apps
Fill Up – Q1, 2, 3, 4 Tick the Correct Answer –Q1, 2, 3, 4 Find the Truth – Q1, 2 Short Answers – Q5
Warm-Up
● Brief the students about the backstory.
● Invite students to:
Conclude the topics Assign the homework
3 min
■ Recap the story covered in the previous chapter briefly with the CS concepts covered.
■ Recap the story covered in the current chapter with the CS concepts covered.
● Say: Let me explain what apps, smartphones, android, and iOS and types of apps are.
What are apps
Smartphones
Android and iOS
Types of apps
As given in Panel 4 on Page 15
As given in Panel 4 of page 15
As given in Panel 2 of page 16
As given in Panel 1 of page 17
● Present the scenario: Consider that your teacher has given you research work on technologies. You and your group have decided to research “Types of apps.”
● Discuss:
■ How many types of apps will you include?
Possible Responses: Desktop apps; Mobile apps; Web apps
■ What are some examples of Desktop apps?
Possible Responses: Notepad; Word processors; Spreadsheets; MS Paint
■ What are some examples of Mobile apps?
Possible Responses: Whatsapp; Facebook; Zoom; Games apps
■ What are some examples of Web apps?
Possible Responses: Gmail; Google Docs; WordPress
● If time allows, discuss all four questions, or discuss the first two.
● Conduct Fill Up on Page 27:
■ Say: Let’s help Mel to fill in the blanks.
■ Read Q1, 2, 3 and 4 aloud, one by one.
■ Invite some students to share their answers and others to validate their peers’ answers.
■ Instruct students to write the final answers in their books.
● Conduct Tick the Correct Answer on Page 27:
■ Say: Let’s tick the correct answers to pass Elder Wizard’s test.
■ Read Q1, 2, 3 and 4 aloud, one by one.
■ Invite some students to share their responses.
■ Discuss and validate the answers with the whole class.
■ Instruct students to mark the final answers in their books.
● Conduct Find the Truth on Page 28:
■ Say: Let’s help Avora News figure out the facts.
■ Read Q1 and 2 aloud, one by one.
■ Invite some students to share their answers and others to validate their peers’ answers.
■ Instruct students to mark the final answers in their books.
● Conduct Short Answers on Page 28:
■ Say: Answer these questions to test your knowledge.
■ Read Q5 aloud.
■ Invite some students to share their answers.
■ Discuss and validate their answers.
■ Instruct students to write the final answer in their books.
Sum-Up
● Conclude: Today, we learned about apps, smartphones, android, iOS and types of apps.
● Ask the following probing questions:
■ Where can you download mobile apps from?
Possible Responses: Google play store; App Store
■ Which mobile devices use iOS?
Possible Responses: iPhone; iPad; iPod touch
● Assign the following questions as homework:
■ Long Answers – Q5
In this session, students will learn about –
● Native apps
● Hybrid apps
● Entertainment apps
● Social media apps
● Native app: apps developed for a specific OS like Android or iOS
● Hybrid app: contain features of both web apps and native apps
Recap the backstory Invite students to brief the class on the story and CS concepts covered in the chapter
Discuss native apps, hybrid apps, entertainment apps, and social media apps
Fill Up – Q5
Tick the Correct Answer –Q5
Find the Truth – Q3 Short Answers – Q1, 2, 3
● Invite students to:
Conclude the topics Assign the homework
5 min
■ Recap the story covered in the previous chapter briefly with the CS concepts covered.
■ Recap the story covered in the current chapter with the CS concepts covered.
12 min Engage
● Say: Let me explain native apps, hybrid apps, entertainment apps and social media apps.
CS Concept Explain
Native apps
Hybrid apps
Entertainment apps
Social media apps
As given in Panel 1 on Page 18
As given in Panel 3 of Page 18
As given in Panel 2 of Page 19
As given in Panel 2 of Page 19
● Present the scenario: Consider that you and your group are still doing the research work on types of apps. Now you come across the categories of apps.
● Discuss:
■ What are the different categories of apps?
Possible Responses: Native apps; Hybrid apps
■ Give some examples of Native apps.
Possible Responses: Clock; Camera; Calendar; Gallery
■ Give some examples of Hybrid apps.
Possible Responses: Gmail; Uber; Twitter; Instagram
■ What are the different specifications of a mobile phone?
Possible Responses: Operating system; Wifi; Bluetooth; GPS; Memory
● If time allows, discuss all four questions, or discuss the first two.
Build
● Conduct Fill Up on Page 27:
■ Say: Let’s help Mel to fill in the blanks.
■ Read Q5 aloud.
■ Invite some students to share their answers and others to validate their peers’ answers.
■ Instruct students to write the final answer in their books.
● Conduct Tick the Correct Answer on Page 27:
■ Say: Let’s tick the correct answers to pass Elder Wizard’s test.
■ Read Q5 aloud.
■ Invite some students to share their answers.
■ Discuss and validate their answers.
■ Instruct students to mark the final answer in their books.
● Conduct Find the Truth on Page 28:
■ Say: Let’s help Avora News figure out the facts.
■ Read Q3 aloud.
■ Invite some students to share their answers and others to validate their peers’ answers.
■ Instruct students to mark the final answer in their books.
● Conduct Short Answers on Page 28:
■ Say: Answer these questions to test your knowledge.
■ Read Q1, 2 and 3 aloud, one by one.
■ Invite some students to share their answers.
■ Discuss and validate their answers.
■ Instruct students to write the final answers in their books.
Sum-Up 3 min
● Conclude: Today, we learned about native apps, hybrid apps, entertainment apps and social media apps.
● Ask the following probing questions:
■ Give some examples of entertainment apps.
Possible Responses: Hotstar; Netflix; Spotify; BookmyShow
■ Give some examples of social media apps.
Possible Responses: Whatsapp; Facebook; Instagram; Linkedin
● Assign the following questions as homework:
■ Long Answers – Q1
In this session, students will learn about –
● Banking apps
● Ecommerce apps
● Educational apps
● Creating apps in Scratch
● Ecommerce apps: a piece of software where buyers can browse through products and make purchases using their mobile devices
● Scratch: block-based programming language
Recap the backstory Invite students to brief the class on the story and CS concepts covered in the chapter
Discuss what are banking apps, ecommerce apps, educational apps and how to create an app in Scratch
Find the Truth – Q4, 5 Short Answers – Q4
Conclude the topics Assign the homework
● Invite students to:
■ Recap the story covered in the previous chapter briefly with the CS concepts covered.
■ Recap the story covered in the current chapter with the CS concepts covered.
● Say: Let me explain what banking apps, e-commerce apps, and educational apps are and how to create an app in Scratch.
Banking apps
E-commerce apps
Educational apps
As given in Panel 1 on Page 20
As given in Panel 1 of page 20
As given in Panel 1 of page 21
Scenarios If you are teaching without a projector
If you are teaching with a projector
● Present the scenario: Consider that you and your group continue doing the research work on types of apps. Now you started working on the types of apps based on functionalities.
● Discuss:
■ What are the different types of apps based on functionalities?
Possible Responses: Entertainment apps; Social media apps; Banking apps; E-commerce apps; Educational apps
■ Give some examples of banking apps.
Possible Responses: Paytm; Phonepe; Googlepay
■ Give some examples of educational apps.
Possible Responses: Google Classroom; Coursera; Tekie
■ Give some examples of E-Commerce apps.
Possible Responses: Flipkart; Amazon; Myntra; Olx
● If time allows, discuss all four questions, or discuss the first two.
● Conduct Find the Truth on Page 28:
■ Say: Let’s help Mel to find the truth.
■ Read Q4 and 5 aloud, one by one.
■ Invite some students to share their answers and others to validate their peers’ answers.
■ Instruct students to write the final answers in their books.
● Conduct Short Answers on Page 28:
■ Say: Answer these questions to test your knowledge.
■ Read Q4 aloud.
■ Invite some students to share their answers.
■ Discuss and validate their answers.
■ Instruct students to write the final answer in their books.
● Conclude: Today, we learned about banking apps, e-commerce apps, educational apps and creating an app in Scratch.
● Ask the following probing questions:
■ What are the mobile apps for SBI and ICICI banks?
Possible Responses: YONO for SBI; iMobile for ICICI
■ What are the different types of digital payment methods?
Possible Responses: Credit card; Debit card; Giftcards, Cryptocurrency; Coupons
● Assign the following questions as homework:
■ Long Answers – Q2, 3 and 4
In this session, students will learn about –
● Creating apps in Scratch
Keywords
● Scratch: block-based programming language
● Say: Do you remember what we learned in the previous session?
● Invite responses from some students.
● Discuss the concepts learned in the last session.
● Instruct: Go to the Tekie panel.
● Show slides one by one and discuss the concepts shown on the slide in the panel.
● Discuss the following questions one by one to check students’ understanding:
■ What can you create in Scratch?
Possible Responses: Interactive stories; Games; Apps; Animations
■ What background will you choose for your app?
Possible Responses: Arctic; Baseball1; Baseball2; Colorful City; Concert
■ What are the different options available under the Looks tab?
Possible Responses: Say hello for 2 seconds; Say Hello; Think hmm; Switch costume
■ What are the different options available under the Events tab in Scratch?
Possible Responses: When this sprite is clicked; When the space key is pressed; When the backdrop switches to backdrop 1
● If time allows, discuss all four questions, or discuss the first two.
● Instruct:
■ Ask students to open the Lab time on Page 30.
■ Follow the steps given to complete the lab activity.
● Walk around in the classroom and observe the activity done by the students.
● Conclude: Today, we learned about creating an app in Scratch.
● Ask the following probing questions:
■ What are the projects you would like to create in Scratch?
Possible Responses: Birthday Video; Racing game; Interactive story
■ What is block programming?
Possible Responses: In block programming, we use blocks for writing our code
● Assign the following questions as homework:
■ DIY Activity on page 29
Note: Use the following points to prepare for the session beforehand. Avoid reading the points in the class.
● Mel and Conji discussed how even after knowing the truth, Lord Ero is still on Cyborg’s side.
● The muses visited Avora to meet Mel and Conji.
● Mel and Conji asked them about Cyborg’s escape from the void.
● The muses told the kids about the void, the strongest force on Nexus.
● They concluded that Cyborg must be feeding stories to Ero.
● It’s a beautiful day in Avora.
● Mel, Conji and the muses are in a spaceship to the Anywhere Room.
● Suddenly, Lord Ero appears on their screen and threatens them.
● In the past, the muses enticed Lord Ero and the Cyborg.
● In the present, the muses look at the wrong flowchart and get annoyed.
● Mel tells Conji about algorithms.
The content covered in this chapter is aligned with the following CSTA Standard
● 2-AP–10 Algorithms
This chapter is divided into the following classroom sessions
1. Algorithms I
2. Algorithms II
3. Flowcharts I
4. Flowcharts II
In this session, students will learn about –
● Algorithms
● Characteristics of Algorithms
● Algorithm: step-by-step process to solve a problem
● Input: data required to start an algorithm, not required for all algorithms
● Output: result of the execution of an algorithm’s instructions
● Unambiguity: using simple and precise steps in algorithms
● Uniqueness: using clearly labelled steps in algorithms
● Finiteness: having a countable number of steps in algorithms
● Deterministic: should produce the same output every time on the same set of inputs
● Language Independence: algorithms being independent of a computer language
● Recap the story covered in the previous chapter.
● Invite students to:
■ Recap the story covered in the previous chapter briefly with the CS concepts covered.
Engage
● Say: Let me explain Algorithms and their characteristics.
CS Concept Explain
Algorithm
Writing an Algorithm
Examples of Algorithms
Input
Output
Unambiguity
Uniqueness
Finiteness
Deterministic
Language Independence
As given in Panel 4 on Page 36
As given on Page 37
As given in Panels 2 and 3 on Page 38 and Panel 1 on Page 39
As given in Panel 2 on Page 39
As given in Panel 2 on Page 39
As given in Panel 2 on Page 39
As given in Panel 2 on Page 39
As given in Panel 2 on Page 39
As given in Panel 2 on Page 39
As given in Panel 2 on Page 39
● Present the scenario: You have lost the instruction manual for a Lego build, but you have figured out the steps by trying it multiple times. Now you want to write an instruction manual for later use.
● Discuss:
■ Will the sequence of steps matter for the final build?
Possible Responses: Yes; No; Maybe
■ What will the properties be for the steps you develop to assemble the final build?
Possible Responses: Clarity; Finiteness; Simplicity; Sequential
■ Suppose you have jumbled up a few steps in between, will you get the final build?
Possible Responses: No; Yes; Maybe
■ On which factors does the final build depend?
Possible Responses: Sequence of steps; Using proper blocks
Note
● If time allows, discuss all four questions or the first two.
● Conduct Fill Up on Page 47:
■ Say: Help Mel and Conji to complete the fill-ups.
■ Read Q1 and 2 aloud, one by one.
■ Invite some students to share their answers and others to validate their peers’ answers.
■ Instruct: Fill in the final answers in your books.
● Conduct Short Answers on Page 49:
■ Say: Help Eva answer the following questions in short.
■ Read Q3 and 5 aloud, one by one.
■ Invite some students to share their answers.
■ Discuss and validate their answers.
■ Write the final answers on the board for students to take notes.
■ Instruct: Write the final answers in your notebooks.
■ Say: Help Mel and Conji to answer the following question.
■ Read Q1 aloud.
■ Invite some students to share their answers.
■ Discuss and validate their answers.
■ Write the final answer on the board for students to take notes.
■ Instruct: Write the final answer in your notebooks.
● Conclude: Today, we learned about Algorithms and their characteristics.
● Ask the following probing questions:
■ What are some characteristics of an algorithm?
Possible Responses: Unambiguous; Unique; Finite; Deterministic
■ Can an algorithm have an infinite number of steps and still produce the same output?
Possible Responses: No; Yes; Maybe
● Assign the following as homework:
■ Brain Teasers: Tick the correct answer – Q1, 2
In this session, students will learn about –
● Advantages of Algorithms
● Disadvantages of Algorithms
● Advantages of Algorithms: benefits of using a step-by-step approach
● Disadvantages of Algorithms: shortcomings of using the algorithmic approach
● Recap the story and concepts covered in the previous session.
● Say: Let me explain the advantages and disadvantages of using algorithms.
Advantages of Algorithms
Disadvantages of Algorithms
As given in Panel 2 on Page 40
As given in Panel 4 on Page 40
● Present the scenario: Your father has bought a new surround-sound system for your home, and you want to use your new-found knowledge of algorithms to assemble it.
● Discuss:
■ What might be the properties of the steps you will use to assemble the sound system?
Possible Responses: Simple steps; Logical steps; Easy to understand; Modular steps
■ Should you write all the instructions in one step?
Possible Responses: No; Yes; Maybe
■ What possible disadvantages might you face if the music system is very large or has to be installed in a very large place?
Possible Responses: Complex algorithm; Time-consuming; Less clarity
■ Suppose you have used a computer language to code your algorithm, but it can’t work in another coding language. Is it a good algorithm?
Possible Responses: No; Yes; Maybe
● If time allows, discuss all four questions, or discuss the first two.
● Conduct Short Answers on Page 49:
■ Say: Help Eva to answer the following question in short.
■ Read Q2 aloud.
■ Invite some students to share their answers.
■ Discuss and validate their answers.
■ Write the final answer on the board for students to take notes.
■ Instruct: Write the final answer in your notebooks.
● Conduct Long Answers on Page 49:
■ Say: Help Mel and Conji to answer the following questions.
■ Read Q2 and 4 aloud, one by one.
■ Invite some students to share their answers.
■ Discuss and validate their answers.
■ Write the final answers on the board for students to take notes.
■ Instruct: Write the final answers in your notebooks.
● Conclude: Today, we learned about the pros and cons of using algorithms.
● Ask the following probing questions:
■ Is writing an algorithm for a factory machine which performs complex tasks in a loop advisable?
Possible Responses: No; Yes; Maybe
■ In which real-life scenarios might you use algorithms?
Possible Responses: Directions to reach somewhere; Solve puzzles; Make recipes
● Assign the following as homework:
■ Find the Truth – Q4
■ Tick the Correct Answer – Q3, 4
■ DIY Activity – Fun Time
In this session, students will learn about –
● Flowcharts
● Symbols of a flowchart
● Features of a flowchart
● Examples of flowchart
● Flowchart: a visual representation of steps of algorithms
● Start/Stop Symbols: used to initiate or end a flowchart
● Input/Output Symbols: used to represent input or output in a flowchart
● Processing Symbol: used to represent data manipulation, mostly arithmetic operations
● Decision Symbol: shows different outputs based on different conditions
● Flow Lines: used to connect one symbol to another symbol
● Features: properties a flowchart must have
● Recap the story and concepts covered in the previous sessions.
● Say: Let me explain flowcharts, their symbols and their characteristics.
Flowchart
Start/Stop Symbol
Input/Output Symbol
Processing Symbol
Decision Symbol
Flow Lines
Features of a Flowchart
Examples
As given in Panel 2 on Page 41
As given in Panel 2 on Page 41
As given in Panel 2 on Page 41
As given in Panel 2 on Page 41
As given in Panel 1 on Page 42
As given in Panel 1 on Page 42
As given in Panel 1 on Page 42
As given on Page 43 and in Panel 1 on Page 44
● Present the scenario: You have developed an algorithm for making a complex recipe in a Coding language, but you have to make the same recipe with your uncle who does not have Coding experience but knows flowcharts.
● Discuss:
■ Can you still make the recipe?
Possible Responses: Yes; No; Maybe
■ Which shapes might you use for making your flowchart?
Possible Responses: Oval; Parallelogram; Diamond; Rectangle
■ How many decisions might you make in a flowchart?
Possible Responses: Only 1; Maximum 5; As many as required
■ What algorithms can you visualize using flowcharts?
Possible Responses: Directions to reach somewhere; Solve puzzles; Make recipes
● If time allows, discuss all four questions, or discuss the first two.
Build
● Conduct Fill Up on Page 47:
■ Say: Help Mel and Conji to complete the fill-ups.
■ Read Q3 and 4 aloud, one by one.
■ Invite some students to share their answers and others to validate their peers’ answers.
■ Instruct: Fill in the final answer in your books.
● Conduct Short Answers on Page 49:
■ Say: Help Eva to answer the following questions in short.
■ Read Q1 aloud.
■ Invite some students to share their answers.
■ Discuss and validate their answers.
■ Write the final answer on the board for students to take notes.
● Conduct Long Answers on Page 49:
■ Say: Help Mel and Conji to answer the following question.
■ Read Q3 aloud.
■ Invite some students to share their answers.
■ Discuss and validate their answers.
■ Write the final answer on the board for students to take notes.
■ Instruct: Write the final answer in your notebooks.
Sum-Up
● Conclude: Today, we learned about flowcharts, their symbols and their features.
● Ask the following probing questions:
■ Is there any correlation between algorithms and flowcharts?
Possible Responses: Yes; No; Maybe
■ Which symbols must be used only once in a flowchart?
Possible Responses: Start symbol; Stop symbol
● Assign the following as homework:
■ Find the Truth – Q1
■ Tick the Correct Answer – Q2
In this session, students will learn about –
● Advantages of using Flowcharts
● Disadvantages of using Flowcharts
Keywords
● Advantages of Flowcharts: benefits of using flowcharts
● Disadvantages of Flowcharts: shortcomings of using flowcharts
Action Plan
● Recap the story and concepts covered in the previous sessions.
● Say: Let me explain the pros and cons of using flowcharts to represent algorithms visually.
CS Concept Explain
Advantages of Flowcharts
Disadvantages of Flowcharts
As given in Panel 1 on Page 45
As given in Panel 1 on Page 45
● Present the scenario: You have now mastered the basics and the pros and cons of using flowcharts. Now you have multiple algorithms which you want to convert into flowcharts.
● Discuss:
■ One algorithm is not complete yet. Should you make a flowchart of the algorithm?
Possible Responses: No; Yes; Maybe
■ Which method might you use to make flowcharts?
Possible Responses: Using algorithms; Using steps to solve any problem
■ What possible disadvantages might you face while making flowcharts for very complex problems?
Possible Responses: Time-consuming; Difficult to understand; Hard to make corrections
■ Suppose you have made a flowchart, but you have used a circle for one of the decision symbols. Is it a correct flowchart?
Possible Responses: No; Yes; Maybe
● If time allows, discuss all four questions, or discuss the first two.
● Conduct Fill Up on Page 47:
■ Say: Help Mel and Conji to complete the fill-ups.
■ Read Q5 aloud, one by one.
■ Invite some students to share their answers and others to validate their peers’ answers.
■ Instruct: Fill in the final answer in your books.
● Conduct Short Answers on Page 49:
■ Say: Help Eva to answer the following questions in short.
■ Read Q4 aloud.
■ Invite some students to share their answers.
■ Discuss and validate their answers.
■ Write the final answer on the board for students to take notes.
■ Instruct: Write the final answer in your notebooks.
● Conduct Long Answers on Page 49:
■ Say: Help Mel and Conji to answer the following question.
■ Read Q5 aloud.
■ Invite some students to share their answers.
■ Discuss and validate their answers.
■ Write the final answer on the board for students to take notes.
■ Instruct: Write the final answer in your notebooks.
● Conclude: Today, we learned about the advantages and disadvantages of using flowcharts to represent algorithms visually.
● Ask the following probing questions:
■ Is it advisable to make a flowchart for a factory machine which performs complex tasks with multiple decisions and directions of results?
Possible Responses: No; Yes; Maybe
■ Which real-life scenarios might you want to represent in a flowchart?
Possible Responses: Assembling furniture; Assembling Lego figures; Installing a software program; Building a house; Preparing a recipe
● Assign the following as homework:
■ Brain Teasers: Find the Truth – Q5
■ Brain Teasers: Tick the Correct Answer – Q5
■ DIY Activity: Fill Up
Note: Use the following points to prepare for the session beforehand. Avoid reading the points in class.
● Mel,Conji and the muses are in a spaceship anywhere in the room.
● In the past, the muses enticed Lord Ero and the Cyborg.
● In the present, the muses look at the wrong flowchart and get annoyed.
● Mel tells Conji about algorithms.
● Conji remembers that the muses spoke about multiple ideas like Cyborg in the void.
● Mel wonders why the monsters couldn’t escape the void.
● Conji and Mel ask the muses how they decide whether an idea is good or bad.
● The muses respond that they have to watch the ideas closely and admit that they did not predict that Cyborg would become evil.
● Conji wants to check the records of all the ideas.
The content covered in this chapter is aligned with the following CSTA Standard
● 2-DA–08 Data & Analysis
This chapter is divided into the following classroom sessions
1. MS Access Forms – I
2. MS Access Forms – II
3. MS Access Forms – III
4. MS Access Forms – IV
In this session, students will learn about –
● What is a Form?
● Uses of a Form
● Advantages of using a Form
● Scenario of a flight-booking system
Keywords
● Forms: feature that allows for easier input of and access to data through graphical user interfaces with various controls
Revise the story and CS concepts covered in the previous session
Invite students to brief the class on the story and CS concepts covered in the chapter
Discuss MS Access Form and its Uses, advantages of using a Form, and the flight-booking system scenario
Q and A time - Q1 Answer the following briefly - Q1, 2
Action Plan
● Recap the story and CS concepts covered in the previous chapter.
● Invite students to:
Conclude the concepts Assign homework
■ Brief the story covered in the previous chapter with the CS concepts covered
■ Brief the story covered in the current chapter with the CS concepts covered
● Explain Form and its uses, Advantages of using a Form and scenario of the flight-booking system.
CS Concepts
What is a Form
Uses of a Form
Advantages of Using a Form
Scenario of flight-booking system
As given in Panel 1 on Page 59
As given in Panel 2 on Page 59
As given in Panel 2 on Page 60
As given in Panel 2 on Page 61
● Present the scenario: You have to collect personal information about the students in your class.
● Discuss:
■ What kind of information will you collect in the form?
Possible Responses: Name of the student; DOB; Parent’s name; Phone number; Address
■ What are some different types of forms?
Possible Responses: Online forms; Paper forms; Interactive forms
■ What are some examples of forms that you might encounter in your daily life, both online and offline?
Possible Responses: Job applications; Registration forms for events or activities; Surveys or questionnaires; Feedback forms; Tax forms
■ What are some potential disadvantages of using forms, and how can they be mitigated?
Possible Responses: Time-consuming to fill in, especially if they are complex or require a lot of information; can be difficult to design in a way that is clear and user-friendly; May not be accessible to individuals with disabilities or language barriers
● Conduct Q and A time on Page 70:
■ Say: Let’s help Conji and Mel to answer the question.
■ Read Q1 aloud.
■ Invite some students to share responses.
■ Discuss and validate the answers with the whole class.
■ Instruct: Write the correct answers in your notebooks.
● Conduct Answer the following briefly on Page 70:
■ Say: Let’s help Conji to answer these questions.
■ Read Q1 and 2 aloud.
■ Invite some students to share their answers and others to validate their peers’ answers.
■ Instruct: Write the correct answers in your notebooks.
● Conclude: Today, we learned about Forms and their uses, the advantages of using a form and the scenario of a flight-booking system.
● Ask the following probing questions:
■ What are some common elements of forms?
Possible Response: Fields; Labels; Buttons
■ What are the different types of buttons that can be used in Forms?
Possible Responses: command buttons; Option buttons; Check boxes; Toggle buttons
● Assign the following from Brain Teasers as homework:
■ Answer the following briefly – Q4
Objectives
In this session, students will apply the learnings from the previous session -
● What is a Form?
● Uses of a Form
● Advantages of using a Form
● Scenario of a flight-booking system
Keywords
● Forms: feature that allows for easier input and access of data through graphical user interfaces with various controls
Action Plan
● Say: Do you remember what we learned in the previous session?
● Invite responses from some students.
● Say: Let’s revise what we have learned.
● Instruct: Go to the Panel and open the Lab on Forms in MS Access II.
● Show slides one by one and discuss the concepts shown on the slide in the panel.
Engage
● Say: Let me explain Forms, their uses, the advantages of using forms and some scenarios.
● Discuss the following questions one by one to check students’ understanding:
7 min
■ How can forms be used to improve communication and collaboration among individuals and groups?
Possible Responses: By providing a structured way to share information; Allowing multiple people to contribute to the same form or document
■ How can forms be used to automate processes or tasks?
Possible Responses: Drop-down menus; Automatic calculations; Conditional formatting
■ How can forms be designed to be more user-friendly?
Possible Responses: By using clear language and instructions; Organizing the form logically; Making the form visually appealing
■ What are some advantages of using online forms versus paper forms?
Possible Responses: They can be accessed from anywhere with an internet connection; can be completed more quickly; Can be automatically processed
● Invite answers from as many students as possible.
● Address any other doubts students may have related to the concepts presented in the slides.
min
● Instruct: We know how to use Forms, their advantages, and scenarios where they can be used.
● Now, let’s practice our learning. Click on the Practice button on the Assignment page to attempt the activity.
● Make the students practice the activity until they understand the concepts covered in the session.
● Walk around in the classroom and observe the activity done by the students.
● Instruct: Click on the Confirm button to submit your work when you are done with the activity.
5 min
Sum-Up
● Conclude: Today, we have learned to use Forms, their advantages, and different scenarios.
● Instruct: Practice the same activity at home.
● The project is optional, kindly assign if feasible.
In this session, students will learn about –
● Data types and changing the data type of a field
● Form creation
● Adding rows in a table
● Filtering data in a table
● Custom filtering
Keywords
● Data type: type of data in a column of a table
Revise the story and CS concepts covered in the previous session
Invite students to brief the class on the story and CS concepts covered in the chapter
Discuss data types, changing data types of a field, Form creation, adding rows in a table, filtering data in a table, and custom filtering
Q and A time – Q2, 3 Answer the following briefly – Q3
Action Plan
● Recap the story and CS concepts covered in the previous session.
Conclude the concepts Assign homework
● Say: Let’s learn about data types, form creation, adding rows in a table, and filtering data in forms.
min Engage
CS Concepts Explain
Data Types
Changing Datatypes of a field
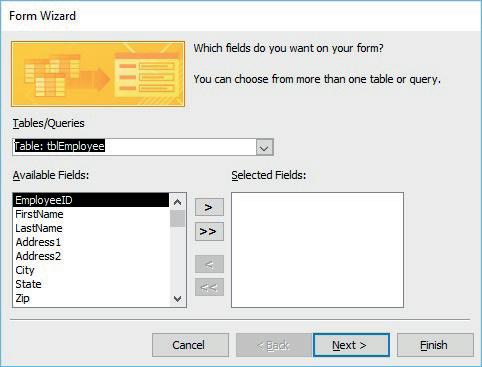
Form creation
Adding Rows in a table
Filtering Data in a table
Custom Filtering
As given in Panel 1 on Page 62
As given in Panel 2 on Page 62
As given on Page 63 and in Panel 1 on Page 64
As given in Panel 3 on Page 64 and Panel 1 on Page 65
As given in Panel 3 on Page 65 and Panel 1 on Page 66
As given in Panel 3 on Page 66 and Panel 1 on Page 67
● Present the scenario: Your teacher has asked you to create a form to track each student’s attendance.
● Discuss:
■ What fields should be included in the form?
Possible Responses: The form includes fields for the date; The student’s name; Whether they were present or absent
■ What are some common data types used in MS Access, and how are they used in creating tables?
Possible Responses: Text; Number; Date/time; Yes/no
■ What are some advantages of using forms?
Possible Responses: To customize the interface for specific users; Reduce errors and increase data accuracy; Providing a user-friendly way to interact with data
■ What are some strategies for filtering data in a form?
Possible Responses: Using drop-down menus or search boxes to select specific criteria; Using filters to display only specific records; Sorting data based on specific fields
● Conduct Q and A time on Page 70:
■ Say: Let’s help Conji and Mel to answer the question.
■ Read Q2, 3 aloud.
■ Invite some students to share responses.
■ Discuss and validate the answers with the whole class.
■ Instruct: Write the correct answers in your notebooks.
● Conduct Answer the following briefly on Page 70:
■ Say: Let’s help Conji to answer these questions.
■ Read Q3 aloud.
■ Invite some students to share their answers and others to validate their peers’ answers.
■ Instruct: Write the correct answers in your notebooks.
● Conduct True/False on Page 71:
■ Say: Let’s help Conji and Mel to tick the correct answers.
■ Read all questions aloud, one by one.
■ Invite some students to share responses.
■ Discuss and validate the answers with the whole class.
■ Instruct: Write the correct answers in your books.
■ Invite some students to share their answers and others to validate their peers’ answers.
■ Instruct: Write the correct answers in your books.
● If time permits, discuss the section Brain Teaser – If-then Q1, 2, 3 or assign them as homework.
● Conclude: Today, we learned about data types, changing data type of a field, Form creation, adding rows in a table, and filtering data in a table.
● Ask the following probing questions:
■ How can forms be used to automate repetitive tasks or processes?
Possible Responses: To automate tasks such as data entry; Report generation; Record keeping
■ What are some examples of how forms can be used in different industries?
Possible Responses: Can be used in healthcare for patient intake or medical history; In education for enrollment or student evaluation; In finance for tax forms or expense reports
● Assign the Brain Teaser exercise as homework:
■ Answer in Detail – DIY on page 69
Objectives
In this session, students will apply what they have learned from the previous session –
● Data types and changing data type of a field
● Form creation
● Adding rows in a table
● Filtering data in a table
● Custom Filtering
Keywords
● Data type: type of data in a column of a table
Action Plan
● Say: Do you remember what we learned in the previous session?
● Invite responses from some students.
● Say: Let’s revise what we have learned.
● Instruct: Go to the Panel and open Lab on Forms in MS Access II.
● Show slides one by one and discuss the concepts shown on the slide in the panel.
Engage
● Say: Let me explain: What is a form, Automation using form, Data Types, and form creation.
CS Concepts Explain
What is a Form
Automation using form
Data Types
Changing data type of a field
Form creation
Learning Slides on Tekie platform
Learning Slides on Tekie platform
Learning Slides on Tekie platform
Learning Slides on Tekie platform
Learning Slides on Tekie platform
● Discuss the following questions one by one to check students’ understanding:
■ What are some common data types used in MS Access, and what types of data are they used for?
Possible Responses: Text and Memo are used for text values; Number for numeric values; Date/Time for dates and times; Currency for monetary values; Yes/No for true/false or yes/no values
■ What are some ways to customize a form in MS Access?
Possible Responses: Adding and removing fields; Changing the layout; Adding graphics and images; Applying format; Adding command buttons; Adding a filter and sort controls
■ What is custom filtering in MS Access?
Possible Responses: Drop-down lists; Combo boxes; Check boxes; To select and compare specific criteria
■ What are some advantages of using forms in MS Access to enter and edit data?
Possible Responses: Provide a user-friendly interface; Allow for data validation; Can be customised to display specific fields; Can include command buttons to perform specific tasks
● Invite answers from as many students as possible.
● Address any other doubts students may have related to the concepts presented in the slides.
● Instruct: We know Form creation, Datatypes and automation using forms.
● Now, let’s practice our learning. Click on the Practice button on the Assignment page of Forms in MS Access II to attempt the activity.
Note
● Make the students practice the activity until they understand the concepts covered in the session.
● Walk around in the classroom and observe the activity done by the students.
● Instruct: Click on the Confirm button to submit your work when you are done with the activity.
● Conclude: Today, we have learned to use data types, form creation, adding rows in a table and filtering data.
● Instruct: Practice the same activity at home.
● Assign the following as homework:
■ Project: Lab time on Page 93
■ Brain Teaser – Case Studies on page 69
■ Brain Teaser – Class Activity on page 70
The project is optional, kindly assign if feasible. Note to the Teacher
1. Recall the concepts covered in the previous session.
2. Reinforce the learnings at the end of the session.
3. Brief the students about the homework and how they need to attempt it.
4. All of the in-class activities mentioned in the action plan are not mandatory to be completed in a session. Do as the time permits.
5. Select the activities left over in the upcoming session.
Note: Use the following points to prepare for the session beforehand. Avoid reading the points in the class.
● Conji recalled the muses discussing multiple ideas like Cyborg in the void.
● Mel questioned why the monsters couldn’t escape the void.
● Conji and Mel asked the muses how they determined if an idea was good or bad.
● The muses replied that they closely monitored ideas and had not anticipated Cyborg‘s becoming evil.
● Conji wanted to review all the idea records.
● Cyborg and Ero are at the stairway to the Idea Centre.
● Cyborg tells Ero that he’s not allowed to enter.
● Ero claims to have a spell that will allow him to enter and starts preparing it.
● Suddenly, an alarm starts in the Idea Centre.
● Mel and Conji, along with the muses, reach Miss Idea’s office and encounter Cyborg and Ero.
● It is revealed that Ero has been working with the muses.
● Ero casts a spell on Cyborg that seals him inside the void again.
● Mel and Conji start being sucked into the void.
The content covered in this chapter is aligned with the following CSTA Standard
● 2-DA–08 Data & Analysis
This chapter is divided into the following classroom and lab sessions
1. MS Access Queries – I
2. MS Access Queries – II
3. MS Access Queries – III
4. MS Access Queries – IV
In this session, students will learn about –
● What is a query?
● Advantages of using a query
● Types of queries
Keywords
● Query: a way to specify multiple conditions to search for data
Revise the story and CS concepts covered in the previous session
Invite students to brief the class on the story and CS concepts covered in the chapter
Discuss MS Access Queries, Advantages of using a query, Types of query
True/False – Q1, 3, 4 Answer the following –Q1, 2 Reasoning time
Conclude the concepts Assign homework
● Recap the story and CS concepts covered in the previous chapter.
● Invite students to:
■ Brief the class on the story covered in the previous chapter with the CS concepts covered.
■ Brief the class on the story to be covered in the current session with the CS concepts covered.
Engage
● Explain MS Access Query, advantages of using a query and types of queries
CS Concepts Explain
MS Access Query
Advantages of using a query
Types of Queries – One table Query
As given in Panel 1 on Page 74
As given in Panel 5 on Page 74 and Panel 1 on Page 75
As given in Panel 1 on Page 76
● Present the scenario: You are a student in charge of organising a class project where you need to collect information about your classmates.
● Discuss:
■ What kind of information will you store in the database?
Possible Responses: Name; Age; Favourite Subject; Grade point average
■ Which software can be used to create a database?
Possible Responses: MS Access; MySQL; Oracle Database; FileMaker Pro
■ What are some reasons why you might want to use a query in MS Access?
Possible Responses: To find specific information quickly and accurately; To customise the query to fit your specific needs; To update or delete specific records; To sort or filter data
■ How can using a query improve efficiency when working with a database?
Possible Responses: Queries can retrieve specific information quickly and accurately; Queries can reduce the need to manually search through data; Queries can automate repetitive tasks
● Conduct True/False on Page 87:
■ Say: Let’s help Conji to escape the secret chamber by marking the statements as true or false.
■ Read Q1, 3 and 4 aloud, one by one.
■ Invite some students to share responses.
■ Discuss and validate the answers with the whole class.
■ Instruct: Mark the correct answers in your books.
● Conduct Answer the following on page 85:
■ Say:Let’s help Conji to answer all these questions.
■ Read Q1, 2 aloud, one by one.
■ Invite some students to share their answers and others to validate their peers’ answers.
■ Instruct: Write the correct answers in your notebooks.
● If time permits, discuss Q1 from the section Brain Teaser - Reasoning time on page 85.
● Conclude: Today, we learned about MS Access Queries, the advantages of using a query, and types of queries.
● Ask the following probing questions:
■ How can you customise the design of a query in MS Access?
Possible Response: You can add or remove fields from a query; You can sort or filter the data in a query; You can use expressions or functions to calculate values in a query
■ How can you test a query to make sure it is working correctly?
Possible Responses: You can preview the results of a query before running it; You can run the query and review the output to ensure it is accurate; You can modify the query to adjust the results if necessary
In this session, students will apply what they have learned from the previous session -
● What is a query?
● Advantages of using a query
● Types of queries
Keywords
● Query: specify multiple conditions to search for data
● Say: Do you remember what we learned in the previous session?
● Invite responses from some students.
● Say: Let’s revise what we have learned.
● Instruct: Go to the Panel and open the Lab on Queries in MS Access II.
● Show slides one by one and discuss the concepts shown on the slide in the panel.
● Say: Let me explain queries in MS access, and the advantages of using a query and types of queries.
CS Concepts
What is a query
Advantages of using a query
Types of query
Demonstrate
Learning Slides on Tekie platform
Learning Slides on Tekie platform
Learning Slides on Tekie platform
● Discuss the following questions one by one to check students’ understanding:
■ When is a single table query used in MS Access?
Possible Responses: When you need to search for data within a single table; It can be used to create reports or forms that display data from a single table
■ When is a multi-table query used in MS Access?
Possible Responses: It’s useful when you need to retrieve data that is related across multiple tables; It can be used to create reports or forms that summarise data from different tables
■ How does using a query improve the performance of a database?
Possible Responses: Query can help reduce the amount of data that needs to be retrieved from a database; By making searches and calculations faster; It can also help reduce the amount of data that needs to be stored; By improving the overall efficiency of the database
■ Where can you use a query to calculate something in your database?
Possible Responses: Sum; Average; The statistical measures for a specific field
● Invite answers from as many students as possible.
● Address any other doubts students may have related to the concepts presented in the slides.
15 min
Build
● Instruct: We know what a query is, the advantages of using a query and types of queries
● Now, let’s practice our learning. Click on the Practice button on the Assignment page to attempt
● Make the students practice the activity till the concepts are covered in the session.
● Walk around in the classroom and observe the activity done by the students.
● Instruct: Click on the Confirm button to submit your work when you are done with the activity.
Sum-Up
5 min
● Conclude: Today, we have learned what a query is, the advantages of using a query and types of queries.
● Instruct: Practice the same activity at home.
In this session, students will learn about –
● Creating a one-table query
● Multi-Table query
● Creating a multi-table query
Keywords
● Criteria: rules you use to filter and retrieve specific data from a database
● One-table query: retrieves data from a single table in a database based on specific criteria
● Multi-table query: retrieves and combines data from two or more related tables in a database based on specific criteria
Revise the story and CS concepts covered in the previous session
Invite students to brief the class on the story and CS concepts covered in the chapter
Discuss creating one table query, multi-table query, creating multi table query
Action Plan
● Recap the story and CS concepts covered in the previous session.
● Say: Let’s learn about creating a one-table query, a multi-table query, creating a multi-table query.
Engage
CS Concepts
Creating a one-table query
Multi-table query
Creating a multi-table query
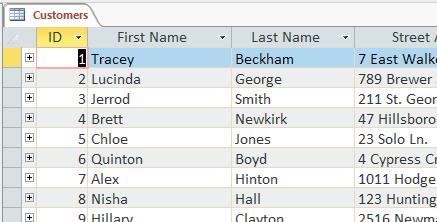
As given in Panel 3 on Page 76 and Panel 1 on Page 77
As given in Panel 2 on Page 78 and Panel 1 on Page 79
As given in Panel 3 on Page 79, Panel 1 and 3 on Page 80 and Panel 1 on Page 81
● Present the scenario: Your class teacher wants to keep track of her students’ grades for the current semester.
● Discuss:
■ What tables should she have in her database?
Possible Responses: Students table; Grades table; Subjects table
■ What fields should there be in the Students’ table?
Possible Responses: Student ID; First name; Last name; Grade
■ What fields should there be in the Grade’s table?
Possible Responses: Student ID; Subject; Grades of each Subject for all students
■ What fields should there be in the Subject’s table?
Possible Responses: Subject ID; Subject name
Note
● Some questions are not relevant to the book. Please follow these questions.
● Conduct True/False on Page 87:
■ Say: Let’s help Conji to escape the secret chamber by marking the statements as true or false.
■ Read Q2 aloud.
■ Invite some students to share their answers and others to validate their peers’ answers.
■ Instruct: Write the correct answers in your books.
Note
● If time permits, discuss the section Brain Teaser – DIY or assign them as homework.
● Conclude: Today, we learned about creating a one-table query, multi-table query and creating a multi-table query.
● Ask the following probing questions:
■ What are some potential challenges or limitations when creating database queries?
Possible Responses: understanding the structure of the database and the relationships between tables; Writing queries that are efficient and return accurate results; Dealing with large amounts of data that can slow down query performance
■ What is a subquery and how can it be used in a database query?
Possible Responses: A subquery is a query that is nested inside another query; It can be used in a database query to retrieve data from the nested query. For example, a subquery could be used to retrieve all the students who received a grade above the class average for a specific subject
In this session, students will apply what they have learned from the previous session -
● Creating a one-table query
● Multi-Table query
● Creating a multi-table query
● Criteria: rules you use to filter and retrieve specific data from a database
● One-table query: retrieves data from a single table in a database based on specific criteria
● Multi-table query: retrieves and combines data from two or more related tables in a database based on specific criteria
● Say: Do you remember what we learned in the previous session?
● Invite responses from some students.
● Say: Let’s revise what we have learned.
● Instruct: Go to the Panel and open Lab on Queries in MS Access II and Multi-table queries II.
● Show slides one by one and discuss the concepts shown on the slide on the panel.
● Say: Let me explain creating a one-table query, multi table query and creating a multi-table query.
Creating one-table query
Multi-table query
Creating multi-table query
Demonstrate
Learning Slides on Tekie platform
Learning Slides on Tekie platform
Learning Slides on Tekie platform
● Discuss the following questions one by one to check students’ understanding:
■ Give some examples of a one-table query using AND.
Possible Responses: It can be used to retrieve all records where a student’s grade is above a certain value and they also attended a class on a specific day
■ Give some examples of a one-table query using OR.
Possible Responses: It can be used to retrieve all records where a student’s grade is above a certain value or they attended a class on a specific day
■ Give an example of a multi-table AND query?
Possible Responses: It can be used to retrieve all records where a student’s grade is above a certain value and they also attended a class on a specific day; While also retrieving information about the student and the class from separate tables
■ Give an example of a multi-table OR query.
Possible Responses: It can be used to retrieve all records where a student’s grade is above a certain value or they attended class on a specific day; While also retrieving information about the student and the class from separate tables
● Invite answers from as many students as possible.
● Address if students have any other doubts related to the concepts presented in the slides.
● Instruct: We know how to create a one-table query, multi-table query and create a multi-table query.
● Now, let’s practice our learning. Click on the Practice button on the Assignment page of Queries in MS Access II and Multi-table queries II to attempt the activity.
● Make the students practice the activity till the concepts covered in the session.
● Walk around in the classroom and observe the activity done by the students.
● Instruct: Click on the Confirm button to submit your work when you are done with the activity.
● Instruct: Click on the Confirm button to submit your work when you are done with the activity.
● Conclude: Today, we have learned to create one-table queries and multi-table queries.
● Instruct: Practice the same activity at home.
Note: Use the following points to prepare for the session beforehand. Avoid reading the points in the class.
● Cyborg and Ero are at the stairway to the Idea Centre.
● Cyborg tells Ero that he’s not allowed to enter.
● Ero claims to have a spell that will allow him to enter and starts preparing it.
● Suddenly, an alarm starts in the Idea Centre.
● Mel and Conji, along with the muses, reach Miss Idea’s office and encounter Cyborg and Ero.
● It is revealed that Ero has been working with the muses.
● Ero casts a spell on Cyborg that seals him inside the void again.
● Mel and Conji start being sucked into the void.
● Mel, Conji, and Eva are confronting Cyborg.
● Eva tries to cast a spell on Cyborg but misses.
● Lord Ero joins them and threatens the three kids.
● Mr. Geebal, who followed Lord Ero, comes to their rescue.
● Joy takes the kids to the Ministry of Happiness where they learn about Google Sheets.
The content covered in this chapter is aligned with the following CSTA Standard
● 2-DA–08 Data & Analysis
This chapter is divided into the following classroom sessions
1. Introduction to Google Sheets I
2. Introduction to Google sheets II
3. Functions in sheets I
4. Functions in sheets II
Objectives
In this session, students will learn about -
● Basics of Sheets
● Naming a cell
● Cell Formula
● BEDMAS rule
Keywords
● Google Sheets: made up of rows and columns and are used to store and analyse data
● Cell Address: combination of the column letter and row number that identifies a cell
Revise the story and CS concepts covered in the previous chapter Read or Invite students to read the story
Discuss the basics of Google Sheets; what cells are and how we name them; cell formula and BEDMAS rule
Fill Up – Q5 Tick the Correct Answer – Q1, 3 Find the Truth – Q2, 5
Conclude the concepts Assign the homework
Action Plan 5
● Recap the story covered in the previous chapter.
Warm-Up 12 min Engage
● Say: Let me explain the two types of software.
CS Concept Explain
Naming cell/Cell Address
Cell Formula
BEDMAS Rule
As given in Panel 2 on Page 92
As given in Panel 1 on Page 93
As given in Panel 3 on Page 93 to Panel 3 on page 94
● Present the scenario: Consider your father asks you to help him store the data related to his business.
■ What purpose will you mention about Google Sheets that can be helpful to him?
Possible Responses: Sheets are used to edit; Analyse; Organise data; We can perform mathematical calculations; We can collaborate and work on the same document simultaneously
■ What kind of data can be added in cells?
Possible Responses: Plain text or names and special characters (like _ * % $ @); Numbers; Currency; Date; Time; Percentage; Formulas
■ How can you perform calculations in Sheets?
Possible Responses: Use cell formulas; Built-in functions; Sheets use BEDMAS rule to solve Cell formulas
■ Who uses Google Sheets?
Possible Responses: Sheets are used by managers; Business firms; Teachers; Doctors; Digital services; Accountants; Salespeople; Analysts; Businessmen; Corporate workers. (All use them to maintain their data)
● If time allows, discuss all four questions, or discuss the first two.
● Conduct Pick the odd one out on Page 100:
■ Say: Pick the odd one to help Conji recover his memory.
■ Read all the questions aloud
■ Invite some students to share their answers and others to validate their peers’ answers.
■ Instruct students to mark the final answer in their books.
● Conduct Answer the following on Page 101:
■ Say: Answer these questions to make sure Conji has recovered his memory.
■ Read Q2 aloud, one by one.
■ Invite some students to share their answers.
■ Discuss and validate their answers.
■ Instruct students to write the final answers in their notebooks.
● Conclude: Today, we learned about the basics of Google Sheets.
● Ask the following probing questions:
■ What are the benefits of Google Sheets?
Possible Responses: We can collaborate and work; Store data in tabular form; We can use cell formulas; Functions; We can style data and present it in a more visual way
■ Do you know any other platforms/software that do the same work as Google Sheets?
Possible Responses: Microsoft Excel; Libreoffice Calc; Smartsheets; Zoho sheets; Airtable
In this session, students will apply what they learned from the previous class to complete tasks on Google Sheets.
● Google Sheets: made up of rows and columns and are used to store and analyse data
● Cell Address: combination of the column letter and row number that identifies a cell
● Say: Do you remember what we learned in the previous session?
● Invite responses from some students.
● Say: Let’s revise what we have learned.
● Instruct: Go to the Panel and open Lab on Google Sheets – Introduction II
● Show slides one by one and discuss the concepts shown on the slide in the panel.
● Discuss the following questions one by one to check students’ understanding:
■ What are the uses of Sheets?
Possible Responses: Sheets are used to edit; Analyse; Organise data; We can perform mathematical calculations; We can collaborate and work on the same document simultaneously
■ How do we open Sheets?
Possible Responses: From our Google Drive; Type in the URL for sheets and press the new + button
■ How do we name cells in Google Sheets? (ask the students to give the cell address of a few cells – give them random row and column numbers)
Possible Responses: Column letter and row number
■ How can we perform calculations in cells?
Possible Responses: Add cell formulas; Functions; Begin with equal (=)
● Invite answers from as many students as possible.
● Address any other doubts students may have related to the concepts presented in the slides.
● Discuss the following questions one by one to check students’ understanding:
■ What are the uses of Sheets?
Possible Responses: Sheets are used to edit; Analyse; Organise data; We can perform
■ Mathematical calculations; We can collaborate and work on the same document simultaneously.
■ How do we open Sheets?
Possible Responses: From our Google Drive; Type in the URL for sheets and press the new + button
■ How do we name cells in Google Sheets? (ask the students to give the cell address of a few cells – give them random row and column numbers)
Possible Responses: Column letter and row number
■ How can we perform calculations in cells?
Possible Responses: Add cell formulas; Functions; Begin with equal (=)
● Invite answers from as many students as possible.
● Address any other doubts students may have related to the concepts presented in the slides.
● Instruct: We know a few basics of Google Sheets.
● Now, let’s practice our learning. Click on the Practice button on the Assignment page to attempt the activity.
● Click on the Attempt button to open the activity page.
● Walk around in the classroom and observe the activity done by the students.
● Instruct: Click on the Confirm button to submit your work when you are done with the activity.
● Conclude: Today, we have learned a few basic concepts of Google Sheets.
● Instruct: Practice the same activity at home.
● Assign the following as homework:
■ Ask the students to create a list of their marks in 5 subjects in three terms (For the previous academic year).
1. They will find the Sum and Average of their marks per term.
2. They should spot the highest and lowest marks scored in the year.
In this session, students will learn about -
● Functions in Google Sheets.
● SUM(); AVERAGE(); MIN(); MAX()
● MEAN(); MEDIAN(); MODE()
● SUM(): calculates the sum of all the numbers
● AVERAGE(): calculates the average or mean of all the numbers
● MIN(): gives the minimum among all the numbers
● MAX(): gives the maximum among all the numbers
● MEDIAN(): gives the midpoint of all the numbers
● MODE(): gives the number that occurs the maximum number of times
Revise the story and CS concepts covered in the previous chapter Read or Invite students to read the story of the chapter
Discuss what functions are and the types of functions in Google Sheets
Answer the following –Q1, 3, 4 and 5
Conclude the session Assign the homework
● Brief the students about the previous concepts.
● Invite a few students to recall the CS concepts covered in the previous session.
● Say: Let me explain all these functions to you.
Functions
SUM()
AVERAGE()
MIN() and MAX()
MEDIAN()
As given in Panel 4 on Page 94
As given in Panel 4 on Page 94
As given in Panel 4 on Page 95
As given in Panel 1 on Page 96
As given in panel 3 on page 97
MODE() As given on page 98
● Present the scenario: Consider you have a lot of data in a workbook that contains multiple sheets.
● Discuss:
■ You need to perform some calculations on the data. What functions can be used?
Possible Responses: On numbers; SUM(); AVERAGE(); COUNT(); PRODUCT(); MIN(); MAX(); MODE(); MEDIAN()
■ How can you add data in Sheets?
Possible Responses: Use ADD(); =(A1+A2…) Use cell formula; Use Autosum function
■ How will you find information about a person in a huge list/data?
Possible Responses: Use find functionality; Use filters
■ Do you know what “auto- generate” is in Google Sheets? What can be generated automatically?
Possible Responses: Auto- generate means we can create a list of items just by writing the first two elements, selecting, and dragging them down; It helps generate numbers; Dates; The alphabet; Letters
● If time allows, discuss all three questions or the first two.
Build
● Conduct Answer the following on Page 101:
■ Say: Help Conji fight Ero’s efforts to erase his memory by answering this question.
■ Read Q1, 3, 4 and 5 aloud, one by one.
10 min
■ Invite some students to share their answers and others to validate their peers’ answers.
■ Instruct students to write the final answers in their notebooks.
● Conduct What’s the scenario? on Page 100:
■ Say: Help Conji fight Ero’s efforts to erase his memory by answering this question.
■ Read QA, B and C aloud
■ Invite some students to share their answers.
■ Discuss and validate their answers.
■ Instruct students to write the final answer in their books.
● Conclude: Today we learned about some tools in Google Sheets.
● Ask the following probing questions:
■ What are the scenarios where you can use Google sheets in your day- to-day life?
Possible Responses: To create a budget for a birthday; Create a shopping list with item cost; Store marks in various subjects over a period of different semesters; Store information in a tabular form
■ What tools/functionality are you aware of with Google Sheets?
Possible Responses: We can add information; Format data; Add charts; Edit information to present well; Data visualisation
● Assign the Brain Teaser exercises as homework:
■ Crosswords
In this session, students will apply what they have learned from the previous class to complete tasks on Google Sheets.
● SUM(): calculates the sum of all the numbers
● AVERAGE(): calculates the average or mean of all the numbers
● MIN(): gives the minimum among all the numbers
● MAX(): gives the maximum among all the numbers
● MEDIAN(): gives the midpoint of all the numbers
● MODE(): gives the number that occurs the maximum number of times
● Say: Do you remember what we learned in the previous session?
● Invite responses from some students.
● Say: Let’s revise what we have learned.
● Instruct: Go to the Panel and open Lab on Functions in Sheets – II
● Show slides one by one and discuss the concepts shown on the slide in the panel.
Discuss the following questions one by one to check students’ understanding:
■ Name a few tools that we can use in Google Sheets.
Possible Responses: Spell check; Find and replace; Autocomplete; Arithmetic functions
■ Name a few mathematical functions and how we can use them.
Possible Responses: SUM(); AVERAGE(); COUNT(); PRODUCT(); We start typing in the cell which should contain the answer/result; Each function begins with an = (equal to) sign
■ How can we add and rename sheets?
Possible Responses: Click on + → Click on the small triangle just beside the sheet tab → Select an option to duplicate/rename the sheet; Double-click on the sheet and rename it
■ In what cases can we use functions/Google Sheets in various walks of life?
Possible Responses: To maintain data like marks; Customer details in business; Supplier details in business; Records of clients; List of students; List of teachers; Maintain records of employees
● Invite answers from as many students as possible.
● Address any other doubts students may have related to the concepts presented in the slides.
● Instruct: We know a few features that we can use in Google Sheets.
● Now, let’s practice what we have learned. Click on the Practice button on the
● Assignment page to attempt the activity.
● Click on the Attempt button to open the activity page.
● Walk around in the classroom and observe the activity done by the students.
● Instruct: Click on the Confirm button to submit your work when you are done with the activity.
● Conclude: Today, we have learned about functions in Google Sheets.
● Instruct: Practice the same activity at home.
Note
● Make the students practice the activity up to the concepts covered in the session.
Note: Use the following points to prepare for the session beforehand. Avoid reading the points in the class.
● Mel, Conji, and Eva are confronting Cyborg.
● Eva tries to cast a spell on Cyborg but misses.
● Lord Ero joins them and threatens the three kids.
● Mr. Geebal, who followed Lord Ero, comes to their rescue.
● Joy takes the kids to the Ministry of Happiness where they learn about Google Sheets.
● Mel teaches Conji about data analysis in Google Sheets.
● She teaches him how to freeze rows and columns.
● She teaches him how to filter data as well.
● Conji learns to group rows and columns.
● Mel teaches Conji various ways to visualize data in the form of charts.
The content covered in this chapter is aligned with the following CSTA Standard
● 2-DA–07 Storage
● 2-DA–08 Collection Visualisation & Transformation
This chapter is divided into the following classroom and lab sessions
1. Freeze and Filter I
2. Freeze and Filter II
3. Group and Visualize I
4. Group and Visualize II
In this session, students will learn about –
● Data Analysis
● Freeze
● Filter
● Data Analysis: using data to get useful information and make important decisions
● Freeze: to stop the movement of rows and columns on scrolling
● Filter: to look at the information we want only while hiding everything else
Recap the story and the CS concepts covered in the previous chapter Invite students to brief the class on the story and CS concepts covered in the chapter
Discuss data analysis, freeze, and filter tools
Answer the following questions in Detail – Q1, 2, 3
Conclude the session Assign the Homework
● Recap the story covered in the previous chapter.
● Invite students to:
■ Recap the story covered in the previous chapter briefly with the CS concepts covered.
■ Recap the story covered in the current chapter with the CS concepts covered.
● Say: Let me explain data analysis and some of the tools we can use.
CS Concept Explain
Data Analysis
Steps of Data Analysis
Freeze
Filter
As given in Panel 2 on Page 104
As given in Panel 4 on Page 104
As given in Panel 2 and 3 on Page 105
As given on Page 107
● Present the scenario: Consider that you are asked by your teacher to keep records of the students in a Google Sheet.
● Discuss:
■ What will you do so that the first row of data does not move while scrolling?
Possible Responses: Freeze; Freeze 1st row; Freeze 1st column
■ You have added a column with the total marks of an exam. You want to see the highest scorer at the top. What tools would you use?
Possible Responses: Filter tool; Max; Filter by total score
■ What are the possible reasons for freezing rows and columns?
Possible Responses: Keep rows and columns visible while scrolling; Keep heading visible; Preventing accidental edits
■ What will be the possible benefits of using filters in your sheet?
Possible Responses: Sorting records; Finding minimum and maximum easily
Note
● If time allows, discuss all four questions, or discuss the first two.
● Conduct Answer the following on Page 117:
■ Say: Help Mel to answer these questions.
■ Read Q1, 2 and 3 aloud, one by one.
■ Invite some students to share their answers and others to validate their peers’ answers.
■ Discuss and validate their answers.
■ Write the final answers on the board for all students to take notes.
Note
● Some questions are not relevant to the book. Please follow these questions.
● Conduct fill in the blanks :
■ Say: Help Mel to fill the right answers in the blanks.
■ Read all the questions:
■ is using data to get useful information and make important decisions using that data.
■ Click on in the menu and select Freeze.
■ means only looking at the information we want to look at, and hiding everything else.
■ Invite students to share their answers and others to validate their peers’ answers.
■ Discuss and validate their answers.
■ Write the final answers on the board for all students to take notes.
● Conclude: Today, we learned about data analysis, freezing and filtering data in Google Sheets.
● Ask the following questions:
■ There are 5 columns with name, roll number, total score, and grade. Which field/s can we use to filter data?
Possible Responses: Name; Roll number; Total Score; All
■ Can we freeze more than one row or column in Google Sheets?
Possible Responses: Yes; No; Maybe
In this session, students will learn about –
● Applications of Freeze Tool
● Applications of Filter Tool
Keywords
● Data Analysis: using data to get useful information and make important decisions
● Freeze: to stop the movement of rows and columns on scrolling
● Filter: to look at the information we want only while hiding everything else
Action Plan
● Say: Do you remember what we learned in the previous session?
● Invite responses from some students.
● Say: Let’s revise what we have learned.
● Instruct: Go to the Panel and open Lab on Freeze and Filter II
● Show slides one by one and discuss the concepts shown on the slide in the panel.
● Say: Let me explain how to use the freeze and filter tools.
CS Concept Demonstrate
● Discuss the following questions one by one to check students’ understanding:
■ What orders of filtering are available in Google Sheets?
Possible Responses: A to Z; Z to A; Numerically
■ Once frozen, can we move the rows and columns in Google Sheets?
Possible Responses: Yes; No; Maybe
■ Can the filter tool be used to remove records from the Google Sheets?
Possible Responses: Yes; No; Maybe
■ Filters are added to .
Possible Responses: Column header; Rows
● Instruct: We know how to freeze and filter data in Google sheets.
● Now, let’s practice what we have learned.
● Click on the Practice button on the Assignment page to attempt the activity.
● Make the students practice the activity until they have mastered the concepts covered in the session.
● Walk around in the classroom and observe the activity done by the students.
● Instruct: Submit your Google Sheets file on the platform.
Sum-Up 2 min
● Conclude: Today, we have learned freeze and filter tools in Google sheets.
● Instruct: Practice the same activity at home.
Project: Collect data about 10 famous buildings, their addresses, and other fields as well, and use freeze and filter tools to find the tallest, the shortest and the average building height.
● The project is optional. Assign only if feasible.
In this session, students will learn about –
● Grouping of Rows and Columns
● Visualising Data Using Charts
Keywords
● Grouping: technique to show and hide rows and columns
● Data Visualisation: looking at data in a graphical manner
● Pie Chart: percentage-based graphical representation that has a circular form
● Bar Graph: used to compare different items or same items over a period of time
Recap the story and the CS concepts covered in the previous session
Invite students to brief the class on the story and CS concepts covered in the chapter
Discuss group and charts tools in Google Sheets
Answer the following questions in detail – Q4, 5
Conclude the session Assign the Homework
● Recap the story covered in the previous chapter.
● Say: Let me explain the group tool and charting tools.
● Present the scenario: Consider that you took part in an inter-school sports competition in which five schools competed.
● Discuss:
■ In a Google Sheet, data is kept of student names and school names. You want to visualise the percentage of students from each school. Which tool can you use?
Possible Responses: Charts; Visualisation; Pie Chart
■ What kinds of data can be shown in Bar graphs?
Possible Responses: Comparison among items; Change in an item’s attribute over time
■ How many parts of the pie chart will be there if we choose it to visualise the students’ schools?
Possible Responses: 5; Equal to the number of students; Equal to the number of schools
■ Which charting options are available in Google Sheets?
Possible Responses: Bar graph; Pie chart; Column chart
● If time allows, discuss all four questions, or discuss the first two.
● Conduct Answer the following questions in detail on Page 117:
■ Say: Help Mel to answer these questions.
■ Read Q4, 5 aloud, one by one.
■ Invite some students to share their answers and others to validate their peers’ answers.
■ Discuss and validate their answers.
■ Write the final answers on the board for all students to take notes.
● Conclude: Today, we learned about grouping and visualisation of data in Google Sheets.
● Ask the following probing questions:
■ In which ways can we show data in Google Sheets?
Possible Responses: Numerical form; Alphabetical form; Visualisation form
■ What are the few possible advantages of visual representation of data?
Possible Responses: Better understanding; Looks better; Quick understanding
In this session, students will learn about –
● Applications of Group Tool
● Applications of Charting Tools
Keywords
● Grouping: technique to show and hide rows and columns
● Data Visualisation: looking at data in a graphical manner
● Pie Chart: percentage-based graphical representation that has a circular form
● Bar Graph: is used to compare different items or same items over a period of time
● Say: Do you remember what we learned in the previous session?
● Invite responses from some students.
● Say: Let’s revise what we have learned.
● Instruct: Go to the Panel and open Lab on Group and Chart.
● Show slides one by one and discuss the concepts shown on the slide in the panel.
● Say: Let me explain how to use group and charting tools in Google Docs.
● Discuss the following questions one by one to check students’ understanding:
■ What operations can you perform using the group tool?
Possible Responses: Show rows; Show columns; Hide rows; Hide Columns
■ Which checkboxes can be used to make the charting process easier?
Possible Responses: Switch rows; Switch columns; Use row 1 as header; Use column as header
■ What things can we use as labels in charts?
Possible Responses: Column header; Row header
■ What are the options you have while grouping data?
Possible Responses: Group rows X-Y; Group columns X-Y
● Invite answers from as many students as possible.
● Address any other doubts students may have related to the concepts presented in the slides.
18 min
● Instruct: We know how to use grouping and charting tools.
● Click on the Practice button on the Assignment page to attempt the activity.
● Make the students practice the activity until they have mastered the concepts covered in the session.
● Walk around in the classroom and observe the activity done by the students.
● Instruct: Submit your Google Sheets file on the platform.
Sum-Up
2 min
● Conclude: Today, we have learned applications of grouping and charting tools in Google Sheets.
● Instruct: Practice the same activity at home.
The content covered in this chapter is aligned with the following CSTA Standard
● 2-AP–11 Variables
This chapter is divided into the following classroom and lab sessions
1. Introduction to Java
2. Execution of a Java Program
3. Structure of a Java Program
4. The main() Method
5. Data Types and Variables I
6. Data Types and Variables II
7. Operators I
8. Operators II
9. BEMDAS Rule
In this session, students will learn about –
● What is programming?
● Binary and high-level language
● What is Java?
● Why do we learn Java?
● Programming: the process of creating a set of instructions that tells a computer how to perform a task
● High-level Language: a human friendly programming language
Discuss Java with the students to prepare them for the session
Play the video given in the panel to introduce the concepts to be covered in this session
Discuss the meaning of programming, learn about binary language and high-level language Introduce Java and why we learn Java.
Action Plan
Warm-Up
● Say: Today, the session topic is “Introduction to Java”. What is Java?
● Invite 1 or 2 responses from the students, but don’t give the correct answer yet.
● Say: Let’s watch a video together to understand Java better.
● Play the video titled “Introduction” in the panel.
Engage
7 min
10 min
● Say: Let’s learn about the meaning of programming? What is a binary language and high-level language? Introduce Java to the students and explain why we learn Java.
● Explain the CS concepts as mentioned in the table below.
Programming
Binary Language
High-level Language
What is Java?
Why do we learn Java?
As given on Page 1
As given on Page 1
As given on Page 1
As given on Page 2
As given on Page 2
Build 10 min
● Conduct the following activity.
● Present the scenario: I (the teacher) want to create a Java program to maintain a record of class attendance.
● Discuss:
■ Can you recall who created Java?
Possible Responses: Sun Microsystems; James Gosling
■ What was Java called earlier?
Possible Responses: Oak
■ Why is Java called a platform?
Possible Responses: It has a runtime environment (JRE) and API
■ Why should I choose Java over other languages?
Possible Responses: Beginner-friendly; Platform-independent; Robust; Secure and dynamic; Less execution time
● Conclude: Today, we learned about programming and we were introduced to Java.
● Ask the following probing questions:
■ Why do programmers use high-level language instead of binary?
Possible Responses: Binary is difficult to remember; High-level languages are humanfriendly
■ What are some job roles that are possible when using Java?
Possible Responses: Software developer; Web developer; Application developer
● Assign the following project as homework:
■ Find 10 high-level languages other than Java.
Note
● The project is optional. Assign it if feasible.
• Fundamentals of Java
In this session, students will learn about –
● Execution of a Java program
● OOP
● Advantages of OOP
● Objects and classes in Java
Keywords
● OOP (Object-Oriented Programming): is a style of programming used to design a program using classes and objects
● Classes: a group of the same kind of objects
Recall the concepts covered in the previous coding session
Play the video given in the panel to introduce the concepts to be covered in this session
Discuss the execution of Java programs, OOP and its advantages, and objects and classes in Java
● Say: Do you remember what we learned in the previous session?
● Invite responses from some students.
● Revise the concepts learned in the previous class.
● Show the video, titled “Programs in Java” in the panel.
● Say: Let’s learn about execution of Java programs, OOP and their advantages and objects and classes in Java.
● Explain the CS concepts as mentioned in the table below.
Execution of Java programs
OOP
Advantages of OOP
Objects and classes
As given on Page 3
As given on Page 4
As given on Page 4
As given on Page 5 to 6
● Conduct the activity mentioned below.
● Present the scenario: We want to create a class named “Mobile Phone”. Let’s discuss more about it.
● Discuss:
■ Give some attributes we can assign to this class.
Possible Responses: Brand; RAM; Functions
■ What methods will be related to this class?
Possible Responses: Calling; Texting; Using social media; Photographing images
■ Why is it better to use OOP than other programming styles?
Possible Responses: Faster; Easier; Clear structure; Reuseable
■ What style of programming does Java use?
Possible Responses: Beginner-friendly; Platform-independent; Robust; Secure and dynamic; Less execution time
● Conclude: Today, we learned about the Execution of a Java program and OOP.
● Ask the following probing questions:
■ What is JVM?
Possible Responses: Java virtual machine
■ Is the Java file platform independent?
Possible Responses: Yes; No
Explanation: Java is platform-independent because it uses a virtual machine. The Java programming language and all APIs are compiled in bytecodes. Bytecodes are effectively platform-independent. The virtual machine takes care of the differences between the bytecodes for the different platforms
● Assign the following project as homework:
■ In your notebook, write down any three classes of your choice. Write their attributes and methods.
Eg: Class – cars
Objects – Mercedes, Toyota, Ford
Attribute – Year, Price, Mileage
Method – Built in GPS guide, Speed sensors, Cruise control
Note
● The project is optional. Assign it if feasible.
of Java
In this session, students will learn about –
● The Structure of a Java program
● Comments in Java
Keywords
● OOP (Object-Oriented Programming): is a style of programming used to design a program that uses classes and objects
● Classes: a group of the same kind of objects
Recall the concepts covered in the previous coding session
Play the video given in the panel to introduce the concepts to be covered in this session
Discuss the structure of Java programs and comments in Java
Conduct the activity “Welcome to Class!”
Conclude the session Assign the homework
● Say: Do you remember what we learned in the previous session?
● Invite responses from some students.
● Revise the concepts learned in the previous class.
● Show the video, titled “Structure of Java Program” in the Tekie Panel.
● Say: Let’s learn about the structure of a Java program and comments in Java.
● Explain the CS concepts as mentioned in the table below.
● Conduct the following activity.
● Present the scenario: We want to create a Java program to print “Welcome to class!”
● Discuss:
■ What are the four components of the program?
Possible Responses: Documentation start; Import statement; Class definition statement; Main method
■ What are the three types of comments in Java?
Possible Responses: Single line; Multi-line; Documentation comment
■ What is a documentation statement?
Possible Responses: It tells us what the program is about
■ What is a suitable documentation statement for the program we want to print?
Possible Responses: //program to print “Welcome to class!”
● Conclude: Today, we learned about the Structure of Java program and comments.
● Ask the following probing questions:
■ How do we create our own class in Java?
Possible Responses: By using the keyword: class
■ What type of brackets are used to indicate the start and end of class?
Possible Responses: Curly brackets
● Assign the following project as homework:
■ Draw and write a Java program in your book to print “Good Morning class 8.”
Note
● The project is optional. Assign it if feasible.
In this session, students will learn about –
● What is the main() method?
● Public static void
● Syntax
● Syntax error
● Method: a block of code that, when called, performs specific actions mentioned in it
Recall the concepts covered in the previous coding session
Play the video given in the panel to introduce the concepts to be covered in this session
Discuss main() method, meanings of public static void main, what syntax is and what syntax error is
Action
Conduct the activity given in the Coding Booklet, Example 1.5 given on Page 11
● Say: Do you remember what we learned in the previous session?
● Invite responses from some students.
● Revise the concepts learned in the previous class.
● Show the video, titled “main() Method and Syntax” in the panel.
● Discuss the Quiz questions given in the Tekie Panel.
● Invite answers from as many students as possible.
● Conduct Example 1.5 given one Page 11:
■ Explain the activity to the students.
■ Instruct: Click on the Practice button on the Assignment page to attempt the activity.
■ Instruct: Click on the Attempt button to open the activity page.
■ Walk around in the classroom and observe the activity done by the students.
■ Assist the students if any of them are struggling.
■ Instruct: Click on the Yes button to submit the activity.
● If time permits, conduct the additional activity Example 1.3 given in the Coding Booklet on Page 10.
min
● Conclude: Today, we learned about main() method, meanings of public static void main, what syntax is and what syntax error is.
● Ask the following probing questions:
■ What do we mean when we say “Java is case sensitive”?
Possible Responses: It senses the difference between uppercase letters and lowercase letters; It must be written in a particular form, for example using capital letters or all small letters where necessary, in order for Java to recognise it
■ What is the difference between “System.out.println()” and “System.out.print”?
Possible Responses: “println” moves the cursor to the next line after printing the desired result whereas “print” method keeps the cursor on the same line
● Assign the following project as homework:
■ Example 1.4 given in the Coding Booklet on Page 10
● The project is optional. Assign it if feasible.
In this session, students will learn about –
● What is a variable?
● Declaring a variable
● Variable initialisation
● Data Types
● Variable: a memory location on a computer that can hold any value and change as needed
Recall the concepts covered in the previous coding session
Play the video given in the panel to introduce the concepts to be covered in this session
Discuss what a variable is, how to declare a variable, variable initialisation and data types
Conduct the activity given in the Coding Booklet, Example 1.7 given on Page 16
Conclude the session Assign the homework
● Say: Do you remember what we learned in the previous session?
● Invite responses from some students.
● Revise the concepts learned in the previous class.
● Show the video, titled “Data Type and Variables I” in the panel.
● Discuss the Quiz questions given on the Tekie Panel.
● Invite answers from as many students as possible.
● Conduct Example 1.7 given on Page 16:
■ Explain the activity to the students.
■ Instruct: Click on the Practice button on the Assignment page to attempt the activity.
■ Instruct: Click on the Attempt button to open the activity page.
■ Walk around in the classroom and observe the activity done by the students.
■ Assist the students if any of them are struggling.
■ Instruct: Click on the Yes button to submit the activity.
● If time permits, conduct the additional activity Example 1.6 given in the Coding Booklet on Page 15.
Sum-Up
3 min
● Conclude: Today, we learned about what a variable is, how to declare a variable, variable initialisation and data types.
● Ask the following probing questions:
■ What are the three components of initialising a variable?
Possible Responses: Data type; Variable name; Initial value
■ What type of data is a “String” variable?
Possible Responses: Sequence of characters; Holds words; Contains numbers as well as letters
● Assign the following project as homework:
■ Store 7 in a variable named x and display it.
● The project is optional. Assign it if feasible.
In this session, students will learn about –
● Other common data types
● The Camel Case
● Variable: a memory location on a computer that can hold any value and be changed as needed
Recall the concepts covered in the previous coding session
Play the video given in the panel to introduce the concepts to be covered in this session
Discuss what the other commonly used data type is, and what the camel case is
● Say: Do you remember what we learned in the previous session?
● Invite responses from some students.
● Revise the concepts learned in the previous class.
● Show the video, titled “Data Type and Variables II” in the panel.
● Discuss the Quiz questions given in the Tekie Panel.
● Invite answers from as many students as possible.
Conclude
session
● Conduct Example 1.9 given on the Page 20:
■ Explain the activity to the students.
■ Instruct: Click on the Practice button on the Assignment page to attempt the activity.
■ Instruct: Click on the Attempt button to open the activity page.
■ Walk around in the classroom and observe the activity done by the students.
■ Assist the students if any of them are struggling.
■ Instruct: Click on the Yes button to submit the activity.
● If time permits, conduct the additional activity Example 1.8 given in the Coding Booklet on Page 20.
● Conclude: Today, we learned about what a variable is, how to declare a variable, variable initialisation and data types.
● Ask the following probing questions:
■ What is a constant?
Possible Responses: A fixed value that doesn’t change during execution of a program; Permanent value
■ Write the following in camel case: “Address of the House”.
Possible Responses: Sequence of characters; Address Of The House
● Assign the following project as homework:
■ Example 1.10 given in the Coding Booklet on Page 21
● The project is optional. Assign it if feasible.
In this session, students will learn about –
● What are operators?
● Arithmetic operators
● Comparison operators
● Operators: are special symbols used to perform calculations
Recall the concepts covered in the previous coding session
Play the video given in the panel to introduce the concepts to be covered in this session
Discuss what operators are, what arithmetic operators are, and what comparison operators are
Conduct the activity “Comparison Operators” given in the Tekie Panel
Conclude the session Assign the homework
● Say: Do you remember what we learned in the previous session?
● Invite responses from some students.
● Revise the concepts learned in the previous class.
● Show the video, titled “Operators I” in the panel.
● Discuss the Quiz questions given in the Panel.
● Invite answers from as many students as possible.
● Conduct Comparison Operators in the Tekie Panel:
■ Explain the activity to the students.
■ Instruct: Click on the Practice button on the Assignment page to attempt the activity.
■ Instruct: Click on the Attempt button to open the activity page.
■ Walk around in the classroom and observe the activity done by the students.
■ Assist the students if any of them are struggling.
■ Instruct: Click on the Yes button to submit the activity.
Solution
Note
● If time permits, conduct the additional activity “Arithmetic Operators” given in the Tekie Panel.
Solution
● Conclude: Today, we learned about operators, arithmetic operators and comparison operators.
● Ask the following probing questions:
■ Why do we need operators?
Possible Responses: To perform calculation; To perform operations on variables
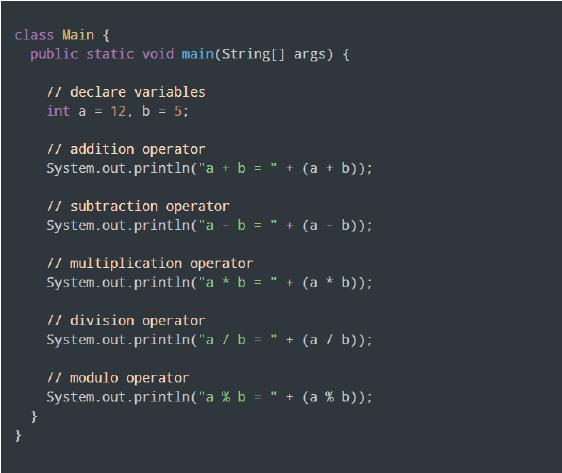

■ Which type of operator will be used to find the greater of the two numbers?
Possible Responses: Comparison
● Assign the following project as homework:
■ Create a Java program named “Operators Homework” and declare two integers 900 and 560. Perform the following operations:
1. Add both integers
2. Check if 900 is greater than 560
3. Check if the operators are not equal to each other in value
Note
● The project is optional. Assign it if feasible.
In this session, students will learn about –
● Logical operators
● Unary operators
● Operators: are special symbols used to perform calculations
WEBS at a Glance
Recall the concepts covered in the previous coding session
Play the video given in the panel to introduce the concepts to be covered in this session
● Say: Do you remember what we learned in the previous session?
● Invite responses from some students.
● Revise the concepts learned in the previous class.
● Show the video, titled “Operators I” in the panel.
● Discuss the Quiz questions given in the Tekie Panel.
● Invite answers from as many students as possible.
● Conduct Unary Operators given in the Tekie Panel:
■ Explain the activity to the students.
■ Instruct: Click on the Practice button on the Assignment page to attempt the activity.
■ Instruct: Click on the Attempt button to open the activity page.
■ Walk around in the classroom and observe the activity done by the students.
■ Assist the students if any of them are struggling.
■ Instruct: Click on the Yes button to submit the activity.
Solution
Note
● If time permits, conduct the additional activity “Logical Operators” given here.
Solution
● Conclude: Today, we learned about logical operators and unary operators.
● Ask the following probing questions:
■ What are the two unary operators we use?
Possible Responses: Increment; Decrement
■ What is the meaning of “logical operator”?
Possible Responses: Operators that compare the results of two or more comparisons in Java
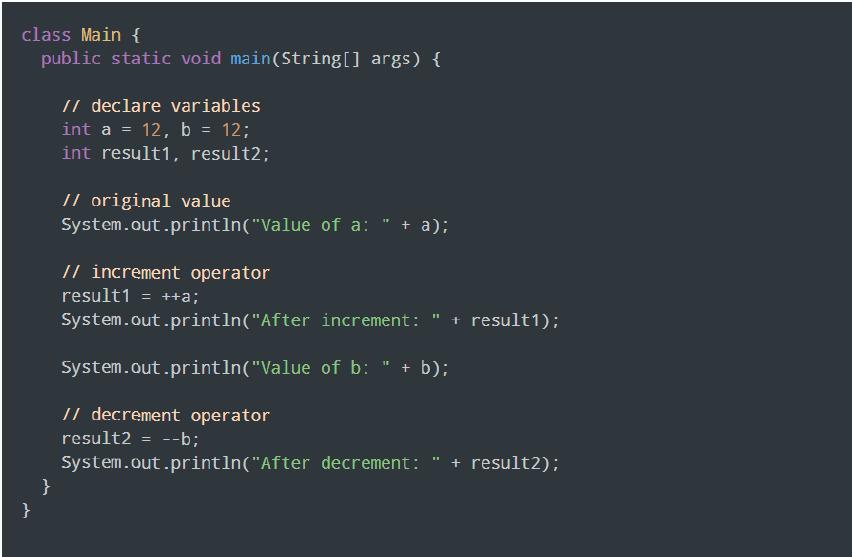
● Assign the following project as homework:
■ Create a Java program named “Operators Homework II” and declare four variable integers 9, 3, 8 and 4. Perform the following operations:
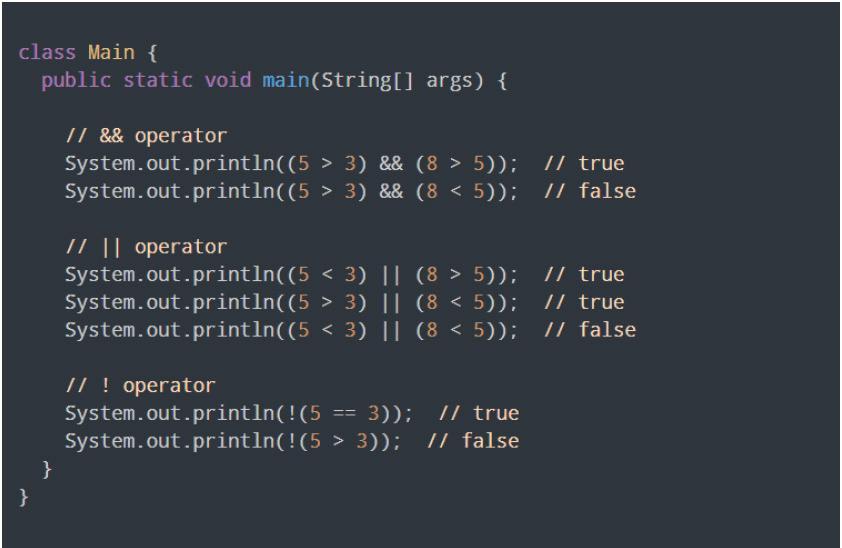
1. Decrease 9 by 1
2. Check if 9+3 is greater than 8+4
3. Check if 9+3 is equal to 8+4
Note
● The project is optional. Assign it if feasible.
In this session, students will learn about the order in which Java performs the operations to solve any calculator. This order is called the BEMDAS rule.
● Method: a block of code that, when called, performs specific actions mentioned in it
Recall the concepts covered in the previous coding session
Play the video given in the panel to introduce the concepts to be covered in this session
● Say: Do you remember what we learned in the previous session?
● Invite responses from some students.
● Revise the concepts learned in the previous class.
● Show the video, titled “BEMDAS Rule” in the panel.
● Discuss the Quiz questions given in the Tekie Panel.
● Invite answers from as many students as possible.
● Conduct Example 1.12 given on Page 24:
■ Explain the activity to the students.
■ Instruct: Click on the Practice button on the Assignment page to attempt the activity.
■ Instruct: Click on the Attempt button to open the activity page.
■ Walk around in the classroom and observe the activity done by the students.
■ Assist the students if any of them are struggling.
■ Instruct: Click on the Yes button to submit the activity.
● If time permits, conduct the additional activity to “Calculate the area and perimeter of a rectangle with length and breadth 7 and 4 respectively” given in the Panel
Sum-Up
● Conclude: Today, we learned about BEMDAS order in which Java performs calculations.
● Ask the following probing questions:
■ Elaborate on the abbreviation BEMDAS.
Possible Responses: Brackets; Exponents; Multiplication & Division; Addition & Subtraction
■ Simplify the expression by using the BEMDAS rule: (4×3÷6+1)×32 ?
Possible Responses: Step 1 – First, we need to multiply 4 by 3 in the expression, (4×3÷6+1)×32, we get, (12÷6+1)×32
Step 2 – Now, we need to divide 12 by 6 inside the bracket, so, we get, (2+1)×32
Step 3 – Remove brackets. After adding 2 and 1, we get 3×32
Step 4 – Solve exponent, i.e. 32, which is 9, 3×9
Step 5 – Multiply 3 by 9 to get the final answer, which is, 3×9 = 27
∴ (4×3÷6+1)×32= 27.
● Assign the following project as homework:
■ Example 1.11 given in the Coding Booklet on Page 23.
● The project is optional. Assign it if feasible.
The content covered in this chapter is aligned with the following CSTA Standard
● 2-AP-10 Algorithms
● 2-AP-12 Control
This chapter is divided into the following lab sessions
1. Conditions I
2. Conditions II
3. Conditions III
4. Conditions IV
In this session, students will learn about –
● User Input
● Conditions and Flowcharts
● Decision statement
Keywords
● User Input: helps in taking the input from the user
● Decision statement: in java decision statement allows you to make a decision based on the outcome of a condition
Recall the concepts covered in the previous coding session
Play the video given in the panel to introduce the concepts to be covered in this session
Action Plan
Warm-Up
● Say: What does “User Input, decision statement” mean?
● Invite 1 or 2 responses from the students.
● Say: User input helps in taking the input from the user
● Say: Let’s understand the structure of functions.
● Open Lab on User Input, and decision statement.
● Show the video with the title “User Input, and decision statement”.
● Explain the following concepts -
User Input
Conditions and Flowcharts
As given on Pages 25, 26, and 27
As given on Pages 27 and 28
● Conduct The input game given on Tekie panel:
■ Say: Create a program that takes a user input.
■ Instruct: Click on the Assignment section.
■ Instruct: Click on the Go to Practice button to attempt the activity.
■ Walk around in the classroom and observe the activity done by the students.
● If time permits, conduct the additional activity given in the panel.
● Conduct Integer output given in Panel:
■ Say: Define a program that takes user input as an integer.
■ Instruct: Click on the Assignment section.
■ Instruct: Click on the Go to Practice button to attempt the activity.
■ Walk around in the classroom and observe the activity done by the students.
● Conclude: Today, we were introduced to user input, conditions and flowcharts
● Assign the following Practice Problems as homework:
■ Ask the students to complete Q2 of Practice Questions on page 38.
In this session, students will learn about –
● If statement
● The if-else statement
● If statement: a statement or blocks of statements get executed when the given condition becomes true
● The if-else statement: two sets of code to be executed in either case if the condition is true or false
Recall the concepts covered in the previous coding session
Play the video given in the panel to introduce the concepts to be covered in this session
● Say: What are “If and if-else statement”?
● Invite 1 or 2 responses from the students.
● Revise the concepts learned in the previous class.
● Say: An If statement is executed when the condition becomes true, whereas in an if-else statement, two sets of code are to be executed in either case if the given condition is true or false.
● Say: Let’s understand the If and if-else statement
● Open Lab on If and if-else statements.
● Show the video with the title “If and if-else statement”.
● Explain the following concepts –
If statement
if-else statement
● Conduct Find the square given in Tekie panel:
As given on Page 28, 29, and 30
As given on Page 30, 31, and 32
■ Say: Take values of length and breadth of a rectangle from the user and check if it is square or not.
■ Instruct: Click on the Assignment section.
■ Instruct: Click on the Go to Practice button to attempt the activity.
■ Walk around in the classroom and observe the activity done by the students.
● If time permits, conduct the additional activity given in the panel.
● Conduct The greatest number given in Panel:
■ Say: Take two int values from the user and print the greatest among them.
■ Instruct: Click on the Assignment section.
■ Instruct: Click on the Go to Practice button to attempt the activity.
■ Walk around in the classroom and observe the activity done by the students.
● Conclude: Today, we learned about If and if-else statements.
● Assign the following Practice Problems as homework:
■ Ask the students to complete Q1 of Practice Problems on page 38
In this session, students will learn about –
● Nested if statement
Keywords
● Nested if statement: it is a set of if conditions one within another
Recall the concepts covered in the previous coding session
Play the video given in the panel to introduce the concepts to be covered in this session
● Say: What is a “Nested if statement”?
● Invite 1 or 2 responses from the students.
● Say: It is a set of if conditions, one within another.
● Revise the concepts learned in the previous class.
● Say: Let’s understand the Nested if statement
● Open Lab on Nested if statement.
● Show the video with the title “Nested if statement”.
● Explain the following concepts –
Nested if statement
As given on Pages 32, 33, 34, and 35
● Conduct Greatest among three given in Panel:
■ Ask the students to write a program that checks whether a number is the greatest among three numbers.
■ Instruct: Click on the Assignment section.
■ Instruct: Click on the Go to Practice button to attempt the activity.
■ Walk around in the classroom and observe the activity done by the students.
● If time permits, conduct the additional activity given in the panel.
● Conduct Find the ratings given in Panel:
■ Say: Suppose the rating for a product can be from 1 to 10. If the rating is less than 5, then it is considered a Bad rating. Otherwise, if the rating is from 5 to 7 then it is an Average rating, and if the rating is from 8 to 10 then it is a Good rating.
■ Instruct: Click on the Assignment section.
■ Instruct: Click on the Go to Practice button to attempt the activity.
■ Walk around in the classroom and observe the activity done by the students.
Sum-Up 3 min
● Conclude: Today, we learned about the Nested if statement.
● Assign the following program as homework:
■ Write a program to Check if three numbers are equal.
In this session, students will learn about –
● The if-else-if ladder
● The if-else-if ladder: the conditional expressions are evaluated from the top downward. As soon as a true condition is found, the statement associated with it is executed
Recall the concepts covered in the previous coding session
Play the video given in the panel to introduce the concepts to be covered in this session
● Say: What is The if-else-if ladder?
● Invite 1 or 2 responses from the students.
● Say: It means that a function calls itself.
● Revise the concepts learned in the previous class.
● Open Lab on The if-else-if ladder
● Show the video with the title “The if-else-if ladder”.
● Explain the following concepts –
● Conduct Negative, positive, or zero given in Panel:
■ Say: Write a program to check whether the entered number by the user is negative, positive or zero.
■ Instruct: Click on the Assignment section.
■ Instruct: Click on the Go to Practice button to attempt the activity.
■ Walk around in the classroom and observe the activity done by the students.
Note
● If time permits, conduct the additional activity given in the panel.
● Conduct Grading software given on the Panel:
■ Say: Define a program that displays the grades of the student by entering the marks.
■ Instruct: Click on the Assignment section.
■ Instruct: Click on the Go to Practice button to attempt the activity.
■ Walk around in the classroom and observe the activity done by the students.
● Conclude: Today, we were introduced to The if-else-if ladder.
● Assign the following Practice Problems as homework:
■ Ask the students to complete Q3 of Practice Problems on page 38
3 min
The content covered in this chapter is aligned with the following CSTA Standard
● 2-AP-12
● Control
This chapter is divided into the following lab sessions
1. Loops I
2. Loops II
3. Loops III
4. Jump Statements
5. Coding Challenge
In this session, students will learn about –
● Introduction to Loops
● Loops: executes a set of instructions until a termination condition is reached
in
● Say: What does “Loops” mean?
● Invite 1 or 2 responses from the students.
● Say: It executes a set of instructions until a termination condition is reached
● Say: Let’s understand the Loops.
● Open Lab on Loops.
● Show the video with the title “Loops”.
● Explain the following conceptsCS Concepts Explain Loops
As given on Page 39
● Conduct the output given in Tekie panel:
■ Say: Create a program that displays a text five times.
■ Instruct: Click on the Assignment section.
■ Instruct: Click on the Go to Practice button to attempt the activity.
■ Walk around in the classroom and observe the activity done by the students.
● If time permits, conduct the additional activity given in the panel.
● Conduct 1 to 5 numbers given in Panel:
■ Say: Define a program that displays numbers from 1 to 5.
■ Instruct: Click on the Assignment section.
■ Instruct: Click on the Go to Practice button to attempt the activity.
■ Walk around in the classroom and observe the activity done by the students.
● Conclude: Today, we were introduced to Loops.
● Assign the following program as homework:
■ Write a program to print 1 to 100 numbers.
In this session, students will learn about –
● While Loop
● While loop: repeats a statement until the looping condition is true
Recall the concepts covered in the previous coding session
Play the video given in the panel to introduce the concepts to be covered in this session
Discuss While loop Positive sum, the greatest number, multiplication table
Conclude the session Assign the homework
● Say: What is “While loop”?
● Invite 1 or 2 responses from the students.
● Revise the concepts learned in the previous class.
● Say: It repeats a statement until the looping condition is true.
● Say: Let’s understand the While loop.
● Open Lab on While loop.
● Show the video with the title “While loop”.
● Explain the following concepts -
While loop
As given on Pages 40, 41, and 42
● Conduct assignment positive sum given on the Tekie panel:
■ Say: Write a program to display the sum of positive numbers.
■ Instruct: Click on the Assignment section.
■ Instruct: Click on the Go to Practice button to attempt the activity.
■ Walk around in the classroom and observe the activity done by the students.
● If time permits, conduct the additional activity given in the panel.
● Conduct the Multiplication table given in Tekie panel:
■ Say: Take two integer values from the user and print the greatest of them.
■ Instruct: Click on the Assignment section.
■ Instruct: Click on the Go to Practice button to attempt the activity.
■ Walk around in the classroom and observe the activity done by the students.
● Conclude: Today, we learned about the While loop.
● Assign the following Practice Problems as homework:
■ Ask the students to complete Q2 of Practice Problems on page 46
In this session, students will learn about –
● For loop
● For loop: it is used for iterating over a sequence
Recall the concepts covered in the previous coding session
Play the video given in the panel to introduce the concepts to be covered in this session
Discuss For loop 1 to 10 numbers, find the ratings, natural numbers
Conclude the session Assign the homework
● Say: What is a “For loop”?
● Invite 1 or 2 responses from the students.
● Say: It is used for iterating over a sequence.
● Revise the concepts learned in the previous class.
● Say: Let’s understand the For loop
● Open Lab on For loop
● Show the video with the title “For loop”.
● Explain the following concepts –
As given on Pages 42, 43, 44
● Conduct 1 to 10 numbers given on Tekie panel:
■ Say: Write a program that displays 1 to 10 numbers using a for loop.
■ Instruct: Click on the Assignment section.
■ Instruct: Click on the Go to Practice button to attempt the activity.
■ Walk around in the classroom and observe the activity done by the students.
Note
● If time permits, conduct the additional activity given in the panel.
● Conduct Natural numbers given on Tekie panel:
■ Say: Write a program to display the sum of Natural Numbers using for loop.
■ Instruct: Click on the Assignment section.
■ Instruct: Click on the Go to Practice button to attempt the activity.
■ Walk around in the classroom and observe the activity done by the students.
● Conclude: Today, we learned about the For loop
● Assign the following program as homework:
■ Write a program to find the factorial of a number.
In this session, students will learn about –
● Jump statement
■ Break statement
■ Continue statement
Keywords
● Jump statement: it is a control statement that transfers control of the execution from one place to another
Recall the concepts covered in the previous coding session
Play the video given in the panel to introduce the concepts to be covered in this session
● Say: What is a Jump statement?
● Invite 1 or 2 responses from the students.
● Say: It is a control statement that transfers control of the execution from one place to another.
● Revise the concepts learned in the previous class.
● Open Lab on Jump statement
● Show the video with the title “Jump statement”.
● Explain the following concepts
Jump statement
As given on Page 35, 36, 37, and 38
● Conduct odd numbers program given in Tekie panel:
■ Say: Write a program to skip even numbers and print odd numbers.
■ Instruct: Click on the Assignment section.
■ Instruct: Click on the Go to Practice button to attempt the activity.
■ Walk around in the classroom and observe the activity done by the students.
● If time permits, conduct the additional activity given in the panel.
● Conduct Even numbers program given in the Tekie panel:
■ Say: Define a program to print the even numbers between 1 and 10.
■ Instruct: Click on the Assignment section.
■ Instruct: Click on the Go to Practice button to attempt the activity.
■ Walk around in the classroom and observe the activity done by the students.
● Conclude: Today, we were introduced to the Jump statement.
● Assign the following Practice Problems as homework:
■ Ask the students to complete Q1 of Practice Problems on page 46
Objectives
Revise the previous session concepts and in this session, we will be doing the –
● Coding Challenge
Keywords
● Jump statement: it is a control statement that transfers control of the execution from one place to another
Recall the concepts covered in the previous coding session
Play the video given in the panel to introduce the concepts to be covered in this session
● Say: Today we will be doing a Coding challenge.
● Say: Are you ready for the challenge?
● Invite the students to respond.
● Open Lab on a Coding challenge.
● Explain the following concepts -
CS Concepts
Coding challenge
As given on Page 46
● Conduct the Coding challenge given on page 46:
■ Say: We will be creating the rock, paper, scissor game.
■ Say: Now call 2 or 3 students to identify the conditions to be used for game building.
■ Ask: Which loop will we be using to create the game functionality?
■ Guide the students about the program logic.
■ Build a flowchart of the program based on answers that students give.
■ Instruct: Click on the Assignment section.
■ Instruct: Click on the Coding challenge button to attempt the challenge.
■ Walk around in the classroom and observe the activity done by the students.
● Conclude: Today, we learned about the rock, paper, scissors game.
● Assign the following assignment as homework:
■ Ask the students to create a program to print a multiplication table of a number entered by a user with the help of a loop.
This Teacher Manual has been designed to implement Tekie, the storytelling-based Coding and Computer Science program. The manual consists of lesson plans within each chapter that teachers transact within classrooms and computer labs. Each lesson is based on a research-based ‘WEBS’ framework that simplifies pedagogical practices for teachers and enables them to deliver effectively.
• Sharp Lesson Planning: Each lesson plan focuses on specific sub-learning outcomes within a chapter and are designed for delivery within the stipulated class or lab time.
• Real-life and Application-based Questions: Additional questions that link Computer Science to real-life contexts and assist teachers to develop learners’ conceptual understanding and application skills.
• Support and Detailed Solutions: In-depth solutions for in-class and post-class activities to reinforce learning.

Uolo partners with K12 schools to bring technology-based learning programs. We believe pedagogy and technology must come together to deliver scalable learning experiences that generate measurable outcomes. Uolo is trusted by over 8,000 schools with more than 3 million learners across India, South East Asia, and the Middle East.