
EDUCATION TO ARTIFICIAL INTELLIGENCE SOFTWARE PRESENTATION AND SCENARIO SHEETS

INTRODUCTION
AlphAi allows you to understand the basics of Artificial Intelligence by manipulating a learning ro bot and making it learn intelligent behavior.
P.02SOFTWARE PRESENTATION AND SCENARIO SHEETS
For this reason, the graphical interface does not resemble graphical programming environments such as Scratch. What appears in the center of the window is an artificial neural network that we will parameterize to become able to perform the right learning. At the end of the learning process, the neural network will be able to correctly process its inputs, i.e. the measurements of the robot’s sensors, in order to provide as output the right predictions of the best actions to perform.
This document starts with a general presentation of the program functions. Some of these descrip tions may seem complex? Don’t panic! The Scenarios that come in the second part will propose a course of experimentation with the robot that will introduce each notion one after the other.
What is Artificial Intelligence? We are not going to discuss this question in detail in this introduc tion but you can find more elements in this document and in our online resources. Let’s just say that the AlphAi robot and its interface will introduce a new way of programming where instead of giving instructions, we rely on machine learning algorithms.
P.03SOFTWARE PRESENTATION AND SCENARIO SHEETS TABLE OF CONTENTS Introdution ........2 Table of contents ...........................................................3 Installation Guide.............................................................................................................................................................4 License activation............................................................................................................................................................5 Software Presentation ...............................................6 Menus ..........................................................................................................................................................................7 Main screen...............................................................................................................................................................8 Main control bar.......................................................................................................................................................9 Sensors window....................................................................................................................................................10 Actions ProgressVisualizationA.I.Rewardswindow......................................................................................................................................................11window...................................................................................................................................................12window..............................................................................................................................................................13window...........................................................................................................................................14graph.......................................................................................................................................................15 Robot learning scenarios ............................................................................................16 Getting started with the simulated robot...................................................................................................17 Getting started with the real robot................................................................................................................18 Image recognition using the camera............................................................................................................20 Supervised Learning - navigation with camera.........................................................................................22 Manual edition of a simple neural network................................................................................................24 Reinforcement Learning - navigation blocked/moving.......................................................................27 Reinforcement Learning - navigation with camera..............................................................................29 Introder Detection..............................................................................................................................................30 Balloon Tracking...................................................................................................................................................32 Line RecapTracking.........................................................................................................................................................34table............................................................................................................................................................35
Download the latest version of the installer
Followhttps://learningrobots.ai/downloads/softwareattheinstructionsoftheinstallationwizard
WINDOWS
P.04SOFTWARE PRESENTATION AND SCENARIO SHEETS
To launch the software, note the path of the AlphAI folder (on the Mac, right click in Finder, see above), then open a new terminal and type : $ cd path/to/alphai $ python3 -m venv alphaienv $ source (alphaienv)$$$(alphaienv)$alphaienv/bin/activatepipinstall-rrequirements.txtcdpath/to/alphaisourcealphaienv/bin/activatepythonStart_Alphai.pyc
(On Mac: BE CAREFUL, extracting the .zip by clicking on it may give an unexpected result; in this case note the path of the folder that contains AlphAI-xxx.zip - you can get this path in the Finder by right-clicking on the folder, pressing the Control key, and selecting «Copy «xxx» as path name» - then open a terminal, go to this folder with the cd command, and type «unzip AlphAI-xxx.zip»)
SOFTWARE INSTALLATION GUIDE
: A cmd.exe window is launched and proceeds to the installation of the software and its envi ronment (Python 3). We have not yet developed an installer for Linux and Mac (it will come soon for Mac), so you will have to type some command lines to install the software. Go to https://learningrobots.ai/downloads/software and download the latest .zip version of the AlphAI code. Extract the .zip in the folder of your choice. Install Python 3.9, if you don’t have it already, and create a virtual environment: Open a terminal and type the following commands:
P.05SOFTWARE PRESENTATION AND SCENARIO SHEETS
LICENCE ACTIVATION
In the case of temporary use (for example, installation on a student’s personal computer), indicate the period of validity required: at the end of this period, the license associated with this computer will be deleted and a new license associated with another computer will be window asks you to provide us with some in Thisformation:stepis not mandatory but we recommend that you fill in the different fields, this information will allow us to provide you with assistance but also to inform you in case of software updates.
When you use the software for the first time, an activa tion key is requested: Fill in the «Activation key» field using the activation key supplied with the robot (XXX-XXX-XXX). Each activation key allows the creation and use of 30 licenses simultaneously.
Thecreated.next


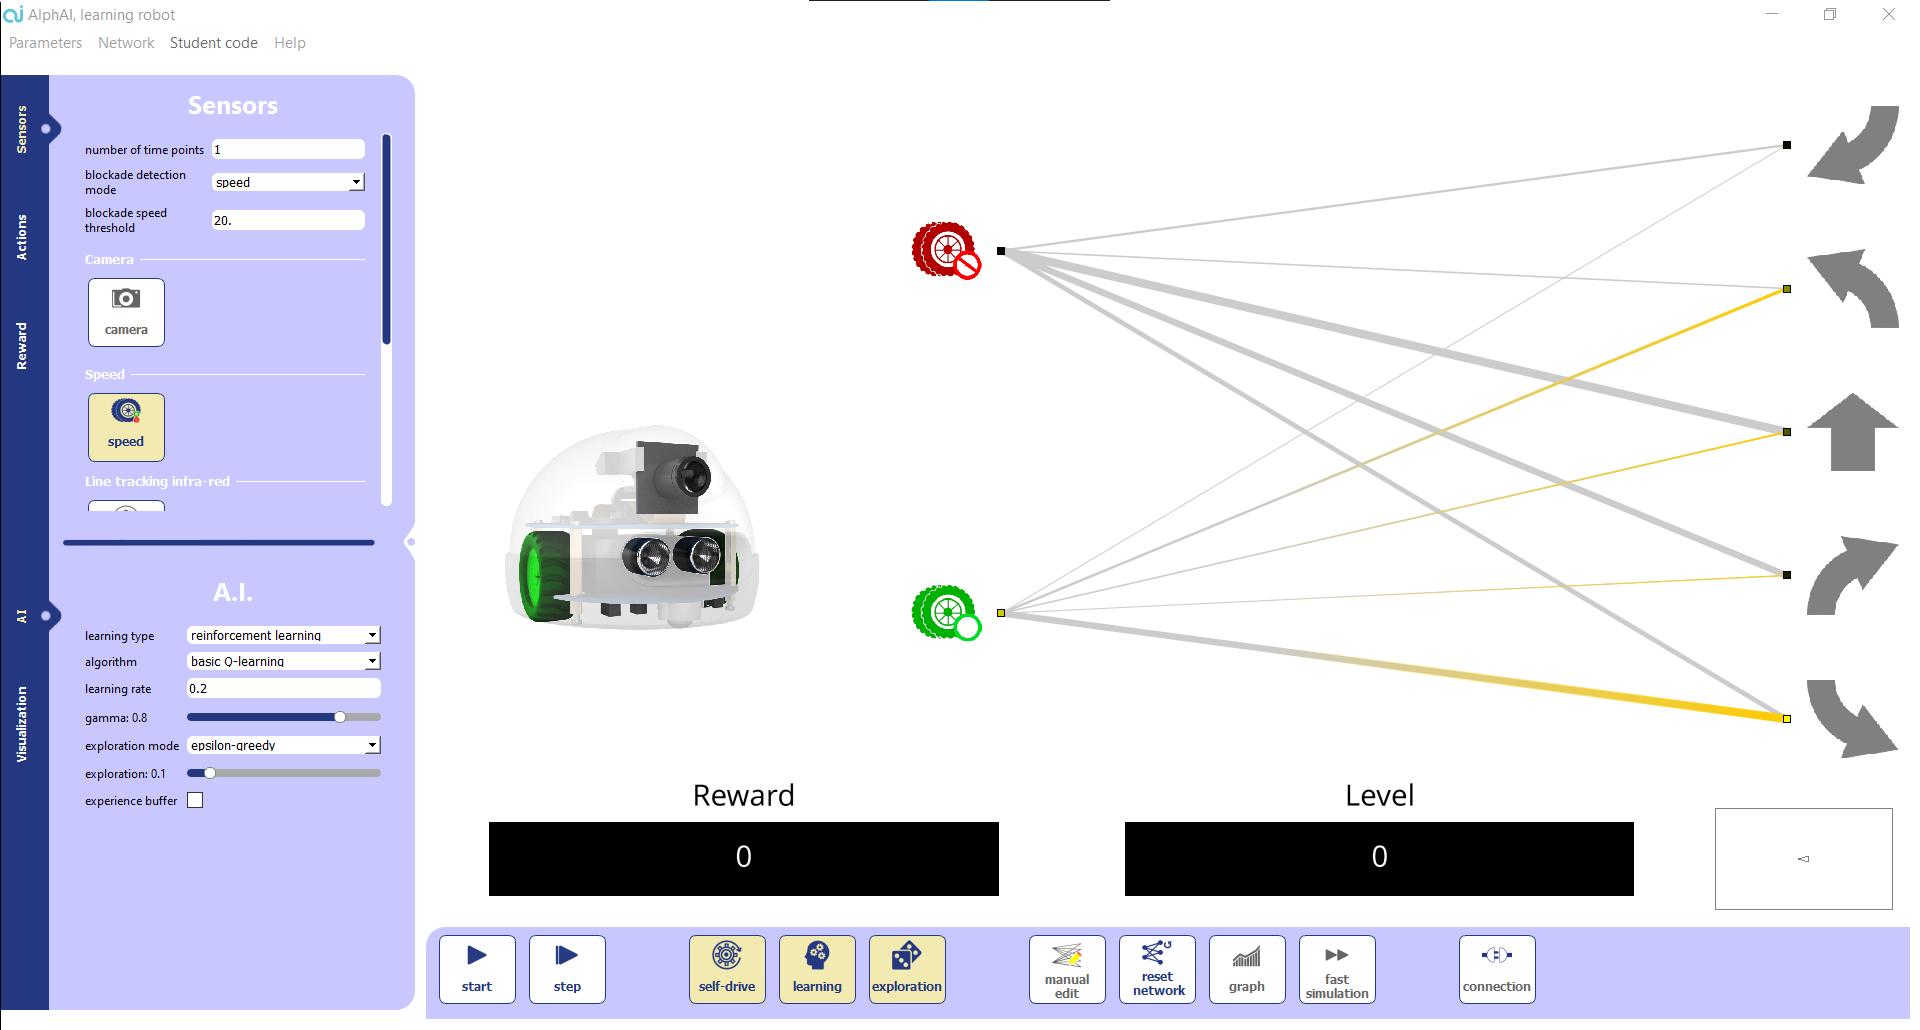
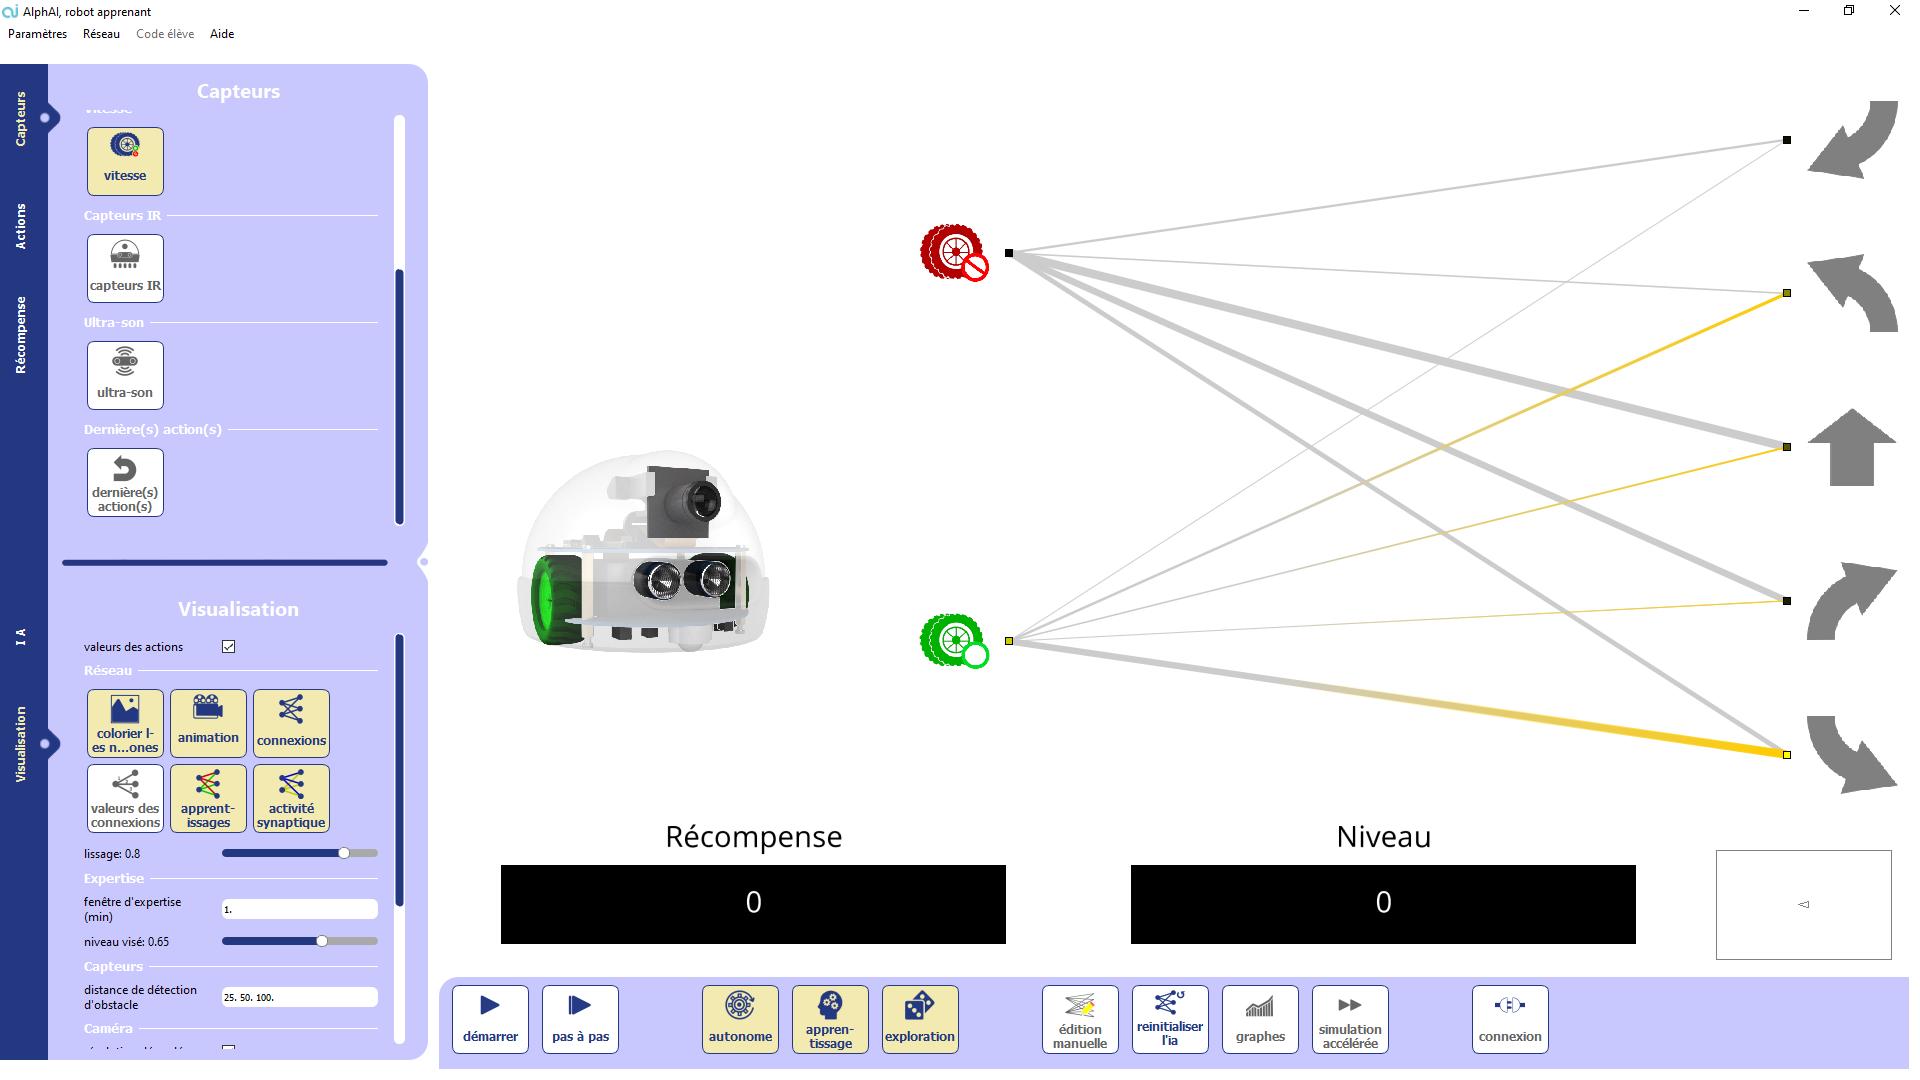
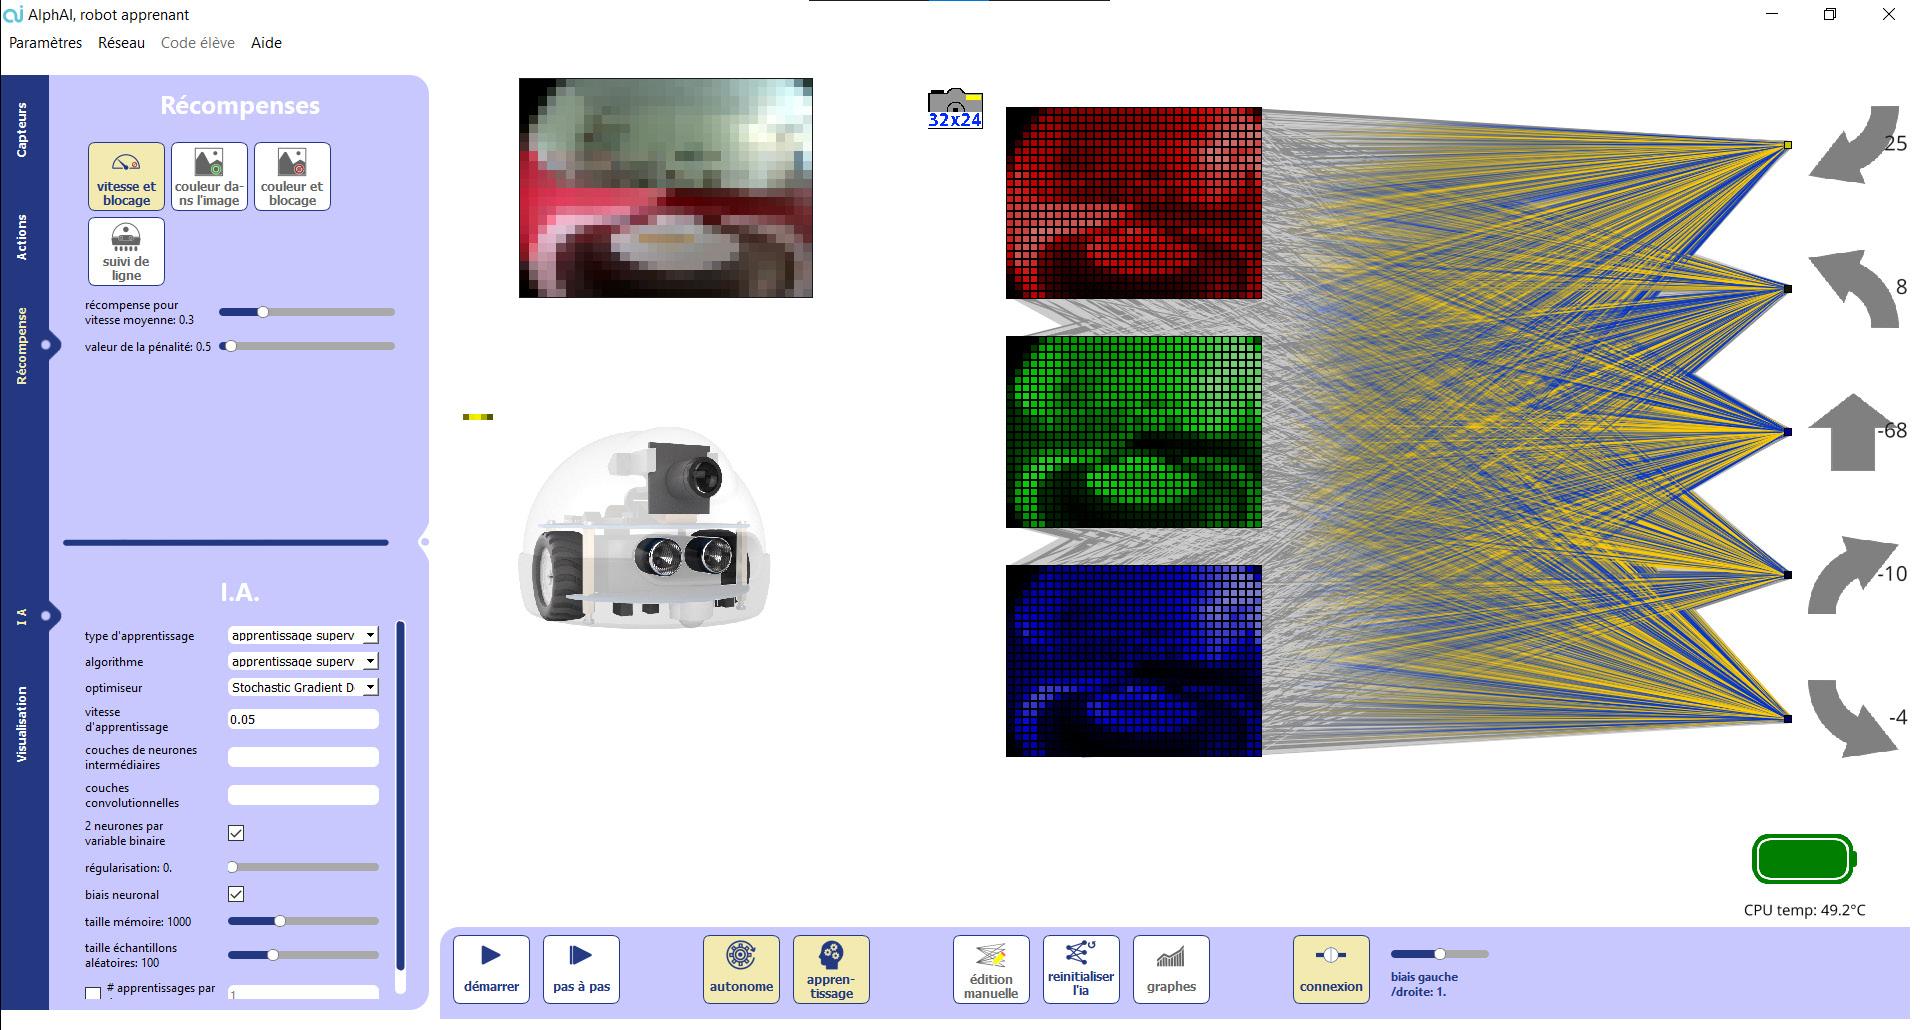
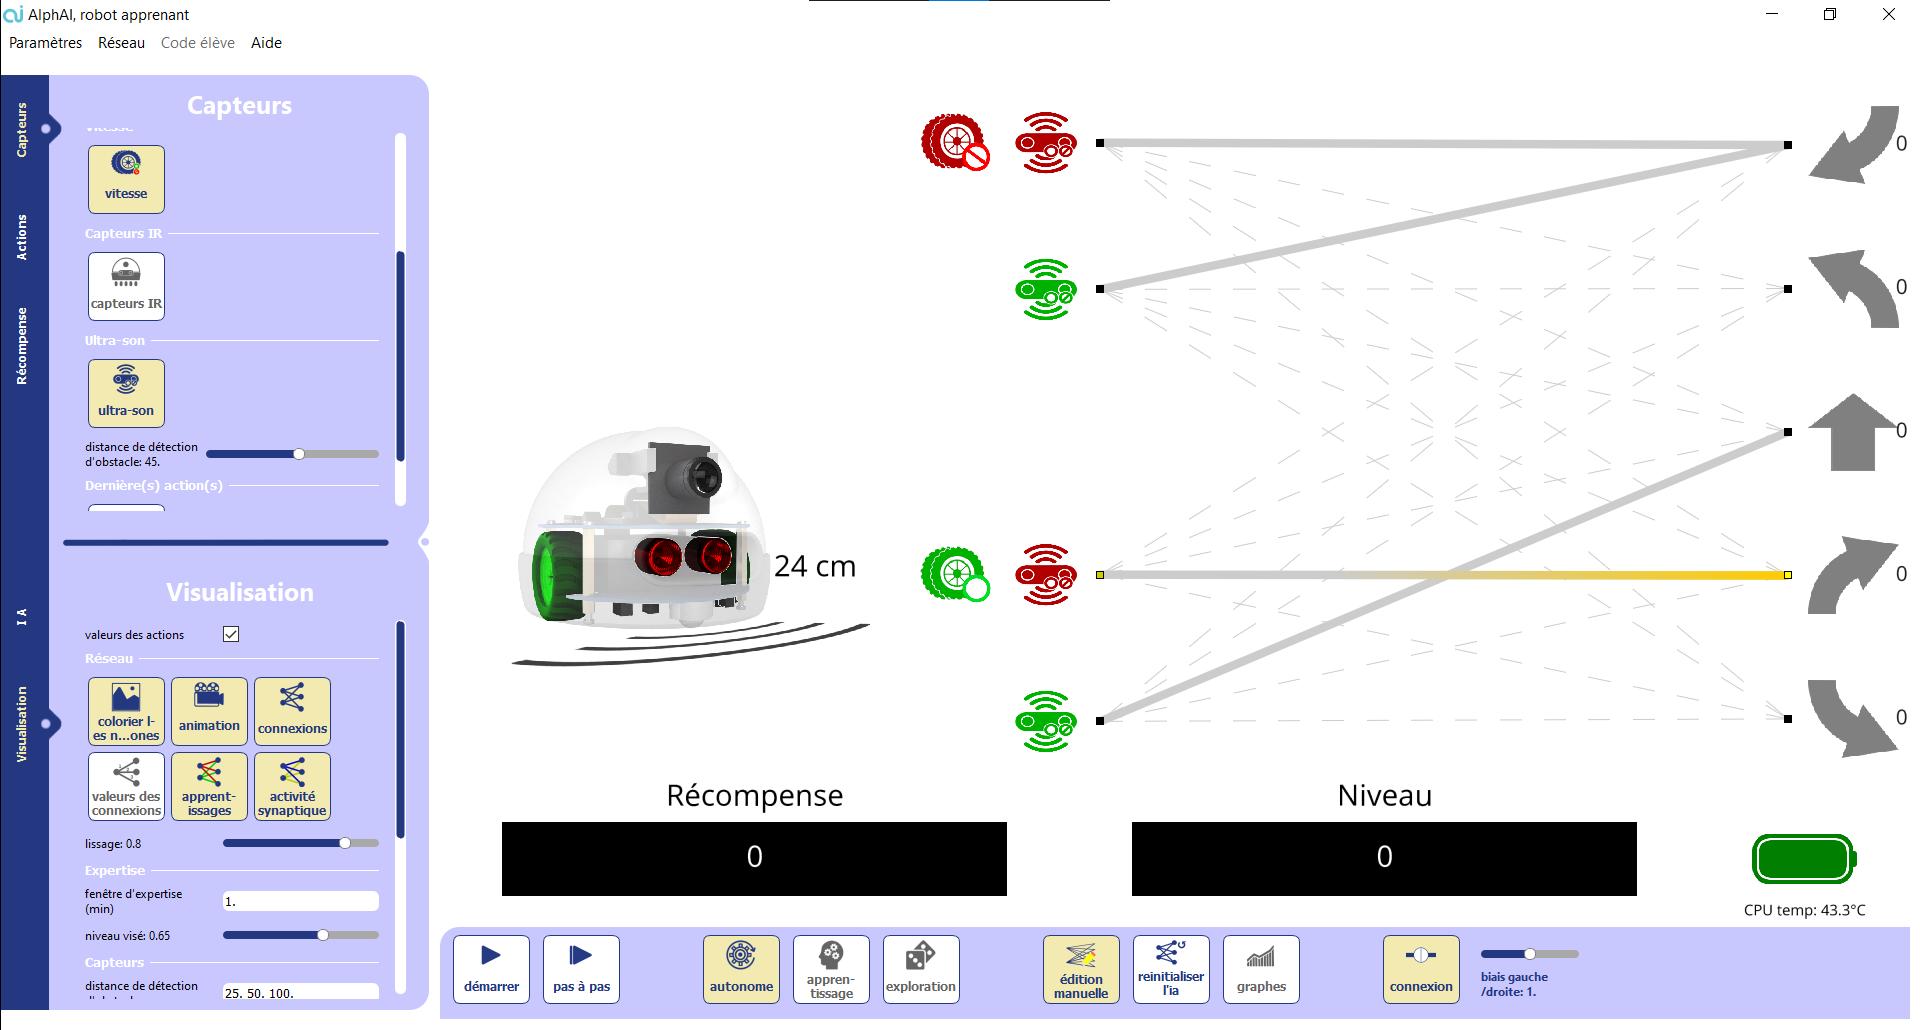
P.06SOFTWARE PRESENTATION AND SCENARIO SHEETS SOFTWARE PRESENTATION The program has two main components: The main display screen shows the status of the robot, the current learning, the neural Thenetwork.control interfaces are divided into : - The main control bar at the bottom - The parameter controls on the left side - The menus.
The Network tab allows you to load the state of the network and the experience memory or to save the current ones.
P.07SOFTWARE PRESENTATION AND SCENARIO SHEETS
MENUS
The Settings tab allows you to load predefined settings or save the current settings. It also allows you to display the settings in beginner, intermediate, or expert mode. (Some options appear only in intermediate and expert mode or just expert).
The Student code tab allows you to manage the code written by the user. This menu is only available after selecting the «Student code» algorithm.


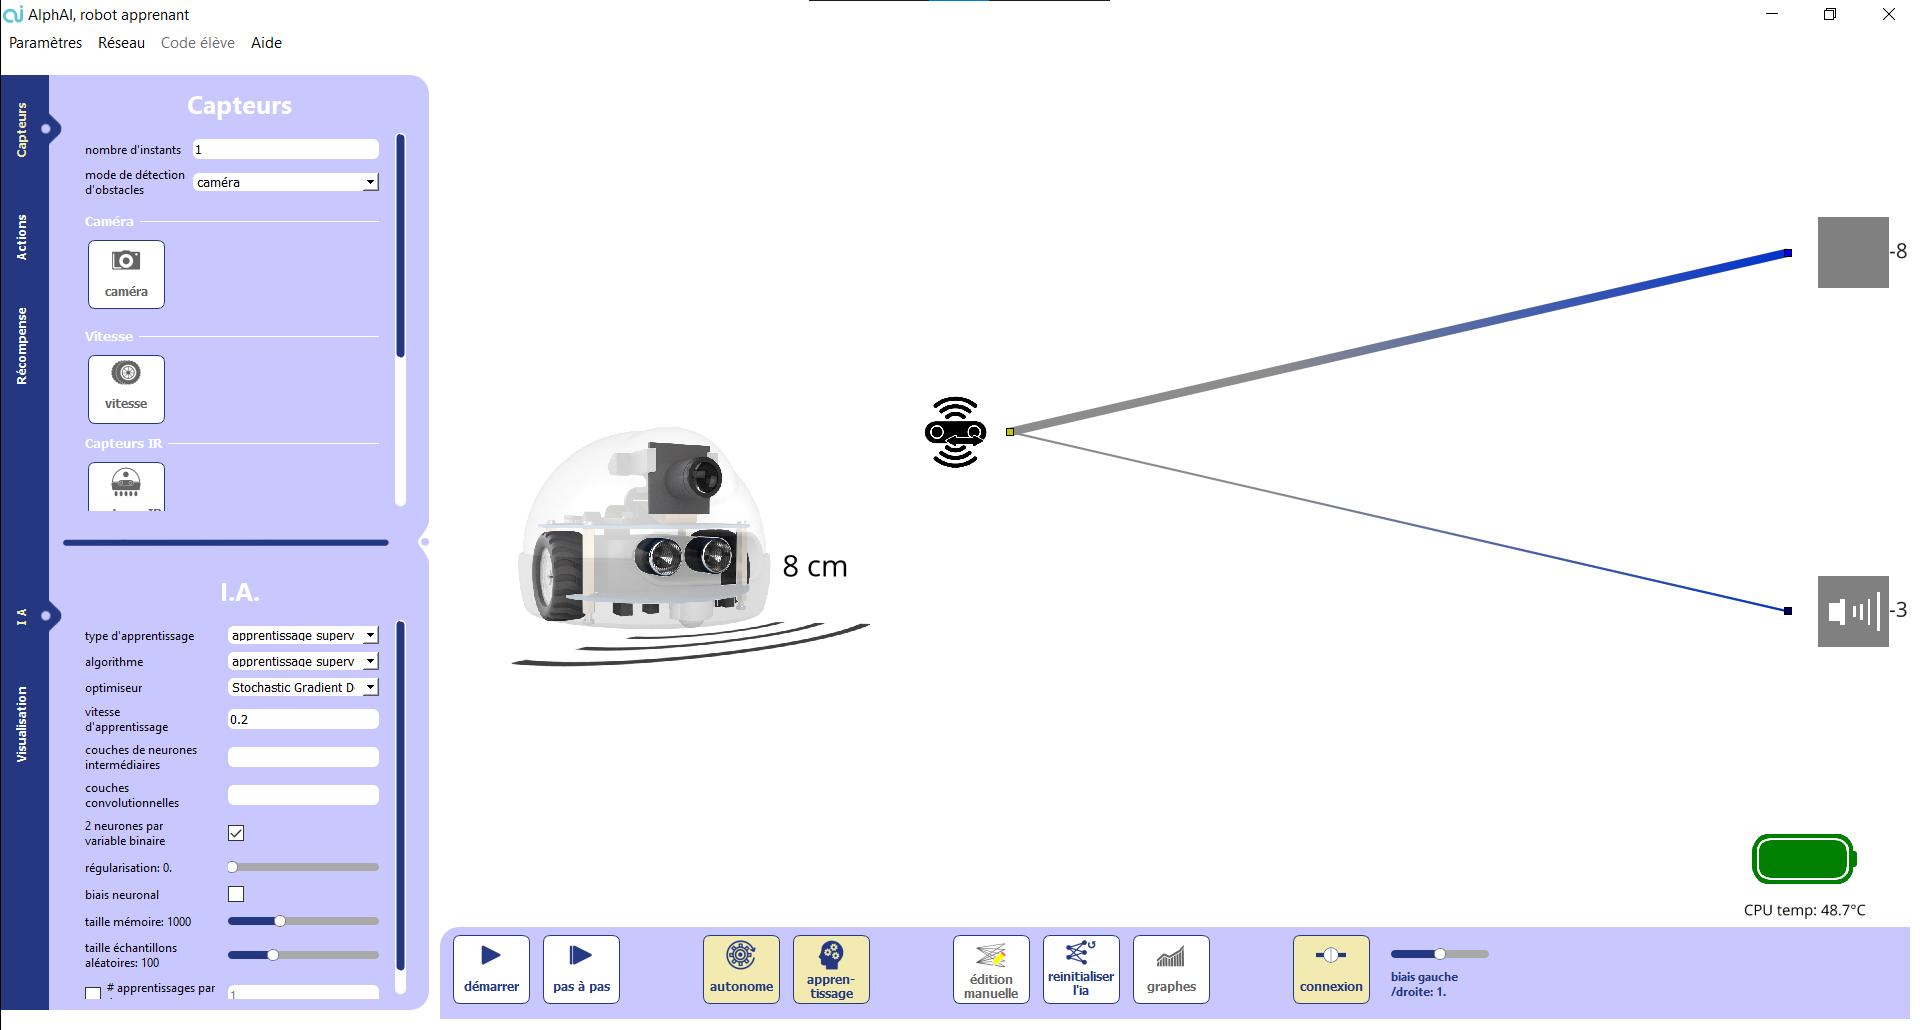
The possible actions for the robot. These are the outputs of the network. You can click directly on them to force the robot to do an action.
Level : average of the rewards over the last 2 minutes. Robot battery level. When the robot is not connected, a representation of the simu lated robot is displayed instead. The arena is represented by a rectangle, the robot by a triangle. (The front is the smallest side).
Representation of the robot to visualize the sensors that are activated.
MAIN SCREEN
Display of the robot’s camera.
The sensors of the robot activated. These are the inputs of the neural network. The neural network. You can see its evolution in real time (yellow/blue transmission of positive/negative activity; green/red: reinforcement/decrease of the connections during learning). The thickness of the lines is proportional to the weight of the connection.
Reward: reward that the robot receives for each action during a reinforcement learning.
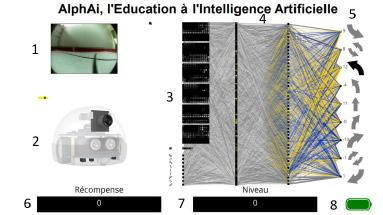
1 1 7 2 8 3 4 5 6 2 3 6 7 8 45 , l’Education à l’Intelligence Artificielle P.08SOFTWARE PRESENTATION AND SCENARIO SHEETS
The main screen shows the status of the robot and its training.
Connect to the robot. Accelerate the simulation (only for the simulated robot).
Learning (allow the robot to change its neural network to learn).
Start/stop the robot. Start the robot step by step (the robot will do only one step each time you press the Self-drivebutton).(when deactivated, the robot will only perform the actions you enter).
Display the progress graph of the robot (not available in the beginner setting).
Exploration (allow the robot to take a random decision from time to time). Edit the neural network manually. Reset the neural network.
MAIN CONTROL BAR
P.09SOFTWARE PRESENTATION AND SCENARIO SHEETS
PLEASE NOTE : All controls display a small help when you leave the mouse over them for a few seconds. A selected button will be yellow, while an unselected button will be white.


The Sensors window allows you to choose the robot sensors that will be used. This window also allows you to set some speed parameters of the robot.
Ultra sound: returns the distance to an obstacle.
Ultra sound: returns a binary response depending on whether it detects an obsta cle in front of it or not (to be defined with a certain threshold).
Detect if the robot is moving forward or not. Line tracking sensor.
Last action: all actions chosen for the robot will be added to the network inputs. When the robot does an action, it will be activated in the inputs at the next step.
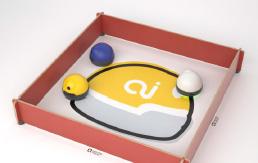
Camera of the robot (different image formats are available).
P.10SOFTWARE PRESENTATION AND SCENARIO SHEETS
SENSOR WINDOW


allows you to choose the actions that the
can perform. (The asterisk means that the action will appear twice in the list of actions: one for the right and one for the left). Go straight ahead. BackPivot*.TurnTurn*.slowly*.upwhile turning*. Back up. Stop.
The window robot
ACTIONS WINDOW
P.11SOFTWARE PRESENTATION AND SCENARIO SHEETS
Actions


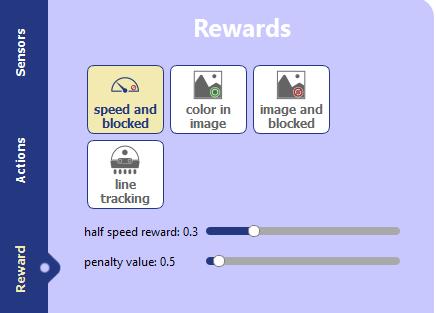
Reward if many pixels of the camera are of a certain color (you can choose the color by varying the parameters that are displayed afterwards).
Reward if many pixels of the camera are of a certain color, punish if the robot stops.
P.12SOFTWARE PRESENTATION AND SCENARIO SHEETS
Reward if the robot detects black just below him.
The Rewards window allows you to choose the type of reward during reinforcement learning.
Reward if the robot goes fast, punish if it stops.
REWARD WINDOW


Regularization : Positive or null parameter limiting the intensity of the connections.
Neurons have bias : Check to allow neurons to adjust their activation threshold (this means that all neurons receive a constant input that they can adjust, not represented in the gra phical interface). Experience buffer : Check to allow the AI to continue learning from past actions and rewards.
P.13SOFTWARE PRESENTATION AND SCENARIO SHEETS
A.I. WINDOW
Gamma : Adjust the importance given to immediate rewards (value close to 0) compared to more distant rewards in time (value close to 1)
Learning rate : Increase for faster learning... but decrease if divergence errors appear.
The A.I. window allows you to choose how the robot is trained, in particular to choose between supervised learning and reinforcement learning (Deep Q Learning). It also allows to set the parameters of the different algorithms.
Convolutional layers : Configuration of convolutional neuron layers : layer is defined by three parameters : number of kernels, filter size, and stride (i.e. image size reduc tion factor). The parameters of a layer are separated by «,» while the layers are se parated by commas «,». For example «4/5/2, 8/5/2» configures 2 layers, the 1st with 4 kernels, the 2nd with 8 kernels, and both with filters of size 5 and stride 2.
Exploration: Frequency of exploration (value between 0 and 1).
2 neurons per binary value : Check to have 2 neurons for true or false inputs (one and only one will be activated) ; Uncheck to use only 1 neuron.
Exploration mode: Select the exploration strategy.
Hidden layers of neurons : Number of neurons in each «hidden» layer, for example : put nothing to directly connect inputs to outputs, put «100 50» for two intermediate layers of respectively 100 and neurons.
Optimizer : Optimization algorithm used to evolve the neural network
Algorithm: Select the AI algorithm used.

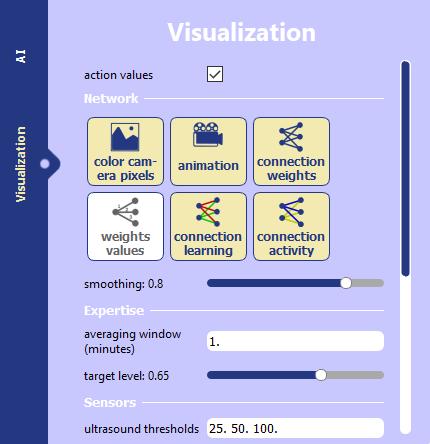
VISUALIZATION WINDOW
Display the activity in the network (yellow / green color for excitation / inhibition activities).
Display the weights of the connections.
Display the learning (green / red colors for connections that intensify / decrease).
P.14SOFTWARE PRESENTATION AND SCENARIO SHEETS
Animate the activity in the network (movement of inputs to outputs).
The Visualization window allows you to choose what is displayed or not on the main screen.
Display the network connections.


This graph allows to follow the progress of the robot by displaying its rewards and the error of its predictions over time. If the robot is progressing well, the reward graph should increase and the error graph should decrease. These graphs are not necessarily very readable, in this case you can average them, for exa mple over 2 minutes, by clicking on smoothing - 2 minutes
PROGRESSION GRAPHS
P.15SOFTWARE PRESENTATION AND SCENARIO SHEETS

We are now going to present different scenarios that will give you an overview of what you can do with the software and what you can teach the robot. For your own experience with the robot, we advise you to run these scenarios one after the other in the order described below. Then you can build your own sequence of scenarios, and of course invent your own scenarios to fit the time you have with your students, the target audience, the level of detail of what you want to teach, etc. By default in most scenarios, the icons de l’onglet du bas seront activées, et les actions possibles du robot seront If this is not the case, it will be indicated in the instructions. self-drive Learning Exploration
P.16SOFTWARE PRESENTATION AND SCENARIO SHEETS
Go straight ahead Turn Step back
ROBOT LEARNING SCENARIOS


Concepts learned:
Turn on the software.
No need to want to understand everything at this level: it will be more interesting to do so by switching to the real robot!
GETTING STARTED WITH THE VIRTUAL ROBOT
1 1 2 2 3 3 P.17SOFTWARE PRESENTATION AND SCENARIO SHEETS
When the software is launched, the robot is not yet connected. But you can still run the software with a simulated robot. This allows to test the different methods without having to use the real robot.
We are also beginning to get acquainted with the graphical interface of AlphAi: for the moment, we can be satisfied with paying particular attention to the Start/Stop button, to the improvement of the simulated robot’s behavior and to the corresponding increase in its level.
At the bottom right you can see the simulated robot. The robot is represented by a triangle, the smaller side being the front of the robot, and the arena by a large rectangle Start the simulated robot. You should see the simulated robot moving. Usually it starts by turning around, then «discovering» the straight line, then «discovering» to turn around when it is blocked by an obstacle.
We note that the behavior of the simulated robot has improved over time. The great progress in the field of Artificial Intelligence at the beginning of the 21st century is essentially due to the improvement of automatic learning techniques.
GETTING STARTED WITH THE REAL ROBOT
The arena proposed by Learning Robots
Now we will connect to the real robot! To do this, we must first set up its arena.
Set up an arena: if you are building your own arena, here are some tips: Size: square or rectangle from 80cm to a few feet on a side. Walls can be planks or any type of object (reams of paper, etc.). Prefer surfaces that can slightly absorb shocks.
For effective learning when the robot navigates with its camera, make sure that all the walls have the same color, which is a different color than the floor. Prefer a slightly textured floor. Indeed, when the floor is too smooth or of too uniform color, it can happen that the robot has difficulties to determine if it is in movement (the detection of the movement is done by the infra-red sensors located under the robot, it is the same pro blem as when one uses a computer mouse on a too smooth surface).
Be careful, make sure that there is no dust on the floor, as it damages the motors. Dust the floor with a cloth before use, do not run the robot on carpet.
P.18SOFTWARE PRESENTATION AND SCENARIO SHEETS
Connect to the robot’s wifi (look for the wifi that starts with ALPHAI: the password is identical to the wifi name).
P.19SOFTWARE PRESENTATION AND SCENARIO SHEETS
Turn on the robot (the switch is on the bottom). It makes a small movement when it is ready.
On the software, press the connection button
You are now connected to the robot. The level of its battery should be displayed at the bottom right (check that the robot is well charged). Start the robot. Check that the robot moves correctly.
You can also give commands directly to the robot by pressing the arrows on the left of the screen or by using the directional arrows on the keyboard.

• In the action tab, put as many actions as people/objects to be recognize :
• In the Sensors tab, select : - «camera» (for exemple 32x24).
- Hold the robot in your hands so that it does not move even when its wheels are turning.
- Start the robot. - Point at a person or an object with the robot’s camera, and press re peatedly on one of the on one of the arrows on the screen (on the left of the network). This arrow will be used to identify the person or object.
- Repeat this operation on other people or objects, assigning them different ar rows each time. different arrows each time.
P.20SOFTWARE PRESENTATION AND SCENARIO SHEETS
IMAGE RECOGNITION USING THE CAMERA
Load the configuration «image recognition with the camera». Or to select parameters your self, start the program and then :
We are going to see one of the most used learning categories in artificial intelligence; supervised learning. The goal is to use the robot’s camera to make it recognize people and categorize them. At first, we will have to tell the robot how to classify each person, but then it will be able to recognize them by itself.
• In AI tab : - Select «Supervised learning»; - Set the learning speed to 0.05; - Check experience buffer.

P.21SOFTWARE PRESENTATION AND SCENARIO SHEETS - Look back at the different people or objects you have pointed to; the robot will be able to will be able to recognize them by pointing to the right arrow that identifies them (check it by looking at the arrow that appears on the screen). You can point out to the students that the robot does not really recognize the person or object because it analyzes the whole image, including the background. If you change the place of a person or an object, the robot may not recognize it anymore.
Concepts learned: What we call Artificial Intelligence today is the automatic learning capabilities of compu ters «machine learning». The robot trains on training data where the correct answers are given by the human ope rator, then it is able to generalize to new test data.
SUPERVISED LEARNING CAMERA NAVIGATION
• In AI tab : - Select «Supervised Learning» ; - In «Hidden Layers» put «100 100 50» ;
• In Sensor tab, select : - « blocked/moving ». «camera» (for exemple 32x24).
P.22SOFTWARE PRESENTATION AND SCENARIO SHEETS
We will see how to use supervised learning in order to direct the robot well in the arena. We would like the robot to go straight as often as possible, but avoid hitting the wall. As we activate the camera, the robot will be able to spot the walls. As before, the robot must first be shown how to act before being allowed to act by itself.
• (non mandatory) In Visualization tab: - uncheck the display options of the neural network to ensure that there will be no there will be no display delays due to the large number of connections.
- Start the robot. - As long as the robot is not stuck, press «go straight forward.» - If the robot gets stuck, press backturn left/right.
Load configuration «supervised learning - navigation with camera». Or to select the parameters yourself, start the program and then :


Concepts learned: In supervised learning, it is important to give correct instructions in the learning phase.
Be careful: if you ever tell the robot to turn too early or too late, the robot will learn from a dis torted database and will act in any way. As it is not necessarily easy to press just at the right time, you can remove the autonomy1 from the robot to give step by step instructions to the robot. Then re-enable the autonomy and continue to correct the robot if it makes mistakes from time to time.
P.23SOFTWARE PRESENTATION AND SCENARIO SHEETS
We
-
As
; • The
are : • The
• In
MANUAL EDITION OF A SIMPLE NEURAL NETWORK will see in more detail how the connections in the neural network of the robot work with a simple case. the configuration «manual edition of a simple neural network». Or to select the parameters yourself, launch the program and then : AI tab: - Select «q-learning simple». Sensors tab, select: - «blocked/moving». Reward tab: - Select «Speed and blocked». the Control Bar : Select mode «manual Edition» ; - click on «reset network» ; - unset learning and exploration. inputs robot is not blocked robot is blocked. outputs, 5 actions are possible: back to the right, turn to the left, go straight, turn to the right, back to the left.
• In
• In
The possible
Load
• In
P.24SOFTWARE PRESENTATION AND SCENARIO SHEETS


• If it is not blocked and there is nothing in front of it, go straight ahead ;
Now the robot can detect the walls thanks to these ultrasounds, so we can use them to make it anticipate the walls and take a turn before
S olution : We would like the robot to go straight as often as possible, and to go backwards as soon as it is stuck. To do this, we have to tell the robot :
Here there is no learning, it is up to you to create the appropriate links between these inputs (sensors) and outputs (actions) to generate a consistent behavior of the robot. If you create a link between a sensor and an action, it will mean that as soon as the sensor is activated, the robot will perform the action that is linked to it.
• if it is not blocked, go straight forward ; • if it is blocked, go backward. Which is programmed as : With these connections it should have the desired behavior.
Draw the connections that you think are good, and then start the robot. You can also change the connections after the robot has started.
P.25SOFTWARE PRESENTATION AND SCENARIO SHEETS
O bjective : Set up the connections that allow the robot to get the most rewards and thus reach the highest possible level. Hint: The robot gets rewards when it moves forward.
Variant : to add a little complexity, we can take into account the ultrasonic sounds. In the sensor tab select absence/presence of obstacle.
S olution : You have to tell the robot :
• If it is not blocked but there is an obstacle in front of it, turn ; • If it is blocked, back up.


Start the robot; it should behave as expected. The robot may have trouble anticipating steps that arrive in a perpendicular fashion. If the robot does not anticipate any walls, you may need to change the obstacle detection distance. Concepts learned : For the robot to behave, it is necessary to create connections between these sensors and the different actions it can do.
P.26SOFTWARE PRESENTATION AND SCENARIO SHEETS
• In AI tab : - Select «q-learning simple».
REINFORCEMENT LEARNING BLOCKED/MOVING NAVIGATION
The principle of reinforcement learning is to encourage the robot to do certain actions by giving it rewards or punishments. The robot will then modify its behavior in order to maximize its level, which is the average of its rewards over the last 2 minutes. Here, the faster the robot goes, the more reward it will get, but if it stops, it will get a punishment. To maximize its level the robot should go straight as often as possible and stop as little as possible.
P.27SOFTWARE PRESENTATION AND SCENARIO SHEETS
• In reward tab : - select « Speed and blocked »
• In control bar : - unset «exploration».
Previously we have even created the network of connections so that the robot acts as we wanted. Now we are going to see that we can use artificial intelligence to make the robot build the same network by itself without human intervention. To do this we will use reinforcement learning.
Load the configuration «learning by reinforcement - navigation blocked/moving». Or to select the parameters yourself, start the program and then :
• In sensor tab, select : - «blocked/moving».


It is also necessary to allow the robot to explore and not always choose the action that seems best, because this will allow it to discover new actions that may prove to be even better.
The robot starts to turn left without stopping. But this is not his best action: he would have a better level if he went straight ahead. But since the robot has never tried to go straight, it cannot know this. So we have to force the robot to try.
Since it still doesn’t get a reward, it keeps decreasing it, until this weight becomes less than that of another stop. At this point, the robot thinks that the action that gives it the most reward is turning left. So it turns left, gets a reward higher than its prediction, so it increases the weight of this edge until it stabilizes at 30. At this point, the robot thinks that turning left is the best action, and since this action makes it turn without ever stopping, it will continue doing it indefinitely.
P.28SOFTWARE PRESENTATION AND SCENARIO SHEETS
Activate the exploration 3 box in the bottom tab. When exploration is enabled, the robot will not necessarily choose the edge with the highest weight, but will occasionally choose another direction. When the robot finally chooses the random go straight action, it will receive a high reward and increase the weight of this stop. After a while the weight of the ridge will exceed the weight of turning left, and the robot will start going straight instead of turning in circles. After a while, the robot has the desired behavior (going straight as often as possible, backing up as soon as it gets stuck), but this time it has done it entirely by itself, without having to be told what to do Concepts learned: .1 .2 .3 To allow the robot to learn without being supervised by humans, it is given more or less reward each time it performs an action. Depending on what it receives, the robot will adapt its choices in order to maximize its rewards. The rewards in question are simply a numerical value, negative if it is a punishment, that the robot seeks to maximize.
Unlike last time, the sensors are not connected to a single action but to all of them at the same time. Each connection has a different weight that corresponds to the reward the robot expects to receive by using this connection. For now, the weights are randomly initialized. Start 1 the robot. You can also launch it step by step 2 to better understand what happens at each Initiallystep.the robot is not stuck, for him the best action, the one that would bring him the most reward (the one with the strongest weight) is to go backwards, so he chooses this action. But since he doesn’t get any reward, he decreases the weight of this stop, then he starts again.
Load the «learning by reinforcement - navigation with camera» configuration. Or to select the parameters yourself, start the program and :
• In reward tab: - select «Speed and blocked». Start the robot. After a while (about 10 minutes) the robot will eventually run through the whole arena anticipating the walls. Concepts learned: The interest of artificial intelligence is to be able to process huge networks and find the right connections that will allow the robot to have the desired behavior, whereas it would be impossible to try to do it by hand or to intuit them.
• In a AI tab: - Select «deep q-learning» ; - in «Hidden layers» put «100 100 50» ; - set experience buffer.
REINFORCEMENT
LEARNING CAMERA NAVIGATION
• In Sensor tab, select: - «blocked/moving» ; - «camera» (for exemple 32x24).
P.29SOFTWARE PRESENTATION AND SCENARIO SHEETS
The principle is the same as before, but this time we use the camera of the robot. The inputs are very numerous (all the pixels of the camera and their composition of red, blue and green) and we need to add layers of neurons to analyze the image; we end up with a very complex network, which we cannot do by hand or try to understand step by step.

In the previous case we used layers of intermediate neurons to process very complex information. Here we will see a simpler case to understand what these intermediate neurons are used for. Load the «intruder detection» configuration. Or to select the parameters yourself, launch the program and then :
- Position the robot so that it can turn its wheels without moving. Place the robot facing a wall or a similar flat-sided object (e.g. a box). Leave some space between the robot and the wall.
• In AI tab : - Select «supervised learning» ; - Unset neurons have bias ; - Set experience buffer.
- We want to tell the robot that this situation is normal; start the robot on (the icon on the right). The intruder that the robot will have to detect will be symbolized by an object with a flat side, for example a box. You can also use your hand if you have nothing else. P.30
• In Action tab, select : - « buzzer » ; - « stop ».
SOFTWARE PRESENTATION AND SCENARIO SHEETS
• In Sensor tab, select : - Ultrasound distance obstacle.
INTRUDER DETECTION

- Re-train the robot as before.
- Teach the robot to behave : • When there are no intruders, press • When there is an intruder, either parallel to the wall or at an angle, press the times on the buzzer icon - After training, the robot has the expected behavior. Concepts learned: Adding intermediate neurons is used to process the information further, and in particular to process it with linear functions.
In the AI window, in intermediate neural layers, type 5.
Once the robot is well trained, place the intruder between the robot and the wall, but this time at an at an angle. This time, the robot can’t recognize it.
The robot will continue to spin its wheels when it shouldn’t. To solve this problem, we need to add a neural network.
- Place the intruder between the robot and the wall, parallel to the wall, and press the buzzer incon severalRemovetimes.the intruder.
P.31
In the AI window, check neurons have bias.
Because the intruder is at an angle, the ultrasonic beams are deflected instead of being sent directly back to the robot. To solve this problem, the robot must learn that if the distance calculated with the ultrasound is either too long or too short, then there is an intruder. To take into account this more complex reasoning, a layer of intermediate neurons must be added.
SOFTWARE PRESENTATION AND SCENARIO SHEETS

Here is another example of reinforcement learning. By changing the type of reward and placing a new element in the arena, we can succeed in making the robot adopt a completely different behavior. Load the configuration «balloon tracking (green)». Or to select the parameters yourself, start the program and then :
- Place a green balloon in the arena (you can use another color, but you will have to change the color detection settings in the in which case you will have to change the color detection settings in the Rewards tab).
SOFTWARE PRESENTATION AND SCENARIO SHEETS
- Start the robot. After a while (about 20 minutes), the robot will start chasing the balloon.
• In AI tab: - Select «deep Q-learning» ; - In «Hidden Layers» put «100 100 50» ; - Set experience buffer.
P.32
BALLOON TRACKING
• In Sensor tab, select: - «blocked/moving» ; - «camera» (for exemple 32x24).
- Check that the balloon color setting is correct by placing the balloon in front of the robot robot; dots should appear on the camera image at the balloon. In the reward tab, vary the hue and luminance to match the color of the balloon to that of the balloon.
• In Reward tab: select «image and blocked».


The robot tries to maximize the number of pixels of the color of the balloon on its camera: it will therefore learn to approach the balloon as close as possible, but as it approaches it, it taps into it, so it starts to approach it again and so on.
P.33
SOFTWARE PRESENTATION AND SCENARIO SHEETS
Concepts learned: During reinforcement learning, to give a specific behavior to the robot, the reward must be well thought out; so that it rewards the robot only when it has the desired behavior.
• In AI tab: - Select «deep Q-learning» ; - In «Hidden layers» put «150 150 50» ; - Set experience buffer.
SOFTWARE PRESENTATION AND SCENARIO SHEETS
P.34
- Start the robot. After a long time (about 2-3 hours) the robot will follow the track.
LINE TRACKING
• In Action tab: - put all possible actions.
- Place black tape in the arena to make a loop (if the tape is not wide, feel free to double or triple the double or triple the width of the track).
Here is another example of reinforcement learning. By changing the type of reward and placing a new element in the arena, we can succeed in making the robot adopt a completely different behavior. Load the «line tracking» configuration. Or to select the parameters yourself, start the program and then :
• In Sensor tab, select: - « camera » (for exemple 32x24)» ; - « IR sensor line tracking - signal from each of the sensors ».
• In Reward tab: - Selct « Line tracking ».


SOFTWARE PRESENTATION AND SCENARIO SHEETS startedGettingTITLEwiththefakerobot Reinforcement 2~3 min 1-5 min 1-5 min 1-5 5-105-105-105-10minminminminmin/ ////10-15/ min 2~3 min 2~3 Immediate15~20minmin10~15min2~3h5min/ Blocked/Moving datadataSupervisedunderstandBrieflywhatyouseeonthescreenlearning(trainingandtestphases)ImportanceoftrainingqualityImportanceoftrainingquality 5~10 min immediatetraining,forlearning learningConnectionsintheneuralnetworkUsinginamorecomplexcaseImportanceofthehiddenneuronlayersImportanceofthechosenrewardforreinforcementlearningImportanceofthechosenrewardforreinforcementlearning Launch the robot at the start of the session and do the tantarena,therobotanotherwithrestwhilewaitingforittotrainTherobotmaypushballoutoftheitwillhavetobewatchedTherobotfindsthesamenetworkastheonepreviouslymadebyhandItisimportosteertherobotcorrectlySetupthearena!VirtualrobotonlytoConnectiontherobotving,Blocked/MoBlocked/MoBlocked/MoBlocked/MoBlocked/MoBlocked/Movingvingving&Cameraving&Cameraving&CameraCamera&infraredsBlocked/Moving&UltrasoundsCameraUltrasoundsReinforceReinforceReinforceReinforceReinforcementmentmentmentment .1 **************.10.4.3.2.5.6.7.8.9 startedGettingwit h the Blocked/MorecognitionImagerobotrealReinforcementlearningvingReinforcementlearningusingthecameraIntruderdetectionBalloontrackingLinetrackingNavigationwithcameraManualEdition SupervisedSupervisedSupervisedNone DIFFICULTY ALGORITHM DURATIONLEARNING DURATIONTOTAL MISC.SENSORS CONCEPTS SUMMARY TABLE OF SCENARIOS P.35
+33 (0)1 69 82 34 911901http://learningrobots.aicontact@learningrobots.co03,Avenuedelaterrasse,Gif-sur-Yvette-France
