Google Sketch Up For Site Design

Page 67

2. Select the Push/Pull tool. Hover over

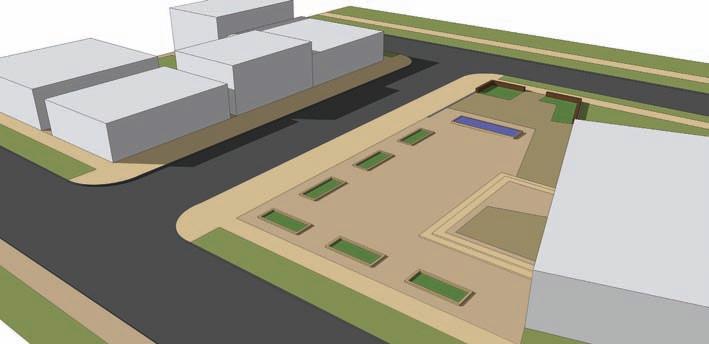
the area designated as road. Push/Pull downward: Click and drag the cursor down. Immediately type the value 6˝. SketchUp will do one of two things (Fig. 6-16): 33SketchUp will create a 6˝ thick volume 33SketchUp will lower the top surface 6˝ and the road surface will have 6˝ walls surrounding it.

Fig. 6-16: ​Push/Pull the road surface downward 6˝.

In either situation you should clean up the road surface by doing one of the ­following: ‘ 33If SketchUp created a 6˝ volume, delete the top surface and the adjacent “walls”. Or 33Simply delete the adjacent walls. In either case, do not delete the geometry that defines the 6˝ curb adjacent to the tree lawn and walks.

Fig. 6-17: ​Delete the excess faces and lines around the lowered road.

Creating the Building Push/Pull the surface area designated as the building. Push/Pull the building footprint to a volume of 13´ height (Fig. 6-18).

Fig. 6-18: ​Push/Pull to make a building volume. Delete the extra lines on the face. Draw a line along the top length of the volume.

Chapter 6: Introduction to SketchUp Process Modeling

59


Turn static files into dynamic content formats.

Create a flipbook

Articles inside

Adding People and Cars

0
page 362

Adding New Details

2min
pages 358-361

Making Adjustments

1min
pages 356-357

Importing Layers

0
page 342

Adding More Components

0
page 355

Exchanging 3D Components

0
pages 351-352

Exploding the Objects

0
page 341

Conceptual Grading

1min
pages 353-354

Replacing the Components

3min
pages 343-349

Populating the Flatwork Base

1min
pages 339-340

Troubleshooting Ruby Scripts

1min
page 335

Healing with the Line Tool

4min
pages 327-329

AutoCAD Clean-Up Ruby Scripts

2min
pages 330-331

Working with Ruby Scripts

2min
pages 332-334

The Flatwork Drawing File

1min
page 322

Exploding the Flatwork Base

1min
page 323

Write Block Surfaces and Objects

2min
pages 319-320

Closing Perimeters

1min
page 317

Organizing Site Objects

1min
page 318

Isolating Surfaces

1min
page 316

Arranging the Objects

2min
pages 307-310

Generating the Geometry

1min
pages 305-306

2D Plan to 3D Form

1min
page 274

Simple Canopy Tutorial

4min
pages 275-280

Campus Quad—Area 4

4min
pages 265-273

Campus Quad—Area 2

3min
pages 246-249

Campus Quad—Area 1

1min
pages 243-245

Park Landform

6min
pages 234-242

Building Entry Walk

9min
pages 223-233

Conceptual Grading

1min
page 214

Slopes and Grades

1min
pages 221-222

Pedestrian Ramp

1min
pages 216-217

Driveway Ramp

1min
pages 218-220

Simplify Contours

0
page 210

Construction Geometry

0
page 213

Drop Ruby

0
page 209

Joint Push Pull

1min
pages 206-207

The From Scratch Tool

0
page 200

Adding Detail to the Building

2min
pages 193-197

The Drape Tool

0
page 202

The Smoove Tool

0
page 201

Adding the Custom Components

2min
pages 183-187

Building

3min
pages 188-192

Hidden Geometry

1min
page 169

Adding Volume

3min
pages 176-182

Drafting the Floor Plate

1min
pages 173-175

The Courthouse Tutorial

1min
page 172

Working with Arcs and Circles

1min
page 168

Components and Faceted Surfaces

2min
pages 170-171

Furnishing Components

0
page 160

Balcony Component

2min
pages 149-153

Door Components

0
page 148

Window Components

2min
pages 144-147

Components

2min
pages 134-135

Adding Mass to Building 3

1min
pages 142-143

Components

1min
page 136

The Handrail

1min
pages 131-132

The Follow Me Tool

3min
pages 109-111

The Modern Bench

0
page 118

Components within Components

2min
pages 107-108

The Modeling Process

0
page 106

Detailing the Planters

2min
pages 103-105

Ramp

1min
page 98

Building Volumes

1min
page 100

Planter Walls

0
page 97

Create the Flatwork Base Group

1min
page 93

Adding Color and Texture

0
page 94

Drafting Order

7min
pages 86-92

Using Site Plans

0
page 81

Preparing the Drafting Trace

1min
page 84

Drafting Tips

1min
page 85

Importing Site Plans

1min
page 82

Modeling Your Own Designs

0
page 80

An Advanced Example

0
page 79

Adding Component Windows and Doors

1min
page 76

Component Tools

3min
pages 71-73

Flatwork Base

1min
pages 74-75

Creating the Building

1min
page 67

Reviewing the Drawing

1min
page 63

Organizing Models

1min
page 65

Drawing the Base

4min
pages 60-62

Drafting the Flatwork Base

0
page 59

2D = 3D

0
page 58

The Built Environment

1min
page 56

Troubleshooting an Installation

1min
pages 54-55

Components within Components

2min
pages 40-41

Components and Layers

1min
page 42

Downloading Ruby Scripts

0
page 52

Support Sites

1min
pages 50-51

Adjusting the Component/Group View

2min
pages 38-39

Model Organization

4min
pages 32-35

Drafting with Edges

2min
pages 30-31

Drawing and Modification Tools

1min
page 23

Part 4: AutoCAD to SketchUp

0
page 18

Additional Tools

2min
pages 24-25

Styles

1min
page 27

Navigation and 3D Inference System

3min
pages 28-29

Who Can Use This Book

1min
pages 10-11

The Value Control Box

0
page 26

Basic SketchUp Tools

1min
page 22
Issuu converts static files into: digital portfolios, online yearbooks, online catalogs, digital photo albums and more. Sign up and create your flipbook.